Enable rules
In Harness Code Repository, you can use branch rules, tag rules, push rules, and CODEOWNERS to govern how contributors change a repository. Rules control who can create, update, and delete references, and what must happen before a pull request merges.
For broader permissions, such as the ability to view repositories within a specific Harness project, go to Manage access and security to configure project access.
Before you begin
-
Repository permissions: You need Edit on Repository to create or change rules. Go to the permissions reference to review the full permission list, and to RBAC in Harness to configure roles.
-
Scope access: To set rules at the project, organization, or account level, you need access at that scope. Go to RBAC in Harness to understand the permissions hierarchy.
-
Push rules availability: Push rules are available only in the new UI and are behind the feature flag
PL_UNIFIED_OPT_IN_ENABLED. Contact Harness Support to enable the flag on your account.
Rule scope and inheritance
Rules apply at four levels: repository, project, organization, and account. A rule set on a repository applies only to that repository. A rule set at the project, organization, or account level applies to every matching repository at that scope, including repositories created later.
When rules exist at more than one level, Harness combines them with an AND clause, so the more restrictive rule effectively applies. For example, if a repository rule requires one approval and the organization rule requires two, the branch needs two approvals: the repository requires one approval and the organization requires two, so two approvals satisfy both.
Scope rules to specific repositories
When you create a branch rule or a tag rule at the account, organization, or project level, you can include or exclude repositories so the rule does not apply to every repository at that scope. You can scope a rule in two ways:
- By selecting specific repositories: For example,
billing-apiandweb-frontend. - By using name patterns: For example,
service-*andexp-*.
You can mix includes and excludes. Excludes take precedence where the two overlap. The following combination includes every repository matching service-* plus two named repositories, then removes the experimental repositories and one named repository:
- Include by pattern:
service-* - Include specific repositories:
billing-api,web-frontend - Exclude by pattern:
exp-* - Exclude a specific repository:
playground
Branch rules
Branch rules establish criteria for approving and merging pull requests, define who can create and delete branches, and control force pushes.
Add a branch rule
To create a branch rule, do the following:
-
Navigate to the level where you want to enable branch rules. For projects, organizations, or accounts, select Manage Repositories. For a repository, select Settings.
-
Select the Rules tab.
-
Click + Create Branch Rule.
-
Enter the rule Name and an optional Description.
infoName must start with a letter or
_and can contain only[a-zA-Z0-9-_.]. -
In Target Patterns, specify the branches this rule covers using branch name globstar patterns, such as
string,feature-*, orreleases/**. You can also select whether the rule applies to the default branch, such asmain.At the account, organization, or project level, you can also limit which repositories the rule applies to. Go to Scope rules to specific repositories to configure includes and excludes.
-
In Bypass List, specify the users, user groups, or service accounts that can bypass this rule.
-
For each of the available branch rules, select the rule you want to enable and provide any additional configuration. For example, if you select Require a minimum number of reviewers, you must specify the minimum number of reviewers.
-
Select Create Rule.
Available branch rules
The following rules are available when you add a branch rule. Some rules require additional configuration.
| Rule | Additional configuration |
|---|---|
| Block branch creation | This rule does not block users, groups, or service accounts in the Bypass List. |
| Block branch update | This rule does not block users, groups, or service accounts in the Bypass List. |
| Block branch deletion | This rule does not block users, groups, or service accounts in the Bypass List. |
| Block force push | This rule does not block users, groups, or service accounts in the Bypass List. |
| Require pull request | This rule does not block users, groups, or service accounts in the Bypass List. |
| Enable default reviewers | Automatically assigns default reviewers to new pull requests. Optionally, enforce a minimum number of approvals from default reviewers before merging. Go to Default reviewers to review the behavior. |
| Require a minimum number of reviewers | You must specify the minimum number of reviewers. |
| Add Code Owners as reviewers | This rule automatically adds relevant code owners as reviewers. |
| Require review from code owners | This rule requires a CODEOWNERS file in your branches. If there is no CODEOWNERS file, Harness cannot enforce the rule. Go to CODEOWNERS to create one. |
| Require approval of new changes | This rule requires that you also enable Require a minimum number of reviewers or Require review from code owners, or both. Without at least one of those rules, this rule has no effect. |
| Require resolution of change requests | None. |
| Require comment resolution | None. |
| Require status checks to pass | You must specify the checks that must pass. Go to Status checks from Harness pipelines to make a pipeline appear in the dropdown. |
| Limit merge strategies | You must select the allowed merge strategies. |
| Auto delete branch on merge | None. |
Status checks from Harness pipelines
When you enable Require status checks to pass, the status check dropdown lists only the checks that the repository has already emitted at least once.
For Harness pipelines, the pipeline must run from a pull request event before it appears as an available status check in the branch rule configuration.
If a pipeline does not appear in the status check dropdown, check the following:
- Default codebase: The pipeline has a CI or Build stage configured with the Harness Code repository as the default codebase.
- Pull request webhook trigger: The pipeline has a webhook trigger configured for pull request events, such as open, reopen, or update.
- At least one run: A pull request has triggered the pipeline at least once.
- Status check published: The pipeline execution publishes a status check back to the repository.
Manual executions, custom triggers, branch triggers, and tag triggers do not create the pull request status check entry that branch rules require.
To make a Harness pipeline appear in the dropdown, do the following:
- Configure the pipeline with the Harness Code repository as the default codebase.
- Add or update the pipeline trigger to listen for pull request events.
- Open or update a test pull request to trigger the pipeline.
- Wait for the pipeline execution to complete and publish its status check to the repository.
- Return to Manage Repository > Rules > Require status checks to pass, then select the emitted status check.
Default reviewers
You configure default reviewers as part of branch protection rules. When you enable Enable default reviewers, Harness automatically assigns the specified reviewers to new pull requests.
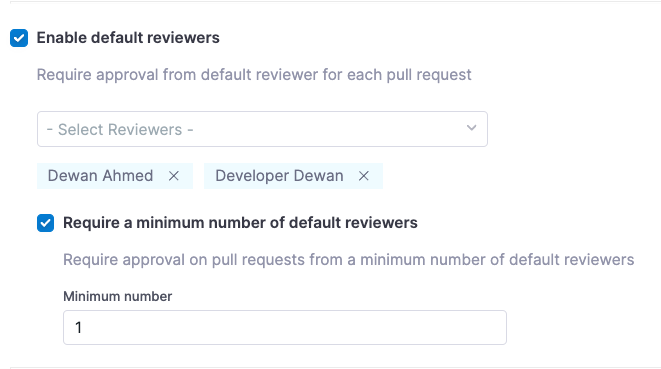
Select the users or user groups to assign automatically to new pull requests.
If the rule requires a minimum number of approvals from default reviewers, the pull request cannot merge until it receives at least that many approvals. The Approvals section of the pull request summary displays this requirement.
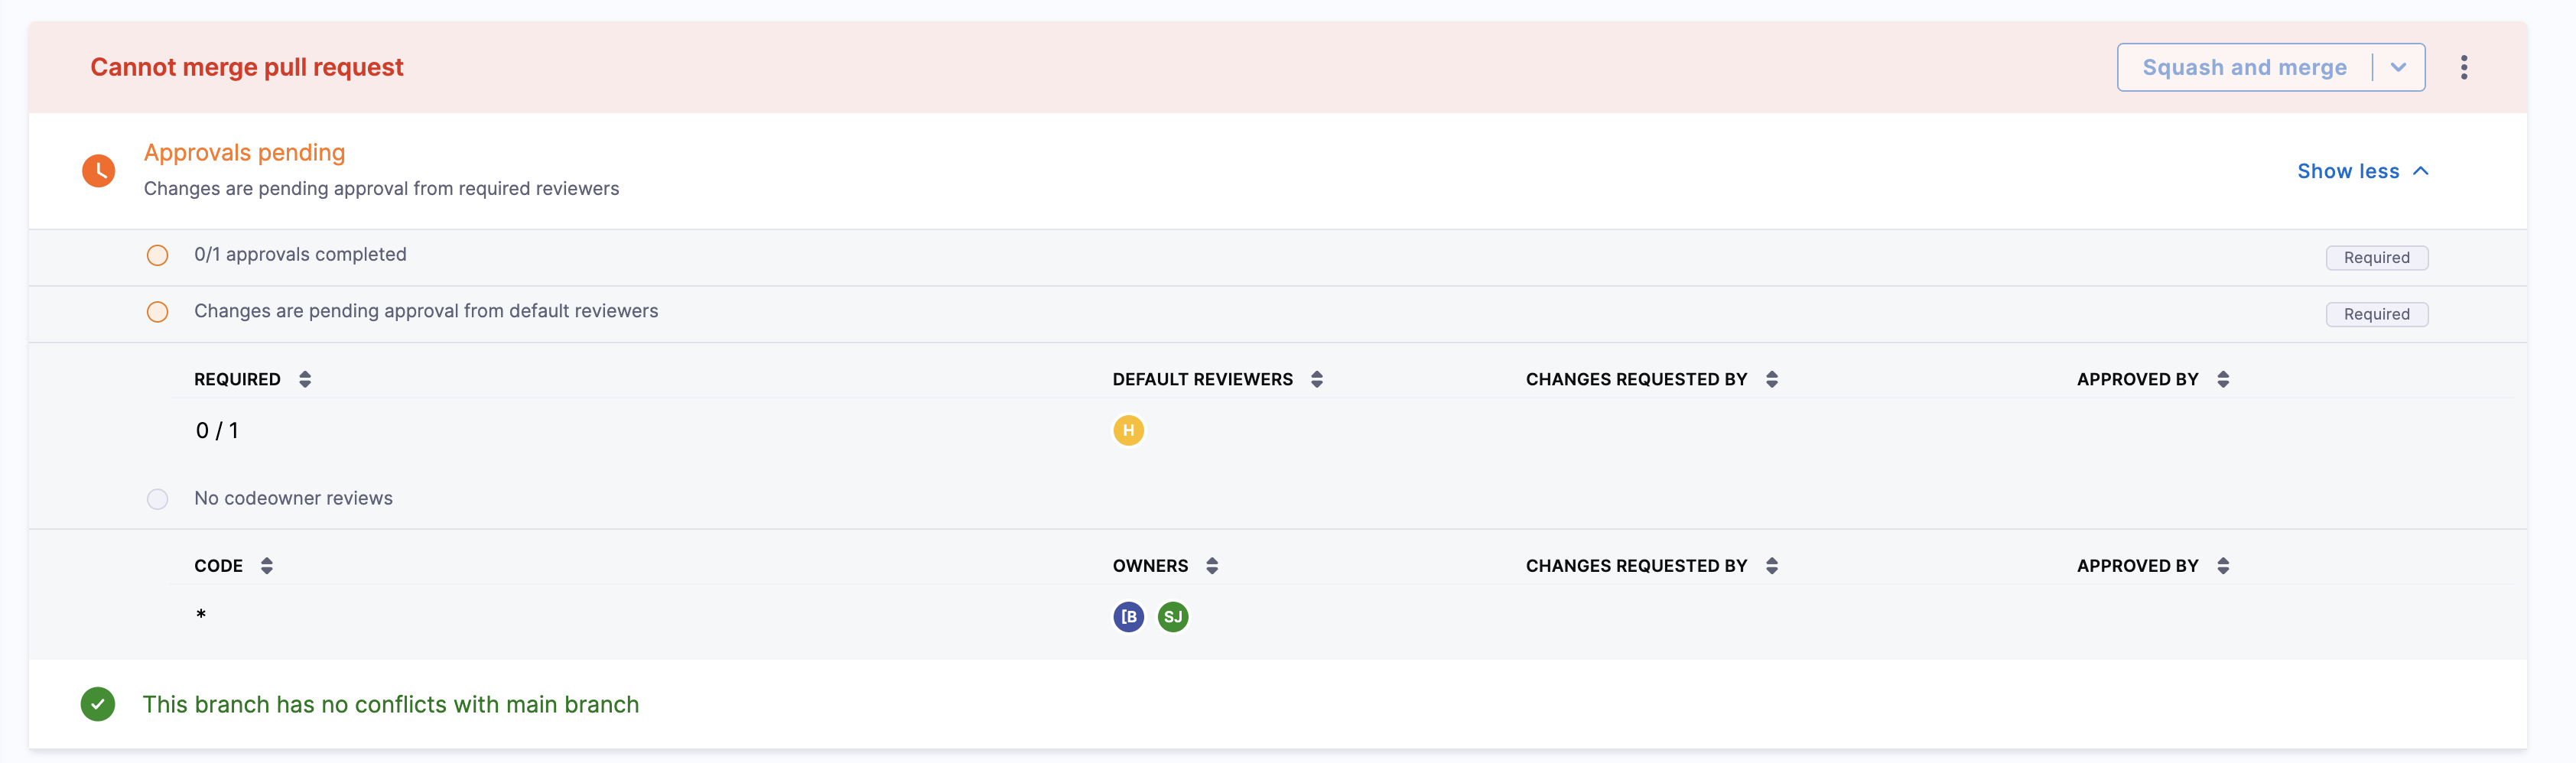
The Approvals section shows how many default reviewer approvals remain outstanding.
Pull requests authored by a default reviewer skip the required approval check if there are not enough remaining default reviewers to meet the condition. To enforce the approval requirement in these cases, add more default reviewers.
Updating the rule does not retroactively assign reviewers to existing pull requests. The rule applies only at the time of pull request creation.
Tag rules
Tag rules enforce fine-grained control over Git tag operations, similar to branch protection rules but specific to tags. You can restrict who can create, delete, or update tags, and apply rules to specific tag patterns.
Add a tag rule
To create a tag rule, do the following:
- Navigate to Code Repository, then select your repository.
- In the left sidebar, select Manage Repository.
- Select the Rules tab.
- Click the + Create Branch Rule dropdown, then select + Create Tag Rule.
Tag rule fields
After you select + Create Tag Rule, the rule editor appears. Configure the following fields.
Enable
Select this checkbox to activate the rule.
Name and description
Identify the rule for the people who maintain it:
- Name: A human readable name for the rule.
- Description: Optional context for the purpose of this rule.
Target patterns
Define which tag patterns this rule applies to using globstar style matching:
v*matches all version tags.release/**matches nested release tags.
At the account, organization, or project level, you can also limit which repositories the rule applies to. Go to Scope rules to specific repositories to configure includes and excludes.
Rules: select all that apply
Choose which operations to restrict for tags matching the pattern:
- Block tag creation: Restrict who can create matching tags.
- Block tag deletion: Restrict who can delete matching tags.
- Block tag update: Restrict who can update matching tags.
Bypass list
Allow specific users, user groups, or service accounts to bypass the rule. Only the listed principals can perform the restricted operations.
Example: prevent accidental release tags
To prevent unapproved users from creating or deleting tags such as v1.0.0, configure the following:
- Target pattern:
v* - Enable Block tag creation, Block tag deletion, and Block tag update
- Add your CI service account to the bypass list
Tips for tag rules
Keep the following in mind when you work with tag rules:
- Use tag rules in combination with branch rules for comprehensive Git policy enforcement.
- You can view all active tag rules in the Rules tab of the repository, under the Tag filter.
- Harness enforces rules at the Git operation level. Users pushing from the Git CLI or through CI tools see a rejection message when a rule blocks the operation.
Push rules
Push rules enforce fine-grained control over Git push operations.
Add a push rule
To create a push rule, do the following:
- Navigate to Code Repository, then select your repository.
- In the topbar, select Settings.
- Select the Rules tab.
- Click the + Create Rule dropdown, then select + Create Push Rule.
Push rule fields
After you select + Create Push Rule, the rule editor appears. Configure the following fields.
Enable
Enable the toggle to activate the rule.
Name and description
Identify the rule for the people who maintain it:
- Name: A human readable name for the rule.
- Description: Optional context for the purpose of this rule.
Rules: select all that apply
Choose which operations to restrict:
- Secret scanning enabled: Restrict users from pushing secrets.
- Verify committer identity: Restrict users from pushing commits whose author does not match their Harness identity.
- File size limit: Restrict users from pushing files larger than the specified size, in bytes.
Bypass list
Allow specific users, user groups, or service accounts to bypass the rule. Only the listed principals can perform the restricted operations.
Repository settings and push rules
Prefer rules over repository settings. Rules support overrides and remain the supported mechanism going forward.
When both settings and push rules are configured, the following behavior applies:
- No settings and no push rules: Default settings behavior applies.
- Settings configured, push rules not configured: Harness enforces the settings.
- Push rules configured, settings not configured: Harness enforces the push rules.
- Both settings and push rules configured: Both must pass. Harness enforces all conditions defined in settings and all conditions defined in push rules.
Override behavior
If the same condition exists in both settings and push rules, and you override the push rule, Harness still enforces the setting condition. The override can therefore appear ineffective when the restriction also exists in settings.
Manage rules
Toggle a rule
To turn a rule on or off, do the following:
- Go to your repository, then select Settings.
- Select the Rules tab.
- Select your rule.
- Click the Enable the rule toggle at the top of the page.
Edit or delete a rule
To change or remove an existing rule, do the following:
- Go to your repository, then select Settings.
- Select the Rules tab.
- Locate the rule you want to change, select More options, then select Edit Rule or Delete Rule.
CODEOWNERS
A CODEOWNERS file declares the users and user groups responsible for a repository or part of a repository. To use a CODEOWNERS file, create a file named CODEOWNERS in one of the following locations in your repository:
CODEOWNERSat the root level.harness/CODEOWNERS
Harness Code recognizes code owners when a CODEOWNERS file is present, but does not automatically add them as reviewers. This behavior prevents unnecessary notifications when changes affect files that do not require review from all code owners. To add code owners as reviewers automatically, enable the Add Code Owners as reviewers branch rule.
Harness might not add code owners automatically as reviewers if the CODEOWNERS file contains syntax errors or invalid patterns. Make sure your file follows the correct format and resolve any errors to ensure proper reviewer assignment.
You can still request reviews from specific code owners manually. If a code owner voluntarily reviews a pull request, Harness adds them as a reviewer for record keeping, in the same way as any other independent review. When the Require review from code owners branch rule is enabled, code owners function as an approval policy, so a pull request cannot merge until the required code owners approve the changes. The Approvals section of the pull request summary displays this requirement.
CODEOWNERS syntax
In your Harness Code CODEOWNERS file, you can assign code ownership to users and user groups within your Harness account, organizations, or projects.
You can declare code owners using either of the following:
- The email address associated with a Harness user profile.
- User groups at the project, organization, or account level.
For user groups, use the following formats:
- Project level user group:
@my_project_group - Organization level user group: Use
@org.my_org_groupor@my_org_groupif the repository is at the organization level. If the repository is at the project level, you must use@org.my_org_group. - Account level user group:
@account.my_account_group
Harness supports both the long form (@org.my_org_group) and the short form (@my_org_group), but the short form works only when the repository itself is at the organization level. Go to Manage user groups to create the groups you reference.
When a CODEOWNERS rule includes a user group, any member of that group can provide the required approval.
If multiple rules use the same pattern, the last matching rule takes precedence. Harness applies only the final rule.
You can assign ownership to specific files, directories, or patterns. Wildcards are allowed. The following CODEOWNERS file demonstrates the different ways you can declare ownership:
# Global owner
* email

# User groups at different scopes
** @dev-team @org.security-group @account.admins

# Specific file with multiple owners
Gemfile.lock email1 email2

# Subdirectory owners
/some_directory/ email
/some_directory_2/ email1 email2

# Workspace owner
WORKSPACE email

# Wildcards
**/src/** email
*.lock email
Troubleshooting
Code owners are not added automatically as reviewers on a Harness Code Repository pull request
Enable the Add Code Owners as reviewers branch rule, and verify the CODEOWNERS file has no syntax errors or invalid patterns.
A Harness pipeline does not appear in the Require status checks to pass dropdown in a Harness Code Repository branch rule
The pipeline must run from a pull request event at least once. Configure the Harness Code repository as the default codebase, add a pull request webhook trigger, then open or update a test pull request.
A push to a Harness Code repository is still rejected even though the user is in the push rule bypass list
Repository settings are enforced independently of push rules. If the same restriction exists in repository settings, overriding the push rule does not remove it.
The default reviewer approval requirement is skipped on a Harness Code Repository pull request
Pull requests authored by a default reviewer skip the check when too few remaining default reviewers exist to meet the minimum. Add more default reviewers.
Next steps
You have configured rules that govern how contributors change branches, tags, and pushes in your repository. You can now layer repository level security controls and pull request workflows on top of them.
- Enable security: Configure repository security settings and secret scanning.
- Sign commits: Verify commit authorship with GPG or SSH signing.
- Manage user groups: Create the groups you reference in bypass lists and
CODEOWNERS.