Get started with Kubernetes deployments
This guide walks you through the simplest path to deploying a containerized application to a Kubernetes cluster using Harness CD. By the end, you will have a working pipeline that performs a rolling deployment and rolls back automatically on failure.
What you will need
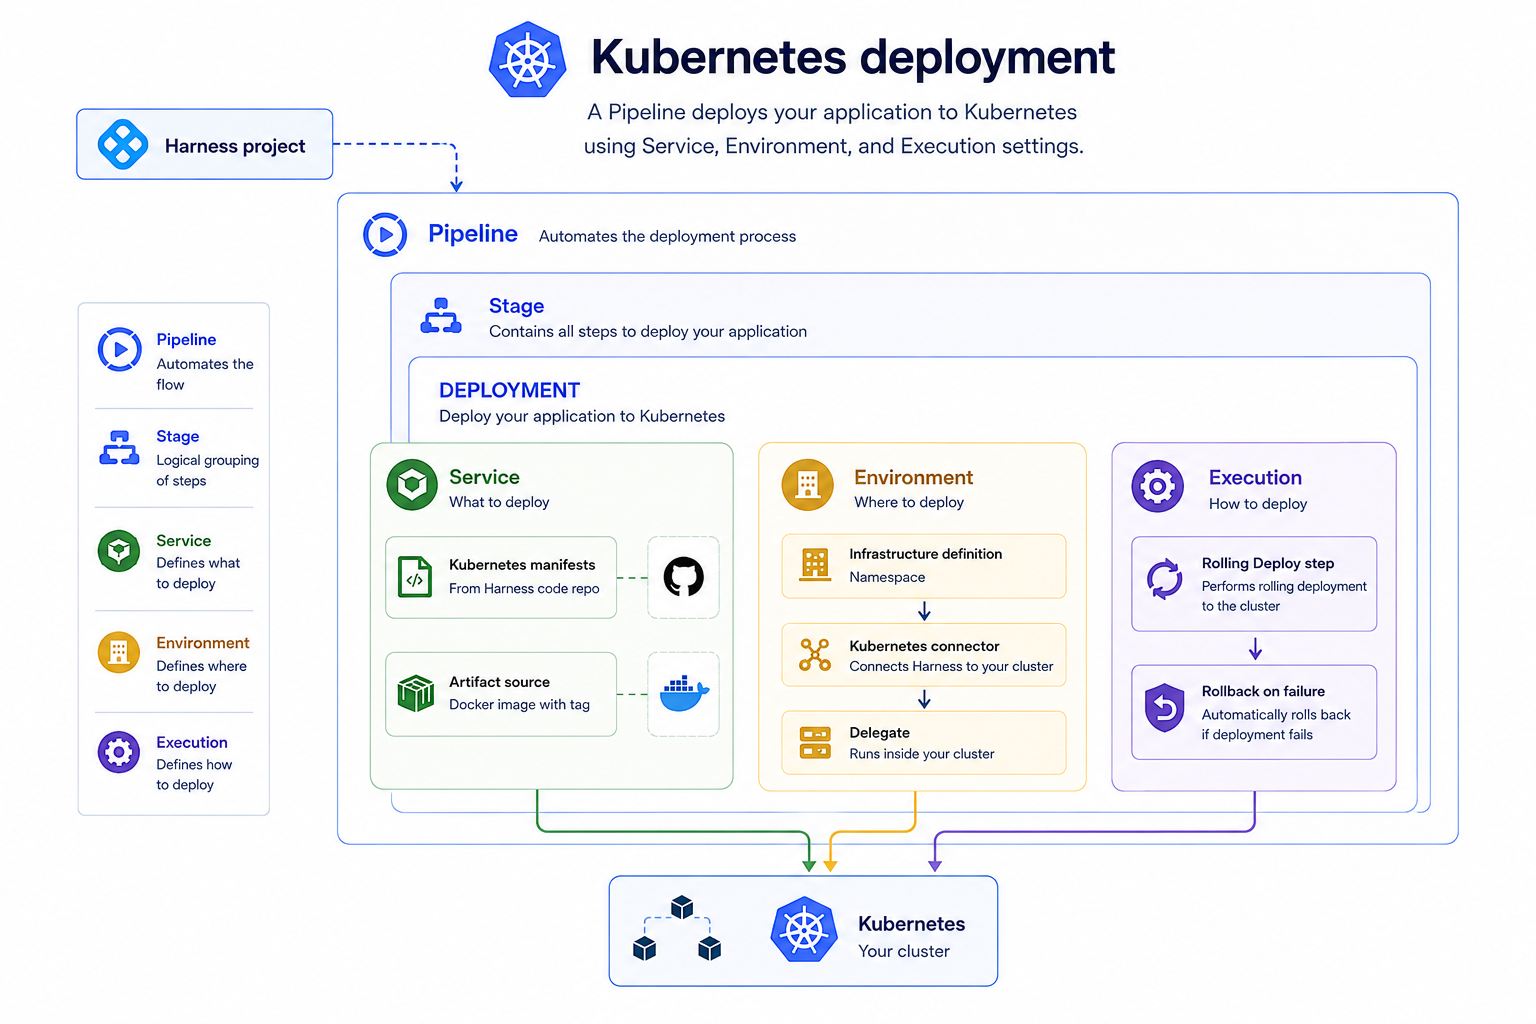
A Kubernetes deployment in Harness is made up of several entities that build on each other. The diagram below shows the full dependency chain, with the Delegate running inside your cluster and connecting outbound to Harness.
Before you begin
Before you start, make sure you have:
- A Kubernetes cluster with outbound HTTPS access to
app.harness.io. - A Kubernetes service account with
list,get,create, anddeletepermissions on the target namespace. - A container image in a registry, or use the sample manifest in Step 3 which references a public image.
Step 1: Install a delegate
A Delegate is a worker process that runs inside your cluster and executes deployment steps on Harness's behalf. You must install one before Harness can communicate with your cluster.
- Go to Account Settings, then select General Settings, then select Delegates.
- Select Create Delegate.
- Choose a delegate type:
- Delegate Classic — Delegate 1.0, supports v0 and v1 pipelines
- Delegate New — Delegate 3.x, lightweight container-based agent, supports v1 pipelines
- Select Kubernetes as the installation method.
- Harness generates a YAML manifest. Before downloading, add any tags you want to use to identify this delegate — tags are visible in the Harness UI and used to target specific delegates from pipeline steps.
- Download the YAML and apply it to your cluster:
kubectl apply -f delegate.yaml
- Return to the Harness UI and wait for the delegate to show Connected status.
The delegate needs outbound HTTPS access on port 443 to app.harness.io. No inbound ports need to be opened.
Step 2: Create a Kubernetes connector
A Kubernetes connector authenticates Harness to your cluster using the delegate you installed in Step 1.
- Go to Settings, then select Connectors, then select New Connector.
- Select Kubernetes.
- Under connection details, select Inherit from Delegate — this uses the delegate's own credentials to connect to the cluster.
- Select the delegate you installed in Step 1. Use the tag name you assigned to filter it from other delegates.
- Select Submit. Harness verifies the connection and the connector is ready to use.
Step 3: Create a service
A service represents your application. It holds the Kubernetes manifests and configuration used at deploy time.
- Go to Deployments, then select Services (or go to Project Settings and select Services).
- Select New Service.
- Enter a service name, set Deployment Target to Kubernetes, and select Create.
Set up a Harness Code repository
This guide uses Harness Code as the manifest store. Before adding the manifest to the service, create a repository and add a manifest file to it.
- Go to Code Repositories and select Create Repository.
- Enter a repository name, choose public or private, and select Create Repository.
- Inside the repository, create the folder path
kubernetes/service/and add a file namedmanifest.yaml.
Sample manifest.yaml
apiVersion: apps/v1
kind: Deployment
metadata:
  name: hello-app
spec:
  replicas: 2
  revisionHistoryLimit: 3
  selector:
    matchLabels:
      app: hello-app
  template:
    metadata:
      labels:
        app: hello-app
    spec:
      containers:
        - name: hello-app
          image: docker.io/hashicorp/http-echo:0.2.3
          args:
            - "-text=Hello from Harness CD"
          ports:
            - containerPort: 5678
---
apiVersion: v1
kind: Service
metadata:
  name: hello-app
spec:
  type: ClusterIP
  selector:
    app: hello-app
  ports:
    - port: 80
      targetPort: 5678
Add the manifest to your service
- In your service, go to the Configuration tab and under Manifests, select Add Manifest.
- Select K8s Manifest, then select Continue.
- Under Specify K8s Manifest Store, select Harness Code.
- Enter a Manifest Identifier.
- Select the repository you created.
- Set Fetch Type to Branch and enter your branch name.
- Enter the file path to your manifest (for example,
kubernetes/service/manifest.yaml). - Select Submit.
Step 4: Create an environment
An environment represents a logical deployment target such as production or staging. Environments hold one or more infrastructure definitions.
- In your Harness project, go to Deployments, then select Environments.
- Select New Environment.
- Enter an environment name (for example,
production) and select the type: Production or Pre-Production. - Select Save.
Step 5: Create an infrastructure definition
An infrastructure definition ties an environment to a specific cluster and namespace.
- Open the environment you created in Step 4 and select the Infrastructure Definitions tab.
- Select Create Infrastructure.
- Enter a name for the infrastructure definition.
- Under Deployment Type, select Kubernetes.
- Under Infrastructure Type, select Kubernetes.
- Under Cluster Details, select the connector you created in Step 2.
- Enter the Namespace where you want your application deployed.
- Select Save.
Step 6: Create a pipeline
- Go to the Pipelines section and select Create Pipeline.
- Enter a pipeline name, set the storage type to Inline, and select Create.
- Harness adds a default stage automatically. Delete it, then select the + icon to add a new stage.
- When prompted with "What would you like to do?", select Deploy and select Next.
- Enter a stage name, set Deployment Target to Kubernetes, and select Next.
- In Configure Service, select the service you created in Step 3 and select Next.
- In Configure Environment, select the environment you created in Step 4. Under infrastructure, select Select Infrastructures Manually and choose the infrastructure definition from Step 5. Select Next.
- In Choose Deployment Strategy, select Rolling Deploy and select Next.
- In Configure Runtime, select Directly on Delegate. This sets where deployment steps execute.
- Select Add Stage. Harness automatically adds the Kubernetes Rolling Deploy step and the rollback steps.
- Select Save.
Step 7: Run the pipeline
- Open your pipeline and select Run.
- Select Run Pipeline.
- In the execution view, watch the stage progress through the following steps:
- Initialize: Provisions the execution environment.
- Service: Loads manifests and variables.
- Infrastructure: Connects to the target cluster.
- Kubernetes Rolling Deploy: Applies manifests and waits for all pods to reach steady state.
A successful run marks every step green. If the Rolling Deploy step fails, the rollback group re-applies the previous release manifests automatically.
After a successful run, verify the deployment in your cluster:
kubectl get pods -n <target-namespace>
Next steps
- Go to Kubernetes rolling deployment to understand how the rolling strategy works and how to extend it with additional steps.
- Go to Kubernetes services to configure Helm charts, Kustomize overlays, and multiple artifact sources.
- Go to Kubernetes infrastructure to understand namespace isolation, simultaneous deployments, and connector configuration options.
- Go to Kubernetes canary deployment to route a subset of traffic to the new version before promoting to all pods.