Manage GitOps Applications
You can manage your applications through the Applications found in GitOps Overview page.
New Applications
Create a new application by clicking +New Application in the top right. To learn more about creating applications, go to Add a Harness GitOps Application
Applications Health Status Graph
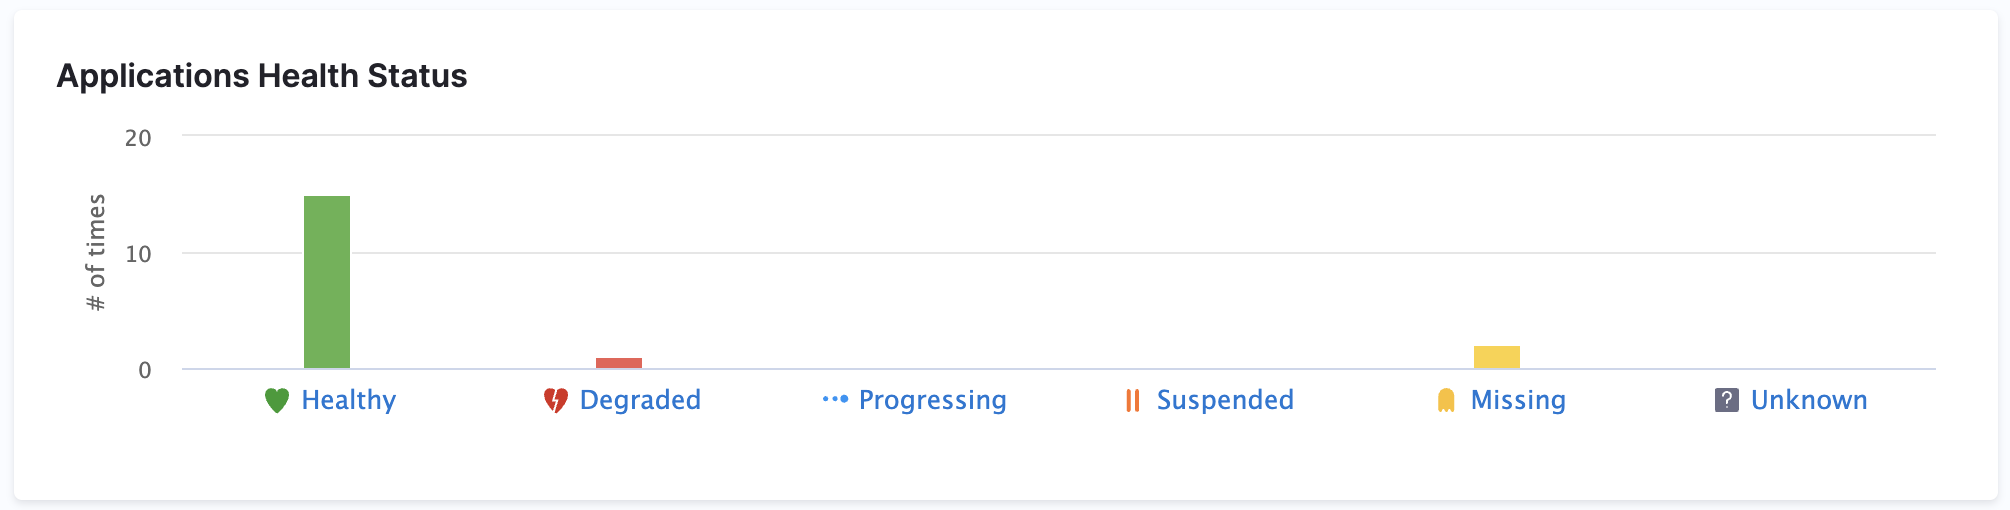
On the GitOps Overview page, you’ll find the Applications Health Status bar chart, which shows how many applications are in each of these states:
- Healthy: Running without issues
- Degraded: Experiencing reduced functionality
- Progressing: Currently deploying or reconciling
- Missing: No longer found in the cluster
- Suspended: Paused or not actively reconciled
Each status bar is clickable. Click any bar (for example, Healthy) to open the Applications Dashboard filtered to show only applications in that state.
Application Operations
Applications are displayed on this page as a series of tiles. You can change this to a list of rows in the top right.
Each application will display various helpful information such as the application repository or a name and link to the GitOps Agent.
Each tile will have 3 vertical dots. Clicking this will allow you to manually Sync, Refresh, or Delete the application.
- Go to Sync GitOps applications to sync applications from the UI or a pipeline.
- Go to Rollback GitOps applications to roll back to a previous revision from the UI or a pipeline.
- Go to Update GitOps Apps in a Pipeline to update application source settings from a pipeline.
- Go to GitOps refresh to refresh an application.
Delete GitOps applications
You can delete GitOps applications from the Applications dashboard on the GitOps Overview page. Harness sends the delete request to Argo CD through the GitOps Agent, then removes the application from Harness when Argo CD confirms the deletion.
Standard delete
- On the GitOps Overview page, open the application tile menu (three vertical dots), or open the application and select Delete.
- In the Delete Application dialog, choose a propagation policy:
- Foreground (recommended): Deletes the application first, then waits for managed resources to be removed.
- Background: Deletes the application immediately and removes managed resources asynchronously.
- Non-cascading: Deletes only the Application CR without removing deployed resources.
- Select Delete to confirm.
Go to Delete a Harness GitOps application to review propagation policy details and finalizer options.
Force delete from Harness
Some applications become stuck when Harness can no longer reach them on Argo CD. This commonly happens when:
- The Argo CD Application was deleted outside Harness.
- The GitOps Agent that served the application was removed.
- A parent ApplicationSet was deleted and Harness still lists the generated application.
These applications often show Unknown health or sync status. Standard sync and delete operations fail because Harness cannot communicate with Argo CD.
When Harness detects that an application is unreachable on Argo CD, the Delete Application dialog displays a Force delete from Harness checkbox. This option does not appear when the application is reachable on Argo CD.
- In your Harness project, go to CD > GitOps > Overview.
- Open the application tile menu (three vertical dots), or open the application and select Delete.
- In the Delete Application dialog, select Force delete from Harness.
- Select Delete to confirm.
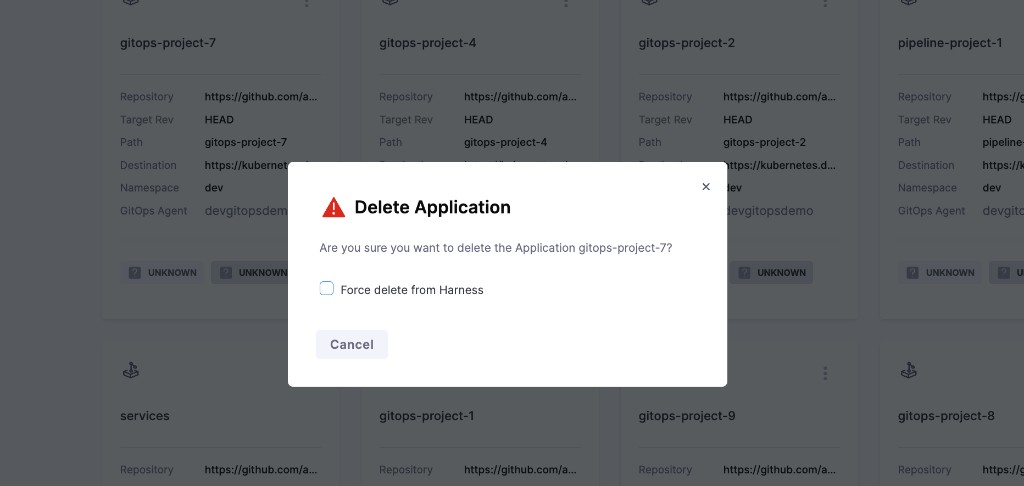
Force delete from Harness removes the application record from Harness only. It does not delete cluster resources that may still be running. Use this option only when the Argo CD application no longer exists or the agent is unavailable.
| Component | Minimum version |
|---|---|
| gitops-service | v1.162.0 |
| terraform-provider-harness | 0.43.0 |
Delete with Terraform
When you manage GitOps applications with Terraform, set force_delete = true on the harness_platform_gitops_applications resource before you run terraform destroy. Harness removes the application from Harness even when the agent cannot reach Argo CD.
resource "harness_platform_gitops_applications" "example" {
  # ... application configuration ...

  force_delete = true
}
Go to the Harness Terraform Provider documentation to review all delete options for GitOps applications.
Filter Applications
At the top you can filter your applications using a search bar and application attributes.
Create and Save Filters
You can also create and save custom filters so that you can make sure you're only looking at relevant applications consistently.
This feature is currently behind the feature flag GITOPS_FILTER_PANE_ENABLED. To enable this feature, contact Harness Support
To create and save a filter, do the following:
- Create a filter by doing any of the following:
- Add a custom search term
- Choose to filter by Agents, Sync Status, Health Status, Labels etc.
- Add an additional filter field by clicking the +Add Filter button.
- Click Save
- Enter a name for the filter, and choose if you want it visible to Only me or Everyone in the scope.
You can then load the filter any time by clicking the filter icon to the right of Reset and searching for your saved filter.
Filter by Application Labels
You can filter applications by their labels.
-
Exact match (Key:Value)
- If you want to match specific applications, you can do an exact match using Key:Value in the labels.
- You can add labels to an application in the App Details page.
-
Partial match (Key or Value)
- Search using a key or value.
- Partial matches are supported. For example, if a label key is
teamor a value ispayment-service, searching forteaorpaywill return that application. - The search also considers the Service name and Environment name associated with the GitOps application as labels, and will match them in partial searches.
Application Management Dashboard
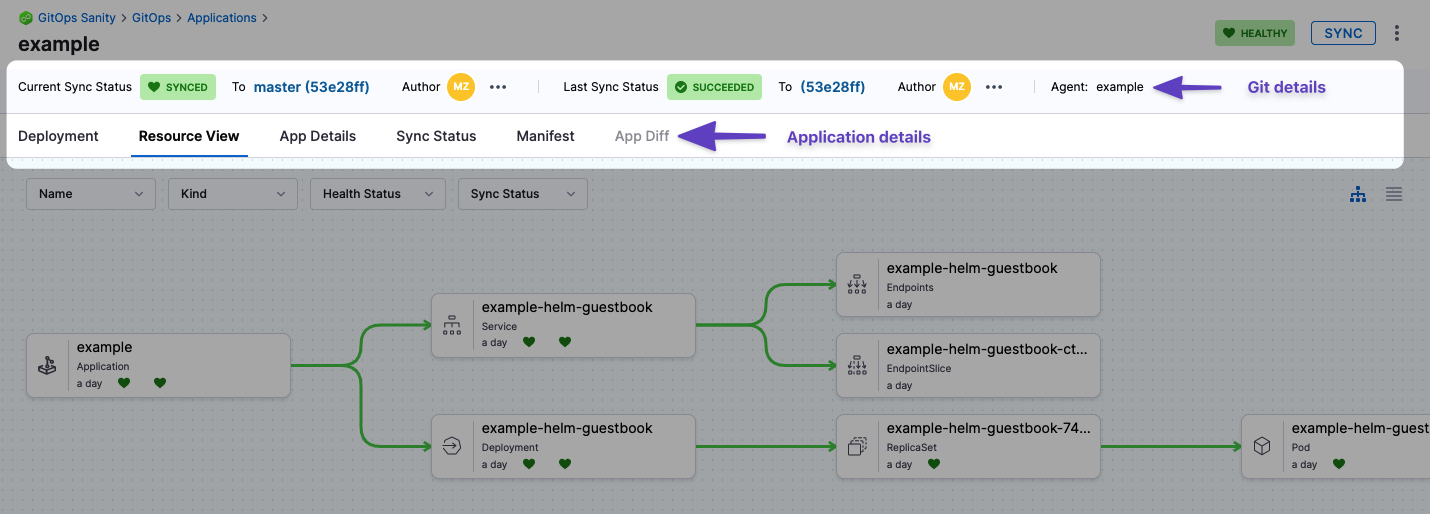
After you select an application, you will see the application dashboard:
-
Git details: you can see the Git commit used as the source for the sync. Clicking the commit Ids opens the commit in the source provider.
-
Deployment: the deployments dashboard shows when the Application was deployed (synced).
-
Resource View: displays the desired to target state mapping of each Kubernetes object. The Resource View lets you inspect the live target infrastructure by:
- Name: Kubernetes object names.
- Kind: Kubernetes object types.
- Health Status: the health status of the Application. For example, is it syncing correctly (Healthy)?
- Sync Status: sort Kubernetes objects by their sync status.
Select any item to see:
- Overview: An overview of the resource properties, such as name, namespace, or sync status.
- Events: Any events emitted by the pod.
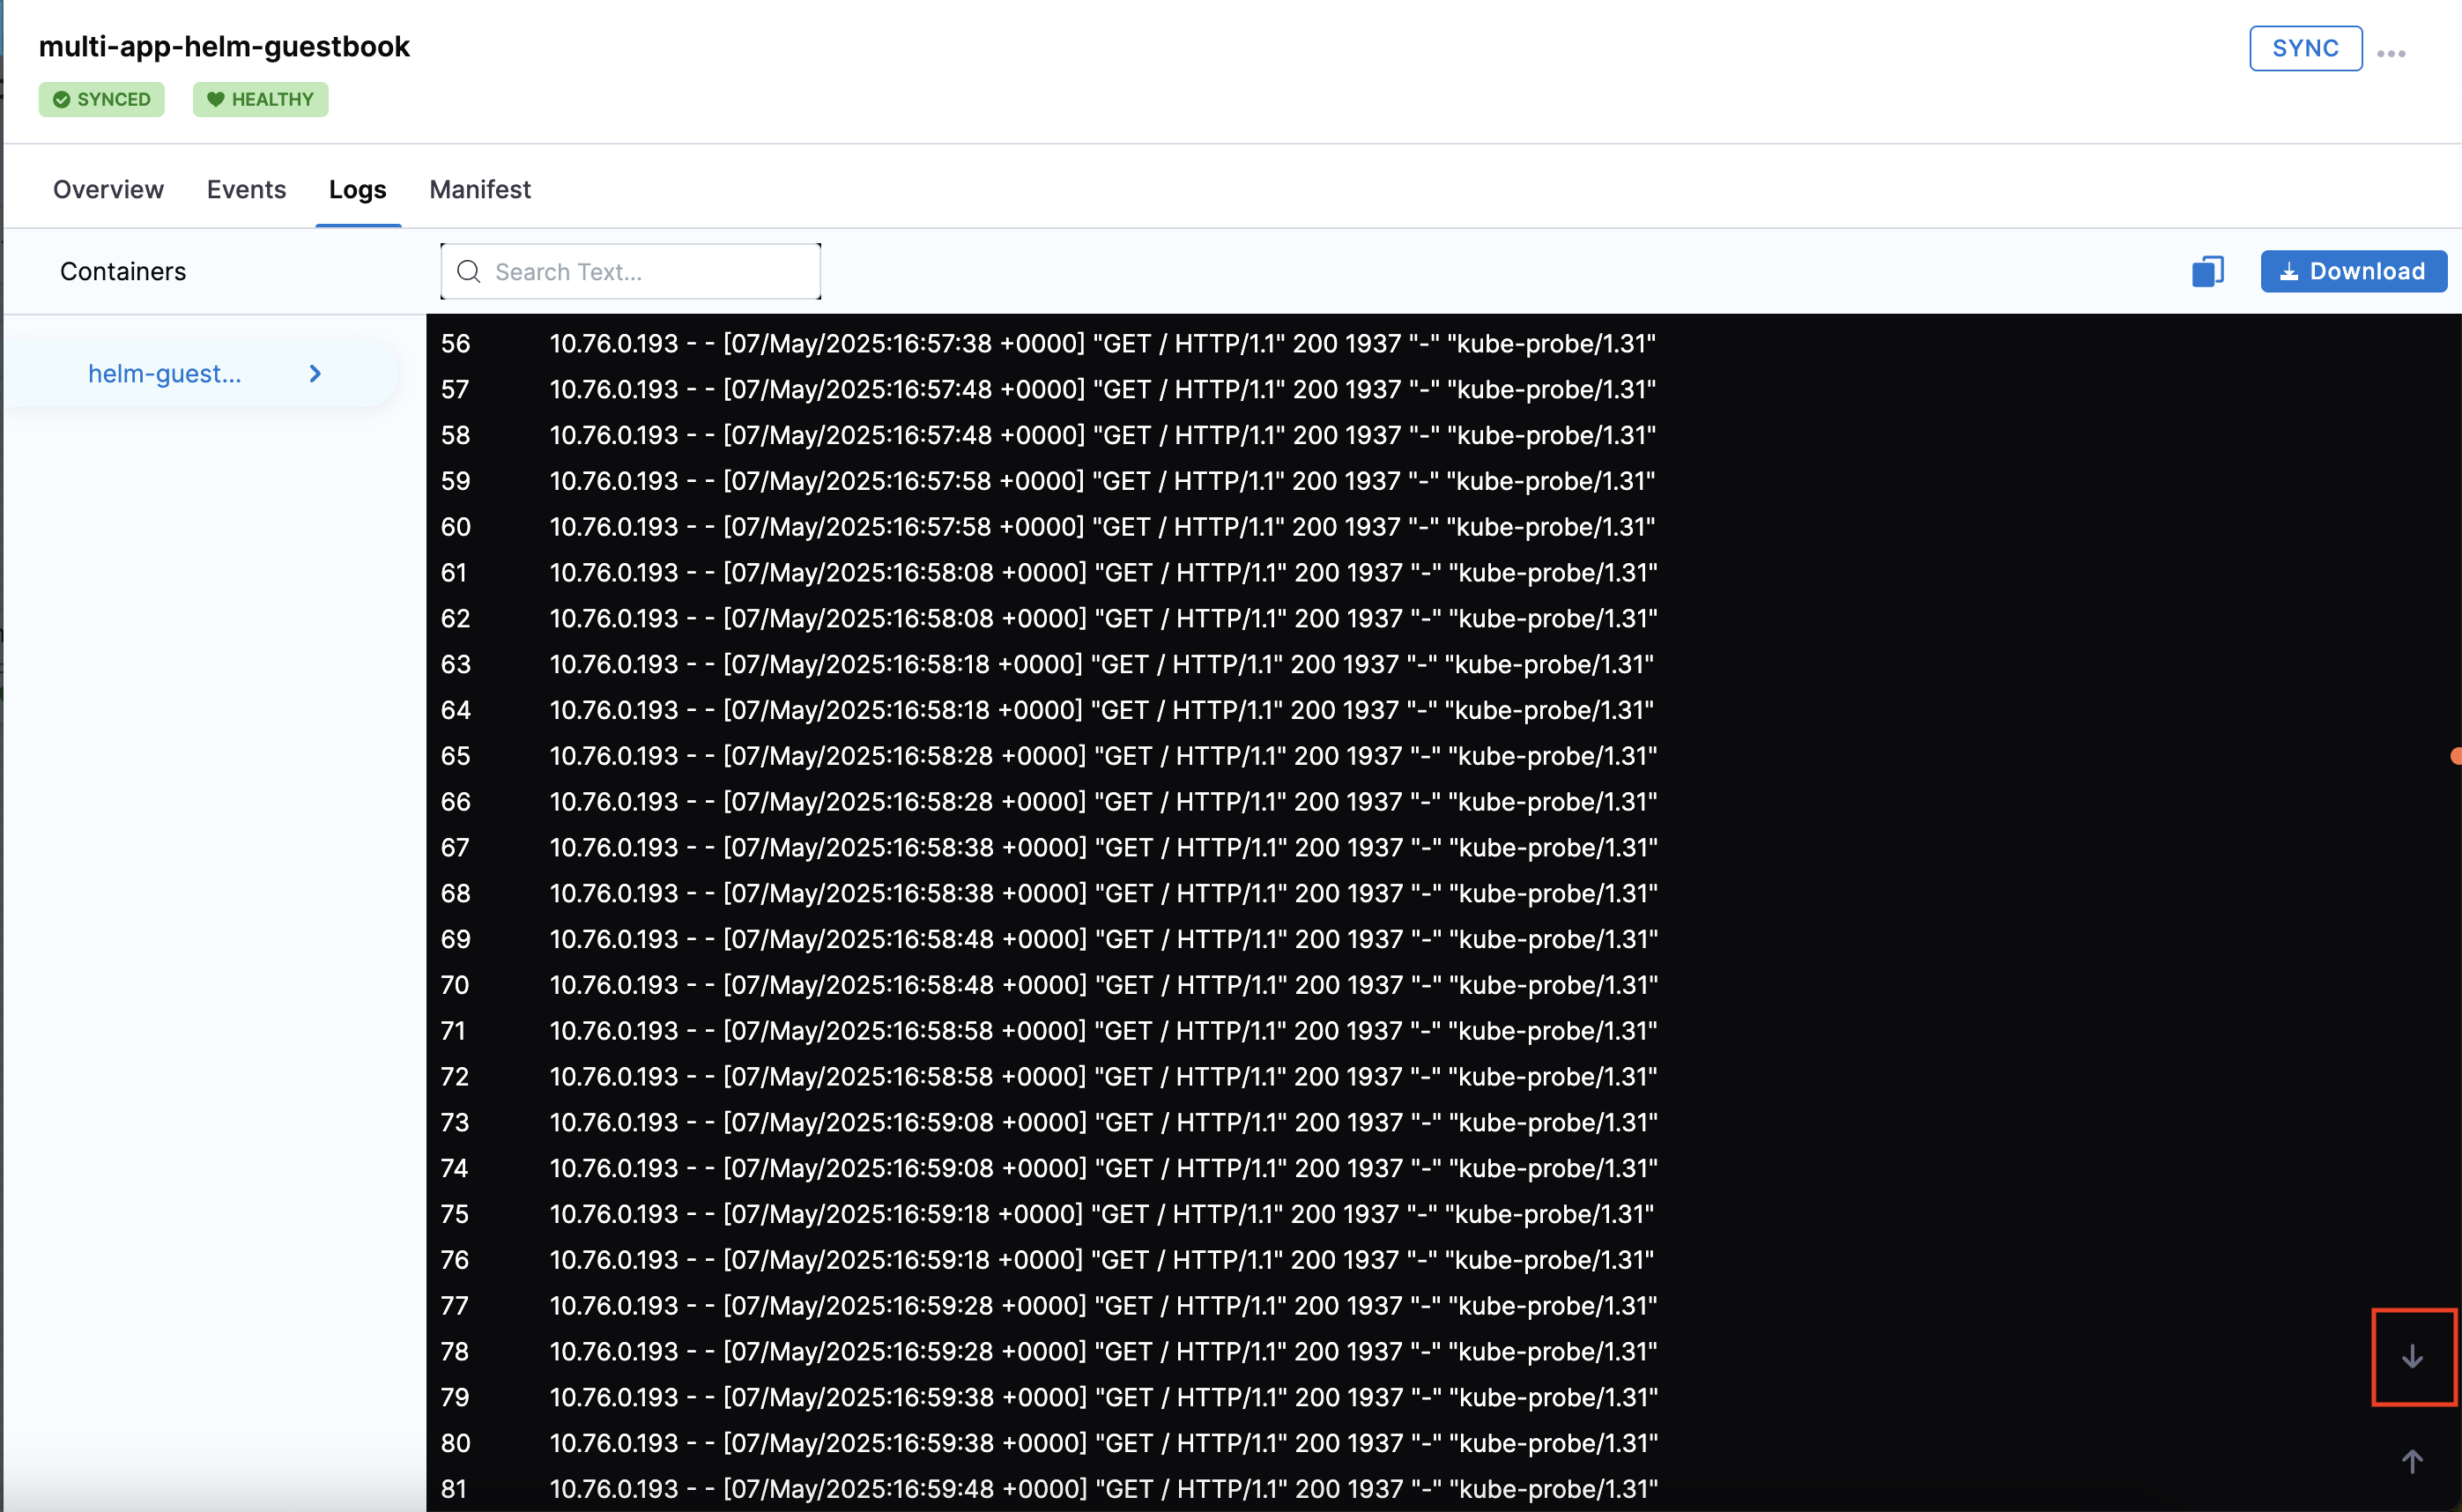
- Logs: The logs of the resource. These logs are searchable, copyable, and downloadable. You can also view the log tail by clicking on the down arrow in the bottom right corner (click image below).
- Manifest: The manifest of the resource.
- Diff: The diff between the source manifest and application if they are out of sync.
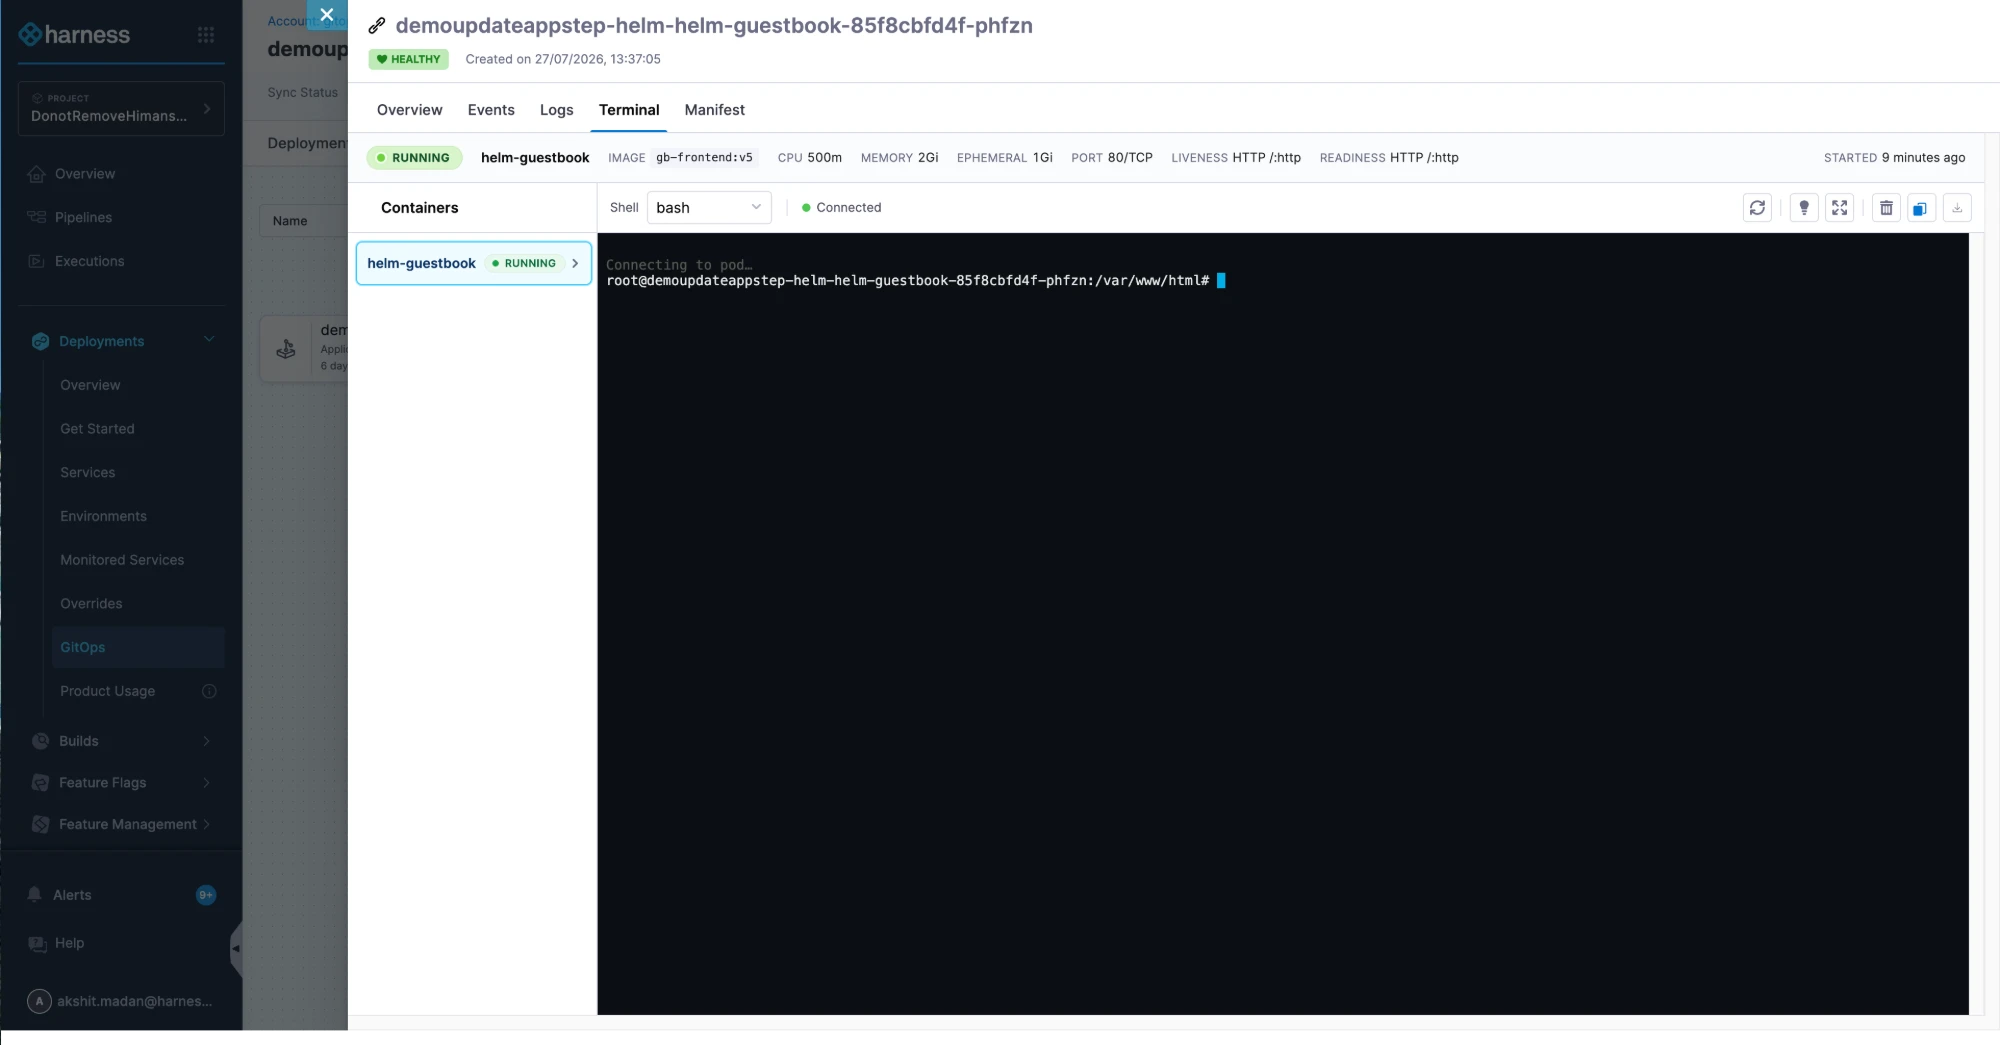
- Terminal: For pod resources, open a web-based shell directly into a running container. Go to Open a web-based terminal into a pod to learn more.
Open a web-based terminal into a pod
You can open an interactive shell directly into a running pod from the Resource View, without leaving Harness. Use the terminal to debug a crashing container, inspect running processes, test network connectivity from inside the pod, or check the filesystem state. Harness runs kubectl exec on the pod through the GitOps Agent, so you do not need to locate a kubeconfig or run kubectl manually.
Before you begin
- Exec permission: Opening a terminal requires the GitOps application Exec permission. This is a distinct, privileged permission from View, Edit, and Sync, so a user with view-only access cannot open a terminal. Go to Manage access for GitOps Applications to configure roles.
- Agent exec permission: The GitOps Agent runs
kubectl execusing its own Kubernetes ServiceAccount, not your user identity. The agent's ClusterRole must allowcreateonpods/exec. Enable this when you install or upgrade the agent.
To open a terminal into a pod, do the following:
- On the Application Management Dashboard, select the Resource View tab.
- Select the pod you want to inspect.
- Select the Terminal tab.
- If the pod runs more than one container, select the container to connect to from the Containers list.
- Select the shell to use from the Shell dropdown. If the selected shell is not present, an error will be thrown.
When the status shows Connected, you have an interactive shell into the container. The tab header displays the container status, image, and resource details such as CPU, memory, port, and health probes.
Requirements
To use the web-based terminal feature, ensure you have the following minimum versions:
- GitOps Agent: version 0.122.0 or later
- Helm: version 1.2.8 or later
- App Details: displays the settings of the Application. You can edit the settings and apply your changes, including the Sync Options & Policy.
- History & Rollback: displays previous deployment revisions for the Application. Select 'Rollback' on a previous revision to restore that version. The current revision is marked with a Current badge and does not include a rollback action. Go to Rollback GitOps applications to roll back from the UI or a pipeline.
- Manifest: displays the manifest of the Application. This is not the same as the source manifest in the Git source repo.
You can edit the manifest in Manifest and the changes are synced in the target infrastructure, but when you do a full sync from your source repo the state of the source repo overwrites any changes made in Manifest. - App Diff: displays a diff against the live state in the cluster and desired state in Git.
Health and Sync Status
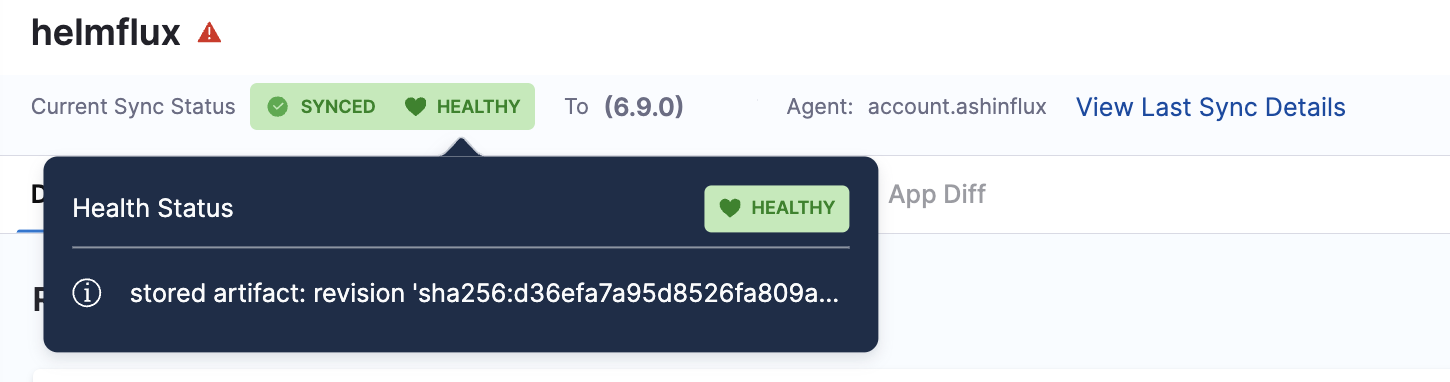
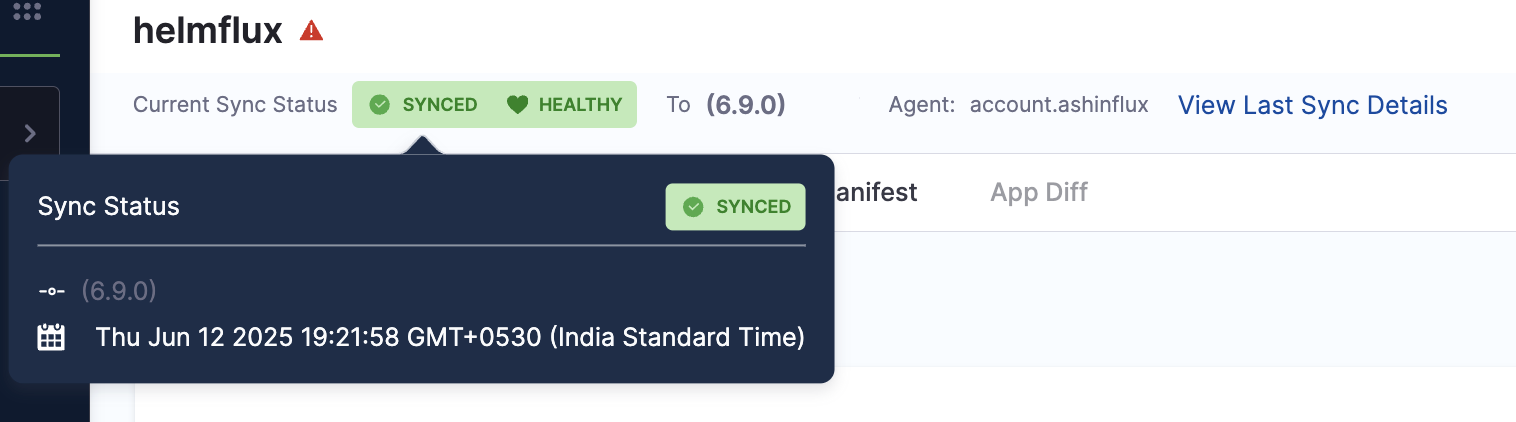
The Health and Sync status indicators now include extended metadata in a popover. Hovering over a status reveals additional context such as sync type, revision, and more. This allows you to quickly assess the application state without leaving the dashboard.
Last Sync Details
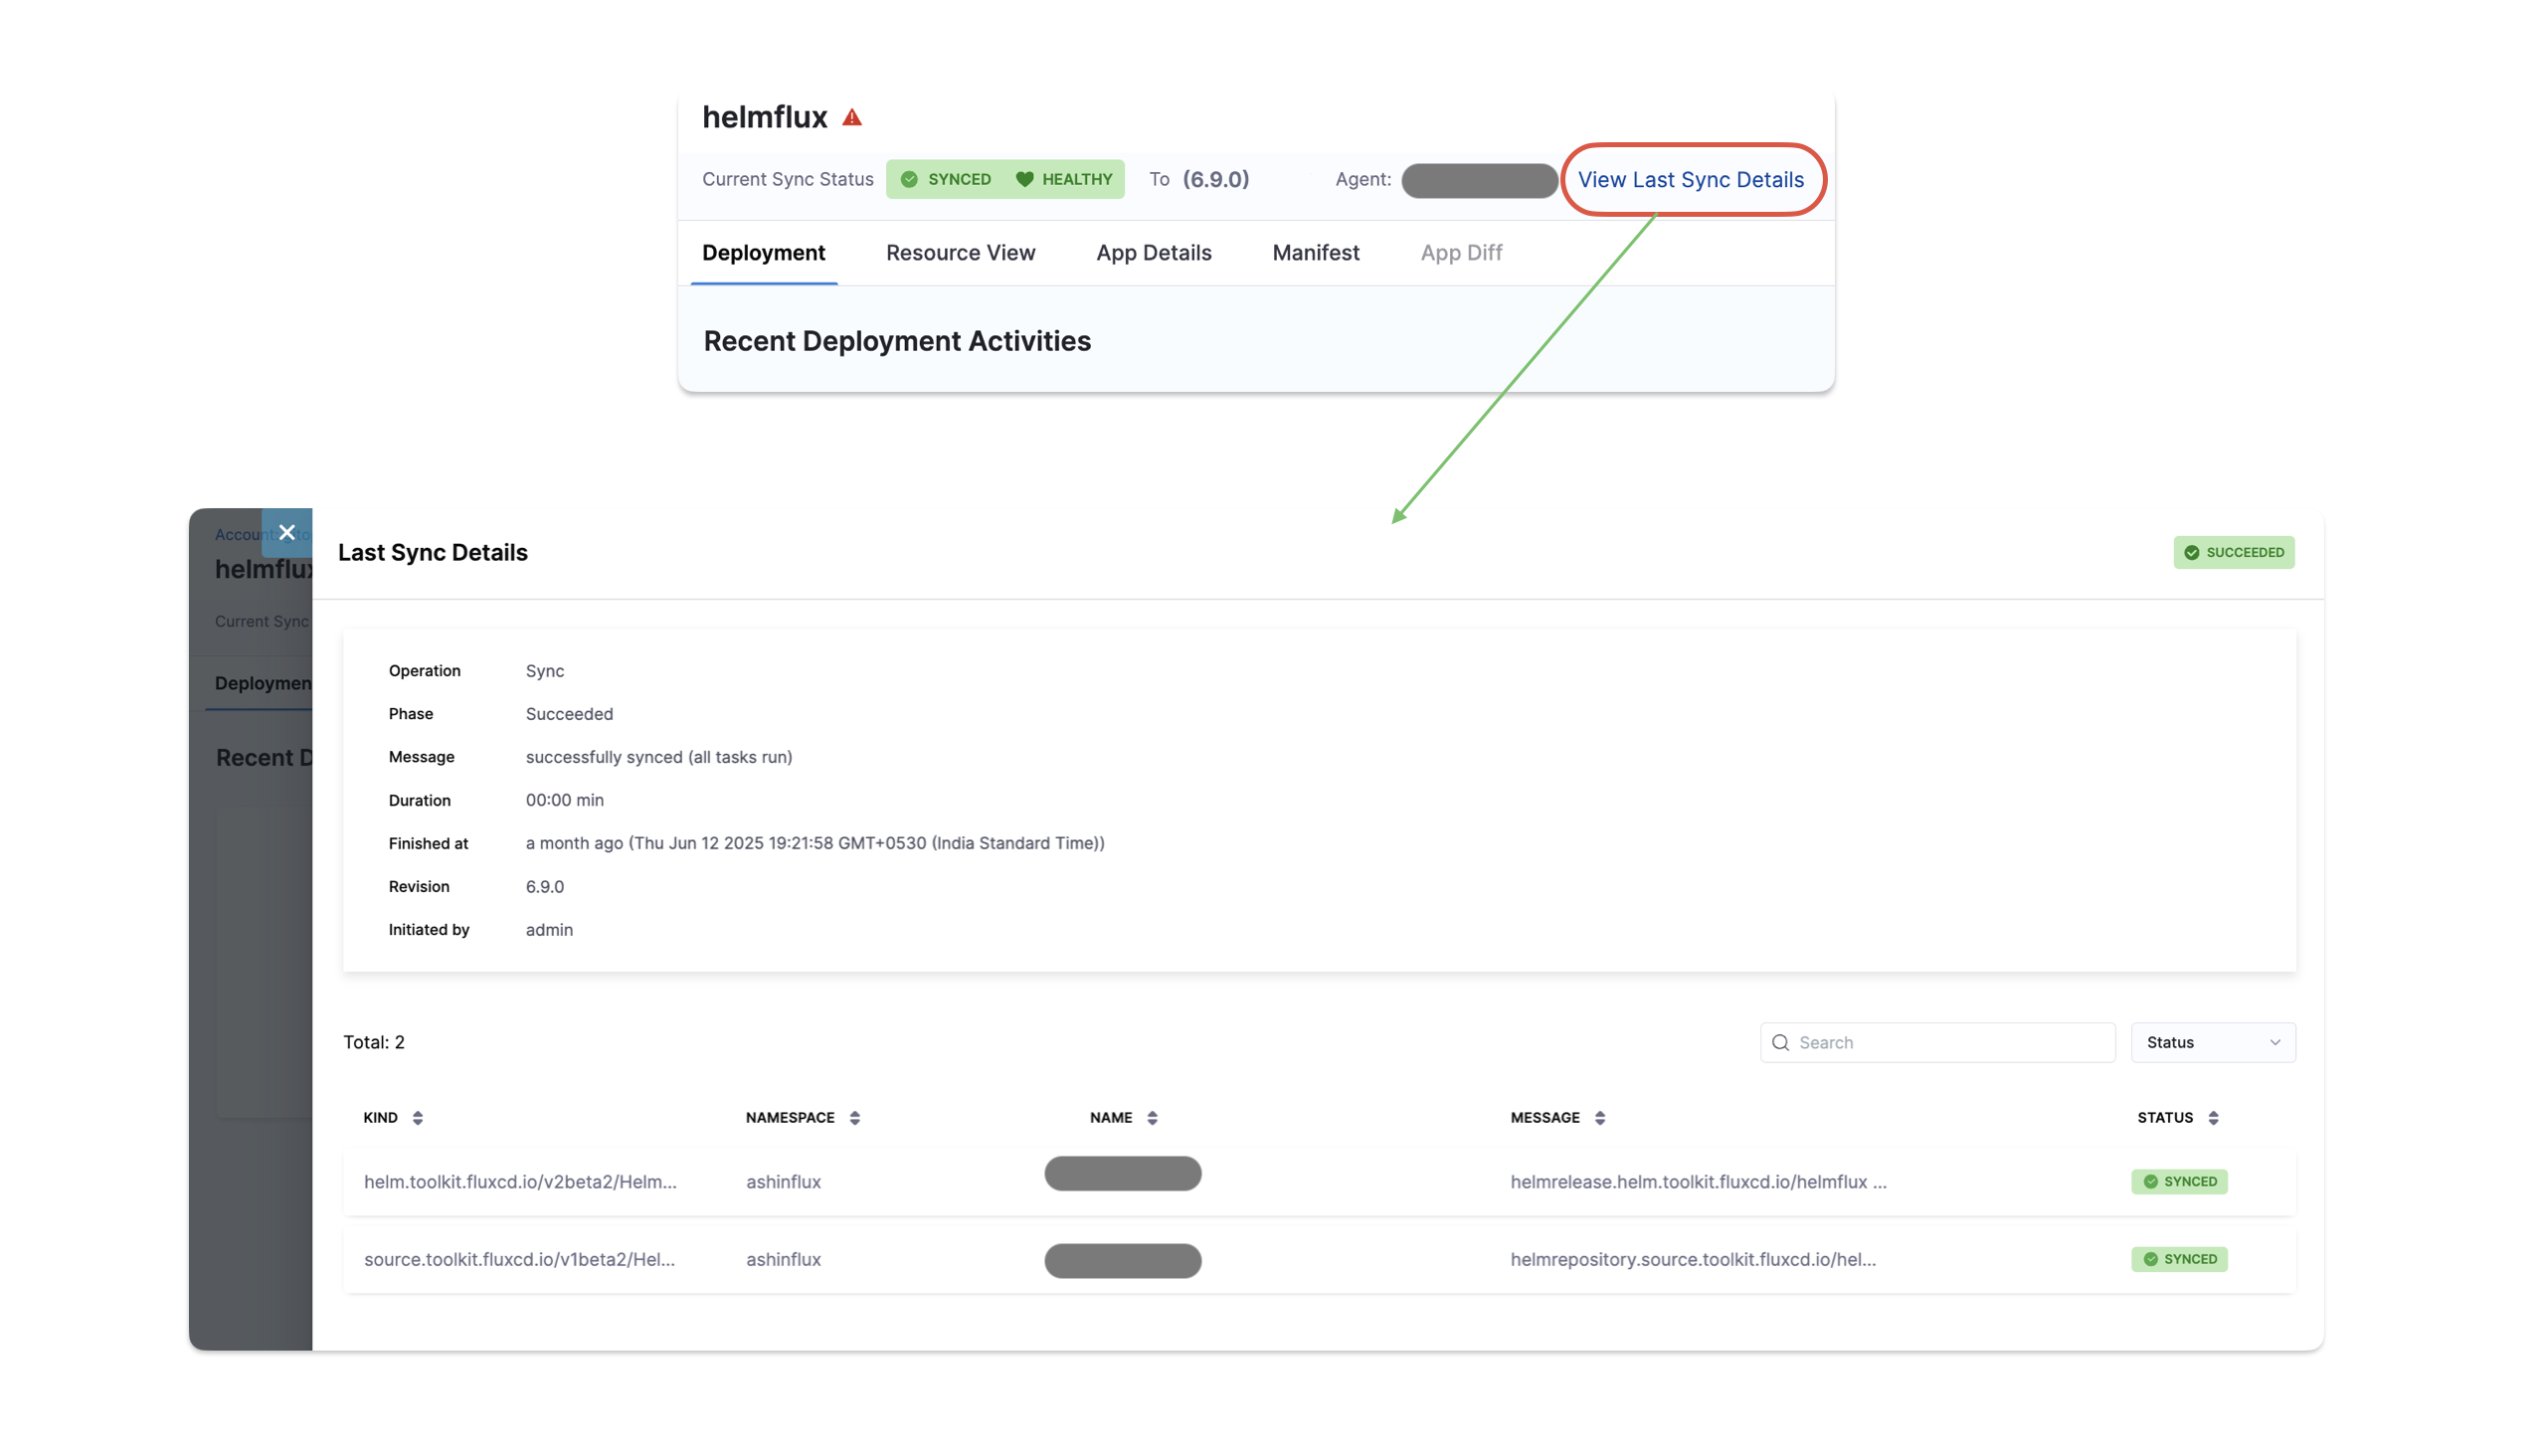
Users can now view details like sync history, commit ID, sync result, and timestamps in a side drawer that opens directly from the application dashboard.
Application Configuration Options
Ignore HPA Changes to Prevent Out-of-Sync Status
When Horizontal Pod Autoscaler (HPA) is enabled, pod scaling can cause GitOps to detect unwanted differences and mark applications as out of sync.
To prevent this, configure the following in the application to ignore differences on replicas:
ignoreDifferences:
    - group: apps
      kind: Deployment
      jsonPointers:
        - /spec/replicas
    - group: apps
      kind: StatefulSet
      jsonPointers:
        - /spec/replicas
syncPolicy:
  syncOptions:
  - RespectIgnoreDifferences=true
Alternatively, you can add the following to the Argo ConfigMap:
apiVersion: v1
kind: ConfigMap
metadata:
  name: argocd-cm
data:
  resource.customizations: |
    apps/Deployment:^(app-with-hpa|hpa-enabled-.*|.*-autoscaled)$:
      ignoreDifferences: |
        jsonPointers:
        - /spec/replicas
For more details, see:
Harness Secret Expressions in Application Manifests
This feature is behind the feature flag CDS_GITOPS_SECRET_RESOLUTION_ENABLED. Contact Harness Support to enable the feature.
For existing Agent installations (BYOA or Harness-installed Argo): The Enable ArgoCD Harness Plugin checkbox cannot be changed after the initial installation. You must configure the Harness ArgoCD plugin by running a patch script on your existing Argo CD installation. For detailed setup instructions, go to Enable Harness Expression Resolution for Existing Installations.
For new Agent installations: Enable the Enable ArgoCD Harness Plugin (Required for Harness expression resolution) checkbox during GitOps agent installation to use this feature.
Currently, this feature only supports secrets that are configured in Harness and use either HashiCorp Vault or Harness Secret Manager as the secret storage backend. Other secret managers (such as AWS Secrets Manager, Azure Key Vault, or GCP Secret Manager) are not supported.
You can use Harness secret expressions directly in your Kubernetes manifests. When you reference a Harness secret in your YAML files, the secret is resolved and decrypted during the manifest rendering phase. The <+secrets.getValue()> expressions are only resolved and decrypted when they appear within a Kubernetes object of type Secret.
After the manifest rendering phase decrypts the secrets and shows the diff, you must sync the application to push the resolved secret values to the cluster.
To use Harness secrets in your manifests, you must first create the secrets in Harness at the account, org, or project level. Once created, you can reference them in your manifests using the appropriate expression syntax based on the secret's scope:
- Account-level secrets:
<+secrets.getValue("account.secret_id")> - Org-level secrets:
<+secrets.getValue("org.secret_id")> - Project-level secrets:
<+secrets.getValue("secret_id")>
Example manifest with Harness secrets:
apiVersion: v1
kind: Secret
metadata:
  name: redis-db-vals
stringData:
  # Account-level secret
  secretfordb: <+secrets.getValue("account.vaultsecret")>
  # Account-level secret
  username1: <+secrets.getValue("account.secret2HSM")>
  # Org-level secret
  orgSecret: <+secrets.getValue("org.apikey")>
  # Project-level secret
  projectSecret: <+secrets.getValue("dbpassword")>
In this example:
account.vaultsecretandaccount.secret2HSMare secrets configured at the account levelorg.apikeyis a secret configured at the org leveldbpasswordis a secret configured at the project level- The secret expressions are resolved and decrypted when Argo CD renders the manifests
- Since
stringDatais used, the values are base64-encoded before being stored in the cluster - Secret values are masked in the Harness UI for security
Argo CD caches the manifests generated by plugins, along with the injected secrets, in its Redis instance. To mitigate security risks, implement network policies to restrict access to Argo CD components (Redis and repo-server) and consider running Argo CD on a dedicated cluster. For more information, refer to the Argo CD Secret Management documentation.
Additional Resources
For detailed setup and troubleshooting guide, refer to Secret Injection Harness Plugin.
For more samples and detailed explanations about using Harness Secret Expressions in GitOps applications, visit the GitOps samples repository.