Groups
- Harness FME
- Split Legacy
The following sections provides general information about Harness user groups, roles, and resource groups. This content applies across the Harness platform and is included here for reference.
User groups contain multiple Harness users. You can assign roles and resource groups to user groups, and the permissions and access granted by those roles and resource groups will apply to all group members.
You can also assign roles and resource groups to individual users that are not in a group. However, user groups keep your role-based access control (RBAC) organized and make permissions and access easier to manage. Instead of modifying each user individually, you edit the permissions and access for the entire group at once.
Harness includes built-in user groups, and you can create user groups manually, through inheritance, or through automated provisioning. You can create user groups at all scopes: Account, Organization, and Project.
What will you learn in this topic?
By the end of this topic, you will be able to:
- Identify the built-in user groups available at each scope.
- Create user groups manually, by inheritance, or through automated provisioning.
- Assign roles and resource groups to a user group.
- Edit a group's metadata, members, and notification preferences.
- Delete user groups and apply split Manage permissions.
Before you begin
Before you manage user groups, ensure you have the following:
- Harness account access: An Account Admin role with permission to view and manage user groups.
- RBAC familiarity: Understanding of how roles, resource groups, and scopes work in RBAC in Harness.
- Users to add (optional): Users invited to the relevant scope, if you want to add members while creating the group.
Built-in user groups
Harness has a built-in user group at each scope, so every user starts with a default group at their scope. This group is called All Project Users, All Organization Users, or All Account Users, depending on the scope. By default, users within a particular scope are in the All Users group for that scope.
- All Account Users: All users in the Account scope.
- All Organization Users: All users in an Organization scope.
- All Project Users: All users in a Project scope.
Whenever you create an organization or project, Harness creates an All Users group for the org or project.
Initially, built-in user groups have no role or resource group assignments. You can assign a role and resource group to the built-in user group at a specific scope, which becomes the default role and resource group for all users at that scope.
For example, if you add a user to a project, they are added to the All Project Users group for that project, and they inherit the role and resource group you assigned to the All Project Users group.
Apart from assigning roles and resource groups, you cannot edit or delete the built-in user groups. These groups are created and managed by Harness.
Use automated provisioning
You can provision user groups from an external identity provider (IdP) instead of creating them by hand. You can create users and user groups manually in Harness, as described in Create user groups manually, or import them automatically using one of the following methods:
Manage imported groups
Automated provisioning splits management between two systems. Your IdP remains the source of truth for who belongs to a group, and Harness controls what that group can do.
| What you manage | Where you manage it |
|---|---|
| Group metadata, group membership, and user profiles | Your IdP |
| Role and resource group assignments | Harness |
You can still create users and user groups directly in Harness. However, once a user or group is imported from your IdP, you must manage it in your IdP.
How import works
Imported groups in Harness have no permissions attached, so you grant access as a separate step. For example, if you use Okta as your IdP:
- In Okta, create a user group and assign users to it.
- Harness imports the group and its members. At this point, the group and its members are not associated with any roles or resource groups.
- In Harness, assign roles and resource groups to the user group.
The group members then inherit permissions and access from the role and resource group assigned to the user group.
Map SCIM group names to Harness identifiers
Harness derives the user group identifier from the display name of the user group in your SCIM provider, and applies the following transformations:
| Character in SCIM display name | Result in Harness identifier |
|---|---|
. (dots) and - (dashes) | Replaced with _ (underscore) |
Other special characters (#, ?, %, and so on) and spaces | Removed |
Leading digits 0 through 9 and $ | Removed |
- Example 1: An SCIM user group named
Harness.Group?Next#Gen-Firstbecomes theidentifierHarness_GroupNextGen_First. - Example 2: An SCIM user group named
123#One.$Two.$Three.123becomes theidentifierOne_$Two_$Three_123.
These transformations apply only to the user group identifier. The group name in Harness retains the special symbols from your SCIM provider. For example, a SCIM user group named Harness.Group?Next#Gen-First keeps the same name in Harness: Harness.Group?Next#Gen-First.
Create user groups manually
Create a user group manually when you are not provisioning from an IdP. To create user groups in Harness, you need a role, such as Account Admin, that has permission to view and manage user groups. Follow the steps below to create a user group manually:
-
In Harness, navigate to the scope where you want to create the user group.
- To create a user group at the Account scope, select Account Settings, and then select Access Control.
- To create a user group at the Organization scope, navigate to Account Settings, select Organizations, select the relevant organization, and then select Access Control.
- To create a user group at the Project scope, navigate to Projects, select the relevant project, and then select Access Control.
-
Select User Groups in the header, and then click New User Group.
-
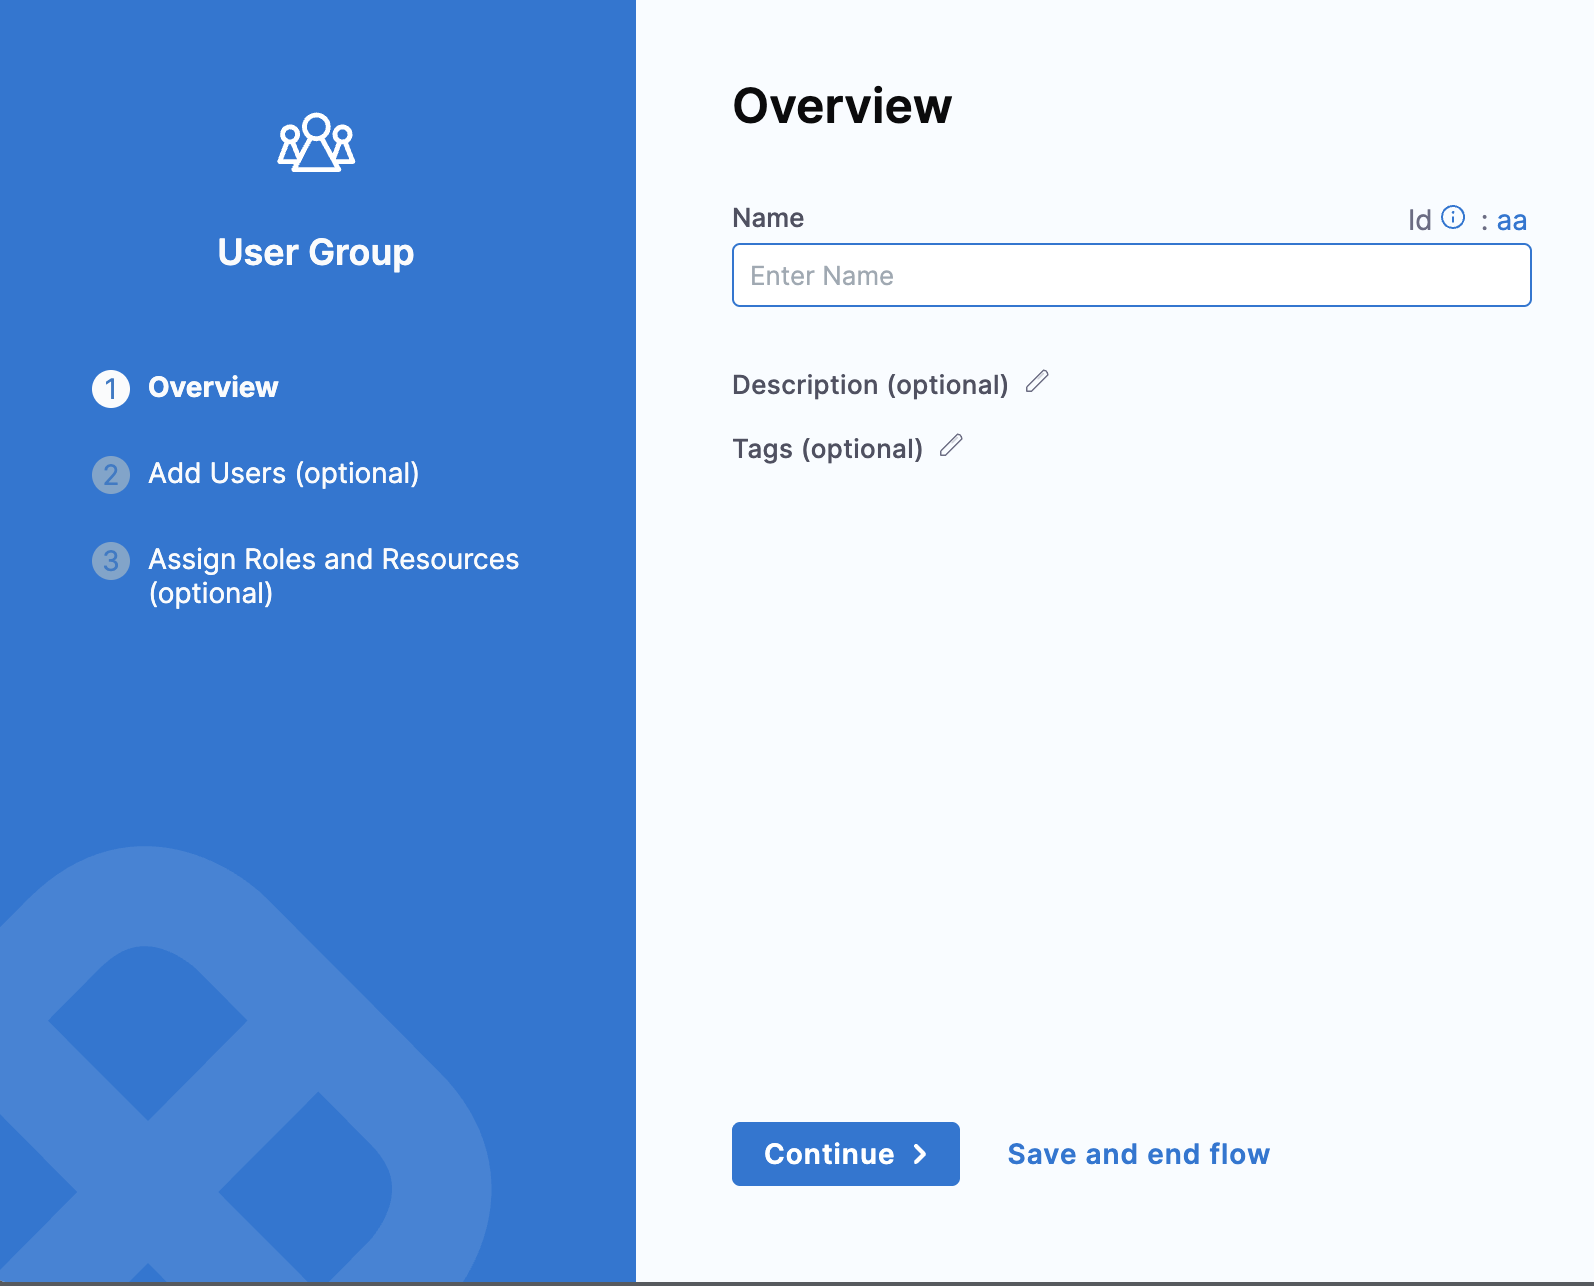
On the Overview page, enter a Name for the user group. Harness generates the Id automatically from the name. Description and Tags are optional.
-
Click Continue to move to the next step, or click Save and end flow to save the group now.
-
On the Add Users step, select the users to add to the group. This step is optional. If you have not invited any users yet, you can add them later, as described in Edit group members.
-
Click Continue to move to the next step, or click Save and end flow to save the group now.
-
On the Assign Roles and Resources step, click Add, then select a role and a resource group. This step is optional, and you can assign roles and resource groups later.
-
Click Save.
Create groups by inheritance
You can inherit a group from a higher scope to reuse its membership and metadata at a lower scope without recreating it. At the Organization and Project scopes, you can create groups by inheriting them from higher scopes. Metadata and members of inherited groups are managed at their original scope. When inherited at a lower scope, you can change only the role and resource group assignment at the inherited scope.
You can modify the group at the group's original scope, and those changes are reflected at all scopes where the group is inherited.
| Action | Scope |
|---|---|
| Edit group members | Original scope only. The changes are reflected in all scopes where the group is inherited. |
| Edit name, description, tags, and notification preferences | Original scope only. The changes are reflected in all scopes where the group is inherited. |
| Edit roles and resource groups | You can change the roles and resource groups that were assigned at the current scope only. You cannot make cross-scope modifications.
|
| Delete group | Original scope only. If deleted, the group is also removed from all scopes where it was inherited. |
When a user group is inherited from the Account scope to a Project scope, Harness automatically assigns the Organization Viewer role to that user group for the organization containing the project. The role assignment is also recorded in the audit logs. If this role assignment is removed, the user group can lose access to the Organization.
To inherit user groups in Harness, you need the following permissions:
- View user groups at the original scope. For example, if the group originates from the Account scope, you must have the ability to view user groups at the Account scope.
- Manage user groups at the inheritance scope. For example, if you want to inherit a group at a Project scope, you must have the ability to manage user groups at that Project scope.
You can split the Manage permission into granular permissions to give users access only to the actions they actually need when managing user groups. For more information on how the granular permissions work, see split Manage permissions.
-
In Harness, navigate to the scope where you want to inherit the user group.
- To inherit a user group at the Organization scope, navigate to Account Settings, select Organizations, select the relevant organization, and then select Access Control.
- To inherit a user group at the Project scope, navigate to Projects, select the relevant project, and then select Access Control.
-
Select User Groups in the header, and then click Assign Roles next to New User Group.
-
On the Select User Group(s) step, select the groups to inherit. Use the All tab to browse every group available to you, or select a scope tab, such as Organization or Account, to list only the groups that originate at that scope. If you do not see a particular group, it either exists at a lower scope or you do not have permission to view it.
-
Click Apply Selected.
-
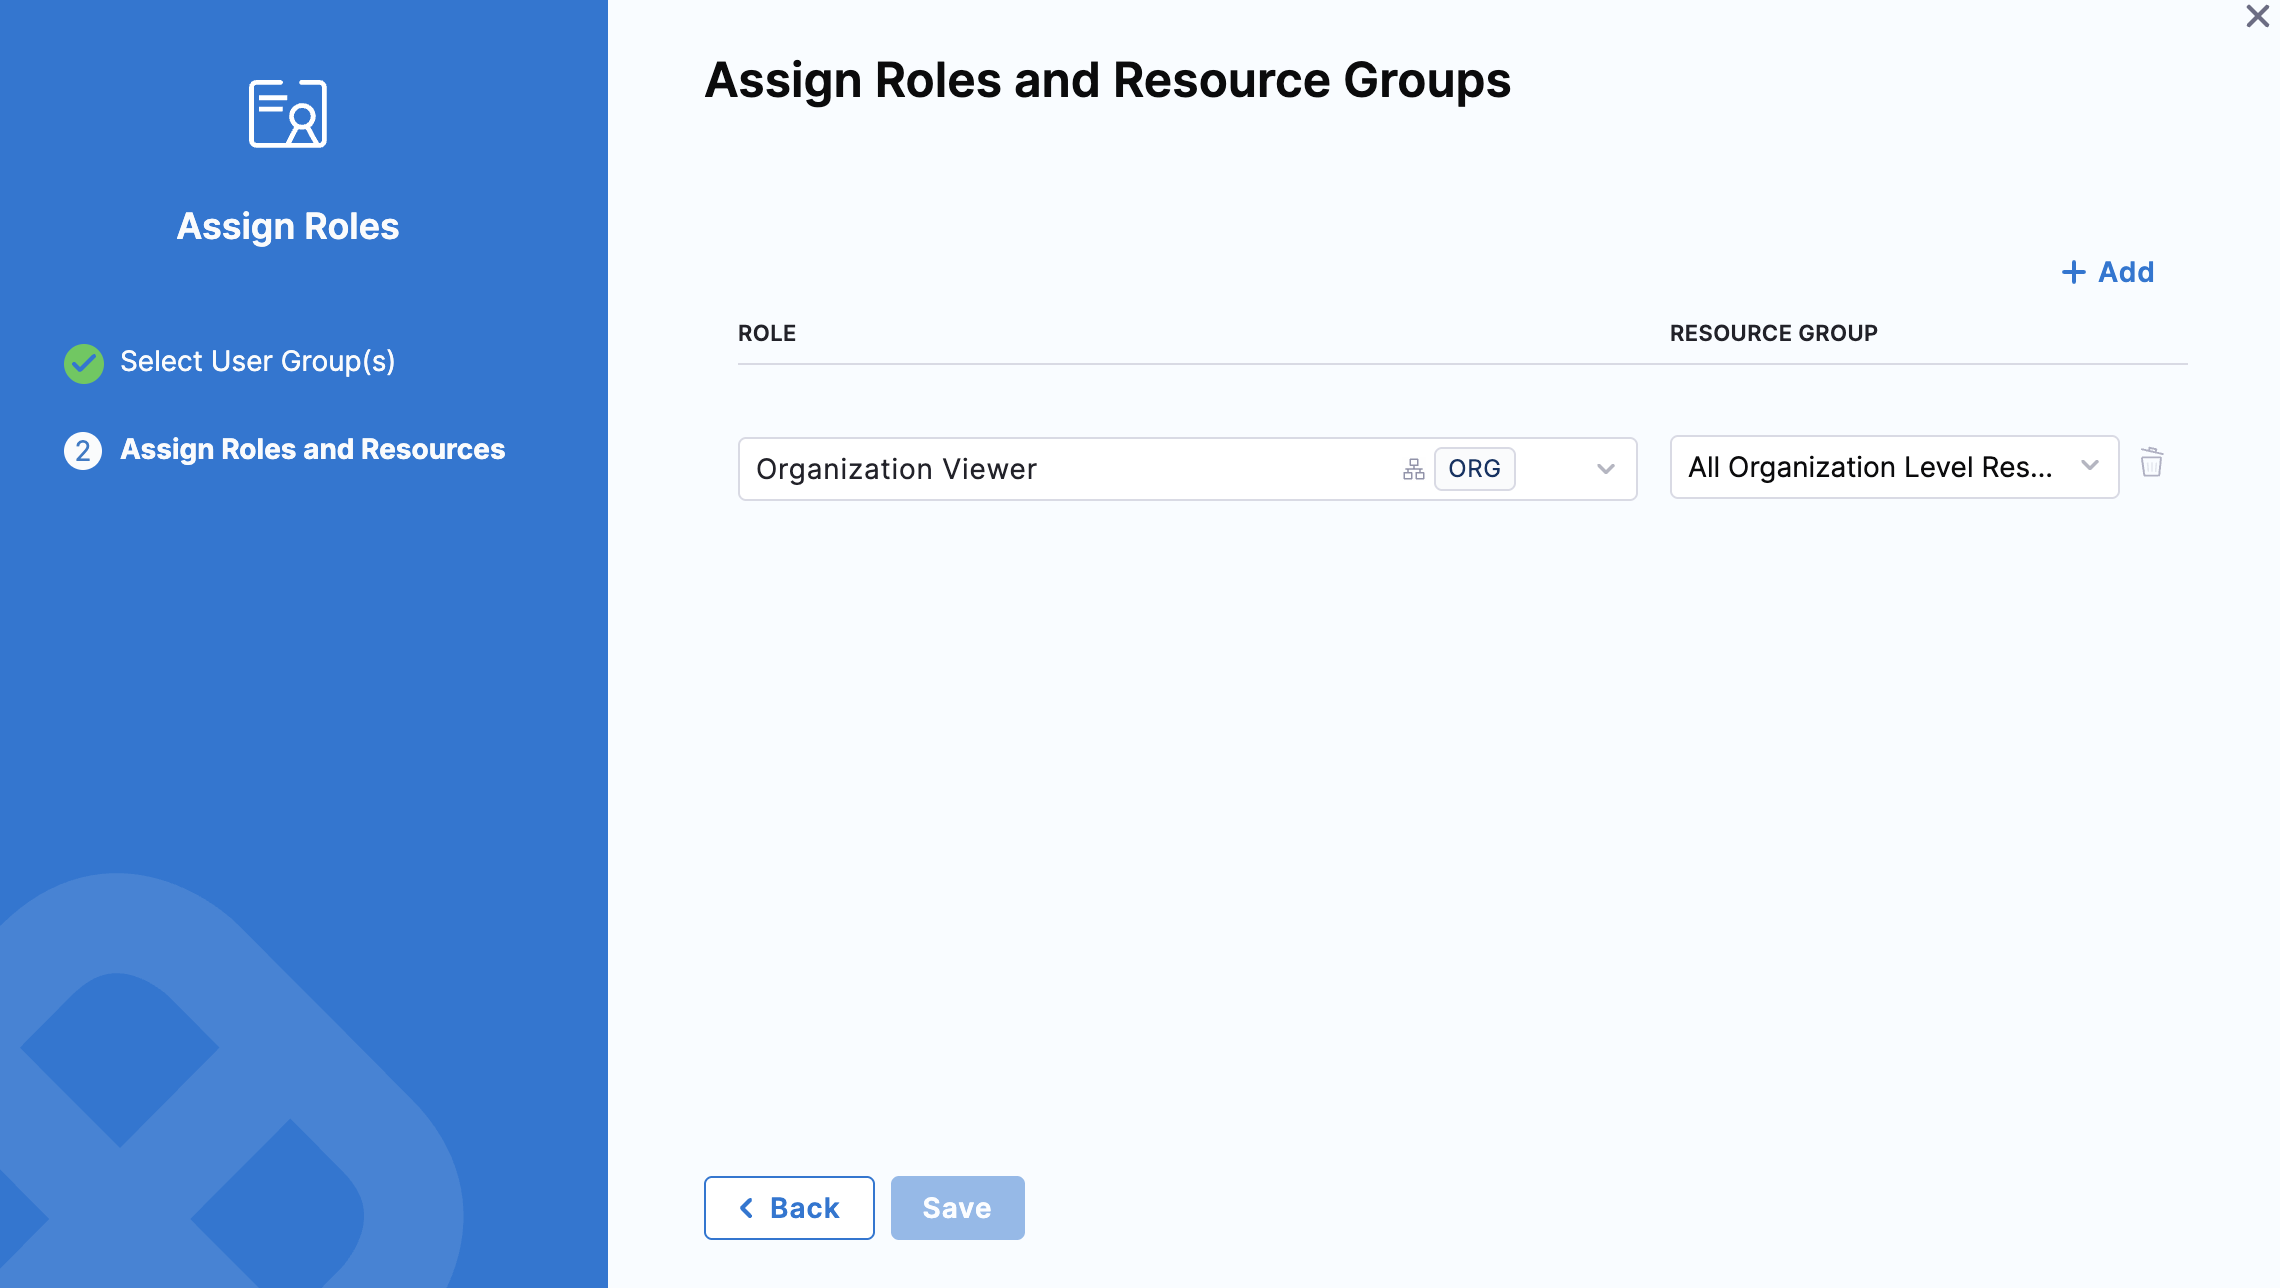
On the Assign Roles and Resource Groups step, click + Add, and then select a Role and a Resource Group to assign to the inherited group at the inherited scope. This determines the group's permissions and access at the inherited scope. If the group does not already have sufficient permissions and access from the original scope, add the additional permissions and access here.
-
Click Save.
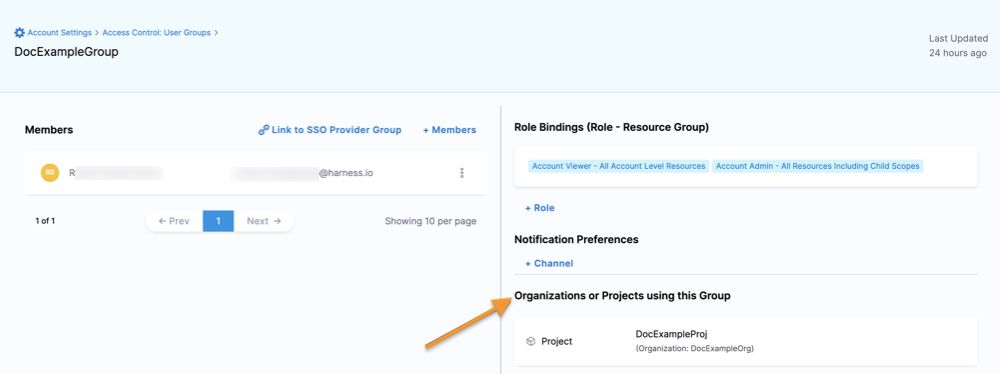
When you view user groups at higher scopes, you can find a list of Organizations or Projects using this Group in the group details. These are the organizations and projects where the group is inherited.
Assign roles and resource groups
Assign roles and resource groups to a group to grant its members permissions and access. Initially, user groups have no permissions or access. You can assign roles and resource groups to user groups, and then the permissions and access granted by the assigned roles and resource groups apply to all group members. For more information on how role binding works, see RBAC in Harness: Role binding.
RBAC is additive. The total expanse of a user or service account's permissions and access is the sum of all the roles and resource groups from all user groups they belong to, as well as any roles and resource groups assigned directly to them as an individual user or service account.
Follow the principle of least privilege (PoLP), a security principle that grants users the minimum access and permissions necessary to complete their tasks and nothing more.
While Harness includes some built-in roles and resource groups, to ensure the least privilege, consider:
- Being selective in the way you apply roles and resource groups.
- Creating your own roles and resource groups as needed for refined access control.
To manage user groups in Harness, you need a role, such as Account Admin, that has permission to view and manage user groups.
-
In Harness, navigate to the scope where you want to configure the group's role and resource group assignments.
- To edit a user group at the Account scope, select Account Settings, and then select Access Control.
- To edit a user group at the Organization scope, navigate to Account Settings, select Organizations, select the relevant organization, and then select Access Control.
- To edit a user group at the Project scope, navigate to Projects, select the relevant project, and then select Access Control.
-
Select User Groups in the header.
-
Locate the group you want to edit and select Manage Role Bindings.
-
In Assign Roles, click +Add, then select a role and a resource group.
- To delete a role binding, select the Delete icon.
- To add another role binding, click +Add again.
-
Click Save.
Edit group metadata
Edit a group's metadata to keep its name, description, and tags accurate as your organization changes.
-
In Harness, navigate to the scope where the user group exists.
- To edit a user group at the Account scope, select Account Settings, and then select Access Control.
- To edit a user group at the Organization scope, navigate to Account Settings, select Organizations, select the relevant organization, and then select Access Control.
- To edit a user group at the Project scope, navigate to Projects, select the relevant project, and then select Access Control.
-
Select User Groups in the header.
-
Locate the group you want to edit.
-
Select More options (⋮), and then select Edit.
-
Edit the group's name, description, or tags, and then click Save.
Edit group members
Add or remove users to keep a group's membership current. Membership changes take effect at the group's original scope and are reflected wherever the group is inherited.
-
In Harness, navigate to the scope where the user group exists.
- To edit a user group at the Account scope, select Account Settings, and then select Access Control.
- To edit a user group at the Organization scope, navigate to Account Settings, select Organizations, select the relevant organization, and then select Access Control.
- To edit a user group at the Project scope, navigate to Projects, select the relevant project, and then select Access Control.
-
Select User Groups in the header.
-
Add users to the group in either of the following ways:
- In the MEMBERS column of the user groups list, click + on the row for the group. For a group that has no members yet, this control appears as + Members.
- Select the group to open its details, and then click + Members on the Overview tab.
-
Select the users to add, and then click Save.
-
To remove users from the group, select the group to open its details, locate the user you want to remove, select More options (⋮), and then select Remove.
For a group whose membership is managed at a higher scope, the list shows Members managed in Account scope instead. Edit the membership at the group's original scope.
Edit notification preferences
You can configure notification channels for Harness to send messages to group members. When you assign an alert notification rule to a group, the channels specified in the group's Notification Preferences are used to notify all group members.
-
In Harness, navigate to the scope where the user group exists.
- To edit a user group at the Account scope, select Account Settings, and then select Access Control.
- To edit a user group at the Organization scope, navigate to Account Settings, select Organizations, select the relevant organization, and then select Access Control.
- To edit a user group at the Project scope, navigate to Projects, select the relevant project, and then select Access Control.
-
Select User Groups in the header.
-
Select the group you want to edit.
-
Under Notification Preferences, click +Channel.
-
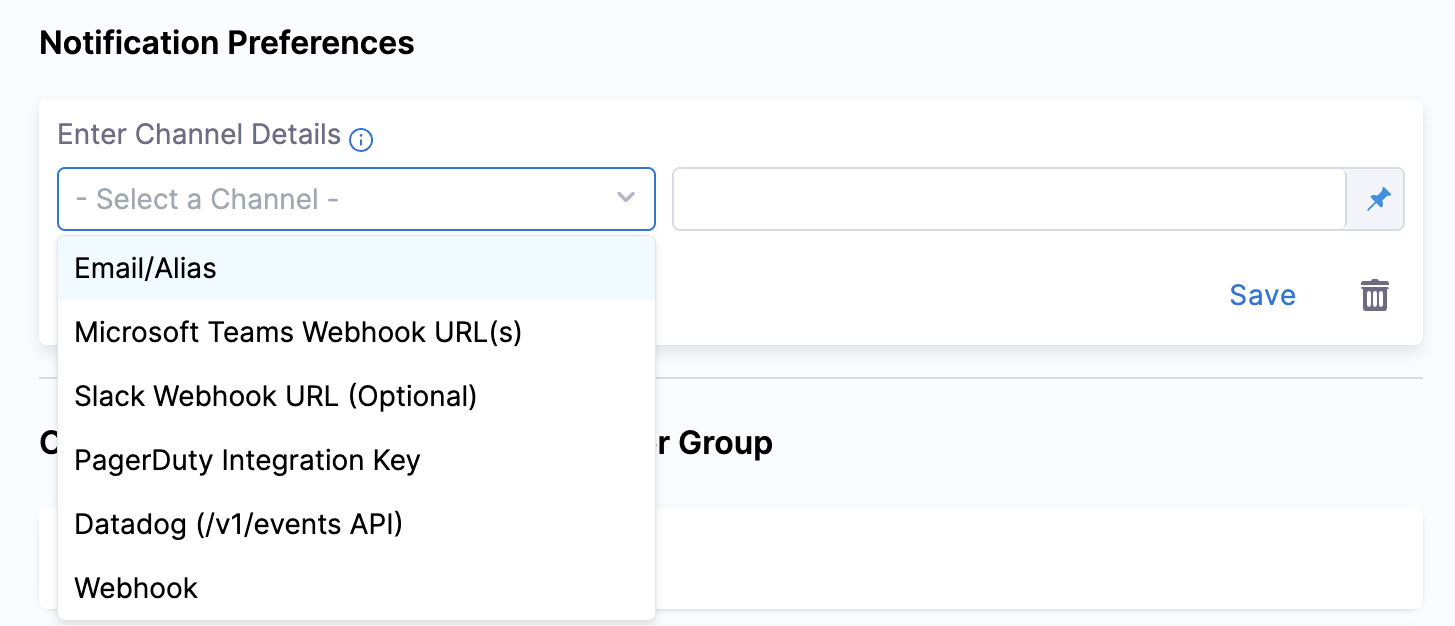
Configure the notification settings for the preferred channel:
-
Email/Alias: Enter any group email addresses where Harness can send notifications. For more information on configuring email notifications for a user group, see Send notifications using email.
-
Microsoft Teams Webhook URL(s): Enter the Microsoft Teams incoming webhook URL. For more information on configuring Microsoft Teams notifications, see Send notifications to Microsoft Teams.
-
Slack Webhook URL (Optional): Enter the Slack channel incoming webhook URL. For more information on configuring Slack notifications, see Send notifications using Slack.
-
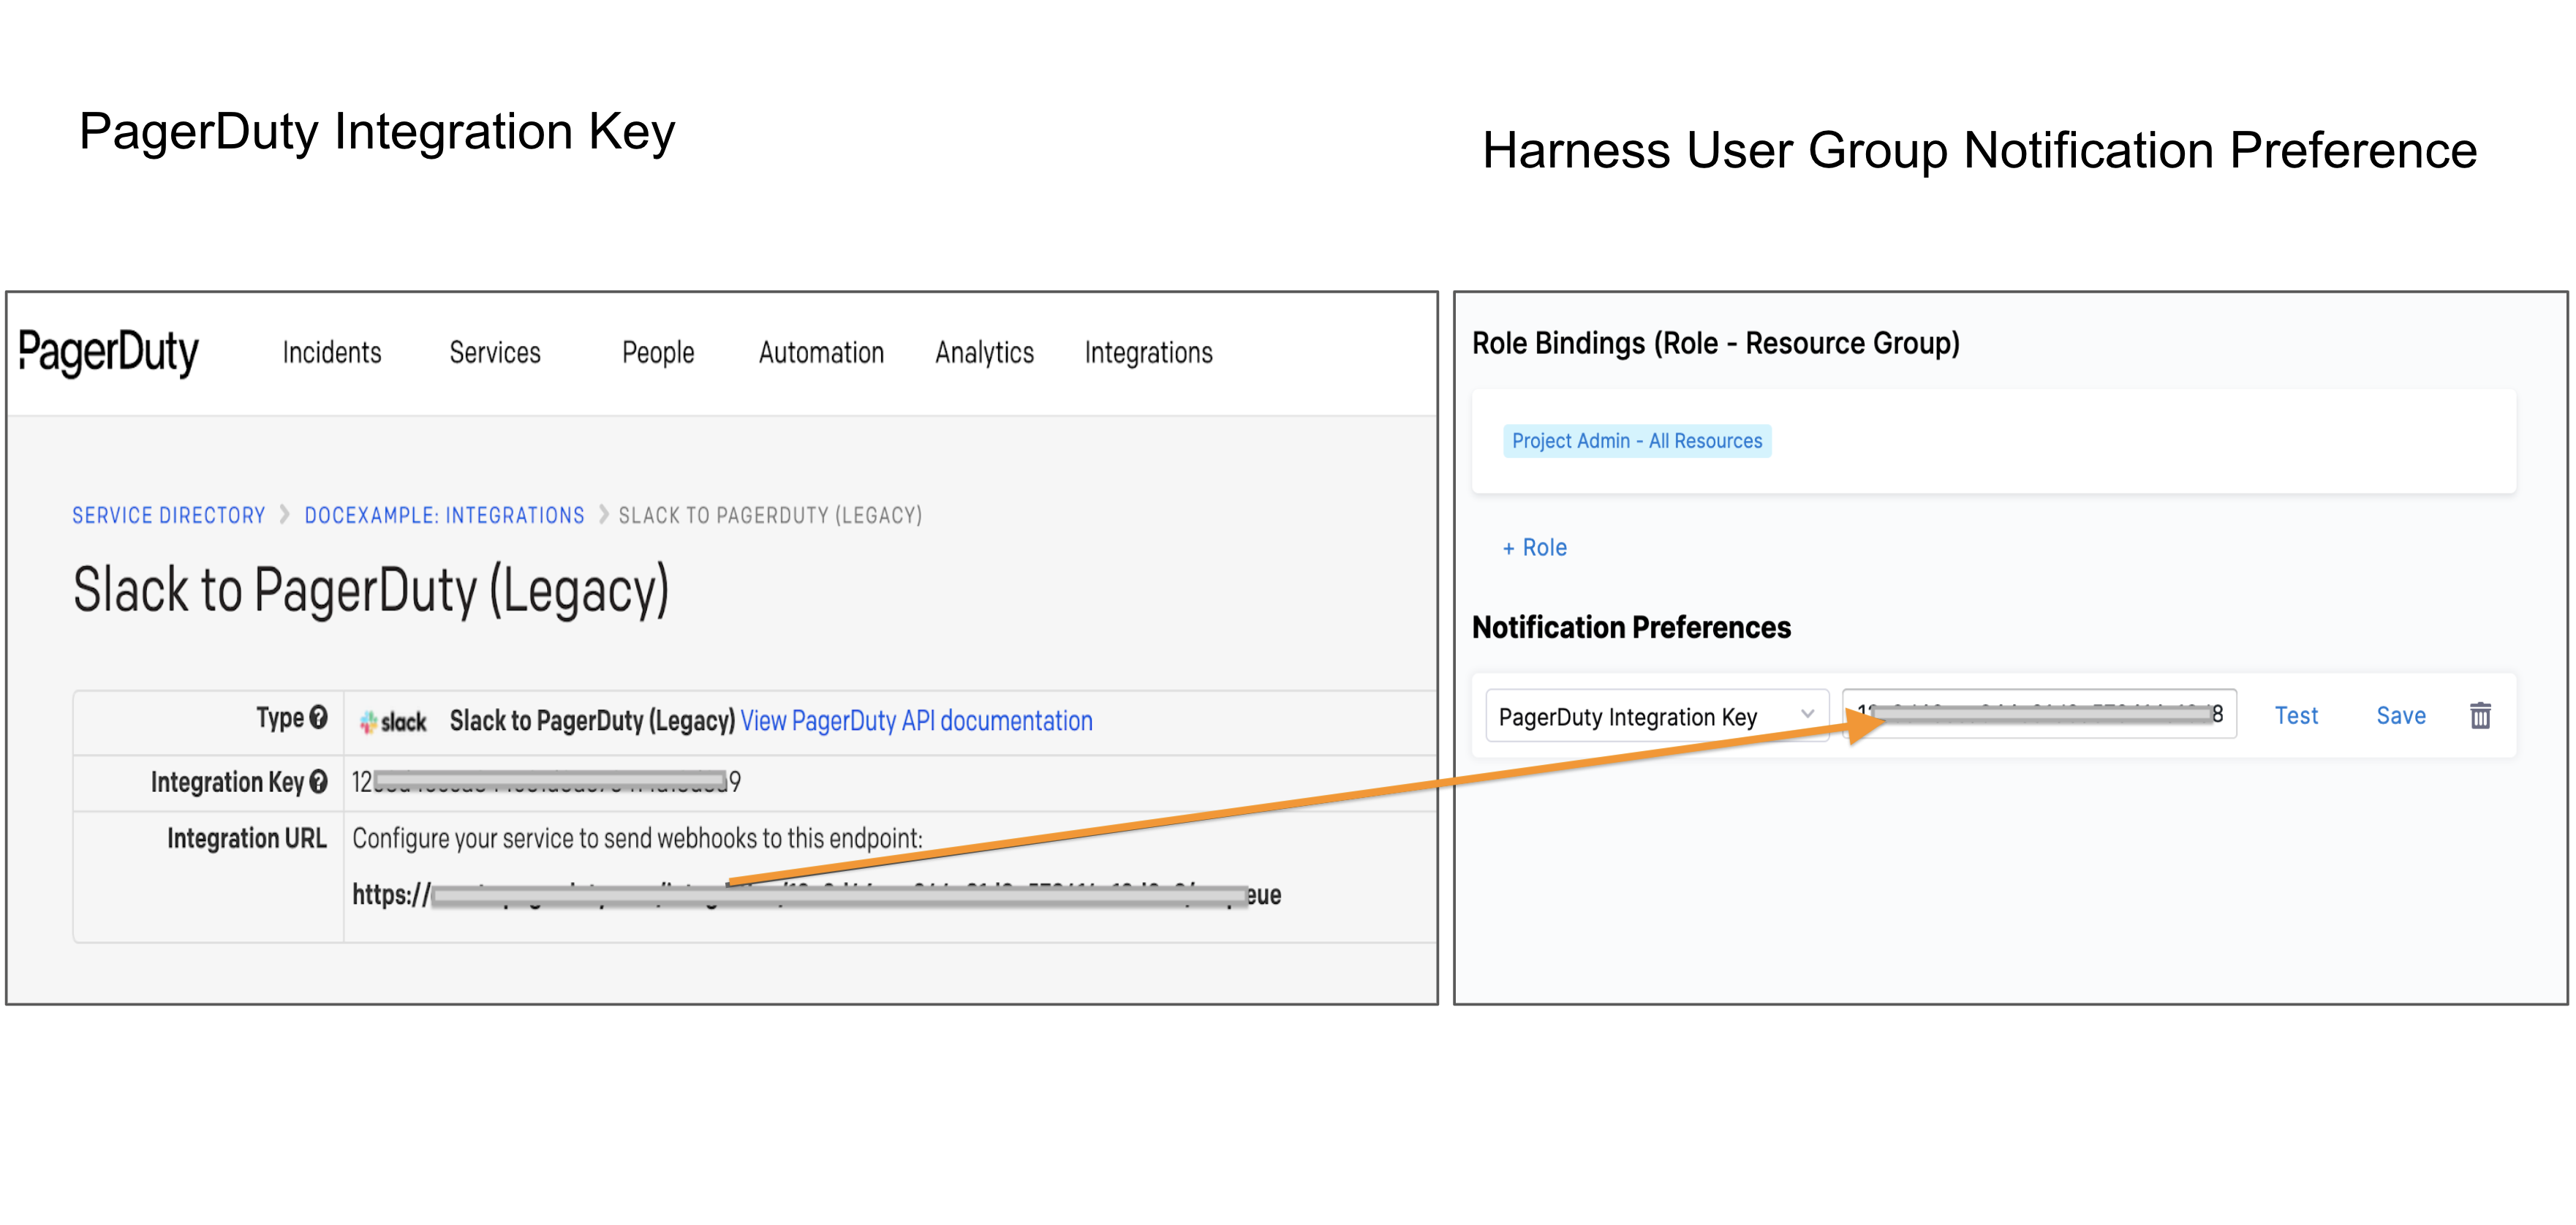
PagerDuty Integration Key: Enter the key for a PagerDuty account or service to which Harness can send notifications. You can get this key from the integration details in PagerDuty (navigate to Services and then Service Directory).
-
Datadog (/v1/events API): Enter the Datadog URL and Datadog API Key to send notifications to Datadog. Harness recommends that you create an encrypted text secret for your Datadog API key and reference it using an expression (for example,
<+secrets.getValue("datadogkey")>). For more information on obtaining your API key from Datadog, see the Datadog API keys documentation. -
Webhook: Enter the webhook URL that Harness calls to send notifications to your external application or service. The webhook receives POST requests with JSON payloads containing notification details. Use expressions to compose the URL if needed (for example,
https://companyurl.notify.com/webhook).
-
-
(Optional) Select Test to send a test notification and confirm that the channel details are valid.
-
Select Save.
Delete user groups
You can delete a user group when it is no longer needed. Deleting a group removes it from all scopes where it is inherited, so confirm that no members rely on it for access before you proceed.
-
In Harness, navigate to the scope where the user group exists.
- To delete a user group at the Account scope, select Account Settings, and then select Access Control.
- To delete a user group at the Organization scope, navigate to Account Settings, select Organizations, select the relevant organization, and then select Access Control.
- To delete a user group at the Project scope, navigate to Projects, select the relevant project, and then select Access Control.
-
Select User Groups in the header.
-
Locate the group you want to delete.
-
Select More options (⋮), and then select Delete.
Split the Manage permissions
Split the broad Manage permission into granular permissions so you can grant users access only to the specific user group actions they need.
Harness supports granular permissions for user groups. Instead of a single broad Manage permission that grants full control, you can grant access only to the specific actions required.
Feature flag rollout process
The permission split rolls out in two stages, and a separate feature flag controls each stage. Enable the flags in the following order:
PL_USER_GROUPS_MANAGE_PERMISSION_SPLIT_MIGRATION: This flag enables migration. Roles are migrated into granular permissions as shown in the table below.PL_USER_GROUPS_MANAGE_PERMISSION_SPLIT_ENFORCE: This flag enforces permissions. UI changes and access checks depend on the split permissions.
Contact Harness Support to enable these feature flags.
User group permissions
The View permission remains unchanged and is always available. The Manage permission for user groups is split into multiple granular permissions to provide administrators with finer control, as shown below.
The core_usergroup_manage permission is no longer available once the feature flag is enabled.
| Action | Permission | Description |
|---|---|---|
| Create | core_usergroup_create | Permission to create a user group |
| Edit (metadata) | core_usergroup_editMetadata | Permission to edit metadata of a user group |
| Delete | core_usergroup_delete | Permission to delete a user group |
| Manage Users | core_usergroup_manageUsers | Permission to manage users in a user group |
| Manage SSO | core_usergroup_manageSSO | Permission to perform SSO-related operations within the scope of a user group |
| Manage SCIM | core_usergroup_manageSCIM | Permission to manage a user group through SCIM |
| Manage Notifications | core_usergroup_manageNotifications | Permission to manage notification settings for a user group |
| Manage Role Assignments | core_usergroup_manageRoleAssignments | Permission to manage role assignments for a user group |
View all user group permissions
The following permissions are always available:
core_usergroup_view: Permission to view a user group.core_usergroup_manage: Permission to manage a user group.
With feature flag enabled:
core_usergroup_create: Permission to create a user group.core_usergroup_editMetadata: Permission to edit metadata of a user group.core_usergroup_delete: Permission to delete a user group.core_usergroup_manageUsers: Permission to manage users in a user group.core_usergroup_manageSSO: Permission to perform SSO-related operations within the scope of a user group.core_usergroup_manageSCIM: Permission to manage a user group through SCIM.core_usergroup_manageNotifications: Permission to manage notification settings for a user group.core_usergroup_manageRoleAssignments: Permission to manage role assignments for a user group.
When the feature flag is enabled, review your existing permissions carefully to understand how they are used and which additional permissions are required.
- If your automation assigns the
core_usergroup_managepermission to the user, it now needs to assign the new permissions. Otherwise, users cannot perform the intended operations. - Any APIs that were previously accessed using the
core_usergroup_managepermission now require new granular permissions. Review the API calls and add the required permissions for each operation. Otherwise, those API requests fail after the feature flag is enabled.
New permission behavior
- Create a user group: The
core_usergroup_createpermission is mandatory. If additional permissions (such ascore_usergroup_manageUsers,core_usergroup_manageSSO, orcore_usergroup_manageNotifications) are missing, the request still succeeds, but only the components covered by the granted permissions are created. - Update a user group: At least one relevant edit or manage permission is required (for example,
core_usergroup_editMetadata,core_usergroup_manageUsers,core_usergroup_manageSSO, orcore_usergroup_manageNotifications).- If none of these permissions are present, the request fails.
- If some permissions are present, only the components covered by those permissions are updated.
Related articles
- Manage roles: Define the permissions for user group grants.
- Manage resource groups: Control which resources a user group can access.
- RBAC in Harness: Permissions hierarchy and role binding.
- Permissions reference: Permissions required to manage user groups.
This documentation describes the Split legacy User group experience.
If your organization is using Harness FME, user groups and the UI may differ. For more information, see RBAC for Split Admins and Inviting an IT Colleague to Your New Harness Account.
A group is a convenient way to manage a collection of users in your account. Use groups to grant administrative controls and grant environment-, feature flag-, or segment-level controls.
About default administrator group
When you set up Harness FME, the Administrators group is automatically created. Administrators are the only users that can access advanced administrative features, e.g., account settings, traffic type setup, team management, environment setup, API tokens and integrations.
Creating a group
To create a new group, do the following:
- From the left navigation pane, click the profile button at the bottom, select Admin settings and then Groups.
- Click Add group.
- Enter a Name and Description for this group and click the Create button.
Deleting a group
To delete a group, do the following:
From the left navigation pane, click the profile button at the bottom, select Admin settings and then Groups. 2. Click Delete and confirm you want to delete this group.
Deleting a group is permanent. If you are using the group to control edit rights for feature flag or segments, users in this group may no longer be able to edit those items if the group is deleted.
Modifying group membership
To edit a group's membership, do the following:
- From the left navigation pane, click the profile button at the bottom, select Admin settings and then Groups.
- Click the Action button and from the menu list, click Edit in the row for the group that you want to edit.
- Add or remove users as desired and click the Save button.