Users
- Harness FME
- Split Legacy
The following sections provides general information about Harness users, roles, and resource groups. This content applies across the Harness platform and is included here for reference.
A Harness user is any individual registered with Harness with a unique email address. Users can be associated with multiple Harness accounts, and they can be in multiple user groups. You assign roles and resource groups directly to users, or they inherit them from user groups.
What will you learn in this topic?
By the end of this topic, you will be able to:
- Import users and groups from your Identity Provider (IdP) through automated provisioning.
- Add users manually at the account, organization, or project scope.
- Assign roles and resource groups to grant permissions and access.
- Review role bindings and edit direct and inherited assignments.
- Delete users from a Harness scope.
Before you begin
Before you manage users, ensure you have the following:
- User management permissions: A role, such as Account Admin, that has permission to invite and manage users.
- Target scope access: Access to the scope where the user belongs, at the Account, Organization, or Project level.
- Authentication method: A configured authentication method, which determines whether Harness sends invitation emails.
You can also create service accounts in Harness for programmatic access instead of individual user accounts.
Use automated provisioning
You can use automated provisioning to keep Harness users and groups in sync with your Identity Provider (IdP), including:
When you use automated provisioning, users and user groups are imported from your IdP, and then you assign roles and resource groups to the imported users and groups in Harness. For imported users and groups, you manage group metadata, group membership, and user profiles in your IdP, and you manage their role and resource group assignments in Harness. You can also create users and user groups directly in Harness, but any users or groups imported from your IdP must be managed in your IdP.
For example, if you use Okta as your IdP, you create a user group in Okta and assign users to that group in Okta. When the user group is first imported into Harness, the group and the group members are not associated with any roles or resource groups. You must assign roles and resource groups to the user group in Harness. The group members then inherit permissions and access from the role and resource group that is assigned to the user group.
Add users manually
Add users manually when you do not use automated provisioning, or when you need to invite an individual outside your IdP sync.
You can add up to 50,000 users in paid plans. Free plans and Harness Community Edition accounts are limited to 1,500 users.
When a new user is added to a project, the user is automatically added to the All Organization Users user group of the parent organization. However, when a user is removed from a project, they are not removed from the All Organization Users user group of the parent organization.
-
In Harness, navigate to the scope where you want to add the user.
- To add a user at the Account scope, select Account Settings, and then select Access Control.
- To add a user at the Organization scope, navigate to Account Settings, select Organizations, select the relevant organization, and then select Access Control.
- To add a user at the Project scope, navigate to Projects, select the relevant project, and then select Access Control.
-
Select New User.
-
In Users, enter the email address that the user will use to log in to Harness.
You can add multiple users at once by entering multiple email addresses.
-
In User Group(s), assign the user to one or more user groups.
When assigned to a user group, the user inherits the roles and resource groups assigned to that group.
You can also assign roles and resource groups directly to individual users.
Users are not required to belong to user groups. However, user groups make it easier to manage permissions and access. Instead of modifying each user individually, you can edit the permissions and access for the entire group at once.
-
In Role, assign roles and resource groups directly to the new user.
If you selected any User Groups, the role and resource group assignments inherited from those groups are not listed in Role.
If you did not select any user groups, you must select a role. Without a role, either direct or inherited from a user group, the user does not have any permissions or access in Harness.
-
Click Apply. Users receive a verification email at the addresses you entered. When the user logs in to Harness, the user creates a password, the email address is verified, and the user's name attribute is updated.
Set default landing URL for invited users
Set a default landing URL to direct a new user to a specific page or dashboard when they first log in.
Currently, this feature is behind the feature flag PL_PREFERENCE_LANDING_PAGE_URL. Contact Harness Support to enable it.
-
In the invitation form, enter the email addresses of the users you want to invite.
-
In the Default Landing URL field, specify the URL you want the invited user to be redirected to after they accept the invitation. For example, you set it to
https://app.harness.io/ng/account/<account-id>/module/ssca/projectsfor the SCS homepage. -
Send the invitation.
After the user accepts the invite and logs in, Harness redirects them to the specified URL.
Update user preferences
Users update their own default landing URL from their profile settings, which overrides the URL set at invitation.
Currently, this feature is behind the feature flag PL_PREFERENCE_LANDING_PAGE_URL. Contact Harness Support to enable it.
-
Sign in as the invited user.
-
Navigate to the user profile.
-
Select the Preferences tab.
-
Update the Default Landing URL to the desired page, such as
https://app.harness.io/ng/account/account/<account-id>/module/cf/home/projectsfor the Feature Flags homepage. -
Save the changes.
The next time the user logs in, Harness redirects them to the updated URL.
Invitation emails
Whether a new user receives an invitation email depends on your authentication configuration. When you add a user, Harness checks your authentication method and email invite preferences to determine if an email invitation should be sent:
- Login via a Harness account or public OAuth providers: The invited user gets an email invitation. The user is listed on Pending Users until the user accepts the invitation.
- SAML, LDAP, or OAuth with
PL_NO_EMAIL_FOR_SAML_ACCOUNT_INVITESenabled: Harness adds the user directly to the Active Users list and does not send an email to the user. - SAML, LDAP, or OAuth with
AUTO_ACCEPT_SAML_ACCOUNT_INVITESenabled: Harness adds the user directly to the Active Users list and sends a notification email to the user. - SAML, LDAP, or OAuth with both feature flags enabled:
PL_NO_EMAIL_FOR_SAML_ACCOUNT_INVITEStakes precedence overAUTO_ACCEPT_SAML_ACCOUNT_INVITES. Harness adds users directly to the Active Users list and does not send invitation emails.
Assign roles and resource groups
Assign roles and resource groups when a user needs permissions and access in Harness. Users inherit roles and resource groups from group membership, or you assign roles and resource groups directly to individual users. Go to RBAC in Harness: Role binding for more information on assigning roles and resource groups.
To manage users in Harness, you need a role, such as Account Admin, that has permission to manage users.
Follow the principle of least privilege
Grant each user the minimum access and permissions necessary to complete their tasks, and nothing more. This is the principle of least privilege (PoLP).
RBAC is additive, so least privilege matters. The total expanse of a user or service account's permissions and access is the sum of all the roles and resource groups from all user groups they belong to, as well as any roles and resource groups assigned directly to them as an individual user or service account.
Harness includes some built-in roles and resource groups. To ensure the least privilege, consider:
- Being selective in the way you apply roles and resource groups.
- Creating your own roles and resource groups as needed for refined access control.
View role bindings
Review role bindings to confirm which permissions a user holds and where each assignment originates.
-
In Harness, navigate to the scope where the user exists.
- To edit a user at the Account scope, select Account Settings, and then select Access Control.
- To edit a user at the Organization scope, navigate to Account Settings, select Organizations, select the relevant organization, and then select Access Control.
- To edit a user at the Project scope, navigate to Projects, select the relevant project, and then select Access Control.
-
Select the user you want to view.
-
Switch to the Role Bindings tab.
-
Select a Scope.
- All: List role bindings across all scopes.
- Account only: List role bindings only at the account scope.
- Organization only: List role bindings in the scope of a specific organization, but not the projects under that organization.
- Organization and Projects: List role bindings in the scope of a specific organization and all projects under that organization.
-
Review the role bindings.
The Assigned Through column indicates the source of the role binding. Assignments are either Direct or inherited from a user group. If inherited, the user group name is listed.
The Assigned At column indicates the scope at which the assignment was made. If assigned at an organization or project scope, the organization and project name are listed.
Edit direct assignments
Edit direct assignments to change permissions for a single user without affecting any group. Use these steps to manage directly assigned role bindings.
-
In Harness, navigate to the scope where the user exists.
- To edit a user at the Account scope, select Account Settings, and then select Access Control.
- To edit a user at the Organization scope, navigate to Account Settings, select Organizations, select the relevant organization, and then select Access Control.
- To edit a user at the Project scope, navigate to Projects, select the relevant project, and then select Access Control.
-
Select the user you want to edit.
-
Switch to the Role Bindings tab.
-
Select Manage Role Bindings.
-
In Role Bindings, select Add, then select a role and a resource group. Repeat to add more role bindings.
-
To delete a role binding, select the Delete icon.
-
Click Save.
Edit inherited assignments
Inherited assignments come from user groups, so you change them either through group membership or through the group's own role bindings. There are several ways to edit inherited role bindings:
- Edit group membership through an individual user's profile. This is best for changing group membership for a single user.
- Edit membership in the user group's settings, rather than editing each user individually. This is useful for adding and removing multiple users at once.
- Edit role bindings in the user group's settings. Do this to change inherited role bindings without changing group membership.
- Edit group membership in your IdP. If you use automated provisioning, group membership is managed through your IdP.
To edit group membership through a user's profile:
-
In Harness, navigate to the scope where the user exists.
- To edit a user at the Account scope, select Account Settings, and then select Access Control.
- To edit a user at the Organization scope, navigate to Account Settings, select Organizations, select the relevant organization, and then select Access Control.
- To edit a user at the Project scope, navigate to Projects, select the relevant project, and then select Access Control.
-
Select the user you want to edit.
-
In the Group Memberships tab select a Scope.
- All: List groups across all scopes.
- Account only: List groups only at the account scope.
- Organization only: List groups in the scope of a specific organization, but not the projects under that organization.
- Organization and Projects: List groups in the scope of a specific organization and all projects under that organization.
-
Select + Add to a new User Group, and then modify the user's group membership by selecting or deselecting groups accordingly.
- To add the user to a group, search for and select the relevant group.
- To remove the user from a group, search for and deselect the relevant group.
-
Click Apply Selected.
Delete users
Delete a user to revoke their permissions and access in a Harness scope. Use these steps to delete a user from Harness.
If you use automated provisioning, user accounts are managed by your IdP. Delete or deactivate the user in your IdP to revoke their access to Harness.
When a user is deleted from an account and then added back, their permissions are not restored immediately. It takes 5 to 10 minutes for the user to inherit their previous permissions.
-
Make sure you have a role, such as Account Admin, that has permission to manage users.
-
In Harness, navigate to the scope where the user exists.
- To delete a user at the Account scope, select Account Settings, and then select Access Control.
- To delete a user at the Organization scope, navigate to Account Settings, select Organizations, select the relevant organization, and then select Access Control.
- To delete a user at the Project scope, navigate to Projects, select the relevant project, and then select Access Control.
-
Locate the user you want to delete.
-
Select More options (⋮), and then select Delete.
Related articles
- Manage user groups: Group users and manage their permissions in bulk.
- Manage roles: Define the permissions you assign to users.
- Manage resource groups: Control which resources a user can access.
- Manage service accounts: Set up programmatic access instead of individual user accounts.
This documentation describes the Split legacy User experience.
If your organization is using Harness FME, user roles and the UI may differ. For more information, see RBAC for Split Admins and Inviting an IT Colleague to Your New Harness Account.
Split supports three roles to give users different permission levels in the Split UI:
-
Viewer: Users with the Viewer role are only allowed to view data and objects. They cannot modify any objects like feature flags or segments in the web console.
-
Editor: Users with the Editor role can modify objects like feature flags and segments. They also can approve or reject change requests.
-
Administrators: Users with the Administrators role have full permissions. They can view and modify all objects in the web console. They also participate in approval decisions and perform all administrative responsibilities. For example, they can create new users or manage groups. Administrators are also the only users that can create and manage API and SDK keys.
Administrators is a group that has been created for you. The first user in a new account is automatically added to the Administrators group. A user added to the Administrators group will have full administrator privileges, without regard for other role assignments.
Session management
The Split console uses a single important cookie: split-token, which stores the user’s JSON Web Token (JWT) credentials after authentication.
This cookie is required to maintain the user’s session while they are logged in.
Assigning user roles
The following sections explain how a user in the Administrators group can assign a role to other users.
Assigning an Editor or Viewer Role when creating a user
A role is assigned when creating a new user as described below.
- From the left navigation, click the user's initials at the bottom and click the Invite menu item.
- Assign the Editor or Viewer role by selecting the role in the User role menu list. The Editor role is selected by default.
- Click the Invite button. The new user is created.
Creating a new user in the Administrators group
A new user can be created in the Administrators group as described below.
-
From the left navigation click the Invite menu item.
-
Add the user to the Administrators group by typing 'Administrators' in the Group text box.
-
Click the Invite button. The new user is created.
noteThe Invitation link sent to new users will expire within 2 weeks from the time they are sent. If they are used after expiration, the login page will not change after updating the login email and password, and no account is created.
Changing permissions of existing users by assigning the Editor or Viewer role
The Editor or a Viewer role can be assigned to an existing user by following the steps below.
-
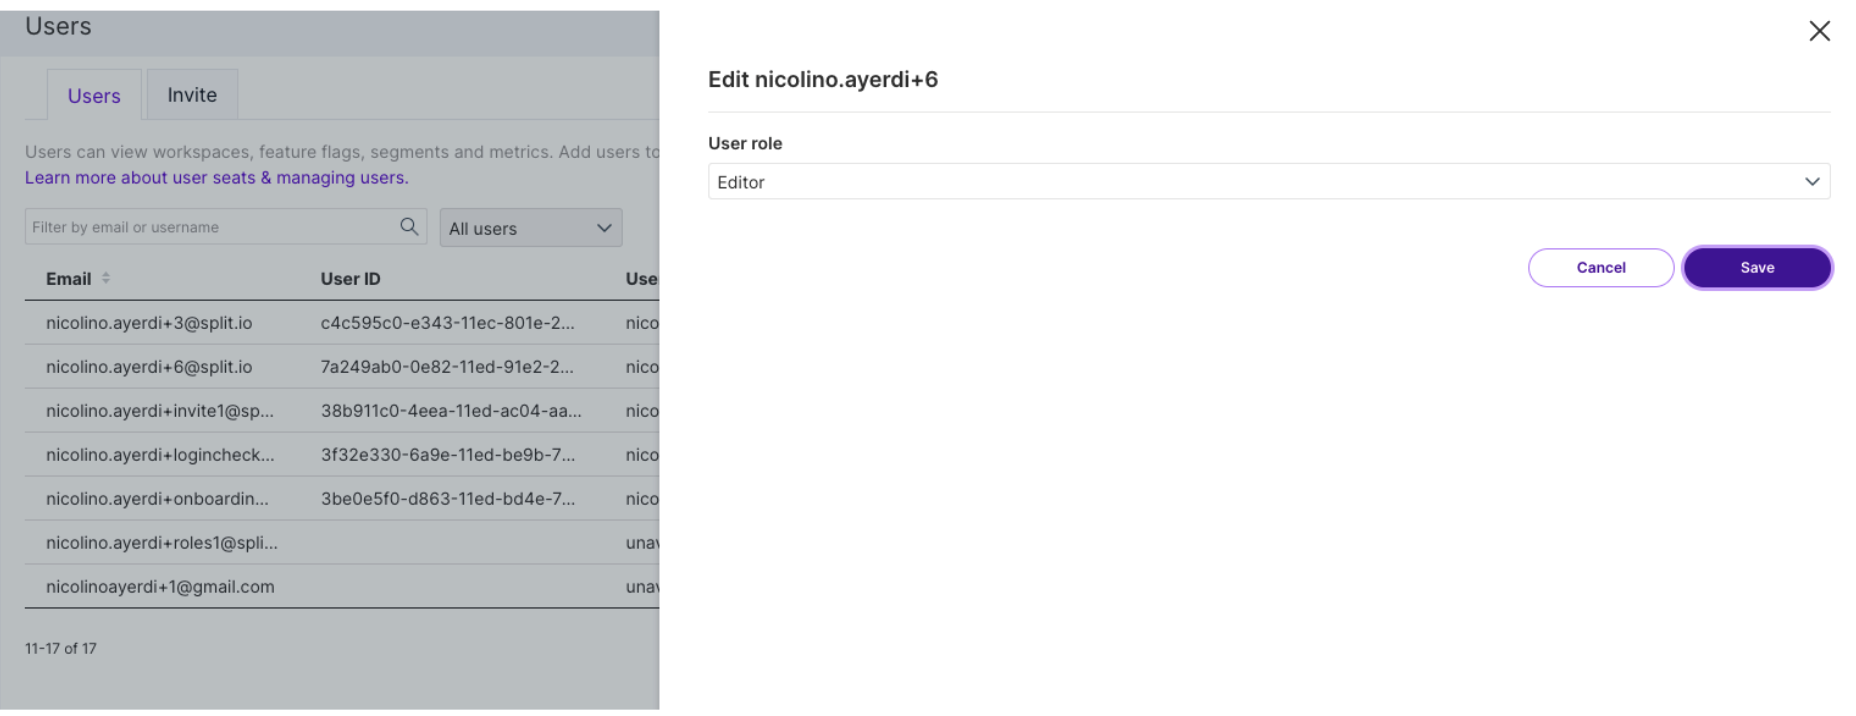
In the left navigation, click the user's initials at the bottom, select Admin settings, and click Users. A list of users appears.
-
Find the desired user and click Edit.
-
Select the desired role from the User role menu list.
-
Click the Save button. The new role will be assigned to the user.
Adding an existing user to the Administrators group
An existing user can be added to the Administrators group as described below.
-
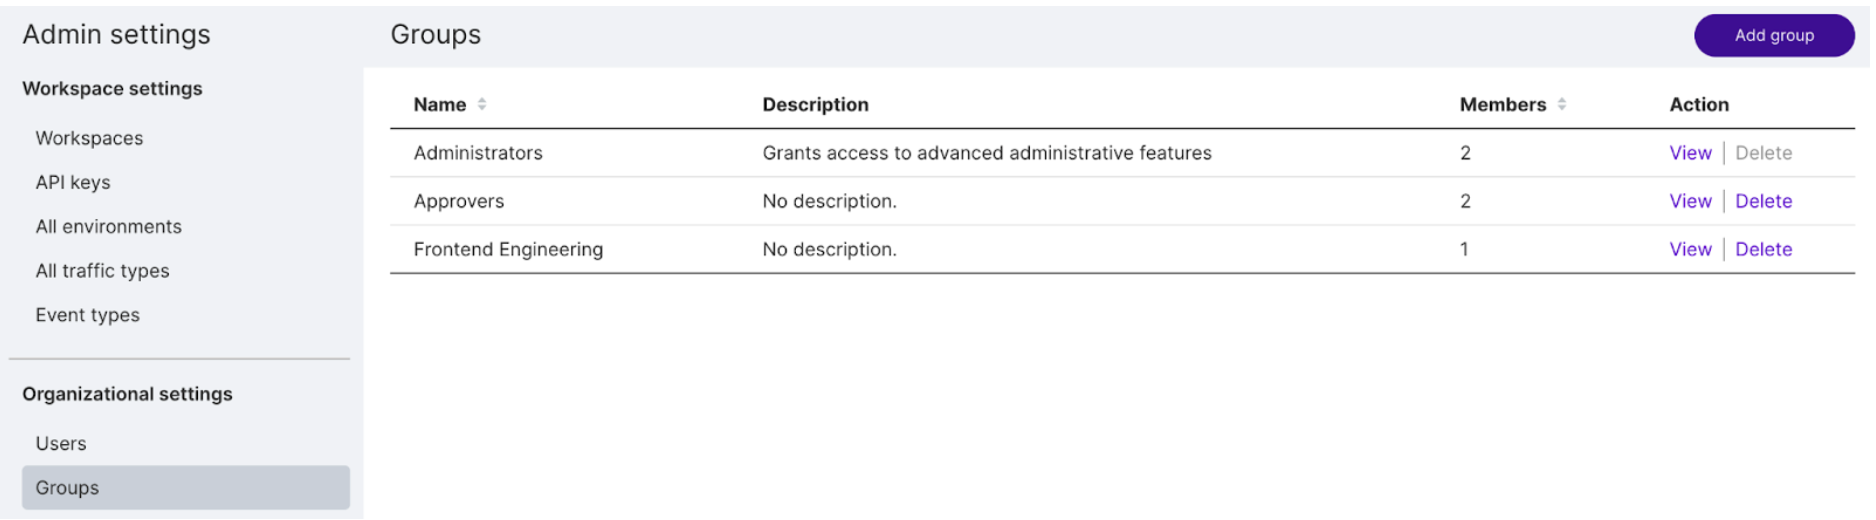
In the left navigation, click the user's initials at the bottom and select Admin settings.
-
Click Groups and in the Action column, click View in the Administrators group.
-
Select an existing user and click Add member. A new member is added.

Managing users
Split’s permissions model allows for by-environment or by-feature access controls, as well as the creation of groups for easier administration of permissions by teams.
Administrators can visit the admin section of Split to enable or disable access to any environment or feature at the individual user level, or create groups to quickly grant permissions to all the users within them. Any Split user can be a part of as many groups as you’d like.
In addition to tags, you can use owners to organize and manage feature flags, segments and metrics across the Split user interface. Use owners to isolate feature flags, segments, and metrics in the browse panes to those owned by me and simplify permissions by providing owners edit rights for a single feature flag across all environments by toggling permissions on. When toggled on, permissions will inherit owners as editors.
Harness recommends using groups where possible as owners. As you onboard new teammates their Split instance will have several feature flags owned by their team.
For more information about Split’s permissions controls, using owners, and creating groups, see Groups.
About object-level edit permissions
For a user that is not in the Administrators group, object-level edit permissions previously granted will no longer be honored once the user is switched to the Viewer role.
In other words, even if the user still appears in object-level edit permissions (Feature flag, Segment, or Metric owners), Environment settings (in the list of editors and approvers), or Feature flag change requests (in the list of approvers), the user will only be able to view any of those objects, and will not be able to edit them.
About audit logging
A change in the role assignment for a user (e.g. from Editor to Viewer) is tracked in the Admin audit logs (under Admin settings, Security). Viewing behavior of a Viewer user is not captured in audit logs.
Google account sign-in (SSO)
Users can authenticate in the Split user interface using Google account sign-in, as long as the login ID (email address) used in Split matches their Gmail account.
If you are a new user, your Split account must be activated before you can use Google authentication. When you receive your invitation, make sure to click the invite link, set a password, and log in to Split at least once before signing in with Google.
Two-factor authentication (2FA)
For increased login security, you can add two-factor authentication (2FA) for your Harness FME account. With 2FA enabled, Harness FME asks you to enter a verification code after authentication.
Setup
Set up 2FA in a few steps:
- In the left navigation, click on the profile button at the bottom, and go to Personal Settings > Security.
- Click Enable Two-Factor Authentication.
- Download an authenticator app like Google Authenticator.
- Scan the QR code on your screen.
- Enter the 6-digit verification code generated by the app to complete setup.
- On your next login, you are prompted to enter a code generated from the authentication app on your smartphone.
Manage
See 2FA status for users
Administrators can see which users on your team have set up two-factor authentication. In Admin Settings > Users, column 2FA shows a user's 2FA status (enabled or disabled).
Disable 2FA for someone who cannot sign in
Administrators can disable 2FA for users on their team:
- Go to Admin Settings > Users.
- Click Disable 2FA in the Action column next to a user's name.
Session reset
By default, we do not automatically kill active user sessions. However, team administrators can kill an active user session and force them to log out.
Administrators can do this by going to Admin settings > Users and then clicking Force Logout in the Action column next to a user’s name.
After you force a session to reset, the affected team member is automatically logged out of Harness FME. This user must sign in again and complete two-factor authentication if it has been set up.
Session timeout
Administrators can modify session timeout settings to ensure that a session closes when it is no longer in use. By default, sessions automatically time out after 30 minutes of inactivity, forcing users to re-authenticate for access. However, team administrators can customize this setting for their organization by specifying a timeout value. All sessions will timeout after 7 days regardless of your organization's setting, forcing users to re-authenticate.
The timeout value represents the length of time after which the system logs out inactive users. The timeout is between 15 minutes and 7 days. We recommend maintaining a shorter timeout period to enforce stricter security.
To update session timeout settings:
- Go to Admin settings > Security > Session settings.
- Select a timeout value.
- Click Update.
Deactivate or reactivate a user
Administrators can take a number of actions to help manage users in their Harness FME account.
Deactivate a user
- From the left navigation, click the profile button at the bottom, select Admin settings and then Users.
- Click Deactivate next to a user’s name. The user’s status changes to Inactive.
When the user’s login is deactivated, they cannot access your account in Harness FME and cannot reactivate their own login.
Reactivate a user
- From the left navigation, click the profile button at the bottom, select Admin settings and then Users.
- Click Activate next to a user’s name. The user’s status changes to Active.
When the user’s login is activated, they can access your account in Harness FME.
Unblock a user
Password reset
A user can go through the password reset flow to unblock their login.
- Go to app.split.io/login.
- Click Forgot?.
- Enter your email.
- Follow the instructions sent to the email, provided the user exists.
Admin intervention
An administrator can unblock users in Admin settings.
- From the left navigation pane, click the project switcher at the bottom and select Admin settings.
- Click Users.
- If the user's status is blocked, click Unblock next to the username. The user’s status changes to Active.
Troubleshooting
I've deleted or can't find the authenticator app used to enable two-factor authentication. How can I log in?
If you lose your phone or no longer have access to the authentication app used during setup, use one of the recovery codes provided when you set up two-factor authentication for your account.
You can use any of these codes to access your account. Note that each recovery code can only be used once.
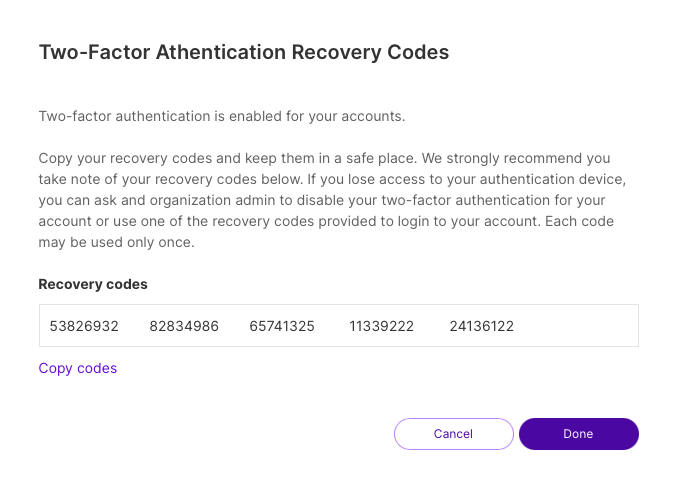
While the recovery codes allow you to access Harness FME in an emergency, you should contact your team's Administrator to disable two-factor authentication and then complete the setup process again. If you do not have access to the recovery codes, your team's administrator can disable two-factor authentication for your account.
User invitation emails were never received
An invitation is sent successfully to a user for the given organization, but the user never receives the email containing the invitation link.
Split’s backend servers use SendGrid, an enterprise email service typically configured for individually targeted business emails. In some cases, emails from SendGrid may be blocked or filtered if they are not recognized as individually targeted, causing invitation emails from Split.io to fail to reach the recipient.
To resolve this, contact your IT team and request that individually targeted emails from SendGrid be allowed or allowlisted.
User unable to login after accepting invitation
An invitation is sent successfully to a user for the given organization. However, after setting their password and clicking the Login button, nothing happens. The login screen remains unchanged.
There are multiple potential causes for this issue:
-
The same user ID (email address) already exists in another organization. The Split platform does not allow users to belong to multiple organizations.
-
The invitation link has expired.
-
The user is trying to log in with Google Authentication instead of using Split authentication for their first login.
If the user’s email already exists in another organization, consider one of the following options:
-
Have the user log in to their existing organization, navigate to My settings, and change their email address to one other than their official work email.
-
Use the same email address with a +1 suffix to differentiate the user in Split. For example, if the user’s email is first.last@email.com, they can use first.last+1@email.com. The email server will route the message to the same inbox, but Split will treat it as a separate user.
-
Contact Harness Support or use this form to request deletion of the existing account, then reissue the invitation.