> For the complete documentation index, see [llms.txt](https://developer.harness.io/llms.txt). Markdown versions of documentation pages are available by appending `.md` to page URLs; this page is available as [Markdown](https://developer.harness.io/ai-test-automation/use-ai-test-automation/test-suites/create-and-run/harness-ai-suites.md).

# AI Test Automation

Under **Test Suites** in the product, select **Create new suite** and choose **AI Test** to create and run batches of Harness-authored tests. For **Playwright** suites executed in Harness, select **Playwright** from the same dropdown. Go to [Playwright in AI Test Automation](/ai-test-automation/use-ai-test-automation/test-suites/create-and-run/playwright-builds.md) for that flow.

***

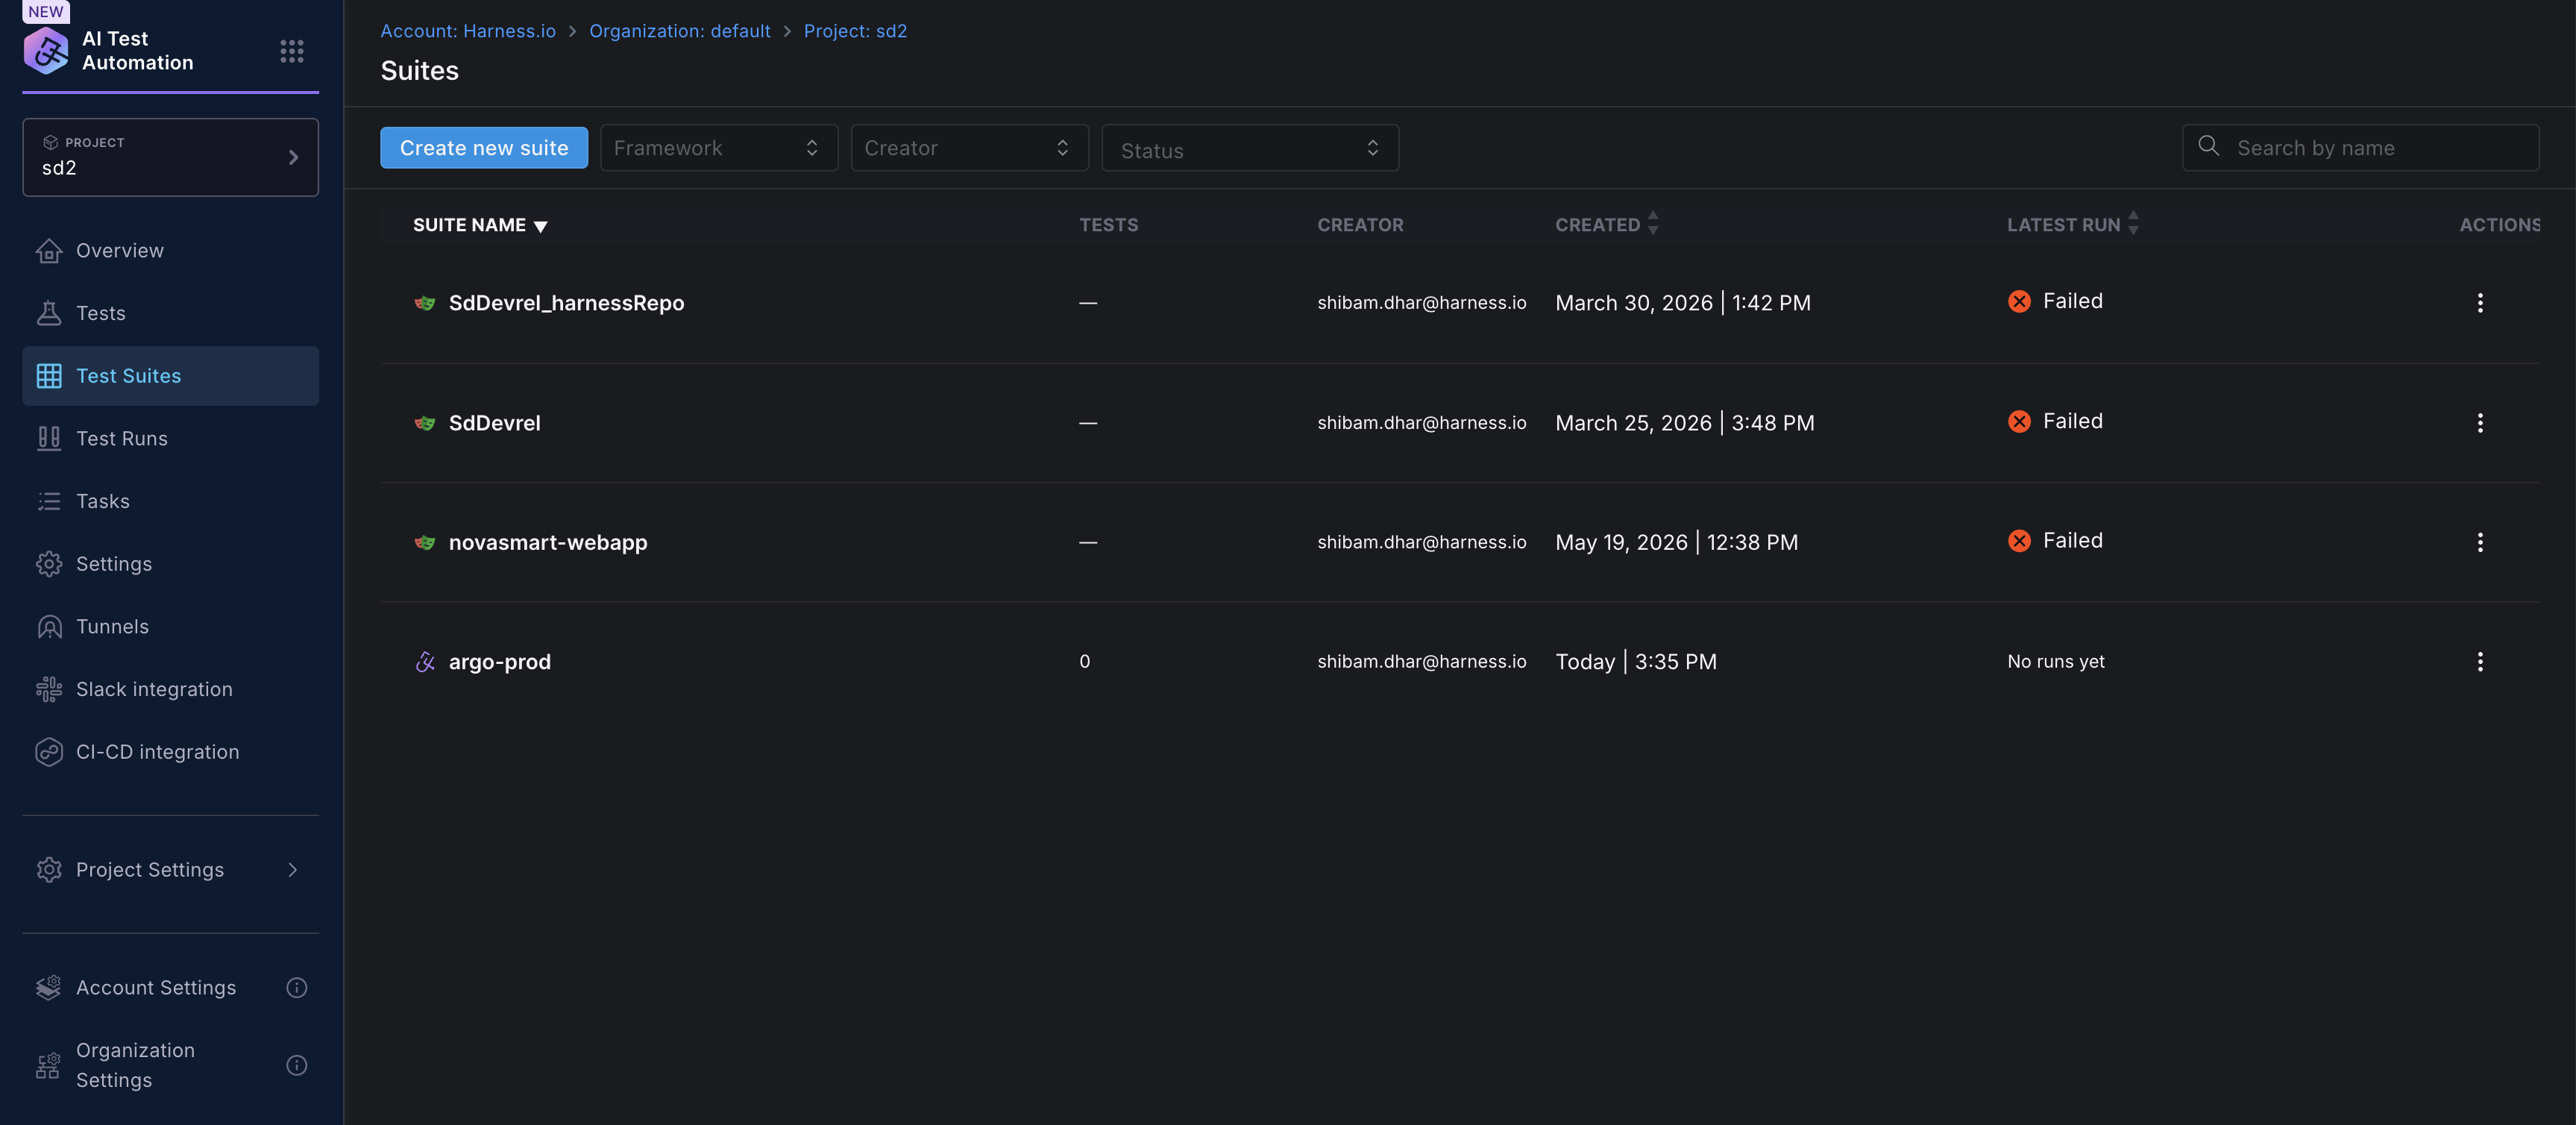
<figure><img src="/files/2bA3AtYKpKp1xZcs4gc4" alt="Test Suites list page showing suite names, creators, and latest run status"><figcaption><p>Test Suites list page</p></figcaption></figure>

Test suites let you group multiple tests together and run them as a single batch. This is particularly useful for:

* **CI/CD integration**: Automate test execution from [Harness CI and CD pipelines](/ai-test-automation/integrations/integrations/harness-cd.md) using a **custom stage** and the **AI Test Automation** step
* **Regression testing**: Run comprehensive test sets to validate application changes
* **Organized testing**: Group related tests by feature, module, or test type
* **Parallel execution**: Run multiple tests simultaneously to reduce overall execution time

***

### Creating a Test Suite <a href="#creating-a-test-suite" id="creating-a-test-suite"></a>

You can create a new test suite primarily using two methods:

**Method 1: From the Tests Page**

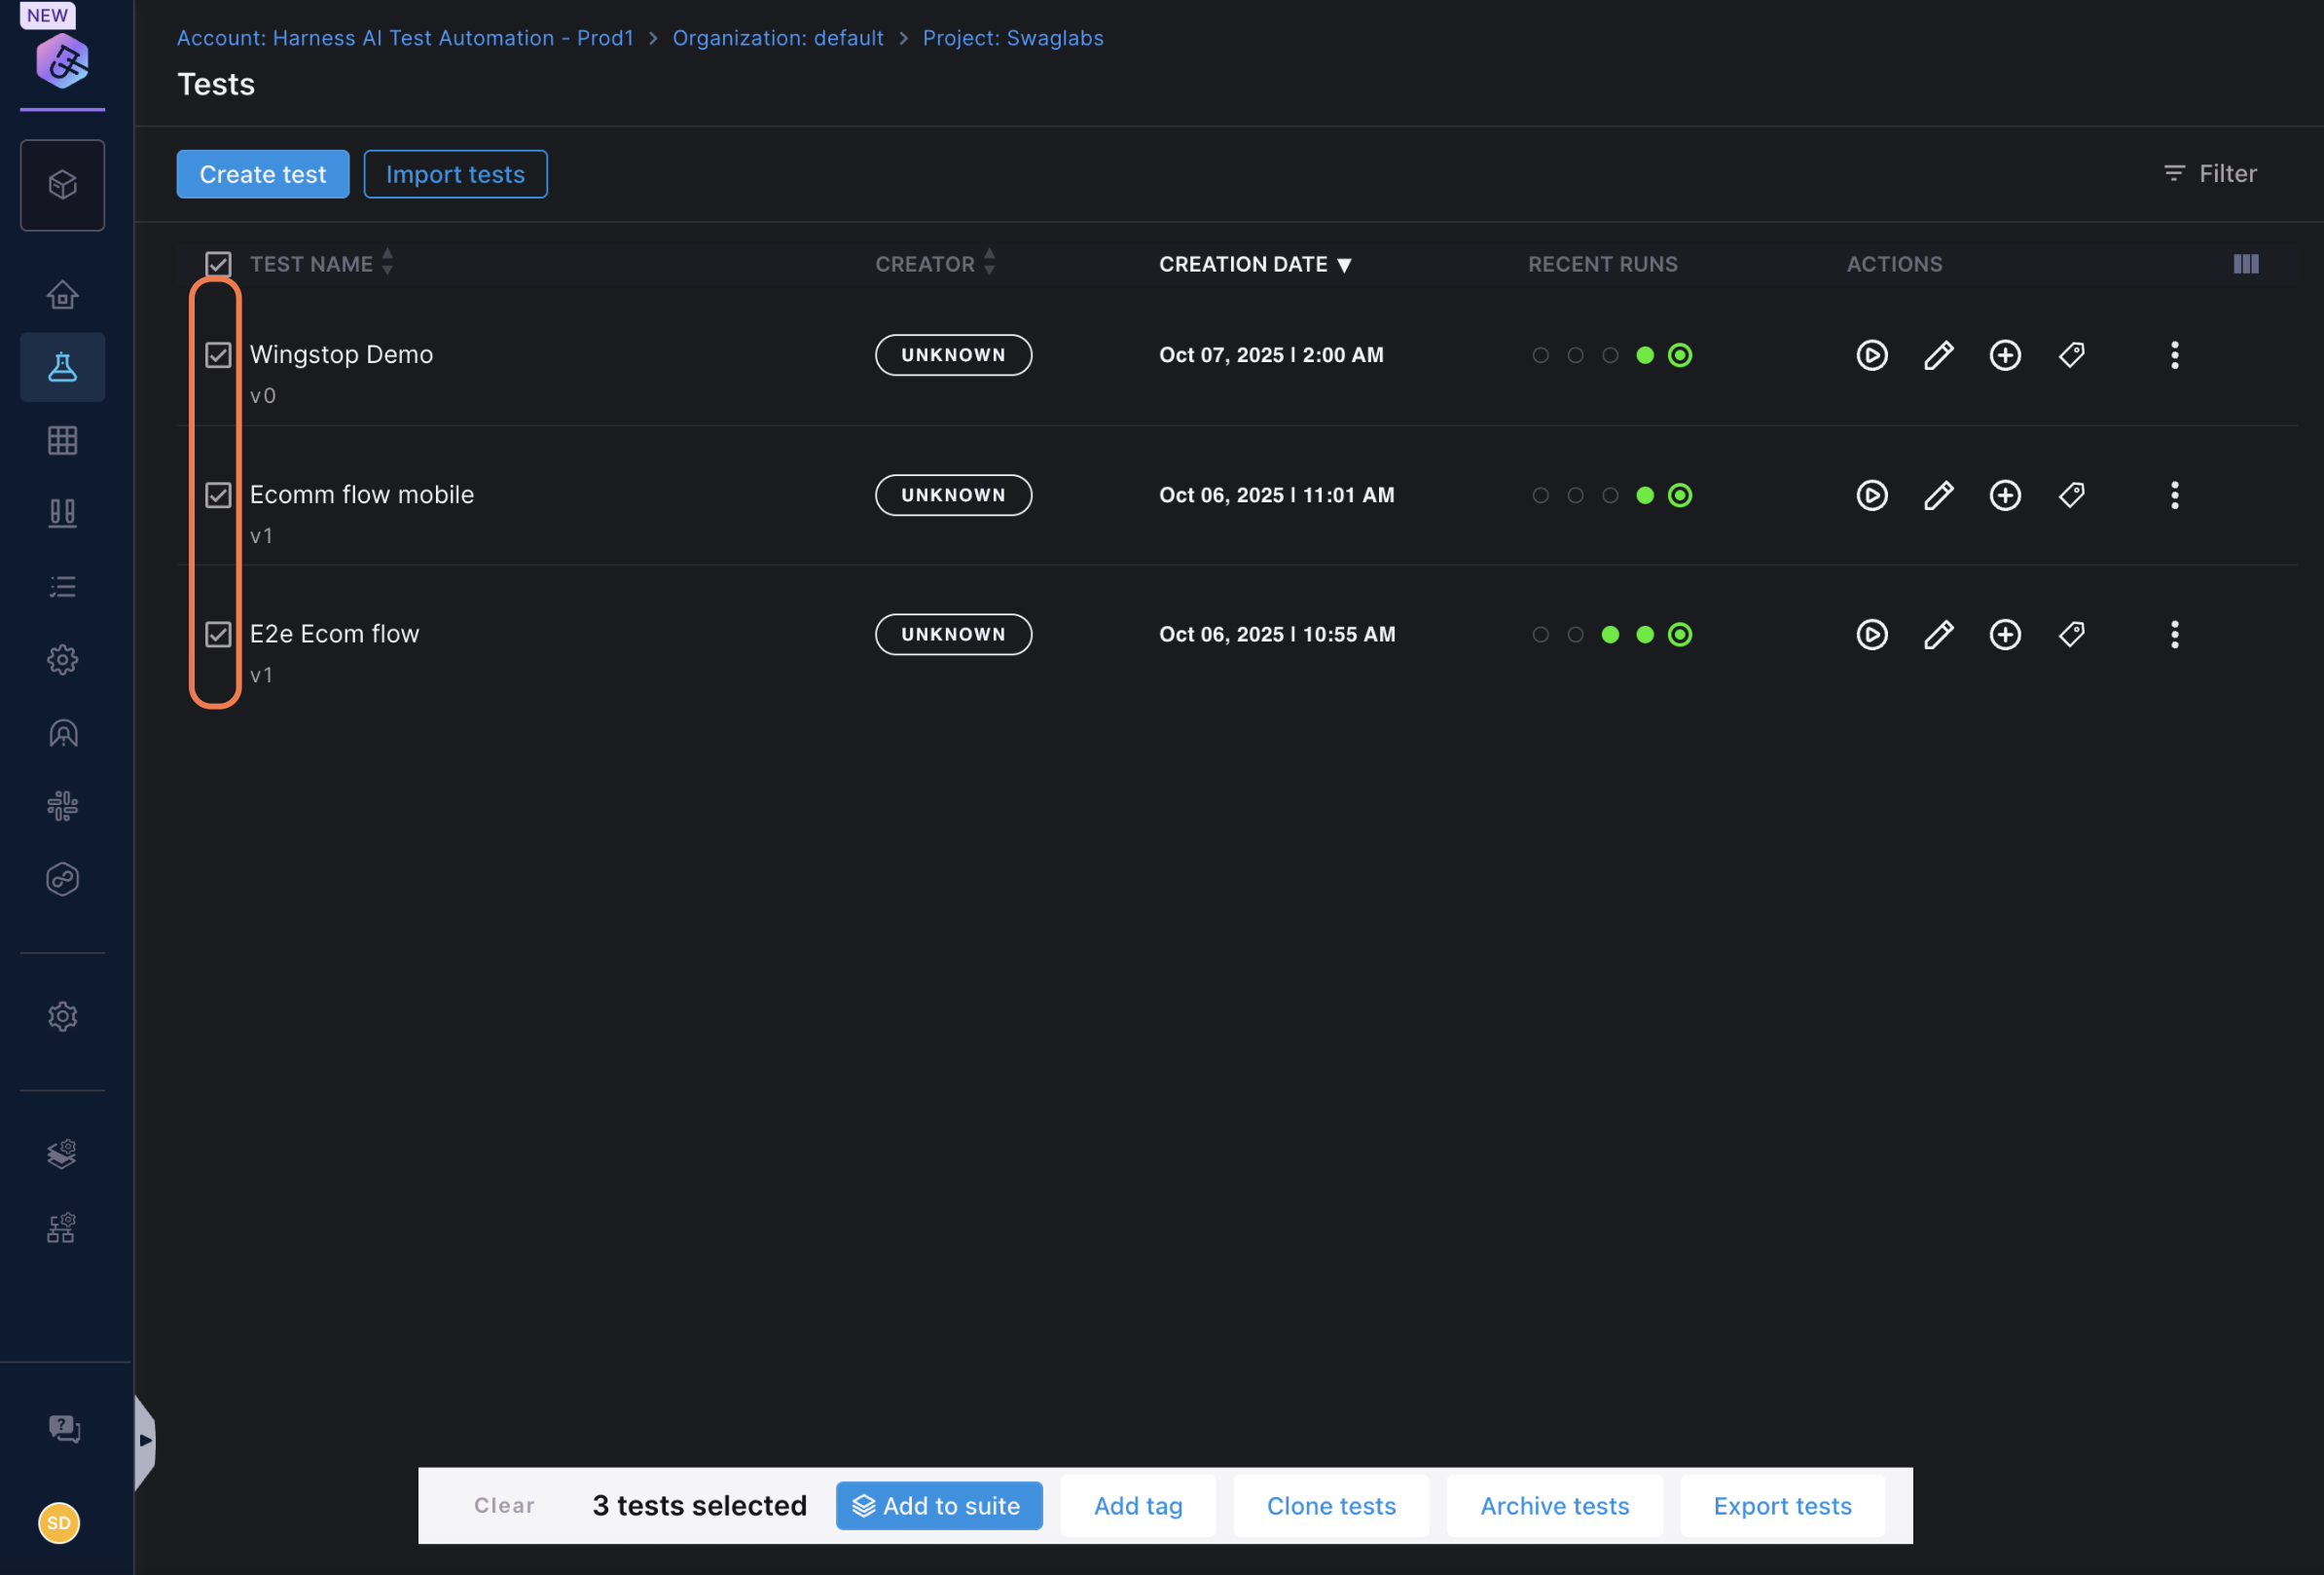
This is the most common way to create a test suite when you already know which tests you want to group together:

1. Navigate to the **Tests** tab in your project
2. Select one or more tests using the checkboxes
3. Click **Add to Suite** at the bottom of the page
4. In the dialog that appears:
   * **Create a new suite**: Enter a name for your new test suite
   * **Add to existing suite**: Select an existing suite from the dropdown
5. Click **Create** or **Add** to confirm

<figure><img src="/files/Nnn9HPfTf8DN7xVMy9Hm" alt="Test Suite Creation"><figcaption><p>Click to view full size image</p></figcaption></figure>

**Method 2: Direct Creation**

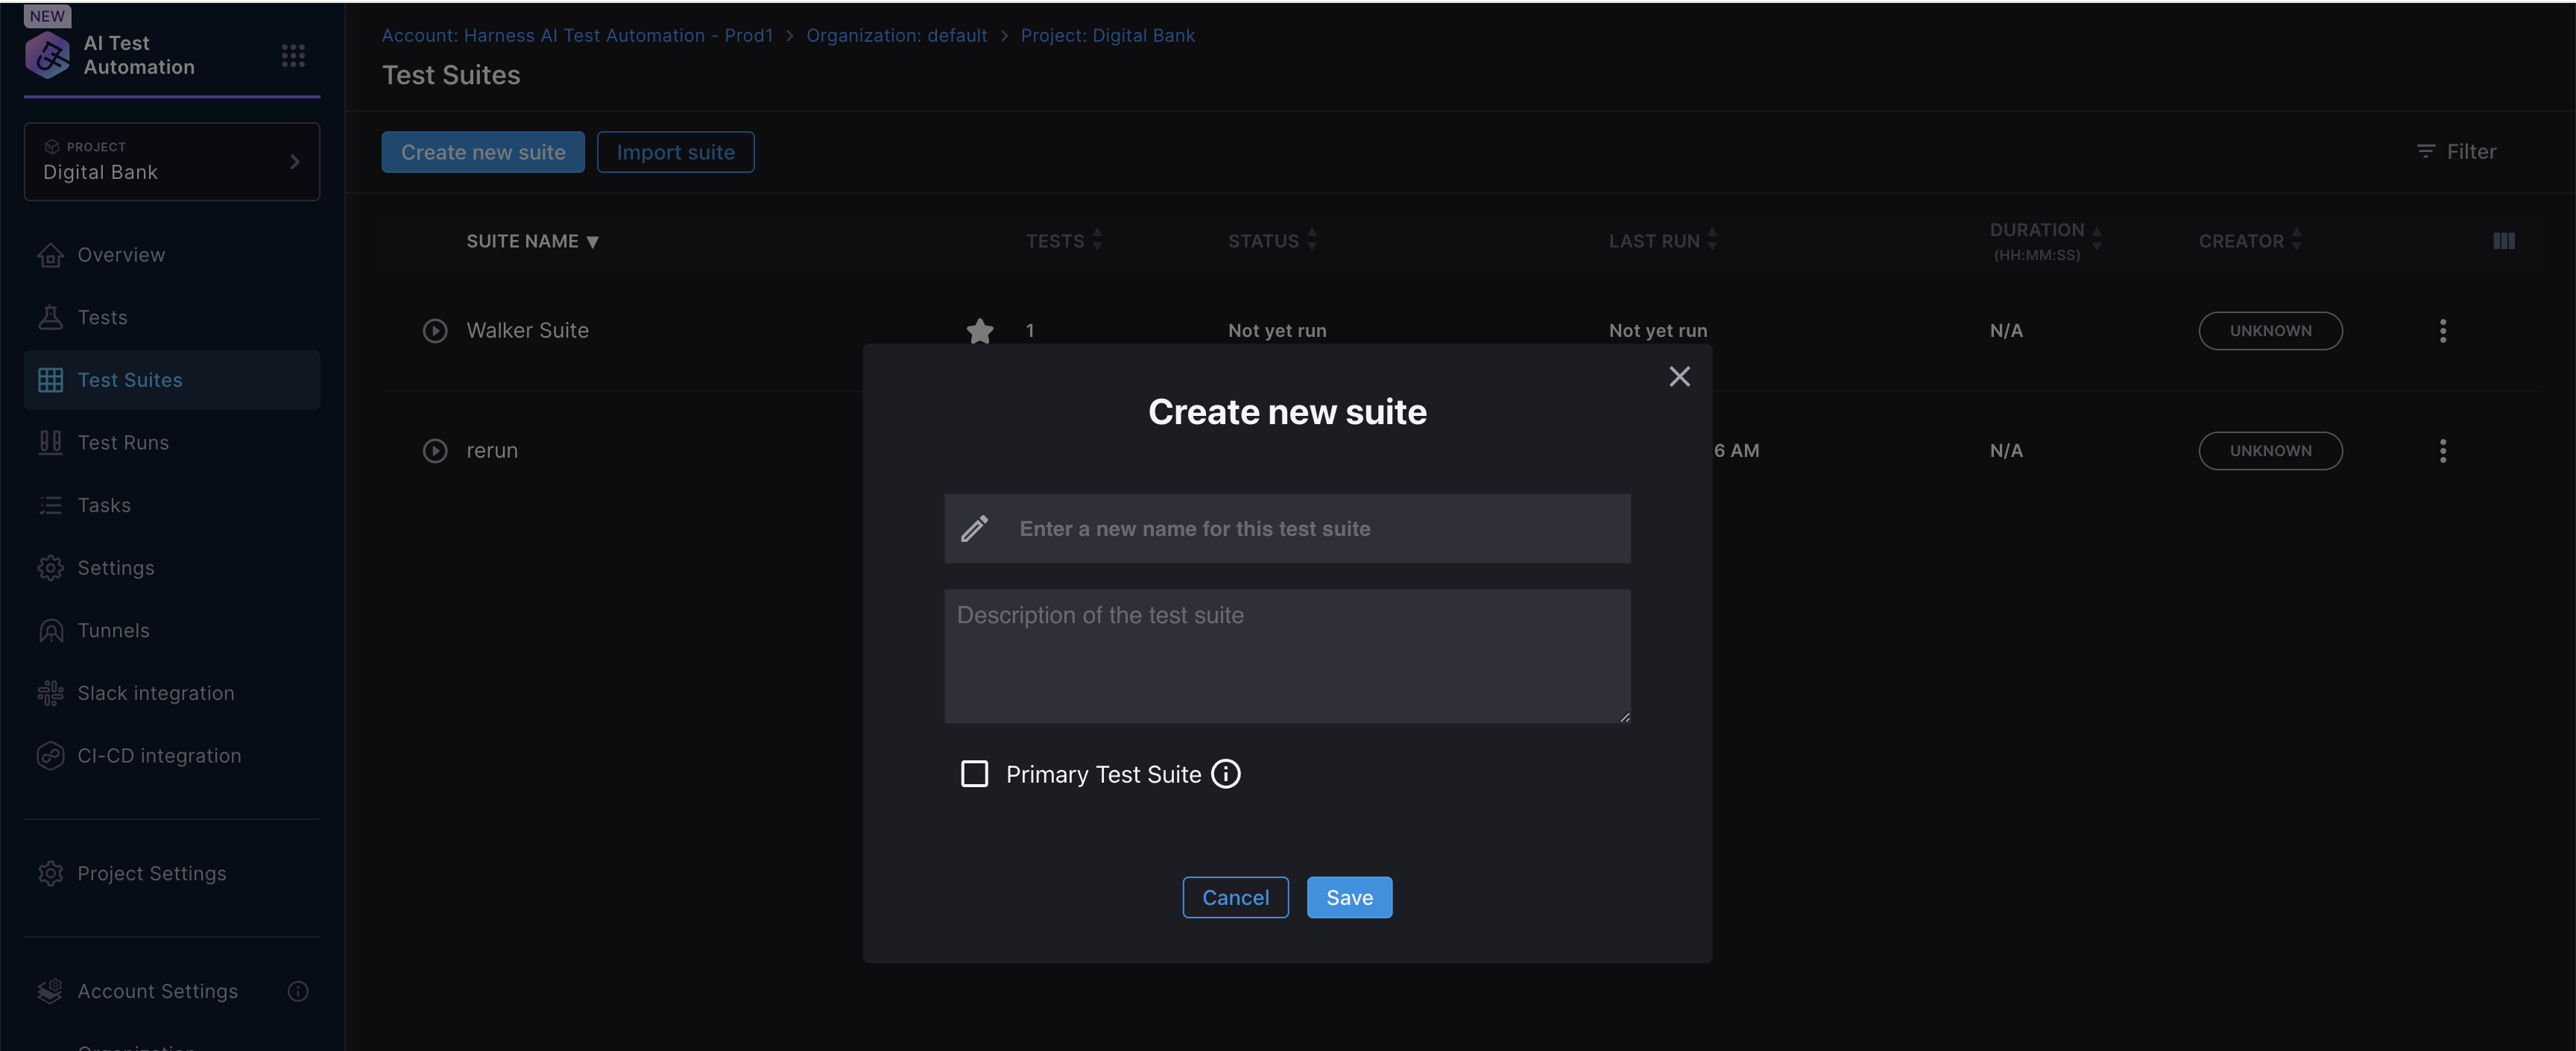
Alternatively, you can create an empty test suite first and add tests later:

1. Navigate to the **Test Suites** tab from the left navigation
2. Click **Create new suite** button
3. Provide the following details:
   * **Suite name**: A descriptive name for your test suite
   * **Description** (optional): Additional context about the suite's purpose
4. Click **Create**
5. Once created, you can add tests by clicking **Add tests** within the suite

<figure><img src="/files/c47AYHJvSQ3c1miqODKS" alt="Create Test Suite"><figcaption><p>Click to view full size image</p></figcaption></figure>

***

### Managing Test Suite Configuration <a href="#managing-test-suite-configuration" id="managing-test-suite-configuration"></a>

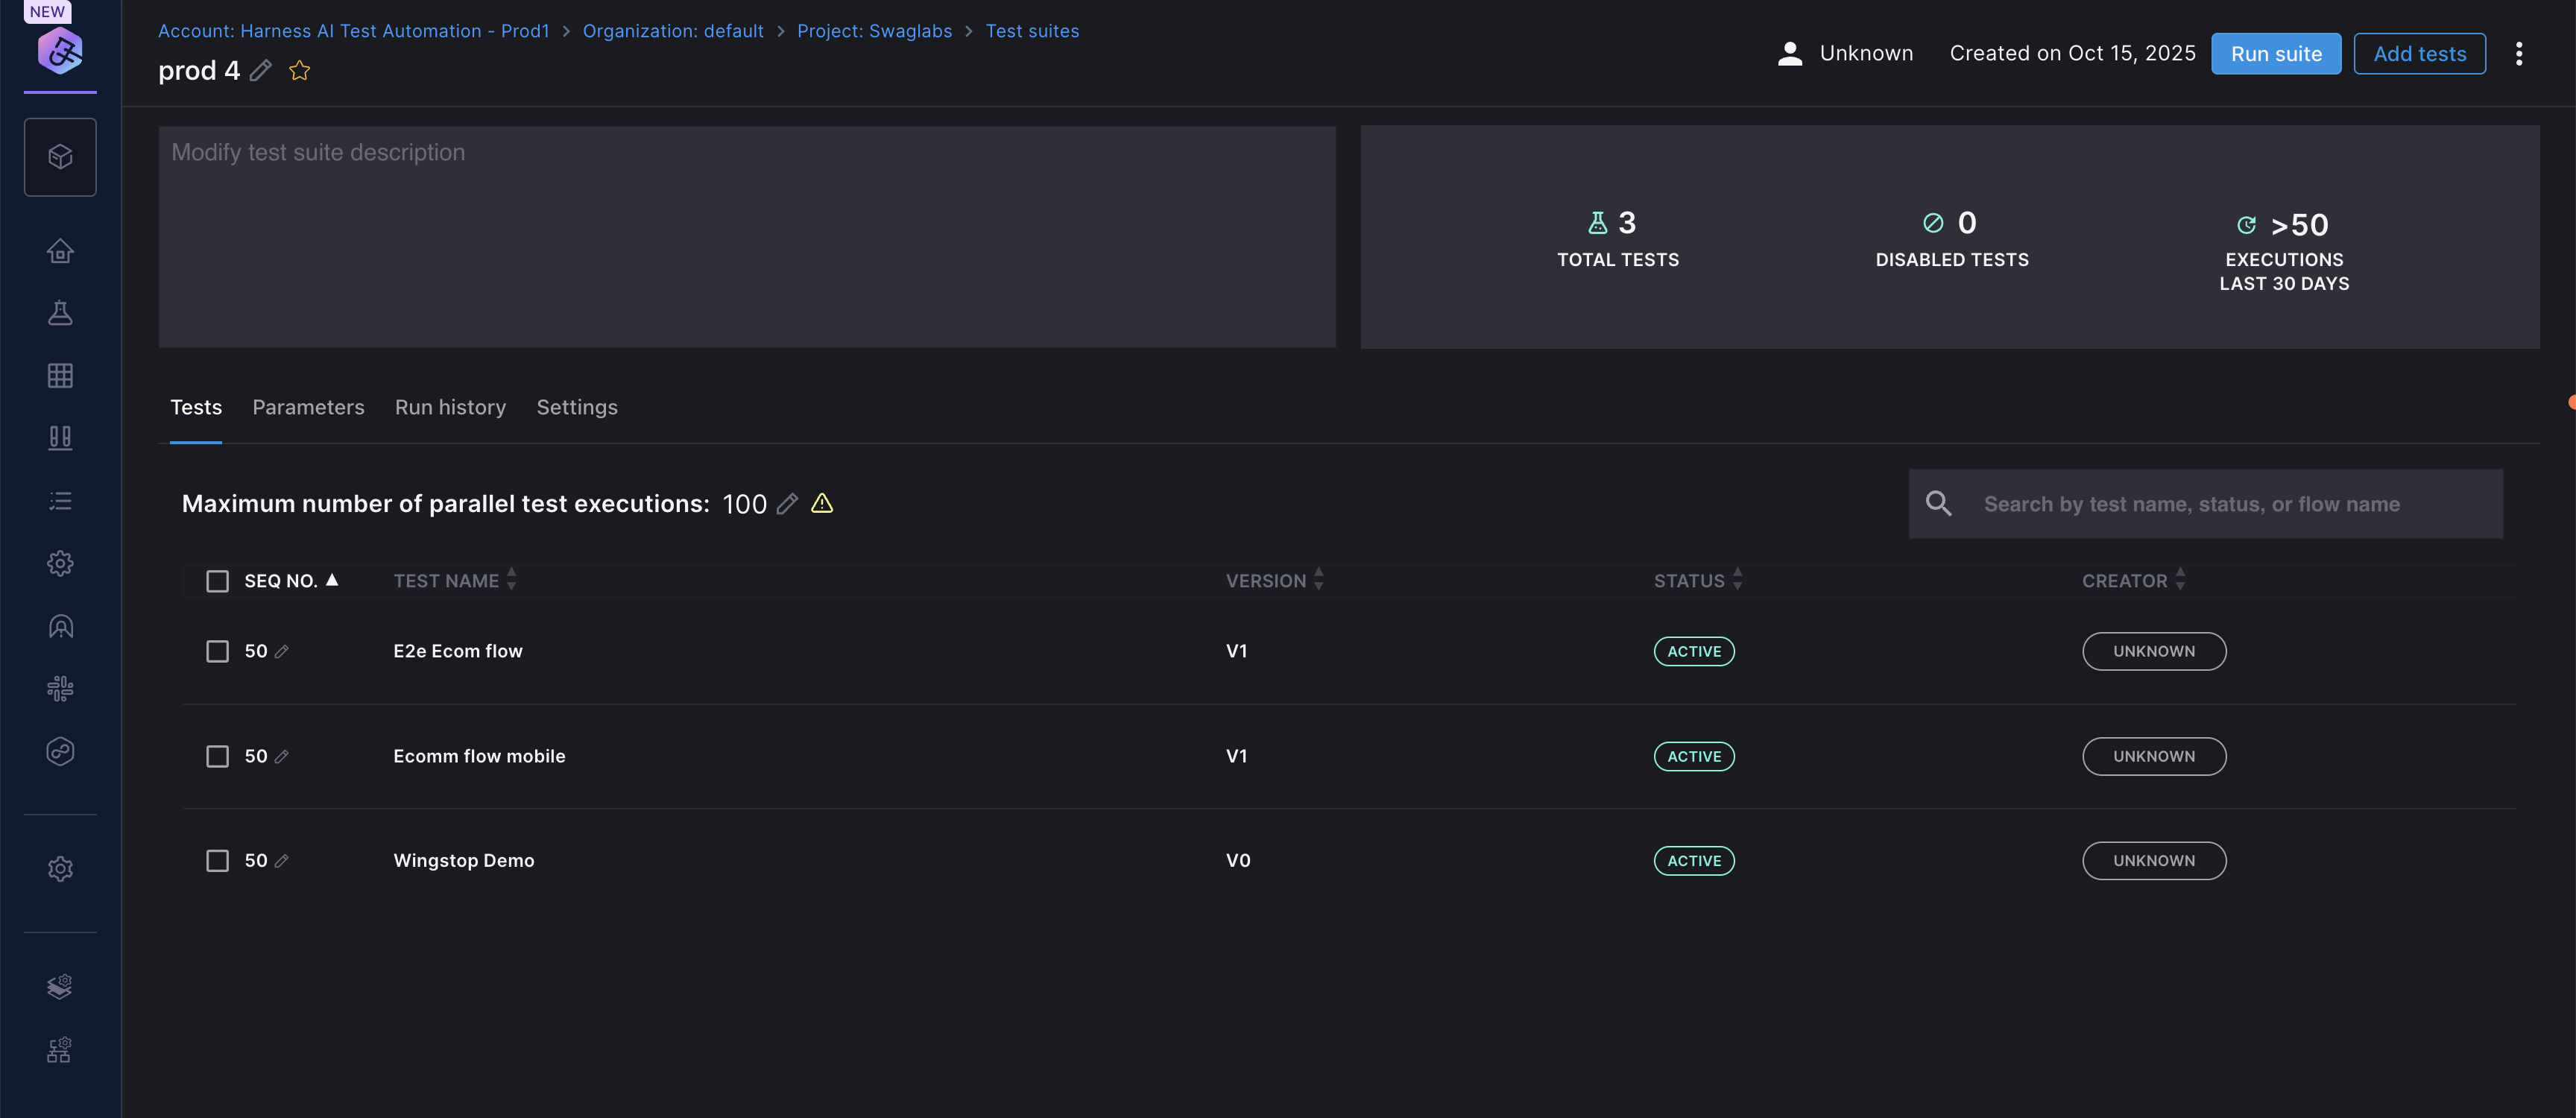
<figure><img src="/files/XPF9ojcSRsd1mjpp8Wxo" alt="Test Suite"><figcaption><p>Click to view full size image</p></figcaption></figure>

#### Tests Tab <a href="#tests-tab" id="tests-tab"></a>

View and manage all tests included in the suite:

* **Add tests**: Click **Add tests** to include additional tests
* **Remove tests**: Select tests and remove them from the suite
* **Reorder tests**: Change test execution sequence
* **View test details**: Click on any test to see its configuration

**Sequencing and Parallel Execution**

**Understanding Sequence Numbers**

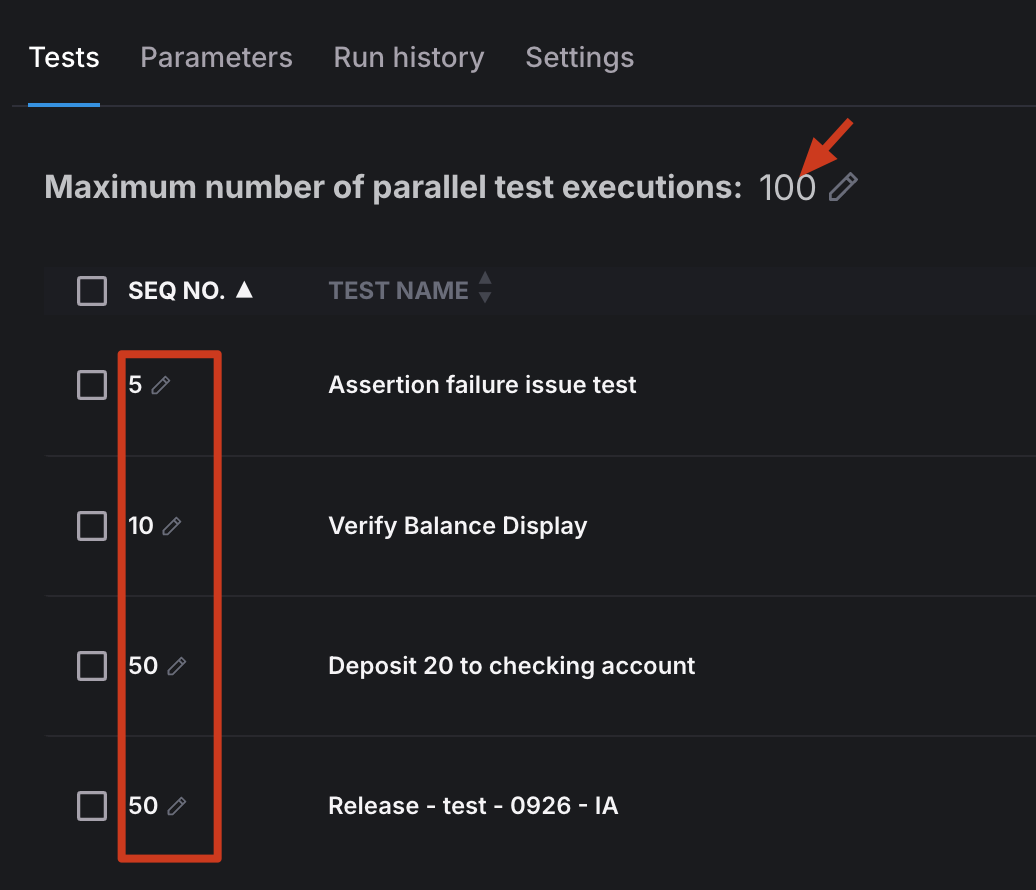
By default, all tests in a suite have a sequence number of **50**, meaning they can run in any order (parallel execution).

To control execution order:

1. Go to the **Tests** tab in your suite
2. Click the pencil icon next to **SEQ NO**
3. Assign sequence numbers:
   * **Lower numbers run first** (e.g., 10 runs before 20)
   * **Same numbers run in parallel** (e.g., all tests with 50 run together)
   * **Higher numbers run later** (e.g., 100 runs after 50)

**Example sequencing strategy:**

* **Sequence 10**: Setup/prerequisite tests
* **Sequence 50**: Main functional tests (run in parallel)
* **Sequence 100**: Cleanup/teardown tests

{% hint style="info" %}
**NEGATIVE SEQUENCE NUMBERS**

Tests can have a negative sequence number (e.g., **-10**). The negative sign indicates that if the test fails, the test suite will abort. This is typically used for setup tests where subsequent tests cannot proceed if the setup fails.
{% endhint %}

**Maximum Parallel Executions**

Control how many tests run simultaneously:

1. In the suite details page, find **Maximum number of parallel test executions**
2. Click the edit icon
3. Set your desired value (default is **100**)
4. Lower values reduce resource usage but increase total execution time

<figure><img src="/files/z1PmJoiWTa4snsjLJmtt" alt="Test Suite Sequencing"><figcaption><p>Click to view full size image</p></figcaption></figure>

#### Parameters Tab <a href="#parameters-tab" id="parameters-tab"></a>

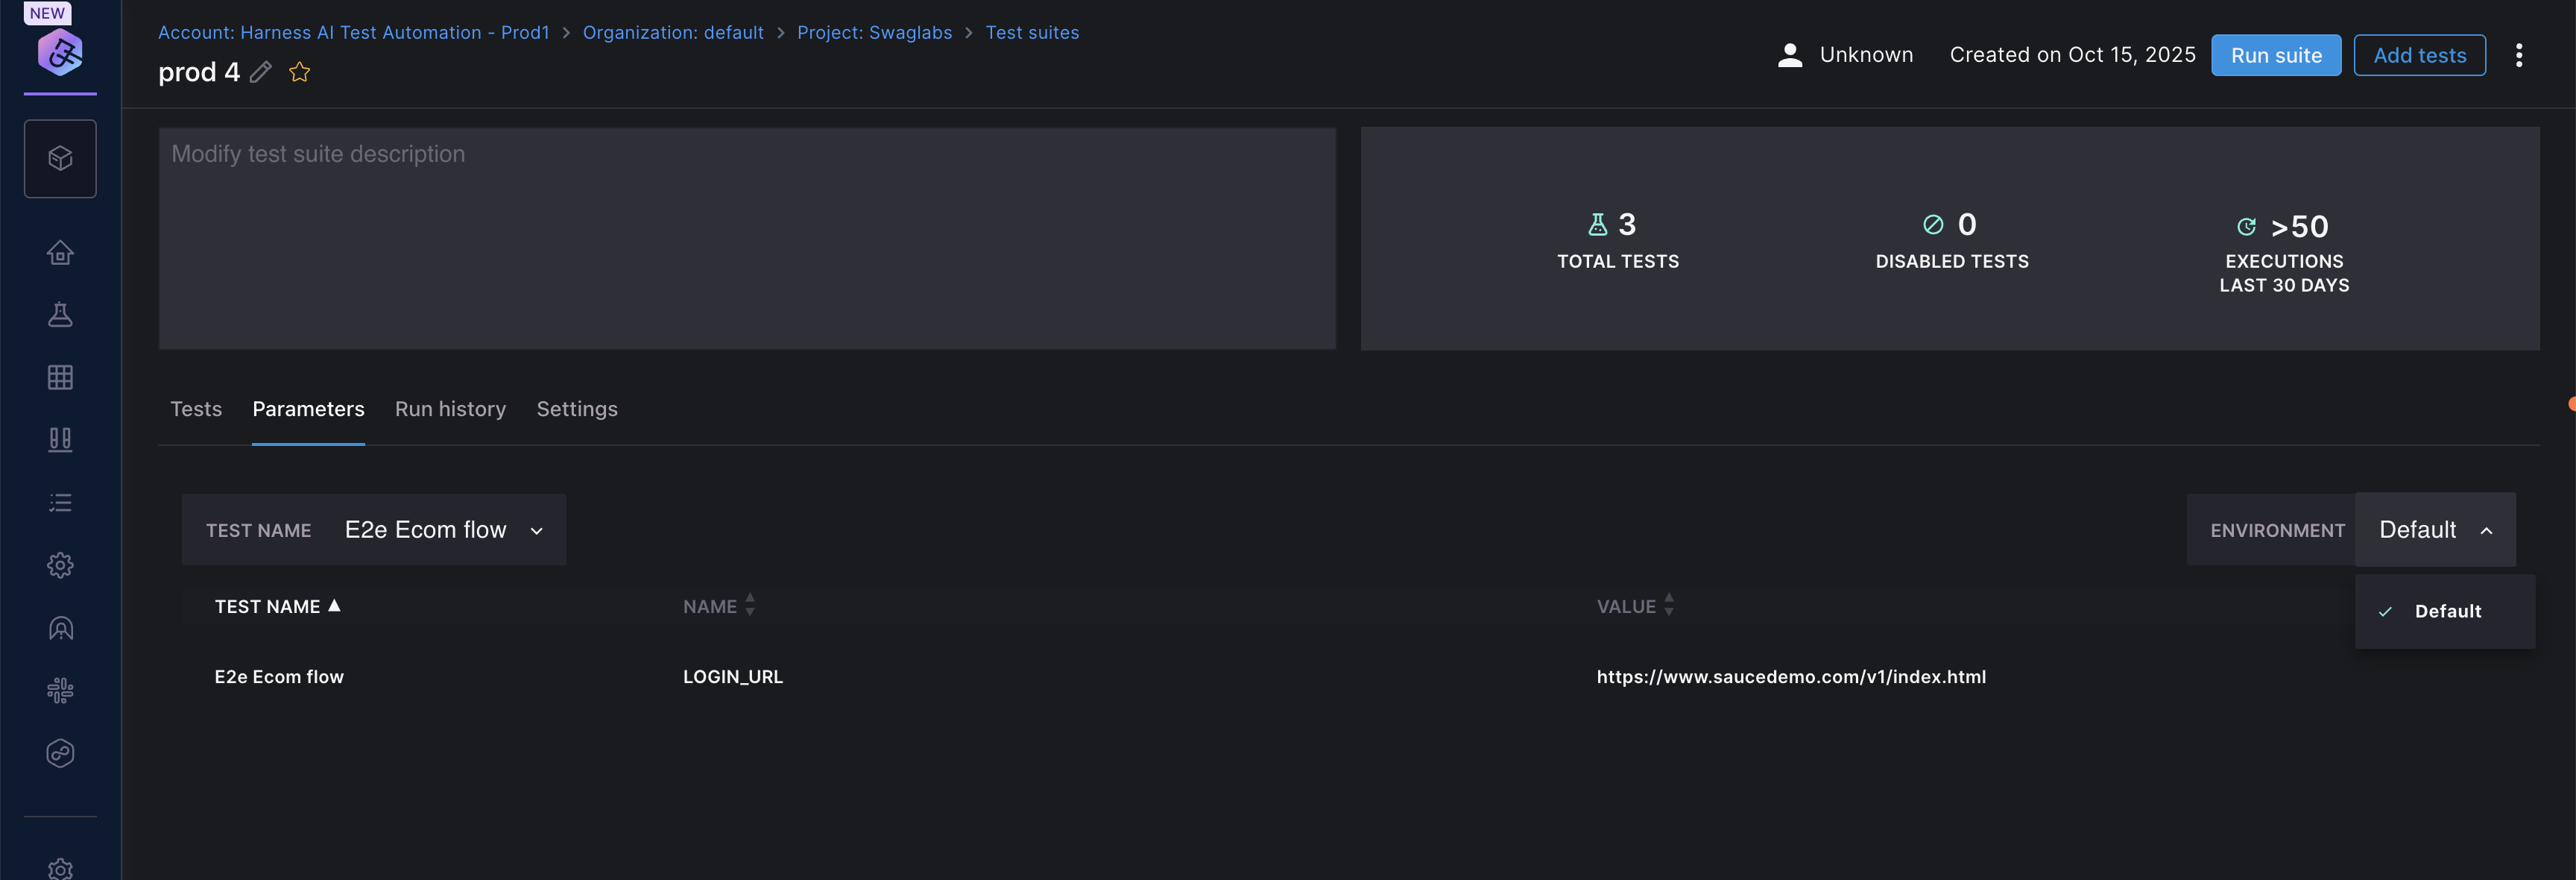
The **Parameters** tab provides an overview of the test parameters defined for each environment. You can use it to inspect the key-value pairs associated with a specific test and switch between environments to see how the configuration varies.

Selecting an environment updates the displayed parameter values accordingly. This helps users verify environment-specific configurations without editing them.

**Example**

| **Field**       | **Description**                                                  |
| --------------- | ---------------------------------------------------------------- |
| **Test Name**   | Displays the selected test for which parameters are being viewed |
| **Name**        | Parameter key or variable name                                   |
| **Value**       | Value assigned to the parameter key                              |
| **Environment** | Environment selector to switch parameter views                   |

<figure><img src="/files/mdNTS6hn5yT1ZQ02wCKz" alt="Parameters Tab"><figcaption><p>Click to view full size image</p></figcaption></figure>

#### Run History Tab <a href="#run-history-tab" id="run-history-tab"></a>

Track all past executions of your test suite:

* View execution timestamp
* Check status (Completed, Failed, Running)
* Review duration and test results
* Click on any run to see detailed results

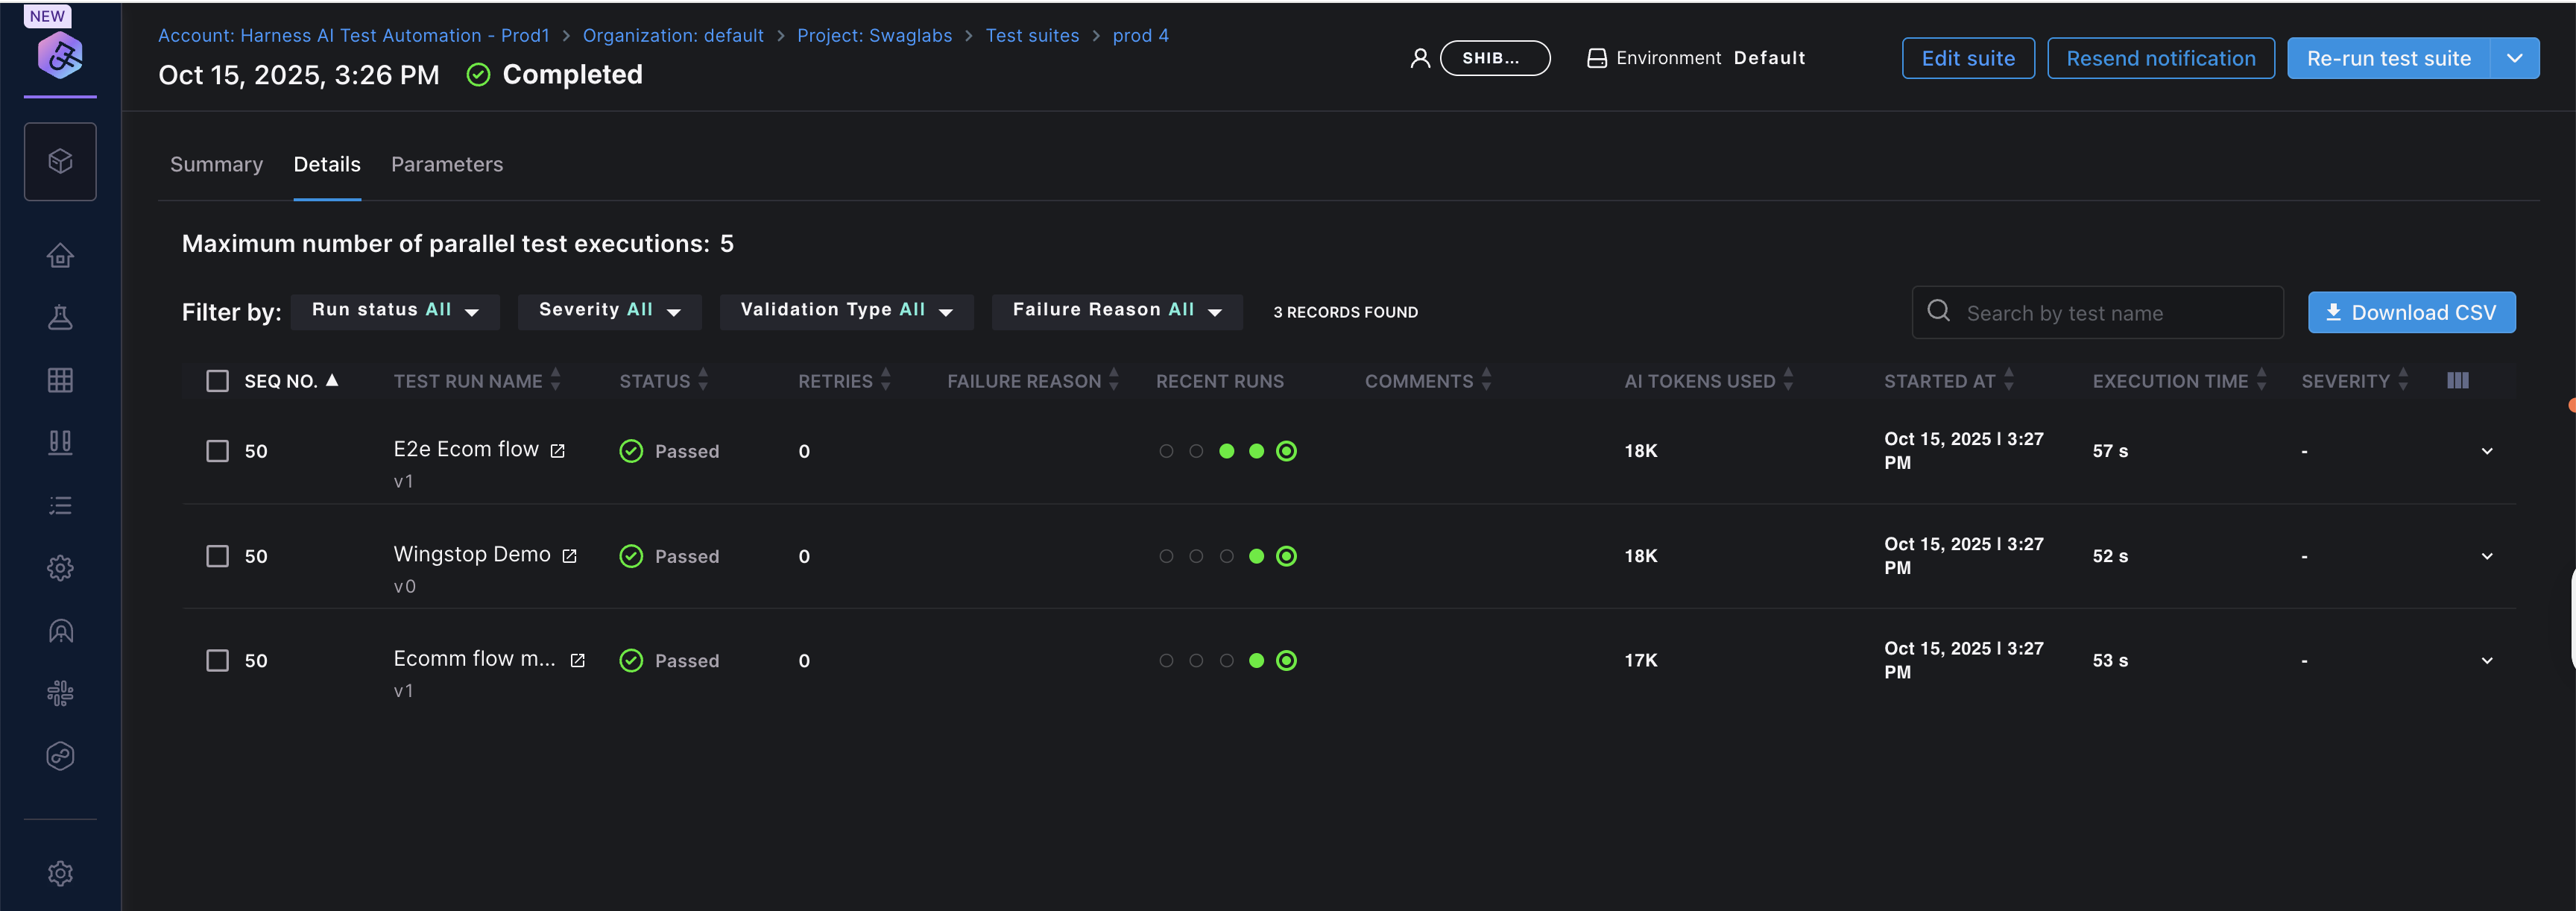
**Re-run Test Suite and Tests**

You can re-run test suites or individual tests:

**Quick Access Method:**

1. From the **Test Suites** list page, locate your test suite
2. Click on the **Last Run** column for that test suite
3. This takes you directly to the details page where you can:
   * **Re-run test suite**: Re-execute the entire test suite
   * **Run failed tests**: Quickly re-run only the tests that failed
   * **Select individual tests**: Choose specific tests to re-run by selecting them from the list

> **From Run History Tab:**
>
> > 1. Navigate to the **Run History** tab within a test suite
> > 2. Click on a test run to open its details page
> > 3. In the **Details** tab, you have the same re-run options as above

This allows you to efficiently debug and validate fixes without running the entire suite every time.

<figure><img src="/files/j2tOkohFfXXVT7ij5EIb" alt="ReRun Test Suite"><figcaption><p>Click to view full size image</p></figcaption></figure>

#### Settings Tab <a href="#settings-tab" id="settings-tab"></a>

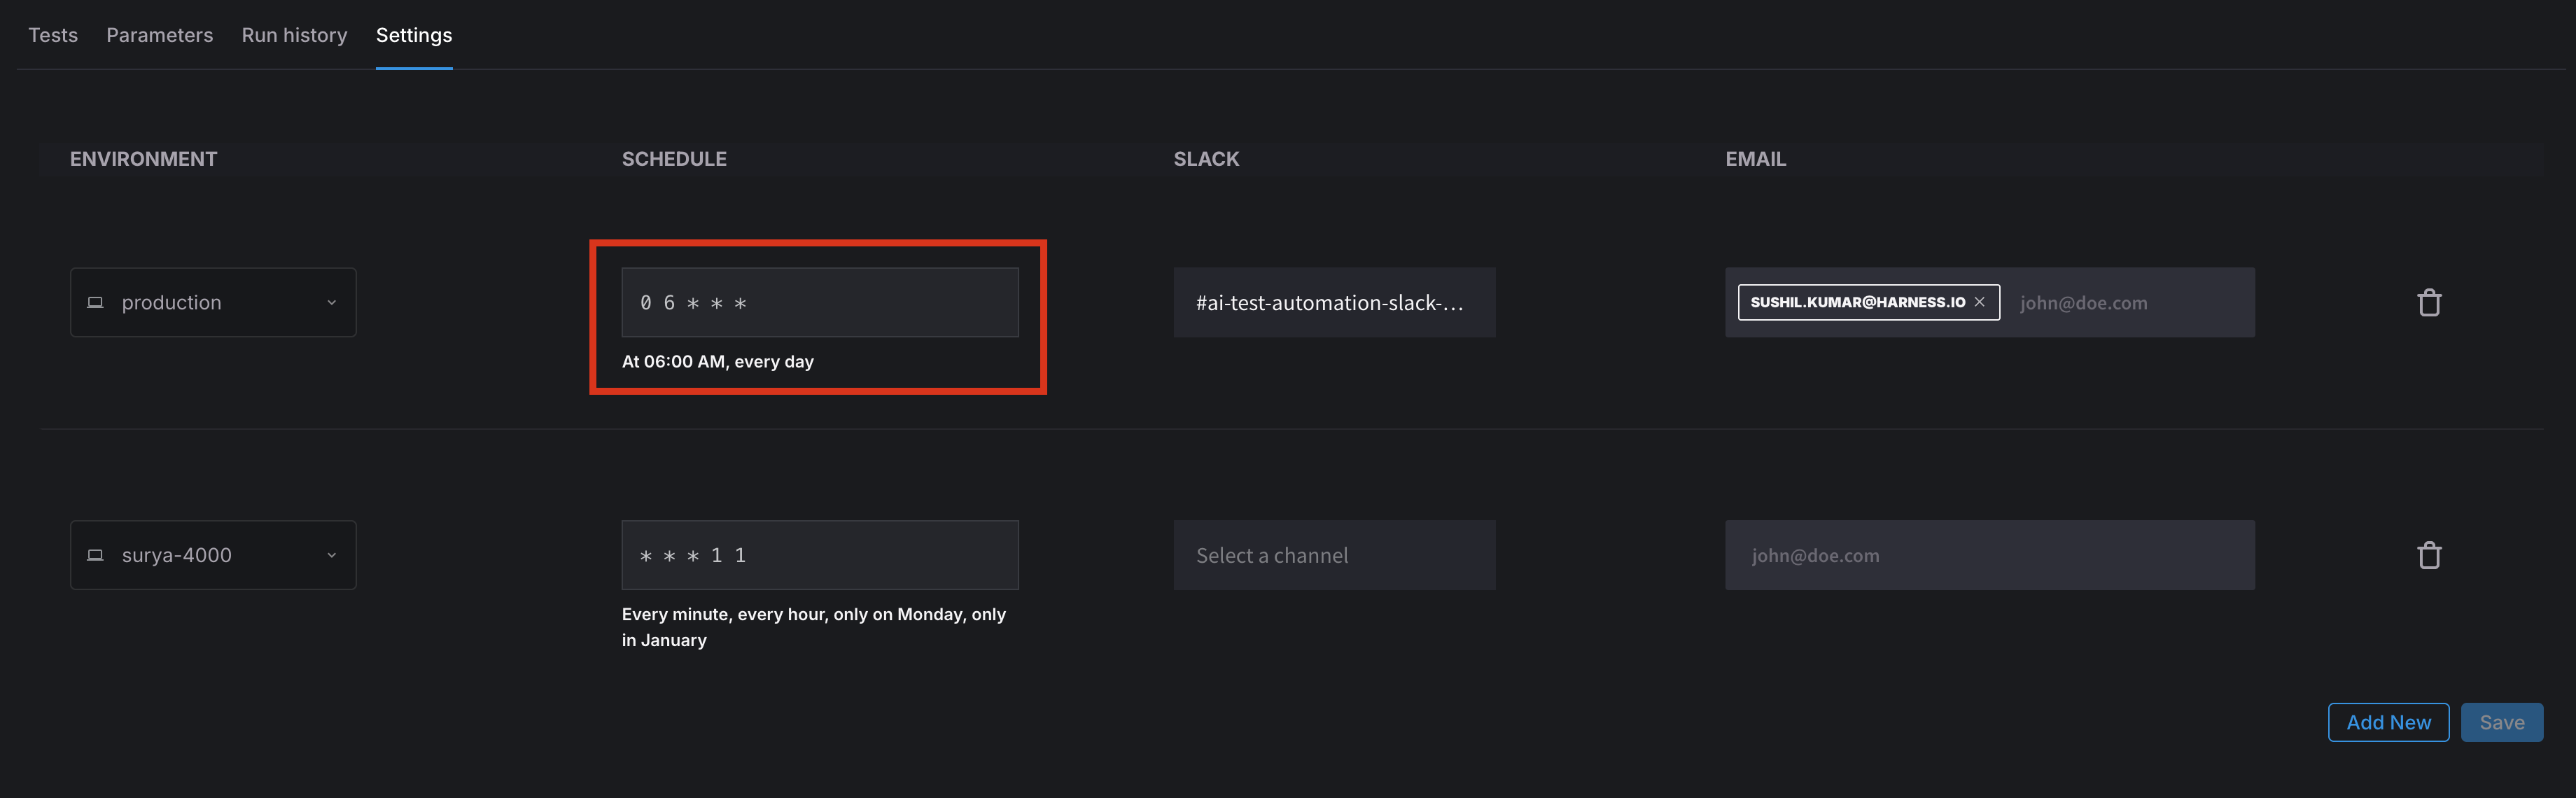
Configure suite-level settings including scheduling and notifications.

**Scheduling and Notifications**

**Scheduling Test Runs**

1. In the **Scheduling** section, enter a cron expression
2. Save your configuration

**Example cron expressions:**

* `0 4 * * *` - Run daily at 4:00 AM UTC
* `0 0 * * 1` - Run every Monday at midnight UTC
* `0 */6 * * *` - Run every 6 hours

Use [crontab.guru](https://crontab.guru/) to create and validate cron expressions.

**Setting Up Notifications**

Get notified when test suite execution completes:

1. In the **Notification** section, configure notification channels:
   * **Slack**: Enter your Slack channel name
   * **Email**: Enter email addresses (comma-separated)
2. Save your configuration

You'll receive notifications after every scheduled or manual execution.

<figure><img src="/files/ujipfB9NQelipMpUzqfY" alt="Test Suite Schedule"><figcaption><p>Click to view full size image</p></figcaption></figure>

***

### Test Execution <a href="#test-execution" id="test-execution"></a>

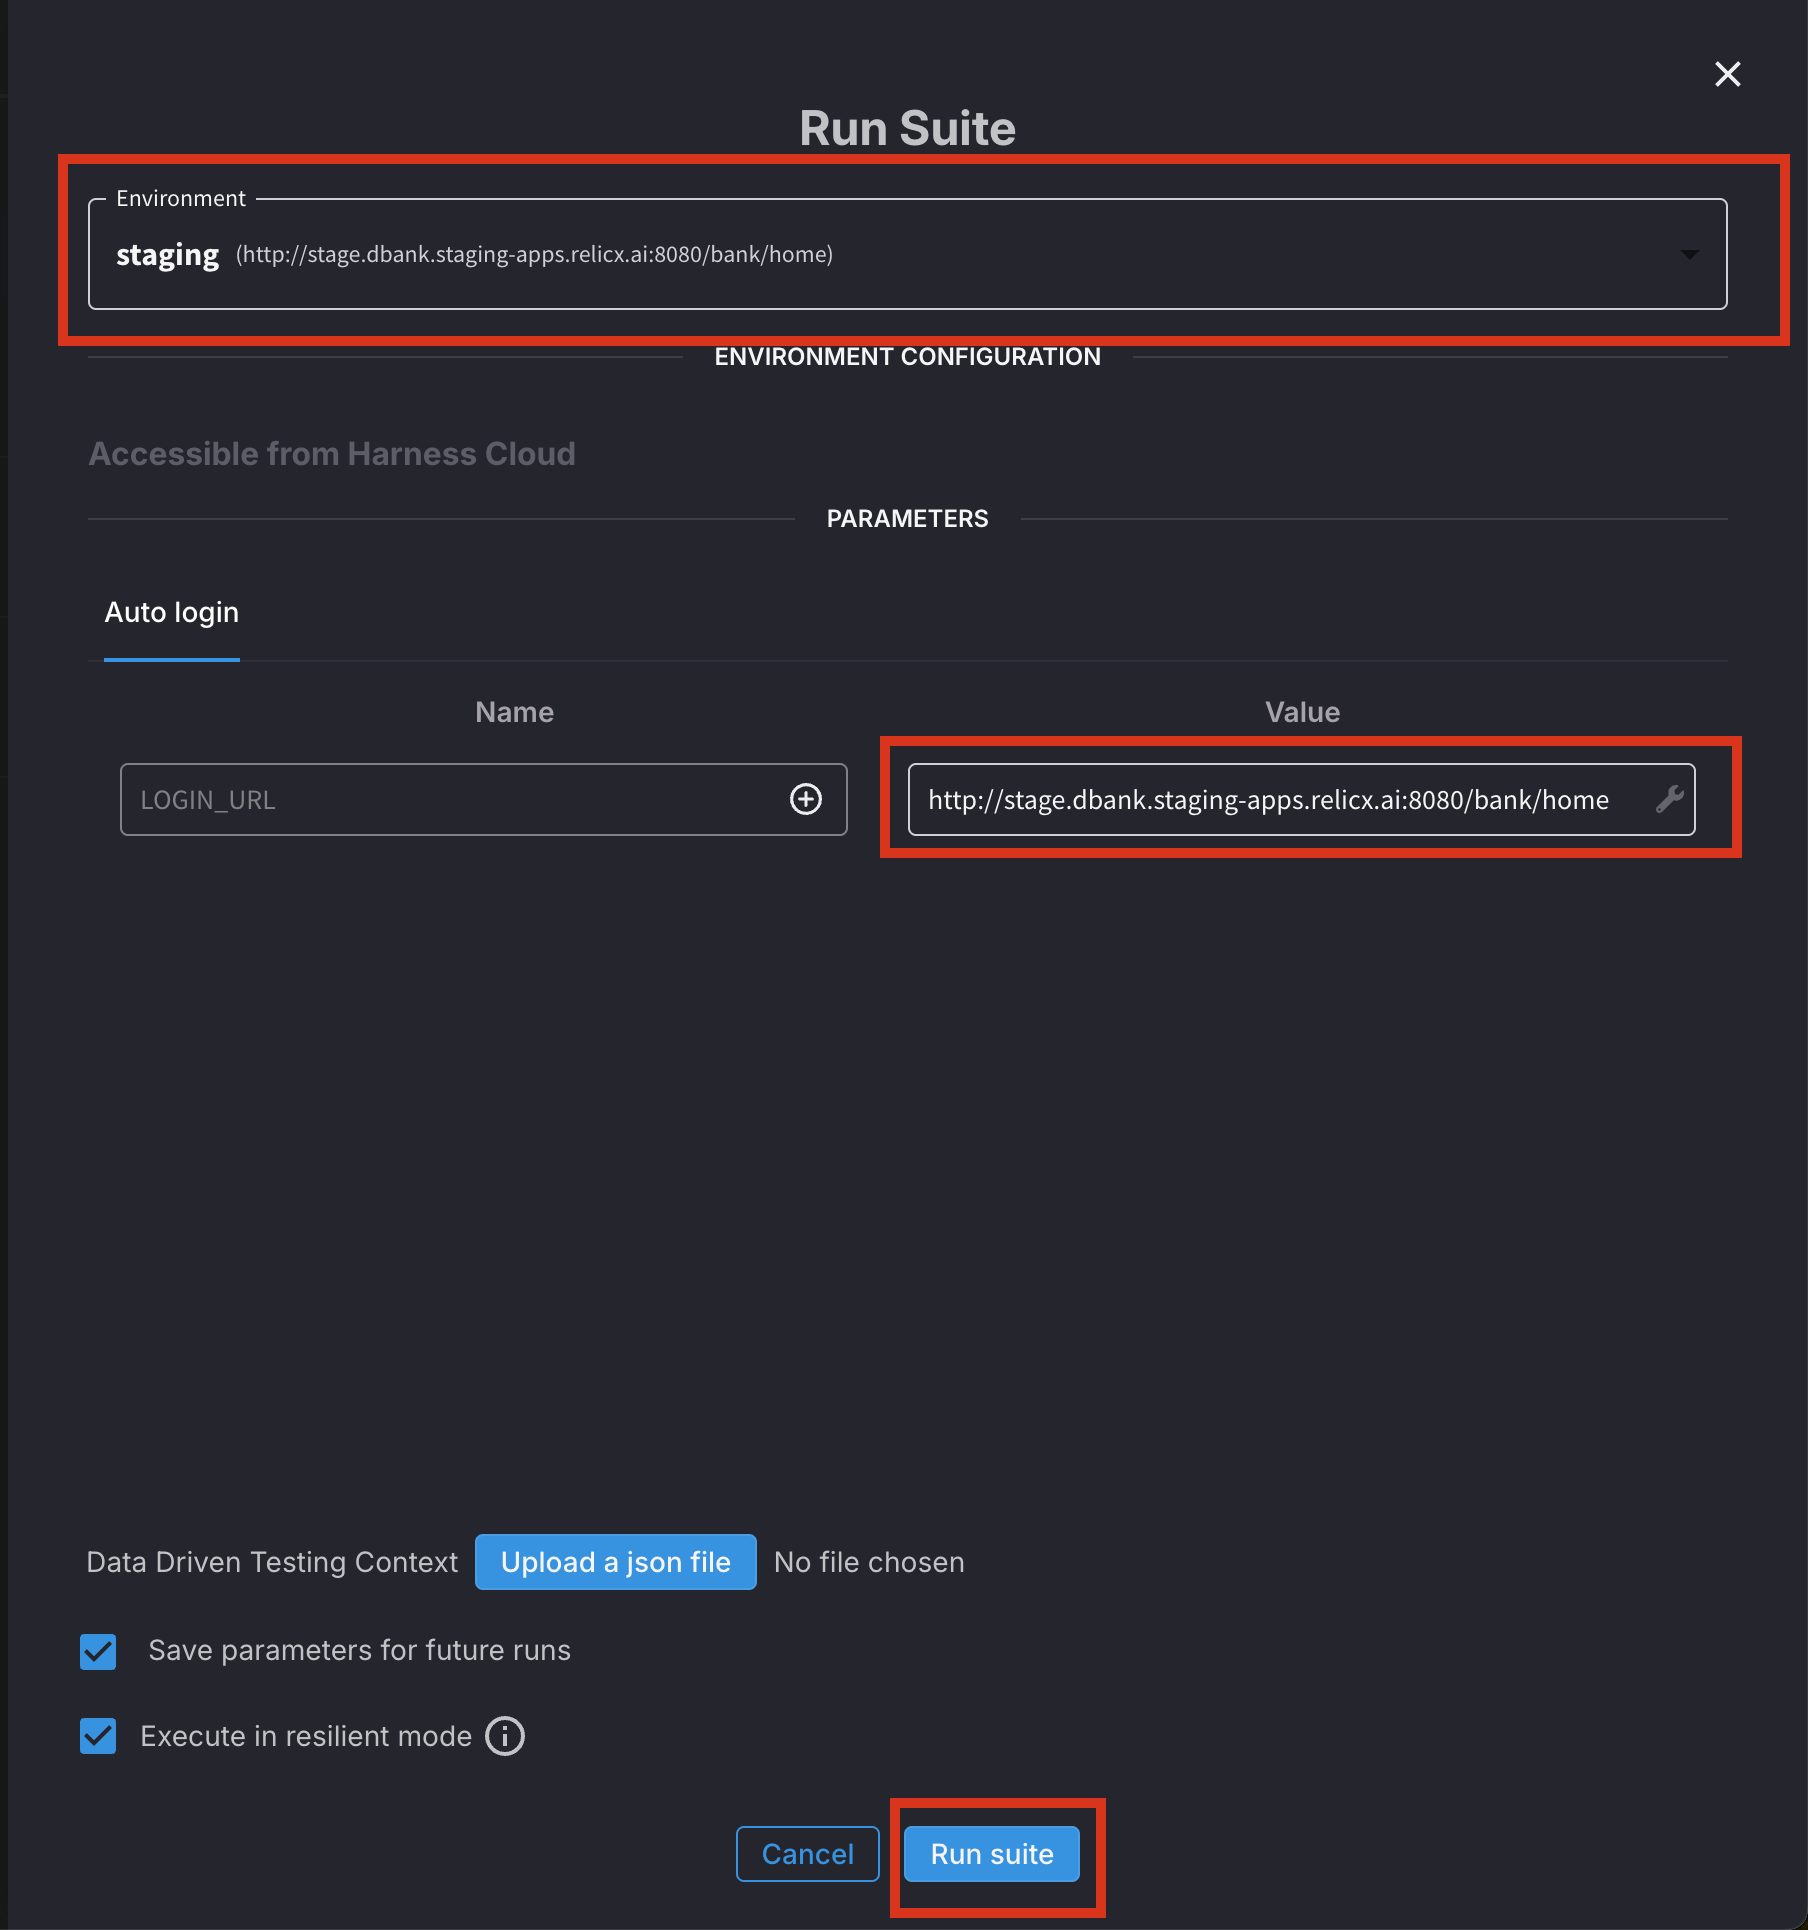
#### Running a Test Suite <a href="#running-a-test-suite" id="running-a-test-suite"></a>

1. Navigate to your Test Suite
2. Click **Run suite** in the top-right corner
3. Select the target environment
4. Review and modify parameters if needed
5. Click **Run** to start execution

Tests in the suite run with default parameters and can be bulk edited before execution.

<figure><img src="/files/CustsHZvqR9nriEDoBXr" alt="Run Test Suite"><figcaption><p>Click to view full size image</p></figcaption></figure>

#### Execution Behavior <a href="#execution-behavior" id="execution-behavior"></a>

* Tests run in parallel by default (up to the configured maximum)
* Tests with the same sequence number run in parallel
* Tests with different sequence numbers run in order
* Failed tests don't block other tests from running

**Video Tutorial**

Watch this overview of Test Suites in Harness AI Test Automation:

{% embed url="<https://www.loom.com/embed/82b37c54cbb24b4db74f926c0f719e7a>" %}