> For the complete documentation index, see [llms.txt](https://developer.harness.io/llms.txt). Markdown versions of documentation pages are available by appending `.md` to page URLs; this page is available as [Markdown](https://developer.harness.io/cloud-cost-management/3.0/troubleshooting-and-resources/self-managed-enterprise-edition/aws-smp.md).
# AWS
The procedure to set up CCM for AWS by using Harness Self-Managed Enterprise Edition.
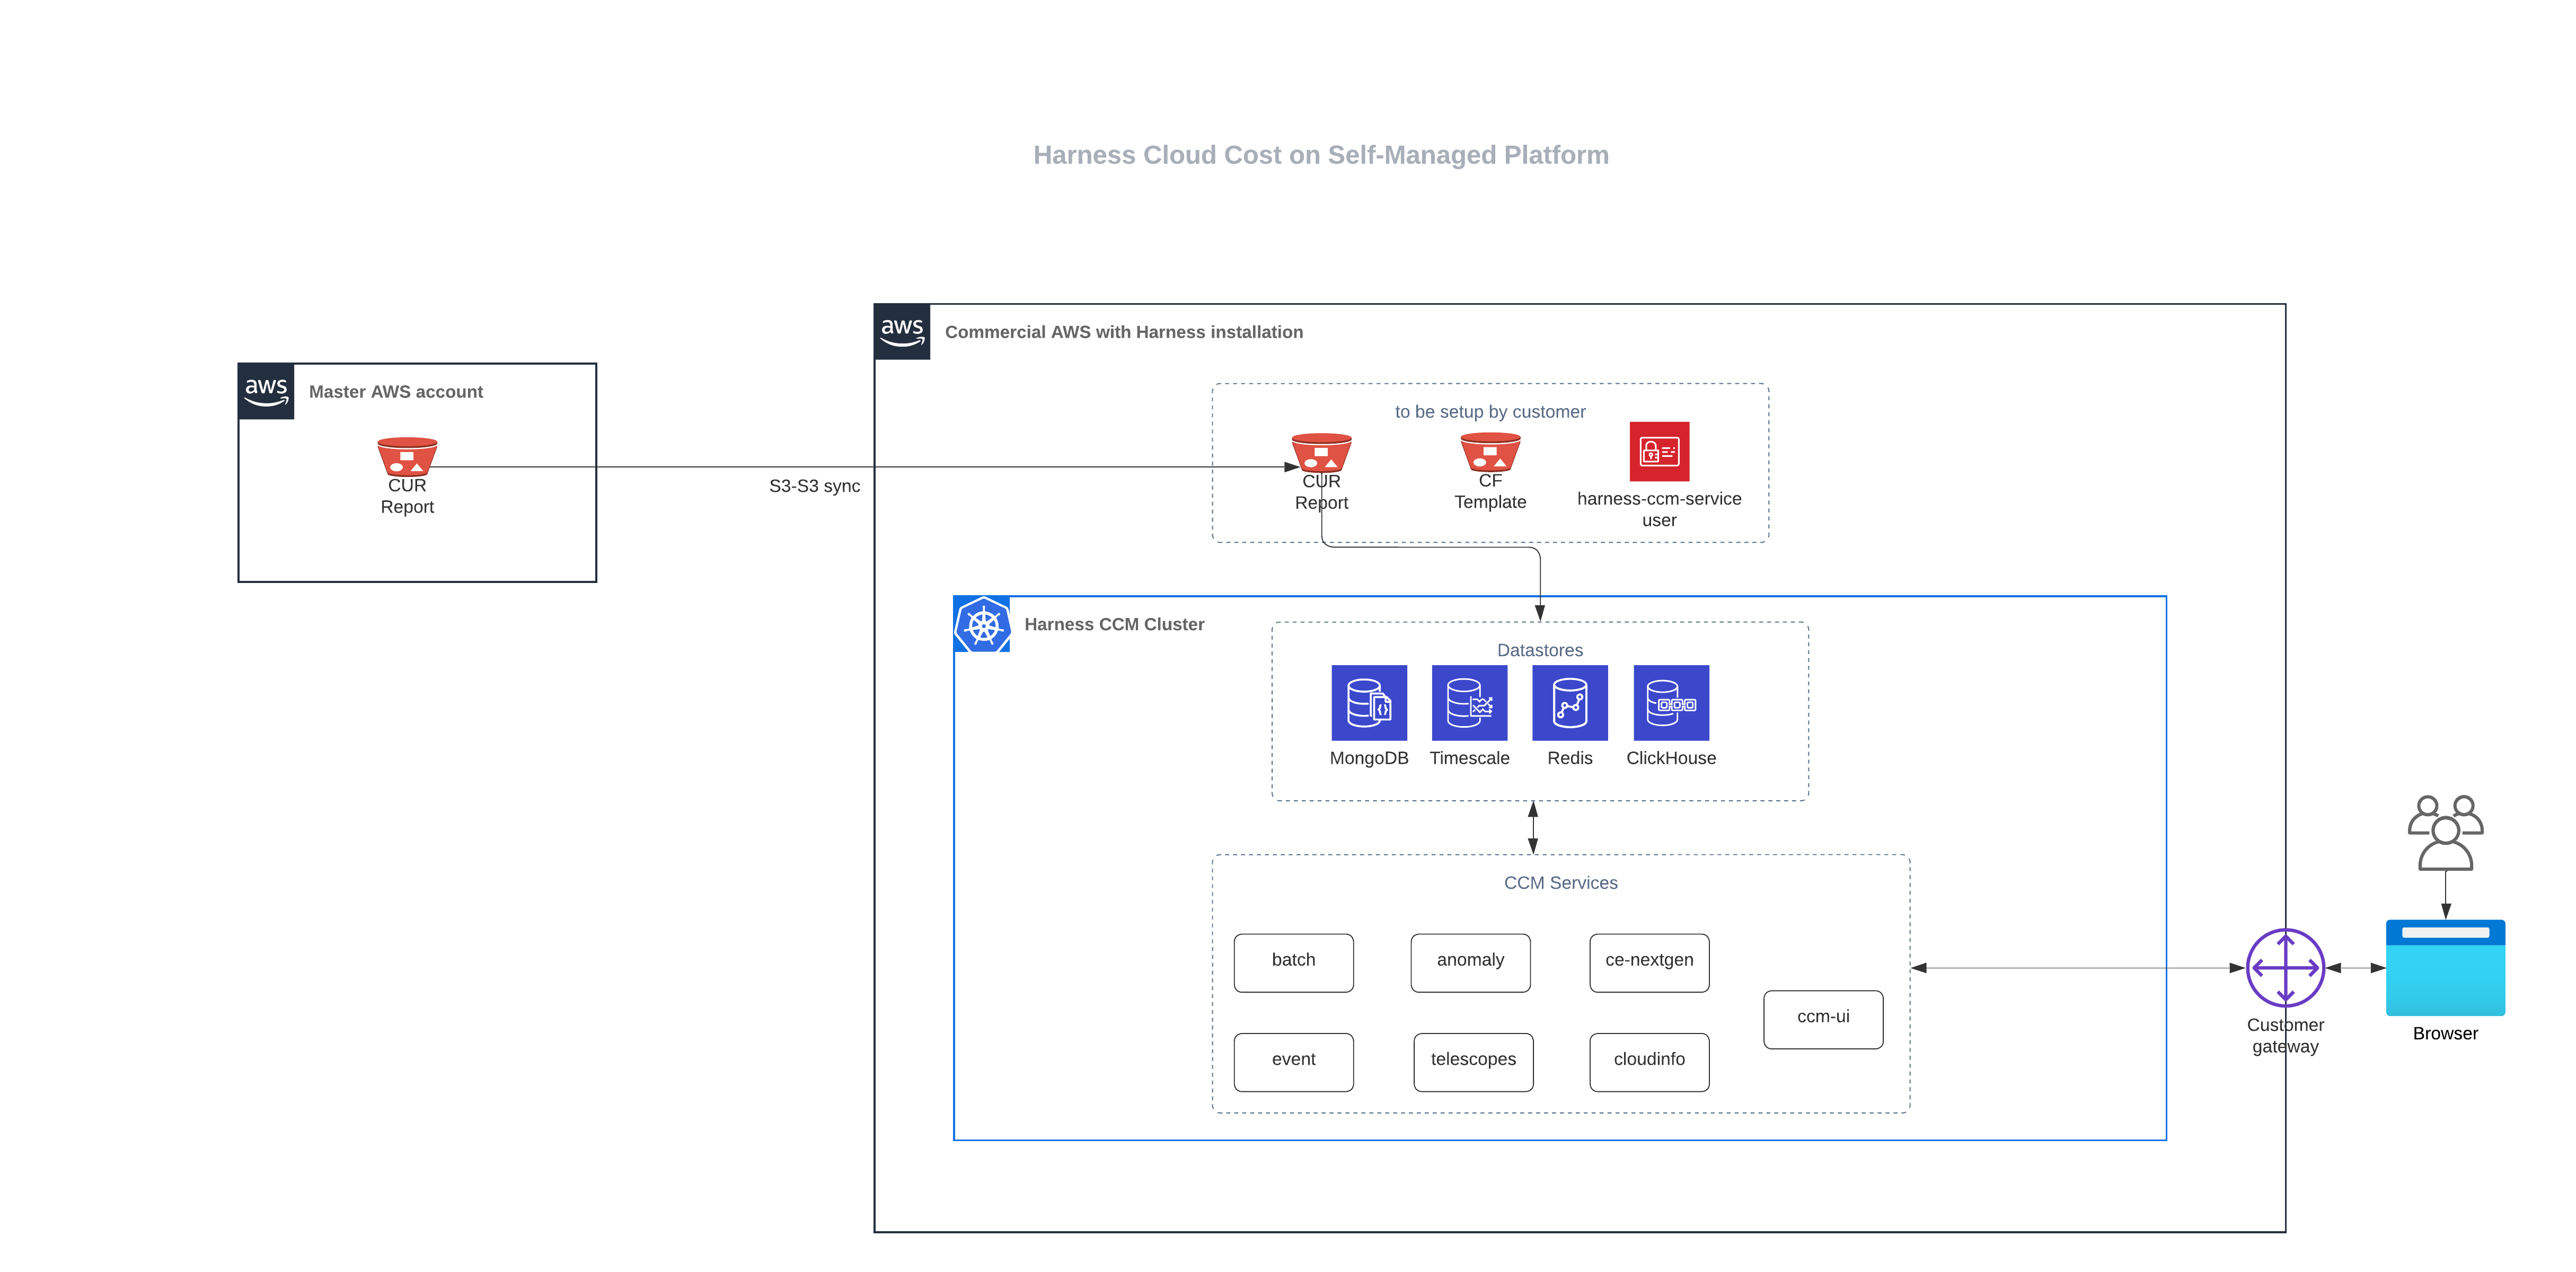
This topic walks you through the steps required to set up CACM for AWS in a self-managed platform.
**Figure: AWS CACM Self-Managed Enterprise Edition architecture diagram**
Click to view full size image
You need to perform the following tasks to set up CACM for AWS:
1. [Add a new user for programmatic access](#add-a-new-user-for-programmatic-access).
2. [Create Amazon S3 Bucket](#create-amazon-s3-bucket).
3. [Edit the CF template](#edit-the-cf-template).
4. [Upload the CF template to S3 bucket](#upload-cf-template-to-s3-bucket).
5. [Deploy workloads via Helm charts](#deploy-workloads-via-helm-charts).
## Add a new user for programmatic access
1. Sign in to your [AWS console](https://console.aws.amazon.com/).
2. Create a new user. For example, `harness-ccm-service-user`. For more information, go to [Adding a user](https://docs.aws.amazon.com/IAM/latest/UserGuide/id_users_create.html).
3. Set up programmatic user access keys by using the policy given below.
Policy to set up programmatic user access
```
{
"Version": "2012-10-17",
"Statement": [
{
"Effect": "Allow",
"Action": [
"pricing:GetAttributeValues",
"pricing:GetProducts"
],
"Resource": [
"*"
]
},
{
"Effect": "Allow",
"Action": [
"ec2:DescribeAvailabilityZones",
"ec2:DescribeImages",
"ec2:DescribeSpotPriceHistory"
],
"Resource": [
"*"
]
},
{
"Effect": "Allow",
"Action": [
"sts:AssumeRole"
],
"Resource": [
"*"
]
},
{
"Sid": "VisualEditor0",
"Effect": "Allow",
"Action": [
"s3:ListAccessPointsForObjectLambda",
"s3:DeleteAccessPoint",
"s3:DeleteAccessPointForObjectLambda",
"s3:DeleteJobTagging",
"s3:PutLifecycleConfiguration",
"s3:PutObjectTagging",
"s3:DeleteObject",
"s3:CreateMultiRegionAccessPoint",
"s3:PutAccessPointPolicyForObjectLambda",
"s3:PutAccountPublicAccessBlock",
"s3:GetBucketWebsite",
"s3:PutMultiRegionAccessPointPolicy",
"s3:DeleteStorageLensConfigurationTagging",
"s3:GetMultiRegionAccessPoint",
"s3:GetObjectAttributes",
"s3:DeleteObjectVersionTagging",
"s3:InitiateReplication",
"s3:GetObjectLegalHold",
"s3:GetBucketNotification",
"s3:DeleteBucketPolicy",
"s3:GetReplicationConfiguration",
"s3:DescribeMultiRegionAccessPointOperation",
"s3:PutObject",
"s3:PutBucketNotification",
"s3:PutObjectVersionAcl",
"s3:PutAccessPointPublicAccessBlock",
"s3:PutBucketObjectLockConfiguration",
"s3:PutAccessPointPolicy",
"s3:GetStorageLensDashboard",
"s3:GetLifecycleConfiguration",
"s3:GetBucketTagging",
"s3:GetInventoryConfiguration",
"s3:GetAccessPointPolicyForObjectLambda",
"s3:ReplicateTags",
"s3:ListBucket",
"s3:AbortMultipartUpload",
"s3:PutBucketTagging",
"s3:UpdateJobPriority",
"s3:DeleteBucket",
"s3:PutBucketVersioning",
"s3:GetMultiRegionAccessPointPolicyStatus",
"s3:ListBucketMultipartUploads",
"s3:PutIntelligentTieringConfiguration",
"s3:PutMetricsConfiguration",
"s3:PutStorageLensConfigurationTagging",
"s3:PutObjectVersionTagging",
"s3:GetBucketVersioning",
"s3:GetAccessPointConfigurationForObjectLambda",
"s3:PutInventoryConfiguration",
"s3:ObjectOwnerOverrideToBucketOwner",
"s3:GetStorageLensConfiguration",
"s3:DeleteStorageLensConfiguration",
"s3:GetAccountPublicAccessBlock",
"s3:PutBucketWebsite",
"s3:ListAllMyBuckets",
"s3:PutBucketRequestPayment",
"s3:PutObjectRetention",
"s3:CreateAccessPointForObjectLambda",
"s3:GetBucketCORS",
"s3:DeleteAccessPointPolicy",
"s3:GetObjectVersion",
"s3:PutAnalyticsConfiguration",
"s3:PutAccessPointConfigurationForObjectLambda",
"s3:GetObjectVersionTagging",
"s3:PutStorageLensConfiguration",
"s3:CreateBucket",
"s3:GetStorageLensConfigurationTagging",
"s3:ReplicateObject",
"s3:GetObjectAcl",
"s3:GetBucketObjectLockConfiguration",
"s3:DeleteBucketWebsite",
"s3:GetIntelligentTieringConfiguration",
"s3:DeleteAccessPointPolicyForObjectLambda",
"s3:GetObjectVersionAcl",
"s3:PutBucketAcl",
"s3:DeleteObjectTagging",
"s3:GetBucketPolicyStatus",
"s3:GetObjectRetention",
"s3:GetJobTagging",
"s3:ListJobs",
"s3:PutObjectLegalHold",
"s3:PutBucketCORS",
"s3:ListMultipartUploadParts",
"s3:GetObject",
"s3:DescribeJob",
"s3:PutBucketLogging",
"s3:GetAnalyticsConfiguration",
"s3:GetObjectVersionForReplication",
"s3:GetAccessPointForObjectLambda",
"s3:CreateAccessPoint",
"s3:GetAccessPoint",
"s3:PutAccelerateConfiguration",
"s3:DeleteObjectVersion",
"s3:GetBucketLogging",
"s3:ListBucketVersions",
"s3:RestoreObject",
"s3:GetAccelerateConfiguration",
"s3:GetObjectVersionAttributes",
"s3:GetBucketPolicy",
"s3:PutEncryptionConfiguration",
"s3:GetEncryptionConfiguration",
"s3:GetObjectVersionTorrent",
"s3:GetBucketRequestPayment",
"s3:GetAccessPointPolicyStatus",
"s3:GetObjectTagging",
"s3:GetBucketOwnershipControls",
"s3:GetMetricsConfiguration",
"s3:PutObjectAcl",
"s3:GetBucketPublicAccessBlock",
"s3:PutBucketPublicAccessBlock",
"s3:GetMultiRegionAccessPointPolicy",
"s3:GetAccessPointPolicyStatusForObjectLambda",
"s3:ListAccessPoints",
"s3:PutBucketOwnershipControls",
"s3:DeleteMultiRegionAccessPoint",
"s3:PutJobTagging",
"s3:ListMultiRegionAccessPoints",
"s3:UpdateJobStatus",
"s3:GetBucketAcl",
"s3:BypassGovernanceRetention",
"s3:ListStorageLensConfigurations",
"s3:GetObjectTorrent",
"s3:PutBucketPolicy",
"s3:GetBucketLocation",
"s3:GetAccessPointPolicy",
"s3:ReplicateDelete"
],
"Resource": [
"arn:aws:s3:::harness-ccm-service-data-bucket-*",
"arn:aws:s3:::harness-ccm-service-data-bucket-*/*",
"arn:aws:s3:::harness-ccm-source-data-*",
"arn:aws:s3:::harness-ccm-source-data-*/*"
]
}
]
}
```
{% hint style="info" %}
Make a note of your AWS Access key and Secret key.
{% endhint %}
## Create Amazon S3 Bucket
1. Create an S3 bucket with the following naming convention. For more information, go to [Creating a bucket](https://docs.aws.amazon.com/AmazonS3/latest/userguide/create-bucket-overview.html). This bucket will be used to retrieve the CUR report from your master AWS accounts.
`harness-ccm-service-data-bucket-`
2. Create another bucket with the following naming convention.
`harness-ccm-service-template-bucket-`
3. Apply the following bucket policy.
```
{
"Version": "2008-10-17",
"Statement": [
{
"Sid": "AllowPublicRead",
"Effect": "Allow",
"Principal": {
"AWS": "*"
},
"Action": "s3:GetObject",
"Resource": "arn:aws:s3:::harness-ccm-service-template-bucket-/*"
}
]
}
```
## Edit the CF template
In the given YAML template, modify the specified field.
Replace `` with the AWS account ID in which the S3 buckets were created.
```
PrincipalBilling:
Type: String
Default: 'arn:aws:iam:::root'
```
YAML template
```
AWSTemplateFormatVersion: 2010-09-09
Outputs:
CrossAccountRoleArn:
Value: !GetAtt
- HarnessCloudFormationRole
- Arn
Parameters:
PrincipalBilling:
Type: String
Default: 'arn:aws:iam:::root'
ExternalId:
Type: String
BucketName:
Description: Leave this field blank if BillingEnabled is false
Type: String
RoleName:
Type: String
Default: HarnessCERole
Description: "Must begin with Harness e.g., HarnessCERole, HarnessManagedRole"
AllowedPattern: "^Harness(.*)$"
ConstraintDescription: "Malformed input-Parameter RoleName must begin with Harness, e.g., HarnessCERole"
LambdaExecutionRoleName:
Type: String
Default: HarnessCELambdaExecutionRole
Description: "Must begin with Harness e.g., HarnessCELambdaExecutionRole"
AllowedPattern: "^Harness(.*)$"
ConstraintDescription: "Malformed input-Parameter RoleName must be of the pattern /^Harness(.*)$/ , e.g., HarnessCELambdaExecutionRole"
BillingEnabled:
Description: Whether CostAndUsage Report feature is enabled or not.
Default: false
Type: String
AllowedValues: [true, false]
EventsEnabled:
Default: false
Type: String
AllowedValues: [true, false]
OptimizationEnabled:
Default: false
Type: String
AllowedValues: [true, false]
GovernanceEnabled:
Default: false
Type: String
AllowedValues: [true, false]
Conditions:
CreatingHarnessBillingMonitoringPolicy: !Equals
- !Ref BillingEnabled
- true
CreateHarnessEventsMonitoringPolicy: !Equals
- !Ref EventsEnabled
- true
CreateHarnessOptimisationPolicy: !Equals
- !Ref OptimizationEnabled
- true
CreateHarnessGovernancePolicy: !Equals
- !Ref GovernanceEnabled
- true
Resources:
HarnessCloudFormationRole:
Type: 'AWS::IAM::Role'
Properties:
RoleName: !Ref RoleName
AssumeRolePolicyDocument:
Version: 2012-10-17
Statement:
- Effect: Allow
Principal:
AWS:
- !Ref PrincipalBilling
Action: 'sts:AssumeRole'
Condition:
StringEquals:
'sts:ExternalId': !Ref ExternalId
HarnessOptimizationLambdaExecutionRole:
Type: 'AWS::IAM::Role'
Condition: CreateHarnessOptimisationPolicy
Properties:
RoleName: !Ref LambdaExecutionRoleName
AssumeRolePolicyDocument:
Version: 2012-10-17
Statement:
- Effect: Allow
Principal:
Service: "lambda.amazonaws.com"
Action: 'sts:AssumeRole'
Path: /ce-optimization-service-role/
HarnessGetRolePolicy:
Type: 'AWS::IAM::ManagedPolicy'
Properties:
Description: Policy granting Harness Simulate Principle Policy
PolicyDocument:
Version: 2012-10-17
Statement:
- Effect: Allow
Action:
- 'iam:SimulatePrincipalPolicy'
Resource:
- !Join
- ''
- - 'arn:aws:iam::'
- !Ref AWS::AccountId
- ':role/'
- !Ref RoleName
Roles:
- !Ref HarnessCloudFormationRole
HarnessEventsMonitoringPolicy:
Type: 'AWS::IAM::ManagedPolicy'
Condition: CreateHarnessEventsMonitoringPolicy
Properties:
Description: Policy granting Harness Access to Enable Event Collection
PolicyDocument:
Version: 2012-10-17
Statement:
- Effect: Allow
Action:
- 'ecs:ListClusters*'
- 'ecs:DescribeClusters'
- 'ecs:ListServices'
- 'ecs:DescribeServices'
- 'ecs:DescribeContainerInstances'
- 'ecs:ListTasks'
- 'ecs:ListContainerInstances'
- 'ecs:DescribeTasks'
- 'ec2:DescribeInstances*'
- 'ec2:DescribeRegions'
- 'cloudwatch:GetMetricData'
- 'ec2:DescribeVolumes'
- 'ec2:DescribeSnapshots'
- 'rds:DescribeDBSnapshots'
- 'rds:DescribeDBInstances'
- 'rds:DescribeDBClusters'
- 'rds:DescribeDBSnapshotAttributes'
- 'ce:GetRightsizingRecommendation'
- 'cloudwatch:ListMetrics'
- 'organizations:ListAccounts'
- 'organizations:ListTagsForResource'
Resource: '*'
Roles:
- !Ref HarnessCloudFormationRole
HarnessBillingMonitoringPolicy:
Type: 'AWS::IAM::ManagedPolicy'
Condition: CreatingHarnessBillingMonitoringPolicy
Properties:
Description: Policy granting Harness Access to Collect Billing Data
PolicyDocument:
Version: 2012-10-17
Statement:
- Effect: Allow
Action:
- 's3:GetBucketLocation'
- 's3:ListBucket'
- 's3:GetObject'
Resource:
- !Join
- ''
- - 'arn:aws:s3:::'
- !Ref BucketName
- !Join
- /
- - !Join
- ''
- - 'arn:aws:s3:::'
- !Ref BucketName
- '*'
- Effect: Allow
Action:
- 's3:ListBucket'
- 's3:PutObject'
- 's3:PutObjectAcl'
Resource:
- 'arn:aws:s3:::harness-ccm-service-data-bucket-*'
- 'arn:aws:s3:::harness-ccm-service-data-bucket-*/*'
- Effect: Allow
Action:
- 'cur:DescribeReportDefinitions'
- 'organizations:Describe*'
- 'organizations:List*'
Resource: "*"
Roles:
- !Ref HarnessCloudFormationRole
HarnessOptimsationLambdaPolicy:
Type: 'AWS::IAM::ManagedPolicy'
Condition: CreateHarnessOptimisationPolicy
Properties:
Description: Policy granting Harness Access to Enable Cost Optimisation
PolicyDocument:
Version: 2012-10-17
Statement:
- Effect: Allow
Action:
- 'ec2:CreateNetworkInterface'
- 'ec2:CreateNetworkInsightsPath'
- 'ec2:CreateNetworkInterfacePermission'
- 'ec2:CreateNetworkAcl'
- 'ec2:*'
- 'ec2:CreateNetworkAclEntry'
- 'logs:CreateLogGroup'
- 'logs:CreateLogStream'
- 'logs:PutLogEvents'
Resource: "*"
Roles:
- !Ref HarnessOptimizationLambdaExecutionRole
HarnessOptimisationPolicy:
Type: 'AWS::IAM::ManagedPolicy'
Condition: CreateHarnessOptimisationPolicy
Properties:
Description: Policy granting Harness Access to Enable Cost Optimisation
PolicyDocument:
Version: 2012-10-17
Statement:
- Effect: Allow
Action:
- elasticloadbalancing:*
- ec2:StopInstances
- autoscaling:*
- ec2:Describe*
- iam:CreateServiceLinkedRole
- iam:ListInstanceProfiles
- iam:ListInstanceProfilesForRole
- iam:AddRoleToInstanceProfile
- iam:PassRole
- ec2:StartInstances
- ec2:*
- iam:GetUser
- ec2:ModifyInstanceAttribute
- iam:ListRoles
- acm:ListCertificates
- lambda:*
- cloudwatch:ListMetrics
- cloudwatch:GetMetricData
- route53:GetHostedZone
- route53:ListHostedZones
- route53:ListHostedZonesByName
- route53:ChangeResourceRecordSets
- route53:ListResourceRecordSets
- route53:GetHealthCheck
- route53:GetHealthCheckStatus
- cloudwatch:GetMetricStatistics
- ecs:ListClusters
- ecs:ListContainerInstances
- ecs:ListServices
- ecs:ListTaskDefinitions
- ecs:ListTasks
- ecs:DescribeCapacityProviders
- ecs:DescribeClusters
- ecs:DescribeContainerInstances
- ecs:DescribeServices
- ecs:DescribeTaskDefinition
- ecs:DescribeTasks
- ecs:DescribeTaskSets
- ecs:RunTask
- ecs:StopTask
- ecs:StartTask
- ecs:UpdateService
- rds:DescribeDBClusters
- rds:DescribeDBInstances
- rds:ListTagsForResource
- rds:AddTagsToResource
- rds:RemoveTagsFromResource
- rds:ModifyDBInstance
- rds:StartDBCluster
- rds:StartDBInstance
- rds:StopDBCluster
- rds:StopDBInstance
- s3:ListBucket
- s3:GetObject
- s3:ListAllMyBuckets
- s3:GetBucketLocation
- secretsmanager:GetSecretValue
Resource: "*"
Roles:
- !Ref HarnessCloudFormationRole
HarnessGovernancePolicy:
Type: 'AWS::IAM::ManagedPolicy'
Condition: CreateHarnessGovernancePolicy
Properties:
Description: Policy granting Harness Access to Enable policy execution
PolicyDocument:
Version: 2012-10-17
Statement:
- Effect: Allow
Action:
- ec2:Describe*
- ec2:DeleteSnapshot
- ec2:DeleteVolume
- ec2:Get*
- ec2:ListImagesInRecycleBin
- ec2:ListSnapshotsInRecycleBin
- elasticbeanstalk:Check*
- elasticbeanstalk:Describe*
- elasticbeanstalk:List*
- elasticbeanstalk:Request*
- elasticbeanstalk:Retrieve*
- elasticbeanstalk:Validate*
- elasticloadbalancing:Describe*
- rds:Describe*
- rds:Download*
- rds:List*
- autoscaling-plans:Describe*
- autoscaling-plans:GetScalingPlanResourceForecastData
- autoscaling:Describe*
- autoscaling:GetPredictiveScalingForecast
- s3:DescribeJob
- s3:Get*
- s3:List*
Resource: "*"
Roles:
- !Ref HarnessCloudFormationRole
```
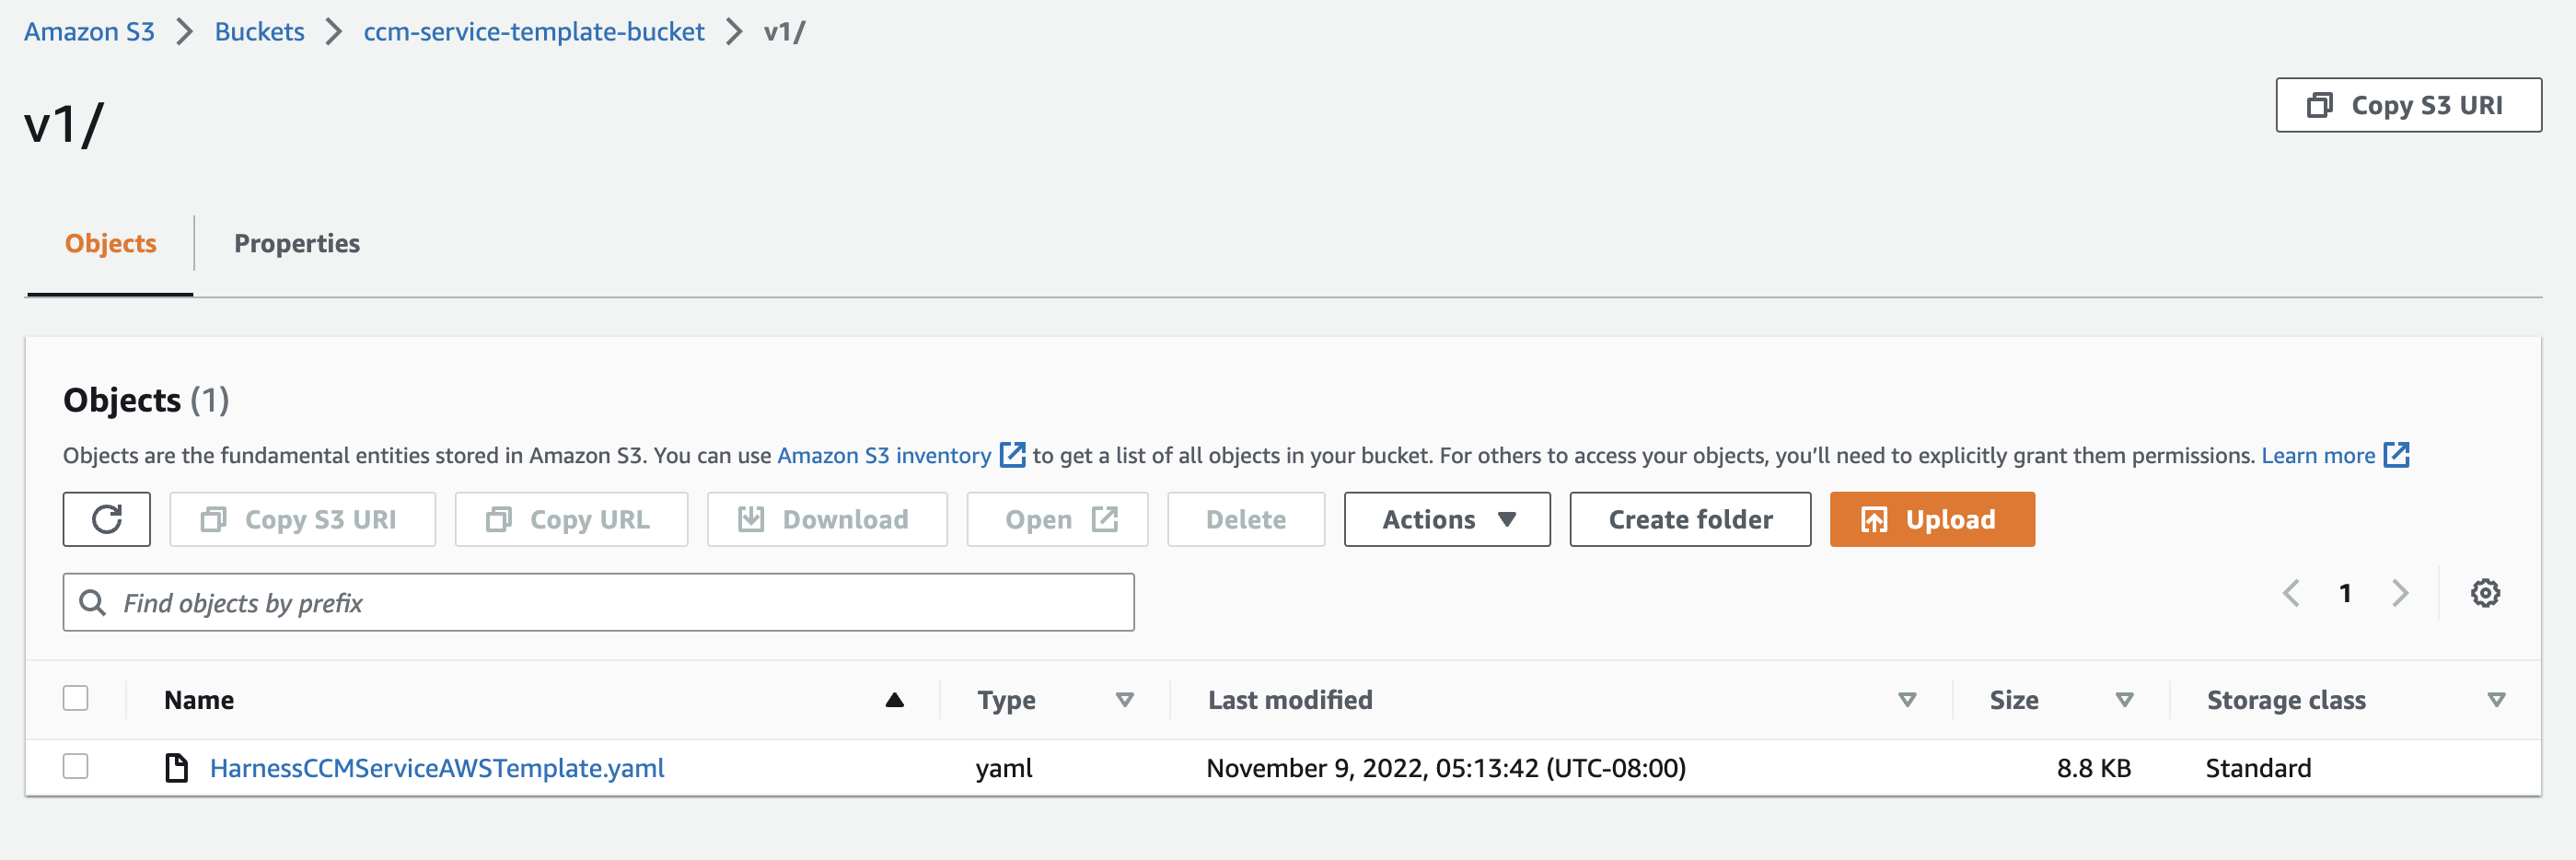
## Upload the CF template to S3 bucket
Upload the YAML template to S3 bucket `harness-ccm-service-template-bucket-`.
1. Go to **Amamzon S3** > **ccm-service-template-bucket**.
2. Create a folder named `v1`.
3. Upload the file.
Click to view full size image
{% hint style="info" %}
Make a note of the following:
* The names of the two S3 buckets.
* The complete path of the CF template in the bucket. For example, .
{% endhint %}
## Deploy workloads via Helm charts
1. Clone the chart repository.
```
git clone git@github.com:harness/helm-charts.git
cd main/src/harness
```
2. Upgrade charts if you're already using Harness Self-managed Enterprise Edition services. Perform the following steps to update the override files:
1. Retrieve the current override values provided during the installation or upgrade of the Helm charts.
```
helm get values -n > override.yaml
```
2. After obtaining the override file, you can make necessary modifications based on the type of environment.
Override file changes for a connected environment
```
global:
ccm:
enabled: true
smtpCreateSecret:
enabled: true
license:
ng:
database:
clickhouse:
enabled: true
ccm:
batch-processing:
cloudProviderConfig:
S3_SYNC_CONFIG_BUCKET_NAME: [AWS Setup - bucket name from here 'harness-ccm-service-data-bucket-']
S3_SYNC_CONFIG_REGION: [AWS Setup - Create S3 buckets step - Use region from here]
```
Override file changes for an air-gapped environment
CACM leverages AWS APIs that require connectivity from the isolated (air-gapped) instance. To grant access to these AWS APIs, establish VPC endpoints for the respective AWS services. For services lacking VPC endpoints, use a proxy to facilitate access.
```
global:
ccm:
enabled: true
smtpCreateSecret:
enabled: true
license:
ng:
# -- To enable the use of a proxy for AWS SDK calls to services such as organization, CUR (Cost and Usage Report), CE (Cost Explorer), and IAM (Identity and Access Management), set the `global.proxy.enabled` parameter to true.
# -- Set the `global.proxy.host` parameter by specifying the proxy host or IP address (for example, localhost, 127.0.0.1)
# -- Set the `global.proxy.port` parameter by specifying the proxy port. It takes an integer value.
# -- Set the `global.proxy.username` parameter and `global.proxy.password` parameter by specifying the proxy username and password. If not required, remove it or leave it blank.
# -- Set the `global.proxy.protocol` parameter as https.
proxy:
enabled: true
host: localhost
port: 80
username: ""
password: ""
protocol: https
# -- CACM uses `us-east-1` as the default region where the respective endpoint URLs are used for STS (Security Token Service), ECS (Elastic Container Service), and CloudWatch services. However, if there is a need to specify a different region, you have the option to customize the endpoint URLs using the following configuration:
# -- Set the `global.awsServiceEndpointUrls.enabled` parameter to true to enable endpoint URLs.
# -- Set a valid AWS region in the `global.awsServiceEndpointUrls.endPointRegion.host` parameter to specify the region where this endpoint is accessible.
# -- Set the STS (Security Token Service) endpoint URL in the `global.awsServiceEndpointUrls.stsEndPointUrl` parameter.
# -- Set the ECS (Elastic Container Service) endpoint URL in the `global.awsServiceEndpointUrls.ecsEndPointUrl` parameter.
# -- Set the CloudWatch endpoint URL in the `global.awsServiceEndpointUrls.cloudwatchEndPointUrl` parameter.
awsServiceEndpointUrls:
enabled: true
endPointRegion: us-east-2
stsEndPointUrl: https://sts.us-east-2.amazonaws.com
ecsEndPointUrl: https://ecs.us-east-2.amazonaws.com
cloudwatchEndPointUrl: https://monitoring.us-east-2.amazonaws.com
database:
clickhouse:
enabled: true
ccm:
batch-processing:
cloudProviderConfig:
S3_SYNC_CONFIG_BUCKET_NAME: [AWS Setup - bucket name from here 'harness-ccm-service-data-bucket-']
S3_SYNC_CONFIG_REGION: [AWS Setup - Create S3 buckets step - Use region from here]
# -- To enable the use of a proxy for AWS S3 sync, set the `ccm.batch-processing.cliProxy.enabled` parameter to true.
# -- Set the `ccm.batch-processing.cliProxy.host` parameter by specifying the proxy host or IP address (for example, localhost, 127.0.0.1)
# -- Set the `ccm.batch-processing.cliProxy.port` parameter by specifying the proxy port. It takes an integer value.
# -- Set the `ccm.batch-processing.cliProxy.username` parameter and `ccm.batch-processing.cliProxy.password` parameter by specifying the proxy username and password. If not required, remove it or leave it blank.
# -- Set the `ccm.batch-processing.cliProxy.protocol` parameter as http.
cliProxy:
enabled: true
host: localhost
port: 80
username: ""
password: ""
protocol: http
# -- Set the `ccm.cloud-info.proxy.httpsProxyEnabled` parameter to true to route AWS SDK calls for EC2 and pricing through a proxy.
# -- Configure the `ccm.cloud-info.proxy.httpsProxyUrl` parameter with the appropriate proxy URL. For example, if your HTTP proxy is running on localhost port 1234 and requires authentication, you can use a format like http://username:password@proxy.example.com:1234. If no username and password are required, a value like http://proxy.example.com:1234 can be provided.
cloud-info:
proxy:
httpsProxyEnabled: true
httpsProxyUrl: http://proxy.example.com:1234
```
3. After making the necessary updates to the override file, you can proceed with the Helm chart upgrade.
```
helm upgrade -n -f override.yaml
```
## Handling Kubernetes secrets
When installing or upgrading the Helm charts, Kubernetes secrets with default values are created within the cluster. These generated secrets should be updated with the values mentioned above. Before updating the secrets, you need to convert the secret into base64 encoded format. For example, if your **AWS\_DESTINATION\_BUCKET** value is "harness-ccm-service-data-bucket-12345678", it would be stored as `aGFybmVzcy1jY20tc2VydmljZS1kYXRhLWJ1Y2tldC0xMjM0NTY3OA==` after encoding. After changing secrets, we will provide directives to `kubectl delete` the corresponding pods in order for your release to inherit new changes.
The following are the secrets specific to CACM services:
* batch-processing
```
kubectl edit secret batch-processing -n
```
```
S3_SYNC_CONFIG_ACCESSKEY: [AWS Setup - Add a new user - Use saved aws access key]
S3_SYNC_CONFIG_SECRETKEY: [AWS Setup - Add a new user- Use saved aws secret key]
```
* cloud-info-secret-mount \[config-file]
```
kubectl edit secret cloud-info-secret-mount -n
```
```
config-file: [Sample can be found below]
```
* nextgen-ce
```
kubectl edit secret nextgen-ce -n
```
```
AWS_ACCESS_KEY: [AWS Setup - Add a new user - Use saved aws access key]
AWS_SECRET_KEY: [AWS Setup - Add a new user- Use saved aws secret key]
AWS_ACCOUNT_ID: [AWS Setup - Id from here]
AWS_DESTINATION_BUCKET: [AWS Setup - bucket name from here 'harness-ccm-service-data-bucket-']
AWS_TEMPLATE_LINK: [AWS Setup - Create S3 buckets step - Use complete path of CF template]
CE_AWS_TEMPLATE_URL: [AWS Setup - Create S3 buckets step - Use c
```
Config file
```
environment = "production"
debug = false
shutdownTimeout = "5s"
[config.vault]
enabled = false
address = ""
token = ""
secretPath = ""
[log]
format = "json"
level = "info"
[metrics]
enabled = false
address = ":9090"
[jaeger]
enabled = false
# Configure either collectorEndpoint or agentEndpoint.
# When both are configured collectorEndpoint will take precedence and the exporter will report directly to the collector.
collectorEndpoint = "http://localhost:14268/api/traces?format=jaeger.thrift"
agentEndpoint = "localhost:6831"
# username = ""
# password = ""
[app]
address = ":8000"
basePath = "/"
[scrape]
enabled = true
interval = "24h"
[provider.amazon]
enabled = true
# See available regions in the documentation:
# https://aws.amazon.com/about-aws/global-infrastructure/regions_az
region = "us-east-1"
# Static credentials
accessKey = "" [AWS Setup - Add a new user - Use saved aws access key]
secretKey = "" [AWS Setup - Add a new user- Use saved aws secret key]
# Shared credentials
# sharedCredentialsFile = ""
# profile = ""
# http address of a Prometheus instance that has AWS spot price metrics via banzaicloud/spot-price-exporter.
# If empty, the cloudinfo app will use current spot prices queried directly from the AWS API.
prometheusAddress = ""
# advanced configuration: change the query used to query spot price info from Prometheus.
prometheusQuery = "avg_over_time(aws_spot_current_price{region=\"%s\", product_description=\"Linux/UNIX\"}[1w])"
# Amazon pricing API credentials (optional)
# Falls back to the primary credentials.
[provider.amazon.pricing]
# See available regions in the documentation:
#
region = "us-east-1"
# Static credentials
accessKey = "" [AWS Setup - Add a new user - Use saved aws access key]
secretKey = "" [AWS Setup - Add a new user- Use saved aws secret key]
# Shared credentials
# sharedCredentialsFile = ""
# profile = ""
[provider.google]
enabled = false
# base64 encoded credentials in json format (base64 encoded content of the credential file)
# credentials = ""
# credentialsFile = ""
# project = ""
[provider.alibaba]
enabled = false
# region = ""
# accessKey = ""
# secretKey = ""
[provider.oracle]
enabled = false
# tenancy = ""
# user = ""
# region = ""
# fingerprint = ""
# privateKey = ""
# privateKeyPassphrase = ""
# configFilePath = ""
# profile = ""
[provider.azure]
enabled = false
# subscriptionId = ""
# Client credentials
# clientId = ""
# clientSecret = ""
# tenantId = ""
[provider.digitalocean]
enabled = false
[provider.vsphere]
enabled = false
# accessToken = ""
[management]
enabled = true
address = ":8001"
[serviceloader]
serviceConfigLocation = "./configs"
serviceConfigName = "services"
format = "yaml"
[store.redis]
enabled = false
host = "localhost"
port = 6379
[store.cassandra]
enabled = false
hosts = "localhost"
port = 9042
keyspace = "cloudinfo"
table = "products"
[store.gocache]
expiration = 0
cleanupInterval = 0
```
The following are some secrets from platform-service that you need to update:
* smtp-secret - Required to support budget alerts email.
```
kubectl edit secret smtp-secret -n
```
```
SMTP_HOST:
SMTP_PASSWORD:
SMTP_USERNAME:
```
{% hint style="info" %}
To increase TimescaleDB to 100Gi, run: `kubectl edit pvc wal-volume-harness-timescaledb-0 -n `. Features like Recommendations and Anomalies within CACM services use it.
{% endhint %}
## Next steps
* [Kubernetes connector setup](/cloud-cost-management/integrations/kubernetes.md)
* [AWS connector setup](/cloud-cost-management/integrations/cloud-providers/aws.md)
### Troubleshooting
If in case the K8s secrets expire, the secrets will have to be set again. First you would have to update the secrets in respective `secret.yaml` and then delete the pod. We recommend to `kubectl delete` the following pods:
* `batch-processing`
* `ce-nextgen`
* `cloud-info`
and then follow the [same steps](#handling-kubernetes-secrets) to set the keys. After the new keys are set, verify the changes by looking at the `configs` for the pods.
Please refer to the commands below:
* batch-processing: `kubectl exec -it -n batch-processing cat batch-processing-config.yml | grep -E 'awsAccessKey|awsSecretKey`
```
awsAccessKey: Updated Access Key
awsSecretKey: Updated Secret Key
```
* cloud-info:
`kubectl exec -it -n cloud-info cat config/config.toml | grep -E 'accessKey|secretKey'`
```
accessKey = "Updated Access Key"
secretKey = "Updated Secret Key"
```
* nextgen-ce: `kubectl exec -it -n nextgen-ce cat config.yml | grep -E 'accessKey|secretKey|harnessAwsAccountId|destinationBucket:|awsConnectorTemplate'`
```
accessKey: Updated Access Key
secretKey: Updated Secret Key
destinationBucket: Updated Destination Bucket
harnessAwsAccountId: Updated AWS Account Id
awsConnectorTemplate: Updated AWS Template URL
```
AWS Visibility connector connection test fails with implicit deny on organizations:ListAccounts or organizations:ListTagsForResource in SMP
Connectors created after April 8, 2026 require `organizations:ListAccounts` and `organizations:ListTagsForResource` on the IAM role. Re-run your CloudFormation stack with the updated YAML template to attach the updated `HarnessEventsMonitoringPolicy`, then retest the connector.
{% @harness-feedback/feedback %}