> For the complete documentation index, see [llms.txt](https://developer.harness.io/llms.txt). Markdown versions of documentation pages are available by appending `.md` to page URLs; this page is available as [Markdown](https://developer.harness.io/cloud-cost-management/3.0/troubleshooting-and-resources/self-managed-enterprise-edition/gcp-smp.md).
# GCP
The procedure to set up CCM for GCP by using Harness Self-Managed Enterprise Edition.
This topic walks you through the steps required to set up CACM for GCP in a self-managed platform.
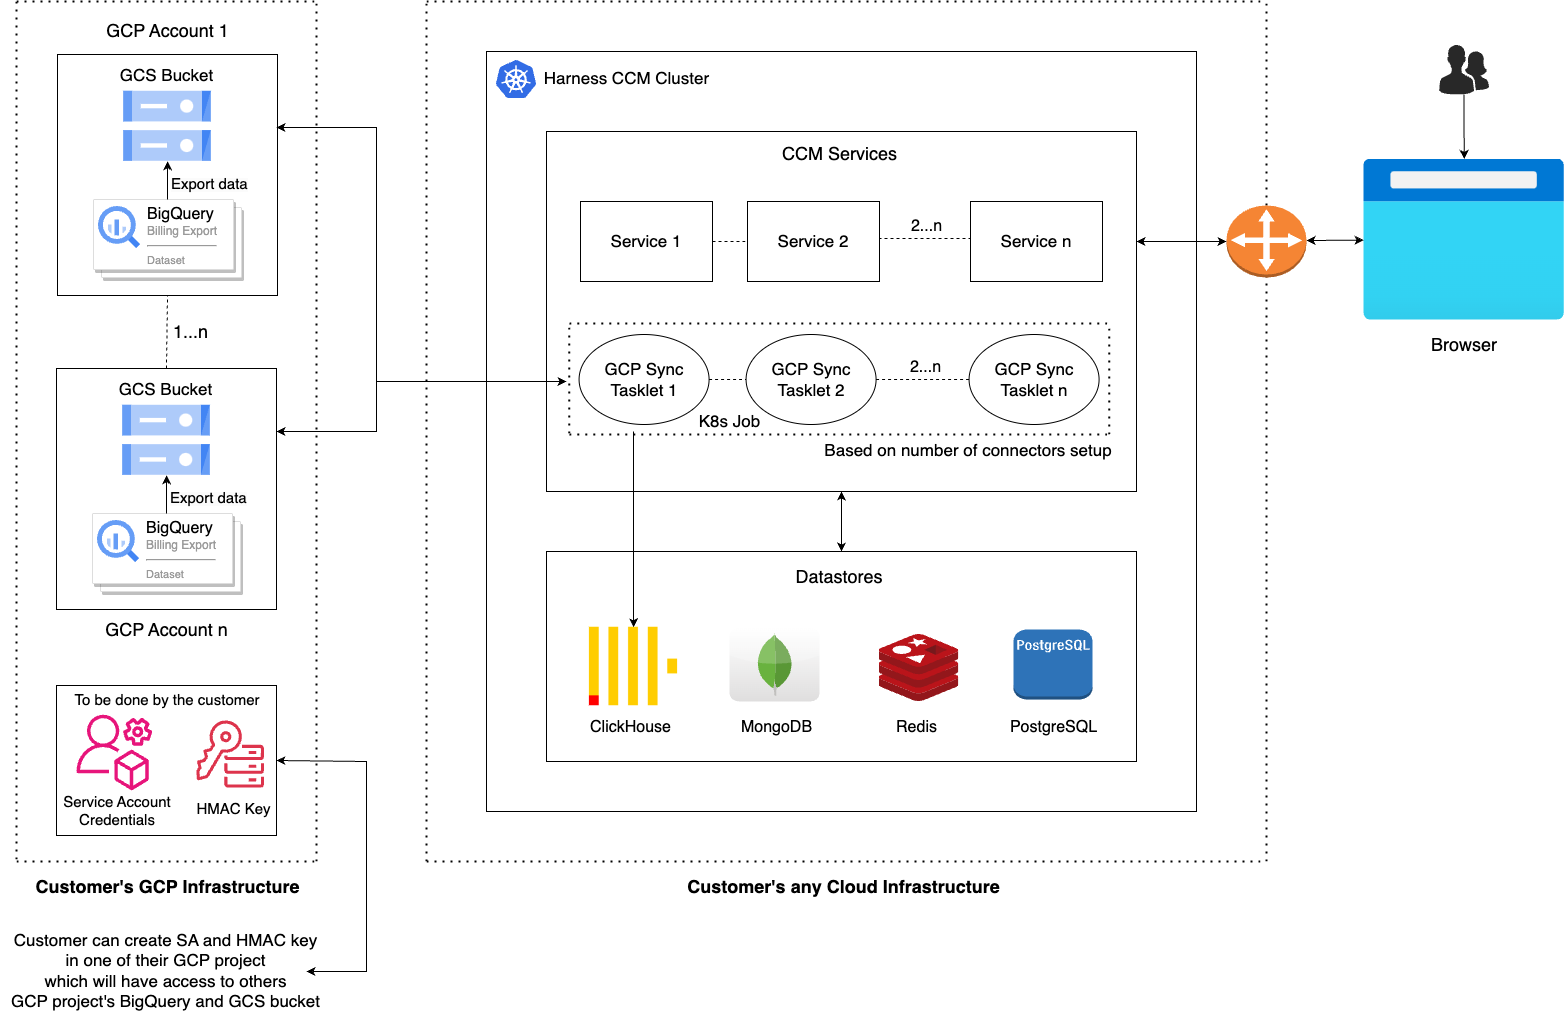
**Figure: GCP CACM Self-Managed Enterprise Edition architecture diagram**
Click to view full size image
## Major Components
* **K8s Job:** In the cloud-hosted infra, a K8s Job is configured to run daily. This job performs all necessary steps to ingest GCP billing data from BigQuery to ClickHouse, utilizing a GCS bucket as an intermediary and then eventually to ClickHouse table.
* **BigQuery:** The GCP project's billing data resides in a BigQuery table.
* **Google Cloud Storage (GCS):** Billing data is stored in the parquet format in GCS bucket. Parquet, as a column-oriented format, represents a better interchange format since it is inherently compressed and faster for BigQuery to export and ClickHouse to query.
* **ClickHouse:** Serves as the datastore where GCP billing data is finally ingested.
* **Service Account Key:** It is a JSON file that contains the information needed to authenticate and authorize requests made by an application or a service.
* **HMAC Key:** HMAC (Hash-based Message Authentication Code) keys are used for authentication and ensuring the integrity of requests made to GCS.
## Data Flow
**Steps**
1. Authenticate and initialize clients for BigQuery, GCS and ClickHouse using **SA and HMAC** keys.
2. Create a dedicated **GCS** bucket to store billing data in **Parquet** format. The sub-folders will be organized based on timestamps or dates to precisely track when each bucket was created.
3. Initiate an export query to transfer data from **BigQuery** to the **GCS** bucket in **Parquet** format with GZIP compression. The export query employs a **SELECT** statement, resulting in charges based solely on the data scan.
4. Check if the billing table exists in **ClickHouse**; create it if not.
5. Initiate an insert query to efficiently move data from the **GCS** bucket to the **ClickHouse table** in batch.
You need to perform the following tasks to set up CACM for GCP:
1. [Create Service Account](#step-1-create-service-account)
2. [Create HMAC Key](#step-2-create-hmac-key)
3. [Deploying workloads via Helm Charts](#deploying-workloads-via-helm-charts)
4. [Handling Kubernetes Secrets](#step-3-handling-kubernetes-secrets)
## GCP Setup
### Step 1: Create Service Account
A GCP service account is needed to be able to authenticate and perform operations on the customer’s BQ and GCS buckets.You will need one SA and its JSON key during onboarding.
1. Before creating a Service Account, you have to create Custom Role and provide necessary permissions to it. Follow [these](https://cloud.google.com/iam/docs/creating-custom-roles#creating) steps to create Custom Role and add below permissions:
```
bigquery.datasets.create
bigquery.datasets.get
bigquery.datasets.getIamPolicy
bigquery.jobs.create
bigquery.tables.create
bigquery.tables.export
bigquery.tables.get
bigquery.tables.getData
bigquery.tables.list
storage.buckets.create
storage.buckets.get
storage.objects.list
storage.objects.create
storage.objects.get
```
2. Follow [these](https://cloud.google.com/iam/docs/service-accounts-create#creating) steps to create Service Account and add the above IAM custom role to it.
3. Follow [these](https://developers.google.com/workspace/guides/create-credentials#create_credentials_for_a_service_account) steps to create Service Account Credential Key.
Please refer [this](https://www.cloudquery.io/blog/creating-cross-project-service-accounts-in-gcp#how-do-you-set-up-a-service-account-in-gcp?) doc if you encounter any difficulties understanding the process. It provides a comprehensive explanation of all steps accompanied by screenshots.
### Step 2: Create HMAC Key
To be able to make use of ClickHouse methods to ingest data from GCS, you will need HMAC key.
1. Follow [these](https://cloud.google.com/storage/docs/authentication/managing-hmackeys#create) steps to create HMAC key for the Service Account created above.
## Deploying workloads via Helm charts
### Step 1: Clone chart repository
```
git clone git@github.com:harness/helm-charts.git
cd main/src/harness
```
### Step 2: Already using harness services OnPrem? Upgrade charts
```
helm get values -n > override.yaml
# update override.yaml with ccm specific configuration provided below
helm upgrade -n -f override.yaml
```
Example: `helm upgrade ccm . -n harness -f old_values.yaml`
```
global:
ccm:
enabled: true
gcpProjectId: ""
smtpCreateSecret:
enabled: true # Update the default values of "smtp-secret" as mentioned in below step else application startup will fail.
license:
ng:
database:
clickhouse:
enabled: true
ccm:
ce-nextgen:
cloudProviderConfig:
GCP_SERVICE_ACCOUNT_EMAIL: ""
batch-processing:
serviceAccount:
create: true
annotations: {}
name: "batch-processing-default"
secrets:
fileSecret:
- volumeMountPath: "/opt/harness/svc"
keys:
- key: ce-gcp-home-project-creds
path: "ce_gcp_home_project_creds.json"
- key: ce-batch-gcp-credentials
path: "ce_batch_gcp_credentials.json"
default:
ce-gcp-home-project-creds: ""
ce-batch-gcp-credentials: ""
gcpConfig:
GCP_SMP_ENABLED: true
bucketNamePrefix: "harness-ccm-%s-%s" # Update the bucket name prefix if you want, but keep double %s for project and region
```
### Step 3: Handling Kubernetes Secrets
On installing/upgrading charts you will see K8s secrets created with default value in the cluster. You need to update these secrets with the above noted values. Before updating the secrets you need to convert the secret into base64 encoded, let say the `HMAC_ACCESS_KEY` value is: `accessKey`, then it would it be stored as `YWNjZXNzS2V5`. After changing secrets, we will provide directives to `kubectl delete` the corresponding pods in order for your release to inherit new changes.
Command: `echo -n "accessKey" | base64`
The -n option with echo prevents the trailing newline character from being included in the output. To encode service account credential JSON file, use below command:
`base64 -i service-account.json -o service-account-base64-encoded.txt`
Following are the secrets specific to CACM services:
**1. batch-processing** `kubectl edit secret batch-processing -n `
````
```
HMAC_ACCESS_KEY:
HMAC_SECRET_KEY:
ce-gcp-home-project-creds:
ce-batch-gcp-credentials:
```
````
**2. cloud-info-secret-mount \[config-file]** `kubectl edit secret cloud-info-secret-mount -n `
config.toml.dist
```
environment = "production"
debug = false
shutdownTimeout = "5s"
[config.vault]
enabled = false
address = ""
token = ""
secretPath = ""
[log]
format = "json"
level = "info"
[metrics]
enabled = false
address = ":9090"
[jaeger]
enabled = false
# Configure either collectorEndpoint or agentEndpoint.
# When both are configured collectorEndpoint will take precedence and the exporter will report directly to the collector.
collectorEndpoint = "http://localhost:14268/api/traces?format=jaeger.thrift"
agentEndpoint = "localhost:6831"
# username = ""
# password = ""
[app]
address = ":8000"
basePath = "/"
[scrape]
enabled = true
interval = "24h"
[provider.amazon]
enabled = false
# See available regions in the documentation:
# https://aws.amazon.com/about-aws/global-infrastructure/regions_az
# region = "us-east-1"
# Static credentials
# accessKey = ""
# secretKey = ""
# Shared credentials
# sharedCredentialsFile = ""
# profile = ""
# IAM Role ARN to assume
# assumeRoleARN = ""
# http address of a Prometheus instance that has AWS spot price metrics via
banzaicloud/spot-price-exporter.
# If empty, the cloudinfo app will use current spot prices queried directly from
the AWS API.
prometheusAddress = ""
# advanced configuration: change the query used to query spot price info from
Prometheus.
prometheusQuery = "avg_over_time(aws_spot_current_price{region=\"%s\",
product_description=\"Linux/UNIX\"}[1w])"
# Amazon pricing API credentials (optional)
# Falls back to the primary credentials.
[provider.amazon.pricing]
# See available regions in the documentation:
# https://docs.aws.amazon.com/awsaccountbilling/latest/aboutv2/using-pelong.html
# region = "us-east-1"
# Static credentials
# accessKey = ""
# secretKey = ""
# Shared credentials
# sharedCredentialsFile = ""
# profile = ""
# IAM Role ARN to assume
# assumeRoleARN = ""
[provider.google]
enabled = false
# base64 encoded credentials in json format (base64 encoded content of the
credential file)
# credentials = ""
# credentialsFile = ""
# project = ""
[provider.alibaba]
enabled = false
# region = ""
# accessKey = ""
# secretKey = ""
[provider.oracle]
enabled = false
# tenancy = ""
# user = ""
# region = ""
# fingerprint = ""
# privateKey = ""
# privateKeyPassphrase = ""
# configFilePath = ""
# profile = ""
[provider.azure]
enabled = true
# subscriptionId = ""
# Client credentials
clientId = ""
clientSecret = ""
tenantId = ""
[provider.digitalocean]
enabled = false
[provider.vsphere]
enabled = false
# accessToken = ""
[management]
enabled = true
address = ":8001"
[serviceloader]
serviceConfigLocation = "./configs"
serviceConfigName = "services"
format = "yaml"
[store.redis]
enabled = false
host = "localhost"
port = 6379
[store.cassandra]
enabled = false
hosts = "localhost"
port = 9042
keyspace = "cloudinfo"
table = "products"
[store.gocache]
expiration = 0
cleanupInterval = 0
```
```
config-file:
gcp-creds:
```
```
# In config.toml.dist provided below:
[provider.google]
enabled = true
# base64 encoded credentials in json format (base64 encoded content of the credential file)
# credentials = ""
credentialsFile = "/config/gcp-creds.json"
project = ""
```
**3. ceng-secret-mount**
````
```kubectl edit secret ceng-secret-mount -n ```
```ceng-gcp-credentials: ```
````
**4. nextgen-ce configmap**
````
```kubectl edit configmap nextgen-ce -n harness```
Update below fields:
```
GCP_PROJECT_ID:
GCP_SERVICE_ACCOUNT_EMAIL:
```
````
Following are some secrets from platform-service that you will need to update:
1. **smtp-secret** \[Required to support budget alerts E-mail]
`kubectl edit secret smtp-secret -n `
```
SMTP_HOST:
SMTP_PASSWORD:
SMTP_PORT:
SMTP_USE_SSL:
SMTP_USERNAME:
```
{% hint style="info" %}
Run `kubectl edit pvc wal-volume-harness-timescaledb-0 -n ` and increase to 100Gi. It is used by recommendations and anomalies features within CACM services.
{% endhint %}
## GCP Connector Setup
### Authorize Service Account to access BigQuery and GCS buckets in other projects
In the **Grant Permissions** step of GCP Connector flow, follow below steps:
1. Create same Custom Role with different name in the project for which you are setting up the billing report (refer Step 1 of GCP Setup for creating Custom Role).
2. Follow [these](https://gtseres.medium.com/using-service-accounts-across-projects-in-gcp-cf9473fef8f0) steps to grant role to Service Account to access other project.
3. Click on **Continue** to test the connection.
Please refer [this](#step-3-handling-kubernetes-secrets) doc if you encounter any difficulties understanding the process. It provides a comprehensive explanation of all steps accompanied by screenshots.
{% hint style="info" %}
Not supporting **GCP Inventory management** in the **Choose Requirements** step of GCP Connector flow.
{% endhint %}
## Replay GCP Billing Export data
### Step 1: Get GCP Connector details
Use below API to get GCP Connector details for your account.
[Harness API docs](https://apidocs.harness.io)
Body:
```json
{
"filterType": "Connector",
"types": [
"GcpCloudCost"
]
}
```
### Step 2: Update GCP Sync Replay yaml file
Replace each `` in the YAML below with the corresponding value from the connector response retrieved in Step 1.
| YAML Field | Where to get the value |
| ---------------------------- | ------------------------------------------------------------------------------------------ |
| `image` | Path to the GCP Sync K8s Job image. Example: `docker.io/harness/ccm-gcp-smp-signed:100079` |
| `accountId` | `accountIdentifier` from the connector |
| `sourceGcpProjectId` | `spec.projectId` from the connector |
| `sourceDataSetId` | `spec.billingExportSpec.datasetId` from the connector |
| `sourceDataSetRegion` | Check the **Details** section of the billing export table's dataset in GCP |
| `connectorId` | `identifier` from the connector |
| `sourceGcpTableName` | `spec.billingExportSpec.tableId` from the connector |
| `replayIntervalInDays` | Number of days for which you want to replay billing data |
| `http_proxy` / `https_proxy` | Your environment's proxy URL (e.g. `https://proxy.example.com:3128`) |
```yaml
apiVersion: batch/v1
kind: Job
metadata:
name: gcp-sync-k8s-job
namespace: harness
labels:
job-type: gcp-sync-k8s-job
spec:
ttlSecondsAfterFinished: 604800
template:
spec:
containers:
- image: ""
imagePullPolicy: IfNotPresent
name: python-gcp-sync-container
command: ["python3.11", "/data-pipeline/gcp_billing_bq_main.py"]
args: [
'{
"accountId": "",
"sourceGcpProjectId": "",
"sourceDataSetId": "",
"sourceDataSetRegion": "",
"connectorId": "",
"sourceGcpTableName": "",
"replayIntervalInDays": ""
}',
]
env:
- name: CLICKHOUSE_ENABLED
valueFrom:
configMapKeyRef:
name: batch-processing
key: CLICKHOUSE_ENABLED
- name: CLICKHOUSE_URL
valueFrom:
configMapKeyRef:
name: batch-processing
key: CLICKHOUSE_URL_PYTHON
- name: CLICKHOUSE_PORT
valueFrom:
configMapKeyRef:
name: batch-processing
key: CLICKHOUSE_PORT_PYTHON
- name: CLICKHOUSE_USERNAME
value: default
- name: CLICKHOUSE_PASSWORD
valueFrom:
secretKeyRef:
name: clickhouse
key: admin-password
- name: CLICKHOUSE_SEND_RECEIVE_TIMEOUT
value: "86400"
- name: CLICKHOUSE_QUERY_RETRIES
value: "3"
- name: HMAC_ACCESS_KEY
valueFrom:
secretKeyRef:
name: batch-processing
key: HMAC_ACCESS_KEY
- name: HMAC_SECRET_KEY
valueFrom:
secretKeyRef:
name: batch-processing
key: HMAC_SECRET_KEY
- name: SERVICE_ACCOUNT_CREDENTIALS
valueFrom:
secretKeyRef:
name: batch-processing
key: ce-batch-gcp-credentials
- name: http_proxy
value: ""
- name: https_proxy
value: ""
resources:
limits:
cpu: "1"
memory: 2Gi
requests:
cpu: "1"
memory: 2Gi
terminationMessagePath: /dev/termination-log
terminationMessagePolicy: File
dnsPolicy: ClusterFirst
restartPolicy: OnFailure
schedulerName: default-scheduler
securityContext: {}
terminationGracePeriodSeconds: 30
backoffLimit: 3
```
### Step 3: Apply/Delete GCP Sync Replay yaml file
```
kubectl apply -f //gcp-sync-replay.yaml
kubectl delete -f //gcp-sync-replay.yaml
```
{% hint style="info" %}
Job name should be unique. OR delete the existing job and re-apply it.
{% endhint %}
{% @harness-feedback/feedback %}