Get Started
This topic talks about Harness cloud asset governance.
Navigate to Setup > Cloud Providers > Add a Connector
Select your cloud provider (AWS, Azure, or GCP)
During connector setup, ensure you select "Cloud Governance" under "Choose Requirements".
Verify Required Permissions
Ensure your connector has all required permissions for each cloud provider:
For AWS: Verify IAM roles include necessary read permissions for resource discovery
For Azure: Confirm service principal has appropriate Reader roles
For GCP: Check service account permissions for resource monitoring
After connector configuration, CACM takes up to 24 hours to collect data and identify resources.
Key Concepts
Cloud Asset Governance operates through four essential concepts working together: Rules, Rule Sets, Enforcements, Evaluations.
Rules are set of instructions you write in form of code to manage your cloud resources automatically. A Rule is essentially a file with a set of logic that you can run on your cloud infrastructure.
Example: Suppose you want all your EBS volumes to use the newer, cheaper gp3 type instead of gp2.
Without rules: you'd have to manually check every volume and upgrade it.
With a rule: the system finds all gp2 volumes and migrates them to gp3 for you.
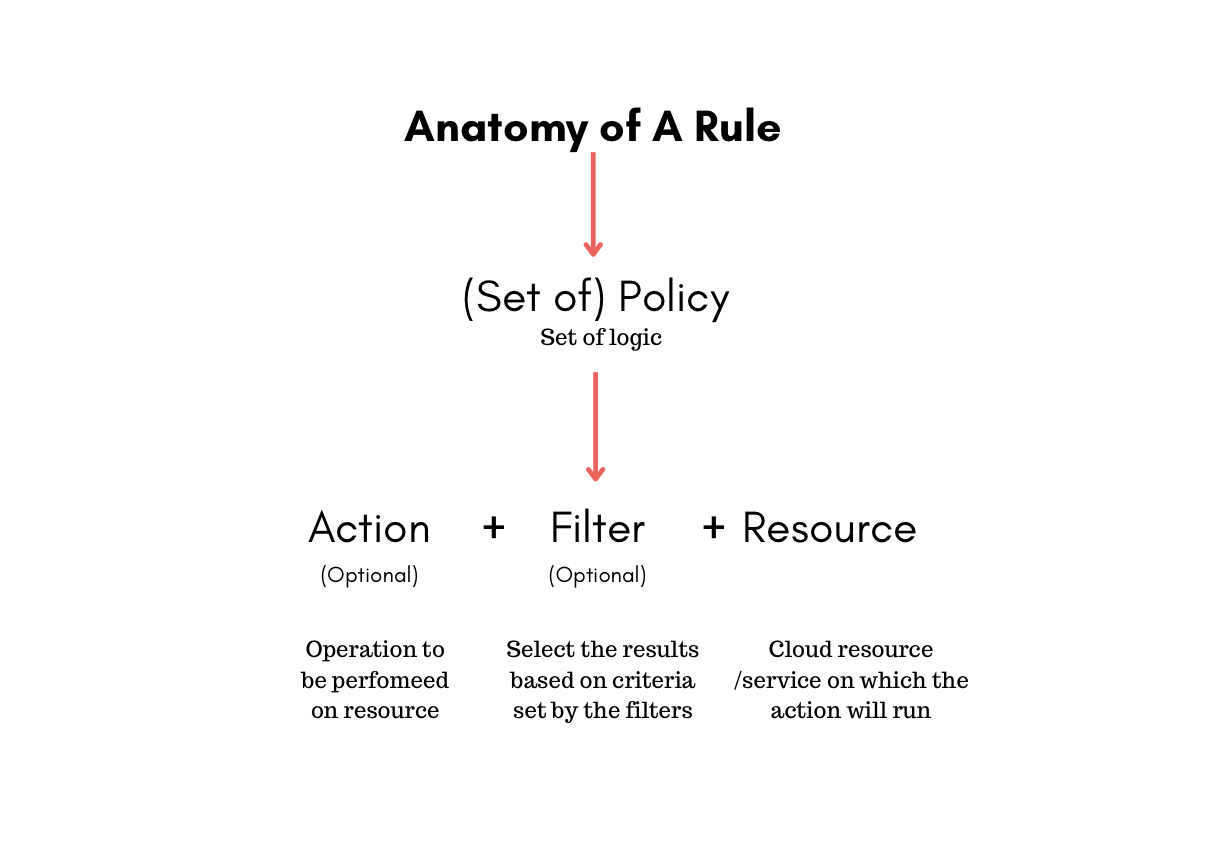
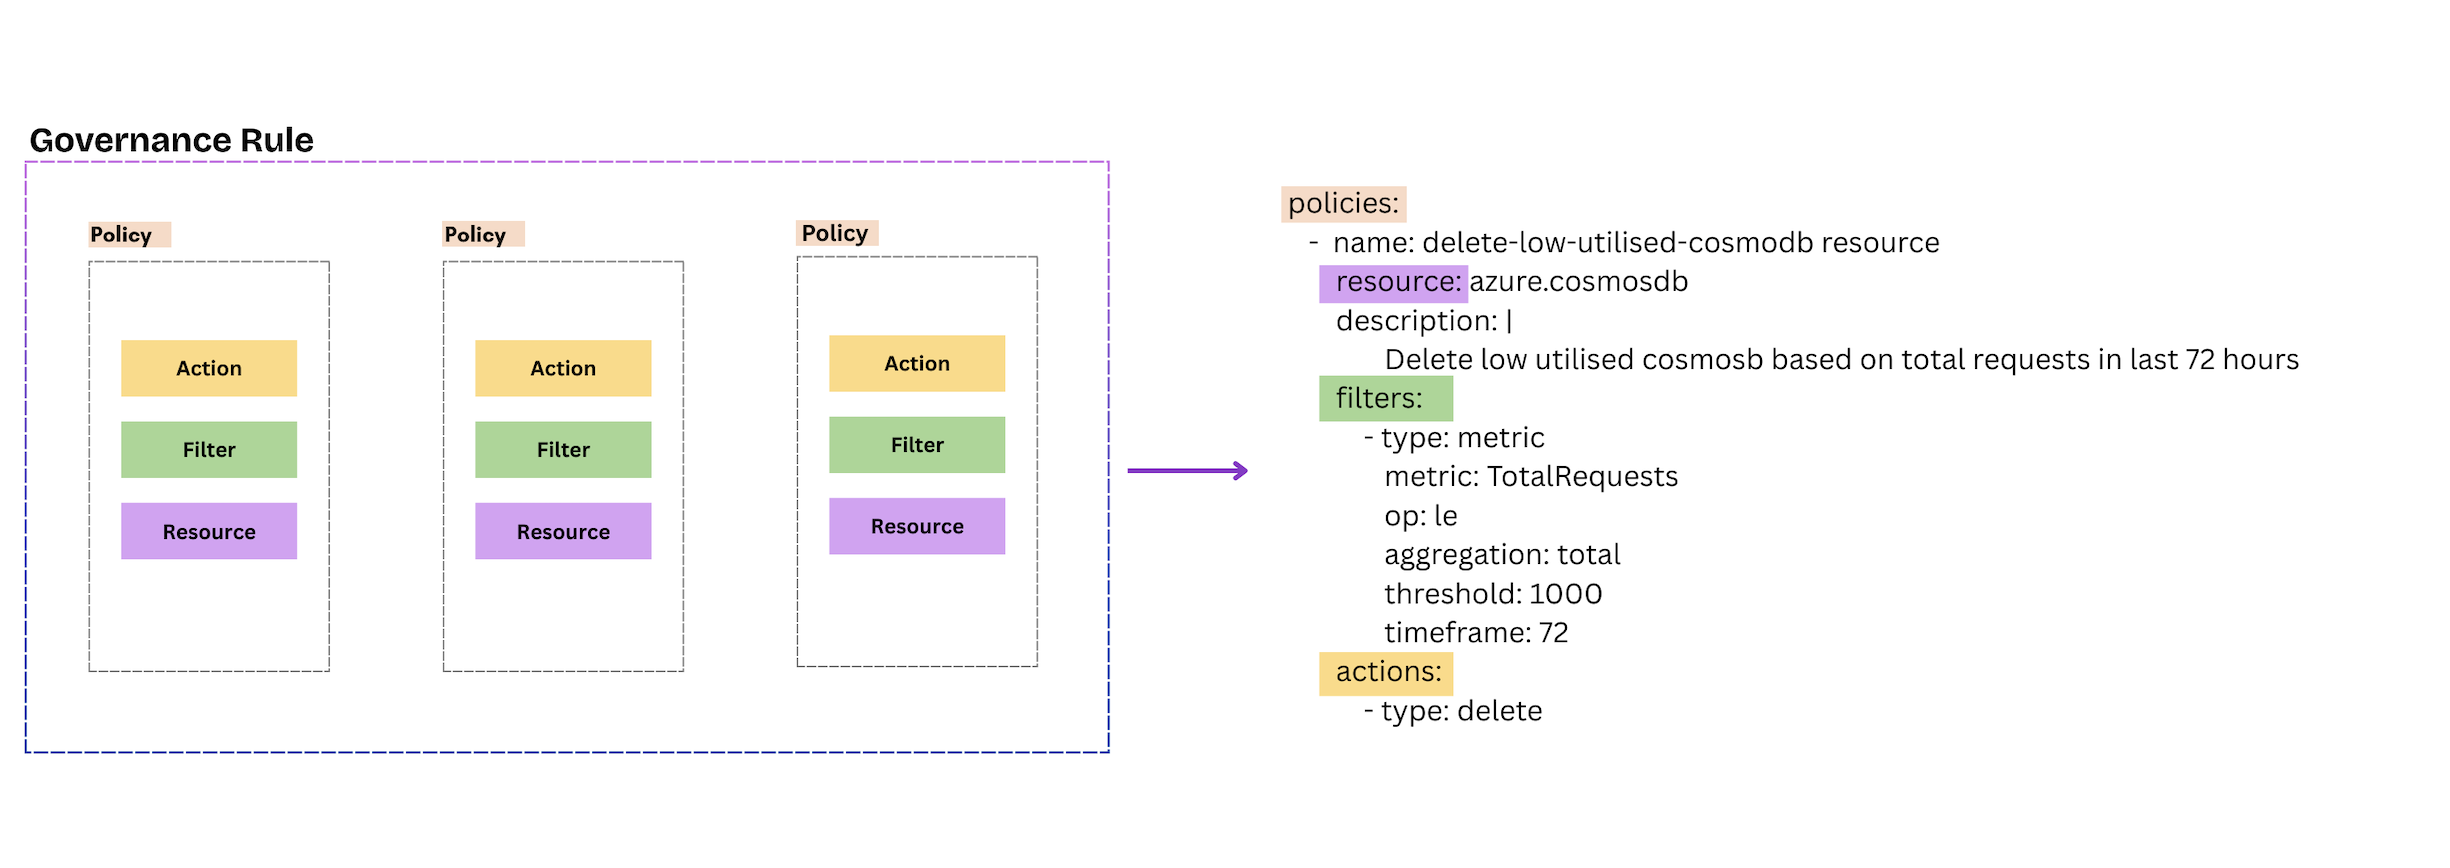
What makes up a Rule: Ideally, rules contain policies which include resource, filters, and actions. A rule is written in YAML format. Rules can include multiple policies.

A policy is the overall instruction and consists of filters and actions that are applied to a specific type of cloud resource.
A resource is the type of cloud resource or service on which the rule will be run with the actions and filters, such as Azure VMs, AKS, Cosmos DB, etc.
A filter, as the name suggests, is a criteria used to narrow down the results based on the attributes. These attributes can include anything such as tags, metadata, or any other resource property provided by you. When the filter is applied, only those resources that match the criteria specified in the filter are given as a result.
Actions are operations performed on the filtered resources. Actions include things like terminating an azure vm, deleting an azure storage-container, or sending an email notification.

So essentially, a Rule is a file that includes logic defined by a policy that performs certain actions on the resource based on the filters provided by the user.
Create a new Rule
In Harness, go to Cloud Costs > Asset Governance > Rules. Select + New Rule.

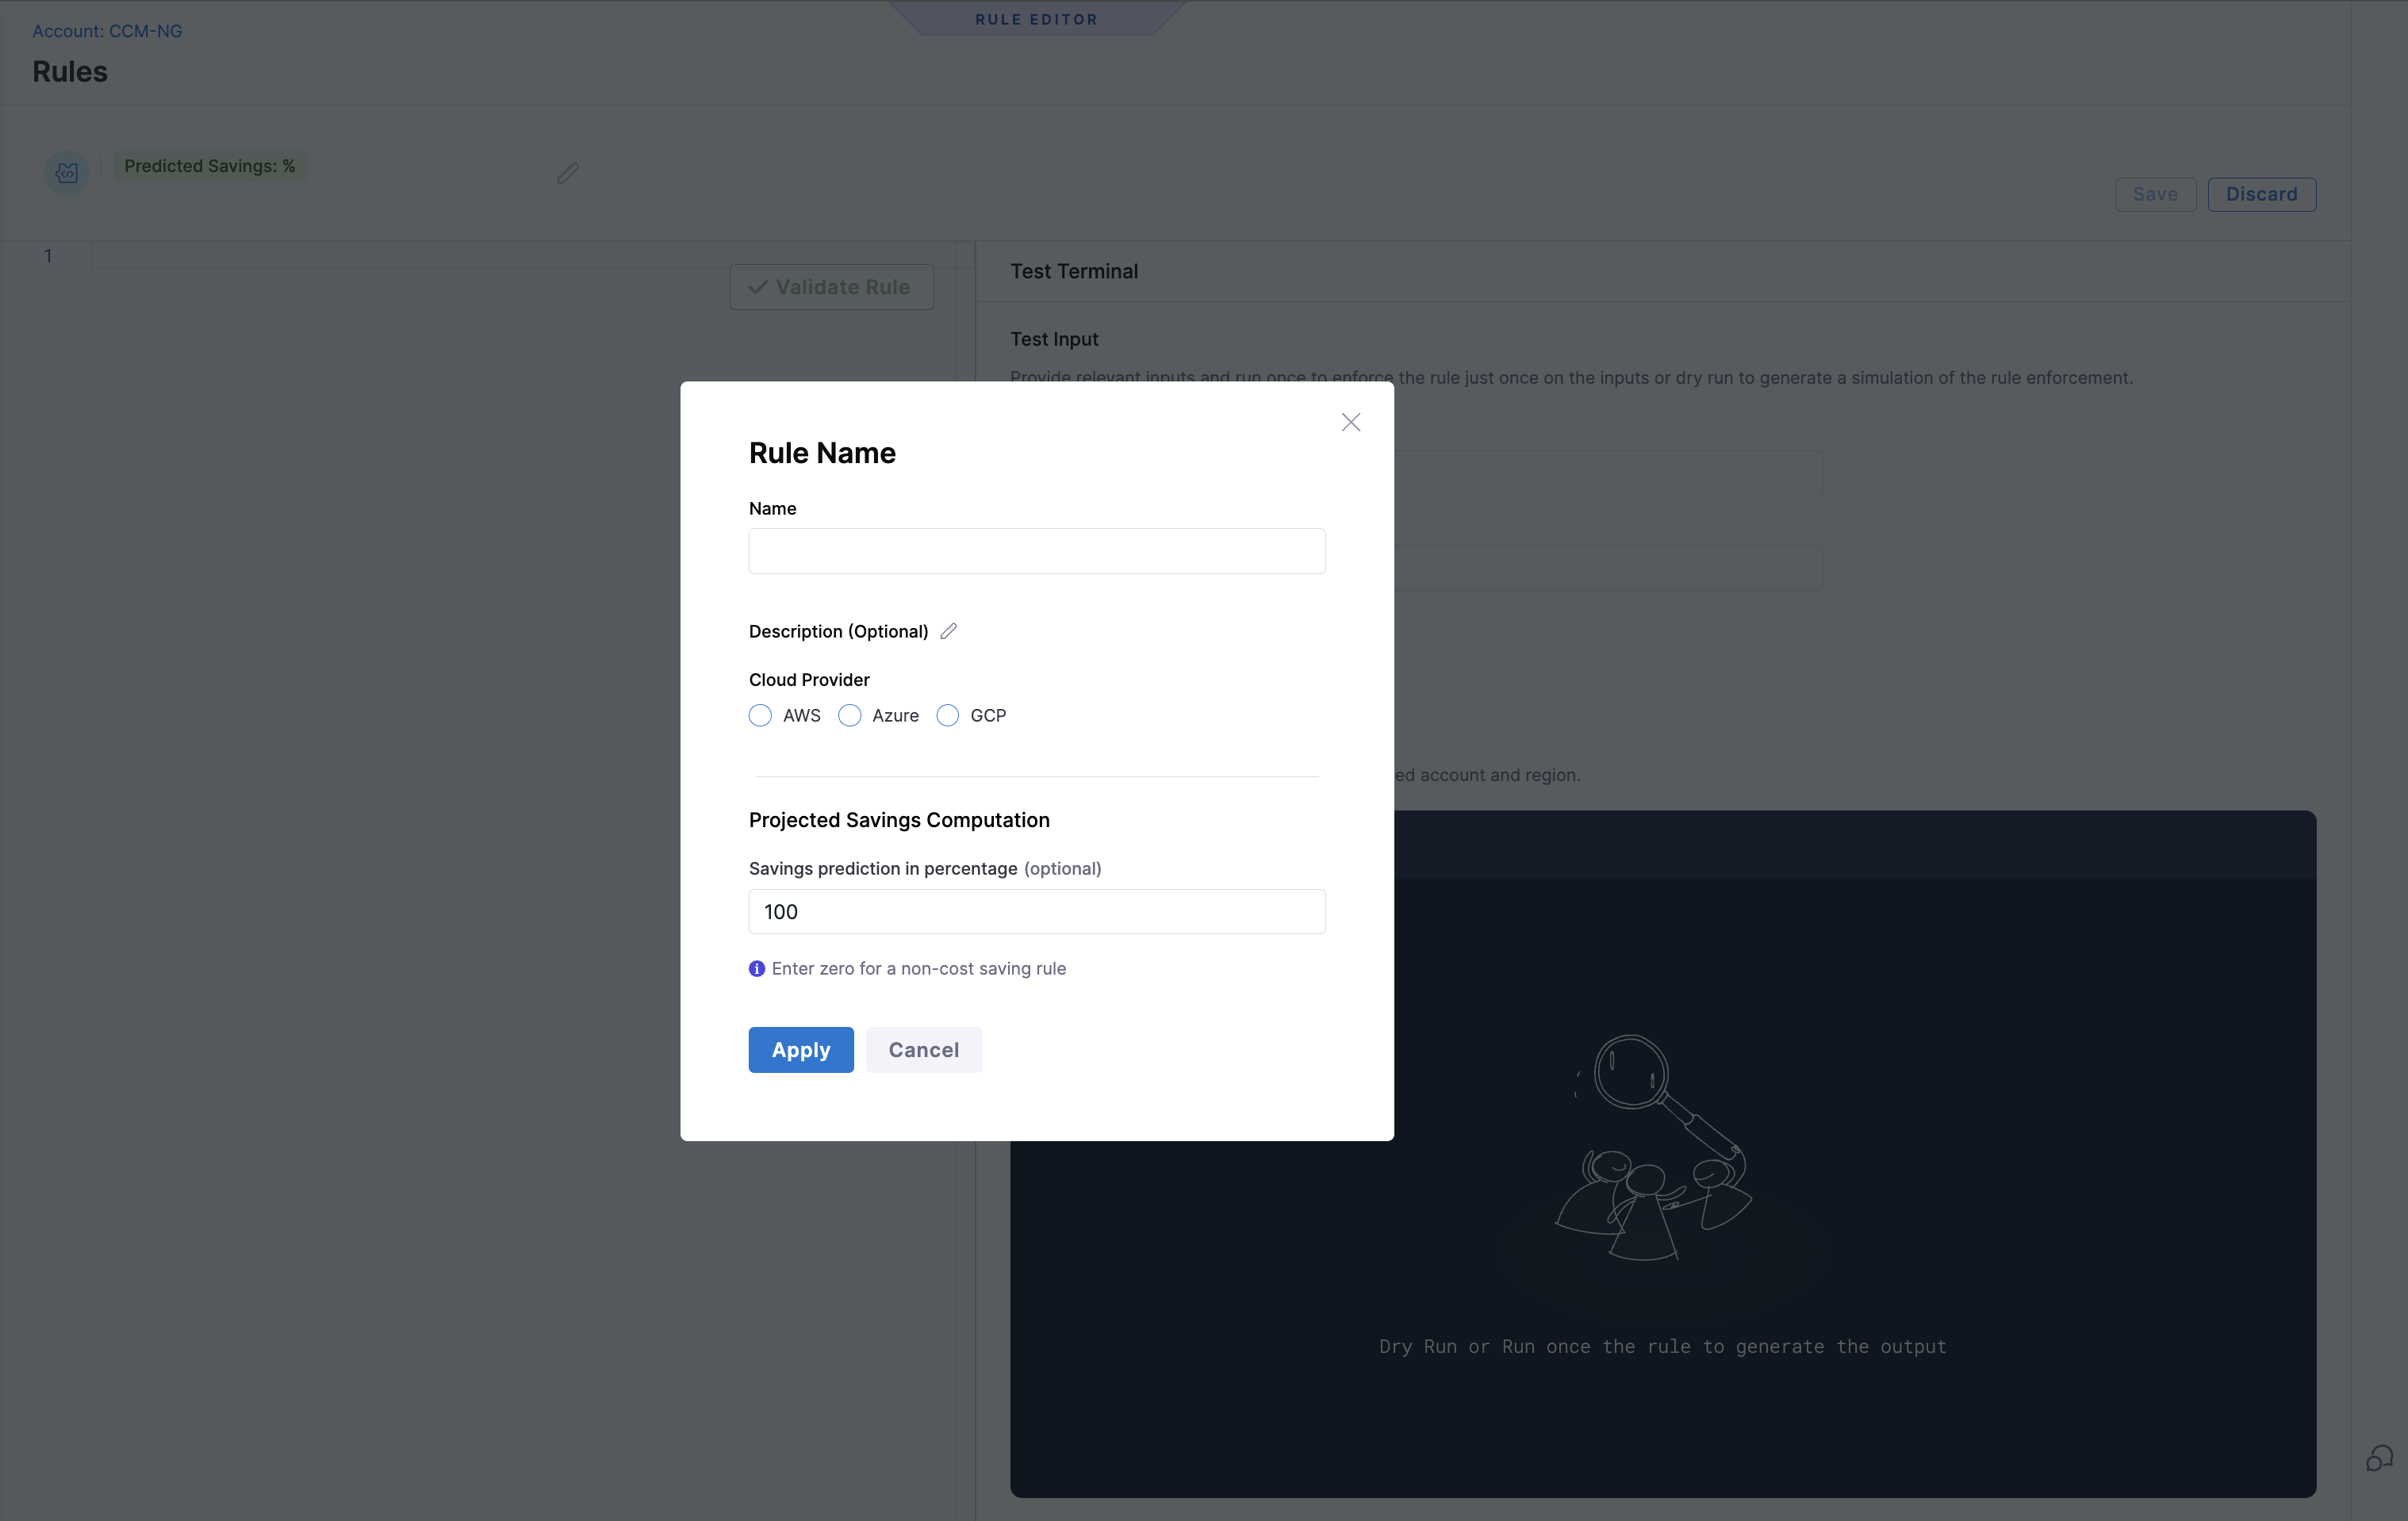
Enter a name for the rule, select the cloud provider. Also, enter Savings prediction in percentage (optional). This custom percentage will be honored during savings computation. Savings prediction is used to calculate the savings that can be achieved by enforcing the rule.
Optionally, enter a description of the rule. Select Apply.
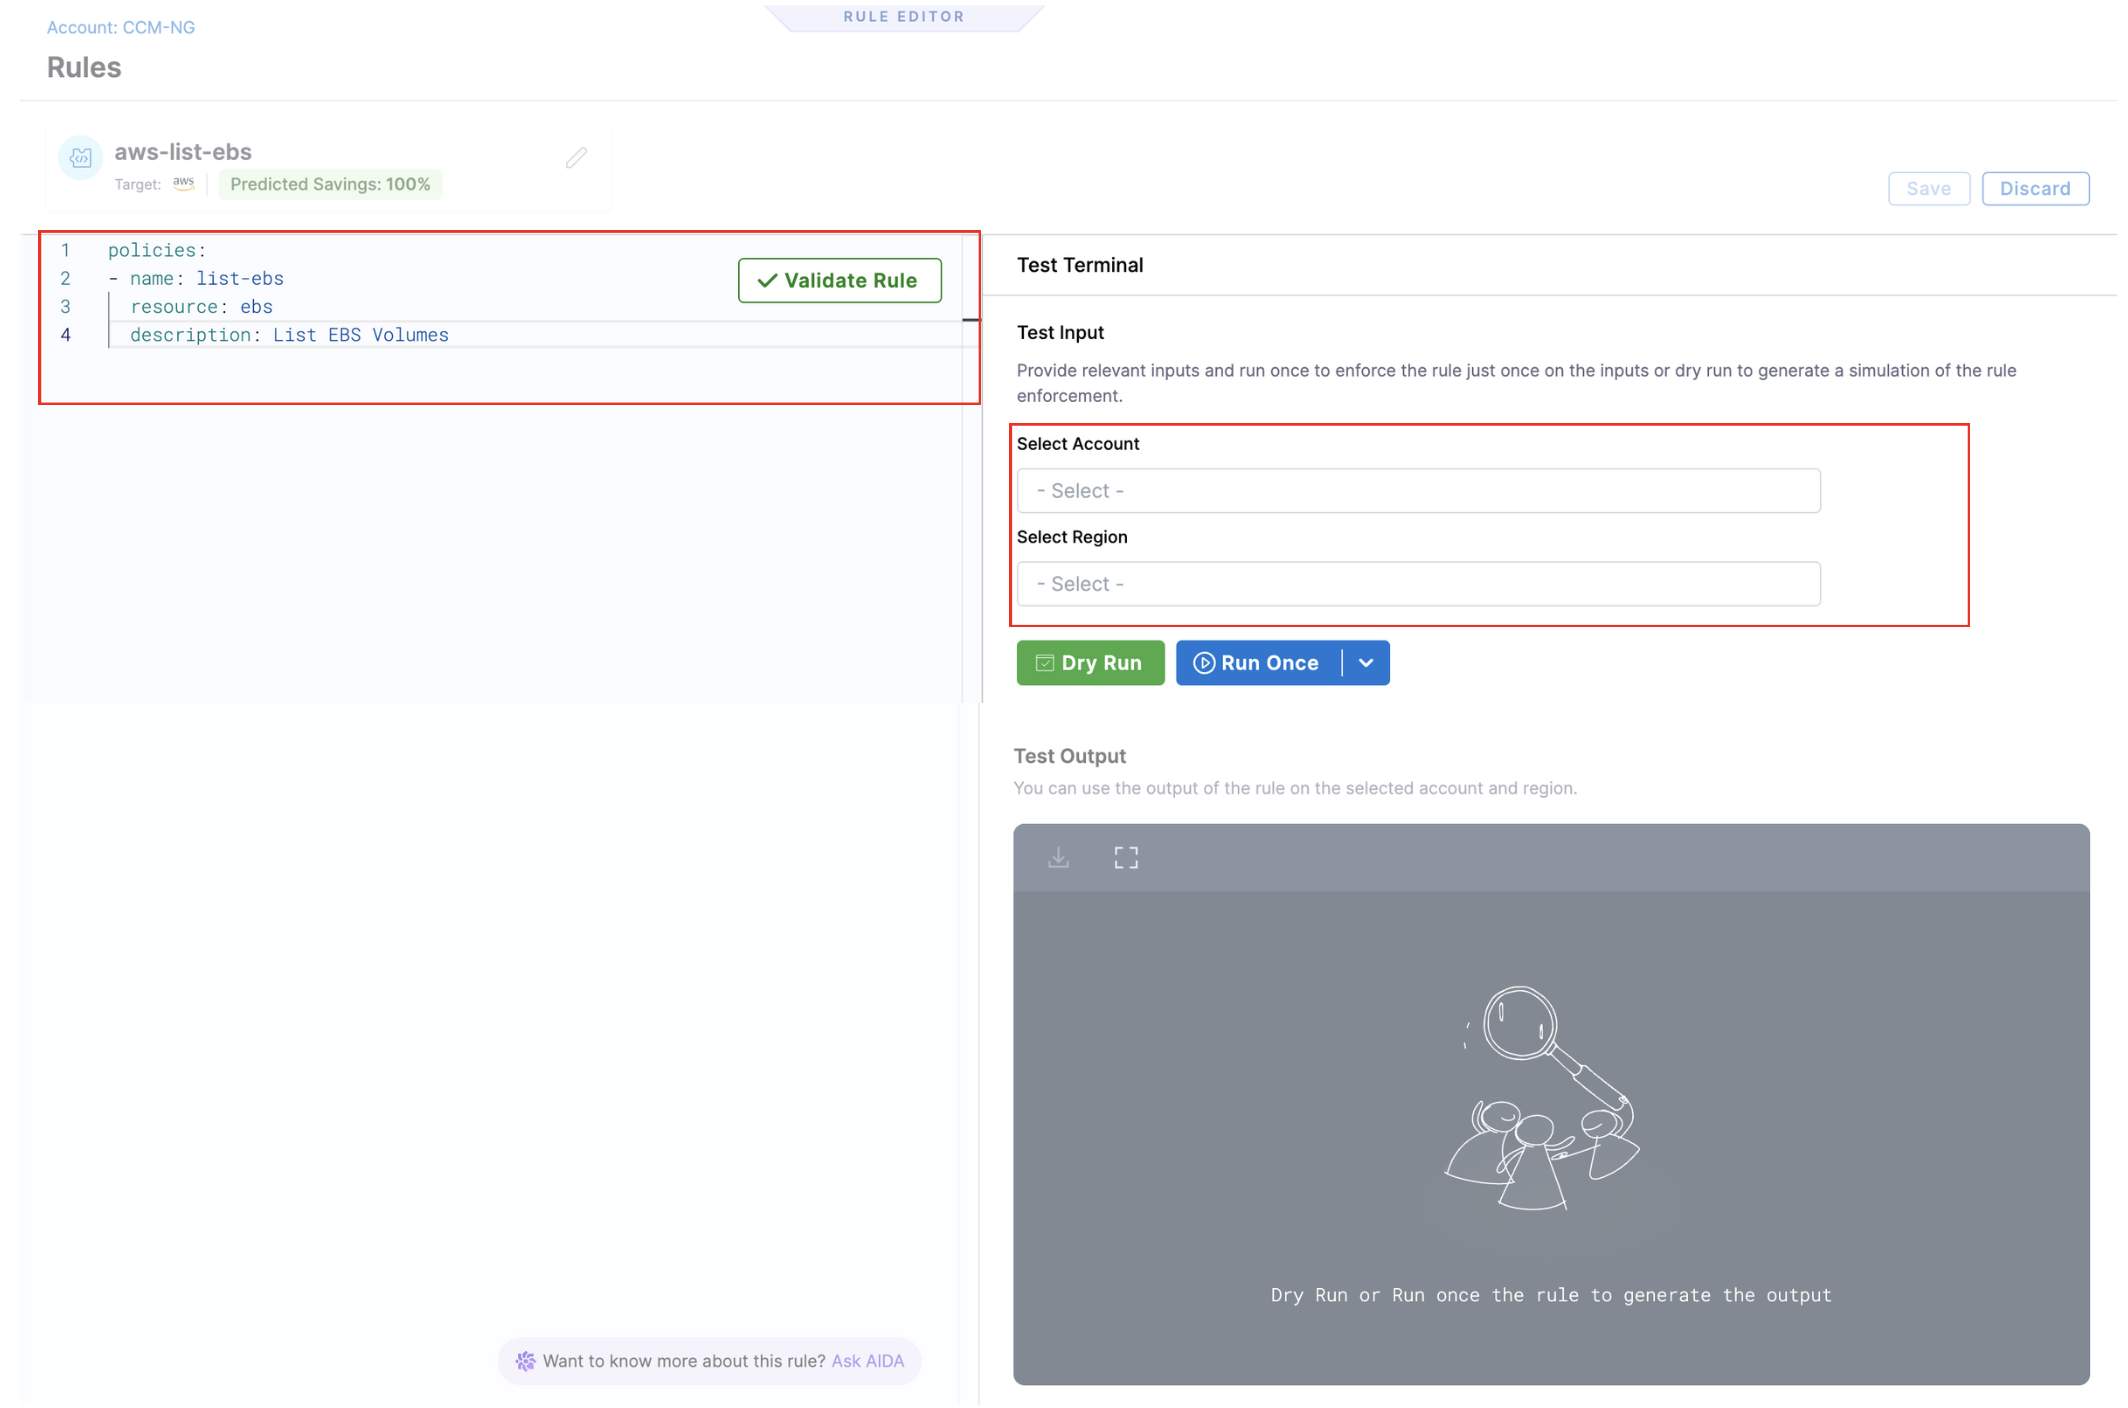
Enter the YAML policy in the rule editor. Select Save. If the policy is invalid, an error message is displayed.
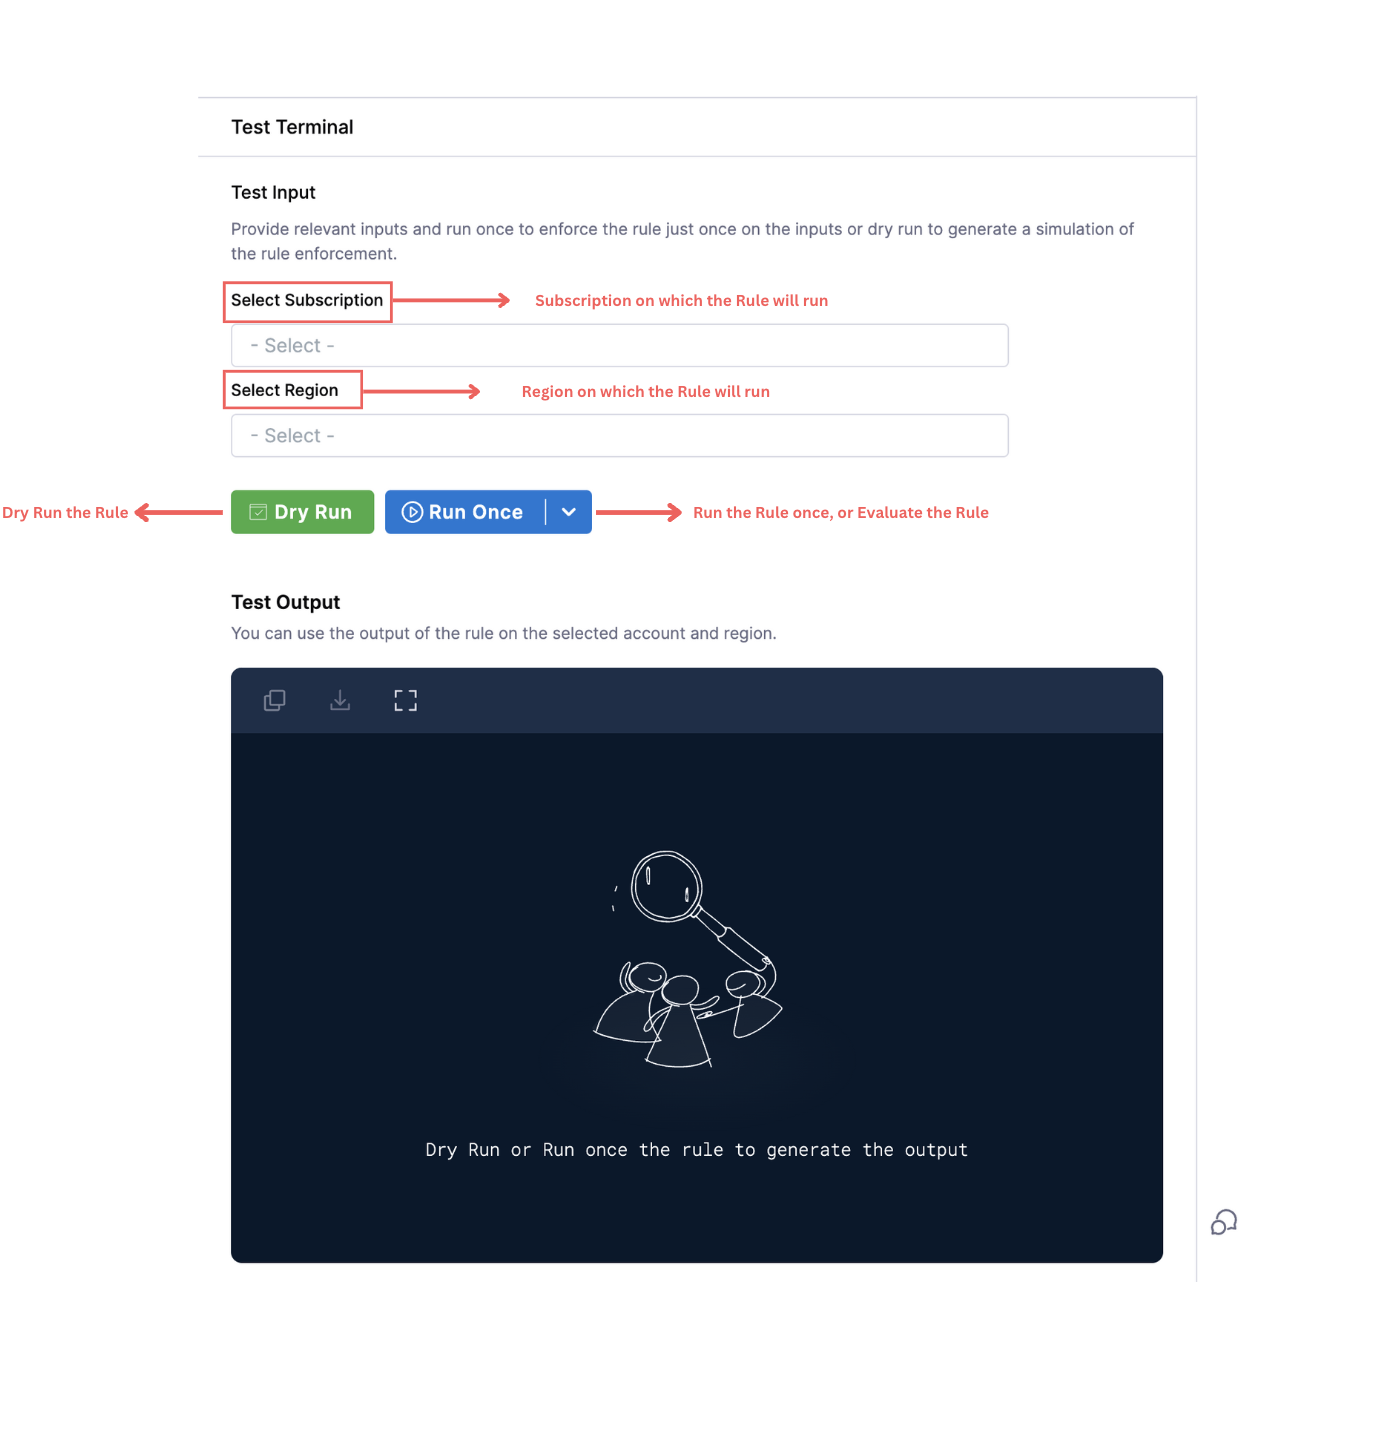
Select the Account/Project/Subscription and the Region from the dropdown list in the Test Terminal. Select Dry Run to view the instances or services that will be acted upon when you enforce the rule.
After evaluating the output, select Run Once to execute the rule.

Update/Delete a Rule
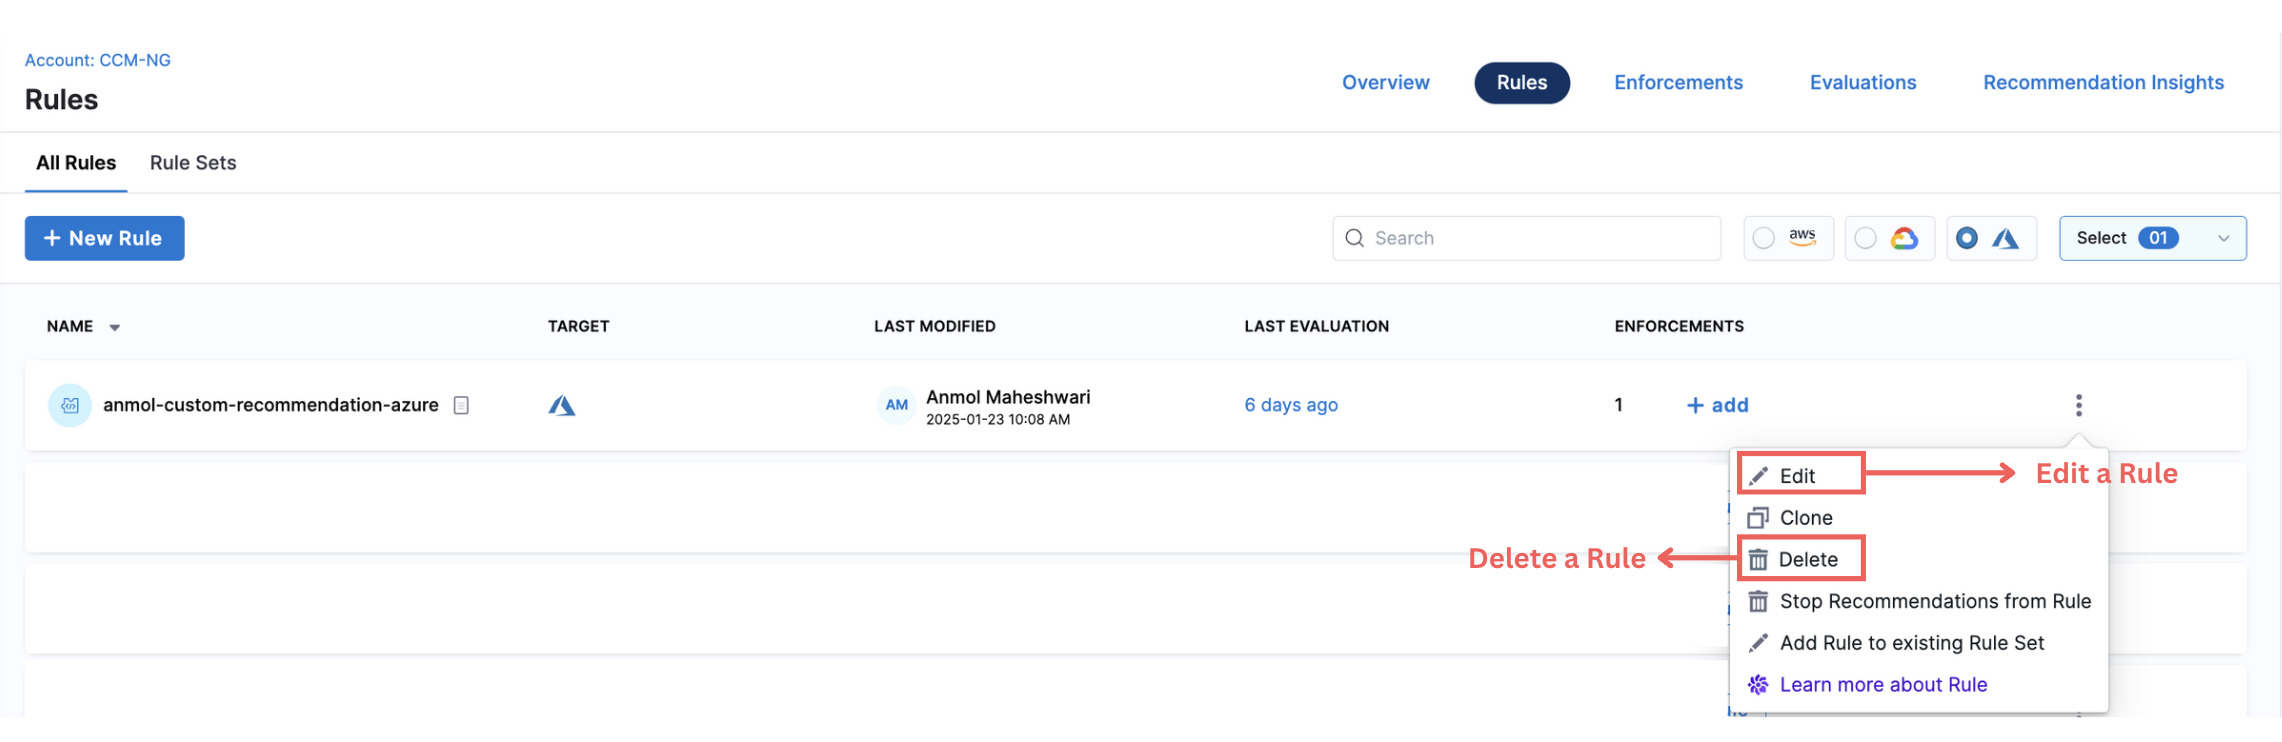
You can view the Rules on the Asset Governance Rules page. You can click on Edit button from the vertical ellipsis menu (⋮) to edit a Rule or simply click on the Rule to open Rule editor and then make changes.
To delete a Rule Set, click on Delete from the vertical ellipsis menu (⋮).

Click to view full size image
Testing Terminal
In the rule editor, a test terminal is present for users to see the output in the terminal itself upon evaluating a Rule. This is done to ensure that users can run the rules and try accordingly to check how the output would look on the selected subscription and region. There are two options: first, to select the target subscription and second, to select the regions. After providing the relevant inputs, the users can select either to dry run the rule first, run it once or enforce the rule.

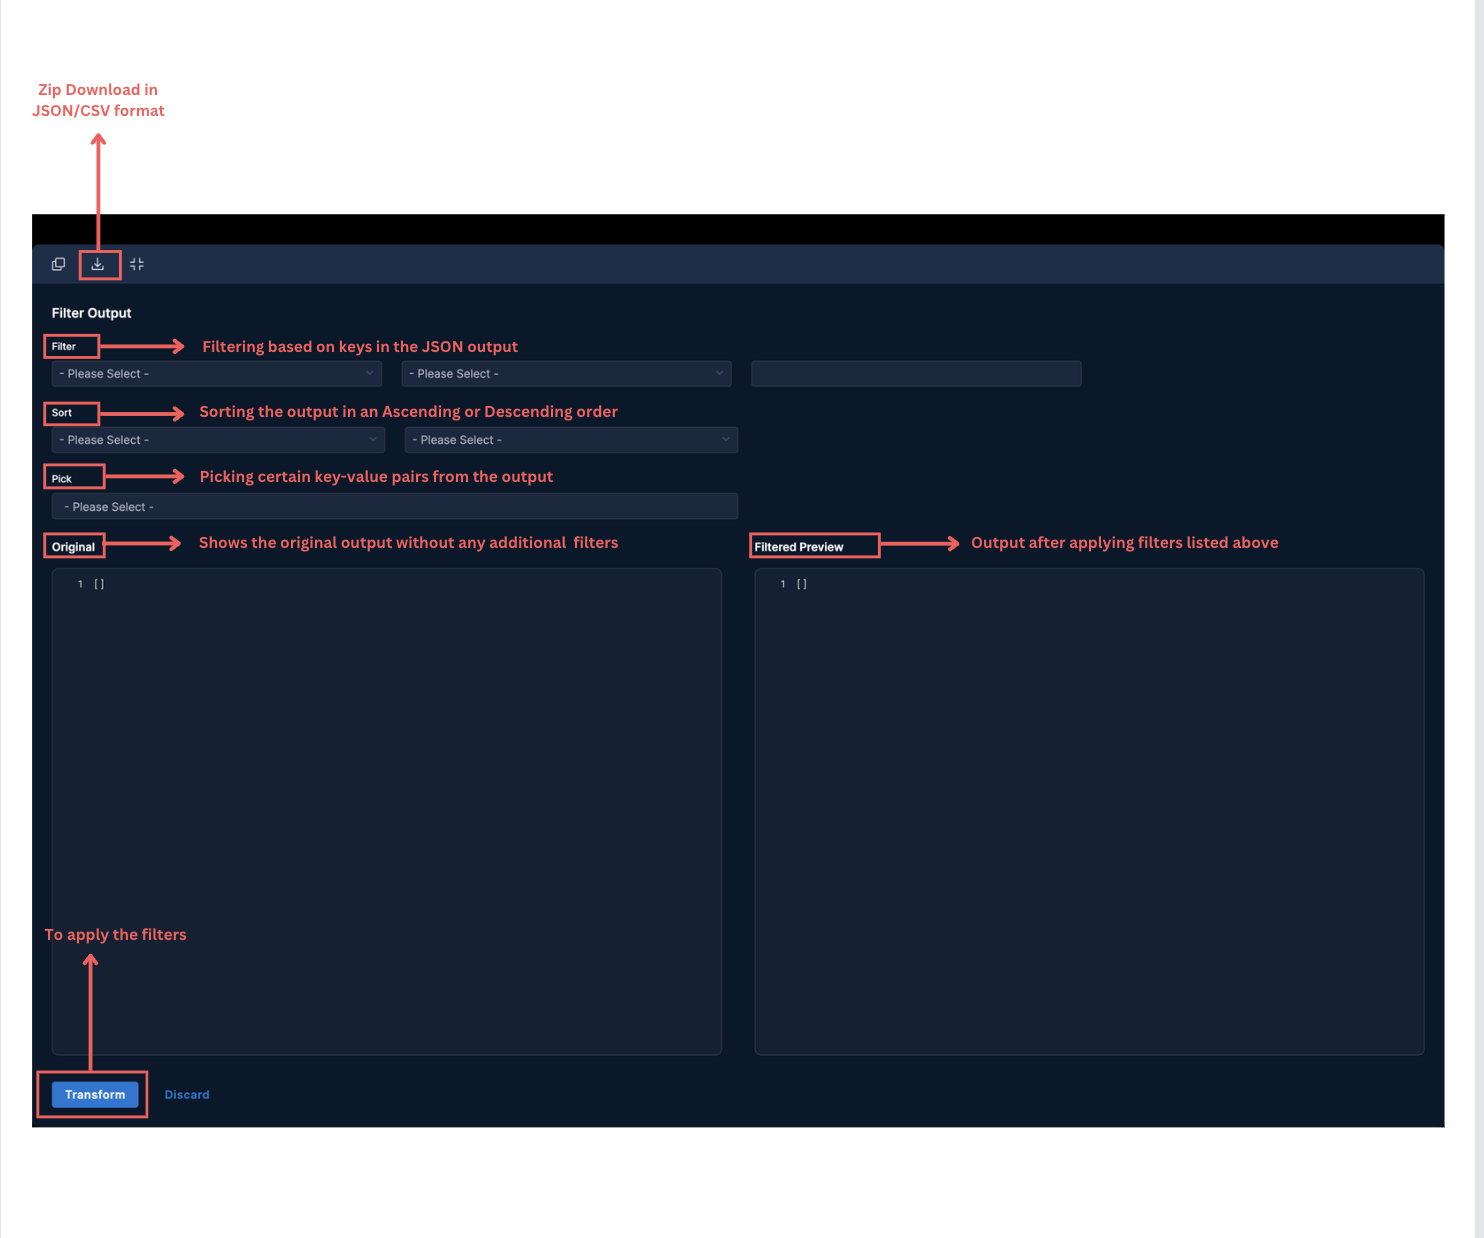
After this, the resources identified are shown on the output terminal in JSON format. With this output, users can perform different actions like searching, downloading, filtering, sorting and picking.

Searching in Output Terminal
After the output is rendered, users can search for any keywords in the output terminal. This streamlines troubleshooting and debugging processes and helps to efficiently locate required information amidst large volumes of output data.
Zip Downloads
The JSON output can be downloaded in either JSON format or a CSV format(original or flatted) into a single zip archive.
JSON Filtering
The output can be filtered based on the keys present in the JSON output. Currently, filtering on the basis of ==, !=, <, <=, >, >= is supported in terms of numeric key values and if the key's value is a string, string matching using LIKE is supported. This feature enables users to extract specific fields, filter out irrelevant data, and perform relevant queries on JSON datasets.
Sorting
The output can be sorted based on the keys present in the JSON output in either an ASCENDING or DESCENDING manner.
Pick
If output needs to be streamlined and only a few keys-value pairs are required, 'Pick' functionality can be used. Using this, users can pick only the required keys and see the data associated with them in the output.
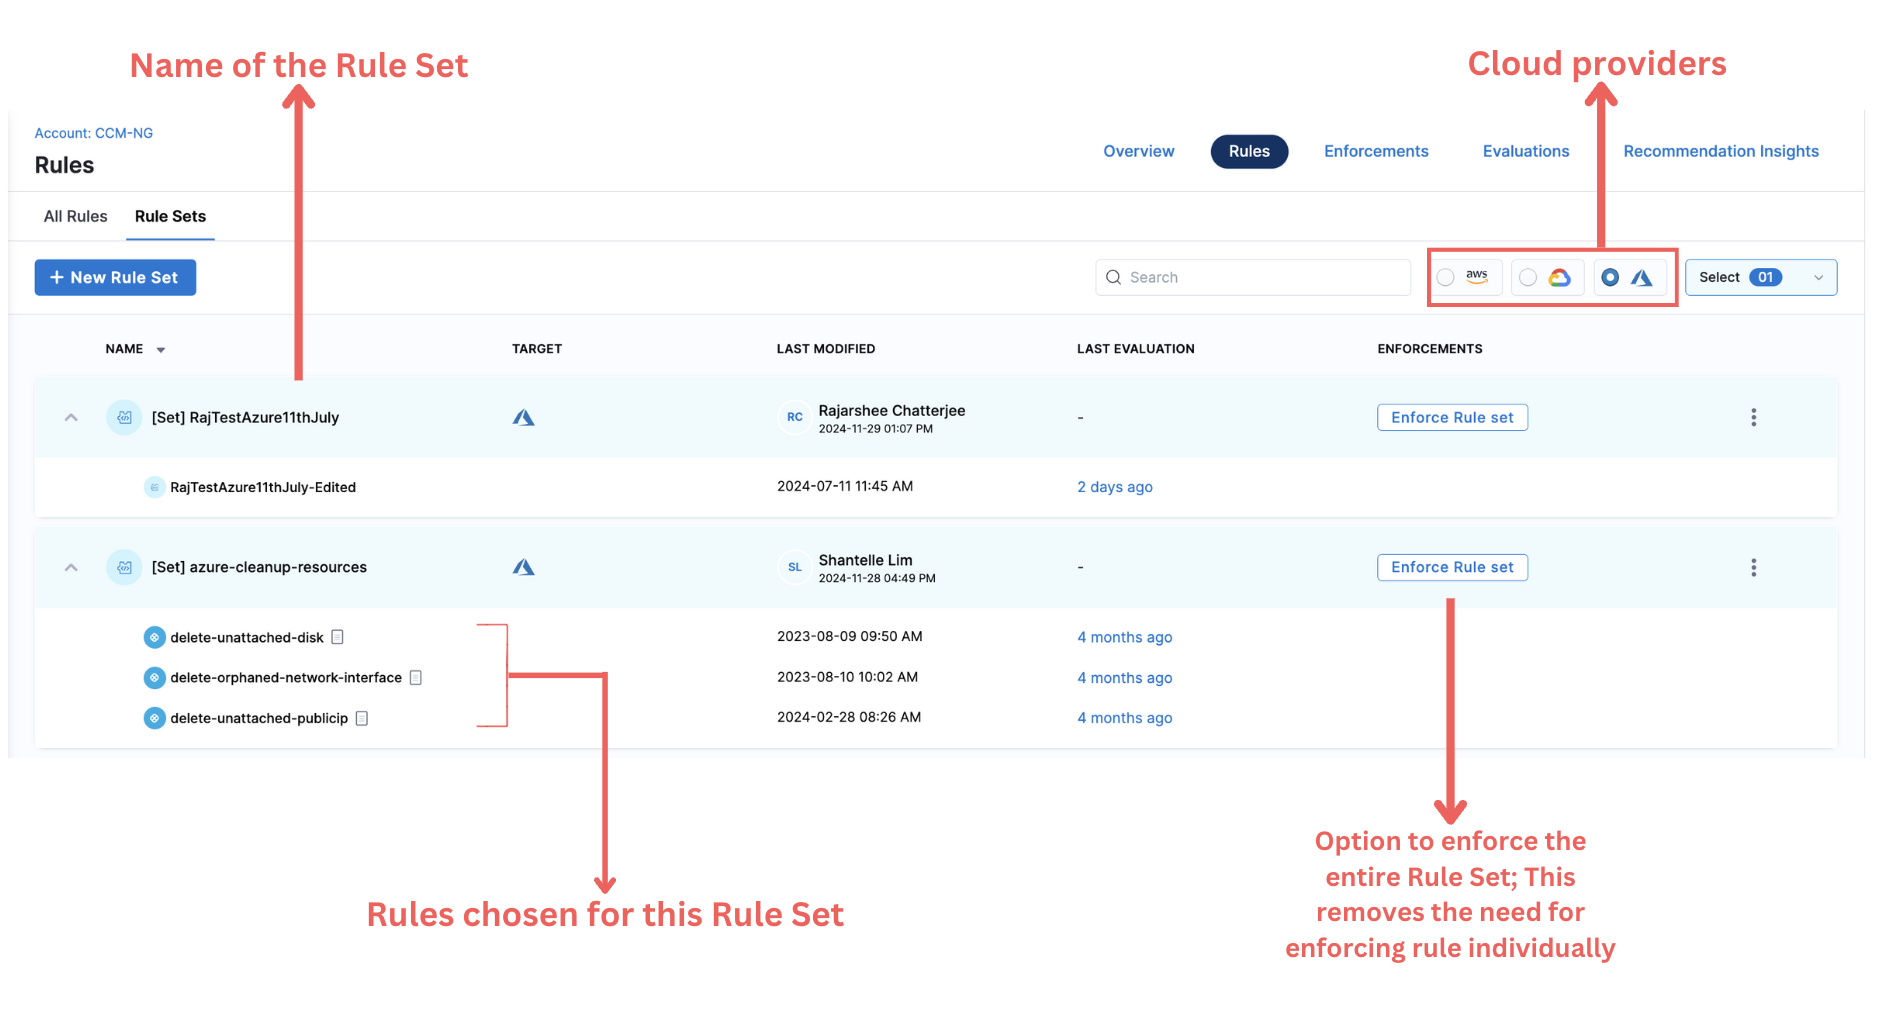
As mentioned previously, a Rule can have multiple policies. However, when there are multiple rules with multiple policies, it can become hard to manage them all together. This is where Rule Sets can be used. Rule sets serve as logical bindings on top of individual rules that help you organize and manage rules. By organizing rules into sets, organizations improve accessibility and simplify maintenance, as enforcements can be made against the entire rule set rather than individual rules.

Create a new Rule Set
To create a Rule Set, perform the following steps:
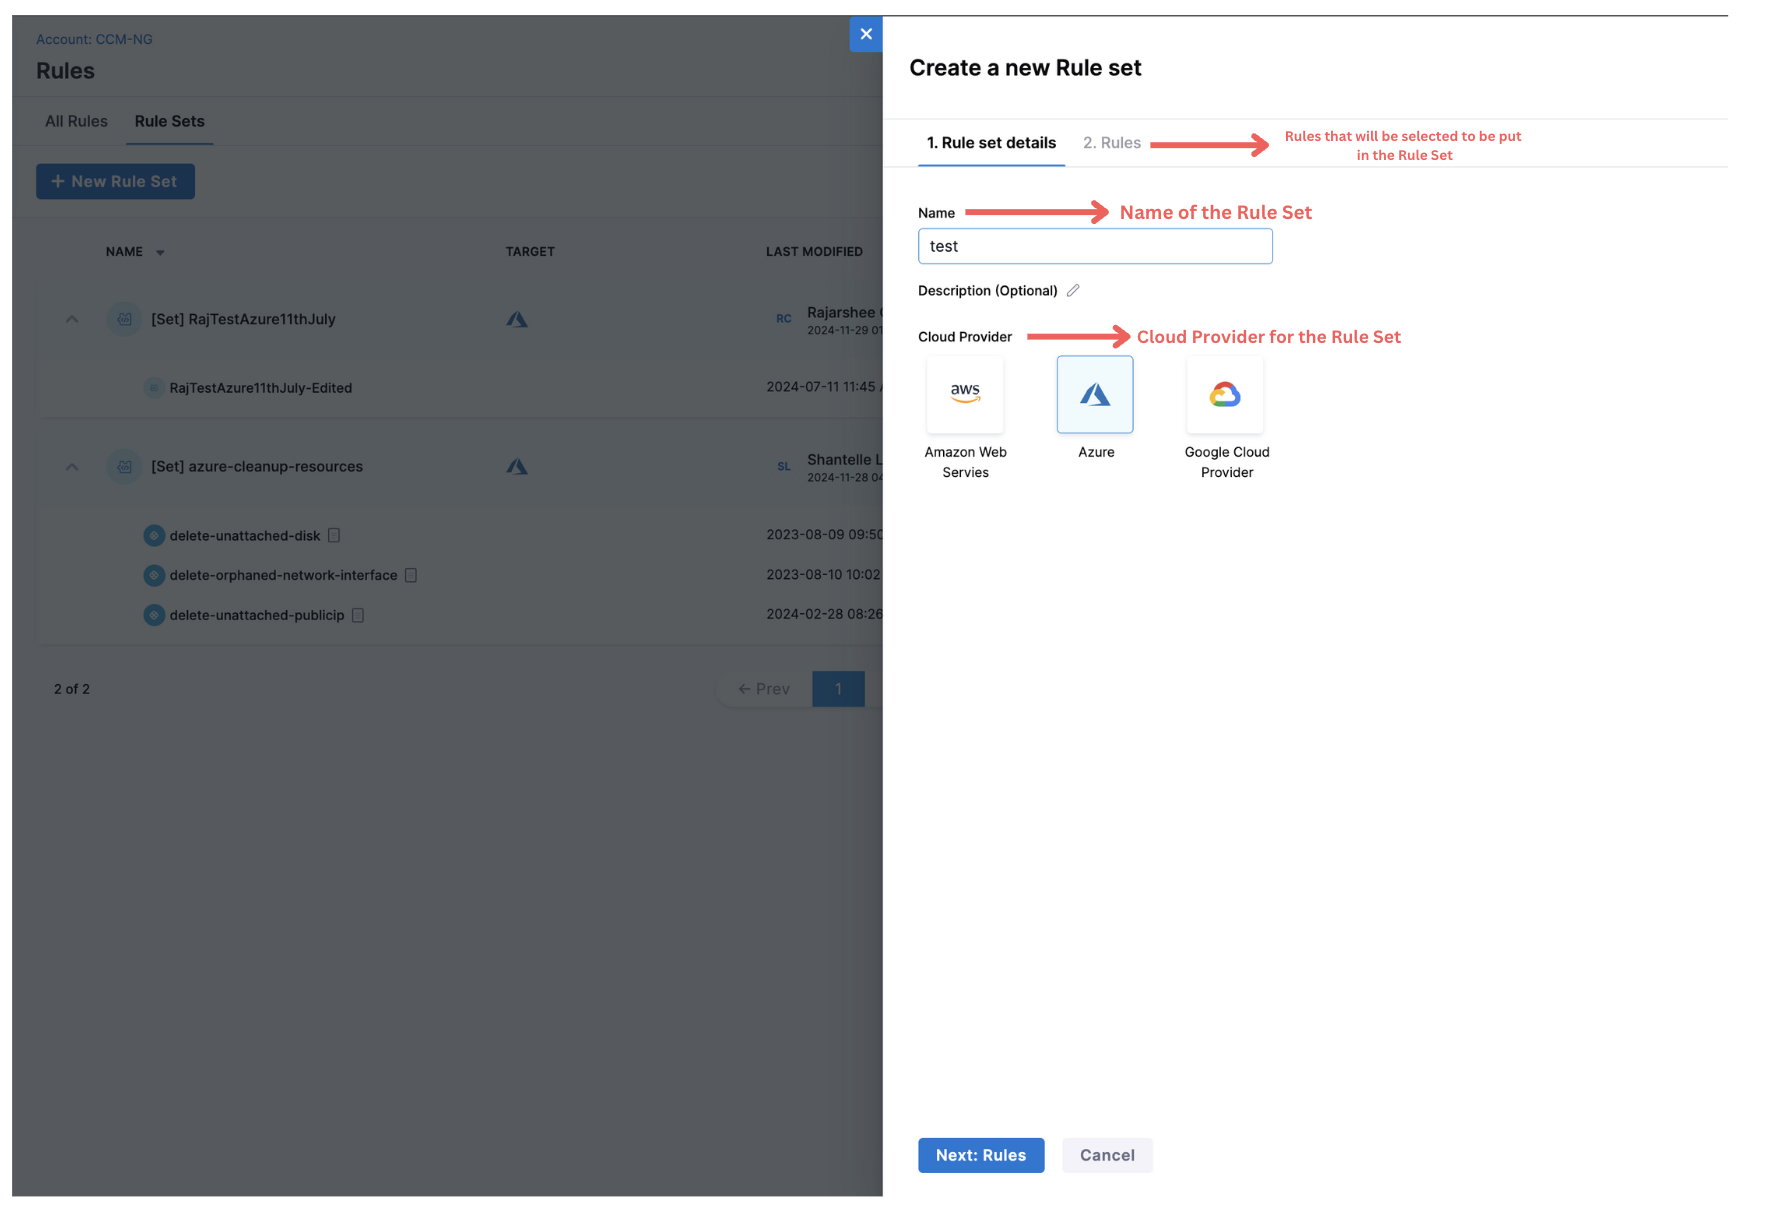
In Harness, go to Cloud Costs > Asset Governance > Rules > Create a new Rule Set
Enter a name for the rule set. Optionally, enter a description of the rule set.
Select the cloud provider and click on Next.
Select the rules that you want to add to the rule set. Select Create Rule Set.
The rule set is created successfully.

You can view the rule set on the Asset Governance Rules page. Expand the rule set to view the individual rules in the rule set.
Select Enforce Rule Set in the Enforcements column to enforce this rule set.
Update/Delete Rule Set
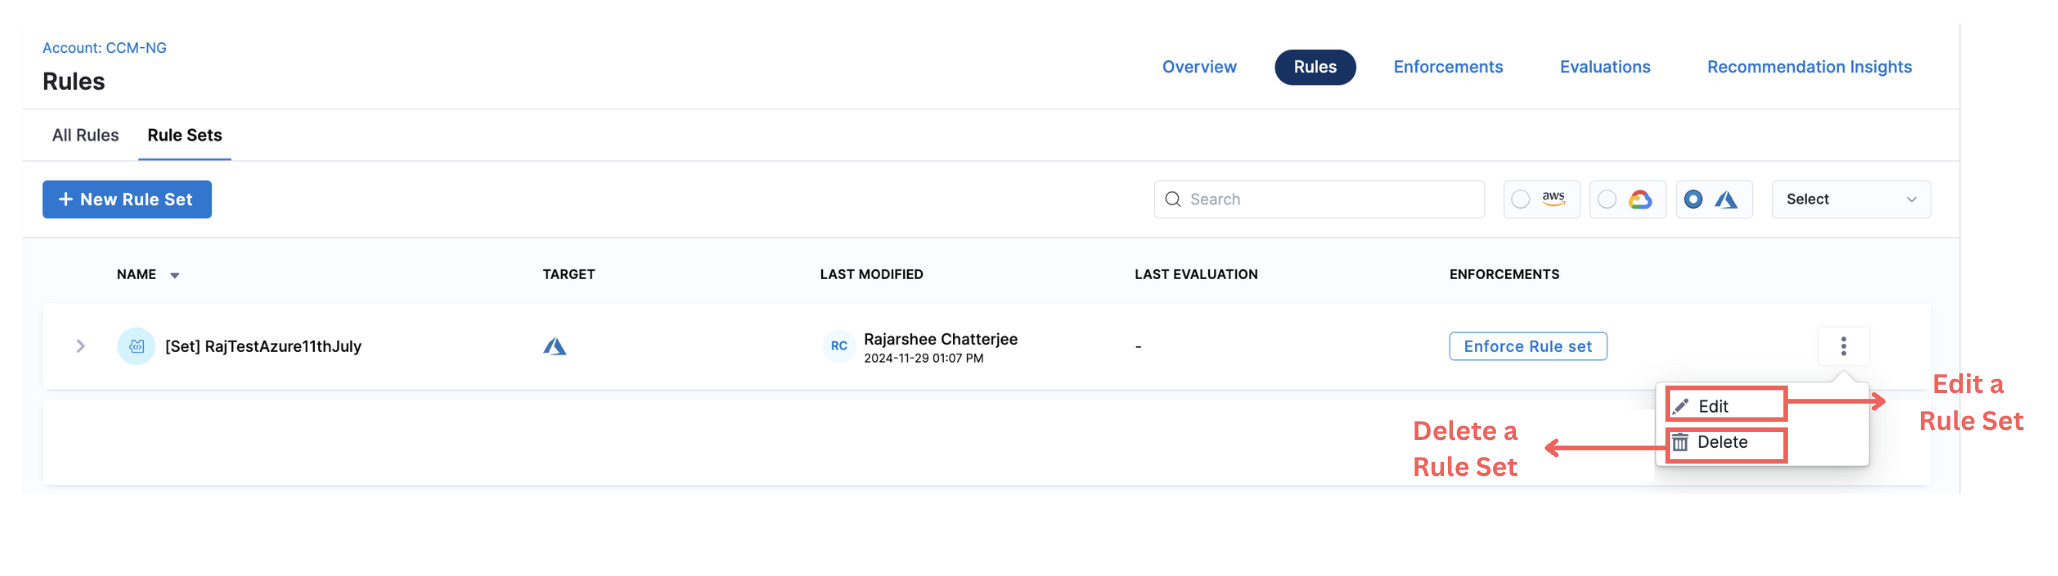
You can view the Rule Set on the Asset Governance Rules page. Expand the rule set to view the individual rules in the rule set. You can click on Edit button from the vertical ellipsis menu (⋮) to edit the rule set.
To delete a Rule Set, click on Delete from the vertical ellipsis menu (⋮).

Enforcements enable you to enforce a certain set of Rules or Rule Sets (also known as governance guardrails) against a specific set of targets (accounts, projects, or subscriptions) to run periodically. Sometimes, we need rules to run periodically, such as every day, week, or month. However, running these rules manually every day or week at a specified time creates extra overhead and is a slow process prone to manual errors.
To solve this, Enforcements allow users to set up a timely schedule and choose the day, time, and frequency for their rules or rule sets.
For example: A user can create an Enforcement to schedule the deletion of all unattached disks. This Enforcement will run on the days specified by the user, at the specified time, and with the specified frequency (hourly, daily, monthly). For instance, you could set it to run daily at 2:00 AM to ensure that any unattached disks meeting the criteria are removed. Alternatively, you might choose to run it hourly during peak usage times, or monthly for less critical cleanup tasks.

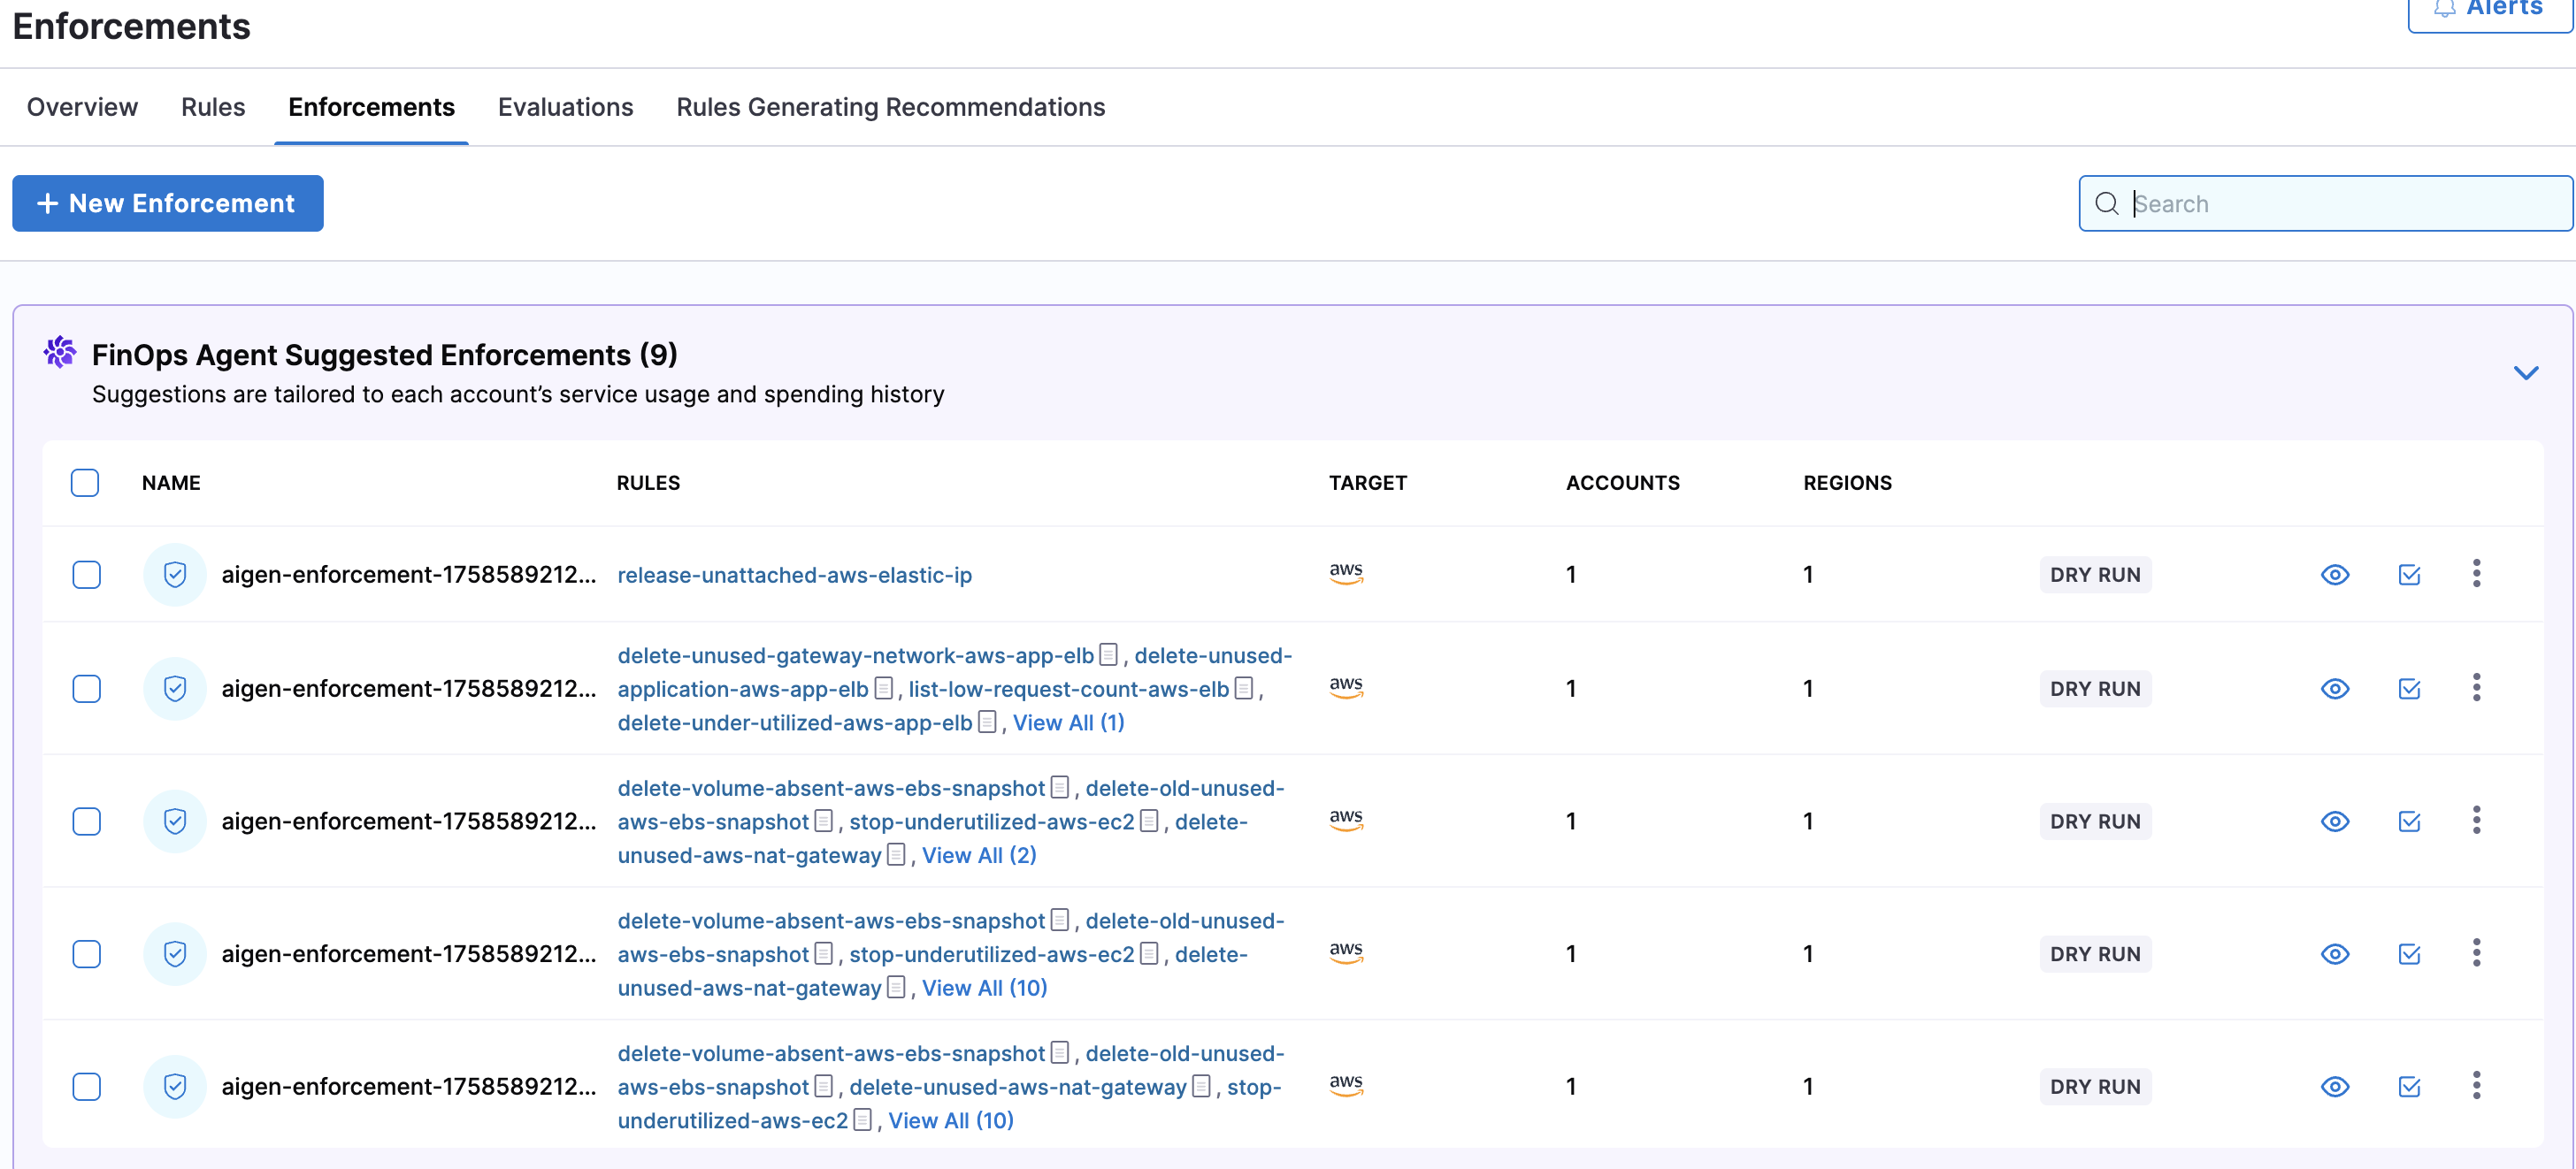
FinOps Agent Suggested Enforcements

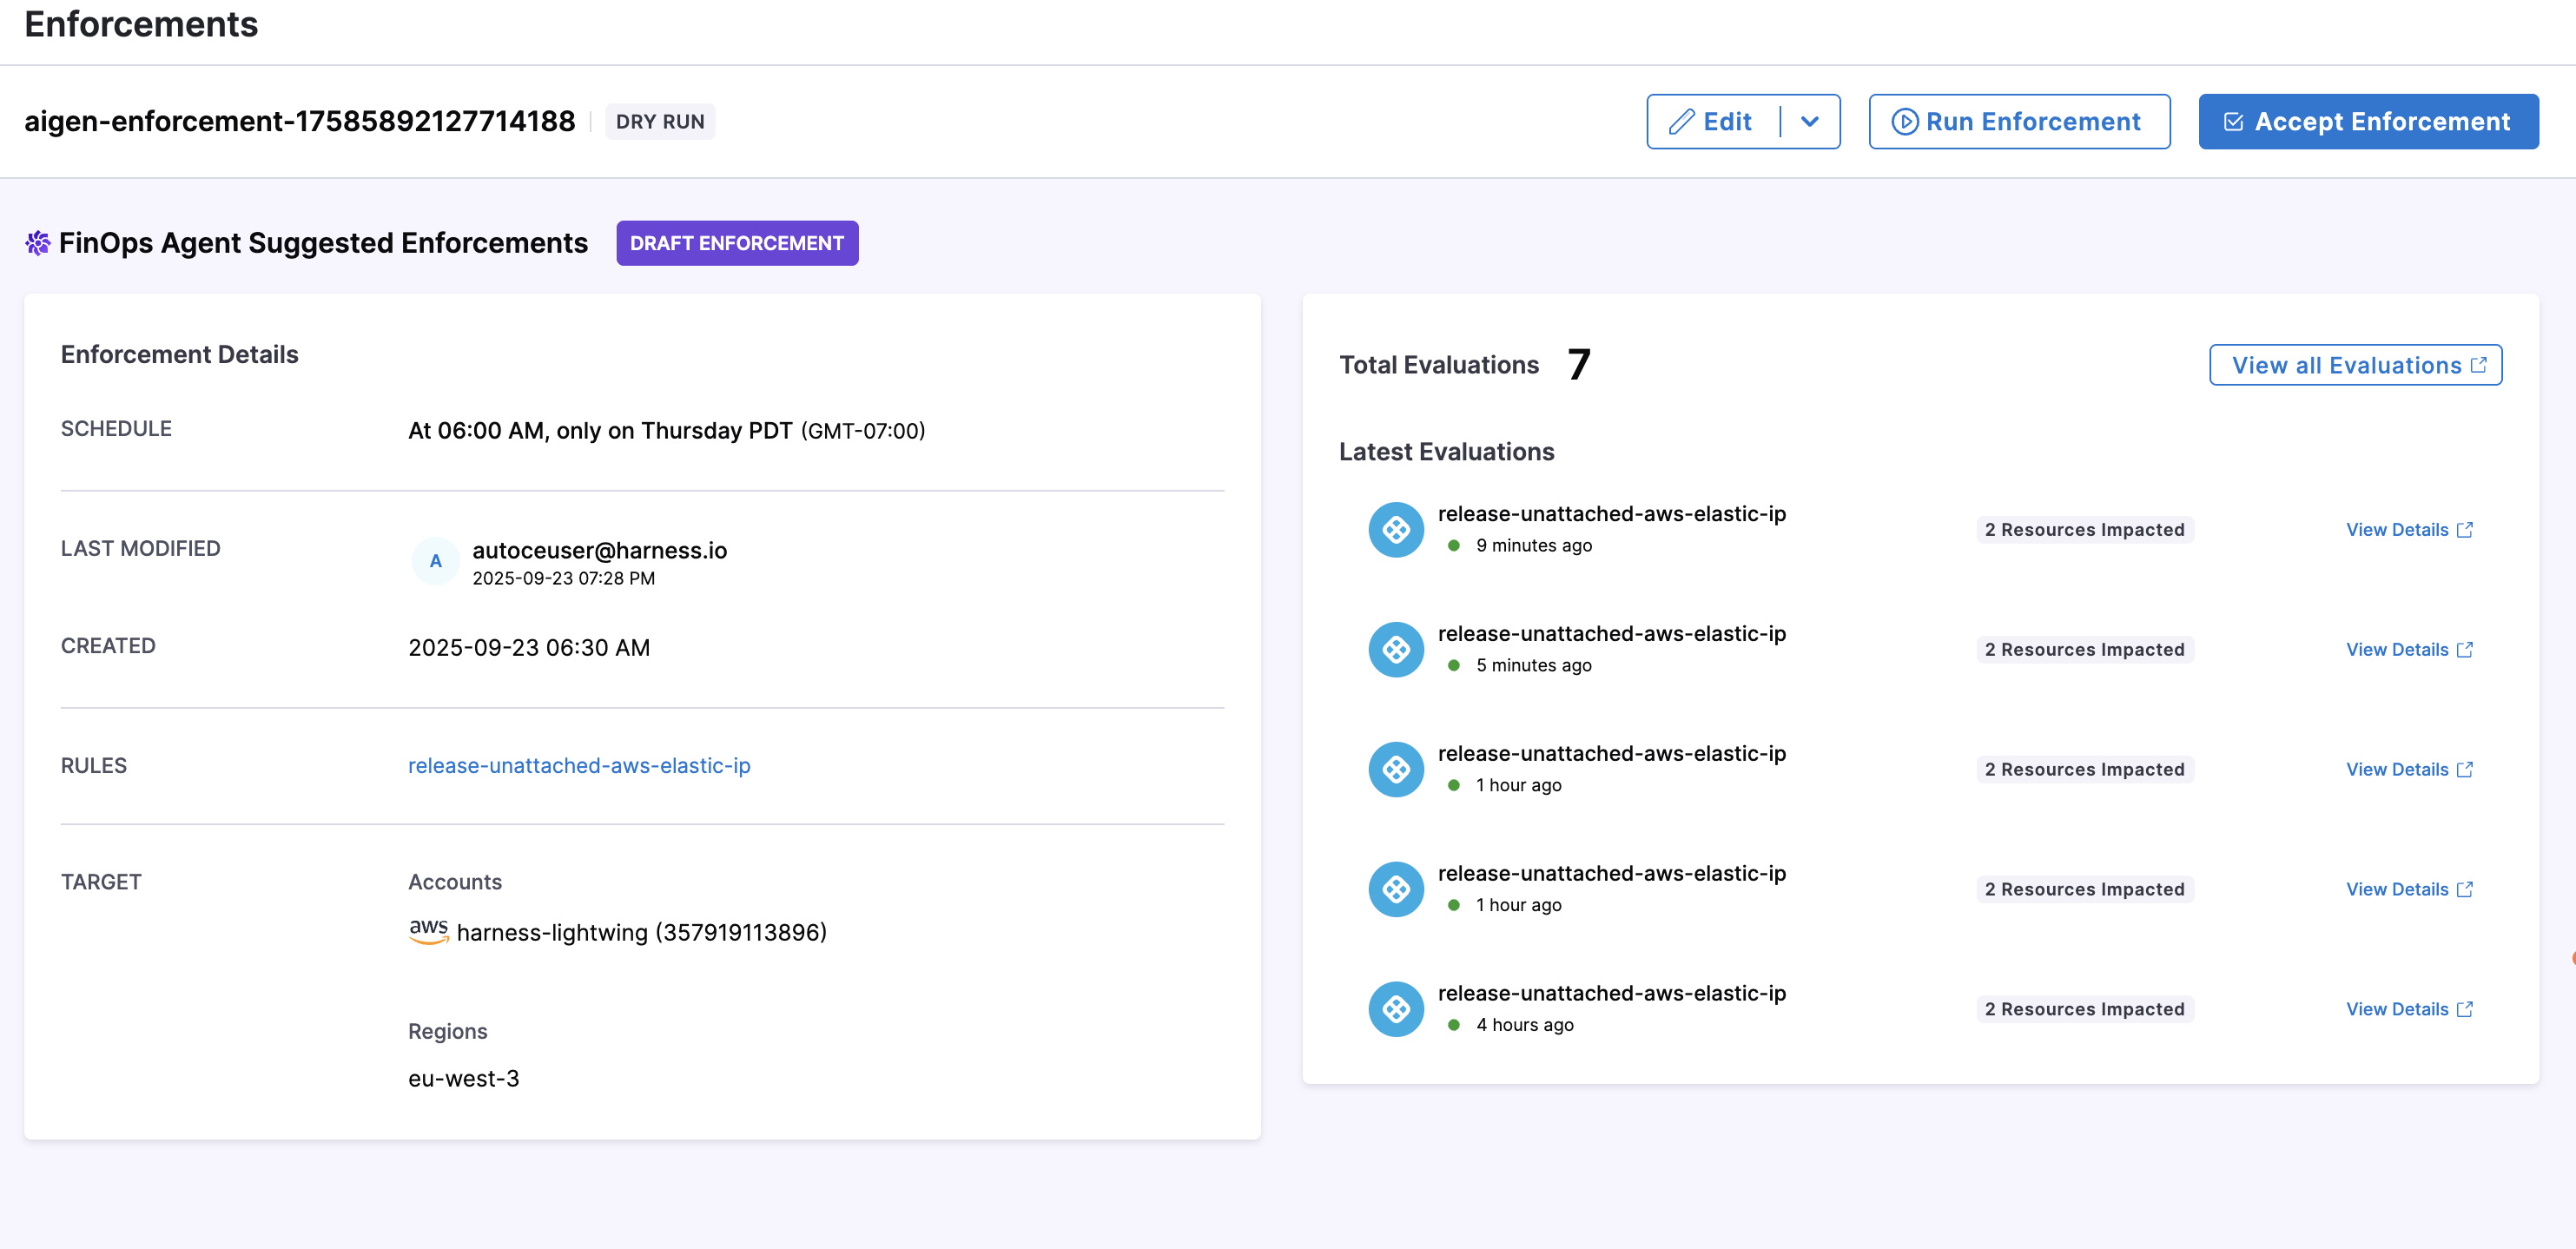
Harness CACM's intelligent FinOps Agent analyzes your cloud environment to automatically identify cost-saving opportunities and suggest appropriate governance enforcements. Each suggested enforcement is created as a draft that you can review before implementation.
To implement a suggested enforcement, simply review and accept it. The system will then automatically create and schedule the enforcement to run against the specified accounts. All evaluations from these accepted suggestions appear on the Evaluations page alongside your manually created enforcements, providing a unified view of all governance activities.

Create a new Enforcement
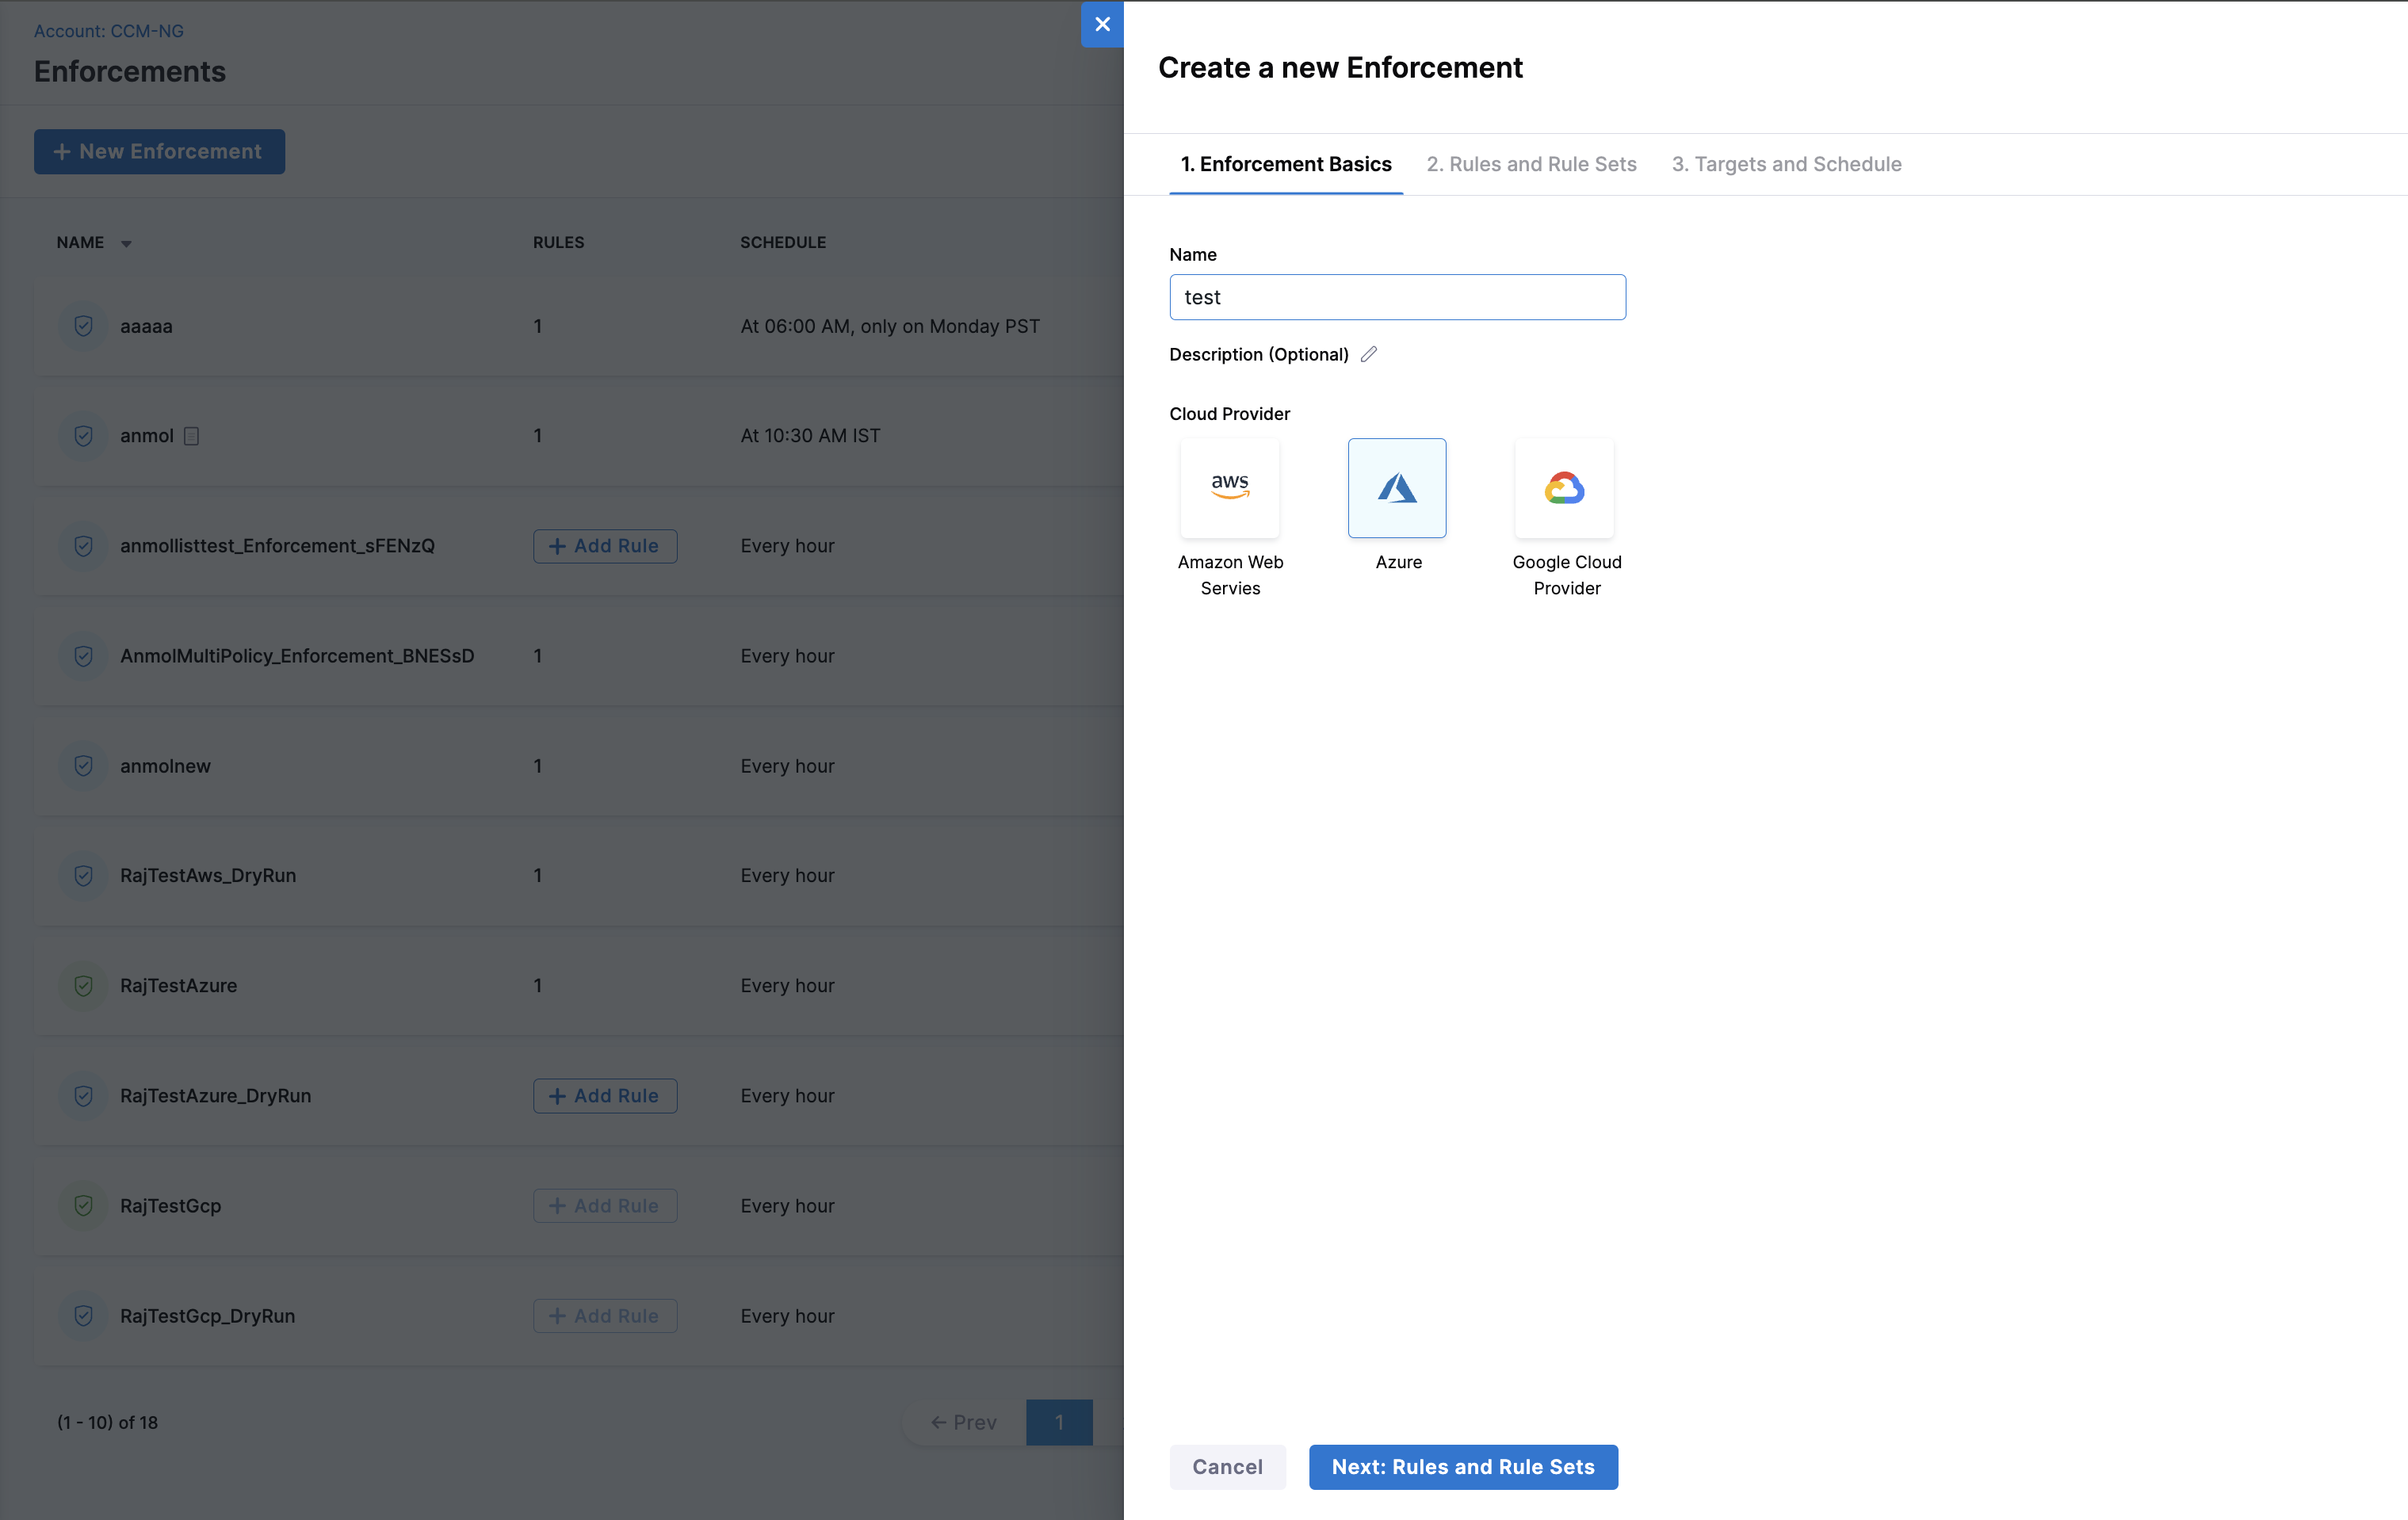
To create an Enforcement, perform the following steps: In your Harness application, go to Cloud Costs > Asset Governance > Enforcements > + New Enforcement
Enter a name for the Enforcement. Optionally, enter a description of the Enforcement. Select the cloud provider.

Click to view full size image
Select the rules or rule sets that you want to enforce. By enforcing a rule or rule set, you are ensuring that the policies defined in the rule or rule set are applied to the target accounts/project/subscription and regions.
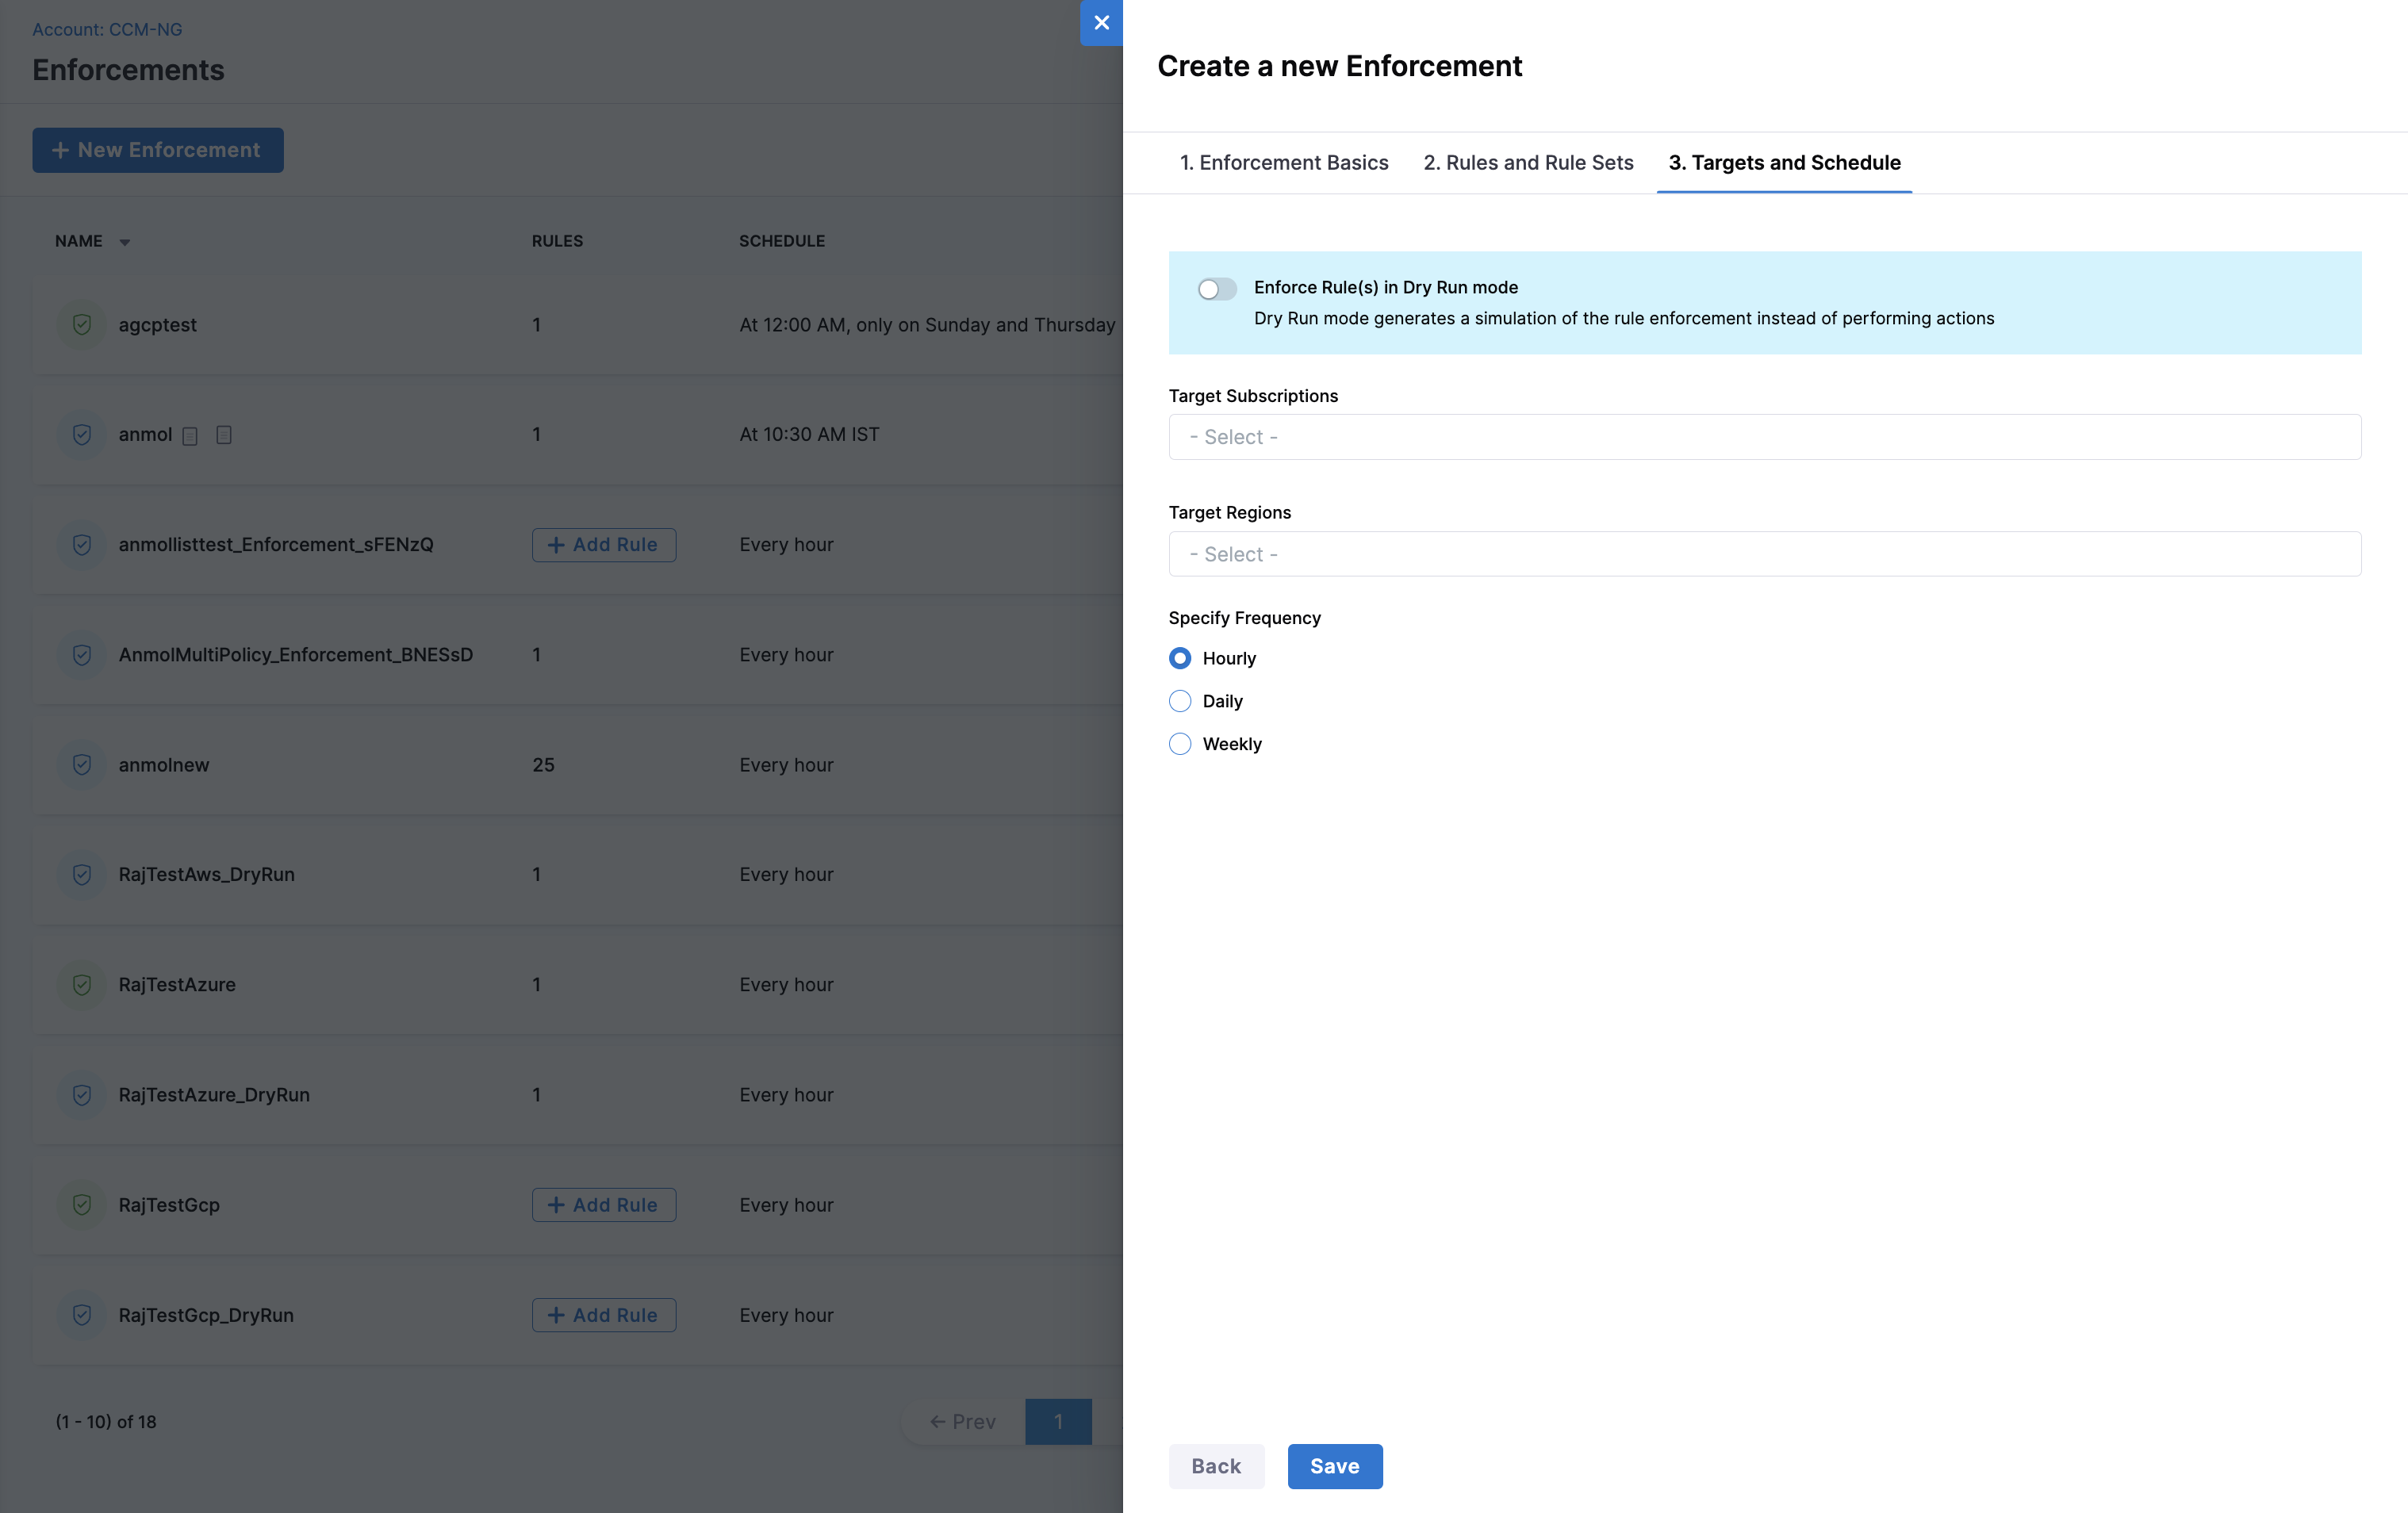
Select the target accounts/project/subscription and target regions that you will be running the Enforcements on.
Set the frequency from Hourly, Daily, or Weekly options. In case you select Daily or Weekly, specify the day, time, and time zone to run the rule on schedule.
Toggle the Dry Run mode if you do not want to take action immediately.
Select Finish.

Click to view full size image
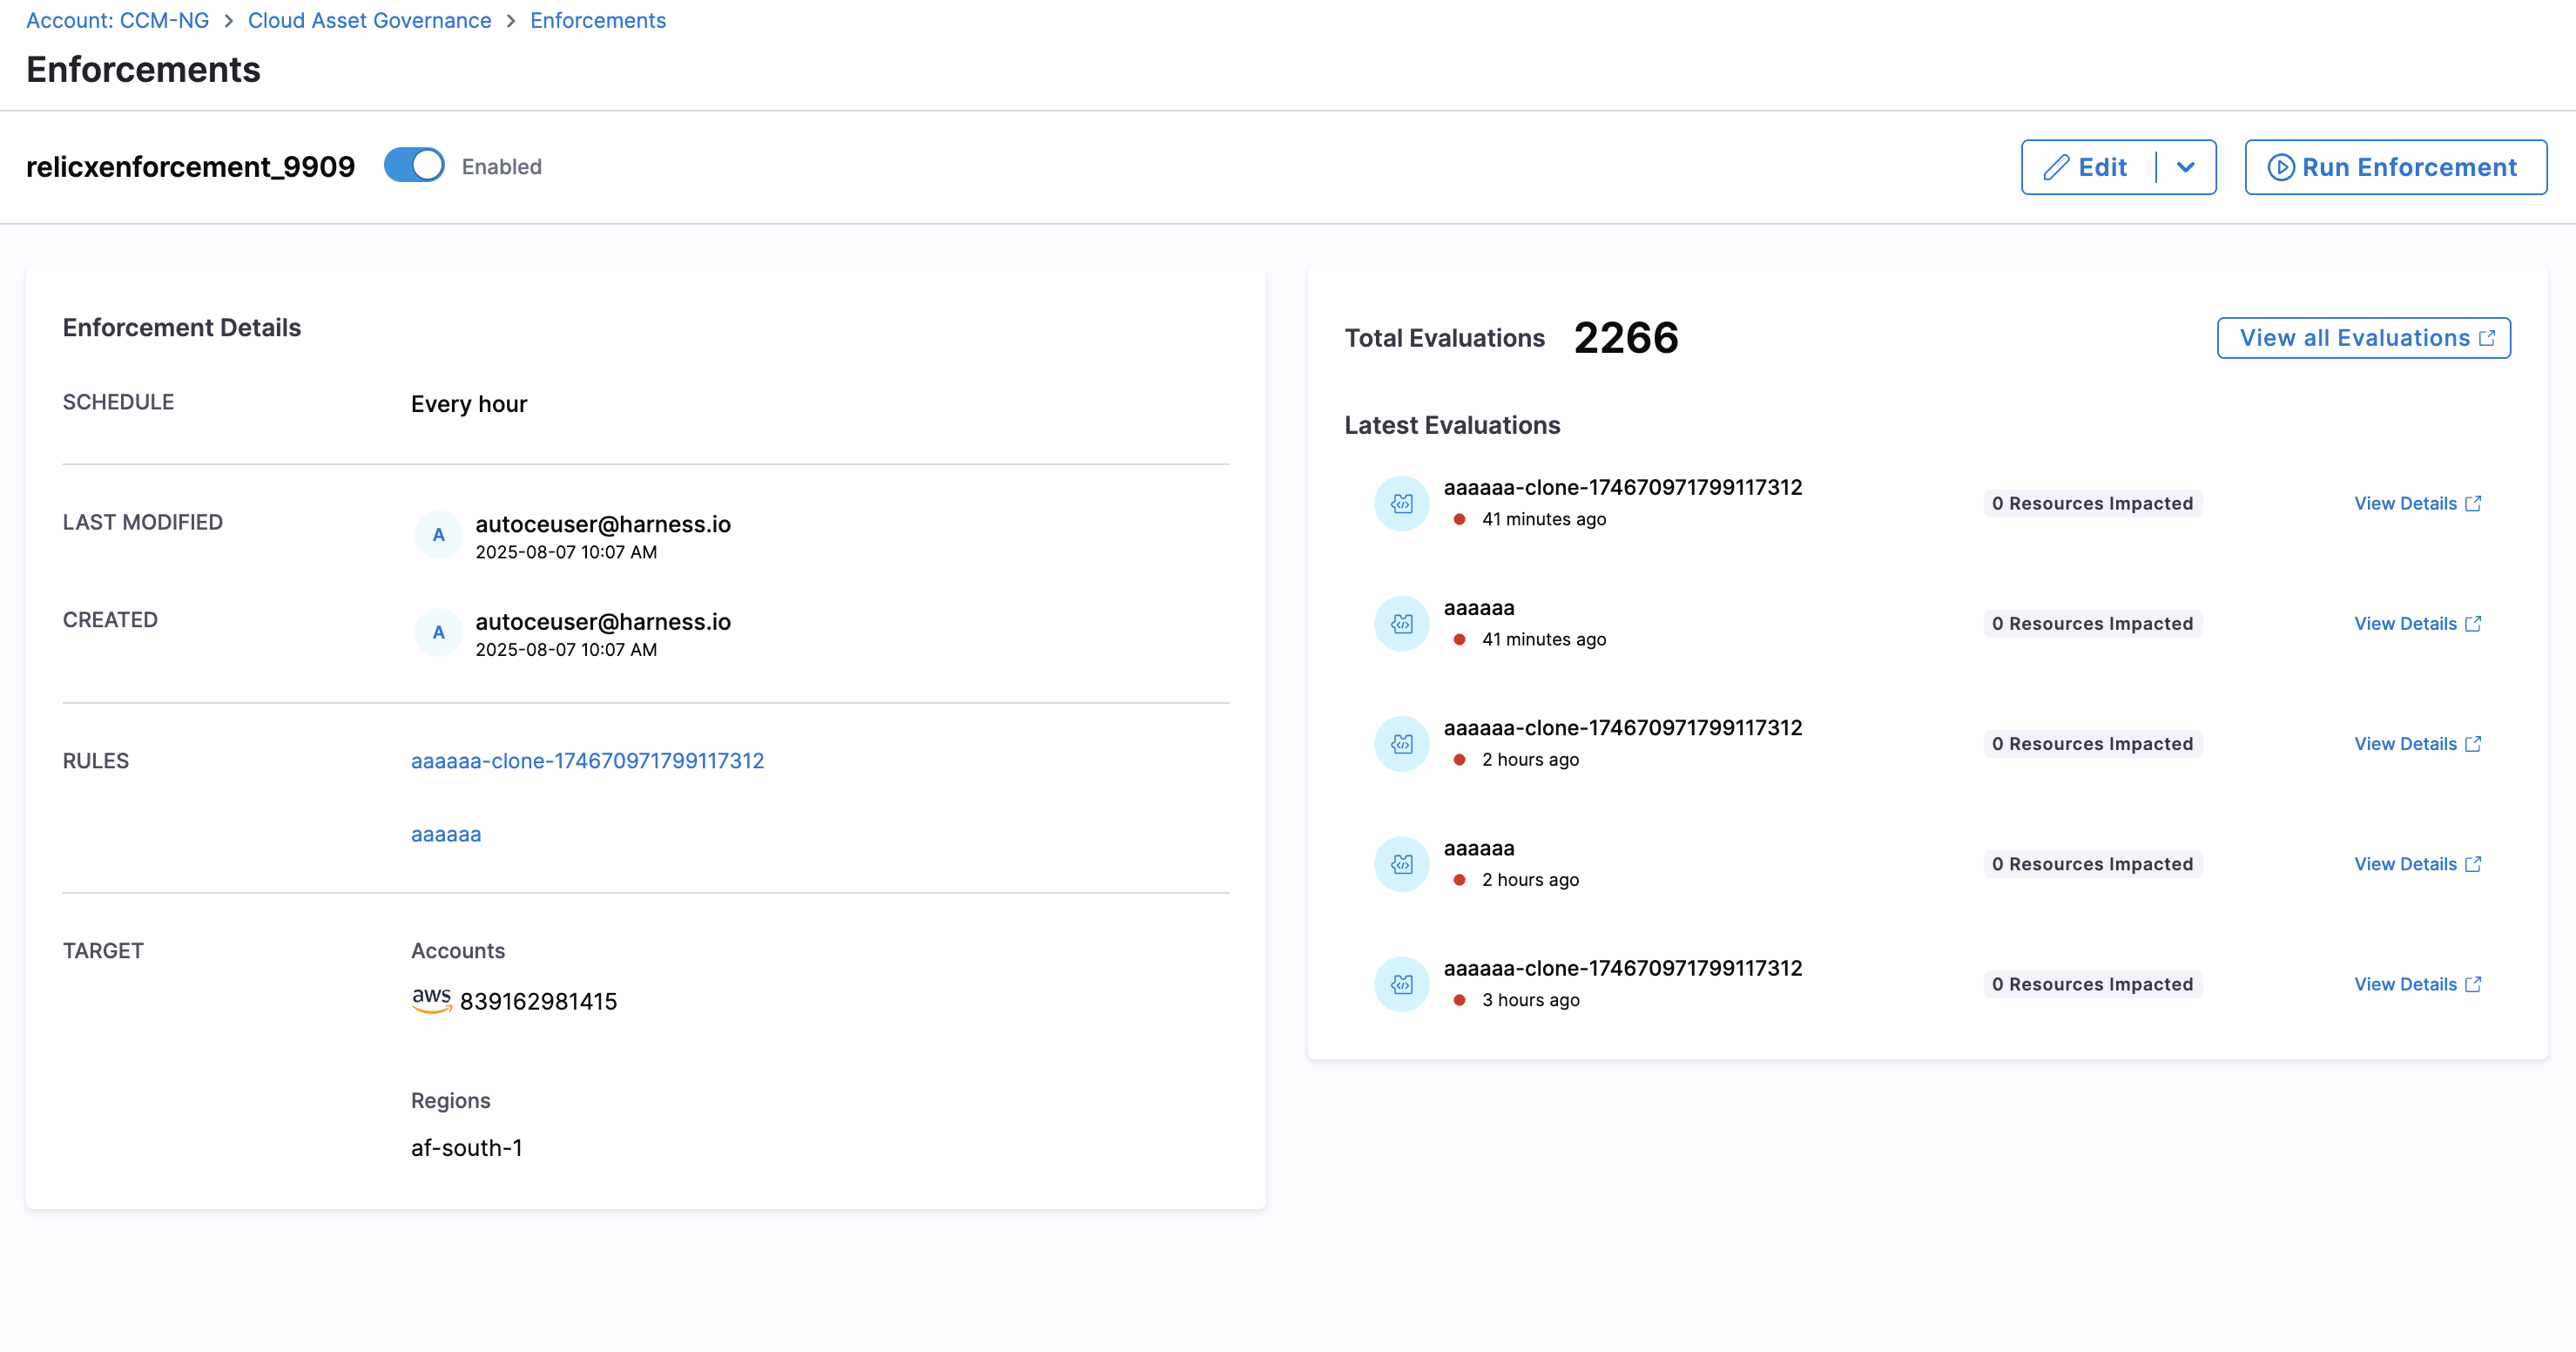
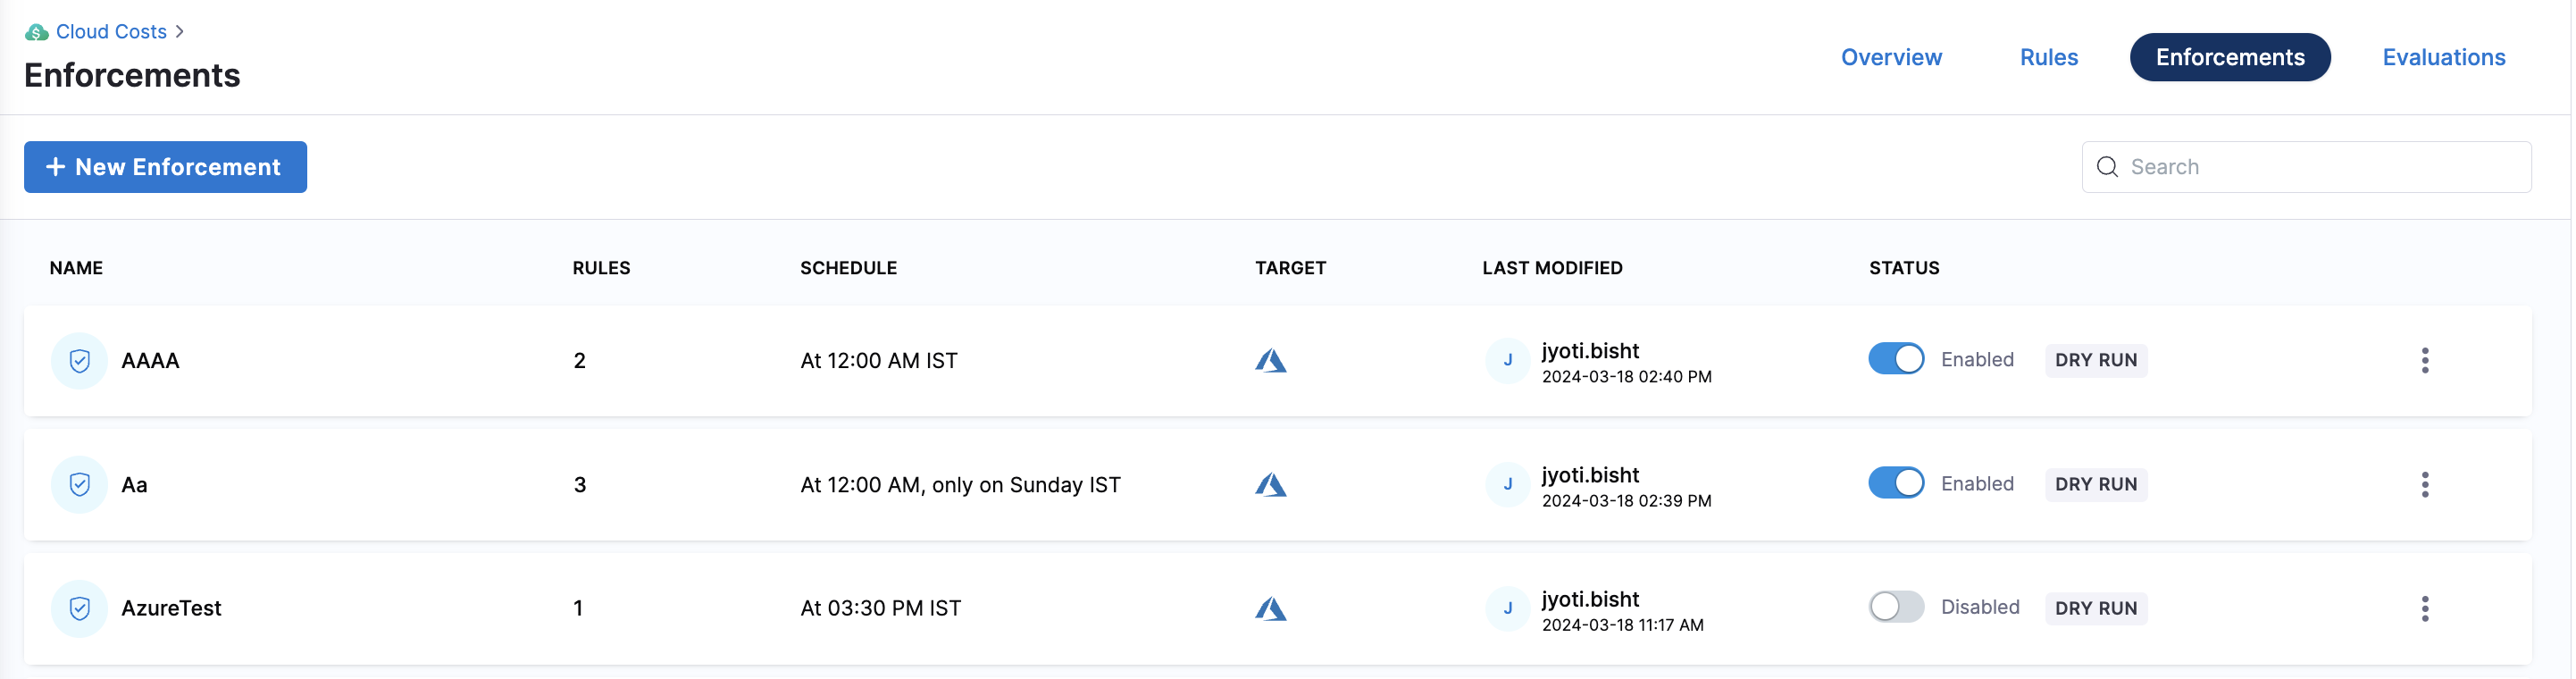
After setting up the schedule, you can view the Enforcement on the Enforcements page.

Furthermore, you can disable the Enforcement at any time using the toggle button in the Status column. If you want to turn off the dry-run mode, select Edit from the vertical ellipsis menu (⋮) then go to "Target And Schedule", use slider to turn off "Enforce Rule(s) in Dry Run mode" and click on Finish.
Update/Delete an Enforcement
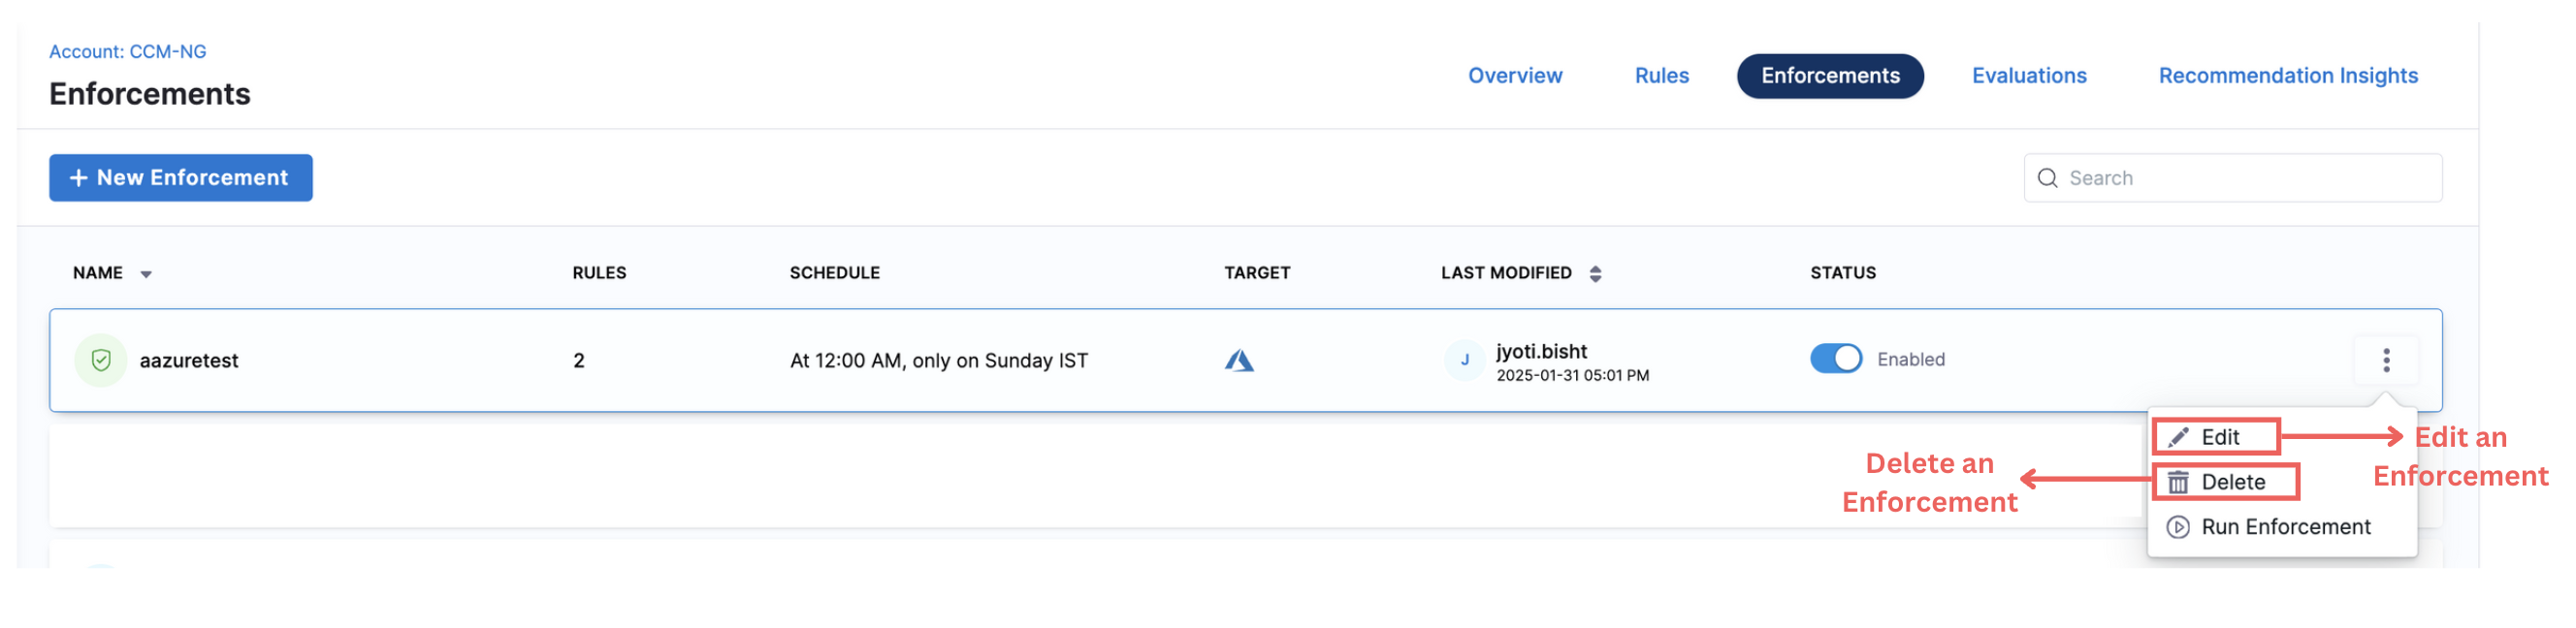
You can view any Enforcements on Rule Enforcements page. Click on the enforcement to view details such as the rules, target accounts, and regions included in the enforcement. For updating, you can use the "Edit" button from the vertical ellipsis menu (⋮) to update the enforcements as per your convenience.
To delete an enforcement, simply click on “Delete” from the vertical ellipsis menu (⋮).

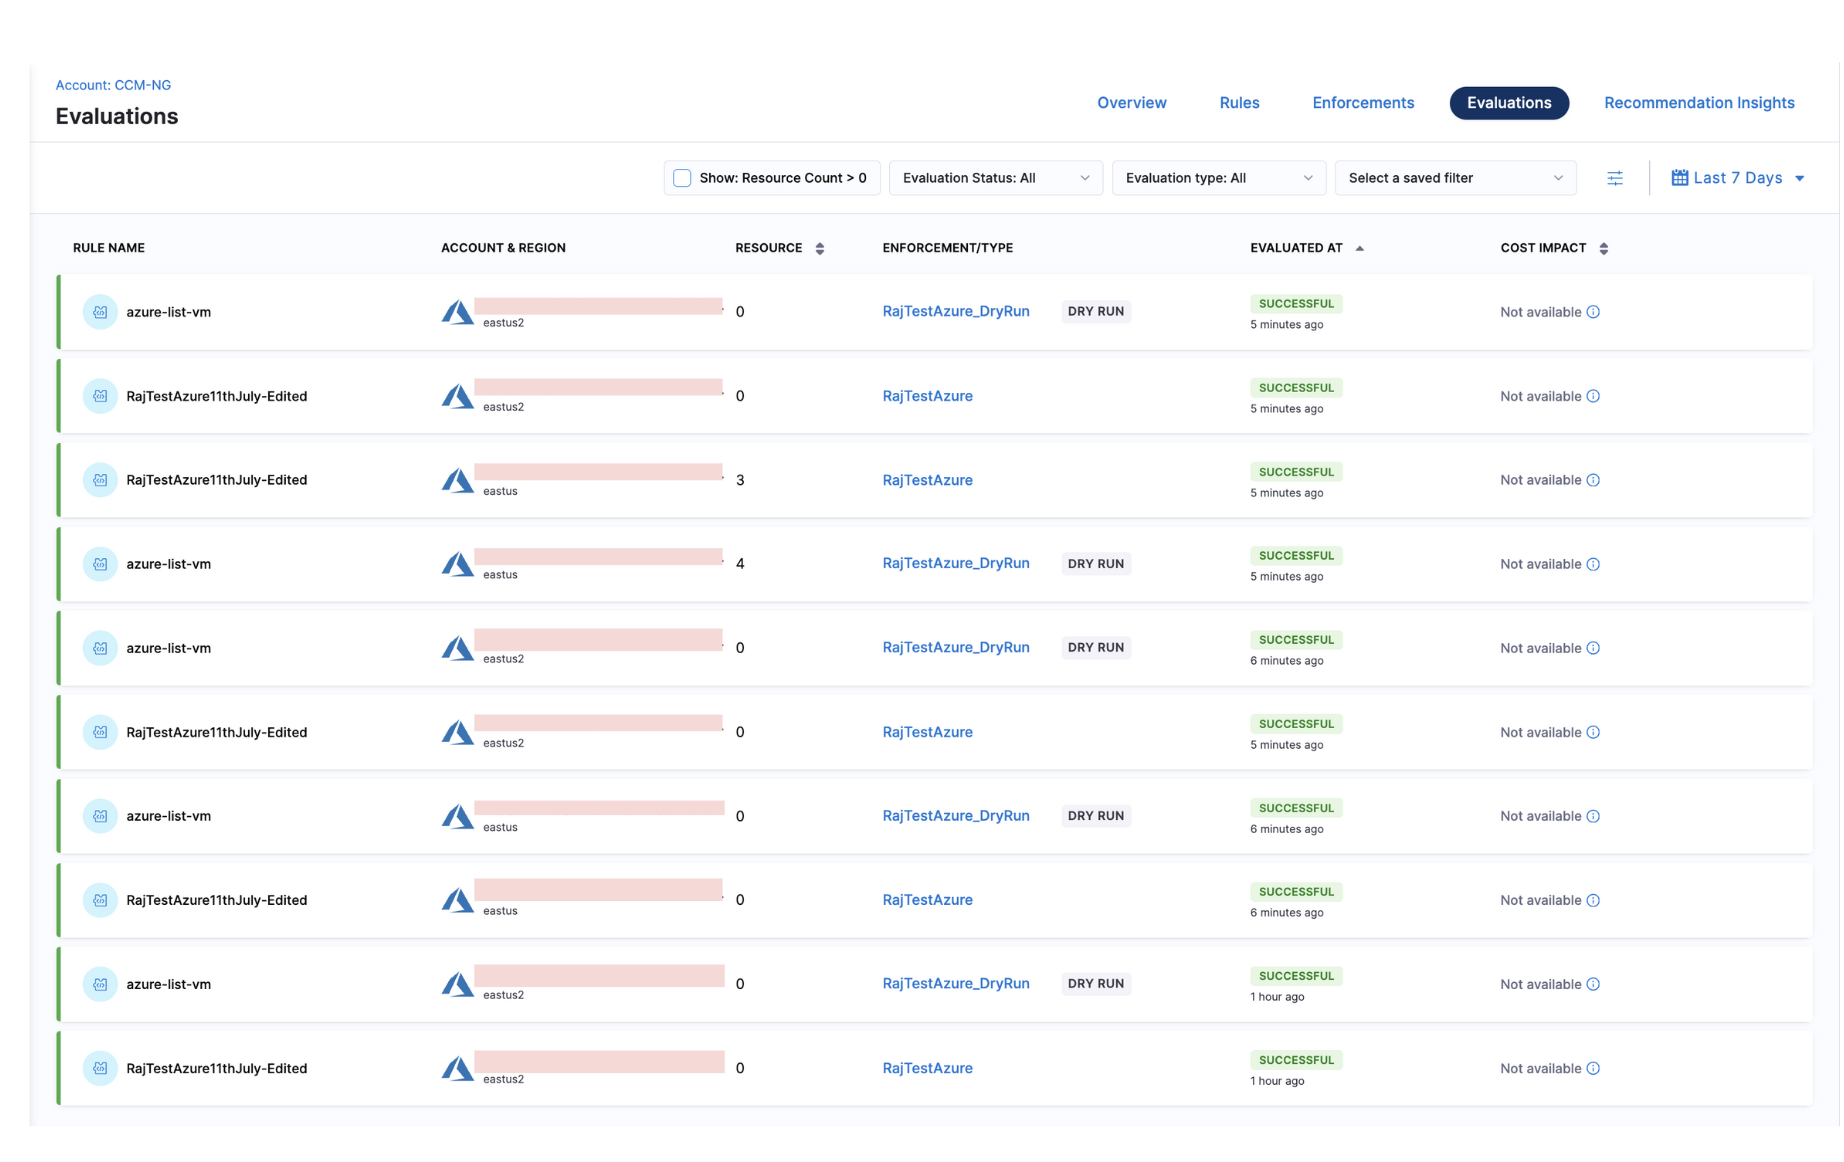
Evaluations include all the data about enforcements run (both RUN ONCE from rule editor and from Enforcement). The Evaluations window also shows you the total cost impact with each Enforcement i.e. the costs or spendings associated with each Evaluation along with the last time that Rule/Rule set was enforced. With Evaluations, you can view and audit all the Enforcements that ran in the past.
Harness CACM also supports multiple statuses for evaluations. Currently CACM supports three statuses for an evaluation:
Success: If the evaluation is completed without any errors, the status of the evaluation is shown as "Successful".
Failure: If the evaluation is not completed and has errors, the status of the evaluation is shown as "Failure".
Partial Success: If the evaluation is successful without any Harness errors but Cloud Custodian has additional logs and/or in case of multi-policy evaluations, if the evaluation was successful only for a subset of resources, the status is shown as "Partial Success".

View Evaluations
In your Harness application, go to Cloud Costs.
Select Asset Governance.
Select Evaluations.
You can see all the Evaluations of Rules listed on the window.
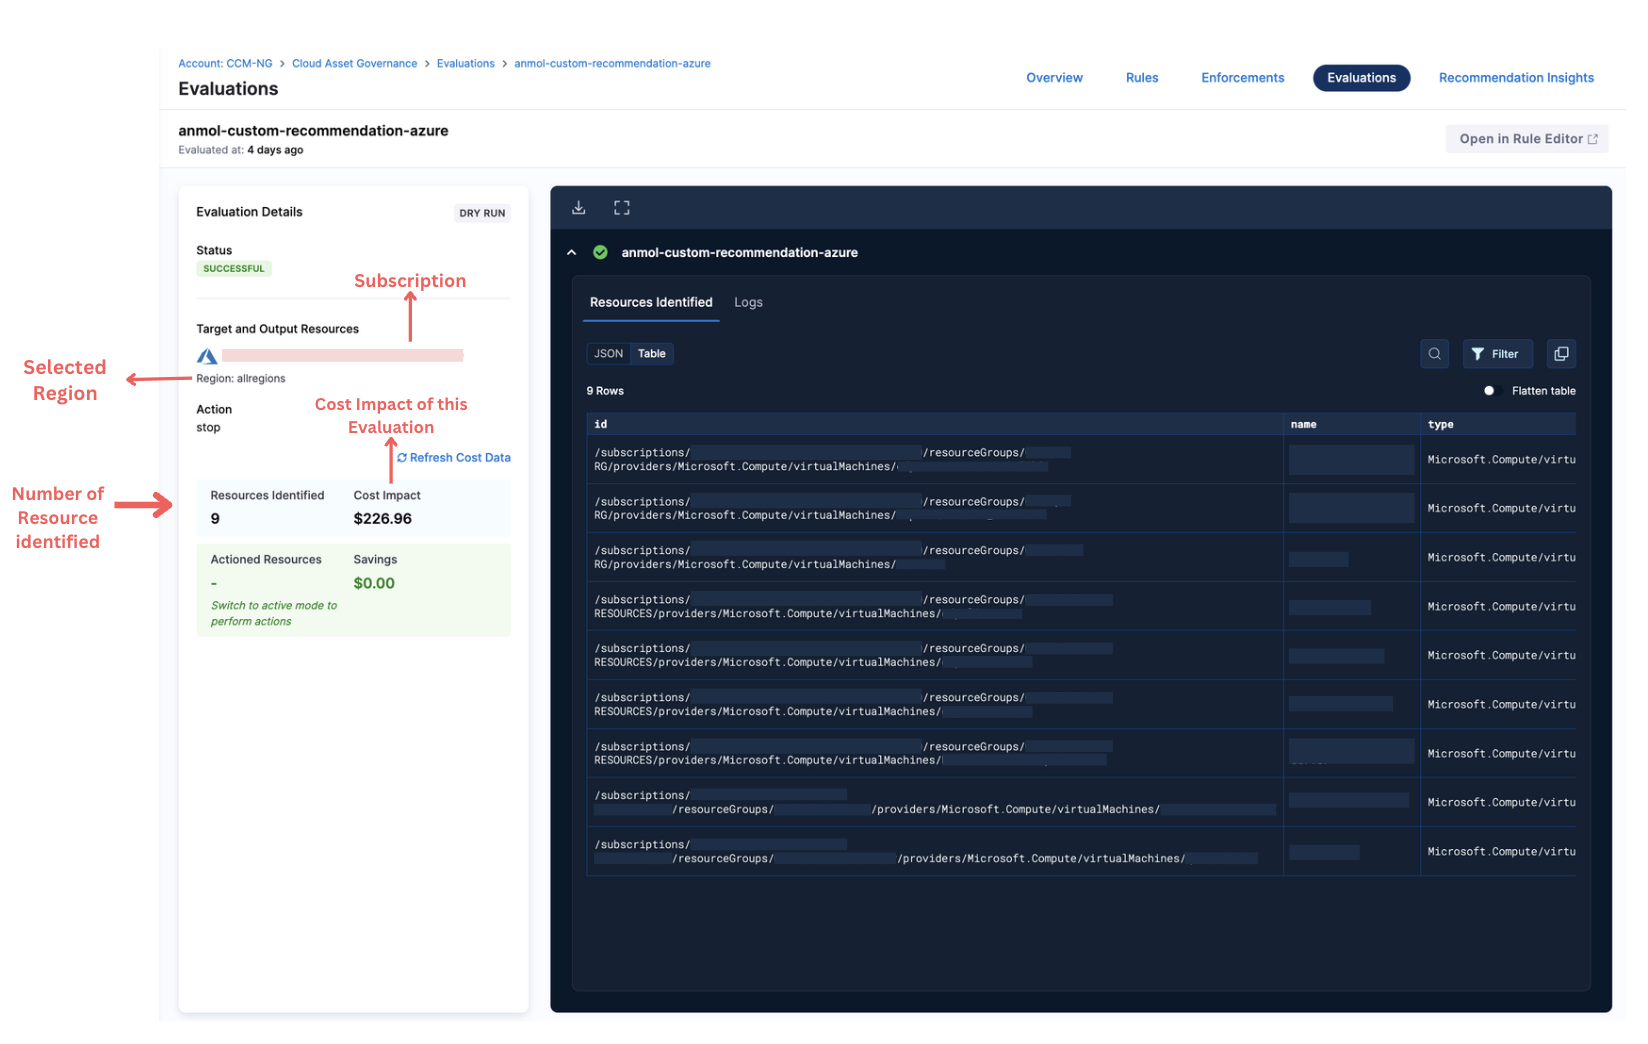
Select the rule for which you want to view the Evaluation details. The target subscription, region, identified resources and evaluation logs are displayed.
In the output window, users can see the resources identified in form of a Table or JSON. The table view supports all the filters and flattening of the table is supported as well. That essentially means, nested properties are flattened. By default, nested objects and arrays are collapsed and can be expanded up to two levels. Further nested properties are shown as formatted JSON.

Cost Correlation
Cost Correlation in Harness CACM connects governance with their actual cost impact, allowing you to quantify the financial implications.
What's supported
AWS
aws.ec2, aws.ebs, aws.rds, aws.ebs-snapshot, aws.elastic-ip, aws.elb, cache-cluster, s3, redshift, redshift-snapshot, aws.log-group, aws.rds-snapshot, aws.nat-gateway, aws.sqs, aws.firehose, aws.dynamodb-table
Yes ✅
Yes ✅
Yes ✅
Yes ✅
Yes ✅
GCP
gcp.instance, gcp.disk, gcp.snapshot, gcp.sql-instance, gcp.image, gcp.loadbalancer-address, gcp.loadbalancer-forwarding-rule, gcp.bucket, gcp.gke-cluster, gcp.bq-dataset, gcp.function, gcp.redis, gcp.cloud-run-service, gcp.dataflow-job
No ❌
Yes ✅
Yes ✅
No ❌
Yes ✅
Azure
Every Resource in Billing Report
Yes ✅
Yes ✅
Yes ✅
No ❌
Yes ✅
Cost Impact/Cost Co-relation
When you click on Refresh button on the screen, CACM refreshes or updates the cost of all resources in the evaluation. It is exposed to resolve cases where the cost for any resource is not yet part of CUR, Billing Report, or Billing Data (due to newly deployed resources, etc.). You can hit the refresh cost button only once every 30 minutes for any evaluation.
Filters in Evaluations List Page
You can create filters to view selected rules:
Select the filter icon.
Enter a name.
Select who can edit and view the filter.
Select one or more of the following criteria to filter the results:
Rules
Rule Sets
Enforcements
Minimum Cost Impact ($)
Cloud Provider
Azure Filters
Azure Subscription
Target Regions
Select Apply.

Bulk Export Evaluations
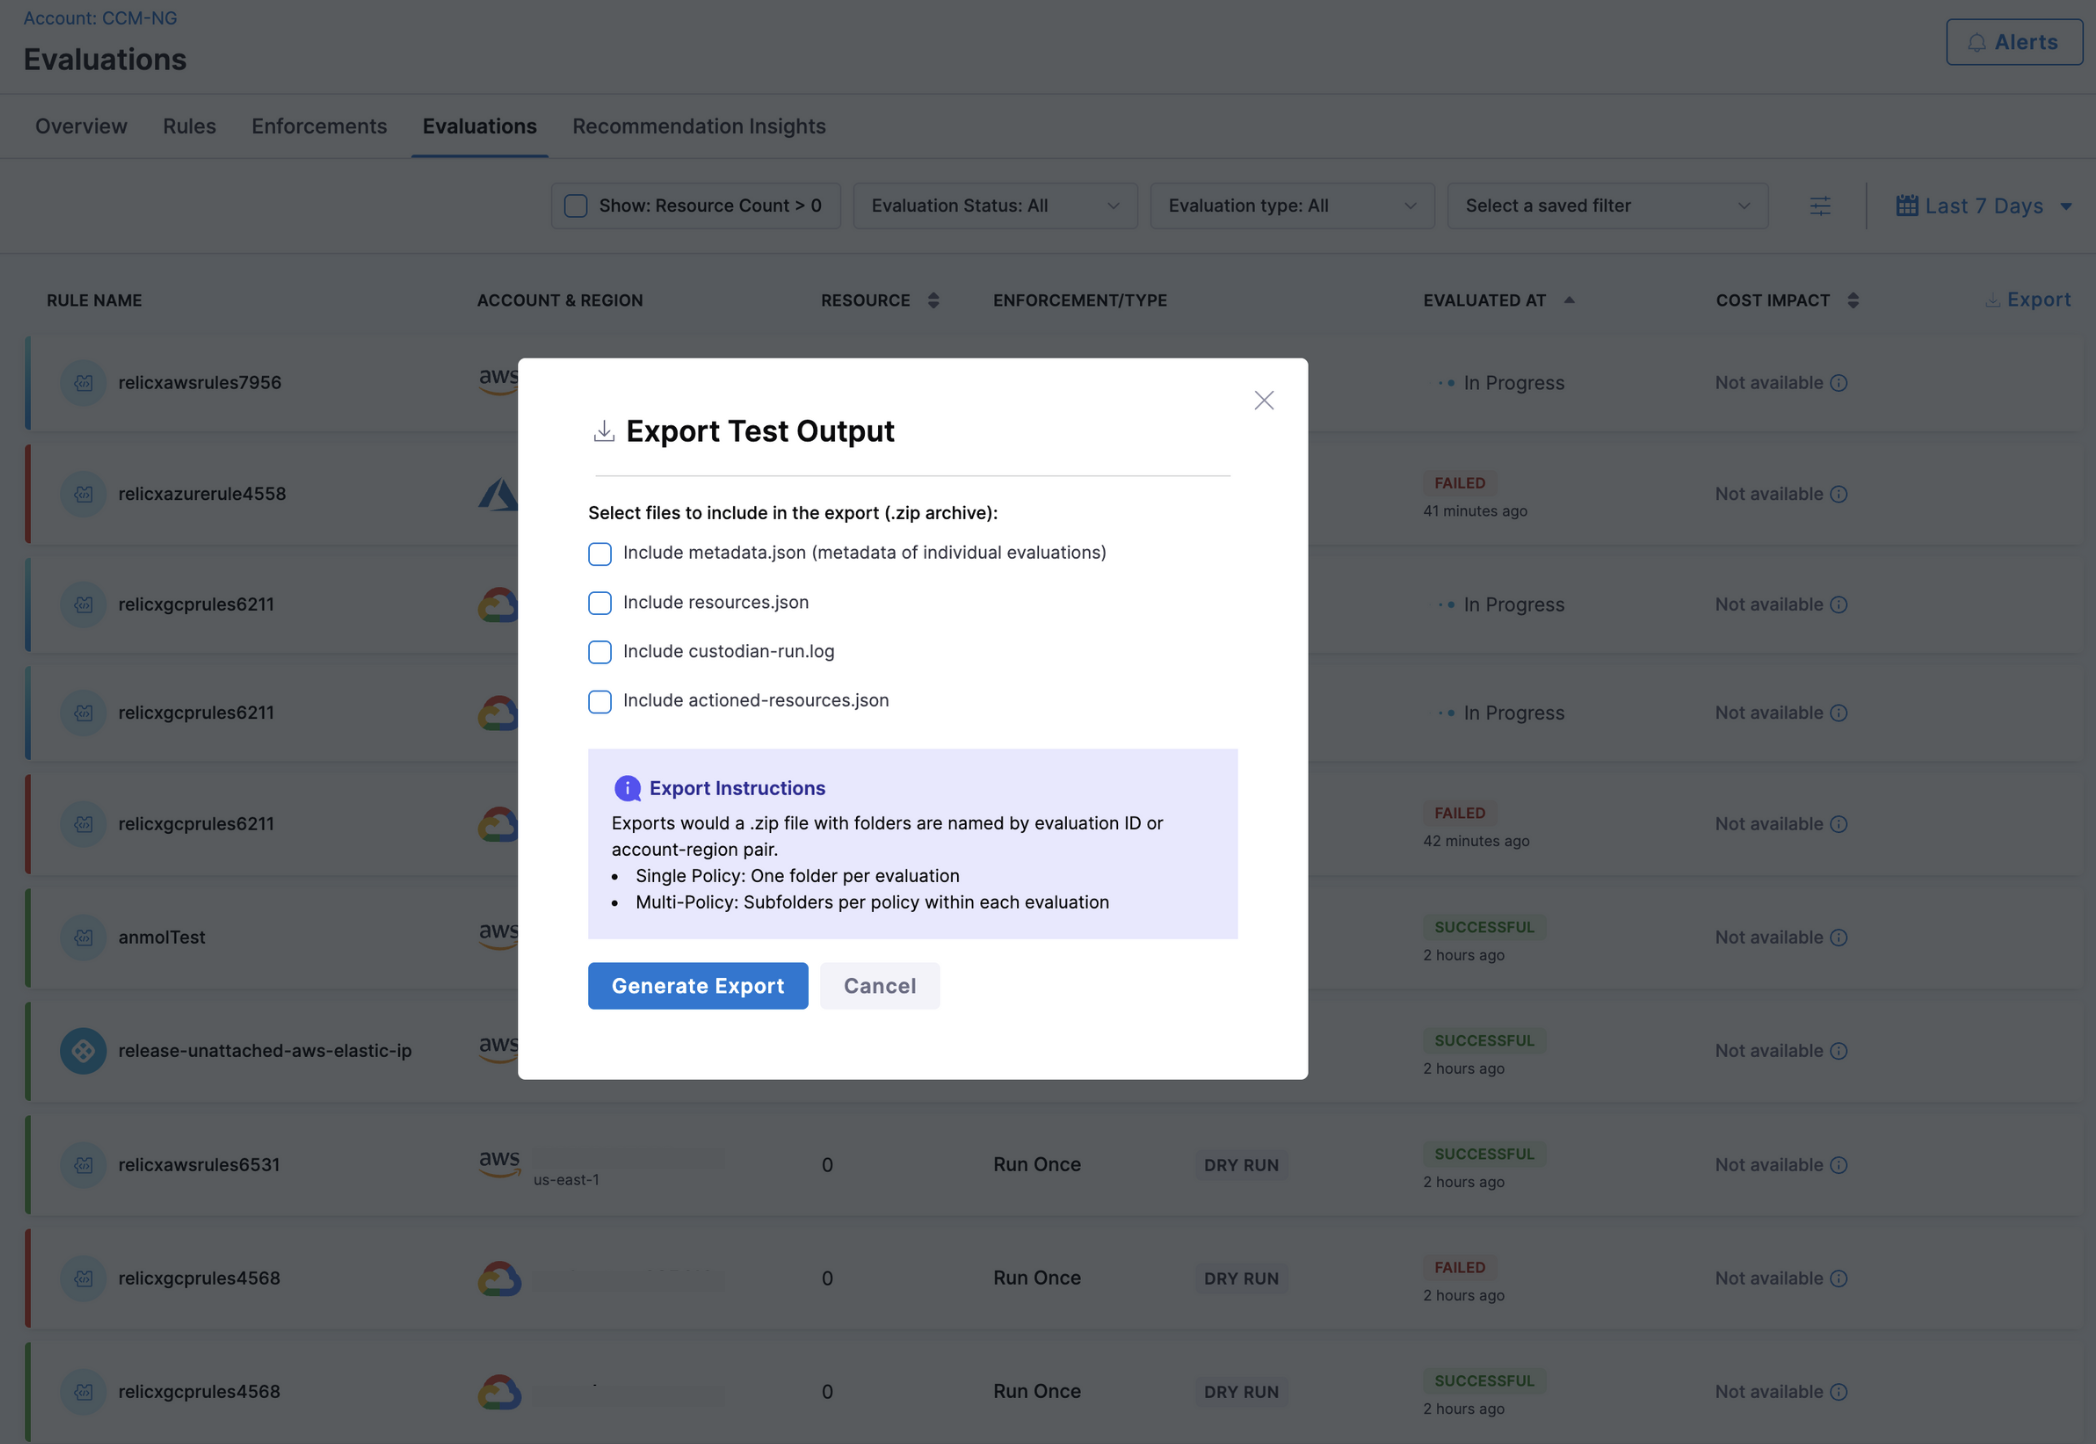
Use Bulk Export to download up to 100 evaluation results (AWS, GCP, or Azure) in a single ZIP file. Export is available when all selected evaluations are in a terminal state (Succeeded or Failed).
How to export
Click Export.
Choose the artefacts to include:
metadata.json: summary of each evaluationresources.json: resources identifiedcustodian-run.log: execution logactioned-resources.json: resources acted on
Click Generate Report.
The ZIP file is organised by evaluation ID (or by policy sub-folders for multi-policy runs) so you can quickly locate results. You can also export from the Test Terminal when evaluating multiple targets.

Last updated
Was this helpful?