> For the complete documentation index, see [llms.txt](https://developer.harness.io/llms.txt). Markdown versions of documentation pages are available by appending `.md` to page URLs; this page is available as [Markdown](https://developer.harness.io/cloud-cost-management/cost-optimization/autostopping-rules/k8s-coverage-setup.md).

# Set Up K8s Coverage

This guide walks you through setting up K8s Coverage, from installing the AutoStopping components (version 2.0.0 and later) to creating your first rule. You enable AutoStopping on your CCM Kubernetes connector, which installs the components that discover your applications and surface them as recommendations you can turn into rules.

***

### Before You Begin <a href="#before-you-begin" id="before-you-begin"></a>

* **Cluster:** A node-based (VM) Kubernetes cluster.
* **Delegate:** A Harness delegate deployed in the target cluster. Go to [Delegate installation overview](/harness-ai/use-harness-platform/delegates/delegate/install-delegates/overview.md) to install one.
* **Cloud Provider Kubernetes connector:** A platform Kubernetes connector that targets the delegate. Go to [Add a Kubernetes cluster connector](/harness-ai/use-harness-platform/connectors/cloud-providers/add-a-kubernetes-cluster-connector.md) to create it. You reference this connector when you create the CCM connector below.
* **CCM Kubernetes connector:** A CCM (Cloud Costs) Kubernetes connector that references the Cloud Provider connector above. If you do not have one, you create it in the first step below. Go to [Create a CACM Kubernetes connector](/cloud-cost-management/new-to-cacm/quickstart.md#create-a-cacm-kubernetes-connector) to set it up.
* **Harness API key:** A personal access token or a service account token. Go to [Add and manage API keys](/harness-ai/use-harness-platform/automation/api/add-and-manage-api-keys.md) to create one. You provide this key when you create the secret below.

***

### How Setup Works <a href="#how-setup-works" id="how-setup-works"></a>

You enable AutoStopping on your CCM Kubernetes connector and install the AutoStopping components in the cluster. The controller and its supporting components then run discovery on their own, group related workloads into applications, and surface them under **K8s Coverage** as recommendations. From there you create rules without writing any configuration by hand.

Go to [K8s Coverage](/cloud-cost-management/cost-optimization/autostopping-rules/k8s-coverage.md) to understand discovery, the Network Map, and how recommendations become rules.

***

### Install the AutoStopping Components <a href="#install-the-autostopping-components" id="install-the-autostopping-components"></a>

Install the AutoStopping components into your cluster. Choose one method: run the CCM Kubernetes connector wizard, which generates and applies everything for you, or install the Helm chart directly. Both install the controller, the eBPF discovery DaemonSet, and the progress agent, and both read the `harness-api-key` secret to communicate with Harness.

{% tabs %}
{% tab title="Connector Setup" %}
Create the CCM Kubernetes connector and enable AutoStopping during the wizard. The steps below run inside the connector wizard on the [Set up cost visibility for Kubernetes](/cloud-cost-management/new-to-cacm/quickstart.md) page. Follow each link, complete the step there, then return here for the next one.

1. **Start the connector wizard.** In Harness, go to **Account Resources** > **Connectors** > **New Connector** > **Cloud Costs** > **Kubernetes**. Go to [Create a CACM Kubernetes connector](/cloud-cost-management/new-to-cacm/quickstart.md#create-a-cacm-kubernetes-connector) to open the wizard. The connector wizard opens on the **Overview** step.
2. **Reference your cluster.** In the **Overview** step, select the Cloud Provider Kubernetes connector you created in [Before you begin](#before-you-begin), then select **Save and Continue**. Go to [Connect your Kubernetes cluster to CACM](/cloud-cost-management/new-to-cacm/quickstart.md#connect-your-kubernetes-cluster-to-cacm) for the details. The wizard advances to the **Choose Requirements** step.
3. **Enable AutoStopping.** In **Choose Requirements**, select **Kubernetes optimization using AutoStopping rules**, then select **Continue**. Go to [Choose Requirements](/cloud-cost-management/new-to-cacm/quickstart.md#choose-requirements) for the details. Enabling this feature adds the **Create a Secret** step to the wizard.
4. **Create the API-key secret.** In **Create a Secret**, provide your Harness API key, then run the commands shown to create the `harness-autostopping` namespace and the `harness-api-key` secret in your cluster. Go to [Create a Secret](/cloud-cost-management/new-to-cacm/quickstart.md#optional-create-a-secret) for the commands. Select **Continue** to reach the **Provide permissions** step.
5. **Apply the permissions manifest.** In **Provide permissions**, select **Download YAML**, then run `kubectl apply` to install the AutoStopping components in your cluster. Go to [Provide permissions](/cloud-cost-management/new-to-cacm/quickstart.md#provide-permissions) for the commands. Select **Done** and **Continue**.
6. **Verify the connection.** In **Verify connection**, wait for the test connection to succeed, then select **Finish**. The connector is created and the AutoStopping components are running in your cluster.
   {% endtab %}

{% tab title="Helm" %}
Install the AutoStopping components with the Harness AutoStopping Helm chart. Use this method if you manage cluster components with Helm instead of the connector wizard. This path still needs a CCM Kubernetes connector, because the chart references it by ID.

1. **Create the CCM Kubernetes connector.** In Harness, go to **Account Resources** > **Connectors** > **New Connector** > **Cloud Costs** > **Kubernetes**, reference the Cloud Provider Kubernetes connector you created in [Before you begin](#before-you-begin), and enable **Kubernetes optimization using AutoStopping rules**. Go to [Create a CACM Kubernetes connector](/cloud-cost-management/new-to-cacm/quickstart.md#create-a-cacm-kubernetes-connector) for the details. Note the connector ID; the chart needs it.
2. **Create the API-key secret.** Run the commands to create the `harness-autostopping` namespace and the `harness-api-key` secret from your Harness API key. Go to [Create a Secret](/cloud-cost-management/new-to-cacm/quickstart.md#optional-create-a-secret) for the commands. You now have the namespace and secret the chart expects.
3. **Install the chart.** Add the Harness AutoStopping Helm repository and install the chart, passing your account ID, the connector ID from step 1, and your API token. Go to [Installation via Helm](/cloud-cost-management/cost-optimization/autostopping-rules/autostopping-rules.md#kubernetes) for the repository, values, and prerequisites. The AutoStopping components are now running in your cluster.
   {% endtab %}
   {% endtabs %}

{% hint style="info" %}
The API key must be stored as a Kubernetes secret. The AutoStopping controller does not read the key from an external secret manager such as AWS Secrets Manager. The controller's read permission is cluster-scoped, so you can place the secret in a namespace of your choice rather than in `harness-autostopping`, as long as you reference the correct namespace and key.
{% endhint %}

#### What the YAML Installs <a href="#what-the-yaml-installs" id="what-the-yaml-installs"></a>

The connector wizard and the Helm chart both apply the same set of components to your cluster:

* **AutoStopping controller** (Deployment): runs discovery, applies rules, scales workloads, and updates ingress routing when workloads stop or start.
* **eBPF discovery agent** (DaemonSet): observes kernel-level network activity on every node and reports the connections between workloads.
* **`AutoStoppingRule` CRD** and the RBAC (service accounts, cluster roles, and bindings) the controller and agent need.

The controller reads its configuration from environment variables and the API-key secret. When you use the connector wizard, `CONNECTOR_ID` and `REMOTE_ACCOUNT_ID` are populated for you in the downloaded YAML, so you do not set them by hand:

```yaml
env:
  - name: HARNESS_API
    value: https://app.harness.io   # your Harness URL
  - name: CONNECTOR_ID
    value: <your-connector-id>       # filled in for you in the downloaded YAML
  - name: REMOTE_ACCOUNT_ID
    value: <your-account-id>         # filled in for you in the downloaded YAML
  - name: DISCOVERY_TICKER_INTERVAL
    value: '10m'                     # optional; how often discovery runs. Defaults to 10m. Accepts values like 1h2m3s
  - name: HARNESS_SECRET_NAME
    value: harness-api-key           # optional; secret that holds your API key. Defaults to harness-api-key
  - name: HARNESS_SECRET_NAMESPACE
    value: harness-autostopping      # optional; defaults to harness-autostopping
  - name: HARNESS_SECRET_KEY
    value: token                     # optional; defaults to token
  - name: CLOUD_PROVIDER
    value: aws                       # optional; aws, azure, or gcp. Set this if the controller logs that it cannot identify the cloud provider
```

***

### Discover Your Application <a href="#discover-your-application" id="discover-your-application"></a>

Once the components are running, discovery starts on its own. You do not configure or trigger it. Discovery runs continuously and refreshes periodically, every 10 minutes by default, so newly added workloads and connections appear over time. To pick up changes faster, lower the `DISCOVERY_TICKER_INTERVAL` value on the controller. The results show up under **K8s Coverage**.

Go to [Workload Discovery](/cloud-cost-management/cost-optimization/autostopping-rules/k8s-coverage.md#workload-discovery) to understand how discovery builds this picture, and to [The Network Map and Applications](/cloud-cost-management/cost-optimization/autostopping-rules/k8s-coverage.md#the-network-map-and-applications) to understand how workloads are grouped.

#### Open K8s Coverage <a href="#open-k8s-coverage" id="open-k8s-coverage"></a>

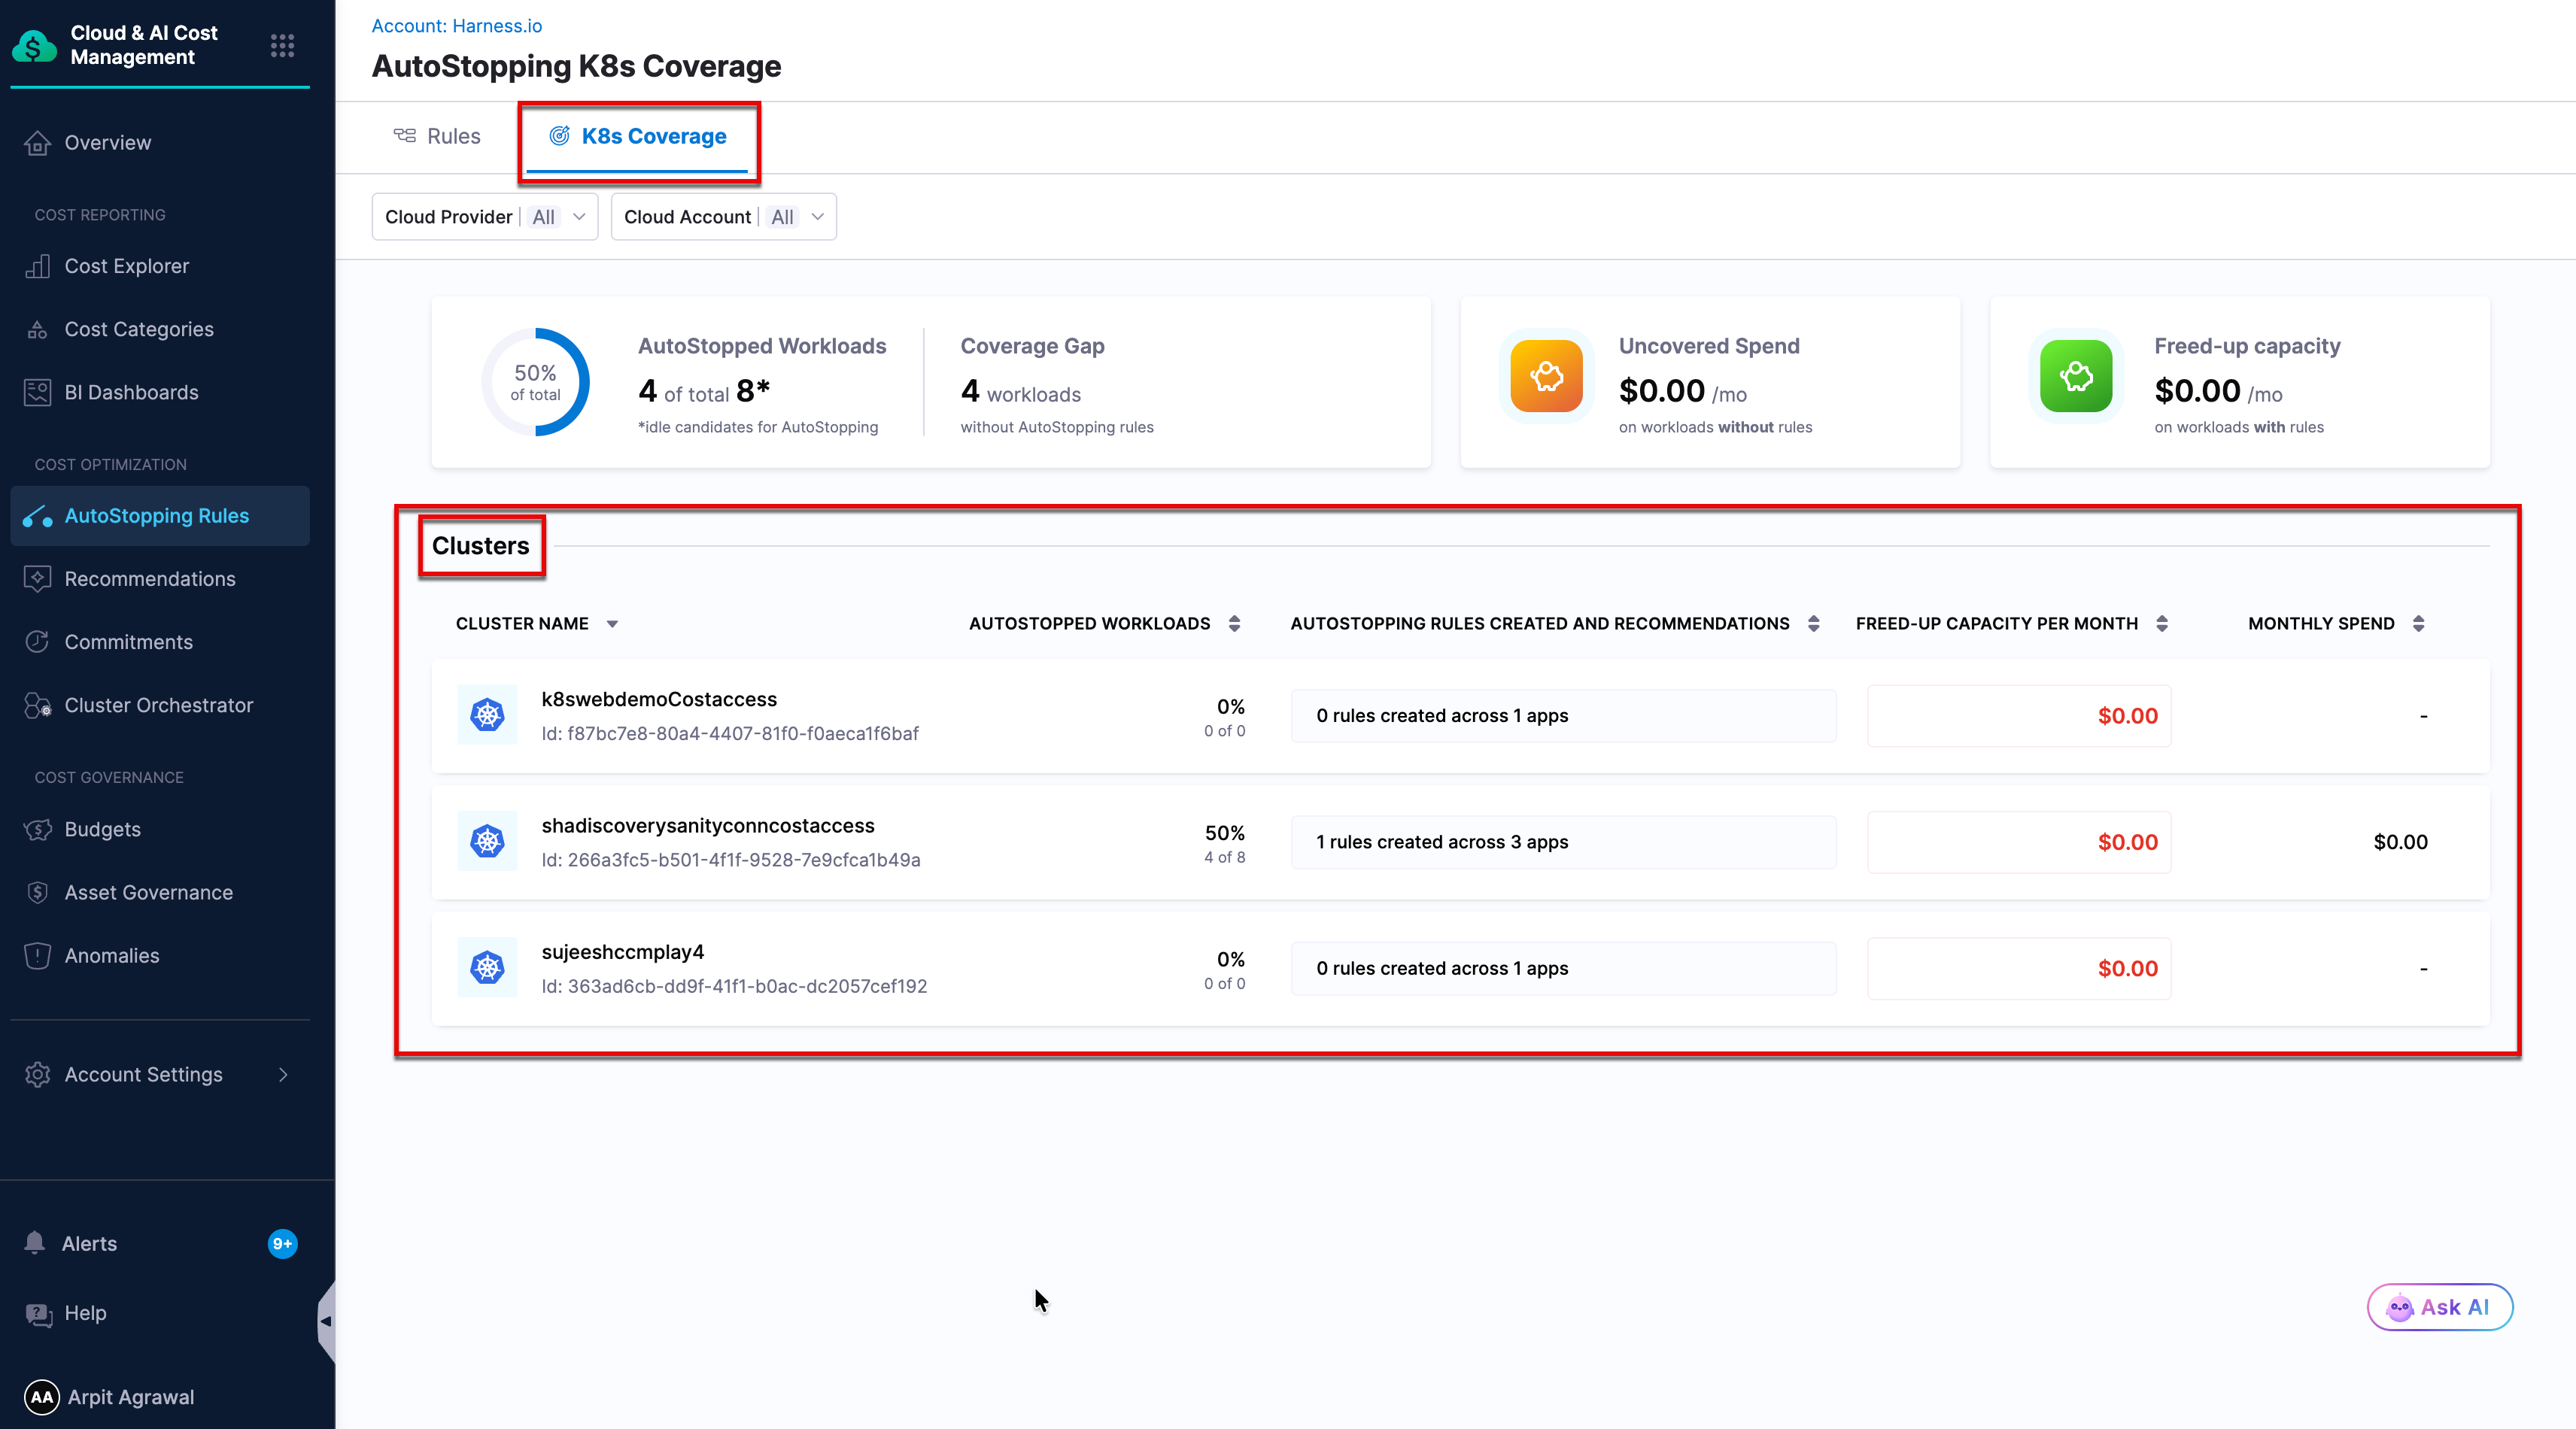
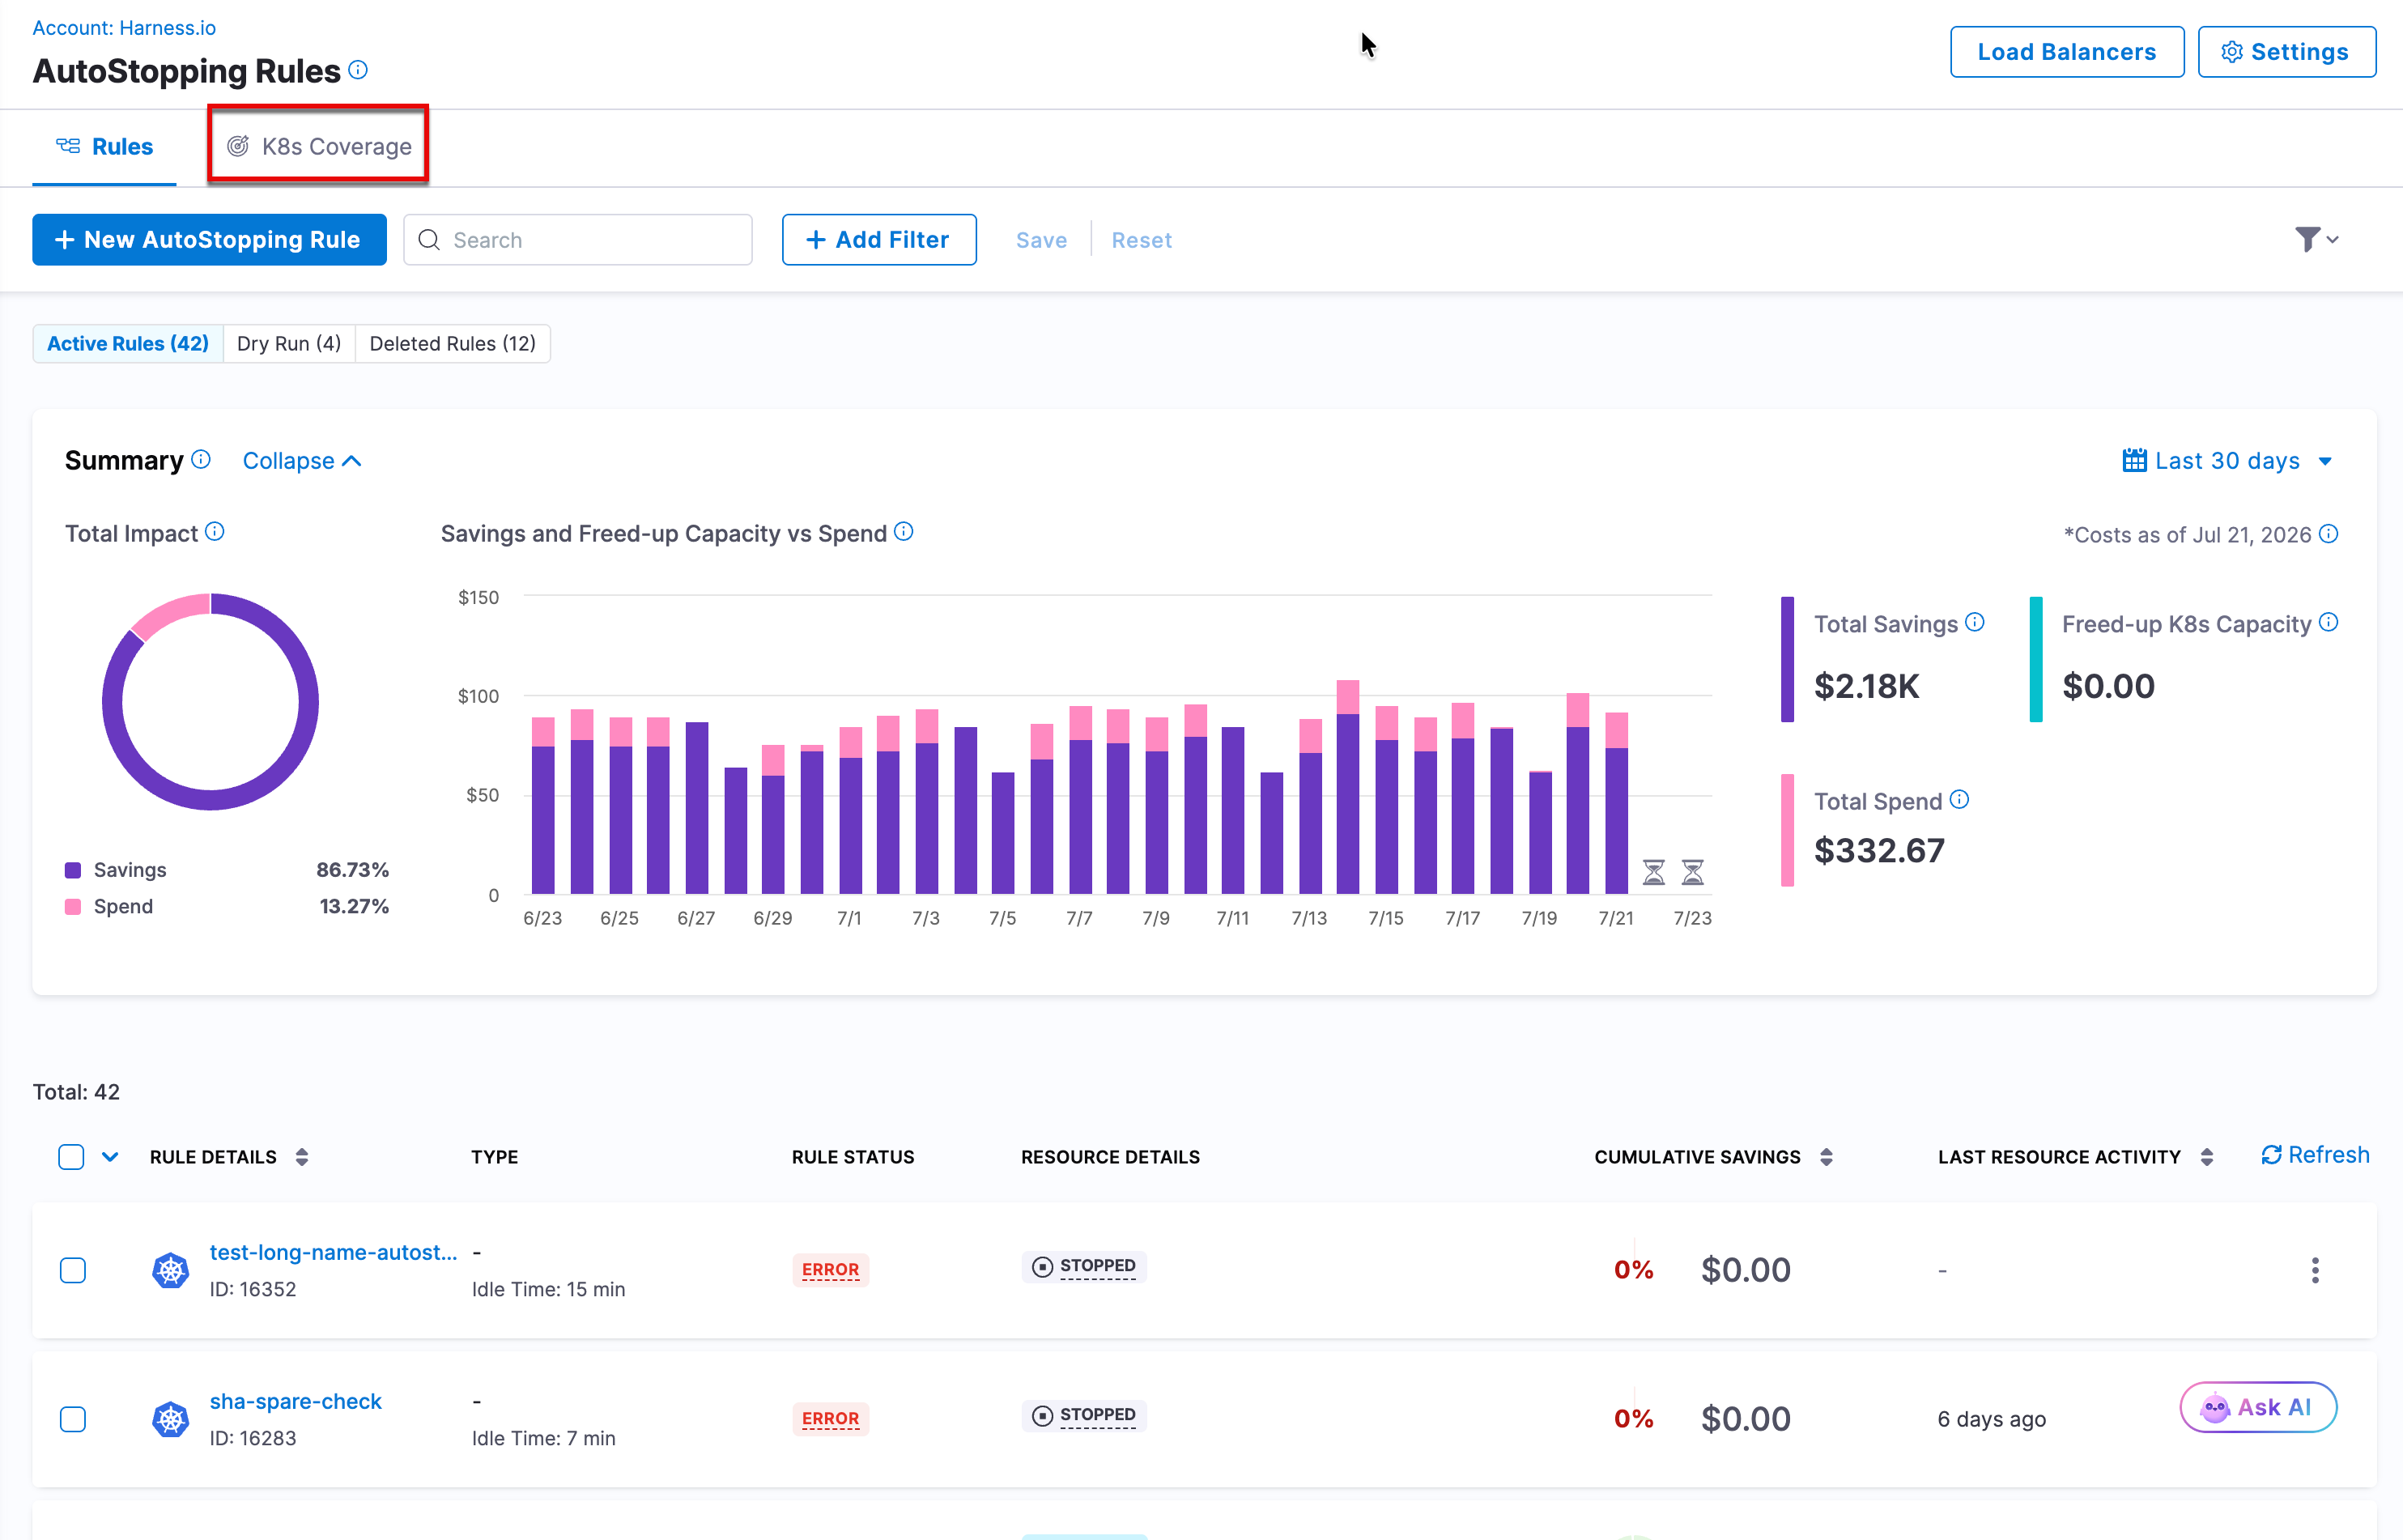
In Harness, go to **AutoStopping Rules**, then select the **K8s Coverage** tab.

<figure><img src="/files/zaUII6S9S5MdJnnjEChe" alt=""><figcaption><p>The K8s Coverage tab on the AutoStopping Rules page</p></figcaption></figure>

This page lists your connected clusters, identified by their CCM Kubernetes connector ID. Each cluster shows coverage metrics, including the **Uncovered Spend**, which is the cost of workloads that no AutoStopping rule manages yet.

<figure><img src="/files/7lE62Uq9lu9OS9sRgROQ" alt=""><figcaption><p>The K8s Coverage cluster list with coverage metrics</p></figcaption></figure>

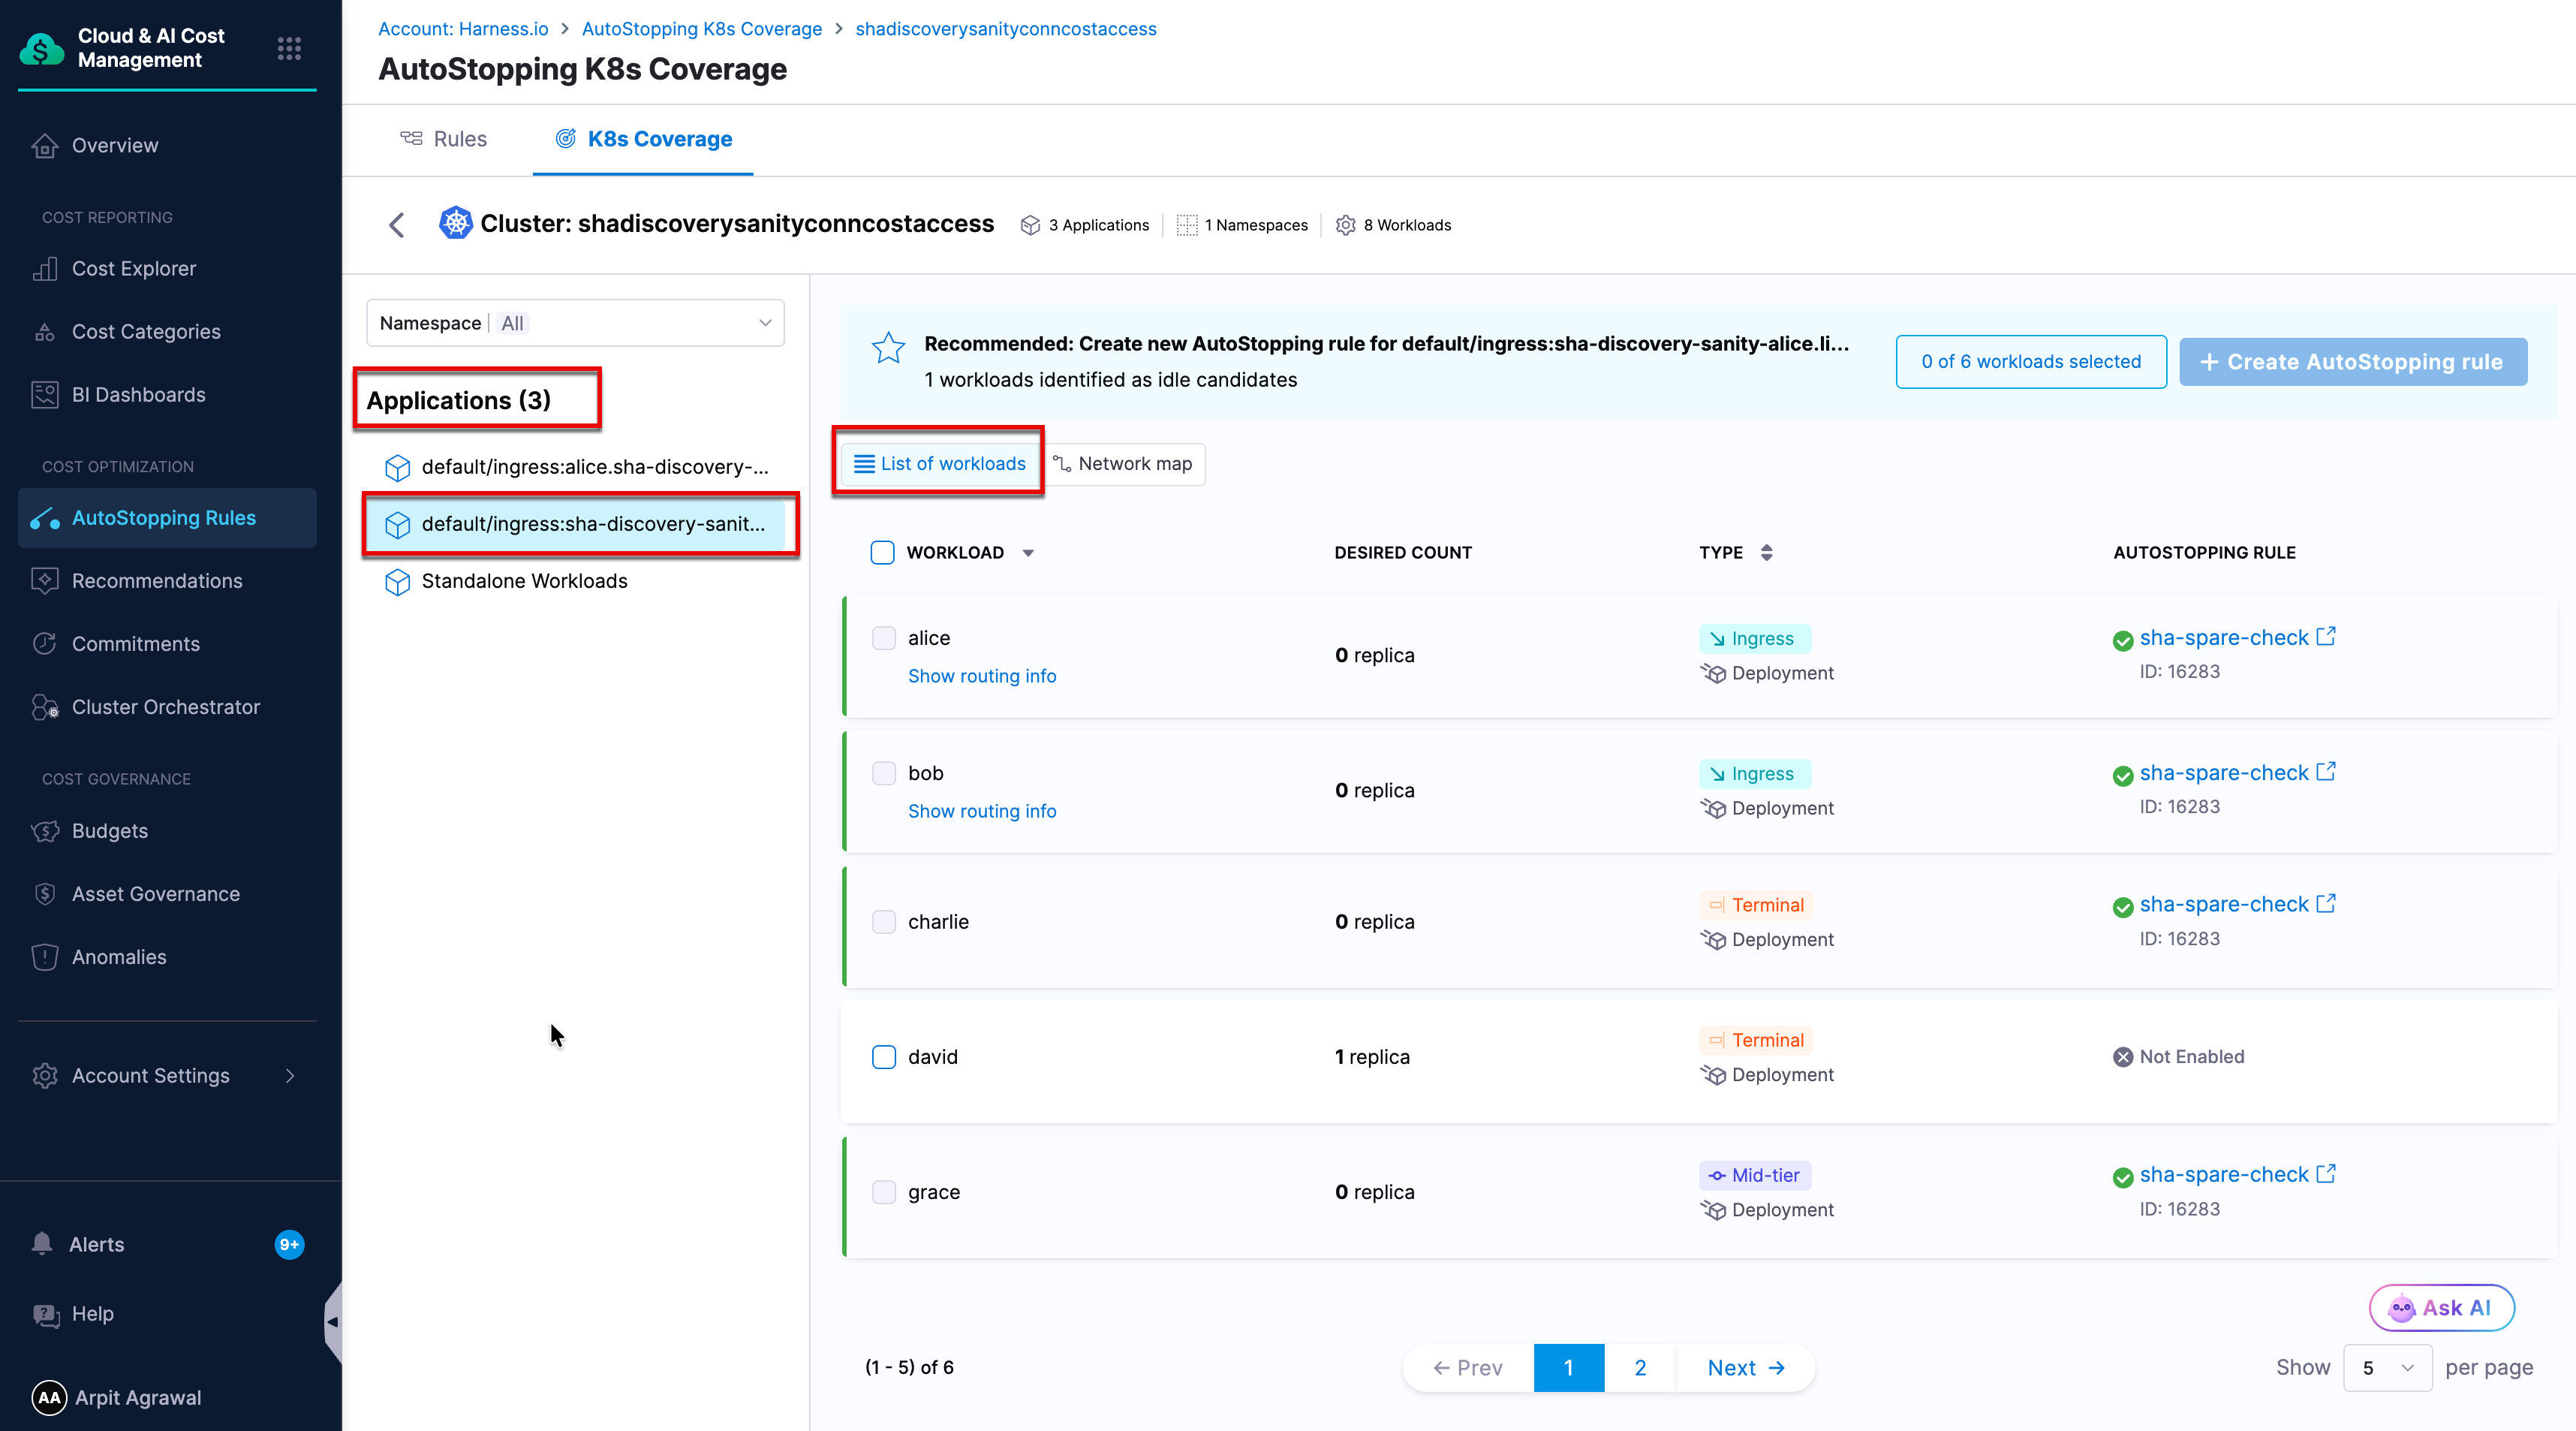
Select a cluster to see the applications and workloads that discovery found in it. The cluster view shows the number of **Applications** and namespaces, and you can filter by **Namespace**.

#### Review Discovered Applications <a href="#review-discovered-applications" id="review-discovered-applications"></a>

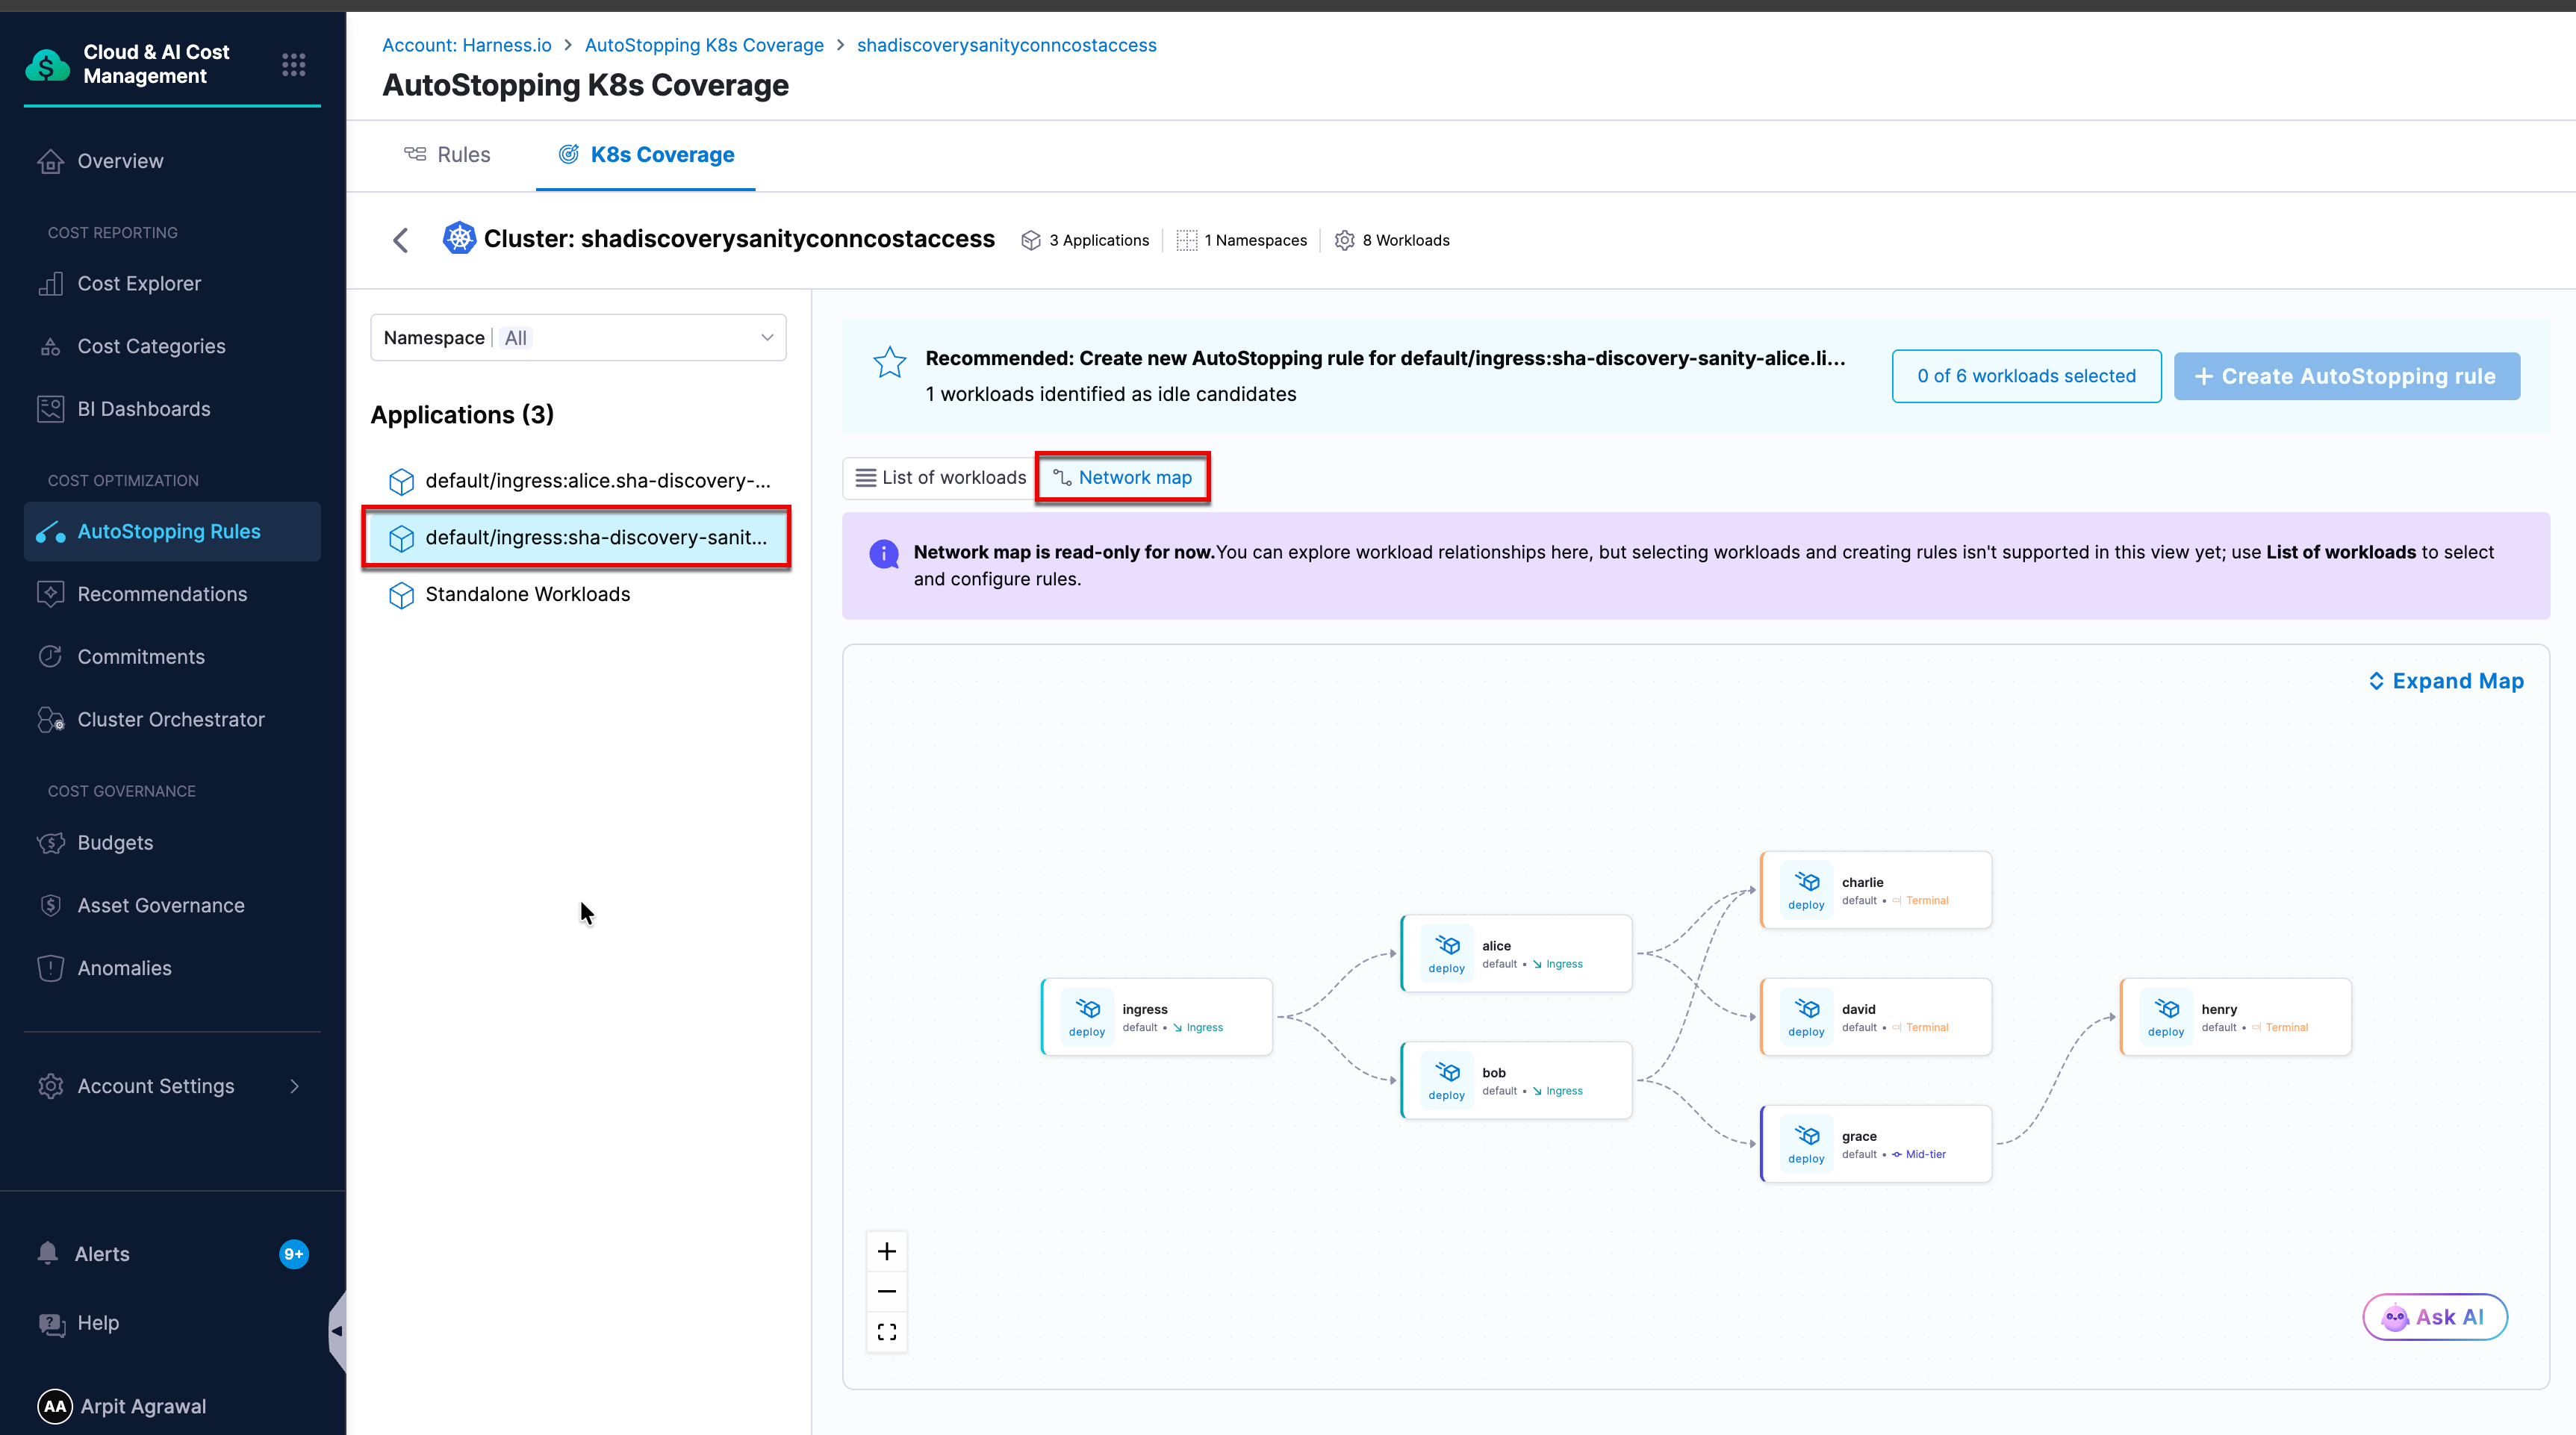
Inside a cluster, discovery presents your workloads in two ways. Use the **List of workloads** and **Network map** toggle to switch between them:

* **List of workloads:** Discovered applications, each expandable to the individual workloads (Deployments and StatefulSets) it contains. Each workload shows a **Show routing info** link with its ingress routing details. Workloads that no rule covers yet appear with **Not Enabled** in the **AutoStopping Rule** column.

  <figure><img src="/files/uWKNf1VtZfOCRk2DP0nR" alt=""><figcaption><p>List of workloads for a discovered application</p></figcaption></figure>
* **Network map:** A visual layout of the same applications. The ingress that exposes an application appears as a node, workloads appear as nodes, and the connections between them appear as edges. The Network map is read-only, so you select and configure rules from the **List of workloads** view.

  <figure><img src="/files/DLeAM0gCCTzwzrbR3Ksy" alt=""><figcaption><p>Network map of a discovered application</p></figcaption></figure>

Applications are composed by their ingress and hostname: every ingress-exposed workload, together with the workloads it depends on (to any depth), is grouped into one application. Applications are listed by their ingress and host, for example `default/ingress:alice.sha-discovery-...`.

Workloads that are neither exposed through an ingress nor yet detected being contacted by another workload are grouped under a **Standalone** recommendation. You can create an AutoStopping rule from all or a subset of these workloads and control them with a schedule. As discovery detects traffic to a standalone workload, it can move into another recommendation.

An application is a group of workloads that Harness determines should start and stop together, either because they sit on the same request path or because they share a dependency. Grouping is a Harness concept, so there is no matching label or object in your cluster.

Go to [The Network Map and Applications](/cloud-cost-management/cost-optimization/autostopping-rules/k8s-coverage.md#the-network-map-and-applications) to understand how Harness decides which workloads belong to the same application.

***

### Review a Recommendation and Create a Rule <a href="#review-a-recommendation-and-create-a-rule" id="review-a-recommendation-and-create-a-rule"></a>

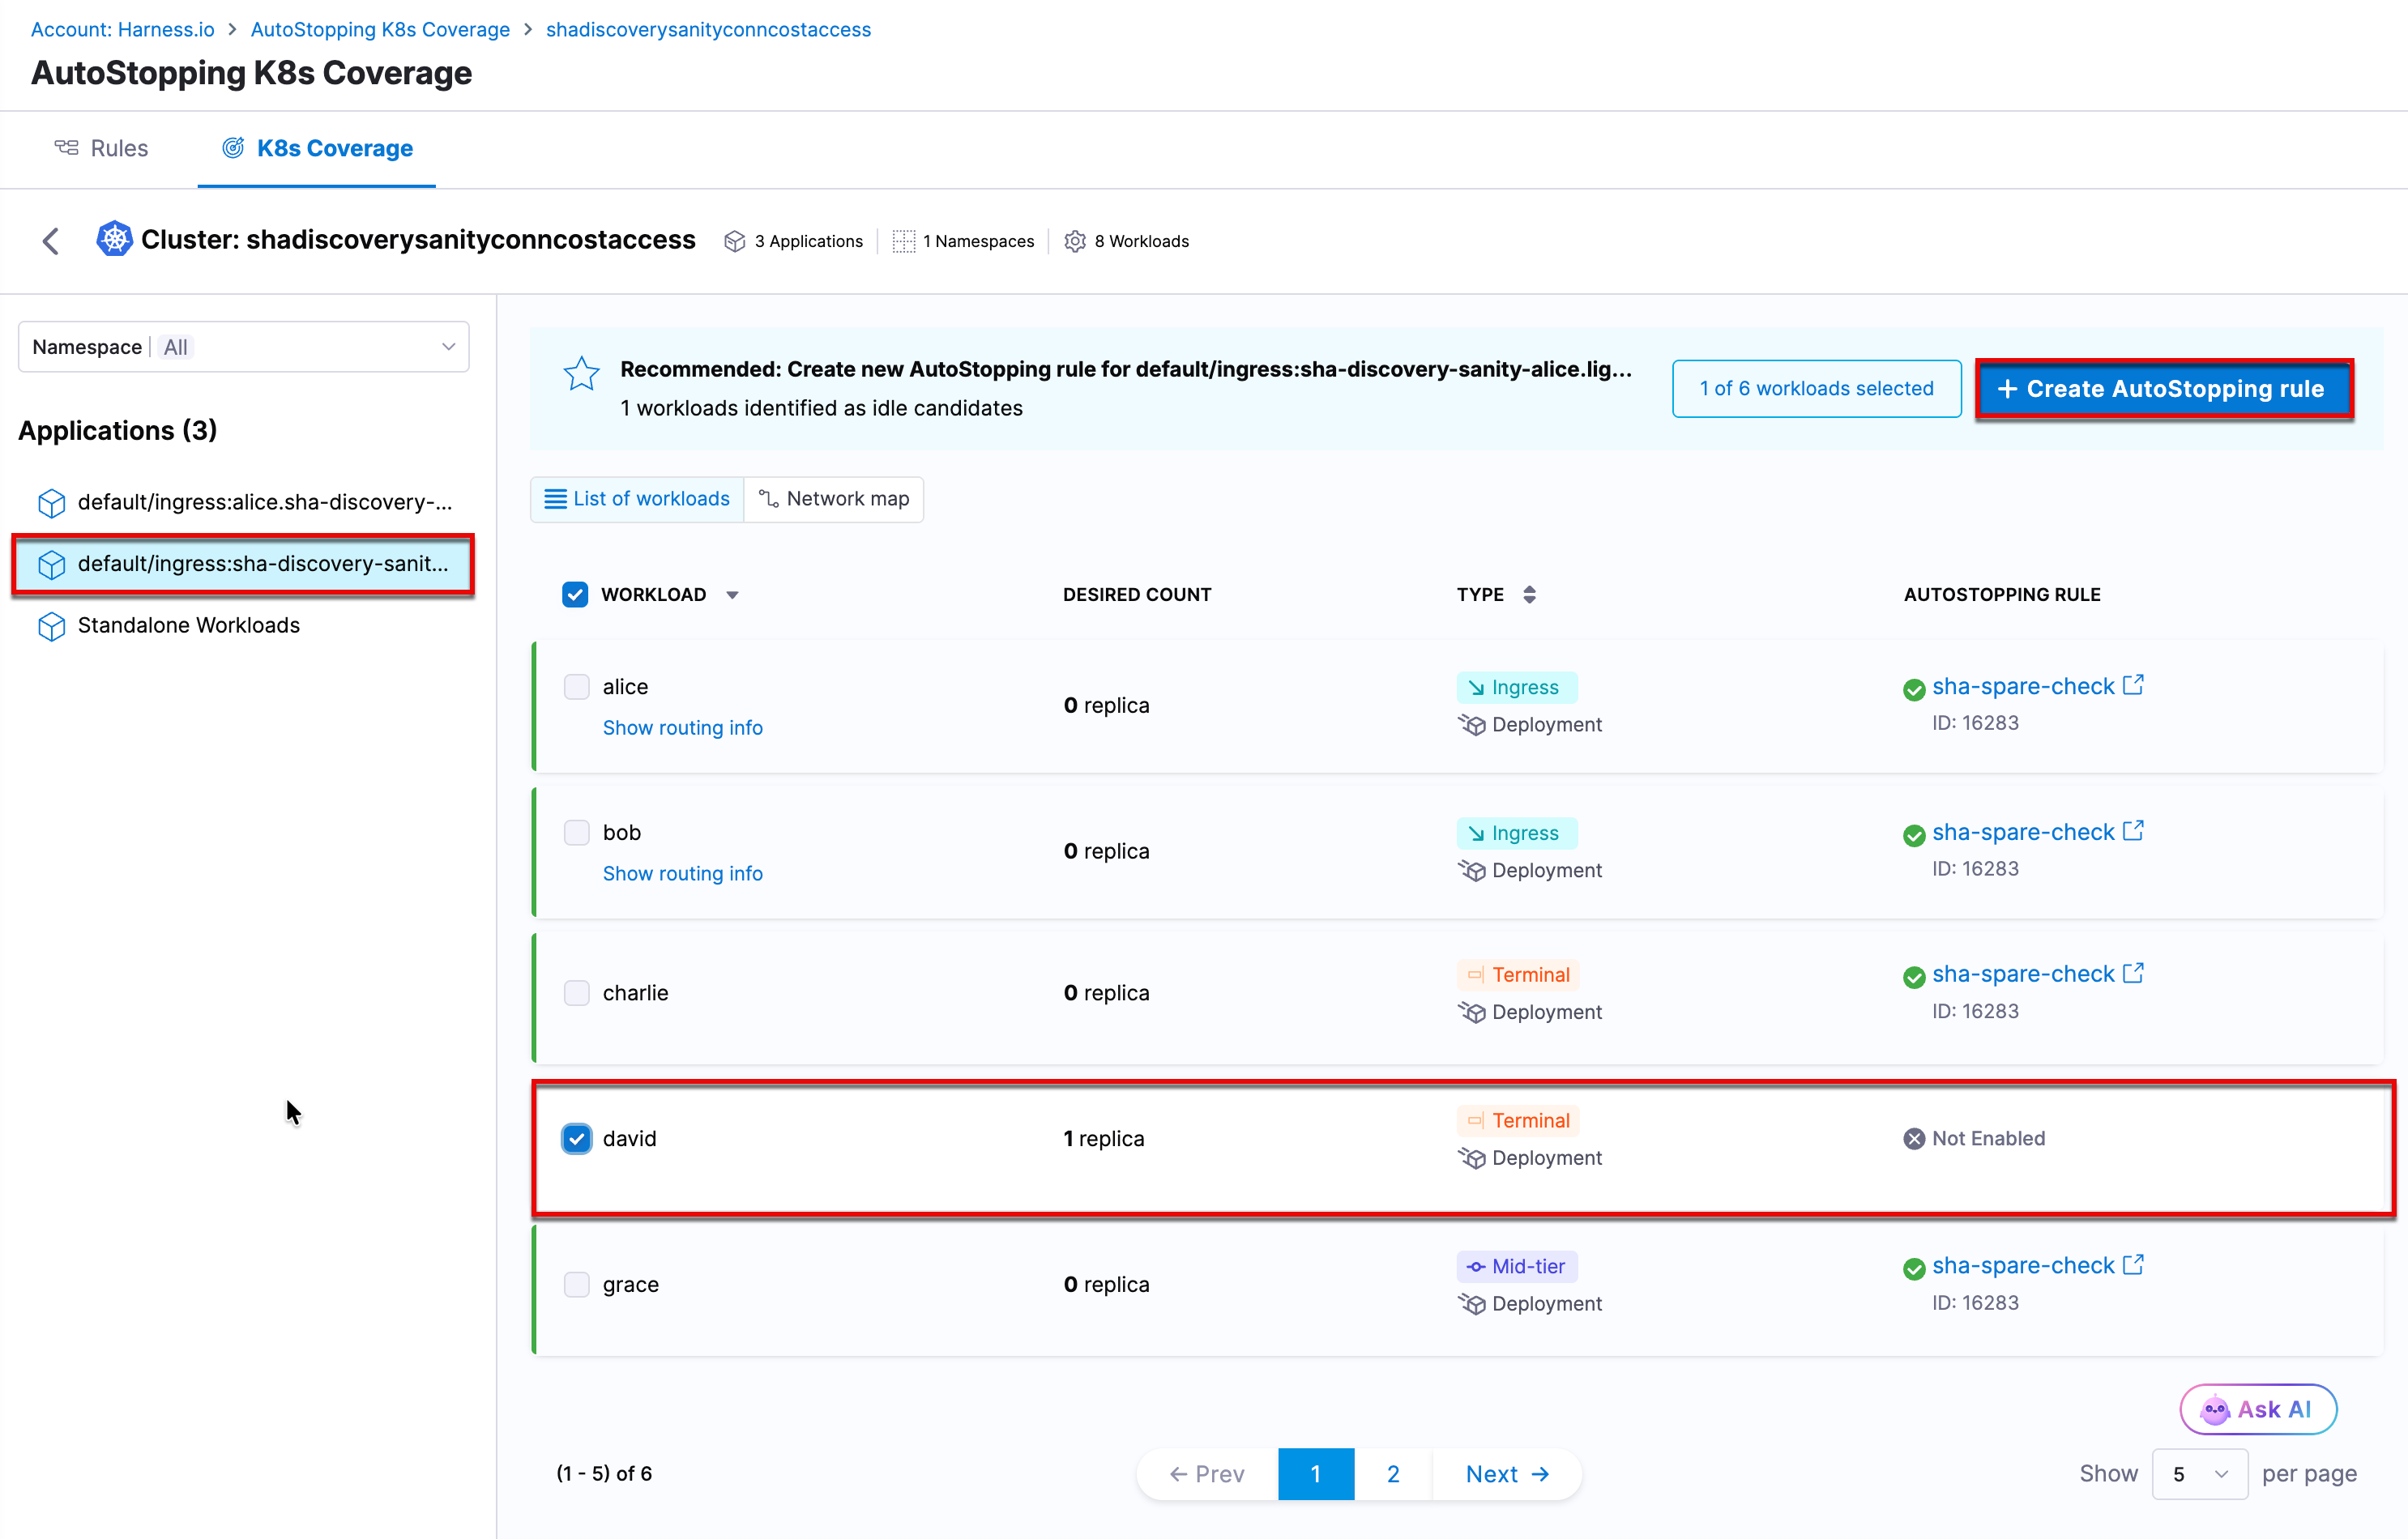
For each application, Harness surfaces a recommendation that identifies the workloads you can bring under a single AutoStopping rule, shown as **Recommended: Create new AutoStopping rule** with the count of workloads identified as idle candidates. Instead of writing the rule configuration by hand, you select the workloads and Harness composes the rule for you.

1. In your cluster under **K8s Coverage**, select an application from the list.
2. Select the workloads you want to cover. Workloads that an existing rule already covers cannot be selected again.

   <figure><img src="/files/SltiPgmdofx0BKRzBa13" alt=""><figcaption><p>Select workloads and create an AutoStopping rule</p></figcaption></figure>
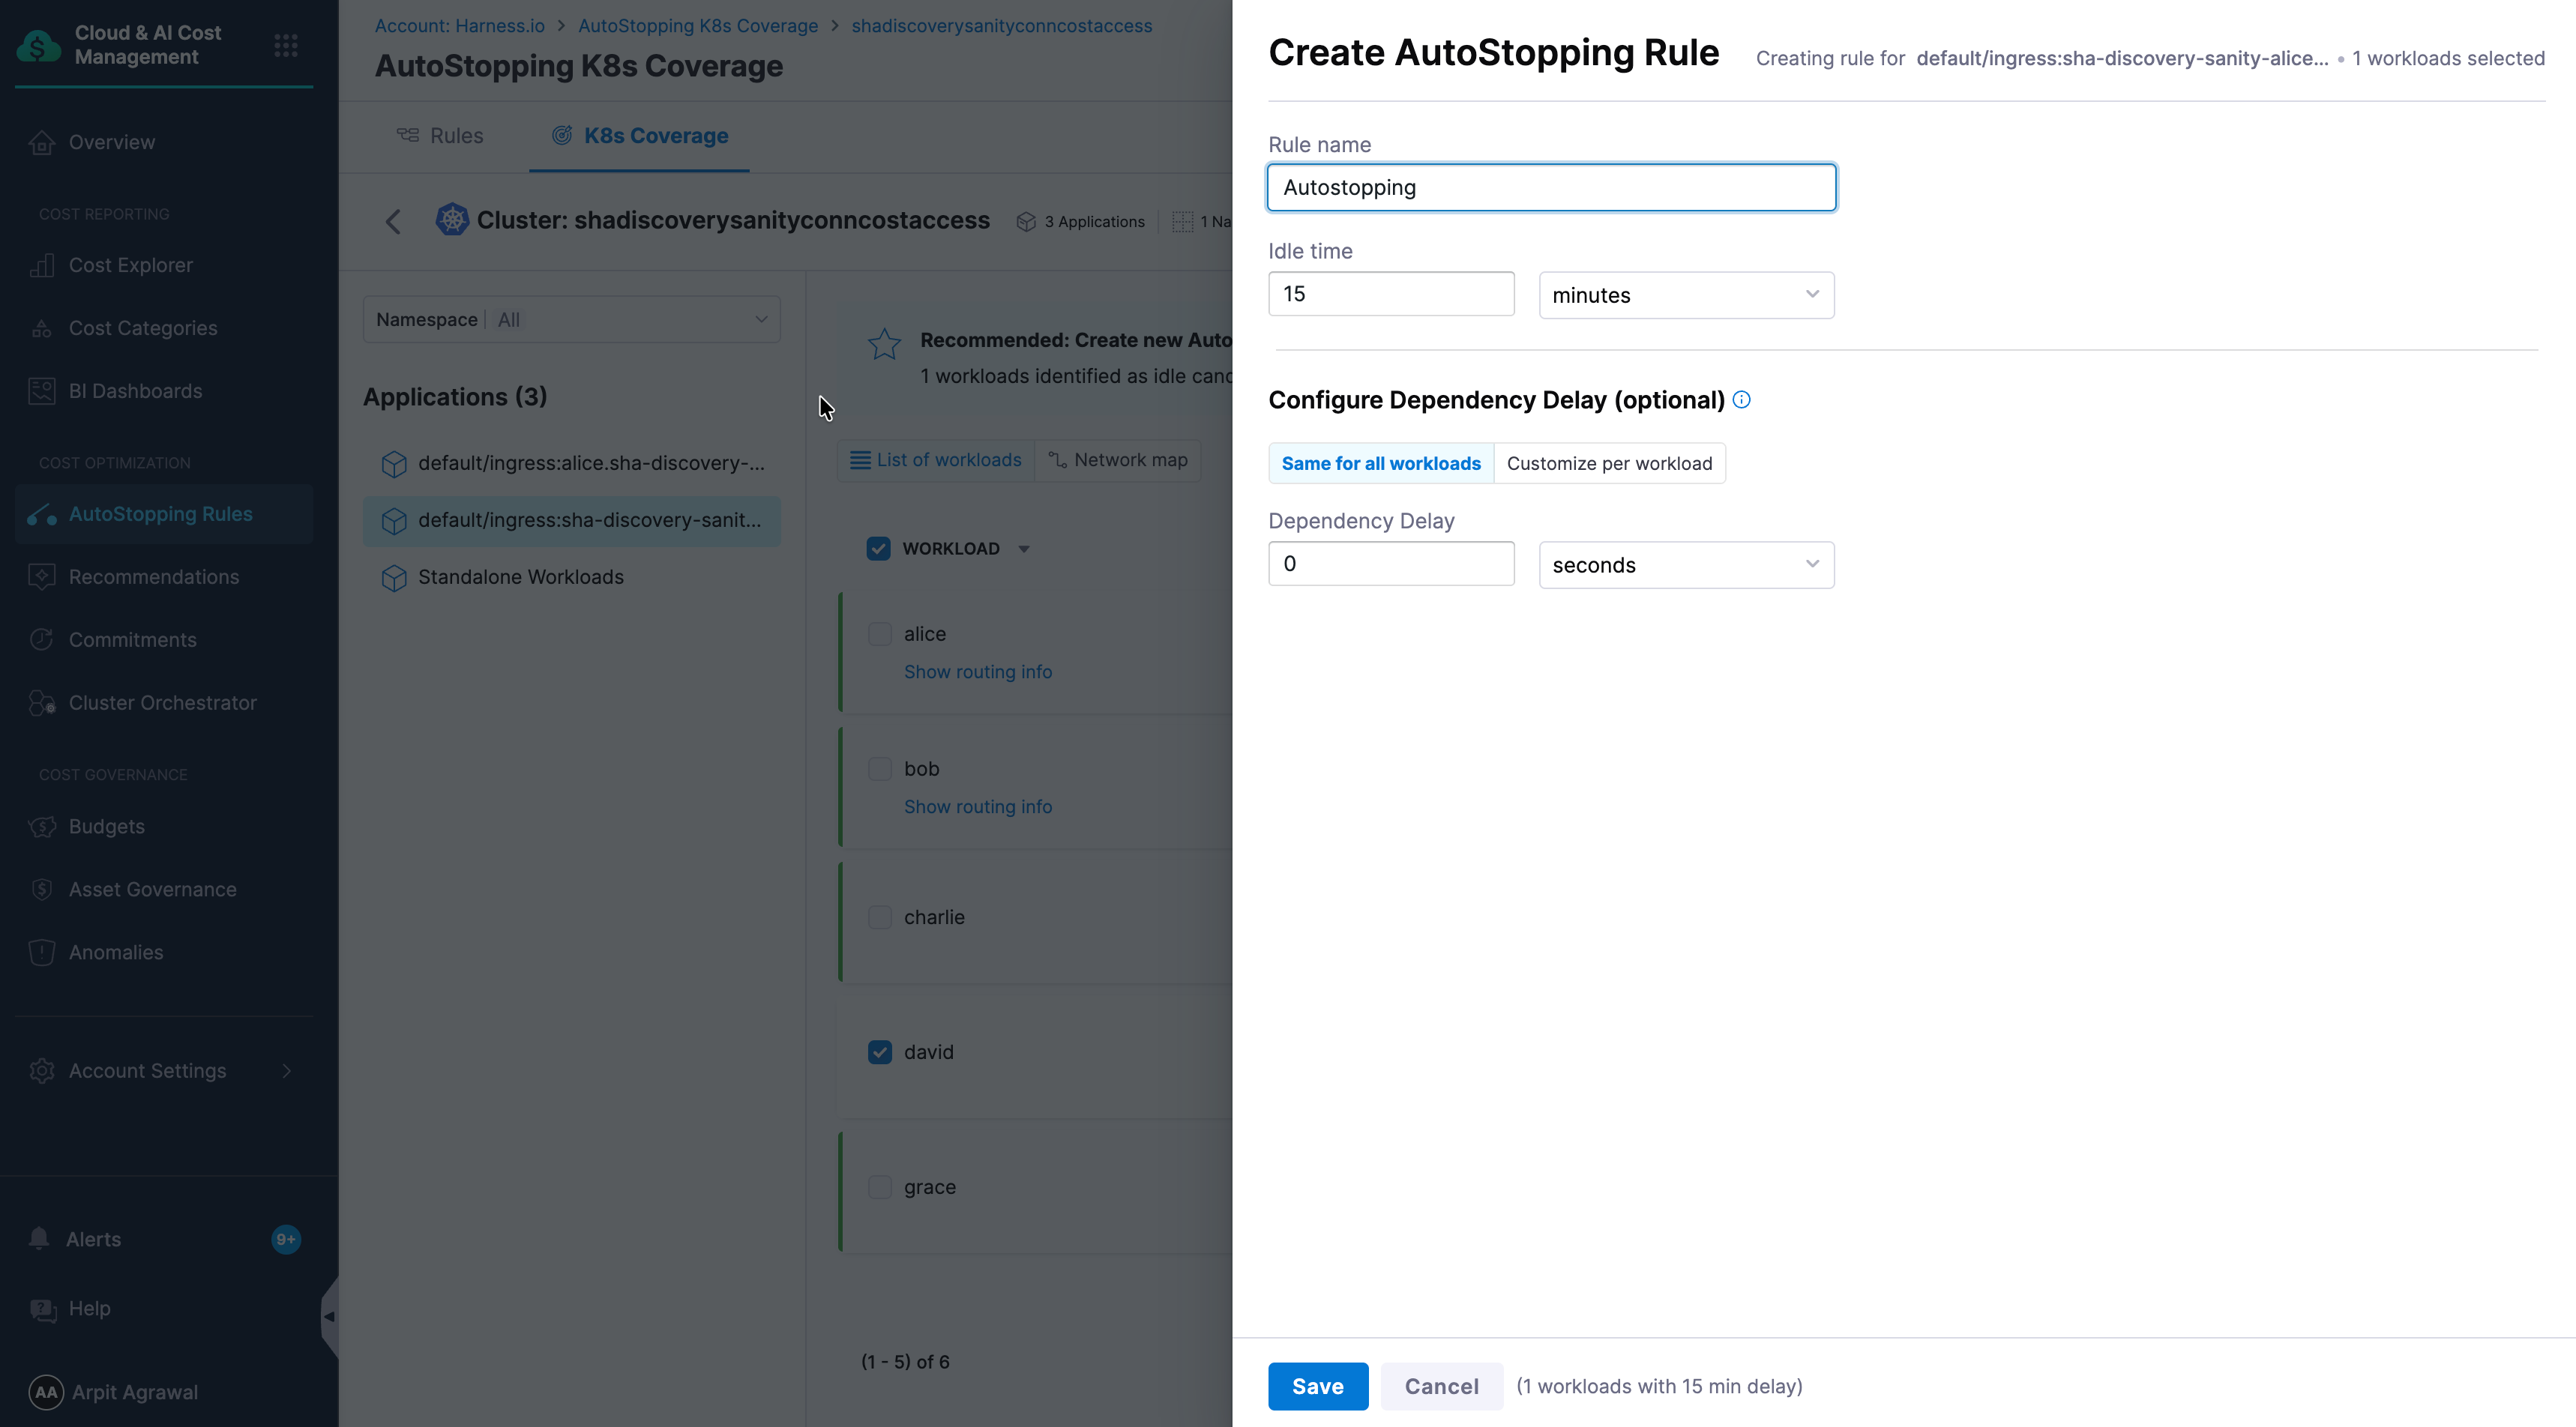
3. Select **Create AutoStopping rule**. The **Create AutoStopping Rule** panel opens, showing the application and the number of workloads selected.
4. Configure the rule:
   * **Rule name:** Enter a name for the rule.
   * **Idle time:** Set how long a workload stays inactive, measured from its last traffic activity, before AutoStopping stops it. Enter a value and select the unit, for example `15` minutes.
   * **Configure Dependency Delay (optional):** For workloads that depend on another workload to start first, set a startup delay. Select **Same for all workloads** to apply one delay to every workload, or **Customize per workload** to set a different **Dependency Delay** for each. Enter a value and select the unit.
5. Select **Save**.

   <figure><img src="/files/PzrNp5dlwkjCVxYUalrI" alt=""><figcaption><p>The Create AutoStopping Rule panel</p></figcaption></figure>

{% hint style="info" %}
The recommendation only identifies which workloads to cover. It does not analyze your traffic patterns or pre-fill the idle time. You choose the idle time and any dependency delay yourself.
{% endhint %}

When you select **Save**, Harness composes the rule configuration and creates the rule. The rule appears under the **Rules** tab, and Harness creates a matching `AutoStoppingRule` custom resource in your cluster and keeps the two in sync. You do not need to apply any YAML.

To add a fixed schedule, edit the rule after you create it. A schedule is not part of the **Create AutoStopping Rule** panel.

{% hint style="info" %}
Adding workloads to an existing rule from a recommendation is not yet available. Create a new rule for the workloads you want to cover.
{% endhint %}

***

### Troubleshooting <a href="#troubleshooting" id="troubleshooting"></a>

<details>

<summary>The AutoStopping controller (version 2.0.0 and later) pod does not start after installing the Helm chart in a Kubernetes cluster.</summary>

Confirm the harness-autostopping namespace exists and the API key secret is present and readable. Check the controller pod logs with kubectl logs.

</details>

<details>

<summary>No recommendations appear under K8s Coverage after installing the AutoStopping controller (version 2.0.0 and later).</summary>

Discovery runs periodically after the controller starts. Confirm the CCM Kubernetes connector has AutoStopping enabled and that the controller is running, then allow time for the first discovery cycle to complete.

</details>

***

### Next Steps <a href="#next-steps" id="next-steps"></a>

You now have an AutoStopping controller running in your cluster and a rule created from a recommendation. Next, review the two rule models and how AutoStopping calculates savings.

* [Single-workload and multi-workload rules](/cloud-cost-management/cost-optimization/autostopping-rules/single-multi-workload-rules.md): Compare the two rule models and how to move between them.
* [AutoStopping Rules overview](/cloud-cost-management/cost-optimization/autostopping-rules/1-auto-stopping-rules.md): Understand how AutoStopping reduces spend on non-production resources.