> For the complete documentation index, see [llms.txt](https://developer.harness.io/llms.txt). Markdown versions of documentation pages are available by appending `.md` to page URLs; this page is available as [Markdown](https://developer.harness.io/cloud-cost-management/integrations/cloud-providers/aws.md).
# AWS
Connect AWS to bring your cloud spend into Cloud & AI Cost Management.
{% hint style="info" %}
**IMPORTANT**
We recommend AWS **CUR 2.0** (Data Exports), which covers all CACM features. **CUR 1.0 (Legacy CUR)** is also fully supported.
{% endhint %}
***
### Before you start
To ensure a smooth and error-free setup experience, complete the following steps in your **AWS console** before launching the Harness wizard. This will allow you to progress through the setup without delays or missing prerequisites.
| Required Info | Where to Find It | Why It’s Needed |
| ------------------------------------ | -------------------------------------------- | ------------------------------------------------------------- |
| **AWS Account ID** (12-digit number) | AWS Console → Account Settings | Used to associate your cloud costs with your Harness project. |
| **Cost and Usage Report (CUR)** | AWS Console → Billing → Cost & Usage Reports | Harness uses this to ingest detailed billing data. |
| **S3 Bucket Name** | AWS Console → S3 | Stores the CUR files for Harness to access. |
#### Set up the Cost and usage report
Create the report in your AWS console, then use its name and S3 bucket when you configure the Harness connector. We recommend **CUR 2.0**, but **Legacy CUR** is also fully supported.
{% hint style="info" %}
CUR 2.0 support is enabled through the `CCM_AWS_NEW_CUR` feature flag. Contact [Harness Support](mailto:support@harness.io) to enable it.
{% endhint %}
{% tabs %}
{% tab title="CUR 2.0 (recommended)" %}
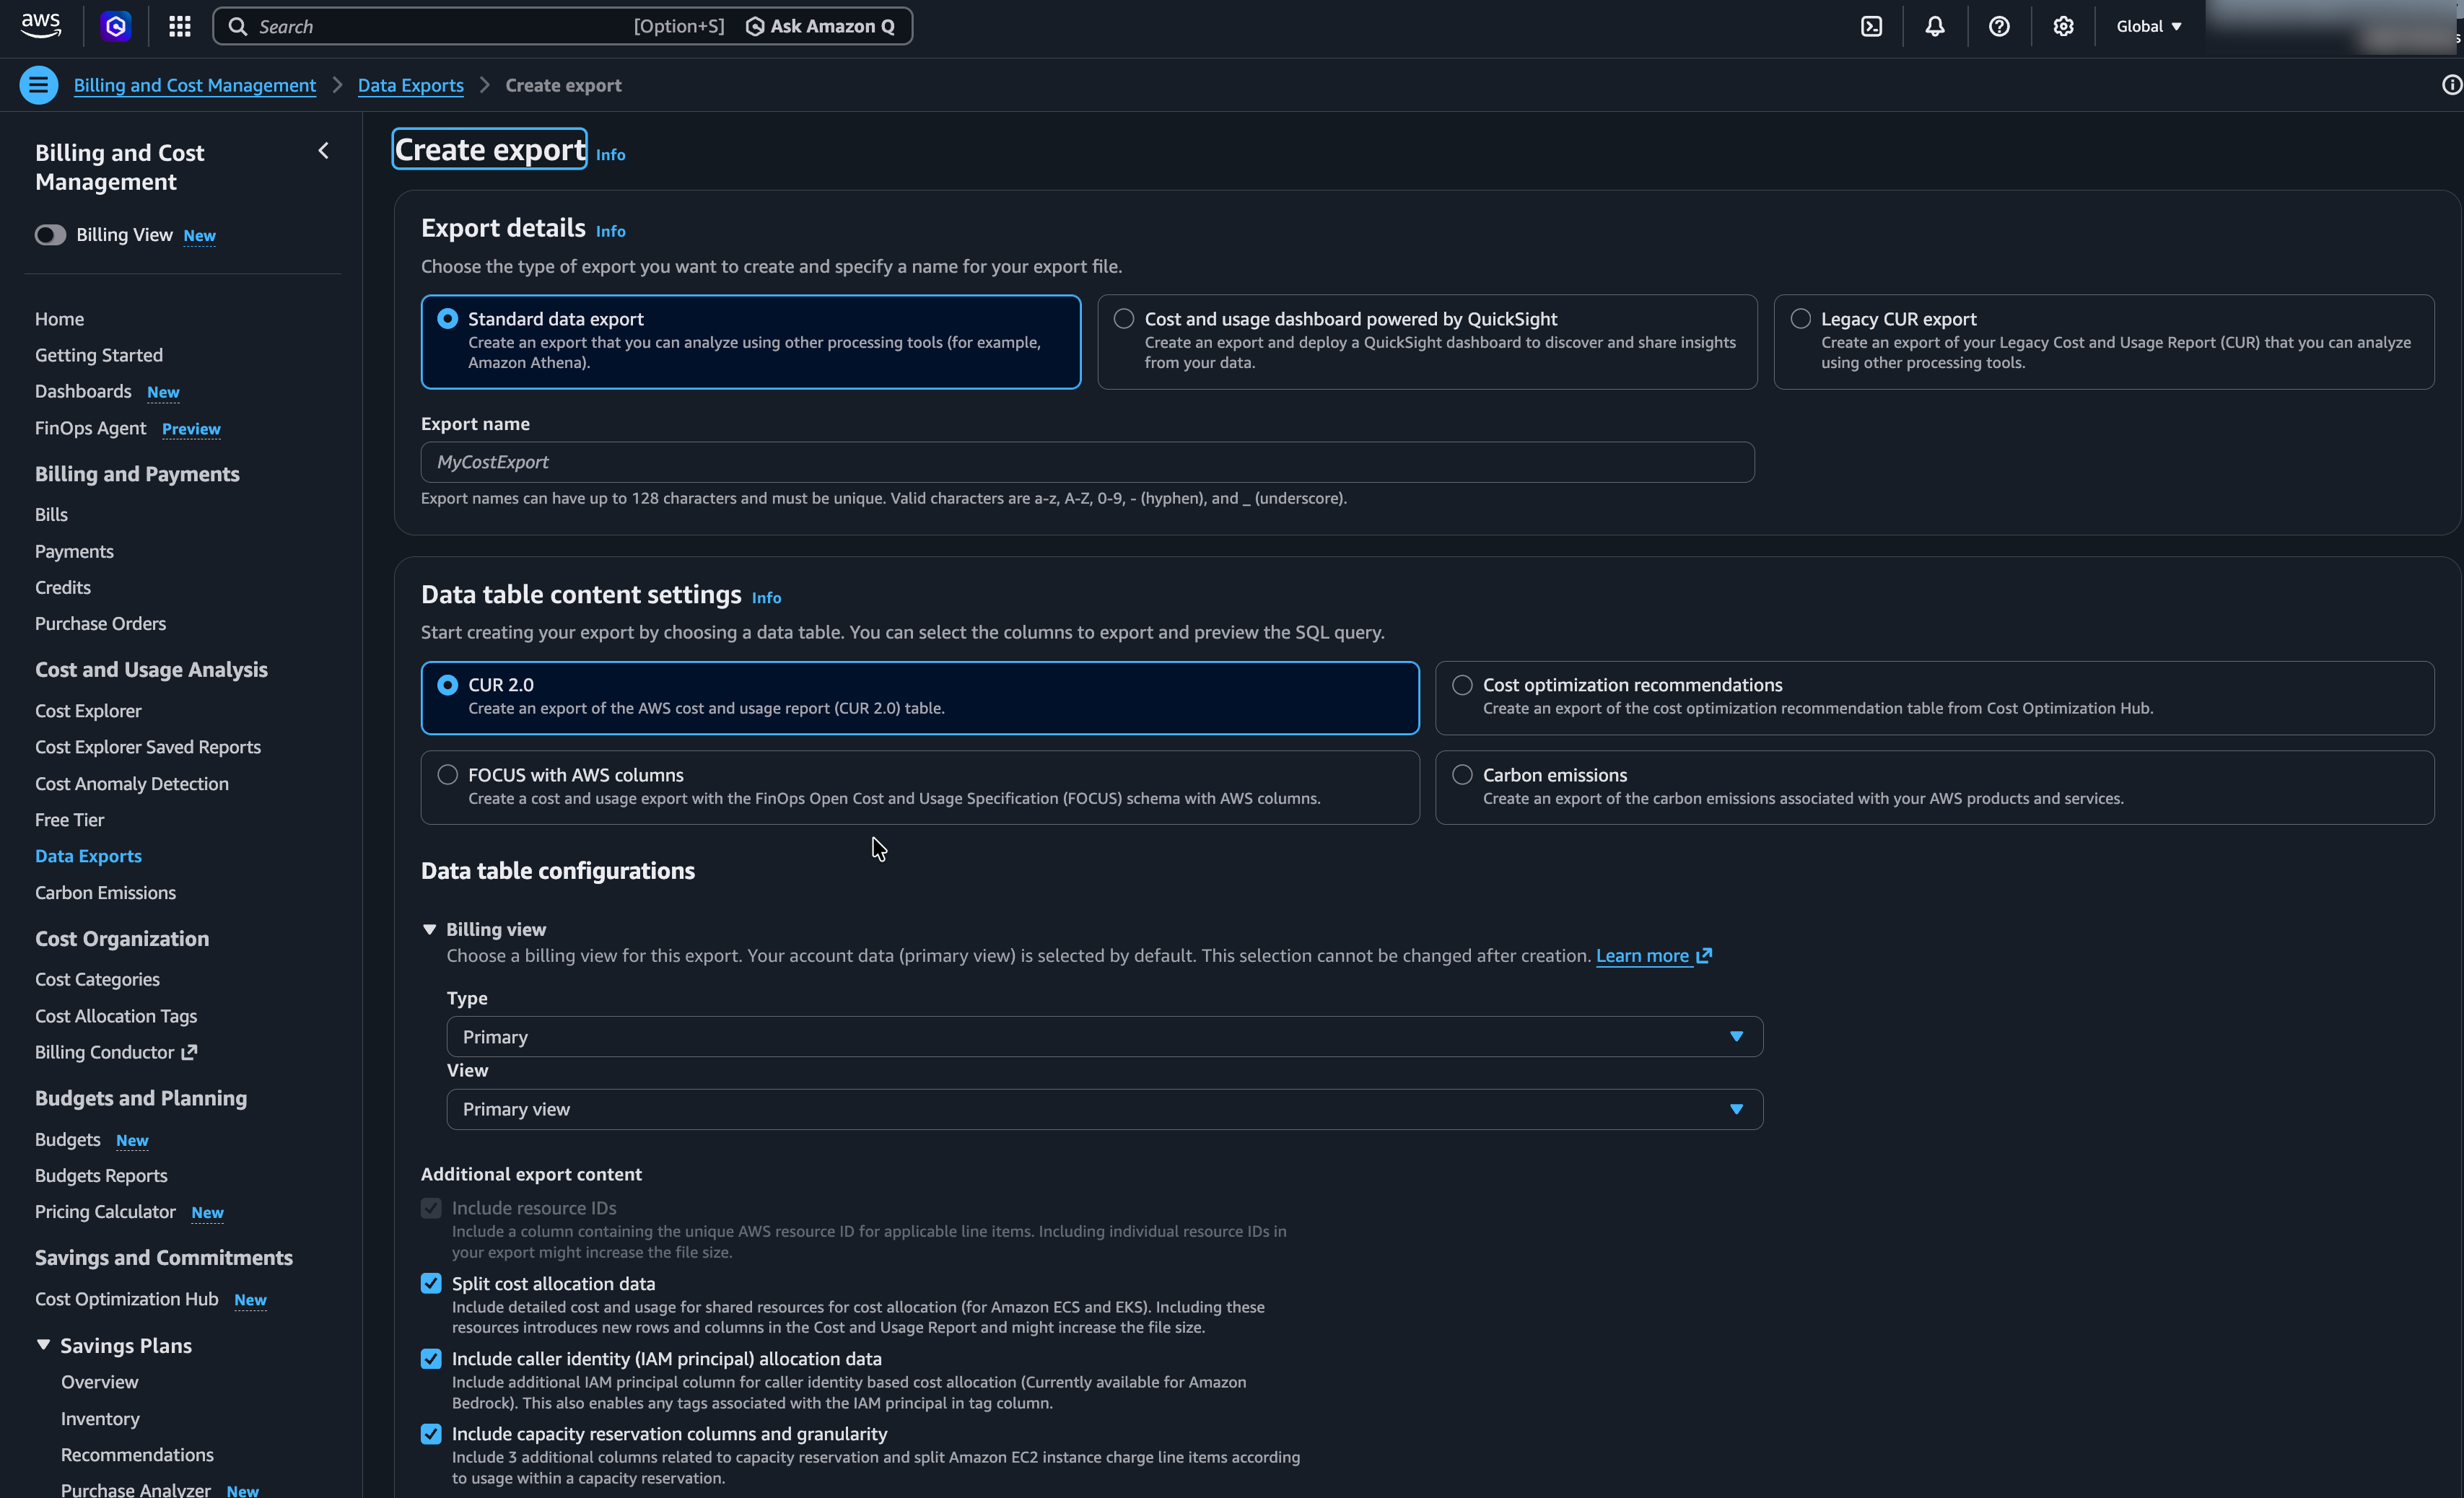
1. In the AWS console, navigate to **Billing and Cost Management** → **Data Exports** → **Create export**.
2. Under **Report details**, select all four options:
* Include resource IDs
* Split cost allocation data
* Include caller identity (IAM principal) allocation data
* Include capacity reservation columns and granularity
3. Under **Delivery options**, configure the following:
| Setting | Required Value |
| -------------------- | ----------------------------------------------------------------------------------------------- |
| **Compression type** | Parquet |
| **S3 bucket** | Select or create a bucket. Copy the bucket name, as you will need it for the Harness connector. |
| **S3 path prefix** | Enter any prefix. |
4. Do not uncheck any columns.
5. Review and create the export. Copy the export name, as you will need it for the Harness connector.
Click to view full size image
{% endtab %}
{% tab title="Legacy CUR" %}
1. In the AWS console, go to **Billing → Cost & Usage Reports** and click **Create report**.
2. Select **Legacy CUR export** and give the report a descriptive name. Copy this name, as you will need it for the Harness connector.
3. Under **Report details**, configure the following:
| Setting | Required Value | Notes |
| ------------------------ | ------------------------- | ---------------------------------------------- |
| **Include Resource IDs** | ✅ Enabled | Must be checked in "Additional report details" |
| **Time Granularity** | Hourly | Required for accurate cost tracking |
| **Report versioning** | Create new report version | - |
4. Under **Delivery options**, configure the following:
| Setting | Required Value | Notes |
| ------------------------- | ------------------------- | ---------------------------------------------- |
| **S3 bucket** | Select or create a bucket | Copy the bucket name for the Harness connector |
| **S3 path prefix** | Enter any prefix | Note it if you set one |
| **Compression** | GZIP | Required format |
| **File Format** | CSV | Parquet is not supported |
| **Data Refresh Settings** | Automatic | Enable "Automatically refresh" |
5. Review and create the report.
{% endtab %}
{% endtabs %}
**Related Documentation**
* [AWS CUR User Guide](https://docs.aws.amazon.com/cur/latest/userguide/what-is-cur.html)
* [Legacy CUR vs CUR 2.0](https://docs.aws.amazon.com/cur/latest/userguide/table-dictionary-cur2.html)
***
{% hint style="warning" %}
**TIME FOR DATA DELIVERY**
It may take up to **24 hours** for AWS to begin delivering cost and usage data. You can still proceed through the wizard, but the connection test may fail if data isn’t yet available.
In the meantime, explore the optional requirements and feature integrations available in Harness CACM, these will be available to select in your **Choose Requirements** step of the connection wizard:
* [Resource Inventory Management](/cloud-cost-management/cost-reporting/bi-dashboards/overview.md).
* [Optimization by AutoStopping](/cloud-cost-management/cost-optimization/autostopping-rules/1-auto-stopping-rules.md).
* [Cloud Governance](/cloud-cost-management/cost-governance/asset-governance/1-asset-governance.md).
* [Commitment Orchestration](/cloud-cost-management/cost-optimization/commitment-orchestrator.md).
{% endhint %}
***
### Interactive guide
Connect your AWS account to Harness using the connector wizard. Watch the walkthrough below, or follow the [Step-by-Step](#step-by-step) instructions for the full detail on each step.
{% embed url="" %}
Add AWS Cloud Cost Connector in Harness
{% endembed %}
### Step-by-Step
#### Step 1: Add AWS account details
1. In the wizard, enter a name for your connector (e.g., `ccm-aws-prod`).
2. Enter your **12-digit AWS Account ID**.
3. (Optional) Add a description and tags to help identify this connector later.
4. If you are using a GovCloud account, select **Yes**; otherwise, leave the default.
5. Click **Continue**.
#### Step 2: Select or create a Cost and Usage Report
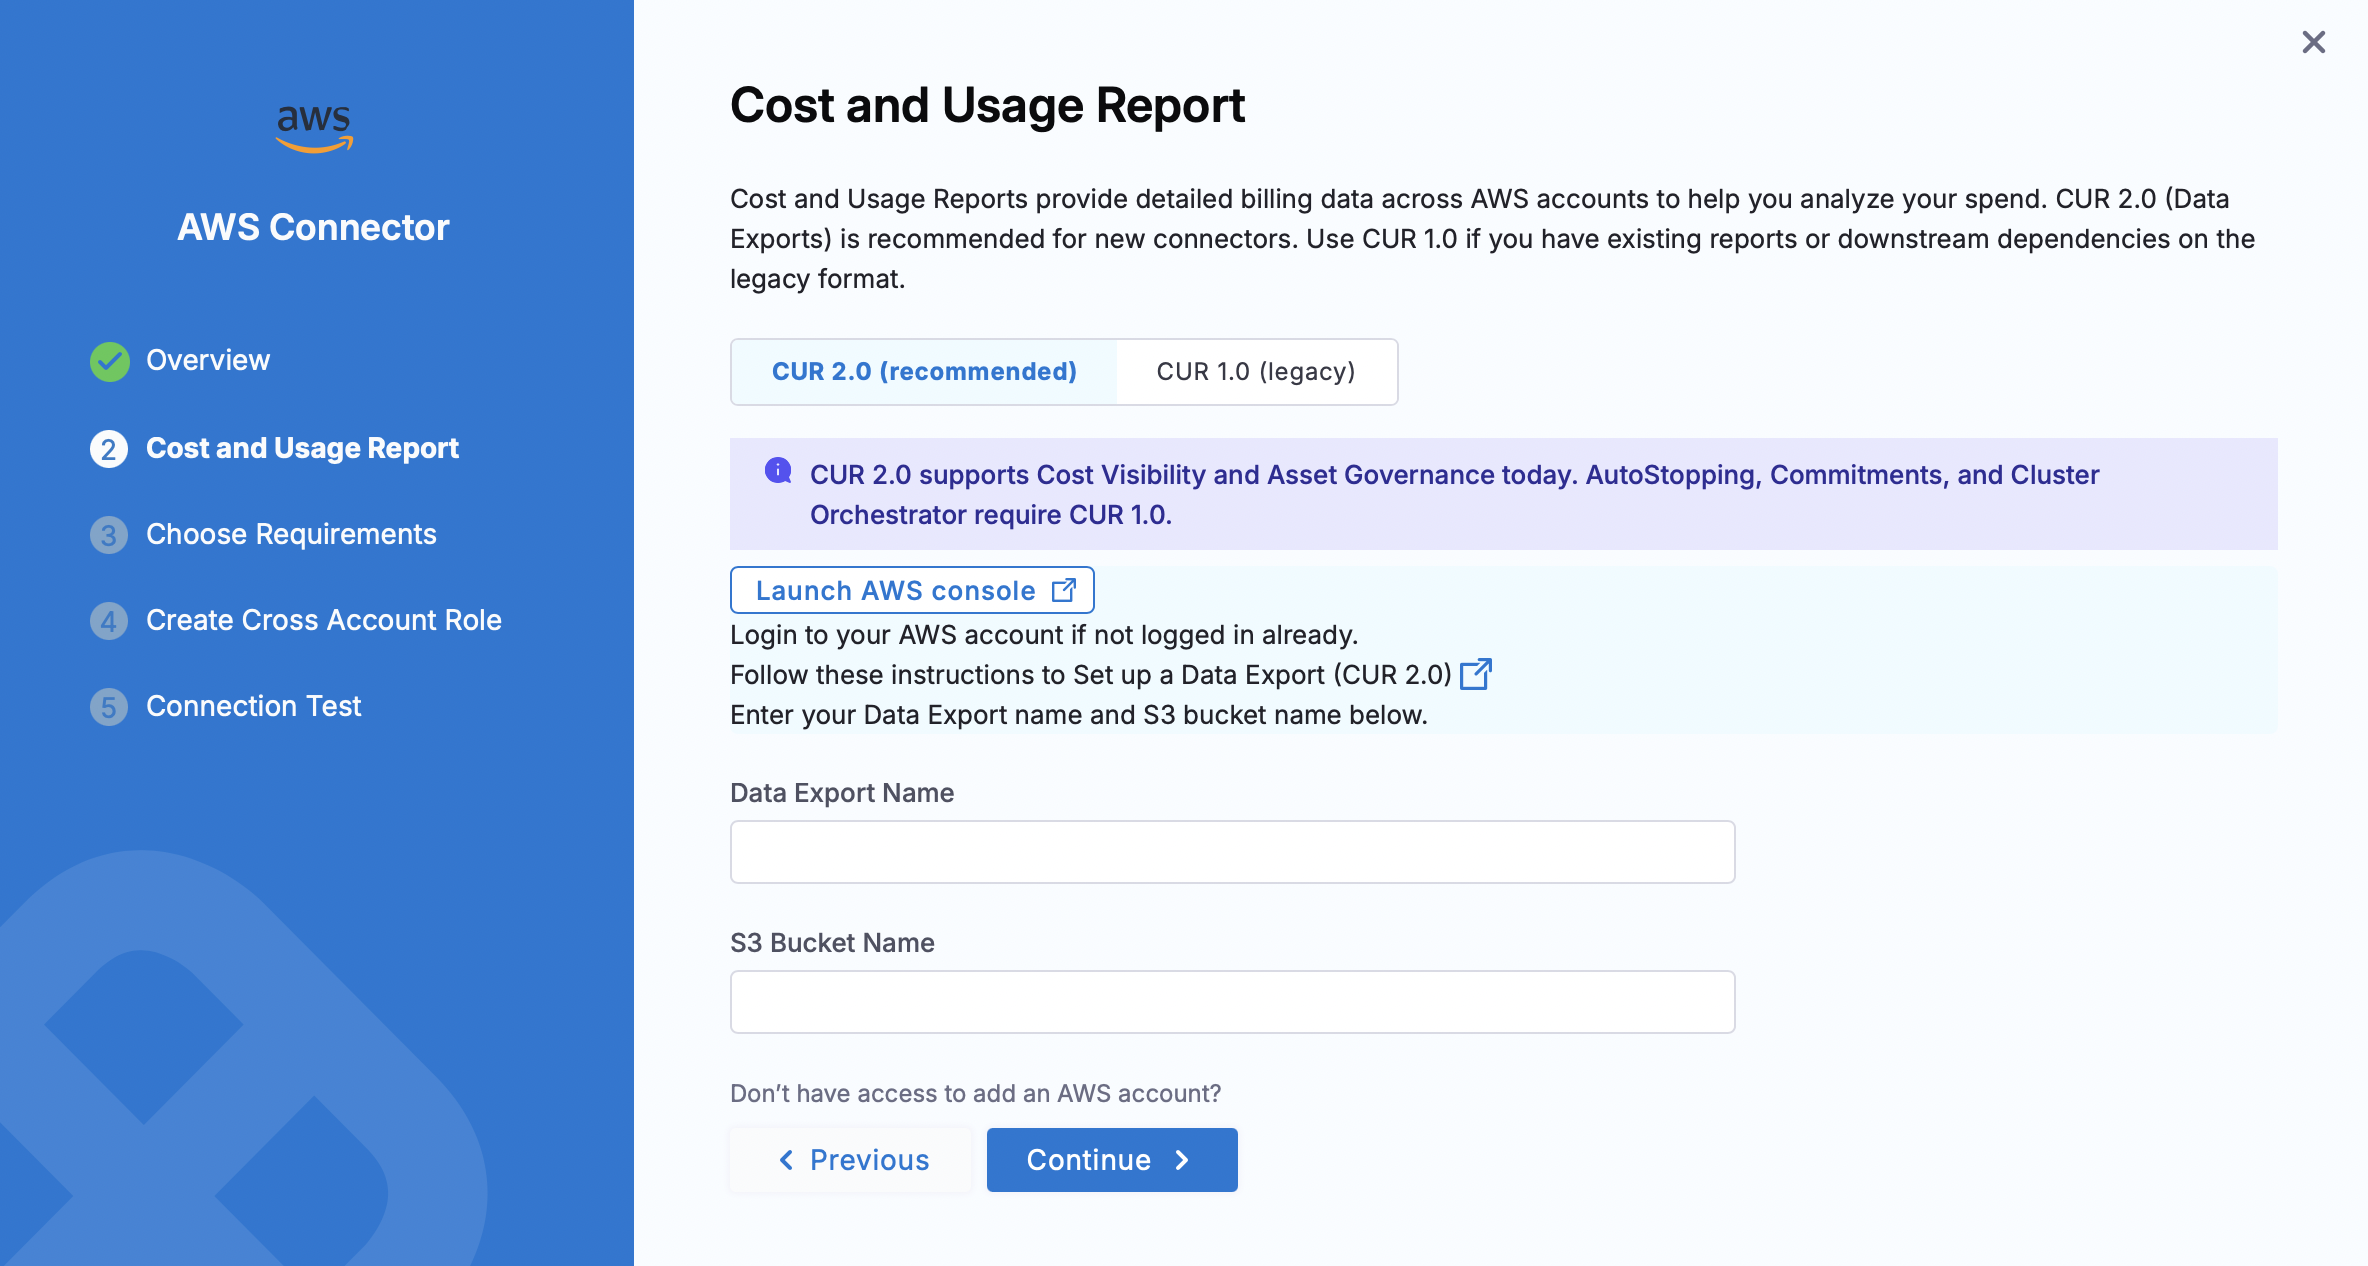
In the connector wizard, select a report type. We recommend **CUR 2.0**, but **CUR 1.0 (legacy)** is also fully supported.
{% tabs %}
{% tab title="CUR 2.0 (recommended)" %}
1. In the connector wizard, select the **CUR 2.0 (recommended)** tab.
2. Click **Launch AWS console** and follow the [CUR 2.0 setup steps](/cloud-cost-management/integrations/cloud-providers.md#set-up-the-cost-and-usage-report) to create a Data Export if you have not done so already.
3. Enter the **Data Export Name** and **S3 Bucket Name** in the fields provided.
4. Click **Continue**.
Click to view full size image
{% endtab %}
{% tab title="CUR 1.0 (legacy)" %}
1. In the connector wizard, select the **CUR 1.0 (legacy)** tab.
2. Click **Launch AWS console** and follow the [Legacy CUR setup](/cloud-cost-management/integrations/cloud-providers.md#legacy-cur-setup) steps to create a report if you have not done so already.
3. Enter the **Cost and Usage Report Name** and **S3 Bucket Name** in the fields provided.
4. Click **Continue**.
{% endtab %}
{% endtabs %}
{% hint style="info" %}
Review [Feature Permissions](/cloud-cost-management/resources/feature-permissions.md) for CACM to understand the minimum IAM roles or policies needed for every CACM feature.
{% endhint %}
#### Step 3: Choose requirements
1. **Cost Visibility** is selected by default and is required, leave it checked.
2. (Optional) You can enable any of the following features (they can also be added later):
* Resource Inventory Management
* Optimization by AutoStopping
* Cloud Governance
* Commitment Orchestration
3. Click **Continue**.
{% hint style="info" %}
Not sure which options to choose? For more information, go to [each feature](#before-you-start).
{% endhint %}
#### Step 4: Authentication (Conditional)
If you have selected **Optimization by AutoStopping**, **Cloud Governance** or **Commitment Orchestration**, in previous step, you can set up Authentication using OIDC. If not selected, this step will not be prompted.
You can enable authentication for your AWS account via
* Cross Account Role: Created with [custom permissions](/cloud-cost-management/resources/feature-permissions.md)
* [OIDC Authentication](/cloud-cost-management/resources/oidc-auth.md): Federated access with no stored credentials
{% hint style="info" %}
OIDC Authentication for AWS is behind the `CCM_ENABLE_OIDC_AUTH_AWS` feature flag. Contact [Harness Support](mailto:support@harness.io) to enable it.
{% endhint %}
#### Step 5: Enter cross account role details
1. Paste the **Cross Account Role ARN** you created via the [CloudFormation template](https://continuous-efficiency.s3.us-east-2.amazonaws.com/setup/v1/ng/HarnessAWSTemplate.yaml). You can find it under **CloudFormation → Stacks → Outputs tab** in AWS.
{% hint style="info" %}
If you are using **CUR 2.0**, ensure the Cross Account IAM role has been updated with the **CUR 2.0** permissions by re-running the [CloudFormation template](https://continuous-efficiency.s3.us-east-2.amazonaws.com/setup/v1/ng/HarnessAWSTemplate.yaml) or manually adding them as described in the [Migrating from CUR 1.0](#migrating-from-cur-10) section.
{% endhint %}
2. The **External ID** will be pre-filled. Leave it as is.
3. Click **Save and Continue**.
#### Step 6: Verify the connection
1. Harness will attempt to validate the connection using your inputs.
2. If this step fails, it is usually because AWS has not yet delivered the first CUR file.
* Wait up to **24 hours** after setting up the CUR before trying again.
3. Once validated, click **Finish Setup**.
***
🎉 You’ve now connected your AWS account and enabled cost visibility in Harness.
***
### Migration from CUR 1.0
If you already have an AWS billing connector configured with **CUR 1.0** and want to migrate to **CUR 2.0**:
1. Edit the existing AWS billing connector.
2. In the **Cost and Usage Report** step, select the **CUR 2.0 (recommended)** tab.
3. Update the Cross Account IAM role with the required **CUR 2.0** permissions using one of the following methods:
* **CloudFormation template (recommended):** Re-run the [CloudFormation template](https://continuous-efficiency.s3.us-east-2.amazonaws.com/setup/v1/ng/HarnessAWSTemplate.yaml), which includes all required permissions for both **CUR 1.0** and **CUR 2.0**.
* **Manual:** Add the following permissions directly to the existing Cross Account IAM role:
```json
{
"Action": [
"cur:DescribeReportDefinitions",
"bcm-data-exports:GetExport",
"bcm-data-exports:ListExports",
"organizations:Describe*",
"organizations:List*"
]
}
```
4. Ensure the role also has the required S3 bucket permissions and resource-level access for the Data Export location.
{% hint style="info" %}
After you migrate, AWS generates all new billing data in **CUR 2.0** format. Keep the following in mind:
* **Historical data:** Data from before the migration remains in **CUR 1.0** format and is not automatically converted.
* **Backfill:** If you need pre-migration data in **CUR 2.0** format, contact AWS Support. AWS can backfill up to 36 months. Harness recommends requesting at least the current year to maintain uninterrupted reporting in Harness CCM.
Go to [Migration to CUR 2.0 - Cloud Intelligence Dashboards on AWS](https://docs.aws.amazon.com/guidance/latest/cloud-intelligence-dashboards/migration-to-cur.html) to understand the full impact of migrating.
{% endhint %}
***
### Next steps
Once your **AWS billing data** is flowing into Harness, explore these features to enhance your cloud & AI cost management:
* [View and Create Perspectives](https://developer.harness.io/docs/cloud-cost-management/use-ccm-cost-reporting/ccm-perspectives/creating-a-perspective) to visualize cloud usage and trends.
* Create [Budgets and Alerts](/cloud-cost-management/cost-governance/budgets/create-a-budget.md) to monitor spend thresholds.
* Use [BI Dashboards](/cloud-cost-management/cost-reporting/bi-dashboards/overview.md) to visualize cloud usage and trends.
* Revisit optional integrations you skipped earlier:
* [Resource Inventory Management](/cloud-cost-management/cost-reporting/bi-dashboards/overview.md).
* [Optimization by AutoStopping](/cloud-cost-management/cost-optimization/autostopping-rules/1-auto-stopping-rules.md).
* [Cloud Governance](/cloud-cost-management/cost-governance/asset-governance/1-asset-governance.md).
* [Commitment Orchestration](/cloud-cost-management/cost-optimization/commitment-orchestrator.md).
Take the next step in your cloud & AI cost management journey and turn visibility into action.
{% @harness-feedback/feedback %}