> For the complete documentation index, see [llms.txt](https://developer.harness.io/llms.txt). Markdown versions of documentation pages are available by appending `.md` to page URLs; this page is available as [Markdown](https://developer.harness.io/cloud-cost-management/integrations/kubernetes.md).
# Kubernetes
Connect Kubernetes to bring your cluster cost into Cloud & AI Cost Management.
## Before you start
* For more information, go to [Roles and Policies for the Connector](https://developer.harness.io/harness-ai/use-harness-platform/connectors/cloud-providers/add-a-kubernetes-cluster-connector#review-roles-and-policies-for-the-connector) to learn about the IAM roles and policies that you need to be assigned to be able to create a connector.
{% hint style="danger" %}
### Deploy one delegate per cluster
CACM does not support a single delegate serving multiple clusters. Metric collection is memory-intensive, and the resource requirement grows with the number of nodes in each cluster. Sharing a delegate across clusters will exceed its resource capacity and produce inaccurate cost data.
{% endhint %}
Cluster, Delegate, and Metrics Server Requirements
### Kubernetes cluster requirements
You need a target Kubernetes cluster for the Harness Delegate and deployment. Make sure your cluster meets the following requirements:
* **Number of nodes**: 2
* **vCPUs, Memory, Disk Size**: 4vCPUs, 16GB memory, 100GB disk. In GKE, the **e2-standard-4** machine type is enough for this quickstart.
* **Networking**: outbound HTTPS for the Harness connection to **app.harness.io**, **github.com**, and **hub.docker.com**. Allow TCP port 22 for SSH.
* **Kubernetes service account** with permission to create entities in the target namespace is required. The set of permissions should include `list`, `get`, `create`, and `delete` permissions. In general, the cluster-admin permission or namespace admin permission is enough. For more information, go to [User-Facing Roles](https://kubernetes.io/docs/reference/access-authn-authz/rbac/#user-facing-roles).
{% hint style="warning" %}
### Do not rename the cluster
You must not rename the cluster. If you are setting up a new connector with this cluster, it is identified by the `clustername`. Renaming the cluster results in duplicate entries in the dashboard.
{% endhint %}
### Delegate size requirements
Your Kubernetes cluster must have unallocated resources required to run the Harness Delegate workload.
**Baseline Configuration:** For clusters with up to 200 nodes and 4000 pods, each delegate should be configured with:
* 2 vCPUs
* 8 GB of memory
**Incremental Scaling:** For every additional 50 nodes and 1000 pods, the delegate capacity should be increased by 0.5 vCPUs and 2 GB of memory This scaling ensures that the delegate can handle the increased load and continue to collect metrics efficiently.
### Single replica requirement:
The following requirements apply to each delegate replica:
* All specified resource requirements pertain to a single replica of the delegate.
* Instead of utilizing Horizontal Pod Autoscaler (HPA) to increase the number of smaller-sized replicas Harness recommends provisioning each delegate with the necessary resources to handle the specified number of nodes and pods.
{% hint style="warning" %}
**Delegate sizing considerations**
* These sizing requirements are for the Delegate only. Your cluster will require more memory for Kubernetes, the operating system, and other services. Ensure that the cluster has enough memory, storage, and CPU for all of its resource consumers.
* We recommend using one delegate per cluster and Large size delegates for production clusters for optimal performance.
{% endhint %}
### Metrics server requirements
Metrics Server must be running on the Kubernetes cluster where your Harness Kubernetes Delegate is installed. Before enabling CACM for Kubernetes, you must make sure the utilization data for pods and nodes is available.
The Metrics Server is a cluster-wide aggregator of resource usage data. It collects resource metrics from kubelets and exposes them in the Kubernetes API server through Metrics API. CACM polls the utilization data every minute on the Delegate. The metrics are aggregated for 20 minutes and then CACM keeps one data point per 20 minutes. For more information, go to [Installing the Kubernetes Metrics Server](https://docs.aws.amazon.com/eks/latest/userguide/metrics-server.html).
Metrics Server is installed by default on GKE and AKS clusters; however, you need to install it on the AWS EKS cluster.
To install the metrics server on your EKS clusters, run the following command:
```bash
kubectl apply -f https://github.com/kubernetes-sigs/metrics-server/releases/download/v0.5.0/components.yaml
```
Resources can be adjusted proportionally based on number of nodes in the cluster.
For clusters exceeding 100 nodes, allocate the following additional resources:
* 1m core per node
* 2MiB memory per node
{% hint style="warning" %}
### Right-size your delegate before you deploy
The more nodes your cluster has, the more CPU and memory your delegate needs. Always deploy one delegate replica sized for that cluster. Do not split the load across multiple smaller replicas, as CACM does not support horizontal scaling. Go to [Cluster, Delegate, and Metrics Server Requirements](#delegate-size-requirements) to review sizing before you deploy.
{% endhint %}
## Install delegate
[Install a Harness Kubernetes delegate in the cluster.](https://developer.harness.io/harness-ai/use-harness-platform/delegates/delegate/install-delegates/overview)
### Delegate permission requirements
You can choose one of the following permissions for the delegate for CACM:
* **Install Delegate with cluster-wide read/write access:** Creates a new namespace called "harness-delegate-ng" with the service account bound to Cluster Admin role. This Delegate will be able to read tasks (capture change events etc., needed for Harness Cloud & AI Cost Management) anywhere on the K8s cluster where the Delegate is installed.
* **Install Delegate with cluster-wide read access:** (Requires read-only Cluster Admin role) Creates a new namespace called "harness-delegate-ng" with the service account bound to Cluster Admin role. This Delegate will be able to perform read-only tasks (capture change events etc., needed for Harness Cloud & AI Cost Management) anywhere on the K8s cluster where the Delegate is installed.
### Delegate role requirements for CACM visibility features and recommendations:
The YAML provided for the Harness Delegate defaults to the `cluster-admin` role. If you cannot use cluster-admin because you are using a cluster in your company, you will need to edit the delegate YAML to include the role below. If you deployed your delegate with Helm, you can also set the value `ccm.visibility: true` to have this role and binding created.
Delegate ClusterRole YAML
```yaml
apiVersion: rbac.authorization.k8s.io/v1
kind: ClusterRole
metadata:
name: ce-clusterrole
rules:
- apiGroups:
- ""
resources:
- pods
- nodes
- nodes/proxy
- events
- namespaces
- persistentvolumes
- persistentvolumeclaims
verbs:
- get
- list
- watch
- apiGroups:
- apps
- extensions
resources:
- statefulsets
- deployments
- daemonsets
- replicasets
verbs:
- get
- list
- watch
- apiGroups:
- batch
resources:
- jobs
- cronjobs
verbs:
- get
- list
- watch
- apiGroups:
- metrics.k8s.io
resources:
- pods
- nodes
verbs:
- get
- list
- apiGroups:
- storage.k8s.io
resources:
- storageclasses
verbs:
- get
- list
- watch
```
## Set up the Kubernetes connector
{% tabs %}
{% tab title="Quick Create" %}
## Quick create method
{% hint style="info" %}
### What this creates
The following entities are created in this process:
* A Kubernetes delegate of medium size with cluster admin permissions.
* A Kubernetes connector which can also be used for other Harness modules such as CI, CD, and so on.
* Cost Visibility is enabled on this Kubernetes connector.
{% endhint %}
{% embed url="" %}
Add Kubernetes Cloud Cost Connector in Harness
{% endembed %}
## Step-by-step guide
### Step 1: Overview
Complete the following steps in the Quick Create wizard:
1. Launch the wizard and select **Kubernetes** as the cloud provider. Click on **Quick Create**.
2. Enter a name for your connector. Note that this is the name with which the Kubernetes Cluster will be identified in Harness Cloud & AI Cost Management. Also, you must have the **Cluster Admin Role** for the Cluster you want to add.
3. Click **Continue**.
***
### Step 2: Download and apply YAML
To grant Harness the required cluster permissions, apply the **delegate YAML**.
#### What this YAML does
* Creates a Harness Delegate.
* Grants the Delegate the `cluster-admin` role.
#### How to apply
1. In the wizard, click **Download YAML** (you can preview the file).
2. Run the following command:
```bash
kubectl apply -f harness-delegate.yml
```
3. After the command succeeds, return to the wizard and click **Continue**. Harness will create a Kubernetes Connector.
{% hint style="info" %}
### EKS requirement
For Amazon EKS clusters, make sure the Kubernetes **Metrics Server** is installed in the cluster where the Harness Delegate runs.
{% endhint %}
***
### Step 3: Create and test connection
After successfully creating the delegate and connectors and verifying permissions, select **Finish**. The connector is now listed in the Kubernetes clusters table.
***
🎉 You’ve now connected your Kubernetes cluster and enabled cost visibility in Harness.
{% endtab %}
{% tab title="Advanced" %}
## Advanced method
{% hint style="info" %}
### Before you begin
If you have previously created a connector to the preferred cluster for any other modules (Deployments, Builds etc.), you may reference the same connector to upgrade to support Cloud & AI Cost Management.
If this is your first time creating a connector to the cluster, you need to create a new connector.
{% endhint %}
To fully enable CACM for a Kubernetes cluster, you need to:
* **Deploy a delegate into the target cluster.** This gives Harness a connection into your cluster.
* **Create a Harness cloud provider Kubernetes connector that targets the delegate.** This ties your cluster and delegate to a representation of your cluster in Harness.
* **Create a Harness CACM Kubernetes connector that targets the Kubernetes connector.** This enables the delegate to start collecting usage metrics to be sent back to Harness for use in CACM.
* **(Optional) Deploy the autostopping controller and router into the target cluster.** This enables you to create CACM autostopping rules to reduce costs of your cluster.
{% hint style="info" %}
### Data availability
After you enable CACM in your first cluster, the data is available within a few minutes for viewing and analysis.
However, you cannot see the idle cost due to missing utilization data. CACM generates the last 30 days of the cost data based on the first events.
From the second cluster onwards, it takes about 2 to 3 hours for the data to be available for viewing and analysis.
If you are using a CACM cloud connector, the data generation is delayed. Since CACM performs cost true-up based on cost information available at cloud provider source.
{% endhint %}
## Kubernetes CACM connection requirements and workflow
For CACM, you can only use Kubernetes connectors at the Account level in Harness. This section describes how to set up the CACM Kubernetes connector.
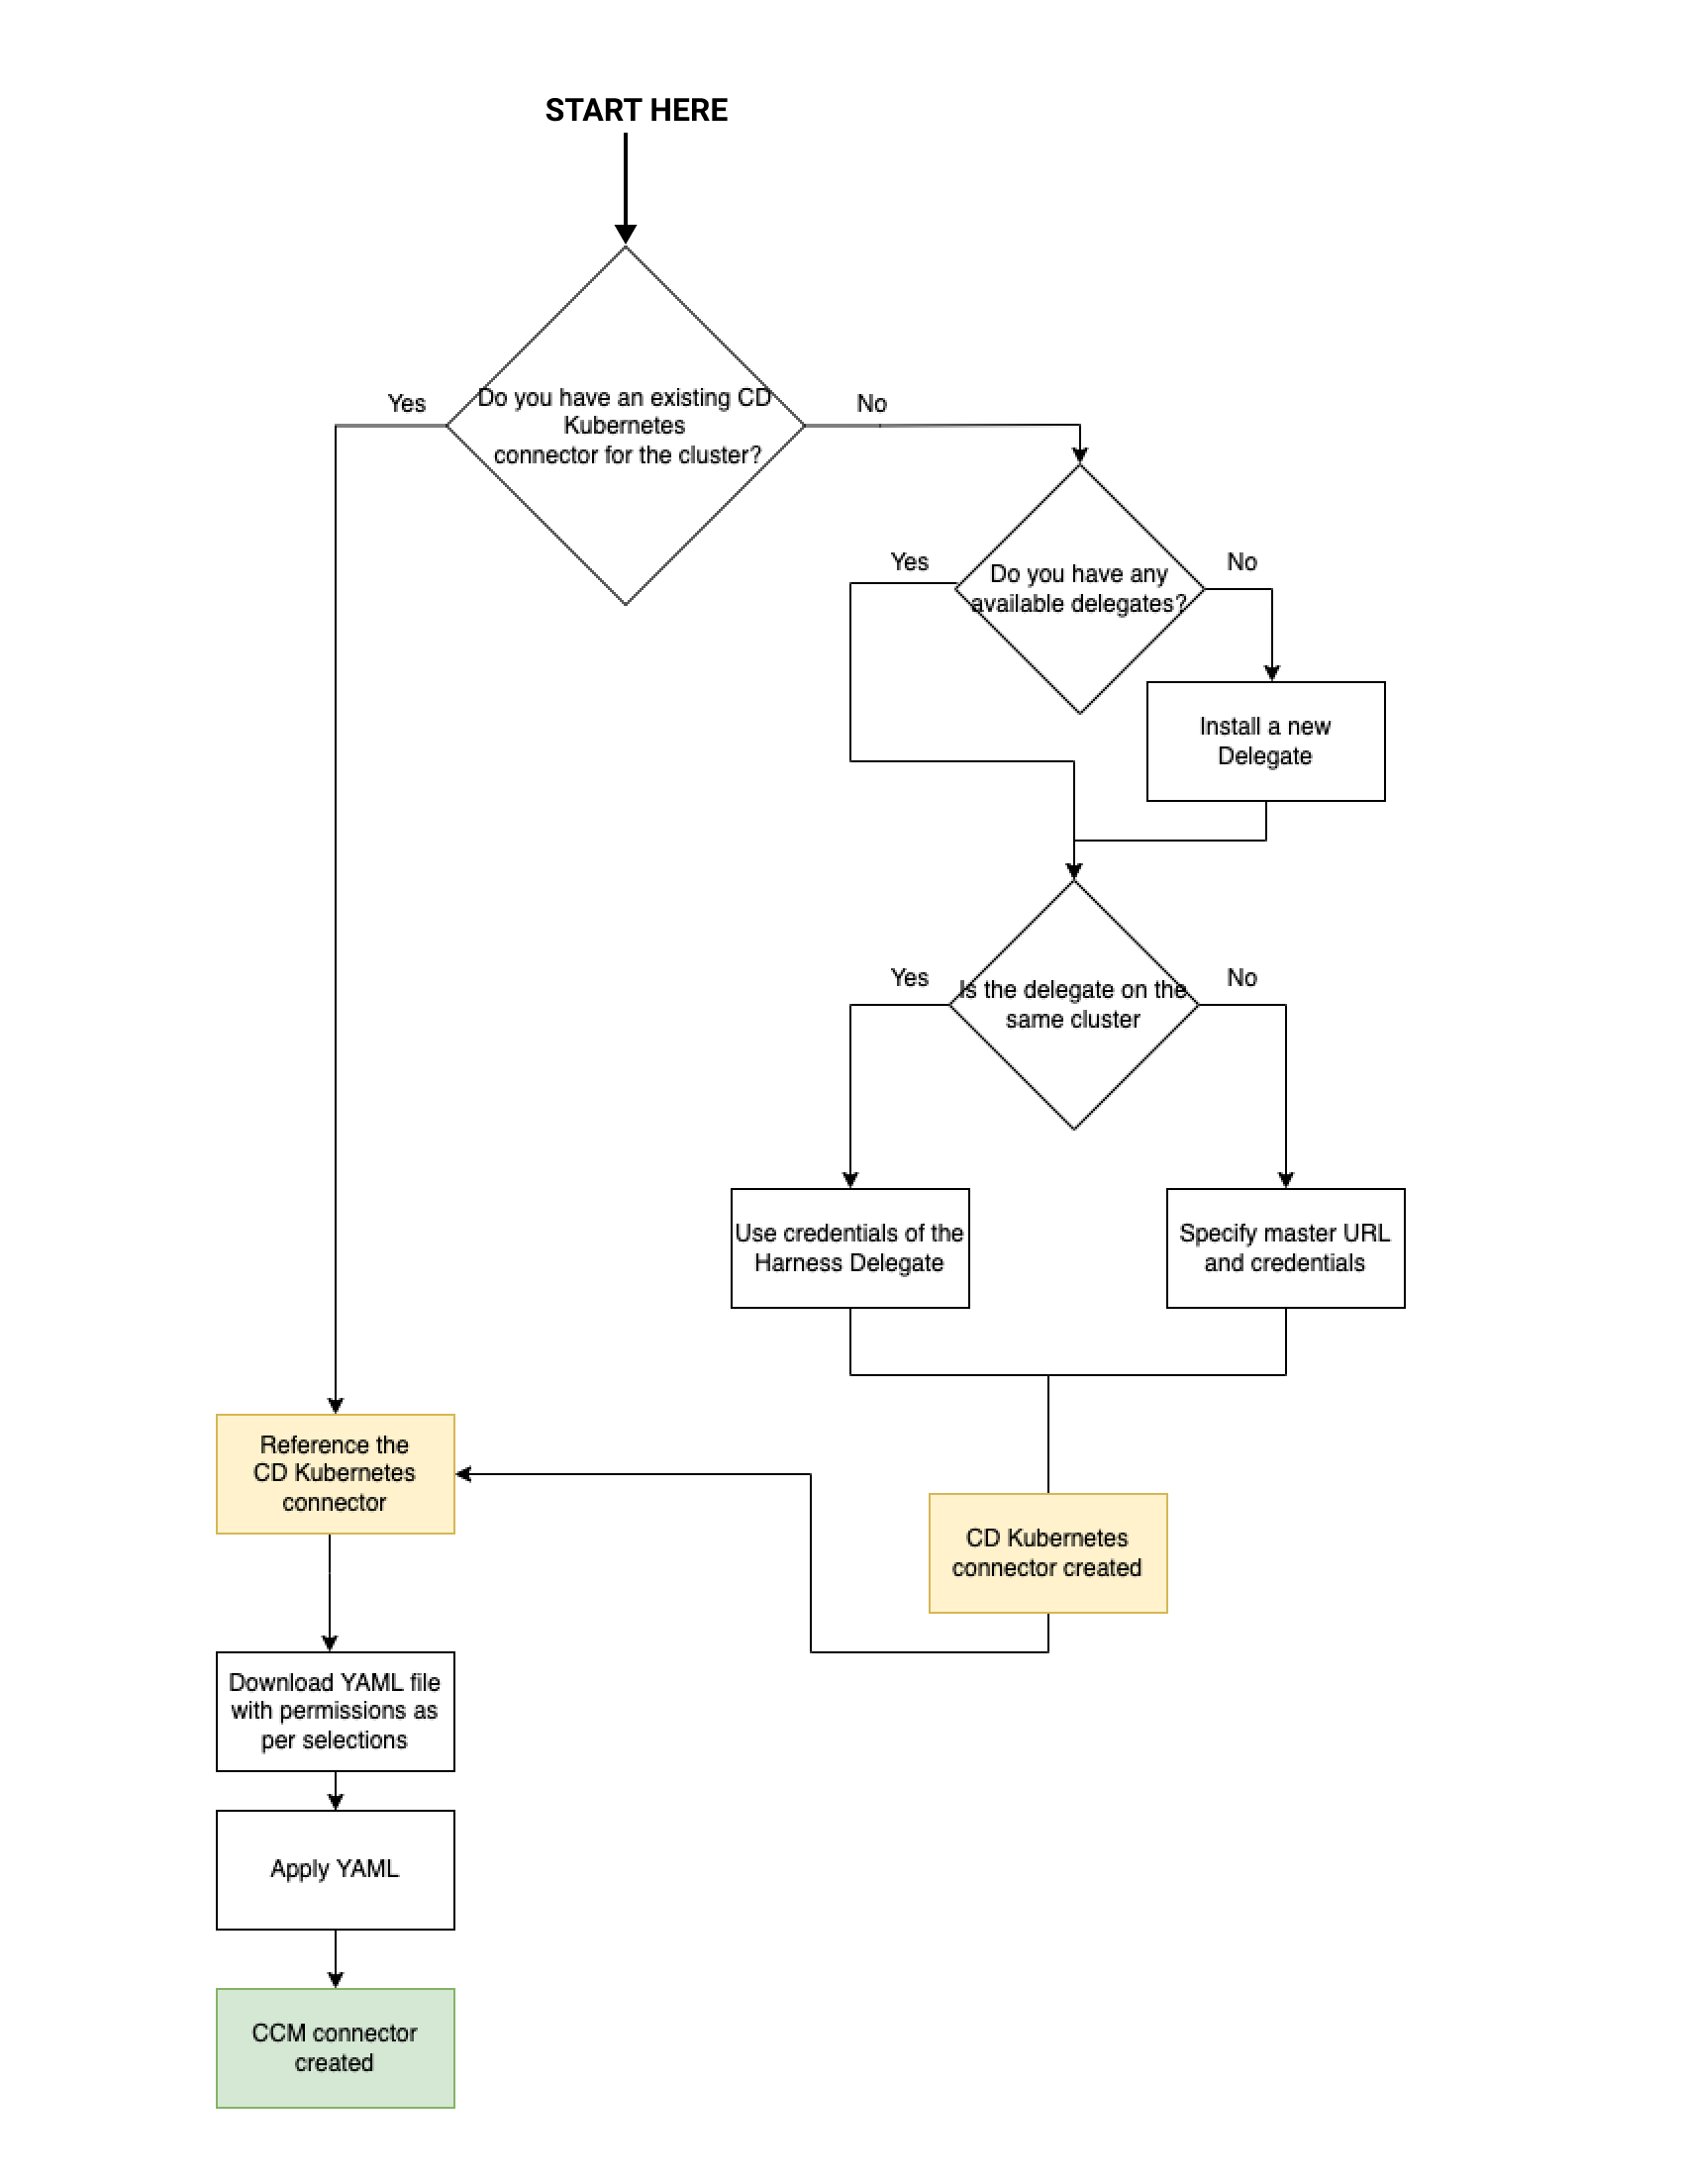
Here is a visual representation of the CACM Kubernetes connector requirements and workflow:
Click to view full size image
## Create the cloud provider Kubernetes cluster connector
Once the delegate is deployed you need to [create a Kubernetes cloud provider connector](https://developer.harness.io/harness-ai/use-harness-platform/connectors/cloud-providers/add-a-kubernetes-cluster-connector) at the Account level. This connector should be created to `Use credentials of a specific Harness delegate` and select the delegate you deployed into the target cluster.
Make sure the connector passes its connection test to validate the delegate has been installed correctly and can make outbound connections to the Harness Manager.
{% hint style="warning" %}
### Delegate and connector ratio
Deploy each delegate inside its target cluster. CACM collects metrics directly from the cluster it runs in and cannot serve multiple clusters. As a result, the ratio of Delegates to Connectors in Harness is 1:2. For 20 clusters, you need 20 delegates and 40 connectors (one Kubernetes cloud provider connector and one CACM Kubernetes connector per cluster).
{% endhint %}
## Create CACM Kubernetes connector
## Interactive guide
{% embed url="" %}
Add Kubernetes Cloud Cost Connector in Harness
{% endembed %}
## Step-by-Step guide
### Step 1: Overview
Complete the following steps in the connector wizard:
1. **Select Kubernetes Connector**: Choose an existing Kubernetes connector from your available connectors.
2. **Configure Cloud Cost Connector**: Enter a name, optional description, and tags for your connector.
3. Click **Continue** to proceed to the next step.
***
### Step 2: Feature selection
Choose the Cloud & AI Cost Management features you want to enable for your Kubernetes cluster:
* **Deep Kubernetes Cost Visibility** (Selected by default)
* **Kubernetes Optimization by AutoStopping** (Optional)
{% hint style="info" %}
**AutoStopping**
You can enable AutoStopping later if you prefer to start with cost visibility only.
{% endhint %}
{% hint style="info" %}
**Cloud provider notes**
* For AWS and Azure, if the cloud connectors are set up, then the cost will be trued-up to the pricing received from the CUR/billing export. However, for GCP the list pricing is used.
* CACM supports Karpenter for AWS starting from version 0.37 and later. However, it is currently not supported for GCP and Azure.
{% endhint %}
Click **Continue** to proceed to the next step.
***
### Step 3: Secret creation (conditional - if AutoStopping is selected)
Complete the following steps to create the required secret for AutoStopping:
1. **Create an API key** from your Harness account settings
2. **Create namespace**:
```bash
kubectl create namespace harness-autostopping
```
3. **Create secret YAML file** - Replace `YOUR_API_TOKEN_HERE` with your actual API key:
```yaml
apiVersion: v1
stringData:
token: YOUR_API_TOKEN_HERE
kind: Secret
metadata:
name: harness-api-key
namespace: harness-autostopping
type: Opaque
```
4. **Apply the secret**:
```bash
kubectl apply -f secret.yaml
```
***
### Step 4: Provide permissions
Complete the following steps to grant the connector the required permissions:
1. **Download YAML file** - The wizard will provide a YAML file containing permissions to access the pods and services of the cluster. You can also preview the YAML file.
2. Copy the downloaded YAML to a machine where you have kubectl installed and have access to your Kubernetes cluster. Run the following command to apply the Harness delegate to your Kubernetes Cluster:
```bash
kubectl apply -f ccm-kubernetes.yaml
```
{% hint style="info" %}
### EKS requirement
For EKS clusters, ensure the metrics server is installed.
{% endhint %}
3. Click **Done** and then **Continue**
***
### Step 5: Verify connection
Harness will verify the connection to your Kubernetes cluster
***
🎉 **Success!** You have successfully connected your Kubernetes cluster to Harness Cloud & AI Cost Management.
***
## Troubleshooting
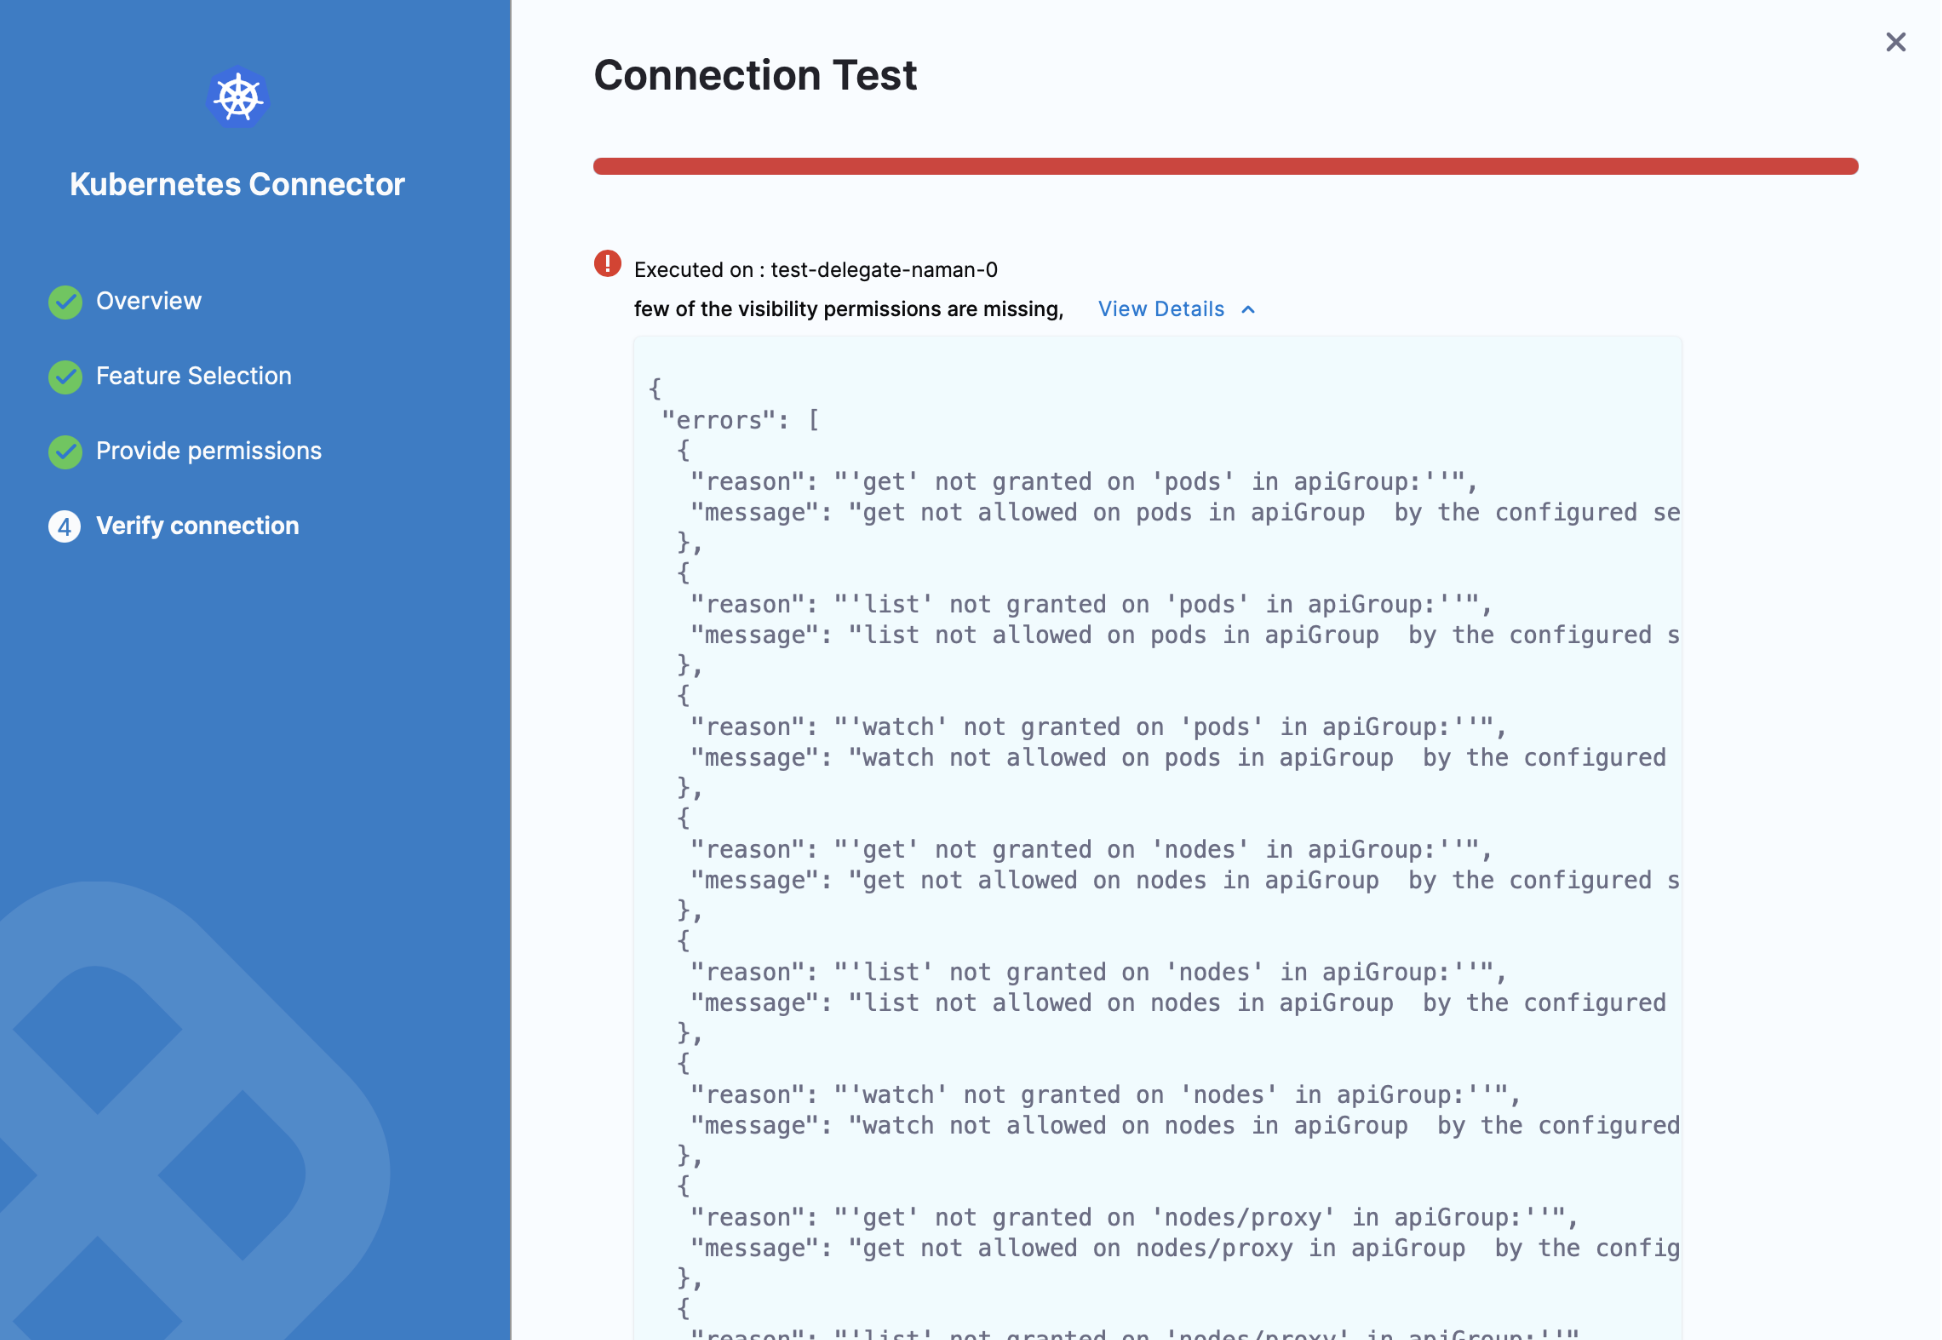
In the **Verify connection** step, if you get an error message like `few of the visibility permissions are missing`, then you need to review the CACM permissions required for Harness Delegate.
Click to view full size image
Verify that you have all the required permissions for the Service account using the following commands:
```bash
kubectl auth can-i watch pods
--as=system:serviceaccount::
--all-namespaces
kubectl auth can-i watch nodes
--as=system:serviceaccount::
--all-namespaces
```
```bash
kubectl auth can-i get nodemetrics
--as=system:serviceaccount::
--all-namespaces
kubectl auth can-i get podmetrics
--as=system:serviceaccount::
--all-namespaces
```
Here is an example showing the commands and output using the default Delegate Service account name and namespace:
```bash
$ kubectl auth can-i watch pods --as=system:serviceaccount:harness-delegate:default --all-namespaces
yes
$ kubectl auth can-i watch nodes --as=system:serviceaccount:harness-delegate:default --all-namespaces
yes
$ kubectl auth can-i watch nodemetrics --as=system:serviceaccount:harness-delegate:default --all-namespaces
yes
$ kubectl auth can-i watch podmetrics --as=system:serviceaccount:harness-delegate:default --all-namespaces
yes
```
{% endtab %}
{% endtabs %}
***
## Next steps
Explore these features to enhance your cloud & AI cost management:
* Create [Budgets and Alerts](/cloud-cost-management/cost-governance/budgets/create-a-budget.md) to monitor spend thresholds
* Use [BI Dashboards](/cloud-cost-management/cost-reporting/bi-dashboards/overview.md) to visualize cloud usage and trends
* Revisit optional integrations:
* [Resource Inventory Management](/cloud-cost-management/cost-reporting/bi-dashboards/overview.md)
* [Optimization by AutoStopping](/cloud-cost-management/cost-optimization/autostopping-rules/1-auto-stopping-rules.md)
* [Cloud Governance](/cloud-cost-management/cost-governance/asset-governance/1-asset-governance.md)
Turn visibility into action and unlock cost efficiency across your Azure cloud infrastructure.
***
## FAQs How can we report on which connectors are stale?
If clusters are decommissioned, no heartbeat will be received from the delegate, and this will be reflected directly on the connector. On the Cloud Integration page, the Reporting tab shows whether events are being received. If events are not being received, the status will appear in red, indicating a stale connector.
{% @harness-feedback/feedback %}