> For the complete documentation index, see [llms.txt](https://developer.harness.io/llms.txt). Markdown versions of documentation pages are available by appending `.md` to page URLs; this page is available as [Markdown](https://developer.harness.io/continuous-delivery/new-to-continuous-delivery/getting-started.md).
# Getting Started with Deployments
Learn how to create your first deployment pipeline in Harness CD
This topic walks you through creating your first deployment pipeline in Harness Continuous Delivery (CD).
{% hint style="info" %}
**NEW TO HARNESS CD?**
Start with the [CD overview](/continuous-delivery/new-to-continuous-delivery/overview.md) to understand key concepts, including [services](/continuous-delivery/use-continuous-delivery/cd-building-blocks/services/services-overview.md), [environments](/continuous-delivery/use-continuous-delivery/cd-building-blocks/environments/environment-overview.md), pipelines, and [deployment strategies](/continuous-delivery/use-continuous-delivery/manage-deployments/deployment-concepts.md).
{% endhint %}
***
## What you will learn from this topic
* How to [create a deployment pipeline](#step-1-create-your-pipeline).
* How to [add a Deploy stage and configure your deployment](#step-2-add-a-deploy-stage-and-configure-deployment).
* How to [configure a service](#step-3-configure-your-service) to define what to deploy.
* How to [set up an environment and infrastructure](#step-4-configure-environment-and-infrastructure) to define where to deploy.
* How to [choose an execution strategy](#step-5-configure-execution-strategy) for your deployment.
* How to [run your first deployment](#step-6-run-your-pipeline).
***
## Before you begin
Ensure you have the following:
* **A Harness account**: [Sign up for free](https://app.harness.io/auth/#/signup/?module=cd).
* **Access to a Harness project**: Use the Default Project or create your own.
***
## Platform setup
Select your deployment platform to get started with the required setup and [connectors](/harness-platform/use-harness-platform/connectors.md).
{% tabs %}
{% tab title="Kubernetes" %}
Set up your Kubernetes cluster and configure the required connectors to deploy containerized applications with Harness CD.
**Infrastructure requirements:**
* A Kubernetes cluster (local like [K3D](https://k3d.io/), or cloud-managed like GKE, EKS, AKS).
* `kubectl` access to your cluster.
* Application deployed to a container registry (Docker Hub, ECR, GCR, and so on).
* **A Harness Delegate installed**: Required to connect to your cluster. Go to the [delegate installation guide](/harness-platform/use-harness-platform/delegates/delegate/install-delegates/overview.md) to install a delegate.
**Quick verification:**
```bash
# Verify kubectl access
kubectl cluster-info
kubectl get nodes
```
**Required connectors:**
* **Kubernetes Cluster Connector**: Connects Harness to your cluster.
* Go to **Project Settings** > **Connectors** > **New Connector** > **Kubernetes Cluster**.
* Select the connection method (Delegate, Service Account, and so on).
* For more information, see [Create a Kubernetes connector](/harness-platform/use-harness-platform/connectors/cloud-providers/add-a-kubernetes-cluster-connector.md).
* **Git Connector**: For storing Kubernetes manifests.
* Go to **Project Settings** > **Connectors** > **New Connector** > **GitHub/GitLab/Bitbucket**.
* Provide the repository URL and authentication (a Personal Access Token is recommended).
* For more information, see [Git connector setup](/harness-platform/use-harness-platform/connectors/code-repositories/add-a-git-connector/git-connector-settings-reference.md).
* **Docker Registry Connector**: For pulling container images.
* Go to **Project Settings** > **Connectors** > **New Connector** > **Docker Registry**.
* For Docker Hub: Use `https://registry.hub.docker.com/v2/`.
* For ECR/GCR/ACR: Use respective registry URLs.
* For more information, see [Docker Registry connector](https://app.gitbook.com/s/3F2TpHXhur2QtQnORSM9/use-harness-platform/connectors/cloud-providers/ref-cloud-providers/docker-registry-connector-settings-reference).
{% endtab %}
{% tab title="SSH / Traditional" %}
Prepare your target hosts and configure the required connectors to deploy applications to virtual machines or physical servers over SSH.
**Infrastructure requirements:**
* Target VMs or servers (on-premises or cloud)
* SSH key-based authentication configured
* Application artifacts in a repository (Artifactory, Nexus, S3, and so on)
* **A Harness Delegate installed**: Required to execute deployment commands on your servers. Go to the [delegate installation guide](/harness-platform/use-harness-platform/delegates/delegate/install-delegates/overview.md) to install a delegate.
**SSH key setup:**
```bash
# Generate SSH key if needed
ssh-keygen -t rsa -b 4096 -f ~/.ssh/harness_deploy
# Copy public key to target servers
ssh-copy-id -i ~/.ssh/harness_deploy.pub user@server-ip
```
**Required connectors:**
* **SSH Key Secret**: Store your private SSH key.
* Go to **Project Settings** > **Secrets** > **New Secret** > **File**.
* Upload your private SSH key file.
* For more information, see [SSH secret setup](/harness-platform/use-harness-platform/secrets/add-file-secrets.md).
* **SSH Connector**: Connects to your servers.
* Go to **Project Settings** > **Connectors** > **New Connector** > **SSH**.
* Provide host details and select SSH key secret.
* For more information, see [Add and reference SSH secrets](/harness-platform/use-harness-platform/secrets/add-use-ssh-secrets.md).
* **Artifact Repository Connector**: For application packages.
* **For Artifactory**: Go to **Connectors** > **New Connector** > **Artifactory**.
* **For Nexus**: Go to **Connectors** > **New Connector** > **Nexus**.
* **For S3**: Go to **Connectors** > **New Connector** > **AWS** > Configure S3 access.
* For more information, see [Artifactory connector settings](/harness-platform/use-harness-platform/connectors/artifact-repositories/add-an-artifactory-connector/artifactory-connector-settings-reference.md).
{% endtab %}
{% tab title="Google Cloud Run" %}
Configure your Google Cloud environment and the required connectors to deploy containerized applications to Cloud Run.
**Infrastructure requirements:**
* A GCP project with billing enabled.
* For Cloud Run: Cloud Run API enabled.
* For GKE: A GKE cluster.
* Container image in GCR or Artifact Registry.
**Enable required APIs:**
```bash
# Enable Cloud Run API
gcloud services enable run.googleapis.com
# Enable Artifact Registry
gcloud services enable artifactregistry.googleapis.com
# Enable Container Registry (if using GCR)
gcloud services enable containerregistry.googleapis.com
```
**Required connectors:**
* **GCP Connector**: Connects Harness to Google Cloud.
* Go to **Project Settings** > **Connectors** > **New Connector** > **GCP**.
* Select the authentication method: Service Account Key or GCE VM.
* Provide service account key (JSON) with required permissions.
* For more information, see [GCP connector setup](/harness-platform/use-harness-platform/connectors/cloud-providers/connect-to-google-cloud-platform-gcp.md).
**Required GCP permissions:**
* Cloud Run: `roles/run.admin`
* Artifact Registry: `roles/artifactregistry.reader`
* GKE: `roles/container.developer`
* **Git Connector** (if using Git for manifests).
* Go to **Project Settings** > **Connectors** > **New Connector** > **GitHub/GitLab**.
* Provide repository URL and authentication.
* For more information, see [Git connector setup](/harness-platform/use-harness-platform/connectors/code-repositories/add-a-git-connector/git-connector-settings-reference.md).
* **GCR/Artifact Registry Connector**: For container images.
* Go to **Project Settings** > **Connectors** > **New Connector** > **GCR/GAR**.
* Select your GCP connector.
* Specify registry hostname.
* For more information, see [GCR connector setup](/harness-platform/use-harness-platform/connectors/cloud-providers/connect-to-google-cloud-platform-gcp/gcs-connector-settings-reference.md).
{% endtab %}
{% tab title="Azure" %}
Set up your Azure environment and configure the required connectors to deploy applications to Azure services.
**Infrastructure requirements:**
* An Azure subscription with appropriate permissions.
* For Functions: Function App created in the Azure Portal.
* For Web Apps: App Service plan configured.
* Application package or container image is ready.
**Azure CLI verification:**
```bash
# Login to Azure
az login
# Verify subscription
az account show
# List resource groups
az group list
```
**Required connectors:**
* **Azure Connector**: Connects Harness to Azure.
* Go to **Project Settings** > **Connectors** > **New Connector** > **Azure**.
* Select authentication: Service Principal or Managed Identity.
* Provide:
* Application (Client) ID
* Tenant ID
* Client Secret (create as Harness Secret first)
* For more information, see [Azure connector setup](/harness-platform/use-harness-platform/connectors/cloud-providers/add-a-microsoft-azure-connector.md).
**Required Azure permissions:**
* Contributor role on resource group or specific: `Microsoft.Web/sites/*` for Web Apps/Functions
* **Git Connector** (for configuration files).
* Go to **Project Settings** > **Connectors** > **New Connector** > **GitHub/GitLab**.
* Provide repository URL and authentication.
* For more information, see [Git connector setup](/harness-platform/use-harness-platform/connectors/code-repositories/add-a-git-connector/git-connector-settings-reference.md).
* **Azure Container Registry Connector** (for containerized apps).
* Go to **Project Settings** > **Connectors** > **New Connector** > **Docker Registry**.
* Use ACR login server URL (e.g., `myregistry.azurecr.io`).
* Authenticate using Azure credentials or ACR admin credentials.
* For more information, see [ACR connector setup](https://app.gitbook.com/s/3F2TpHXhur2QtQnORSM9/use-harness-platform/connectors/cloud-providers/ref-cloud-providers/docker-registry-connector-settings-reference).
{% endtab %}
{% tab title="AWS Lambda" %}
Prepare your AWS environment and configure the required connectors to deploy serverless applications to AWS Lambda.
**Infrastructure requirements:**
* An AWS account with appropriate IAM permissions.
* Lambda execution role with required policies.
* S3 bucket for deployment packages (or ECR for container images).
* Deployment package (ZIP file) uploaded to S3.
**AWS CLI verification:**
```bash
# Verify AWS credentials
aws sts get-caller-identity
# List S3 buckets
aws s3 ls
# Verify Lambda access
aws lambda list-functions --region us-east-1
```
**Required connectors:**
* **AWS Connector**: Connects Harness to AWS.
* Go to **Project Settings** > **Connectors** > **New Connector** > **AWS**.
* Select the authentication method:
* **Access Key** (recommended for getting started)
* **IAM Role** (recommended for production)
* **IRSA** (for EKS)
* For Access Key method:
* Create a secret for Access Key ID.
* Create a secret for Secret Access Key.
* For more information, see [AWS connector setup](/harness-platform/use-harness-platform/connectors/cloud-providers/add-aws-connector.md).
**Required IAM policies:**
* `AWSLambda_FullAccess` or `AWSLambdaFullAccess`
* `IAMReadOnlyAccess` (for role verification)
* `AmazonS3ReadOnlyAccess` (for artifact retrieval)
* **Git Connector**: For Lambda function definitions.
* Go to **Project Settings** > **Connectors** > **New Connector** > **GitHub/GitLab**.
* Provide repository URL and authentication.
* Example repo: `https://github.com/harness-community/harnesscd-example-apps`.
* For more information, see [Git connector setup](/harness-platform/use-harness-platform/connectors/code-repositories/add-a-git-connector/git-connector-settings-reference.md).
* **AWS Secrets**: Store AWS credentials.
* Go to **Project Settings** > **Secrets** > **New Secret** > **Text**.
* Create two secrets to use in the AWS connector:
* `aws_access_key_id`: Your AWS Access Key ID.
* `aws_secret_access_key`: Your AWS Secret Access Key.
**Pre-deployment setup:**
* Upload your Lambda deployment package (ZIP) to an S3 bucket.
* Note the bucket name and file path. You need these in Step 3.
* Ensure the Lambda execution role ARN is ready. You need it in the function definition.
{% endtab %}
{% endtabs %}
***
{% hint style="info" %}
* Complete all connector setups before proceeding. You select these connectors in the following steps.
* Test each connector. Use the **Test Connection** button to verify connectivity.
* Save connector identifiers. You reference these by name when configuring services and environments.
{% endhint %}
***
## Step 1: Create your pipeline
Perform the following steps to create your first deployment pipeline:
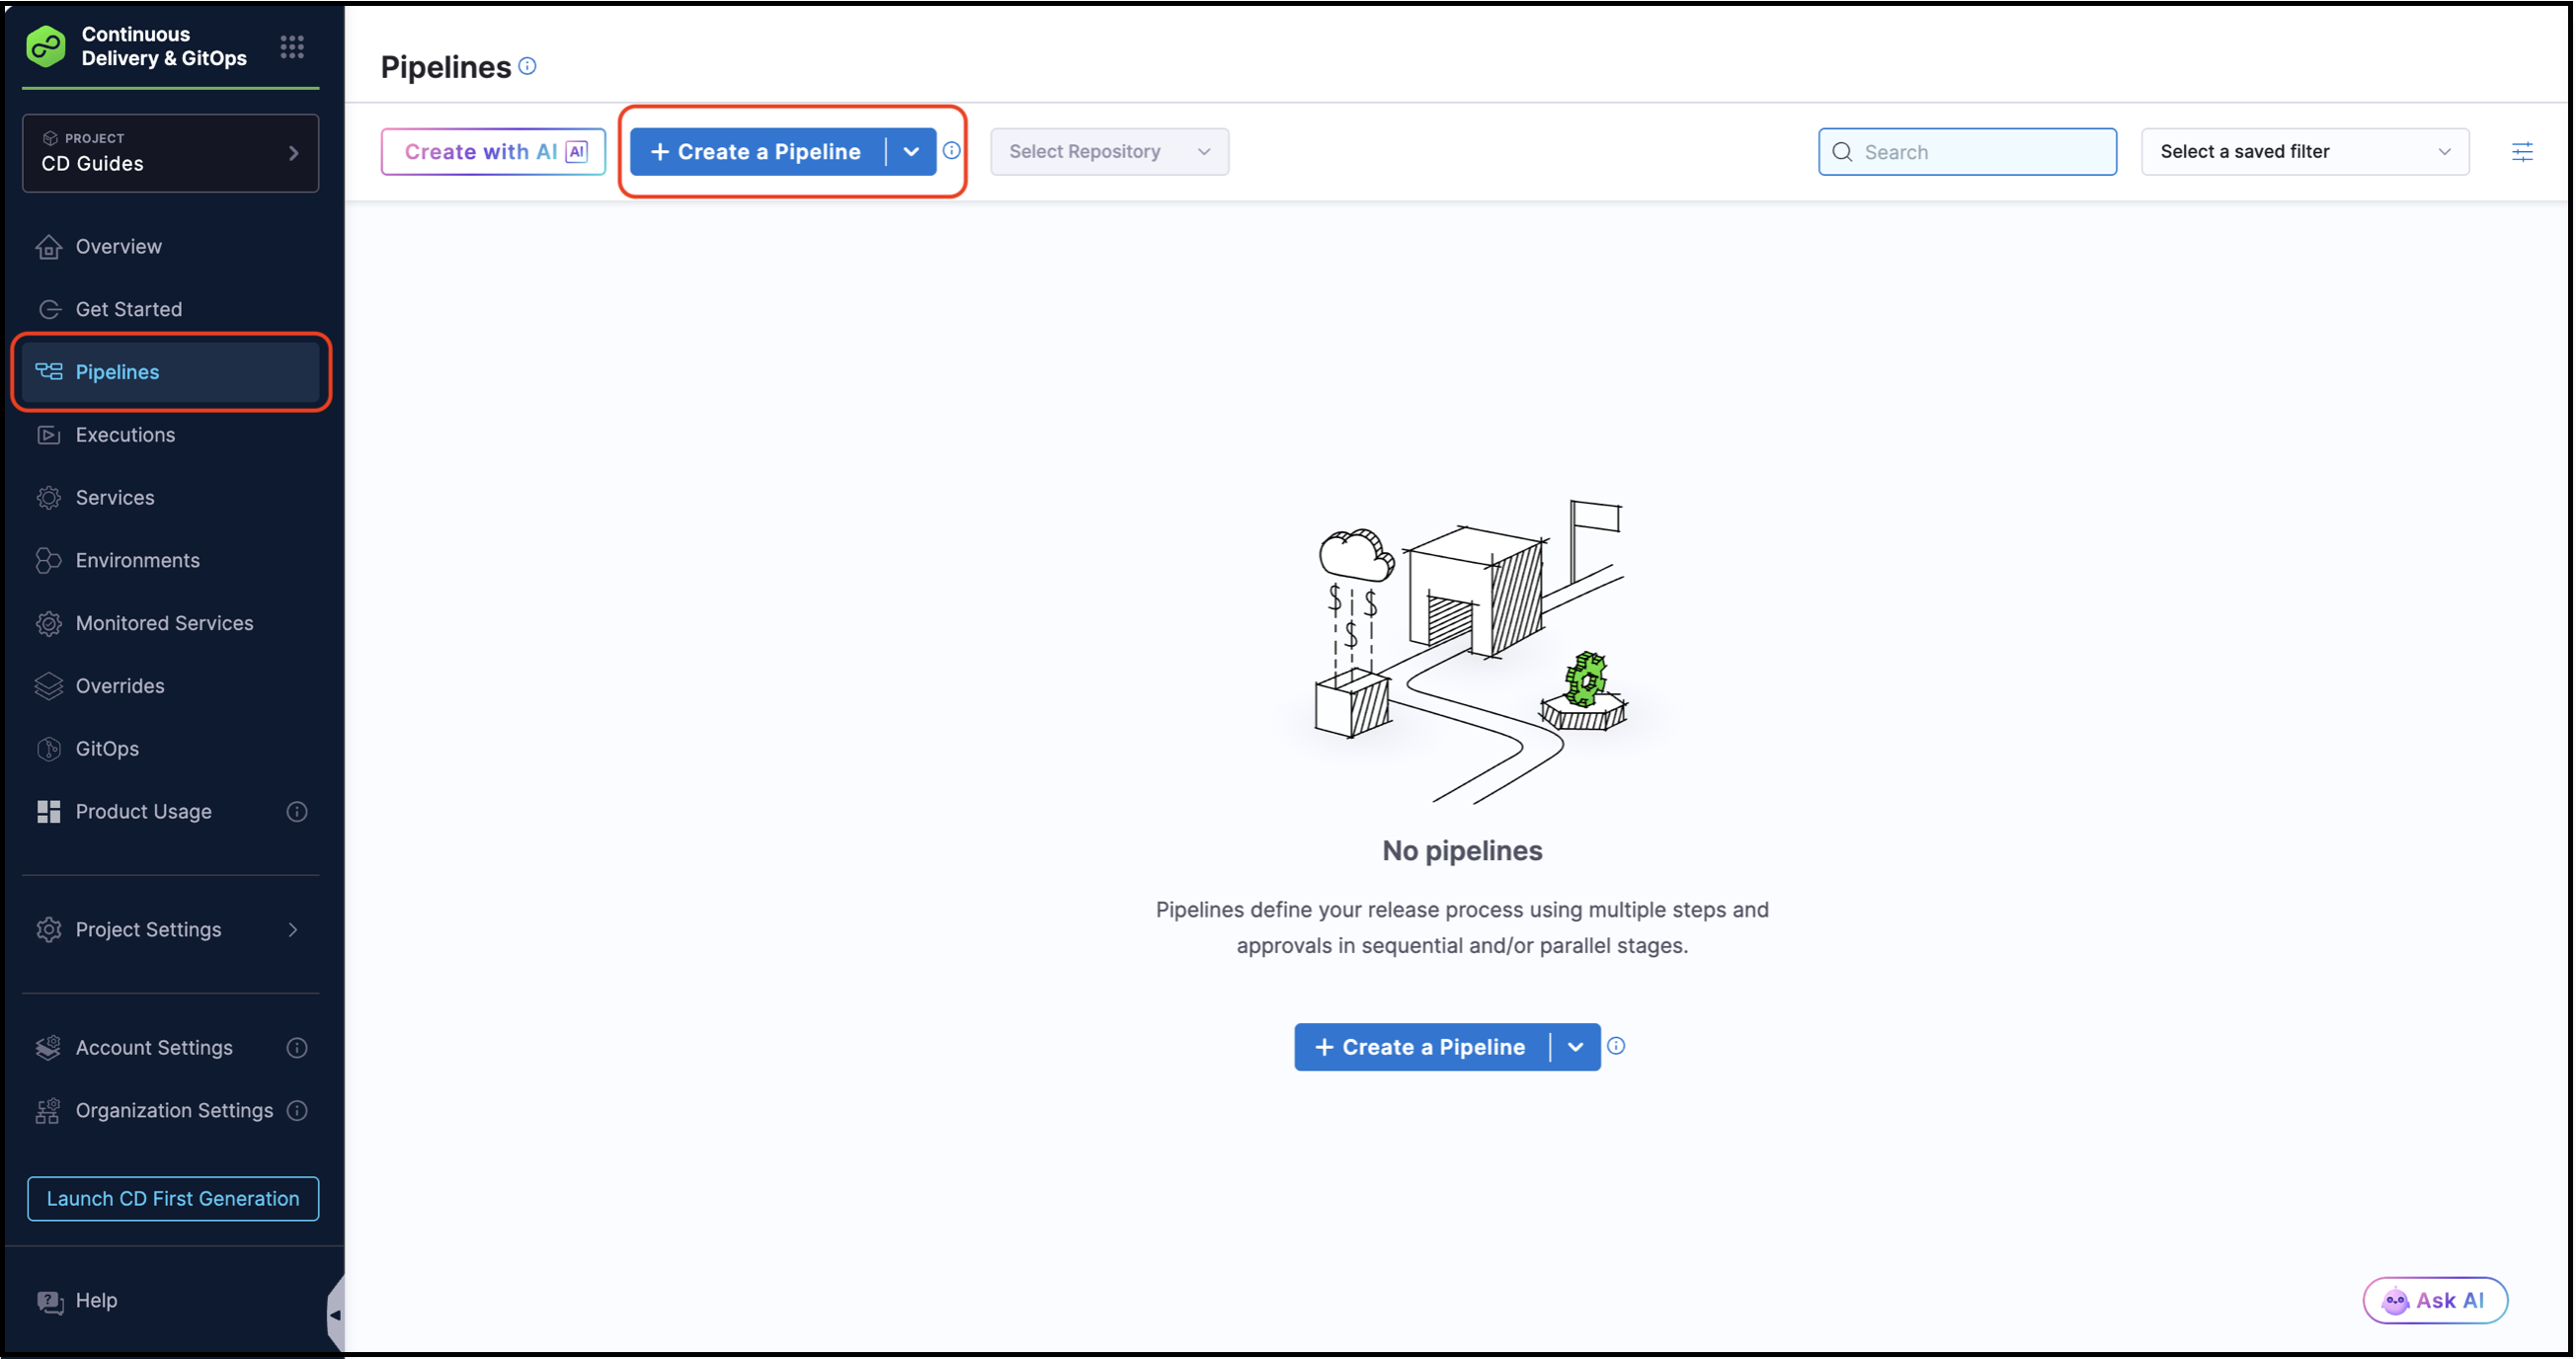
**Navigate to Pipelines**
1. From your Harness project, select **Pipelines** from the left navigation menu.
2. Click **+ Create a Pipeline**.
Click to view full size image
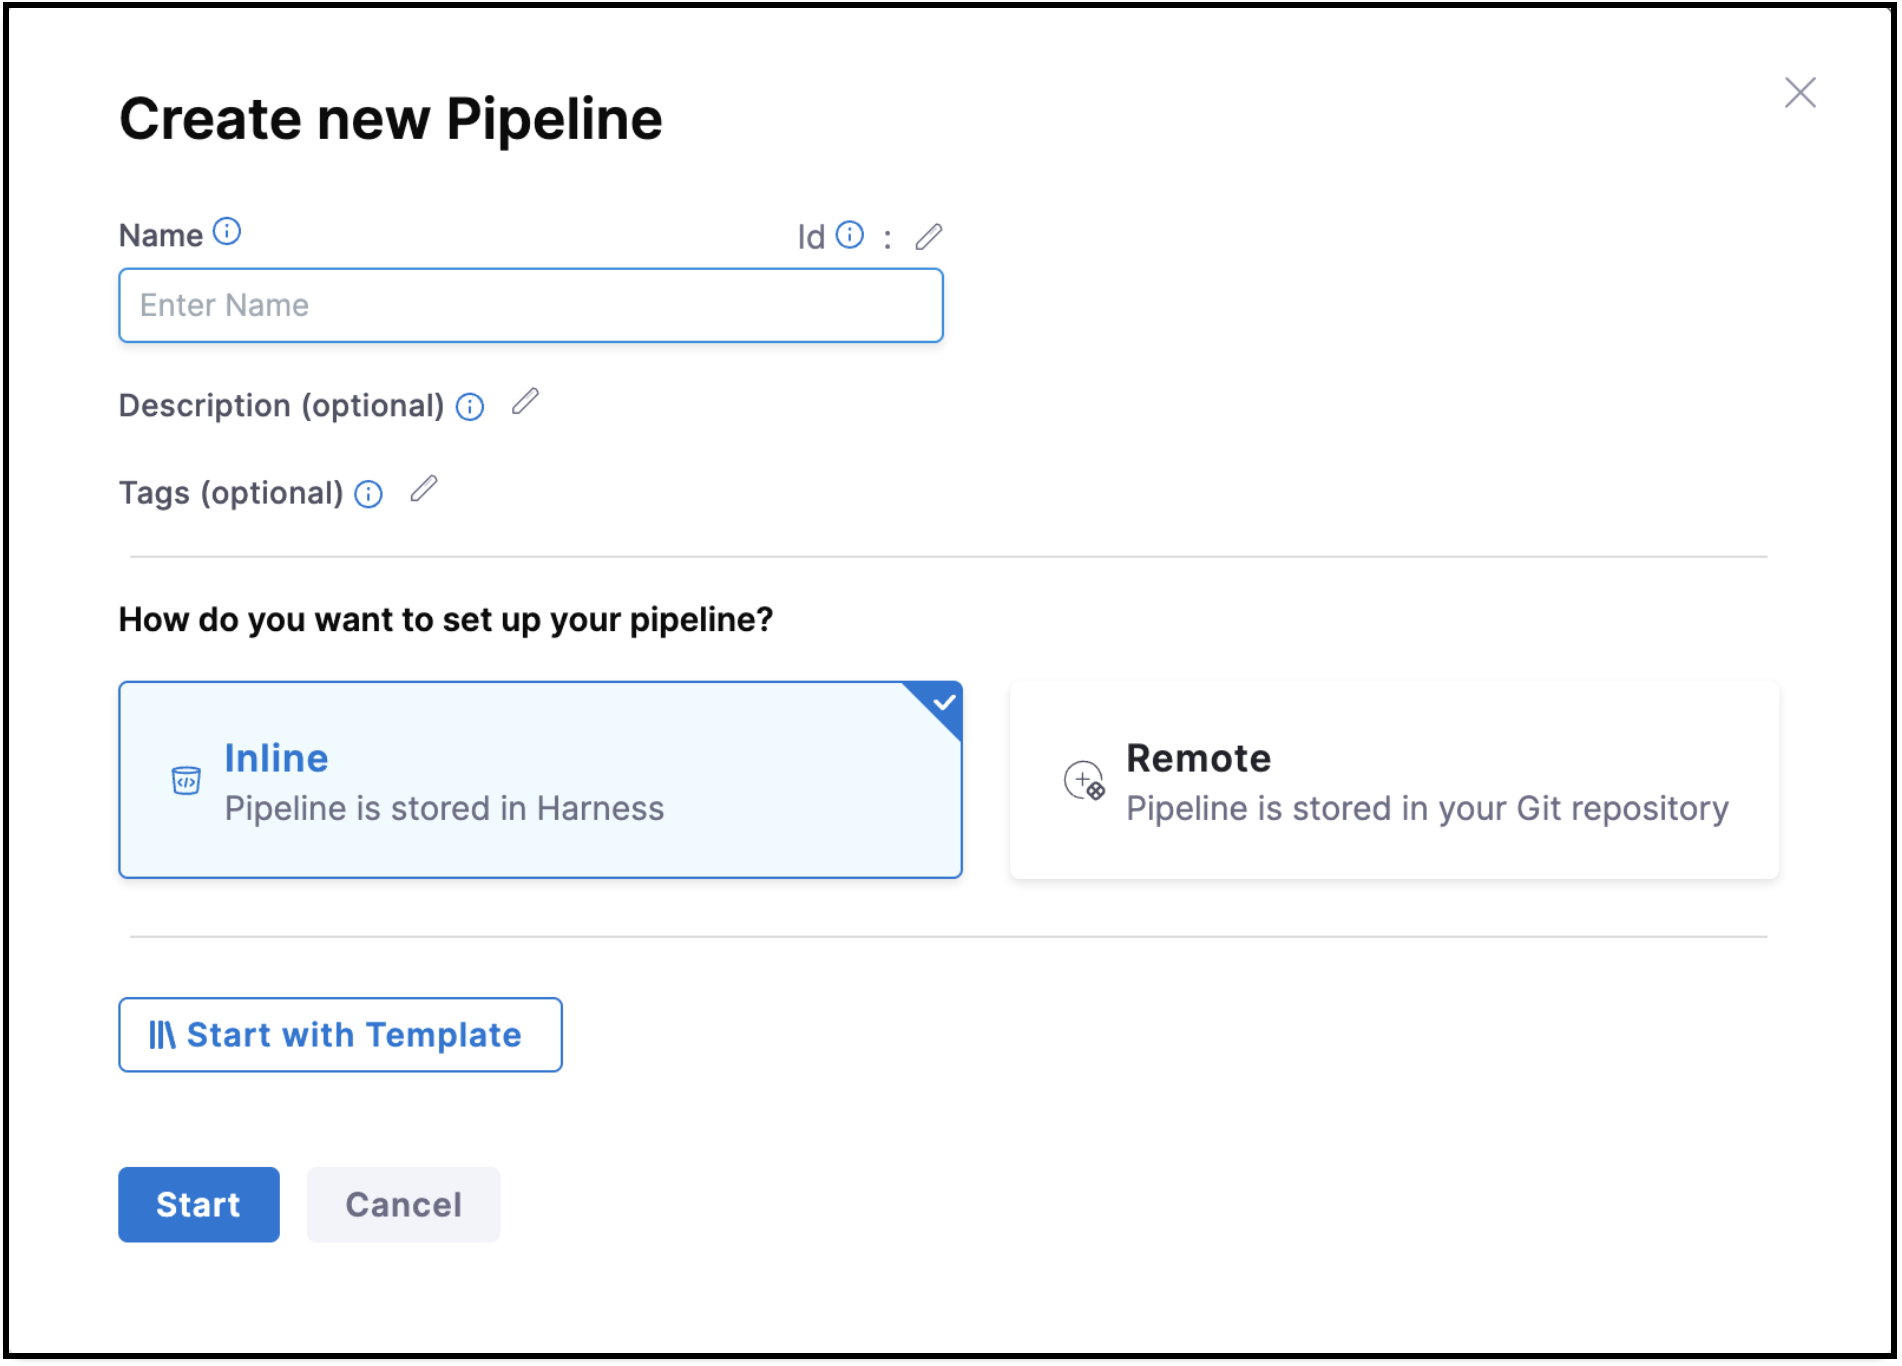
**Configure pipeline basics**
1. Provide a **Name** for your pipeline. For example, **Deploy to Production**.
2. Select **Inline** for **Pipeline Storage** (stores configuration in Harness).
3. Click **Start**.
Click to view full size image
{% hint style="info" %}
You can also store pipelines in Git using **Remote** storage. For more information, see [Pipelines documentation](/harness-platform/use-harness-platform/pipelines.md).
{% endhint %}
***
## Step 2: Add a Deploy stage and configure deployment
Perform the following steps to add a Deploy stage and configure your deployment based on your target platform:
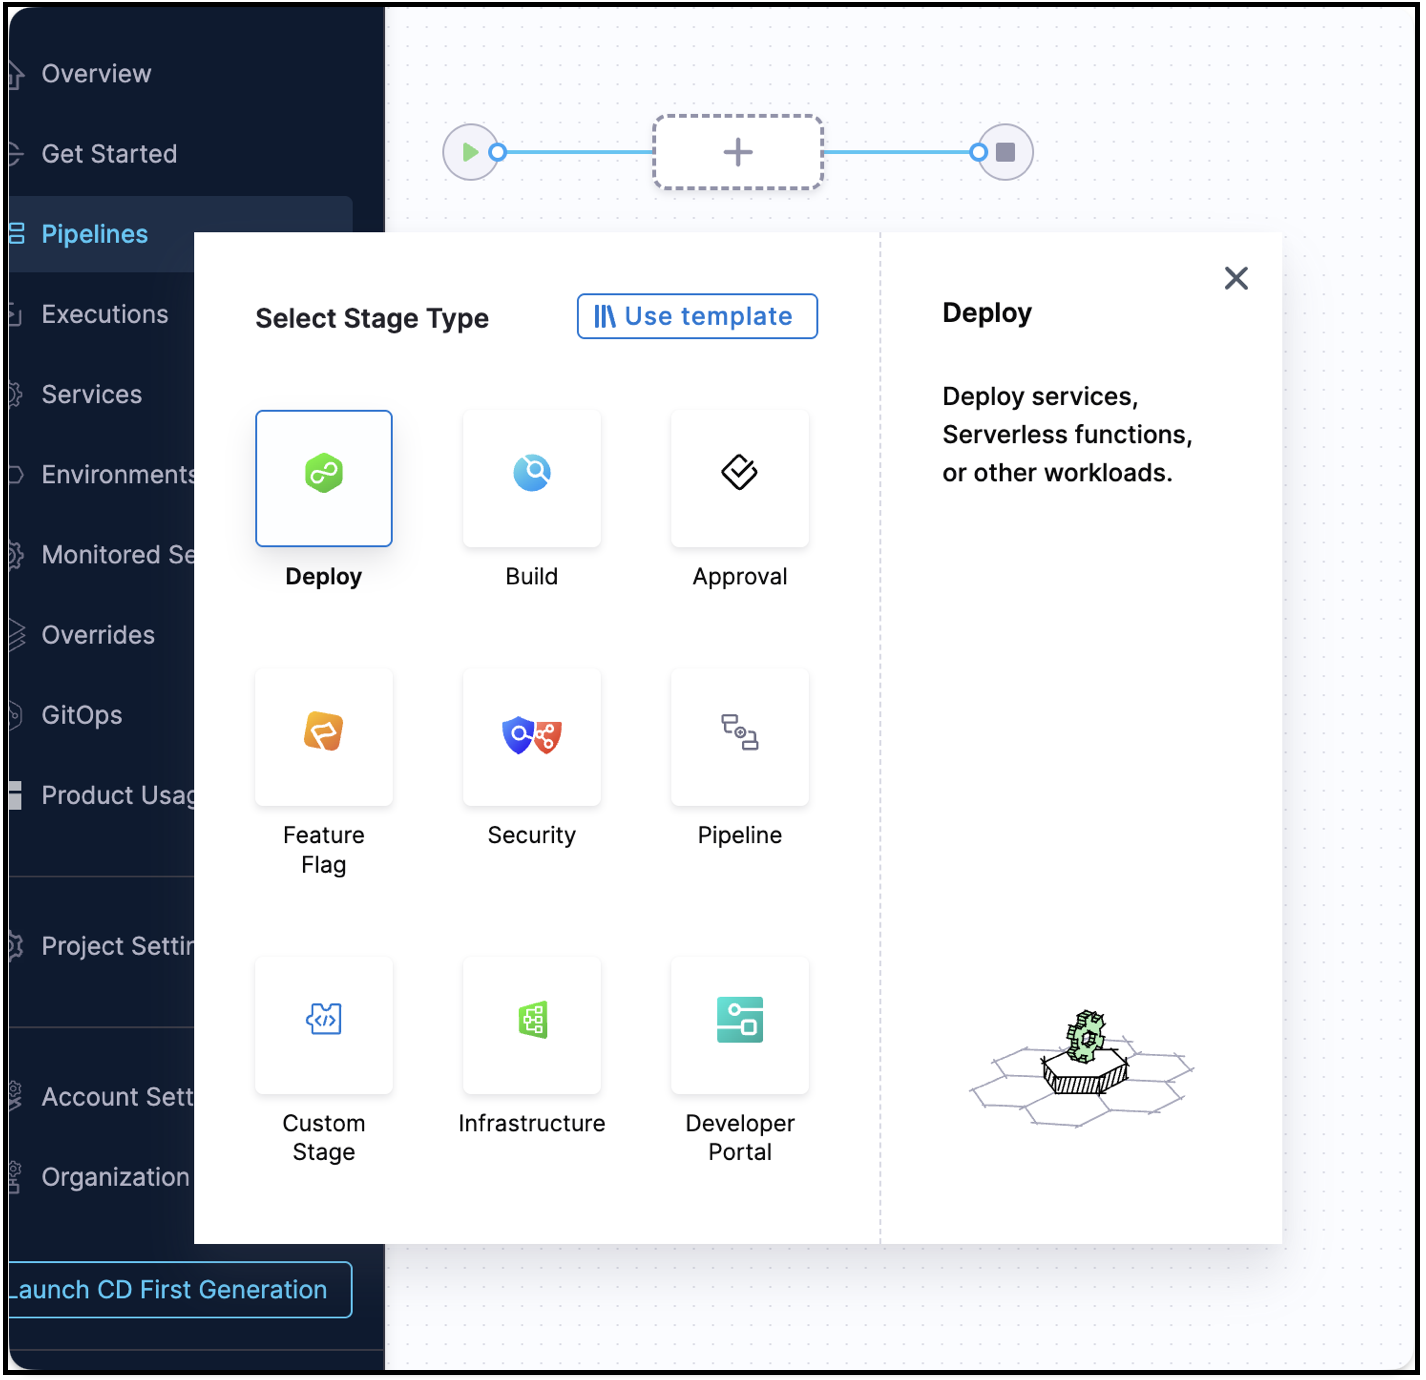
1. Select the **Deploy** stage type.
Click to view full size image
2. In the **About your Stage** section:
* Enter a **Stage Name**. For example, **Deploy to Dev**.
* Select the **Deployment Type** that matches your infrastructure from the following:
* **Kubernetes**: Deploy to any Kubernetes cluster.
* **AWS Lambda**: Serverless functions on AWS.
* **Google Cloud Run**: Fully managed containers on GCP.
* **Azure Web Apps**: PaaS web applications on Azure.
* **Azure Functions**: Serverless compute on Azure.
* **SSH**: Deploy to Linux/Windows servers.
3. Click **Set Up Stage** to continue.
{% hint style="info" %}
Harness supports 20+ deployment types, including ECS, Helm, SAM, Google Cloud Functions, Spot, Tanzu, and more. For the complete list, see [What's Supported](/continuous-delivery/new-to-continuous-delivery/cd-integrations.md).
{% endhint %}
{% hint style="warning" %}
The deployment type you select here determines the configuration needed in the Service, Environment, and Infrastructure sections. Make sure to follow the same deployment type throughout all configuration steps.
{% endhint %}
***
## Step 3: Configure your service
The [service](/continuous-delivery/use-continuous-delivery/cd-building-blocks/services/services-overview.md) defines what you are deploying (application, artifacts, manifests).
Select the deployment platform based on the requirement:
{% tabs %}
{% tab title="Kubernetes" %}
Define the Kubernetes service by adding a manifest and a container image to deploy.
**Add a service**
1. In the **Service** tab, click **+ Add Service**.
2. Provide a **Name**. For example, `nginx-service`.
3. Click **Save**.
**Add Kubernetes manifest**
1. Click **Add Manifest**.
2. Select **K8s Manifest**.
3. Configure the following:
* **Manifest Identifier**: `k8s-manifest`.
* **Git Connector**: Select the Git connector you created in [Platform setup](#platform-setup).
* **Repository**: Use `https://github.com/harness-community/harnesscd-example-apps`.
* **Branch**: `master`.
* **File Path**: `guestbook/manifest.yaml`.
**Sample manifest:**
```yaml
apiVersion: apps/v1
kind: Deployment
metadata:
name: guestbook-ui
spec:
replicas: 3
selector:
matchLabels:
app: guestbook-ui
template:
metadata:
labels:
app: guestbook-ui
spec:
containers:
- name: guestbook-ui
image: <+artifact.image>
ports:
- containerPort: 80
---
apiVersion: v1
kind: Service
metadata:
name: guestbook-ui
spec:
type: LoadBalancer
selector:
app: guestbook-ui
ports:
- protocol: TCP
port: 80
targetPort: 80
```
**Add container image**
1. Click **Add Primary Artifact**.
2. Select **Docker Registry**.
3. Configure the following:
* **Artifact Source Name**: `nginx`.
* **Docker Registry Connector**: Select the Docker Registry connector you created in [Platform setup](#platform-setup).
* **Image Path**: `library/nginx`.
* **Tag**: Select `stable` or use `<+input>` for runtime input.
4. Click **Continue** to proceed to environment configuration.
{% hint style="info" %}
Harness also supports [Helm charts](/continuous-delivery/use-continuous-delivery/deploy-services-on-different-platforms/helm/helm-cd-quickstart.md) and [Kustomize](/continuous-delivery/use-continuous-delivery/deploy-services-on-different-platforms/kustomize/kustomize-quickstart.md) for Kubernetes deployments.
{% endhint %}
{% endtab %}
{% tab title="SSH / Traditional" %}
Define the service by adding the application package to deploy to your target hosts.
**Add a service**
1. In the **Service** tab, click **+ Add Service**.
2. Enter a **Name**. For example, `tomcat-app`.
3. Click **Save**.
**Add application package**
1. Click **Add Primary Artifact**.
2. Select artifact source based on what you configured in [Platform setup](#platform-setup):
* **Artifactory**: For JARs, WARs, and so on.
* **Nexus**: For Maven artifacts.
* **Amazon S3**: For packages.
3. Configure the following:
* **Connector**: Select the artifact repository connector you created in [Platform setup](#platform-setup).
* **Artifact Path**: Path to your application package.
* **Format**: JAR, WAR, TAR, ZIP, and so on.
For example, for a WAR file from Artifactory:
* **Repository**: `libs-release-local`.
* **Artifact Path**: `com/example/myapp/1.0/myapp-1.0.war`.
**Add deployment scripts (optional)**
1. Click **Add Config File** to add installation or startup scripts.
2. Add pre-deployment and post-deployment scripts as needed.
3. Click **Continue** to proceed to environment configuration.
{% hint style="info" %}
Harness also supports [WinRM deployments](/continuous-delivery/use-continuous-delivery/deploy-services-on-different-platforms/traditional/win-rm-tutorial.md) for Windows servers.
{% endhint %}
{% endtab %}
{% tab title="Google Cloud Run" %}
Define the Cloud Run service by adding a service definition and a container image to deploy.
Sample configuration files are available in the [harnesscd-example-apps repository](https://github.com/harness-community/harnesscd-example-apps/tree/master/google-cloud-run).
**Add a service**
1. In the **Service** tab, click **+ Add Service**.
2. Enter a **Name**. For example, `cloud-run-service`.
3. Click **Save**.
**Add Cloud Run service definition**
1. Click **Add Manifest**.
2. Select **Google Cloud Run Service Definition**.
3. Configure the following:
* **Manifest Source**: Git Repository.
* **Git Connector**: Select the Git connector you created in [Platform setup](#platform-setup).
**Sample Cloud Run service definition:**
```yaml
apiVersion: serving.knative.dev/v1
kind: Service
metadata:
name: <+service.name>
spec:
template:
spec:
containers:
- image: <+artifact.image>
ports:
- containerPort: 8080
env:
- name: ENV
value: "production"
```
**Add container image**
1. Click **Add Primary Artifact**.
2. Select **Google Artifact Registry** or **GCR**.
3. Configure the following:
* **GCP Connector**: Select the GCP connector you created in [Platform setup](#platform-setup).
* **Project**: Your GCP project ID.
* **Image Path**: Path to your container image.
* **Tag**: Select a tag or use `<+input>`.
4. Click **Continue** to proceed to environment configuration.
{% hint style="info" %}
Harness also supports [Google Cloud Functions](/continuous-delivery/use-continuous-delivery/deploy-services-on-different-platforms/google-cloud-functions/google-functions.md) and [GKE](/continuous-delivery/use-continuous-delivery/deploy-services-on-different-platforms/kubernetes/kubernetes-deployments-overview.md).
{% endhint %}
{% endtab %}
{% tab title="Azure" %}
Define the Azure service by adding a function configuration and an artifact to deploy.
Sample configuration files are available in the [harnesscd-example-apps repository](https://github.com/harness-community/harnesscd-example-apps/tree/master/azure-function-deployment).
**Add a service**
1. In the **Service** tab, click **+ Add Service**.
2. Enter a **Name**. For example, `azure-function`.
3. Click **Save**.
**Add Azure function configuration**
1. Click **Add Manifest**.
2. Select **Azure Function App Configuration**.
3. Configure the following:
* **Manifest Source**: Git or Harness File Store.
* **Git Connector**: Select the Git connector you created in [Platform setup](#platform-setup) (if using Git).
**Sample application settings:**
```json
{
"AzureWebJobsStorage": "",
"FUNCTIONS_WORKER_RUNTIME": "node",
"FUNCTIONS_EXTENSION_VERSION": "~4"
}
```
**Add function artifact**
1. Click **Add Primary Artifact**.
2. Select an artifact source:
* **Azure Artifacts**: For packages.
* **ACR**: Select the ACR connector you created in [Platform setup](#platform-setup).
3. Configure the connector and artifact details.
4. Click **Continue** to proceed to environment configuration.
{% hint style="info" %}
Harness also supports [Azure Web Apps](/continuous-delivery/use-continuous-delivery/deploy-services-on-different-platforms/azure/azure-web-apps-tutorial.md) and [AKS](/continuous-delivery/use-continuous-delivery/deploy-services-on-different-platforms/kubernetes/kubernetes-deployments-overview.md).
{% endhint %}
{% endtab %}
{% tab title="AWS Lambda" %}
Define the Lambda service by adding a function definition and an artifact to deploy.
Sample configuration files are available in the [harnesscd-example-apps repository](https://github.com/harness-community/harnesscd-example-apps/tree/master/aws-lambda).
**Add a service**
1. In the **Service** tab, click **+ Add Service**.
2. Enter a **Name**. For example, `lambda-function`.
3. Click **Save**.
**Add Lambda function definition**
1. Click **Add Manifest**.
2. Select **AWS Lambda Function Definition**.
3. Configure the following:
* **Manifest Source**: Git or Harness File Store.
* **Git Connector**: Select the Git connector you created in [Platform setup](#platform-setup) (if using Git).
* **File Path**: Path to your function definition JSON.
**Sample Lambda Function Definition** ([view full example](https://github.com/harness-community/harnesscd-example-apps/blob/master/aws-lambda/function-definition.json)):
```json
{
"FunctionName": "hello-world-lambda",
"Runtime": "python3.9",
"Role": "arn:aws:iam::123456789012:role/lambda-execution-role",
"Handler": "lambda_function.lambda_handler",
"Code": {
"S3Bucket": "<+artifact.bucketName>",
"S3Key": "<+artifact.key>"
},
"Description": "Hello World Lambda function",
"Timeout": 30,
"MemorySize": 128,
"Publish": true
}
```
{% hint style="info" %}
Replace the `Role` ARN with your actual Lambda execution role ARN.
{% endhint %}
**Add Lambda artifact**
1. Click **Add Primary Artifact**.
2. Select **Amazon S3**.
3. Configure the following:
* **AWS Connector**: Select the AWS connector you created in [Platform setup](#platform-setup).
* **Region**: `us-east-1` (or your region).
* **Bucket**: Your S3 bucket name (where you uploaded the ZIP in [Platform setup](#platform-setup)).
* **File Path**: `hello-world.zip` (the file you uploaded).
**Sample artifact**: [hello-world.zip](https://github.com/harness-community/harnesscd-example-apps/blob/master/aws-lambda/hello_world.zip)
4. Click **Continue** to proceed to environment configuration.
{% hint style="info" %}
Harness also supports [ECS](/continuous-delivery/use-continuous-delivery/deploy-services-on-different-platforms/aws/ecs/ecs-deployment-tutorial.md), [SAM](/continuous-delivery/use-continuous-delivery/deploy-services-on-different-platforms/aws/aws-sam-deployments.md), and [other AWS services](/cloud-cost-management/references/onboarding/aws.md).
{% endhint %}
{% endtab %}
{% endtabs %}
***
## Step 4: Configure environment and infrastructure
Perform the following steps to define where you are deploying (the [environment](/continuous-delivery/use-continuous-delivery/cd-building-blocks/environments/environment-overview.md)) and the specific infrastructure details:
Select your deployment platform from the following:
{% tabs %}
{% tab title="Kubernetes" %}
Create an environment to represent your deployment target, then define the Kubernetes infrastructure to deploy to.
**Create environment**
1. Click **+ New Environment**.
2. Configure the following:
* **Name**: `dev-environment`.
* **Environment Type**: **Pre-Production**.
3. Click **Save**.
**Define infrastructure**
1. Click **+ Select Infrastructure**.
2. Provide **Name**: `k8s-dev-cluster`.
3. Configure the following:
* **Connector**: Select the Kubernetes cluster connector you created in [Platform setup](#platform-setup).
* **Namespace**: Enter target namespace (e.g., `default`, `dev`, `production`).
* **Release Name**: `release-<+INFRA_KEY>` (for deployment tracking).
4. Click **Continue** to proceed to Execution.
For more information, see [Kubernetes infrastructure](/continuous-delivery/use-continuous-delivery/deploy-services-on-different-platforms/kubernetes/define-your-kubernetes-target-infrastructure.md).
{% endtab %}
{% tab title="SSH / Traditional" %}
Create an environment that represents your deployment target, then define the target hosts to deploy to via SSH.
**Create environment**
1. Click **+ New Environment**.
2. Configure the following:
* **Name**: `production-servers`.
* **Environment Type**: **Production**.
3. Click **Save**.
**Define infrastructure**
1. Click **+ Select Infrastructure**.
2. Provide **Name**: `prod-vms`.
3. Configure the following:
* **For a static host list**:
* **Connector**: Select the SSH connector you created in [Platform setup](#platform-setup).
* **Hosts**: Add target host IPs or hostnames (e.g., `192.168.1.10`, `server1.example.com`).
* **Host Attributes**: Add tags for organization (optional).
* **For dynamic infrastructure**:
* **Cloud Provider**: Select the AWS, Azure, or GCP connector from [Platform setup](#platform-setup).
* **Region**: Select a region.
* **Tags**: Define filters to dynamically select instances.
4. Click **Continue** to proceed to Execution.
For more information, see [SSH infrastructure](/continuous-delivery/use-continuous-delivery/deploy-services-on-different-platforms/traditional/ssh-ng.md#infrastructure).
{% endtab %}
{% tab title="Google Cloud Run" %}
Create an environment to represent your deployment target, then define the Google Cloud infrastructure to deploy to.
**Create environment**
1. Click **+ New Environment**.
2. Configure the following:
* **Name**: `gcp-production`.
* **Environment Type**: **Production**.
3. Click **Save**.
**Define infrastructure**
1. Click **+ Select Infrastructure**.
2. Provide **Name**: `cloud-run-infra`.
3. Configure the following:
* **GCP Connector**: Select the GCP connector you created in [Platform setup](#platform-setup).
* **Project**: Your GCP project ID (e.g., `my-project-123456`).
* **Region**: Select region (e.g., `us-central1`, `us-east1`).
4. Click **Continue** to proceed to Execution.
For more information, see [Cloud Run infrastructure](/continuous-delivery/use-continuous-delivery/deploy-services-on-different-platforms/google-cloud-functions/google-cloud-run.md).
{% endtab %}
{% tab title="Azure" %}
Create an environment to represent your deployment target, then define the Azure infrastructure to deploy to.
**Create environment**
1. Click **+ New Environment**.
2. Configure the following:
* **Name**: `azure-prod`.
* **Environment Type**: **Production**.
3. Click **Save**.
**Define infrastructure**
1. Click **+ Select Infrastructure**.
2. Provide **Name**: `azure-func-infra`.
3. Configure the following:
* **Azure Connector**: Select the Azure connector you created in [Platform setup](#platform-setup).
* **Subscription**: Select your Azure subscription ID.
* **Resource Group**: Your resource group name (e.g., `my-function-rg`).
* **Function App Name**: Your function app name (the one you created in Azure Portal).
4. Click **Continue** to proceed to Execution.
For more information, see [Azure Functions infrastructure](/continuous-delivery/use-continuous-delivery/deploy-services-on-different-platforms/azure/azure-function-tutorial.md).
{% endtab %}
{% tab title="AWS Lambda" %}
Create an environment to represent your deployment target, then define the AWS infrastructure to deploy to.
**Create environment**
1. Click **+ New Environment**.
2. Configure the following:
* **Name**: `aws-lambda-prod`.
* **Environment Type**: **Production**.
3. Click **Save**.
**Define infrastructure**
1. Click **+ Select Infrastructure**.
2. Provide **Name**: `lambda-infra`.
3. Configure the following:
* **AWS Connector**: Select the AWS connector you created in [Platform setup](#platform-setup).
* **Region**: Select your AWS region (e.g., `us-east-1`, `us-west-2`).
4. Click **Continue** to proceed to Execution.
For more information, see [Lambda infrastructure](/continuous-delivery/use-continuous-delivery/deploy-services-on-different-platforms/aws/aws-lambda-deployments.md#infrastructure).
{% endtab %}
{% endtabs %}
***
## Step 5: Configure execution strategy
Different deployment types support different execution strategies. Select your deployment platform to view the available strategies:
{% tabs %}
{% tab title="Kubernetes" %}
Perform the following steps to configure the execution strategy for your Kubernetes deployment:
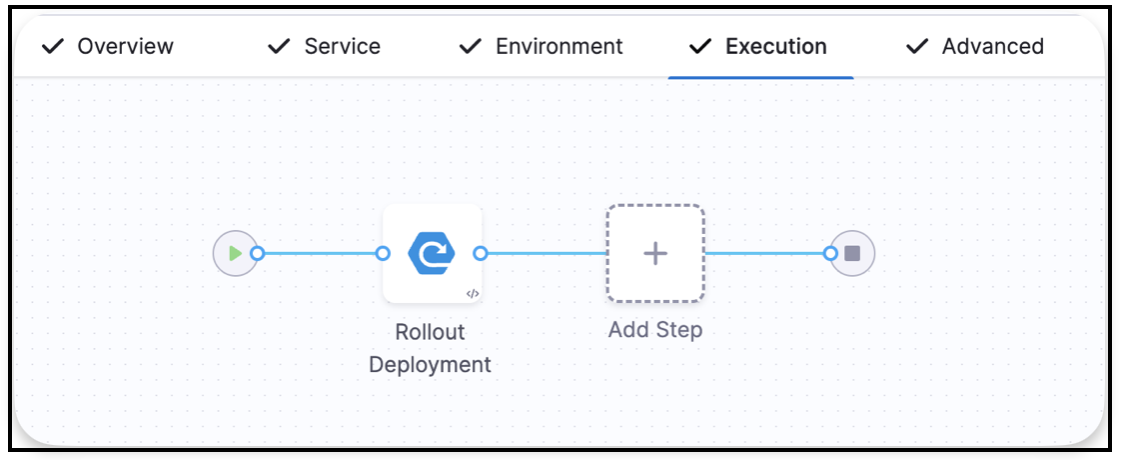
1. In the **Execution** tab, Harness automatically adds a **Rollout Deployment** step.
Click to view full size image
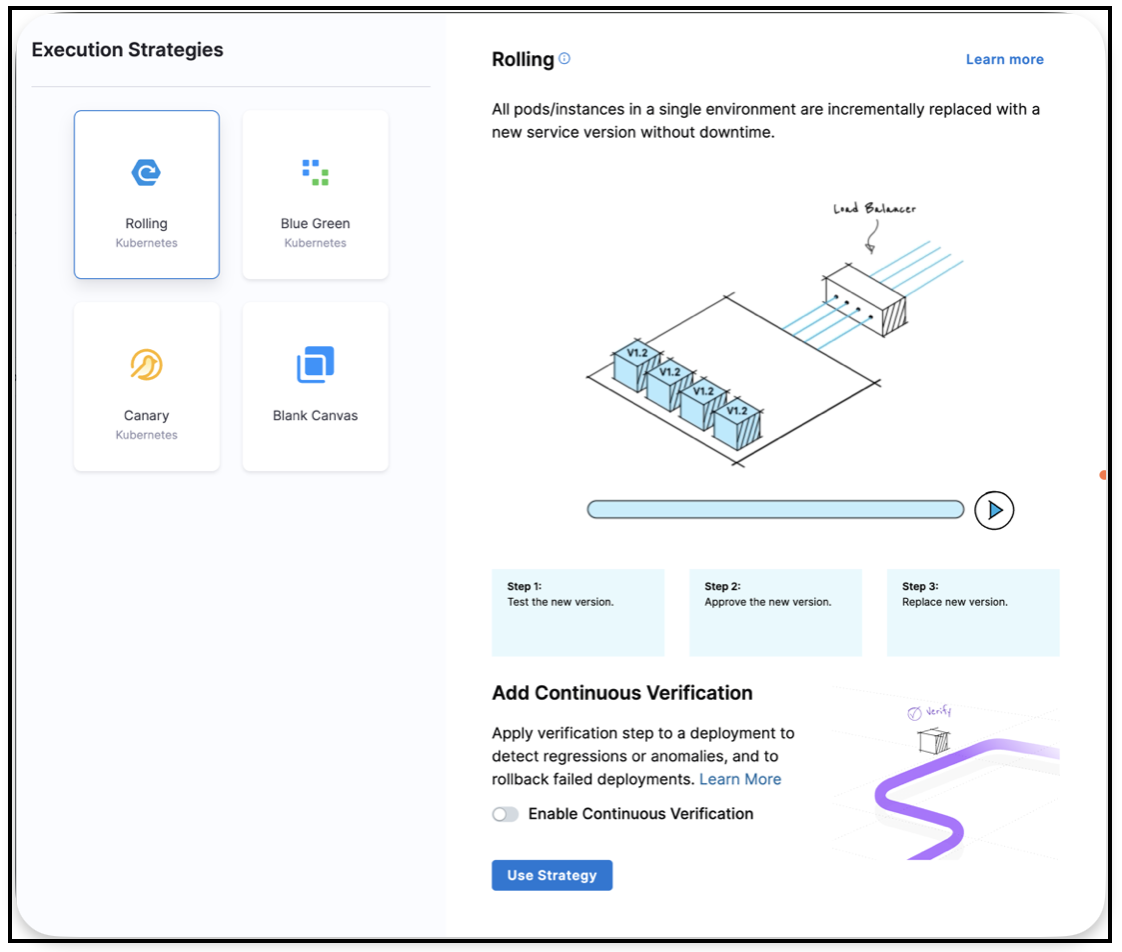
2. Click the step to select your execution strategy:
Click to view full size image
**Available strategies for Kubernetes:**
* [Rolling](/continuous-delivery/use-continuous-delivery/deploy-services-on-different-platforms/kubernetes/kubernetes-executions/create-a-kubernetes-rolling-deployment.md): Incrementally updates pods with zero downtime. Supports all Kubernetes workloads (Deployment, DaemonSet, and so on).
* [Blue Green](/continuous-delivery/use-continuous-delivery/deploy-services-on-different-platforms/kubernetes/kubernetes-executions/create-a-kubernetes-blue-green-deployment.md): Deploys a new version alongside the old, then instantly switches traffic. Supports Deployment workloads only.
* [Canary](/continuous-delivery/use-continuous-delivery/deploy-services-on-different-platforms/kubernetes/kubernetes-executions/create-a-kubernetes-canary-deployment.md): Gradually routes traffic to the new version in phases. Supports Deployment workloads only.
* **Blank Canvas**: Start with an empty execution for custom workflows.
3. Select your strategy and click **Use Strategy**.
For more details on Kubernetes deployment strategies, see [What Can I Deploy in Kubernetes?](/continuous-delivery/use-continuous-delivery/deploy-services-on-different-platforms/kubernetes/cd-k8s-ref/what-can-i-deploy-in-kubernetes.md).
{% endtab %}
{% tab title="SSH / Traditional" %}
Perform the following steps to configure the execution strategy for your SSH deployment:
1. In the **Execution** tab, Harness automatically adds deployment steps.
**Available strategy:**
* **Rolling**: Deploys to target hosts incrementally, either all at once or in phases. You can specify:
* Number of instances to deploy simultaneously.
* Percentage-based deployment phases.
* Custom deployment patterns.
The Rolling strategy is ideal for traditional deployments as it:
* Maintains service availability during deployment.
* Allows for gradual rollout verification.
* Supports easy rollback if issues are detected.
2. Click **Save** to save your pipeline.
For more details on SSH deployments, see [SSH deployments](/continuous-delivery/use-continuous-delivery/deploy-services-on-different-platforms/traditional/ssh-ng.md).
{% endtab %}
{% tab title="Google Cloud" %}
Perform the following steps to configure the execution strategy for your Cloud Run deployment:
1. In the **Execution** tab, select your deployment strategy.
**Available strategies for Cloud Run:**
* [Basic](/continuous-delivery/use-continuous-delivery/deploy-services-on-different-platforms/google-cloud-functions/google-cloud-run.md): Deploys new revision and routes 100% of traffic immediately.
* Steps: Download Manifest > Prepare Rollback > Deploy.
* [Canary](/continuous-delivery/use-continuous-delivery/deploy-services-on-different-platforms/google-cloud-functions/google-cloud-run.md): Gradually shifts traffic from old to new revision.
* Steps: Download Manifest > Prepare Rollback > Deploy > Traffic Shift.
**For Google Cloud Functions (2nd gen):**
* **Basic**: Deploys new function version and routes 100% traffic.
* **Canary**: Gradually routes traffic to the new version.
* **Blue Green**: Deploys a new version and switches traffic at once.
**For Google Cloud Functions (1st gen):**
* **Basic only**: Deploys a new function and terminates the old one.
2. Select your strategy, and Harness will automatically add the required steps.
3. Click **Save** to save your pipeline.
For more details, see [Google Cloud Functions](/continuous-delivery/use-continuous-delivery/deploy-services-on-different-platforms/google-cloud-functions/google-functions.md) and [Google Cloud Run](/continuous-delivery/use-continuous-delivery/deploy-services-on-different-platforms/google-cloud-functions/google-cloud-run.md).
{% endtab %}
{% tab title="Azure" %}
Perform the following steps to configure the execution strategy for your Azure deployment:
1. In the **Execution** tab, select your deployment strategy.
**Available strategies for Azure Web Apps:**
* [Basic](/continuous-delivery/use-continuous-delivery/deploy-services-on-different-platforms/azure/azure-web-apps-tutorial.md): Deploys to the target slot without traffic shifting.
* Step: Slot Deployment.
* [Canary](/continuous-delivery/use-continuous-delivery/deploy-services-on-different-platforms/azure/azure-web-apps-tutorial.md): Shifts traffic from production to the deployment slot incrementally.
* Steps: Slot Deployment > Traffic Shift (incremental) > Swap Slot.
* [Blue Green](/continuous-delivery/use-continuous-delivery/deploy-services-on-different-platforms/azure/azure-web-apps-tutorial.md): Deploys to the deployment slot, then swaps all traffic at once.
* Steps: Slot Deployment > Swap Slot.
**For Azure Functions:**
* **Basic**: Deploys a new function version.
* **Custom**: Define your own deployment workflow.
2. Select your strategy, and Harness will automatically add the required steps.
3. Click **Save** to save your pipeline.
{% hint style="info" %}
Azure Web Apps use slots for staging and production environments. Rolling strategy is not supported because it does not align with the slot-based deployment model. For more details, see [Azure Web Apps](/continuous-delivery/use-continuous-delivery/deploy-services-on-different-platforms/azure/azure-web-apps-tutorial.md) and [Azure Functions](/continuous-delivery/use-continuous-delivery/deploy-services-on-different-platforms/azure/azure-function-tutorial.md).
{% endhint %}
{% endtab %}
{% tab title="AWS Lambda" %}
Perform the following steps to configure the execution strategy for your Lambda deployment:
1. In the **Execution** tab, select your deployment strategy.
**Available strategies for Lambda:**
* [Basic](/continuous-delivery/use-continuous-delivery/deploy-services-on-different-platforms/aws/aws-lambda-deployments.md): Deploys new function version and routes 100% traffic immediately.
* Steps: AWS Lambda Deploy > AWS Lambda Rollback (for rollback).
* [Canary](/continuous-delivery/use-continuous-delivery/deploy-services-on-different-platforms/aws/aws-lambda-deployments.md): Gradually shifts traffic to the new version using AWS Lambda's traffic shifting.
* Steps: Lambda Canary Deploy > Traffic Shift (for example, 10%) > Traffic Shift (100%) > Canary Rollback.
**Canary deployment details:**
* Deploy the new version without initially shifting traffic.
* Incrementally route traffic (for example, 10%, then 100%).
* Add approval steps between traffic shifts to validate deployment health.
* Automatic rollback if failure is detected.
2. Select your strategy, and Harness will automatically add the required steps.
3. Click **Save** to save your pipeline.
For more details, see [AWS Lambda Deployments](/continuous-delivery/use-continuous-delivery/deploy-services-on-different-platforms/aws/aws-lambda-deployments.md).
{% endtab %}
{% endtabs %}
***
## Enable Continuous Verification (optional)
You can enable Continuous Verification to automatically monitor your application's health after deployment.
Perform the following steps to enable Continuous Verification:
1. Toggle **Enable Continuous Verification**.
2. Configure your monitoring tools, such as Application Performance Monitoring (APM), logging, and metrics.
For more information, see [Continuous Verification documentation](/continuous-delivery/use-continuous-delivery/verify-deployments/verify-deployments-with-the-verify-step.md).
***
## Step 6: Run your pipeline
After completing all configuration steps, perform the following steps to execute your deployment:
1. Ensure your pipeline is saved. Click **Save** if needed.
2. In the **Pipeline Editor**, click **Run** in the top right corner.
3. Provide any required runtime inputs:
* Artifact versions or tags
* Environment variables
* Infrastructure parameters
4. Click **Run Pipeline** to begin execution.
Harness executes your deployment and displays real-time progress, logs, and status for each step.
For detailed information on monitoring execution, viewing logs, troubleshooting failures, and understanding deployment status, see [Pipeline Execution Walkthrough](/continuous-delivery/troubleshooting-and-resources/resources/new-user/pipeline-execution-walkthrough.md).
***
## Next steps
Now that you have completed your first deployment, continue your Harness CD journey with the following:
* [Browse all CD tutorials](/continuous-delivery/troubleshooting-and-resources/tutorials.md): Step-by-step guides for every deployment type.
* [Harness CD example apps repository](https://github.com/harness-community/harnesscd-example-apps): Ready-to-use sample applications for Kubernetes, Helm, AWS Lambda, Azure Functions, Google Cloud Run, and more.
* [Variables and expressions](/harness-platform/use-harness-platform/variables-and-expressions/add-a-variable.md): Use variables for dynamic pipeline configuration.
* [Pipeline triggers](/harness-platform/use-harness-platform/triggers/tutorial-cd-trigger.md): Automate deployments in response to events.
* [Continuous Verification](/continuous-delivery/use-continuous-delivery/verify-deployments/verify-deployments-with-the-verify-step.md): Add automated deployment verification.
* [Approval steps](/continuous-delivery/use-continuous-delivery/cd-building-blocks/cd-steps/approvals/using-harness-approval-steps-in-cd-stages.md): Add manual or automated approvals.
{% hint style="info" %}
The [harnesscd-example-apps](https://github.com/harness-community/harnesscd-example-apps) repository contains complete working examples with manifests, configurations, and artifacts that you can fork and use in your own pipelines.
{% endhint %}
{% hint style="info" icon="diploma" %}
For an interactive onboarding experience with advanced features such as canary deployments, blue-green strategies, and automated rollbacks, visit the [**Harness CD self-paced training**](https://developer.harness.io/university/continuous-delivery#self-paced-training).
{% endhint %}
{% @harness-feedback/feedback %}