> For the complete documentation index, see [llms.txt](https://developer.harness.io/llms.txt). Markdown versions of documentation pages are available by appending `.md` to page URLs; this page is available as [Markdown](https://developer.harness.io/continuous-delivery/troubleshooting-and-resources/resources/new-user/rampup-dev.md).
# 3. Developer Day-to-Day Guide
Daily deployment tasks for developers.
This guide is intended to get you started with Harness CD in the **Developer role**.
This topic assumes you have set up the necessary Harness integrations (Harness Delegate, Kubernetes Cluster connector, AWS connector, JIRA connector, SSO configuration, etc.) and your Harness account configurations.
For onboarding your team, go to the [Onboarding path](/continuous-delivery/troubleshooting-and-resources/resources/new-user/onboarding-path.md).
For CD tutorials, go to [CD and GitOps tutorials](/continuous-delivery/troubleshooting-and-resources/tutorials/cd-gitops-tutorials.md).
If you have any additional questions, [reach out to us](mailto:support@harness.io) and the Harness team will be happy to help.
## What you will learn from this topic
* The three Harness entities — service, environment, and pipeline — and how they model a deployment
* How to manually trigger a deployment, respond to approval gates, and review deployment history
* How to automate deployments using Git webhooks and the Harness API
* How to configure pipeline notifications and assign roles to team members
## What is Harness Continuous Delivery (CD)?
Harness CD is a cloud-native software delivery platform that automates the deployment process, helping teams to release applications quickly, securely, and reliably.
Harness simplifies complex CD tasks by providing features like automated rollback, deployment verification, and performance analysis. Harness integrates with all tools and platforms and offers insights into deployment metrics to optimize the release process.
Harness' goal is to increase deployment frequency, reduce failures, and provide a reliable experience for software delivery.
## Performing a deployment
There are three Harness entities you define when performing a deployment with Harness:
* Service: **What** you are deploying.
* Environment: **Where** you are deploying.
* Pipeline: **How** you are deploying.
These entities are summarized below.
### Services
You can define a Harness service in your Harness project. The service defines the application, microservice, serverless function, or other workloads you are deploying. For more information, go to [Create services](/continuous-delivery/use-continuous-delivery/cd-building-blocks/services/create-services.md), [Deploy services on different platforms](/continuous-delivery/use-continuous-delivery/deploy-services-on-different-platforms.md), and [Services overview](/continuous-delivery/use-continuous-delivery/cd-building-blocks/services/services-overview.md).
### Environments
As you onboard more services, you also need to onboard more Harness environments for the different business environments where you are deploying these services.
A common pattern is three environments:
* Development
* QA
* Production
For more information, go to [Environments overview](/continuous-delivery/use-continuous-delivery/cd-building-blocks/environments/environment-overview.md).
### Pipelines
To deploy your service, you need to model your release process using a pipeline. Harness offers a pipeline modeling experience that automatically adds the steps needed for all popular deployment types and strategies. Harness also lets you build pipelines from scratch. For an example using Kubernetes, go to [Kubernetes deployments](/continuous-delivery/use-continuous-delivery/deploy-services-on-different-platforms/kubernetes/kubernetes-cd-quickstart.md).
## Pipeline example
The following is an example of a common Kubernetes pipeline.
To copy it and paste it into the YAML builder in your Harness project, select **Deployments**, **Create a Pipeline**, name the pipeline, and then use the YAML builder to update any settings.
Sample pipeline YAML
```yaml
projectIdentifier: default
orgIdentifier: default
tags: {}
stages:
- stage:
name: deployKubernetes
identifier: Deploy_Kubernetes
description: Golden Kubernetes Deployment Stage
type: Deployment
spec:
deploymentType: Kubernetes
execution:
steps:
- step:
type: K8sDryRun
name: Dry Run
identifier: Dry_Run
spec: {}
timeout: 10m
- step:
type: HarnessApproval
name: Approval
identifier: Approval
spec:
approvalMessage: Please review the following information and approve the pipeline progression
includePipelineExecutionHistory: true
isAutoRejectEnabled: false
approvers:
userGroups:
- account._account_all_users
minimumCount: 1
disallowPipelineExecutor: false
approverInputs: []
timeout: 1d
- step:
type: K8sRollingDeploy
name: Rolling Deployment
identifier: RRolling_Deployment
spec:
skipDryRun: <+input>
pruningEnabled: false
timeout: 10m
- step:
type: K8sDelete
name: Cleanup
identifier: Cleanup
spec:
deleteResources:
type: ReleaseName
spec:
deleteNamespace: false
timeout: 10m
rollbackSteps:
- step:
name: Rollback Rollout Deployment
identifier: rollbackRolloutDeployment
type: K8sRollingRollback
timeout: 10m
spec:
pruningEnabled: false
services:
values: <+input>
metadata:
parallel: false
environments:
metadata:
parallel: true
values: <+input>
tags: {}
failureStrategies:
- onFailure:
errors:
- AllErrors
action:
type: StageRollback
- onFailure:
errors:
- AllErrors
action:
type: StageRollback
when:
pipelineStatus: Success
allowStageExecutions: true
```
## Manually performing a deployment in Harness Manager
Depending on the project you have access to and the pipeline you have permissions to, a Harness user can log in and deploy a service using the Harness Manager UI.
Go to the [Harness CD tutorials](/continuous-delivery/troubleshooting-and-resources/tutorials/cd-gitops-tutorials.md) for various deployment types, or go to [Kubernetes deployments](/continuous-delivery/use-continuous-delivery/deploy-services-on-different-platforms/kubernetes/kubernetes-cd-quickstart.md) for a Kubernetes-specific example.
Video overview:
{% embed url="" %}
## Automating deployments with triggers
With Harness triggers, you can start automating your deployments from any location, such as a source repository, an artifact repository, or a third party system.
Any Developer with pipeline create and edit permissions can configure a trigger in Harness. Developers who engage with the trigger's listening source (webhook, artifact repository, etc.) can fire off a trigger.
The following example shows a GitHub webhook trigger automated deployment.
The pipeline trigger in Harness looks like this:

The webhook in GitHub looks like this:
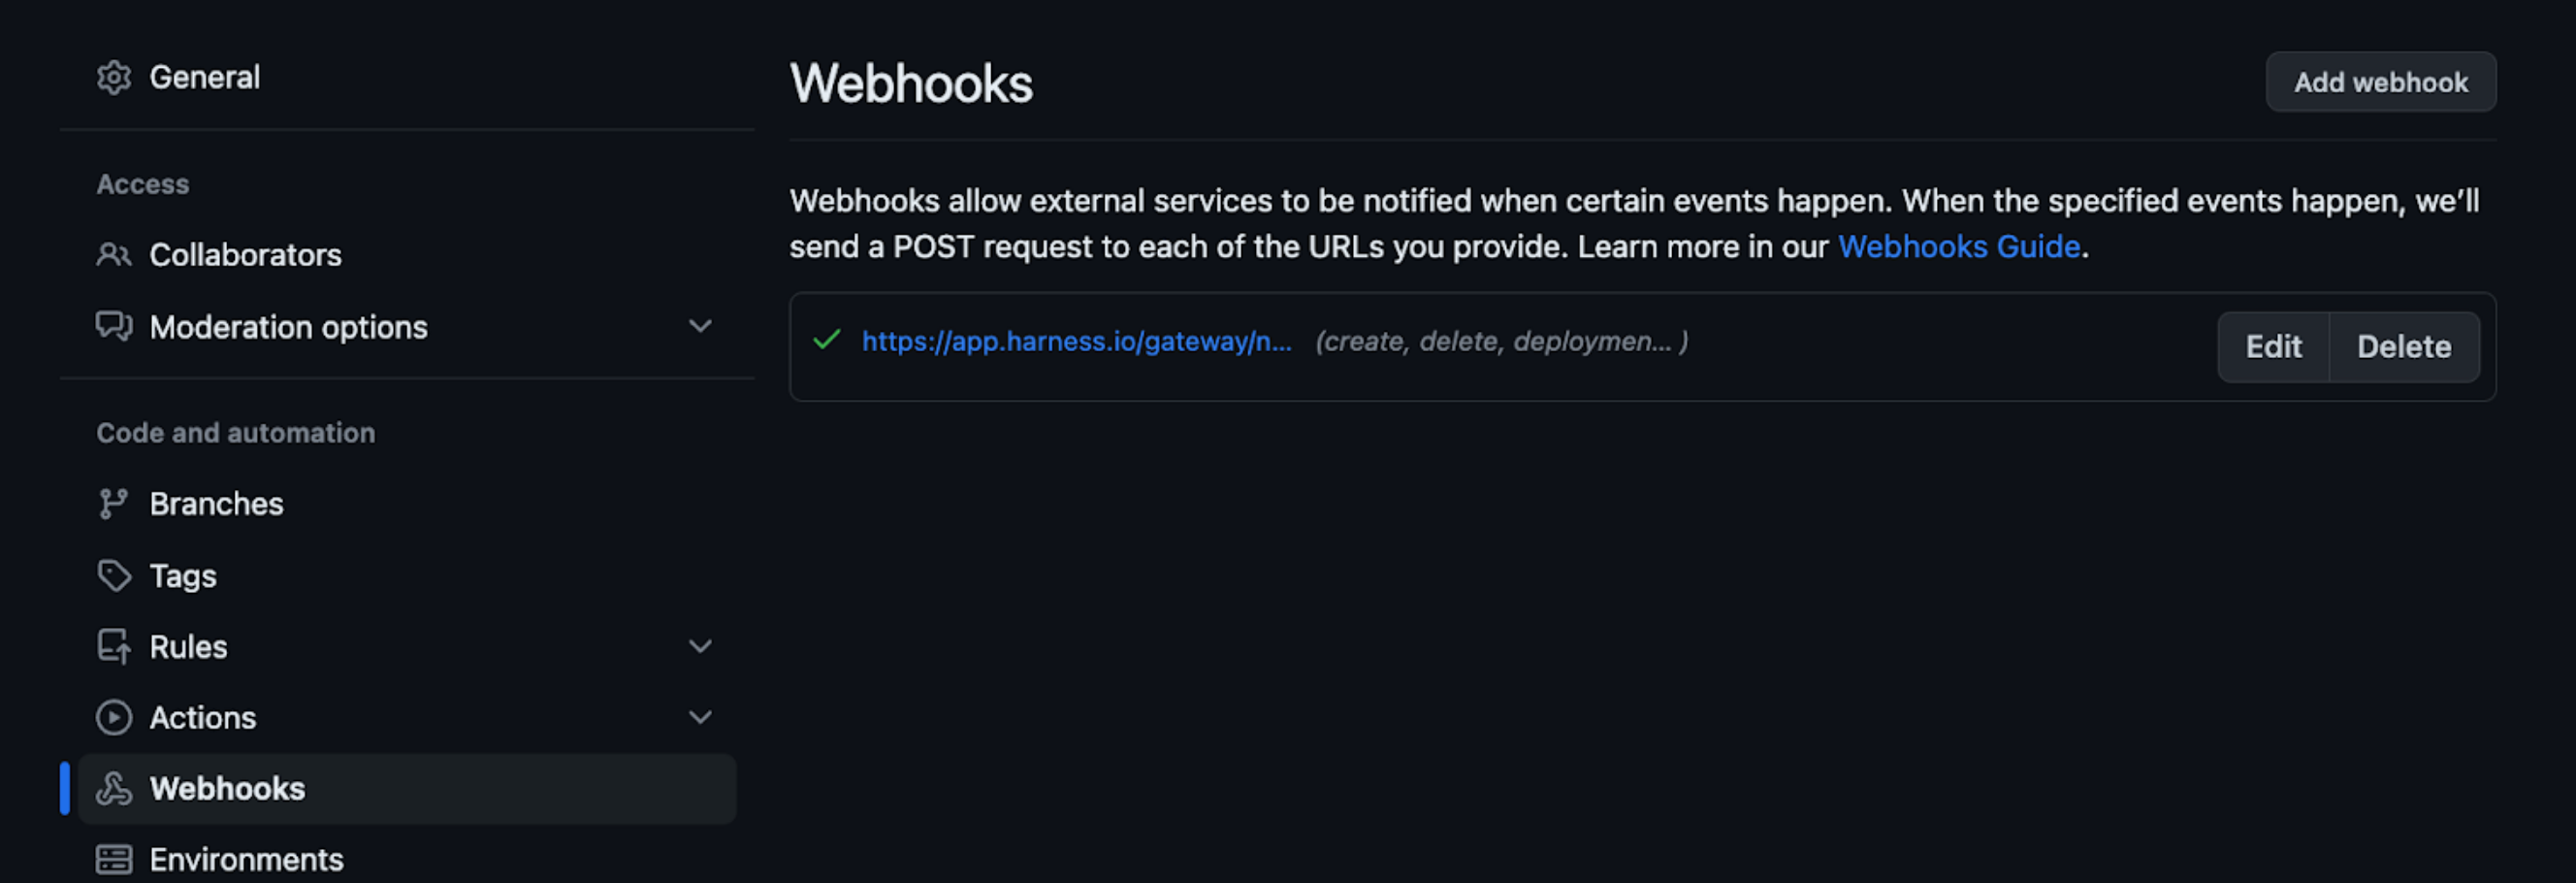
Once the webhook is auto-created in your GitHub repository, Harness receives Git events from the webhook to initiate pipeline execution.
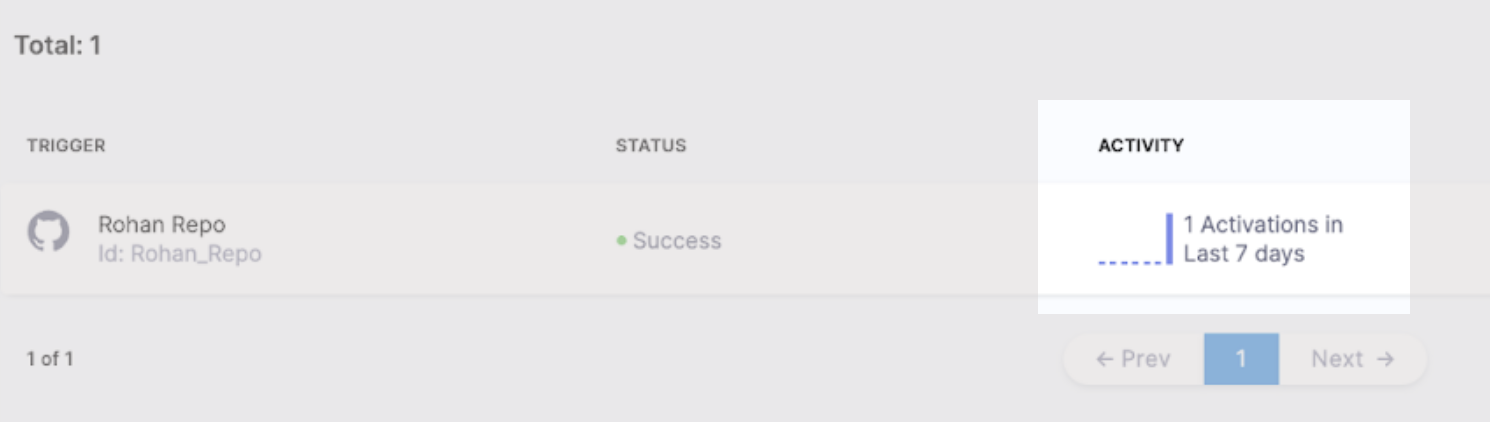
In Harness, the trigger indicates when it was activated.
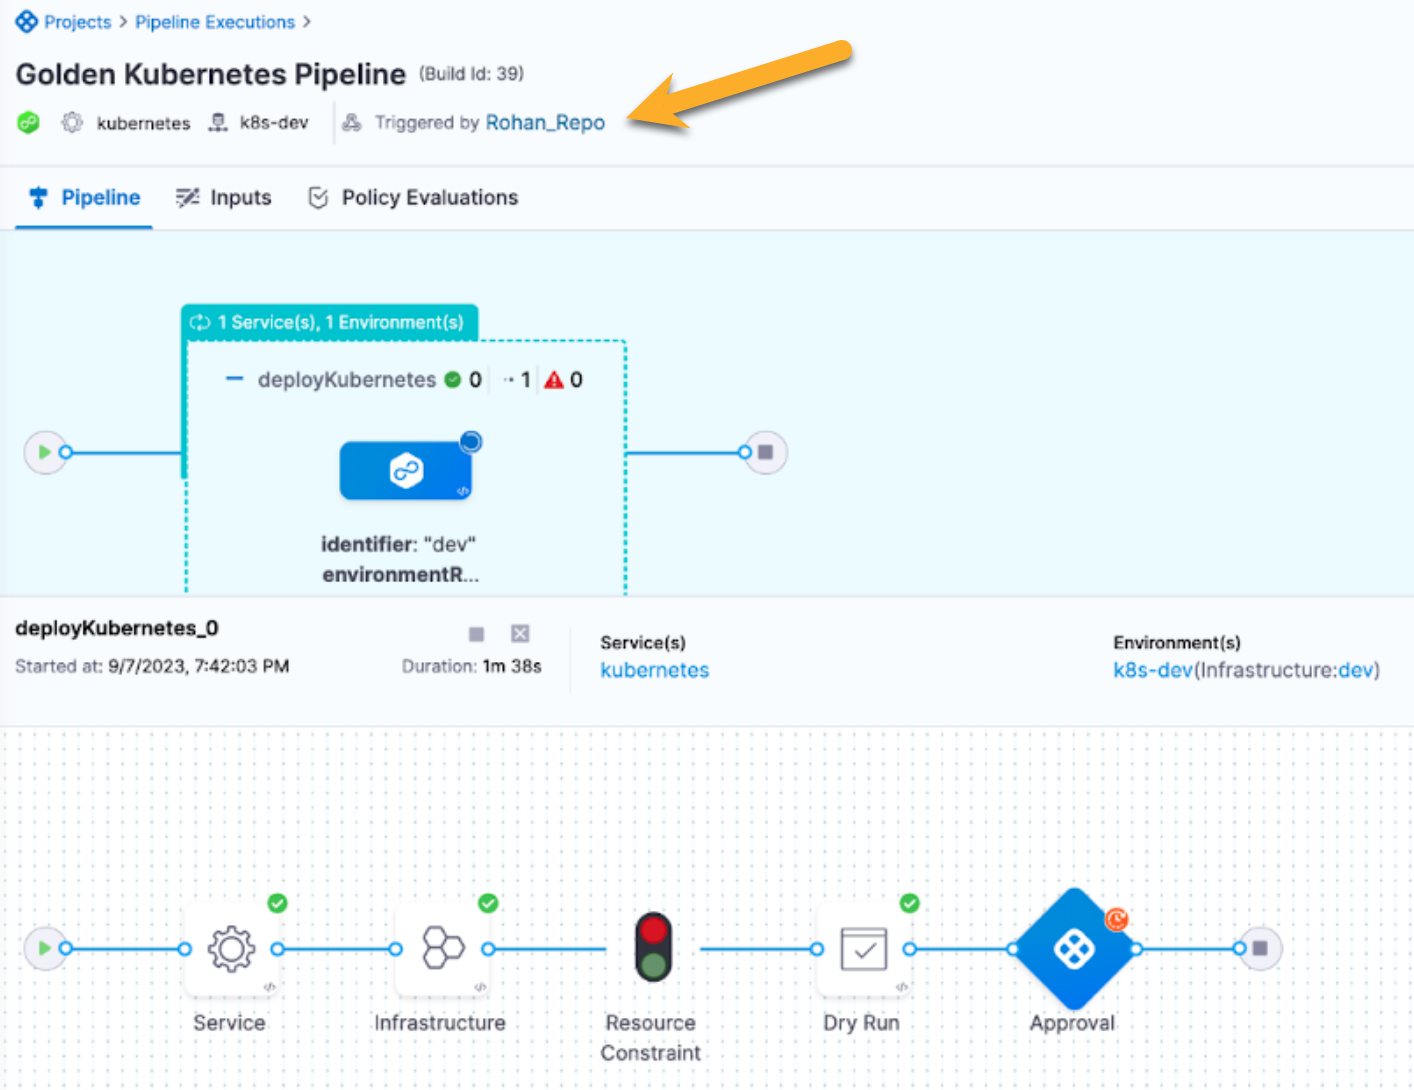
Go to the **Pipeline Executions** page to see the pipeline initiated by the trigger:
For more information, go to [Trigger pipelines using Git events](https://developer.harness.io/docs/platform/triggers/triggering-pipelines).
## Automating deployments using the Harness API
If you are the pipeline executor, you can also initiate pipeline executions via API. The API lets you integrate with any third party system to initiate and pass parameters to a Harness pipeline.
```curl
curl -i -X POST \
'https://app.harness.io/pipeline/api/pipeline/execute/IDENTIFIER/inputSetList?accountIdentifier=string&orgIdentifier=string&projectIdentifier=string&moduleType=string&branch=string&repoIdentifier=string&getDefaultFromOtherRepo=true&useFQNIfError=false¬esForPipelineExecution=' \
-H 'Content-Type: application/json' \
-H 'x-api-key: YOUR_API_KEY_HERE' \
-d '{
"inputSetReferences": [
"string"
],
"withMergedPipelineYaml": true,
"stageIdentifiers": [
"string"
],
"lastYamlToMerge": "string"
}'
```
For more information, go to [Execute a Pipeline with Input Set References](https://apidocs.harness.io/tag/Pipeline-Execute/#operation/postPipelineExecuteWithInputSetList).
## Responding to Harness approvals
Many pipelines have approvals as quality gates. Approvals require developers to review the pipeline's progress to ensure nothing is going wrong.
Depending on your user group and access to the project, you can see the approval action on the Home Screen.
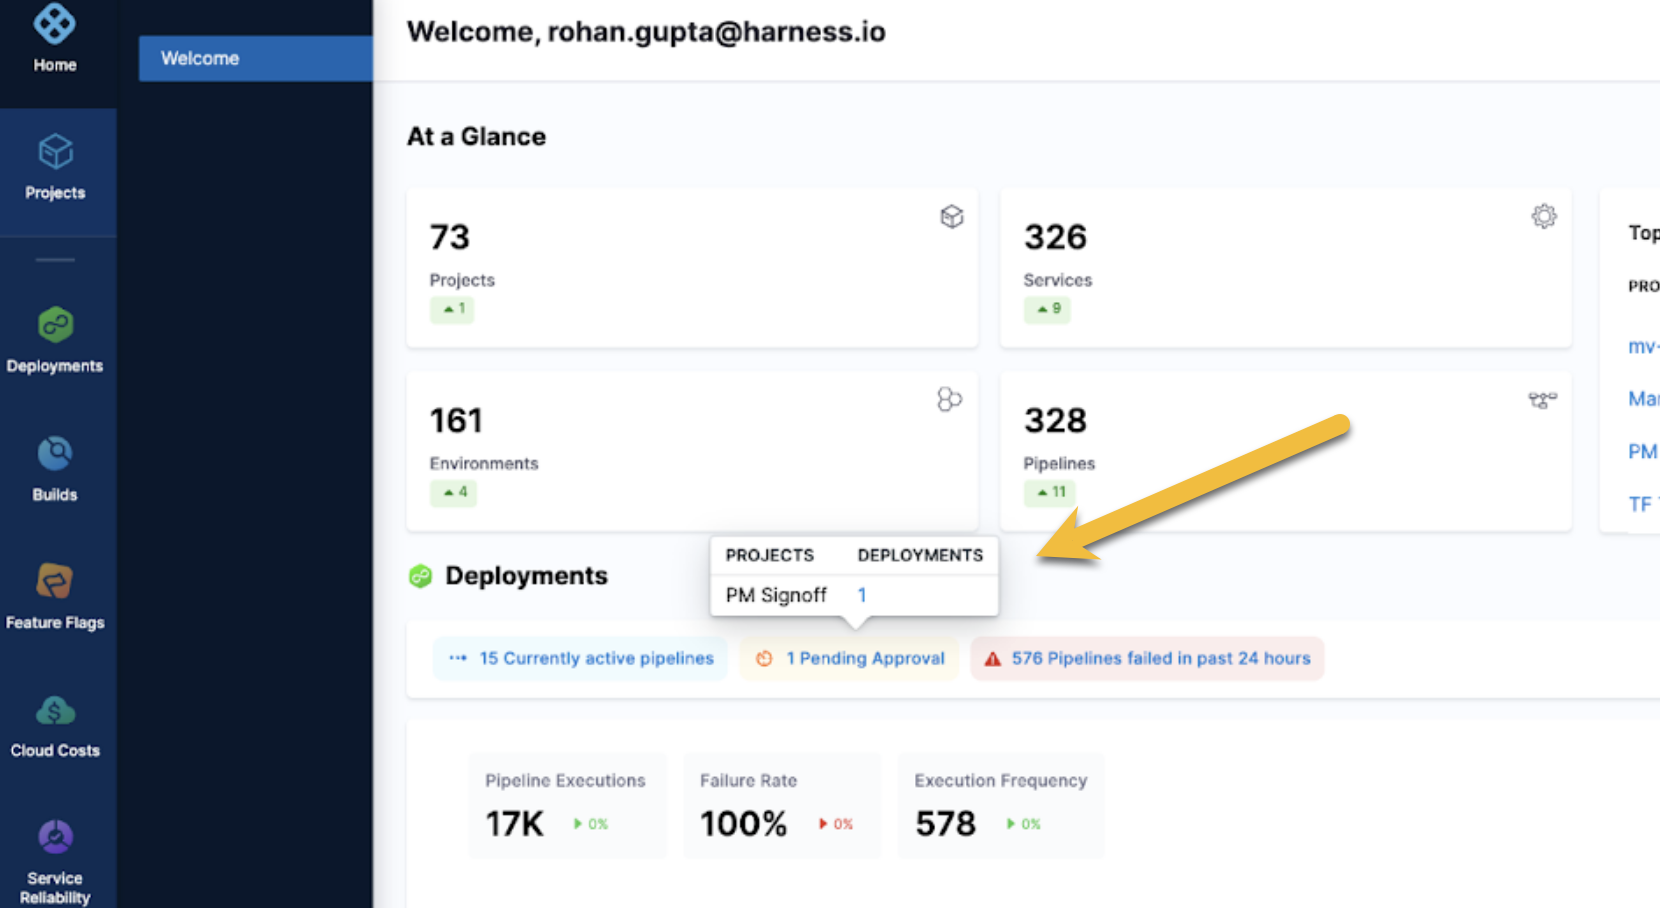
And in the pipeline, you can view and add comments to your approval. This information is stored and logged with the pipeline for auditing.
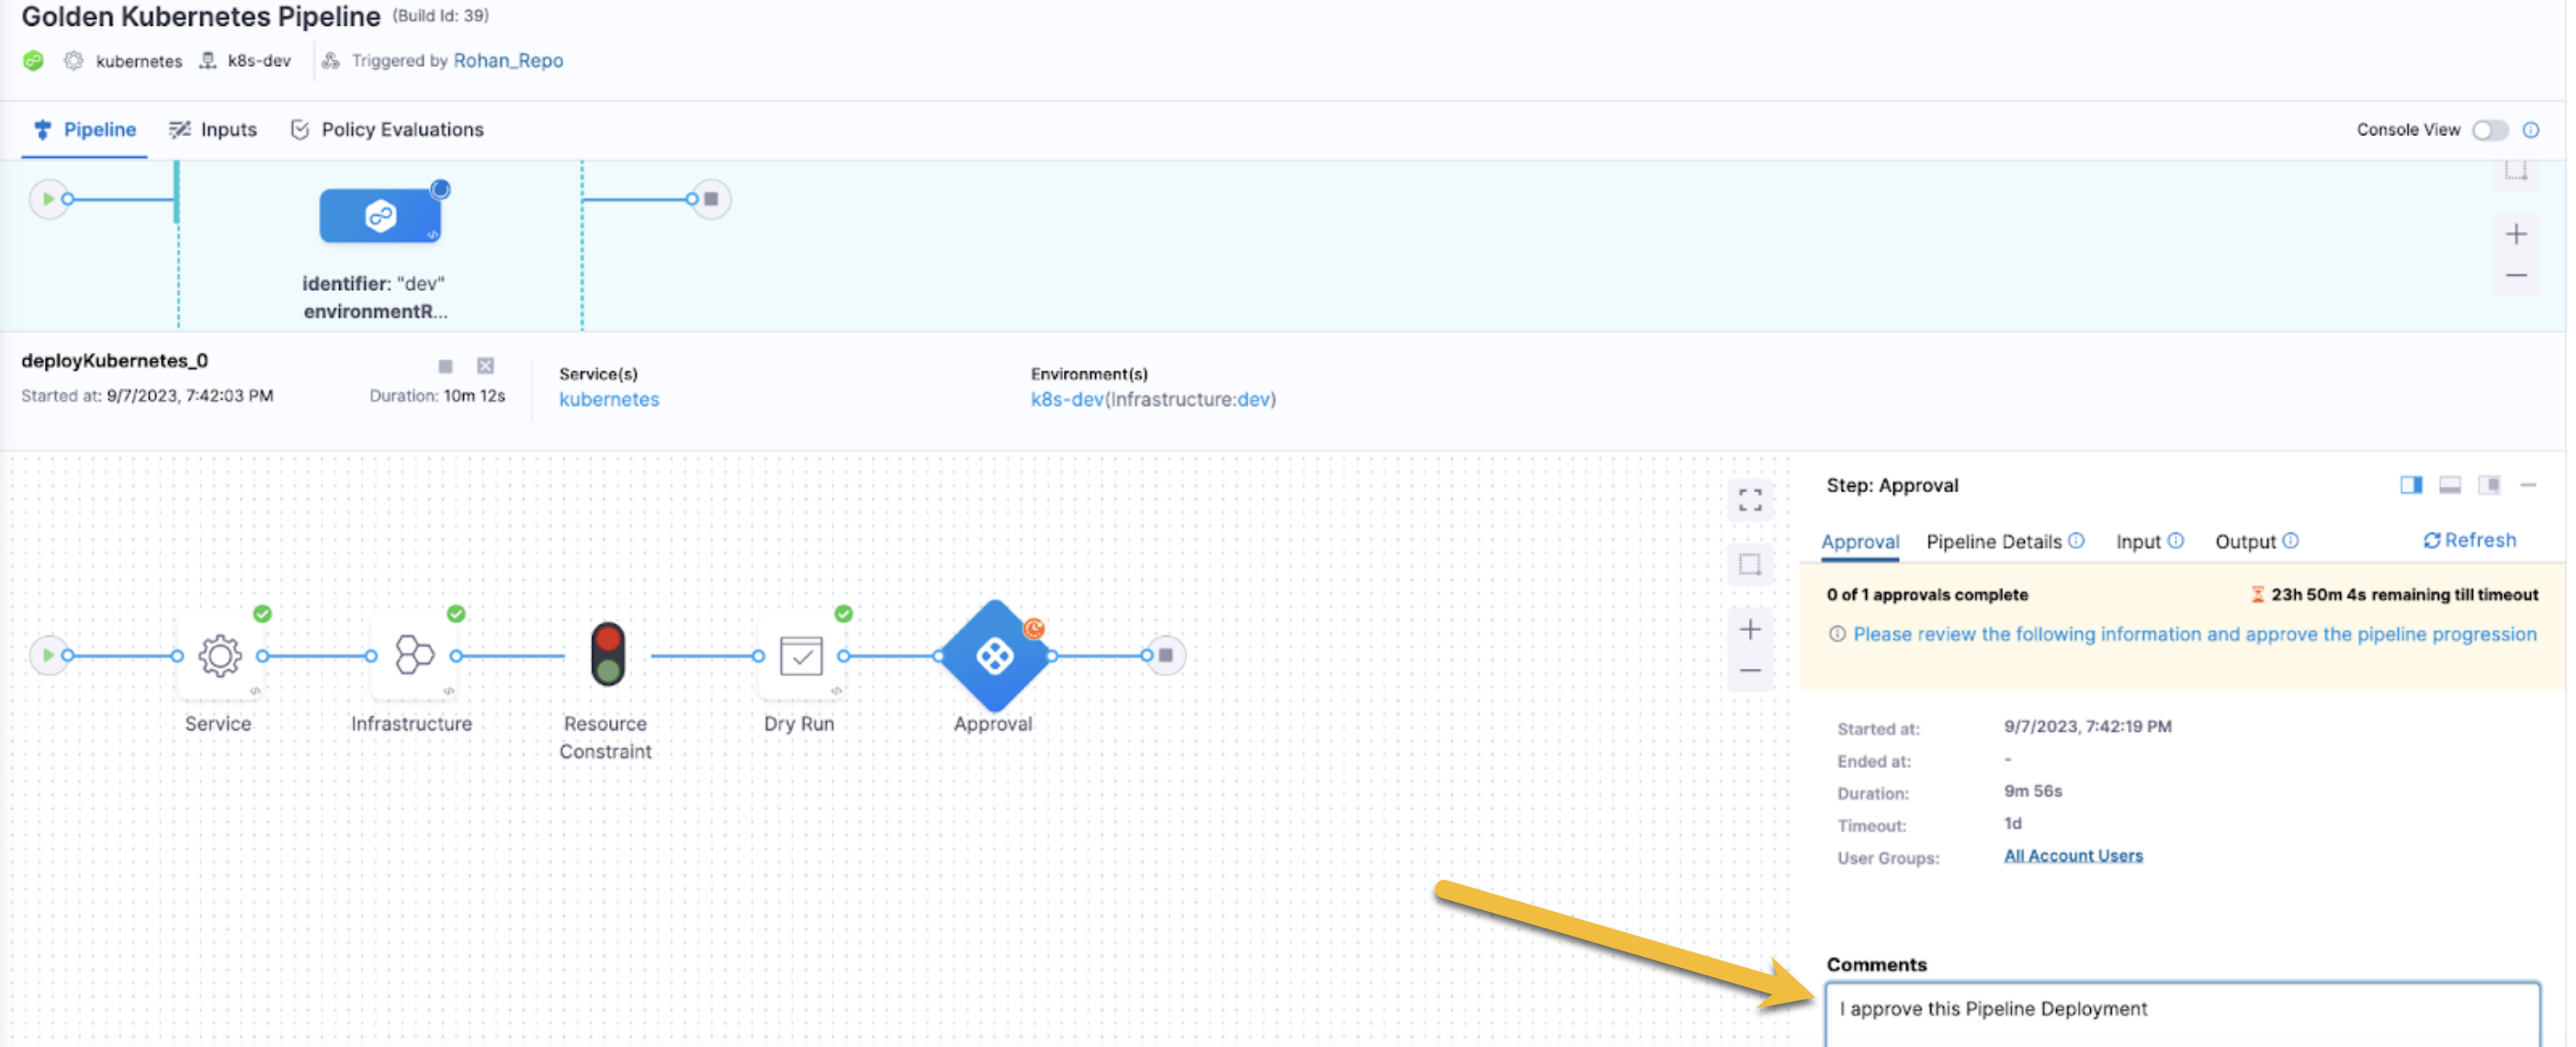
Select **Approve** and the pipeline progresses. If you reject the approval, the pipeline ends and initiates rollback or the [pipeline failure strategy](https://developer.harness.io/docs/platform/pipelines/failure-handling/define-a-failure-strategy-on-stages-and-steps).
For more information, go to [Using manual Harness approval stages](https://developer.harness.io/docs/platform/approvals/adding-harness-approval-stages), the [Approvals tutorial](https://developer.harness.io/docs/platform/approvals/approvals-tutorial), and [Notifications settings](https://developer.harness.io/docs/platform/notifications-alerts-and-banners/notifications/notifications-overview).
## Assigning roles to new team members
If your Harness Administrator has not set up the user groups, roles, and permissions for all your development teams, and if you are a Project Administrator, you can add your teammates to the project yourself.
For more information, go to [Manage users](https://developer.harness.io/docs/platform/platform-access-control/add-users).
## Add pipeline notifications
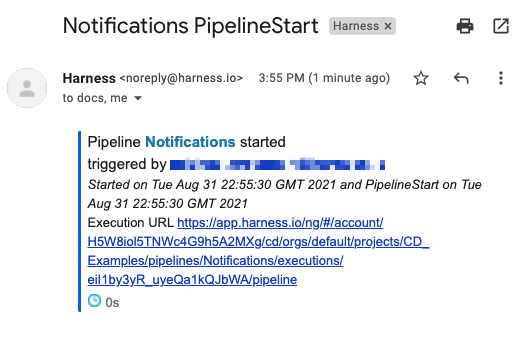
If you are Pipeline Creator or Editor, you can add pipeline notifications to notify yourself and your teammates of deployment progress and status.
Harness integrates with Slack, Webhook, MS Teams, PagerDuty, and Emails. For more information, go to [Notifications settings](https://developer.harness.io/docs/platform/notifications-alerts-and-banners/notifications/notifications-overview).
## Reviewing deployments
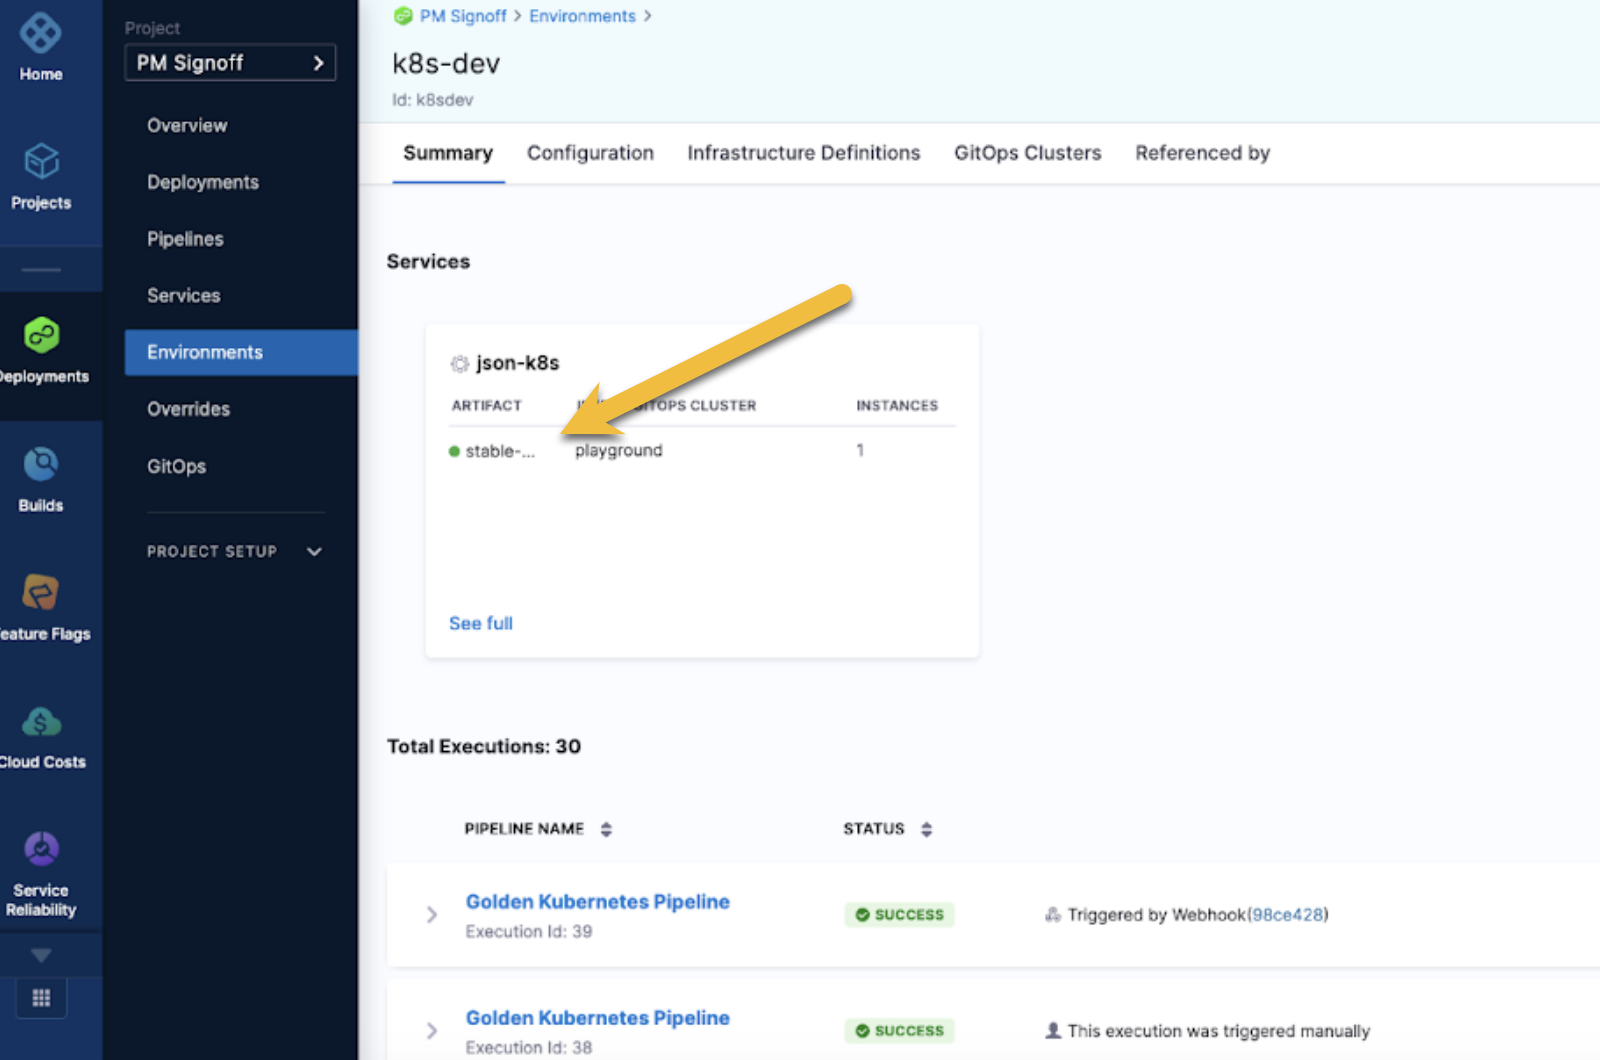
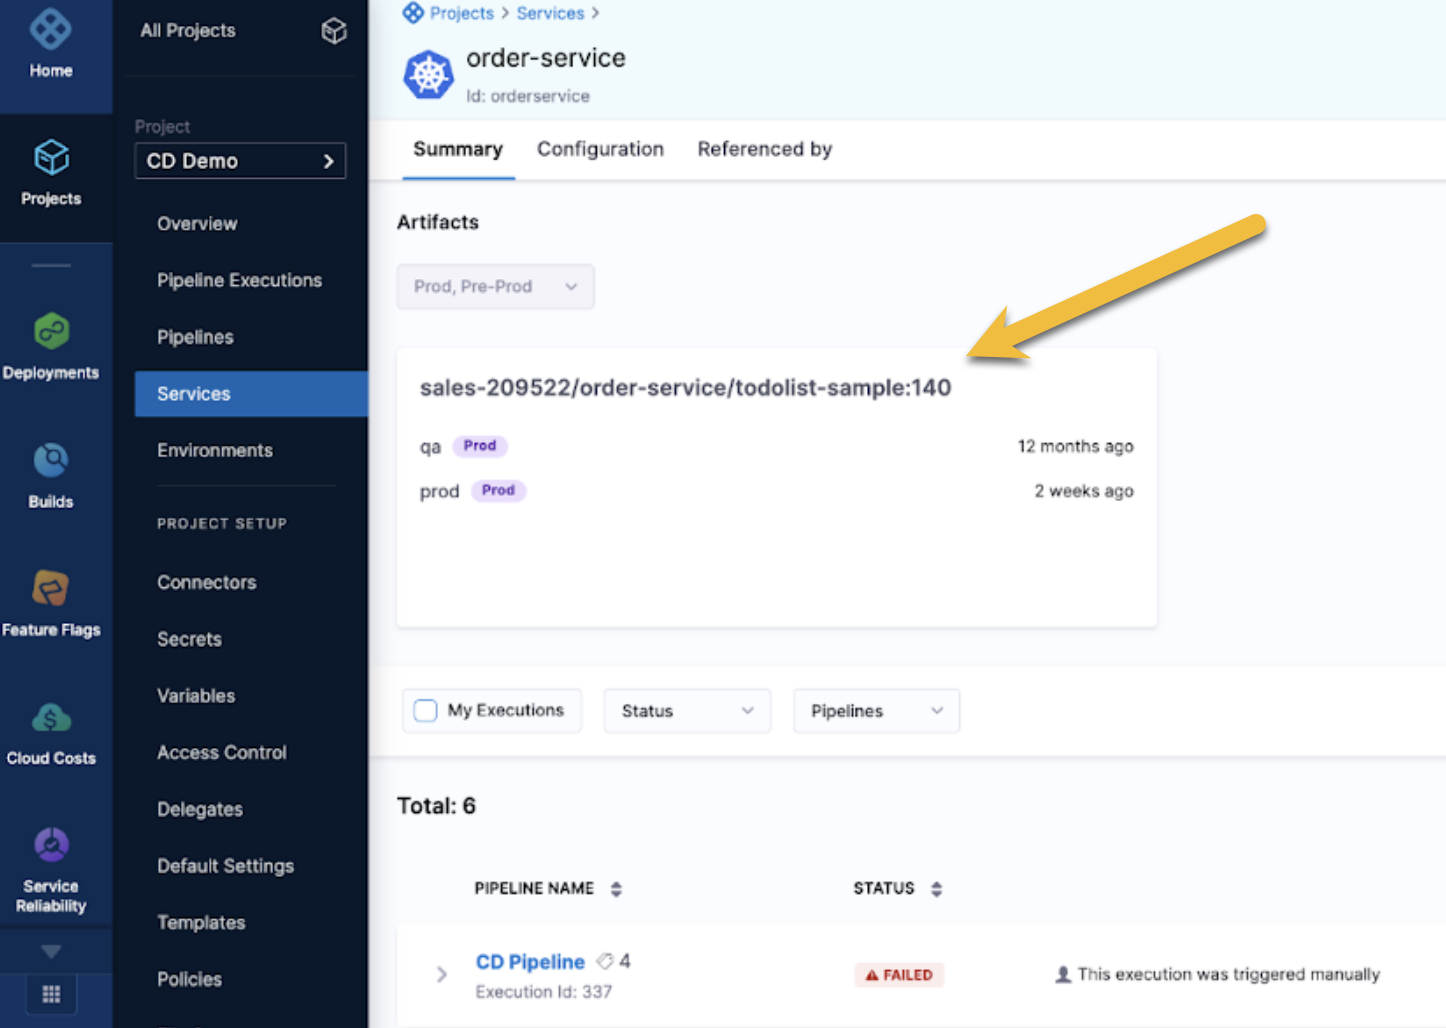
After a deployment occurs, you want to know what was deployed and where, so you can track the version of a service or an artifact across different environments.
For more information, go to [Monitor deployments and services in CD dashboards](/continuous-delivery/use-continuous-delivery/monitor-deployments/monitor-cd-deployments.md).
Go to **Environments** to see an environment. The summary dashboard shows what version of a service is deployed in your environment.
You can also view the same information from a service perspective.
## Conclusion
Thanks for reading this Developer role ramp-up guide. If you have any feedback or suggestions on how to improve it, [reach out to us](mailto:support@harness.io).
## Next steps
* [Harness deployments onboarding path](/continuous-delivery/troubleshooting-and-resources/resources/new-user/onboarding-path.md)
* [CD and GitOps tutorials](/continuous-delivery/troubleshooting-and-resources/tutorials/cd-gitops-tutorials.md)
* [Create services](/continuous-delivery/use-continuous-delivery/cd-building-blocks/services/create-services.md)
* [Monitor CD deployments](/continuous-delivery/use-continuous-delivery/monitor-deployments/monitor-cd-deployments.md)
{% @harness-feedback/feedback %}