> For the complete documentation index, see [llms.txt](https://developer.harness.io/llms.txt). Markdown versions of documentation pages are available by appending `.md` to page URLs; this page is available as [Markdown](https://developer.harness.io/continuous-delivery/troubleshooting-and-resources/tutorials/aws-deployments/aws-lambda.md).
# AWS Lambda serverless deployments
Deploy a Serverless app on AWS Lambda.
This tutorial demonstrates how to deploy on AWS Lambda using Harness Continuous Delivery (CD). We will guide you through deploying a sample function using a Harness pipeline.
{% hint style="info" %}
[Sign up today to unleash the potential of intelligent Harness CD](https://app.harness.io/auth/#/signup/?module=cd\&utm_source=website\&utm_medium=harness-developer-hub\&utm_campaign=cd-plg\&utm_content=tutorials-cd-serverless-aws-lambda).
{% endhint %}
{% tabs %}
{% tab title="Serverless.com Infrastructure" %}
### Before you begin
Verify the following:
1. **Obtain GitHub personal access token with the repo scope**. For the GitHub documentation, go to [creating a personal access token](https://help.github.com/en/github/authenticating-to-github/creating-a-personal-access-token-for-the-command-line).
2. **Docker**. For this tutorial ensure that you have the Docker runtime installed on your Harness Delegate host. If not, use one of the following options to install Docker:
* [Docker for Mac](https://docs.docker.com/desktop/install/mac-install/)
* [Docker for CentOS](https://docs.docker.com/engine/install/centos/)
* [Docker for Ubuntu](https://docs.docker.com/engine/install/ubuntu/)
* [Docker for Debian](https://docs.docker.com/engine/install/debian/)
* [Docker for Windows](https://docs.docker.com/desktop/install/windows-install/)
* Check [Delegate system requirements](/harness-ai/use-harness-platform/delegates/delegate/delegate-concepts/delegate-requirements.md).
3. **Fork the** [**harnesscd-example-apps**](https://github.com/harness-community/harnesscd-example-apps/fork) repository through the GitHub website.
* For more information on forking a GitHub repository, go to [GitHub docs](https://docs.github.com/en/get-started/quickstart/fork-a-repo#forking-a-repository).
4. **AWS user account with required policy:** Serverless deployments require an AWS user account with specific AWS permissions, as described in [AWS Credentials](https://www.serverless.com/framework/docs/providers/aws/guide/credentials) from Serverless.com. To create the AWS user, do the following in AWS IAM:
* Select **Users**, and then **Add user**. Enter a name. Enable **Programmatic access** by selecting the checkbox. Select **Next** to go to the **Permissions** page. Do one of the following:
* **Full Admin Access:** select **Attach existing policies directly**. Search for and select **AdministratorAccess** then select **Next: Review**. Check to make sure everything looks good and select **Create user**.
* **Limited Access:** select **Create policy**. Select the **JSON tab**, and add the JSON from the [Serverless gist: IAMCredentials.json](https://gist.github.com/ServerlessBot/7618156b8671840a539f405dea2704c8#file-iamcredentials-json).
#### Supported platforms and versions
* Harness supports Serverless framework 1.82 and later.
* Harness supports Serverless framework CLI versions 2.x.x and 3.x.x.
* Harness supports all language runtimes that Serverless supports.
* Harness supports ZIP files and Docker image artifacts only.
* ZIP files are supported with JFrog Artifactory.
* Docker images are supported with AWS ECR.
### Getting Started with Harness CD
1. Log into [Harness](https://app.harness.io/).
2. Select **Projects** and choose **Default Project**.
{% hint style="warning" %}
Going forward, follow all the steps as they are, including the naming conventions, for the pipeline to run successfully.
{% endhint %}
### Delegate What is the Harness Delegate?
The Harness Delegate is a service that runs in your local network or VPC to establish connections between the Harness Manager and various providers such as artifacts registries, cloud platforms, etc. The delegate is installed in the target infrastructure, for example, a Kubernetes cluster, and performs operations including deployment and integration. Learn more about the delegate in the [Delegate Overview](/harness-ai/use-harness-platform/delegates/delegate/delegate-concepts/delegate-overview.md).
1. Under **Project Setup**, select **Delegates**.
2. In **Delegates Setup**, select **Install new Delegate**. The delegate wizard appears.
3. In **New Delegate**, in **Select where you want to install your Delegate**, select **Docker**.
4. Enter the delegate name, `harness-aws-lambda-delegate`.
Now you can install the delegate by using the command that appears on your installation wizard. The command is prefilled with the information for the environment variables in the example below.
```bash
docker run --cpus=1 --memory=2g \
-e DELEGATE_NAME=harness-serverless-delegate \
-e NEXT_GEN="true" \
-e DELEGATE_TYPE="DOCKER" \
-e ACCOUNT_ID= YOUR_HARNESS_ACCOUNTID \
-e DELEGATE_TOKEN=YOUR_DELEGATE_TOKEN \
-e MANAGER_HOST_AND_PORT=YOUR_MANAGER_HOST_AND_PORT \
DELEGATE_IMAGE:TAG
```
{% hint style="info" %}
Replace `DELEGATE_IMAGE:TAG` with the custom delegate image `harnesscommunity/serverless-delegate:latest`. This image has the Serverless.com framework installed.
{% endhint %}
#### Verify delegate connectivity
1. Select **Continue**. After the health checks passes, your delegate is available to use.
2. Select **Done** and verify your new delegate is listed.
### Secrets What are Harness secrets?
Harness offers built-in secret management for encrypted storage of sensitive information. Secrets are decrypted when needed, and only the private network-connected Harness Delegate has access to the key management system. You can also integrate your own secret manager. To learn more about secrets in Harness, go to [Harness Secret Manager Overview](/harness-ai/use-harness-platform/secrets/secrets-management/harness-secret-manager-overview.md).
#### Github secret
1. Under **Project Setup**, select **Secrets**.
2. Select **New Secret**, and then select **Text**.
3. Enter the secret name `harness_gitpat`.
4. For the secret value, paste the GitHub personal access token you saved earlier.
5. Select **Save**.
#### AWS secret
1. Select **New Secret**, and then select **Text**.
2. Enter the secret name `awssecret`.
3. For the secret value, paste the access token for your AWS user account. The Harness Delegate uses this credential to authenticate Harness with AWS at deployment runtime.
4. Select **Save**.
{% tabs %}
{% tab title="UI" %}
### Connectors What are connectors?
Connectors in Harness enable integration with 3rd party tools, providing authentication for operations during pipeline runtime. For instance, a GitHub connector facilitates authentication and fetching files from a GitHub repository within pipeline stages. For more details, go to [Connectors](/harness-ai/use-harness-platform/connectors.md).
1. Create the **GitHub connector**.
1. Copy the contents of [github-connector.yml](https://github.com/harness-community/harnesscd-example-apps/blob/master/serverless-lambda/harnesscd-pipeline/github-connector.yml).
2. In your Harness project in the Harness Manager, under **Project Setup**, select **Connectors**.
3. Select **Create via YAML Builder** and paste the copied YAML.
4. Assuming you have already forked the [harnesscd-example-apps](https://github.com/harness-community/harnesscd-example-apps/fork) repository mentioned earlier, replace `GITHUB_USERNAME` in the YAML with your GitHub account username.
5. In `projectIdentifier`, replace with the project identifier with yours, for example, `default`.
6. Select **Save Changes** and verify that the new connector named **harness\_gitconnector** is successfully created.
7. Finally, select **Connection Test** under **Connectivity Status** to ensure the connection is successful.
2. Create the **AWS Connector**.
1. Copy the contents of [aws-connector.yml](https://github.com/harness-community/harnesscd-example-apps/blob/master/serverless-lambda/harnesscd-pipeline/aws-connector.yml).
2. In your Harness project in the Harness Manager, under **Project Setup**, select **Connectors**.
3. Select **Create via YAML Builder** and paste the copied YAML.
4. Assuming you have already forked the [harnesscd-example-apps](https://github.com/harness-community/harnesscd-example-apps/fork) repository mentioned earlier, replace `crossAccountRoleArn` in the YAML with your AWS role's ARN.
5. Replace the `accessKey` placeholder with the [AWS access key](https://docs.aws.amazon.com/powershell/latest/userguide/pstools-appendix-sign-up.html) for the AWS user you created (with the required policies).
6. Here we assume the `region` for secret key to be `us-east-1`. Please replace it with the appropriate region.
7. In `projectIdentifier`, replace with the project identifier with yours, for example, `default`.
8. Select **Save Changes** and verify that the new connector named **harness\_awsconnector** is successfully created.
9. Finally, select **Connection Test** under **Connectivity Status** to ensure the connection is successful.
### Environment What are Harness environments?
Environments define the deployment location, categorized as **Production** or **Pre-Production**. Each environment includes infrastructure definitions for serverless functions, VMs, Kubernetes clusters, or other target infrastructures. To learn more about environments, go to [Environments overview](/continuous-delivery/use-continuous-delivery/cd-building-blocks/environments/environment-overview.md).
1. In your Harness project, select **Environments**.
1. Select **New Environment**, and then select **YAML**.
2. Copy the contents of [environment.yml](https://github.com/harness-community/harnesscd-example-apps/blob/master/serverless-lambda/harnesscd-pipeline/environment.yml), paste it into the YAML editor, and select **Save**.
3. In your new environment, select the **Infrastructure Definitions** tab.
4. Select **Infrastructure Definition**, and then select **YAML**.
5. Copy the contents of [infrastructure-definition.yml](https://github.com/harness-community/harnesscd-example-apps/blob/master/serverless-lambda/harnesscd-pipeline/infrastructure-definition.yml) and paste it into the YAML editor.
6. Select **Save** and verify that the environment and infrastructure definition are created successfully.
### Services What are Harness services?
In Harness, services represent what you deploy to environments. You use services to configure variables, manifests, functions, and artifacts. The **Services** dashboard provides service statistics like deployment frequency and failure rate. To learn more about services, go to [Services overview](/continuous-delivery/use-continuous-delivery/cd-building-blocks/services/services-overview.md).
1. In your Harness project, select **Services**.
1. Select **New Service**.
2. Enter the name `harnessserverless`.
3. Select **Save**, and then **YAML** (on the **Configuration** tab).
4. Select **Edit YAML**, copy the contents of [service.yml](https://github.com/harness-community/harnesscd-example-apps/blob/master/serverless-lambda/harnesscd-pipeline/service.yml), and paste the into the YAML editor.
5. Select **Save** and verify that the service **harness\_serverless** is successfully created.
### Pipeline What are Harness pipelines?
A pipeline is a comprehensive process encompassing integration, delivery, operations, testing, deployment, and monitoring. It can utilize CI for code building and testing, followed by CD for artifact/function deployment in production. A CD pipeline is a series of stages where each stage deploys a service to an environment. To learn more about CD pipeline basics, go to [CD pipeline basics](/continuous-delivery/new-to-continuous-delivery/overview.md#pipeline).
1. In your Harness project, select **Pipelines**.
1. Select **Create a Pipeline**.
2. Enter the name `serverless_pipeline`.
3. Choose **Inline** to store the pipeline in Harness.
4. Select **Start**.
5. In **Pipeline Studio**, select **YAML**.
6. Select **Edit YAML** and paste in the YAML in the next section.
### Deploy AWS Lambda using Serverless.com Framework
1. Copy the contents of [serverless-pipeline.yml](https://github.com/harness-community/harnesscd-example-apps/blob/master/serverless-lambda/harnesscd-pipeline/serverless-deployment.yml).
2. In your Harness pipeline YAML editor, paste the YAML.
3. Select **Save**.
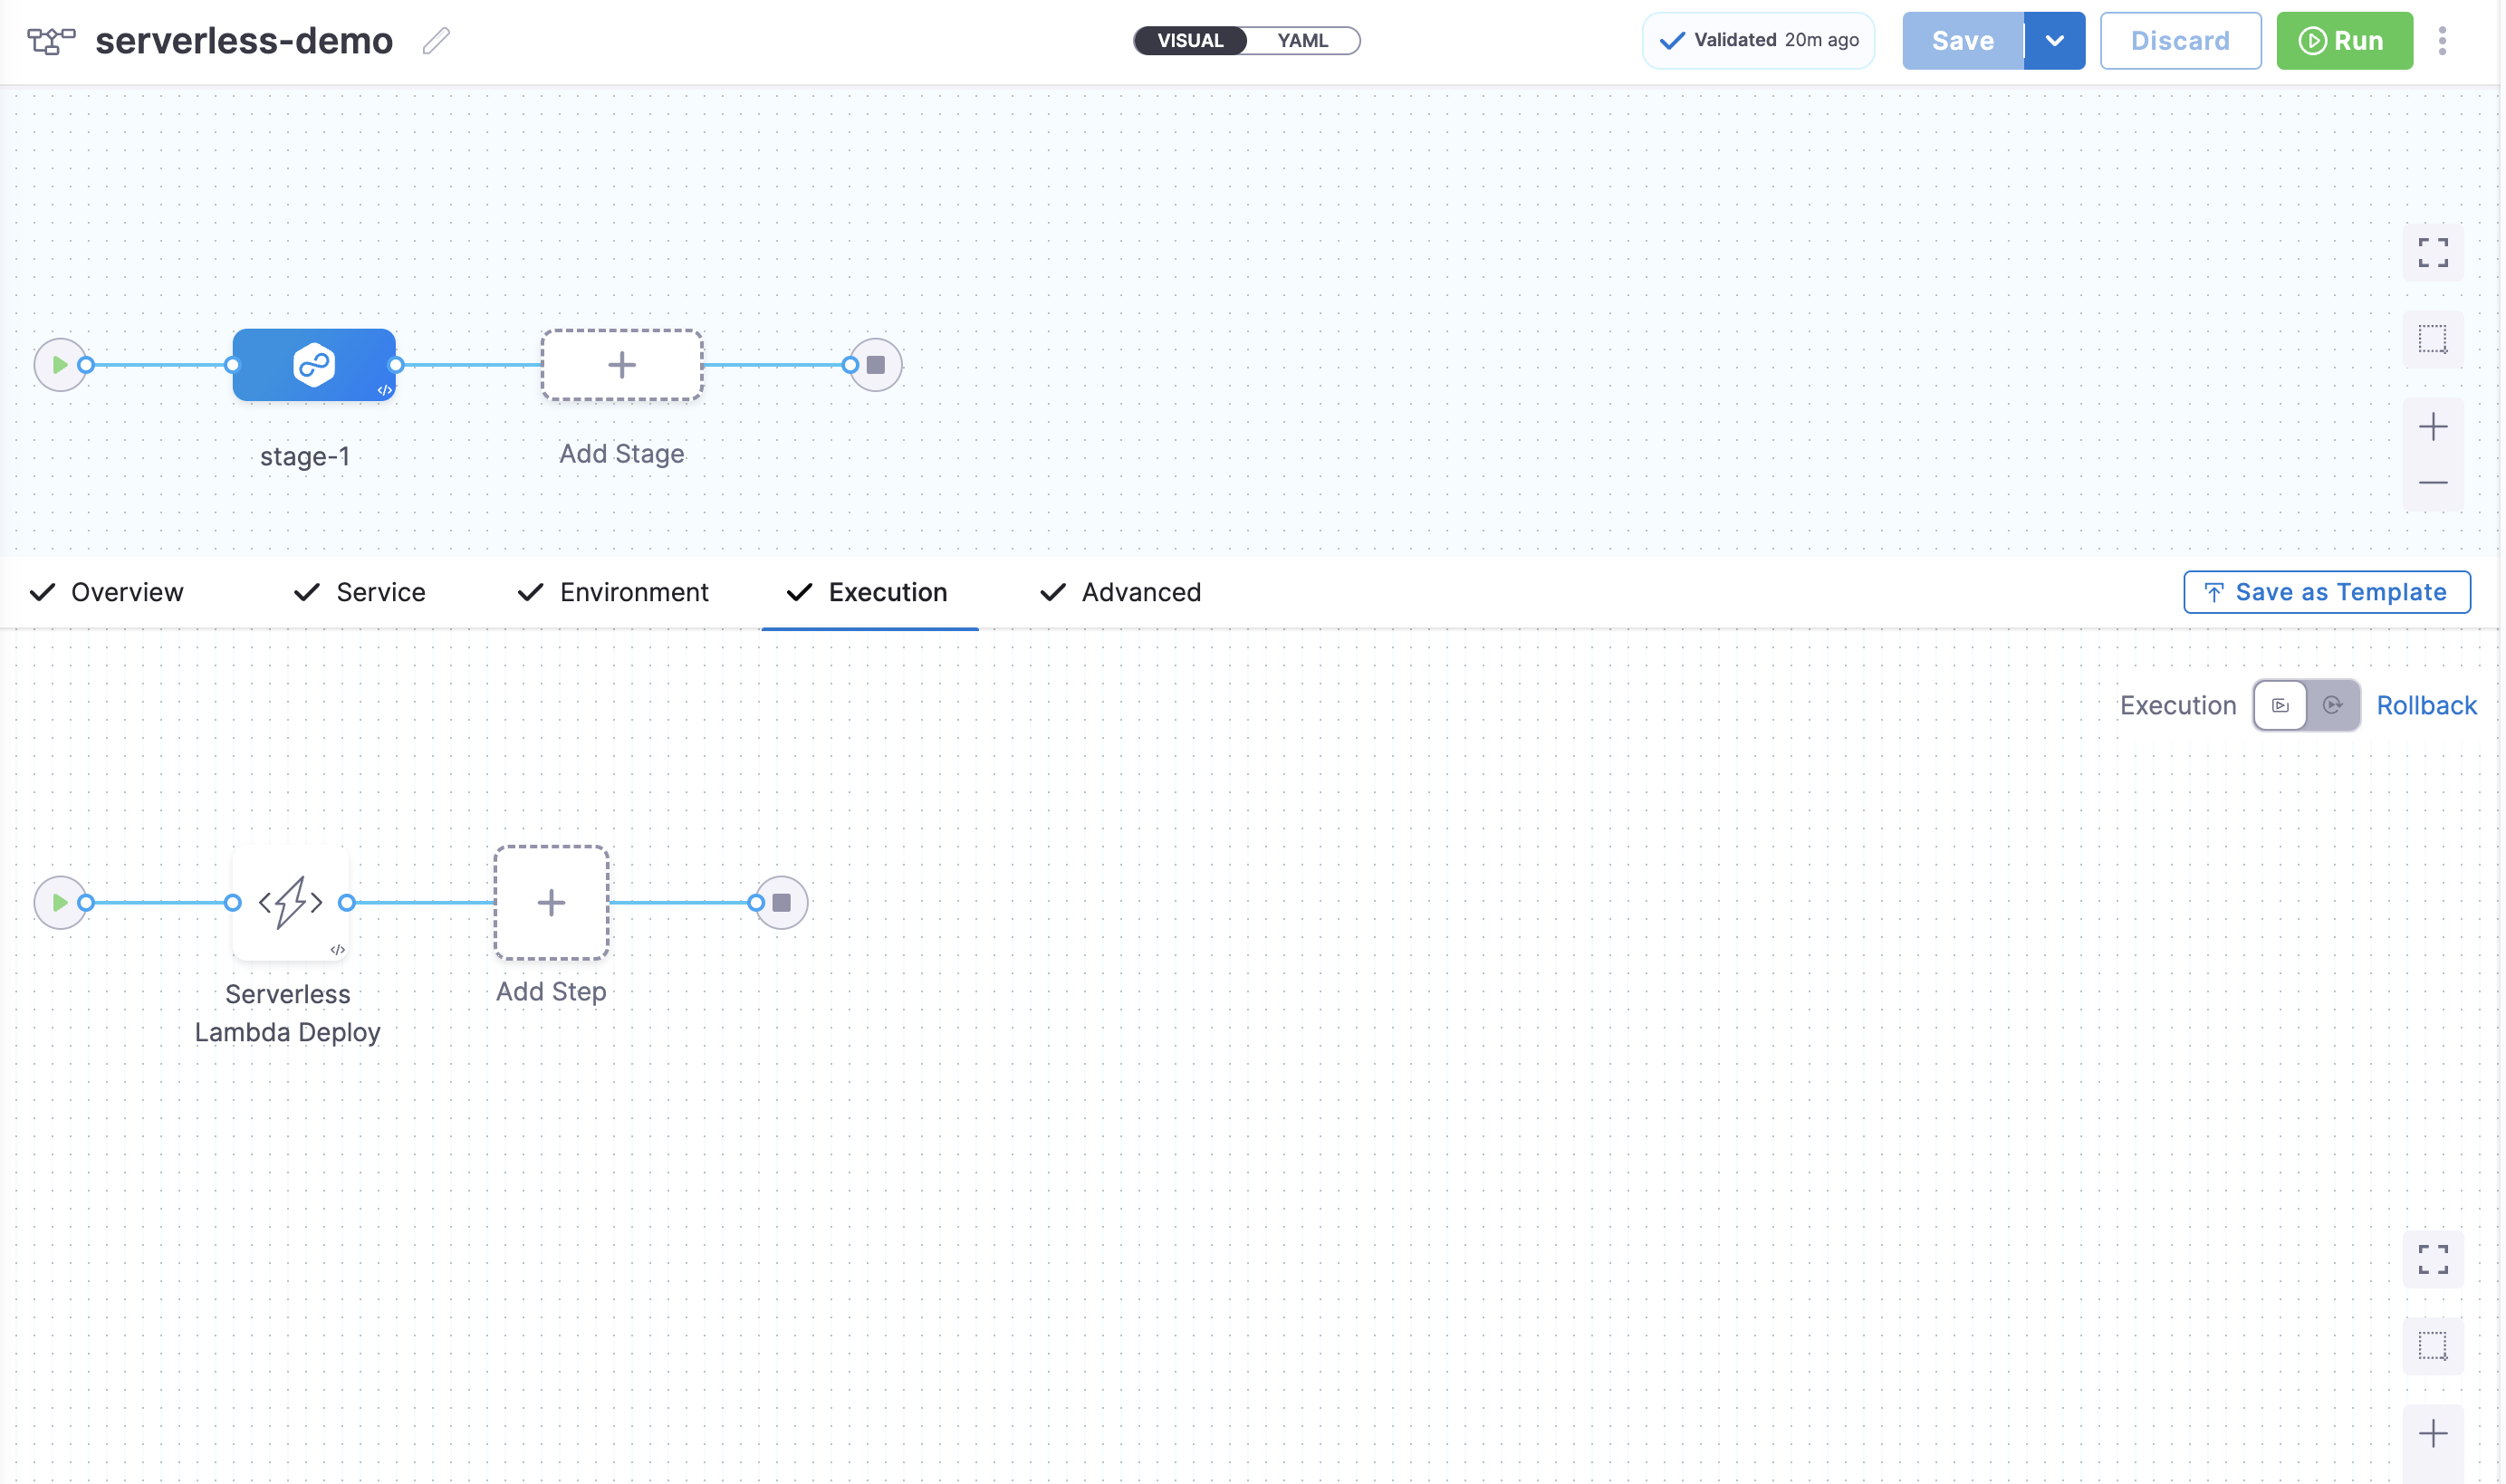
You can switch to the **Visual** pipeline editor and confirm the pipeline stage and execution steps as shown below.
4. Finally, it's time to execute the pipeline. Select **Run**, and then select **Run Pipeline** to initiate the deployment.
Observe the execution logs as Harness deploys the function.
{% endtab %}
{% tab title="CLI" %}
1. Download and configure the Harness CLI.
{% tabs %}
{% tab title="MacOS" %}
```bash
curl -LO https://github.com/harness/harness-cli/releases/download/v0.0.25-Preview/harness-v0.0.25-Preview-darwin-amd64.tar.gz
tar -xvf harness-v0.0.25-Preview-darwin-amd64.tar.gz
export PATH="$(pwd):$PATH"
echo 'export PATH="'$(pwd)':$PATH"' >> ~/.bash_profile
source ~/.bash_profile
harness --version
```
{% endtab %}
{% tab title="Linux" %}
{% tabs %}
{% tab title="ARM" %}
```bash
curl -LO https://github.com/harness/harness-cli/releases/download/v0.0.25-Preview/harness-v0.0.25-Preview-linux-arm64.tar.gz
tar -xvf harness-v0.0.25-Preview-linux-arm64.tar.gz
```
{% endtab %}
{% tab title="AMD" %}
```bash
curl -LO https://github.com/harness/harness-cli/releases/download/v0.0.25-Preview/harness-v0.0.25-Preview-linux-amd64.tar.gz
tar -xvf harness-v0.0.25-Preview-linux-amd64.tar.gz
```
{% endtab %}
{% endtabs %}
{% endtab %}
{% tab title="Windows" %}
```
a. Open Windows Powershell and run the command below to download the Harness CLI.
```
```
Invoke-WebRequest -Uri https://github.com/harness/harness-cli/releases/download/v0.0.25-Preview/harness-v0.0.25-Preview-windows-amd64.zip -OutFile ./harness.zip
```
````
b. Extract the downloaded zip file and change the directory to extracted file location.
c. Follow the steps below to make it accessible via terminal.
```
$currentPath = Get-Location
[Environment]::SetEnvironmentVariable("PATH", "$env:PATH;$currentPath", [EnvironmentVariableTarget]::Machine)
```
d. Restart terminal.
````
{% endtab %}
{% endtabs %}
2. Clone the forked **harnesscd-example-apps** repo and change directory.
```bash
git clone https://github.com/GITHUB_ACCOUNTNAME/harnesscd-example-apps.git
cd harnesscd-example-apps
```
Replace GITHUB_ACCOUNTNAME with your GitHub account name.
3. Log in to Harness from the CLI.
```bash
harness login --api-key --account-id HARNESS_API_TOKEN
```
Replace HARNESS_API_TOKEN with Harness API token that you obtained during the prerequisite section of this tutorial.
### Connectors What are connectors?
Connectors in Harness enable integration with 3rd party tools, providing authentication for operations during pipeline runtime. For instance, a GitHub connector facilitates authentication and fetching files from a GitHub repository within pipeline stages. For more details, go to [Connectors](/harness-ai/use-harness-platform/connectors.md).
1. Create the **GitHub connector**.
1. Replace **DELEGATE\_NAME** under delegate selectors with the Delegate name.
2. In `projectIdentifier`, verify that the project identifier is correct. You can see the Id in the browser URL (after `account`). If it is incorrect, the Harness YAML editor will suggest the correct Id.
3. Now create the **GitHub connector** using the following CLI command:
```
harness connector --file "/serverless-lambda/harnesscd-pipeline/github-connector.yml" apply
```
2. Create the **AWS connector**.
1. In `projectIdentifier`, verify that the project identifier is correct. You can see the Id in the browser URL (after `account`). If it is incorrect, the Harness YAML editor will suggest the correct Id.
2. Now create the **AWS connector** using the following CLI command:
```
harness connector --file "/serverless-lambda/harnesscd-pipeline/aws-connector.yml" apply
```
### Environment What are Harness environments?
Environments define the deployment location, categorized as **Production** or **Pre-Production**. Each environment includes infrastructure definitions for serverless functions, VMs, Kubernetes clusters, or other target infrastructures. To learn more about environments, go to [Environments overview](/continuous-delivery/use-continuous-delivery/cd-building-blocks/environments/environment-overview.md).
1. Use the following CLI command to create an environment in your Harness project:
```
harness environment --file "/serverless-lambda/harnesscd-pipeline/environment.yml" apply
```
2. In your new environment, add an **Infrastructure Definitions** using the following CLI command:
```
harness infrastructure --file "/serverless-lambda/harnesscd-pipeline/infrastructure-definition.yml" apply
```
### Services What are Harness services?
In Harness, services represent what you deploy to environments. You use services to configure variables, manifests, functions, and artifacts. The **Services** dashboard provides service statistics like deployment frequency and failure rate. To learn more about services, go to [Services overview](/continuous-delivery/use-continuous-delivery/cd-building-blocks/services/services-overview.md).
1. Use the following CLI command to create a service in your Harness project.
```
harness service -file "/serverless-lambda/harnesscd-pipeline/service.yml" apply
```
### Deploy AWS Lambda using Serverless.com Framework What are Harness pipelines?
A pipeline is a comprehensive process encompassing integration, delivery, operations, testing, deployment, and monitoring. It can utilize CI for code building and testing, followed by CD for artifact/function deployment in production. A CD pipeline is a series of stages where each stage deploys a service to an environment. To learn more about CD pipeline basics, go to [CD pipeline basics](/continuous-delivery/new-to-continuous-delivery/overview.md#pipeline).
1. Use this CLI command to create a serverless deployment pipeline:
```
harness pipeline --file "/serverless-lambda/harnesscd-pipeline/serverless-deployment.yml" apply
```
2. In your Harness pipeline, select **Save**.
You can switch to the **Visual** pipeline editor and confirm the pipeline stage and execution steps as shown below.
3. Finally, it's time to execute the pipeline. Select **Run**, and then select **Run Pipeline** to initiate the deployment.
Observe the execution logs as Harness deploys the function.
{% endtab %}
{% endtabs %}
### Congratulations!🎉
You've just learned how to use Harness CD to deploy an AWS Lambda function on AWS Lambda using the Serverless.com Framework.
{% endtab %}
{% tab title="Native AWS Lambda" %}
### Before you begin
Verify the following:
1. **Obtain GitHub personal access token with the repo scope**. For GitHub documentation, go to [creating a personal access token](https://help.github.com/en/github/authenticating-to-github/creating-a-personal-access-token-for-the-command-line).
2. **Docker**. For this tutorial ensure that you have the Docker runtime installed on your Harness Delegate host. If not, use one of the following options to install Docker:
* [Docker for Mac](https://docs.docker.com/desktop/install/mac-install/)
* [Docker for CentOS](https://docs.docker.com/engine/install/centos/)
* [Docker for Ubuntu](https://docs.docker.com/engine/install/ubuntu/)
* [Docker for Debian](https://docs.docker.com/engine/install/debian/)
* [Docker for Windows](https://docs.docker.com/desktop/install/windows-install/)
* Check [Delegate system requirements](/harness-ai/use-harness-platform/delegates/delegate/delegate-concepts/delegate-requirements.md).
3. **Fork the** [**harnesscd-example-apps**](https://github.com/harness-community/harnesscd-example-apps/fork) repository through the GitHub website.
* For more information on forking a GitHub repository, go to [GitHub docs](https://docs.github.com/en/get-started/quickstart/fork-a-repo#forking-a-repository).
4. **AWS S3 bucket with the artifact**, upload the [hello-world.zip](https://github.com/harness-community/harnesscd-example-apps/blob/master/aws-lambda/hello_world.zip) in a new s3 bucket, to be used as an artifact.
5. **AWS user account with required policy:** To deploy a Lambda function, you need an AWS Identity and Access Management (IAM) role with the necessary permissions. You will use that role in the credentials you supply to the Harness AWS connector.
* In AWS IAM, select **Users**, and then **Add user**. Enter a name. Enable **Programmatic access** by selecting the checkbox. Select **Next** to go to the **Permissions** page. Do one of the following:
* **Full Admin Access:** select **Attach existing policies directly**. Search for and select **AdministratorAccess** then select **Next: Review**. Check to make sure everything looks good and select **Create user**.
* **Limited Access:** select **Create policy** and add the following minimum AWS IAM role policies that you would need to deploy a Lambda function:
* **IAMReadOnlyAccess**: Needed to verify required policies.
* **AWSLambdaRole**: Needed to invoke function.
* **AWSLambda\_FullAccess** (previously AWSLambdaFullAccess): Needed to write to Lambda.
* **AmazonS3ReadOnlyAccess**: Needed to pull the function file from S3.
* **AmazonEC2ContainerRegistryReadOnly**: Needed to pull function container image from ECR. This policy provides read-only access to the ECR repository.
* **AWS Lambda Execution Role**: As a Lambda user, you probably already have the AWS Lambda Execution Role set up. If you do not, follow the steps in [AWS Lambda Execution Role](https://docs.aws.amazon.com/lambda/latest/dg/lambda-intro-execution-role.html) from AWS.
Example IAM policy:
```json
{
"Version": "2012-10-17",
"Statement": [
{
"Sid": "IAMReadOnlyAccess",
"Effect": "Allow",
"Action": ["iam:Get*", "iam:List*", "iam:SimulateCustomPolicy"],
"Resource": "*"
},
{
"Sid": "LambdaAccess",
"Effect": "Allow",
"Action": [
"lambda:CreateFunction",
"lambda:UpdateFunctionCode",
"lambda:UpdateFunctionConfiguration",
"lambda:PublishVersion",
"lambda:CreateAlias",
"lambda:Get*",
"lambda:List*",
"lambda:InvokeFunction",
"lambda:DeleteFunction",
"lambda:DeleteAlias",
"lambda:DeleteFunctionConcurrency",
"lambda:AddPermission",
"lambda:RemovePermission",
"lambda:EnableReplication",
"lambda:DisableReplication",
"lambda:GetFunctionCodeSigningConfig",
"lambda:UpdateFunctionCodeSigningConfig",
"lambda:GetCodeSigningConfig",
"lambda:ListCodeSigningConfigs",
"lambda:CreateCodeSigningConfig",
"lambda:DeleteCodeSigningConfig",
"lambda:UpdateFunctionEventInvokeConfig",
"lambda:GetFunctionEventInvokeConfig",
"lambda:ListFunctionsByCodeSigningConfig",
"lambda:ListTags",
"lambda:TagResource",
"lambda:UntagResource"
],
"Resource": "*"
},
{
"Sid": "S3ReadOnlyAccess",
"Effect": "Allow",
"Action": ["s3:Get*", "s3:List*"],
"Resource": "*"
},
{
"Sid": "ECRReadOnlyAccess",
"Effect": "Allow",
"Action": [
"ecr:GetAuthorizationToken",
"ecr:BatchCheckLayerAvailability",
"ecr:GetDownloadUrlForLayer",
"ecr:GetRepositoryPolicy",
"ecr:DescribeRepositories",
"ecr:ListImages",
"ecr:DescribeImages",
"ecr:BatchGetImage"
],
"Resource": "*"
},
{
"Sid": "LambdaRoleAccess",
"Effect": "Allow",
"Action": ["iam:PassRole"],
"Resource": "arn:aws:iam::*:role/service-role/AWSLambdaExecutionRole"
}
]
}
```
#### Supported platforms and versions
* Harness can deploy a new Lambda function or update an existing Lambda function.
* Harness' support only deploys and updates Lambda functions. Harness does not update auxiliary event source triggers like the API Gateway, etc.
* Currently, Lambda functions can be packaged as ZIP files in S3 Buckets or as containers in AWS ECR.
* If Harness were to support another repository, like Nexus, when the container is fetched by the API, AWS spins up AWS resources (S3, ECR) anyways, and so Harness has limited support to S3 and ECR.
* The containers must exist in ECR. Containers are not supported in other repositories.
### Getting Started with Harness CD
1. Log into [Harness](https://app.harness.io/).
2. Select **Projects**, and then select **Default Project**.
{% hint style="warning" %}
For the pipeline to run successfully, please follow the remaining steps as they are, including the naming conventions.
{% endhint %}
#### Delegate What is the Harness Delegate?
The Harness Delegate is a service that runs in your local network or VPC to establish connections between the Harness Manager and various providers such as artifacts registries, cloud platforms, etc. The delegate is installed in the target infrastructure, for example, a Kubernetes cluster, and performs operations including deployment and integration. Learn more about the delegate in the [Delegate Overview](/harness-ai/use-harness-platform/delegates/delegate/delegate-concepts/delegate-overview.md).
1. Under **Project Setup**, select **Delegates**.
2. In **Delegates Setup**, select **Install new Delegate**. The delegate wizard appears.
3. In **New Delegate**, in **Select where you want to install your Delegate**, select **Docker**.
Now you can install the delegate by using the command that appears on your installation wizard. The command is prefilled with the information for the environment variables as in the example below.
```bash
docker run --cpus=1 --memory=2g \
-e DELEGATE_NAME=docker-delegate \
-e NEXT_GEN="true" \
-e DELEGATE_TYPE="DOCKER" \
-e ACCOUNT_ID= YOUR_HARNESS_ACCOUNTID \
-e DELEGATE_TOKEN=YOUR_DELEGATE_TOKEN \
-e MANAGER_HOST_AND_PORT=YOUR_MANAGER_HOST_AND_PORT \
DELEGATE_IMAGE:TAG
```
{% hint style="info" %}
You can also follow the [Install Harness Delegate on Kubernetes](/harness-ai/troubleshooting-and-resources/tutorials/install-delegate.md) steps to install the delegate using the Harness Terraform Provider or a Kubernetes manifest.
{% endhint %}
#### Verify delegate connectivity
1. Select **Continue**. After the health checks passes, your delegate is available to use.
2. Select **Done** and verify your new delegate is listed.
#### Secrets What are Harness secrets?
Harness offers built-in secret management for encrypted storage of sensitive information. Secrets are decrypted when needed, and only the private network-connected Harness Delegate has access to the key management system. You can also integrate your own secret manager. To learn more about secrets in Harness, go to [Harness Secret Manager Overview](/harness-ai/use-harness-platform/secrets/secrets-management/harness-secret-manager-overview.md).
1. Under **Project Setup**, select **Secrets**.
1. Select **New Secret**, and then select **Text**.
2. Enter the secret name `harness_gitpat`.
3. For the secret value, paste the GitHub personal access token you saved earlier.
4. Select **Save**.
2. Under **Project Setup**, select **Secrets**.
1. Select **New Secret**, and then select **Text**.
2. Enter the secret name `awssecret`.
3. For the secret value, add the AWS [Secret access key](https://docs.aws.amazon.com/powershell/latest/userguide/pstools-appendix-sign-up.html).
4. Select **Save**.
{% tabs %}
{% tab title="UI" %}
#### Connectors What are connectors?
Connectors in Harness enable integration with 3rd party tools, providing authentication and operations during pipeline runtime. For instance, a GitHub connector facilitates authentication and fetching files from a GitHub repository within pipeline stages. Explore connector how-tos [here](/harness-ai/use-harness-platform/connectors.md).
1. Create the **GitHub connector**.
1. Copy the contents of [github-connector.yml](https://github.com/harness-community/harnesscd-example-apps/blob/master/aws-lambda/harnesscd-pipeline/git-connector.yml).
2. In your Harness project in the Harness Manager, under **Project Setup**, select **Connectors**.
3. Select **Create via YAML Builder** and paste the copied YAML.
4. Assuming you have already forked the [harnesscd-example-apps](https://github.com/harness-community/harnesscd-example-apps/fork) repository mentioned earlier, replace `GITHUB_USERNAME` with your GitHub account username in the YAML.
5. In `projectIdentifier`, verify that the project identifier is correct. You can see the Id in the browser URL (after `account`). If it is incorrect, the Harness YAML editor will suggest the correct Id.
6. Select **Save Changes** and verify that the new connector named **harness\_gitconnector** is successfully created.
7. Finally, select **Connection Test** under **Connectivity Status** to ensure the connection is successful.
2. Create the **AWS Connector**.
1. Copy the contents of [aws-connector.yml](https://github.com/harness-community/harnesscd-example-apps/blob/master/aws-lambda/harnesscd-pipeline/aws-connector.yml).
2. In your Harness project in the Harness Manager, under **Project Setup**, select **Connectors**.
3. Select **Create via YAML Builder** and paste the copied YAML.
4. In `projectIdentifier`, verify that the project identifier is correct. You can see the Id in the browser URL (after `account`). If it is incorrect, the Harness YAML editor will suggest the correct Id.
5. Replace the `accessKey` placeholder with the [AWS access key](https://docs.aws.amazon.com/powershell/latest/userguide/pstools-appendix-sign-up.html) for the AWS user you created (with the required policies).
6. Here we assume the `region` for secret key to be `us-east-1`. Please replace it with the appropriate region.
7. Select **Save Changes** and verify that the new connector named **harness\_awsconnector** is successfully created.
8. Finally, select **Connection Test** under **Connectivity Status** to ensure the connection is successful.
### Environment What are Harness environments?
Environments define the deployment location, categorized as **Production** or **Pre-Production**. Each environment includes infrastructure definitions for serverless functions, VMs, Kubernetes clusters, or other target infrastructures. To learn more about environments, go to [Environments overview](/continuous-delivery/use-continuous-delivery/cd-building-blocks/environments/environment-overview.md).
1. In your Harness project, select **Environments**.
1. Select **New Environment**, and then select **YAML**.
2. Copy the contents of [environment.yml](https://github.com/harness-community/harnesscd-example-apps/blob/master/aws-lambda/harnesscd-pipeline/environment.yml), paste it into the YAML editor, and select **Save**.
3. In your new environment, select the **Infrastructure Definitions** tab.
4. Select **Infrastructure Definition**, and then select **YAML**.
5. Copy the contents of [infrastructure-definition.yml](https://github.com/harness-community/harnesscd-example-apps/blob/master/aws-lambda/harnesscd-pipeline/infrastructure-definition.yml) and paste it into the YAML editor.
6. Select **Save** and verify that the environment and infrastructure definition are created successfully.
### Services What are Harness services?
In Harness, services represent what you deploy to environments. You use services to configure variables, manifests, functions, and artifacts. The **Services** dashboard provides service statistics like deployment frequency and failure rate. To learn more about services, go to [Services overview](/continuous-delivery/use-continuous-delivery/cd-building-blocks/services/services-overview.md).
#### Function definition and function artifacts What is AWS Lambda Function Definition?
Harness uses the AWS Lambda [Create Function API](https://docs.aws.amazon.com/lambda/latest/dg/API_CreateFunction.html) to create a new Lambda function in the specified AWS account and region. In Harness, you use a [JSON configuration file](https://github.com/harness-community/harnesscd-example-apps/blob/master/aws-lambda/function-definition.json) to define the AWS Lambda you wish to deploy. This configuration lets you define all the function settings supported by the Create Function API.
**Setting up Lambda functions**
1. Assuming you have already forked the [harnesscd-example-apps](https://github.com/harness-community/harnesscd-example-apps/fork) repo, edit the [function-definition.json](https://github.com/harness-community/harnesscd-example-apps/blob/master/aws-lambda/function-definition.json) file in your fork and **add the ARN for your role having full AWS Lambda access** in which you want to deploy the serverless application.
2. In your Harness project, select **Services**.
1. Select **New Service**.
2. Enter the name `harnessserverless`.
3. Select **Save**, and then **YAML** (on the **Configuration** tab).
4. Select **Edit YAML**, copy the contents of [service.yml](https://github.com/harness-community/harnesscd-example-apps/blob/master/aws-lambda/harnesscd-pipeline/service.yml), and paste the into the YAML editor.
5. Mention the `bucket name` and `region` where you uploaded the artifact in the beginning.
6. Select **Save** and verify that the service **harness\_serverless** is successfully created.
### Pipeline What are Harness pipelines?
A pipeline is a comprehensive process encompassing integration, delivery, operations, testing, deployment, and monitoring. It can utilize CI for code building and testing, followed by CD for artifact/function deployment in production. A CD pipeline is a series of stages where each stage deploys a service to an environment. To learn more about CD pipeline basics, go to [CD pipeline basics](/continuous-delivery/new-to-continuous-delivery/overview.md#pipeline).
1. In your Harness project, select **Pipelines**.
1. Select **Create a Pipeline**.
2. Enter the name `native-aws-lambda`.
3. Choose **Inline** to store the pipeline in Harness.
4. Select **Start**.
5. In **Pipeline Studio**, select **YAML**.
6. Select **Edit YAML** and paste in the YAML in the next section.
### Deploy the serverless application on AWS Lambda
1. Copy the contents of [pipeline.yml](https://github.com/harness-community/harnesscd-example-apps/blob/master/aws-lambda/harnesscd-pipeline/pipeline.yml).
2. In your Harness pipeline YAML editor, paste the YAML.
3. Select **Save**.
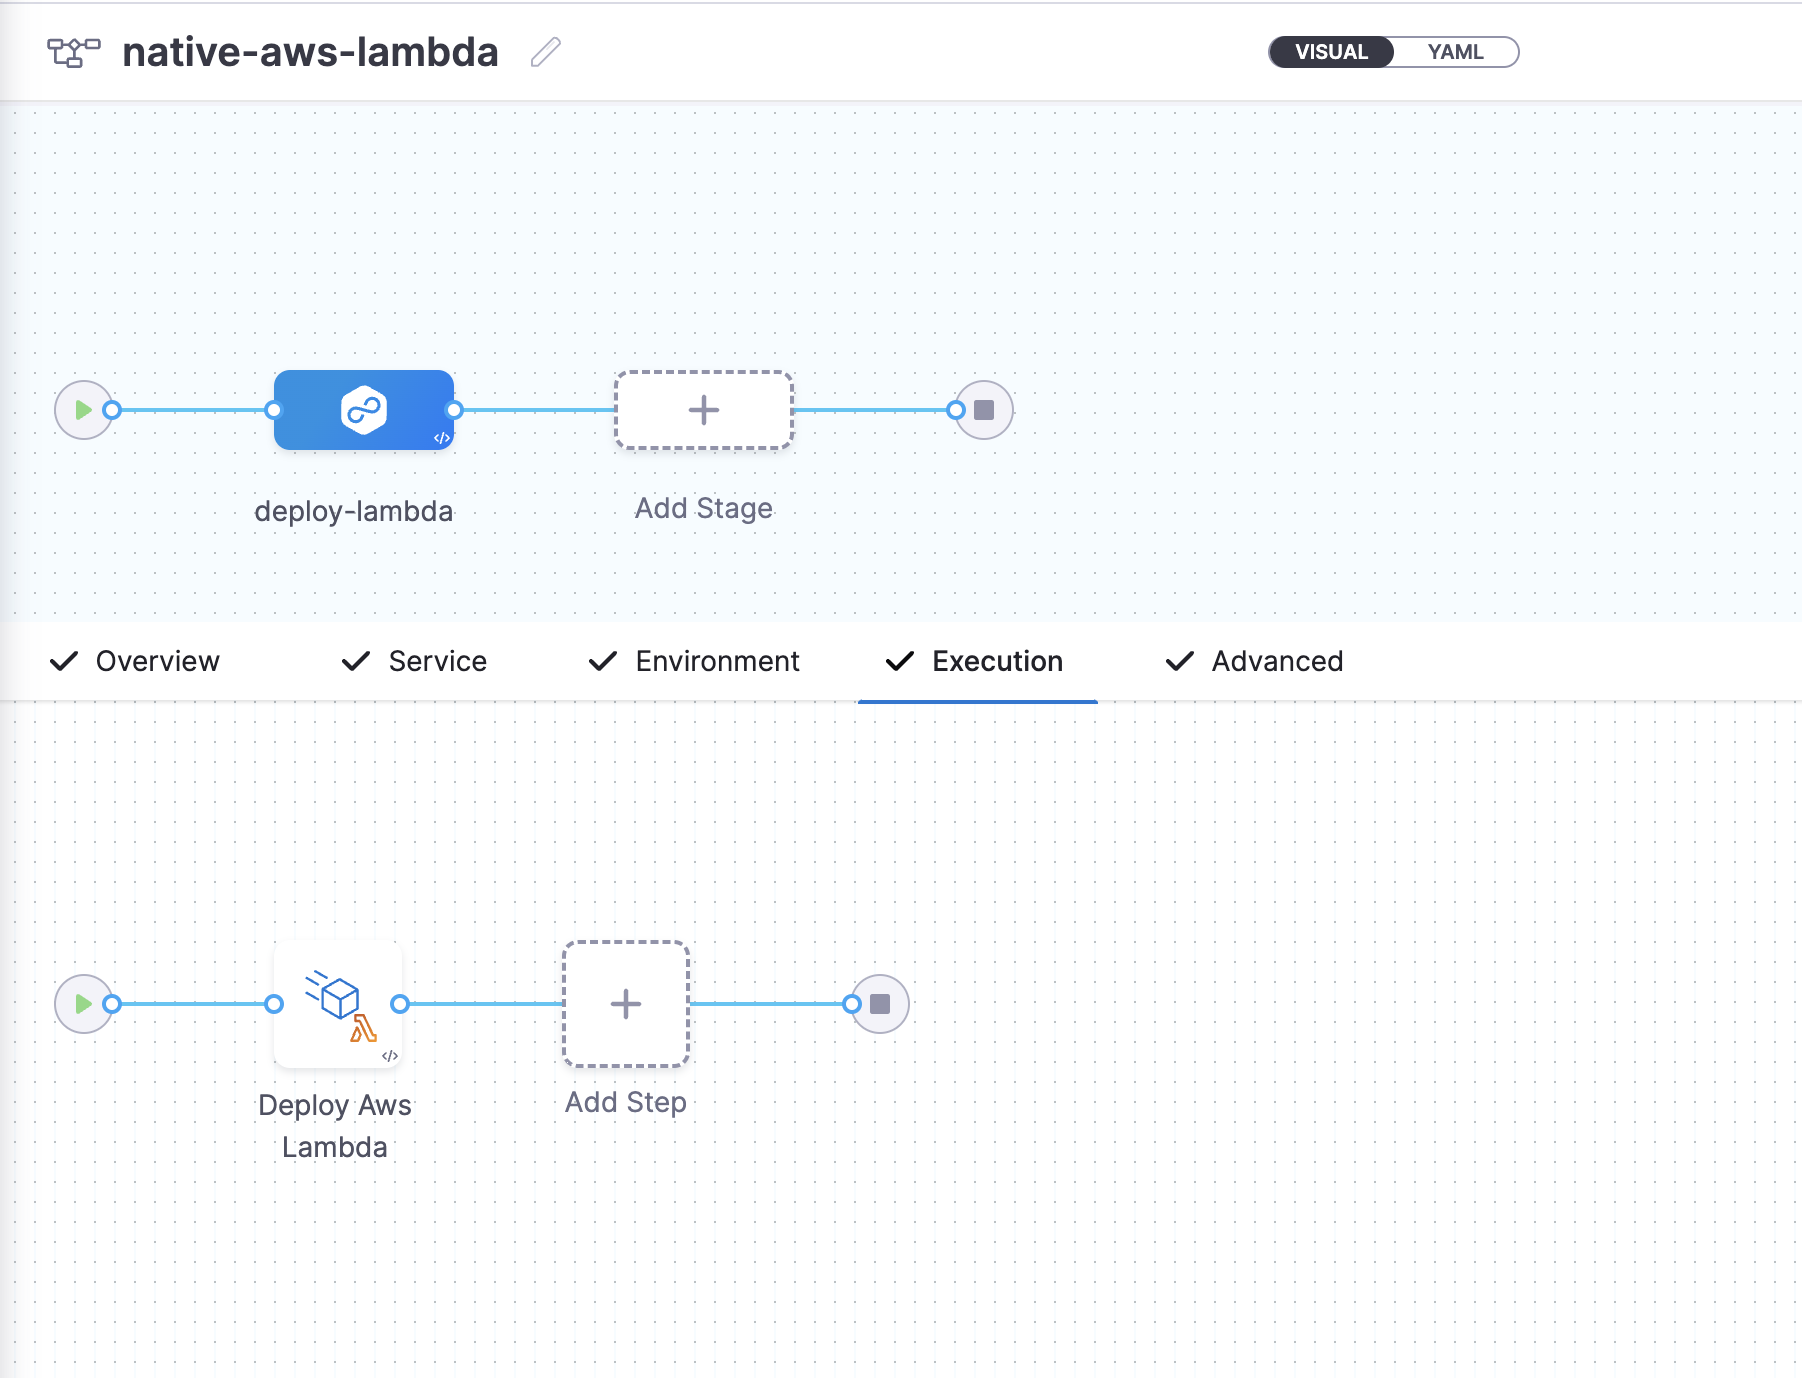
You can switch to the **Visual** pipeline editor and confirm the pipeline stage and execution steps as shown below.
4. Finally, it's time to execute the Pipeline. Select **Run**.
5. Enter the **Primary Artifact** name and **File Path** for the artifact.
6. Select **Run Pipeline** to initiate the deployment.
Observe the execution logs as Harness deploys the function.
{% endtab %}
{% tab title="CLI" %}
1. Download and configure the Harness CLI.
{% tabs %}
{% tab title="MacOS" %}
```bash
curl -LO https://github.com/harness/harness-cli/releases/download/v0.0.25-Preview/harness-v0.0.25-Preview-darwin-amd64.tar.gz
tar -xvf harness-v0.0.25-Preview-darwin-amd64.tar.gz
export PATH="$(pwd):$PATH"
echo 'export PATH="'$(pwd)':$PATH"' >> ~/.bash_profile
source ~/.bash_profile
harness --version
```
{% endtab %}
{% tab title="Linux" %}
{% tabs %}
{% tab title="ARM" %}
```bash
curl -LO https://github.com/harness/harness-cli/releases/download/v0.0.25-Preview/harness-v0.0.25-Preview-linux-arm64.tar.gz
tar -xvf harness-v0.0.25-Preview-linux-arm64.tar.gz
```
{% endtab %}
{% tab title="AMD" %}
```bash
curl -LO https://github.com/harness/harness-cli/releases/download/v0.0.25-Preview/harness-v0.0.25-Preview-linux-amd64.tar.gz
tar -xvf harness-v0.0.25-Preview-linux-amd64.tar.gz
```
{% endtab %}
{% endtabs %}
{% endtab %}
{% tab title="Windows" %}
```
a. Open Windows Powershell and run the command below to download the Harness CLI.
```
```
Invoke-WebRequest -Uri https://github.com/harness/harness-cli/releases/download/v0.0.25-Preview/harness-v0.0.25-Preview-windows-amd64.zip -OutFile ./harness.zip
```
````
b. Extract the downloaded zip file and change directory to extracted file location.
c. Follow the steps below to make it accessible via terminal.
```
$currentPath = Get-Location
[Environment]::SetEnvironmentVariable("PATH", "$env:PATH;$currentPath", [EnvironmentVariableTarget]::Machine)
```
d. Restart terminal.
````
{% endtab %}
{% endtabs %}
2. Clone the forked **harnesscd-example-apps** repo and change directory.
```bash
git clone https://github.com/GITHUB_ACCOUNTNAME/harnesscd-example-apps.git
cd harnesscd-example-apps
```
Replace GITHUB_ACCOUNTNAME with your GitHub Account name.
3. Log in to Harness from the CLI.
```bash
harness login --api-key --account-id HARNESS_API_TOKEN
```
Replace HARNESS_API_TOKEN with Harness API token that you obtained during the prerequisite section of this tutorial.
### Connectors What are connectors?
Connectors in Harness enable integration with 3rd party tools, providing authentication for operations during pipeline runtime. For instance, a GitHub connector facilitates authentication and fetching files from a GitHub repository within pipeline stages. For more details, go to [Connectors](/harness-ai/use-harness-platform/connectors.md).
1. Create the **GitHub connector**.
1. Replace **DELEGATE\_NAME** under delegate selectors with Delegate Name.
2. In `projectIdentifier`, verify that the project identifier is correct. You can see the Id in the browser URL (after `account`). If it is incorrect, the Harness YAML editor will suggest the correct Id.
3. Now create the **GitHub connector** using the following CLI command:
```
harness connector --file "/aws-lambda/harnesscd-pipeline/git-connector.yml" apply
```
2. Create the **AWS Connector**.
1. In `projectIdentifier`, verify that the project identifier is correct. You can see the Id in the browser URL (after `account`). If it is incorrect, the Harness YAML editor will suggest the correct Id.
2. Now create the **AWS Connector** using the following CLI command:
```
harness connector --file "/aws-lambda/harnesscd-pipeline/aws-connector.yml" apply
```
### Environment What are Harness environments?
Environments define the deployment location, categorized as **Production** or **Pre-Production**. Each environment includes infrastructure definitions for serverless functions, VMs, Kubernetes clusters, or other target infrastructures. To learn more about environments, go to [Environments overview](/continuous-delivery/use-continuous-delivery/cd-building-blocks/environments/environment-overview.md).
1. Use the following CLI command to create an **Environment** in your Harness project:
```
harness environment --file "/aws-lambda/harnesscd-pipeline/environment.yml" apply
```
2. In your new environment, add an **Infrastructure Definition** using the following CLI command:
```
harness infrastructure --file "/aws-lambda/harnesscd-pipeline/infrastructure-definition.yml" apply
```
### Services What are Harness services?
In Harness, services represent what you deploy to environments. You use services to configure variables, manifests, functions, and artifacts. The **Services** dashboard provides service statistics like deployment frequency and failure rate. To learn more about services, go to [Services overview](/continuous-delivery/use-continuous-delivery/cd-building-blocks/services/services-overview.md).
#### Function definition and function artifacts What is AWS Lambda Function Definition?
Harness uses the AWS Lambda [Create Function API](https://docs.aws.amazon.com/lambda/latest/dg/API_CreateFunction.html) to create a new Lambda function in the specified AWS account and region. In Harness, you use a [JSON configuration file](https://github.com/harness-community/harnesscd-example-apps/blob/master/aws-lambda/function-definition.json) to define the AWS Lambda you wish to deploy. This configuration lets you define all the function settings supported by the Create Function API.
**Setting up Lambda functions**
1. Assuming you have already forked the [harnesscd-example-apps](https://github.com/harness-community/harnesscd-example-apps/fork) repo, edit the [function-definition.json](https://github.com/harness-community/harnesscd-example-apps/blob/master/aws-lambda/function-definition.json) file in your fork and **add the ARN for your role having full AWS Lambda access** in which you want to deploy the serverless application.
2. Use the following CLI command to create a **Service** in your Harness Project.
```
harness service -file "/aws-lambda/harnesscd-pipeline/service.yml" apply
```
### Deploy the serverless application on AWS Lambda What are Harness pipelines?
A pipeline is a comprehensive process encompassing integration, delivery, operations, testing, deployment, and monitoring. It can utilize CI for code building and testing, followed by CD for artifact deployment in production. A CD Pipeline is a series of stages where each stage deploys a service to an environment. To learn more about CD pipeline basics, go to [CD pipeline basics](/continuous-delivery/new-to-continuous-delivery/overview.md#pipeline).
1. Use this CLI command to create a serverless deployment pipeline:
```
harness pipeline --file "/aws-lambda/harnesscd-pipeline/pipeline.yml" apply
```
2. In your Harness pipeline editor, select **Save**.
You can switch to the **Visual** pipeline editor and confirm the pipeline stage and execution steps as shown below.
3. Finally, it's time to execute the Pipeline. Select **Run**.
4. Enter the **Primary Artifact** name and **File Path** for the artifact.
5. Select **Run Pipeline** to initiate the deployment.
Observe the execution logs as Harness deploys the function.
{% endtab %}
{% endtabs %}
### Congratulations!🎉
You've just learned how to use Harness CD to deploy an AWS Lambda function on AWS Lambda.
{% endtab %}
{% endtabs %}
{% @harness-feedback/feedback %}