> For the complete documentation index, see [llms.txt](https://developer.harness.io/llms.txt). Markdown versions of documentation pages are available by appending `.md` to page URLs; this page is available as [Markdown](https://developer.harness.io/continuous-delivery/use-continuous-delivery/ai-agents-deployment/aws-agent-core/agent-service.md).
# Agent service
Register an agent service that represents your AI agent and targets AWS Agent Core.
An agent service represents a single AI agent in Harness CD. It defines the agent identity, the target runtime, the artifact the agent runs from, either a container image or an S3 Direct Code zip, and any configuration variables the agent needs at runtime. This page shows you how to register an agent service that deploys to AWS Agent Core, the Amazon Bedrock AgentCore runtime.
{% hint style="info" %}
Agent deployments are behind the feature flag `CDS_AGENT_RUNTIME_DEPLOYMENT`. Contact [Harness Support](mailto:support@harness.io) to enable the feature.
{% endhint %}
For prerequisites, go to [Before you begin](/continuous-delivery/use-continuous-delivery/ai-agents-deployment/aws-agent-core/overview.md#before-you-begin) on the overview.
***
### Open Agent Services
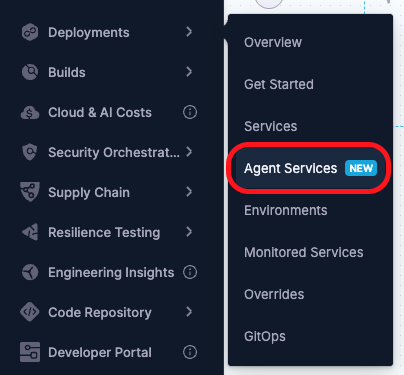
Agent services live in the **Continuous Delivery & GitOps** module. Select **Agent Services** in the left navigation to open the listing page, which shows every agent service in the project. Use the search field to filter by name, and select any row to review or edit its configuration.
Click to view full size image
***
### Register an agent service
To register an agent service, select **New Agent Service** on the listing page and complete the **Register an Agent** panel.
1. In **Agent name**, enter a name for the agent. Harness generates the agent **Id** from the name. Select the edit icon next to the **Id** to change it before you save.
2. Under **Deploy target**, select **AWS Agent Core** to deploy the agent to Amazon Bedrock AgentCore.
3. Under **Artifact type**, select how the agent code reaches AgentCore, then complete the fields for that type.
* For **Image URI (ECR)**, enter the Amazon ECR URI of the agent container image in **Image URI**, for example `123456789012.dkr.ecr.us-east-1.amazonaws.com/agent:1.0.0`.
* For **S3 Direct Code**, enter:
* **S3 bucket:** The name of the S3 bucket that holds the agent zip, for example `my-agent-code-bucket`.
* **S3 key:** The full object key of the zip, for example `agents/security-assistant/code.zip`. This is the key of the object itself, not a prefix.
* **Runtime:** The managed language runtime AgentCore uses to run the agent. Choose from `PYTHON_3_10`, `PYTHON_3_11`, `PYTHON_3_12`, `PYTHON_3_13`, `PYTHON_3_14`, or `NODE_22`.
* **Entry point:** The path to the entry file inside your zip, relative to its root, for example `main.py`. This is not a Lambda-style `module.function` handler. Select **Add** only if the zip needs a second entry, for example `opentelemetry-instrument` ahead of `main.py` when the zip bundles the OpenTelemetry package. Each entry is a single token, so a space inside one entry is read as part of that one path, not as a second entry.
* **Version ID:** (Optional) The S3 object version of the zip. Pin it to prevent drift when the object is overwritten.
Go to [Prepare agent code for S3 Direct Code](#prepare-agent-code-for-s3-direct-code) before you upload the zip. AgentCore enforces specific requirements on dependencies, zip structure, and file permissions.
4. In **Execution Role ARN**, enter the IAM role the agent assumes at runtime, for example `arn:aws:iam::123456789012:role/AgentCore`. This role must trust `bedrock-agentcore.amazonaws.com`. AgentCore uses this role to pull the container image or read the S3 object, and to run the agent.
5. (Optional) Add config variables. Go to [Add config variables](#add-config-variables) for details.
6. (Optional) Add an AgentConfig manifest. Go to [Add an AgentConfig manifest](#add-an-agentconfig-manifest) for details.
7. (Optional) Configure an agent authorizer to control who can invoke the agent. Go to [Configure an agent authorizer](#configure-an-agent-authorizer) for details.
8. (Optional) Expand **Metadata** to add a description and tags.
9. Select **Save**.
***
### Prepare agent code for S3 Direct Code
AgentCore reads the S3 zip directly, so the zip must match the layout and contract AgentCore expects. Review each requirement before you upload the zip to S3.
* **Dependencies built for arm64:** AgentCore runs on arm64. When you install dependencies, pass `--python-platform aarch64-manylinux2014` to target that architecture, `--python-version` matching the runtime you select in the agent service, and `--only-binary=:all:` so pip does not fall back to a source build that produces x86 binaries. Without `--python-platform`, pip can install wheels for your local architecture instead, and AgentCore then fails at startup with a binary files incompatible with Linux ARM64 error.
* **Zip structure:** Place your installed dependencies and your source code as siblings at the root of the zip. AgentCore expects both at the top level, not a snapshot of your source directory alone.
* **Entry point matches the zip contents:** The entry point path you enter in the agent service must match what the zip actually contains, for example `main.py`, or a second entry of `opentelemetry-instrument` ahead of `main.py` only if the zip bundles the OpenTelemetry package.
* **Agent contract:** Your code must implement exactly one of the two contracts AgentCore supports: the `@app.entrypoint` SDK decorator, or an HTTP server that exposes `POST /invocations` and `GET /ping` on `0.0.0.0:8080`.
* **File permissions:** Set non-executable files to `644`, directories to `755`, and executable files to `755`. AgentCore silently defaults an unset directory permission to `755` instead of failing, so a missing permission does not surface as an error at deploy time. If you build the zip on Windows, set permissions through the Windows permissions dialog before you zip the files, since Windows does not preserve POSIX permissions by default.
* **Size limits:** Keep the zip at 250 MB or smaller, and the unzipped contents at 750 MB or smaller, combined across all files.
Go to [Get started with code deployment on AgentCore Runtime](https://docs.aws.amazon.com/bedrock-agentcore/latest/devguide/runtime-get-started-code-deploy-python.html) for the full AWS reference.
***
### Add config variables
Config variables pass configuration to the agent at runtime. They correspond to the parameters defined in your AgentCore CLI project files, specifically `agentcore/agentcore.json` (project and agent configuration) and `agentcore/aws-targets.json` (AWS account and region targets). When you deploy through Harness instead of running `agentcore deploy` locally, config variables are how you supply those same parameters at deploy time. Go to [Get started with the AgentCore CLI](https://docs.aws.amazon.com/bedrock-agentcore/latest/devguide/runtime-get-started-cli.html) to review the full set of supported parameters.
To add a config variable, select **Add variable** and complete the panel:
* **Type:** The variable type, either **String**, **Number**, or **Secret**. Plain values reach the agent environment as-is, and secret values resolve through the Harness secret manager at deploy time.
* **Name:** The variable name.
* **Value:** The variable value. For a secret, reference a Harness secret.
* **Set variable as required during runtime:** Set to **True** to require a value at runtime.
* **Description:** (Optional) A description of the variable.
***
### Add an AgentConfig manifest
An AgentConfig manifest lets you store the AWS AgentCore project configuration file in Harness rather than relying on the local `agentcore/agentcore.json` file. When you deploy through Harness, the manifest contents override the local project file on the deploy plugin side, so deploy-time configuration is version-controlled and auditable alongside the rest of your pipeline.
The AgentConfig manifest holds the same fields you would author in `agentcore/agentcore.json` directly, such as agent name, execution role, and any optional parameters the AWS AgentCore CLI supports. Go to [Get started with the AgentCore CLI](https://docs.aws.amazon.com/bedrock-agentcore/latest/devguide/runtime-get-started-cli.html) to review the full parameter set.
To add an AgentConfig manifest, select **Add manifest** in the agent service configuration and complete the following fields:
* **Manifest identifier:** A unique name for this manifest within the agent service.
* **Manifest format:** Select **AgentConfig**.
* **Store:** Choose how Harness retrieves the manifest at deploy time.
* **Git store:** Store the config file in a Git repository. Select a Git connector, the repository, branch, and the path to the config JSON file.
* **Harness file store:** Store the config file in the Harness file store. Select the file from your file store.
AgentConfig manifest YAML example
```yaml
manifests:
- manifest:
identifier: agentConfig
type: AgentConfig
spec:
store:
type: Github
spec:
connectorRef: account.github_connector
gitFetchType: Branch
branch: main
paths:
- agentcore/agentcore.json
```
***
### Configure an agent authorizer
An agent authorizer controls who can invoke the agent's runtime after deployment. Harness passes the authorizer configuration to Amazon Bedrock AgentCore Identity, which enforces it at invocation time. This is separate from outbound access: the AWS resources the agent itself can call are controlled by **Execution Role ARN**.
To configure an authorizer, click **Add** in the **Agent Authorizer** section and select a type.
* **AWS\_IAM:** Callers invoke the agent with AWS SigV4 credentials. This type has no configurable fields beyond **Restrict to Gateway**.
* **CUSTOM\_JWT:** Callers present an OIDC or OAuth bearer token. Configure the following fields.
* **Discovery URL:** The OIDC discovery endpoint Harness uses to validate incoming tokens, for example `https://idp.example.com/.well-known/openid-configuration`. This field is required.
* **Allowed audiences, Allowed clients, Allowed scopes:** Lists of accepted token audiences, client IDs, and scopes. Configure at least one of these three lists, or add a custom claim, so the authorizer has a rule to match tokens against.
* **Custom claims:** Additional claim-matching rules. For each claim, enter a **name**, choose a **value type**, select an **operator**, and provide one or more **values**. The value type determines which operators are available: **String** supports only **Equals**, which matches a single value, while **String array** supports **Contains** or **Contains any of**, which can match against multiple values.
For both authorizer types, set **Restrict to Gateway** to **True** to restrict invocation to callers that come through the AgentCore Gateway. Harness enforces this inline for the Custom JWT authorizer, and through a resource policy on the runtime for AWS IAM.
{% hint style="info" %}
**One authorizer per agent service**
An agent service supports a single authorizer configuration. Select the existing authorizer card to edit it, or remove it to configure a different type.
{% endhint %}
Agent authorizer YAML example
```yaml
service:
spec:
type: AwsAgentCore
spec:
authorizer:
type: CUSTOM_JWT
restrictToGateway: true
spec:
discoveryUrl: https://idp.example.com/.well-known/openid-configuration
allowedAudiences:
- my-agent-api
allowedScopes:
- agent:invoke
customClaims:
- name: department
operator: EQUALS
valueType: STRING
values:
- platform-eng
```
***
### Review an agent service
Select an agent service from the listing page to open its details.
The **Configuration** tab shows the agent identity, the target platform and its settings, the artifact details such as the image URI or S3 bucket, key, and runtime, the execution role ARN, and any config variables or agent authorizer. You can edit the configuration from this tab.
The **Summary** tab shows the agent details and the list of deployments that reference this agent service across environments. **Referenced by** shows the pipelines and other entities that use the agent service.
***
### Next steps
After you register an agent service, configure the environment for AWS Agent Core and build the deployment pipeline.
* [Environment](/continuous-delivery/use-continuous-delivery/ai-agents-deployment/aws-agent-core/environment.md)
* [Canary deployment](/continuous-delivery/use-continuous-delivery/ai-agents-deployment/aws-agent-core/canary-deployment.md)
{% @harness-feedback/feedback %}