> For the complete documentation index, see [llms.txt](https://developer.harness.io/llms.txt). Markdown versions of documentation pages are available by appending `.md` to page URLs; this page is available as [Markdown](https://developer.harness.io/continuous-delivery/use-continuous-delivery/ai-agents-deployment/aws-agent-core/agent-service.md).
# Agent service
Register an agent service that represents your AI agent and targets AWS Agent Core.
An agent service represents a single AI agent in Harness CD. It defines the agent identity, the target runtime, the container image the agent runs from, and any configuration variables the agent needs at runtime. This page shows you how to register an agent service that deploys to AWS Agent Core, the Amazon Bedrock AgentCore runtime.
{% hint style="info" %}
Agent deployments are behind the feature flag `CDS_AGENT_RUNTIME_DEPLOYMENT`. Contact [Harness Support](mailto:support@harness.io) to enable the feature.
{% endhint %}
For prerequisites, go to [Before you begin](/continuous-delivery/use-continuous-delivery/ai-agents-deployment/aws-agent-core/overview.md#before-you-begin) on the overview.
***
### Open Agent Services
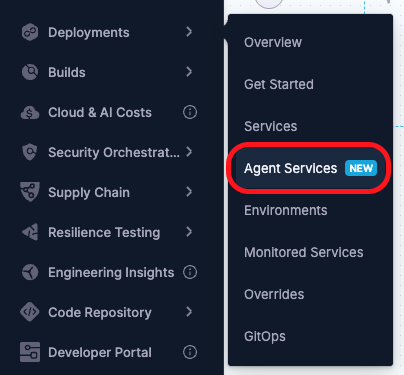
Agent services live in the **Continuous Delivery & GitOps** module. Select **Agent Services** in the left navigation to open the listing page, which shows every agent service in the project. Use the search field to filter by name, and select any row to review or edit its configuration.
Click to view full size image
***
### Register an agent service
To register an agent service, select **New Agent Service** on the listing page and complete the **Register an Agent** panel.
1. In **Agent name**, enter a name for the agent. Harness generates the agent **Id** from the name. Select the edit icon next to the **Id** to change it before you save.
2. Under **Deploy target**, select **AWS Agent Core** to deploy the agent to Amazon Bedrock AgentCore.
3. In **Image URI**, enter the Amazon ECR URI of the agent container image, for example `123456789012.dkr.ecr.us-east-1.amazonaws.com/agent:1.0.0`.
4. In **Execution Role ARN**, enter the IAM role the agent assumes at runtime, for example `arn:aws:iam::123456789012:role/AgentCore`. AgentCore uses this role to pull the image and run the agent.
5. (Optional) Add config variables. Go to [Add config variables](#add-config-variables) for details.
6. (Optional) Add an AgentConfig manifest. Go to [Add an AgentConfig manifest](#add-an-agentconfig-manifest) for details.
7. (Optional) Expand **Metadata** to add a description and tags.
8. Select **Save**.
#### Add config variables
Config variables pass configuration to the agent at runtime. They correspond to the parameters defined in your AgentCore CLI project files, specifically `agentcore/agentcore.json` (project and agent configuration) and `agentcore/aws-targets.json` (AWS account and region targets). When you deploy through Harness instead of running `agentcore deploy` locally, config variables are how you supply those same parameters at deploy time. Go to [Get started with the AgentCore CLI](https://docs.aws.amazon.com/bedrock-agentcore/latest/devguide/runtime-get-started-cli.html) to review the full set of supported parameters.
To add a config variable, select **Add variable** and complete the panel:
* **Type:** The variable type, either **String**, **Number**, or **Secret**. Plain values reach the agent environment as-is, and secret values resolve through the Harness secret manager at deploy time.
* **Name:** The variable name.
* **Value:** The variable value. For a secret, reference a Harness secret.
* **Set variable as required during runtime:** Set to **True** to require a value at runtime.
* **Description:** (Optional) A description of the variable.
***
### Add an AgentConfig manifest
An AgentConfig manifest lets you store the AWS AgentCore project configuration file in Harness rather than relying on the local `agentcore/agentcore.json` file. When you deploy through Harness, the manifest contents override the local project file on the deploy plugin side, so deploy-time configuration is version-controlled and auditable alongside the rest of your pipeline.
The AgentConfig manifest holds the same fields you would author in `agentcore/agentcore.json` directly, such as agent name, execution role, and any optional parameters the AWS AgentCore CLI supports. Go to [Get started with the AgentCore CLI](https://docs.aws.amazon.com/bedrock-agentcore/latest/devguide/runtime-get-started-cli.html) to review the full parameter set.
To add an AgentConfig manifest, select **Add manifest** in the agent service configuration and complete the following fields:
* **Manifest identifier:** A unique name for this manifest within the agent service.
* **Manifest format:** Select **AgentConfig**.
* **Store:** Choose how Harness retrieves the manifest at deploy time.
* **Git store:** Store the config file in a Git repository. Select a Git connector, the repository, branch, and the path to the config JSON file.
* **Harness file store:** Store the config file in the Harness file store. Select the file from your file store.
AgentConfig manifest YAML example
```yaml
manifests:
- manifest:
identifier: agentConfig
type: AgentConfig
spec:
store:
type: Github
spec:
connectorRef: account.github_connector
gitFetchType: Branch
branch: main
paths:
- agentcore/agentcore.json
```
***
### Review an agent service
Select an agent service from the listing page to open its details.
The **Configuration** tab shows the agent identity, the target platform and its settings, the platform config such as the image URI and execution role ARN, and any config variables. You can edit the configuration from this tab.
The **Summary** tab shows the agent details and the list of deployments that reference this agent service across environments. **Referenced by** shows the pipelines and other entities that use the agent service.
***
### Next steps
After you register an agent service, configure the environment for AWS Agent Core and build the deployment pipeline.
* [Environment](/continuous-delivery/use-continuous-delivery/ai-agents-deployment/aws-agent-core/environment.md)
* [Canary deployment](/continuous-delivery/use-continuous-delivery/ai-agents-deployment/aws-agent-core/canary-deployment.md)
{% @harness-feedback/feedback %}