> For the complete documentation index, see [llms.txt](https://developer.harness.io/llms.txt). Markdown versions of documentation pages are available by appending `.md` to page URLs; this page is available as [Markdown](https://developer.harness.io/continuous-delivery/use-continuous-delivery/cd-building-blocks/cd-steps/containerized-steps/containerized-step-groups.md).
# Containerize step groups
Run Continuous Delivery steps in ephemeral containers on a Kubernetes cluster, virtual machines, or Amazon ECS
{% hint style="success" %}
This feature is in Limited GA and requires enablement. [View all early access features.](/release-notes/features.md)
{% @harness-feature-flag-access/request-feature-flag-access module="continuous-delivery" pagePath="continuous-delivery/use-continuous-delivery/cd-building-blocks/cd-steps/containerized-steps/containerized-step-groups" featureFlags="%5B%7B%22name%22%3A%22VM%20infrastructure%20for%20containerized%20step%20groups%22%2C%22key%22%3A%22CDS\_ENABLE\_VM\_CONTAINER\_STEP\_GROUP\_INFRA%22%2C%22status%22%3A%22LIMITED\_GA%22%2C%22description%22%3A%22Enables%20the%20VMs%20infrastructure%20type%20for%20Continuous%20Delivery%20containerized%20step%20groups.%22%7D%2C%7B%22name%22%3A%22Amazon%20ECS%20infrastructure%20for%20containerized%20step%20groups%22%2C%22key%22%3A%22CDS\_ENABLE\_ECS\_CONTAINER\_STEP\_GROUP\_INFRA%22%2C%22status%22%3A%22LIMITED\_GA%22%2C%22description%22%3A%22Enables%20the%20Amazon%20ECS%20Fargate%20infrastructure%20type%20for%20Continuous%20Delivery%20containerized%20step%20groups.%22%7D%5D" %}
{% endhint %}
By default, Harness Continuous Delivery steps run on the Harness Delegate host system, for example, the Kubernetes cluster where a Kubernetes delegate is running.
To control the resources used for Continuous Delivery steps, you can use your own Kubernetes cluster, Linux virtual machines, or Amazon ECS as the runtime infrastructure.
Use a Continuous Delivery step group that points to that infrastructure as the runtime, then add the steps supported by containerized step groups. In this architecture, no tooling is installed on delegates. Delegates act as orchestrators. Tooling is installed and removed on demand in the ephemeral step containers.
When you use deployment types that support containerized step groups (for example, AWS SAM), Harness generates containerized steps when you add the execution strategy for the stage. When you add a step group manually, enable containerized step groups by selecting **Enable container based execution**.
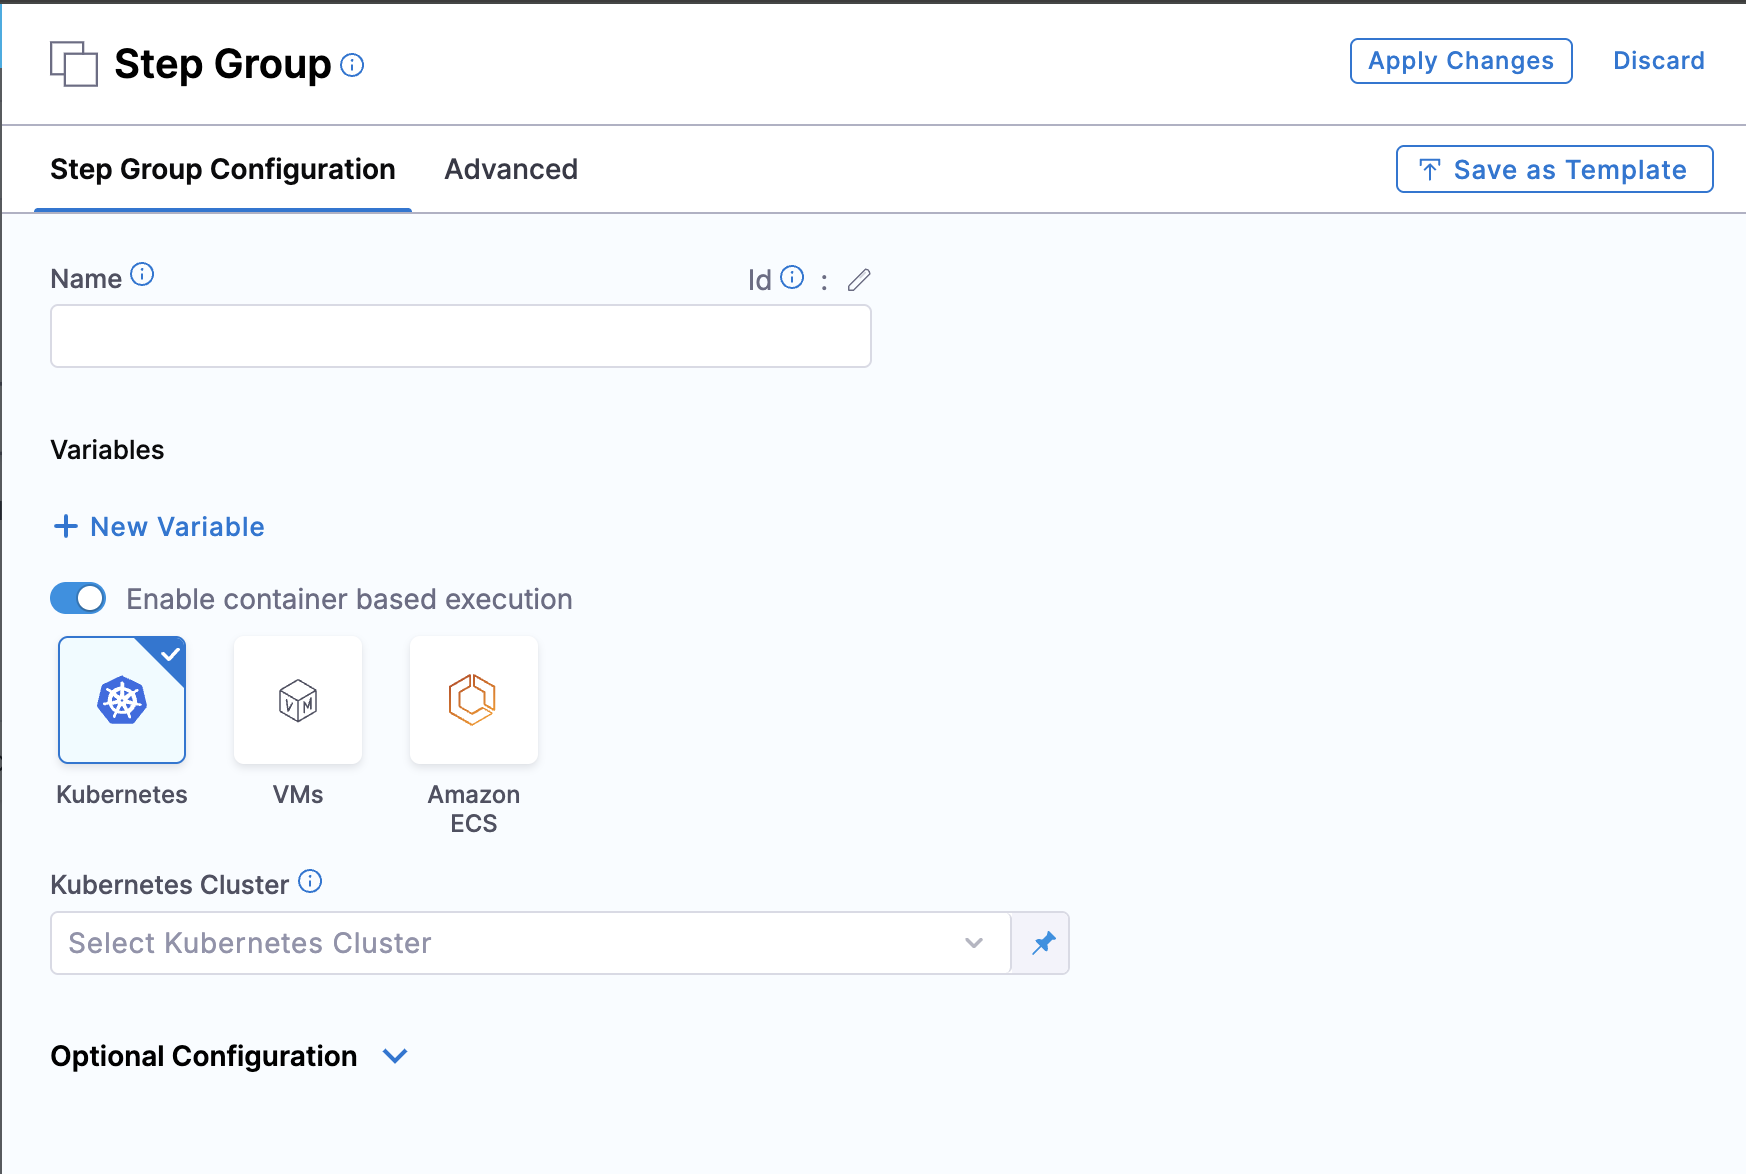
This option is disabled for deployment types that do not support containerized step groups.
***
## What you will learn from this topic
* How to [enable container-based execution](#add-a-containerized-step-group) on a step group
* How to [select Kubernetes, VM, or Amazon ECS infrastructure](#infrastructure-options)
* How to [configure a Kubernetes step group](#kubernetes-infrastructure), including volumes and the security context
* How to [read the Initialize log](#containerized-step-group-example) and [connect a Docker registry](#harness-docker-connector-for-all-group-steps) so the group steps can pull images
***
## Before you begin
* **Deploy or Custom stage**: Continuous Delivery containerized step groups are supported in Deploy and Custom stages.
* **Runtime infrastructure**: Use your Kubernetes cluster, Linux virtual machines, or Amazon ECS. The Harness Delegate orchestrates the steps, and tooling runs in the ephemeral step containers.
* **Pipeline permissions**: You need **View**, **Create/Edit**, and **Execute** on pipelines. Go to [RBAC in Harness](https://developer.harness.io/docs/platform/role-based-access-control/rbac-in-harness) to assign roles.
* **Delegate access**: A Harness Delegate that can reach the selected runtime infrastructure. Go to [Delegate overview](https://developer.harness.io/docs/platform/delegates/delegate/delegate-concepts/delegate-overview) to install and configure a delegate.
***
## Infrastructure options
When you enable container-based execution, select one of three infrastructure types:
* **Kubernetes**: Run steps in containers on a Kubernetes cluster.
* **VMs**: Run steps in containers on virtual machines.
* **Amazon ECS**: Run steps in containers on AWS ECS Fargate.
***
## Important notes
The following limits apply to containerized step groups:
* Continuous Delivery containerized step groups are supported in Deploy and Custom stages.
* Not all steps are supported in containerized step groups. You can see which steps are supported when you add steps in the containerized step group.
* When you use Kubernetes infrastructure, you can use the same cluster to run the Harness Delegate and the containerized step groups. The same cluster is not required.
* Permission configuration is inherited by a step within a step group. Inheritance rules can affect existing configurations. Go to [Step group inheritance logic](/continuous-delivery/troubleshooting-and-resources/knowledge-base-article/configuration-inheritance-stepgroup-step.md) to review the inheritance rules.
* A containerized step group can fail when it uses a cross-account role if the delegate responsible for execution lacks the permissions to assume the role. The delegate must have the required permissions to assume the cross-account role.
* You can use containerized step groups with mutual TLS (mTLS) connections. Go to [mTLS support through delegates](https://developer.harness.io/docs/platform/delegates/secure-delegates/delegate-mtls-support/) to secure delegate communication.
***
## Add a containerized step group
Harness adds the step group and steps needed for a deployment when you select the stage execution strategy in **Execution**.
Whether the containerized step group is added automatically or manually, you must configure it.
Perform the following steps to add a containerized step group manually:
1. In the Deploy stage, in **Execution**, select **Add Step**, and then select **Add Step Group**.
2. To configure a step group as containerized, enable **Enable container based execution**.
3. Select the infrastructure type: **Kubernetes**, **VMs**, or **Amazon ECS**.
4. Configure the settings for the infrastructure type you selected.
***
## VM infrastructure
{% hint style="info" %}
**VM infrastructure feature flag**
VM support for containerized step groups requires the feature flag `CDS_ENABLE_VM_CONTAINER_STEP_GROUP_INFRA`. Contact [Harness Support](mailto:support@harness.io) to enable the feature.
{% endhint %}
When you select **VMs** as the infrastructure type, the containerized step group runs on virtual machine infrastructure.
### Prerequisites
VM infrastructure has the following requirements:
* **VM Runner**: The Drone VM Runner must be installed on your virtual machine infrastructure to communicate with Harness and manage containerized step execution.
* **Operating system**: Only Linux virtual machines are supported for Continuous Delivery containerized step groups.
Go to [Set up VM build infrastructures](https://developer.harness.io/docs/category/set-up-vm-build-infrastructures) to install the runner.
### Operating system
Select the operating system for your virtual machine infrastructure. Only **Linux** is supported.
### Pool name
Enter the name of the virtual machine pool as defined in your `pool.yml` configuration file. The pool defines the virtual machine specifications and pool size for running your containerized steps.
### Override image connector
By default, Harness pulls images from public Docker Hub repositories for backend processes. You can override this by selecting a different connector for the Harness Container Image Registry.
Go to [Connect to the Harness container image registry](https://developer.harness.io/docs/platform/connectors/artifact-repositories/connect-to-harness-container-image-registry-using-docker-connector/) to use your own connector.
### Supported steps
When you use virtual machine infrastructure, only the following step categories are supported:
**SBOM steps**:
* SBOM Orchestration
* SBOM Policy Enforcement
* SLSA Verification
**AWS CDK steps**:
* AWS CDK Bootstrap
* AWS CDK Deploy
* AWS CDK Rollback
* AWS CDK Destroy
**Serverless AWS Lambda steps**:
* Serverless AWS Lambda Prepare
* Serverless AWS Lambda Package
* Serverless AWS Lambda Deploy V2
* Serverless AWS Lambda Rollback
**Download steps**:
* Download AWS S3
* Download Harness Store
**Source control steps**:
* Git Clone
***
## Amazon ECS infrastructure
{% hint style="info" %}
**Amazon ECS infrastructure feature flag**
Amazon ECS support for containerized step groups requires the feature flag `CDS_ENABLE_ECS_CONTAINER_STEP_GROUP_INFRA`. Contact [Harness Support](mailto:support@harness.io) to enable the feature.
{% endhint %}
When you select **Amazon ECS** as the infrastructure type, the containerized step group runs on AWS ECS Fargate infrastructure. You can run containerized Continuous Delivery steps, such as AWS CDK deployments, without a Kubernetes cluster. Teams that already operate in ECS can use the same infrastructure.
### AWS cloud provider
Select or add a Harness AWS connector configured with the necessary ECS permissions, VPC settings, cluster information, and IAM roles. The connector configuration includes the settings for ECS Fargate execution, including region, cluster, VPC, subnets, security groups, and IAM roles.
Go to [Add an AWS connector](https://developer.harness.io/docs/platform/connectors/cloud-providers/add-aws-connector) to configure a connector.
### Supported steps on Amazon ECS
When you use Amazon ECS infrastructure, only the following step categories are supported:
**SBOM steps**:
* SBOM Orchestration
* SBOM Policy Enforcement
* SLSA Verification
**AWS CDK steps**:
* AWS CDK Bootstrap
* AWS CDK Deploy
* AWS CDK Rollback
* AWS CDK Destroy
**Serverless AWS Lambda steps**:
* Serverless AWS Lambda Prepare
* Serverless AWS Lambda Package
* Serverless AWS Lambda Deploy V2
* Serverless AWS Lambda Rollback
**Download steps**:
* Download AWS S3
* Download Harness Store
**Source control steps**:
* Git Clone
***
## Kubernetes infrastructure
{% hint style="info" %}
**ECS Fargate delegate support**
Kubernetes infrastructure for containerized step groups supports ECS Fargate-based delegates. You can use delegates running on AWS ECS Fargate to orchestrate containerized step execution on your Kubernetes cluster. In most configurations, this removes the need for Kubernetes-based delegates when your delegate infrastructure is on ECS.
To use ECS Fargate delegates with Kubernetes containerized step groups, contact [Harness Support](mailto:support@harness.io) to enable the following feature flags.
Flags required for all ECS Fargate delegate configurations:
* **`CDS_INIT_CONTAINER_V2_ASYNC_STEP`**: Uses `AsyncExecutable` for the `InitContainerV2` step so it can submit a delegate task and return a callback ID for asynchronous execution without blocking pipeline progress.
* **`CDS_CONTAINER_STEP_DELEGATE_SELECTOR_PRECEDENCE`**: Ensures delegate selectors follow precedence rules when routing containerized step tasks, which prevents conflicts when you use a mix of Delegate 1.0 and Delegate 3.x.
Flags required for Kubernetes infrastructure with Delegate 3.x:
* **`CDS_CONTAINER_STEP_USE_SINGLE_STEP_TASK`**: Enables single task-based execution for Kubernetes containerized step groups on Delegate 3.x.
* **`CDS_CONTAINER_STEP_GROUP_STEPS_USE_RUNNER`**: Switches Continuous Delivery container step group steps to runner-based execution.
* **`PL_RUNNER_K8S_INFRA_USE_SCHEDULED_TASK_API`**: Routes containerized step execution to the Runner Scheduled Task API for Kubernetes infrastructure.
Go to [Install a delegate on Amazon ECS or AWS Fargate](https://developer.harness.io/docs/platform/delegates-v2/install-a-delegate/install-delegate-ecs-fargate/) to set up an ECS Fargate delegate.
{% endhint %}
When you select **Kubernetes** as the infrastructure type, configure the following settings.
### Kubernetes cluster
Select or add a Harness Kubernetes Cluster connector to connect to the cluster where the containers run.
### Namespace
Enter an existing namespace in the cluster.
### Shared paths
This setting is the same as the Kubernetes `mountPath`. The `name` for the `volumeMounts` is added internally.
Enter shared directories or specific paths within the filesystem to share them between containers running in the same pod.
### Volumes
This setting maps directly to Kubernetes volumes. Harness supports the following volume types:
* Host Path (`hostPath`)
* Empty Directory (`emptyDir`)
* Persistent Volume Claim (`persistentVolumeClaim`)
* ConfigMaps (`configMap`)
* Kubernetes Secrets (`secret`)
**ConfigMaps and secrets as volumes**
**Mount a ConfigMap as a volume**
Perform the following steps to mount a Kubernetes ConfigMap as a volume in a pod:
1. Under **Volumes**, click **Add**.
2. Set the following values:
* **Mount Path**: Path inside the container where the ConfigMap is mounted.
* **Type**: Select **Config Map** from the dropdown.
* **Config Map Name**: Enter the name of the Kubernetes ConfigMap.
* **Optional**: Select this checkbox to make the ConfigMap optional, so the step does not fail if the ConfigMap is missing.
Once configured, the specified ConfigMap is mounted at the defined path in the pod.
Sample YAML for adding ConfigMaps in a volume
```yaml
volumes:
- mountPath: /dir
type: ConfigMap
spec:
name: test_config
optional: false
```
Go to the [Kubernetes documentation on mounting ConfigMaps as volumes](https://kubernetes.io/docs/tasks/configure-pod-container/configure-pod-configmap/#add-configmap-data-to-a-volume) to review the volume fields.
**Mount a Kubernetes secret as a volume**
Perform the following steps to mount a Kubernetes secret:
1. Under **Volumes**, click **Add**.
2. Set the following values:
* **Mount Path**: Path inside the container where the secret is mounted.
* **Type**: Select **Secret** from the dropdown.
* **Secret Name**: Enter the name of the Kubernetes secret.
* **Optional**: Select this checkbox to make the secret optional.
These are Kubernetes-native secrets, not Harness secrets. Harness does not mask or redact the secret values in this case.
Go to the [Kubernetes documentation on mounting secrets as volumes](https://kubernetes.io/docs/concepts/configuration/secret/) to review the secret volume fields.
Sample YAML for a secret volume
```yaml
volumes:
- mountPath: /dir/test
type: Secret
spec:
name: test
optional: false
```
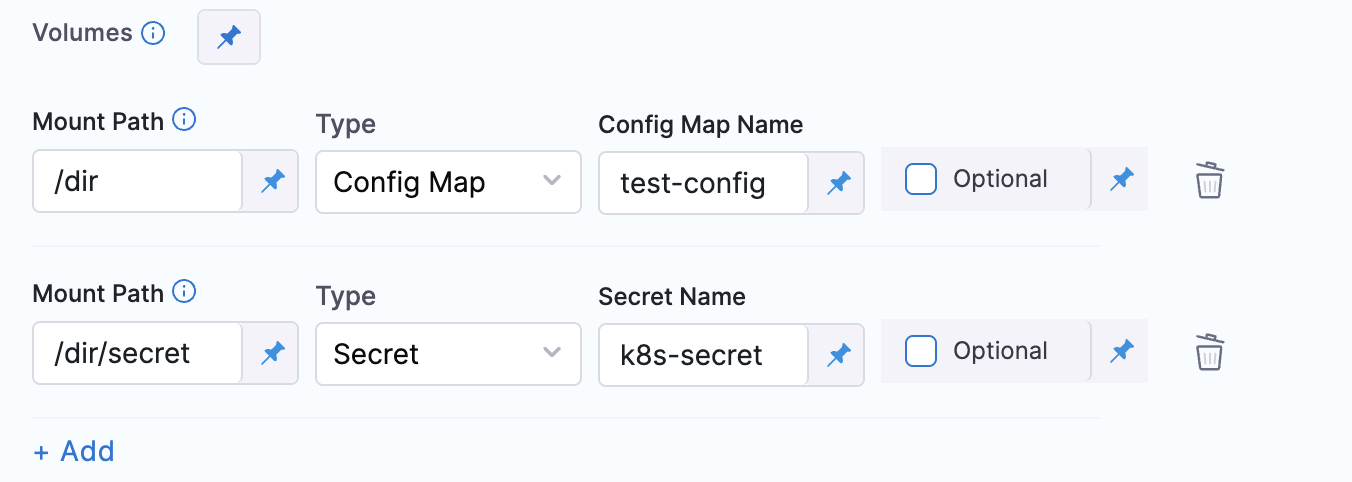
**Additional notes**: You can mount only one volume per mount path.
### Service account name
Specify a Kubernetes service account for step containers to use when communicating with the Kubernetes API server. Leave this blank to use the namespace's default service account.
### Automount service account token
An application running inside a pod can access the Kubernetes API using automatically mounted service account credentials. Go to [Accessing the cluster](https://kubernetes.io/docs/tasks/access-application-cluster/access-cluster/) to review how a pod uses those credentials.
To use a different service account, enter its name here.
### Labels
Enter any labels to apply to the pods.
### Annotations
Enter any annotations to apply to the pods.
### Privileged
This is the standard `privileged` property for the Kubernetes `securityContext`.
When this setting is enabled, it grants the container elevated privileges within the underlying host environment. The container has access to all Linux kernel capabilities and devices, similar to processes that run outside the container. It removes the isolation provided by the container runtime and can pose security risks if you do not use it carefully.
### Allow privilege escalation
This is the standard `allowPrivilegeEscalation` property for the Kubernetes `securityContext`.
When this setting is enabled, the container can gain additional privileges beyond those granted during container startup.
### Add capabilities
This is the standard `add` setting for the `capabilities` property in the Kubernetes `securityContext`.
Add the name of the capability, such as `NET_ADMIN`.
### Drop capabilities
This is the standard `drop` setting for the `capabilities` property in the Kubernetes `securityContext`.
Add the name of the capability, such as `CHOWN`.
### Run as non root
Enable this setting to run the container as a non-root user.
### Read-only root filesystem
This is the standard `readOnlyRootFilesystem` setting for the `securityContext` property.
Enable this setting to mount the root filesystem of the container as read-only.
### Run as user
This is the standard `runAsUser` setting for the `securityContext` property.
Specify the user ID (UID) under which the container runs.
### Priority class
This is the standard Kubernetes `PriorityClass`.
Enter a standard `priorityClassName`, such as `system-node-critical`.
### Node selector
This is the standard Kubernetes `nodeSelector`.
Enter a key, such as `disktype`, and a value, such as `ssd`.
### Tolerations
These are the standard Kubernetes `tolerations`. Use the settings to specify that a pod can tolerate, or ignore, the effects of node taints.
### Init timeout
This is the standard Kubernetes `timeoutSeconds` for `initContainers`.
### Override image connector for Kubernetes
By default, at pipeline runtime, Harness pulls certain images from public Docker Hub repositories. These images are used only for backend processes. At runtime, the Harness Delegate makes an outbound connection to the public repository and pulls the images.
The Harness Container Image Registry is dedicated exclusively to Harness-supported images.
You can override the default behavior and download your build images from this repository instead. To view the list of images in this registry, enter the following command:
```bash
curl -X GET https://app.harness.io/registry/_catalog
```
Add or select a connector to use instead of the default connector used for the Harness Container Image Registry.
Go to [Connect to the Harness container image registry](https://developer.harness.io/docs/platform/connectors/artifact-repositories/connect-to-harness-container-image-registry-using-docker-connector/) to use your own connector.
### Advanced settings
In **Advanced**, you can use the following options:
* [Delegate Selector](https://developer.harness.io/docs/platform/delegates/manage-delegates/select-delegates-with-selectors/)
* [Conditional Execution](https://developer.harness.io/docs/platform/pipelines/step-skip-condition-settings)
* [Failure Strategy](https://developer.harness.io/docs/platform/pipelines/failure-handling/define-a-failure-strategy-on-stages-and-steps)
* [Looping Strategy](https://developer.harness.io/docs/platform/pipelines/looping-strategies/looping-strategies-matrix-repeat-and-parallelism)
***
## Containerized step group example
When you run a pipeline that uses a containerized step group, you can see the container setup in the automatically generated **Initialize** step in the pipeline execution.
Select **Initialize** to see its log and how the container is set up.
Step group setup log
In the following log, the containerized step group is created and a Background step using Docker in Docker (DinD) is also set up. The Background step is only required for certain subsequent step types that need DinD. It is provided here as an example only.
```
Successfully assigned / to
Pulling image "harness/ci-addon:1.16.8"
Successfully pulled image "harness/ci-addon:1.16.8" in 437.806182ms (437.815597ms including waiting)
Created container setup-addon
Started container setup-addon
Container image "harness/drone-git:1.3.4-rootless" already present on machine
Created container step-harness-git-clonem1
Started container step-harness-git-clonem1
Container image "harness/drone-git:1.3.4-rootless" already present on machine
Created container step-harness-git-clonem2
Started container step-harness-git-clonem2
Pulling image "harnessdev/sam-deploy:1.82.0-latest"
Successfully pulled image "harnessdev/sam-deploy:1.82.0-latest" in 429.518494ms (429.527506ms including waiting)
Created container step-samdeploy
Started container step-samdeploy
Pulling image "harnessdev/sam-build:1.82.0-latest"
Successfully pulled image "harnessdev/sam-build:1.82.0-latest" in 380.845932ms (380.855397ms including waiting)
Created container step-sambuild
Started container step-sambuild
Container image "docker:dind" already present on machine
Created container step-dind
Started container step-dind
Pulling image "harness/ci-lite-engine:1.16.8"
Successfully pulled image "harness/ci-lite-engine:1.16.8" in 355.654902ms (355.690135ms including waiting)
Created container lite-engine
Started container lite-engine
```
***
## Harness Docker connector for all group steps
In each step in a containerized step group, provide a [Harness connector](https://developer.harness.io/docs/platform/connectors/cloud-providers/ref-cloud-providers/docker-registry-connector-settings-reference/) to a Docker container registry and an image for the container step to run.
You can create connectors while you add steps, or separately, outside of pipeline creation. Images are specified at the step level.
Add a Docker registry connector
Harness offers several types of Docker-compliant cloud provider and artifact repository connectors, and there are several ways to create connectors. The following examples show how to create a [Docker connector](https://developer.harness.io/docs/platform/connectors/cloud-providers/ref-cloud-providers/docker-registry-connector-settings-reference/).
In the Harness Platform, you can use the connector creation wizard. Perform the following steps to create the connector:
1. In Harness, go to **Account Settings**, **Organization Settings**, or **Project Settings**, depending on the scope at which you want to create the connector.
2. Select **Connectors**, select **New Connector**, and then select the **Docker Registry** connector.
3. Enter a **Name** and select **Continue**.
4. Configure the **Details** settings, and then select **Continue**:
* **Provider Type**: Select **DockerHub**.
* **Docker Registry URL**: Enter `https://docker.dev.harness.io/v2/`.
* **Authentication**: For the quickest setup, select **Anonymous**.
5. Connect using a Harness Delegate, and then select **Continue**.
6. Select any delegate, or select or create a specific delegate, and then select **Save and Continue**.
7. When the connection test is complete, select **Finish**.
You can create connectors in Harness YAML:
```yaml
connector:
name: Docker Hub with Pwd
identifier: Docker_Hub_with_Pwd
description: ""
orgIdentifier: default
projectIdentifier: CD_Docs
type: DockerRegistry
spec:
dockerRegistryUrl: https://docker.dev.harness.io/v2/
providerType: DockerHub
auth:
type: Anonymous
executeOnDelegate: true
```
You can create a Docker connector with the Create a Connector endpoint:
```bash
curl --location --request POST 'https://app.harness.io/gateway/ng/api/connectors?accountIdentifier=123456' \
--header 'Content-Type: text/yaml' \
--header 'x-api-key: PERSONAL_ACCESS_TOKEN' \
--data-raw 'connector:
name: dockerhub
identifier: dockerhub
description: ""
tags: {}
orgIdentifier: default
projectIdentifier: APISample
type: DockerRegistry
spec:
dockerRegistryUrl: https://docker.dev.harness.io/v2/
providerType: DockerHub
auth:
type: Anonymous'
```
For the Terraform Provider Docker connector resource, go to the Terraform documentation for `harness_platform_connector_docker`.
Here is an example of a Terraform provider Docker connector:
```hcl
# credentials anonymous
resource "harness_platform_connector_docker" "test" {
identifier = "identifier"
name = "name"
description = "test"
tags = ["foo:bar"]
type = "DockerHub"
url = "https://docker.dev.harness.io/v2/"
delegate_selectors = ["harness-delegate"]
}
```
{% hint style="info" %}
**Image pull limits**
* When pulling images from Docker repositories, Harness is restricted by Docker repository limits, such as [Docker Hub limits](https://docs.docker.com/docker-hub/download-rate-limit/).
* The maximum number of artifact image tags fetched by Harness is 10000.
{% endhint %}
When you configure pipelines, you most often select a Docker connector when a step needs to pull an image. For example, if a Shell Script step needs to run curl commands, you might pull an image that contains the curl binary.
Harness also uses a Docker connector to pull the Harness images that support pipeline execution. Harness can pull the images from the public Harness container registry, using the default built-in Harness Image connector, or you can configure pipelines to use your own Docker connector. Use that connector to pull with authentication credentials, or to pull from a private container registry where you have cloned the Harness images. Go to [Connect to the Harness container image registry](https://developer.harness.io/docs/platform/connectors/artifact-repositories/connect-to-harness-container-image-registry-using-docker-connector/) to configure that connector.
***
## DinD Background step
Some steps in a containerized step group might require Docker in Docker (DinD). For example, some deployment types use DinD because of the requirements of their platforms. Go to [Background step](/continuous-delivery/use-continuous-delivery/cd-building-blocks/cd-steps/containerized-steps/background-step.md) to configure the Background step.
{% hint style="info" %}
**When Docker in Docker is required**
There is no DinD requirement for containerized step groups. Unless a step requires DinD, Harness needs only a Kubernetes cluster to run the containerized step.
If a Harness deployment type requires DinD, the Background step is added automatically as part of the stage Execution setup.
Whether the DinD step is added automatically or manually, you must configure it.
{% endhint %}
If any step in a containerized step group requires DinD, you can add a **Background** step that performs the Docker in Docker (DinD) setup.

The Background step creates the DinD environment. In this environment, each subsequent step group step runs inside the Kubernetes pod as a container.
### Container registry
**Container Registry** is the Harness container registry connector that connects to the container registry hosting the image to use for this step.
### Image
This is the container image to use for the background service.
Enter `docker:dind`.
### Entry point
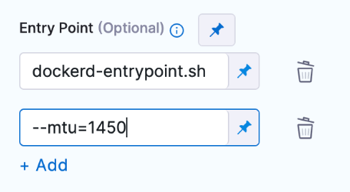
Supply a list of arguments in `exec` format. Enter each argument separately.
{% tabs %}
{% tab title="Visual" %}
{% endtab %}
{% tab title="YAML" %}
```yaml
entrypoint:
- dockerd-entrypoint.sh
- "--mtu=1450"
```
{% endtab %}
{% endtabs %}
**Entry Point** arguments override the image `ENTRYPOINT` and any commands in the **Command** field.
### Shell and command
For **Shell**, select the shell script type for the arguments and commands defined in **Entry Point** and **Command**.
In **Command**, enter POSIX shell script commands to execute inside the container.
For example, a command that checks the Java version installed on the system and verifies that it is equal to 17:
```bash
JAVA_VER=$(java -version 2>&1 | head -1 | cut -d'"' -f2 | sed '/^1\./s///' | cut -d'.' -f1)
if [[ $JAVA_VER == 17 ]]; then
echo successfully installed $JAVA_VER
else
exit 1
fi
```
The following notes apply to commands in this step:
* You can use `docker-compose up` to start multiple services in one Background step.
* You can run PowerShell commands on Windows virtual machines running in AWS build farms.
* You can run PowerShell Core commands in pods or containers that have pwsh installed.
### Privileged
Enable this option to run the container with escalated privileges. This is equivalent to running a container with the Docker `--privileged` flag.
### Report paths
Specify the file paths or directories within the container where reports or log files generated by applications or processes running inside the container are stored.
### Environment variables
You can inject environment variables into a container and use them in the **Command** script. You must enter a **Name** and **Value** for each variable.
You can reference environment variables in the **Command** script by their name. For example, a Bash script uses `$var_name` or `${var_name}`, and a Windows PowerShell script uses `$Env:varName`.
### Image pull policy
Select an option to set the pull policy for the image:
* **Always**: The kubelet queries the container image registry to resolve the name to an image digest every time the kubelet launches a container. If the kubelet encounters an exact digest cached locally, it uses its cached image. Otherwise, the kubelet downloads (pulls) the image with the resolved digest, and uses that image to launch the container.
* **If Not Present**: The image is pulled only if it is not already present locally.
* **Never**: The image is assumed to exist locally. No attempt is made to pull the image.
### Set container resources
Maximum resource limits for containers that clone the codebase at runtime. Go to [Resource units in Kubernetes](https://kubernetes.io/docs/concepts/configuration/manage-resources-containers/#resource-units-in-kubernetes) to review resource units.
### DinD Background step example
When you run a pipeline that uses a containerized step group and a Background step, you can see the DinD setup in the step log in the pipeline execution.
Select the step to see its log and how DinD is set up. The general sequence is:
1. The log shows certificate requests being self-signed for the Docker in Docker (DinD) server and client.
2. The DinD environment is starting up.
3. The log indicates that containerd is not running, and the managed containerd process starts.
4. Containerd starts with information about the revision and version.
5. Plugins are loaded, such as snapshotter, content, metadata, differ, event, GC scheduler, lease manager, NRI (disabled), runtime, sandbox, streaming, and services.
6. The log ends without further actions or errors.
***
## AWS SAM and Serverless.com connectors with containerized step groups
For AWS SAM and Serverless deployments with Continuous Delivery containerized steps, a Harness connector that uses IRSA and IAM roles for authentication performed by the Harness Delegate could not deploy.
The service account specified in the step group configuration was not used by the step images during deployment.
The following enhancements address this issue.
* **Additional credential parameters**: In addition to the access key and secret key, Harness transmits the cross-account role Amazon Resource Name (ARN) and an optional external ID. The step images use these credentials to assume the roles required for deployment.
* **Service account integration**: You can use the service account specified in the step group configuration.
The following environment variables are configured in the images:
1. Specified in the connector:
* `PLUGIN_AWS_ROLE_ARN` (cross-account role)
* `PLUGIN_AWS_STS_EXTERNAL_ID`
* `PLUGIN_AWS_ACCESS_KEY`
* `PLUGIN_AWS_SECRET_KEY`
2. `PLUGIN_REGION` (region provided in the infrastructure configuration)
To use the Harness connector for AWS SAM and Serverless.com container steps, configure the connector and the service account.
### Connector configuration
In the connector configuration, configure the cross-account role and an optional external ID.


The connection test verifies delegate connectivity to the AWS account.

### Service account configuration
For the pods to connect to the AWS account, configure the service account in the step group settings.

If the access key and secret key environment variables are set, the image uses those keys for deployment. If the access key and secret key are not configured, the image assumes the role of the service account configured for deployment.
Harness passes the cross-account role to the image. If you do not want the image to use that role, set the value to empty.

***
## Next steps
* [Background step](/continuous-delivery/use-continuous-delivery/cd-building-blocks/cd-steps/containerized-steps/background-step.md): Configure a Background step, including Docker in Docker.
* [Step group inheritance logic](/continuous-delivery/troubleshooting-and-resources/knowledge-base-article/configuration-inheritance-stepgroup-step.md): Review how step group settings pass to steps.
* [mTLS support through delegates](https://developer.harness.io/docs/platform/delegates/secure-delegates/delegate-mtls-support/): Secure delegate communication with mutual TLS.
* [Connect to the Harness container image registry](https://developer.harness.io/docs/platform/connectors/artifact-repositories/connect-to-harness-container-image-registry-using-docker-connector/): Pull Harness images through your own connector.
{% @harness-feedback/feedback %}