> For the complete documentation index, see [llms.txt](https://developer.harness.io/llms.txt). Markdown versions of documentation pages are available by appending `.md` to page URLs; this page is available as [Markdown](https://developer.harness.io/continuous-delivery/use-continuous-delivery/cd-building-blocks/services/artifact-sources.md).
# CD artifact sources
Connect Harness with the artifact sources to use for deployments.
In DevOps, an artifact source is a location where the compiled, tested, and ready-to-deploy software artifacts are stored. These artifacts can be container images, compiled binary files, executables, or any other software components that are part of the application.
To add an artifact source, you add a Harness connector to the artifact platform (Docker Hub, Google Container Registry, Artifactory, and so on) and then add an artifact source to a Harness service that defines the artifact source name, path, tags, and so on.
This topic lists the artifact sources you can use in your Harness services.
***
### What will you learn in this topic?
* How to [reference artifacts in your manifests](#use-artifacts-in-manifests) with the Harness artifact expression or a hardcoded location.
* How to add an artifact source from [Harness Artifact Registry](#harness-artifact-registry), a [Docker](#docker) registry, or a cloud registry such as [GCR](#google-container-registry-gcr), [GAR](#google-artifact-registry), [ACR](#azure-container-registry-acr), or [ECR](#amazon-elastic-container-registry-ecr).
* How to add package and file artifact sources such as [Nexus](#nexus), [Artifactory](#artifactory), [GitHub packages](#github-packages), and a [custom artifact source](#custom-artifact-source).
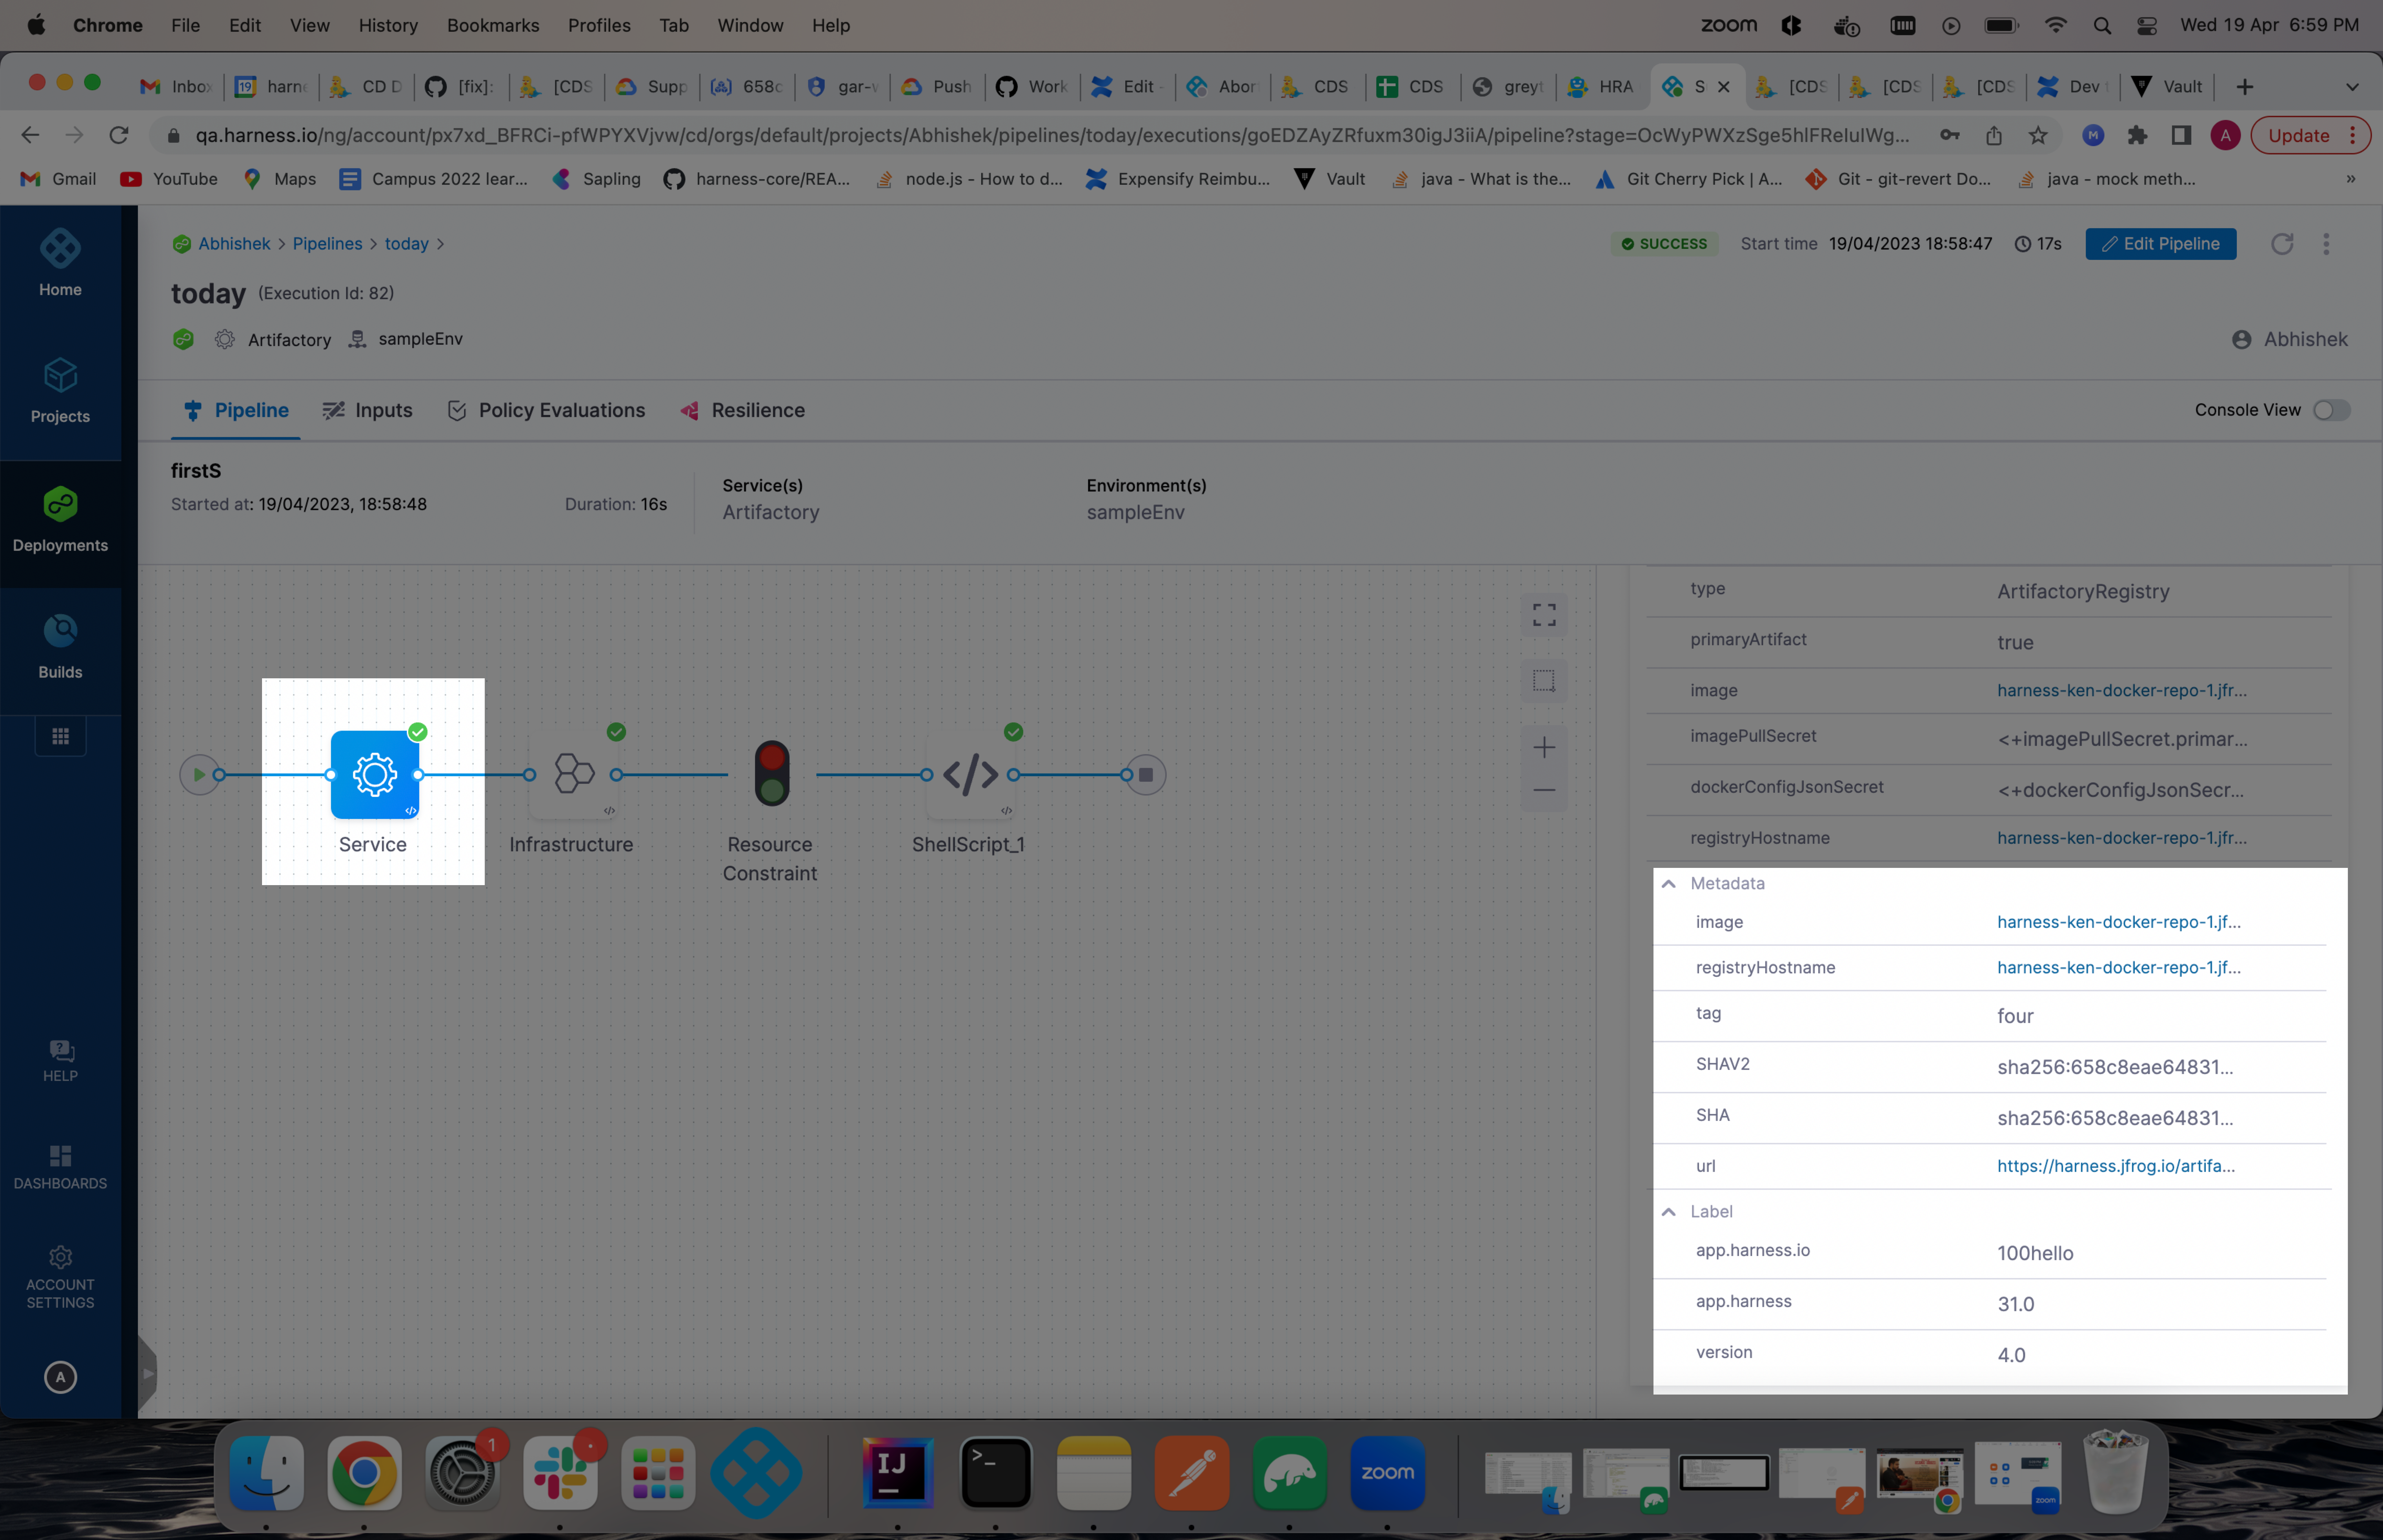
* How to reference artifact properties with [artifact expressions](#docker-artifact-expressions).
* How to [pull an image from a private registry](#pull-an-image-from-a-private-registry) and deploy [sidecar workloads](#sidecar-workloads).
***
{% hint style="warning" %}
**GOOGLE CONTAINER REGISTRY DEPRECATION NOTICE**
Google Container Registry (GCR) is deprecated and scheduled to shut down on **March 18, 2025**. Migrate to Google Artifact Registry (GAR) before this date. Go to [Google's transition documentation](https://cloud.google.com/artifact-registry/docs/transition/transition-from-gcr) to plan the migration.
Go to the [GCR section](#google-container-registry-gcr) to review the Harness GCR configuration.
{% endhint %}
{% hint style="warning" %}
**SECRETS ARE NOT SUPPORTED IN ARTIFACT SOURCE CONFIGURATION**
Harness does not resolve secret references (such as `<+secrets.getValue("secret_name")>`) in artifact source configuration fields like **Region**, **Image Path**, or **Registry ID**. If you use a secret in these fields, the pipeline fails because the raw secret manager expression is passed as-is instead of the resolved value.
Use fixed values or non-secret variable expressions (for example, pipeline, stage, or service variables) for artifact source configuration fields instead.
{% endhint %}
***
### Use artifacts in manifests
You have two options when you reference the artifacts you want to deploy:
* Add an artifact source to the Harness service and reference it with the [Harness service artifacts expression](/harness-platform/use-harness-platform/variables-and-expressions/harness-variables.md#service-artifacts-expressions) `<+artifacts.primary.image>` in the values YAML file.
* Hardcode the artifact into the manifests or values YAML file.
#### Use the artifact expression
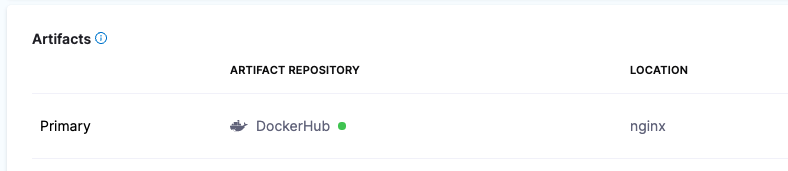
Add the image location to Harness as an artifact in the **Artifacts** section of the service.
This lets you reference the image in your values YAML files with the Harness expression `<+artifacts.primary.image>`.
```yaml
...
image: <+artifacts.primary.image>
...
```
You cannot use Harness variable expressions in your Kubernetes object manifest files. You can only use Harness variable expressions in values YAML files or a Kustomize patch file.
When you select the artifact repo for the artifact, like a Docker Hub repo, you specify the artifact and tag/version to use.
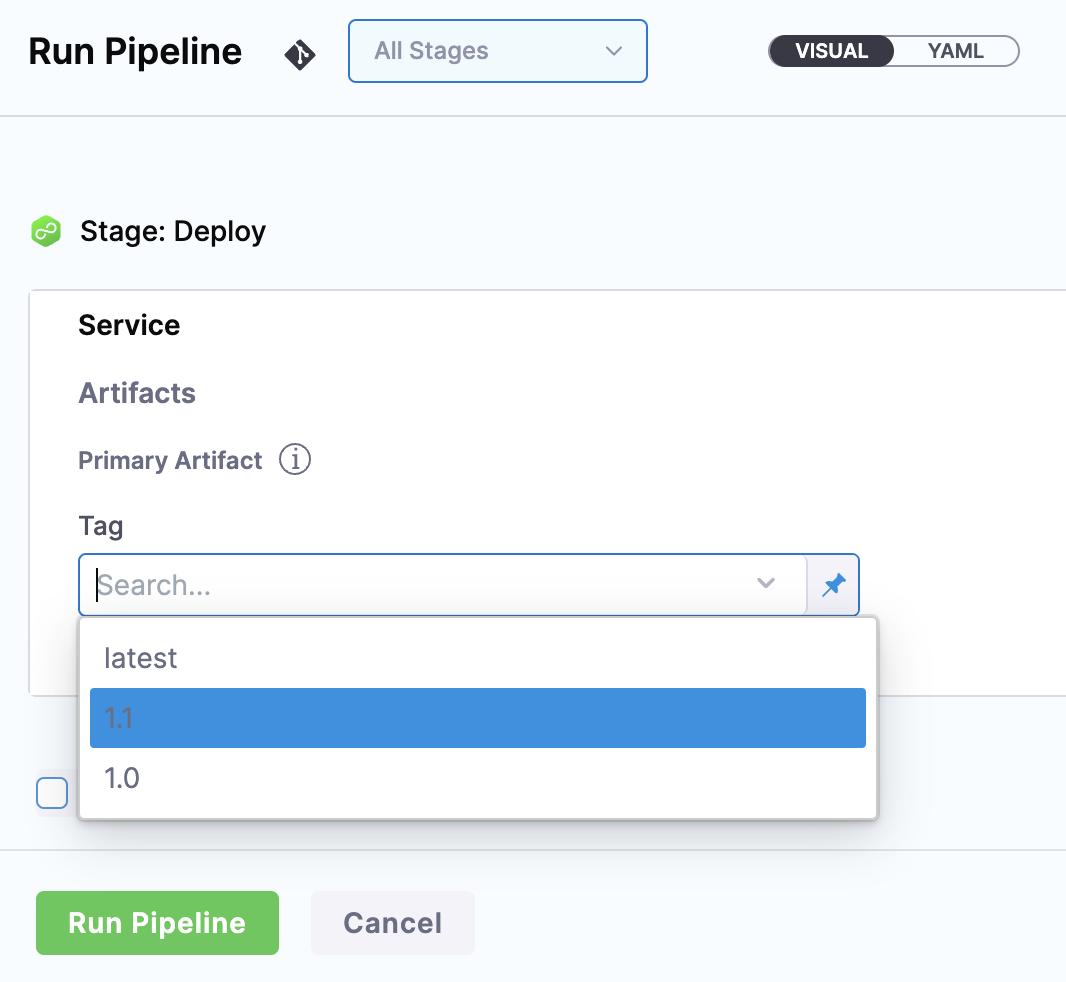
You can select a specific tag/version, use a [runtime input](/harness-platform/use-harness-platform/variables-and-expressions/runtime-inputs.md) so that you are prompted for the tag/version when you run the pipeline, or you can use a Harness variable expression to pass in the tag or version at execution.
The following example uses a runtime input, and you select which image version or tag to deploy.
With a Harness artifact, you can template your manifests and detach them from a hardcoded location. This makes your manifests reusable and dynamic.
#### Hardcode the artifact
If a Docker image location is hardcoded in your Kubernetes manifest (for example, `image: nginx:1.14.2`), add the manifest to Harness in **Manifests** and Kubernetes pulls the image during deployment.
When you hardcode the artifact in your manifests, any artifacts added to your Harness service are ignored.
{% hint style="info" %}
You can configure dependent fields, such as the artifact tag, as runtime inputs when the primary artifact is set as an expression only in YAML, not through the UI.
{% endhint %}
#### Skip artifact consumption for the stage
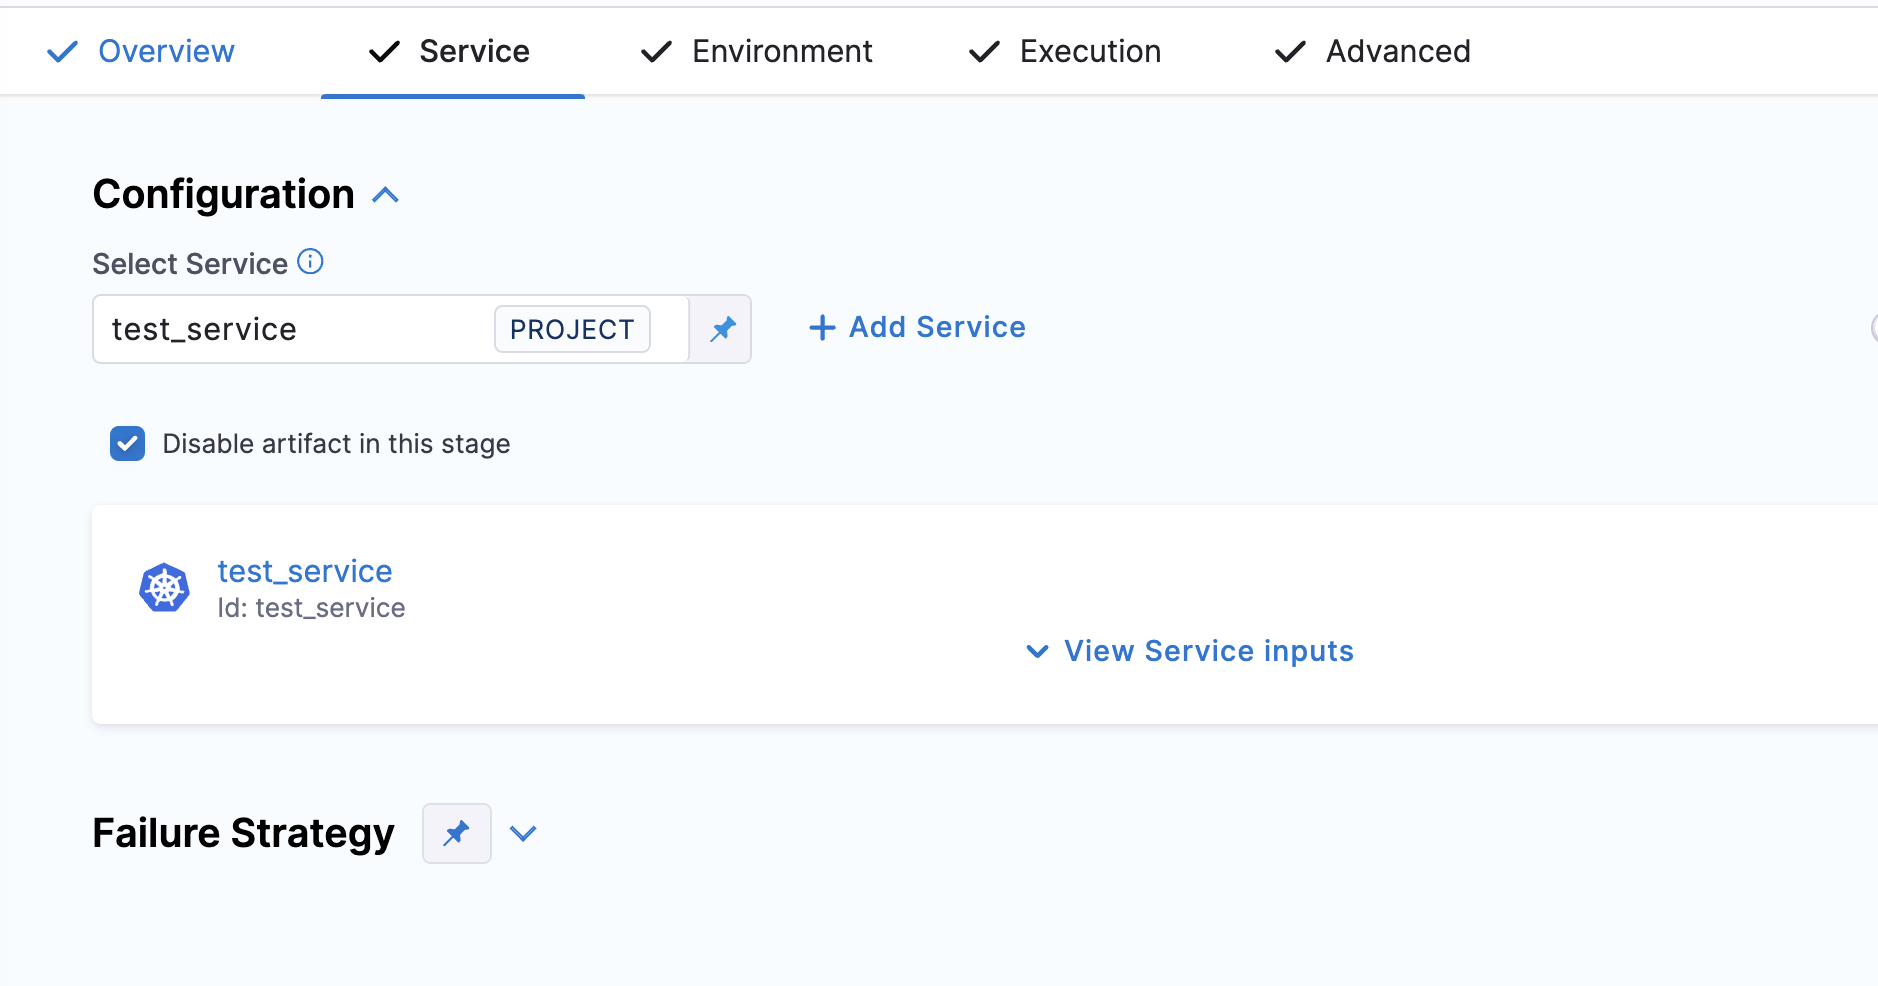
You can bypass artifact consumption checks for a service in a **Deploy** stage by selecting the **Disable artifact in this stage** checkbox. When this option is enabled, the pipeline treats the service as having no artifact configuration and skips the artifact consumption check.
This feature works for:
* **Primary artifacts**: Applies to both single and multiple primary artifact services. If multiple primary artifacts are used, the checkbox applies to all primary artifacts.
* **Sidecar artifacts**: Artifact consumption check is also skipped for sidecar artifacts when this checkbox is enabled.
This logic also applies when the same service is propagated to subsequent stages:
* If you enable **Disable artifact in this stage** for a service in one stage and propagate that service to another stage, artifact consumption check is also skipped in the propagated stage.
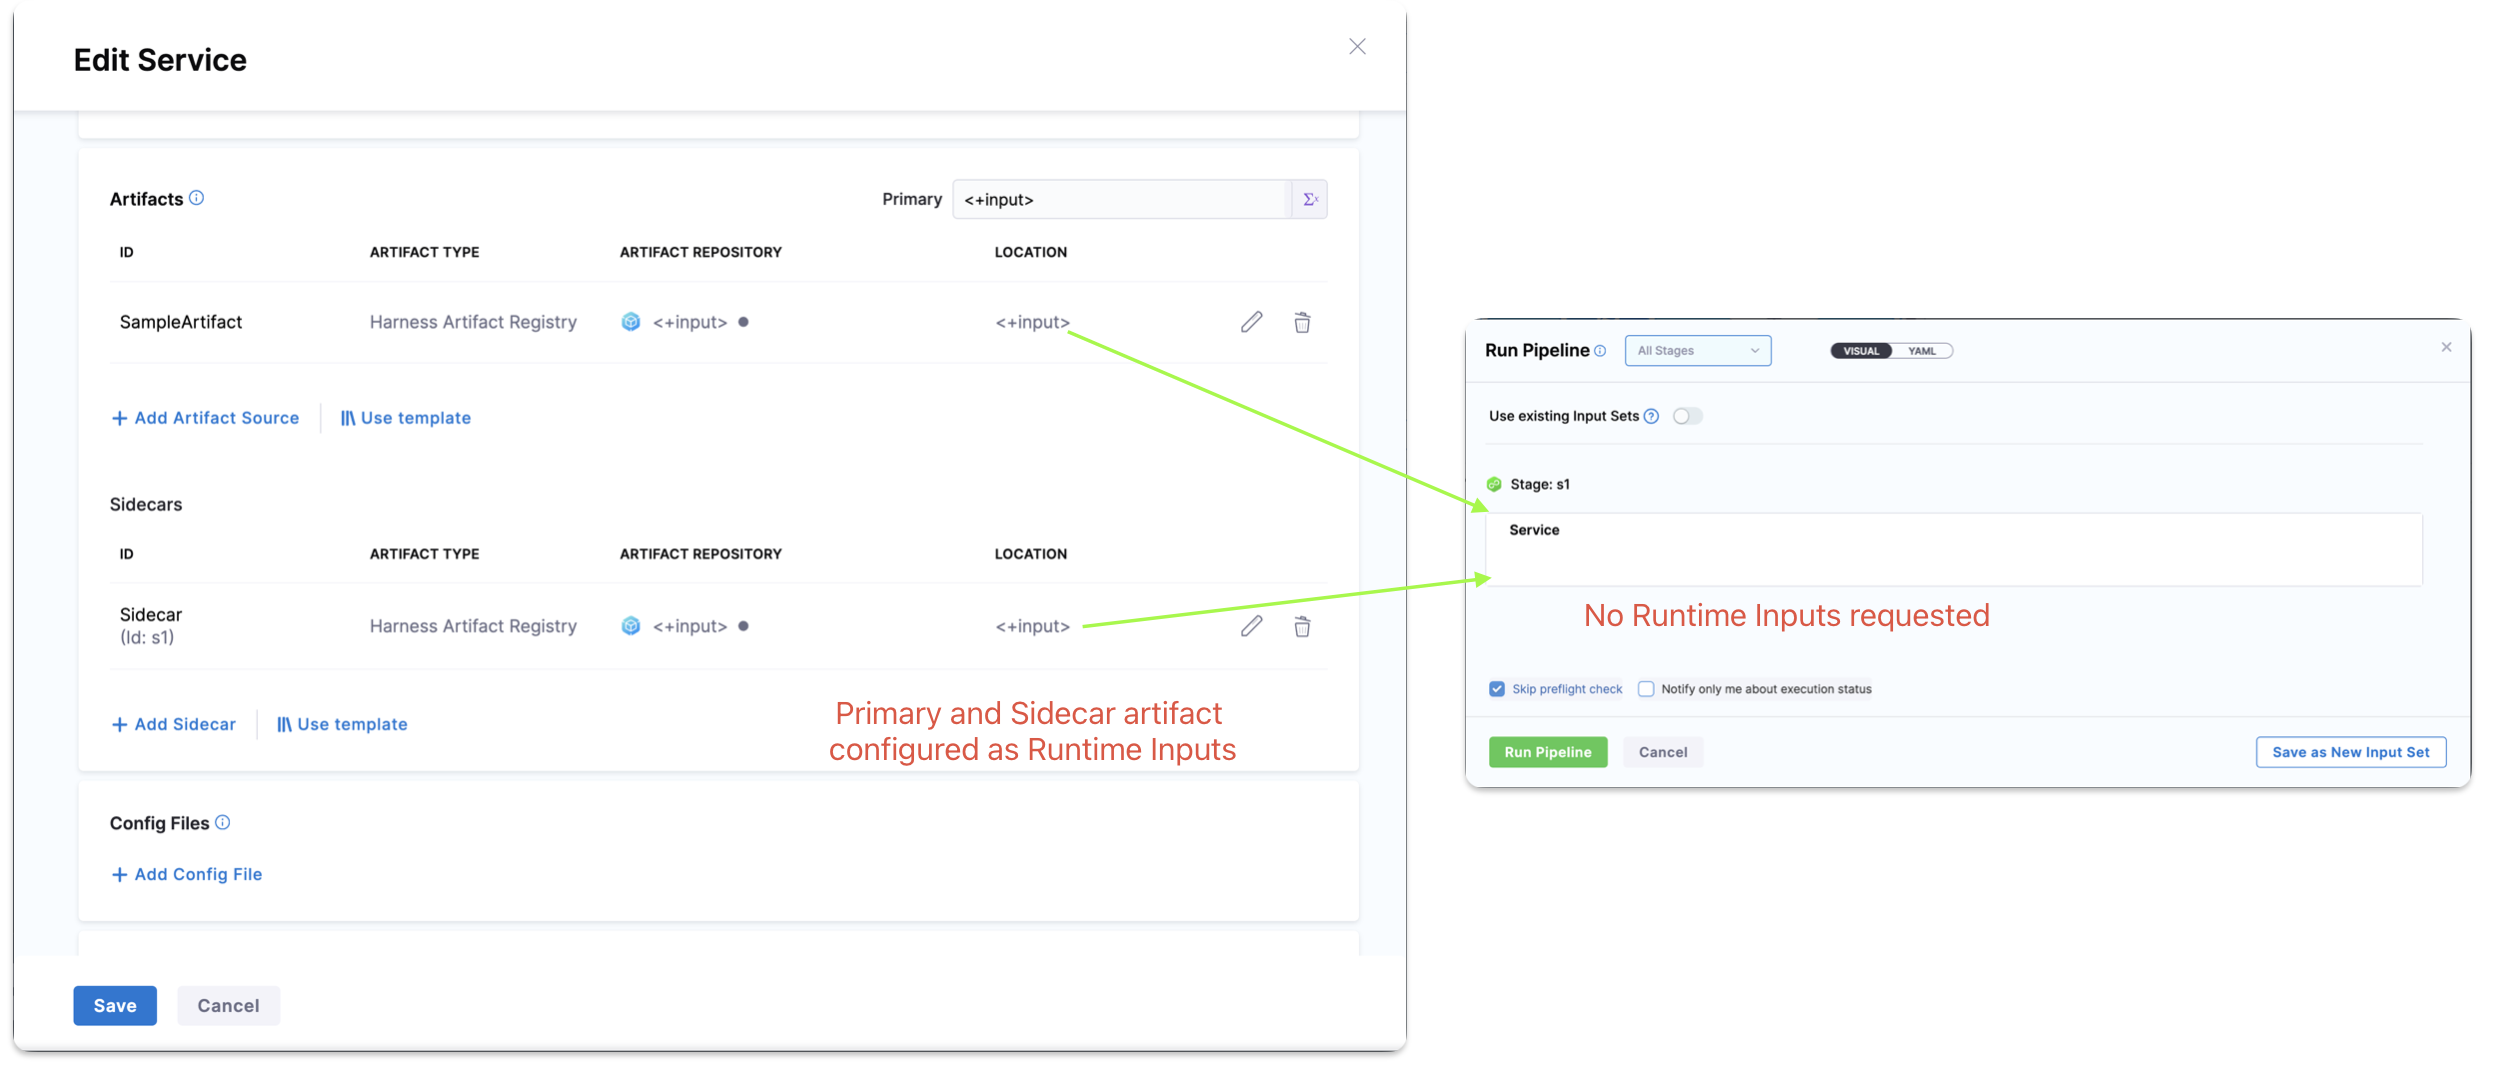
* If the **Disable artifact in this stage** checkbox is enabled, and the artifact or artifact tag is configured as runtime inputs, the pipeline does not prompt for the artifact or artifact tag during execution.
{% hint style="warning" %}
**STEPS THAT NEED AN ARTIFACT FAIL**
If the **Disable artifact in this stage** checkbox is enabled, any steps in the stage that require an artifact are likely to fail. Make sure no steps in the stage depend on an artifact.
{% endhint %}
***
### Harness Artifact Registry
#### Use artifacts from Harness Artifact Registry
Harness Artifact Registry (HAR) is a managed artifact repository that lets you store and manage artifacts directly within your Harness account. HAR supports both container images (Docker) and packaged artifacts (Generic, NPM, NuGet, Maven, and Raw formats), and provides secure, scalable storage that integrates with Harness Continuous Delivery (CD) pipelines.
{% hint style="info" %}
The **Raw** repository format is supported as a Harness Artifact Registry artifact source only for **WinRM** deployment types.
{% endhint %}
{% hint style="info" %}
HAR is natively integrated with Harness CD and does not require a separate connector. However, you need a valid HAR license to use this feature.
To get started with HAR:
* Go to [set up Harness Artifact Registry](/artifact-registry/new-to-artifact-registry/overview.md) to enable HAR.
* Go to the [quickstart guide](/artifact-registry/new-to-artifact-registry/quickstart.md#docker) to create and store Docker images.
* Contact [Harness Support](mailto:support@harness.io) for licensing information.
{% endhint %}
**YAML**
**Service using HAR artifact YAML**
```yaml
service:
name: k8s_service
identifier: k8s_service
orgIdentifier: default
projectIdentifier: Krishika_CD_Samples
serviceDefinition:
spec:
artifacts:
primary:
sources:
- identifier: demo_artifact
type: Har
spec:
registryRef: dev
type: docker
spec:
imagePath: function-plugin
tag: <+input>
digest: ""
primaryArtifactRef: demo_artifact
type: Kubernetes
```
**Harness Manager**
Perform the following steps to add an artifact from Harness Artifact Registry:
1. In your project, in CD (Deployments), select **Services**.
2. Select **New Service**.
3. Enter a name for the service and select **Save**.
4. Select **Configuration**.
5. In **Service Definition**, select **Kubernetes** or another supported deployment type.
6. In **Artifacts**, select **Add Artifact Source**.
7. In **Specify Artifact Repository Type**, select **Artifact Registry**, and then click **Continue**.
8. The **Artifact Registry** option appears in the left navigation.
9. In **Artifact Details**, specify the following:
1. **Artifact Source Identifier**: Enter a name that identifies your artifact source.
2. **Repository Format**: Select the artifact format (for example, `docker`).
3. **Registry**: Select the HAR registry where your images are stored (for example, `dev`).
4. **Repository Type**: Select `docker` for container images.
5. **Image Path**: Enter the name of the image you want to deploy.
6. **Tag**: Enter or select the Docker image tag for the image, or use a [runtime input](/harness-platform/use-harness-platform/variables-and-expressions/runtime-inputs.md) to select at deployment time.
If you use runtime input, when you deploy the pipeline, Harness pulls the list of tags from the repo and prompts you to select one.
10. (Optional) To specify an image digest, use **Digest** and enter the unique identifier for the image you want to use. Specifying an image by tag and digest (rather than tag alone) is useful when you want to deploy an image with a fixed digest/SHA for your service.
If an image with the specified tag/digest combination does not exist in the artifact registry, the pipeline fails.
11. Select **Submit**. The artifact is added to the service definition.
**Permissions**
To use Harness Artifact Registry as an artifact source:
* You need a valid **HAR license**.
* You must have appropriate Role-Based Access Control (RBAC) permissions to access the HAR registry within your Harness account.
Go to the [Harness Artifact Registry documentation](https://app.gitbook.com/s/GmEmgYs6IUcqNiV0OEgB/README) to configure and manage HAR.
***
### Docker
#### Use artifacts in any Docker registry
**YAML**
To use a Docker artifact, you create or use a Harness connector to connect to your Docker repo and then use that connector in your Harness service and reference the artifact to use.
**Docker connector YAML**
```yaml
connector:
name: Docker Hub with Pwd
identifier: Docker_Hub_with_Pwd
description: ""
orgIdentifier: default
projectIdentifier: CD_Docs
type: DockerRegistry
spec:
dockerRegistryUrl: https://index.docker.io/v2/
providerType: DockerHub
auth:
type: UsernamePassword
spec:
username: johndoe
passwordRef: Docker_Hub_Pwd
executeOnDelegate: false
```
**Service using Docker artifact YAML**
```yaml
service:
name: Example K8s2
identifier: Example_K8s2
serviceDefinition:
type: Kubernetes
spec:
manifests:
- manifest:
identifier: myapp
type: K8sManifest
spec:
store:
type: Harness
spec:
files:
- /Templates/deployment.yaml
valuesPaths:
- /values.yaml
skipResourceVersioning: false
artifacts:
primary:
primaryArtifactRef: <+input>
sources:
- spec:
connectorRef: Docker_Hub_with_Pwd
imagePath: library/nginx
tag: stable-perl
identifier: myimage
type: DockerRegistry
gitOpsEnabled: false
```
**API**
Create the Docker connector with the [Create a Connector](https://apidocs.harness.io/tag/Connectors#operation/createConnector) API.
**Docker connector example**
```yaml
curl --location --request POST 'https://app.harness.io/gateway/ng/api/connectors?accountIdentifier=123456' \
--header 'Content-Type: text/yaml' \
--header 'x-api-key: pat.123456.123456' \
--data-raw 'connector:
name: dockerhub
identifier: dockerhub
description: ""
tags: {}
orgIdentifier: default
projectIdentifier: APISample
type: DockerRegistry
spec:
dockerRegistryUrl: https://index.docker.io/v2/
providerType: DockerHub
auth:
type: Anonymous'
```
Create a service with an artifact source that uses the connector using the [Create Services](https://apidocs.harness.io/tag/Services#operation/createServicesV2) API.
**Terraform provider**
For the Terraform provider Docker connector resource, go to [harness\_platform\_connector\_docker](https://registry.terraform.io/providers/harness/harness/latest/docs/resources/platform_connector_docker).
**Docker connector example**
```json
# credentials anonymous
resource "harness_platform_connector_docker" "test" {
identifier = "identifier"
name = "name"
description = "test"
tags = ["foo:bar"]
type = "DockerHub"
url = "https://hub.docker.com"
delegate_selectors = ["harness-delegate"]
}
# credentials username password
resource "harness_platform_connector_docker" "test" {
identifier = "identifier"
name = "name"
description = "test"
tags = ["foo:bar"]
type = "DockerHub"
url = "https://hub.docker.com"
delegate_selectors = ["harness-delegate"]
credentials {
username = "admin"
password_ref = "account.secret_id"
}
}
```
For the Terraform provider service resource, go to [harness\_platform\_service](https://registry.terraform.io/providers/harness/harness/latest/docs/resources/platform_service).
**Service example**
```json
resource "harness_platform_service" "example" {
identifier = "identifier"
name = "name"
description = "test"
org_id = "org_id"
project_id = "project_id"
## SERVICE V2 UPDATE
## We now take in a YAML that can define the service definition for a given Service
## It isn't mandatory for Service creation
## It is mandatory for Service use in a pipeline
yaml = <<-EOT
service:
name: Example K8s2
identifier: Example_K8s2
serviceDefinition:
type: Kubernetes
spec:
manifests:
- manifest:
identifier: myapp
type: K8sManifest
spec:
store:
type: Harness
spec:
files:
- /Templates/deployment.yaml
valuesPaths:
- /values.yaml
skipResourceVersioning: false
artifacts:
primary:
primaryArtifactRef: <+input>
sources:
- spec:
connectorRef: Docker_Hub_with_Pwd
imagePath: library/nginx
tag: stable-perl
identifier: myimage
type: DockerRegistry
gitOpsEnabled: false
EOT
}
```
**Harness Manager**
Perform the following steps to add an artifact from a Docker registry:
1. In your project, in CD (Deployments), select **Services**.
2. Select **New Service**.
3. Enter a name for the service and select **Save**.
4. Select **Configuration**.
5. In **Service Definition**, select **Kubernetes**.
6. In **Artifacts**, select **Add Artifact Source**.
7. In **Select Artifact Repository Type**, select the registry where your Docker artifact is hosted. For this example, select **Docker Registry**, and then select **Continue**.
8. Select or create a [Docker Registry Connector](https://app.gitbook.com/s/3F2TpHXhur2QtQnORSM9/use-harness-platform/connectors/cloud-providers/ref-cloud-providers/docker-registry-connector-settings-reference).
9. Select **Continue**.
10. In **Artifact Source Name**, enter a name that identifies your artifact.
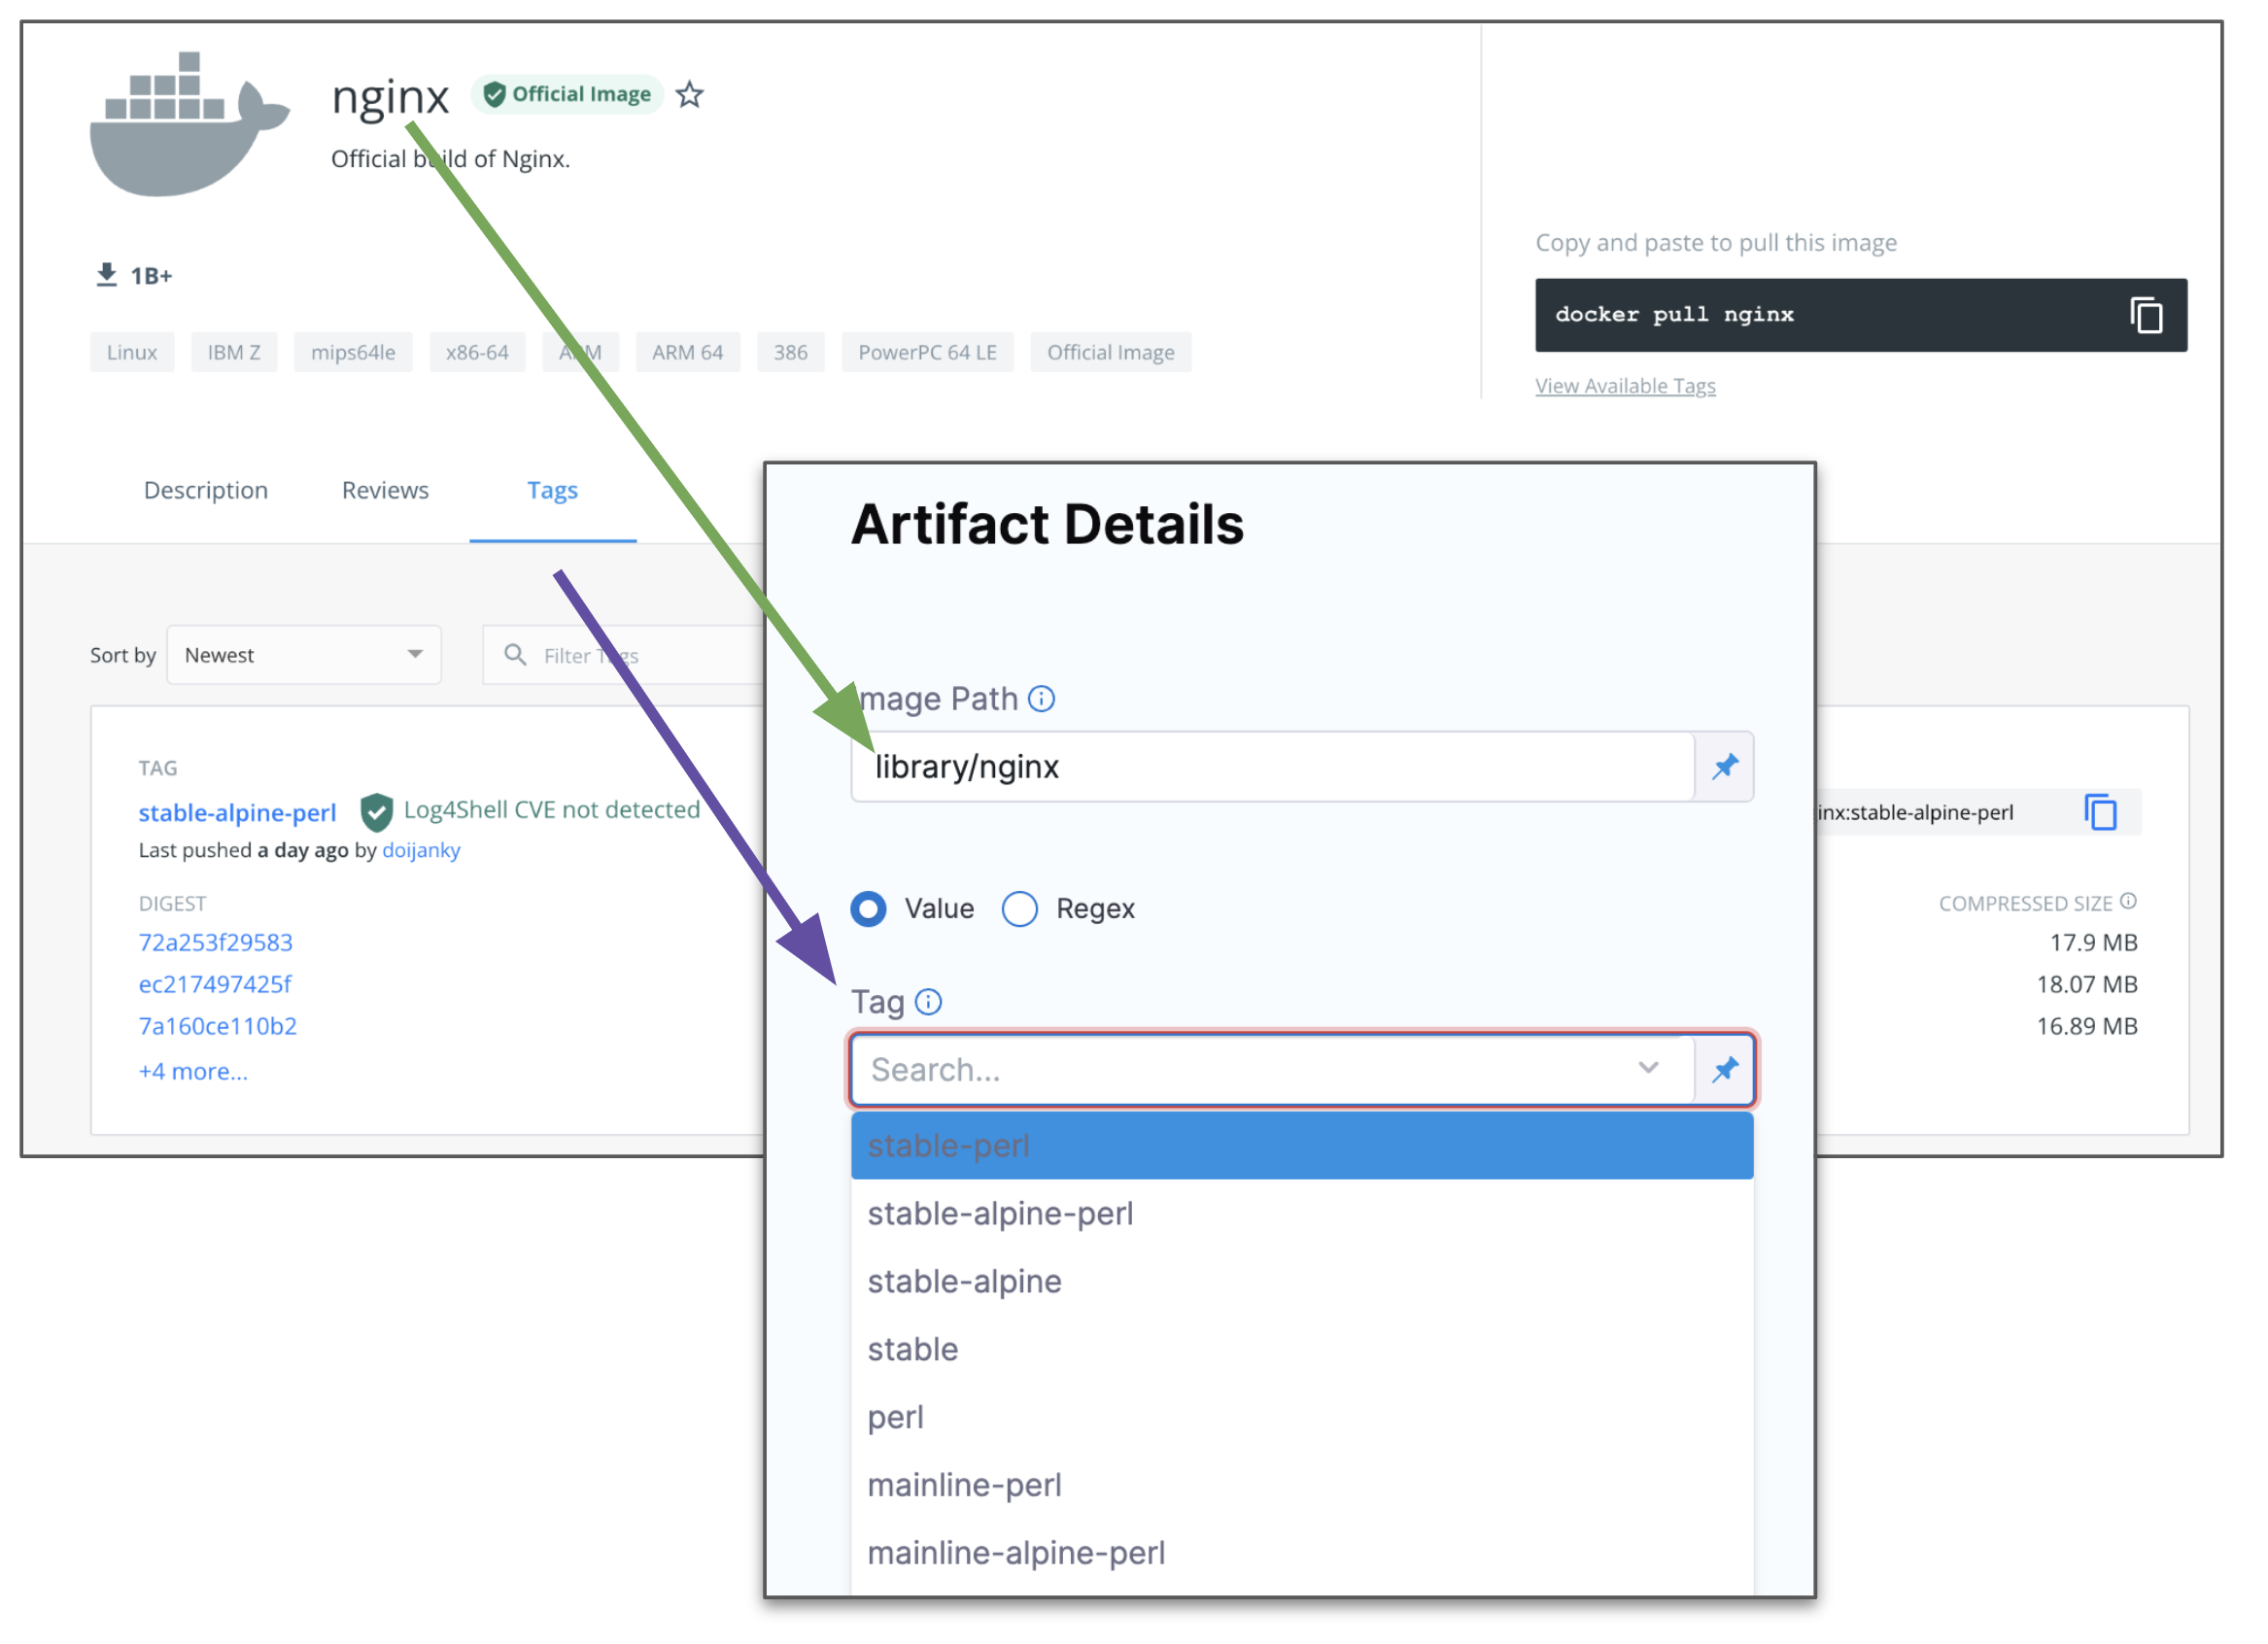
11. In **Image path**, enter the name of the artifact you want to deploy, such as `library/nginx` or `jsmtih/privateimage`.
Official images in public repos often need the label `library`, e.g. `library/tomcat`.
Wildcards are not supported.
12. In **Tag**, enter or select the [Docker image tag](https://docs.docker.com/engine/reference/commandline/tag/) for the image.
13. To specify an image digest, use **Digest** and the unique identifier for the image you want to use. Specifying an image by tag and digest (rather than tag alone) is useful when you want to deploy an image with a fixed digest/SHA for your service.
{% hint style="info" %}
If an image with the specified tag/digest combination does not exist in the artifact registry, the pipeline fails.
{% endhint %}
14. Select **Submit**. The artifact is added to the service definition.
**Important notes**
* For pulling Docker images from Docker repos, Harness is restricted by the limits of the Docker repo. For example, [Docker Hub limits](https://docs.docker.com/docker-hub/download-rate-limit/).
* The maximum number of artifact image tags fetched by Harness that is 10000.
#### Docker artifact expressions
You can reference artifact properties using the following expressions in a values YAML file or in any Harness setting that supports [Harness expressions](/harness-platform/use-harness-platform/variables-and-expressions/harness-variables.md).
| **Expression** | **Description** | **Example** |
| ------------------------------------ | --------------------------------------------------------------------------------------------- | ------------------------------------------------------------------------- |
| `<+artifact.connectorRef>` | Identifier of the connector used by the artifact source | `org.dockerhub` |
| `<+artifact.identifier>` | Identifier of the artifact source in the service definition | `NGINX` |
| `<+artifact.type>` | This will be `DockerRegistry` always | `DockerRegistry` |
| `<+artifact.primaryArtifact>` | Boolean values. `true` in case of primary artifact | `true` |
| `<+artifact.tag>` | This is the Docker tag | `v1` |
| `<+artifact.image>` | This is the image of the particular version. The value is used with `docker pull` command | `index.docker.io/library/nginx:v1` |
| `<+artifact.imagePath>` | This is the name of the image without registry info or tag. | `library/nginx` |
| `<+artifact.imagePullSecret>` | This will be the base64 encoded secret used for pulling the image | |
| `<+artifact.dockerConfigJsonSecret>` | This is the `kubernetes.io/dockerconfigjson` credentials | |
| `<+artifact.label.[PLACEHOLDER]>` | This is the label set in the Docker image. Replace the placeholder with the appropriate label | |
| `<+artifact.metadata.SHA>` | SHA of the Docker image | `sha256:b3ebe55062b76860c6c0c78f5cae81ec393a944bcc96c05b5f411d3560c9f1d8` |
| `<+artifact.metadata.SHAV2>` | Docker supports v1 and v2 format. Both are listed when applicable. | `sha256:6d001fb3022161cdcb5f4df6cca5b5705e064ce873cd16144c3e4de8d2653d0b` |
***
### Google Container Registry (GCR)
{% hint style="warning" %}
**GOOGLE CONTAINER REGISTRY DEPRECATION NOTICE**
Google Container Registry (GCR) is deprecated and scheduled for shutdown on **March 18, 2025**. Migrate your container images and workflows to Google Artifact Registry (GAR) before this date. Go to [Google's transition documentation](https://cloud.google.com/artifact-registry/docs/transition/transition-from-gcr) to plan the migration.
{% endhint %}
#### Use GCR artifacts
You connect to GCR using a Harness GCP connector. Go to the [Google Cloud Platform (GCP) Connector Settings Reference](/harness-platform/use-harness-platform/connectors/cloud-providers/connect-to-google-cloud-platform-gcp/gcs-connector-settings-reference.md) to review the GCR requirements for the GCP connector.
**YAML**
To use a GCR artifact, you create or use a Harness GCP Connector to connect to GCR repo and then use that connector in your Harness service and reference the artifact to use.
**GCP connector YAML**
This example uses a Harness Delegate installed in GCP for credentials.
```yaml
connector:
name: GCR
identifier: GCR
description: ""
orgIdentifier: default
projectIdentifier: CD_Docs
type: Gcp
spec:
credential:
type: InheritFromDelegate
delegateSelectors:
- gcpdocplay
executeOnDelegate: true
```
**Service using GCR artifact YAML**
```yaml
service:
name: Google Artifact
identifier: Google_Artifact
serviceDefinition:
type: Kubernetes
spec:
manifests:
- manifest:
identifier: manifests
type: K8sManifest
spec:
store:
type: Harness
spec:
files:
- account:/Templates
valuesPaths:
- account:/values.yaml
skipResourceVersioning: false
artifacts:
primary:
primaryArtifactRef: <+input>
sources:
- spec:
connectorRef: GCR
imagePath: docs-play/todolist-sample
tag: <+input>
registryHostname: gcr.io
identifier: myapp
type: Gcr
gitOpsEnabled: false
```
**API**
Create the GCR connector with the [Create a Connector](https://apidocs.harness.io/tag/Connectors#operation/createConnector) API.
**GCR connector example**
```curl
curl --location --request POST 'https://app.harness.io/gateway/ng/api/connectors?accountIdentifier=12345' \
--header 'Content-Type: text/yaml' \
--header 'x-api-key: pat.12345.6789' \
--data-raw 'connector:
name: GCRexample
identifier: GCRexample
description: ""
orgIdentifier: default
projectIdentifier: CD_Docs
type: Gcp
spec:
credential:
type: InheritFromDelegate
delegateSelectors:
- gcpdocplay
executeOnDelegate: true'
```
Create a service with an artifact source that uses the connector using the [Create Services](https://apidocs.harness.io/tag/Services#operation/createServicesV2) API.
**Terraform provider**
For the Terraform provider GCP connector resource, go to [harness\_platform\_connector\_gcp](https://registry.terraform.io/providers/harness/harness/latest/docs/resources/platform_connector_gcp).
**GCP connector example**
```json
# Credential manual
resource "harness_platform_connector_gcp" "test" {
identifier = "identifier"
name = "name"
description = "test"
tags = ["foo:bar"]
manual {
secret_key_ref = "account.secret_id"
delegate_selectors = ["harness-delegate"]
}
}
# Credentials inherit_from_delegate
resource "harness_platform_connector_gcp" "test" {
identifier = "identifier"
name = "name"
description = "test"
tags = ["foo:bar"]
inherit_from_delegate {
delegate_selectors = ["harness-delegate"]
}
}
```
For the Terraform provider service resource, go to [harness\_platform\_service](https://registry.terraform.io/providers/harness/harness/latest/docs/resources/platform_service).
**Harness Manager**
You connect to GCR using a Harness GCP connector. Go to the [Google Cloud Platform (GCP) Connector Settings Reference](/harness-platform/use-harness-platform/connectors/cloud-providers/connect-to-google-cloud-platform-gcp.md) to review the GCR requirements for the GCP connector.
Perform the following steps to add an artifact from GCR:
1. In your project, in CD (Deployments), select **Services**.
2. Select **New Service**.
3. Enter a name for the service and select **Save**.
4. Select **Configuration**.
5. In **Service Definition**, select **Kubernetes**.
6. In **Artifacts**, select **Add Artifact Source**.
7. In **Select Artifact Repository Type**, click **GCR**, and then click **Continue**.
8. In **GCR Repository**, select or create a [Google Cloud Platform (GCP) Connector](/harness-platform/use-harness-platform/connectors/cloud-providers/connect-to-google-cloud-platform-gcp.md) that connects to the GCP account where the GCR registry is located.
9. Click **Continue**.
10. In **Artifact Source Name**, enter a name for the artifact.
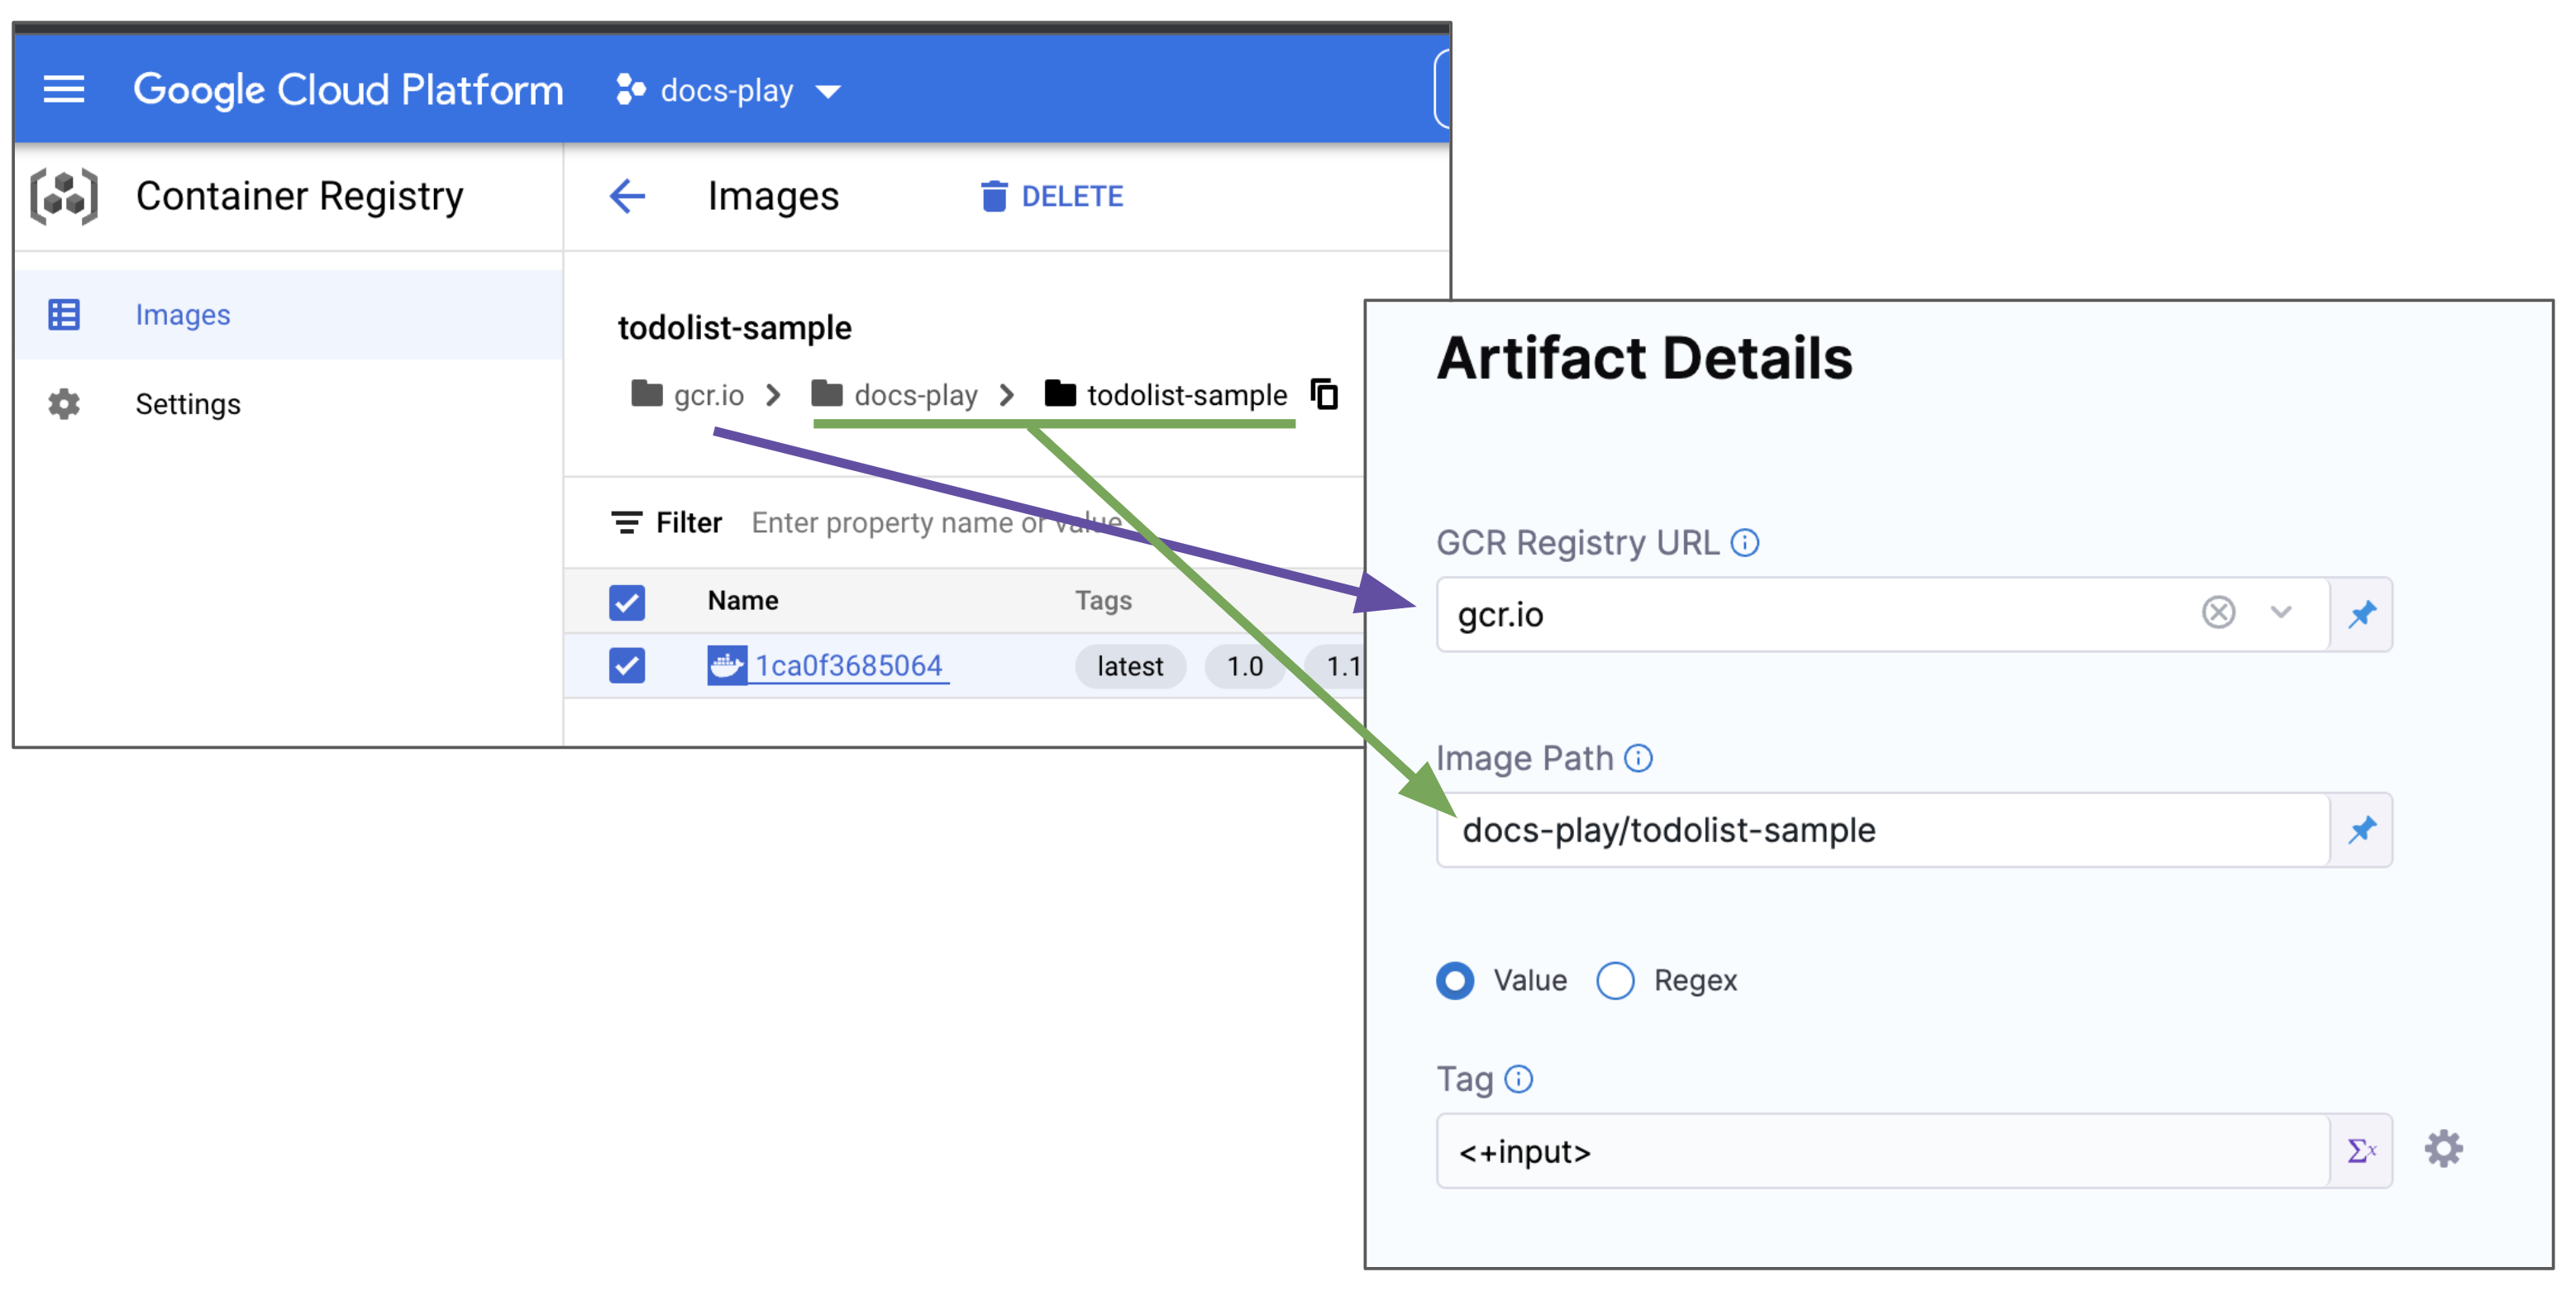
11. In **GCR Registry URL**, select the GCR registry host name, for example `gcr.io`.
12. In **Image Path**, enter the name of the artifact you want to deploy.
Images in repos need to reference a path starting with the project Id that the artifact is in, for example: `myproject-id/image-name`.
13. In **Tag**, enter or select the [Docker image tag](https://docs.docker.com/engine/reference/commandline/tag/) for the image or select a [runtime input or expression](/harness-platform/use-harness-platform/variables-and-expressions/runtime-inputs.md).
If you use runtime input, when you deploy the pipeline, Harness pulls the list of tags from the repo and prompts you to select one.
14. To specify an image digest, use **Digest** and the unique identifier for the image you want to use. Specifying an image by tag and digest (rather than tag alone) is useful when you want to deploy an image with a fixed digest/SHA for your service.
{% hint style="info" %}
If an image with the specified tag/digest combination does not exist in the artifact registry, the pipeline fails.
{% endhint %}
14. Select **Submit**.
The Artifact is added to the **Service Definition**.
#### Permissions
For Google Container Registry (GCR), the following roles are required:
* Storage Object Viewer (roles/storage.objectViewer)
* Storage Object Admin (roles/storage.objectAdmin)
Go to the GCP documentation for [Cloud IAM roles for Cloud Storage](https://cloud.google.com/storage/docs/access-control/iam-roles) to review the required roles.
Make sure the Harness Delegate you have installed can reach `storage.cloud.google.com` and your GCR registry host name, for example `gcr.io`.
#### Use Docker Registry for GCR
If you do not want to use the GCP connector for GCR, you can use the platform-agnostic Docker Registry connector.
Use the following settings:
* **Provider Type**: select **Other (Docker V2 compliant)**.
* **URL**: Enter the GCR URL for your GCP account.
* Example: `https://gcr.io/my-account`.
* **Authentication**:
* **Username**: Enter `_token`.
* The usage of `_token` as a username for GCP authentication typically occurs when using certain command-line utilities or API clients that require an access token instead of a traditional username and password.
* **Password**: Enter the output of the `gcloud auth print-access-token` command using a Harness secret.
Make sure the GCP IAM user you use has the correct permissions to pull from GCR.
**Permissions**
For Google Container Registry (GCR), the following roles are required:
* Storage Object Viewer (roles/storage.objectViewer)
* Storage Object Admin (roles/storage.objectAdmin)
Go to the GCP documentation for [Cloud IAM roles for Cloud Storage](https://cloud.google.com/storage/docs/access-control/iam-roles) to review the required roles.
Make sure the Harness Delegate you have installed can reach `storage.cloud.google.com` and your GCR registry host name, for example `gcr.io`.
#### GCR artifact expressions
You can reference artifact properties using the following expressions in a values YAML file or in any Harness setting that supports [Harness expressions](/harness-platform/use-harness-platform/variables-and-expressions/harness-variables.md).
| **Expression** | **Description** | **Example** |
| ------------------------------------------------- | --------------------------------------------------------------------------------------------- | ------------------------------------------------------------------------- |
| `<+artifact.connectorRef>` | Identifier of the connector used by the artifact source | `org.gcp` |
| `<+artifact.identifier>` | Identifier of the artifact source in the service definition | `Acme_NGINX` |
| `<+artifact.type>` | This will be `Gcr` always | `Gcr` |
| `<+artifact.primaryArtifact>` | Boolean values. `true` in case of primary artifact | `true` |
| `<+artifact.tag>`, `<+artifact.metadata.tag>` | This is the Docker tag | `v1` |
| `<+artifact.image>`, `<+artifact.metadata.image>` | This is the image of the particular version. The value is used with `docker pull` command | `us.gcr.io/cd-project/acme/nginx:v1` |
| `<+artifact.imagePath>` | This is the name of the image without registry info or tag | `cd-project/acme/nginx` |
| `<+artifact.imagePullSecret>` | This will be the base64 encoded secret used for pulling the image | |
| `<+artifact.dockerConfigJsonSecret>` | This is the `kubernetes.io/dockerconfigjson` credentials | |
| `<+artifact.registryHostname>` | GCR registry hostname | `us.gcr.io` |
| `<+artifact.digest>` | This is the digest specified in the GCR artifact source definition | `sha256:6d001fb3022161cdcb5f4df6cca5b5705e064ce873cd16144c3e4de8d2653d0b` |
| `<+artifact.label.[PLACEHOLDER]>` | This is the label set in the Docker image. Replace the placeholder with the appropriate label | |
| `<+artifact.metadata.SHAV2>` | Docker supports v1 and v2 format. Both are listed when applicable. | `sha256:6d001fb3022161cdcb5f4df6cca5b5705e064ce873cd16144c3e4de8d2653d0b` |
| `<+artifact.metadata.SHA>` | SHA of the Docker image | `sha256:b3ebe55062b76860c6c0c78f5cae81ec393a944bcc96c05b5f411d3560c9f1d8` |
***
### Google Cloud Storage (GCS)
#### Use GCS artifacts
You connect to GCS using a Harness GCP connector. Go to the [Google Cloud Platform (GCP) Connector Settings Reference](/harness-platform/use-harness-platform/connectors/cloud-providers/connect-to-google-cloud-platform-gcp/gcs-connector-settings-reference.md) to review the GCS requirements for the GCP connector.
**YAML**
To use a GCS artifact, you create or use a Harness GCP Connector to connect to GCS bucket and then use that connector in your Harness service and reference the artifact to use.
**GCP connector YAML**
This example uses a Harness Delegate installed in GCP for credentials.
```yaml
connector:
name: GCS
identifier: GCS
description: ""
orgIdentifier: default
projectIdentifier: CD_Docs
type:
spec:
credential:
type: InheritFromDelegate
delegateSelectors:
- gcpdocplay
executeOnDelegate: true
```
**Service using GCS artifact YAML**
```yaml
service:
name: GCS
identifier: GCS
tags: {}
serviceDefinition:
spec:
artifacts:
primary:
primaryArtifactRef: <+input>
sources:
- spec:
connectorRef: GCP_Connector
project: myapp
bucket: functions
artifactPath: myfunction.zip
identifier: myfunction
type: GoogleCloudStorage
manifests:
- manifest:
identifier: myfunction
type: GoogleCloudFunctionDefinition
spec:
store:
type: Harness
spec:
files:
- /google-cloud-function/myfunction
type: GoogleCloudFunctions
```
**API**
Create the GCP connector with the [Create a Connector](https://apidocs.harness.io/tag/Connectors#operation/createConnector) API.
**GCP connector example**
```curl
--header 'Content-Type: text/yaml' \
--header 'x-api-key: pat.12345.6789' \
--data-raw 'connector:
name: GCXexample
identifier: GCSexample
description: ""
orgIdentifier: default
projectIdentifier: CD_Docs
type: Gcp
spec:
credential:
type: InheritFromDelegate
delegateSelectors:
- gcpdocplay
executeOnDelegate: true'
```
Create a service with an artifact source that uses the connector using the [Create Services](https://apidocs.harness.io/tag/Services#operation/createServicesV2) API.
**Terraform provider**
For the Terraform provider GCP connector resource, go to [harness\_platform\_connector\_gcp](https://registry.terraform.io/providers/harness/harness/latest/docs/resources/platform_connector_gcp).
**GCP connector example**
```json
# Credential manual
resource "harness_platform_connector_gcp" "test" {
identifier = "identifier"
name = "name"
description = "test"
tags = ["foo:bar"]
manual {
secret_key_ref = "account.secret_id"
delegate_selectors = ["harness-delegate"]
}
}
# Credentials inherit_from_delegate
resource "harness_platform_connector_gcp" "test" {
identifier = "identifier"
name = "name"
description = "test"
tags = ["foo:bar"]
inherit_from_delegate {
delegate_selectors = ["harness-delegate"]
}
}
```
For the Terraform provider service resource, go to [harness\_platform\_service](https://registry.terraform.io/providers/harness/harness/latest/docs/resources/platform_service).
**Harness Manager**
You connect to GCS using a Harness GCP connector. Go to the [Google Cloud Platform (GCP) Connector Settings Reference](/harness-platform/use-harness-platform/connectors/cloud-providers/connect-to-google-cloud-platform-gcp.md) to review the GCS requirements for the GCP connector.
Perform the following steps to add an artifact from GCS:
1. In your project, in CD (Deployments), select **Services**.
2. Select **New Service**.
3. Enter a name for the service and select **Save**.
4. Select **Configuration**.
5. In **Service Definition**, select **Google Cloud Functions**.
6. In **Artifacts**, select **Add Artifact Source**.
7. In **Select Artifact Repository Type**, click **Google Cloud Storage**, and then click **Continue**.
8. In **Google Cloud Storage Repository**, select or create a [Google Cloud Platform (GCP) Connector](/harness-platform/use-harness-platform/connectors/cloud-providers/connect-to-google-cloud-platform-gcp.md) that connects to the GCP account where the GCS bucket is located.
9. Click **Continue**.
10. In **Project**, select the GCP project where the bucket is located.
11. In **Bucket**, select the GCS bucket.
12. In **Artifact Path**, select the name of the artifact you want to deploy.
13. Click **Submit**.
The Artifact is added to the **Service Definition**.
#### Permissions
For Google Cloud Storage (GCS), the following roles are required:
* Storage Object Viewer (roles/storage.objectViewer)
* Storage Object Admin (roles/storage.objectAdmin)
Go to the GCP documentation for [Cloud IAM roles for Cloud Storage](https://cloud.google.com/storage/docs/access-control/iam-roles) to review the required roles.
#### GCS artifact expressions
You can reference artifact properties using the following expressions in a values YAML file or in any Harness setting that supports [Harness expressions](/harness-platform/use-harness-platform/variables-and-expressions/harness-variables.md).
| **Expression** | **Description** | **Example** |
| --------------------------------------------------------------- | ----------------------------------------------------------- | ---------------------------------------------------------------------------------- |
| `<+artifact.connectorRef>` | Identifier of the connector used by the artifact source | `org.gcp` |
| `<+artifact.identifier>` | Identifier of the artifact source in the service definition | `AcmeGcs` |
| `<+artifact.type>` | This will be `GoogleCloudStorage` always | `GoogleCloudStorage` |
| `<+artifact.primaryArtifact>` | Boolean values. `true` in case of primary artifact | `true` |
| `<+artifact.artifactPath>`, `<+artifact.metadata.artifactName>` | Full Path of the file in GCS bucket | `acme-apps/hello-world/v1.tgz` |
| `<+artifact.bucket>`, `<+artifact.metadata.bucket>` | GCS bucket | `acme-lambda` |
| `<+artifact.url>` | URL to the artifact file | `https://www.googleapis.com/storage/v1/b/acme-lambda/acme-apps/hello-world/v1.tgz` |
| `<+artifact.project>` | GCP project | `acme-devs` |
***
### Google Artifact Registry
#### Use Google Artifact Registry artifacts
You connect to Google Artifact Registry using a Harness GCP Connector.
Go to the [Google Cloud Platform (GCP) Connector Settings Reference](/harness-platform/use-harness-platform/connectors/cloud-providers/connect-to-google-cloud-platform-gcp.md) to review the Google Artifact Registry requirements for the GCP connector.
**YAML**
This example uses a Harness Delegate installed in GCP for credentials.
**Google Artifact Registry connector YAML**
```yaml
connector:
name: Google Artifact Registry
identifier: Google_Artifact_Registry
description: ""
orgIdentifier: default
projectIdentifier: CD_Docs
type: Gcp
spec:
credential:
type: InheritFromDelegate
delegateSelectors:
- gcpdocplay
executeOnDelegate: true
```
**Service using Google Artifact Registry artifact YAML**
```yaml
service:
name: Google Artifact Registry
identifier: Google_Artifact_Registry
tags: {}
serviceDefinition:
spec:
manifests:
- manifest:
identifier: myapp
type: K8sManifest
spec:
store:
type: Harness
spec:
files:
- /Templates
valuesPaths:
- /values.yaml
skipResourceVersioning: false
enableDeclarativeRollback: false
artifacts:
primary:
primaryArtifactRef: <+input>
sources:
- identifier: myapp
spec:
connectorRef: Google_Artifact_Registry
repositoryType: docker
project: docs-play
region: us-central1
repositoryName: quickstart-docker-repo
package: quickstart-docker-repo
version: <+input>
type: GoogleArtifactRegistry
type: Kubernetes
```
**API**
Create the Google Artifact Registry connector with the [Create a Connector](https://apidocs.harness.io/tag/Connectors#operation/createConnector) API.
**GCR connector example**
```curl
curl --location --request POST 'https://app.harness.io/gateway/ng/api/connectors?accountIdentifier=12345' \
--header 'Content-Type: text/yaml' \
--header 'x-api-key: pat.12345.6789' \
--data-raw 'connector:
name: Google Artifact Registry
identifier: Google_Artifact_Registry
description: ""
orgIdentifier: default
projectIdentifier: CD_Docs
type: Gcp
spec:
credential:
type: InheritFromDelegate
delegateSelectors:
- gcpdocplay
executeOnDelegate: true'
```
Create a service with an artifact source that uses the connector using the [Create Services](https://apidocs.harness.io/tag/Services#operation/createServicesV2) API.
**Terraform provider**
For the Terraform provider GCP connector resource, go to [harness\_platform\_connector\_gcp](https://registry.terraform.io/providers/harness/harness/latest/docs/resources/platform_connector_gcp).
**GCP connector example**
```json
# Credential manual
resource "harness_platform_connector_gcp" "test" {
identifier = "identifier"
name = "name"
description = "test"
tags = ["foo:bar"]
manual {
secret_key_ref = "account.secret_id"
delegate_selectors = ["harness-delegate"]
}
}
# Credentials inherit_from_delegate
resource "harness_platform_connector_gcp" "test" {
identifier = "identifier"
name = "name"
description = "test"
tags = ["foo:bar"]
inherit_from_delegate {
delegate_selectors = ["harness-delegate"]
}
}
```
For the Terraform provider service resource, go to [harness\_platform\_service](https://registry.terraform.io/providers/harness/harness/latest/docs/resources/platform_service).
**Harness Manager**
You connect to Google Artifact Registry using a Harness GCP Connector.
Go to the [Google Cloud Platform (GCP) Connector Settings Reference](/harness-platform/use-harness-platform/connectors/cloud-providers/connect-to-google-cloud-platform-gcp.md) to review the Google Artifact Registry requirements for the GCP connector.
Perform the following steps to add an artifact from Google Artifact Registry:
1. In your project, in CD (Deployments), select **Services**.
2. Select **New Service**.
3. Enter a name for the service and select **Save**.
4. Select **Configuration**.
5. In **Service Definition**, select **Kubernetes**.
6. In **Artifacts**, select **Add Artifact Source**.
7. In **Artifact Repository Type**, select **Google Artifact Registry**, and then select **Continue**.
8. In **GCP Connector**, select or create a [Google Cloud Platform (GCP) Connector](/harness-platform/use-harness-platform/connectors/cloud-providers/connect-to-google-cloud-platform-gcp.md) that connects to the GCP account where the Google Artifact Registry is located.
9. Select **Continue**.
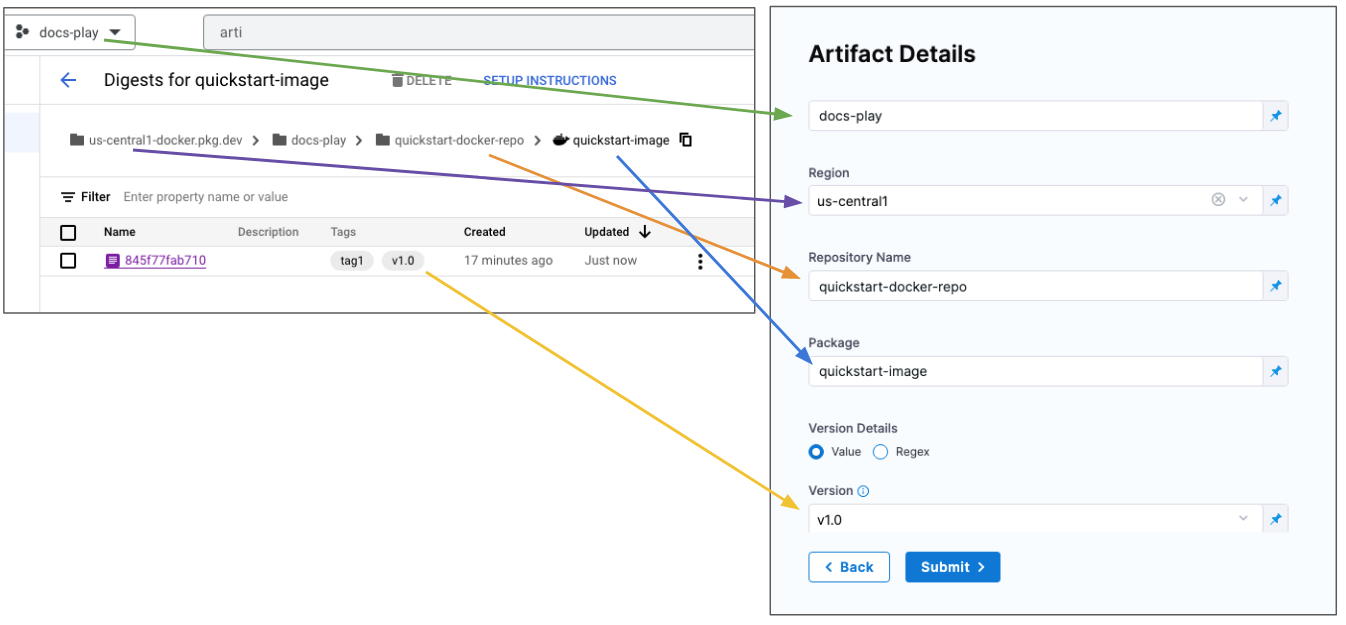
10. In **Artifact Details**, you are basically creating the pull command. For example:
```bash
docker pull us-central1-docker.pkg.dev/docs-play/quickstart-docker-repo/quickstart-image:v1.0
```
11. In **Artifact Source Name**, enter a name for the artifact.
12. In **Repository Type**, select the format of the artifact.
13. In **Project**, enter the Id of the GCP project.
14. In **Region**, select the region where the repo is located.
15. In **Repository Name**, enter the name of the repo.
16. In **Package**, enter the artifact name.
17. In **Version Details**, select **Value** or **Regex**.
18. In **Version**, enter or select the [Docker image tag](https://docs.docker.com/engine/reference/commandline/tag/).
If you used Fixed Value in Version and Harness is not able to fetch the image tags, ensure that the GCP service account key used in the GCP connector credentials, or in the service account used to install the Harness Delegate, has the required permissions. See the Permissions tab in this documentation.
If you use runtime input, when you deploy the pipeline, Harness pulls the list of tags from the repo and prompts you to select one.
19. To specify an image digest, use **Digest** and the unique identifier for the image you want to use. Specifying an image by tag and digest (rather than tag alone) is useful when you want to deploy an image with a fixed digest/SHA for your service.
If an image with the specified tag/digest combination does not exist in the artifact registry, the pipeline fails.
20. Select **Submit**. The artifact is added to the service definition.
#### Permissions
For Google Artifact Registry, the following roles are required:
* Artifact Registry Reader
* Artifact Registry Writer
Go to the GCP documentation [Configure roles and permissions](https://cloud.google.com/artifact-registry/docs/access-control) to review the required roles and permissions.
Make sure the Harness Delegate you have installed can reach your Google Artifact Registry region, for example `us-central1`.
#### Google Artifact Registry artifact expressions
You can reference artifact properties using the following expressions in a values YAML file or in any Harness setting that supports [Harness expressions](/harness-platform/use-harness-platform/variables-and-expressions/harness-variables.md).
| **Expression** | **Description** | **Example** |
| ----------------------------------------------------------------------- | ---------------------------------------------------------------------------------------------------------------------- | ------------------------------------------------------------------------- |
| `<+artifact.connectorRef>` | Identifier of the connector used by the artifact source | `org.gcp` |
| `<+artifact.identifier>` | Identifier of the artifact source in the service definition | `AcmeGAR` |
| `<+artifact.type>` | This will be `GoogleArtifactRegistry` always | `GoogleArtifactRegistry` |
| `<+artifact.primaryArtifact>` | Boolean values. `true` in case of primary artifact | `true` |
| `<+artifact.version>` | This is the Docker tag | `v1` |
| `<+artifact.region>` | Region where the GAR repository is hosted | `us` |
| `<+artifact.pkg>` | Name of the GAR package | `alpine` |
| `<+artifact.repositoryType>` | Type of repository. | `docker` |
| `<+artifact.image>`, `<+artifact.metadata.image>` | This is the image of the particular version. The value is used with \`docker pull\` command | `us-docker.pkg.dev/acme-dev/acme-docker/alpine:v1` |
| `<+artifact.repositoryName>` | Name of the repository in GAR | `acme-docker` |
| `<+artifact.project>` | Project ID in GCP | `acme-dev` |
| `<+artifact.registryHostname>`, `<+artifact.metadata.registryHostname>` | This is the hostname of the registry | `us-docker.pkg.dev` |
| `<+artifact.imagePullSecret>` | This will be the base64 encoded secret used for pulling the image | |
| `<+artifact.dockerConfigJsonSecret>` | This is the `kubernetes.io/dockerconfigjson` credentials. Valid for `docker` only | |
| `<+artifact.digest>` | This is the digest specified in the ECR artifact source definition. Valid for `docker` only | `sha256:6d001fb3022161cdcb5f4df6cca5b5705e064ce873cd16144c3e4de8d2653d0b` |
| `<+artifact.label.[PLACEHOLDER]>` | This is the label set in the Docker image. Replace the placeholder with the appropriate label. Valid for `docker` only | |
| `<+artifact.metadata.SHAV2>` | Docker supports v1 and v2 format. Both are listed when applicable. Valid for `docker` only | `sha256:6d001fb3022161cdcb5f4df6cca5b5705e064ce873cd16144c3e4de8d2653d0b` |
| `<+artifact.metadata.SHA>` | SHA of the Docker image. Valid for `docker` only | `sha256:b3ebe55062b76860c6c0c78f5cae81ec393a944bcc96c05b5f411d3560c9f1d8` |
***
### Azure DevOps artifacts
#### Use Azure Artifacts
You connect to your Azure DevOps artifacts using a Harness Azure Artifacts connector.
**YAML**
**Azure Artifacts connector YAML**
```yaml
connector:
name: Azure Artifacts
identifier: Azure_Artifacts
description: ""
orgIdentifier: default
projectIdentifier: CD_Docs
type: AzureArtifacts
spec:
azureArtifactsUrl: https://dev.azure.com/garvit-test
auth:
spec:
type: PersonalAccessToken
spec:
tokenRef: azureartifactspat
delegateSelectors:
- gcpdocplay
executeOnDelegate: true
```
**Service using Azure Artifacts artifact YAML**
```yaml
service:
name: Azure Artifacts
identifier: Azure_Artifacts
tags: {}
serviceDefinition:
spec:
artifacts:
primary:
primaryArtifactRef: <+input>
sources:
- identifier: mypackage
spec:
connectorRef: Azure_Artifacts
scope: org
feed: garvit-test
packageType: maven
package: com.mycompany.app:my-app
version: 1.1-SNAPSHOT
type: AzureArtifacts
type: Ssh
```
**API**
**Azure Artifact connector example**
Create the Azure Artifact connector with the [Create a Connector](https://apidocs.harness.io/tag/Connectors#operation/createConnector) API.
```yaml
curl --location --request POST 'https://app.harness.io/gateway/ng/api/connectors?accountIdentifier=12345' \
--header 'Content-Type: text/yaml' \
--header 'x-api-key: pat.12345.6789' \
--data-raw 'connector:
name: Azure Artifacts
identifier: Azure_Artifacts
description: ""
orgIdentifier: default
projectIdentifier: CD_Docs
type: AzureArtifacts
spec:
azureArtifactsUrl: https://dev.azure.com/garvit-test
auth:
spec:
type: PersonalAccessToken
spec:
tokenRef: azureartifactspat
delegateSelectors:
- gcpdocplay
executeOnDelegate: true'
```
Create a service with an artifact source that uses the connector using the [Create Services](https://apidocs.harness.io/tag/Services#operation/createServicesV2) API.
**Harness Manager**
**Azure Artifact connector**
1. In your Harness project, in **Connectors**, select **New Connector**, and then select **Azure Artifacts**.
2. Enter a name for the connector, and select **Continue**.
3. In **Azure Artifacts URL**, enter the Azure DevOps organization URL, for example, `https://dev.azure.com/my-org`.
4. In **Personal Access Token**, enter a PAT token for the Azure DevOps organization, and select **Continue**.
5. In **Delegates Setup**, select a delegate that has network connectivity to the Azure Cloud.
6. Save the connector.
**Add an Azure Artifact artifact**
1. In a Harness service, select **Configuration**.
2. In **Deployment Type**, select one of the [supported deployment types](#deployment-type-support).
3. In **Artifacts**, select **Add Artifact Source**.
4. In **Specify Artifact Repository Type**, select **Azure Artifacts**, and select **Continue**.
5. In **Azure Artifacts Repository**, select or create an Azure Artifacts connector that connects to your Azure DevOps organization, and then select **Continue**.
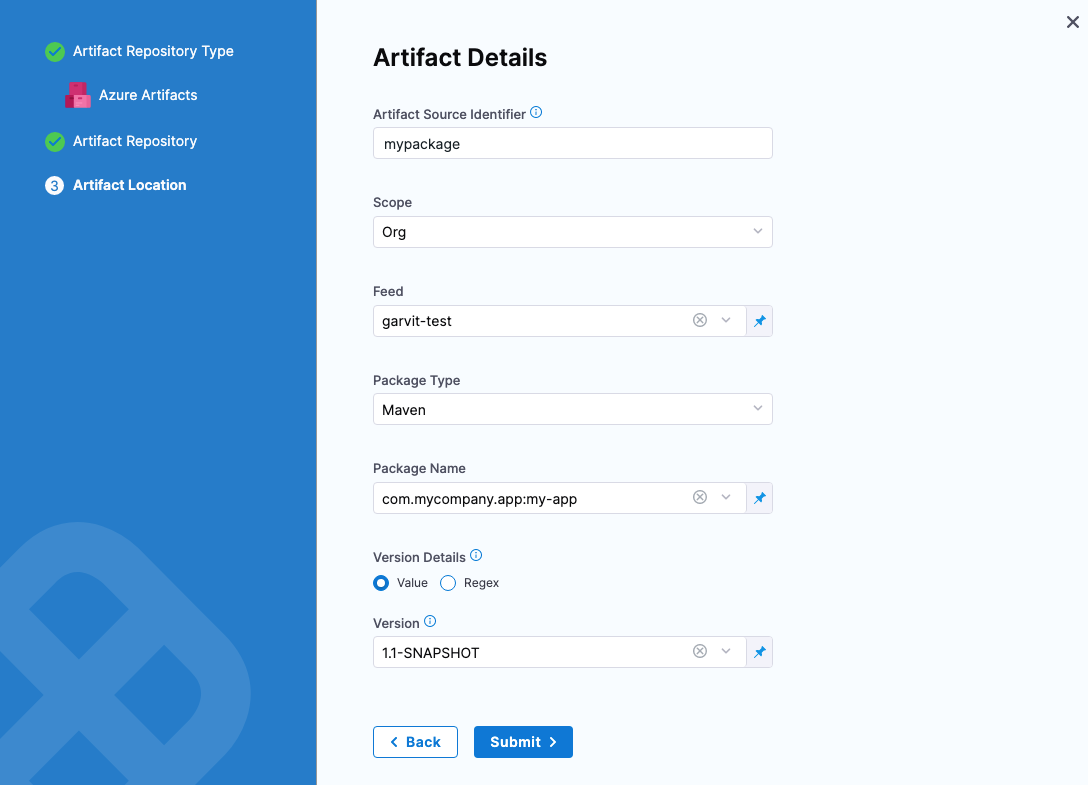
6. In **Artifact Details**, enter the following:
1. **Artifact Source Identifier**: Enter the name for the artifact in Harness.
2. **Scope**: Select **Org** or **Project**.
3. **Feed**: Select the artifact feed.
4. **Package Name**: Select the name of the package on Azure Artifacts.
5. **Version**: Select the artifact version to use or set the option as a runtime input or expression.
7. Select **Submit**.
**Deployment type support**
Azure DevOps Artifacts can be used with the following Harness deployment types:
* SSH
* WinRM
* Azure Web Apps
* Tanzu
**Package type support**
Harness supports Maven and Nuget package types.
Harness also supports [universal packages](https://learn.microsoft.com/en-us/azure/devops/artifacts/quickstarts/universal-packages?view=azure-devops\&tabs=Windows), which enable developers to store an extensive array of package types that extend beyond the conventional ones. Note the following:
* Currently support is limited to traditional VM deployments using [SSH](/continuous-delivery/use-continuous-delivery/deploy-services-on-different-platforms/traditional/ssh-ng.md) or [WinRM](/continuous-delivery/use-continuous-delivery/deploy-services-on-different-platforms/traditional/win-rm-tutorial.md).
* Artifact source templates are not currently supported for universal packages.
The following example defines a universal package in a Harness service definition:
```yaml
service:
name: azure
identifier: azure
tags: {}
serviceDefinition:
spec:
artifacts:
primary:
primaryArtifactRef: <+input>
sources:
- identifier: azure
spec:
connectorRef: azure
scope: org
feed: universaltest68137
packageType: maven
package: my-first-package
version: 0.0.1
type: AzureArtifacts
type: AzureWebApp
```
**Azure DevOps URL**
This is the URL in your browser when you are in the Azure DevOps organization containing the projects and feed(s) you want to use.
For example, in this URL, `https://dev.azure.com/garvit-test/sample-project/_packaging?_a=feed&feed=other-feed`, you only need to use `https://dev.azure.com/garvit-test` in Harness connector **Azure DevOps URL** setting.
#### Permissions
You use an Azure DevOps Personal Access Token (PAT) to authenticate with Azure.
Create a Personal Access token as described in [Authenticate access with personal access tokens](https://docs.microsoft.com/en-us/azure/devops/organizations/accounts/use-personal-access-tokens-to-authenticate?view=azure-devops\&tabs=preview-page) from Azure.
Next, copy the token and paste it in the Harness Encrypted Text secret you use for the PAT in the Harness Azure Artifacts connector.
The PAT must have the **Read** permission in **Packaging**.
#### Azure DevOps artifacts expressions
You can reference artifact properties using the following expressions in a values YAML file or in any Harness setting that supports [Harness expressions](/harness-platform/use-harness-platform/variables-and-expressions/harness-variables.md).
| **Expression** | **Description** | **Example** |
| --------------------------------- | ------------------------------------------------------------------------------------------------------------------------ | --------------------- |
| `<+artifact.connectorRef>` | Identifier of the connector used by the artifact source | `org.azuredevops` |
| `<+artifact.identifier>` | Identifier of the artifact source in the service definition | `AcmeAzureDevops` |
| `<+artifact.type>` | This will be `AzureArtifacts` always | `AzureArtifacts` |
| `<+artifact.primaryArtifact>` | Boolean values. `true` in case of primary artifact | `true` |
| `<+artifact.project>` | Name of the projects in Azure Artifacts | `acme-project` |
| `<+artifact.feed>` | Name of the feed in Azure artifacts | `acme-feed-universal` |
| `<+artifact.scope>` | It will be one of `org` or `project` | `project` |
| `<+artifact.packageType>` | Package type. It is one of `NuGet`, `maven` | `maven` |
| `<+artifact.packageName>` | Name of the package in the feed | `acme-maven` |
| `<+artifact.version>` | Version of the artifact | `0.0.1` |
| `<+artifact.metadata.get([KEY])>` | This is the metadata attached with the file in Azure Devops. Popular keys include `publishDate`, `versionId`, `version`. | |
***
### Azure Container Registry (ACR)
#### Use ACR artifacts
You connect to ACR using a Harness Azure connector. Go to [Add a Microsoft Azure cloud connector](/harness-platform/use-harness-platform/connectors/cloud-providers/add-a-microsoft-azure-connector.md) to review the Azure requirements for the Azure connector.
**YAML**
This example uses a Harness Delegate installed in Azure for credentials.
**Azure connector for ACR YAML**
```yaml
connector:
name: ACR-docs
identifier: ACRdocs
description: ""
orgIdentifier: default
projectIdentifier: CD_Docs
type: Azure
spec:
credential:
type: ManualConfig
spec:
applicationId: xxxxx-xxxx-xxxx-xxxx-xxxxx
tenantId: xxxxx-xxxx-xxxx-xxxx-xxxxx
auth:
type: Secret
spec:
secretRef: acrvalue
azureEnvironmentType: AZURE
executeOnDelegate: false
```
**Service using ACR artifact YAML**
```yaml
service:
name: Azure with ACR
identifier: Azure
tags: {}
serviceDefinition:
spec:
manifests:
- manifest:
identifier: myapp
type: K8sManifest
spec:
store:
type: Harness
spec:
files:
- /Templates
valuesPaths:
- /values.yaml
skipResourceVersioning: false
enableDeclarativeRollback: false
artifacts:
primary:
primaryArtifactRef: <+input>
sources:
- spec:
connectorRef: ACRdocs
tag: <+input>
subscriptionId: <+input>
registry: <+input>
repository: <+input>
identifier: myapp
type: Acr
type: Kubernetes
```
**API**
Create the ACR connector with the [Create a Connector](https://apidocs.harness.io/tag/Connectors#operation/createConnector) API.
**ACR connector example**
```curl
curl --location --request POST 'https://app.harness.io/gateway/ng/api/connectors?accountIdentifier=12345' \
--header 'Content-Type: text/yaml' \
--header 'x-api-key: pat.12345.6789' \
--data-raw 'connector:
name: ACR-docs
identifier: ACRdocs
description: ""
orgIdentifier: default
projectIdentifier: CD_Docs
type: Azure
spec:
credential:
type: ManualConfig
spec:
applicationId: xxxxx-xxxx-xxxx-xxxx-xxxxx
tenantId: xxxxx-xxxx-xxxx-xxxx-xxxxx
auth:
type: Secret
spec:
secretRef: acrvalue
azureEnvironmentType: AZURE
executeOnDelegate: false'
```
Create a service with an artifact source that uses the connector using the [Create Services](https://apidocs.harness.io/tag/Services#operation/createServicesV2) API.
**Terraform provider**
For the Terraform provider ACR connector resource, go to [harness\_platform\_connector\_azure\_cloud\_provider](https://registry.terraform.io/providers/harness/harness/latest/docs/resources/platform_connector_azure_cloud_provider).
**ACR connector example**
```json
resource "harness_platform_connector_azure_cloud_provider" "manual_config_secret" {
identifier = "identifier"
name = "name"
description = "example"
tags = ["foo:bar"]
credentials {
type = "ManualConfig"
azure_manual_details {
application_id = "application_id"
tenant_id = "tenant_id"
auth {
type = "Secret"
azure_client_secret_key {
secret_ref = "account.${harness_platform_secret_text.test.id}"
}
}
}
}
azure_environment_type = "AZURE"
delegate_selectors = ["harness-delegate"]
}
resource "harness_platform_connector_azure_cloud_provider" "manual_config_certificate" {
identifier = "identifier"
name = "name"
description = "example"
tags = ["foo:bar"]
credentials {
type = "ManualConfig"
azure_manual_details {
application_id = "application_id"
tenant_id = "tenant_id"
auth {
type = "Certificate"
azure_client_key_cert {
certificate_ref = "account.${harness_platform_secret_text.test.id}"
}
}
}
}
azure_environment_type = "AZURE"
delegate_selectors = ["harness-delegate"]
}
resource "harness_platform_connector_azure_cloud_provider" "inherit_from_delegate_user_assigned_managed_identity" {
identifier = "identifier"
name = "name"
description = "example"
tags = ["foo:bar"]
credentials {
type = "InheritFromDelegate"
azure_inherit_from_delegate_details {
auth {
azure_msi_auth_ua {
client_id = "client_id"
}
type = "UserAssignedManagedIdentity"
}
}
}
azure_environment_type = "AZURE"
delegate_selectors = ["harness-delegate"]
}
resource "harness_platform_connector_azure_cloud_provider" "inherit_from_delegate_system_assigned_managed_identity" {
identifier = "identifier"
name = "name"
description = "example"
tags = ["foo:bar"]
credentials {
type = "InheritFromDelegate"
azure_inherit_from_delegate_details {
auth {
type = "SystemAssignedManagedIdentity"
}
}
}
azure_environment_type = "AZURE"
delegate_selectors = ["harness-delegate"]
}
```
For the Terraform provider service resource, go to [harness\_platform\_service](https://registry.terraform.io/providers/harness/harness/latest/docs/resources/platform_service).
**Harness Manager**
You connect to ACR using a Harness Azure connector. Go to [Add a Microsoft Azure cloud connector](/harness-platform/use-harness-platform/connectors/cloud-providers/add-a-microsoft-azure-connector.md) to review the Azure requirements for the Azure connector.
Perform the following steps to add an artifact from ACR:
1. In your project, in CD (Deployments), select **Services**.
2. Select **New Service**.
3. Enter a name for the service and select **Save**.
4. Select **Configuration**.
5. In **Service Definition**, select **Kubernetes**.
6. In **Artifacts**, select **Add Artifact Source**.
7. In **Artifact Repository Type**, click **ACR**, and then select **Continue**.
8. In **ACR Repository**, select or create an [Azure Connector](/harness-platform/use-harness-platform/connectors/cloud-providers/add-a-microsoft-azure-connector.md) that connects to the Azure account where the ACR registry is located.
9. Select **Continue**.
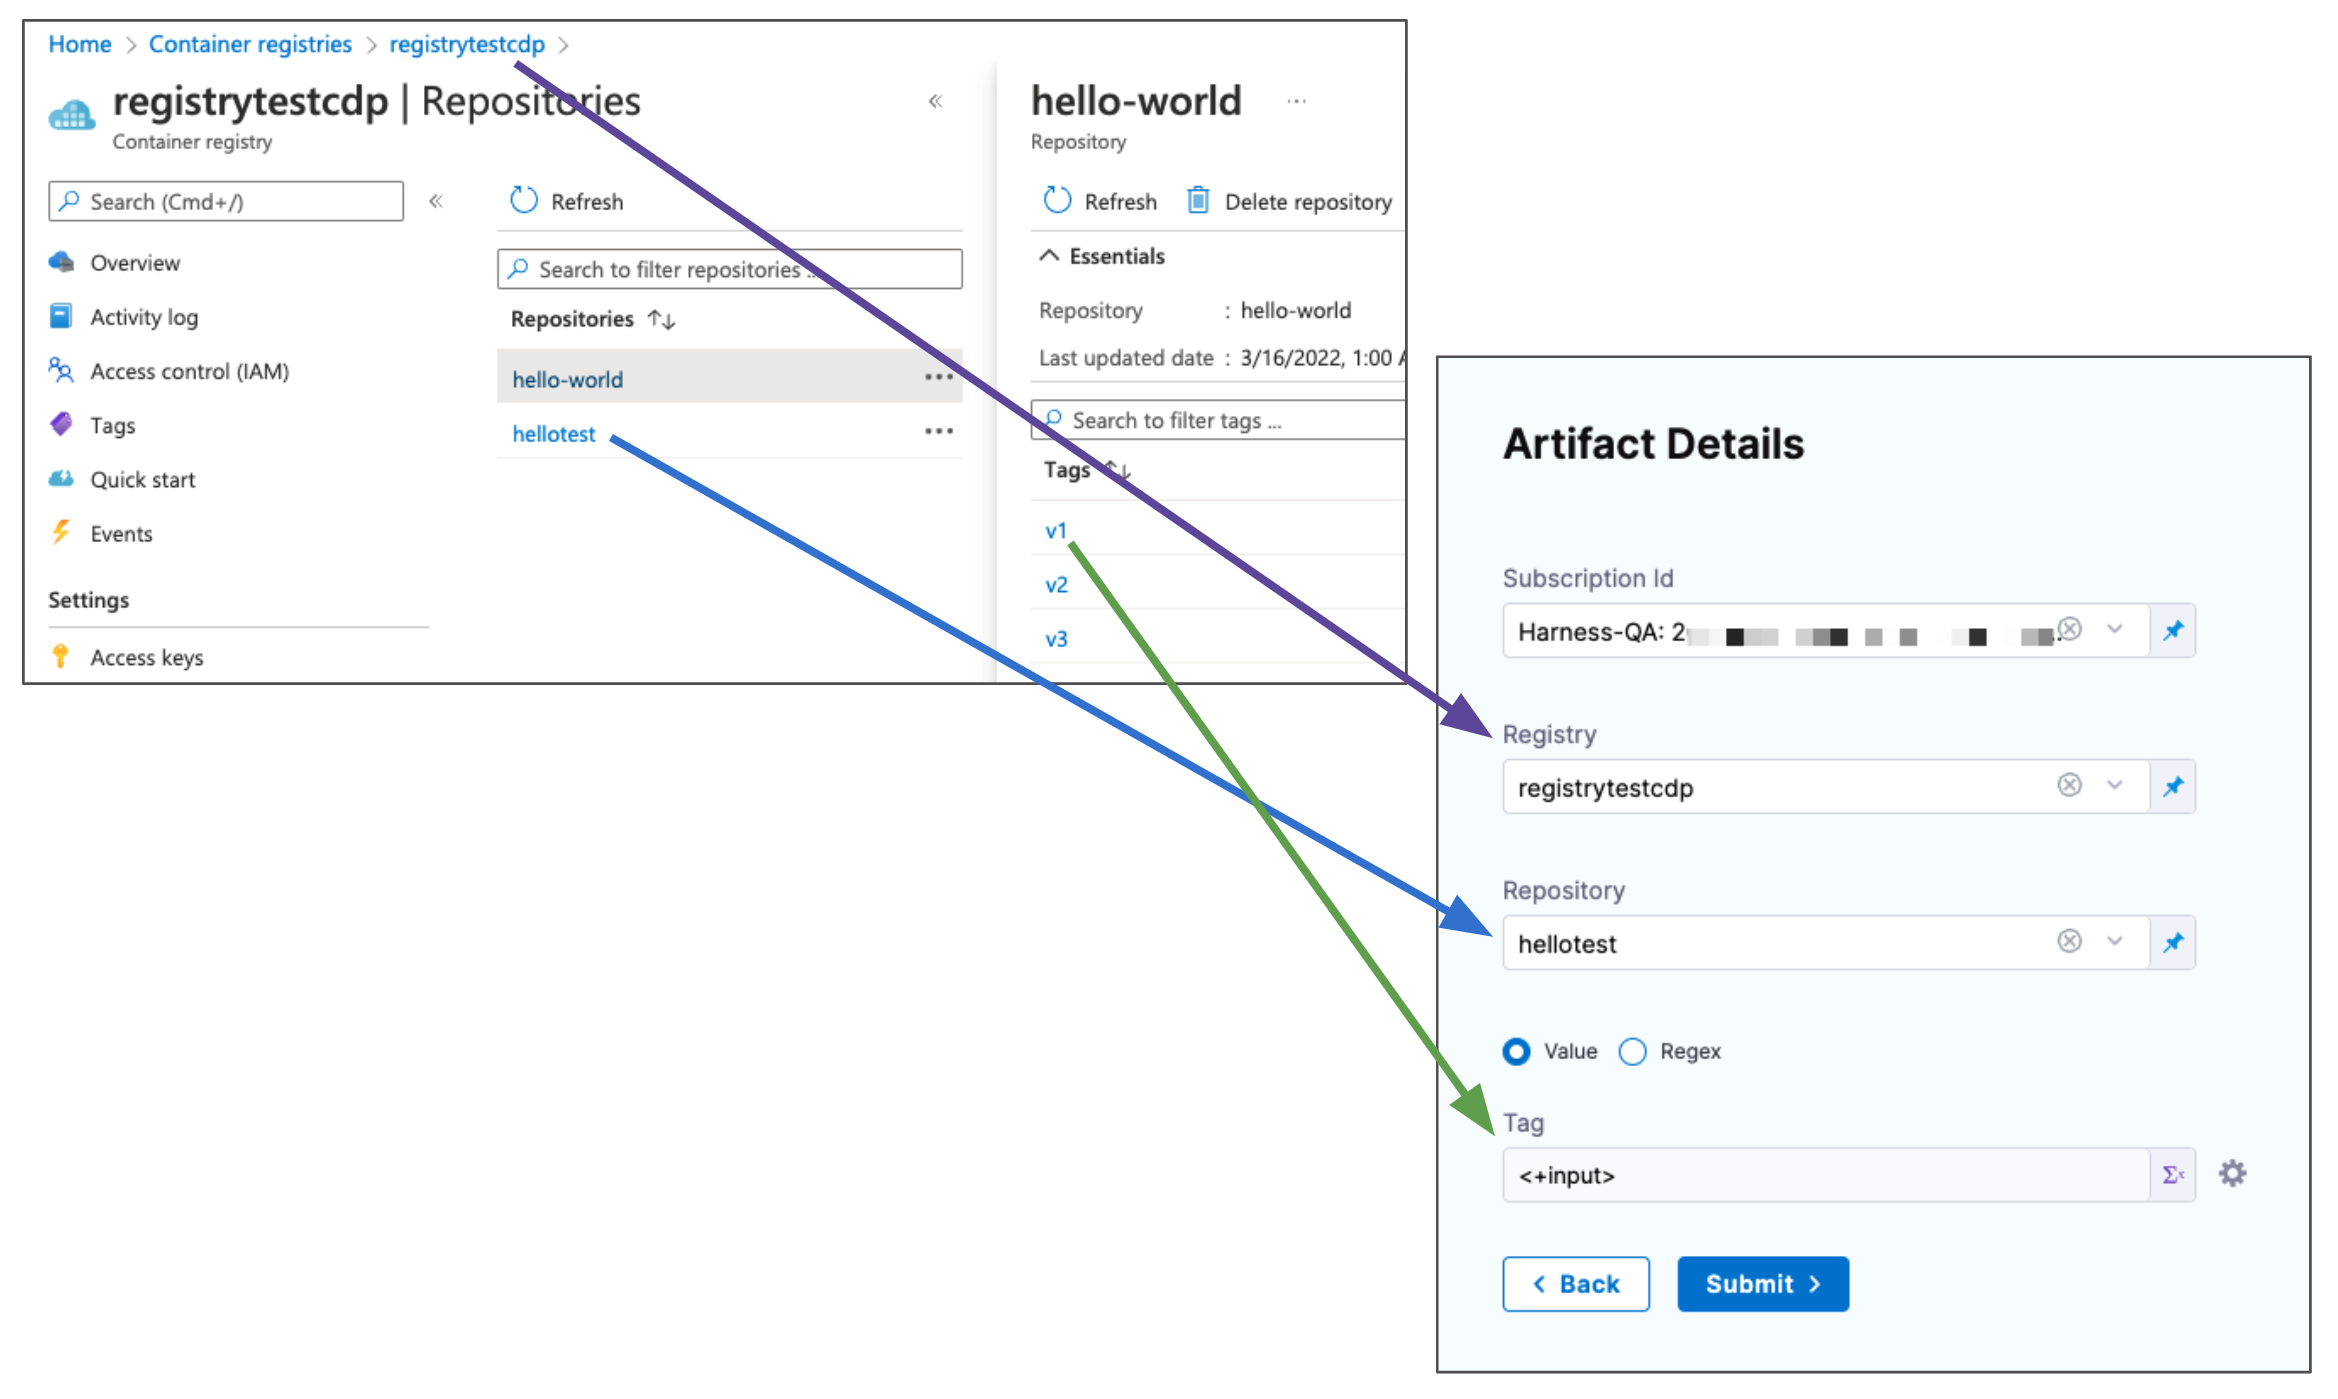
10. In **Artifact Details**, in **Subscription Id**, select the Subscription Id where the artifact source is located.
11. In **Registry**, select the ACR registry to use.
12. In **Repository**, select the repo to use.
13. In **Tag**, enter or select the tag for the image.
If you use runtime input, when you deploy the pipeline, Harness pulls the list of tags from the repo and prompts you to select one.
14. Click **Submit**. The artifact is added to the Service Definition.
#### Permissions
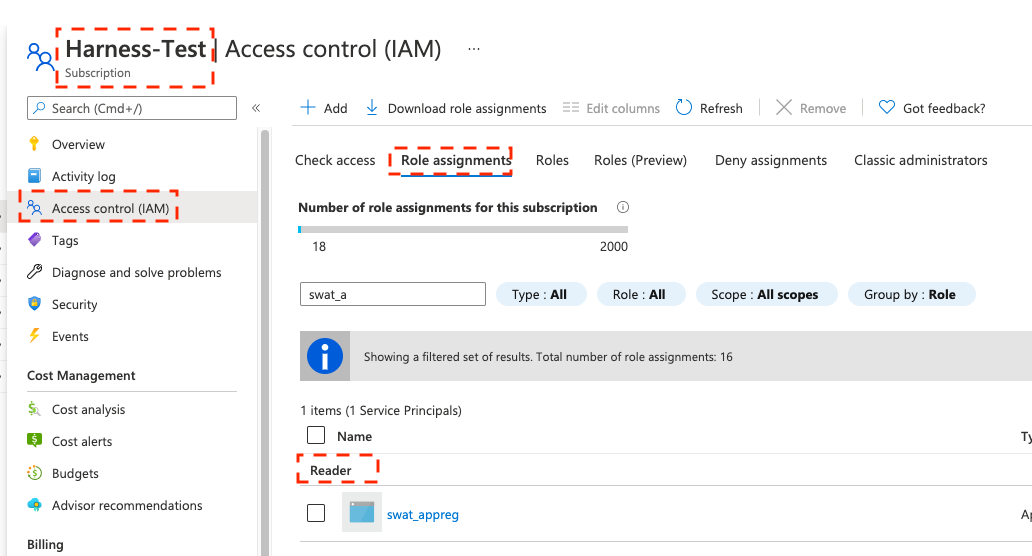
The Harness Azure connectors that you use to connect Harness to ACR must have the **Reader** role, at minimum. You can also use a custom role that includes the permissions of the Reader role.
**Reader role information**
The Reader role must be assigned at the subscription or resource group level that is used by the Application (Client) Id that you use in the Azure connector settings. The application must have permission to list all container registries.
{% hint style="info" %}
Make sure you:
* Do not put the Reader role in a different IAM section of Azure.
* Do not provide only the **AcrPull** role instead of Reader. It might appear that the AcrPull role gives access to a specific registry, but Harness needs to list all registries.
{% endhint %}
**Custom role information**
The following permissions (actions) are necessary for any Service Principal and/or Managed Identity user, regardless of whether you are using Kubernetes RBAC or Azure RBAC:
* `Microsoft.ContainerRegistry/registries/read`
* `Microsoft.ContainerRegistry/registries/builds/read`
* `Microsoft.ContainerRegistry/registries/metadata/read`
* `Microsoft.ContainerRegistry/registries/pull/read`
* `Microsoft.ContainerService/managedClusters/read`
* `Microsoft.ContainerService/managedClusters/listClusterUserCredential/action`
* `Microsoft.Resource/subscriptions/resourceGroup/read`
For Helm deployments, the version of Helm must be >= 3.2.0. The Harness `HELM_VERSION_3_8_0` feature flag must be activated.
You cannot use Pod Assigned Managed Identity and System Assigned Managed Identity for the same cluster.
The following JSON sample creates a custom role with the required permissions. To use this sample, replace `xxxx` with the role name, subscription Id, and resource group Id.
```json
{
"id": "/subscriptions/xxxx/providers/Microsoft.Authorization/roleDefinitions/xxxx",
"properties": {
"roleName": "xxxx",
"description": "",
"assignableScopes": [
"/subscriptions/xxxx/resourceGroups/xxxx"
],
"permissions": [
{
"actions": [],
"notActions": [],
"dataActions": [
"Microsoft.ContainerService/managedClusters/configmaps/read",
"Microsoft.ContainerService/managedClusters/configmaps/write",
"Microsoft.ContainerService/managedClusters/configmaps/delete",
"Microsoft.ContainerService/managedClusters/secrets/read",
"Microsoft.ContainerService/managedClusters/secrets/write",
"Microsoft.ContainerService/managedClusters/secrets/delete",
"Microsoft.ContainerService/managedClusters/apps/deployments/read",
"Microsoft.ContainerService/managedClusters/apps/deployments/write",
"Microsoft.ContainerService/managedClusters/apps/deployments/delete",
"Microsoft.ContainerService/managedClusters/events/read",
"Microsoft.ContainerService/managedClusters/events/write",
"Microsoft.ContainerService/managedClusters/events/delete",
"Microsoft.ContainerService/managedClusters/namespaces/read",
"Microsoft.ContainerService/managedClusters/nodes/read",
"Microsoft.ContainerService/managedClusters/pods/read",
"Microsoft.ContainerService/managedClusters/pods/write",
"Microsoft.ContainerService/managedClusters/pods/delete",
"Microsoft.ContainerService/managedClusters/services/read",
"Microsoft.ContainerService/managedClusters/services/write",
"Microsoft.ContainerService/managedClusters/services/delete",
"Microsoft.ContainerService/managedClusters/apps/statefulsets/read",
"Microsoft.ContainerService/managedClusters/apps/statefulsets/write",
"Microsoft.ContainerService/managedClusters/apps/statefulsets/delete",
"Microsoft.ContainerService/managedClusters/apps/replicasets/read",
"Microsoft.ContainerService/managedClusters/apps/replicasets/write",
"Microsoft.ContainerService/managedClusters/apps/replicasets/delete"
],
"notDataActions": []
}
]
}
}
```
**Important notes**
* Harness supports 500 images from an ACR repo. If you do not see some of your images, then you might have exceeded this limit. This is the result of an Azure API limitation.
* If you connect to an ACR repo via the platform-agnostic Docker Connector, the limit is 100.
**Use Docker Registry connector for ACR**
If you do not want to centrally manage service principles for access to ACR, you can use the platform-agnostic Docker Registry connector and [repository-scoped permissions](https://learn.microsoft.com/en-us/azure/container-registry/container-registry-repository-scoped-permissions) to connect Harness to ACR.
Perform the following steps to use the Docker Registry connector to connect to ACR:
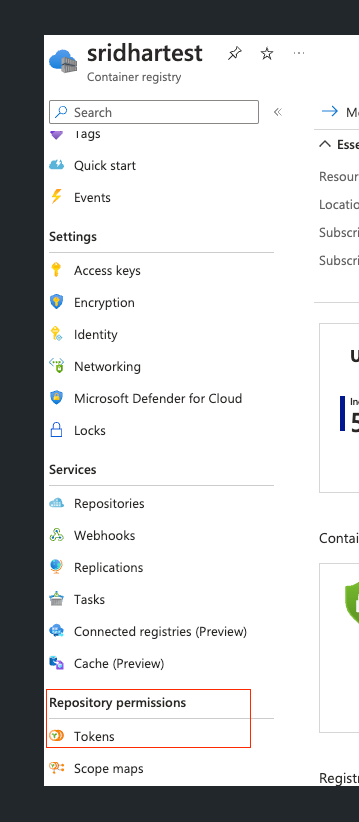
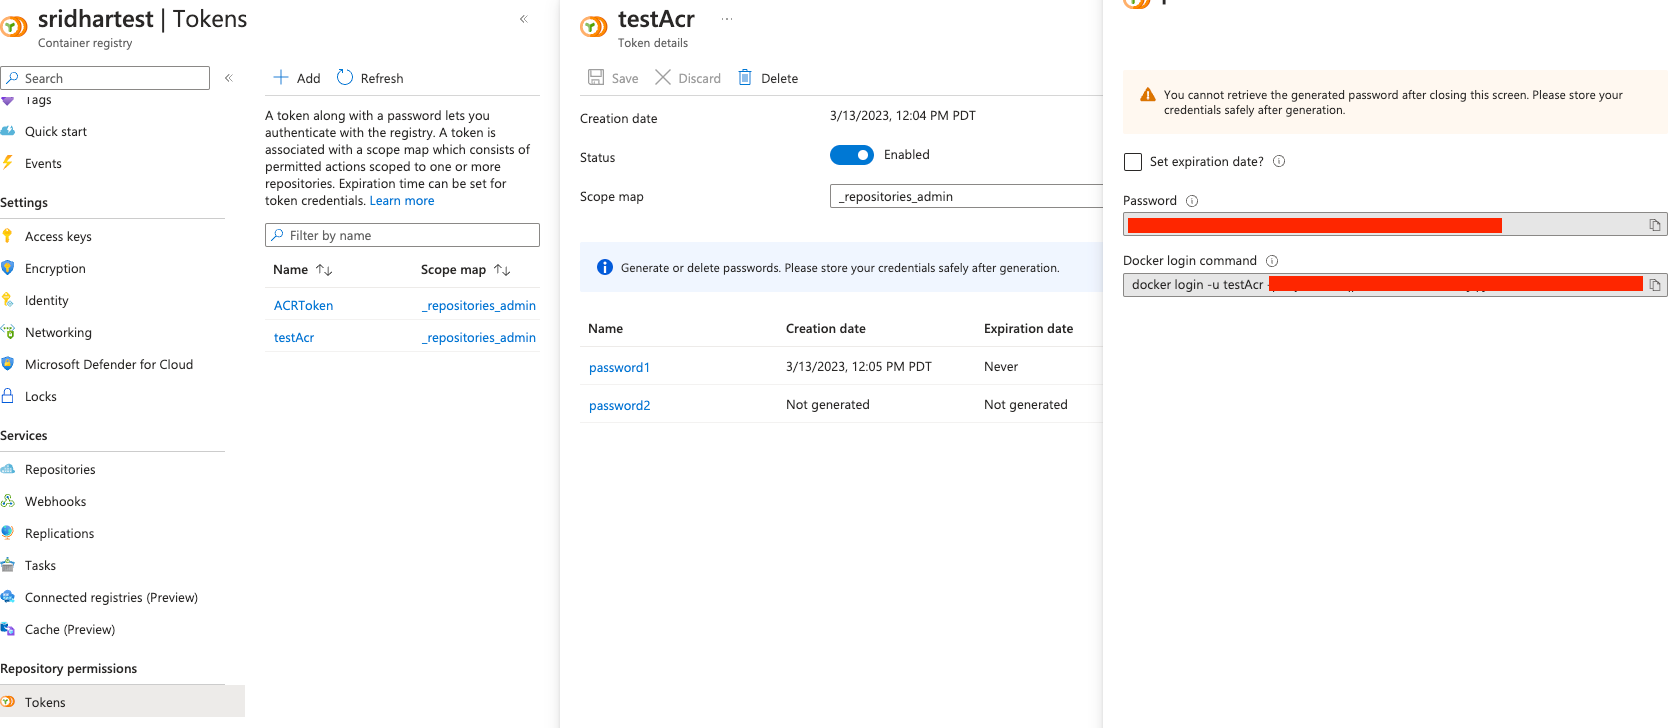
1. In Azure ACR, in **Repository permissions**, select **Tokens**.
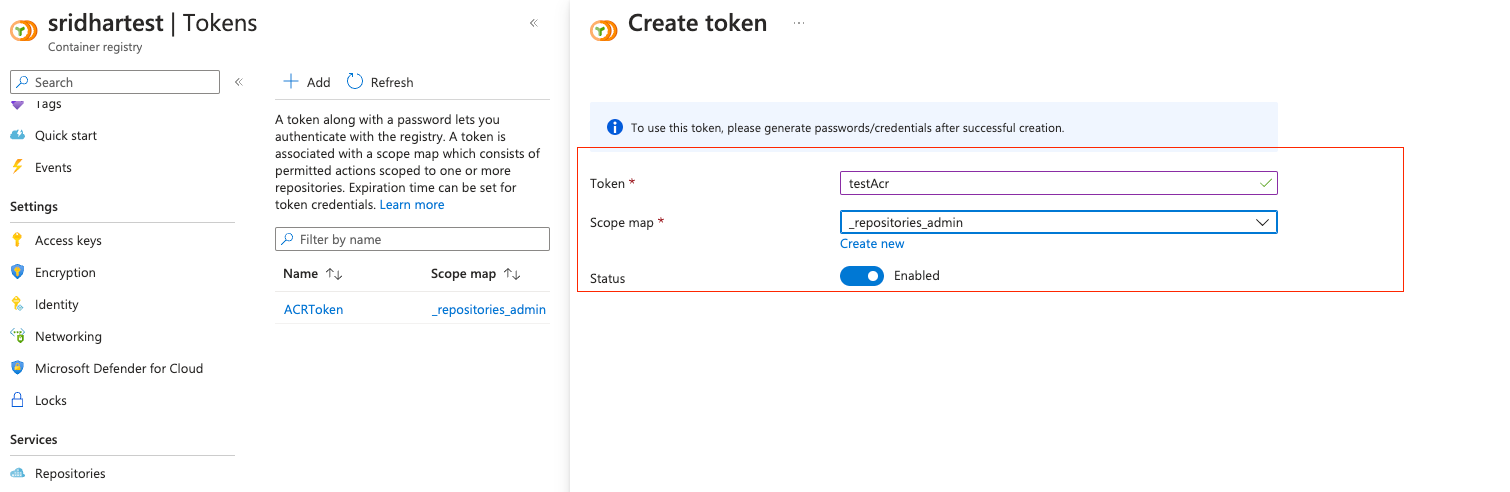
2. Create a new token and scope map.
3. Generate the password for the token.
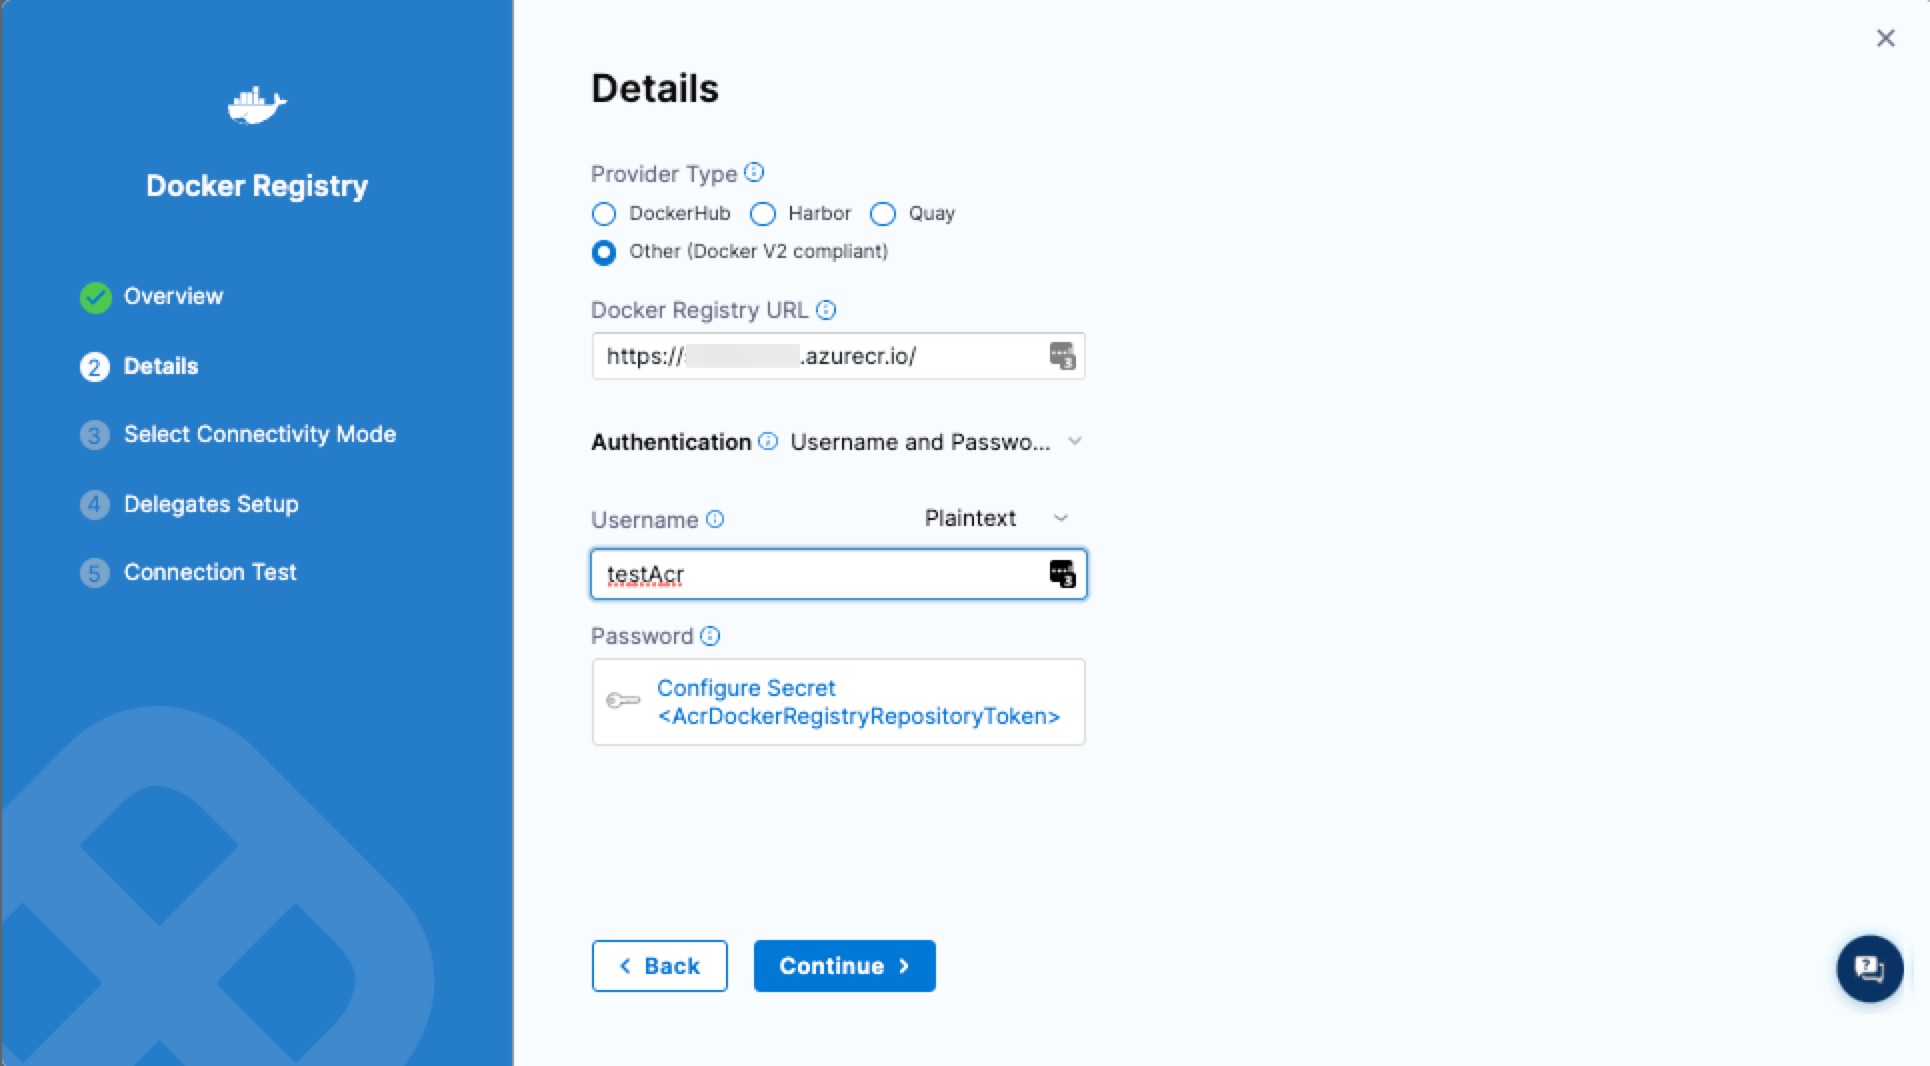
3. In Harness, create a new Docker Registry connector.
4. For **Provider Type**, select **Other**.
5. Select **Username and Password** for **Authentication**, and use the username and password for the ACR token.
#### ACR artifact expressions
You can reference artifact properties using the following expressions in a values YAML file or in any Harness setting that supports [Harness expressions](/harness-platform/use-harness-platform/variables-and-expressions/harness-variables.md).
| **Expression** | **Description** | **Example** |
| --------------------------------------------------------------- | --------------------------------------------------------------------------------------------- | ------------------------------------------------------------------------- |
| `<+artifact.connectorRef>` | Identifier of the connector used by the artifact source | `org.azureConnector` |
| `<+artifact.identifier>` | Identifier of the artifact source in the service definition | `AcmeAcrRegistry` |
| `<+artifact.type>` | This will be `Acr` always | `Acr` |
| `<+artifact.primaryArtifact>` | Boolean values. `true` in case of primary artifact | `true` |
| `<+artifact.subscription>` | This is the Azure cloud subscription ID | `20d6a917-99fa-4b1b-9b2e-a3d624e9dcf0` |
| `<+artifact.registry>`, `<+artifact.metadata.registryHostname>` | Container registry hostname | `acme.azurecr.io` |
| `<+artifact.tag>`, `<+artifact.metadata.tag>` | This is the Docker tag | `v1` |
| `<+artifact.image>`, `<+artifact.metadata.image>` | This is the image of the particular version. The value is used with \`docker pull\` command | `acme.azurecr.io/hello-world:v1` |
| `<+artifact.repository>` | This is the name of the image without registry info or tag | `hello-world` |
| `<+artifact.imagePullSecret>` | This will be the base64 encoded secret used for pulling the image | |
| `<+artifact.dockerConfigJsonSecret>` | This is the `kubernetes.io/dockerconfigjson` credentials | |
| `<+artifact.digest>` | This is the digest specified in the ACR artifact source definition | `sha256:6d001fb3022161cdcb5f4df6cca5b5705e064ce873cd16144c3e4de8d2653d0b` |
| `<+artifact.label.[PLACEHOLDER]>` | This is the label set in the Docker image. Replace the placeholder with the appropriate label | |
| `<+artifact.metadata.SHAV2>` | Docker tends to support v1 and v2 format. Both are listed when applicable. | `sha256:6d001fb3022161cdcb5f4df6cca5b5705e064ce873cd16144c3e4de8d2653d0b` |
| `<+artifact.metadata.SHA>` | SHA of the Docker image | `sha256:b3ebe55062b76860c6c0c78f5cae81ec393a944bcc96c05b5f411d3560c9f1d8` |
***
### Amazon Elastic Container Registry (ECR)
#### Use ECR artifacts
You connect to ECR using a Harness AWS connector. Go to the [AWS Connector Settings Reference](/harness-platform/use-harness-platform/connectors/cloud-providers/add-aws-connector.md) to review the ECR requirements for the AWS connector.
AWS OIDC connectors are supported, starting with delegate version `849xx` or later.
**YAML**
This example uses a Harness Delegate installed in AWS for credentials.
**ECR connector YAML**
```yaml
connector:
name: ECR
identifier: ECR
orgIdentifier: default
projectIdentifier: CD_Docs
type: Aws
spec:
credential:
type: ManualConfig
spec:
accessKey: xxxxx
secretKeyRef: secretaccesskey
region: us-east-1
delegateSelectors:
- doc-immut
executeOnDelegate: true
```
**Service using ECR artifact YAML**
```yaml
service:
name: ECR
identifier: ECR
tags: {}
serviceDefinition:
spec:
manifests:
- manifest:
identifier: myapp
type: K8sManifest
spec:
store:
type: Harness
spec:
files:
- /values.yaml
valuesPaths:
- /Templates
skipResourceVersioning: false
enableDeclarativeRollback: false
artifacts:
primary:
primaryArtifactRef: <+input>
sources:
- spec:
connectorRef: ECR
imagePath: todolist-sample
tag: "1.0"
region: us-east-1
identifier: myapp
type: Ecr
type: Kubernetes
```
**API**
Create the ECR connector with the [Create a Connector](https://apidocs.harness.io/tag/Connectors#operation/createConnector) API.
**ECR connector example**
```curl
curl --location --request POST 'https://app.harness.io/gateway/ng/api/connectors?accountIdentifier=12345' \
--header 'Content-Type: text/yaml' \
--header 'x-api-key: pat.12345.6789' \
--data-raw 'connector:
name: ECR
identifier: ECR
orgIdentifier: default
projectIdentifier: CD_Docs
type: Aws
spec:
credential:
type: ManualConfig
spec:
accessKey: xxxxx
secretKeyRef: secretaccesskey
region: us-east-1
delegateSelectors:
- doc-immut
executeOnDelegate: true'
```
Create a service with an artifact source that uses the connector using the [Create Services](https://apidocs.harness.io/tag/Services#operation/createServicesV2) API.
**Terraform provider**
For the Terraform provider ECR connector resource, go to [harness\_platform\_connector\_aws](https://registry.terraform.io/providers/harness/harness/latest/docs/resources/platform_connector_aws).
**ECR connector example**
```json
# Credential manual
resource "harness_platform_connector_aws" "test" {
identifier = "identifier"
name = "name"
description = "test"
tags = ["foo:bar"]
manual {
secret_key_ref = "account.secret_id"
delegate_selectors = ["harness-delegate"]
}
}
# Credentials inherit_from_delegate
resource "harness_platform_connector_aws" "test" {
identifier = "identifier"
name = "name"
description = "test"
tags = ["foo:bar"]
inherit_from_delegate {
delegate_selectors = ["harness-delegate"]
}
}
```
For the Terraform provider service resource, go to [harness\_platform\_service](https://registry.terraform.io/providers/harness/harness/latest/docs/resources/platform_service).
**Harness Manager**
You connect to ECR using a Harness AWS connector. Go to the [AWS Connector Settings Reference](/harness-platform/use-harness-platform/connectors/cloud-providers/add-aws-connector.md) to review the ECR requirements for the AWS connector.
Perform the following steps to add an artifact from ECR:
1. In your project, in CD (Deployments), select **Services**.
2. Select **New Service**.
3. Enter a name for the service and select **Save**.
4. In **Configuration** > **Service Definition**, select **Kubernetes**.
5. In **Artifacts**, select **Add Artifact Source**.
6. In **Artifact Repository Type**, click **ECR**, and then select **Continue**.
7. In **ECR Repository**, select or create an [AWS connector](/harness-platform/use-harness-platform/connectors/cloud-providers/add-aws-connector.md) that connects to the AWS account in which the ECR registry is located.
8. Select **Continue**.
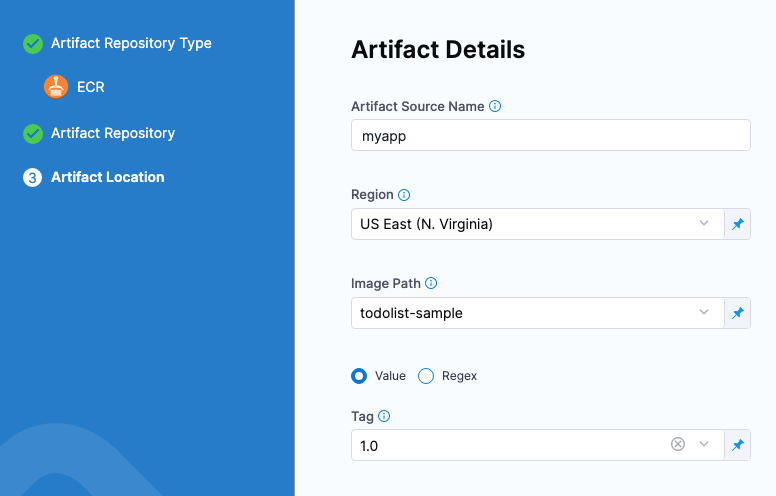
9. In **Artifact Details**, in **Region**, select the region where the artifact source is located.
10. (Optional) In **Registry ID**, enter the AWS account ID of the ECR registry you want to use. This field is useful when the AWS connector can access AWS accounts other than the one it is configured with. If you do not specify a registry ID, Harness uses the default registry associated with the AWS account.
11. If the IAM user has access to the repository in the secondary account, in **Registry ID**, specify the AWS account ID associated with that repository.
Only Tags can be fetched from the repository in the secondary account. You must specify the image path manually.
12. In **Image Path**, enter the name of the artifact you want to deploy.
13. In **Tag**, enter or select the [Docker image tag](https://docs.docker.com/engine/reference/commandline/tag/) for the image.
If you use runtime input, when you deploy the pipeline, Harness pulls the list of tags from the repo and prompts you to select one.
14. To specify an image digest, use **Digest** and the unique identifier for the image you want to use. Specifying an image by tag and digest (rather than tag alone) is useful when you want to deploy an image with a fixed digest/SHA for your service.
{% hint style="info" %}
If an image with the specified tag/digest combination does not exist in the artifact registry, the pipeline fails.
{% endhint %}
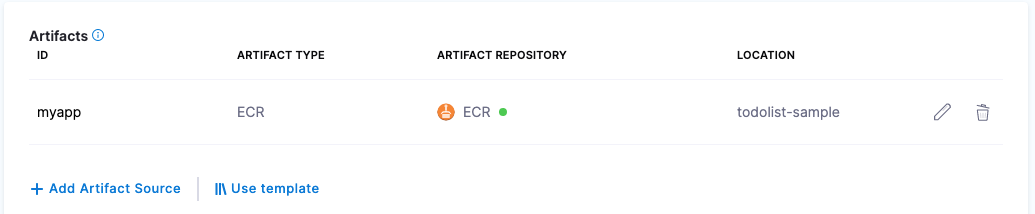
15. Select **Submit**. The artifact is added to the service definition.
#### Permissions
Make sure the AWS IAM user account you use in the AWS connector has the following policy.
**Pull from ECR policy**
* **Policy Name**: `AmazonEC2ContainerRegistryReadOnly`
* **Policy ARN**: `arn:aws:iam::aws:policy/AmazonEC2ContainerRegistryReadOnly`
* **Description**: `Provides read-only access to Amazon EC2 Container Registry repositories.`
* **Policy JSON**:
```json
{
"Version": "2012-10-17",
"Statement": [
{
"Effect": "Allow",
"Action": [
"ecr:GetAuthorizationToken",
"ecr:BatchCheckLayerAvailability",
"ecr:GetDownloadUrlForLayer",
"ecr:GetRepositoryPolicy",
"ecr:DescribeRepositories",
"ecr:ListImages",
"ecr:DescribeImages",
"ecr:BatchGetImage"
],
"Resource": "*"
}
]
}
```
**Use Docker Registry for ECR**
If you do not want to use the AWS connector for ECR, you can use the platform-agnostic Docker Registry connector.
Use the following settings:
* **Provider Type**: select **Other (Docker V2 compliant)**.
* **URL**: Enter the same URL you would use in your push command.
* For example, here is an ECR push command example:
`docker push 1234567890.dkr.ecr.us-east-2.amazonaws.com/my-private-repo:123`.
* Include the `https://` scheme when you add the URL in **URL**.
* Your URL will look something like this: `https://1234567890.dkr.ecr.us-east-2.amazonaws.com`.
* **Authentication**:
* **Username**: Enter `AWS`. Do not enter an access key or user name.
* **Password**: Enter the password returned from the following command (replace `us-east-2` with your region):
```bash
aws ecr get-login-password --region us-east-2
```
Make sure the AWS IAM user you use has the correct policies to pull from ECR:
**Pull from ECR policy**
* **Policy Name**: `AmazonEC2ContainerRegistryReadOnly`
* **Policy ARN**: `arn:aws:iam::aws:policy/AmazonEC2ContainerRegistryReadOnly`
* **Description**: `Provides read-only access to Amazon EC2 Container Registry repositories.`
* **Policy JSON**:
```json
{
"Version": "2012-10-17",
"Statement": [
{
"Effect": "Allow",
"Action": [
"ecr:GetAuthorizationToken",
"ecr:BatchCheckLayerAvailability",
"ecr:GetDownloadUrlForLayer",
"ecr:GetRepositoryPolicy",
"ecr:DescribeRepositories",
"ecr:ListImages",
"ecr:DescribeImages",
"ecr:BatchGetImage"
],
"Resource": "*"
}
]
}
```
**AWS roles for IRSA auth**
If you are using IRSA for authentication in the Harness AWS connector that pulls from ECR, ensure the following AWS roles are mapped to the Kubernetes service account.
* `ecr:DescribeImages`
* `ecr:DescribeRepository`
* `ecr:GetAuthorizationToken`
* `ecr:BatchGetImage`
* `ecr:GetDownloadUrlForLayer`
#### ECR artifact expressions
You can reference artifact properties using the following expressions in a values YAML file or in any Harness setting that supports [Harness expressions](/harness-platform/use-harness-platform/variables-and-expressions/harness-variables.md).
| **Expression** | **Description** | **Example** |
| ------------------------------------------------- | --------------------------------------------------------------------------------------------- | ------------------------------------------------------------------------- |
| `<+artifact.connectorRef>` | Identifier of the connector used by the artifact source | `org.aws` |
| `<+artifact.identifier>` | Identifier of the artifact source in the service definition | `AcmeEcr` |
| `<+artifact.type>` | This will be `Ecr` always | `Ecr` |
| `<+artifact.primaryArtifact>` | Boolean values. `true` in case of primary artifact | `true` |
| `<+artifact.registryId>` | Registry ID of the ECR registry as set in the artifact source config. | `4793702123451` |
| `<+artifact.tag>`, `<+artifact.metadata.tag>` | This is the Docker tag | `v1` |
| `<+artifact.image>`, `<+artifact.metadata.image>` | This is the image of the particular version. The value is used with \`docker pull\` command | `us-east-1.ecr.io/hello-world:v1` |
| `<+artifact.imagePath>` | This is the name of the image without registry info or tag | `hello-world` |
| `<+artifact.imagePullSecret>` | This will be the base64 encoded secret used for pulling the image | |
| `<+artifact.dockerConfigJsonSecret>` | This is the `kubernetes.io/dockerconfigjson` credentials | |
| `<+artifact.digest>` | This is the digest specified in the ECR artifact source definition | `sha256:6d001fb3022161cdcb5f4df6cca5b5705e064ce873cd16144c3e4de8d2653d0b` |
| `<+artifact.label.[PLACEHOLDER]>` | This is the label set in the Docker image. Replace the placeholder with the appropriate label | |
| `<+artifact.metadata.SHAV2>` | Docker supports v1 and v2 format. Both are listed when applicable. | `sha256:6d001fb3022161cdcb5f4df6cca5b5705e064ce873cd16144c3e4de8d2653d0b` |
| `<+artifact.metadata.SHA>` | SHA of the Docker image | `sha256:b3ebe55062b76860c6c0c78f5cae81ec393a944bcc96c05b5f411d3560c9f1d8` |
***
### Amazon S3 Cloud Storage
#### Use AWS artifacts
You connect to AWS using a Harness AWS connector. Go to the [AWS Connector Settings Reference](/harness-platform/use-harness-platform/connectors/cloud-providers/add-aws-connector.md) to review the AWS requirements for the connector.
AWS OIDC connectors also are supported, starting with delegate version `849xx` or later.
**YAML**
This example uses a Harness Delegate installed in AWS for credentials.
**AWS connector YAML**
```yaml
connector:
name: jsmith-aws
identifier: jsmithaws
description: ""
orgIdentifier: default
projectIdentifier: jsmith_project
type: Aws
spec:
credential:
type: ManualConfig
spec:
accessKeyRef: jsmithawsaccesskeyid
secretKeyRef: jsmithawssecretaccesskey
region: us-east-1
executeOnDelegate: false
```
**Service using S3 artifact YAML**
```yaml
service:
name: jsmith-aws-s3-test
identifier: jsmithawss3test
tags: {}
serviceDefinition:
spec:
artifacts:
primary:
primaryArtifactRef: <+input>
sources:
- spec:
connectorRef: jsmithaws
bucketName: jsmith-bucket
filePath: login-service.sh
identifier: jsmith_login_service_test_sh
type: AmazonS3
type: Ssh
```
**API**
Create the AWS connector with the [Create a Connector](https://apidocs.harness.io/tag/Connectors#operation/createConnector) API.
**AWS connector example**
```curl
curl --location --request POST 'https://app.harness.io/gateway/ng/api/connectors?accountIdentifier=12345' \
--header 'Content-Type: text/yaml' \
--header 'x-api-key: pat.12345.6789' \
--data-raw 'connector:
name: jsmith-aws
identifier: jsmithaws
description: ""
orgIdentifier: default
projectIdentifier: jsmith_project
type: Aws
spec:
credential:
type: ManualConfig
spec:
accessKeyRef: jsmithawsaccesskeyid
secretKeyRef: jsmithawssecretaccesskey
region: us-east-1
executeOnDelegate: false'
```
Create a service with an artifact source that uses the connector using the [Create Services](https://apidocs.harness.io/tag/Services#operation/createServicesV2) API.
**Terraform provider**
For the Terraform provider AWS connector resource, go to [harness\_platform\_connector\_aws](https://registry.terraform.io/providers/harness/harness/latest/docs/resources/platform_connector_aws).
**AWS connector example**
```json
# Credential manual
resource "harness_platform_connector_aws" "test" {
identifier = "identifier"
name = "name"
description = "test"
tags = ["foo:bar"]
manual {
secret_key_ref = "account.secret_id"
delegate_selectors = ["harness-delegate"]
}
}
# Credentials inherit_from_delegate
resource "harness_platform_connector_aws" "test" {
identifier = "identifier"
name = "name"
description = "test"
tags = ["foo:bar"]
inherit_from_delegate {
delegate_selectors = ["harness-delegate"]
}
}
```
For the Terraform provider service resource, go to [harness\_platform\_service](https://registry.terraform.io/providers/harness/harness/latest/docs/resources/platform_service).
**Harness Manager**
You connect to AWS using a Harness AWS connector. Go to the [AWS Connector Settings Reference](/harness-platform/use-harness-platform/connectors/cloud-providers/add-aws-connector.md) to review the AWS requirements for the connector.
Perform the following steps to add an artifact from an S3 bucket:
1. In your project, in CD (Deployments), select **Services**.
2. Select **New Service**.
3. Enter a name for the service and select **Save**.
4. Select **Configuration**.
5. In **Service Definition**, select **Secure Shell**.
6. In **Artifacts**, select **Add Artifact Source**.
7. In **Artifact Repository Type**, click **Amazon S3**, and then select **Continue**.
8. In **AWS Connector**, select or create an [AWS connector](/harness-platform/use-harness-platform/connectors/cloud-providers/add-aws-connector.md) that connects to the AWS account where the S3 bucket is located.
9. Select **Continue**.
10. In **Artifact Details**, specify the following:
1. In **Artifact Source Identifier**, add a unique identifier. You can use the Harness expression `<+artifact.primary.identifier>` to reference this setting in your pipelines.
2. in **Region**, select the region where the artifact source is located.
3. In **Bucket Name**, select the bucket where the artifact is located
4. In **File path**, enter the path (from the bucket root) and name of the artifact you want to deploy.
11. Select **Submit**.\
If you use runtime input, when you deploy the pipeline, Harness pulls the list of tags from the repo and prompts you to select one.
12. Select **Submit**. The artifact is added to the service definition.
#### Permissions
You need a dedicated S3 bucket for your artifacts and an AWS connector with read/write access to this bucket.
**Sample S3 Cache Bucket Policy**
```json
{
"Version": "2012-10-17",
"Statement": [
{
"Sid": "AllowS3BucketAccess",
"Effect": "Allow",
"Action": [
"s3:PutObject",
"s3:GetObject",
"s3:ListBucket",
"s3:DeleteObject"
],
"Resource": [
"arn:aws:s3:::your-s3-bucket/*",
"arn:aws:s3:::your-s3-bucket"
]
},
{
"Sid": "AllowDescribeRegions",
"Effect": "Allow",
"Action": "ec2:DescribeRegions",
"Resource": "*"
}
]
}
```
Go to [Add an AWS connector](/harness-platform/use-harness-platform/connectors/cloud-providers/add-aws-connector.md) and the [AWS connector settings reference](/harness-platform/use-harness-platform/connectors/cloud-providers/add-aws-connector/aws-connector-settings-reference.md) to configure an S3 connector and S3 bucket policies.
#### AWS S3 artifact expressions
You can reference artifact properties using the following expressions in a values YAML file or in any Harness setting that supports [Harness expressions](/harness-platform/use-harness-platform/variables-and-expressions/harness-variables.md).
| **Expression** | **Description** | **Example** |
| --------------------------------- | -------------------------------------------------------------------------------------------------------------------------------------------- | ------------------------------ |
| `<+artifact.connectorRef>` | Identifier of the connector used by the artifact source | `org.aws` |
| `<+artifact.identifier>` | Identifier of the artifact source in the service definition | `AcmeS3` |
| `<+artifact.type>` | This will be `AmazonS3` always | `AmazonS3` |
| `<+artifact.primaryArtifact>` | Boolean values. `true` in case of primary artifact | `true` |
| `<+artifact.filePath>` | Full path of the file in S3 bucket | `acme-apps/hello-world/v1.tgz` |
| `<+artifact.region>` | Region of S3 bucket | `us-east-1` |
| `<+artifact.bucketName>` | Name of the S3 bucket | `acme-lambda` |
| `<+artifact.metadata.get([KEY])>` | This is the metadata attached with the file in AWS S3. Popular keys include `x-amz-server-side-encryption`, `Content-Type`, `Last-Modified`. | |
#### AWS S3 file filter
The artifact details settings include a **File Filter** (`fileFilter`) option.
In **File Filter**, you can enter a regex value and Harness will fetch all matching files. You can then select from the list in **File Path**.
This setting is optional. If you do not use it, Harness will fetch and display all files in the **File Path** setting.
If the **File Path** is a fixed value, during pipeline execution, artifact validation is performed using the **File Path** but not the **File Filter**. Harness does not check whether the **File Filter** matches or not during the execution.
Examples:
* `*`: fetch all files in the file path.
* `*.zip`: fetch all files in the file path with the extension `.zip`.
* `*/w10/*.tfstate`: fetch all files in the file path that contain `/w10/` with the extension `.tfstate`.
* `*/w1/*`: fetch all files in the file path that contain `/w1/`.
* `w1`: fetch all files in the file path that contain `w1`.
***
### Amazon EC2 AMIs
#### Use Amazon EC2 AMI artifacts
You connect to your Amazon AWS account using a Harness AWS connector. Go to the [AWS Connector Settings Reference](/harness-platform/use-harness-platform/connectors/cloud-providers/add-aws-connector.md) to review the AWS requirements for the connector.
AWS OIDC connectors are supported, starting with delegate version `849xx` or later.
For AWS AMI artifacts, a version number represents the name of AMI. You can filter names by using tags/filter values.
**YAML**
This example uses a Harness Delegate installed in AWS for credentials.
**AWS connector YAML**
```yaml
connector:
name: jsmith-aws
identifier: jsmithaws
description: ""
orgIdentifier: default
projectIdentifier: jsmith_project
type: Aws
spec:
credential:
type: ManualConfig
spec:
accessKeyRef: jsmithawsaccesskeyid
secretKeyRef: jsmithawssecretaccesskey
region: us-east-1
executeOnDelegate: false
```
**Service using EC2 AMI YAML**
```yaml
service:
name: jsmith-delegate-ami-test
identifier: jsmithdelegateamitest
tags: {}
serviceDefinition:
spec:
artifacts:
primary:
primaryArtifactRef: <+input>
sources:
- identifier: macos_build_farm_for_ci
spec:
connectorRef: jsmithaws
region: us-east-1
tags:
- name: Version
value: ""
filters:
- name: ami-image-id
value: ami-xxxxxxxxxxxxxxxxx
version: macos-build-farm-for-ci
type: AmazonMachineImage
type: Asg
```
**API**
Create the AWS connector with the [Create a Connector](https://apidocs.harness.io/tag/Connectors#operation/createConnector) API.
**AWS connector example**
```curl
curl --location --request POST 'https://app.harness.io/gateway/ng/api/connectors?accountIdentifier=12345' \
--header 'Content-Type: text/yaml' \
--header 'x-api-key: pat.12345.6789' \
--data-raw 'connector:
name: jsmith-aws
identifier: jsmithaws
description: ""
orgIdentifier: default
projectIdentifier: jsmith_project
type: Aws
spec:
credential:
type: ManualConfig
spec:
accessKeyRef: jsmithawsaccesskeyid
secretKeyRef: jsmithawssecretaccesskey
region: us-east-1
executeOnDelegate: false'
```
Create a service with an artifact source that uses the connector using the [Create Services](https://apidocs.harness.io/tag/Services#operation/createServicesV2) API.
**Terraform provider**
For the Terraform provider AWS connector resource, go to [harness\_platform\_connector\_aws](https://registry.terraform.io/providers/harness/harness/latest/docs/resources/platform_connector_aws).
**AWS connector example**
```json
# Credential manual
resource "harness_platform_connector_aws" "test" {
identifier = "identifier"
name = "name"
description = "test"
tags = ["foo:bar"]
manual {
secret_key_ref = "account.secret_id"
delegate_selectors = ["harness-delegate"]
}
}
# Credentials inherit_from_delegate
resource "harness_platform_connector_aws" "test" {
identifier = "identifier"
name = "name"
description = "test"
tags = ["foo:bar"]
inherit_from_delegate {
delegate_selectors = ["harness-delegate"]
}
}
```
For the Terraform provider service resource, go to [harness\_platform\_service](https://registry.terraform.io/providers/harness/harness/latest/docs/resources/platform_service).
**Harness Manager**
You connect to AWS using a Harness AWS connector. Go to the [AWS Connector Settings Reference](/harness-platform/use-harness-platform/connectors/cloud-providers/add-aws-connector.md) to review the AWS requirements for the connector.
Perform the following steps to add an artifact from an Amazon EC2 AMI:
1. In your project, in CD (Deployments), select **Services**.
2. Select **New Service**.
3. Enter a name for the service and select **Save**.
4. Select **Configuration**.
5. In **Service Definition**, select **AWS Auto Scaling Group**.
6. In **Artifacts**, select **Add Artifact Source**.
7. In **Artifact Repository Type**, click **Amazon Machine Image**, and then select **Continue**.
8. In **AWS Connector**, select or create an [AWS connector](/harness-platform/use-harness-platform/connectors/cloud-providers/add-aws-connector.md) that connects to the AWS account where the AMI is located.
9. Select **Continue**.
10. In **Artifact Details**, specify the following:
1. In **Artifact Source Identifier**, add a unique identifier. You can use the Harness expression `<+artifact.primary.identifier>` to reference this setting in your pipelines.
2. in **Region**, select the region where the AMI is located.
3. Set the **AMI Tags** and/or **AMI Filters** to specify the AMI you want to use for the service artifact.
4. In **Version**, select the AMI you want to deploy. The pull-down list is populated based on the specified region, tags, and filters.
11. Select **Submit**.
The artifact is added to the service definition.
***
### Nexus
#### Use Nexus artifacts
You connect to Nexus using a Harness Nexus connector. Go to the [Nexus Connector Settings Reference](/harness-platform/use-harness-platform/connectors/artifact-repositories/add-a-nexus-connector/nexus-connector-settings-reference.md) to review the requirements for the Nexus connector.
**YAML**
**Nexus connector YAML**
```yaml
connector:
name: Harness Nexus
identifier: Harness_Nexus
description: ""
orgIdentifier: default
projectIdentifier: CD_Docs
type: HttpHelmRepo
spec:
helmRepoUrl: https://nexus3.dev.harness.io/repository/test-helm/
auth:
type: UsernamePassword
spec:
username: harnessadmin
passwordRef: nexus3pwd
delegateSelectors:
- gcpdocplay
```
**Service using Nexus artifact YAML**
```yaml
service:
name: Nexus Example
identifier: Nexus_Example
tags: {}
serviceDefinition:
spec:
manifests:
- manifest:
identifier: myapp
type: K8sManifest
spec:
store:
type: Harness
spec:
files:
- /Templates
valuesPaths:
- /values.yaml
skipResourceVersioning: false
enableDeclarativeRollback: false
artifacts:
primary:
primaryArtifactRef: <+input>
sources:
- spec:
connectorRef: account.Harness_Nexus
repository: todolist
repositoryFormat: docker
tag: "4.0"
spec:
artifactPath: nginx
repositoryPort: "6661"
identifier: myapp
type: Nexus3Registry
type: Kubernetes
```
**API**
Create the Nexus connector with the [Create a Connector](https://apidocs.harness.io/tag/Connectors#operation/createConnector) API.
**Nexus connector example**
```curl
curl --location --request POST 'https://app.harness.io/gateway/ng/api/connectors?accountIdentifier=12345' \
--header 'Content-Type: text/yaml' \
--header 'x-api-key: pat.12345.6789' \
--data-raw 'connector:
name: Harness Nexus
identifier: Harness_Nexus
description: ""
orgIdentifier: default
projectIdentifier: CD_Docs
type: HttpHelmRepo
spec:
helmRepoUrl: https://nexus3.dev.harness.io/repository/test-helm/
auth:
type: UsernamePassword
spec:
username: harnessadmin
passwordRef: nexus3pwd
delegateSelectors:
- gcpdocplay'
```
Create a service with an artifact source that uses the connector using the [Create Services](https://apidocs.harness.io/tag/Services#operation/createServicesV2) API.
**Terraform provider**
For the Terraform provider Nexus connector resource, go to [harness\_platform\_connector\_nexus](https://registry.terraform.io/providers/harness/harness/latest/docs/resources/platform_connector_nexus).
**Nexus connector example**
```json
# Credentials username password
resource "harness_platform_connector_nexus" "test" {
identifier = "identifier"
name = "name"
description = "test"
tags = ["foo:bar"]
url = "https://nexus.example.com"
delegate_selectors = ["harness-delegate"]
version = "3.x"
credentials {
username = "admin"
password_ref = "account.secret_id"
}
}
# Credentials anonymous
resource "harness_platform_connector_nexus" "test" {
identifier = "identifier"
name = "name"
description = "test"
tags = ["foo:bar"]
url = "https://nexus.example.com"
version = "version"
delegate_selectors = ["harness-delegate"]
}
```
For the Terraform provider service resource, go to [harness\_platform\_service](https://registry.terraform.io/providers/harness/harness/latest/docs/resources/platform_service).
**Harness Manager**
You connect to Nexus using a Harness Nexus connector. Go to the [Nexus Connector Settings Reference](https://developer.harness.io/docs/platform/connectors/artifact-repositories/nexus-connector-settings-reference) to review the requirements for the Nexus connector.
Perform the following steps to add an artifact from Nexus:
1. In your project, in CD (Deployments), select **Services**.
2. Select **New Service**.
3. Enter a name for the service and select **Save**.
4. Select **Configuration**.
5. In **Service Definition**, select **Kubernetes**.
6. In **Artifacts**, click **Add Artifact Source**.
7. In **Artifact Repository Type**, click **Nexus**, and then select **Continue**.
8. In **Nexus Repository**, select of create a Nexus Connector that connects to the Nexus account where the repo is located.
9. Select **Continue**.
10. Select **Repository URL** or **Repository Port**.
* **Repository Port** is more commonly used and can be taken from the repo settings. Each repo uses its own port.
* **Repository URL** is typically used for a custom infrastructure (for example, when Nexus is hosted behind a reverse proxy).
11. In **Repository**, enter the name of the repo.
12. In **Artifact Path**, enter the path to the artifact you want.
13. In **Tag**, enter or select the [Docker image tag](https://docs.docker.com/engine/reference/commandline/tag/) for the image.
If you use runtime input, when you deploy the pipeline, Harness pulls the list of tags from the repo and prompts you to select one.
14. To specify an image digest, use **Digest** and the unique identifier for the image you want to use. Specifying an image by tag and digest (rather than tag alone) is useful when you want to deploy an image with a fixed digest/SHA for your service.
{% hint style="info" %}
If an image with the specified tag/digest combination does not exist in the artifact registry, the pipeline fails.
{% endhint %}
14. Select **Submit**. The artifact is added to the service definition.
#### Permissions
Make sure the connected account has the following permissions in the Nexus server.
* Repo: All repositories (Read)
* Nexus UI: Repository Browser
Go to [Nexus managing security](https://help.sonatype.com/en/managing-security.html) to configure repository permissions.
For Nexus 3, when used as a **Docker** repo, the account needs:
* A role with the `nx-repository-view-*_*_*` privilege.
#### Nexus3 artifact expressions
You can reference artifact properties using the following expressions in a values YAML file or in any Harness setting that supports [Harness expressions](/harness-platform/use-harness-platform/variables-and-expressions/harness-variables.md).
| **Expression** | **Description** | **Example** |
| ----------------------------------------------------------------------- | ---------------------------------------------------------------------------------------------------------------------- | -------------------------------------------------------------------------------------------- |
| `<+artifact.connectorRef>` | Identifier of the connector used by the artifact source | `org.nexus` |
| `<+artifact.identifier>` | Identifier of the artifact source in the service definition | `AcmeNexus3` |
| `<+artifact.type>` | This will be `Nexus3Registry` always | `Nexus3Registry` |
| `<+artifact.primaryArtifact>` | Boolean values. `true` in case of primary artifact | `true` |
| `<+artifact.tag>`, `<+artifact.metadata.tag>` | This is the Docker tag | `v1` |
| `<+artifact.repositoryFormat>` | Type of repository. It is one of `docker`, `maven`, `nuget`, `npm`, `raw` | `docker` |
| `<+artifact.image>`, `<+artifact.metadata.image>` | This is the image of the particular version. The value is used with \`docker pull\` command | `nexus3.acme.io:80/nginx:v1.0` |
| `<+artifact.repositoryName>` | Name of the repository in Nexus3 | `acme-docker` |
| `<+artifact.artifactPath>` | This is the name of the image without registry info or tag | `nginx` |
| `<+artifact.registryHostname>`, `<+artifact.metadata.registryHostname>` | This is the hostname of the registry | `nexus3.acme.io` |
| `<+artifact.imagePullSecret>` | This will be the base64 encoded secret used for pulling the image | |
| `<+artifact.dockerConfigJsonSecret>` | This is the `kubernetes.io/dockerconfigjson` credentials. Valid for `docker` only | |
| `<+artifact.digest>` | This is the digest specified in the ECR artifact source definition. Valid for `docker` only | `sha256:6d001fb3022161cdcb5f4df6cca5b5705e064ce873cd16144c3e4de8d2653d0b` |
| `<+artifact.label.[PLACEHOLDER]>` | This is the label set in the Docker image. Replace the placeholder with the appropriate label. Valid for `docker` only | |
| `<+artifact.metadata.SHAV2>` | Docker supports v1 and v2 format. Both are listed when applicable. Valid for `docker` only | `sha256:6d001fb3022161cdcb5f4df6cca5b5705e064ce873cd16144c3e4de8d2653d0b` |
| `<+artifact.metadata.SHA>` | SHA of the Docker image. Valid for `docker` only | `sha256:b3ebe55062b76860c6c0c78f5cae81ec393a944bcc96c05b5f411d3560c9f1d8` |
| `<+artifact.metadata.groupId>` | GroupId of the maven artifact. Valid for `maven` only | `mygroup` |
| `<+artifact.metadata.artifactId>` | ArtifactId of the maven artifact. Valid for `maven` only | `myartifact` |
| `<+artifact.metadata.repositoryName>` | Name of the repository in Nexus3. Valid for everything except `docker` only | `maven-releases` |
| `<+artifact.metadata.version>` | Valid for everything except `docker` only | `1.2` |
| `<+artifact.metadata.url>` | URL of the file. Valid for everything except `docker` only | `https://nexus3.acme.io/repository/maven-releases/mygroup/myartifact/1.2/myartifact-1.2.war` |
| `<+artifact.metadata.filename>` | Name of the file. Valid for everything except `docker` only | `myartifact-1.2.war` |
| `<+artifact.metadata.imagePath>` | Path of the file. Valid for everything except `docker` only | `mygroup/myartifact/1.2/myartifact-1.2.war` |
#### Nexus2 artifact expressions
You can reference artifact properties using the following expressions in a values YAML file or in any Harness setting that supports [Harness expressions](/harness-platform/use-harness-platform/variables-and-expressions/harness-variables.md).
| **Expression** | **Description** | **Example** |
| ------------------------------------------------- | ---------------------------------------------------------------- | ------------------------------------------------------------------------------------------------------------------------------------ |
| `<+artifact.connectorRef>` | Identifier of the connector used by the artifact source | `org.nexus` |
| `<+artifact.identifier>` | Identifier of the artifact source in the service definition | `AcmeNexus2` |
| `<+artifact.type>` | This will be `Nexus2Registry` always | `Nexus2Registry` |
| `<+artifact.primaryArtifact>` | Boolean values. `true` in case of primary artifact | `true` |
| `<+artifact.tag>`, `<+artifact.metadata.version>` | This is the version of the nexus artifact | `v1` |
| `<+artifact.repositoryFormat>` | Type of repository. It is one of `maven`, `nuget`, `npm` | `maven` |
| `<+artifact.repositoryName>` | Name of the repository in Nexus2 | `acme-mvn` |
| `<+artifact.artifactPath>` | This is the artifactId | `myartifact` |
| `<+artifact.imagePullSecret>` | This will be the base64 encoded secret used for pulling the file | |
| `<+artifact.metadata.groupId>` | GroupId of the maven artifact. Valid for `maven` only | `mygroup` |
| `<+artifact.metadata.artifactId>` | ArtifactId of the maven artifact. Valid for `maven` only | `myartifact` |
| `<+artifact.metadata.repositoryName>` | Name of the repository in Nexus2. | `maven-releases` |
| `<+artifact.metadata.url>` | URL of the file. | `https://nexus2.acme.io/service/local/artifact/maven/content?r=maven-releases&g=mygroup&a=myartifact&v=1.0&p=jar&e=jar&c=testbundle` |
| `<+artifact.metadata.filename>` | Name of the file. | `foo-1.0-testbundle.jar` |
***
### Artifactory
#### Use Artifactory artifacts
You connect to Artifactory (JFrog) using a Harness Artifactory connector. Go to the [Artifactory Connector Settings Reference](https://developer.harness.io/docs/platform/connectors/artifact-repositories/artifactory-connector-settings-reference) to review the requirements for the Artifactory connector.
**YAML**
**Artifactory connector YAML**
```yaml
connector:
name: artifactory-tutorial-connector
identifier: artifactorytutorialconnector
orgIdentifier: default
projectIdentifier: CD_Docs
type: Artifactory
spec:
artifactoryServerUrl: https://harness.jfrog.io/artifactory/
auth:
type: Anonymous
executeOnDelegate: false
```
**Service using Artifactory artifact YAML**
```yaml
service:
name: Artifactory Example
identifier: Artifactory_Example
tags: {}
serviceDefinition:
spec:
manifests:
- manifest:
identifier: myapp
type: K8sManifest
spec:
store:
type: Harness
spec:
files:
- /Templates
valuesPaths:
- /values.yaml
skipResourceVersioning: false
enableDeclarativeRollback: false
artifacts:
primary:
primaryArtifactRef: <+input>
sources:
- spec:
connectorRef: artifactorytutorialconnector
artifactPath: alpine
tag: 3.14.2
digest: sha256:xxxxxxxxxxxxxxxxxxxxxxxxxxxxxxxxxxxxxxxxxxxxxxxxxxxxxxxxxxxxxxxx
repository: bintray-docker-remote
repositoryUrl: harness-docker.jfrog.io
repositoryFormat: docker
identifier: myapp
type: ArtifactoryRegistry
type: Kubernetes
```
**API**
Create the Artifactory connector with the [Create a Connector](https://apidocs.harness.io/tag/Connectors#operation/createConnector) API.
**Artifactory connector example**
```curl
curl --location --request POST 'https://app.harness.io/gateway/ng/api/connectors?accountIdentifier=12345' \
--header 'Content-Type: text/yaml' \
--header 'x-api-key: pat.12345.6789' \
--data-raw 'connector:
name: artifactory-tutorial-connector
identifier: artifactorytutorialconnector
orgIdentifier: default
projectIdentifier: CD_Docs
type: Artifactory
spec:
artifactoryServerUrl: https://harness.jfrog.io/artifactory/
auth:
type: Anonymous
executeOnDelegate: false'
```
Create a service with an artifact source that uses the connector using the [Create Services](https://apidocs.harness.io/tag/Services#operation/createServicesV2) API.
**Terraform provider**
For the Terraform provider Artifactory connector resource, go to [harness\_platform\_connector\_artifactory](https://registry.terraform.io/providers/harness/harness/latest/docs/resources/platform_connector_artifactory).
**Artifactory connector example**
```json
# Authentication mechanism as username and password
resource "harness_platform_connector_artifactory" "example" {
identifier = "identifier"
name = "name"
description = "test"
tags = ["foo:bar"]
org_id = harness_platform_project.test.org_id
project_id = harness_platform_project.test.id
url = "https://artifactory.example.com"
delegate_selectors = ["harness-delegate"]
credentials {
username = "admin"
password_ref = "account.secret_id"
}
}
# Authentication mechanism as anonymous
resource "harness_platform_connector_artifactory" "test" {
identifier = "identifier"
name = "name"
description = "test"
tags = ["foo:bar"]
org_id = harness_platform_project.test.org_id
project_id = harness_platform_project.test.id
url = "https://artifactory.example.com"
delegate_selectors = ["harness-delegate"]
}
```
For the Terraform provider service resource, go to [harness\_platform\_service](https://registry.terraform.io/providers/harness/harness/latest/docs/resources/platform_service).
**Harness Manager**
You connect to Artifactory (JFrog) using a Harness Artifactory Connector. For details on all the requirements for the Artifactory Connector, go to [Artifactory Connector Settings Reference](https://developer.harness.io/docs/platform/connectors/artifact-repositories/artifactory-connector-settings-reference).
Perform the following steps to add an artifact from Artifactory:
1. In your project, in CD (Deployments), select **Services**.
2. Select **New Service**.
3. Enter a name for the service and select **Save**.
4. Select **Configuration**.
5. In **Service Definition**, select the deployment type.
6. In **Artifacts**, select **Add Artifact Source**.
7. In **Artifact Repository Type**, select **Artifactory**, and then select **Continue**.
8. In **Artifactory Connector**, select or create an Artifactory connector that connects to the Artifactory account where the repo is located. Click **Continue**. The **Artifact Details** settings appear.
9. Enter an **Artifact Source Identifier** and select the **Repository Format**.
10. Set the artifact details based on the format:
* [Docker repository format](#docker-repository-format)
* [Generic repository format](#generic-repository-format)
**Docker repository format**
1. In **Repository**, enter the repo name. If the full path is `docker-remote/library/mongo/3.6.2`, you would enter `docker-remote`.
2. In **Artifact/Image Path**, enter the path to the artifact. If the full path is `docker-remote/library/mongo/3.6.2`, you would enter `library/mongo`.
3. In **Repository URL**, enter the URL from the `docker login` command in Artifactory's **Set Me Up** settings.
4. In **Tag**, enter or select the [Docker image tag](https://docs.docker.com/engine/reference/commandline/tag/) for the image.
You can use a regex to select an image based on a matching pattern. Suppose you have a set of images with tags `3.1.1`, `3.1.2`, `3.1.3.1`, `3.1.3.2`, and `3.1.3.4`. Select **Regex**, then set **Tag Regex** `3.1*` to select the most recent image with prefix `3.1`, in this case the image with tag `3.1.3.4`.
5. If you use runtime inputs when you deploy the pipeline, Harness pulls the list of tags from the repo and prompts you to select one.
6. To specify an image digest, use **Digest** and the unique identifier for the image you want to use. Specifying an image by tag and digest (rather than tag alone) is useful when you want to deploy an image with a fixed digest/SHA for your service.
{% hint style="info" %}
If an image with the specified tag/digest combination does not exist in the artifact registry, the pipeline fails.
{% endhint %}
7. Select **Submit**. The artifact is added to the service definition.
**Generic repository format**
1. In **Repository**, enter the repo name. If the full path is `my-apps/myticketservice/1.0/ticket-service-1.0.jar`, you would enter `my-apps`.
2. Select the method for specifying the artifacts you want to deploy:
* **Artifact Directory** Specify a hard-coded path to the artifacts.
* **Artifact Filter** Use an expression to specify the path. Useful if you want to fetch artifacts from different paths.
3. Specify the artifacts you want to deploy.
* If you selected **Artifact Directory**:
1. In **Artifact Directory**, enter the path to the artifacts. If the full path is `my-apps/myticketservice/1.0/ticket-service-1.0.jar`, you would enter `myticketservice/1.0`.
2. Set **Artifact Details** to **Value** or **Regex** (to select an artifact based on a pattern).
3. Specify the value or the regex for the artifact. If you selected **Regex**, enter the **Artifact Path Filter** for the latest artifact you want to fetch.
* If you selected **Artifact Filter**, enter an expression that matches the artifacts you want to fetch. Here are some examples of expressions you can use:
* `*/*` : Fetch all artifacts from all directories including their subdirectories.
* `*/*.zip` : Fetch all `.zip` artifacts from all directories, including subdirectories.
* `*`: Fetch all artifacts in the root directory.
* `*.zip` : Fetch all `.zip` artifacts in the root directory.
* `folder/*` : Fetch all artifacts contained in directory `folder`.
* `folder/*.zip` : Fetch all `.zip` artifacts contained in directory `folder`.
* `folder/*/*` : Fetch all artifacts from all directories/subdirectories under `folder`, for example `folder/folder1`, `folder/folder1/folder2`, `folder/folder1/folder2/folder3`, etc.
* `folder/*/*.zip` : Fetch all `.zip` artifacts from all directories/subdirectories under `folder`.
* `folder*/*` : Fetch all artifacts from directories/subdirectories that match `folder*`, for example `folder`, `folder123`, `folder/x/y/z`, etc.
You cannot apply a filter that finds BOTH artifacts in a folder AND all subdirectories under that folder. Thus folder/* finds artifacts in folder but no subdirectories, and folder/*/* finds artifacts in all subdirectories but not in folder.
If you use a runtime input when you deploy the pipeline, Harness will pull the list of artifacts from the repo and prompt you to select one.
4. Select **Submit**. The artifact is added to the service definition.
#### Permissions
Make sure the following permissions are granted to the account:
* Privileged User is required to access API, whether Anonymous or a specific username (username and passwords are not mandatory).
* Read permission to all Repositories.
If used as a Docker repo, the account needs:
* List images and tags
* Pull images
Go to [Managing permissions in the JFrog Artifactory user guide](https://www.jfrog.com/confluence/display/RTF/Managing+Permissions) to configure the required permissions.
#### Artifactory artifact expressions
You can reference artifact properties using the following expressions in a values YAML file or in any Harness setting that supports [Harness expressions](/harness-platform/use-harness-platform/variables-and-expressions/harness-variables.md).
| **Expression** | **Description** | **Example** |
| ----------------------------------------------------------------------- | -------------------------------------------------------------------------------------------------------------------------------------- | ------------------------------------------------------------------------- |
| `<+artifact.connectorRef>` | Identifier of the connector used by the artifact source | `org.artifactory` |
| `<+artifact.identifier>` | Identifier of the artifact source in the service definition | `AcmeArtifactory` |
| `<+artifact.type>` | This will be `ArtifactoryRegistry` always | `ArtifactoryRegistry` |
| `<+artifact.primaryArtifact>` | Boolean values. `true` in case of primary artifact | `true` |
| `<+artifact.tag>`, `<+artifact.metadata.tag>` | This is the Docker tag | `v1` |
| `<+artifact.repositoryFormat>` | Type of repository. It is one of `docker`, `generic` | `docker` |
| `<+artifact.image>`, `<+artifact.metadata.image>` | This is the image of the particular version. The value is used with \`docker pull\` command | `acme.jfrog.io/todolist-app/nginx:v1` |
| `<+artifact.repositoryName>` | Name of the repository in Artifactory | `todolist-app` |
| `<+artifact.imagePath>`, `<+artifact.artifactPath>` | This is the name of the image without registry info or tag | `nginx` |
| `<+artifact.artifactDirectory>` | Path to the directory of where the generic artifacts are stored. As specified in the artifact source config. Valid for `generic` only. | `/acme/dev/app` |
| `<+artifact.registryHostname>`, `<+artifact.metadata.registryHostname>` | This is the hostname of the registry | `acme.jfrog.io` |
| `<+artifact.imagePullSecret>` | This will be the base64 encoded secret used for pulling the image | |
| `<+artifact.dockerConfigJsonSecret>` | This is the `kubernetes.io/dockerconfigjson` credentials. Valid for `docker` only. | |
| `<+artifact.digest>` | This is the digest specified in the Artifactory artifact source definition. Valid for `docker` only | `sha256:6d001fb3022161cdcb5f4df6cca5b5705e064ce873cd16144c3e4de8d2653d0b` |
| `<+artifact.label.[PLACEHOLDER]>` | This is the label set in the Docker image. Replace the placeholder with the appropriate label. Valid for `docker` only | |
| `<+artifact.metadata.SHAV2>` | Docker tends to support v1 and v2 format. Both are listed when applicable. Valid for `docker` only | `sha256:6d001fb3022161cdcb5f4df6cca5b5705e064ce873cd16144c3e4de8d2653d0b` |
| `<+artifact.metadata.SHA>` | SHA of the Docker image. Valid for `docker` only | `sha256:b3ebe55062b76860c6c0c78f5cae81ec393a944bcc96c05b5f411d3560c9f1d8` |
| `<+artifact.metadata.fileName>` | Name of the file. Valid for `generic` only. | `artifact.zip` |
| `<+artifact.metadata.url>` | URL to the file. Valid for `generic` only. | `https://acme.jfrog.io/artifactory/todolist/artifact.zip` |
***
### Bamboo
{% hint style="info" %}
Currently, Bamboo support is behind the feature flag `BAMBOO_ARTIFACT_NG`. Contact [Harness Support](mailto:support@harness.io) to enable the feature.
{% endhint %}
#### Use Bamboo build plans as artifacts
You can use Bamboo for build plans when performing deployments using the SSH/WinRM, Serverless.com Framework, and Deployment Templates deployment types. You can also trigger deployments based on new build plans in Bamboo.
You connect to Bamboo using a Harness Bamboo connector.
**YAML**
**Bamboo connector YAML**
```yaml
connector:
name: Bamboo
identifier: Bamboo
description: ""
orgIdentifier: default
projectIdentifier: Docs
type: Bamboo
spec:
bambooUrl: https://bamboo.dev.example.io
auth:
type: UsernamePassword
spec:
username: admin
passwordRef: bamboo
delegateSelectors:
- mydelegate
```
**Service using Bamboo plans YAML**
```yaml
service:
name: Bamboo
identifier: Bamboo
tags: {}
serviceDefinition:
spec:
artifacts:
primary:
primaryArtifactRef: myplan
sources:
- identifier: myplan
spec:
connectorRef: Bamboo
artifactPaths: artifacts
build: 133
planKey: PLAN1
type: Bamboo
type: Ssh
```
**API**
Create the Bamboo connector with the [Create a Connector](https://apidocs.harness.io/tag/Connectors#operation/createConnector) API.
**Bamboo connector example**
```sh
curl --location --request POST 'https://app.harness.io/gateway/ng/api/connectors?accountIdentifier=12345' \
--header 'Content-Type: text/yaml' \
--header 'x-api-key: pat.12345.6789' \
--data-raw 'connector:
name: Bamboo
identifier: Bamboo
description: ""
orgIdentifier: default
projectIdentifier: Docs
type: Bamboo
spec:
bambooUrl: https://bamboo.dev.example.io
auth:
type: UsernamePassword
spec:
username: admin
passwordRef: bamboo
delegateSelectors:
- mydelegate'
```
Create a service with an artifact source that uses the connector using the [Create Services](https://apidocs.harness.io/tag/Services#operation/createServicesV2) API.
**Terraform provider**
The Terraform Provider Bamboo connector resource is coming soon.
**Harness Manager**
Perform the following steps to add a plan from Bamboo:
1. In your project, in CD (Deployments), select **Services**.
2. Select **New Service**.
3. Enter a name for the service and select **Save**.
4. Select **Configuration**.
5. In **Service Definition**, select **Secure Shell** or one of the other deployment types that support Bamboo.
6. In **Artifacts**, select **Add Artifact Source**.
7. In **Artifact Repository Type**, select **Bamboo**, and then select **Continue**.
8. In **Bamboo Repository**, select of create a Bamboo connector that connects to the Bamboo account where the plan is located. Click **Continue**. The **Artifact Details** settings appear.
9. In **Artifact Source Identifier**, enter a name for this artifact.
10. In **Plan Name**, select the name of the plan.
11. In **Artifact Paths**, select the artifact path for the plan.
12. In **Bamboo Builds**, select the plan to use.
13. Select **Submit**. The artifact is added to the service definition.
#### Build plan permissions
Make sure the connected account has the following required permissions to the Bamboo server.
* View plan.
* Build plan (if you plan to trigger a build as part of your pipeline).
Go to [Bamboo Permissions](https://confluence.atlassian.com/bamboo/bamboo-permissions-369296034.html) to review the required permissions.
***
### GitHub packages
#### Use GitHub packages as artifacts
You can use GitHub Packages as artifacts for deployments.
Package type (`packageType`) support:
* Docker
* NPM
* Maven
* Nuget
You connect to GitHub using a Harness [GitHub connector](/harness-platform/use-harness-platform/connectors/code-repositories/add-a-github-connector/git-hub-connector-settings-reference.md), username, and personal access token (PAT).
{% hint style="info" %}
**New to GitHub Packages?** Go to this [video walkthrough](https://www.youtube.com/watch?v=gqseP_wTZsk) to get started.
{% endhint %}
**YAML**
**GitHub Packages connector YAML**
```yaml
connector:
name: GitHub Packages
identifier: GitHub_Packages
orgIdentifier: default
projectIdentifier: CD_Docs
type: Github
spec:
url: https://github.com/johndoe/myapp.git
validationRepo: https://github.com/johndoe/test.git
authentication:
type: Http
spec:
type: UsernameToken
spec:
username: johndoe
tokenRef: githubpackages
apiAccess:
type: Token
spec:
tokenRef: githubpackages
delegateSelectors:
- gcpdocplay
executeOnDelegate: true
type: Repo
```
**Service using GitHub Packages artifact YAML**
```yaml
service:
name: Github Packages
identifier: Github_Packages
tags: {}
serviceDefinition:
spec:
manifests:
- manifest:
identifier: myapp
type: K8sManifest
spec:
store:
type: Harness
spec:
files:
- /Templates
valuesPaths:
- /values.yaml
skipResourceVersioning: false
enableDeclarativeRollback: false
artifacts:
primary:
primaryArtifactRef: <+input>
sources:
- identifier: myapp
spec:
connectorRef: GitHub_Packages
org: ""
packageName: tweetapp
packageType: container
version: latest
type: GithubPackageRegistry
type: Kubernetes
```
**API**
Create the GitHub connector with the [Create a Connector](https://apidocs.harness.io/tag/Connectors#operation/createConnector) API.
**GitHub connector example**
```curl
curl --location --request POST 'https://app.harness.io/gateway/ng/api/connectors?accountIdentifier=12345' \
--header 'Content-Type: text/yaml' \
--header 'x-api-key: pat.12345.6789' \
--data-raw 'connector:
name: GitHub Packages
identifier: GitHub_Packages
orgIdentifier: default
projectIdentifier: CD_Docs
type: Github
spec:
url: https://github.com/johndoe/myapp.git
validationRepo: https://github.com/johndoe/test.git
authentication:
type: Http
spec:
type: UsernameToken
spec:
username: johndoe
tokenRef: githubpackages
apiAccess:
type: Token
spec:
tokenRef: githubpackages
delegateSelectors:
- gcpdocplay
executeOnDelegate: true
type: Repo'
```
Create a service with an artifact source that uses the connector using the [Create Services](https://apidocs.harness.io/tag/Services#operation/createServicesV2) API.
**Terraform provider**
For the Terraform provider GitHub connector resource, go to [harness\_platform\_connector\_github](https://registry.terraform.io/providers/harness/harness/latest/docs/resources/platform_connector_github).
**GitHub connector example**
```json
resource "harness_platform_connector_github" "test" {
identifier = "identifier"
name = "name"
description = "test"
tags = ["foo:bar"]
url = "https://github.com/account"
connection_type = "Account"
validation_repo = "some_repo"
delegate_selectors = ["harness-delegate"]
credentials {
http {
username = "username"
token_ref = "account.secret_id"
}
}
}
resource "harness_platform_connector_github" "test" {
identifier = "identifier"
name = "name"
description = "test"
tags = ["foo:bar"]
url = "https://github.com/account"
connection_type = "Account"
validation_repo = "some_repo"
delegate_selectors = ["harness-delegate"]
credentials {
http {
username = "username"
token_ref = "account.secret_id"
}
}
api_authentication {
token_ref = "account.secret_id"
}
}
resource "harness_platform_connector_github" "test" {
identifier = "identifier"
name = "name"
description = "test"
tags = ["foo:bar"]
url = "https://github.com/account"
connection_type = "Account"
validation_repo = "some_repo"
delegate_selectors = ["harness-delegate"]
credentials {
http {
username = "username"
token_ref = "account.secret_id"
}
}
api_authentication {
github_app {
installation_id = "installation_id"
application_id = "application_id"
private_key_ref = "account.secret_id"
}
}
}
```
For the Terraform provider service resource, go to [harness\_platform\_service](https://registry.terraform.io/providers/harness/harness/latest/docs/resources/platform_service).
**Harness Manager**
You connect to GitHub using a Harness GitHub connector, username, and personal access token (PAT).
Perform the following steps to add an artifact from GitHub Packages:
1. In your project, in CD (Deployments), select **Services**.
2. Select **New Service**.
3. Enter a name for the service and select **Save**.
4. Select **Configuration**.
5. In **Service Definition**, select **Kubernetes**.
6. In **Artifacts**, select **Add Artifact Source**.
7. In **Artifact Repository Type**, select **GitHub Package Registry**, and then select **Continue**.
8. In **GitHub Package Registry Repository**, select or create a GitHub connector that connects to the GitHub account where the package repo is located.
Make sure you enable **API Access** in the GitHub connector, and use a personal access token (PAT) that meets the requirements listed in **Permissions**.
9. Select **Continue**.
10. The **Artifact Details** settings appear.
11. In **Artifact Source Name**, enter a name for this artifact source.
12. In **Package Type**, select the type of package you are using.
13. In **Package Name**, select the name of the package.
14. In **Version**, select the version to use.
15. To specify an image digest, use **Digest** and the unique identifier for the image you want to use. Specifying an image by digest is useful when you want to deploy an image with a fixed digest/SHA for your service.
{% hint style="info" %}
If an image with the specified tag/digest combination does not exist in the GitHub Package registry repository, the pipeline fails.
{% endhint %}
15. Select **Submit**. The artifact is added to the service definition.
#### GitHub connector limitations
Harness does not support **GitHub App connectors** for configuring GitHub Packages as an artifact source.
#### Permissions
The GitHub personal access token (PAT) must have the `write:packages` and `read:packages` permissions.
Make sure you enable **API access** in the Harness GitHub connector. In the GitHub connector YAML, the setting is `apiAccess`:
**GitHub Packages connector YAML**
```yaml
connector:
name: GitHub Packages
identifier: GitHub_Packages
orgIdentifier: default
projectIdentifier: CD_Docs
type: Github
spec:
url: https://github.com/johndoe/myapp.git
validationRepo: https://github.com/johndoe/test.git
authentication:
type: Http
spec:
type: UsernameToken
spec:
username: johndoe
tokenRef: githubpackages
apiAccess:
type: Token
spec:
tokenRef: githubpackages
delegateSelectors:
- gcpdocplay
executeOnDelegate: true
type: Repo
```
You can use the same Harness secret that you used for authentication.
#### GitHub packages artifact expressions
You can reference artifact properties using the following expressions in a values YAML file or in any Harness setting that supports [Harness expressions](/harness-platform/use-harness-platform/variables-and-expressions/harness-variables.md).
| **Expression** | **Description** | **Example** |
| ------------------------------------ | ---------------------------------------------------------------------------------------------------------------------- | ------------------------------------------------------------------------- |
| `<+artifact.connectorRef>` | Identifier of the connector used by the artifact source | `org.github` |
| `<+artifact.identifier>` | Identifier of the artifact source in the service definition | `AcmeGithub` |
| `<+artifact.type>` | This will be `GithubPackageRegistry` always | `GithubPackageRegistry` |
| `<+artifact.primaryArtifact>` | Boolean values. `true` in case of primary artifact | `true` |
| `<+artifact.version>` | This is the Docker tag | `v1` |
| `<+artifact.packageType>` | Type of package. It is one of `container`, `maven`, `nuget`, `npm` | `container` |
| `<+artifact.image>` | This is the image of the particular version. The value is used with \`docker pull\` command | `ghcr.io/acme/helloworld:100` |
| `<+artifact.packageName>` | Name of the repository in GitHub | `helloworld` |
| `<+artifact.imagePullSecret>` | This will be the base64 encoded secret used for pulling the image | |
| `<+artifact.dockerConfigJsonSecret>` | This is the `kubernetes.io/dockerconfigjson` credentials. Valid for `docker` only | |
| `<+artifact.digest>` | This is the digest specified in the ECR artifact source definition. Valid for `docker` only | `sha256:6d001fb3022161cdcb5f4df6cca5b5705e064ce873cd16144c3e4de8d2653d0b` |
| `<+artifact.label.[PLACEHOLDER]>` | This is the label set in the Docker image. Replace the placeholder with the appropriate label. Valid for `docker` only | |
| `<+artifact.metadata.SHAV2>` | Docker supports v1 and v2 format. Both are listed when applicable. Valid for `docker` only | `sha256:6d001fb3022161cdcb5f4df6cca5b5705e064ce873cd16144c3e4de8d2653d0b` |
| `<+artifact.metadata.SHA>` | SHA of the Docker image. Valid for `docker` only | `sha256:b3ebe55062b76860c6c0c78f5cae81ec393a944bcc96c05b5f411d3560c9f1d8` |
***
### Custom artifact source
#### Use artifacts from a custom artifact source
For enterprises that use a custom repository, Harness provides the Custom Artifact Source.
To use this artifact source, you provide a script to query your artifact server via its API (for example, REST) and then Harness stores the output on the Harness Delegate in the Harness-initialized variable `$HARNESS_ARTIFACT_RESULT_PATH`.
The output must be a JSON array, with a mandatory key for a Build Number/Version. You then map a key from your JSON output to the Build Number/Version variable.
For steps on adding a Custom Artifact source, go to [Add a custom artifact source for CD](/continuous-delivery/use-continuous-delivery/cd-building-blocks/services/add-a-custom-artifact-source-for-cd.md).
***
### Artifact limits and display in the Harness UI
The following table lists how many artifact versions Harness displays in its UI drop-downs, and how Harness sorts the versions.
| **Artifact Source Type** | **Limit** | **Order** |
| -------------------------------- | ------------- | ------------------------------------------------------------------------------------------------------ |
| Harness Artifact Registry | No Limit | Descending order of last modified |
| DockerRegistry | 10000 | Lexical (descending) |
| Google Container Registry | No Limit | Lexical (descending) |
| AWS ECR | No Limit | Lexical (descending) |
| Azure Container Registry | 500 | Lexical (descending) |
| Google Artifact Registry(Docker) | 2,147,483,647 | Descending order of last modified |
| Artifactory(Docker) | No Limit | Lexical (descending) |
| Artifactory(Generic) | 10000 | Descending order of created |
| GitHub Packages | No Limit | Descending order of created |
| Nexus3(Docker) | 50 | Descending order of last modified at (3.46.0 and newer). Alphabetically descending for older versions. |
| Nexus3(non-Docker) | 2,147,483,647 | Descending order of last modified at (3.46.0 and newer). Alphabetically descending for older versions. |
| Nexus2 | No Limit | Lexical (descending) |
| Amazon S3 | 500 | Descending order of last modified. |
| Amazon Machine Image | No Limit | Descending order of image creation time. |
| Azure Artifacts | No Limit | |
| Jenkins | 25 | Lexical (descending) |
| Custom | No Limit | The same as the custom script used. |
***
### Pull an image from a private registry
Typically, if the Docker image you are deploying is in a private registry, Harness has access to that registry using the credentials set up in the Harness connector you use with your service **Artifacts**.
#### Credentials to access Docker builds
If some cases, your Kubernetes cluster might not have the permissions needed to access a private Docker registry.
For these cases, the values YAML file in Service Definition **Manifests** section must use the `dockercfg` parameter.
If the Docker image is added in the Service Definition **Artifacts** section, then you reference it like this: `dockercfg: <+artifacts.primary.imagePullSecret>`.
This key will import the credentials from the Docker credentials file in the artifact.
Open the values.yaml file you are using for deployment.
Verify that `dockercfg` key exists, and uses the `<+artifacts.primary.imagePullSecret>` expression to obtain the credentials:
```yaml
name: <+stage.variables.name>
replicas: 2
image: <+artifacts.primary.image>
dockercfg: <+artifacts.primary.imagePullSecret>
createNamespace: true
namespace: <+infra.namespace>
...
```
#### Reference dockercfg in Kubernetes objects
Next, verify that the Deployment and Secret objects reference `dockercfg: {{.Values.dockercfg}}`.
```yaml
...
{{- if .Values.dockercfg}}
apiVersion: v1
kind: Secret
metadata:
name: {{.Values.name}}-dockercfg
annotations:
harness.io/skip-versioning: true
data:
.dockercfg: {{.Values.dockercfg}}
type: kubernetes.io/dockercfg
---
{{- end}}
apiVersion: apps/v1
kind: Deployment
metadata:
name: {{.Values.name}}-deployment
spec:
replicas: {{int .Values.replicas}}
selector:
matchLabels:
app: {{.Values.name}}
template:
metadata:
labels:
app: {{.Values.name}}
spec:
{{- if .Values.dockercfg}}
imagePullSecrets:
- name: {{.Values.name}}-dockercfg
{{- end}}
containers:
- name: {{.Values.name}}
image: {{.Values.image}}
...
```
With these requirements met, the cluster imports the credentials from the Docker credentials file in the artifact.
{% hint style="warning" %}
When you select artifacts or tags in Harness dropdown menus, some Harness expressions cannot be resolved outside of pipeline execution. For example, artifact or tag expressions that use `<+project.name>` or `<+org.name>` do not resolve to values in runtime dropdowns, including those used to load tags.
{% endhint %}
***
### Sidecar workloads
You can use Harness to deploy both primary and sidecar Kubernetes workloads.
Kubernetes sidecar workloads modularize and encapsulate application functionality while keeping the overall architecture simple to manage.
Sidecars are commonly used to implement cross-cutting concerns like logging, monitoring, and security. When you separate these concerns into separate containers, you can add or modify them without affecting the primary container or the application running inside it.
For example, a logging sidecar can capture and store application logs, metrics, and other data, without the primary container implementing any logging code.
Sidecars can also implement advanced features like load balancing, service discovery, and circuit breaking. A sidecar container for these features keeps the primary container simple and focused on its core functionality, while still providing advanced capabilities to the application.
Go to [Add a Kubernetes sidecar container](/continuous-delivery/use-continuous-delivery/deploy-services-on-different-platforms/kubernetes/cd-kubernetes-category/add-a-kubernetes-sidecar-container.md) to configure sidecar workloads.
#### Propagate and override artifacts, manifests, and service variables
You can propagate services between stages and override service settings with multiple values YAML files or **Environment Overrides**.
Go to the following topics to propagate and override services:
* [Propagate CD services](/continuous-delivery/use-continuous-delivery/cd-building-blocks/services/propagate-and-override-cd-services.md): Reuse a service across stages.
* [Add and override values YAML files](/continuous-delivery/use-continuous-delivery/deploy-services-on-different-platforms/kubernetes/cd-kubernetes-category/add-and-override-values-yaml-files.md): Override service settings per stage or environment.
***
### View SHA values and labels
Harness provides expressions you can use to output the SHA values and labels of the Docker images for the following artifact providers:
* Harness Artifact Registry
* Docker Registry (platform agnostic)
* Artifactory
* ECR
* GCR
* Google Artifact Registry
* Nexus 3 Docker
* ACR
* GitHub Packages
SHA values and labels for the artifact are now visible in the Harness service **Output** section of a pipeline execution.
Labels are visible if the artifact manifest supports `schemaVersion1`.
Labels can be referenced using the expression: `<+pipeline.stages.[stage Id].spec.artifacts.primary.label.get("labelKey")>`.
Since manifests can support two schema versions, `schemaVersion1` and `schemaVersion2`, there could be SHA values for each schema version.
Here are the expressions for referencing each version:
* SHA value of `schemaVersion1`: `<+artifacts.primary.metadata.SHA>` (same stage) or `<+pipeline.stages.[stage Id].spec.artifacts.primary.metadata.SHA>`.
* SHA value of `schemaVersion2`: `<+artifacts.primary.metadata.SHAV2>` (same stage) or `<+pipeline.stages.[stage Id].spec.artifacts.primary.metadata.SHAV2>`.
If the service is configured to use an image with a specific digest, you can access the digest using `<+pipeline.stages.STAGE_ID.spec.artifacts.primary.digest>`.
***
### Runtime input for the latest artifact tag
You can fetch and use the latest successfully deployed tag for a service in the **Harness pipeline** using the expression `<+lastSuccessfulDeployed.tag>`.
* When the artifact tag is configured as an expression with `<+lastSuccessfulDeployed.tag>`, the pipeline will deploy the most recent successful artifact tag associated with the service.
* This functionality is supported for the following container artifact types:
* Harness Artifact Registry
* Docker Registry
* GCR (Google Container Registry)
* ECR (Elastic Container Registry)
* ACR (Azure Container Registry)
* Nexus3
* Artifactory
* Google Artifact Registry
* GitHub Package Registry
#### Resolution scope
**Service, Environment, and Infrastructure Consistency**
* The expression `<+lastSuccessfulDeployed.tag>` will only resolve when the service, environment, and infrastructure remain the same across deployments.
**Pipeline Neutrality**
* The resolved tag is consistent across pipelines for the same service, environment and infrastructure:
* Example: If a service with artifact-X(image-tag-v1) is used in pipeline-1 and pipeline-2: If pipeline-1 successfully deployed image-tag-v2, deploying pipeline-2 with `<+lastSuccessfulDeployed.tag>` will resolve to image-tag-v2.
**Scope Neutrality (Account-Level Scope)**
* Example 1: In two organizations with the same Service ID, Environment ID, and Infrastructure ID, `<+lastSuccessfulDeployed.tag>` will retrieve the tag from the organization where the pipeline is running.
* Example 2: In two projects within the same organization, the tag will be retrieved from the project and organization where the pipeline is running.
* Example 3: If service\_id exists across multiple projects and env\_id exists across different organizations, `<+lastSuccessfulDeployed.tag>` will resolve the tag within the project and organization where the pipeline is running.
#### Limitations
**No Previous Successful Artifact**: If no previously successful artifact deployment exists, the pipeline will throw and display an error.
**Artifact Image Change**: If the artifact image differs from the one used in the previous successful deployment, but `<+lastSuccessfulDeployed.tag>` is still used, an error will be thrown. This is because the artifact image is tightly linked to the tag.
**Connector Changes**: If the connector configuration has changed but the tag remains the same, an error will be thrown to ensure consistency and avoid conflicts.
Currently, the expression `<+lastSuccessfulDeployed.tag>` is limited to resolving primary artifact tags and does not support resolving sidecar artifact tags.
#### Latest artifact tag sample
Go to the [Harness Community Repository](https://github.com/harness-community/harnesscd-example-apps/tree/master/cd-features/last-successful-artifact-tag) to see an example of how to use the latest artifact tag in a Harness pipeline.
This repository provides a ready-to-use sample application and the configuration files to help you get started.
***
### Related concepts
Continue with the following topics to reference, propagate, and manage artifacts in your deployments:
* [Harness Artifact Registry](https://app.gitbook.com/s/GmEmgYs6IUcqNiV0OEgB/README): Store and manage artifacts directly within your Harness account.
* [Harness variables and expressions](/harness-platform/use-harness-platform/variables-and-expressions/harness-variables.md): Reference artifact properties and other values with expressions.
* [Runtime inputs](/harness-platform/use-harness-platform/variables-and-expressions/runtime-inputs.md): Prompt for the artifact tag or version at pipeline execution.
* [Add a custom artifact source for CD](/continuous-delivery/use-continuous-delivery/cd-building-blocks/services/add-a-custom-artifact-source-for-cd.md): Query a custom repository with a script.
* [Propagate CD services](/continuous-delivery/use-continuous-delivery/cd-building-blocks/services/propagate-and-override-cd-services.md): Reuse and override a service across stages.
* [Add a Kubernetes sidecar container](/continuous-delivery/use-continuous-delivery/deploy-services-on-different-platforms/kubernetes/cd-kubernetes-category/add-a-kubernetes-sidecar-container.md): Deploy sidecar workloads alongside the primary workload.
{% @harness-feedback/feedback %}