> For the complete documentation index, see [llms.txt](https://developer.harness.io/llms.txt). Markdown versions of documentation pages are available by appending `.md` to page URLs; this page is available as [Markdown](https://developer.harness.io/continuous-delivery/use-continuous-delivery/deploy-services-on-different-platforms/azure/azure-cd-quickstart.md).

# Deploy Azure ACR to Azure AKS

This topic explains how to deploy a Docker image in your Azure Container Registry (ACR) repo to your Azure Kubernetes Service (AKS) cluster. Once you've completed this quickstart, you'll be able to easily set up Harness for your own Azure dev, qa, and production deployments.

In this topic you'll learn how to:

* Set up an ACR to AKS Kubernetes pipeline in Harness.
* Install and launch a Harness Kubernetes delegate in your target AKS cluster.
* Connect Harness to your Azure account using a Harness Azure connector.
* Run the new Kubernetes pipeline and deploy a Docker image to your target cluster.

### Requirements for ACR to AKS deployments <a href="#requirements-for-acr-to-aks-deployments" id="requirements-for-acr-to-aks-deployments"></a>

Make sure you have the following set up before you begin modeling your pipeline in Harness:

* **Manifests:** You can use manifests stored in a Git repo or Harness.
* **Azure ACR and AKS Permissions:** Ensure you have a Service Principal or Managed Identity you can use to connect Harness to your Azure App registration, and that it has the required permissions:
  * **ACR:** the **Reader** role must be assigned.
  * **AKS:** the **Owner** role must be assigned.
  * For a custom role, see the permissions in [Add a Microsoft Azure Cloud connector](/harness-ai/use-harness-platform/connectors/cloud-providers/add-a-microsoft-azure-connector.md).
* **AKS Cluster:** You'll need a target AKS cluster for the deployment. You can also host the Harness Delegate in this cluster. Ensure your cluster meets the following minimum requirements for the delegate (it should also have the resources needed for the app you deploying):
  * **Number of nodes:** 2.
  * **vCPUs, Memory, Disk Size:** 4vCPUs, 16GB memory, 100GB disk. In AKS, the **Standard DS2 v2** machine type is enough for this quickstart.
  * **Networking:** outbound HTTPS for the Harness connection to **app.harness.io**, **github.com**, and **hub.docker.com**. Allow TCP port 22 for SSH.
* AKS deployments require a kubeconfig version that is > 0.1.9.

### Create the AKS deploy stage <a href="#create-the-aks-deploy-stage" id="create-the-aks-deploy-stage"></a>

Here's how you set up a Harness pipeline stage for your deployment.

1. In your Harness Project, select **Deployments**, select **Pipelines**, and then select **Create a Pipeline**.
2. Enter the name **Azure Quickstart** and select **Start**. Your Pipeline appears.
3. Select **Add Stage** and select **Deploy**.
4. Enter the name **Deploy Service**, select **Kubernetes**, and then select **Set Up Stage**. The new stage settings appear.
5. In **Service**, select **Add Service**.

### Add the AKS manifest and values YAML <a href="#add-the-aks-manifest-and-values-yaml" id="add-the-aks-manifest-and-values-yaml"></a>

In the new Harness service, you can add a Kubernetes manifest for your deployment. As an example, you can use a [publicly-available manifest and values file](https://github.com/wings-software/harness-docs/tree/main/default-k8s-manifests/Manifests/Files/templates) from Harness.

1. In **Service Definition**, in **Deployment Type**, ensure **Kubernetes** is selected.
2. In **Manifests**, select **Add Manifest**.
3. Select **K8s Manifest**, and select **Continue**.
4. In **Select K8sManifest Store**, select **GitHub**, and then select **New GitHub Connector**.
5. The **Git Connector** settings appear. Enter the following settings.
   * **Name:** Enter a name for the connector, like **Quickstart**.- **URL Type:** select **Repository**.
   * **Connection Type:** Select **HTTP**.
   * **Git Repository URL:** Enter `https://github.com/wings-software/harness-docs.git`.
   * **Username and Token:** Enter the username and a Github Personal Access Token for your Github account. You'll have to create a Harness secret for the password.
   * In **Personal Access Token**, select **Create or Select a Secret**.
   * Select **New Secret Text**.
   * In **Secret Name**, enter a name for the secret like **github-pat**.
   * In **Secret Value**, paste in a GitHub Personal access token. When you're logged into GitHub, these are typically listed at <https://github.com/settings/tokens>. For steps on setting up a GitHub PAT, go to [Creating a personal access token](https://docs.github.com/en/authentication/keeping-your-account-and-data-secure/creating-a-personal-access-token) from GitHub.
   * Ensure you PAT has the **repo** scope selected:

![](/files/m9ue5sMQjhKqAzAElhp8)

6. Select **Continue**.
7. In **Connect to the provider**, select **Connect through a Harness Delegate**, and select **Continue**.
8. Select or add a Harness Delegate to your environment. For details on adding a delegate, go to [Delegate installation overview](/harness-ai/use-harness-platform/delegates/delegate/install-delegates/overview.md).
9. Back in **Specify K8s Manifest Store**, select **Continue**.
10. In **Manifest Details**, enter the following settings, test the connection, and select **Submit**.

We are going to provide connection and path information for a manifest located at `https://github.com/wings-software/harness-docs/tree/main/default-k8s-manifests/Manifests/Files/templates`.

1. **Manifest Identifier:** Enter an Id, like **manifests**.
2. **Git Fetch Type:** Select **Latest from Branch**.
3. **Branch:** enter **main**.
4. **File/Folder path:** Enter `default-k8s-manifests/Manifests/Files/templates`.

This is the path from the repo root. The manifest is now listed.

![](/files/rJs2JgdCpnH76wb4cGM1)

Next, let's add the values.yaml file for the deployment.

Harness supports Go templating with a values YAML file by default so you can template your manifests. Also, you can use [Harness expressions](/harness-ai/use-harness-platform/variables-and-expressions/harness-variables.md) in your `values.yaml` file.

We will use a [values.yaml file](https://github.com/wings-software/harness-docs/blob/main/default-k8s-manifests/Manifests/Files/ng_values_dockercfg.yaml) that uses the `<+artifact.image>` expression to reference the artifact you will add later in **Artifacts**.

<details>

<summary>values YAML file</summary>

````
```yaml
name: harness-quickstart  
replicas: 1  
  
image: <+artifact.image>  
dockercfg: <+artifact.imagePullSecret>  
  
createNamespace: true  
namespace: <+infra.namespace>  
  
# Service Type allow you to specify what kind of service you want.  
# Possible values for ServiceType are:  
# ClusterIP | NodePort | LoadBalancer | ExternalName  
serviceType: LoadBalancer  
  
# A Service can map an incoming port to any targetPort.  
# targetPort is where application is listening on inside the container.  
servicePort: 80  
serviceTargetPort: 80  
  
# Specify all environment variables to be added to the container.  
# The following two maps, config and secrets, are put into a ConfigMap  
# and a Secret, respectively.  
# Both are added to the container environment in podSpec as envFrom source.  
env:  
  config:  
    key1: value1  
  secrets:  
    key2: value2
```
````
</details>

1. Select **Add Manifest**.
2. In **Specify Manifest Type**, select **Values YAML**, and select **Continue**.
3. In **Specify Values YAML Store**, select the same GitHub Connector you used for your manifests, and then select **Continue**.
4. In **Manifest Details**, enter the following and select **Submit**.
5. **Manifest Identifier:** `values`.
6. **Git Fetch Type:** `Latest from Branch`.
7. **Branch:** `main`.
8. **File Path:** `default-k8s-manifests/Manifests/Files/ng_values_dockercfg.yaml`.

The values file is listed.

![](/files/9pmkZmgisF94IuwrTvPq)

Next, let's add your artifact from ACR.

### Add the ACR artifact <a href="#add-the-acr-artifact" id="add-the-acr-artifact"></a>

You add an artifact from your ACR repo to the Harness service. For example, we'll create a Harness Azure connector to connect Harness with your ACR repo.

1. In **Artifacts**, select **Add Artifact Source**.
2. In **Artifact Repository Type**, select **ACR**, and then select **Continue**.
3. In **ACR Repository**, select **New Azure Connector**.
4. Enter a name for the Connector, such as **Azure Quickstart**, and select **Continue**.
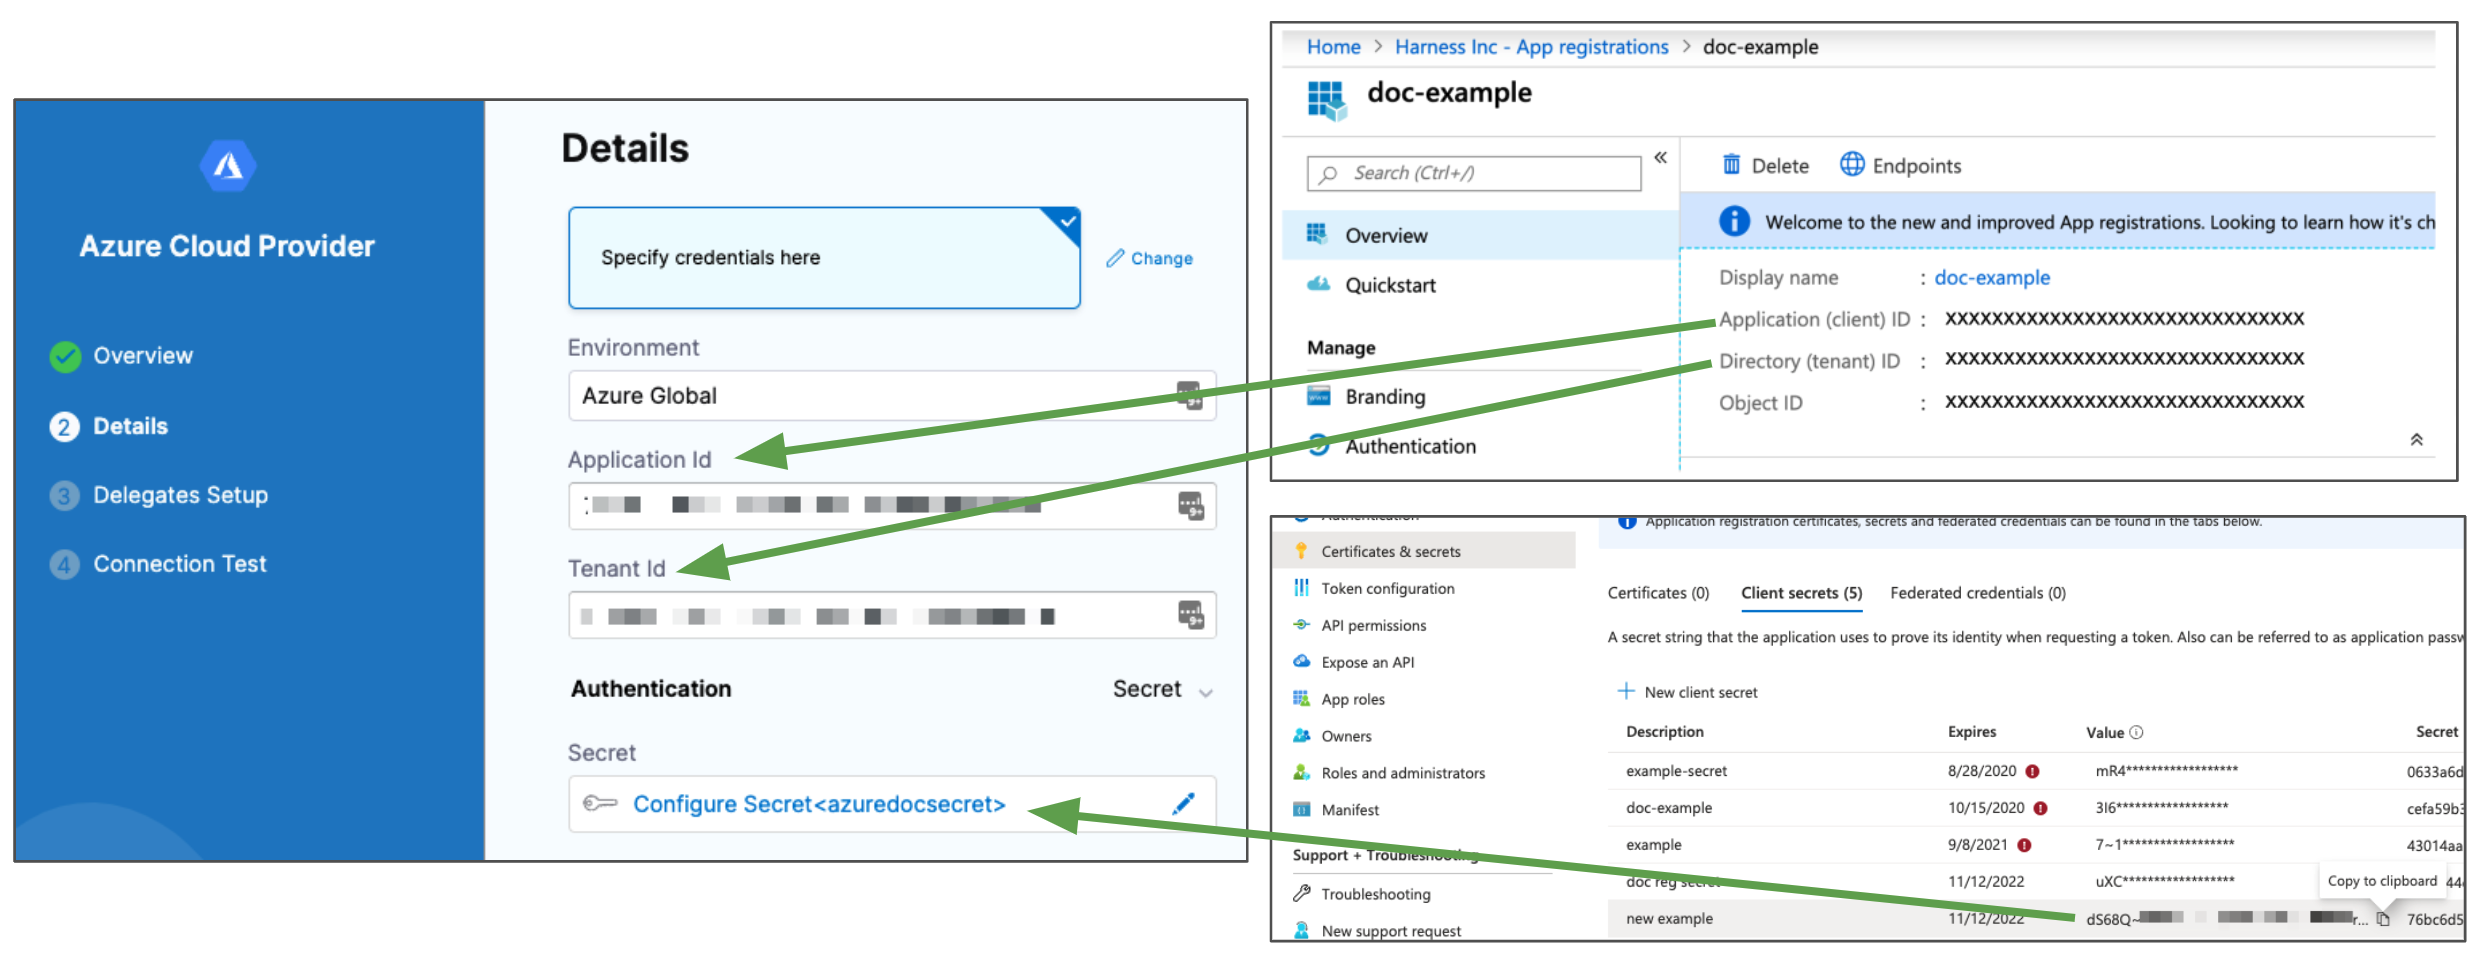
5. In **Details**, select your authentication method, and follow the configuration instructions in [Add a Microsoft Azure Cloud Connector](/harness-ai/use-harness-platform/connectors/cloud-providers/add-a-microsoft-azure-connector.md#configure-credentials)

* **Azure ACR and AKS Permissions:** make sure the Service Principal or Managed Identity has the [required permissions](/harness-ai/use-harness-platform/connectors/cloud-providers/add-a-microsoft-azure-connector.md):
  * **ACR:** the **Reader** role must be assigned.
  * **AKS:** the **Owner** role must be assigned.
  * For a custom role, see the permissions in [Add a Microsoft Azure Cloud Connector](/harness-ai/use-harness-platform/connectors/cloud-providers/add-a-microsoft-azure-connector.md).

7. Select **Continue**.
8. In **Delegates Setup**, select **Only use Delegates with all of the following tags**, and then select the delegate you used earlier.
9. Select **Save and Continue**.
10. The Connection Test is performed. Once it's completed, you'll be back in **ACR Repository**. Select **Continue**.
11. In **Artifact Details**, select the Subscription Id where the artifact source is located.
12. In **Registry**, select the ACR registry to use.
13. In **Repository**, select the repo to use.
14. In **Tag**, enter or select the tag for the image.

Here's an example of how ACR settings map to **Artifact Details**:

<figure><img src="/files/mjhtiud4azHk4o94NYeT" alt=""><figcaption><p>Click to view full size image</p></figcaption></figure>

1. Select **Submit**. The artifact is added to the service.

![](/files/hhLLduXSl2bpwySxzEkE)

Now that the artifact and manifest are defined, you can define the target cluster for your deployment.

16. In the Harness stage, select **Continue** at the bottom of the **Service** tab.

### Define the target AKS infrastructure <a href="#define-the-target-aks-infrastructure" id="define-the-target-aks-infrastructure"></a>

You define the target infrastructure for your deployment in the **Environment** settings of the pipeline stage. You can define an environment separately and select it in the stage, or create the environment within the stage **Environment** tab.

There are two methods of specifying the deployment target infrastructure:

* **Pre-existing**: the target infrastructure already exists and you simply need to provide the required settings.
* **Dynamically provisioned**: the target infrastructure will be dynamically provisioned on-the-fly as part of the deployment process.

For details on Harness provisioning, go to [Provisioning overview](/continuous-delivery/use-continuous-delivery/provision-infrastructure/provisioning-overview.md).

#### Pre-existing AKS infrastructure <a href="#pre-existing-aks-infrastructure" id="pre-existing-aks-infrastructure"></a>

When using a pre-existing infrastructure, the target cluster is your own AKS cluster, hosted in your Azure cloud. This is where we the pipeline deploys your ACR image using the manifest you selected.

1. In **Environment**, in **Specify Environment**, select **New Environment**. Just as with a Harness service, you can create a new environment or select an existing one. Let's create a new one.
2. In **New Environment**, enter a name, select **Pre-Production**, and select **Save**. The new Environment appears.
3. In **Specify Infrastructure**, select **New Infrastructure**.
4. In **New Infrastructure**, enter a name, and then in **Select Infrastructure Type**, select **Microsoft Azure**.
5. In **Cluster details**, enter the following.
   1. In **Connector**, select **Select a connector**.
   2. Select the Azure Connector you added earlier, and then select **Apply Selected**.
   3. In **Subscription Id**, select the Subscription where you AKS cluster is located.
   4. In **Resource Group**, enter the resource group for your AKS cluster.
   5. In **Cluster**, select the cluster name.
   6. In **Namespace**, enter an existing namespace, such as **default**.

Now that the stage's infrastructure is complete, you can select the [deployment strategy](/continuous-delivery/use-continuous-delivery/manage-deployments/deployment-concepts.md) for this stage of the pipeline.

#### Dynamically provisioned AKS infrastructure <a href="#dynamically-provisioned-aks-infrastructure" id="dynamically-provisioned-aks-infrastructure"></a>

Here is a summary of the steps to dynamically provision the target infrastructure for a deployment:

1. **Add dynamic provisioning to the CD stage**:
   1. In a Harness Deploy stage, in **Environment**, enable the option **Provision your target infrastructure dynamically during the execution of your Pipeline**.
   2. Select the type of provisioner that you want to use.

      Harness automatically adds the provisioner steps for the provisioner type you selected.
   3. Configure the provisioner steps to run your provisioning scripts.
   4. Select or create a Harness infrastructure in **Environment**.
2. **Map the provisioner outputs to the Infrastructure Definition**:
   1. In the Harness infrastructure, enable the option **Map Dynamically Provisioned Infrastructure**.
   2. Map the provisioning script/template outputs to the required infrastructure settings.

**Supported provisioners**

The following provisioners are supported for AKS deployments:

* [Terraform](/continuous-delivery/use-continuous-delivery/provision-infrastructure/terraform-infra/terraform-provisioning-with-harness.md)
* [Azure Resource Manager (ARM)](/continuous-delivery/use-continuous-delivery/provision-infrastructure/azure-arm-provisioning.md)
* [Azure Blueprint](/continuous-delivery/use-continuous-delivery/provision-infrastructure/azure-blueprint-provisioning.md)
* [Shell Script](/continuous-delivery/use-continuous-delivery/provision-infrastructure/shell-script-provisioning.md)

**Adding dynamic provisioning to the stage**

To add dynamic provisioning to a Harness pipeline Deploy stage, do the following:

1. In a Harness Deploy stage, in **Environment**, enable the option **Provision your target infrastructure dynamically during the execution of your Pipeline**.
2. Select the type of provisioner that you want to use.

   Harness automatically adds the necessary provisioner steps.
3. Set up the provisioner steps to run your provisioning scripts.

For documentation on each of the required steps for the provisioner you selected, go to the following topics:

* **Terraform:**
  * [Terraform Plan](/continuous-delivery/use-continuous-delivery/provision-infrastructure/terraform-infra/run-a-terraform-plan-with-the-terraform-plan-step.md)
  * [Terraform Apply](/continuous-delivery/use-continuous-delivery/provision-infrastructure/terraform-infra/run-a-terraform-plan-with-the-terraform-apply-step.md)
  * [Terraform Rollback](/continuous-delivery/use-continuous-delivery/provision-infrastructure/terraform-infra/rollback-provisioned-infra-with-the-terraform-rollback-step.md). To see the Terraform Rollback step, toggle the **Rollback** setting.
* [Terragrunt](/continuous-delivery/use-continuous-delivery/provision-infrastructure/terragrunt-howtos.md)
* [Terraform Cloud](/continuous-delivery/use-continuous-delivery/provision-infrastructure/terraform-infra/terraform-cloud-deployments.md)
* [Azure Resource Management (ARM)](/continuous-delivery/use-continuous-delivery/provision-infrastructure/azure-arm-provisioning.md)
* [Azure Blueprint](/continuous-delivery/use-continuous-delivery/provision-infrastructure/azure-blueprint-provisioning.md)
* [Shell Script](/continuous-delivery/use-continuous-delivery/provision-infrastructure/shell-script-provisioning.md)

**Mapping provisioner output**

Once you set up dynamic provisioning in the stage, you must map outputs from your provisioning script/template to specific settings in the Harness Infrastructure Definition used in the stage.

1. In the same CD Deploy stage where you enabled dynamic provisioning, select or create (**New Infrastructure**) a Harness infrastructure.
2. In the Harness infrastructure, in **Select Infrastructure Type**, select **Direct** or **Microsoft Azure**.
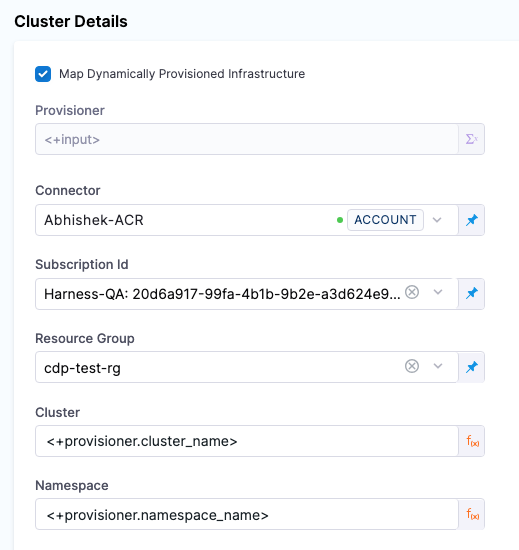
3. In **Cluster details**, enable the option **Map Dynamically Provisioned Infrastructure**.

   The **Azure Infrastructure details** section adds a **Provisioner** setting and configures it as a runtime input.
4. Map the provisioning script/template outputs to the required infrastructure settings.

To provision the target deployment infrastructure, Harness needs specific infrastructure information from your provisioning script. You provide this information by mapping specific Infrastructure Definition settings in Harness to outputs from your template/script.

For AKS, Harness needs the following settings mapped to outputs:

* Cluster (for Microsoft Azure connection type)
* Namespace

For example, here's a snippet of an ARM template that provisions the infrastructure for an AKS deployment and includes the required outputs:

```json

{
  "$schema": "https://schema.management.azure.com/schemas/2019-04-01/deploymentTemplate.json#",
  "contentVersion": "1.0.0.0",
  "parameters": {
    "clusterName": {
      "type": "string",
      "metadata": {
        "description": "Name of the AKS cluster."
      }
    },
...
  "outputs": {
    "cluster_name": {
      "type": "string",
      "value": "[parameters('clusterName')]"
    },
    "namespace_name": {
      "type": "string",
      "value": "default"
    }
  }
}

```

In the Harness Infrastructure Definition, you map outputs to their corresponding settings using expressions in the format `<+provisioner.OUTPUT_NAME>`, such as `<+provisioner.namespace_name>`.

<figure><img src="/files/PaTLCyL881TmSD6Mqx1m" alt=""><figcaption><p>Select to view full size image</p></figcaption></figure>

### Add a Rollout Deployment step to the AKS stage <a href="#add-a-rollout-deployment-step-to-the-aks-stage" id="add-a-rollout-deployment-step-to-the-aks-stage"></a>

1. Once you are done configuring the stage **Environment**, select **Continue**.
2. In **Execution Strategies**, select **Rolling**, and then select **Use Strategy**.

![](/files/YZh4ZbPBni83ryAwT9u5)

The **Rollout Deployment** step is added.

![](/files/ZOvAkH3UVU4PgxXx9PxX)

This is a standard [Kubernetes rolling update](https://kubernetes.io/docs/tutorials/kubernetes-basics/update/update-intro/). By default, Harness uses a `25% max unavailable, 25% max surge` strategy.

That's it. Now the pipeline stage is complete and you can deploy.

### Deploy the AKS pipeline and review <a href="#deploy-the-aks-pipeline-and-review" id="deploy-the-aks-pipeline-and-review"></a>

1. Select **Save** and then **Run**.
2. Select **Run Pipeline**. Harness will verify the pipeline and then run it.

You can see the status of the deployment, and pause or abort it.

![](/files/ARYnEgEIWzpSysD2Murj)

Toggle **Console View** to watch the deployment with more detailed logging.

Select the **Rollout Deployment** step and expand **Wait for Steady State**.

You can see `deployment "[name]" successfully rolled out`.

Congratulations! The deployment was successful.

### Clean up the AKS deployment environment <a href="#clean-up-the-aks-deployment-environment" id="clean-up-the-aks-deployment-environment"></a>

To delete the Harness Delegate from your Kubernetes cluster, go to [Delete a Delegate](/harness-ai/use-harness-platform/delegates/delegate/manage-delegates/delete-a-delegate.md).

### See also <a href="#see-also" id="see-also"></a>

For frequently asked questions about Harness Open Source and Free Edition deployments, go to [Harness Open Source and Free Edition FAQs](/continuous-delivery/use-continuous-delivery/deploy-services-on-different-platforms/community-ed/gitness-community-edition-faqs.md).