> For the complete documentation index, see [llms.txt](https://developer.harness.io/llms.txt). Markdown versions of documentation pages are available by appending `.md` to page URLs; this page is available as [Markdown](https://developer.harness.io/continuous-delivery/use-continuous-delivery/deploy-services-on-different-platforms/azure/azure-container-apps/basic-deployment.md).
# Basic Deployment
Configure and execute Basic Azure Container Apps deployments.
This guide explains how to configure and execute deployments for Azure Container Apps using the Basic strategy in Harness.
{% hint style="info" %}
**FEATURE FLAG**
This feature is behind the feature flag `CDS_AZURE_CONTAINER_APPS`. Contact [Harness Support](mailto:support@harness.io) to enable this feature.
{% endhint %}
### Prerequisites for Basic deployment
Before setting up your Basic deployment, ensure you have the following Azure resources already configured:
* **Harness Account**: Active account with the Continuous Delivery module enabled
* **Azure Subscription**: An active Azure subscription with appropriate permissions
* **Azure Connector**: A Harness connector to Azure using OIDC or Service Principal authentication
* **Managed Environment**: An Azure Container Apps managed environment where your container apps will be deployed
* **Container Registry**: Azure Container Registry (ACR), Docker Hub, or another supported container registry with your container images
* **IAM Permissions**: Service principal with permissions to manage Container Apps, Managed Environments, and related resources
### Select deployment strategy
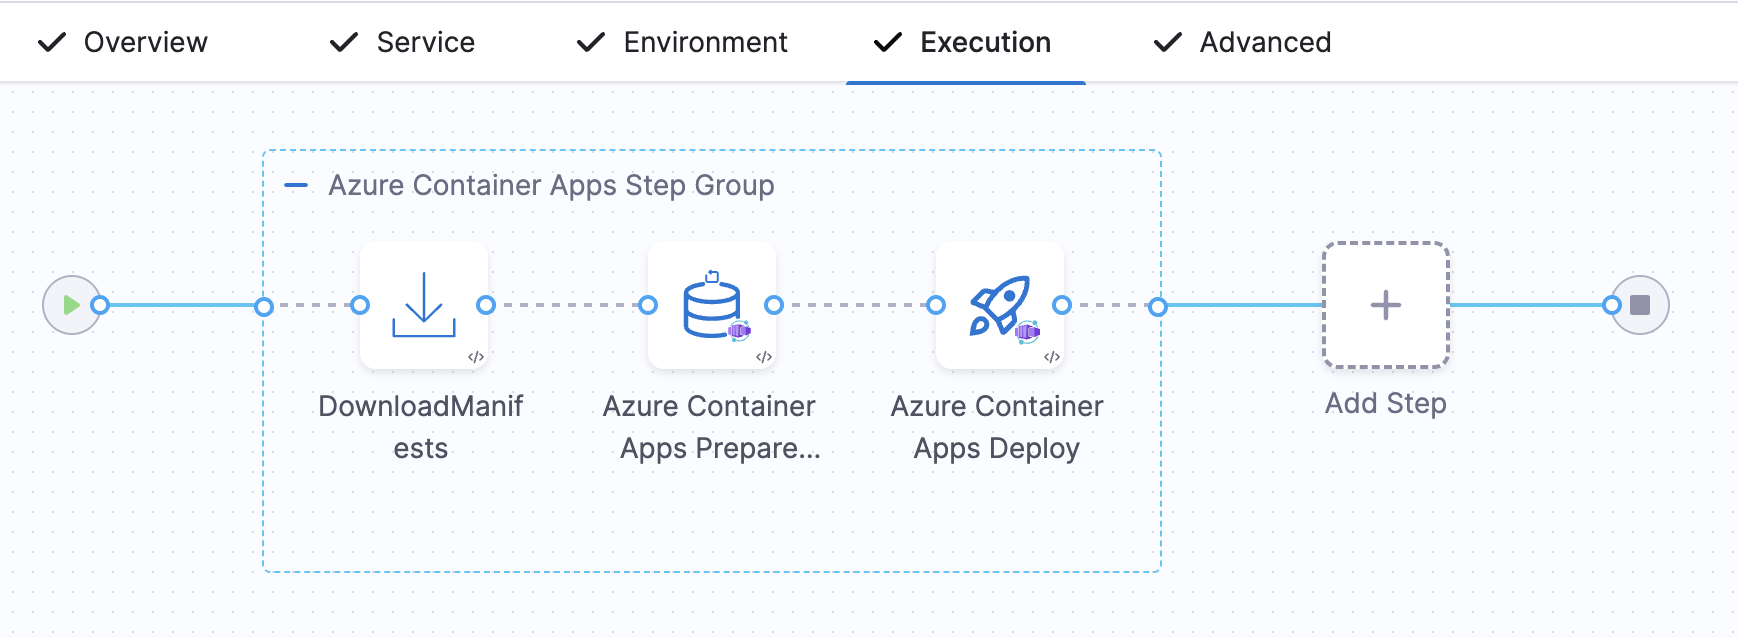
After configuring your service, environment, and infrastructure, navigate to the **Execution** tab and select the **Basic** execution strategy. Harness automatically adds a pre-configured step group containing all the necessary deployment steps. This automated setup provides a straightforward deployment workflow with immediate traffic cutover to the new revision.
Click to view full size image
The step group includes three steps that execute sequentially: Download Manifests, Prepare Rollback Data, and Deploy.
### Step configuration
The Basic deployment workflow uses three steps that must be added within a Container Step Group. Each step is automatically configured when you select the Basic deployment strategy.
{% hint style="info" %}
**CONTAINERIZED STEP GROUP REQUIRED**
All Azure Container Apps deployment steps must be added within a **Container Step Group** (also called a Containerized Step Group). These steps run as containerized tasks and require the container infrastructure configuration (Kubernetes connector and namespace) provided by the step group. The steps will not execute without being placed in a Container Step Group.
{% endhint %}
#### 1. Download Manifests
Click to view full size image
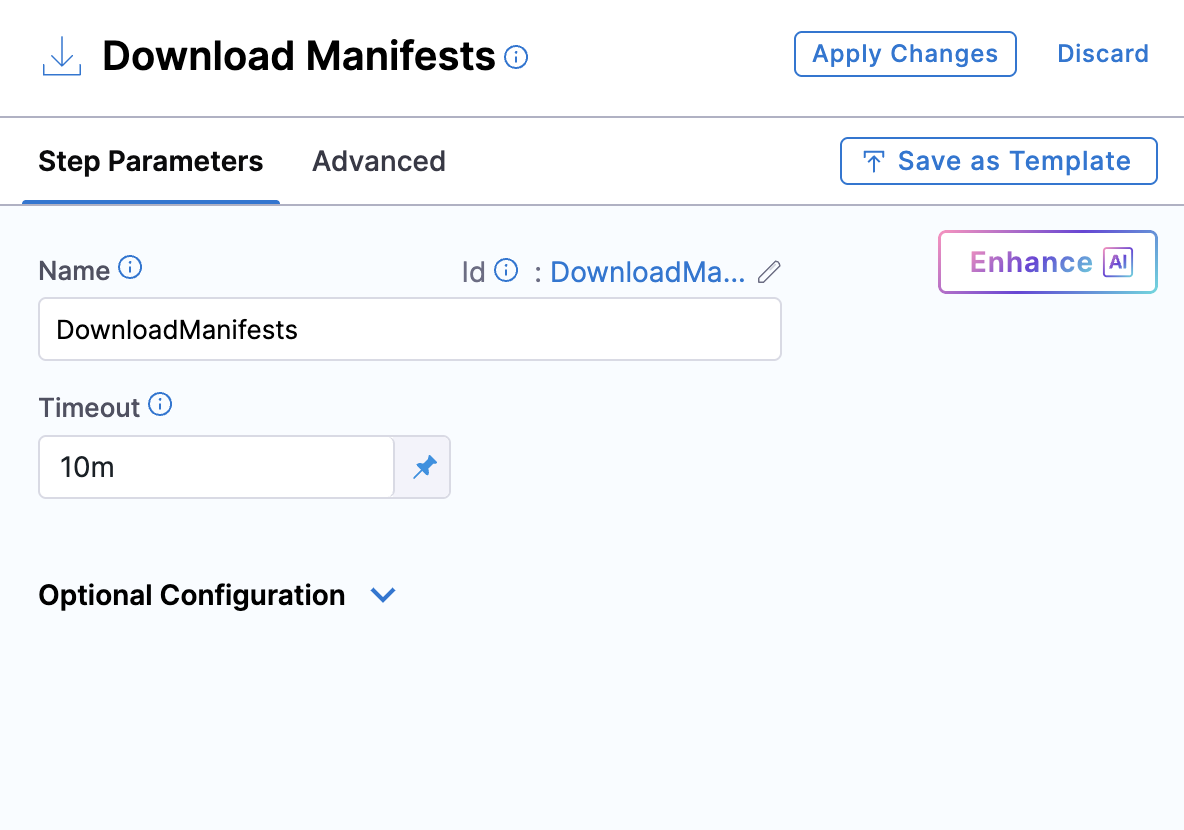
| Parameter | Description | Required | Default |
| ----------- | ---------------------------------------------- | -------- | ------------------- |
| **Name** | Display name for the step | No | `DownloadManifests` |
| **Timeout** | Maximum time allowed for downloading manifests | No | `10m` |
This step downloads all manifest files specified in your service configuration and makes them available for subsequent deployment steps.
For detailed information on how this step works, see [Download Manifests](/continuous-delivery/use-continuous-delivery/deploy-services-on-different-platforms/azure/azure-container-apps/step-references/download-manifests.md).
#### 2. Azure Container Apps Prepare Rollback Data
Click to view full size image
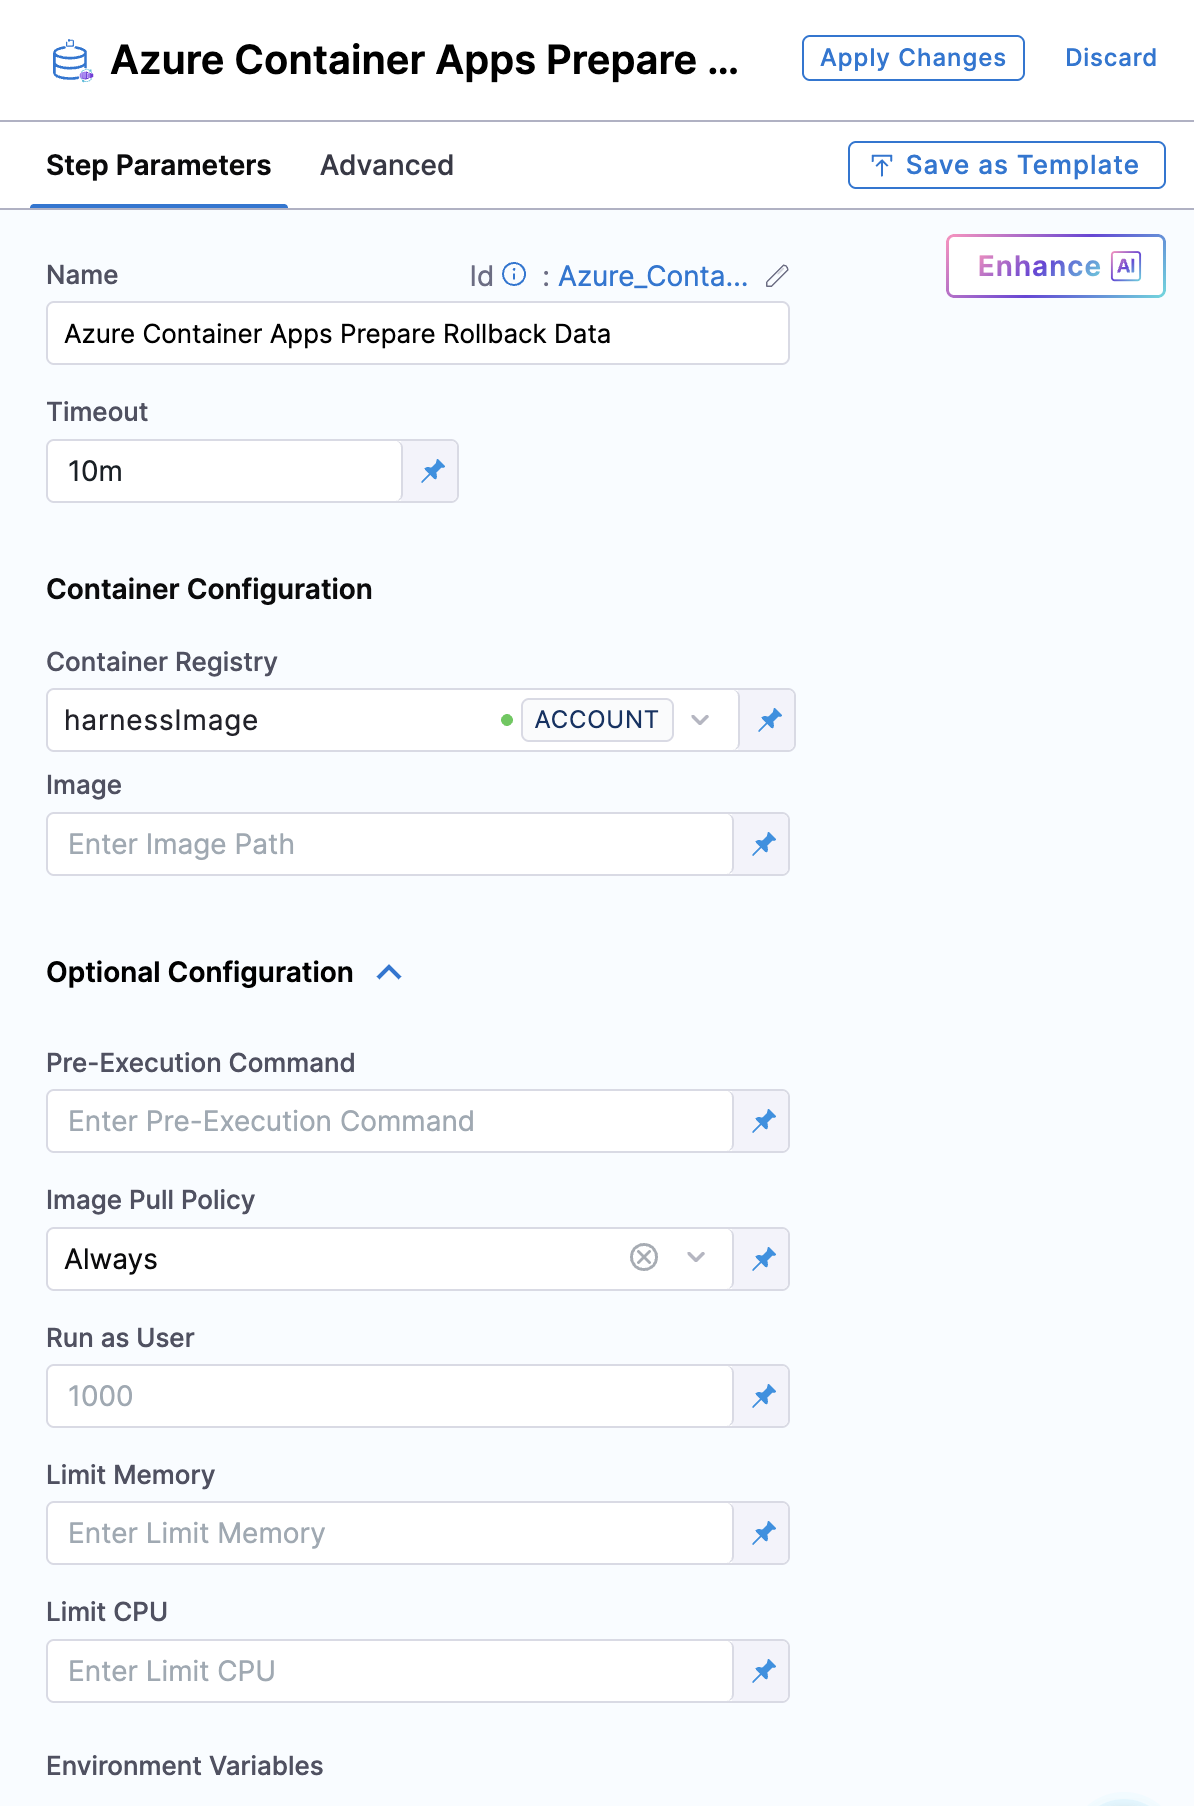
| Parameter | Description | Required | Default |
| ---------------------- | ------------------------------------------------- | -------- | ------------------------------------------------------- |
| **Name** | Display name for the step | No | - |
| **Timeout** | Maximum time for the step to complete | No | `10m` |
| **Container Registry** | Harness connector for the deployment plugin image | Yes | - |
| **Image** | Deployment plugin container image | Yes | `harness/azure-container-apps-plugin:0.0.1-linux-amd64` |
| **Image Pull Policy** | Policy for pulling the container image | No | `Always` |
This step captures the current state of your container app before deployment begins, enabling rollback if needed.
For detailed information on how this step works, see [Azure Container Apps Prepare Rollback Data](/continuous-delivery/use-continuous-delivery/deploy-services-on-different-platforms/azure/azure-container-apps/step-references/prepare-rollback-data.md).
#### 3. Azure Container Apps Deploy
Click to view full size image
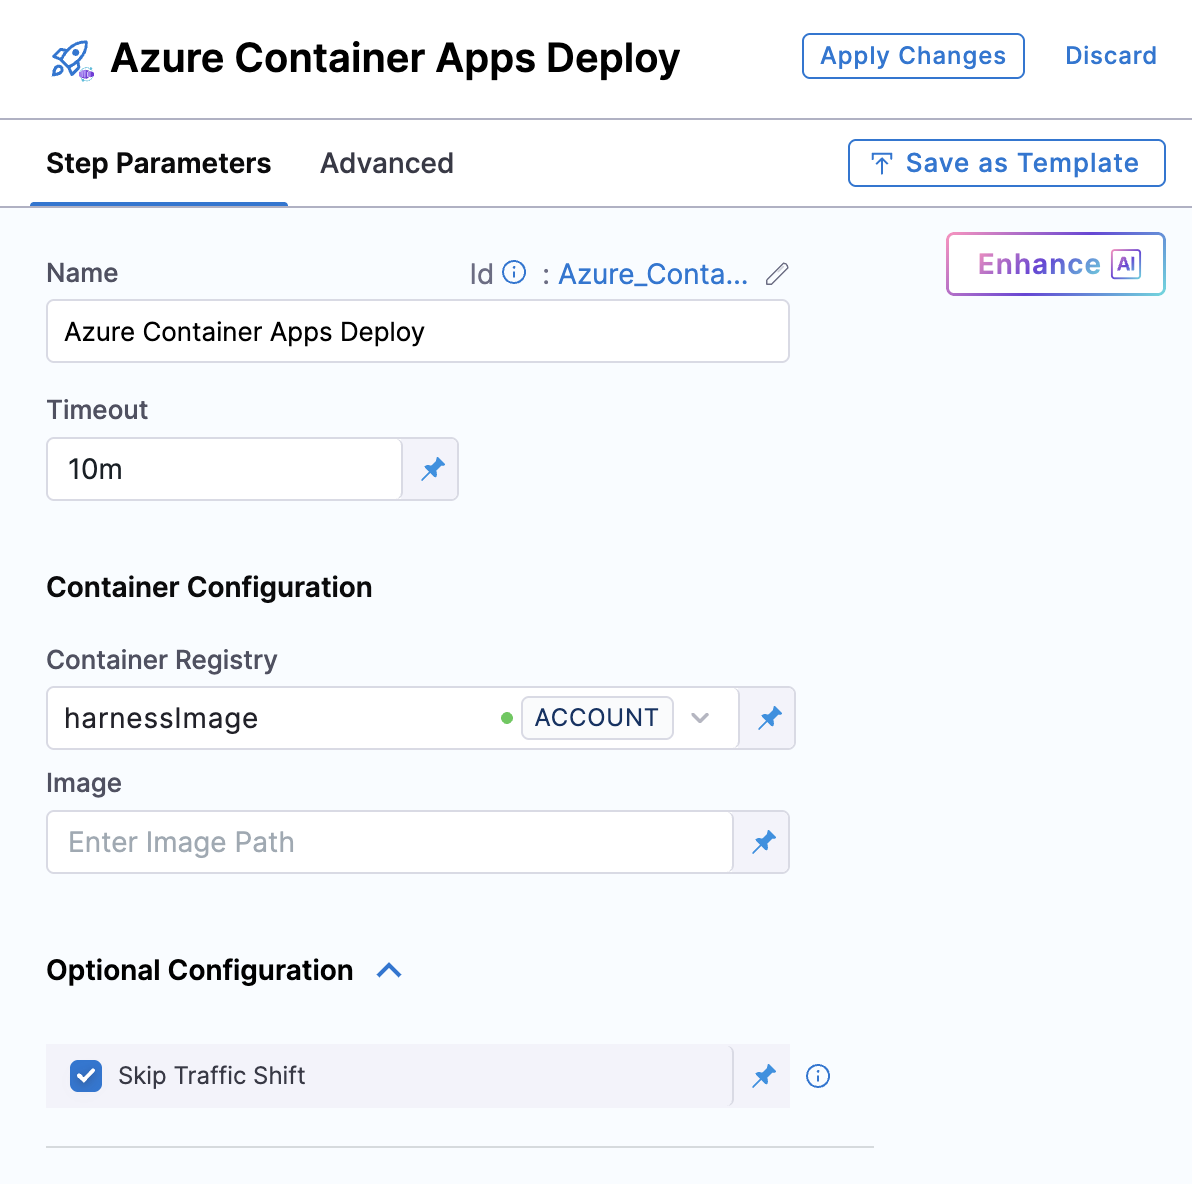
| Parameter | Description | Required | Default |
| ---------------------- | ------------------------------------------------- | -------- | ------------------------------------------------------- |
| **Name** | Display name for the step | No | - |
| **Timeout** | Maximum time for the step to complete | No | `30m` |
| **Skip Traffic Shift** | Controls immediate traffic cutover | No | `false` (disabled) |
| **Container Registry** | Harness connector for the deployment plugin image | Yes | - |
| **Image** | Deployment plugin container image | Yes | `harness/azure-container-apps-plugin:0.0.1-linux-amd64` |
| **Image Pull Policy** | Policy for pulling the container image | No | `Always` |
This step creates a new revision with your updated container image and immediately shifts 100% of traffic to it (when Skip Traffic Shift is disabled).
{% hint style="info" %}
For Basic deployment, **Skip Traffic Shift** must be **disabled (unchecked)** to enable immediate traffic cutover. If the screenshot above shows it enabled, disregard that value — it reflects a Canary deployment configuration.
{% endhint %}
For detailed information on how this step works, see [Azure Container Apps Deploy](/continuous-delivery/use-continuous-delivery/deploy-services-on-different-platforms/azure/azure-container-apps/step-references/deploy-aca.md).
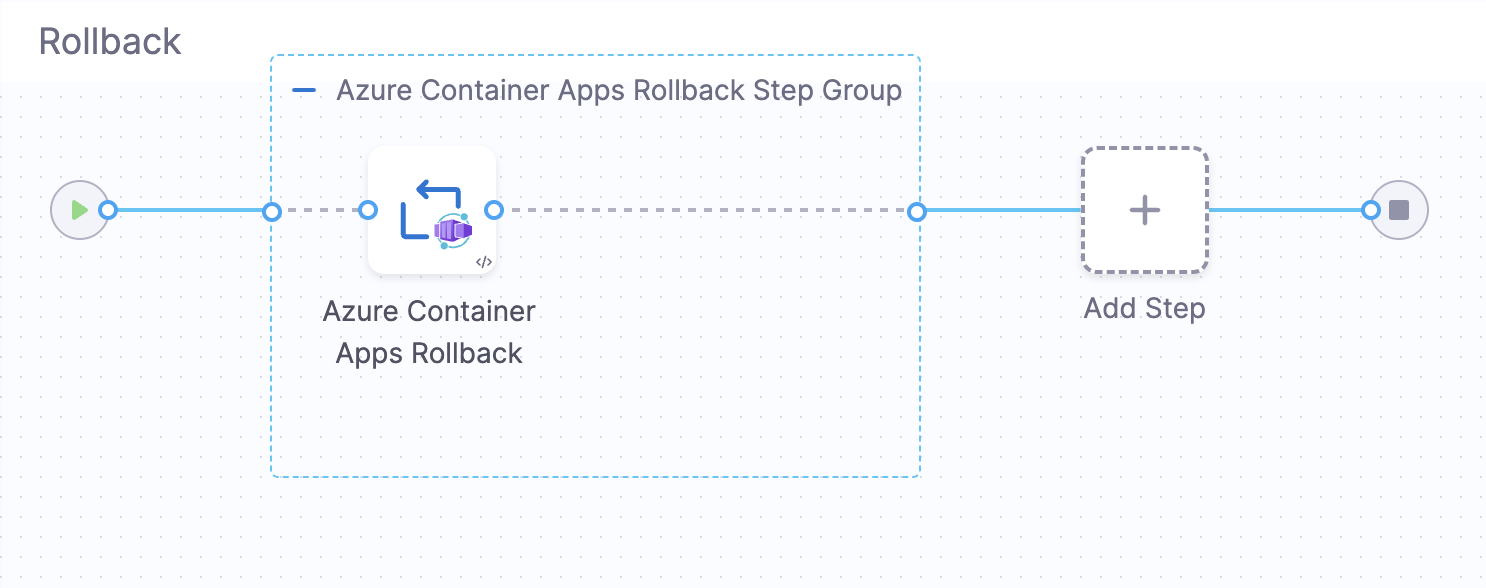
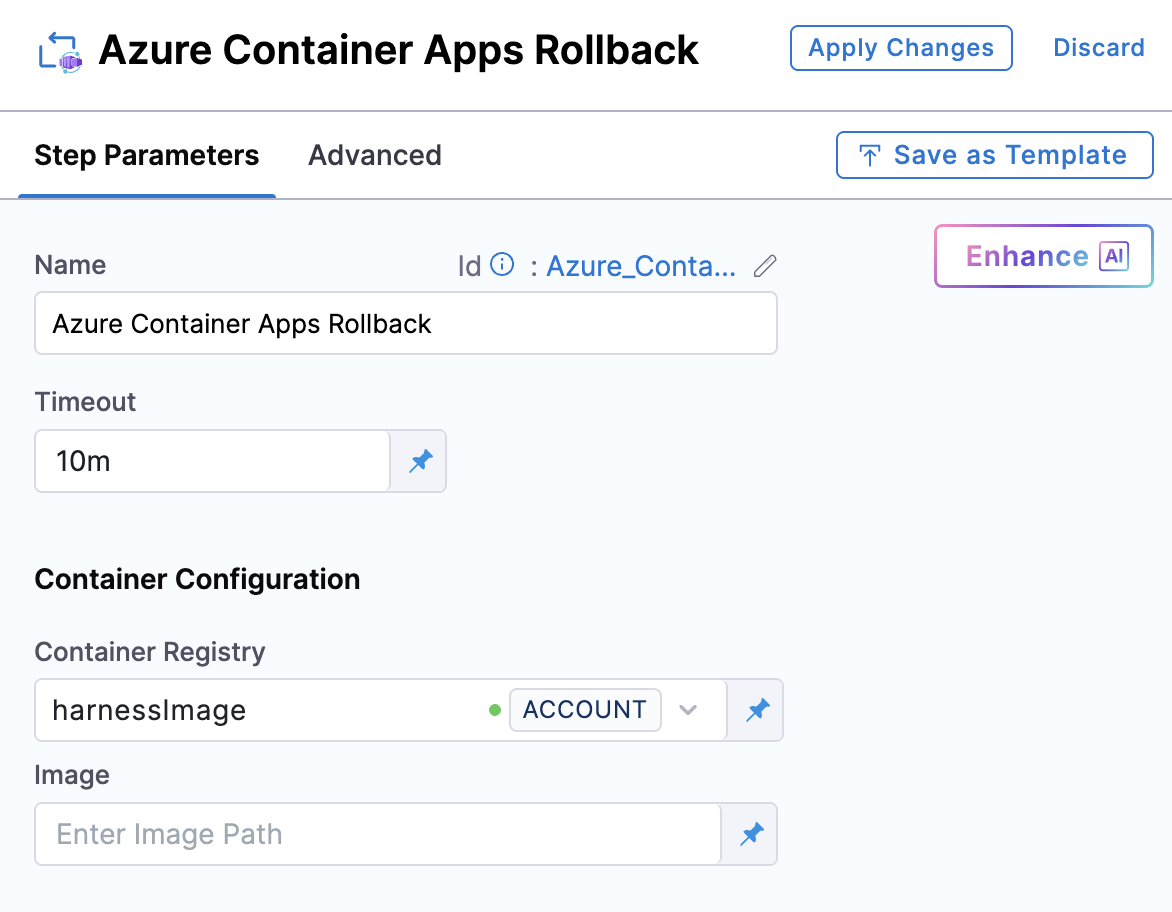
#### 4. Azure Container Apps Rollback (In Rollback Tab)
The rollback step is automatically added to the **Rollback** tab when you select the Basic deployment strategy. Click the **Rollback** tab to view the rollback configuration.
Click to view full size image
Click to view full size image
| Parameter | Description | Required | Default |
| ---------------------- | ------------------------------------------------- | -------- | ------------------------------------------------------- |
| **Name** | Display name for the step | No | `Azure Container Apps Rollback` |
| **Timeout** | Maximum time for the step to complete | No | `30m` |
| **Container Registry** | Harness connector for the deployment plugin image | Yes | - |
| **Image** | Deployment plugin container image | Yes | `harness/azure-container-apps-plugin:0.0.1-linux-amd64` |
| **Image Pull Policy** | Policy for pulling the container image | No | `Always` |
This step restores your container app to its previous state using the rollback data captured before deployment. It executes automatically when a deployment fails or when you manually trigger a rollback.
For detailed information on how this step works, see [Azure Container Apps Rollback](/continuous-delivery/use-continuous-delivery/deploy-services-on-different-platforms/azure/azure-container-apps/step-references/rollback.md).
### How Basic deployment works
Basic deployment provides a straightforward approach to deploying new versions of your Azure Container App. When you deploy a new version, Harness creates a new revision and immediately shifts 100% of traffic to it. This approach is ideal for non-production environments, simple applications, or scenarios where immediate cutover is acceptable.
The three deployment steps execute sequentially, with each phase completing successfully before proceeding to the next.
#### Deployment flow
**Phase 1: Download Manifests**
The Download Manifests step fetches all manifest files specified in your service configuration and makes them available for subsequent deployment steps. Harness downloads the Azure Container Apps manifest from your configured manifest store (Inline, Harness File Store, or Git), validates the YAML/JSON structure, and stages it for use by the deployment steps.
**What this step does:**
* Fetches all manifest files configured in your service definition
* Downloads Azure Container Apps manifest from your configured manifest store
* Validates the YAML/JSON structure of the manifest
* Stages the manifest files in a temporary directory (`/harness/m1/`)
* Makes manifests available for subsequent deployment steps
**Example output:**
```
Download Path: /harness/m1
Creating file : /harness/m1/acaManifest
```
**Phase 2: Prepare Rollback Data**
The Azure Container Apps Prepare Rollback Data step captures the current state of your container app before deployment begins. This step reads the Azure Container Apps manifest to identify the container app name, retrieves the current state from Azure including active revisions and traffic weights, and stores this information for use by the rollback step if deployment fails or issues are detected.
**What this step captures:**
* Current active revisions and their traffic weights
* Current traffic configuration
* Revision names and status
* Container app configuration settings
* Managed environment details
* Resource group and subscription information
This data ensures that if something goes wrong during deployment, Harness can restore your container app to its exact previous state, including traffic distribution across revisions.
**Example log output:**
```
[INFO] Phase 1/2: Parsing manifest
[INFO] Preparing rollback data for container app: aca-aut-test
[INFO] Phase 2/2: Fetching current app state
[INFO] Current traffic config fetched for app: aca-aut-test
[INFO] Saved traffic configuration for rollback:
[INFO] Revision: aca-aut-test--ojvsl4z, Traffic: 100%
```
**Phase 3: Deploy New Revision**
The Azure Container Apps Deploy step creates a new revision with your updated container image and immediately shifts traffic to it. Harness reads the manifest configuration, injects the container image URL from your artifact configuration, and creates the new revision in Azure Container Apps.
**Deployment behavior in Basic strategy:**
By default, the Deploy step has **Skip Traffic Shift disabled (false)**. This means:
* Traffic shifts to the new revision immediately upon deployment
* The new revision receives 100% of traffic as soon as it's successfully deployed
* This is the expected behavior for Basic deployments where you want immediate cutover
* No additional Traffic Shift steps are needed
The Deploy step completes the following operations in four phases:
**Phase 1: Parsing manifest**
```
[INFO] Phase 1/4: Parsing manifest
[INFO] Container App: aca-aut-test
```
Harness reads the Azure Container Apps manifest to extract the container app name and validate the configuration.
**Phase 2: Preparing deployment**
```
[INFO] Phase 2/4: Preparing deployment
[INFO] Using location from managed environment: East US
[INFO] Injecting image URL: index.docker.io/library/nginx:stable-otel
[INFO] Traffic will be forced to latest revision
[INFO] Setting active revisions mode: Single
```
Harness prepares the deployment by determining the Azure region, injecting the container image URL (replaces `placeholder` in the manifest), configuring traffic to route to the new revision, and setting the active revisions mode to `Single`.
**Phase 3: Deploying container app**
```
[INFO] Phase 3/4: Deploying container app
[INFO] Deploying container app completed (took 16s)
[INFO] Container App deployed successfully: aca-aut-test
```
Harness deploys the container app to Azure. If the container app doesn't exist, it creates a new one. If it already exists, it creates a new revision with the updated configuration.
**Phase 4: Finalizing outputs**
```
[INFO] Phase 4/4: Finalizing outputs
[INFO] Waiting 1 minute for deployment to stabilise...
[INFO] Revisions:
[INFO] Revision: aca-aut-test--0000001, Status: Running, Replicas: 1, Traffic: 100%
[INFO] Instances:
[INFO] Instance: aca-aut-test--0000001-7c7fd9f49c-bpfcb, Revision: aca-aut-test--0000001, Status: Running
```
Harness waits for the deployment to stabilize and outputs the current state, including revision status, replica counts, traffic distribution (100% to the new revision), and instance details.
### When to use Basic deployment
Basic deployment is suitable for:
* **Development and testing environments** where immediate cutover is acceptable
* **Simple applications** that don't require gradual traffic shifting
* **Low-risk deployments** where you're confident in the new version
* **Non-production workloads** where brief downtime or immediate rollback is acceptable
* **Quick iterations** during development where you want fast feedback
### When to use Canary deployment instead
Consider using [Canary deployment](/continuous-delivery/use-continuous-delivery/deploy-services-on-different-platforms/azure/azure-container-apps/canary-deployment.md) when you need:
* Progressive traffic shifting to validate new versions gradually
* Risk mitigation for production deployments
* Ability to monitor metrics at each traffic level before full rollout
* Fine-grained control over traffic distribution
* A/B testing or blue-green testing scenarios
### Rollback
When deployment fails or issues are detected, Harness can automatically roll back to the previous state using the rollback data captured during the Prepare Rollback Data step.
**Rollback process:**
1. Retrieves the rollback data captured before deployment
2. Restores the traffic configuration to the previous state
3. Restores the previous revision traffic weights
4. Reactivates previous revisions as needed
The rollback step is automatically added to your pipeline's rollback section when you select the Basic strategy.
### Complete pipeline example
#### Basic deployment pipeline
This example shows a complete Basic deployment pipeline with immediate traffic cutover. The pipeline deploys a new revision and shifts 100% traffic to it immediately.
Complete Pipeline YAML Example
```yaml
pipeline:
name: Azure Container Apps Basic Deployment
identifier: aca_basic_deployment
projectIdentifier: my_project
orgIdentifier: default
tags: {}
stages:
- stage:
name: Deploy
identifier: deploy
description: "Basic Azure Container Apps Deployment"
type: Deployment
spec:
deploymentType: AzureContainerApps
service:
serviceRef: <+input>
serviceInputs: <+input>
environment:
environmentRef: <+input>
deployToAll: false
environmentInputs: <+input>
serviceOverrideInputs: <+input>
infrastructureDefinitions: <+input>
execution:
steps:
- stepGroup:
name: Azure Container Apps Step Group
identifier: Azure_Container_Apps_Step_Group
steps:
- step:
type: DownloadManifests
name: Download Manifests
identifier: DownloadManifests
spec: {}
failureStrategies: []
- step:
type: AzureContainerAppsPrepareRollbackData
name: Azure Container Apps Prepare Rollback Data
identifier: Azure_Container_Apps_Prepare_Rollback_Data
spec:
connectorRef: account.harnessImage
image: harness/azure-container-apps-plugin:0.0.1-linux-amd64
imagePullPolicy: Always
timeout: 10m
- step:
type: AzureContainerAppsDeploy
name: Azure Container Apps Deploy
identifier: Azure_Container_Apps_Deploy
spec:
connectorRef: account.harnessImage
image: harness/azure-container-apps-plugin:0.0.1-linux-amd64
imagePullPolicy: Always
skipTrafficShift: false
timeout: 30m
sharedPaths:
- /var/run
- /var/lib/docker
stepGroupInfra:
type: KubernetesDirect
spec:
connectorRef: <+input>
namespace: default
rollbackSteps:
- stepGroup:
name: Azure Container Apps Rollback Step Group
identifier: Azure_Container_Apps_Rollback_Step_Group
steps:
- step:
type: AzureContainerAppsRollback
name: Azure Container Apps Rollback
identifier: Azure_Container_Apps_Rollback
spec:
connectorRef: account.harnessImage
image: harness/azure-container-apps-plugin:0.0.1-linux-amd64
imagePullPolicy: Always
timeout: 30m
sharedPaths:
- /var/run
- /var/lib/docker
stepGroupInfra:
type: KubernetesDirect
spec:
connectorRef: <+input>
namespace: default
tags: {}
failureStrategies:
- onFailure:
errors:
- AllErrors
action:
type: StageRollback
```
### Comparison with Canary deployment
| Feature | Basic Deployment | Canary Deployment |
| ---------------------- | ------------------------------ | -------------------------------------- |
| **Traffic Shift** | Immediate (100%) | Progressive (e.g., 20% → 70% → 100%) |
| **Default Steps** | 3 steps | 3 steps + optional Traffic Shift steps |
| **Skip Traffic Shift** | Disabled (false) | Enabled (true) for progressive rollout |
| **Risk Level** | Higher (immediate cutover) | Lower (gradual validation) |
| **Deployment Speed** | Faster | Slower (validation at each stage) |
| **Use Case** | Dev/Test environments | Production environments |
| **Monitoring** | Post-deployment only | At each traffic level |
| **Rollback** | Immediate to previous revision | Can halt at any traffic level |
### Related resources
* [Azure Container Apps Sample Repository](https://github.com/harness-community/harnesscd-example-apps/tree/master/azure-container-apps) - Complete working example with automated setup
* [Canary Deployment Strategy](/continuous-delivery/use-continuous-delivery/deploy-services-on-different-platforms/azure/azure-container-apps/canary-deployment.md)
* [Azure Container Apps Revisions](https://learn.microsoft.com/en-us/azure/container-apps/revisions)
* [Configure Service and Environment](/continuous-delivery/use-continuous-delivery/deploy-services-on-different-platforms/azure/azure-container-apps/configure-service-environment.md)
* [Download Manifests](/continuous-delivery/use-continuous-delivery/deploy-services-on-different-platforms/azure/azure-container-apps/step-references/download-manifests.md)
* [Prepare Rollback Data](/continuous-delivery/use-continuous-delivery/deploy-services-on-different-platforms/azure/azure-container-apps/step-references/prepare-rollback-data.md)
* [Azure Container Apps Deploy](/continuous-delivery/use-continuous-delivery/deploy-services-on-different-platforms/azure/azure-container-apps/step-references/deploy-aca.md)
* [Azure Container Apps Rollback](/continuous-delivery/use-continuous-delivery/deploy-services-on-different-platforms/azure/azure-container-apps/step-references/rollback.md)
{% @harness-feedback/feedback %}