> For the complete documentation index, see [llms.txt](https://developer.harness.io/llms.txt). Markdown versions of documentation pages are available by appending `.md` to page URLs; this page is available as [Markdown](https://developer.harness.io/continuous-delivery/use-continuous-delivery/deploy-services-on-different-platforms/azure/azure-container-apps/configure-service-environment.md).
# Configure service and environment
Set up your Azure Container Apps service definition, manifests, and infrastructure
{% hint style="info" %}
This feature is in Beta[^1] and requires enablement. [View all early access features.](/release-notes/features.md)
{% @harness-feature-flag-access/request-feature-flag-access module="continuous-delivery" pagePath="continuous-delivery/use-continuous-delivery/deploy-services-on-different-platforms/azure/azure-container-apps/configure-service-environment" featureFlags="%5B%7B%22name%22%3A%22Azure%20Container%20Apps%22%2C%22key%22%3A%22CDS\_AZURE\_CONTAINER\_APPS%22%2C%22status%22%3A%22BETA%22%2C%22description%22%3A%22Enables%20Azure%20Container%20Apps%20as%20a%20Continuous%20Delivery%20deployment%20type%2C%20including%20service%2C%20environment%2C%20and%20infrastructure%20configuration%20for%20Container%20Apps%20pipelines.%22%7D%5D" %}
{% endhint %}
This topic describes how to configure your service, environment, and infrastructure for Azure Container Apps deployments in Harness.
***
## What you will learn from this topic
* How to add a [Deploy stage](#add-a-deploy-stage) for Azure Container Apps
* How to configure the [service](#configure-the-service), including the container app manifest and artifacts
* How to configure the [environment and infrastructure](#configure-the-environment-and-infrastructure), including Azure authentication and cross-subscription deployments
* How to select a [deployment execution strategy](#deployment-execution-strategy) for your Azure Container Apps pipeline
***
## Before you begin
Confirm the following prerequisites before you configure the service and environment:
* **Azure Container Apps feature flag**: Contact [Harness Support](mailto:support@harness.io) to enable the `CDS_AZURE_CONTAINER_APPS` feature flag for your account.
* **Harness Azure connector**: Create a Harness Azure connector with access to the Azure subscription that contains your container registry and managed environment. Go to [Add a Microsoft Azure Cloud Connector](https://developer.harness.io/harness-platform/use-harness-platform/connectors/cloud-providers/add-a-microsoft-azure-connector) to create the connector.
* **Existing Azure resource group and managed environment**: Confirm the Azure resource group and Container Apps managed environment you plan to deploy to already exist.
* **Container image source**: Confirm access to an Azure Container Registry (ACR) or Docker Hub repository that hosts the container image for your application.
* **Pipeline permissions**: You need permission to create and edit pipelines, services, and environments in your project. Go to the [permissions reference](https://developer.harness.io/harness-platform/use-harness-platform/platform-access-control/permissions-reference) to review required permissions.
***
## Add a Deploy stage
Setting up an Azure Container Apps deployment starts with adding a Deploy stage to your pipeline. Perform the following steps to add the stage:
1. In your project, go to **Deployments** -> **Pipelines**, then open your pipeline (or create one).
2. Select **Add Stage**, then select **Deploy**.
3. When Harness prompts you to select the deployment type, select **Azure Container Apps**.
This selection configures the stage with Container Apps-specific capabilities and deployment steps.
***
## Configure the service
The service definition contains the configuration needed to deploy your Azure Container App, including the container app manifest that defines your application. The manifest defines your infrastructure as code so you can version control and consistently replicate Container Apps deployments across environments.
### Add or select a service
After you create the Deploy stage, select **Set Up Stage** to begin configuring the service. In the **Service** tab, either add a new service or select an existing one.
When you create a new service, use one of the following paths:
* **Within a pipeline**: Harness automatically uses the deployment type configured in the Deploy stage (Azure Container Apps). Provide a descriptive **Service Name** and an optional **Description**.
* **As a standalone service**: Select **Azure Container Apps** as the deployment type, then provide the **Service Name** and **Description**.
The service definition contains the manifest and artifacts Harness needs to deploy your Container App.
### Add Azure Container Apps manifest
Azure Container Apps require a manifest file that defines your container app configuration. You can store the manifest **Inline** (directly in Harness), in **Git providers** (GitHub, GitLab, Bitbucket), or in the **Harness File Store**.
The Container App manifest defines the complete configuration for your Azure Container App. It includes container app properties, ingress configuration, container specifications, resource limits, scaling rules, environment variables, and secrets. This manifest is the blueprint that keeps deployments consistent.
The [Azure Container Apps REST API](https://learn.microsoft.com/en-us/rest/api/containerapps/container-apps) supports a wide range of configuration options. You can specify ingress settings for external or internal traffic, configure automatic scaling based on HTTP requests or custom metrics, define multiple containers, set environment variables and secrets, and configure Dapr settings for microservices integration.
Perform the following steps to add a Container App Manifest:
1. Select **+ Add Azure Container Apps Manifest File**.
2. Select your manifest source:
* **Inline**: Enter or paste your manifest directly in the Harness UI.
* **Harness File Store**: Select a file stored in the Harness File Store.
* **Git**: Connect to your Git repository and provide the file path.
3. Provide the manifest configuration in YAML or JSON format.
The following example shows a basic Azure Container Apps manifest.
Example: Azure Container Apps Manifest (YAML)
```yaml
name: aca-aut-test
properties:
configuration:
activeRevisionsMode: Single
ingress:
external: true
targetPort: 80
traffic:
- latestRevision: true
weight: 100
template:
containers:
- name: my-app
image: placeholder
resources:
cpu: 0.25
memory: 0.5Gi
```
**Key fields:**
* `name`: Container app name (unique within the managed environment)
* `properties.configuration.activeRevisionsMode`: `Single` (only one revision active) or `Multiple` (supports traffic splitting)
* `properties.configuration.ingress`: Ingress configuration for HTTP/HTTPS traffic
* `properties.configuration.ingress.external`: `true` for public access, `false` for internal only
* `properties.configuration.ingress.targetPort`: Container port that receives traffic
* `properties.configuration.ingress.traffic`: Traffic distribution rules across revisions
* `properties.template.containers`: Container specifications including image, resources, and environment variables
* `properties.template.containers[].resources`: CPU and memory limits (for example, `0.25` CPU cores, `0.5Gi` memory)
The following example adds environment variables and autoscaling rules.
Example: Container App with Environment Variables and Scaling
```yaml
name: my-container-app
properties:
configuration:
activeRevisionsMode: Single
ingress:
external: true
targetPort: 8080
traffic:
- latestRevision: true
weight: 100
template:
containers:
- name: my-app-container
image: placeholder
env:
- name: APP_ENV
value: production
- name: LOG_LEVEL
value: info
resources:
cpu: 0.5
memory: 1Gi
scale:
minReplicas: 1
maxReplicas: 10
rules:
- name: http-rule
http:
metadata:
concurrentRequests: "50"
```
**Additional fields:**
* `properties.template.containers[].env`: Environment variables passed to the container
* `properties.template.scale.minReplicas`: Minimum number of replicas (default: 1)
* `properties.template.scale.maxReplicas`: Maximum number of replicas
* `properties.template.scale.rules`: Scaling rules based on HTTP requests, CPU, memory, or custom metrics
{% hint style="info" %}
**Image placeholder**
The `image` field in the manifest can be set to `placeholder`. During deployment, Harness replaces this value with the container image specified in your artifact configuration.
{% endhint %}
### Configure artifacts
Harness needs to know which container image to use for your Azure Container App. Harness supports **Azure Container Registry (ACR)** and **Docker Hub** as artifact sources for Azure Container Apps deployments; other container registries are not supported. The artifact configuration overrides the image specified in your container app manifest, so you can deploy different image versions without modifying the manifest.
Perform the following steps to configure a container artifact:
1. In the **Artifacts** section, select **Add Primary Artifact**.
2. Select your artifact source:
* **Azure Container Registry (ACR)**: For images stored in Azure Container Registry.
* **Docker Registry**: For images stored in Docker Hub or other Docker-compatible registries.
3. Configure the artifact details based on your selected source.
**Azure Container Registry (ACR)**
For ACR artifacts, configure the following fields:
* **Azure Connector**: Select your Harness Azure connector that has access to the subscription containing your ACR.
* **Subscription ID**: The Azure subscription containing your container registry.
* **Registry**: Your ACR registry name (for example, `myregistry.azurecr.io`).
* **Repository**: The repository name within the registry (for example, `my-app`).
* **Tag**: Specific image tag, or use **Tag Regex** to automatically select the latest matching tag.
**Docker Registry**
For Docker Hub or other Docker registries, configure the following fields:
* **Docker Connector**: Select your Harness Docker connector.
* **Image Path**: Full image path (for example, `myorg/my-app`).
* **Tag**: Specific image tag, or use **Tag Regex** for automatic selection.
The following example shows an ACR artifact configuration:
```yaml
artifacts:
primary:
primaryArtifactRef: <+input>
sources:
- identifier: acr_artifact
spec:
connectorRef: my_azure_connector
subscriptionId:
registry: myregistry.azurecr.io
repository: my-app
tag: <+input>
type: Acr
```
### Service YAML example
The following example shows a complete service YAML definition for an Azure Container Apps service.
Complete Service YAML
```yaml
service:
name: my-azure-container-apps-service
identifier: my_azure_container_apps_service
orgIdentifier: default
projectIdentifier: my_project
tags: {}
serviceDefinition:
type: AzureContainerApps
spec:
artifacts:
primary:
primaryArtifactRef: <+input>
sources:
- identifier: acr_artifact
type: Acr
spec:
connectorRef: my_azure_connector
subscriptionId:
registry: myregistry.azurecr.io
repository: my-app
tag: <+input>
digest: ""
- identifier: dockerhub_artifact
type: DockerRegistry
spec:
connectorRef: my_docker_connector
imagePath: myorg/my-app
tag: <+input>
digest: ""
manifests:
- manifest:
identifier: container_app_manifest
type: AzureContainerAppsConfiguration
spec:
store:
type: Harness
spec:
files:
- /acaManifest
gitOpsEnabled: false
```
***
## Configure the environment and infrastructure
After you configure the service with the required manifest and artifacts, define the environment and infrastructure where Harness deploys your Container App. The environment represents the logical target (such as Production or Staging). The infrastructure definition specifies the Azure subscription, resource group, and managed environment.
### Create environment
Select the **Environment** tab and either create a new environment or select an existing one. If you create a new environment, provide a descriptive **Environment Name** (such as "Production" or "Staging") and select the environment type: **Production** or **Pre-Production**. This classification helps Harness apply appropriate governance policies and approval workflows. After you configure these settings, save the environment.
The following example shows an environment YAML definition.
Example Environment YAML
```yaml
environment:
name: Azure_Container_Apps_Production
identifier: azure_container_apps_prod
description: "Production environment for Azure Container Apps"
tags: {}
type: Production
orgIdentifier: default
projectIdentifier: my_project
```
### Configure infrastructure
The infrastructure definition specifies where and how Harness deploys your Container App in Azure. This includes the Azure subscription, resource group, and managed environment.
In the **Infrastructure Definition** section, select **New Infrastructure** and provide a descriptive **Infrastructure Name** (such as `eastus-production`) that clearly identifies the deployment target.
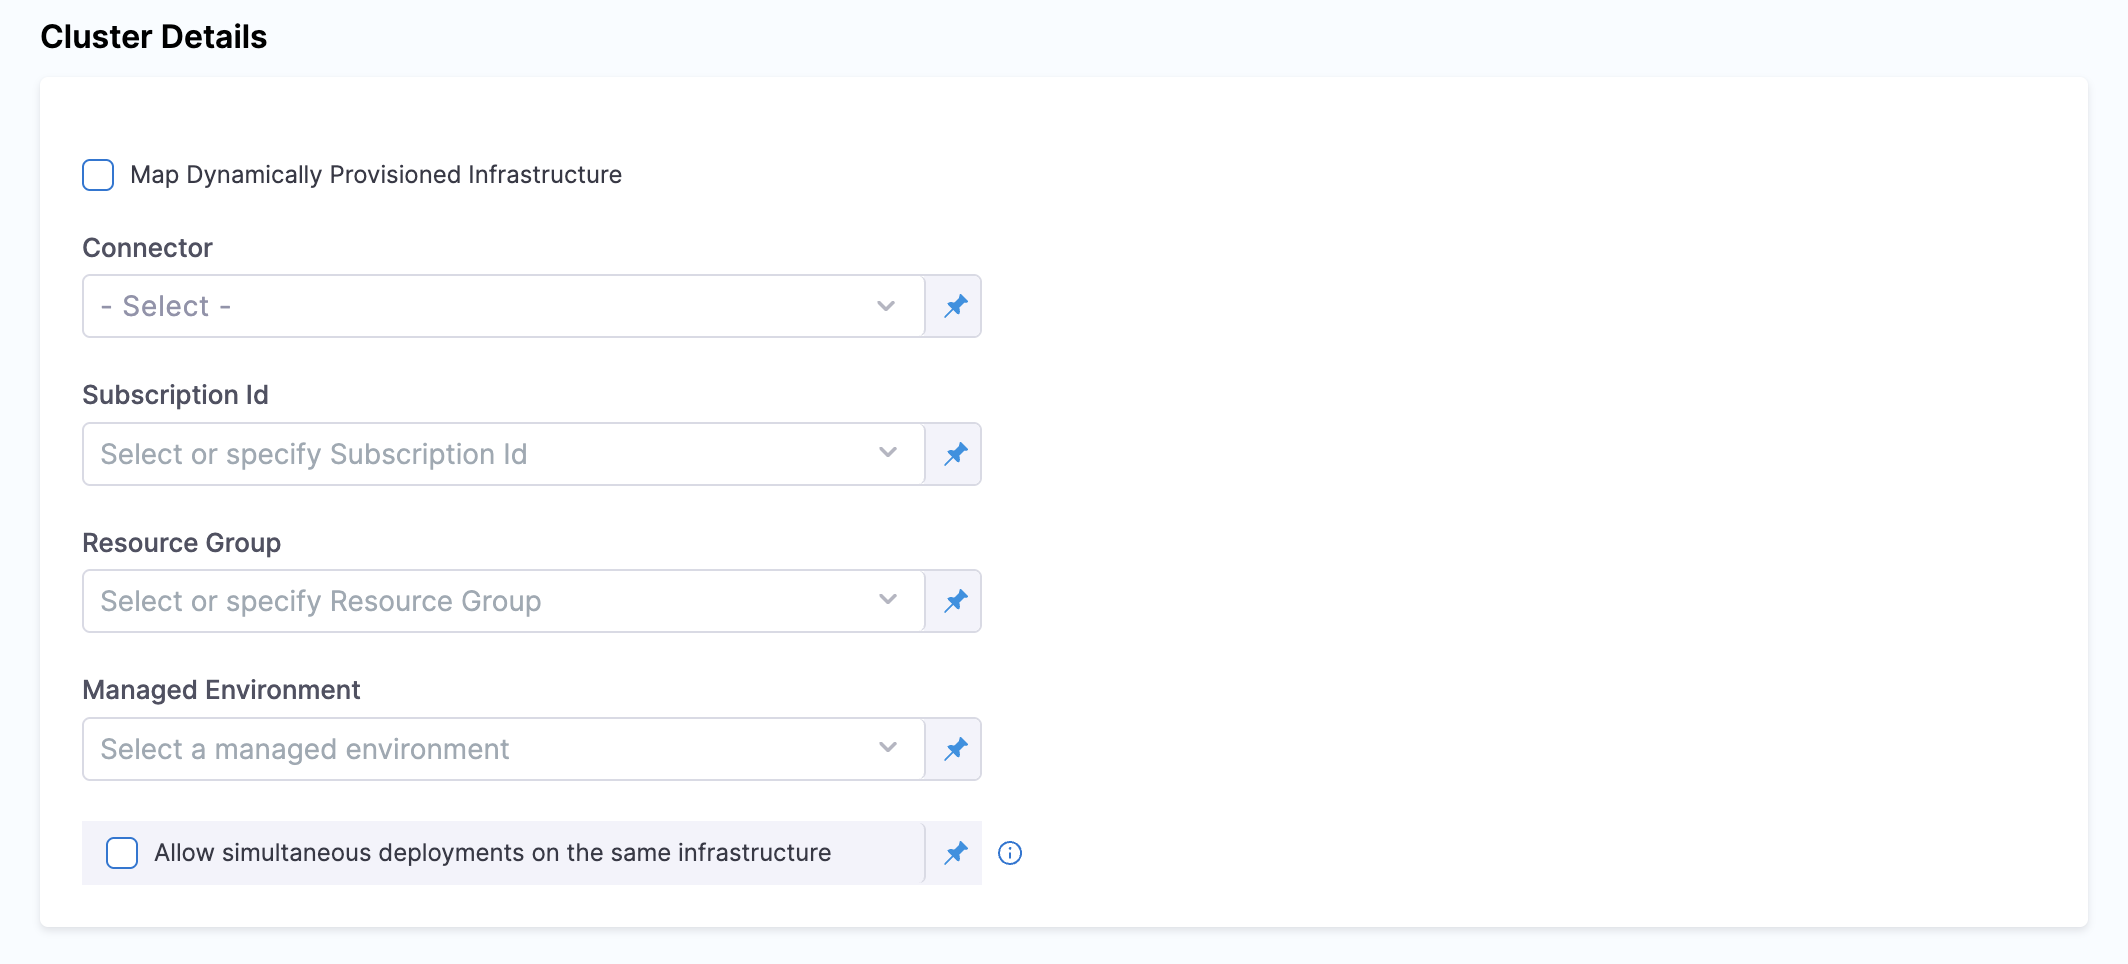
Configure the following Azure-specific details.
**Connector**
Select your Harness Azure connector, which provides authentication to your Azure subscription. This connector uses either OIDC (OpenID Connect) for keyless authentication or a Service Principal with client ID and secret credentials. The connector must have appropriate IAM permissions to create and manage Container Apps, access managed environments, and pull images from container registries. If you do not have a connector configured, select **+ New Connector**, select your preferred authentication method, provide the required credentials, test the connection, and save the connector.
**Subscription ID**
Specify the Azure subscription ID where Harness deploys your Container App (such as ``). This field supports cross-subscription deployments, so you can deploy to a different subscription than the one configured in your connector. This flexibility lets organizations use a single connector across multiple Azure subscriptions and simplifies credential management.
**Resource Group**
Enter the name of the Azure resource group that contains your Container Apps managed environment (such as `my-resource-group`). The resource group must already exist and contain the managed environment where you want to deploy your container app. Harness creates the container app within this resource group.
**Managed Environment**
Specify the name of the Azure Container Apps managed environment where Harness deploys your container app (such as `my-managed-environment`). The managed environment provides the infrastructure boundary for your container apps, including networking, logging, and shared configuration. The managed environment must already exist in the specified resource group.
**Allow simultaneous deployments on the same infrastructure**
This optional checkbox enables multiple deployments to run concurrently on the same managed environment. When enabled, Harness allows parallel deployments without waiting for previous deployments to complete. Use this option when you deploy multiple independent container apps to the same environment or when you want to accelerate deployment workflows.
After you configure these settings, select **Save** to finalize your infrastructure definition.
The following example shows an infrastructure definition YAML.
Example Infrastructure Definition YAML
```yaml
infrastructureDefinition:
name: azure_container_apps_infra
identifier: azure_container_apps_infra
orgIdentifier: default
projectIdentifier: my_project
environmentRef: azure_container_apps_prod
deploymentType: AzureContainerApps
type: AzureContainerApps
spec:
connectorRef: my_azure_connector
subscriptionId:
resourceGroup: my-resource-group
managedEnvironment: my-managed-environment
allowSimultaneousDeployments: false
```
### Azure authentication support
Harness supports two primary authentication methods for connecting to your Azure subscription. Choose the method that matches your security requirements and operational preferences.
**Azure OIDC support**
OpenID Connect (OIDC) provides secure, keyless authentication using workload identity federation. This approach eliminates the need to manage and rotate service principal credentials, which reduces security risk and simplifies credential management. Harness recommends OIDC for production environments because it uses Azure identity federation to authenticate without storing long-lived credentials.
Go to [Add a Microsoft Azure Cloud Connector](https://developer.harness.io/harness-platform/use-harness-platform/connectors/cloud-providers/add-a-microsoft-azure-connector) to configure OIDC authentication.
**Service Principal**
The Service Principal authentication method uses a client ID and client secret for a service principal registered in your Microsoft Entra ID (Azure Active Directory). This method works well when you need to get started quickly or when OIDC is not available in your environment. When you use service principal credentials, rotate secrets regularly and restrict permissions to only what is necessary.
Go to [Add a Microsoft Azure Cloud Connector](https://developer.harness.io/harness-platform/use-harness-platform/connectors/cloud-providers/add-a-microsoft-azure-connector) to configure Service Principal authentication.
### Cross-subscription deployments
Harness supports cross-subscription deployments by default. You can use a single Azure connector to manage Container Apps across multiple Azure subscriptions. This capability removes the need to create and maintain separate connectors for each subscription, which simplifies credential management in multi-subscription environments.
When you configure your infrastructure definition, the **Subscription ID** field accepts any valid Azure subscription ID, either the same subscription configured in the connector or a different one. The **Resource Group** and **Managed Environment** fields determine where Harness deploys the Container App within that subscription. This separation gives you flexibility in organizing Azure resources while keeping authentication centralized.
{% hint style="info" %}
**OIDC cross-subscription prerequisite**
For OIDC-based connectors, grant the associated service principal appropriate IAM permissions in both the connector subscription and the target deployment subscriptions so Harness can access and manage resources across subscriptions.
{% endhint %}
***
## Deployment execution strategy
After you configure the service, environment, and infrastructure, configure your deployment execution strategy in the **Execution** tab.
### Basic strategy
Harness supports the **Basic** deployment strategy for Azure Container Apps deployments with immediate traffic cutover. When you select this strategy, Harness automatically adds a step group containing three deployment steps with rollback capabilities.
* [Basic deployment](/continuous-delivery/use-continuous-delivery/deploy-services-on-different-platforms/azure/azure-container-apps/basic-deployment.md): Configure Basic deployments with immediate traffic cutover and automatic step group setup.
### Canary strategy
Harness supports the **Canary** deployment strategy for Azure Container Apps deployments with progressive traffic shifting. When you select this strategy, Harness automatically adds a step group with three default steps. You can then manually add Traffic Shift steps for progressive rollout.
* [Canary deployment](/continuous-delivery/use-continuous-delivery/deploy-services-on-different-platforms/azure/azure-container-apps/canary-deployment.md): Configure Canary deployments with progressive traffic shifting and rollback.
### Blank Canvas
If you select **Blank Canvas**, you need to manually add and configure the deployment steps. This option lets you customize your deployment workflow for specific requirements.
{% hint style="warning" %}
**Container Step Group required**
All Azure Container Apps deployment steps must be added within a **Container Step Group** (also called a Containerized Step Group). The deployment steps run as containerized tasks and require the container infrastructure configuration provided by the step group. Without a Container Step Group, the Azure Container Apps steps do not execute properly.
{% endhint %}
When you use Blank Canvas, perform the following steps:
1. Add a **Container Step Group** in the Execution section.
2. Configure the step group infrastructure (Kubernetes connector and namespace).
3. Add your Azure Container Apps deployment steps within the step group:
* Download Manifests
* Azure Container Apps Prepare Rollback Data
* Azure Container Apps Deploy
* Azure Container Apps Traffic Shift (optional, for Canary deployments)
4. Configure rollback steps within a separate Container Step Group in the Rollback section.
***
## Troubleshooting
Azure connector test fails or deployments cannot reach Azure
Confirm the connector authentication method (OIDC or Service Principal) and that the identity has permission to manage Container Apps, access the managed environment, and pull images from the registry. Go to [Add a Microsoft Azure Cloud Connector](https://developer.harness.io/harness-platform/use-harness-platform/connectors/cloud-providers/add-a-microsoft-azure-connector) to retest the connector.
Managed Environment or Resource Group is not found
Confirm the **Subscription ID**, **Resource Group**, and **Managed Environment** values match resources that already exist in Azure. Harness does not create the managed environment as part of this service and infrastructure setup.
Azure Container Apps steps fail in Blank Canvas
Confirm every Azure Container Apps step sits inside a **Container Step Group** with a valid Kubernetes connector and namespace. Steps outside a Container Step Group do not receive the required container infrastructure.
***
## Next steps
* [Basic deployment](/continuous-delivery/use-continuous-delivery/deploy-services-on-different-platforms/azure/azure-container-apps/basic-deployment.md): Configure Basic deployments with immediate traffic cutover and automatic step group setup.
* [Canary deployment](/continuous-delivery/use-continuous-delivery/deploy-services-on-different-platforms/azure/azure-container-apps/canary-deployment.md): Configure Canary deployments with progressive traffic shifting and rollback.
* [Azure Container Apps sample repository](https://github.com/harness-community/harnesscd-example-apps/tree/master/azure-container-apps): Complete service and environment configuration examples.
* [Add a Microsoft Azure Cloud Connector](https://developer.harness.io/harness-platform/use-harness-platform/connectors/cloud-providers/add-a-microsoft-azure-connector): Configure Azure authentication for Harness connectors.
* [Harness File Store](/continuous-delivery/use-continuous-delivery/cd-building-blocks/services/add-inline-manifests-using-file-store.md): Store manifests directly in Harness.
* [Azure Container Apps documentation](https://learn.microsoft.com/en-us/azure/container-apps/): Official Microsoft reference for Azure Container Apps.
{% @harness-feedback/feedback %}
[^1]: Beta features are feature-complete but still being validated. Available on request.