> For the complete documentation index, see [llms.txt](https://developer.harness.io/llms.txt). Markdown versions of documentation pages are available by appending `.md` to page URLs; this page is available as [Markdown](https://developer.harness.io/continuous-delivery/use-continuous-delivery/deploy-services-on-different-platforms/helm/native-helm-quickstart.md).
# Deploy Native Helm using Harness
Deploy a Helm chart to a Kubernetes cluster with Native Helm in Harness CD, including Helm version, infrastructure, command flags, and steady state checks.
This topic shows you how to perform Native Helm deployments using Harness.
## What you will learn from this topic
* Understand the [commands Harness runs](#commands-used-by-harness-to-perform-a-helm-chart-deployment-managed-by-helm) during a Helm chart deployment.
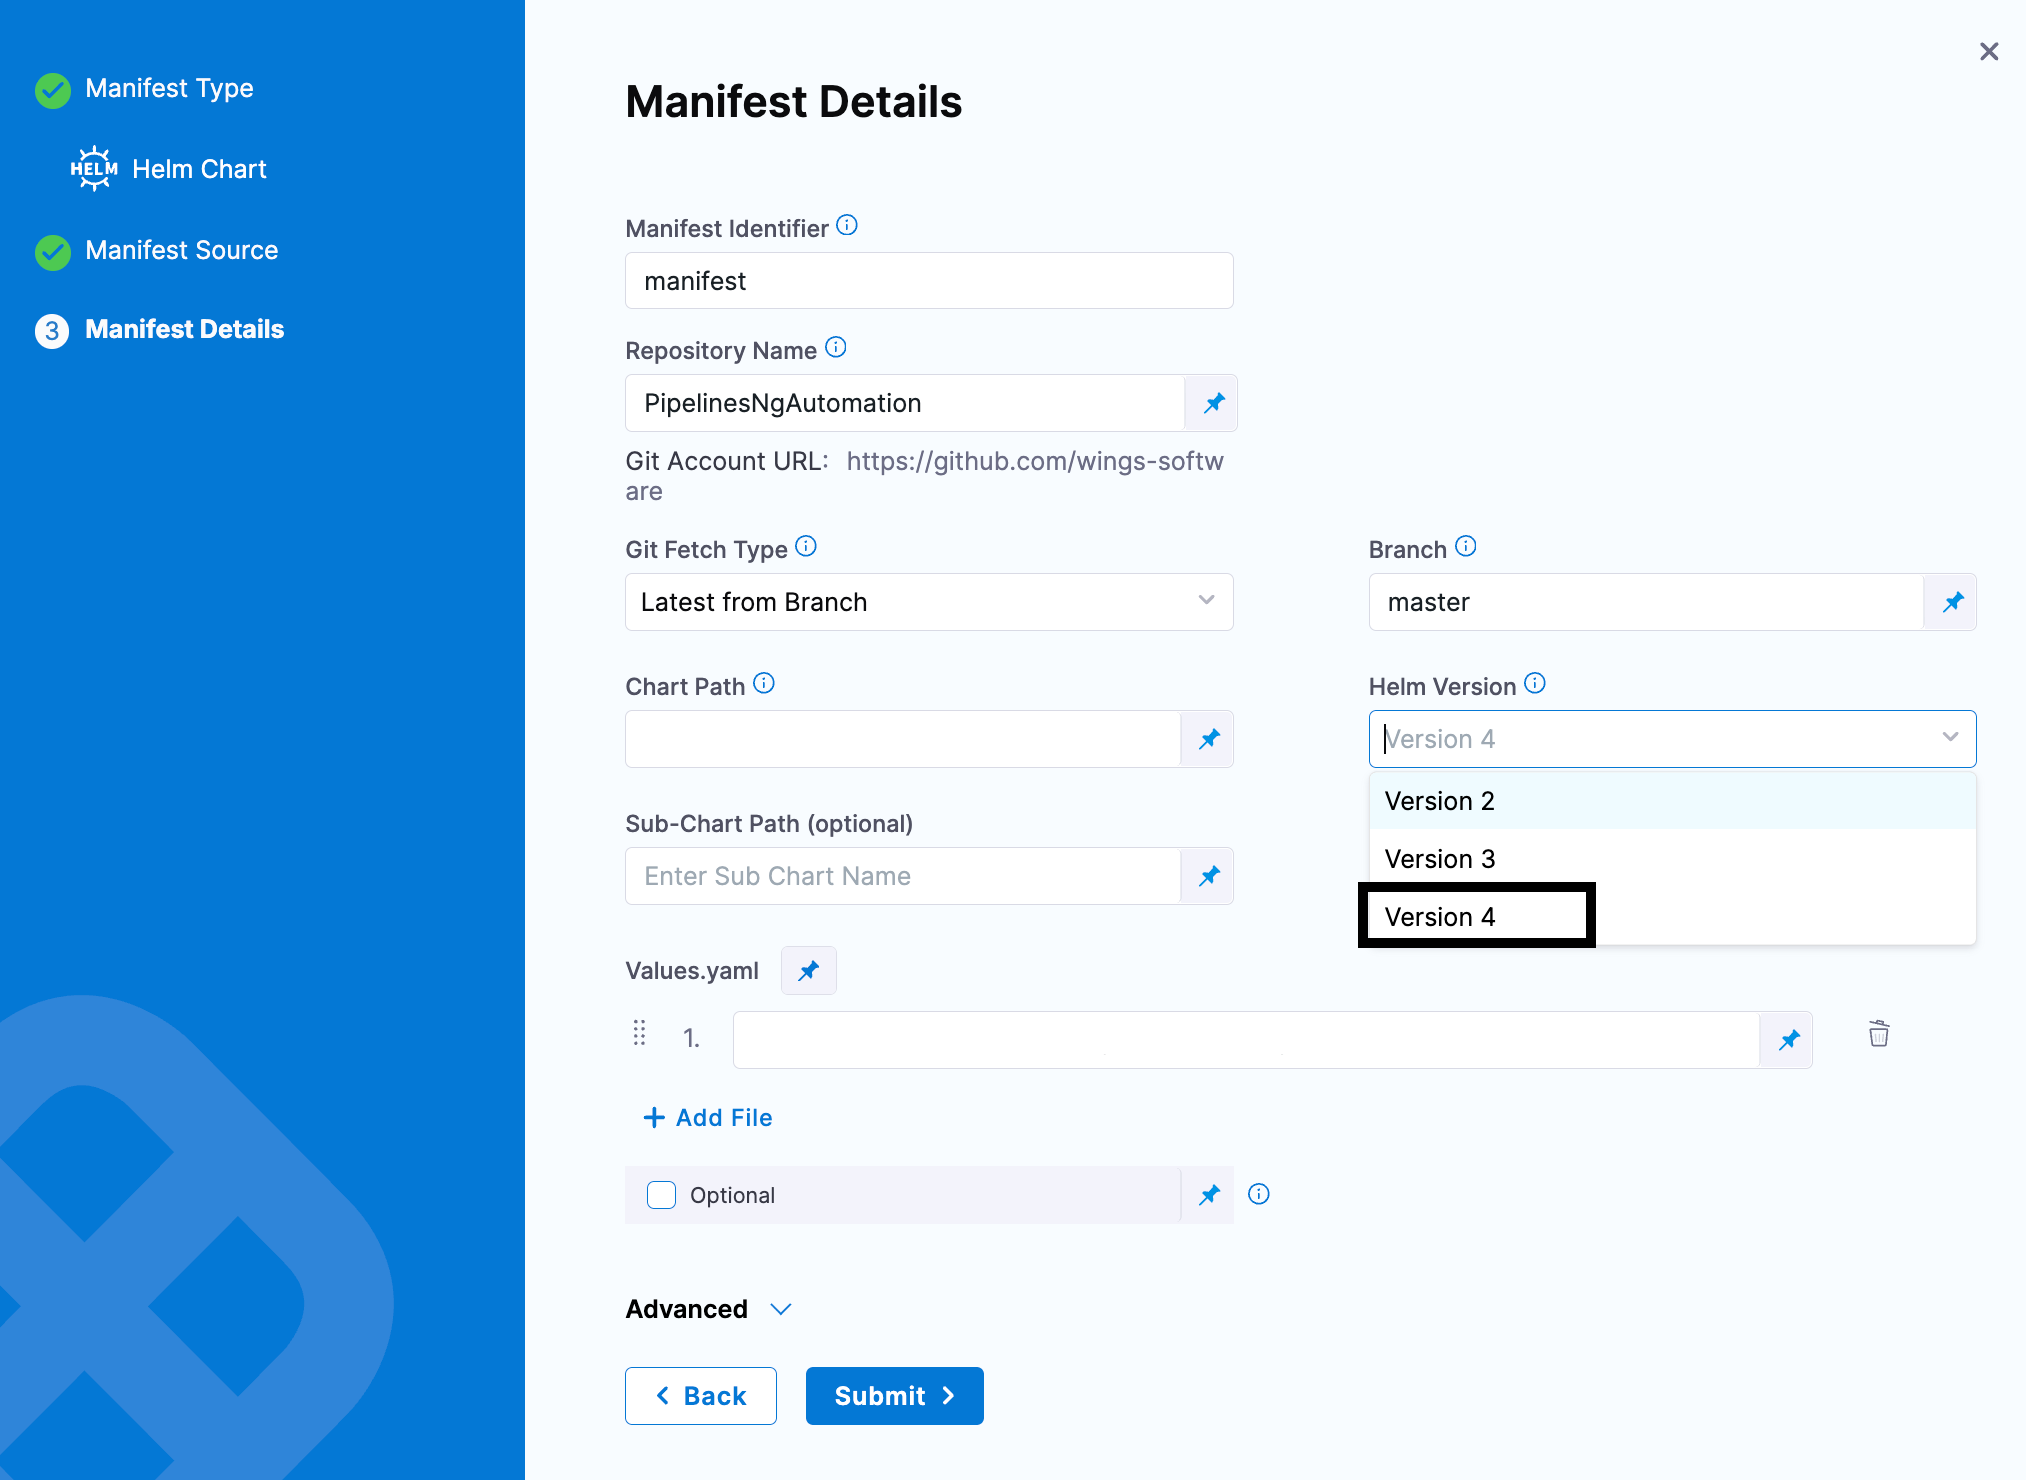
* How to choose a supported [Helm version](#helm-version-support) for your deployment.
* How to configure a [Native Helm deploy stage](#native-helm-deploy-stage) and add a Helm chart to a service.
* How to define the [target infrastructure](#define-the-target-native-helm-infrastructure) for a Native Helm deployment.
* How to add a [Helm Deployment step](#add-a-helm-deployment-step) and deploy and review your pipeline.
## Before you begin
A Native Helm deployment requires the following:
* Helm chart
* Kubernetes cluster
* A **Kubernetes service account** with permission to create entities in the target namespace is required. The set of permissions should include `list`, `get`, `create`, and `delete` permissions. In general, the cluster-admin permission or namespace admin permission is enough. Go to [User-Facing Roles](https://kubernetes.io/docs/reference/access-authn-authz/rbac/#user-facing-roles) from Kubernetes for more information.
## Commands used by Harness to perform a Helm chart deployment managed by Helm
When using the Harness-managed Helm Chart Deployment approach, Harness uses a mix of `helm` and `kubectl` commands to perform the deployment.
1. The command Harness runs to perform **Fetch Files** depends on the store type, Git or Helm Repo.
For Git:
```bash
git clone {{YOUR GIT REPO}}
```
For Helm Repo:
```bash
helm pull {{YOUR HELM REPO}}
```
2. Based on your values.yaml and Harness configured variables, Harness renders those values using `helm template`. Harness consolidates all the rendered manifest into a `manifest.yaml`.
```bash
helm template /opt/harness-delegate/repository/helm/source//helm-test-chart --namespace default -f ./repository/helm/overrides/.yaml
```
3. Harness performs a dry run by default to show what is about to be applied.
```bash
kubectl --kubeconfig=config apply --filename=manifests-dry-run.yaml --dry-run=client
```
4. Harness then runs the `helm install` or `helm upgrade` command to install the chart on the Kubernetes clusters.
```bash
helm upgrade /opt/harness-delegate/repository/helm/source//helm-test-chart -f ./repository/helm/overrides/.yaml
```
5. Harness then queries the deployed resources to show a summary of what was deployed.
```bash
helm get manifest --namespace=default
helm list --filter ^$
```
6. If the deployment fails, Harness performs a `helm rollback`.
```bash
helm rollback
```
### Helm version support
Harness supports Helm v3 and v4:
* **Helm v3**: Harness ships Helm v3.15.4 and supports Helm v3 versions up to v3.21.1. Widely adopted and stable.
* **Helm v4**: Newest version with enhanced features including Server-Side Apply, kstatus-based wait strategies, and improved plugin system.
Select the Helm version in your service manifest configuration that matches your chart requirements.
Go to [Helm Version Support Policy](https://helm.sh/docs/topics/version_skew/) for version compatibility details.
{% hint style="info" %}
**Using Helm v4 in Harness**
**Automatic flag translation:** Harness automatically translates Helm v3 command flags to their v4 equivalents when you select Helm v4. Deprecated flags like `--atomic`, `--force`, and `--dry-run` are automatically converted in the backend.
**Shell script usage:** If you use Helm commands in shell script steps, use the `helm4` binary for Helm v4:
```bash
# Helm v3
helm template . test
# Helm v4
helm4 template . test
```
{% endhint %}
{% hint style="warning" %}
**Known Helm issue with multiple API versions for the same kind**
There is an outstanding Helm bug ([helm/helm#10748](https://github.com/helm/helm/issues/10748)) where Helm does not remove a resource during an upgrade if another resource with the same `Kind` but a different `apiVersion` exists in the same release. Helm merged a fix but subsequently reverted it due to a regression, and the issue remains unresolved.
{% endhint %}
## Native Helm deploy stage
The following steps take you through a typical Native Helm pipeline stage setup to demonstrate the Harness settings involved.
{% hint style="info" %}
**Create a Project for your new CD Pipeline:** If you do not already have a Harness Project, create a Project for your new CD Pipeline. Ensure that you add the **Continuous Delivery** module to the Project. Go to [Create Organizations and Projects](https://developer.harness.io/harness-platform/new-to-harness-platform/get-started).
{% endhint %}
1. In your Harness Project, select **Deployments**, and then select **Create a Pipeline**.
2. Enter a name like **Native Helm Example** and select **Start**.
3. Your Pipeline appears.
4. Select **Add Stage** and select **Deploy**.
5. Enter a name like **quickstart**.
6. In **Deployment Type**, select **Native Helm**, and then select **Set Up Stage**.
7. In **Select Service**, select **Add Service**.
8. Give the service a name.
Once you have created a Service, it is persistent and can be used throughout the stages of this or any other Pipeline in the Project.
Next, add the NGINX Helm chart for the deployment.
{% hint style="info" %}
**Note**
In Harness, native Helm support exists for deployment strategies like Blue-Green and Canary. Go to the [Helm Step Reference](/continuous-delivery/use-continuous-delivery/deploy-services-on-different-platforms/helm/step-reference.md) for more information.
{% endhint %}
## Add a Helm chart to a Native Helm service
To add a Helm chart in this example, add a Harness connector to the HTTP server hosting the chart. This connector uses a Harness Delegate to verify credentials and pull charts. Ensure you have a Harness Delegate installed also. For steps on installing a delegate, go to [Delegate installation overview](https://developer.harness.io/harness-platform/use-harness-platform/delegates/delegate/install-delegates/overview).
1. In the Harness service for your Native Helm deployment, in **Manifests**, select **Add Manifest**.
You can select a Helm Values YAML file or a Helm chart. This example uses a publicly available Helm chart. The process is not very different between these options. For Values YAML, you provide the Git branch and path to the Values YAML file.
2. Select **Helm Chart**, and then select **Continue**.
3. In **Specify Helm Chart Store**, select **HTTP Helm**. In this example, Harness pulls a Helm chart for NGINX from the Bitnami repo at `https://charts.bitnami.com/bitnami`. You do not need any credentials to pull this public chart.
4. Select **New HTTP Helm Repo Connector**.
5. In the **HTTP Helm Repo Connector**, enter a name and select **Continue**.
6. In **Helm Repository URL**, enter `https://charts.bitnami.com/bitnami`.
7. In **Authentication**, select **Anonymous**.
8. Select **Continue**.
9. In **Delegates Setup**, select/create a delegate, and then select **Save and Continue**.
For steps on installing a delegate, go to [Delegate installation overview](https://developer.harness.io/harness-platform/use-harness-platform/delegates/delegate/install-delegates/overview).
When you are done, the Connector is tested. If it fails, your Delegate might not be able to connect to `https://charts.bitnami.com/bitnami`. Review its network connectivity and ensure it can connect.
10. In **Manifest Details**, enter the following settings and select **Submit**.
* **Manifest Identifier**: Enter **nginx**.
* **Chart Name**: Enter **nginx**.
* **Chart Version**: Enter **8.8.1**.
* **Helm Version**: Select **Version 3** (or **Version 4** if you want to use the newest Helm features).
The Helm chart is added to the Service Definition.

Next, you can target your Kubernetes cluster for deployment.
### Multiple Helm charts in a single Harness service
For [Kubernetes Helm](/continuous-delivery/use-continuous-delivery/deploy-services-on-different-platforms/helm/helm-cd-quickstart.md) and [Native Helm](/continuous-delivery/use-continuous-delivery/deploy-services-on-different-platforms/helm/native-helm-quickstart.md) deployment types, you can add multiple Helm charts to a Harness service.

When you run a Harness pipeline that deploys the service, you can select one of the Helm charts to deploy.

By using multiple Helm charts, you can deploy the same artifact with different manifests at pipeline runtime.
#### Video summary of using multiple manifests
{% embed url="" %}
#### Helm chart expressions
For [Kubernetes Helm](/continuous-delivery/use-continuous-delivery/deploy-services-on-different-platforms/helm/deploy-helm-charts.md) and [Native Helm](/continuous-delivery/use-continuous-delivery/deploy-services-on-different-platforms/helm/native-helm-quickstart.md) deployments, you can use the following built-in expressions in your pipeline stage steps to reference chart details.
| Expression | Description |
| --------------------------------------------------- | --------------------------------------------------------------------------------------------------------------------- |
| `<+manifests.MANIFEST_ID.helm.name>` | Helm chart name. |
| `<+manifests.MANIFEST_ID.helm.description>` | Helm chart description. |
| `<+manifests.MANIFEST_ID.helm.version>` | Helm Chart version. |
| `<+manifests.MANIFEST_ID.helm.apiVersion>` | Chart.yaml API version. |
| `<+manifests.MANIFEST_ID.helm.appVersion>` | The app version. |
| `<+manifests.MANIFEST_ID.helm.kubeVersion>` | Kubernetes version constraint. |
| `<+manifests.MANIFEST_ID.helm.metadata.url>` | Helm Chart repository URL. |
| `<+manifests.MANIFEST_ID.helm.metadata.basePath>` | Helm Chart base path, available only for OCI, GCS, and S3. |
| `<+manifests.MANIFEST_ID.helm.metadata.bucketName>` | Helm Chart bucket name, available only for GCS and S3. |
| `<+manifests.MANIFEST_ID.helm.metadata.commitId>` | Store commit Id, available only when manifest is stored in a Git repo and Harness is configured to use latest commit. |
| `<+manifests.MANIFEST_ID.helm.metadata.branch>` | Store branch name, available only when manifest is stored in a Git repo and Harness is configured to use a branch. |
| `<+manifests.MANIFEST_ID.spec.chartName>` | The chart name specified in the manifest configuration. |
| `<+manifests.MANIFEST_ID.spec.chartVersion>` | The chart version specified in the manifest configuration. |
| `<+manifests.MANIFEST_ID.spec.subChartPath>` | The sub-chart path specified in the manifest configuration. |
| `<+manifests.MANIFEST_ID.spec.store>` | The store configuration for the manifest (for example, HTTP, Git, OCI). |
| `<+manifests.MANIFEST_ID.spec.valuesPaths>` | The values file paths specified in the manifest configuration. |
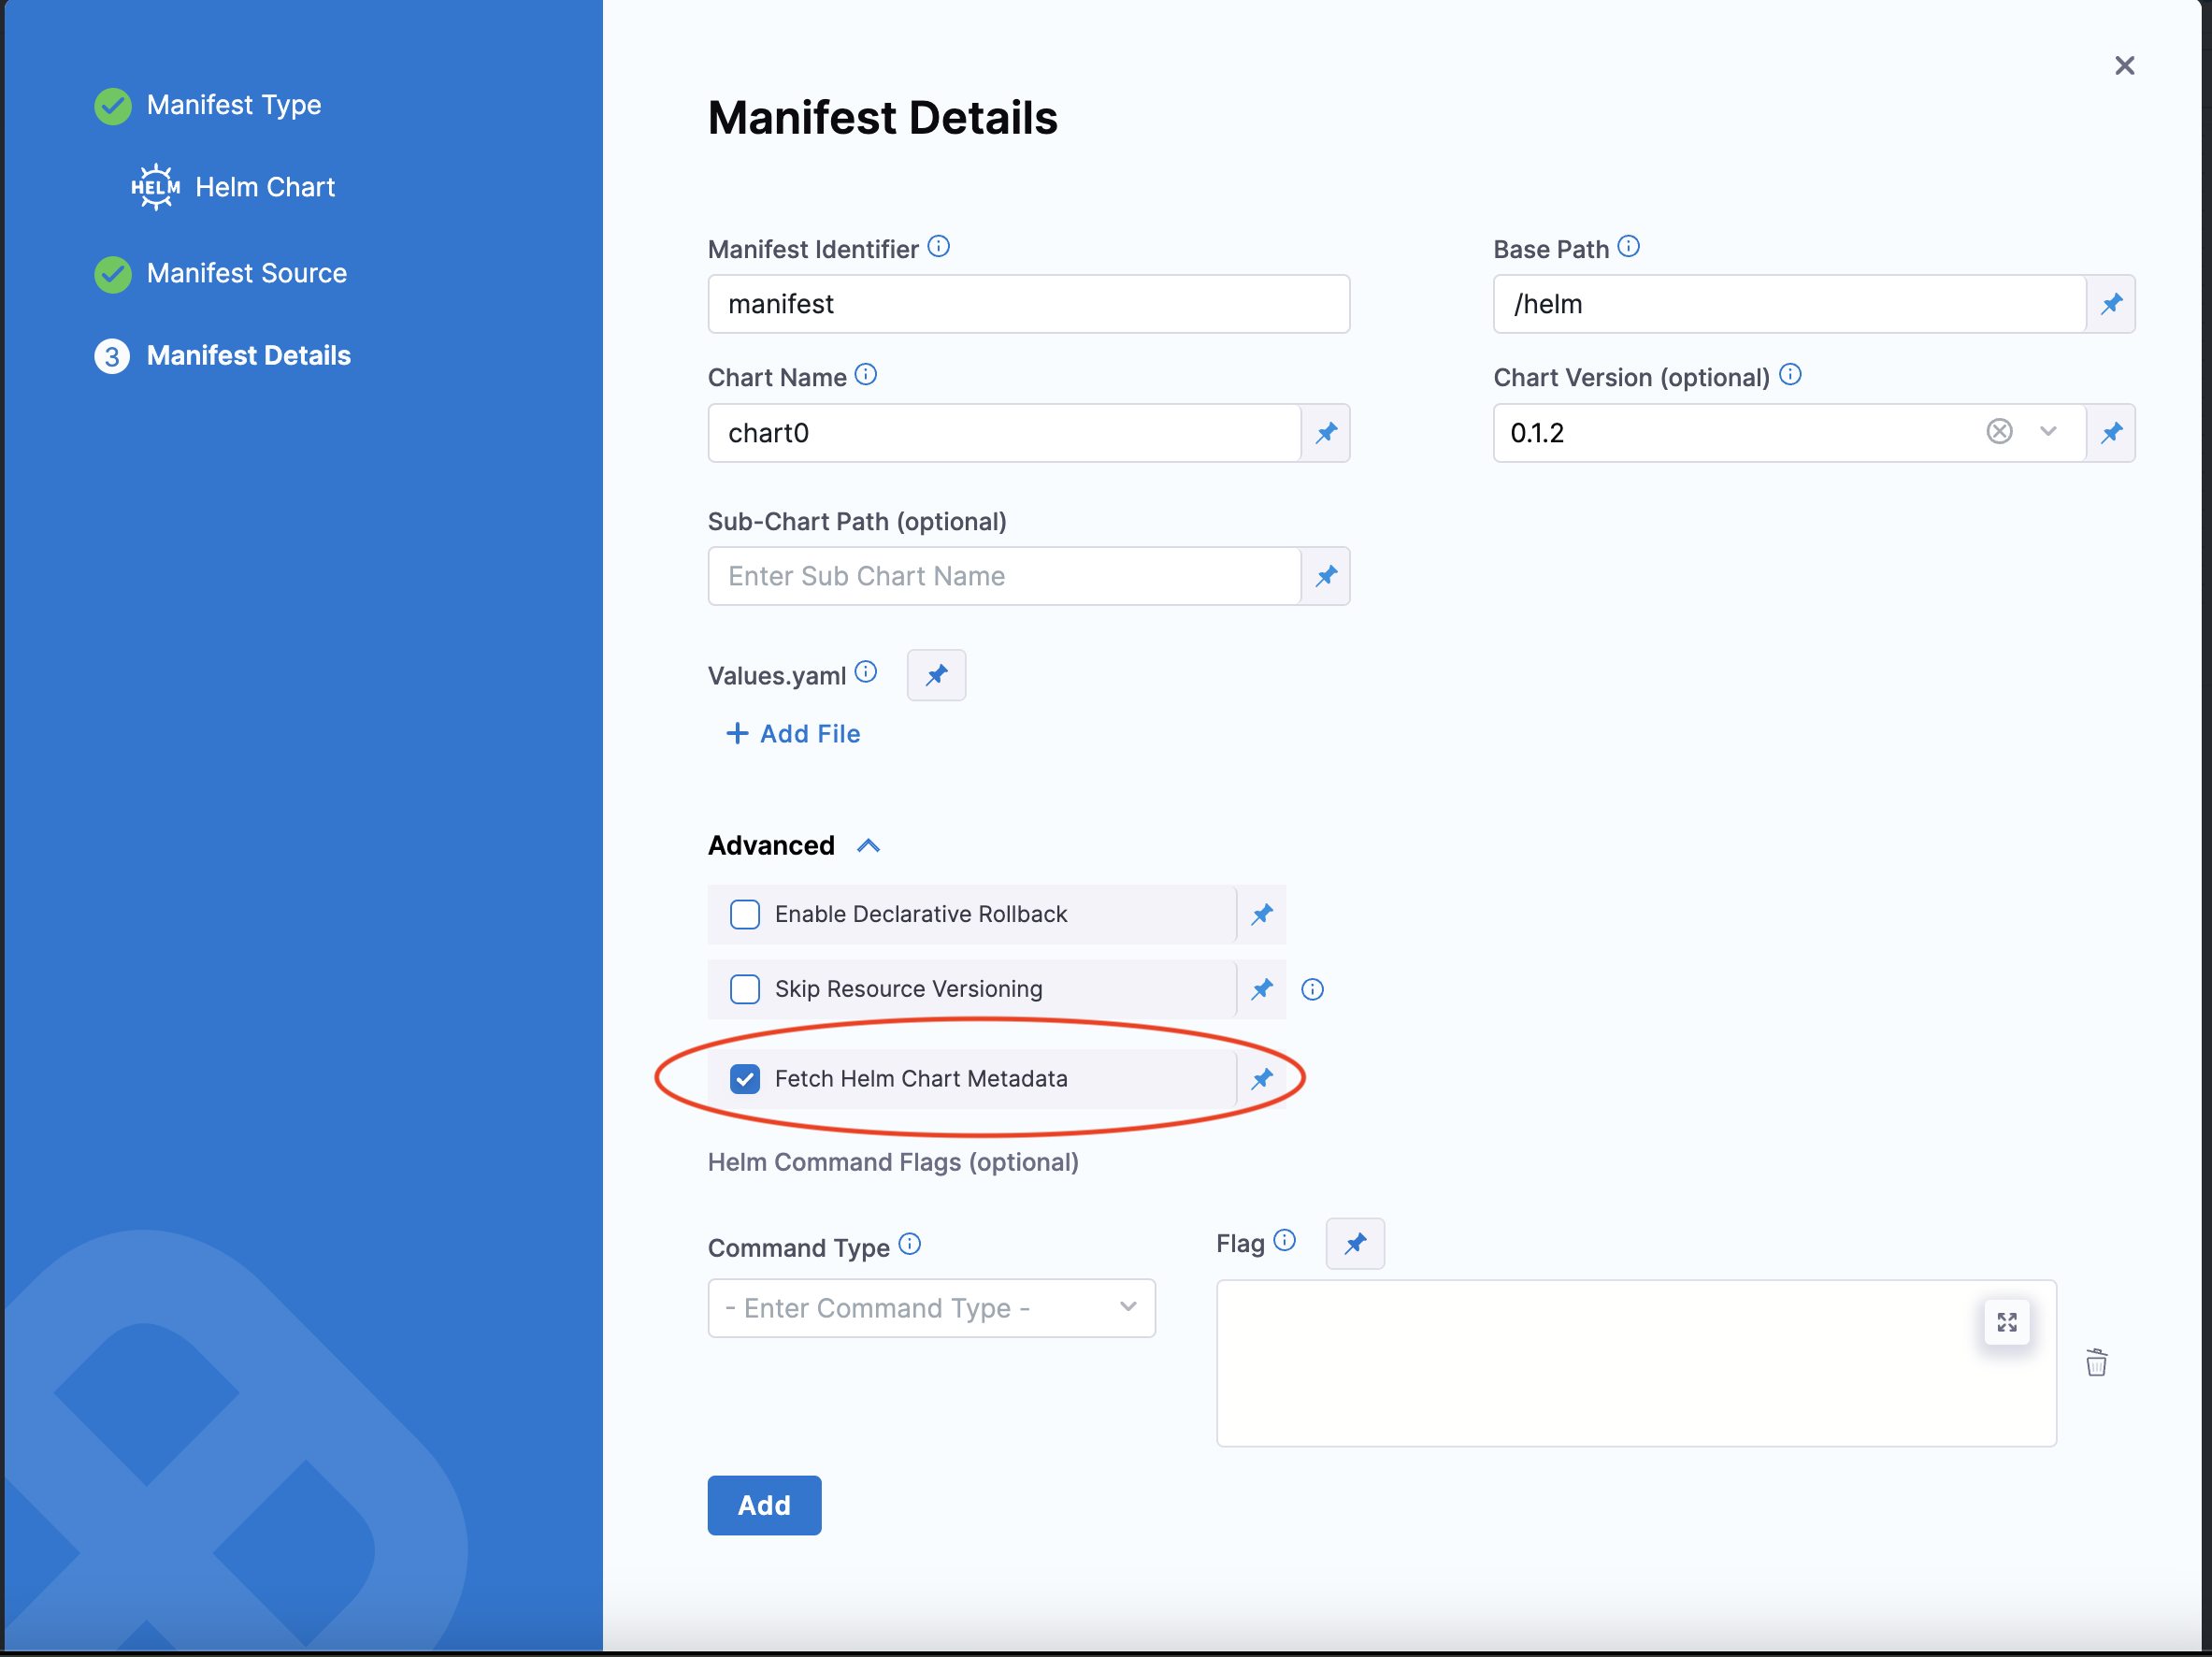
Select **Fetch Helm Chart Metadata** in the **Manifest Details** page's **Advanced** section to enable this functionality.
The `MANIFEST_ID` is located in `service.serviceDefinition.spec.manifests.manifest.identifier` in the Harness service YAML. In the following example, it is `nginx`:
```yaml
service:
name: Helm Chart
identifier: Helm_Chart
tags: {}
serviceDefinition:
spec:
manifests:
- manifest:
identifier: nginx
type: HelmChart
spec:
store:
type: Http
spec:
connectorRef: Bitnami
chartName: nginx
helmVersion: V3
skipResourceVersioning: false
fetchHelmChartMetadata: true
commandFlags:
- commandType: Template
flag: mychart -x templates/deployment.yaml
type: Kubernetes
```
It can also be fetched using the expression `<+manifestConfig.primaryManifestId>`. This expression is supported in multiple Helm chart manifest configurations.\
Using primary manifest ID in expressions
When you have multiple manifests configured in a service, you can reference the primary manifest dynamically using `<+manifestConfig.primaryManifestId>`. This is useful when you need to construct expressions without hardcoding the manifest identifier.
For example, instead of using a hardcoded manifest ID:
```
<+manifests.myHelmChart.spec.chartName>
```
You can use the primary manifest ID dynamically:
```
<+manifests.<+manifestConfig.primaryManifestId>.spec.chartName>
```
This approach allows your expressions to work regardless of the specific manifest identifier used in the service configuration.
## Define the target Native Helm infrastructure
Defining the target cluster infrastructure definition for a Native Helm chart deployment is the same process as a typical Harness Kubernetes deployment.
Go to [Define Your Kubernetes Target Infrastructure](/continuous-delivery/use-continuous-delivery/deploy-services-on-different-platforms/kubernetes/define-your-kubernetes-target-infrastructure.md) to define your target cluster infrastructure.
### Pre-existing and dynamically provisioned infrastructure
There are two methods of specifying the deployment target infrastructure:
* **Pre-existing**: The target infrastructure already exists and you provide the required settings.
* **Dynamically provisioned**: The target infrastructure is dynamically provisioned as part of the deployment process.
For details on Harness provisioning, go to [Provisioning overview](/continuous-delivery/use-continuous-delivery/provision-infrastructure/provisioning-overview.md).
### Define your pre-existing target cluster
Perform the following steps to define your pre-existing target cluster:
1. In **Infrastructure**, in **Environment**, select **New Environment**.
2. In **Name**, enter **quickstart**, select **Non-Production**, and select **Save**.
3. In **Infrastructure Definition**, select **Kubernetes**.
4. In **Cluster Details**, select **Select Connector**. Create a new Kubernetes connector to your target platform, using the same Delegate you installed earlier.
5. Select **New Connector**.
6. Enter a name for the Connector and select **Continue**.
7. In **Details**, select **Use the credentials of a specific Harness Delegate**, and then select **Continue**.

8. In **Set Up Delegates**, select the Delegate you added earlier by entering one of its Tags.
9. Select **Save and Continue**. The Connector is tested. Select **Finish**.
10. Select the new Connector and select **Apply Selector**.
11. In **Namespace**, enter **default** or the namespace you want to use in the target cluster.
12. In **Release Name**, enter **quickstart**.
13. Select **Next**. The deployment strategy options appear.
### Namespace consistency enforcement
Helm deployments in Harness offer packaging and templating capabilities, but with that flexibility comes a gap in namespace enforcement. By default, Helm allows users to deploy workloads into any namespace, regardless of what is defined in the Infrastructure.
This can lead to security and governance issues, especially in shared clusters where namespace isolation is critical.
Helm does not perform strict validation against the namespace defined in the Infrastructure. You can override the namespace in several ways: via chart templates, values files, or by passing the `--namespace` flag during Helm install or upgrade.
This feature requires delegate version `856xx` or later.
To enable this setting, go to **Account** > **Org** > **Project Settings** > **Default Settings**. Under the **Continuous Delivery** section, set the value to **True** for **Enable Namespace validation from different sources with infrastructure level namespace**.
**How it is handled**
Helm does not inherently block namespace overrides, so Harness enforces validation during execution when this feature flag is enabled.
If a Helm chart tries to install resources into a namespace that does not match the one defined in the Infrastructure, Harness will fail the deployment.
This includes scenarios where:
* The chart templates define a hardcoded namespace (`metadata.namespace`)
* The `--namespace` flag is passed in install/upgrade arguments
* Values passed into the chart result in a different namespace
For example:
* The Infrastructure is set to deploy into `secure-team-ns`.
* A Helm chart includes a hardcoded namespace like `sandbox-test`.
* During execution, the chart tries to install into `sandbox-test`.
* With namespace validation enabled, Harness detects the mismatch and blocks the deployment.
This prevents service owners or developers from bypassing namespace boundaries, ensuring that deployments stay confined to the approved environment.
**Limitations**
Helm Canary deployments are not supported with this namespace enforcement feature.
## Add a Helm deployment step
In this example, you use a Rolling [deployment strategy](/continuous-delivery/use-continuous-delivery/manage-deployments/deployment-concepts.md).
1. Select **Rolling**, and select **Apply**.
2. The **Helm Deployment** step is added to **Execution**.
## Command flags at step level
You can optionally override or add native Helm command parameters directly in the Helm Deploy step. This provides greater flexibility to customize Helm CLI behavior without modifying the Service definition.
{% hint style="info" %}
Command Flags at the step level are supported for **Helm v3** only.
{% endhint %}
### Configure command flags
Perform the following steps to configure command flags:
1. In your pipeline, add or edit a **Helm Deploy** step.
2. Select the **Advanced** tab.
3. Locate the **Command Flags** field.
4. Add one or more Helm command flags as needed.
5. Save the step.
During execution, Harness applies the specified flags to the corresponding Helm commands.
### Behavior and precedence
The following table describes how step-level and service-level command flags interact:
| Configuration location | Behavior |
| ---------------------- | -------------------------------------------------------------------------------------------------------- |
| Step and Service | **Step-level flags take precedence.** Service-level flags are used, unless overridden at the step level. |
| Step only | **Step-level flags are used.** |
| Service only | **Service-level flags are used.** |
There is no merging of flags between step and service levels. Step-level flags fully override service-level flags for the same command.
### Server-side dry run example
To perform a server-side dry-run without modifying the Service:
* In the Helm Deploy step, add:
```bash
--dry-run --server
```
**Additional resources**
Go to the [Helm CLI Command Reference](https://helm.sh/docs/helm/) for a full list of supported Helm v3 command flags.
## Environment variables
Native Helm Deploy and Native Helm Rollback steps support setting environment variables.
Under **Optional Configuration** for the step, add any environment variables that you would like to set during the deployment.

## Deploy and review
Perform the following steps to deploy and review your pipeline:
1. Select **Save** to save your pipeline.
2. Select **Run**.
3. Select **Run Pipeline**.
Harness verifies the connections and then runs the Pipeline.
4. Toggle **Console View** to watch the deployment with more detailed logging.

5. Select the **Helm Deployment** step and expand **Wait for Steady State**.
{% hint style="info" %}
**Important**
Enable the feature flag `CDS_HELM_STEADY_STATE_CHECK_1_16_V2_NG` to enable steady state check for Native Helm deployments on Kubernetes clusters using 1.16 or higher. There is a behavior change in how Harness tracks managed workloads for rollback. Harness no longer uses ConfigMap to match the deployed resources' release name when tracking managed workloads for rollback, and instead uses `helm get manifest` to retrieve the workloads from a Helm release. For steady-state checks of the Kubernetes jobs, account, org, and project settings provide an option to configure this behavior, which is not enabled by default. Customers who did not have this feature flag enabled before may see that the Wait for steady state check is not skipped and does not need further configuration.
{% endhint %}
You can see `Status : quickstart-quickstart deployment "quickstart-quickstart" successfully rolled out.`
The deployment completed successfully.
In your project's **Deployments**, you can see the deployment listed.
## Spec requirements for steady state check and versioning
Harness requires that the `release` label be used in **every** Kubernetes spec to ensure that Harness can identify a release, check its steady state, and perform verification and rollback on it.
Ensure that the `release` label is in every Kubernetes object's manifest. If you omit the `release` label from a manifest, Harness cannot track it.
The [Helm built-in Release object](https://helm.sh/docs/chart_template_guide/builtin_objects/) describes the release and allows Harness to identify each release. For this reason, the `harness.io/release: {{ .Release.Name }}` label must be used in your Kubernetes spec.
The following examples show Service and Deployment objects:
```go
{{- if .Values.env.config}}
apiVersion: apps/v1
kind: Deployment
metadata:
name: {{ template "todolist.fullname" . }}
labels:
app: {{ template "todolist.name" . }}
chart: {{ template "todolist.chart" . }}
release: "{{ .Release.Name }}"
harness.io/release: {{ .Release.Name }}
heritage: {{ .Release.Service }}
spec:
replicas: {{ .Values.replicaCount }}
selector:
matchLabels:
app: {{ template "todolist.name" . }}
release: {{ .Release.Name }}
template:
metadata:
labels:
app: {{ template "todolist.name" . }}
release: {{ .Release.Name }}
harness.io/release: {{ .Release.Name }}
spec:
{{- if .Values.dockercfg}}
imagePullSecrets:
- name: {{.Values.name}}-dockercfg
{{- end}}
containers:
- name: {{ .Chart.Name }}
image: {{.Values.image}}
imagePullPolicy: {{ .Values.pullPolicy }}
{{- if or .Values.env.config .Values.env.secrets}}
envFrom:
{{- if .Values.env.config}}
- configMapRef:
name: {{.Values.name}}
{{- end}}
{{- if .Values.env.secrets}}
- secretRef:
name: {{.Values.name}}
{{- end}}
{{- end}}
...
apiVersion: v1
kind: Service
metadata:
name: {{ template "todolist.fullname" . }}
labels:
app: {{ template "todolist.name" . }}
chart: {{ template "todolist.chart" . }}
release: {{ .Release.Name }}
heritage: {{ .Release.Service }}
spec:
type: {{ .Values.service.type }}
ports:
- port: {{ .Values.service.port }}
targetPort: http
protocol: TCP
name: http
selector:
app: {{ template "todolist.name" . }}
release: {{ .Release.Name }}
```
The **Release name** setting in the stage **Infrastructure** is used as the Helm Release Name to identify and track the deployment per namespace:

### Autodetect Helm charts without configuring release names
When you want to deploy a commodity Helm Chart (ElasticSearch, Prometheus, etc.) or a pre-packaged Helm Chart, Harness automatically applies tracking labels to the deployed Helm service. You do not need to add `{{Release.Name}}` to your Helm Chart.
Harness is able to track the deployed Helm Chart in the Services dashboard. All chart information is also available to view in the Services dashboard.
This feature is available for delegate version 810xx and later. Ensure the delegate is up to date before opting into this feature.
## Deploy Helm charts with CRDs
Harness supports deploying Helm charts that include Custom Resource Definitions (CRDs) which may already exist outside the target namespace. This enhancement enables the use of the `helm upgrade --install` command to avoid common CRD-related installation errors.
{% hint style="info" %}
**Delegate version requirement**
Requires delegate version `856xx` or later.
{% endhint %}
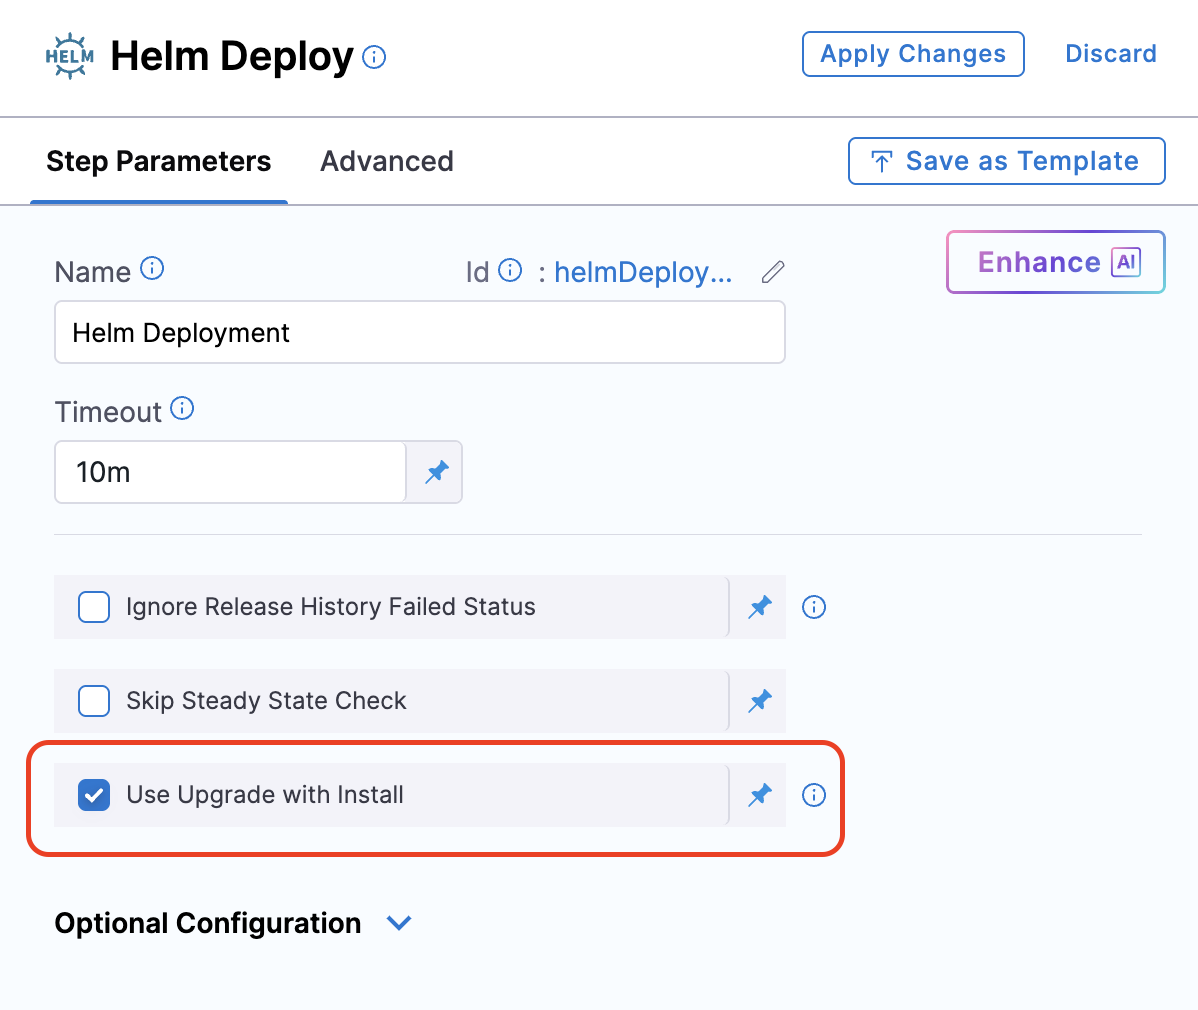
Once enabled, the Helm deployment step configuration includes a checkbox titled **Use Upgrade with Install** in the Helm deployment step configuration.
This option:
* Supports fixed values, runtime inputs, and expressions.
* Works with Helm v3.
* Continues to support custom CLI flags.
This checkbox is available for **Native Helm deployment steps**, including **Rolling Deploy**, **Canary**, and **Blue-Green** deployments.
## Native Helm considerations
Review the following considerations.
### Ignore release history failed status
By default, if the latest Helm release failed, Harness does not proceed with the install/upgrade and throws an error.
For example, consider a Pipeline that performs a Native Helm deployment and fails during execution while running `helm upgrade` because of a timeout error from an etcd server.
You might have several retries configured in the Pipeline, but all of them will fail when Harness runs a `helm history` in the prepare stage with the message: `there is an issue with latest release `.
Enable the **Ignore Release History Failed Status** option to have Harness ignore these errors and proceed with install/upgrade.

### Options for connecting to a Helm chart store
The options available to you to specify a Helm chart store depend on whether or not specific feature flags are enabled on your account. Options available without any feature flags or with specific feature flags enabled are described here:
* **Direct Connection**. Contains the OCI Helm Registry Connector option (shortened to **OCI Helm**), which you can use with any OCI-based registry.
* **Via Cloud Provider**. Contains connector options for AWS ECR and Google Artifact Registry (GAR). These connectors help you overcome authentication limitations specific to each registry: token expiry for ECR and credential management for GAR. The connector option uses cloud provider connectors and regenerates the required authentication token if the token has expired.
* For details on using different AWS authentication types (access key, delegate IAM, and IRSA), go to [Add an AWS connector](https://developer.harness.io/harness-platform/use-harness-platform/connectors/cloud-providers/add-aws-connector).
* For details on using Google Artifact Registry with GCP connectors (manual credentials or OIDC), go to [Add a Google Cloud Platform (GCP) connector](https://developer.harness.io/harness-platform/use-harness-platform/connectors/cloud-providers/connect-to-google-cloud-platform-gcp) and [Deploy Helm charts](/continuous-delivery/use-continuous-delivery/deploy-services-on-different-platforms/helm/deploy-helm-charts.md#manifest-details-for-ecr-and-google-artifact-registry).
{% hint style="info" %}
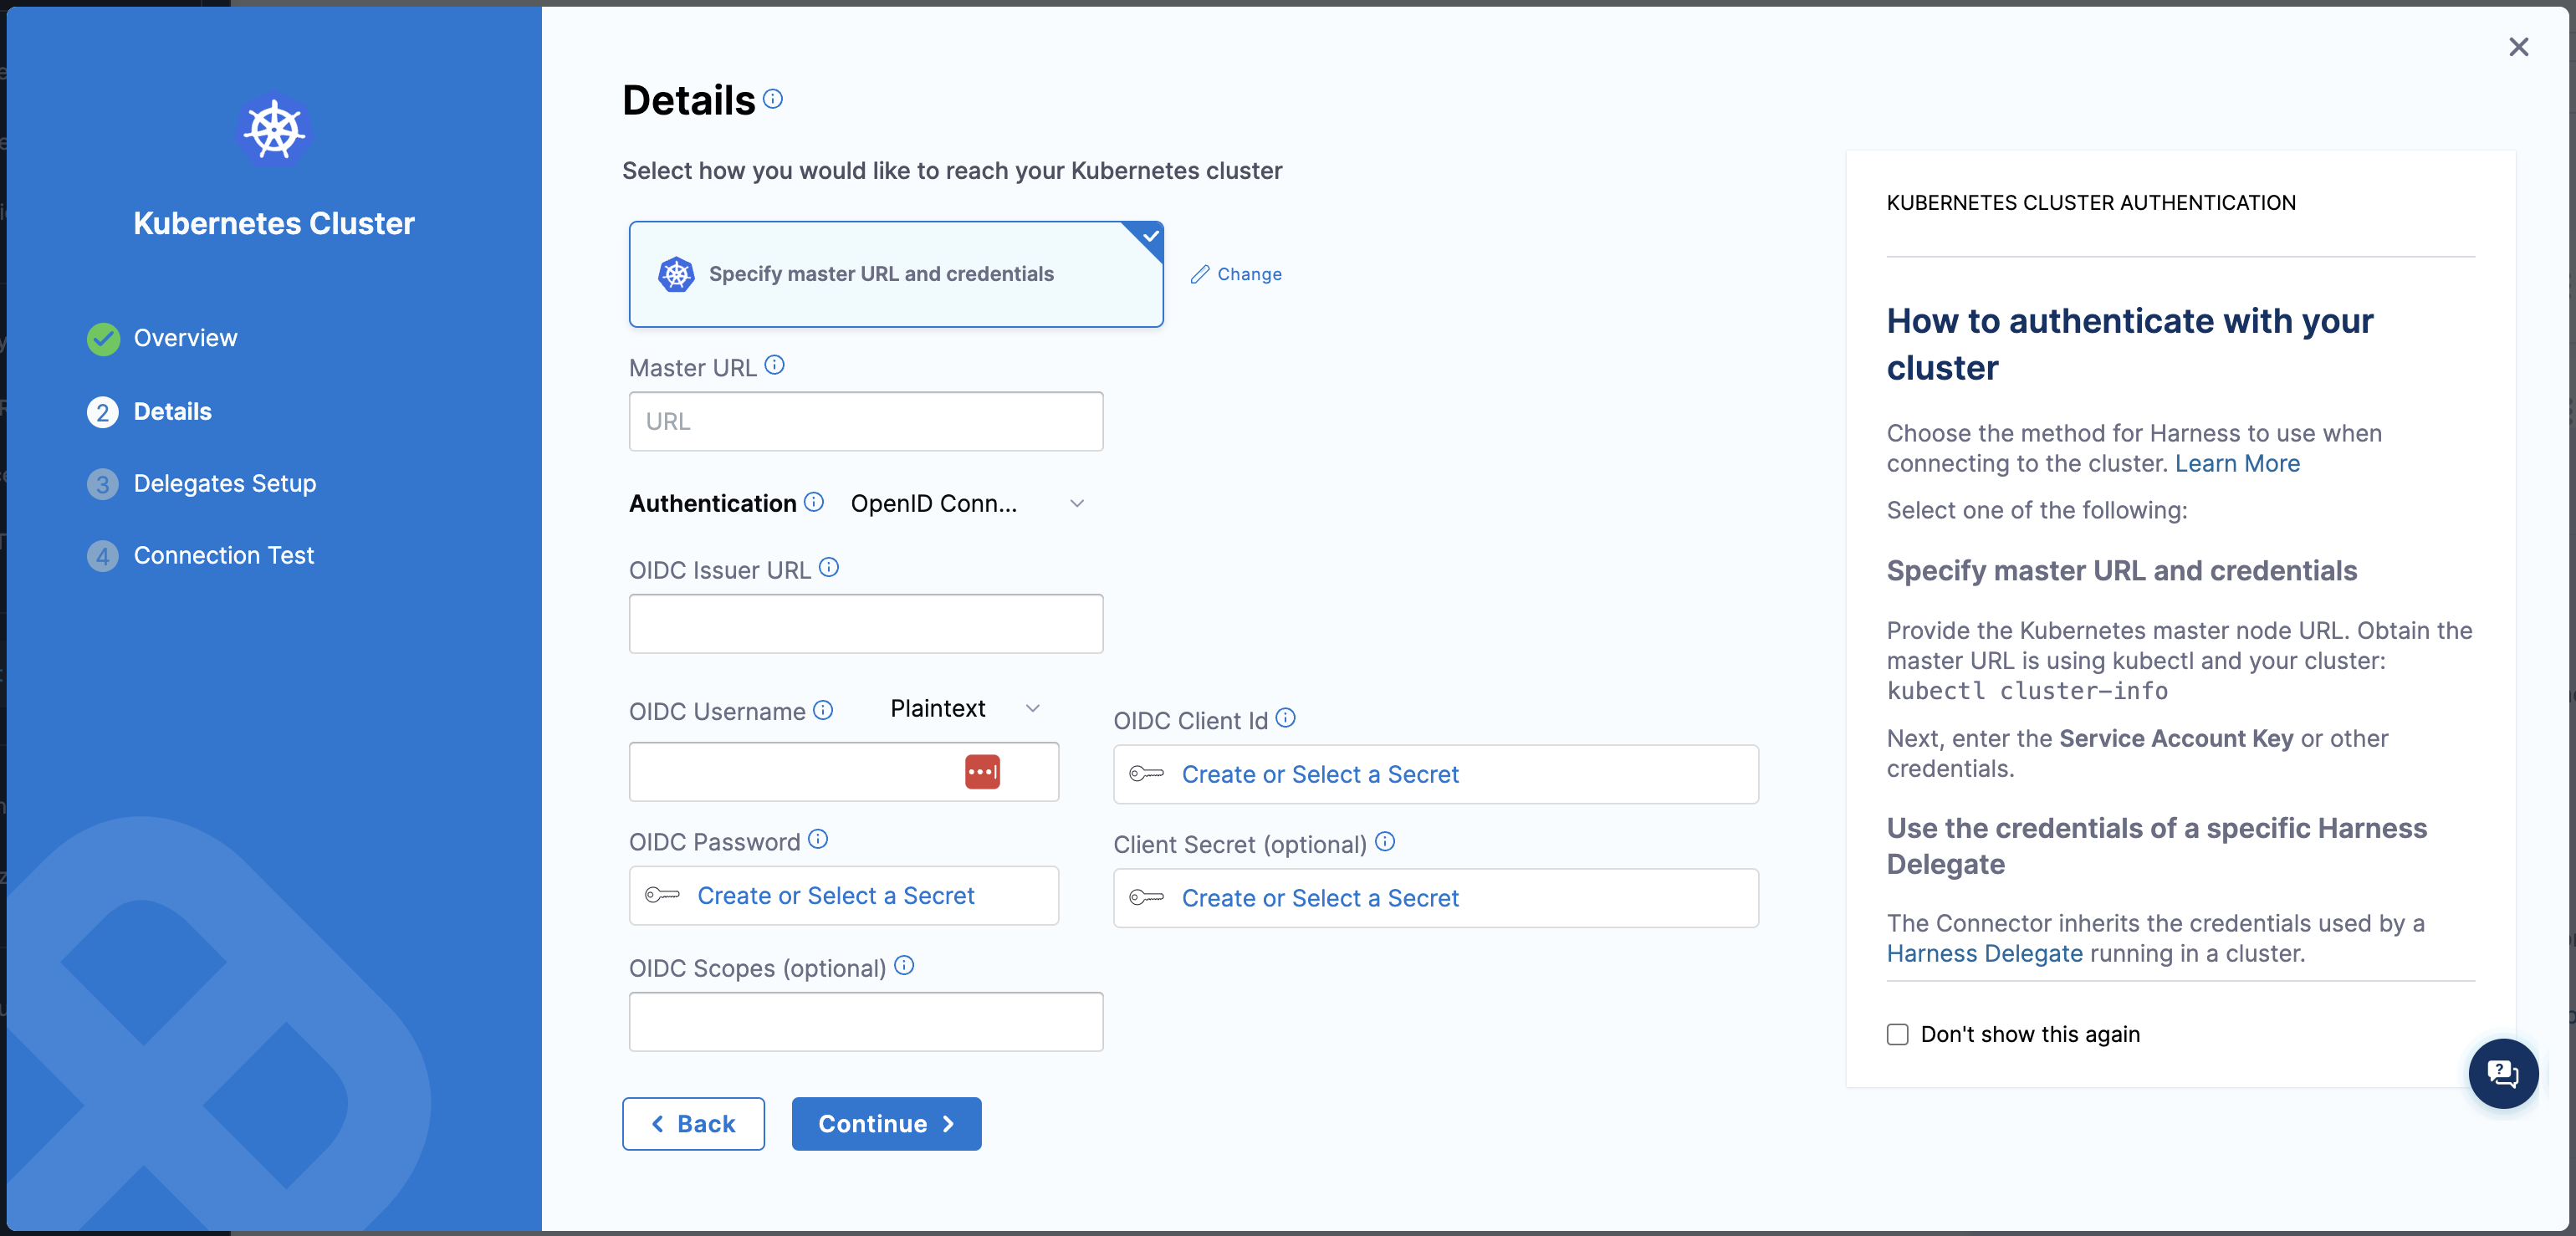
Native Helm supports OpenID Connect (OIDC) authentication, enabling integration with OIDC-compliant identity providers for enhanced security and user management.
To configure OIDC authentication in Kubernetes, do the following:
1. Go to account or project settings.
2. Select **New Connector**, and then select **Kubernetes cluster**.
3. In the **Details** tab, select **Specify master URL and credentials**.
4. Enter the Master URL.
5. In **Authentication**, select **OpenID Connect** and fill in the necessary details.
{% endhint %}
### Helm commands performance analysis
Harness interacts with helm charts and repositories by using various helm commands. When these commands are run in parallel along with a large helm repository, they can leave a significant CPU footprint on the Harness Delegate. The following is a summary of a few vulnerable helm commands which Harness uses:
1. `helm repo add`: Avoids redundant additions by checking if the repository already exists and employs locking to prevent conflicts during parallel deployments.
2. `helm repo update`: Asynchronously fetches index.yaml for all repos, unmarshals and sorts them. Parallel commands do not perform locking, but still manage to run without any failures.
3. `helm pull`: Involves pulling and locally dumping a chart, where it unmarshalls repository config, iterates through repositories, loads index.yaml file, and matches the requested chart entry for downloading.
**Harness improvements**
To improve performance of concurrent helm commands, 'N' parallel helm commands on the same helm repository will not always spawn an equivalent number of processes. This is achieved by trying to re-use the output from one command by other concurrent commands. This reduces both CPU and memory usage of the Harness Delegate, since concurrently running processes are reduced. These improvements are available from `81803` version of Harness Delegate.
**Harness certified limits**
Delegate used for benchmarking: 2 vCPUs, 8 GB memory K8s delegate (1 replica, version 81803)
| Index.yaml size | Concurrent deployments |
| --------------- | ---------------------- |
| 20 MB | 15 |
| 75 MB | 5 |
| 150 MB | 3 |
## Next steps
* [SOPS and values overrides in Native Helm service hooks](/continuous-delivery/use-continuous-delivery/deploy-services-on-different-platforms/helm/native-helm-sops-overrides-service-hooks.md): decrypt or add Helm values overrides in service hooks when using the `CDS_HELM_IMPROVED_SOPS_SUPPORT_FOR_SERVICE_HOOKS` feature flag.
* [Kubernetes How-tos](/continuous-delivery/use-continuous-delivery/deploy-services-on-different-platforms/kubernetes.md): other deployment features for Kubernetes.
{% @harness-feedback/feedback %}
 {% endhint %}
### Helm commands performance analysis
Harness interacts with helm charts and repositories by using various helm commands. When these commands are run in parallel along with a large helm repository, they can leave a significant CPU footprint on the Harness Delegate. The following is a summary of a few vulnerable helm commands which Harness uses:
1. `helm repo add`: Avoids redundant additions by checking if the repository already exists and employs locking to prevent conflicts during parallel deployments.
2. `helm repo update`: Asynchronously fetches index.yaml for all repos, unmarshals and sorts them. Parallel commands do not perform locking, but still manage to run without any failures.
3. `helm pull`: Involves pulling and locally dumping a chart, where it unmarshalls repository config, iterates through repositories, loads index.yaml file, and matches the requested chart entry for downloading.
**Harness improvements**
To improve performance of concurrent helm commands, 'N' parallel helm commands on the same helm repository will not always spawn an equivalent number of processes. This is achieved by trying to re-use the output from one command by other concurrent commands. This reduces both CPU and memory usage of the Harness Delegate, since concurrently running processes are reduced. These improvements are available from `81803` version of Harness Delegate.
**Harness certified limits**
Delegate used for benchmarking: 2 vCPUs, 8 GB memory K8s delegate (1 replica, version 81803)
| Index.yaml size | Concurrent deployments |
| --------------- | ---------------------- |
| 20 MB | 15 |
| 75 MB | 5 |
| 150 MB | 3 |
## Next steps
* [SOPS and values overrides in Native Helm service hooks](/continuous-delivery/use-continuous-delivery/deploy-services-on-different-platforms/helm/native-helm-sops-overrides-service-hooks.md): decrypt or add Helm values overrides in service hooks when using the `CDS_HELM_IMPROVED_SOPS_SUPPORT_FOR_SERVICE_HOOKS` feature flag.
* [Kubernetes How-tos](/continuous-delivery/use-continuous-delivery/deploy-services-on-different-platforms/kubernetes.md): other deployment features for Kubernetes.
{% @harness-feedback/feedback %}
{% endhint %}
### Helm commands performance analysis
Harness interacts with helm charts and repositories by using various helm commands. When these commands are run in parallel along with a large helm repository, they can leave a significant CPU footprint on the Harness Delegate. The following is a summary of a few vulnerable helm commands which Harness uses:
1. `helm repo add`: Avoids redundant additions by checking if the repository already exists and employs locking to prevent conflicts during parallel deployments.
2. `helm repo update`: Asynchronously fetches index.yaml for all repos, unmarshals and sorts them. Parallel commands do not perform locking, but still manage to run without any failures.
3. `helm pull`: Involves pulling and locally dumping a chart, where it unmarshalls repository config, iterates through repositories, loads index.yaml file, and matches the requested chart entry for downloading.
**Harness improvements**
To improve performance of concurrent helm commands, 'N' parallel helm commands on the same helm repository will not always spawn an equivalent number of processes. This is achieved by trying to re-use the output from one command by other concurrent commands. This reduces both CPU and memory usage of the Harness Delegate, since concurrently running processes are reduced. These improvements are available from `81803` version of Harness Delegate.
**Harness certified limits**
Delegate used for benchmarking: 2 vCPUs, 8 GB memory K8s delegate (1 replica, version 81803)
| Index.yaml size | Concurrent deployments |
| --------------- | ---------------------- |
| 20 MB | 15 |
| 75 MB | 5 |
| 150 MB | 3 |
## Next steps
* [SOPS and values overrides in Native Helm service hooks](/continuous-delivery/use-continuous-delivery/deploy-services-on-different-platforms/helm/native-helm-sops-overrides-service-hooks.md): decrypt or add Helm values overrides in service hooks when using the `CDS_HELM_IMPROVED_SOPS_SUPPORT_FOR_SERVICE_HOOKS` feature flag.
* [Kubernetes How-tos](/continuous-delivery/use-continuous-delivery/deploy-services-on-different-platforms/kubernetes.md): other deployment features for Kubernetes.
{% @harness-feedback/feedback %}