For the complete documentation index, see llms.txt. This page is also available as Markdown.

Kubernetes infrastructure

Specify the Kubernetes cluster you want to target for your deployment.

When you set up a Deploy stage, you specify the Kubernetes cluster and namespace where you want to deploy your service. In Harness, this is called the Infrastructure Definition.

A Harness Infrastructure Definition includes specific infrastructure details for the deployment, such as the Harness connector that provides credentials for the cluster and the cluster namespace.

The Infrastructure Definition can point to a pre-existing cluster and namespace or Harness can dynamically provision the namespace using your provisioning scripts/templates. You must use an existing cluster in either use case.

This topic explains how to set up the Infrastructure Definition for your deployments.

For Amazon Elastic Kubernetes Service (Amazon EKS) and OpenShift, use Specify a Vendor Agnostic Kubernetes Cluster.

Important notes

  • When using names in Harness Kubernetes stages, remember that Kubernetes service and pod names follow RFC-1035 and must consist of lowercase alphanumeric characters or '-', start with an alphabetic character, and end with an alphanumeric character.

Harness role permissions required

The following Harness role is required:

  • Environments: View/Create, Edit, Access, Delete.

For more information on roles, go to Add and manage roles.

Pre-existing and dynamically provisioned infrastructure

There are two methods of specifying the deployment target infrastructure:

  • Pre-existing: the target infrastructure already exists and you simply need to provide the required settings.

  • Dynamically provisioned: the target infrastructure will be dynamically provisioned on-the-fly as part of the deployment process.

These methods are described below.

For details on Harness provisioning, go to Provisioning overview.

Pre-existing infrastructure

For a pre-existing infrastructure, you provide Harness with the target cluster and namespace for the deployment.

First, you select/add a Harness environment, then you add an Infrastructure Definition to that environment and define a connection method to connect Harness to your target platform.

To define the target infrastructure, do the following:

  1. In your Harness project, in Deploy, select Environments.

  2. Select an existing environment or select New Environment, name the new environment, and select whether it is a production or pre-production environment.

  3. In the environment, select Infrastructure Definitions.

  4. Select Infrastructure Definition to add a new infrastructure definition.

  5. Enter a name for the new infrastructure definition.

  6. In Deployment Type, select Kubernetes.

  7. Next, select the connection method you want to use.

Each of the connection methods are described below.

Direct

This method avoids vendor-specific settings. A direct connection is a vendor-agnostic connection to the Kubernetes cluster.

A direct connection uses a Harness Kubernetes cluster connector to connect a cluster on any platform.

For details on using OpenShift, go to Using OpenShift with Harness Kubernetes.

Enter the following settings.

To add an Infrastructure Definition with the Direct connection method, do the following:

  1. In your Harness project, select Environments.

  2. Select or create an environment.

  3. In the environment, select Infrastructure Definitions.

  4. Select Infrastructure Definition to create the new infrastructure definition.

  5. Enter a name for the infrastructure definition.

  6. In Deployment Type, select Kubernetes.

  7. In Select Infrastructure Type, select Direct Connection.

  8. In Cluster Details, select or add a Harness Kubernetes Cluster connector.

  9. In Namespace, enter the name of an existing namespace where you want to deploy your service.

  10. Select Save.

Here is the YAML for the Harness Kubernetes Cluster connector used in the Infrastructure Definition.

The InheritFromDelegate credential is used in this example. This credential is used when a Harness Delegate is running inside the target cluster.

Here is the YAML for an Infrastructure Definition.

Use the Harness createInfrastructure API.

Use the harness_platform_infrastructure resource to create the infrastructure definition.


Google Kubernetes Engine (GKE)

  • GCP Workload Identity: if you installed the Harness Kubernetes Delegate in a GCP Kubernetes cluster (GKE) that has GCP Workload Identity enabled, the GCP Connector will use the GCP Workload Identity if it inherits its credentials from that Delegate (using the Use the credentials of a specific Harness Delegate option).

To add an Infrastructure Definition with the GKE connection method, do the following:

  1. In your Harness project, select Environments.

  2. Select or create an environment.

  3. In the environment, select Infrastructure Definitions.

  4. Select Infrastructure Definition to create the new infrastructure definition.

  5. Enter a name for the infrastructure definition.

  6. In Deployment Type, select Kubernetes.

  7. In Select Infrastructure Type, select Google Kubernetes Engine.

  8. In Cluster Details, select or add a Harness GCP connector.

  9. In Cluster, select or enter the name of the target cluster.

  10. In Namespace, enter the name of an existing namespace where you want to deploy your service.

  11. Select Save.

Enable Cross-Project Access

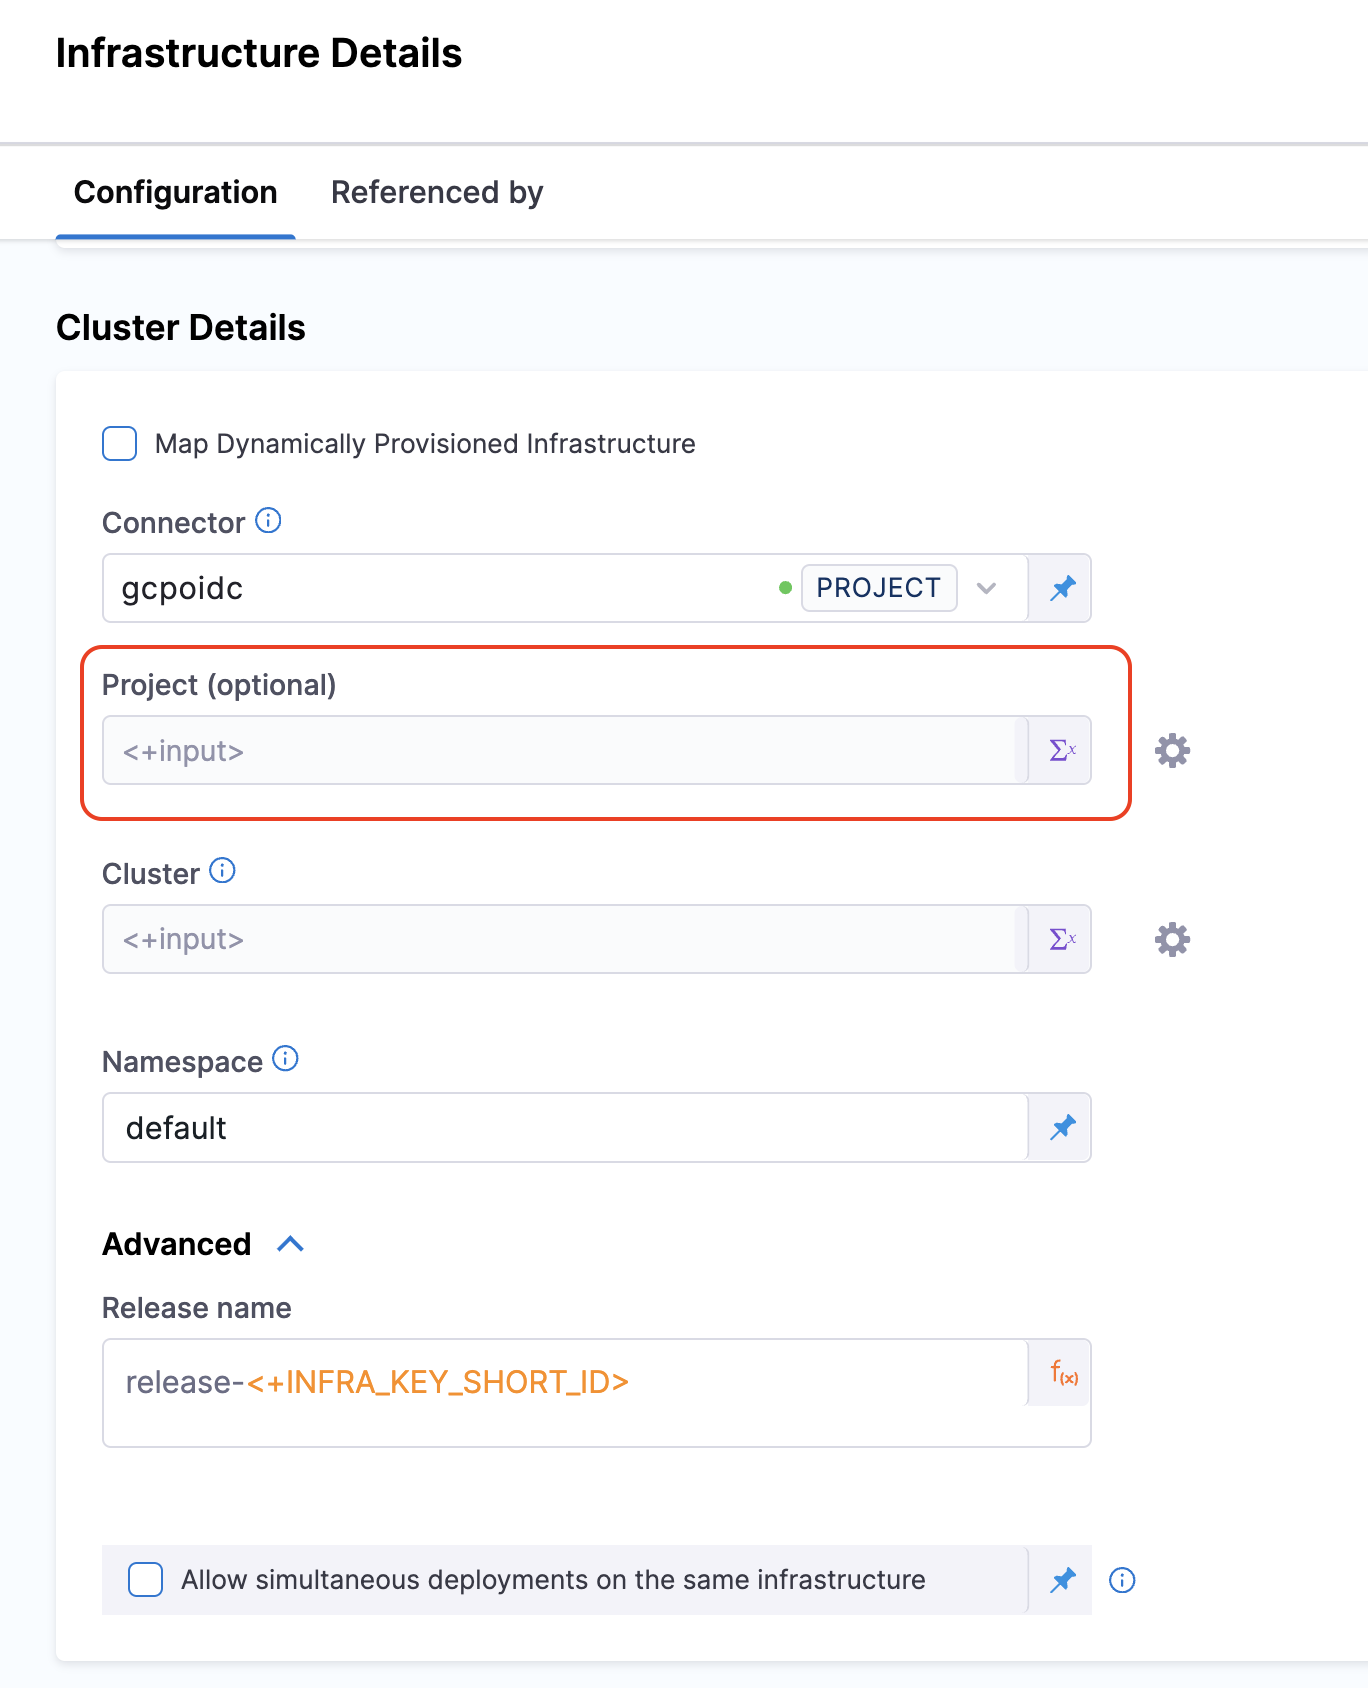
You can now have one connector scoped to multiple GCP projects, eliminating the need to create separate connectors for each project. With this feature, the connector will allow access to multiple GCP projects.

For more information on GCP OIDC connector configuration, refer GCP OIDC Connector Settings.

You will have the option to select the Project in the Cluster details in the Infrastructure configuration.

Project is an optional field.

  • If the project is selected, in the Cluster dropdown, only the clusters associated with the selected project will be listed.

  • If the project field is left blank, the Cluster dropdown will list all the clusters associated with the Project Number configured at the Connector Level.

    Click to view full size image

Here is the YAML for the GCP connector used in the Infrastructure Definition.

Here is the YAML for a GKE Infrastructure Definition. In this example, the cluster parameter is set as a runtime input so you can select the cluster to use when you deploy.

Here is the YAML for a GKE Infrastructure Definition with Cross-Project Access. In this example, the Project field is an additional configuration option.

Use the Harness createInfrastructure API.

Use the harness_platform_infrastructure resource to create the infrastructure definition.


Microsoft Azure Kubernetes Service (AKS)

To add an Infrastructure Definition with the AKS connection method, do the following:

  1. In your Harness project, select Environments.

  2. Select or create an environment.

  3. In the environment, select Infrastructure Definitions.

  4. Select Infrastructure Definition to create the new infrastructure definition.

  5. Enter a name for the infrastructure definition.

  6. In Deployment Type, select Kubernetes.

  7. In Select Infrastructure Type, select Microsoft Azure.

  8. In Subscription Id, select or add a subscription Id for the subscription you want to use.

  9. In Resource Group, select or add the resource group to use.

  10. In Cluster, select or enter the name of the target cluster.

  11. In Namespace, enter the name of an existing namespace where you want to deploy your service.

  12. Select Save.

Here is the YAML for a AKS Infrastructure Definition. In this example, AKS parameters are set as runtime inputs so you can select the cluster to use when you deploy.

Use the Harness createInfrastructure API.

Use the harness_platform_infrastructure resource to create the infrastructure definition.


AWS Elastic Kubernetes Service (EKS)

To add an Infrastructure Definition with the EKS connection method, do the following:

  1. In your Harness project, select Environments.

  2. Select or create an environment.

  3. In the environment, select Infrastructure Definitions.

  4. Select Infrastructure Definition to create the new infrastructure definition.

  5. Enter a name for the infrastructure definition.

  6. In Deployment Type, select Kubernetes.

  7. In Select Infrastructure Type, select Elastic Kubernetes Service.

  8. In Connector, select your AWS connector.

  9. In Cluster, select or enter the name of the target cluster.

  10. In Namespace, enter the name of an existing namespace where you want to deploy your service.

  11. Select Save.

If these connection settings don't work for your setup, try using Manual Configuration. To do so, enable the feature flag CDS_AWS_EKS_CLUSTER_MANUAL_CONFIGURATION by contacting Harness Support.

Once enabled, do the following:

  1. Above Cluster, check the checkbox labeled Manual Configuration. This reveals new options.

  2. In Endpoint, select your cluster endpoint.

  3. In CA Certification Data, select the certificate associated with your cluster, if you have one.

  4. Select your Cluster and Namespace as described above.

This manual configuration will only work for EKS cluster and not for any other Kubernetes cluster.

Here is the YAML for an EKS Infrastructure Definition.

Use the Harness createInfrastructure API.

Use the harness_platform_infrastructure resource to create the infrastructure definition.

EKS Execution Authentication Token Refresh

By default, AWS EKS issues an authentication token with a 15-minute time-to-live. Long-running API calls will fail once this token expires because the aws-iam-authenticator does not automatically refresh it. For more info, refer kubernetes-client/java/issues/2438

  • What it does Checks the token’s expiration timestamp in the ExecCredential response and automatically refreshes the token.

  • Why it matters Prevents unexpected failures on long-running Kubernetes executions against EKS clusters.

With this flag enabled, your EKS-based workflows will seamlessly refresh expired tokens and continue without interruption.


Rancher

Harness supports the ability to perform Kubernetes deployments into Rancher-managed Kubernetes clusters.

You can use Harness Kubernetes and Native Helm deployment types to deploy into Rancher-managed clusters.

This documentation assumes you are familiar with Rancher, have a Rancher account, and have set up Kubernetes clusters in its UI. If you are new to Rancher, go to Setting up Kubernetes Clusters in Rancher from Rancher.

Here's a short video that demonstrates Harness Rancher integration:

To use Rancher with Harness, you set up a Harness Rancher connector. Next, you set up a Rancher infrastructure definition in a Harness environment. Lastly, you select that infrastructure definition in the Harness pipeline stage that is deploying to the Rancher cluster.

To set up a Harness Rancher connector you need:

  • The URL of the Rancher endpoint.

    • This is the domain name you use to connect to Rancher, such as https://rancher-internal.dev.mycompany.io. Make sure to include the URL scheme.

  • The bearer token for the Rancher account to use.

    • The Rancher bearer token you use must be able to use the /v3/clusters/{clusterName}?action=generateKubeconfig and /v3/clusters APIs. The Rancher user account you use to generate the token must have the Rancher Cluster Owner role or a Global Permission that enables cluster administration. Go to Cluster and Project Roles and Global Permissions from Rancher.

    • For steps on creating a bear token, go to API Keys from Rancher.

    • When you create the token, you can scope it to specific clusters. A scope will limit the API key so that it will only work against the Kubernetes API of the specified clusters. If you scope the bearer token to specific clusters, Harness will only be able to query and target that list of clusters when deploying.

    • If you set an expiration period for the token, make sure that its expiration date will not impact your Harness deployments.

To create the Harness Rancher connector, do the following:

  1. In your Harness project, select Connectors.

  2. Select New Connector, and then select Rancher cluster.

  3. In Rancher Connector Details, enter a name for the connector, and then select Continue. You will select this name when you select a connector in the infrastructure definition.

  4. In Details, select Specify rancher URL and credentials.

  5. In Rancher URL, enter the URL to the Rancher server.

  6. In Authentication, select Bearer Token, and select or add a Harness secret containing the token.

  7. Select Continue.

  8. In Delegates Setup, select or add a Harness Delegate to use when performing this connection, or let Harness select the delegate.

  9. Select Continue.

To add an Infrastructure Definition with the Rancher connection method, do the following:

  1. In your Harness project, select Environments.

  2. Select or create an environment.

  3. In the environment, select Infrastructure Definitions.

  4. Select Infrastructure Definition to create the new infrastructure definition.

  5. Enter a name for the infrastructure definition.

  6. In Deployment Type, select Kubernetes.

  7. In Select Infrastructure Type, select Rancher.

  8. In Cluster Details, select or add a Harness Rancher connector.

  9. In Cluster, select or enter the name of the target cluster.

  10. In Namespace, enter the name of an existing namespace where you want to deploy your service.

  11. Select Save.

Here is the YAML for the Rancher connector used in the Infrastructure Definition.

Here is the YAML for a Rancher Infrastructure Definition. In this example, cluster and namespace are set as runtime inputs so you can select the cluster and namespace to use when you deploy.

Use the Harness createInfrastructure API.

Use the harness_platform_infrastructure resource to create the Infrastructure Definition.


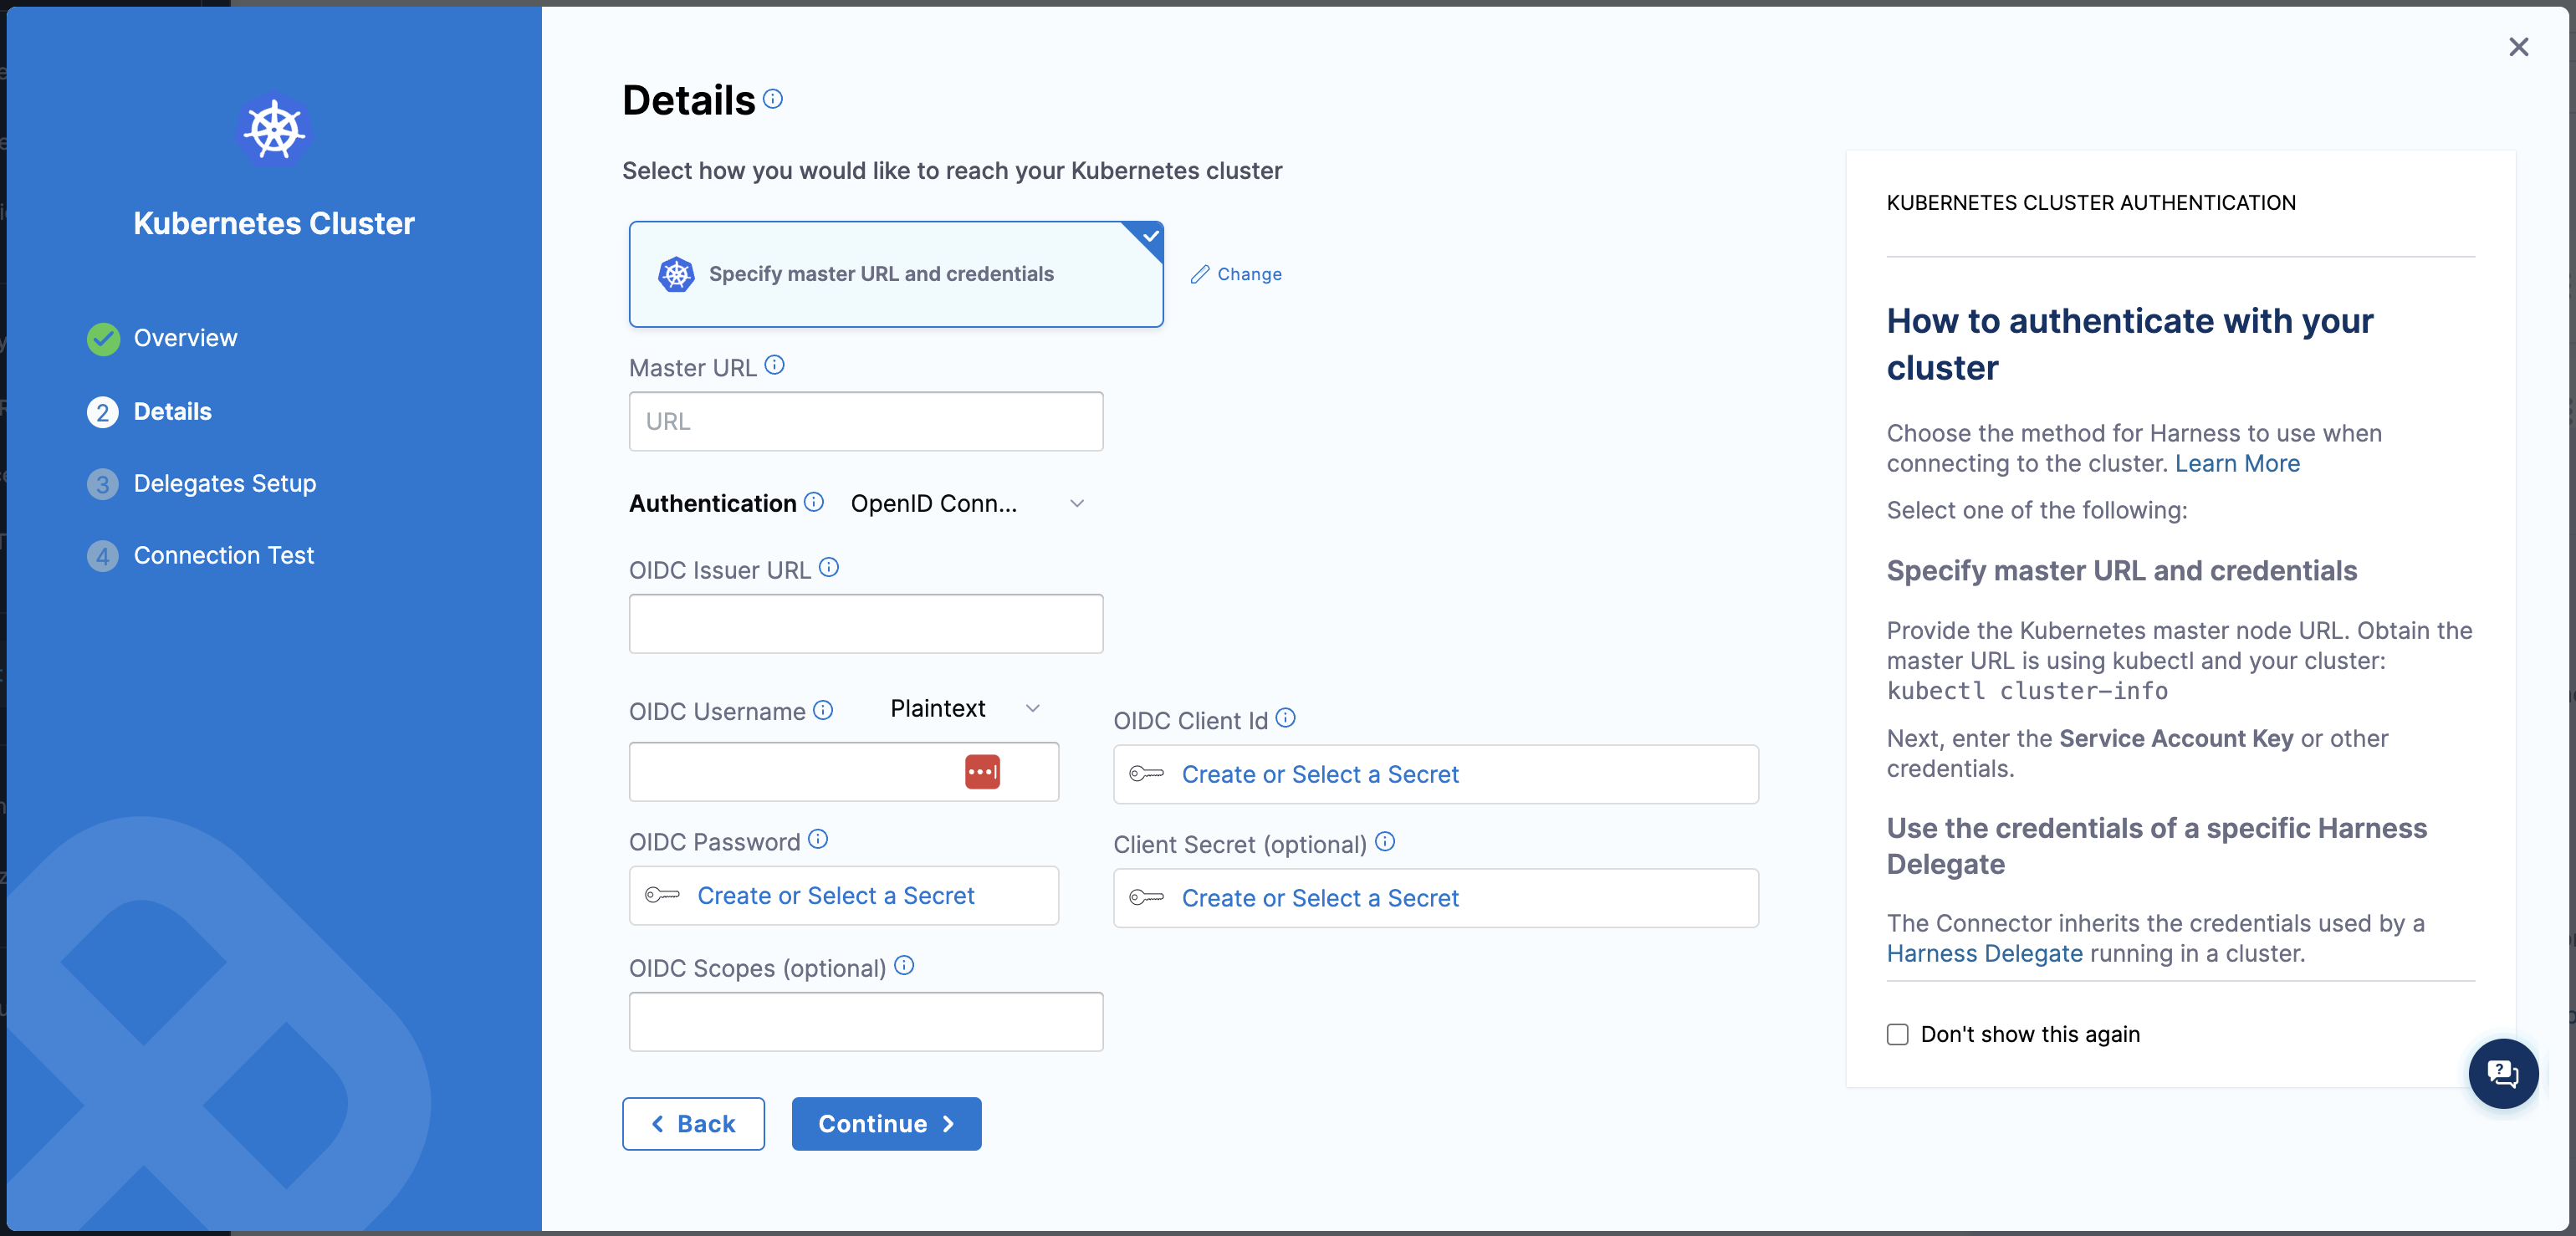
We now support OpenID Connect (OIDC) authentication in Kubernetes, enabling seamless integration with OIDC-compliant identity providers for enhanced security and user management.

To configure OIDC authentication in Kubernetes, navigate to account/project settings.

Select New Connector, select Kubernetes cluster

In the details tab, select Specify master URL and credentials

Enter the Master URL

In the Authentication, select OpenID Connect and fill in the necessary details.

Dynamically provisioned infrastructure

Here is a summary of the steps to dynamically provision the target infrastructure for a deployment:

  1. Add dynamic provisioning to the CD stage:

    1. In a Harness Deploy stage, in Environment, enable the option Provision your target infrastructure dynamically during the execution of your Pipeline.

    2. Select the type of provisioner that you want to use.
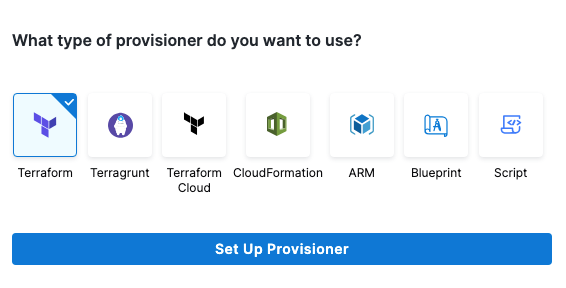
    Harness automatically adds the provisioner steps for the provisioner type you selected. 3. Configure the provisioner steps to run your provisioning scripts. 4. Select or create a Harness infrastructure in Environment.

  2. Map the provisioner outputs to the Infrastructure Definition:

    1. In the Harness infrastructure, enable the option Map Dynamically Provisioned Infrastructure.

    2. Map the provisioning script/template outputs to the required infrastructure settings.

These steps are explained in detail below.

Adding dynamic provisioning to the stage

To add dynamic provisioning to a Harness pipeline Deploy stage, do the following:

  1. In a Harness Deploy stage, in Environment, enable the option Provision your target infrastructure dynamically during the execution of your Pipeline.

  2. Select the type of provisioner that you want to use.

    Click to view full size image
    Harness automatically adds the necessary provisioner steps.

  3. Set up the provisioner steps to run your provisioning scripts.

For documentation on each of the required steps for the provisioner you selected, go to the following topics:

Mapping provisioner output

Once you set up dynamic provisioning in the stage, you must map outputs from your provisioning script/template to specific settings in the Harness Infrastructure Definition used in the stage.

  1. In the same CD Deploy stage where you enabled dynamic provisioning, select or create (New Infrastructure) a Harness infrastructure.

  2. In the Harness infrastructure, in Cluster Details, enable the option Map Dynamically Provisioned Infrastructure.

    The Cluster Details section adds a Provisioner setting and configures it as a runtime input.

  3. Map the provisioning script/template outputs to the required infrastructure settings.

To provision the target deployment infrastructure, Harness needs specific infrastructure information from your provisioning script. You provide this information by mapping specific Infrastructure Definition settings in Harness to outputs from your script.

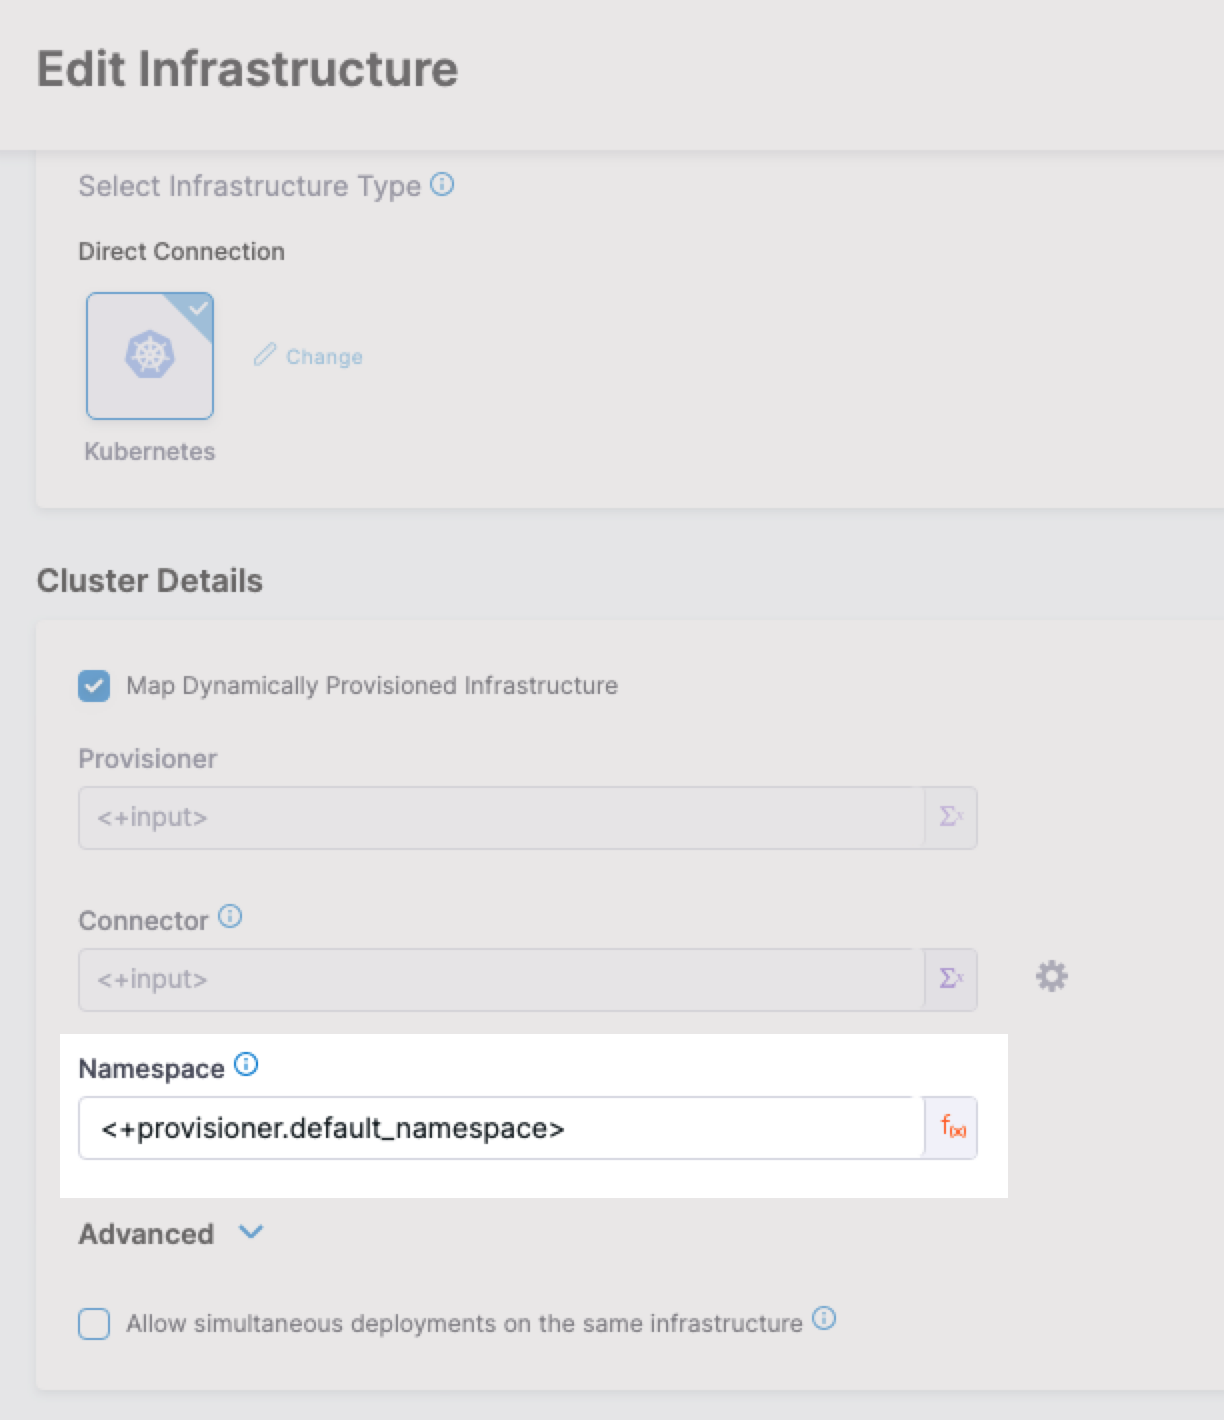
For example, for the Kubernetes direct connection Infrastructure Definition, Harness needs the name of the namespace to provision. In your script, you must add an output for that name. For example, see the default_namespace output in this Terraform script excerpt:

In the Harness Infrastructure Definition, you map that output to the Namespace setting using an expression in the format <+provisioner.OUTPUT_NAME>, such as <+provisioner.default_namespace>.

Click to view full size image

Mapping requirements for connection methods

The following table shows the Infrastructure Definition settings that are mapped to provisioner outputs for each connection method.

Infra type

Infra settings that require mapping

Direct

Namespace, Release Name (optional)

GCP

Namespace, Cluster, Release Name (optional)

Azure

Namespace, Cluster

AWS

Namespace, Cluster, Release Name (optional)

Rancher

Namespace, Cluster, Release Name (optional)

Here are examples for each connection method:

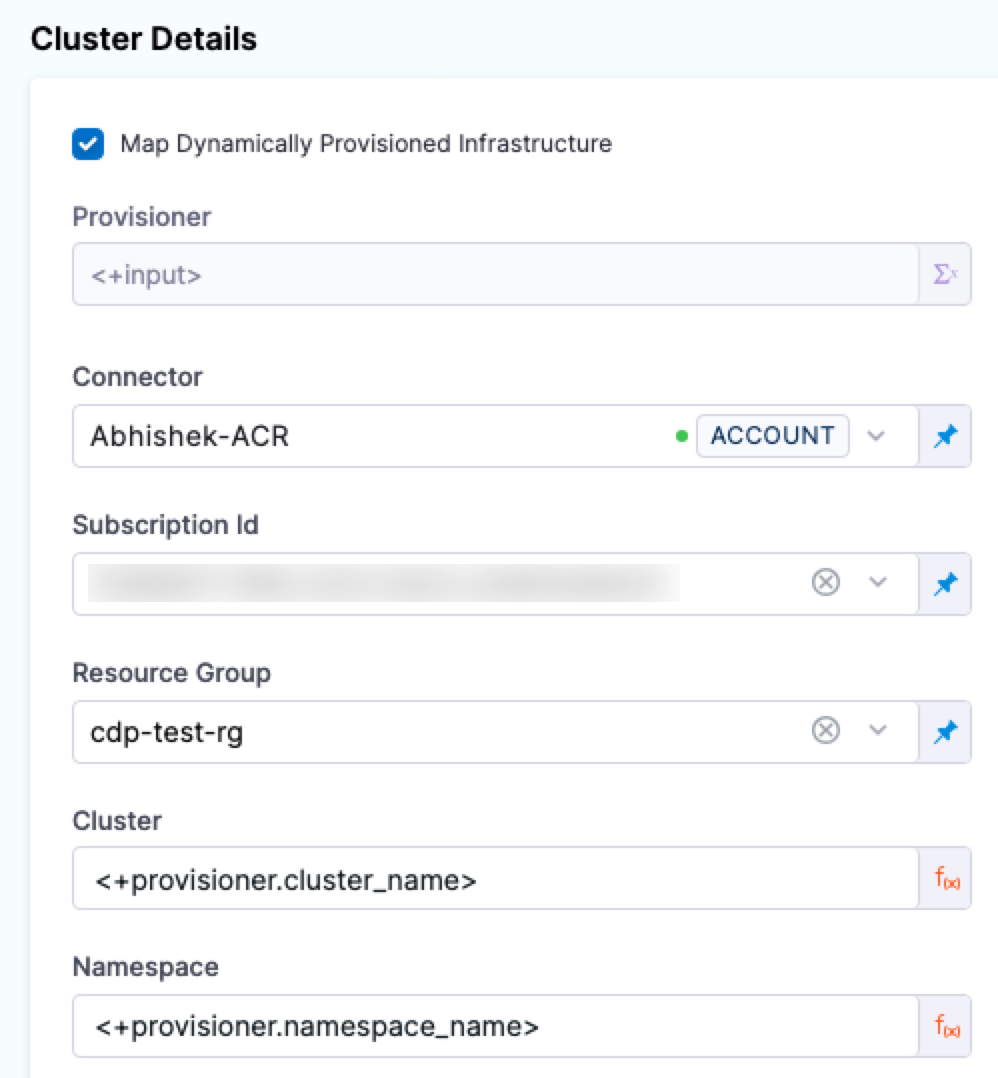
Here's an example of a dynamic provisioning script using Terraform and how to map its namespace output to the required Harness Infrastructure Definition settings for the connection method.

Terraform provisioner example

Here is what the mapping looks like in the Harness Infrastructure Definition:

picture 2

Here's an example of a dynamic provisioning script using Terraform and how to map its namespace output to the required Harness Infrastructure Definition settings for the connection method.

Terraform provisioner example

Here is what the mapping looks like in the Harness Infrastructure Definition:

picture 3

Here's an example of a dynamic provisioning script using Terraform and how to map its namespace output to the required Harness Infrastructure Definition settings for the connection method.

Terraform provisioner example

Here is what the mapping looks like in the Harness Infrastructure Definition:

Click to view full size image

Here's an example of a dynamic provisioning script using Terraform and how to map its namespace output to the required Harness Infrastructure Definition settings for the connection method.

Terraform provisioner example

Here is what the mapping looks like in the Harness Infrastructure Definition:

picture 5

Here is what the mapping looks like in the Harness Infrastructure Definition:

picture 6

Namespaces

You can use the value of the Infrastructure Definition Namespace setting in your manifest.

You reference the Namespace setting value in your values YAML using the Harness expression: <+infra.namespace>.

For example, if you entered default in Namespace, in your values.yaml you can use:

And then in the Namespace object manifest (and any object manifest that uses the namespace) you reference the values.yaml value for namespace:

Now your values YAML and manifest are templated for use with any stage.

For more information about manifests in Harness, see Add Kubernetes Manifests.

If you omit the namespace key and value from a manifest in your Service Definition, Harness automatically uses the namespace you entered in the Harness Environment Infrastructure Definition settings Namespace field.

Enforcing Namespace Consistency

Kubernetes deployments in Harness give you more built-in control when it comes to namespace consistency. If used correctly, you can prevent users from deploying resources into namespaces other than the one defined in the Infrastructure.

This feature requires delegate version 856xx or later. :::

To enable this setting, go to: Account / Org / Project SettingsDefault Settings Under the Continuous Delivery section, set the value to True for: Enable Namespace validation from different sources with infrastructure level namespace

How it's handled

Fortunately, Harness offers a way to enforce namespace checks—but it requires a bit of setup.

If you configure the namespace explicitly in the deployment step (e.g., in a Rollout or Apply step), and this namespace conflicts with the one hardcoded in the manifest, Harness will fail the deployment. This acts as a validation layer.

In other words:

  • You define the namespace in the Infra: team-infra

  • Someone hardcodes rogue-namespace in their manifest

  • You override the namespace again in the step: team-infra

  • Harness catches the mismatch and blocks the deployment

Release Name

The Release name setting is located in Advanced section of the Cluster Details in the Infrastructure Definition. You do not need to edit it.

During deployment Harness creates a ConfigMap listing the resources of the release and uses the Release name for tracking them.

The Release name is a combination of release- and a unique string created using the Harness expression <+INFRA_KEY_SHORT_ID>.

For example, in a Kubernetes deployment you can see harness.io/release-name=release-2f9eadcc06e2c2225265ab3cbb1160bc5eacfd4f.

In Harness, the Release Name is displayed in the logs of the deployment step:

The release name must be unique across the cluster. release-<+INFRA_KEY_SHORT_ID> ensures a unique name.

release- is used as a prefix because Kubernetes service and pod names must follow RFC-1035 and must consist of lowercase alphanumeric characters or '-', start with an alphabetic character, and end with an alphanumeric character.

For more information on INFRA_KEY and INFRA_KEY_SHORT_ID please navigate to our variables page

See Kubernetes Releases and Versioning.

Last updated

Was this helpful?