> For the complete documentation index, see [llms.txt](https://developer.harness.io/llms.txt). Markdown versions of documentation pages are available by appending `.md` to page URLs; this page is available as [Markdown](https://developer.harness.io/continuous-delivery/use-continuous-delivery/deploy-services-on-different-platforms/kubernetes/kubernetes-services.md).
# Harness Kubernetes services
Define a Kubernetes service.
This topic describes how to add and configure a Harness Kubernetes service.
A Kubernetes service represents the microservices and other workloads you want to deploy to the cluster.
Setting up a Kubernetes service involves the following steps:
1. Add your manifests.
2. Add the artifacts you want to deploy.
3. Add any service variables you want to use in your manifests or pipeline.
## What you will learn from this topic
* How to add and configure Kubernetes manifests in a Harness service, including standard manifests, Helm charts, Kustomize, and OpenShift templates
* How to specify artifact sources (Docker registry, ECR, GCR, ACR, and more) in a Kubernetes service
* How to define and reference service variables in manifests and pipeline expressions
## Manifests
Harness supports the following manifest types and orchestration methods.
Go to [Add Kubernetes manifests](/continuous-delivery/use-continuous-delivery/deploy-services-on-different-platforms/kubernetes/cd-kubernetes-category/define-kubernetes-manifests.md) to review how Harness uses Kubernetes manifests.
### Kubernetes Use Kubernetes manifests
You can use:
* Standard Kubernetes manifests hosted in any repo or in Harness.
* Values YAML files that use Go templating to template manifests.
* Values YAML files can use a mix of hardcoded values and Harness expressions.
The following is a YAML example for a service with manifests hosted in GitHub and the nginx image hosted in Docker Hub. You can create the service using the [Create Services](https://apidocs.harness.io/tag/Services#operation/createServicesV2) API, or use the Terraform Provider resource `harness_platform_service`.
To add Kubernetes manifests to your service, do the following:
1. In your project, in **CD (Deployments)**, select **Services**.
2. Select **Manage Services**, and then select **New Service**.
3. Enter a name for the service and select **Save**.
4. Select **Configuration**.
5. In **Service Definition**, select **Kubernetes**.
6. In **Manifests**, click **Add Manifest**.
7. In **Specify Manifest Type**, select **K8s Manifest**, and then click **Continue**.
8. In **Specify K8s Manifest Store**, select the Git provider. The settings for each Git provider are slightly different, but you want to point to the Git account. For example, click **GitHub**, and then select or create a new GitHub Connector. Go to [Connect to Code Repo](https://developer.harness.io/docs/platform/connectors/code-repositories/connect-to-code-repo) to review connector setup.
9. Click **Continue**. **Manifest Details** appears.
10. In **Manifest Identifier**, enter an ID for the manifest.
11. If you selected a Connector that uses a Git account instead of a Git repo, enter the name of the repo where your manifests are located in **Repository Name**.
12. In **Git Fetch Type**, select **Latest from Branch** or **Specific Commit ID**, and then enter the branch or commit ID for the repo. For **Specific Commit ID**, you can also use a Git commit tag.
13. In **File/Folder Path**, enter the path to the manifest file or folder in the repo. The Connector you selected already has the repo name, so you need to add the path from the root of the repo.
14. If you are using a `values.yaml` file and it is in the same repo as your manifests, in **Values YAML**, click **Add File**. Enter the path to the `values.yaml` file from the root of the repo.
15. Click **Submit**. The manifest is added to **Manifests**.
The following is an example with the manifest and `values.yaml` file added. If you use multiple files, the highest priority is given to the last file, and the lowest priority to the first file. For example, if you have 3 files and the second and third files contain the same key:value as the first file, the third file's key:value overrides the second and first files. Alternatively, you can proceed without configuring a `values.yaml` file. Go to [Manifest Optional Values](#manifest-optional-values-file) to review the optional values file.
Harness Kubernetes services can use values YAML files just like you would using Helm. Harness manifests can use Go templating with your values YAML files, and you can include Harness variable expressions in the values YAML files.
**Where is your values YAML file located?**
* **Same folder as manifests**: If you are using a `values.yaml` file and it is in the same repo as your manifests, you can add it when you add your manifests, as described above (**Values YAML** -> **Add File**).
* **Separate from manifests**: If your values file is located in a different folder, you can add it separately as a Values YAML manifest type, described below.
To add a values YAML file as a separate manifest, do the following:
1. In your project, in **CD (Deployments)**, select **Services**.
2. Select **Manage Services**, and then select **New Service**.
3. Enter a name for the service and select **Save**.
4. Select **Configuration**.
5. In **Service Definition**, select **Kubernetes**.
6. In **Manifests**, click **Add Manifest**.
7. In **Specify Manifest Type**, select **Values YAML**, and click **Continue**.
8. In **Specify Values YAML Store**, select the Git repo provider you are using, and then create or select a Connector to that repo. The different connectors are covered in [Connect to a Git Repo](https://developer.harness.io/docs/platform/connectors/code-repositories/connect-to-code-repo). If you have not set up a Harness Delegate, you can add one as part of the Connector setup. This process is described in the Kubernetes CD tutorial, Helm CD tutorial, and [Install a Kubernetes delegate](https://developer.harness.io/docs/platform/delegates/install-delegates/overview).
9. Once you have selected a Connector, click **Continue**. In **Manifest Details**, you tell Harness where the `values.yaml` file is located.
10. In **Manifest Identifier**, enter a name that identifies the file, such as `values`.
11. If you selected a Connector that uses a Git account instead of a Git repo, enter the name of the repo where your manifests are located in **Repository Name**.
12. In **Git Fetch Type**, select a branch or commit ID for the manifest, and then enter the ID or branch. For **Specific Commit ID**, you can also use a Git commit tag.
13. In **File Path**, enter the path to the `values.yaml` file in the repo. You can also proceed without configuring a `values.yaml` file. Go to [Manifest Optional Values](#manifest-optional-values-file) to review the optional values file.
14. You can enter multiple values file paths by clicking **Add File**. At runtime, Harness compiles the files into one values file. If you use multiple files, the highest priority is given to the last file, and the lowest priority to the first file. For example, if you have 3 files and the second and third files contain the same key:value as the first file, the third file's key:value overrides the second and first files.
15. Click **Submit**. The values file(s) are added to the service.
{% hint style="info" %}
If you have values files in both the K8s Manifest **File/Folder Path** and the **Values YAML**, the Values YAML overwrites any matching values in the Values YAML in the Manifest File/Folder Path.
{% endhint %}
**Ignore a manifest file during deployment**
You might have manifest files for resources that you do not want to deploy as part of the main deployment.
Instead, you can tell Harness to ignore these files and then apply them separately using the Harness [Apply](/continuous-delivery/use-continuous-delivery/deploy-services-on-different-platforms/kubernetes/cd-k8s-ref/kubernetes-apply-step.md) step. Or you can ignore them and deploy them later.
Go to [Ignore a manifest file during deployment](/continuous-delivery/use-continuous-delivery/deploy-services-on-different-platforms/kubernetes/cd-kubernetes-category/ignore-a-manifest-file-during-deployment.md) and [Apply](/continuous-delivery/use-continuous-delivery/deploy-services-on-different-platforms/kubernetes/cd-k8s-ref/kubernetes-apply-step.md) to review these options.
**Notes**
* If this is your first time using Harness for a Kubernetes deployment, see [Kubernetes CD tutorial](/continuous-delivery/use-continuous-delivery/deploy-services-on-different-platforms/kubernetes/kubernetes-cd-quickstart.md).
* Go to [Kubernetes How-tos](/continuous-delivery/use-continuous-delivery/deploy-services-on-different-platforms/kubernetes.md) for task-based walkthroughs of Kubernetes features in Harness.
* You can hardcode your artifact in your manifests, or add your artifact source to your **Service Definition** and then reference it in your manifests.
***
### Helm charts
You can use Helm charts stored in an HTTP Helm Repository, OCI Registry, a Git repo provider, a cloud storage service (Google Cloud Storage, AWS S3, Azure Repo), a custom repo, or the [Harness File Store](/continuous-delivery/use-continuous-delivery/cd-building-blocks/services/add-inline-manifests-using-file-store.md).
{% tabs %}
{% tab title="YAML" %}
The following is a YAML example for a service with manifests hosted in GitHub and the nginx image hosted in Docker Hub.
Example
```yaml
service:
name: Helm Chart
identifier: Helm_Chart
tags: {}
serviceDefinition:
spec:
manifests:
- manifest:
identifier: nginx
type: HelmChart
spec:
store:
type: Http
spec:
connectorRef: Bitnami
chartName: nginx
helmVersion: V3
skipResourceVersioning: false
commandFlags:
- commandType: Template
flag: mychart -x templates/deployment.yaml
type: Kubernetes
```
**Important notes**
* If this is your first time using Harness for a Helm Chart deployment, see [Helm Chart deployment tutorial](/continuous-delivery/use-continuous-delivery/deploy-services-on-different-platforms/helm/helm-cd-quickstart.md).
* For a detailed walkthrough of deploying Helm Charts in Harness, including limitations and binary support, see [Deploy Helm Charts](/continuous-delivery/use-continuous-delivery/deploy-services-on-different-platforms/helm/deploy-helm-charts.md).
* Harness supports AWS cross-account access for S3-based Helm chart stores when the AWS connector is configured with [IRSA](https://developer.harness.io/docs/platform/connectors/cloud-providers/ref-cloud-providers/aws-connector-settings-reference) and [cross-account access (STS Role)](https://developer.harness.io/docs/platform/connectors/cloud-providers/ref-cloud-providers/aws-connector-settings-reference#enable-cross-account-access-sts-role). Go to [Deploy Helm Charts - Important notes](/continuous-delivery/use-continuous-delivery/deploy-services-on-different-platforms/helm/deploy-helm-charts.md#important-notes) to review these details.
* Harness cannot fetch Helm chart versions with Helm OCI because Helm OCI no longer supports `helm chart list`. See [OCI Feature Deprecation and Behavior Changes with Helm v3.7.0](https://helm.sh/docs/topics/registries/#oci-feature-deprecation-and-behavior-changes-with-v370).
* Currently, you cannot list the OCI image tags in Harness. This is a Helm limitation. Go to [Helm Search Repo Chart issue](https://github.com/helm/helm/issues/11000) to review this limitation.
{% endtab %}
{% tab title="API" %}
Create a service using the [Create Services](https://apidocs.harness.io/tag/Services#operation/createServicesV2) API.
Services API example
```json
[
{
"identifier": "KubernetesTest",
"orgIdentifier": "default",
"projectIdentifier": "CD_Docs",
"name": "KubernetesTest",
"description": "string",
"tags": {
"property1": "string",
"property2": "string"
},
"yaml": "service:\n name: Helm Chart\n identifier: Helm_Chart\n tags: {}\n serviceDefinition:\n spec:\n manifests:\n - manifest:\n identifier: nginx\n type: HelmChart\n spec:\n store:\n type: Http\n spec:\n connectorRef: Bitnami\n chartName: nginx\n helmVersion: V3\n skipResourceVersioning: false\n commandFlags:\n - commandType: Template\n flag: mychart -x templates/deployment.yaml\n type: Kubernetes"
}
]
```
**Important notes**
* If this is your first time using Harness for a Helm Chart deployment, see [Helm Chart deployment tutorial](/continuous-delivery/use-continuous-delivery/deploy-services-on-different-platforms/helm/helm-cd-quickstart.md).
* For a detailed walkthrough of deploying Helm Charts in Harness, including limitations and binary support, see [Deploy Helm Charts](/continuous-delivery/use-continuous-delivery/deploy-services-on-different-platforms/helm/deploy-helm-charts.md).
* Harness supports AWS cross-account access for S3-based Helm chart stores when the AWS connector is configured with [IRSA](https://developer.harness.io/docs/platform/connectors/cloud-providers/ref-cloud-providers/aws-connector-settings-reference) and [cross-account access (STS Role)](https://developer.harness.io/docs/platform/connectors/cloud-providers/ref-cloud-providers/aws-connector-settings-reference#enable-cross-account-access-sts-role). Go to [Deploy Helm Charts - Important notes](/continuous-delivery/use-continuous-delivery/deploy-services-on-different-platforms/helm/deploy-helm-charts.md#important-notes) to review these details.
* Harness cannot fetch Helm chart versions with Helm OCI because Helm OCI no longer supports `helm chart list`. See [OCI Feature Deprecation and Behavior Changes with Helm v3.7.0](https://helm.sh/docs/topics/registries/#oci-feature-deprecation-and-behavior-changes-with-v370).
* Currently, you cannot list the OCI image tags in Harness. This is a Helm limitation. Go to [Helm Search Repo Chart issue](https://github.com/helm/helm/issues/11000) to review this limitation.
{% endtab %}
{% tab title="Terraform Provider" %}
For the Terraform Provider resource, go to [harness\_platform\_service](https://registry.terraform.io/providers/harness/harness/latest/docs/resources/platform_service).
Example
```hcl
resource "harness_platform_service" "example" {
identifier = "identifier"
name = "name"
description = "test"
org_id = "org_id"
project_id = "project_id"
## SERVICE V2 UPDATE
## We now take in a YAML that can define the service definition for a given Service
## It is not mandatory for Service creation
## It is mandatory for Service use in a pipeline
yaml = <<-EOT
service:
name: Helm Chart
identifier: Helm_Chart
tags: {}
serviceDefinition:
spec:
manifests:
- manifest:
identifier: nginx
type: HelmChart
spec:
store:
type: Http
spec:
connectorRef: Bitnami
chartName: nginx
helmVersion: V3
skipResourceVersioning: false
commandFlags:
- commandType: Template
flag: mychart -x templates/deployment.yaml
type: Kubernetes
EOT
}
```
**Important notes**
* If this is your first time using Harness for a Helm Chart deployment, see [Helm Chart deployment tutorial](/continuous-delivery/use-continuous-delivery/deploy-services-on-different-platforms/helm/helm-cd-quickstart.md).
* For a detailed walkthrough of deploying Helm Charts in Harness, including limitations and binary support, see [Deploy Helm Charts](/continuous-delivery/use-continuous-delivery/deploy-services-on-different-platforms/helm/deploy-helm-charts.md).
* Harness supports AWS cross-account access for S3-based Helm chart stores when the AWS connector is configured with [IRSA](https://developer.harness.io/docs/platform/connectors/cloud-providers/ref-cloud-providers/aws-connector-settings-reference) and [cross-account access (STS Role)](https://developer.harness.io/docs/platform/connectors/cloud-providers/ref-cloud-providers/aws-connector-settings-reference#enable-cross-account-access-sts-role). Go to [Deploy Helm Charts - Important notes](/continuous-delivery/use-continuous-delivery/deploy-services-on-different-platforms/helm/deploy-helm-charts.md#important-notes) to review these details.
* Harness cannot fetch Helm chart versions with Helm OCI because Helm OCI no longer supports `helm chart list`. See [OCI Feature Deprecation and Behavior Changes with Helm v3.7.0](https://helm.sh/docs/topics/registries/#oci-feature-deprecation-and-behavior-changes-with-v370).
* Currently, you cannot list the OCI image tags in Harness. This is a Helm limitation. Go to [Helm Search Repo Chart issue](https://github.com/helm/helm/issues/11000) to review this limitation.
{% endtab %}
{% tab title="Pipeline Studio" %}
To add a Helm chart to your service, do the following:
1. In your project, in CD (Deployments), select **Services**.
2. Select **Manage Services**, and then select **New Service**.
3. Enter a name for the service and select **Save**.
4. Select **Configuration**.
5. In **Service Definition**, select **Kubernetes**.
6. In **Manifests**, click **Add Manifest**.
7. In **Specify Manifest Type**, select **Helm Chart**, and click **Continue**.
8. In **Specify Helm Chart Store**, select the storage service you are using.
**Options for connecting to a Helm chart store**
The options available to you to specify a Helm chart store depend on whether or not specific feature flags are enabled on your account. Options available without any feature flags or with specific feature flags enabled are described here:
* **Feature flag disabled**. Only one option is available: **OCI Helm Registry Connector**. This option enables you to connect to any OCI-based registry.
* **Feature flag enabled**. You can choose between connectors in the following categories:
* **Direct Connection**. Contains the OCI Helm Registry Connector option (shortened to **OCI Helm**), which you can use with any OCI-based registry.
* **Via Cloud Provider**. Contains the ECR connector option. This connector is specifically designed for AWS ECR to help you overcome the limitation of having to regenerate the ECR registry authentication token every 12 hours. The ECR connector option uses an AWS connector and regenerates the required authentication token if the token has expired.
Go to [Connectors](https://6a994c14e7528334531dbe29--harness-developer.netlify.app/docs/category/connectors) or [Connect to a Git repo](https://6a994c14e7528334531dbe29--harness-developer.netlify.app/docs/platform/connectors/code-repositories/connect-to-code-repo) to review the steps and settings of each option.
Once your Helm chart is added, it appears in the **Manifests** section. For example:
**Important notes**
* If this is your first time using Harness for a Helm Chart deployment, see [Helm Chart deployment tutorial](/continuous-delivery/use-continuous-delivery/deploy-services-on-different-platforms/helm/helm-cd-quickstart.md).
* For a detailed walkthrough of deploying Helm Charts in Harness, including limitations and binary support, see [Deploy Helm Charts](/continuous-delivery/use-continuous-delivery/deploy-services-on-different-platforms/helm/deploy-helm-charts.md).
* Harness supports AWS cross-account access for S3-based Helm chart stores when the AWS connector is configured with [IRSA](https://developer.harness.io/docs/platform/connectors/cloud-providers/ref-cloud-providers/aws-connector-settings-reference) and [cross-account access (STS Role)](https://developer.harness.io/docs/platform/connectors/cloud-providers/ref-cloud-providers/aws-connector-settings-reference#enable-cross-account-access-sts-role). Go to [Deploy Helm Charts - Important notes](/continuous-delivery/use-continuous-delivery/deploy-services-on-different-platforms/helm/deploy-helm-charts.md#important-notes) to review these details.
* Harness cannot fetch Helm chart versions with Helm OCI because Helm OCI no longer supports `helm chart list`. See [OCI Feature Deprecation and Behavior Changes with Helm v3.7.0](https://helm.sh/docs/topics/registries/#oci-feature-deprecation-and-behavior-changes-with-v370).
* Currently, you cannot list the OCI image tags in Harness. This is a Helm limitation. Go to [Helm Search Repo Chart issue](https://github.com/helm/helm/issues/11000) to review this limitation.
{% endtab %}
{% endtabs %}
Use Helm Charts
You can use Helm charts stored in an HTTP Helm Repository, OCI Registry, a Git repo provider, a cloud storage service (Google Cloud Storage, AWS S3, Azure Repo), a custom repo, or the [Harness File Store](/continuous-delivery/use-continuous-delivery/cd-building-blocks/services/add-inline-manifests-using-file-store.md).
The following is a YAML example for a service with manifests hosted in GitHub and the nginx image hosted in Docker Hub.
Create a service using the Create Services API.
For the Terraform Provider resource, go to `harness_platform_service`.
To add a Helm chart to your service, do the following:
1. In your project, in CD (Deployments), select **Services**.
2. Select **Manage Services**, and then select **New Service**.
3. Enter a name for the service and select **Save**.
4. Select **Configuration**.
5. In **Service Definition**, select **Kubernetes**.
6. In **Manifests**, click **Add Manifest**.
7. In **Specify Manifest Type**, select **Helm Chart**, and click **Continue**.
8. In **Specify Helm Chart Store**, select the storage service you are using.
**Options for connecting to a Helm chart store**
The options available to you to specify a Helm chart store depend on whether or not specific feature flags are enabled on your account. Options available without any feature flags or with specific feature flags enabled are described here:
* **Feature flag disabled**. Only one option is available: **OCI Helm Registry Connector**. This option enables you to connect to any OCI-based registry.
* **Feature flag enabled**. You can choose between connectors in the following categories:
* **Direct Connection**. Contains the OCI Helm Registry Connector option (shortened to **OCI Helm**), which you can use with any OCI-based registry.
* **Via Cloud Provider**. Contains the ECR connector option. This connector is specifically designed for AWS ECR to help you overcome the limitation of having to regenerate the ECR registry authentication token every 12 hours. The ECR connector option uses an AWS connector and regenerates the required authentication token if the token has expired.
For the steps and settings of each option, go to Connectors or Connect to a Git repo.
Once your Helm chart is added, it appears in the Manifests section. For example:
**Important notes**
* If this is your first time using Harness for a Helm Chart deployment, see [Helm Chart deployment tutorial](/continuous-delivery/use-continuous-delivery/deploy-services-on-different-platforms/helm/helm-cd-quickstart.md).
* For a detailed walkthrough of deploying Helm Charts in Harness, including limitations and binary support, see [Deploy Helm Charts](/continuous-delivery/use-continuous-delivery/deploy-services-on-different-platforms/helm/deploy-helm-charts.md).
* Harness supports AWS cross-account access for S3-based Helm chart stores when the AWS connector is configured with [IRSA](https://developer.harness.io/docs/platform/connectors/cloud-providers/ref-cloud-providers/aws-connector-settings-reference#use-irsa) and [cross-account access (STS Role)](https://developer.harness.io/docs/platform/connectors/cloud-providers/ref-cloud-providers/aws-connector-settings-reference#enable-cross-account-access-sts-role). Go to [Deploy Helm Charts - Important notes](/continuous-delivery/use-continuous-delivery/deploy-services-on-different-platforms/helm/deploy-helm-charts.md#important-notes) to review these details.
* Harness cannot fetch Helm chart versions with Helm OCI because Helm OCI no longer supports `helm chart list`. See [OCI Feature Deprecation and Behavior Changes with Helm v3.7.0](https://helm.sh/docs/topics/registries/#oci-feature-deprecation-and-behavior-changes-with-v370).
* Currently, you cannot list the OCI image tags in Harness. This is a Helm limitation. Go to [Helm Search Repo Chart issue](https://github.com/helm/helm/issues/11000) to review this limitation.
### Kustomize Use Kustomize
Harness supports Kustomize deployments. You can use overlays, multibase, plugins, sealed secrets, patches, etc, just as you would in any native kustomization.
The following is a YAML example for a service using a publicly available helloworld kustomization cloned from Kustomize. You can create the service using the [Create Services](https://apidocs.harness.io/tag/Services#operation/createServicesV2) API, or use the Terraform Provider resource `harness_platform_service`.
To add a kustomization, do the following:
1. In your CD stage, click **Service**.
2. In **Service Definition**, select **Kubernetes**.
3. In **Manifests**, click **Add Manifest**.
4. In **Specify Manifest Type**, click **Kustomize**, and click **Continue**.
5. In **Specify Manifest Store**, select a Git provider, the Harness File Store, or Azure Repo.
6. In **Manifest Details**, enter the following settings, test the connection, and click **Submit**:
* **Manifest Identifier**: enter `kustomize`.
* **Git Fetch Type**: select **Latest from Branch**.
* **Branch**: enter `main`.
* **Kustomize Folder Path**: enter `kustomize/helloWorld`. This is the path from the repo root.
The kustomization is now listed. You cannot use Harness variables in the base manifest or `kustomization.yaml`. You can only use Harness variables in Kustomize patches you add in **Kustomize Patches Manifest Details**.
**How Harness uses `patchesStrategicMerge`**
Kustomize patches override values in the base manifest. Harness supports the `patchesStrategicMerge` patches type.
* If the `patchesStrategicMerge` label is missing from the kustomization YAML file, but you have added Kustomize Patches to your Harness service, Harness adds the Kustomize Patches you added in Harness to the `patchesStrategicMerge` in the kustomization file.
* If you have hardcoded patches in `patchesStrategicMerge`, but have not added these patches to Harness as Kustomize Patches, Harness ignores them.
For a detailed walkthrough of using patches in Harness, go to [Use Kustomize for Kubernetes deployments](/continuous-delivery/use-continuous-delivery/deploy-services-on-different-platforms/kustomize/use-kustomize-for-kubernetes-deployments.md).
To use Kustomize Patches, do the following:
1. In your project, in **CD (Deployments)**, select **Services**.
2. Select **Manage Services**, and then select **New Service**.
3. Enter a name for the service and select **Save**.
4. Select **Configuration**.
5. In **Service Definition**, select **Kubernetes**.
6. In **Manifests**, select **Add Manifest**.
7. In **Specify Manifest Type**, select **Kustomize Patches**, and select **Continue**.
8. In **Specify Kustomize Patches Store**, select your Git provider and Connector. Go to [Connect to a Git Repo](https://developer.harness.io/docs/platform/connectors/code-repositories/connect-to-code-repo) to review connector setup. The Git Connector should point to the Git account or repo where your Kustomize files are located.
9. In **Kustomize Patches**, specify the path to the actual patch files, and select **Continue**.
10. In **Manifest Details**, enter the path to your patch file(s):
* **Manifest Identifier**: enter a name that identifies the patch file(s). You do not have to add the actual filename.
* **Git Fetch Type**: select whether to use the latest branch or a specific commit ID.
* **Branch/Commit ID**: enter the branch or commit ID.
* **File/Folder Path**: enter the path to the patch file(s) from the root of the repo. Click **Add File** to add each patch file.
11. Select **Submit**. The patch file(s) are added to **Manifests**.
The files you add should be the same files listed in `patchesStrategicMerge` of the main Kustomize file in your service. The order in which you add file paths for patches in **File/Folder Path** is the same order that Harness applies the patches during the kustomization build.
{% hint style="info" %}
Small patches that do one thing are recommended. For example, create one patch for increasing the deployment replica number and another patch for setting the memory limit.
{% endhint %}
When the main `kustomization.yaml` is deployed, the patch is rendered and its overrides are added to the `deployment.yaml` that is deployed.
If this is your first time using Harness for a Kustomize deployment, see the [Kustomize Quickstart](/continuous-delivery/use-continuous-delivery/deploy-services-on-different-platforms/kustomize/kustomize-quickstart.md).
For a detailed walkthrough of deploying Kustomize in Harness, including limitations, see [Use Kustomize for Kubernetes Deployments](/continuous-delivery/use-continuous-delivery/deploy-services-on-different-platforms/kustomize/use-kustomize-for-kubernetes-deployments.md).
**Important notes**
* Harness supports Kustomize and Kustomize Patches for Rolling, Blue Green and Delete steps.
* Harness does not use Kustomize for rollback. Harness renders the templates using Kustomize and then passes them onto kubectl. A rollback works exactly as it does for native Kubernetes.
* You cannot use Harness variables in the base manifest or kustomization.yaml. You can only use Harness variables in kustomize patches you add in **Kustomize Patches Manifest Details**.
* **Kustomize binary versions**:
* Harness includes Kustomize binary versions 3.5.4 and 4.0.0. By default, Harness uses 3.5.4.
* To use 4.0.0, you must enable the feature flag `NEW_KUSTOMIZE_BINARY` in your account. Contact [Harness Support](mailto:support@harness.io) to enable the feature.
* Harness will not follow symlinks in the Kustomize and Kustomize Patches files it pulls.
### OpenShift templates Use OpenShift templates
Harness supports OpenShift for Kubernetes deployments.
For an overview of OpenShift support, see [Using OpenShift with Harness Kubernetes](/continuous-delivery/use-continuous-delivery/deploy-services-on-different-platforms/kubernetes/cd-k8s-ref/using-open-shift-with-harness-kubernetes.md).
The following is a YAML example for a service using an OpenShift template that is stored in the Harness File Store. You can create the service using the [Create Services](https://apidocs.harness.io/tag/Services#operation/createServicesV2) API, or use the Terraform Provider resource `harness_platform_service`.
To add an OpenShift template to a service, do the following:
1. In your project, in **CD (Deployments)**, select **Services**.
2. Select **Manage Services**, and then select **New Service**.
3. Enter a name for the service and select **Save**.
4. Select **Configuration**.
5. In **Service Definition**, select **Kubernetes**.
6. In **Manifests**, click **Add Manifest**.
7. In **Specify Manifest Type**, select **OpenShift Template**, and then select **Continue**.
8. In **Specify OpenShift Template Store**, select where your template is located. You can use a Git provider, the Harness File Store, a custom repo, or Azure Repos. For example, click **GitHub**, and then select or create a new GitHub Connector. Go to [Connect to Code Repo](https://developer.harness.io/docs/platform/connectors/code-repositories/connect-to-code-repo) to review connector setup.
9. Select **Continue**. **Manifest Details** appears.
10. In **Manifest Identifier**, enter an ID for the manifest. It must be unique. It can be used in Harness expressions to reference this template's settings.
11. In **Git Fetch Type**, select **Latest from Branch** or **Specific Commit ID/Git Tag**, and then enter the branch or commit ID/tag for the repo.
12. In **Template File Path**, enter the path to the template file. The Connector you selected already has the repo name, so you need to add the path from the root of the repo to the file.
13. Select **Submit**. The template is added to **Manifests**.
OpenShift Param Files can be added in the following ways:
* Attached to the OpenShift Template you added.
* Added as a separate manifest.
For an overview of OpenShift support, see [Using OpenShift with Harness Kubernetes](/continuous-delivery/use-continuous-delivery/deploy-services-on-different-platforms/kubernetes/cd-k8s-ref/using-open-shift-with-harness-kubernetes.md).
The following is an example where the OpenShift Param is attached to a template already added:
1. In your project, in **CD (Deployments)**, select **Services**.
2. Select **Manage Services**, and then select the service with the OpenShift template.
3. Select **Configuration**.
4. In **Manifests**, select **Attach OpenShift Param**.
5. In **Enter File Path**, select where your params file is located.
6. Select **Submit**. The params file is added to **Manifests**.
You can now see the params file in the OpenShift Template **Manifest Details**.
**Deployment strategy support**
In addition to standard workload type support in Harness (see [What can I deploy in Kubernetes?](/continuous-delivery/use-continuous-delivery/deploy-services-on-different-platforms/kubernetes/cd-k8s-ref/what-can-i-deploy-in-kubernetes.md)), Harness supports [DeploymentConfig](https://docs.openshift.com/container-platform/4.1/applications/deployments/what-deployments-are.html), [Route](https://docs.openshift.com/enterprise/3.0/architecture/core_concepts/routes.html), and [ImageStream](https://docs.openshift.com/enterprise/3.2/architecture/core_concepts/builds_and_image_streams.html#image-streams) across Canary, Blue Green, and Rolling deployment strategies.
Use `apiVersion: apps.openshift.io/v1` and not `apiVersion: v1`.
**Harness supports list objects**
You can use Kubernetes list objects as needed without modifying your YAML for Harness.
When you deploy, Harness will render the lists and show all the templated and rendered values in the log.
Harness supports:
* List
* NamespaceList
* ServiceList
* For Kubernetes deployments, these objects are supported for all deployment strategies (Canary, Rolling, Blue/Green).
* For Native Helm, these objects are supported for Rolling deployments.
If you run `kubectl api-resources` you should see a list of resources, and `kubectl explain` will work with any of these.
**Important notes**
* Make sure that you update your version to `apiVersion: apps.openshift.io/v1` and not `apiVersion: v1`.
* The token does not need to have global read permissions. The token can be scoped to the namespace.
* The Kubernetes containers must be OpenShift-compatible containers. If you are already using OpenShift, then this is already configured. But be aware that OpenShift cannot deploy any Kubernetes container. You can get OpenShift images from the following public repos: and .
* Useful articles for setting up a local OpenShift cluster for testing: [How To Setup Local OpenShift Origin (OKD) Cluster on CentOS 7](https://computingforgeeks.com/setup-openshift-origin-local-cluster-on-centos/), [OpenShift Console redirects to 127.0.0.1](https://chrisphillips-cminion.github.io/kubernetes/2019/07/08/OpenShift-Redirect.html).
## Artifacts
You have two options when referencing the artifacts you want to deploy:
* Add an artifact source to the Harness service and reference it using the Harness expression `<+artifacts.primary.image>` in the values YAML file.
* Hardcode the artifact into the manifests or values YAML file.
Use the artifact expression
Add the image location to Harness as an artifact in the **Artifacts** section of the service.
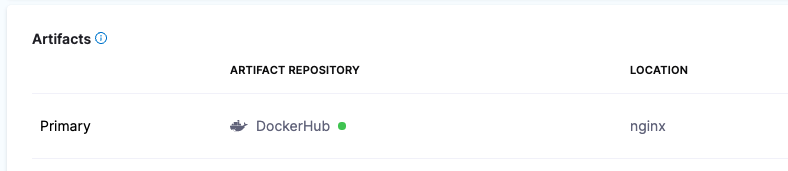
This allows you to reference the image in your values YAML files using the Harness expression `<+artifacts.primary.image>`.
```yaml
---
image: <+artifacts.primary.image>
```
You cannot use Harness variables expressions in your Kubernetes object manifest files. You can only use Harness variables expressions in values YAML files, or Kustomize Patch file.
When you select the artifact repo for the artifact, like a Docker Hub repo, you specify the artifact and tag/version to use.
You can select a specific tag/version, use a [runtime input](https://developer.harness.io/docs/platform/variables-and-expressions/runtime-inputs) so that you are prompted for the tag/version when you run the pipeline, or you can use a Harness variable expression to pass in the tag/version at execution.
The following is an example where a runtime input is used and you select which image version/tag to deploy.
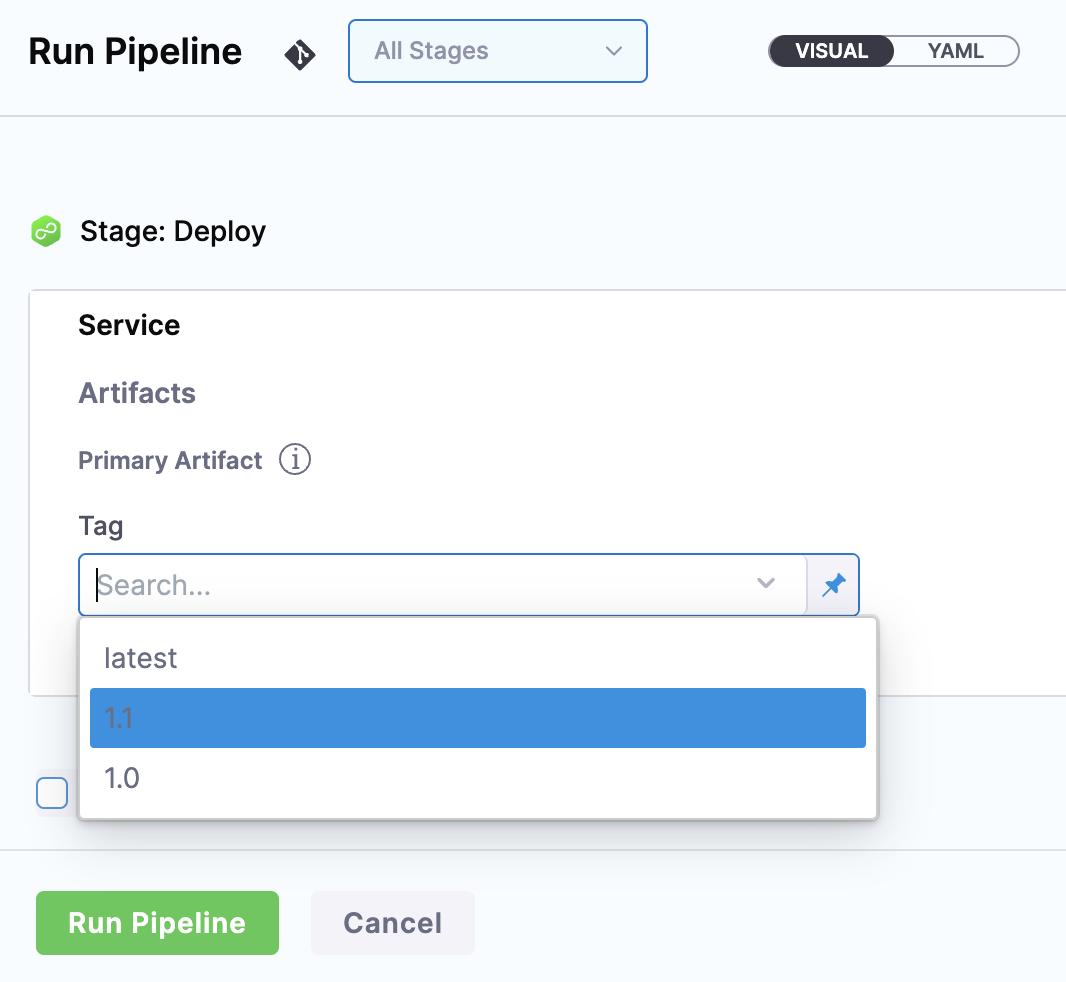
With a Harness artifact, you can template your manifests, detaching them from a hardcoded location. This makes your manifests reusable and dynamic.
Hardcode the artifact
If a Docker image location is hardcoded in your Kubernetes manifest (for example, `image: nginx:1.14.2`), then you can add the manifest to Harness in **Manifests** and Kubernetes will pull the image during deployment.
When you hardcode the artifact in your manifests, any artifacts added to your Harness service are ignored.
### Harness Artifact Registry Use artifacts from Harness Artifact Registry
Harness Artifact Registry (HAR) is a fully managed artifact repository that lets you store and manage artifacts directly in your Harness account. HAR supports both container images (Docker) and packaged artifacts (Maven, npm, NuGet, generic formats), providing secure, scalable storage that integrates with Harness CD pipelines.
{% hint style="info" %}
HAR is natively integrated with Harness CD and does not require a separate connector. However, you need a valid HAR license to use this feature. Contact [Harness Support](mailto:support@harness.io) for licensing information.
{% endhint %}
Create a service with an artifact source that uses HAR using the Create Services API. For step-by-step instructions on adding a Harness Artifact Registry artifact source in the Harness Manager UI, go to Harness Artifact Registry in the artifact sources documentation.
Go to [Harness Artifact Registry documentation](https://developer.harness.io/docs/artifact-registry/) to review HAR.
### Docker Use artifacts in any Docker registry
To use a Docker artifact, you create or use a Harness connector to connect to your Docker repo, and then use that connector in your Harness service to reference the artifact. You can create the Docker connector using the Create a Connector API, and create the service with an artifact source that uses the connector using the Create Services API. For the Terraform Provider Docker connector resource, go to `harness_platform_connector_docker`. For the Terraform Provider service resource, go to `harness_platform_service`.
To add an artifact from a Docker registry, do the following:
1. In your project, in **CD (Deployments)**, select **Services**.
2. Select **Manage Services**, and then select **New Service**.
3. Enter a name for the service and select **Save**.
4. Select **Configuration**.
5. In **Service Definition**, select **Kubernetes**.
6. In **Artifacts**, select **Add Artifact Source**.
7. In **Select Artifact Repository Type**, select the registry where your Docker artifact is hosted. For this example, select **Docker Registry**, and then click **Continue**.
8. Select or create a Docker Registry Connector, and select **Continue**.
9. In **Artifact Source Name**, enter a name that identifies your artifact.
10. In **Image path**, enter the name of the artifact you want to deploy, such as `library/nginx` or `jsmith/privateimage`. Official images in public repos often need the label `library`, for example, `library/tomcat`. Wildcards are not supported.
11. In **Tag**, enter or select the Docker image tag for the image.
12. Click **Submit**. The artifact is added to the Service Definition.
**Important notes**
* For pulling Docker images from Docker repos, Harness is restricted by the limits of the Docker repo. For example, [Docker Hub limits](https://docs.docker.com/docker-hub/download-rate-limit/).
* The maximum number of artifact image tags fetched by Harness is 10000.
### Google Container Registry (GCR)
{% hint style="warning" %}
Google Container Registry (GCR) is being deprecated. Go to the [Deprecation Notice](/continuous-delivery/use-continuous-delivery/cd-building-blocks/services/artifact-sources.md#google-container-registry-gcr) to review this change.
{% endhint %}
Use GCR artifacts
You connect to GCR using a Harness GCP Connector. For details on all the GCR requirements for the GCP Connector, see [Google Cloud Platform (GCP) Connector Settings Reference](https://developer.harness.io/docs/platform/connectors/cloud-providers/ref-cloud-providers/gcs-connector-settings-reference).
You can create the GCR connector using the Create a Connector API, and create a service with an artifact source that uses the connector using the Create Services API. For the Terraform Provider GCP connector resource, go to `harness_platform_connector_gcp`. For the Terraform Provider service resource, go to `harness_platform_service`.
To add an artifact from GCR, do the following:
1. In your project, in **CD (Deployments)**, select **Services**.
2. Select **Manage Services**, and then select **New Service**.
3. Enter a name for the service and select **Save**.
4. Select **Configuration**.
5. In **Service Definition**, select **Kubernetes**.
6. In **Artifacts**, select **Add Artifact Source**.
7. In **Select Artifact Repository Type**, click **GCR**, and then click **Continue**.
8. In **GCR Repository**, select or create a Google Cloud Platform (GCP) Connector that connects to the GCP account where the GCR registry is located. Click **Continue**.
9. In **Artifact Source Name**, enter a name for the artifact.
10. In **GCR Registry URL**, select the GCR registry host name, for example `gcr.io`.
11. In **Image Path**, enter the name of the artifact you want to deploy. Images in repos need to reference a path starting with the project ID that the artifact is in, for example, `myproject-id/image-name`.
12. In **Tag**, enter or select the Docker image tag for the image, or select a runtime input or expression. If you use runtime input, when you deploy the pipeline, Harness pulls the list of tags from the repo and prompts you to select one.
13. Click **Submit**. The artifact is added to the Service Definition.
**Permissions**
For Google Container Registry (GCR), the following roles are required:
* Storage Object Viewer (roles/storage.objectViewer)
* Storage Object Admin (roles/storage.objectAdmin)
Go to the GCP documentation [Cloud IAM roles for Cloud Storage](https://cloud.google.com/storage/docs/access-control/iam-roles) to review these roles.
Ensure the Harness Delegate you have installed can reach `storage.cloud.google.com` and your GCR registry host name, for example `gcr.io`.
### Google Artifact Registry Use Google Artifact Registry artifacts
You connect to Google Artifact Registry using a Harness GCP Connector.
For details on all the Google Artifact Registry requirements for the GCP Connector, see [Google Cloud Platform (GCP) Connector Settings Reference](https://developer.harness.io/docs/platform/connectors/cloud-providers/ref-cloud-providers/gcs-connector-settings-reference).
This example uses a Harness Delegate installed in GCP for credentials. You can create the Google Artifact Registry connector using the Create a Connector API, and create a service with an artifact source that uses the connector using the Create Services API. For the Terraform Provider GCP connector resource, go to `harness_platform_connector_gcp`. For the Terraform Provider service resource, go to `harness_platform_service`.
To add an artifact from Google Artifact Registry, do the following:
1. In your project, in **CD (Deployments)**, select **Services**.
2. Select **Manage Services**, and then select **New Service**.
3. Enter a name for the service and select **Save**.
4. Select **Configuration**.
5. In **Service Definition**, select **Kubernetes**.
6. In **Artifacts**, select **Add Artifact Source**.
7. In **Artifact Repository Type**, select **Google Artifact Registry**, and then select **Continue**.
8. In **GCP Connector**, select or create a Google Cloud Platform (GCP) Connector that connects to the GCP account where the Google Artifact Registry is located. Select **Continue**.
9. In **Artifact Details**, you are creating the pull command. For example, `docker pull us-central1-docker.pkg.dev/docs-play/quickstart-docker-repo/quickstart-image:v1.0`.
10. In **Artifact Source Name**, enter a name for the artifact.
11. In **Repository Type**, select the format of the artifact.
12. In **Project**, enter the ID of the GCP project.
13. In **Region**, select the region where the repo is located.
14. In **Repository Name**, enter the name of the repo.
15. In **Package**, enter the artifact name.
16. In **Version Details**, select **Value** or **Regex**.
17. In **Version**, enter or select the Docker image tag for the image, or select a runtime input or expression. If you use runtime input, when you deploy the pipeline, Harness pulls the list of tags from the repo and prompts you to select one.
18. Click **Submit**. The artifact is added to the Service Definition.
{% hint style="info" %}
If you used a fixed value in **Version** and Harness is not able to fetch the image tags, ensure that the GCP service account key used in the GCP connector credentials, or in the service account used to install the Harness Delegate, has the required permissions. The Permissions section below lists these requirements.
{% endhint %}
**Permissions**
For Google Artifact Registry, the following roles are required:
* Artifact Registry Reader
* Artifact Registry Writer
Go to the GCP documentation [Configure roles and permissions](https://cloud.google.com/artifact-registry/docs/access-control) to review these roles.
Ensure the Harness Delegate you have installed can reach your Google Artifact Registry region, for example `us-central1`.
### Amazon Elastic Container Registry (ECR) Use ECR artifacts
You connect to ECR using a Harness AWS connector. For details on all the ECR requirements for the AWS connector, see [AWS Connector Settings Reference](https://developer.harness.io/docs/platform/connectors/cloud-providers/ref-cloud-providers/aws-connector-settings-reference).
This example uses a Harness Delegate installed in AWS for credentials. You can create the ECR connector using the Create a Connector API, and create a service with an artifact source that uses the connector using the Create Services API. For the Terraform Provider ECR connector resource, go to `harness_platform_connector_aws`. For the Terraform Provider service resource, go to `harness_platform_service`.
To add an artifact from ECR, do the following:
1. In your project, in **CD (Deployments)**, select **Services**.
2. Select **Manage Services**, and then select **New Service**.
3. Enter a name for the service and select **Save**.
4. Select **Configuration**.
5. In **Service Definition**, select **Kubernetes**.
6. In **Artifacts**, select **Add Artifact Source**.
7. In **Artifact Repository Type**, click **ECR**, and then select **Continue**.
8. In **ECR Repository**, select or create an AWS connector that connects to the AWS account where the ECR registry is located. Select **Continue**.
9. In **Artifact Details**, in **Region**, select the region where the artifact source is located.
10. In **Image Path**, enter the name of the artifact you want to deploy.
11. In **Tag**, enter or select the Docker image tag for the image. If you use runtime input, when you deploy the pipeline, Harness pulls the list of tags from the repo and prompts you to select one.
12. Select **Submit**. The artifact is added to the Service Definition.
**Permissions**
Ensure that the AWS IAM user account you use in the AWS Connector has the following policy.
### Azure Container Registry (ACR) Use ACR artifacts
You connect to ACR using a Harness Azure Connector. For details on all the Azure requirements for the Azure Connector, see [Add a Microsoft Azure cloud connector](https://developer.harness.io/docs/platform/connectors/cloud-providers/add-a-microsoft-azure-connector).
This example uses a Harness Delegate installed in Azure for credentials. You can create the ACR connector using the Create a Connector API, and create a service with an artifact source that uses the connector using the Create Services API. For the Terraform Provider ACR connector resource, go to `harness_platform_connector_azure_cloud_provider`. For the Terraform Provider service resource, go to `harness_platform_service`.
To add an artifact from ACR, do the following:
1. In your project, in **CD (Deployments)**, select **Services**.
2. Select **Manage Services**, and then select **New Service**.
3. Enter a name for the service and select **Save**.
4. Select **Configuration**.
5. In **Service Definition**, select **Kubernetes**.
6. In **Artifacts**, select **Add Artifact Source**.
7. In **Artifact Repository Type**, click **ACR**, and then select **Continue**.
8. In **ACR Repository**, select or create an Azure Connector that connects to the Azure account where the ACR registry is located. Select **Continue**.
9. In **Artifact Details**, in **Subscription ID**, select the subscription ID where the artifact source is located.
10. In **Registry**, select the ACR registry to use.
11. In **Repository**, select the repo to use.
12. In **Tag**, enter or select the tag for the image. If you use runtime input, when you deploy the pipeline, Harness pulls the list of tags from the repo and prompts you to select one.
13. Click **Submit**. The artifact is added to the Service Definition.
**Permissions**
The Harness Azure connectors that you will use to connect Harness to ACR must have the **Reader** role, at minimum. You can also use a custom role that includes the permissions of the Reader role.
**Important notes**
* Harness supports 500 images from an ACR repo. If you do not see some of your images, then you might have exceeded this limit. This is the result of an Azure API limitation.
* If you connect to an ACR repo via the platform-agnostic Docker Connector, the limit is 100.
### Nexus Use Nexus artifacts
You connect to Nexus using a Harness Nexus Connector. For details on all the requirements for the Nexus Connector, see [Nexus Connector Settings Reference](https://developer.harness.io/docs/platform/connectors/artifact-repositories/nexus-connector-settings-reference).
You can create the Nexus connector using the Create a Connector API, and create a service with an artifact source that uses the connector using the Create Services API. For the Terraform Provider Nexus connector resource, go to `harness_platform_connector_nexus`. For the Terraform Provider service resource, go to `harness_platform_service`.
To add an artifact from Nexus, do the following:
1. In your project, in **CD (Deployments)**, select **Services**.
2. Select **Manage Services**, and then select **New Service**.
3. Enter a name for the service and select **Save**.
4. Select **Configuration**.
5. In **Service Definition**, select **Kubernetes**.
6. In **Artifacts**, click **Add Artifact Source**.
7. In **Artifact Repository Type**, click **Nexus**, and then select **Continue**.
8. In **Nexus Repository**, select or create a Nexus Connector that connects to the Nexus account where the repo is located. Select **Continue**.
9. Select **Repository URL** or **Repository Port**. **Repository Port** is more commonly used and can be taken from the repo settings; each repo uses its own port. **Repository URL** is typically used for a custom infrastructure, for example, when Nexus is hosted behind a reverse proxy.
10. In **Repository**, enter the name of the repo.
11. In **Artifact Path**, enter the path to the artifact you want.
12. In **Tag**, enter or select the Docker image tag for the image. If you use runtime input, when you deploy the pipeline, Harness pulls the list of tags from the repo and prompts you to select one.
13. Click **Submit**. The artifact is added to the Service Definition.
**Permissions**
Ensure the connected user account has the following permissions in the Nexus Server.
* Repo: All repositories (Read)
* Nexus UI: Repository Browser
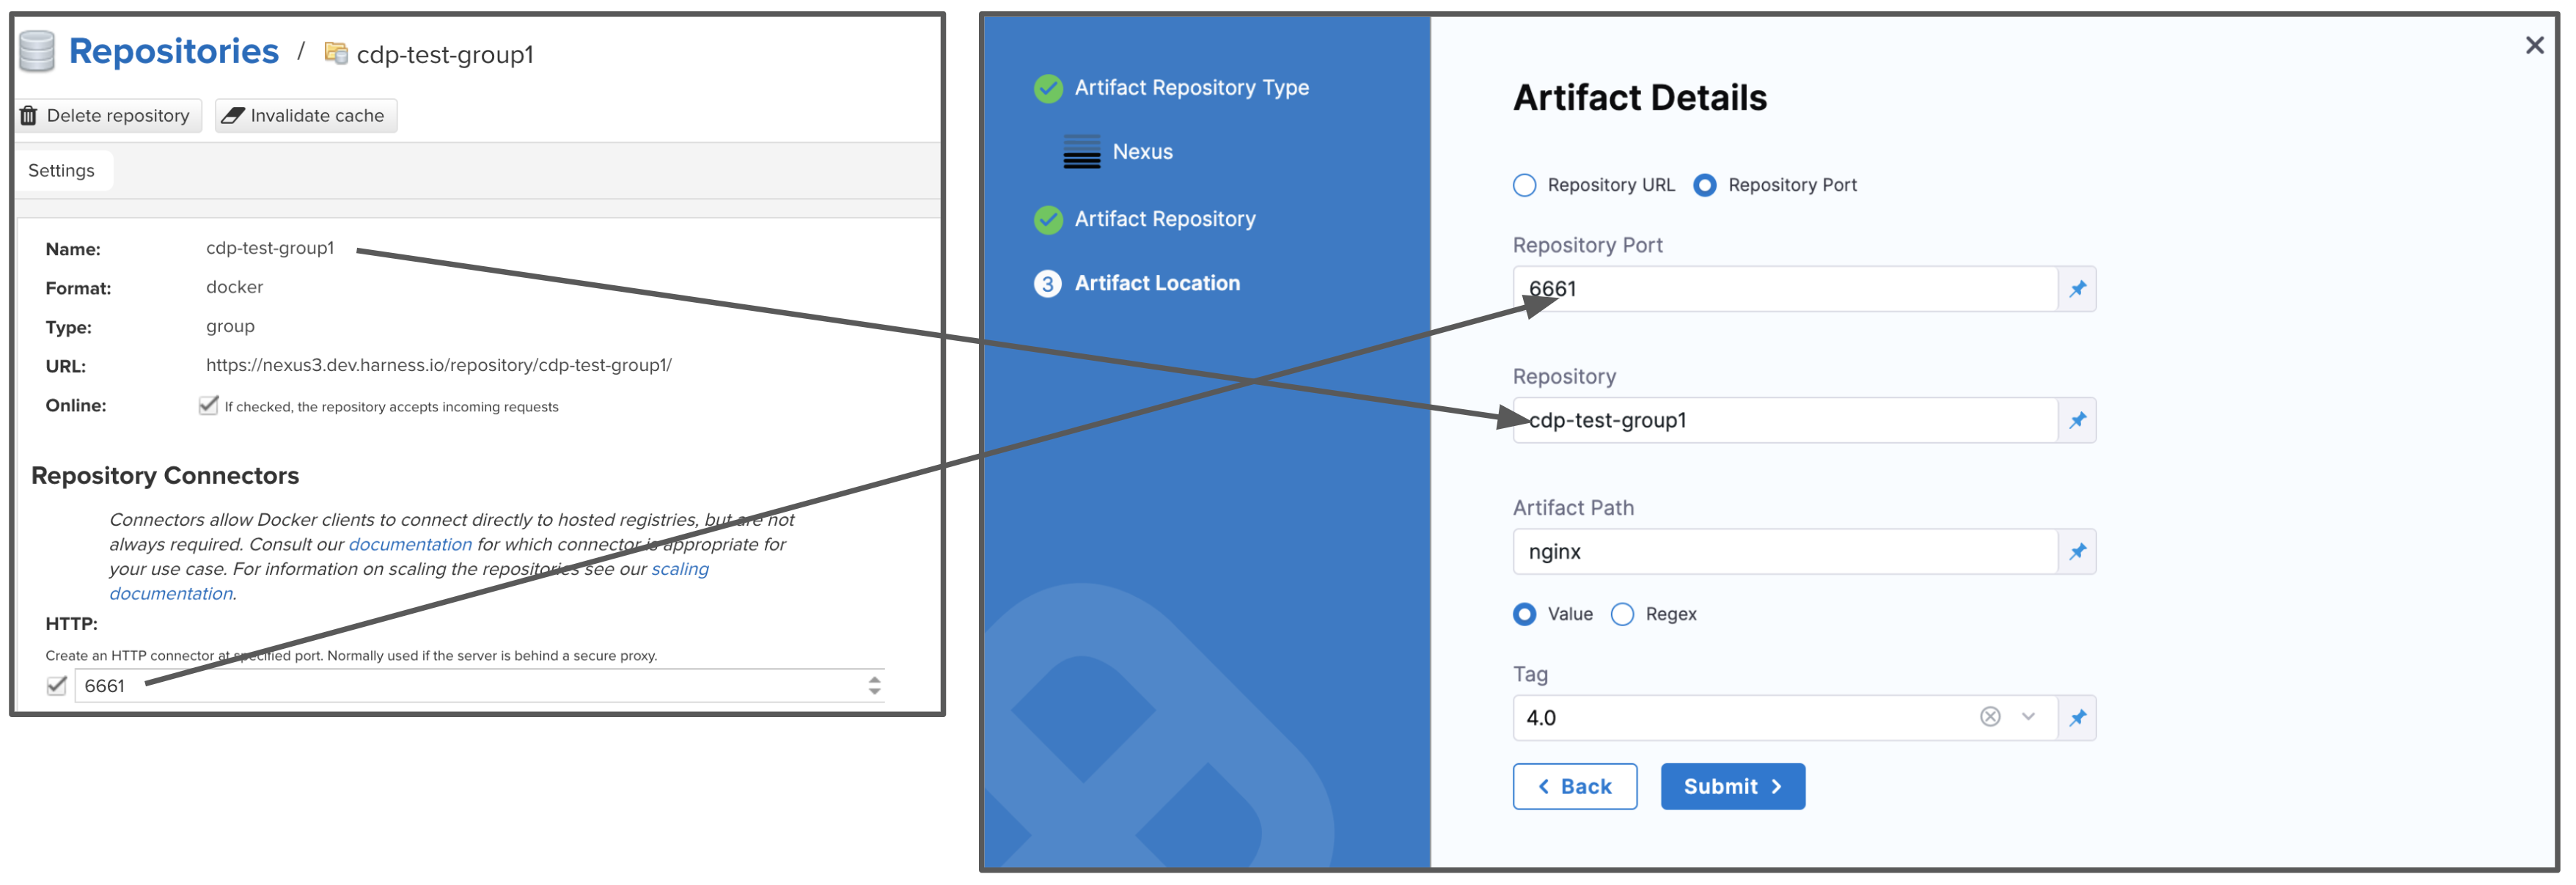
Go to [Nexus Managing Security](https://help.sonatype.com/en/managing-security.html) to review Nexus security settings.
For Nexus 3, when used as a **Docker** repo, the user needs:
* A role with the `nx-repository-view-*_*_*` privilege.
### Artifactory Use Artifactory artifacts
You connect to Artifactory (JFrog) using a Harness Artifactory Connector. For details on all the requirements for the Artifactory Connector, see [Artifactory Connector Settings Reference](https://developer.harness.io/docs/platform/connectors/cloud-providers/ref-cloud-providers/artifactory-connector-settings-reference).
You can create the Artifactory connector using the Create a Connector API, and create a service with an artifact source that uses the connector using the Create Services API. For the Terraform Provider Artifactory connector resource, go to `harness_platform_connector_artifactory`. For the Terraform Provider service resource, go to `harness_platform_service`.
To add an artifact from Artifactory, do the following:
1. In your project, in **CD (Deployments)**, select **Services**.
2. Select **Manage Services**, and then select **New Service**.
3. Enter a name for the service and select **Save**.
4. Select **Configuration**.
5. In **Service Definition**, select **Kubernetes**.
6. In **Artifacts**, select **Add Artifact Source**.
7. In **Artifact Repository Type**, select **Artifactory**, and then select **Continue**.
8. In **Artifactory Repository**, select or create an Artifactory Connector that connects to the Artifactory account where the repo is located. Click **Continue**. The **Artifact Details** settings appear.
9. In **Repository URL**, enter the URL from the `docker login` command in Artifactory's **Set Me Up** settings.
10. In **Repository**, enter the repo name. If the full path is `docker-remote/library/mongo/3.6.2`, you would enter `docker-remote`.
11. In **Artifact Path**, enter the path to the artifact. If the full path is `docker-remote/library/mongo/3.6.2`, you would enter `library/mongo`.
12. In **Tag**, enter or select the Docker image tag for the image. If you use runtime input, when you deploy the pipeline, Harness pulls the list of tags from the repo and prompts you to select one.
13. Select **Submit**. The artifact is added to the Service Definition.
**Permissions**
Make sure the following permissions are granted to the user:
* Privileged User is required to access API, whether Anonymous or a specific username (username and passwords are not mandatory).
* Read permission to all Repositories.
If used as a Docker Repo, user needs:
* List images and tags
* Pull images
Go to [Managing Permissions: JFrog Artifactory User Guide](https://www.jfrog.com/confluence/display/RTF/Managing+Permissions) to review Artifactory permissions.
### GitHub packages Use GitHub Packages as artifacts
You can use GitHub Packages as artifacts for deployments.
Currently, Harness supports only the packageType as `docker(container)`. Support for npm, maven, rubygems, and nuget is coming soon.
You connect to GitHub using a Harness [GitHub Connector](https://developer.harness.io/docs/platform/connectors/code-repositories/ref-source-repo-provider/git-hub-connector-settings-reference), username, and Personal Access Token (PAT).
{% hint style="info" %}
**New to GitHub Packages?** This [quick video](https://www.youtube.com/watch?v=gqseP_wTZsk) will get you up to speed in minutes.
{% endhint %}
You can create the GitHub connector using the Create a Connector API, and create a service with an artifact source that uses the connector using the Create Services API. For the Terraform Provider GitHub connector resource, go to `harness_platform_connector_github`. For the Terraform Provider service resource, go to `harness_platform_service`. You connect to GitHub using a Harness GitHub Connector, username, and Personal Access Token (PAT).
To add an artifact from GitHub Packages, do the following:
1. In your project, in **CD (Deployments)**, select **Services**.
2. Select **Manage Services**, and then select **New Service**.
3. Enter a name for the service and select **Save**.
4. Select **Configuration**.
5. In **Service Definition**, select **Kubernetes**.
6. In **Artifacts**, select **Add Artifact Source**.
7. In **Artifact Repository Type**, select **GitHub Package Registry**, and then select **Continue**.
8. In **GitHub Package Registry Repository**, select or create a GitHub Connector that connects to the GitHub account where the package repo is located. Ensure that you enable **API Access** in the GitHub connector, and use a Personal Access Token (PAT) that meets the requirements listed in Permissions. Select **Continue**. The **Artifact Details** settings appear.
9. In **Artifact Source Name**, enter a name for this artifact source.
10. In **Package Type**, select the type of package you are using.
11. In **Package Name**, select the name of the package.
12. In **Version**, select the version to use. If you use runtime input, when you deploy the pipeline, Harness pulls the list of tags from the repo and prompts you to select one.
13. Select **Submit**. The artifact is added to the Service Definition.
**Permissions**
The GitHub Personal Access Token (PAT) must have the `write:packages` and `read:packages` permissions.
Ensure that you enable **API access** in the Harness GitHub connector. In the GitHub connector YAML, the setting is `apiAccess`:
You can use the same Harness secret that you used for user authentication.
### Custom artifact source Use artifacts from a custom artifact source
For enterprises that use a custom repository, Harness provides the Custom Artifact Source.
To use this artifact source, you provide a script to query your artifact server via its API (for example, REST) and then Harness stores the output on the Harness Delegate in the Harness-initialized variable `$HARNESS_ARTIFACT_RESULT_PATH`.
The output must be a JSON array, with a mandatory key for a Build Number/Version. You then map a key from your JSON output to the Build Number/Version variable.
For steps on adding a Custom Artifact source, go to [Add a custom artifact source for CD](/continuous-delivery/use-continuous-delivery/cd-building-blocks/services/add-a-custom-artifact-source-for-cd.md).
## Go templating
Harness supports [Go templating](https://godoc.org/text/template) for Kubernetes manifests and values YAML files.
You can add one or more values YAML files containing values for different scenarios, and then use Go templating in the manifest files to reference the values in the values YAML files.
Built-in Go templating support enables you to use Kubernetes without the need for Helm.
Go to [Example Kubernetes Manifests using Go Templating](/continuous-delivery/use-continuous-delivery/deploy-services-on-different-platforms/kubernetes/cd-k8s-ref/example-kubernetes-manifests-using-go-templating.md) to review examples.
The following are Kubernetes templating examples.
Basic values YAML and manifests for a public image
The following is the values YAML file:
```yaml
name: <+stage.name>
replicas: 2
image: <+artifacts.primary.image>
# dockercfg: <+artifacts.primary.imagePullSecret>
createNamespace: true
namespace: <+infra.namespace>
serviceType: LoadBalancer
servicePort: 80
serviceTargetPort: 80
env:
config:
key1: value10
secrets:
key2: value2
```
The following is the manifest containing multiple objects referring to the values in the values YAML file:
```go
{{- if .Values.env.config}}
apiVersion: v1
kind: ConfigMap
metadata:
name: {{.Values.name}}
data:
{{.Values.env.config | toYaml | indent 2}}
---
{{- end}}
{{- if .Values.env.secrets}}
apiVersion: v1
kind: Secret
metadata:
name: {{.Values.name}}
stringData:
{{.Values.env.secrets | toYaml | indent 2}}
---
{{- end}}
{{- if .Values.dockercfg}}
apiVersion: v1
kind: Secret
metadata:
name: {{.Values.name}}-dockercfg
annotations:
harness.io/skip-versioning: true
data:
.dockercfg: {{.Values.dockercfg}}
type: kubernetes.io/dockercfg
---
{{- end}}
apiVersion: apps/v1
kind: Deployment
metadata:
name: {{.Values.name}}-deployment
spec:
replicas: {{int .Values.replicas}}
selector:
matchLabels:
app: {{.Values.name}}
template:
metadata:
labels:
app: {{.Values.name}}
spec:
{{- if .Values.dockercfg}}
imagePullSecrets:
- name: {{.Values.name}}-dockercfg
{{- end}}
containers:
- name: {{.Values.name}}
image: {{.Values.image}}
{{- if or .Values.env.config .Values.env.secrets}}
envFrom:
{{- if .Values.env.config}}
- configMapRef:
name: {{.Values.name}}
{{- end}}
{{- if .Values.env.secrets}}
- secretRef:
name: {{.Values.name}}
{{- end}}
{{- end}}
```
## Pull an image from a private registry
Typically, if the Docker image you are deploying is in a private registry, Harness has access to that registry using the credentials set up in the Harness connector you use with your service **Artifacts**.
In some cases, your Kubernetes cluster might not have the permissions needed to access a private Docker registry.
For these cases, the values YAML file in Service Definition **Manifests** section must use the `dockercfg` parameter.
If the Docker image is added in the Service Definition **Artifacts** section, then you reference it like this: `dockercfg: <+artifacts.primary.imagePullSecret>`.
This key will import the credentials from the Docker credentials file in the artifact.
Open the values.yaml file you are using for deployment.
Verify that `dockercfg` key exists, and uses the `<+artifacts.primary.imagePullSecret>` expression to obtain the credentials:
```yaml
name: <+stage.variables.name>
replicas: 2
image: <+artifacts.primary.image>
dockercfg: <+artifacts.primary.imagePullSecret>
createNamespace: true
namespace: <+infra.namespace>
```
### Reference dockercfg in Kubernetes objects
Next, verify that the Deployment and Secret objects reference `dockercfg: {{. Values.dockercfg}}`.
Reference dockercfg in Kubernetes objects
```yaml
...
{{- if .Values.dockercfg}}
apiVersion: v1
kind: Secret
metadata:
name: {{.Values.name}}-dockercfg
annotations:
harness.io/skip-versioning: true
data:
.dockercfg: {{.Values.dockercfg}}
type: kubernetes.io/dockercfg
---
{{- end}}
apiVersion: apps/v1
kind: Deployment
metadata:
name: {{.Values.name}}-deployment
spec:
replicas: {{int .Values.replicas}}
selector:
matchLabels:
app: {{.Values.name}}
template:
metadata:
labels:
app: {{.Values.name}}
spec:
{{- if .Values.dockercfg}}
imagePullSecrets:
- name: {{.Values.name}}-dockercfg
{{- end}}
containers:
- name: {{.Values.name}}
image: {{.Values.image}}
...
```
With these requirements met, the cluster imports the credentials from the Docker credentials file in the artifact.
## Sidecar workloads
You can use Harness to deploy both primary and sidecar Kubernetes workloads.
Kubernetes sidecar workloads let you modularize and encapsulate application functionality while keeping the overall architecture simple and easy to manage.
Sidecars are commonly used to implement cross-cutting concerns like logging, monitoring, and security. By separating these concerns into separate containers, it is possible to add or modify them without affecting the primary container or the application running inside it.
For example, a logging sidecar can be used to capture and store application logs, metrics, and other data, without requiring the primary container to implement any logging code.
Sidecars can also be used to implement advanced features like load balancing, service discovery, and circuit breaking. By using a sidecar container for these features, it is possible to keep the primary container simple and focused on its core functionality, while still providing advanced capabilities to the application.
Go to [Add a Kubernetes sidecar container](/continuous-delivery/use-continuous-delivery/deploy-services-on-different-platforms/kubernetes/cd-kubernetes-category/add-a-kubernetes-sidecar-container.md) to review sidecar configuration.
## Variables
In the **Variables** section of the service, you can add variables and use them in values YAML and params files, or in other settings in your stage that support expressions.

You can use the variable in your values YAML files. For example, here is a service variable used in the `name` key in the values YAML:
Service variable in values YAML file
```yaml
name: <+serviceVariables.appname>
replicas: 2
image: <+artifacts.primary.image>
# dockercfg: <+artifacts.primary.imagePullSecret>
createNamespace: true
namespace: <+infra.namespace>
serviceType: LoadBalancer
servicePort: 80
serviceTargetPort: 80
env:
config:
key1: value10
secrets:
key2: value2
```
You can set variable values as runtime inputs and then provide their values when the pipeline is run.
Go to [Fixed values runtime inputs and expressions](https://developer.harness.io/docs/platform/variables-and-expressions/runtime-inputs) to review runtime inputs and expressions.
### Harness pipeline, stage, service, and built-in variables
You can use pipeline, stage, service, environment, and Harness built-in variables in your values YAML files and service settings.
Go to [Built-in Harness variables reference](https://developer.harness.io/docs/platform/variables-and-expressions/harness-variables) to review built-in variables, or watch this [short video](https://youtu.be/lqbmO6EVGuU).
### Propagate and override artifacts, manifests, and service variables
You can propagate services between stages and override service settings by using multiple values YAML files and/or **Environment Overrides**.
To propagate or override services, go to the following topics:
* [Propagating CD services](/continuous-delivery/use-continuous-delivery/cd-building-blocks/services/propagate-and-override-cd-services.md)
* [Add and override values YAML files](/continuous-delivery/use-continuous-delivery/deploy-services-on-different-platforms/kubernetes/cd-kubernetes-category/add-and-override-values-yaml-files.md)
## Manifest optional values file
You can now proceed with your deployment without configuring a `values.yaml` file or an override file in the **manifest configuration** of a Kubernetes service.
### Optional values file
To skip the `values.yaml` file:
1. Go to the **Service Configuration**.
2. Under the **Manifest** section, click **Add Manifest** or edit the existing manifest.
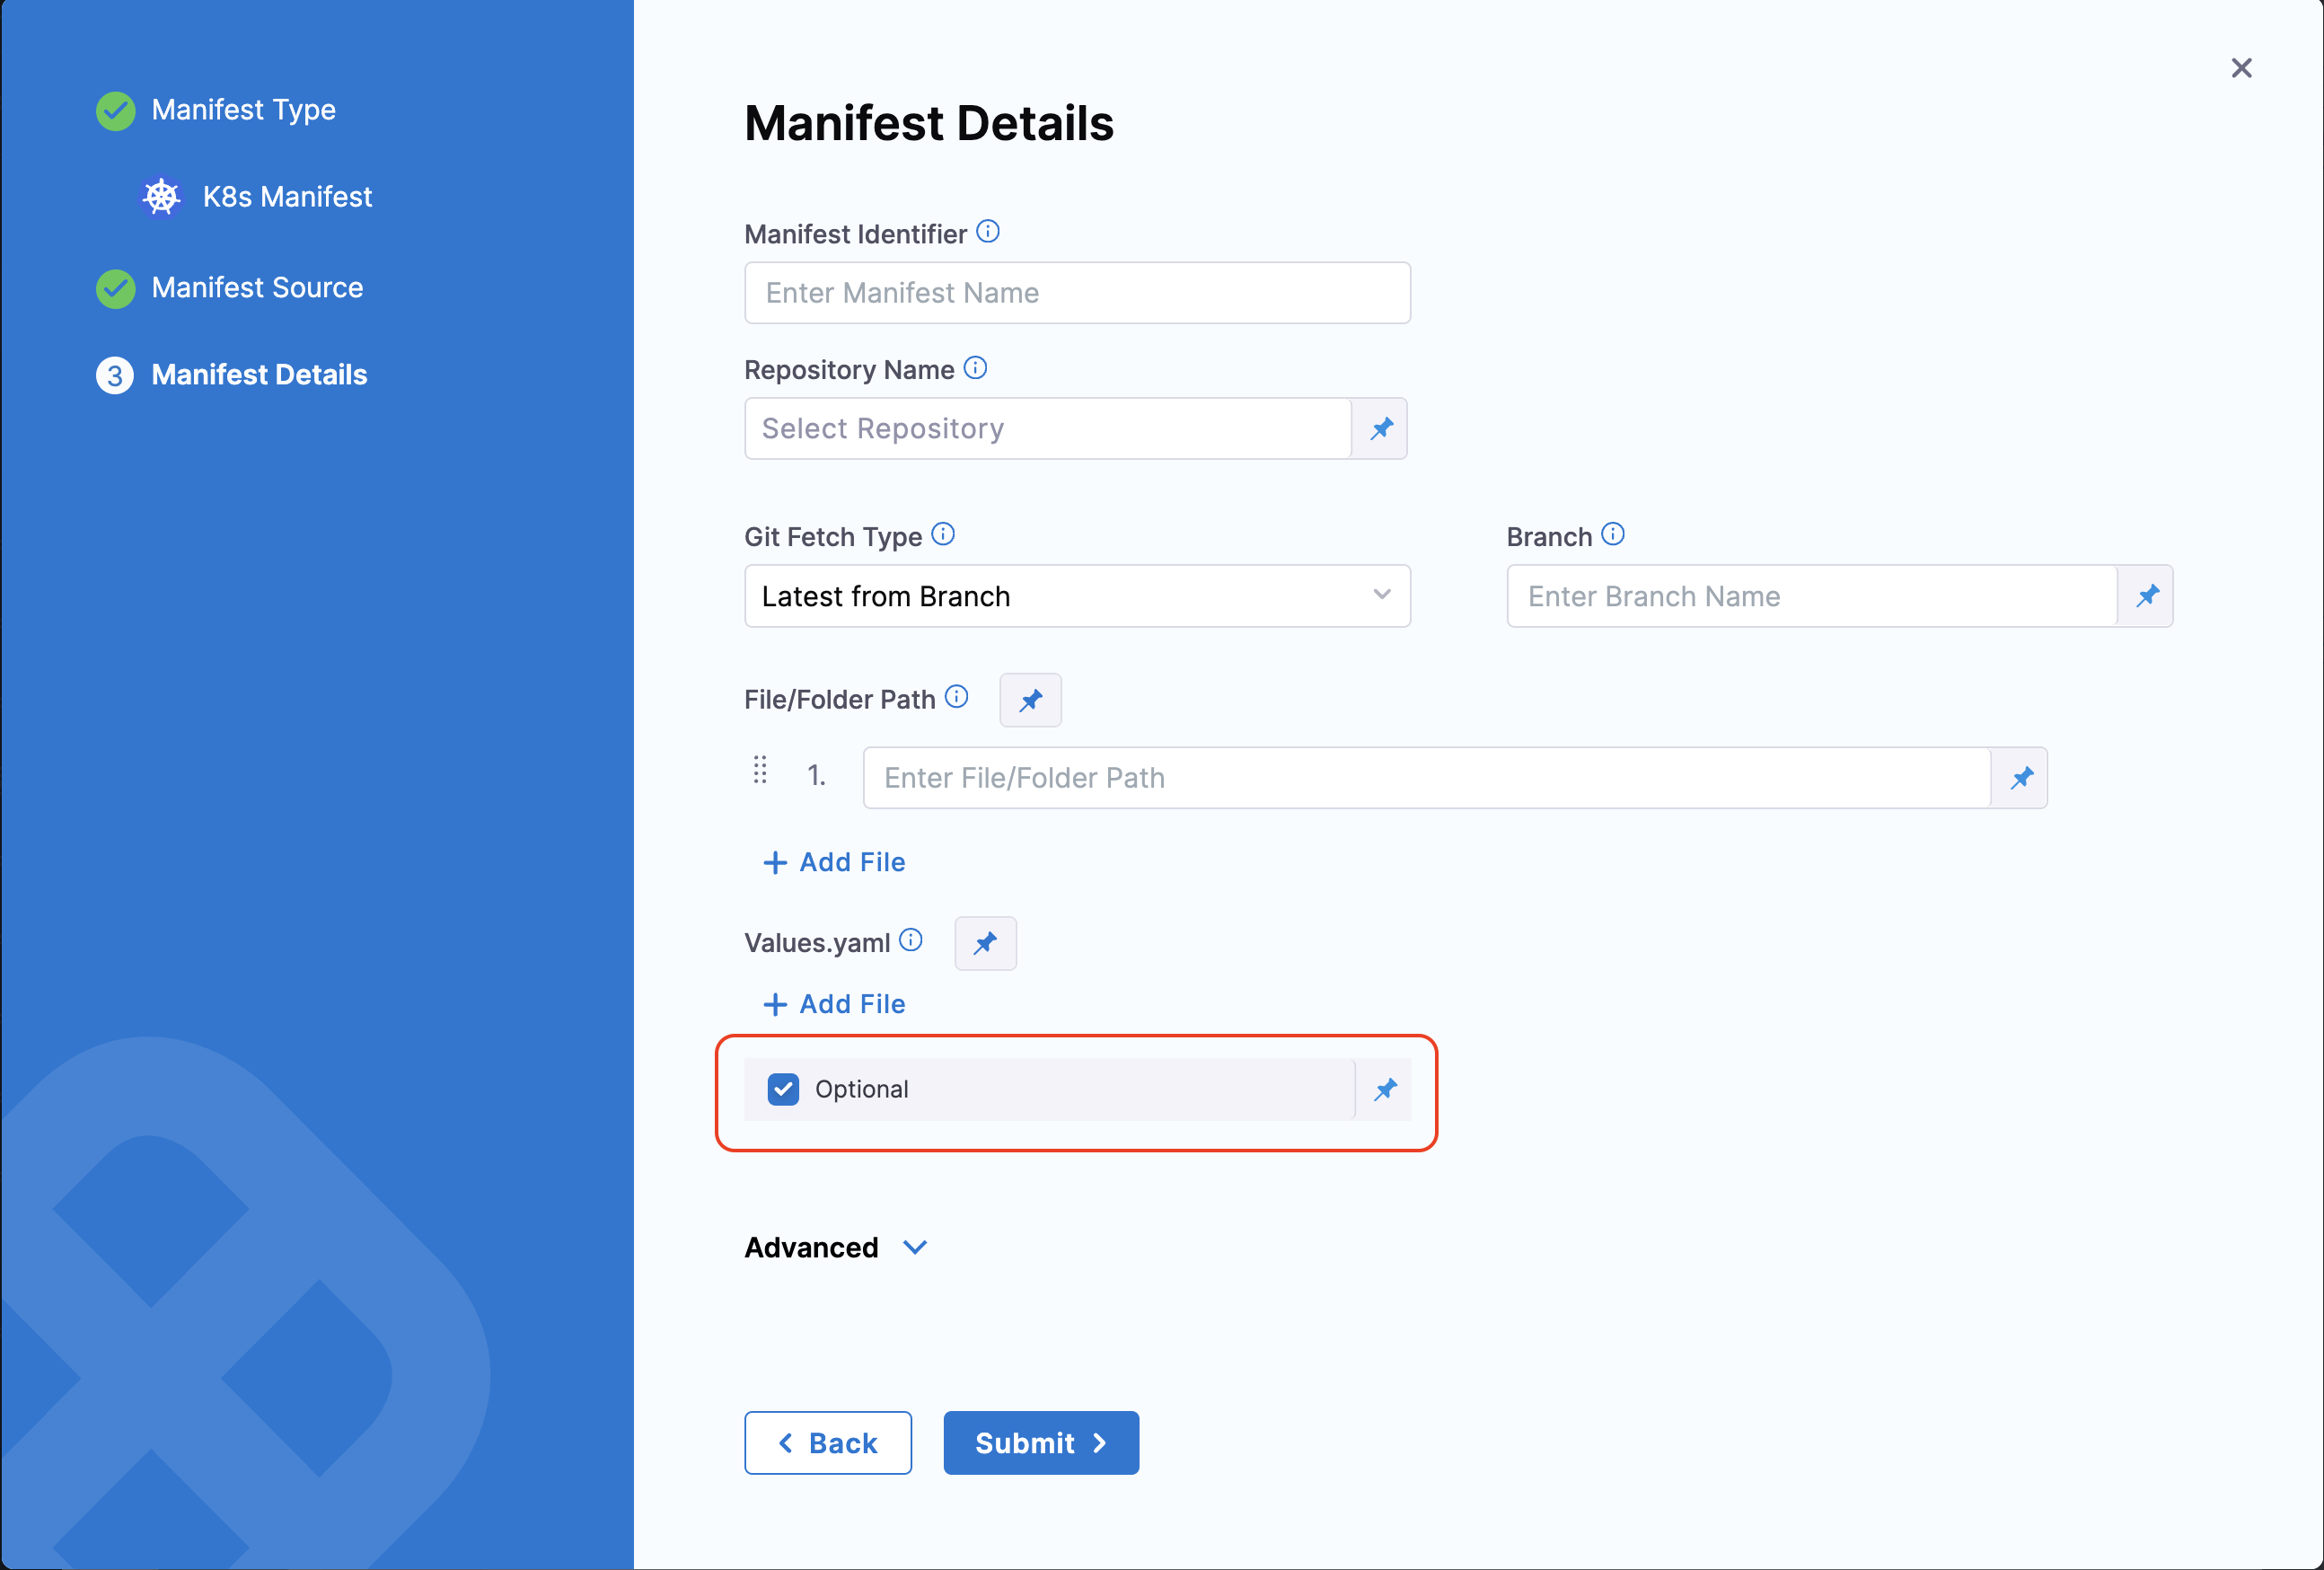
3. In the **Manifest Details** tab, enable the **Optional** checkbox next to the `values.yaml` placeholder.
When this option is enabled, the **Values YAML** file is no longer required. If the file is missing from the specified path, the deployment will still proceed without it.
Optional values.yaml support
Sample YAML
Here is a sample of how the manifest would look when this checkbox is enabled. The `optionalValuesYaml` will be set to `true`.
```yaml
manifests:
- manifest:
identifier: test
type: K8sManifest
spec:
store:
type: Github
spec:
connectorRef: account.gitconnector
gitFetchType: Branch
paths:
- path_to_manifest
repoName: test
branch: test
skipResourceVersioning: false
enableDeclarativeRollback: false
optionalValuesYaml: true
```
### Optional override file
To skip the override file:
1. Go to the Service Configuration.
2. Under the Manifest section, click Add Additional Override File or edit the existing override file.
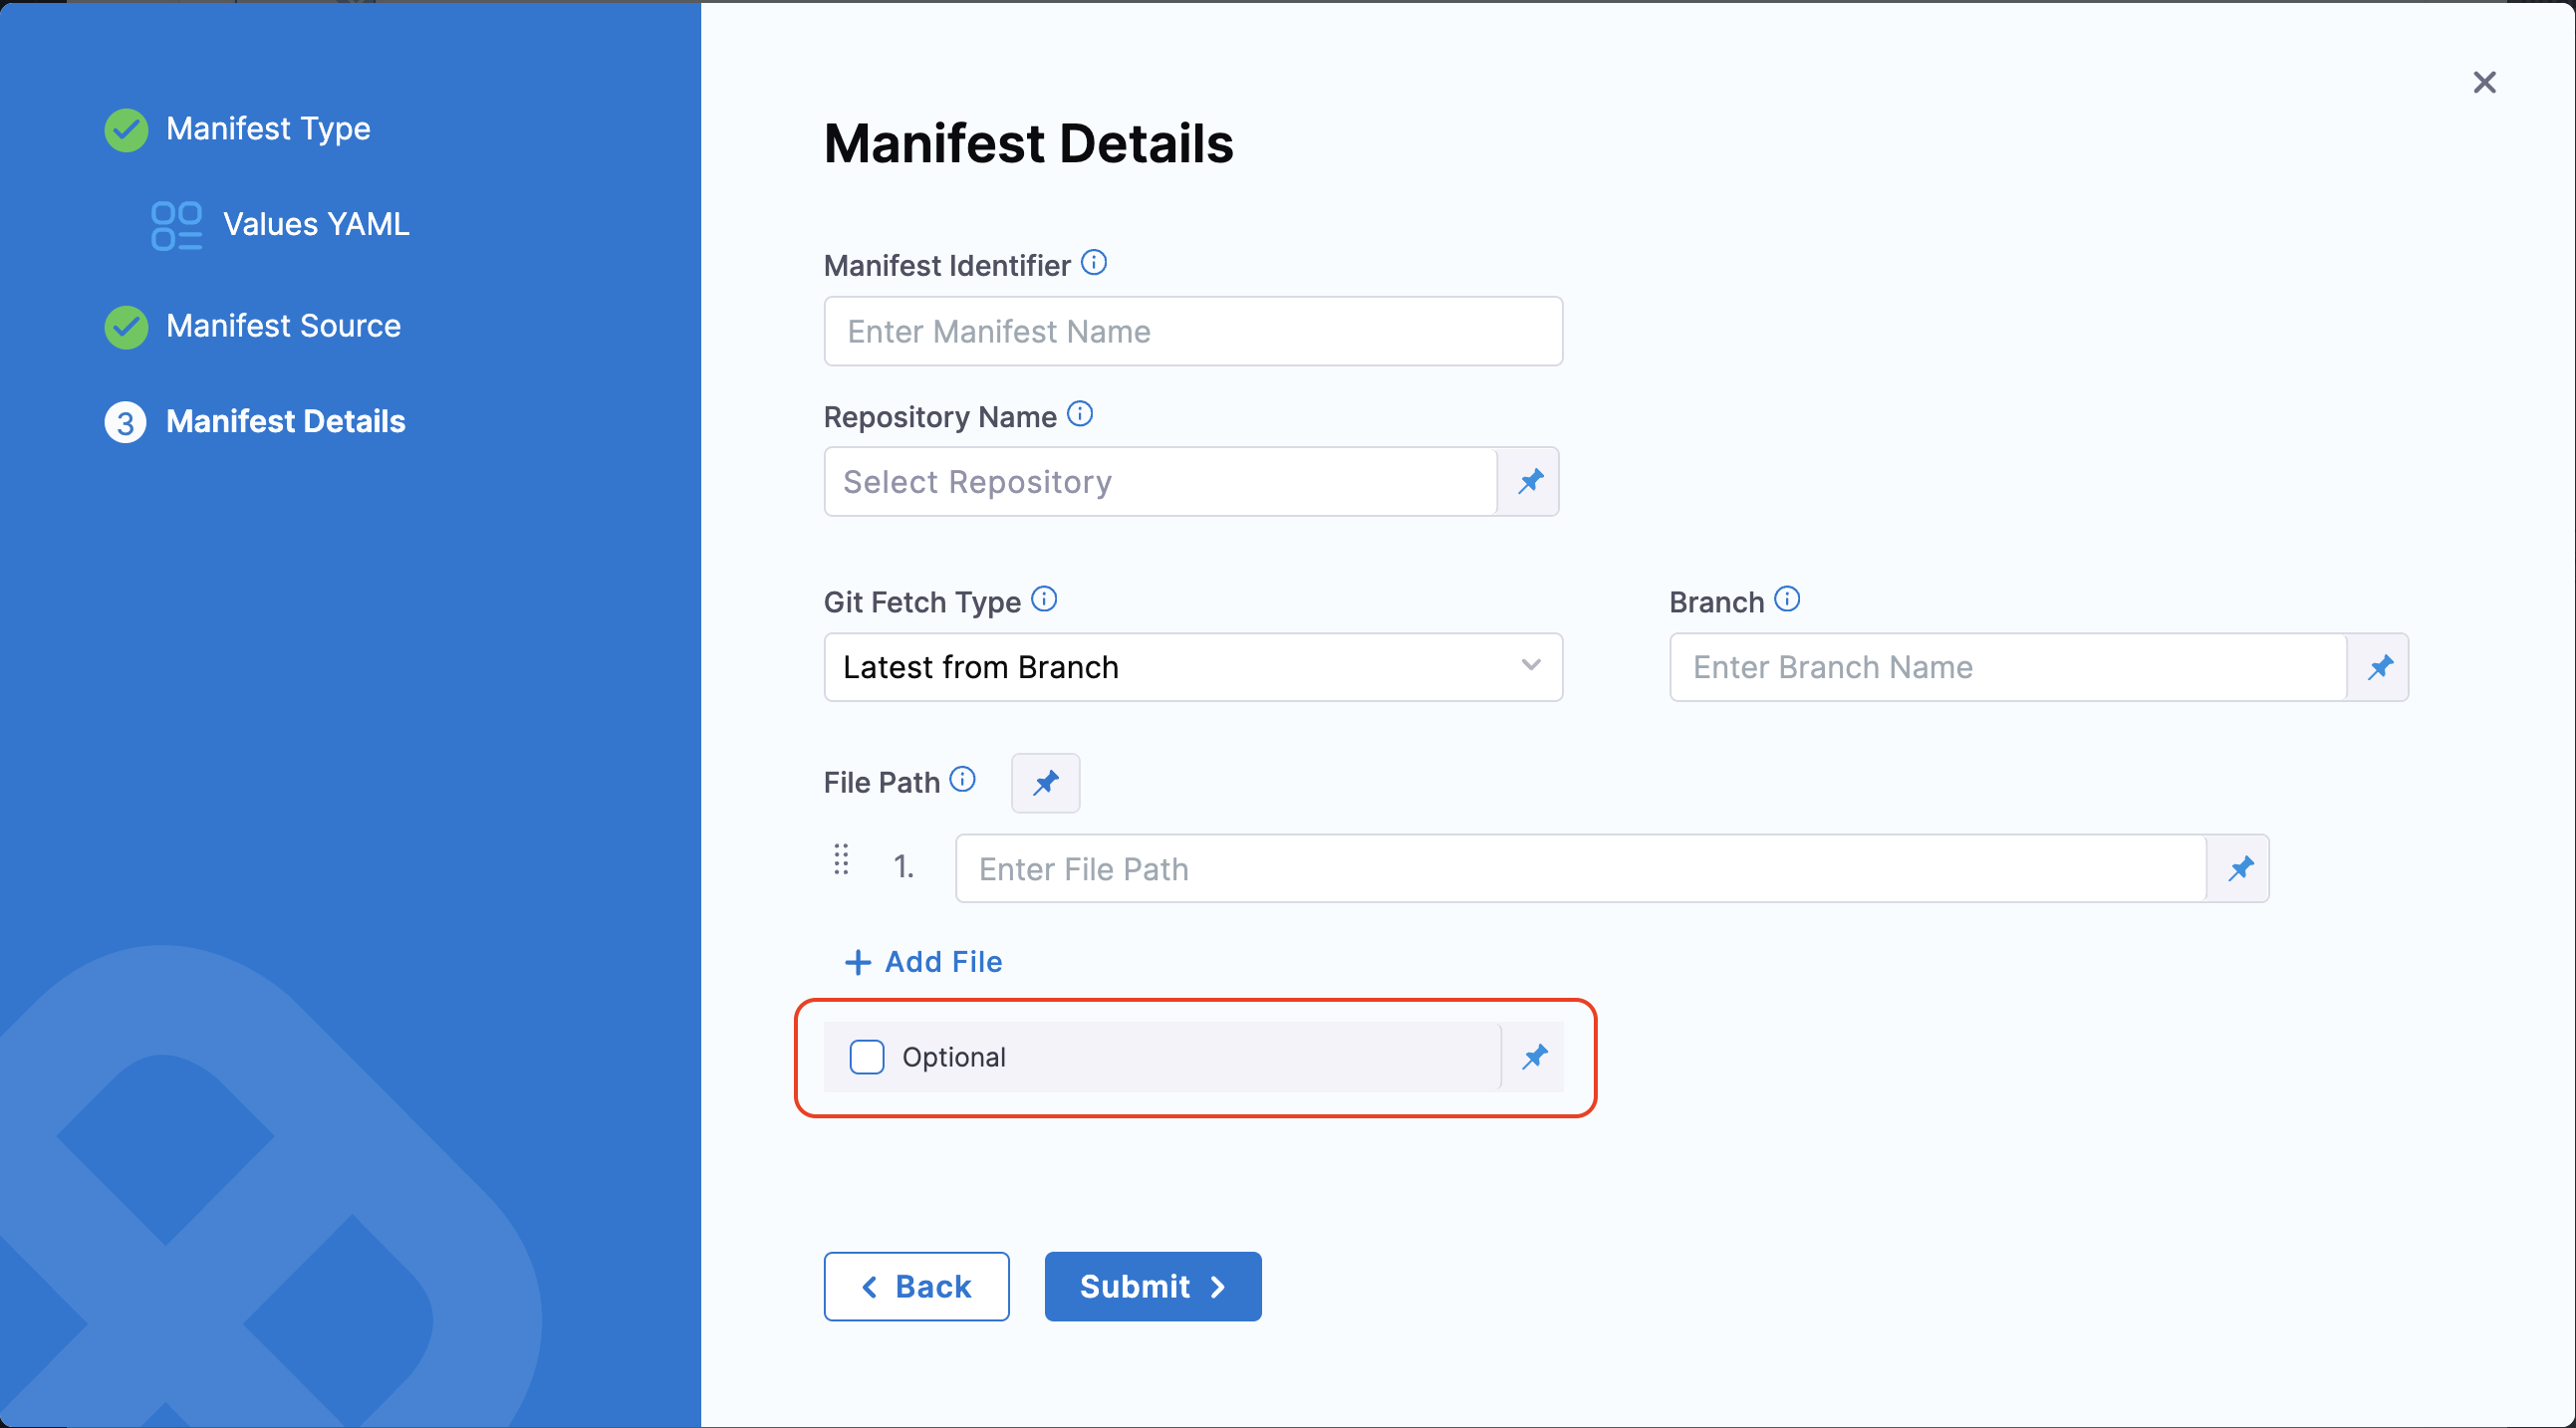
3. In the Manifest Details tab, enable the Optional checkbox next to the Add File placeholder.
When this option is enabled, the **override file** is no longer required. If the file is missing from the specified path, the deployment will still proceed without it.
Optional override file support
Sample YAML
Here is a sample of how the Values config would look when this checkbox is enabled. The `optionalValuesYaml` will be set to `true`.
```yaml
- manifest:
identifier: values_test
type: Values
spec:
store:
type: Github
spec:
connectorRef: account.github_connector
gitFetchType: Branch
paths:
- path_to_file
branch: main
optionalValuesYaml: true
```
## Next steps
Once you have configured your service, you can move onto the stage's **Environment** settings and define the target Kubernetes cluster and namespace for your deployment.
Go to [Define your Kubernetes target infrastructure](/continuous-delivery/use-continuous-delivery/deploy-services-on-different-platforms/kubernetes/define-your-kubernetes-target-infrastructure.md) to review infrastructure settings.
{% @harness-feedback/feedback %}