Serverless.com framework for AWS Lambda
Deploy a Serverless Lambda application to AWS Lambda using Harness.
This topic shows you how to deploy a Serverless Lambda application to AWS Lambda using Harness.
In this topic, we'll use a publicly-available serverless.yaml file and artifact and deploy them to your AWS Lambda service using a Harness Pipeline.
New to Serverless.com Framework? See Tutorial: Your First Serverless Framework Project from Serverless.
Overview
Setting up a Serverless Lambda application involves the following steps:
Add a
serverless.yamlfile and ZIP artifact to a Harness Pipeline stage.Define your AWS Lambda service as the deployment target.
Deploy the Serverless application to Lambda.
Visual summary
Containerized and non-containerized
You have two options for deploying a Serverless.com Framework Lambda application:
Containerized: Deploy your Serverless Lambda application in Harness using containerized steps that allow you to select the Serverless image to use for each step.
For more information containerized step groups, go to Containerize step groups.
Non-containerized: Deploy your Serverless Lambda application in Harness using one or more Serverless versions running on one or more Harness Delegates.
You select whether to use a containerized or non-containerized method in the Execution section of the your pipeline Deploy stage. This topic covers both methods.
Before you begin
Review Harness Key Concepts to establish a general understanding of Harness.
GitHub account: this quickstart uses a publicly available
serverless.yamlfile, but GitHub requires that you use a GitHub account for fetching files.(Non-containerized) Harness Delegate with Serverless installed: the Harness Delegate is a worker process that performs all deployment tasks. Typically, you will install a Kubernetes delegate in your own cluster.
You can use a cluster hosted on a cloud platform or run one in minikube using Docker Desktop locally. The installation steps are the same.
The delegate pod(s) must have Serverless installed. We'll add the Serverless installation script using the delegate environment variable
INIT_SCRIPTto the delegate YAML file later in this quickstart.
(Containerized) Kubernetes cluster and namespace where each container will run: Each containerized step will run in a Kubernetes cluster you provide.
AWS User account with required policy: Serverless deployments require an AWS User with specific AWS permissions, as described in AWS Credentials from Serverless.com. To create the AWS User, do the following:
Log into your AWS account and go to the Identity & Access Management (IAM) page.
Click Users, and then Add user. Enter a name. Enable Programmatic access by clicking the checkbox. Click Next to go to the Permissions page. Do one of the following:
View and copy the API Key and Secret to a temporary place. You'll need them when setting up the Harness AWS Connector later in this quickstart.
Full Admin Access: click on Attach existing policies directly. Search for and select AdministratorAccess then click Next: Review. Check to make sure everything looks good and click Create user.
Limited Access: click on Create policy. Select the JSON tab, and add the JSON using the following code from the Serverless gist IAMCredentials.json:
AWS OIDC connectors are supported for Serverless V2 deployments starting with delegate version
857xxor later.
Use AWS IRSA for Harness AWS connector credentials
The Use IRSA option allows the Harness Kubernetes delegate in AWS EKS to use a specific IAM role when making authenticated requests to resources. This option is also necessary if the delegate uses IRSA on an EKS cluster with OIDC Provider.
By default, the Harness Kubernetes delegate uses a ClusterRoleBinding to the default service account. Instead, with this option, you can use AWS IAM roles for service accounts (IRSA) to associate a specific IAM role with the service account used by the Harness Kubernetes delegate.
Verify your firewall policy and make sure to whitelist all AWS endpoints for the services you're using. For more details, go to view AWS service endpoints.
Modify your delegate YAML, as described below.
Serverless framework support
Harness supports Serverless framework 1.82 and later.
Harness supports Serverless framework CLI versions 2.x.x, 3.x.x, and 4.18.0.
Harness supports all language runtimes that Serverless supports.
Harness supports ZIP files and Docker image artifacts only.
ZIP files are supported with JFrog Artifactory.
Docker images are supported with AWS ECR.
Serverless V4 Support
BREAKING CHANGE
Serverless V4 CLI requires authentication. This means that any CLI based scripts are processes will require an extra input. This means upgrading to V4 could be a breaking change for your pipeline.
Features:
Authenticate using the environment variable
SERVERLESS_ACCESS_KEY.You can rollback from V4 back to V3 in case something goes wrong.
Supports the use of the Node.js 22 runtime.
It is not recommended to switch to Serverless V4 for existing deployments using Serverless V3.
For limitations when using Serverless V4, including custom config file restrictions, go to Limitations.
Containerized step images
Old Images
Harness supports different images for Prepare, Package and deploy for serverless deployment.
Prepare Rollback:- harnessdev/serverless-preparerollback:<LATEST_TAG>
Package:- harnessdev/serverless-package:<LATEST_TAG>
Deploy:- harnessdev/serverless-deploy:<LATEST_TAG>
Rollback:- harnessdev/serverless-rollback:LATEST_TAG
We recommend you to use the new images that we have introduced with multiple runtime support.
New Serverless Images
Harness support multiple runtime images for nodejs24, nodejs22, nodejs20, nodejs18, java25, java21, java17, java8, python3.14, python3.13, python3.12, python3.11, ruby3.4, ruby3.3 and ruby3.2. These are Linux AMD64 images.
Unlike old images, in new images a single image has the capability of handling all the serverless steps.
There are two flavours of images available first with serverless installed and other without serverless installed that you can use.
Serverless V3 Images
The following table lists Serverless Framework V3 images (version 3.39.0):
Runtimes
With Serverless Installed
Without Serverless Installed
Version
nodejs 24
nodejs v24.x
nodejs 22
nodejs v22.14.0
nodejs 20
nodejs v20.19.0
nodejs 18
nodejs v18.20.7
java 25
openjdk 25.x
java 21
openjdk 21.0.6
java 17
openjdk 17.0.11
java 8
openjdk 1.8.0_372
python 3.14
Python 3.14.x
python 3.13
Python 3.13.x
python 3.12
Python 3.12.9
python 3.11
Python 3.11.11
ruby 3.4
ruby 3.4.x
ruby 3.3
ruby 3.3.x
For ECR users, you can access these images via the ECR Image Repository for Serverless Plugin.
For GAR users, you can access these images via:
Europe region: GAR Image Repository for Serverless Plugin (Europe)
Now, let's understand the runtime image one with serverless installed and one without serverless installed.

Build your own image
You can also build your own image based on the base image provided by Harness and use it in the Serverless deployments.
How this pipeline works:
Harness provides a base image that has the Serverless plugin binary. The pipeline takes a pre-built scratch image containing the Serverless plugin binary and creates a properly tagged final image that combines it with the appropriate runtime.
For an in-depth explanation on how to build your own image, go to Build your own image.
Create the Deploy stage
Pipelines are collections of stages. For this quickstart, we'll create a new Pipeline and add a single stage.
In your Harness Project, click Deployments, and then click Create a Pipeline.
Enter the name Serverless Quickstart and click Start. Your Pipeline appears.
Click Add Stage and select Deploy.
Enter the name Deploy Service, make sure Service is selected, and then click Set Up Stage.

The new stage settings appear.
In About the Service, click New Service.
Give the Service the name quickstart and click Save.

Once you have created a Service, it's persistent and you can use it throughout the stages of this or any other Pipeline in the Project.
Add the manifest
Next, we can add a serverless.yaml for our deployment. We'll use the publicly-available serverless.yaml file available from Harness.
In Service Definition, in Deployment Type, click Serverless Lambda.
In Manifests, click Add Manifest.
Select Serverless Lambda Manifest, and click Continue.
In Specify Serverless Lambda Manifest Store, click GitHub, and then click New GitHub Connector. The Git Connector settings appear. Enter the following settings.
Name:
serverless.URL Type:
Repository.Connection Type:
HTTP.GitHub Repository URL:
https://github.com/wings-software/harness-docs.git.Username: Enter your GitHub account username.
In Personal Access Token, click Create or Select a Secret.
Click New Secret Text.
In Secret Name, enter a name for the secret like github-pat.
In Secret Value, paste in a GitHub Personal access token.When you're logged into GitHub, these tokens are listed at https://github.com/settings/tokens. For steps on setting up a GitHub PAT, see Creating a personal access token from GitHub.
Make sure your PAT has the repo scope selected:

Select Connect through Harness Platform.
Click Finish.
Back in Specify Serverless Lambda Manifest Store, click Continue.
In Manifest Details, enter the following.
Manifest Identifier:
serverless.Git Fetch Type:
Latest from Branch.Branch:
main.Folder Path:
serverless/artifacts.In Advanced, you can see Serverless Config File Path. Use this setting when your Serverless manifest isn't named
serverless.yml|.yaml|.js|.json. This option is the same as the--configoption inserverless deploy. See AWS - deploy from Serverless.
You can see the serverless.yaml manifest in Harness.

Add the artifact
Next, add your Serverless artifact. For this quickstart, we will add a publicly available artifact to your service using Artifactory. However, you have more options for your artifact source.
Artifact Sources
Here is a full list of artifact sources available to you for Serverless deployments:
Harness Artifact Registry. Harness supports docker images stored in Harness Artifact Registry as your Serverless deployment artifacts.
Artifactory. Harness supports ZIP files stored in Artifactory as your Serverless deployment artifacts.
AWS S3. Harness supports ZIP files stored in an S3 bucket for your Serverless deployment artifacts.
ECR. Harness supports docker images stored in ECR as your Serverless deployment artifacts.
Add the artifact with Artifactory
For this guide, we'll add a publicly-available artifact to your Service. The artifact is a zip file with a JavaScript function hosted in Artifactory.
We'll add a new Artifactory Connector and install a Harness Kubernetes Delegate in a Kubernetes cluster. The delegate is a worker process that performs the deployment operations. The delegate will use the URL and credentials you provide in the Connector to connect to Artifactory and fetch the artifact at runtime.
In Artifact, click Add Primary.
In Specify Artifact Repository Type, click Artifactory, and click Continue.
In Artifactory Repository, click New Artifactory Connector.
In Create or Select an Existing Connector, click New Artifactory Connector.
Enter a name for the Connector, such as JFrog Serverless. Click Continue.
In Details, in Artifactory Repository URL, enter
https://harness.jfrog.io/artifactory/.In Authentication, select Anonymous.

In Connect to the provider, select Connect through a Harness Delegate, and then select Continue. We don't recommend using the Connect through Harness Platform option here because you'll need a delegate later for connecting to your target environment. Typically, the Connect through Harness Platform option is a quick way to make connections without having to use delegates.
Expand the section below to learn more about installing delegates.
Back in Set Up Delegates, in the list of delegates, you can see your new delegate and its tags.
Select the Connect using Delegates with the following Tags option.
Enter the tag of the new delegate and click Save and Continue.

In Connection Test, you can see that the connection is successful. Click Finish.

Install Serverless on the delegate
For a non-containerized execution, you need to edit the YAML to install Serverless when the delegate pods are created.
Open the delegate YAML in a text editor.
Locate the Environment variable
INIT_SCRIPTin theStatefulSet(Legacy Delegate) orDeployment(Harness Delegate) object:Replace the value with the following Serverless installation script (the Harness Delegate uses the Red Hat Universal Base Image (UBI)).
Here's an example using microdnf and npm:
Here's an example using yum and npm:
In cases when the delegate OS doesn't support apt (Red Hat Linux), you can edit this script to install npm. The rest of the code should remain the same. If you are using Harness Delegate, the base image is Red Hat UBI. Save the YAML file as harness-delegate.yml.
Add the artifact
Back in Artifactory Repository, click Continue.
Enter the following artifact settings and click Submit. The following image shows how the Artifactory settings correspond to Artifact Details.
Repository:
lambda.Artifact Directory:
serverless.Artifact Details:
Value.Artifact Path:
handler.zip. When you click one of the settings, the delegate fetches artifact metadata from Artifactory.
Click Submit.
The artifact is now in the Service.

Click Continue to view the Infrastructure.
Now that you have configured the Service, we can define the target for our deployment.
Define the infrastructure
You define the target infrastructure for your deployment in the Environment settings of the pipeline stage. You can define an environment separately and select it in the stage, or create the environment within the stage Environment tab.
There are two methods of specifying the deployment target infrastructure:
Pre-existing: the target infrastructure already exists and you simply need to provide the required settings.
Dynamically provisioned: the target infrastructure will be dynamically provisioned on-the-fly as part of the deployment process.
For details on Harness provisioning, go to Provisioning overview.
Pre-existing infrastructure
In Infrastructure, we'll add an AWS Connector to connect Harness with your Lambda service.
In Infrastructure Details, in Specify your environment, click New Environment. Just like with a Service, you can create a new Environment or select an existing one. We'll create a new one.
In New Environment, enter a name, select Pre-Production, and click Save. The new Environment appears.
In Infrastructure Definition, click AWS.
In Amazon Web Services Details, click in Connector.
In Create or Select an Existing Connector, click New Connector.
Enter the following and click Save and Continue.
Name:
AWS Serverless.Credentials:
AWS Access Key. Enter the AWS access key for the AWS User you created with the required policies in Before You Begin.Enter the secret key as a Harness Text Secret. The Harness Delegate uses these credentials to authenticate Harness with AWS at deployment runtime.
Delegates Setup:
Only use Delegates with all of the following tags.Select the delegate you added earlier in this quickstart.
The Connection Test verifies the connection. Click Finish.
Back in Amazon Web Services Details, in Region, enter the region for your AWS Lambda service, such as us-east-1.
In Stage, enter the name of the stage in your service that you want to deploy to, such as dev. This is the same as the
--stageoption in theserverless deploycommand.
When you run your deployment, you'll see these settings used in the logs. For example:
serverless deploy list --stage dev --region us-east-1.Click Continue. The Execution steps appear.
Dynamically provisioned infrastructure
Harness supports multiple provisioner types, including Terraform, CloudFormation, Shell Script, and so on. Go to Provision Infrastructure to explore the available provisioners and configure provisioning based on your requirements.
Here is a summary of the steps to dynamically provision the target infrastructure for a deployment:
Add dynamic provisioning to the CD stage:
In a Harness Deploy stage, in Environment, enable the option Provision your target infrastructure dynamically during the execution of your Pipeline.
Select the type of provisioner that you want to use.
Harness automatically adds the provisioner steps for the provisioner type you selected.
Configure the provisioner steps to run your provisioning scripts.
Select or create a Harness infrastructure in Environment.
Map the provisioner outputs to the Infrastructure Definition:
In the Harness infrastructure, enable the option Map Dynamically Provisioned Infrastructure.
Map the provisioning script/template outputs to the required infrastructure settings.
Supported provisioners
The following provisioners are supported for Serverless.com Framework Lambda deployments:
Terraform
Terragrunt
Terraform Cloud
CloudFormation
Shell Script
Adding dynamic provisioning to the stage
To add dynamic provisioning to a Harness pipeline Deploy stage, do the following:
In a Harness Deploy stage, in Environment, enable the option Provision your target infrastructure dynamically during the execution of your Pipeline.
Select the type of provisioner that you want to use.
Harness automatically adds the necessary provisioner steps.
Set up the provisioner steps to run your provisioning scripts.
For documentation on each of the required steps for the provisioner you selected, go to the following topics:
Terraform:
Terraform Rollback. To see the Terraform Rollback step, toggle the Rollback setting.
CloudFormation:
Rollback Stack. To see the Rollback Stack step, toggle the Rollback setting.
Mapping provisioner output
Once you set up dynamic provisioning in the stage, you must map outputs from your provisioning script/template to specific settings in the Harness Infrastructure Definition used in the stage.
In the same CD Deploy stage where you enabled dynamic provisioning, select or create (New Infrastructure) a Harness infrastructure.
In the Harness infrastructure, in Select Infrastructure Type, select AWS if it is not already selected.
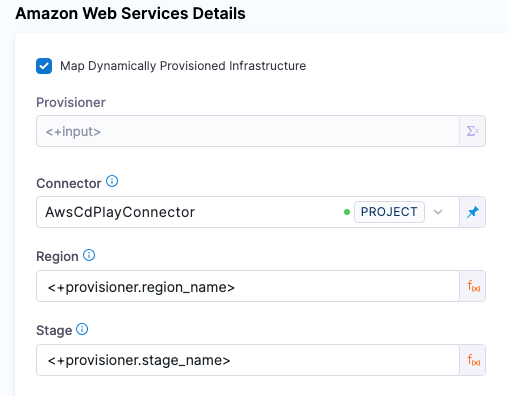
In Amazon Web Services Details, enable the option Map Dynamically Provisioned Infrastructure.
A Provisioner setting is added and configured as a runtime input.
Map the provisioning script/template outputs to the required infrastructure settings.
To provision the target deployment infrastructure, Harness needs specific infrastructure information from your provisioning script. You provide this information by mapping specific Infrastructure Definition settings in Harness to outputs from your template/script.
For Serverless.com framework Lambda, Harness needs the following settings mapped to outputs:
Region
Stage
For example, here's a snippet of a CloudFormation template that provisions the infrastructure for a Serverless.com Framework Lambda deployment and includes the required outputs:
In the Harness Infrastructure Definition, you map outputs to their corresponding settings using expressions in the format <+provisioner.OUTPUT_NAME>, such as <+provisioner.region_name>.

Containerized steps
This section describes how to set up the stage Execution when you are using containerized steps.
Authentication with AWS
AWS authentication occurs in the Harness AWS connector used in the Infrastructure Definition and when using AWS ECR or S3 for the Harness service artifact.
For infrastructure authentication, when the pipeline stage's containerized steps run, Harness passes the AWS access key (PLUGIN_AWS_ACCESS_KEY) and secret key (PLUGIN_AWS_SECRET_KEY) you configured in your AWS connector(s) as environment variables into the containers.
The container images pick up the access and secret keys based on these specific environment variables.
For ECR artifacts, Harness passes in the PLUGINS_ECR_AWS_ACCESS_KEY and PLUGINS_ECR_AWS_SECRET_KEY as environment variables.
For S3 artifacts, Harness passes in the PLUGIN_S3_AWS_ACCESS_KEY and PLUGIN_S3_AWS_SECRET_KEY as environment variables.
For more information on how to use a Serverless Harness Connector with a containerized step group, go to Using Serverless.com Harness Connectors with Containerized Step Groups.
Step group
Harness adds the step group and steps needed for a deployment automatically when you select the stage execution strategy in the Execution section.
To configure the step group, do the following:
Open the step group.
In Kubernetes Cluster, add a Harness Kubernetes Cluster connector to connect to the cluster where the containers will run.
In Namespace, enter an existing namespace in the cluster.
For information on the remaining step group settings, go to Containerize step groups.
Harness Docker Registry connector for all steps
In most steps in the containerized step group, you must provide a Harness connector to a container registry and an image for the container step to run.
You can create the connector in the any of the steps and then select it in the other steps, or you can create it separately and select it in all of the steps.
You select the image to use in each step separately.
For steps on adding a Docker Registry connector, go to Docker Connector Settings Reference.
Download Manifests step
The Download Manifests Step triggers a Git clone step for each manifest in the Harness service in the Service section of the stage.
Serverless directory path
After the Download Manifest step, you can access the directly where the manifest has been downloaded using the expression <+serverlessV2.serverlessDirectoryPath>.
For example, you could add a Run or Shell Script step with the following:
Serverless Prepare Rollback step
The Serverless Prepare Rollback step describes the CloudFormation stack and gets its current state. This information is stored and passed to the Serverless Rollback Step, and used in the case of rollback.
We recommend that you use the latest Harness image that supports multiple runtime. You can use another image, hosted in your own Docker registry.
To configure the Serverless Prepare Rollback step, do the following:
Open the Serverless Prepare Rollback step.
In Container Registry, add a Harness Docker Registry connector to connect to Docker Hub.
In Image, enter the path, image, and tag for the image you want to run in this step. For example, you can specify:
harness/serverless-plugin:nodejs20.x-3.39.0-1.0.0-beta-linux-amd64.
For information on the remaining settings, go to Common settings for all steps.
Serverless Package step
This step performs the Serverless package command.
You can use latest Harness image that supports multiple runtime. You can use another image, hosted in your own Docker registry.
To configure the Serverless Package step, do the following:
Open the Serverless Package step.
In Container Registry, add a Harness Docker Registry connector to connect to Docker Hub.
In Image, enter the path, image, and tag for the image you want to run in this step. For example:
harness/serverless-plugin:nodejs20.x-3.39.0-1.0.0-beta-linux-amd64.
For information on the remaining settings, go to Common settings for all steps.
Serverless Deploy step
This step performs the Serverless deploy command.
The Serverless stage and AWS region are taken from the Harness Infrastructure Definition configured in the Harness pipeline stage's Environment section.
You can use latest Harness image that supports multiple runtime. You can use another image, hosted in your own Docker registry.
To configure the Serverless Deploy step, do the following:
Open the Serverless Deploy step.
In Container Registry, add a Harness Docker Registry connector to connect to Docker Hub.
In Image, enter the path, image, and tag for the image you want to run in this step. For example:
harness/serverless-plugin:nodejs20.x-3.39.0-1.0.0-beta-linux-amd64.
For information on the remaining settings, go to Common settings for all steps.
Serverless Rollback Step
Toggle the Execution/Rollback setting in Execution to see the Serverless Rollback step.
The Serverless Rollback step reads the CloudFormation stack name and state generated by the Serverless Prepare Rollback step and performs rollback, if needed.
You can use latest Harness image that supports multiple runtime. You can use another image, hosted in your own Docker registry.
To configure the Serverless Rollback step, do the following:
Open the Serverless Rollback step.
In Container Registry, add a Harness Docker Registry connector to connect to Docker Hub.
In Image, enter the path, image, and tag for the image you want to run in this step. For example:
harness/serverless-plugin:nodejs20.x-3.39.0-1.0.0-beta-linux-amd64.
For information on the remaining settings, go to Common settings for all steps.
Common settings for all steps
All of the containerized steps include the following settings:
Image Pull Policy: Select an option to set the pull policy for the image:
Always: The kubelet queries the container image registry to resolve the name to an image digest every time the kubelet launches a container. If the kubelet encounters an exact digest cached locally, it uses its cached image; otherwise, the kubelet downloads (pulls) the image with the resolved digest, and uses that image to launch the container.
If Not Present: The image is pulled only if it is not already present locally.
** Never:** The image is assumed to exist locally. No attempt is made to pull the image.
Privileged: The standard
privilegedproperty for KubernetessecurityContext.When this setting is enabled, it grants the container elevated privileges within the underlying host environment. This means that the container has access to all Linux kernel capabilities and devices, similar to running processes outside the container. It effectively removes the isolation provided by the container runtime and can potentially pose security risks if not used carefully.
Environment Variables: You can inject environment variables into a container and use them in the Command script. You must input a Name and Value for each variable.
You can reference environment variables in the Command script by their name. For example, a Bash script would use
$var_nameor${var_name}, and a Windows PowerShell script would use$Env:varName.
Pre Execution Command: Pre Execution command will run before your actual serverless step. You can use this field to install any dependencies needed before the plugin logic executes. For example you can use this field to install any package spec via npm.
Pre Execution command will only run with latest Harness runtime support images.
Non-containerized steps
This section describes how to set up the stage Execution when you are using non-containerized steps.
Add a Serverless AWS Lambda Deploy step
In Execution, you add the steps that define how Harness deploys your Serverless Lambda service.
Harness automatically adds two Serverless Lambda steps to Execution:
Serverless Lambda Deploy: this step performs the deployment.
Serverless Lambda Rollback: this step performs a rollback in the event of a deployment failure. To see this step, toggle the Execution/Rollback setting.

In Execution, click Serverless Lambda Deploy.
Click the Advanced tab and select the delegate that you installed in Delegate Selector.

If you only have one delegate installed in your Project, then this isn't necessary. But if you have multiple delegates, you want to make sure the Serverless Lambda Deploy step uses the delegate where you installed Serverless.
Click Apply Changes.
Now you're ready to deploy.
Serverless Deploy Command Options
In Serverless Deploy Command Options, you can add any serverless deploy command options. See the Serverless AWS - Deploy doc for the list of options.
In the deployment logs, you'll see the options added to the serverless deploy command.
For example, if you add --conceal in Serverless Deploy Command Options you'll see the following:
Deploy and review
Save your Pipeline and then click Run, and then Run Pipeline. The Pipeline executes.
In the Serverless AWS Lambda Deploy step, click Input to see the deployment inputs:

Click Output to see what's deployed:

Click Details or Console View to see the logs.
In the logs you can see the successful deployment.
Congratulations! You have successfully deployed a function using Serverless Lambda and Harness.
Clean up
For steps on deleting the Delegate, go to Delete a delegate.
Notes
Now that you're done the quickstart, here's some more information to help you extend your Harness Serverless Lambda deployments.
Serverless manifest supports Harness secrets and expressions
Harness supports injecting secrets and expressions into your serverless.yaml, but how this works depends on whether you are using non-containerized (V1) or containerized (V2) steps. Using the wrong approach is a common source of confusion.
Non-containerized steps: expressions work directly in the manifest
For non-containerized deployments, Harness resolves built-in expressions directly inside serverless.yaml on the manager side before passing the file to the Serverless CLI. Expressions like <+artifact.path>, <+artifact.image>, and <+service.name> all work as-is:
Containerized steps: expressions require a values file
HARNESS EXPRESSIONS DO NOT WORK DIRECTLY IN THE MANIFEST FOR CONTAINERIZED STEPS
If you place Harness expressions such as <+artifact.path> directly inside a serverless.yaml used with containerized steps, they will not be resolved. The Serverless CLI receives the literal string (e.g. <+artifact.path>), attempts to locate a file at that path, and fails with a file-not-found error. Nothing in the error message indicates that an unresolved expression is the root cause.
Containerized steps always use Go templating with a values.yaml file. Harness expressions placed directly in the manifest will not be resolved.
For containerized deployments, use Go template syntax in serverless.yaml and supply a separate values.yaml file — the same pattern used by Kubernetes manifests in Harness. Harness resolves the values.yaml first (where Harness expressions work freely), then substitutes those values into the manifest before deployment.
Step 1: In serverless.yaml, reference values using Go template syntax:
Step 2: Add a values.yaml file in the same manifest folder. Harness expressions work here:
To add the values file in Harness, follow the same steps used to add the manifest (see Add the manifest), but at step 3 select Values YAML instead of Serverless Lambda Manifest.
For more on Harness expressions and secrets, see:
Supported stores for Serverless Lambda YAML files
Harness can fetch your YAML files and packaged code from the following stores:
AWS S3 buckets.
You can store the serverless.yml and the artifact code in AWS S3, including in the same bucket.
You can use the .Zip format to grab the
serverless.yamland the packaged code that has been bundled in .zip and published in S3.Harness will extrapolate the
serverless.yamlfile and use that for deployment.For S3, you use a Harness AWS Connector. The IAM role permissions required by Harness for S3 are described in AWS Connector Settings Reference.
Git providers.
Rollback timestamps
In a Serverless CLI rollback (serverless rollback --timestamp timestamp), you'd have to manually identify and select the timestamp of the last successful deployment. This can be difficult because you need to know which timestamp to use. With multiple developers deploying, there's the possibility of rolling back to the wrong version.
Harness avoids this issue by automatically identifying the last successful deployment using its timestamp. During the event of a rollback, Harness will automatically rollback to that deployment.
You can see the timestamps in the deployment logs:
If there is no change in code, Serverless doesn't deploy anything new. In the logs you'll see Serverless: Service files not changed. Skipping deployment....
While this is somewhat similar to how rollback is performed in Serverless CLI, Harness performs rollback automatically and always uses the timestamp of the last successful deployment.
During a Harness rollback, you can see the timestamp used to rollback to the last successful deployment (rollback --timestamp 1653415240343 --region us-east-1 --stage dev):
Versioning
Serverless Lambda deployments are versioned using the timestamp of their deployment. This versioning has no relation to the versioning in AWS Lambda.
Sidecar artifacts
You reference sidecar artifacts with the format <+artifacts.sidecars.[artifact_Id]>.
The artifact Id comes from the Artifact Details:

You can see it in the artifact list:

Docker sidecars
Here's an example of a serverless.yaml file referencing primary and sidecar artifacts:
Non-container sidecars
Here's an example of a serverless.yaml file referencing primary and sidecar artifacts:
Plugin support
Harness supports Serverless plugins in your serverless.yaml file.
You simply add the plugin using the standard Serverless plugins format and Harness adds the plugin at runtime.
Serverless YAML for files and images
The serverless.yaml format for files (for example, ZIP, JAR, WAR) is different from the format for Docker images.
Serverless YAML for files
Serverless YAML for Docker images
Limitations
Custom config file limitation in Serverless V4
When using Serverless Framework v4, you cannot use a custom config file (via the --config argument or Serverless Config File Path setting) and keep a serverless.yml file in the root directory at the same time.
Issue description:
When you provide a custom serverless manifest file using the --config argument (or the Serverless Config File Path setting in Harness), the Serverless v4 CLI continues to attempt to access the default serverless.yml file if it exists in the same directory. If the default serverless.yml file has an invalid structure, the deployment fails with a JSON parsing error, even though a valid custom config file was specified.
Workaround:
To use a custom config file with Serverless Framework v4, ensure that you do not have a serverless.yml file in the same directory as your custom config file. Remove or rename the default serverless.yml file before running any serverless commands.
Example scenario:
You have a custom config file:
serverless-custom.ymlYou specify it using Serverless Config File Path in Harness or
--config serverless-custom.ymlIf
serverless.ymlalso exists in the same directory with invalid content, the deployment will failSolution: Delete or move the
serverless.ymlfile from the directory
This is a known behavior of the Serverless Framework v4 and not a Harness-specific issue.
FAQs
For frequently asked questions about Serverless Lambda deployments in Harness, go to Serverless Lambda deployments FAQs.
Last updated
Was this helpful?