> For the complete documentation index, see [llms.txt](https://developer.harness.io/llms.txt). Markdown versions of documentation pages are available by appending `.md` to page URLs; this page is available as [Markdown](https://developer.harness.io/continuous-delivery/use-continuous-delivery/deploy-services-on-different-platforms/tanzu/tanzu-app-services-quickstart.md).

# Tanzu Application Services deployments overview

This topic shows you how to deploy a publicly available application to your Tanzu Application Service (TAS, formerly PCF) space by using any [deployment strategy](/continuous-delivery/use-continuous-delivery/manage-deployments/deployment-concepts.md) in Harness.

### Objectives <a href="#objectives" id="objectives"></a>

You'll learn how to:

* Install and launch a Harness Delegate in your target cluster.
* Connect Harness with your TAS account.
* Connect Harness with a public image hosted on Artifactory.
* Specify the manifest to use for the application.
* Set up a TAS pipeline in Harness to deploy the application.

### Important notes <a href="#important-notes" id="important-notes"></a>

* For TAS deployments, Harness supports the following [artifact sources](/continuous-delivery/use-continuous-delivery/cd-building-blocks/services/artifact-sources.md). You connect Harness to these registries by using your registry account credentials.
  * [Harness Artifact Registry](/continuous-delivery/use-continuous-delivery/cd-building-blocks/services/artifact-sources.md#harness-artifact-registry)
  * Artifactory
  * Nexus
  * Docker Registry
  * Amazon S3
  * Google Container Registry (GCR)

    <div data-gb-custom-block data-tag="hint" data-style="warning" class="hint hint-warning"><p>Google Container Registry (GCR) is being deprecated. For more details, refer to the <a href="/pages/dKvw4iJaffcdCaz8xtLL#google-container-registry-gcr">Deprecation Notice</a>.</p></div>
  * Amazon Elastic Container Registry (ECR)
  * Azure Container Registry (ACR)
  * Google Artifact Registry (GAR)
  * Google Cloud Storage (GCS)
  * GitHub Package Registry
  * Azure Artifacts
  * Jenkins
* Before you create a TAS pipeline in Harness, make sure that you have the **Continuous Delivery** module in your Harness account. For more information, go to [create organizations and projects](/harness-ai/new-to-harness-platform/get-started.md).
* Your Harness Delegate profile must have [CF CLI v7, `autoscaler`, and `Create-Service-Push` plugins](#install-cloud-foundry-command-line-interface-cf-cli-on-your-harness-delegate) added to it.
* For the test connection in the connector, Harness uses the CF SDK to get the list of organizations. If the credentials are correct, you get a list of organizations. Otherwise, the connection fails. For more information, see the [Cloud Foundry documentation](https://apidocs.cloudfoundry.org/196/organizations/list_all_organizations.html).

### Connect to a TAS provider <a href="#connect-to-a-tas-provider" id="connect-to-a-tas-provider"></a>

You can connect Harness to a TAS space by adding a TAS connector. Perform the following steps to add a TAS connector.

1. Open a Harness project and select the **Deployments** module.
2. In **Project Setup**, select **Connectors**, then select **New Connector**.
3. In **Cloud Providers**, select **Tanzu Application Service**. The TAS connector settings appear.
4. Enter a connector name and select **Continue**.
5. Enter the TAS **Endpoint URL**. For example, `https://api.system.tas-mycompany.com`.
6. In **Authentication**, select one of the following options.
   1. **Plaintext** - Enter the username and password. For password, you can either create a new secret or use an existing one.
   2. **Encrypted** - Enter the username and password. You can create a new secret for your username and password or use exiting ones.
7. Select **Continue**.
8. In **Connect to the provider**, select **Connect through a Harness Delegate**, and then select **Continue**. We don't recommend using the **Connect through Harness Platform** option here because you'll need a delegate later for connecting to your TAS environment. Typically, the **Connect through Harness Platform** option is a quick way to make connections without having to use delegates.

   Expand the sections below to learn more about installing delegates.

<details>

<summary>Installing Harness Delegate</summary>

In your Harness project, select **Project Setup** > **Delegates** > **Install Delegate**, and then follow the delegate installation wizard. Use this [delegate installation wizard video](https://www.youtube.com/watch?v=yLMCxs3onH8) to guide you through the process.

You can also install the default Harness Delegate. For more information, go to [Install Harness Delegate on Kubernetes or Docker](/harness-ai/troubleshooting-and-resources/tutorials/install-delegate.md).

To learn more about delegate, watch the [Delegate overview](/harness-ai/use-harness-platform/delegates/delegate/delegate-concepts/delegate-overview.md) video.

</details>

9. In **Set Up Delegates**, select the **Connect using Delegates with the following Tags** option and enter your delegate name.
10. Select **Save and Continue**.
11. Once the test connection succeeds, select **Finish**. The connector now appears in the **Connectors** list.

### Install Cloud Foundry Command Line Interface (CF CLI) on your Harness Delegate <a href="#install-cloud-foundry-command-line-interface-cf-cli-on-your-harness-delegate" id="install-cloud-foundry-command-line-interface-cf-cli-on-your-harness-delegate"></a>

After the delegate pods are created, you must edit your Harness Delegate YAML to install CF CLI v7, `autoscaler`, and `Create-Service-Push` plugins.

1. Open the `delegate.yaml` in a text editor.
2. Locate the environment variable `INIT_SCRIPT` in the `Deployment` object.

   ```
   - name: INIT_SCRIPT  
   value: ""  
   ```
3. Replace `value: ""` with the following script to install CF CLI, `autoscaler`, and `Create-Service-Push` plugins.

   <div data-gb-custom-block data-tag="hint" data-style="info" class="hint hint-info"><p>Harness Delegate uses Red Hat based distributions like Red Hat Enterprise Linux (RHEL) or Red Hat Universal Base Image (UBI). Hence, we recommend that you use <code>microdnf</code> commands to install CF CLI on your delegate. If you are using a package manager in Debian based distributions like Ubuntu, use <code>apt-get</code> commands to install CF CLI on your delegate.</p></div>

{% tabs %}
{% tab title="microdnf" %}

```
- name: INIT_SCRIPT  
value: |
 # update package manager, install necessary packages, and install CF CLI v7
 microdnf update
 microdnf install yum
 microdnf install --nodocs unzip yum-utils
 microdnf install -y yum-utils
 echo y | yum install wget
 wget -O /etc/yum.repos.d/cloudfoundry-cli.repo https://packages.cloudfoundry.org/fedora/cloudfoundry-cli.repo
 echo y | yum install cf7-cli -y

 # autoscaler plugin
 # download and install pivnet.
 wget -O pivnet https://github.com/pivotal-cf/pivnet-cli/releases/download/v0.0.55/pivnet-linux-amd64-0.0.55 && chmod +x pivnet && mv pivnet /usr/local/bin;
 pivnet login --api-token=<replace with api token>

 # download and install autoscaler plugin by pivnet
 pivnet download-product-files --product-slug='pcf-app-autoscaler' --release-version='2.0.295' --product-file-id=912441
 cf install-plugin -f autoscaler-for-pcf-cliplugin-linux64-binary-2.0.295

 # install Create-Service-Push plugin from community
 cf install-plugin -r CF-Community "Create-Service-Push"

 # verify cf version
 cf --version

 # verify plugins
 cf plugins
```

{% endtab %}

{% tab title="apt-get" %}

```
- name: INIT_SCRIPT  
value: |
 # update package manager, install necessary packages, and install CF CLI v7
 apt-get install wget
 wget -q -O - https://packages.cloudfoundry.org/debian/cli.cloudfoundry.org.key | apt-key add -
 echo "deb https://packages.cloudfoundry.org/debian stable main" | tee /etc/apt/sources.list.d/cloudfoundry-cli.list
 apt-get update
 apt-get install cf7-cli

 # autoscaler plugin
 # download and install pivnet
 wget -O pivnet https://github.com/pivotal-cf/pivnet-cli/releases/download/v0.0.55/pivnet-linux-amd64-0.0.55 && chmod +x pivnet && mv pivnet /usr/local/bin;
 pivnet login --api-token=<replace with api token>

 # download and install autoscaler plugin by pivnet
 pivnet download-product-files --product-slug='pcf-app-autoscaler' --release-version='2.0.295' --product-file-id=912441
 cf install-plugin -f autoscaler-for-pcf-cliplugin-linux64-binary-2.0.295

 # install Create-Service-Push plugin from community
 cf install-plugin -r CF-Community "Create-Service-Push"

 # verify cf version
 cf --version

 # verify plugins
 cf plugins
```

{% endtab %}
{% endtabs %}

1. Apply the profile to the delegate profile and check the logs.

   The output for `cf --version` is `cf version 7.2.0+be4a5ce2b.2020-12-10`.

   Here is the output for `cf plugins`.

   ```
   App Autoscaler        2.0.295   autoscaling-apps              Displays apps bound to the autoscaler
   App Autoscaler        2.0.295   autoscaling-events            Displays previous autoscaling events for the app
   App Autoscaler        2.0.295   autoscaling-rules             Displays rules for an autoscaled app
   App Autoscaler        2.0.295   autoscaling-slcs              Displays scheduled limit changes for the app
   App Autoscaler        2.0.295   configure-autoscaling         Configures autoscaling using a manifest file
   App Autoscaler        2.0.295   create-autoscaling-rule       Create rule for an autoscaled app
   App Autoscaler        2.0.295   create-autoscaling-slc        Create scheduled instance limit change for an autoscaled app
   App Autoscaler        2.0.295   delete-autoscaling-rule       Delete rule for an autoscaled app
   App Autoscaler        2.0.295   delete-autoscaling-rules      Delete all rules for an autoscaled app
   App Autoscaler        2.0.295   delete-autoscaling-slc        Delete scheduled limit change for an autoscaled app
   App Autoscaler        2.0.295   disable-autoscaling           Disables autoscaling for the app
   App Autoscaler        2.0.295   enable-autoscaling            Enables autoscaling for the app
   App Autoscaler        2.0.295   update-autoscaling-limits     Updates autoscaling instance limits for the app
   Create-Service-Push   1.3.2     create-service-push, cspush   Works in the same manner as cf push, except that it will create services defined in a services-manifest.yml file first before performing a cf push.
   ```

{% hint style="info" %}
The CF Command script does not require `cf login`. Harness logs in using the credentials in the TAS cloud provider set up in the infrastructure definition for the workflow executing the CF Command.
{% endhint %}

### Create a Deploy stage <a href="#create-a-deploy-stage" id="create-a-deploy-stage"></a>

Pipelines are collections of stages. For this tutorial, we'll create a new pipeline and add a single stage.

1. In your Harness project, select **Pipelines**, select **Deployments**, then select **Create a Pipeline**.

   Your pipeline appears.
2. Enter the name **TAS Quickstart** and click **Start**.

   ![](/files/X9kUGPrW50u1ViHwrApK)
3. Click **Add Stage** and select **Deploy**.
4. Enter the stage name **Deploy TAS Service**, select the **Tanzu Application Services** deployment type, and select **Set Up Stage**.

   The new stage settings appear.

   ![](/files/J08xUtdH0zl3As6tBfTg)

### Create Harness TAS service <a href="#create-harness-tas-service" id="create-harness-tas-service"></a>

Harness services represent your microservices or applications. You can add the same service to as many stages as you need. Services contain your artifacts, manifests, config files, and variables. For more information, go to [services overview](/continuous-delivery/use-continuous-delivery/cd-building-blocks/services/services-overview.md).

#### Create a new service <a href="#create-a-new-service" id="create-a-new-service"></a>

1. Select the **Service** tab, then select **Add Service**.
2. Enter a service name. For example, TAS.

   Services are persistent and can be used throughout the stages of this pipeline or any other pipeline in the project.
3. In **Service Definition**, in **Deployment Type**, verify if **Tanzu Application Services** is selected.

#### Add the manifest <a href="#add-the-manifest" id="add-the-manifest"></a>

1. In **Manifests**, select **Add Manifest**.\
   Harness uses **TAS Manifest**, **Vars**, and **AutoScaler** manifest types for defining TAS applications, instances, and routes.\
   You can use one TAS manifest and one autoscaler manifest only. You can use unlimited vars file manifests.

   ![](/files/EQ29PYvH1w2ogGIfwE3b)
2. Select **TAS Manifest** and select **Continue**.
3. In **Specify TAS Manifest Store**, select **Harness** and select **Continue**.
4. In **Manifest Details**, enter a manifest name. For example, `nginx`.
5. Select **File/Folder Path**.
6. In **Create or Select an Existing Config file**, select **Project**. This is where we will create the manifest.
   1. Select **New**, select **New Folder**, enter a folder name, and then select **Create**.
   2. Select the new folder, select **New**, select **New File**, and then enter a file name. For example, enter `manifest`.
   3. Enter the following in the `manifest` file, and then click **Save**.

      ```
      applications:
      - name: ((NAME))
      health-check-type: process
      timeout: 5
      instances: ((INSTANCE))
      memory: 750M
      routes:
        - route: ((ROUTE))
      ```
7. Select **Apply Selected**.

   You can add only one `manifest.yaml` file.
8. Select **Vars.yaml path** and repeat steps 6.1 and 6.2 to create a `vars` file. Then, enter the following information:

   ```
   NAME: harness_<+service.name>
   INSTANCE: 1
   ROUTE: harness_<+service.name>_<+infra.name>.apps.tas-harness.com
   ```
9. Select **Apply Selected**.

You can add any number of `vars.yaml` files.

11. Select **AutoScaler.yaml** and repeat steps 6.1 and 6.2 to create an `autoscaler` file. Then, enter the following information:

    ```
    instance_limits:
      min: 1
      max: 2
    rules:
    - rule_type: "http_latency"
      rule_sub_type: "avg_99th"
      threshold:
        min: 100
        max: 200
    scheduled_limit_changes:
    - recurrence: 10
      executes_at: "2032-01-01T00:00:00Z"
      instance_limits:
        min: 1
        max: 2
    ```
12. Select **Apply Selected**.

    You can add only one `autoscaler.yaml` file.
13. Select **Submit**.

#### Add the artifact for deployment <a href="#add-the-artifact-for-deployment" id="add-the-artifact-for-deployment"></a>

1. In **Artifacts**, select **Add Artifact Source**.
2. In **Specify Artifact Repository Type**, select **Artifactory**, and select **Continue**.

   <div data-gb-custom-block data-tag="hint" data-style="info" class="hint hint-info"><p><strong>IMPORTANT</strong></p><p>For TAS deployments, Harness supports the following artifact sources. You connect Harness to these registries by using your registry account credentials.</p><ul><li><a href="/pages/dKvw4iJaffcdCaz8xtLL#artifactory">Artifactory</a></li><li><a href="/pages/dKvw4iJaffcdCaz8xtLL#nexus">Nexus</a></li><li><a href="/pages/dKvw4iJaffcdCaz8xtLL#docker">Docker Registry</a></li><li>Amazon S3</li><li><a href="/pages/dKvw4iJaffcdCaz8xtLL#google-container-registry-gcr">Google Container Registry (GCR)</a></li><li><a href="/pages/dKvw4iJaffcdCaz8xtLL#amazon-elastic-container-registry-ecr">Amazon Elastic Container Registry (ECR)</a></li><li><a href="/pages/dKvw4iJaffcdCaz8xtLL#azure-container-registry-acr">Azure Container Registry (ACR)</a></li><li><a href="/pages/dKvw4iJaffcdCaz8xtLL#google-artifact-registry">Google Artifact Registry (GAR)</a></li><li><a href="/pages/dKvw4iJaffcdCaz8xtLL#google-cloud-storage-gcs">Google Cloud Storage (GCS)</a></li><li><a href="/pages/dKvw4iJaffcdCaz8xtLL#github-packages">GitHub Package Registry</a></li><li>Azure Artifacts</li><li><a href="/spaces/3F2TpHXhur2QtQnORSM9/pages/sAxNWVJGublU85i5Z5OW">Jenkins</a></li></ul><p>For this tutorial, we will use Artifactory.</p></div>
3. In **Artifactory Repository**, click **New Artifactory Connector**.
4. Enter a name for the connector, such as **JFrog**, then select **Continue**.
5. In **Details**, in **Artifactory Repository URL**, enter `https://harness.jfrog.io/artifactory/`.
6. In **Authentication**, select **Anonymous**, and select **Continue**.

   ![](/files/gOIXNTAk1ybxMbP0gOVF)
7. In **Delegates Setup**, select **Only use Delegate with all of the following tags** and enter the name of the delegate created in [connect to a TAS provider (step 8)](#connect-to-a-tas-provider).
8. Select **Save and Continue**
9. After the test connection succeeds, select **Continue**.
10. In **Artifact Details**, enter the following details:
    1. Enter an **Artifact Source Name**.
    2. Select **Generic** or **Docker** repository format.
    3. Select a **Repository** where the artifact is located.
    4. Enter the name of the folder or repository where the artifact is located.
    5. Select **Value** to enter a specific artifact name. You can also select **Regex** and enter a tag regex to filter the artifact.
11. Select **Submit**.

#### Add the manifest and artifact as an artifact bundle <a href="#add-the-manifest-and-artifact-as-an-artifact-bundle" id="add-the-manifest-and-artifact-as-an-artifact-bundle"></a>

**Demo Video**

{% embed url="<https://www.loom.com/share/5d3f8f987a014a83b8ee8f8061d03381?sid=1ceb3259-c66f-4c5b-be99-76ce8268e928>" %}

You can add both the manifest and artifact at the same time as an artifact bundle.

In the Harness service, when you add a manifest, select **Artifact Bundle** in **Specify TAS Manifest Store**.

When you use an artifact bundle, you do not need to add an individual artifact in the service's **Artifacts** section. Instead, you add a compressed file (ZIP, TAR, Tar.gz, Tgz) in **Manifests** that contains both the manifest and artifact.

Here's an example of a file structure that you would compress for the artifact bundle.

```
artifactBundle/
 - manifest/
    - manifest.yaml
    - vars.yaml
    - autoscaler.yaml
 - artifact-1.0.war 
```

When you add the artifact bundle to your Harness service, you provide the paths to the manifest, artifact, and any vars.yaml and AutoScaler.yaml files:

![picture 1](/files/VnZlKd6xwz4P7m8EVOwr)

Configure the following artifact bundle settings:

* **Artifact Bundle Type:** Select the type of compressed file. Currently, Zip, Tar, and Tar.gz are supported.
* **Deployable Artifact Path:** The relative path to the artifact from the artifact bundle root after extraction.
* **Manifest Path:** The relative path to the manifest from the artifact bundle root after extraction.
* **Vars.yaml path:** The relative path to the vars.yaml file from the artifact bundle root after extraction. You can add multiple files.
* **AutoScaler.yaml:** The relative path to the autoscaler.yaml file from the artifact bundle root after extraction. You can add multiple files.

{% hint style="info" %}
**NOTE**

You can configure CLI environment variables such as CF\_STAGING\_TIMEOUT and CF\_STARTUP\_TIMEOUT in the **Advanced** section of the service tab.

Certain CF CLI environment variables, such as CF\_HOME, CF\_PLUGIN\_HOME, CF\_USERNAME, CF\_PASSWORD, CF\_DOCKER\_PASSWORD, CF\_SKIP\_SSL\_VALIDATION, CF\_ORG, and CF\_SPACE are internally set by the system and will be ignored.

<img src="/files/ZhPNkJjSo1VqqEa29WNs" alt="" data-size="original">
{% endhint %}

{% hint style="info" %}
**OVERRIDES**

The standard override rules apply to an artifact bundle with these exceptions:

1. If an artifact bundle store type is selected in the service then it can be only overridden by the artifact bundle store type in **Overrides**. A different store type cannot be used in **Overrides** to override an artifact bundle type.
2. If the **Other** store type is selected in the service, then it cannot be overridden by the artifact bundle store type in **Overrides**. The artifact bundle store type cannot be used in **Overrides** to override a different store type.
   {% endhint %}

### Define target infrastructure <a href="#define-target-infrastructure" id="define-target-infrastructure"></a>

You define the target infrastructure for your deployment in the **Environment** settings of the pipeline stage. You can define an environment separately and select it in the stage, or create the environment within the stage **Environment** tab.

There are two methods of specifying the deployment target infrastructure:

* **Pre-existing**: the target infrastructure already exists and you simply need to provide the required settings.
* **Dynamically provisioned**: the target infrastructure will be dynamically provisioned on-the-fly as part of the deployment process.

For details on Harness provisioning, go to [Provisioning overview](/continuous-delivery/use-continuous-delivery/provision-infrastructure/provisioning-overview.md).

#### Pre-existing TAS infrastructure <a href="#pre-existing-tas-infrastructure" id="pre-existing-tas-infrastructure"></a>

The target space is your TAS space. This is where you will deploy your application.

1. In **Specify Environment**, select **New Environment**.
2. Enter the name **TAS tutorial** and select **Pre-Production**.
3. Select **Save**.
4. In **Specify Infrastructure**, select **New Infrastructure**.
5. Enter a name, and then verify that the selected deployment type is **Tanzu Application Type**.
6. Select the [TAS connector](#connect-to-a-tas-provider) you created earlier.
7. In **Organization**, select the TAS org in which want to deploy.
8. In **Space**, select the TAS space in which you want to deploy.

   ![](/files/4ItJnxPcHdspsuqOzcRv)
9. Select **Save**.

#### Dynamically provisioned TAS infrastructure <a href="#dynamically-provisioned-tas-infrastructure" id="dynamically-provisioned-tas-infrastructure"></a>

Harness supports multiple provisioner types, including Terraform, CloudFormation, Shell Script, and so on. Go to [Provision Infrastructure](/continuous-delivery/use-continuous-delivery/provision-infrastructure.md) to explore the available provisioners and configure provisioning based on your requirements.

Here is a summary of the steps to dynamically provision the target infrastructure for a deployment:

1. **Add dynamic provisioning to the CD stage**:
   1. In a Harness Deploy stage, in **Environment**, enable the option **Provision your target infrastructure dynamically during the execution of your Pipeline**.
   2. Select the type of provisioner that you want to use.

      Harness automatically adds the provisioner steps for the provisioner type you selected.
   3. Configure the provisioner steps to run your provisioning scripts.
   4. Select or create a Harness infrastructure in **Environment**.
2. **Map the provisioner outputs to the Infrastructure Definition**:
   1. In the Harness infrastructure, enable the option **Map Dynamically Provisioned Infrastructure**.
   2. Map the provisioning script/template outputs to the required infrastructure settings.

**Supported provisioners**

The following provisioners are supported for TAS deployments:

* Terraform
* Terragrunt
* Terraform Cloud
* CloudFormation
* Azure Resource Manager (ARM)
* Azure Blueprint
* Shell Script

**Add dynamic provisioning to the stage**

To add dynamic provisioning to a Harness pipeline Deploy stage, do the following:

1. In a Harness Deploy stage, in **Environment**, enable the option **Provision your target infrastructure dynamically during the execution of your Pipeline**.
2. Select the type of provisioner that you want to use.

   Harness automatically adds the necessary provisioner steps.
3. Set up the provisioner steps to run your provisioning scripts.

For documentation on each of the required steps for the provisioner you selected, go to the following topics:

* Terraform:
  * [Terraform Plan](/continuous-delivery/use-continuous-delivery/provision-infrastructure/terraform-infra/run-a-terraform-plan-with-the-terraform-plan-step.md)
  * [Terraform Apply](/continuous-delivery/use-continuous-delivery/provision-infrastructure/terraform-infra/run-a-terraform-plan-with-the-terraform-apply-step.md)
  * [Terraform Rollback](/continuous-delivery/use-continuous-delivery/provision-infrastructure/terraform-infra/rollback-provisioned-infra-with-the-terraform-rollback-step.md). To see the Terraform Rollback step, toggle the **Rollback** setting.
* [Terragrunt](/continuous-delivery/use-continuous-delivery/provision-infrastructure/terragrunt-howtos.md)
* [Terraform Cloud](/continuous-delivery/use-continuous-delivery/provision-infrastructure/terraform-infra/terraform-cloud-deployments.md)
* CloudFormation:
  * [Create Stack](/continuous-delivery/use-continuous-delivery/provision-infrastructure/cloudformation-infra/provision-with-the-cloud-formation-create-stack-step.md)
  * [Delete Stack](/continuous-delivery/use-continuous-delivery/provision-infrastructure/cloudformation-infra/remove-provisioned-infra-with-the-cloud-formation-delete-step.md)
  * [Rollback Stack](/continuous-delivery/use-continuous-delivery/provision-infrastructure/cloudformation-infra/rollback-provisioned-infra-with-the-cloud-formation-rollback-step.md). To see the Rollback Stack step, toggle the **Rollback** setting.
* [Azure Resource Management (ARM)](/continuous-delivery/use-continuous-delivery/provision-infrastructure/azure-arm-provisioning.md)
* [Azure Blueprint](/continuous-delivery/use-continuous-delivery/provision-infrastructure/azure-blueprint-provisioning.md)
* [Shell Script](/continuous-delivery/use-continuous-delivery/provision-infrastructure/shell-script-provisioning.md)

**Map provisioner output**

Once you set up dynamic provisioning in the stage, you must map outputs from your provisioning script/template to specific settings in the Harness Infrastructure Definition used in the stage.

1. In the same CD Deploy stage where you enabled dynamic provisioning, select or create (**New Infrastructure**) a Harness infrastructure.
2. In the Harness infrastructure, in **Select Infrastructure Type**, select **Tanzu Application Services** if it is not already selected.
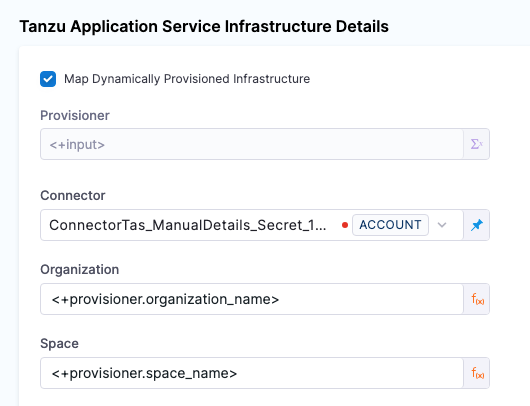
3. In **Tanzu Application Service Infrastructure Details**, enable the option **Map Dynamically Provisioned Infrastructure**.

   A **Provisioner** setting is added and configured as a runtime input.
4. Map the provisioning script/template outputs to the required infrastructure settings.

To provision the target deployment infrastructure, Harness needs specific infrastructure information from your provisioning script. You provide this information by mapping specific Infrastructure Definition settings in Harness to outputs from your template/script.

For TAS, Harness needs the following settings mapped to outputs:

* Organization
* Space

{% hint style="info" %}
Ensure the **Organization** and **Space** settings are set to the **Expression** option.
{% endhint %}

For example, here's a snippet of a Terraform script that provisions the infrastructure for a Tanzu Application Services deployment and includes the required outputs:

```json

provider "aws" {
  region = "us-east-1"
}

resource "aws_opsworks_org" "pcf_org" {
  name = "my-pcf-org"
}

resource "aws_opsworks_space" "pcf_space" {
  name = "my-pcf-space"
  organization_id = aws_opsworks_org.pcf_org.id
}

output "organization_name" {
  value = aws_opsworks_org.pcf_org.name
}

output "space_name" {
  value = aws_opsworks_space.pcf_space.name
}

```

In the Harness Infrastructure Definition, you map outputs to their corresponding settings using expressions in the format `<+provisioner.OUTPUT_NAME>`, such as `<+provisioner.organization_name>`.
<figure><img src="/files/t6sycxJ3liYiOk2QbUz8" alt=""><figcaption><p>Click to view full size image</p></figcaption></figure>

### Select an execution strategy <a href="#select-an-execution-strategy" id="select-an-execution-strategy"></a>

Now you can select the [deployment strategy](/continuous-delivery/use-continuous-delivery/manage-deployments/deployment-concepts.md) for this stage of the pipeline.

{% tabs %}
{% tab title="Basic" %}
The TAS workflow for performing a basic deployment takes your Harness TAS service and deploys it on your TAS infrastructure definition.

1. In Execution Strategies, select **Basic**, then select **Use Strategy**.
2. The basic execution steps are added.

   ![](/files/ZompRD6Dp4ogjzWiKNIc)
3. Select the **Basic App Setup** step to define **Step Parameters**.

   The basic app setup configuration uses your manifest in Harness TAS to set up your application.

   1. **Name** - Edit the deployment step name.
   2. **Timeout** - Set how long you want the Harness Delegate to wait for the TAS cloud to respond to API requests before timeout.
   3. **Instance Count** - Select whether to **Read from Manifest** or **Match Running Instances**.\
      The **Match Running Instances** setting can be used after your first deployment to override the instances in your manifest.
   4. **Existing Versions to Keep** - Enter the number of existing versions you want to keep. This is to roll back to a stable version if the deployment fails.
   5. **Additional Routes** - Enter additional routes if you want to add routes other than the ones defined in the manifests.
   6. Select **Apply Changes**.
4. Select the **App Resize** step to define **Step Parameters**.
   1. **Name** - Edit the deployment step name.
   2. **Timeout** - Set how long you want the Harness Delegate to wait for the TAS cloud to respond to API requests before timeout.
   3. **Ignore instance count in Manifest** - Select this option to override the instance count defined in the `manifest.yaml` file with the values specified in the **App Resize** step.
   4. **Total Instances** - Set the number or percentage of running instances you want to keep.
   5. **Desired Instances - Old Version** - Set the number or percentage of instances for the previous version of the application you want to keep. If this field is left empty, the desired instance count will be the difference between the maximum possible instance count (from the manifest or match running instances count) and the number of new application instances.
   6. Select **Apply Changes**.
5. Add a **Tanzu Command** step to your stage if you want to execute custom Tanzu commands in this step.
   1. **Timeout** - Set how long you want the Harness Delegate to wait for the TAS cloud to respond to API requests before timeout.
   2. **Script** - Select one of the following options.
      * **File Store** - Select this option to choose a script from **Project**, **Organization**, or **Account**.
      * **Inline** - Select this option to enter a script inline.
   3. Select **Apply Changes**.
6. Add an **App Rollback** step to your stage if you want to roll back to an older version of the application in case of deployment failure.
7. In **Advanced** configure the following options.

   * **Delegate Selector** - Select the delegate(s) you want to use to execute this step. You can select one or more delegates for each pipeline step. You only need to select one of a delegate's tags to select it. All delegates with the tag are selected.
   * **Conditional Execution** - Use the conditions to determine when this step is executed. For more information, go to [conditional execution settings](/continuous-delivery/use-continuous-delivery/cd-building-blocks/executions/step-and-stage-conditional-execution-settings.md).
   * **Failure Strategy** - Define the failure strategies to control the behavior of your pipeline when there is an error in execution. For more information, go to [failure strategy references](/continuous-delivery/use-continuous-delivery/cd-building-blocks/executions/step-failure-strategy-settings.md) and [define a failure strategy](/continuous-delivery/use-continuous-delivery/cd-building-blocks/executions/step-failure-strategy-settings.md).

   Expand the following section to view the error types and failure strategies supported for the steps in a Basic TAS deployment.

* **Looping Strategy** - Select **Matrix**, **Repeat**, or **Parallelism** looping strategy. For more information, go to [Use looping strategies](/harness-ai/use-harness-platform/pipelines/looping-strategies/looping-strategies-matrix-repeat-and-parallelism.md).
* **Policy Enforcement** - Add or modify a policy set to be evaluated after the step is complete. For more information, go to [CD governance](/continuous-delivery/use-continuous-delivery/cd-building-blocks/advanced/cd-governance.md).

8. Select **Save**.

Now the pipeline stage is complete and you can deploy.
{% endtab %}

{% tab title="Canary" %}
The TAS canary deployment is a phased approach to deploy application instances gradually, ensuring the stability of a small percentage of instances before rolling out to your desired instance count. With canary deployment, all nodes in a single environment are incrementally updated in small phases. You can add verification steps as needed to proceed to the next phase.

Use this deployment method when you want to verify whether the new version of the application is working correctly in your production environment.

The canary deployment contains **Canary App Setup** and **App Resize** steps. You can add more **App Resize** steps to perform gradual deployment.

1. In **Execution Strategies**, select **Canary**, and then click **Use Strategy**.
2. The canary execution steps are added.

   ![](/files/ruFj5CgyyAom8AJhnC0h)
3. Select the **Canary App Setup** step to define **Step Parameters**.
   1. **Name** - Edit the deployment step name.
   2. **Timeout** - Set how long you want the Harness Delegate to wait for the TAS cloud to respond to API requests before timeout.
   3. **Instance Count** - Select whether to **Read from Manifest** or **Match Running Instances**.\
      The **Match Running Instances** setting can be used after your first deployment to override the instances in your manifest.
   4. **Resize Strategy** - Select **Add new instances first, then downsize old instances** or **Downsize old instances first, then add new instances** strategy. You can also add **Resize Strategy** as a runtime input.
   5. **Existing Versions to Keep** - Enter the number of existing versions you want to keep. This is to roll back to a stable version if the deployment fails.
   6. **Additional Routes** - Enter additional routes if you want to add routes other than the ones defined in the manifests.
   7. Select **Apply Changes**.
4. Select the **App Resize** step to define **Step Parameters**.
   1. **Name** - Edit the deployment step name.
   2. **Timeout** - Set how long you want the Harness Delegate to wait for the TAS cloud to respond to API requests before timeout.
   3. **Ignore instance count in Manifest** - Select this option to override the instance count mentioned in the `manifest.yaml` file with the values mentioned in the **App Resize** step.
   4. **Total Instances** - Set the number or percentage of running instances you want to keep.
   5. **Desired Instances - Old Version** - Set the number or percentage of instances for the previous version of the application you want to keep. If this field is left empty, the desired instance count will be the difference between the maximum possible instance count (from the manifest or match running instances count) and the number of new application instances.
   6. Select **Apply Changes**.
5. Add more **App Resize** steps to perform gradual deployment.
6. Add a **Tanzu Command** step to your stage if you want to execute custom Tanzu commands in this step.
   1. **Timeout** - Set how long you want the Harness Delegate to wait for the TAS cloud to respond to API requests before timeout.
   2. **Script** - Select one of the following options.
      * **File Store** - Select this option to choose a script from **Project**, **Organization**, or **Account**.
      * **Inline** - Select this option to enter a script inline.
   3. Select **Apply Changes**.
7. Add an **App Rollback** step to your stage if you want to rollback to an older version of the application in case of deployment failure.
8. In **Advanced** configure the following options.
   * **Delegate Selector** - Select the delegate(s) you want to use to execute this step. You can select one or more delegates for each pipeline step. You only need to select one of a delegate's tags to select it. All the delegates with that specific tag are selected.
   * **Conditional Execution** - Use the conditions to determine when this step is executed. For more information, go to [conditional execution settings](/continuous-delivery/use-continuous-delivery/cd-building-blocks/executions/step-and-stage-conditional-execution-settings.md).
   * **Failure Strategy** - Define the failure strategies to control the behavior of your pipeline when there is an error in execution. For more information, go to [failure strategy references](/continuous-delivery/use-continuous-delivery/cd-building-blocks/executions/step-failure-strategy-settings.md) and [define a failure strategy](/continuous-delivery/use-continuous-delivery/cd-building-blocks/executions/step-failure-strategy-settings.md).

     Expand the following section to view the error types and failure strategies supported for the steps in a Canary TAS deployment.
   * **Looping Strategy** - Select **Matrix**, **Repeat**, or **Parallelism** looping strategy. For more information, go to [Use looping strategies](/harness-ai/use-harness-platform/pipelines/looping-strategies/looping-strategies-matrix-repeat-and-parallelism.md).
   * **Policy Enforcement** - Add or modify a policy set to be evaluated after the step is complete. For more information, go to [CD governance](/continuous-delivery/use-continuous-delivery/cd-building-blocks/advanced/cd-governance.md).
9. Select **Save**.

Now the pipeline stage is complete and can be deployed.
{% endtab %}

{% tab title="Blue Green" %}
Harness TAS blue green deployments use the route(s) in the TAS manifest and a temporary route you specify in the deployment configuration.

The blue green deployment deploys the applications using the temporary route first using the **App Setup** configuration. Next, in the **App Resize** configuration, Harness maintains the number of instances at 100% of the `instances` specified in the TAS manifest.

Use this deployment method when you want to perform verification in a full production environment, or when you want zero downtime.

For blue green deployments, by default, the **App Resize** step is 100% because it does not change the number of instances as it did in the canary deployment. However, you can define the percentage in the **App Resize** step. In blue green, you are deploying the new application to the number of instances set in the **App Setup** step and keeping the old application at the same number of instances. You

Once the deployment is successful, the **Swap Routes** configuration switches the networking routing, directing production traffic (green) to the new application and stage traffic (blue) to the old application.

1. In Execution Strategies, select **Blue Green**, and then click **Use Strategy**.
2. The blue green execution steps are added.

   ![](/files/AkqmfpZCuHjtRyrfB4To)
3. Select the **BG App Setup** step to define **Step Parameters**.
   1. **Name** - Edit the deployment step name.
   2. **Timeout** - Set how long you want the Harness Delegate to wait for the TAS cloud to respond to API requests before timeout.
   3. **Instance Count** - Select whether to **Read from Manifest** or **Match Running Instances**.\
      The **Match Running Instances** setting can be used after your first deployment to override the instances in your manifest.
   4. **Existing Versions to Keep** - Enter the number of existing versions you want to keep. This is to roll back to a stable version if the deployment fails.
   5. **Additional Routes** - Add additional routes in addition to the routes added in the TAS manifest.

      Additional routes has two uses in blue green deployments.

      * Select the routes that you want to map to the application in addition to the routes already mapped in the application in the manifest in your Harness service.
      * You can also omit routes in the manifest in your Harness service, and select them in **Additional Routes**. The routes selected in **Additional Routes** will be used as the final (green) routes for the application.
   6. **Temporary Routes** - Add temporary routes in addition to additional routes.

      Later, in the **Swap Route** step, Harness will replace these routes with the routes in the TAS manifest in your service.\
      If you do not select a route in Temporary Routes, Harness will create one automatically.
   7. Select **Apply Changes**.
4. Select the **App Resize** step to define **Step Parameters**.
   1. **Name** - Edit the deployment step name.
   2. **Timeout** - Set how long you want the Harness Delegate to wait for the TAS cloud to respond to API requests before timeout.
   3. **Ignore instance count in Manifest** - Select this option to override the instance count defined in the `manifest.yaml` file with the values specified in the **App Resize** step.
   4. **Total Instances** - Set the number or percentage of running instances you want to keep.
   5. **Desired Instances - Old Version** - Set the number or percentage of instances for the previous version of the application you want to keep. If this field is left empty, the desired instance count will be the difference between the maximum possible instance count (from the manifest or match running instances count) and the number of new application instances.
   6. Select **Apply Changes**.
5. Select the **Swap Routes** step to define **Step Parameters**.
   1. **Name** - Edit the deployment step name.
   2. **Timeout** - Set how long you want the Harness Delegate to wait for the TAS cloud to respond to API requests before timeout.
   3. **Downsize Old Application** - Select this option to down size older applications.
   4. Select **Apply Changes**.
6. Add a **Tanzu Command** step to your stage if you want to execute custom Tanzu commands in this step.
   1. **Timeout** - Set how long you want the Harness Delegate to wait for the TAS cloud to respond to API requests before timeout.
   2. **Script** - Select one of the following options.
      * **File Store** - Select this option to choose a script from **Project**, **Organization**, or **Account**.
      * **Inline** - Select this option to enter a script inline.
   3. Select **Apply Changes**.
7. Add a **Swap Rollback** step to your stage if you want to rollback to an older version of the application in case of deployment failure.

   When **Swap Rollback** is used in a deployment's **Rollback Steps**, the application that was active before the deployment is restored to its original state with the same instances and routes it had before the deployment.

   The failed application is deleted.
8. In **Advanced** configure the following options.
   * **Delegate Selector** - Select the delegate(s) you want to use to execute this step. You can select one or more delegates for each pipeline step. You only need to select one of a delegate's tags to select it. All the delegates with the specified tag are selected.
   * **Conditional Execution** - Use the conditions to determine when this step should be executed. For more information, go to [conditional execution settings](/continuous-delivery/use-continuous-delivery/cd-building-blocks/executions/step-and-stage-conditional-execution-settings.md).
   * **Failure Strategy** - Define the failure strategies to control the behavior of your pipeline when there is an error in execution. For more information, go to [failure strategy references](/continuous-delivery/use-continuous-delivery/cd-building-blocks/executions/step-failure-strategy-settings.md) and [define a failure strategy](/continuous-delivery/use-continuous-delivery/cd-building-blocks/executions/step-failure-strategy-settings.md).

     Expand the following section to view the error types and failure strategies supported for the steps in a Blue Green TAS deployment.
   * **Looping Strategy** - Select **Matrix**, **Repeat**, or **Parallelism** looping strategy. For more information, go to [Use looping strategies](/harness-ai/use-harness-platform/pipelines/looping-strategies/looping-strategies-matrix-repeat-and-parallelism.md).
   * **Policy Enforcement** - Add or modify a policy set to be evaluated after the step is complete. For more information, go to [CD governance](/continuous-delivery/use-continuous-delivery/cd-building-blocks/advanced/cd-governance.md).
9. Select **Save**.

Now the pipeline stage is complete and can be deployed.
{% endtab %}

{% tab title="Rolling" %}
This method deploys a new service or artifact version on all pods or instances in a single environment incrementally.

{% hint style="info" %}
**NOTE**

Before performing a rolling deployment, the TAS Rolling Deploy step first verifies that the application exists in Tanzu. If the application does not exist, it deploys the application by using a Basic deployment strategy. If the application exists, it performs a rolling upgrade.
{% endhint %}

1. In Execution Strategies, select **Rolling**, and then click **Use Strategy**.
2. The rolling deploy step is added.

   ![](/files/TDhXoBmo8goL4SbhN7Rc)
3. Select the **Rolling Deploy** step to define **Step Parameters**.
   1. **Name** - Edit the deployment step name.
   2. **Timeout** - Set how long you want the Harness Delegate to wait for the TAS cloud to respond to API requests before timeout.
   3. **Additional Routes** - Add additional routes in addition to the routes added in the TAS manifest.
4. Add a **Tanzu Command** step to your stage if you want to execute custom Tanzu commands in this step.
   1. **Timeout** - Set how long you want the Harness Delegate to wait for the TAS cloud to respond to API requests before timeout.
   2. **Script** - Select one of the following options.
      * **File Store** - Select this option to choose a script from **Project**, **Organization**, or **Account**.
      * **Inline** - Select this option to enter a script inline.
   3. Select **Apply Changes**.
5. Add a **Rolling Rollback** step to your stage if you want to rollback to an older version of the application in case of deployment failure.
6. In **Advanced** configure the following options.
   * **Delegate Selector** - Select the delegate(s) you want to use to execute this step. You can select one or more delegates for each pipeline step. You only need to select one of a delegate's tags to select it. All delegates with the specified tag are selected.
   * **Conditional Execution** - Use the conditions to determine when this step should be executed. For more information, go to [conditional execution settings](/continuous-delivery/use-continuous-delivery/cd-building-blocks/executions/step-and-stage-conditional-execution-settings.md).
   * **Failure Strategy** - Define the failure strategies to control the behavior of your pipeline when there is an error in execution. For more information, go to [failure strategy references](/continuous-delivery/use-continuous-delivery/cd-building-blocks/executions/step-failure-strategy-settings.md) and [define a failure strategy](/continuous-delivery/use-continuous-delivery/cd-building-blocks/executions/step-failure-strategy-settings.md).

     Expand the following section to view the error types and failure strategies supported for the steps in a Rolling TAS deployment.
   * **Looping Strategy** - Select **Matrix**, **Repeat**, or **Parallelism** looping strategy. For more information, go to [Use looping strategies](/harness-ai/use-harness-platform/pipelines/looping-strategies/looping-strategies-matrix-repeat-and-parallelism.md).
   * **Policy Enforcement** - Add or modify a policy set to be evaluated after the step is complete. For more information, go to [CD governance](/continuous-delivery/use-continuous-delivery/cd-building-blocks/advanced/cd-governance.md).
7. Select **Save**.

Now the pipeline stage is complete and can be deployed.
{% endtab %}
{% endtabs %}

### Deploy and review <a href="#deploy-and-review" id="deploy-and-review"></a>

1. Click **Save** **> Save Pipeline**, then select **Run**. Now you can select the specific artifact to deploy.
2. Select a **Primary Artifact**.
3. Select a **Tag**.
4. Select the following **Infrastructure** parameters.
   1. **Connector**
   2. **Organization**
   3. **Space**
5. Click **Run Pipeline**. Harness will verify the pipeline and then run it. You can see the status of the deployment, pause or abort it.
6. Toggle **Console View** to watch the deployment with more detailed logging.

The deployment was successful.

In your project's **Deployments**, you can see the deployment listed.

### TAS Autoscaler Integration <a href="#tas-autoscaler-integration" id="tas-autoscaler-integration"></a>

Harness supports native integration with [TAS Autoscaler](https://techdocs.broadcom.com/us/en/vmware-tanzu/platform/tanzu-platform-for-cloud-foundry/6-0/tpcf/autoscaler-using-autoscaler.html) during Rolling Deployments.

{% hint style="info" %}
**PREREQUISITE**

Harness expects the Autoscaler service to be created and bound to the application **before** deployment.\
Harness automatically runs the `configure-autoscaling` command to attach autoscaling policies to the application during deployment.
{% endhint %}

1. Create the Autoscaler Service

Use a TAS Command step in your pipeline to create the Autoscaler service instance:

```bash
cf create-service autoscaler autoscaler-plan harness-autoscaler
```

2. Reference the Service in the Manifest Update your manifest.yml file to include the Autoscaler under the services section. This ensures the service is bound to the application at deploy time.

```yaml
Copy
Edit
applications:
  - name: dummy-app
    memory: 256M
    instances: 1
    services:
      - harness-autoscaler
```

This binding step is essential. Without it, Harness will not attach the Autoscaler service, and autoscaling policies will not be configured.

Once these steps are complete, Harness will automatically:

* Detect the bound Autoscaler service.
* Execute the configure-autoscaling command during the Rolling Deploy step. This streamlines your workflow by eliminating the need for manual service binding or post-deploy configuration.

### Next steps <a href="#next-steps" id="next-steps"></a>

See [CD tutorials](/continuous-delivery/troubleshooting-and-resources/tutorials/cd-gitops-tutorials.md) for other deployment features.

### FAQs <a href="#faqs" id="faqs"></a>

For frequently asked questions about Tanzu deployments in Harness, go to [Tanzu deployment FAQs](/continuous-delivery/use-continuous-delivery/deploy-services-on-different-platforms/tanzu/tanzu-application-service-deployment-faqs.md).
