> For the complete documentation index, see [llms.txt](https://developer.harness.io/llms.txt). Markdown versions of documentation pages are available by appending `.md` to page URLs; this page is available as [Markdown](https://developer.harness.io/continuous-delivery/use-gitops/applicationsets/harness-git-ops-application-set-tutorial.md).
# Create and manage ApplicationSets
Create and manage GitOps ApplicationSets in Harness using the UI wizard or standard Git flow
Harness provides two ways to work with GitOps ApplicationSets:
1. [First-Class Support](#applicationset-workflows): Enhanced UI wizard with Service and Environment integration, full create/read/update/delete (CRUD) operations, improved role-based access control (RBAC), and Terraform support
2. [Standard Flow](#create-applicationset-standard-flow): Create ApplicationSets as GitOps Applications with manual YAML configuration
{% hint style="info" %}
**First-class ApplicationSet support**
First-class ApplicationSet support is available without a runtime feature flag. The `GITOPS_APPLICATIONSET_FIRST_CLASS_SUPPORT` flag is not required.
Use the **First-Class Support** tab in [ApplicationSet workflows](#applicationset-workflows) for the enhanced UI wizard. Use the **Standard Flow** tab when you manage ApplicationSet YAML in Git without the wizard.
{% endhint %}
## What you will learn from this topic
* How to [create ApplicationSets using the First-Class Support wizard](#create-an-applicationset) with Service and Environment integration
* How to [create ApplicationSets using the Standard Flow](#create-applicationset-standard-flow) with manual YAML configuration
* How to [view and monitor ApplicationSet details](#view-applicationset-details) and generated applications
* How to [auto-create services and environments](#auto-create-services-and-environments) when importing from BYOA setups
* How to [filter, edit, and delete ApplicationSets](#filter-applicationsets)
***
## Before you begin
Complete the following prerequisites before you create an ApplicationSet:
* **GitOps Agent**: Install and run a [Harness GitOps Agent](/continuous-delivery/use-gitops/gitops-entities/agents/install-a-harness-git-ops-agent.md).
* **GitOps Cluster**: Configure at least one [GitOps Cluster](/continuous-delivery/use-gitops/get-started/harness-cd-git-ops-quickstart.md#step-3-add-a-harness-gitops-cluster).
* **GitOps Repository**: Connect a [GitOps Repository](/continuous-delivery/use-gitops/get-started/harness-cd-git-ops-quickstart.md#step-2-add-a-harness-gitops-repository).
* **RBAC permissions**: You need permission to create ApplicationSets in the project. Go to [RBAC in Harness](https://developer.harness.io/docs/platform/role-based-access-control/rbac-in-harness) to configure roles.
**Additional for First-Class Support**:
* [Harness Services](/continuous-delivery/use-gitops/gitops-entities/service/service.md) and [Environments](/continuous-delivery/use-gitops/gitops-entities/environment.md) created in your project
**Additional for Standard Flow**:
* At least two target clusters (for example, development and production)
* A GitHub account with access to clone and modify repositories
{% hint style="info" %}
**Project scope**
ApplicationSets are project-scoped entities. All applications generated by an ApplicationSet belong to the same Harness project as the ApplicationSet itself.
{% endhint %}
## ApplicationSet overview
An ApplicationSet is a Kubernetes custom resource that enables you to automatically generate and manage multiple Argo CD applications from a single manifest. It consists of two main components:
* **Generator**: Defines the source of parameters used to create applications (for example, Git repositories, clusters, or lists)
* **Template**: Defines the application structure with parameterized fields that get substituted with values from the generator
Go to [ApplicationSet basics](/continuous-delivery/use-gitops/applicationsets/appset-basics.md) to review ApplicationSet concepts.
***
## ApplicationSet workflows
{% hint style="info" %}
**Select your flow**
Select the appropriate tab below:
* **First-Class Support**: Use the enhanced UI wizard
* **Standard Flow**: Use the standard ApplicationSet creation method with Git-managed YAML
{% endhint %}
{% tabs %}
{% tab title="First-Class Support" %}
{% hint style="info" %}
**First-Class Support tab**
Use this tab to create and manage ApplicationSets with the enhanced UI wizard. Use the [Standard Flow](#create-applicationset-standard-flow) tab if you manage ApplicationSet YAML in Git without the wizard.
{% endhint %}
### Navigate to ApplicationSets
Perform the following steps to open the Application Set list:
1. In your Harness project, go to **Deployments** -> **GitOps**.
2. Select **Applications** from the left navigation.
3. Select the **Application Set** tab.
You see a list of all ApplicationSets in your project.
### Create an ApplicationSet
Use the wizard to create an ApplicationSet with Service and Environment integration.
### Start the ApplicationSet wizard
Perform the following steps to open the wizard:
1. On the **Application Set** tab, select **+ New Application Set**.
2. The ApplicationSet creation wizard opens with four tabs: **Overview**, **Sync Policy**, **Configuration**, and **Preview**.

### Configure Overview settings
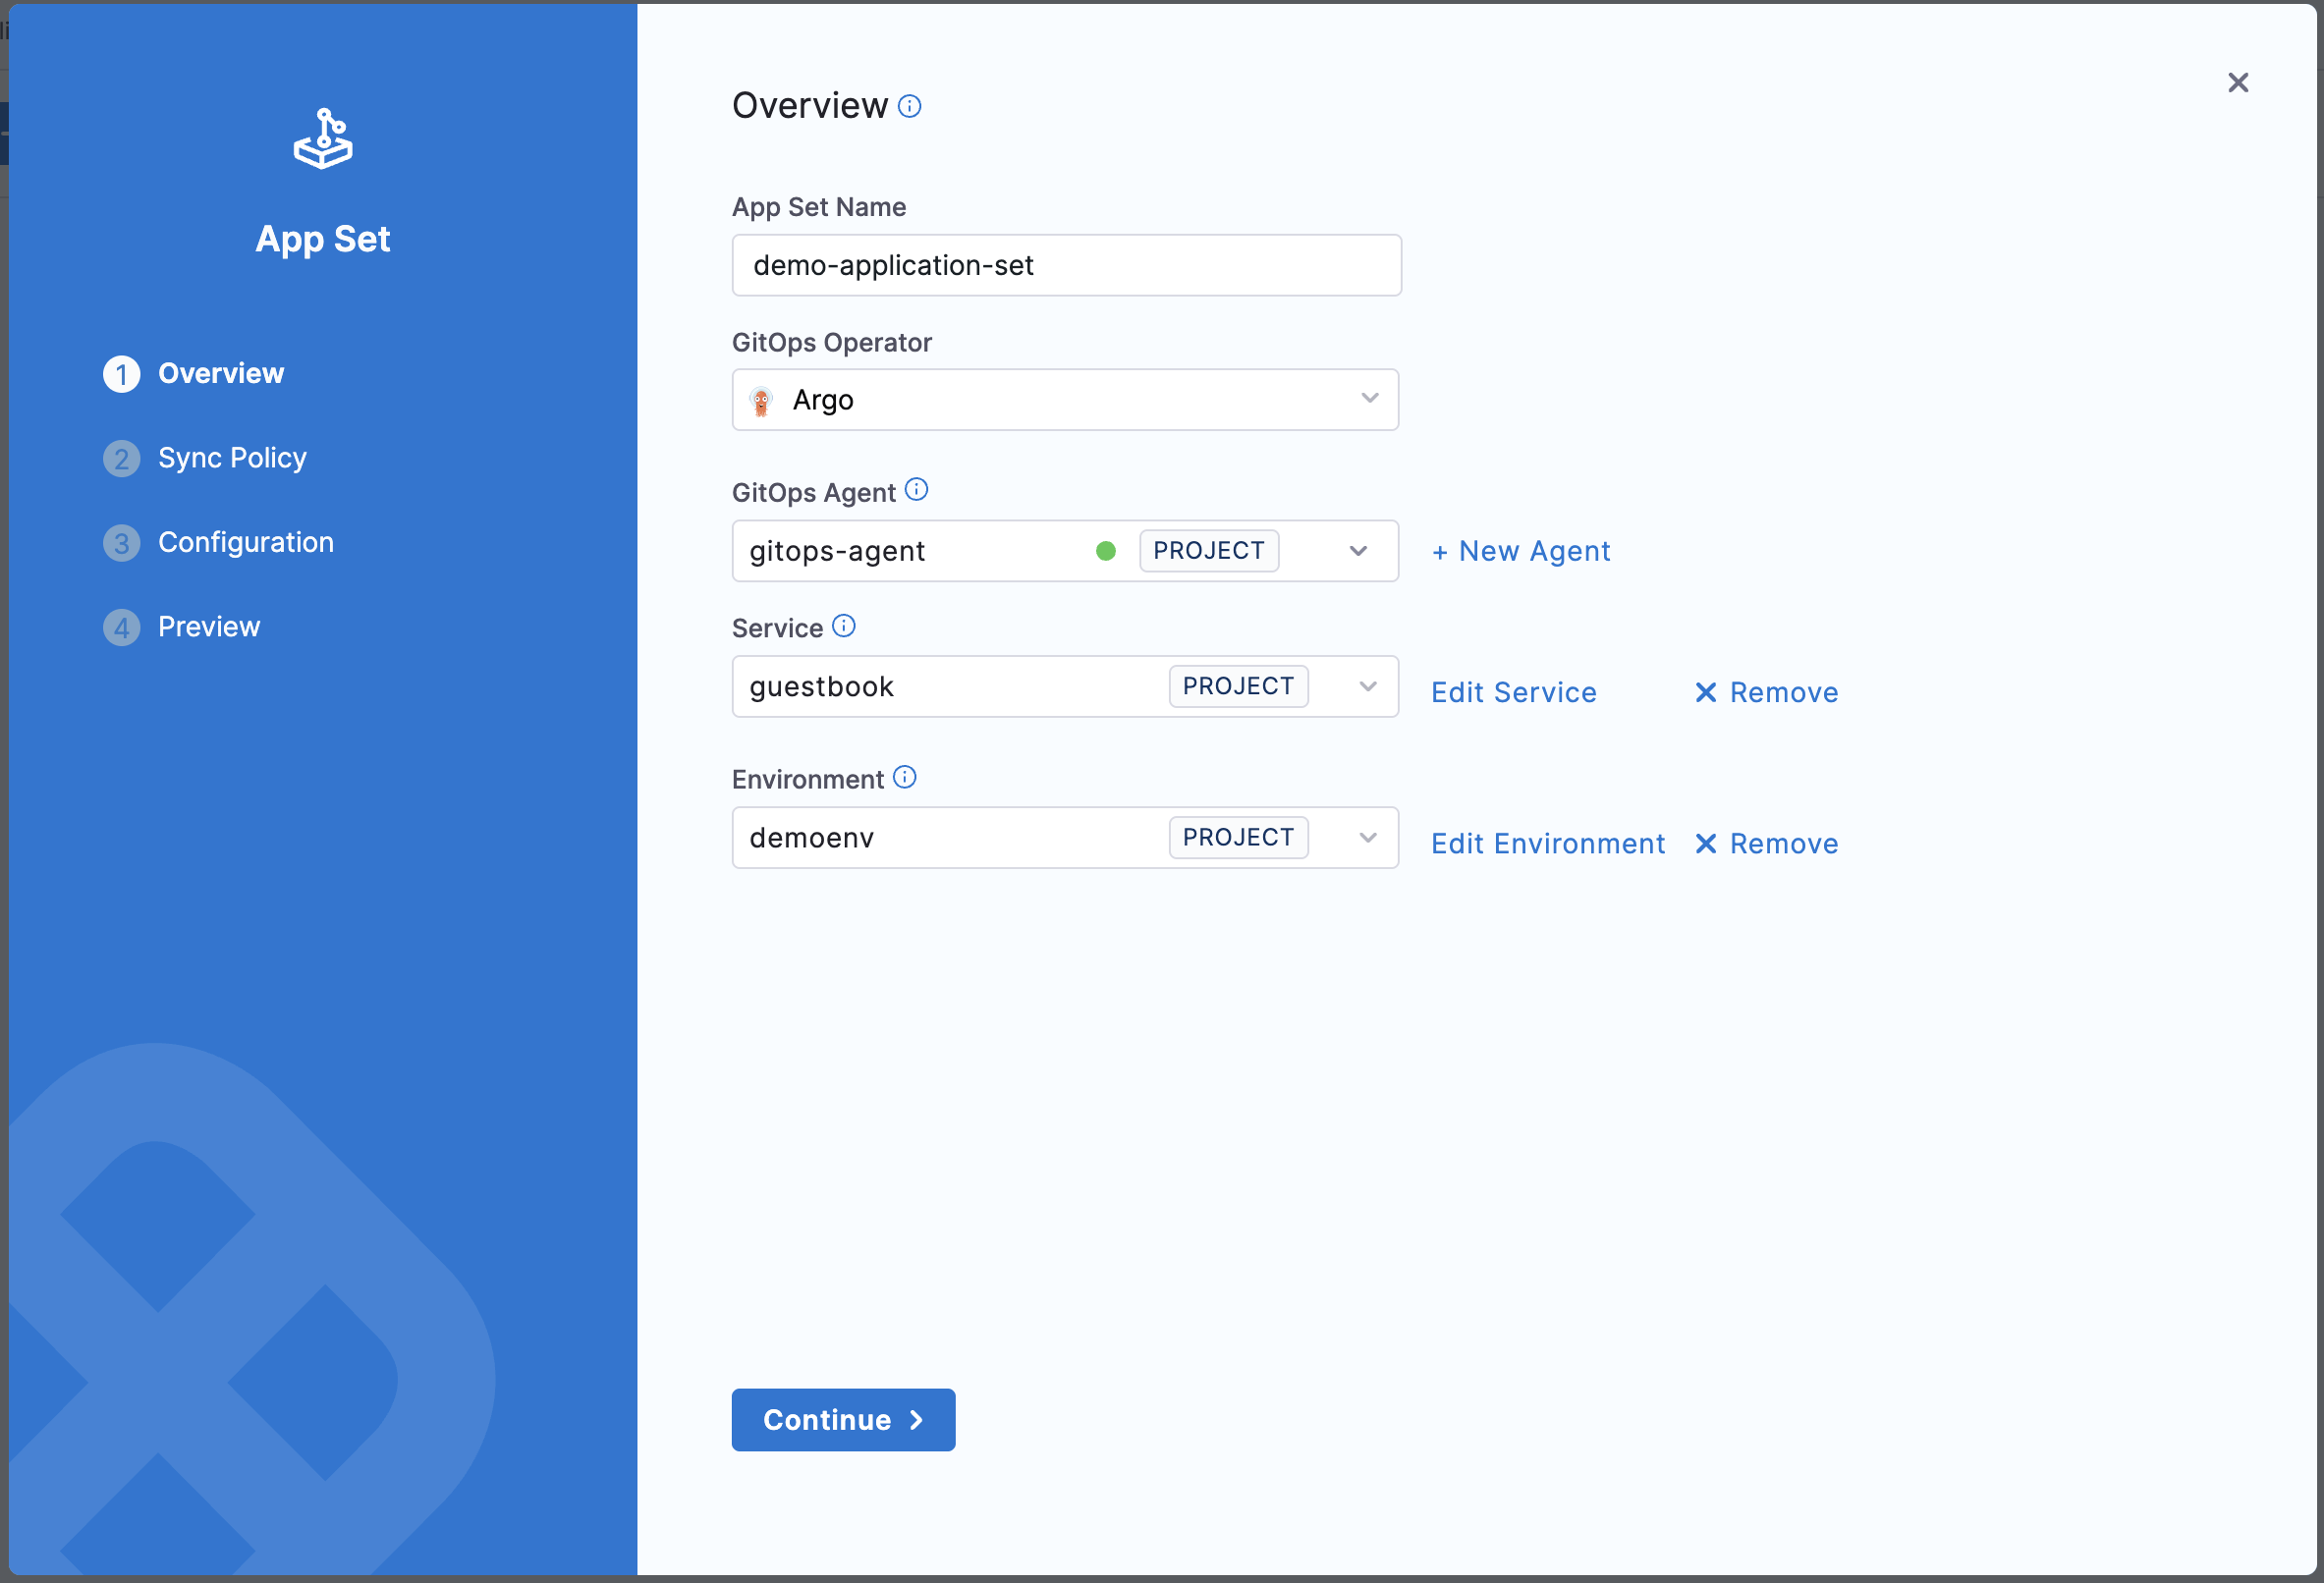
On the **Overview** tab, provide the following details:
* **App Set Name**: Enter a unique name for your ApplicationSet.
* **GitOps Operator**: Select **Argo**. Argo CD is the only supported GitOps reconciler. Flux is not supported.
* **GitOps Agent**: Select the GitOps Agent that manages this ApplicationSet.
* **Service**: Select the Harness Service associated with this ApplicationSet. This enables PR pipeline integration, service dashboard visibility, and RBAC policies.
* **Environment**: Select the Harness Environment associated with this ApplicationSet. This enables environment-based filtering and PR pipeline configuration.
{% hint style="info" %}
**Service and Environment labels**
The Service and Environment selections automatically add `harness.io/serviceRef` and `harness.io/envRef` labels to the ApplicationSet template, enabling integration with Harness pipelines and RBAC policies.
{% endhint %}
Select **Continue** to proceed to the next step.
### Configure Sync Policy
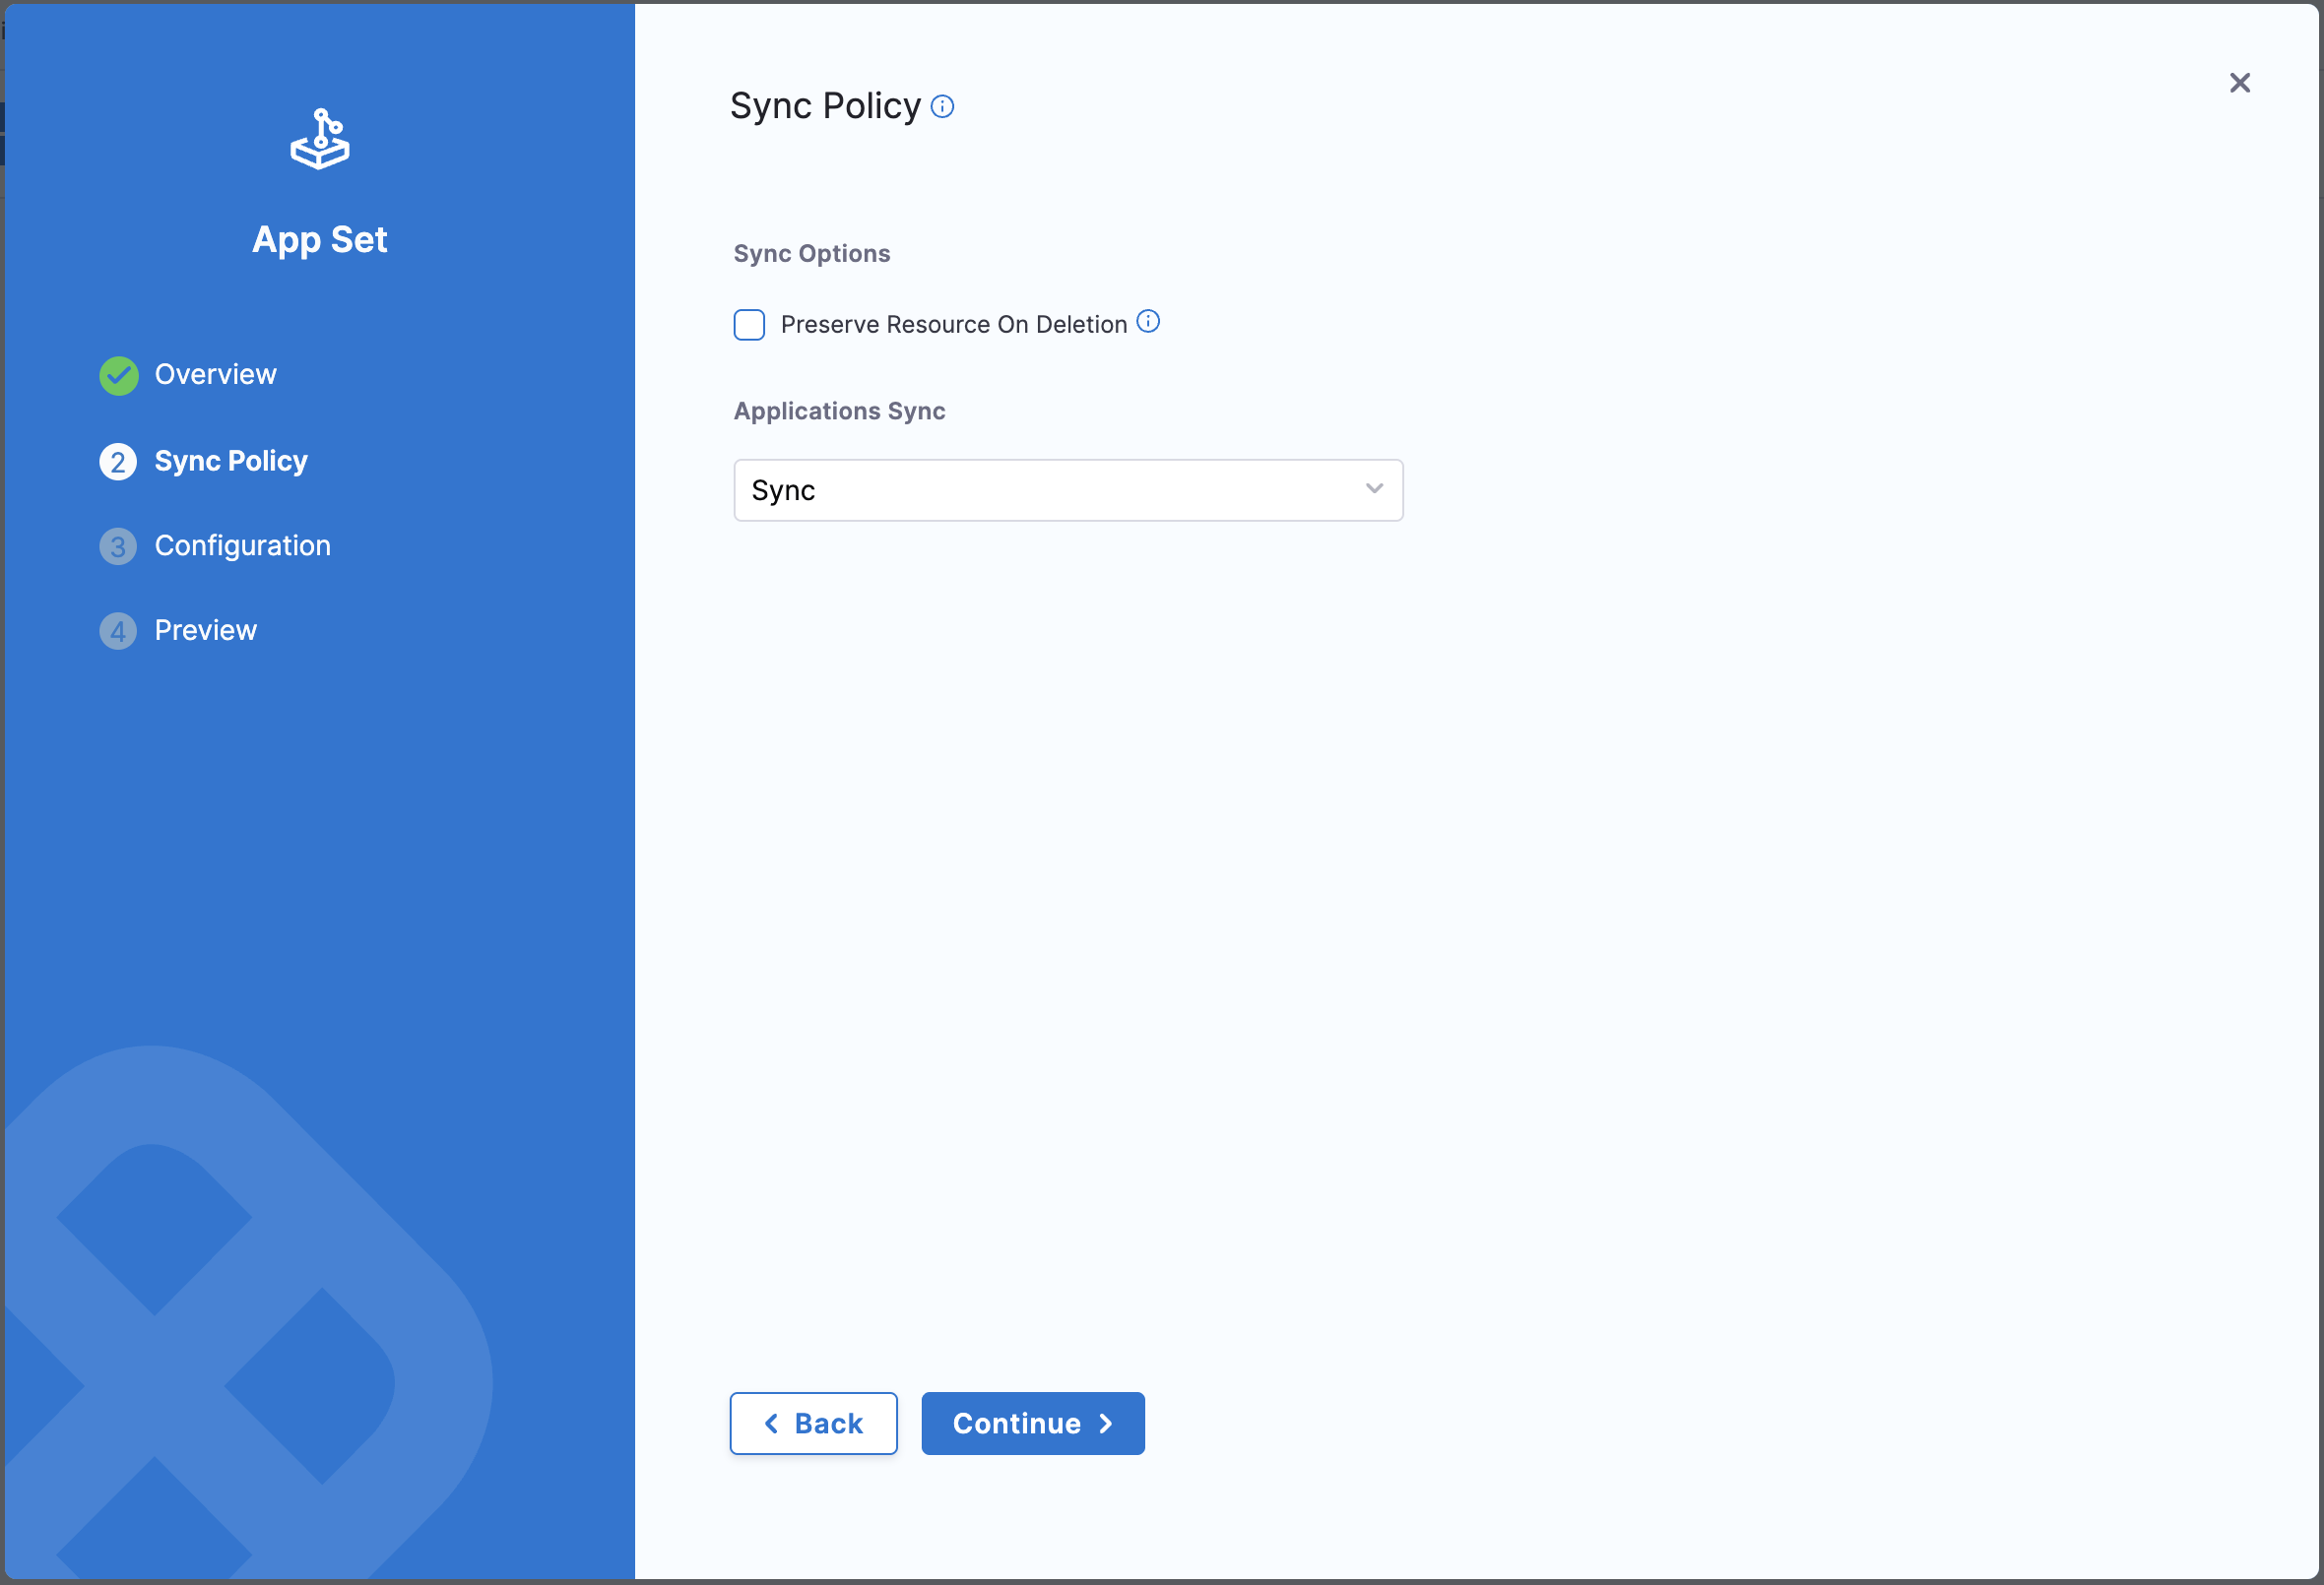
On the **Sync Policy** tab, define the sync policy that governs the relationship between the ApplicationSet and its child applications.
**Sync Options**
* **Preserve Resource On Deletion**: Check this option if you want to preserve Kubernetes resources when the application is deleted from Argo CD.
**Applications Sync**
Select the sync policy for applications created by this ApplicationSet.
**Application Sync Options**:
* **Create-Only**: Only create applications; do not update or delete them automatically.
* **Create-Update**: Create new applications and update existing ones.
* **Create-Delete**: Create new applications and delete removed ones.
* **Sync**: Fully automated sync with create, update, and delete operations.
Select **Continue** to proceed to configuration.
### Configure generator and template
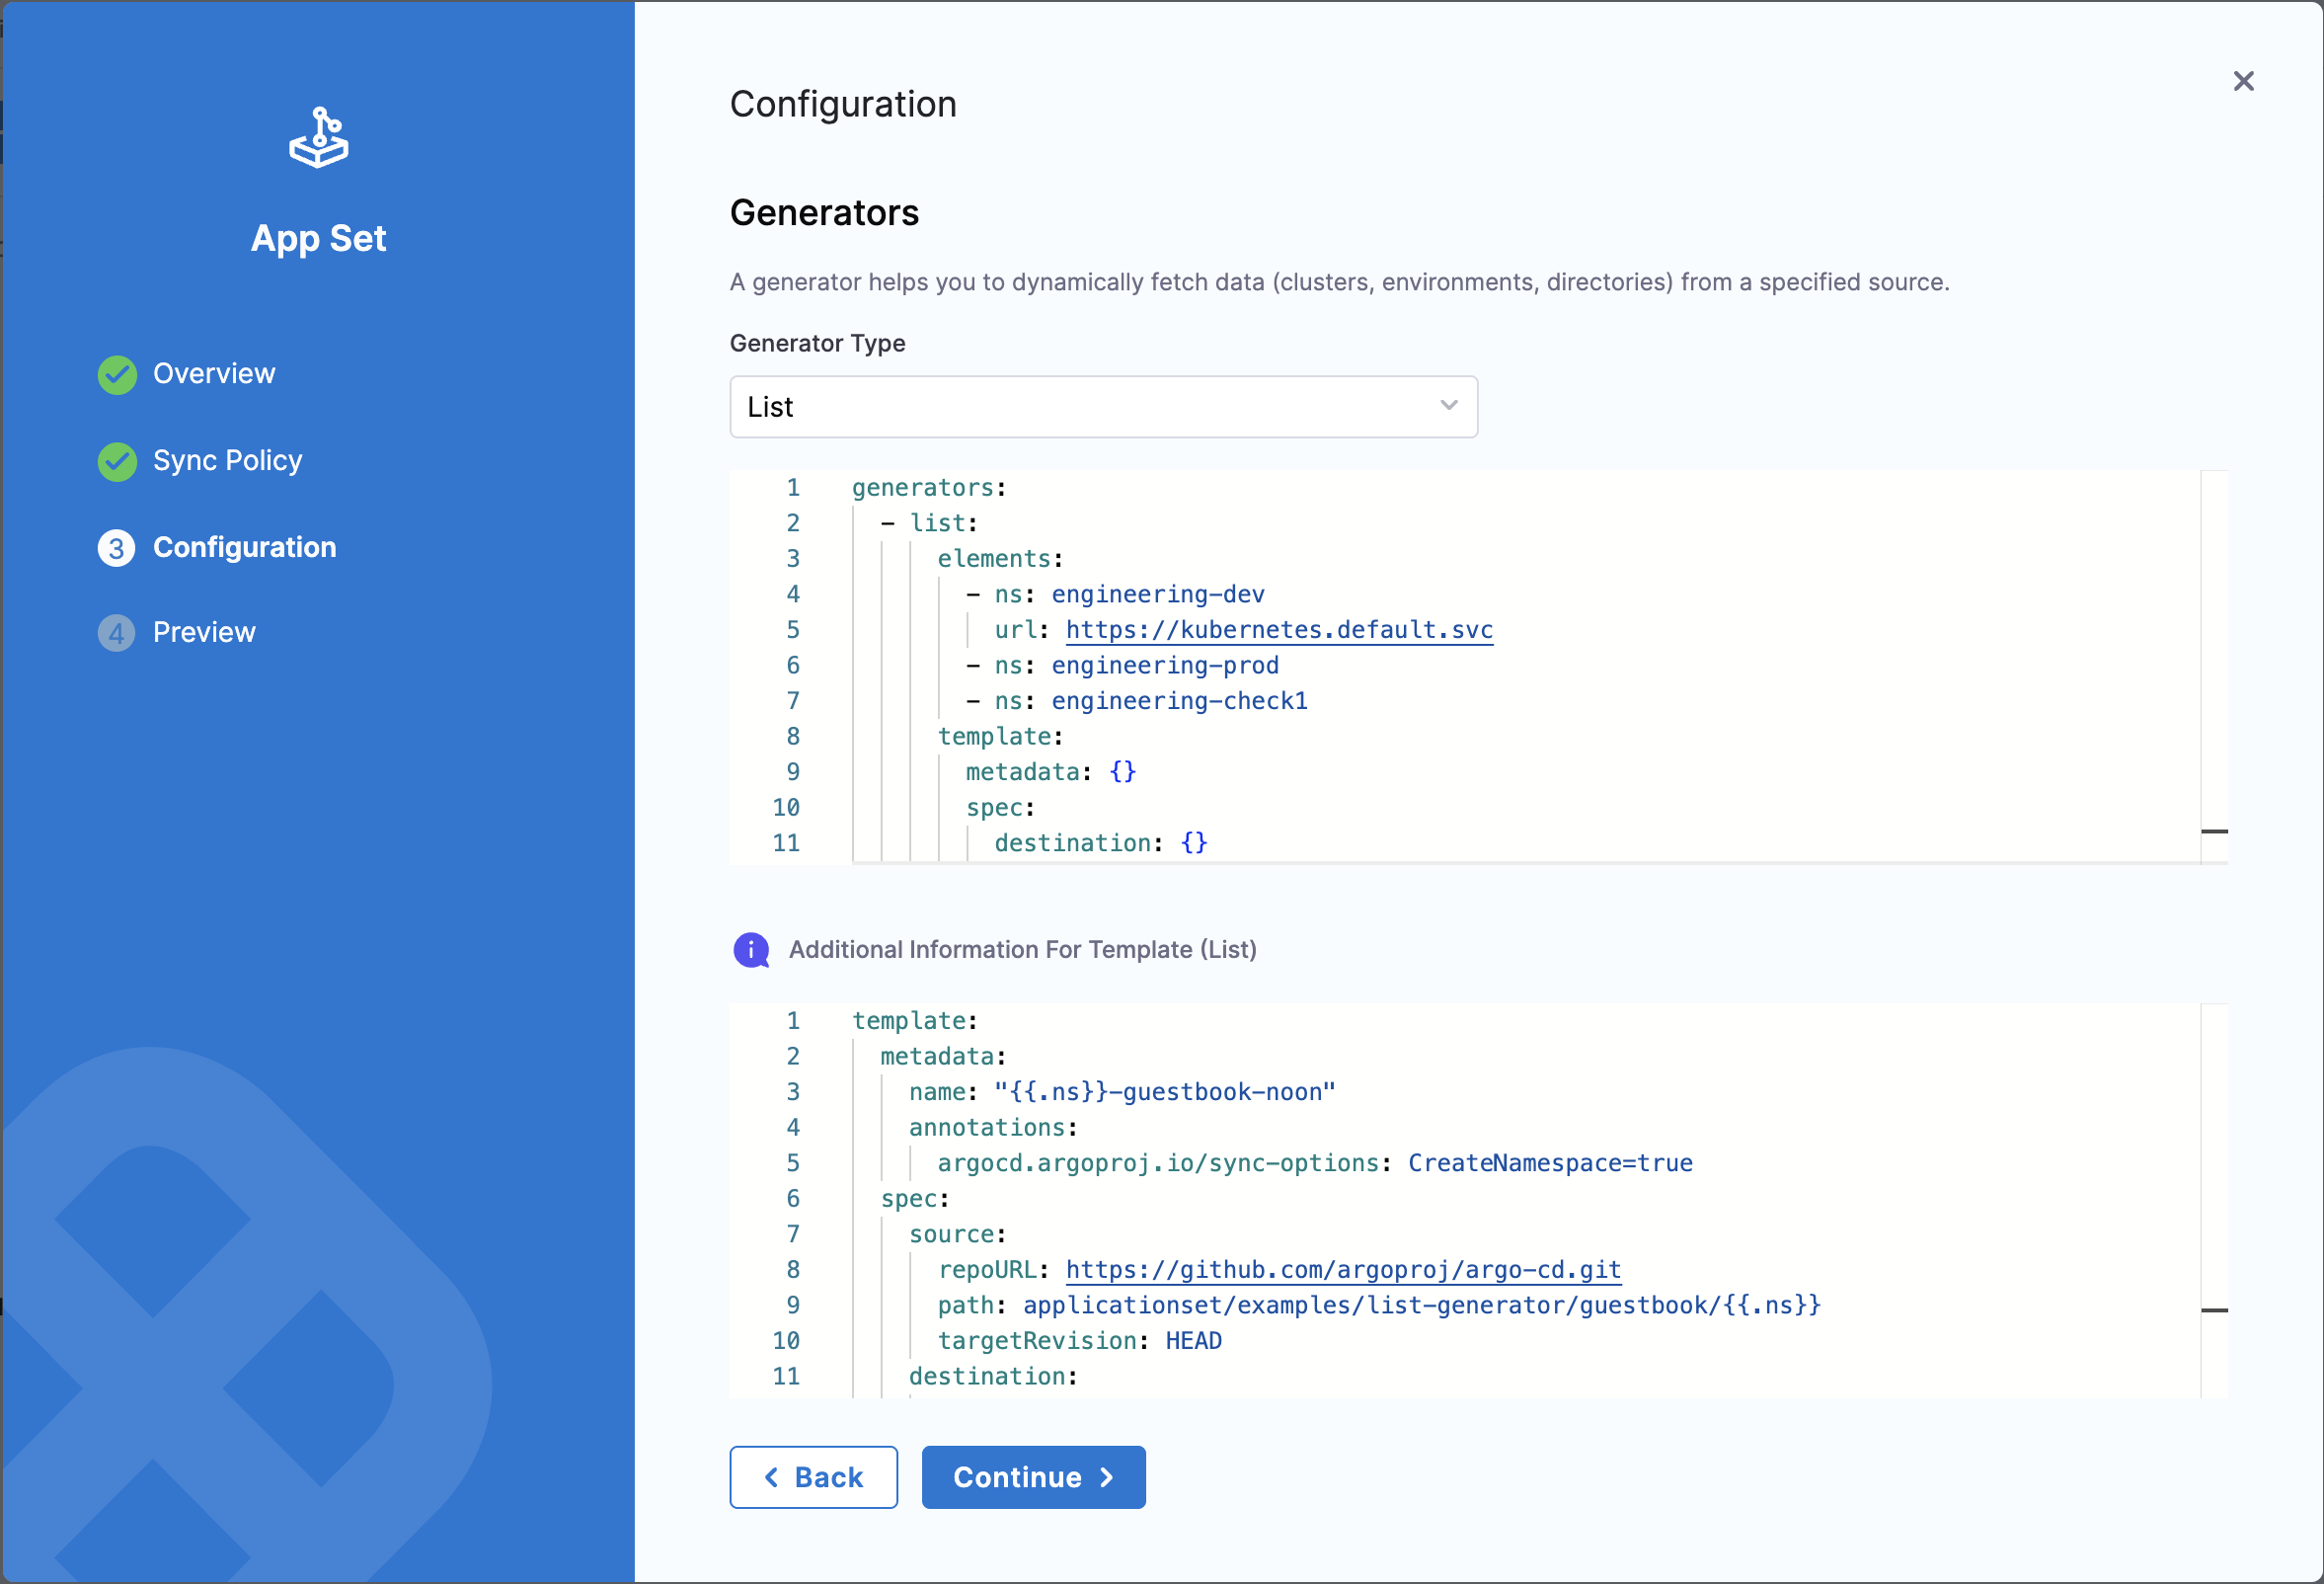
The **Configuration** tab is where you define the generator and template for your ApplicationSet.
**Select Generator Type**
Select the generator type from the dropdown. Harness supports all Argo CD generator types:
* **Git**: Generate applications from files or directories in a Git repository
* **List**: Generate applications from a static list of parameters
* **Cluster**: Generate applications for each cluster registered in Argo CD
* **Matrix**: Combine multiple generators
* **Pull Request**: Generate applications from pull requests
* **SCM Provider**: Generate applications from repositories in an SCM provider
* **Cluster Decision Resource**: Generate applications based on custom Kubernetes resources
* **Plugin**: Use custom generator plugins
Go to [Argo CD Generator Types](https://argoproj.github.io/argo-cd/user-guide/applicationset/generators/) to review supported generator types.
When you select a generator type, Harness automatically generates a template skeleton for that generator.
**Configure Generator**
The generator configuration appears in a YAML editor. Modify the template according to your needs.
**Example: List Generator**
```yaml
generators:
- list:
elements:
- ns: engineering-dev
url: https://kubernetes.default.svc
- ns: engineering-prod
url: https://kubernetes.default.svc
- ns: engineering-check1
url: https://kubernetes.default.svc
```
**Configure Template**
Below the generator configuration, you see the template section with automatically added labels for Harness integration:
```yaml
template:
metadata:
name: "{{.ns}}-guestbook"
labels:
harness.io/serviceRef: guestbook
harness.io/envRef: dev
annotations:
argocd.argoproj.io/sync-options: CreateNamespace=true
spec:
project: default
source:
repoURL: https://github.com/argoproj/argo-cd.git
path: applicationset/examples/list-generator/guestbook/{{.ns}}
targetRevision: HEAD
destination:
server: https://kubernetes.default.svc
namespace: "{{.ns}}"
syncPolicy:
automated:
prune: true
selfHeal: true
syncOptions:
- CreateNamespace=true
```
The template includes:
* **harness.io/serviceRef**: References the Service you selected in the Overview step. This label is added to the ApplicationSet template metadata and are inherited by all child applications generated from this ApplicationSet.
* **harness.io/envRef**: References the Environment you selected in the Overview step. This label is added to the ApplicationSet template metadata and are inherited by all child applications generated from this ApplicationSet.
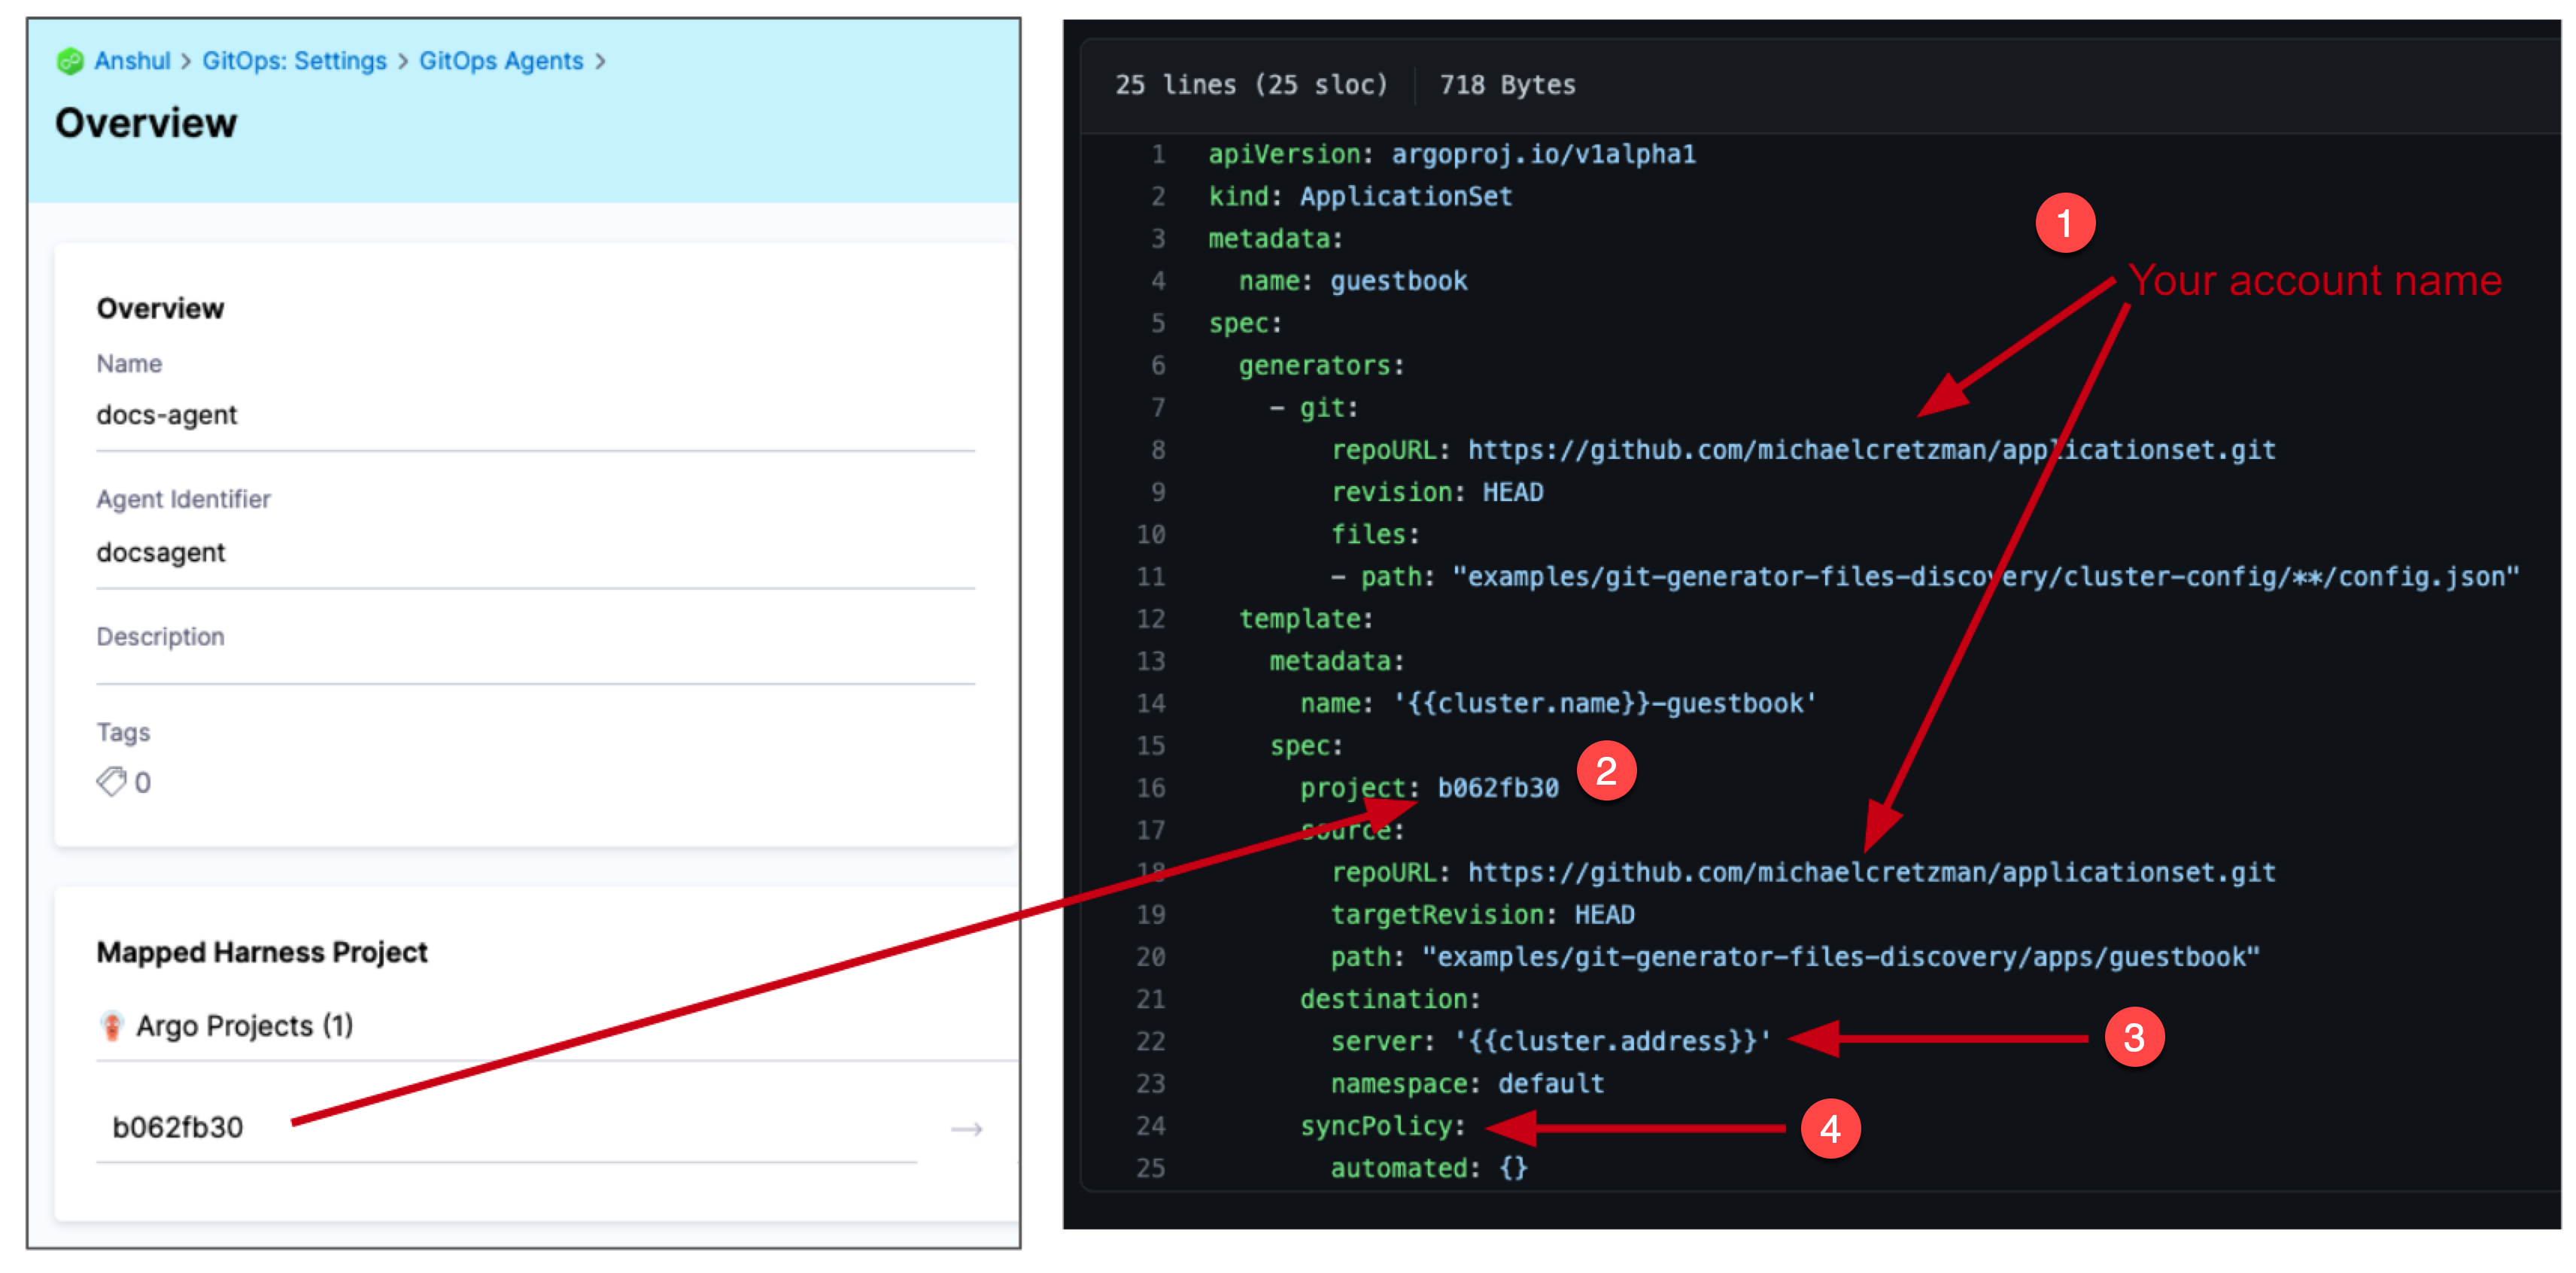
* **project**: The Argo CD project where the ApplicationSet is created. This is usually auto-populated based on the project where the ApplicationSet is created. You can also get this value from the agent details under **Mapped Harness Project** -> **Argo Projects**.
The sample generator and template use the sample Argo CD guestbook ApplicationSet provided in the [Argo CD GitHub repository](https://github.com/argoproj/argo-cd/tree/master/applicationset/examples/list-generator/guestbook).
**How these labels are used**:
The `harness.io/serviceRef` and `harness.io/envRef` labels are applied to all child applications generated by the ApplicationSet. These labels enable:
* **Service Dashboard Tracking**: Applications appear in the Harness Service dashboard for the referenced service
* **PR Pipeline Configuration**: The Fetch Linked Apps step in PR pipelines uses these labels to identify applications associated with a service
* **Environment-based Filtering**: Filter and organize applications by service and environment in the Harness UI
You can use variables in the format `{{.variableName}}` throughout the template. These variables are substituted with values from the generator.
### Preview and validate
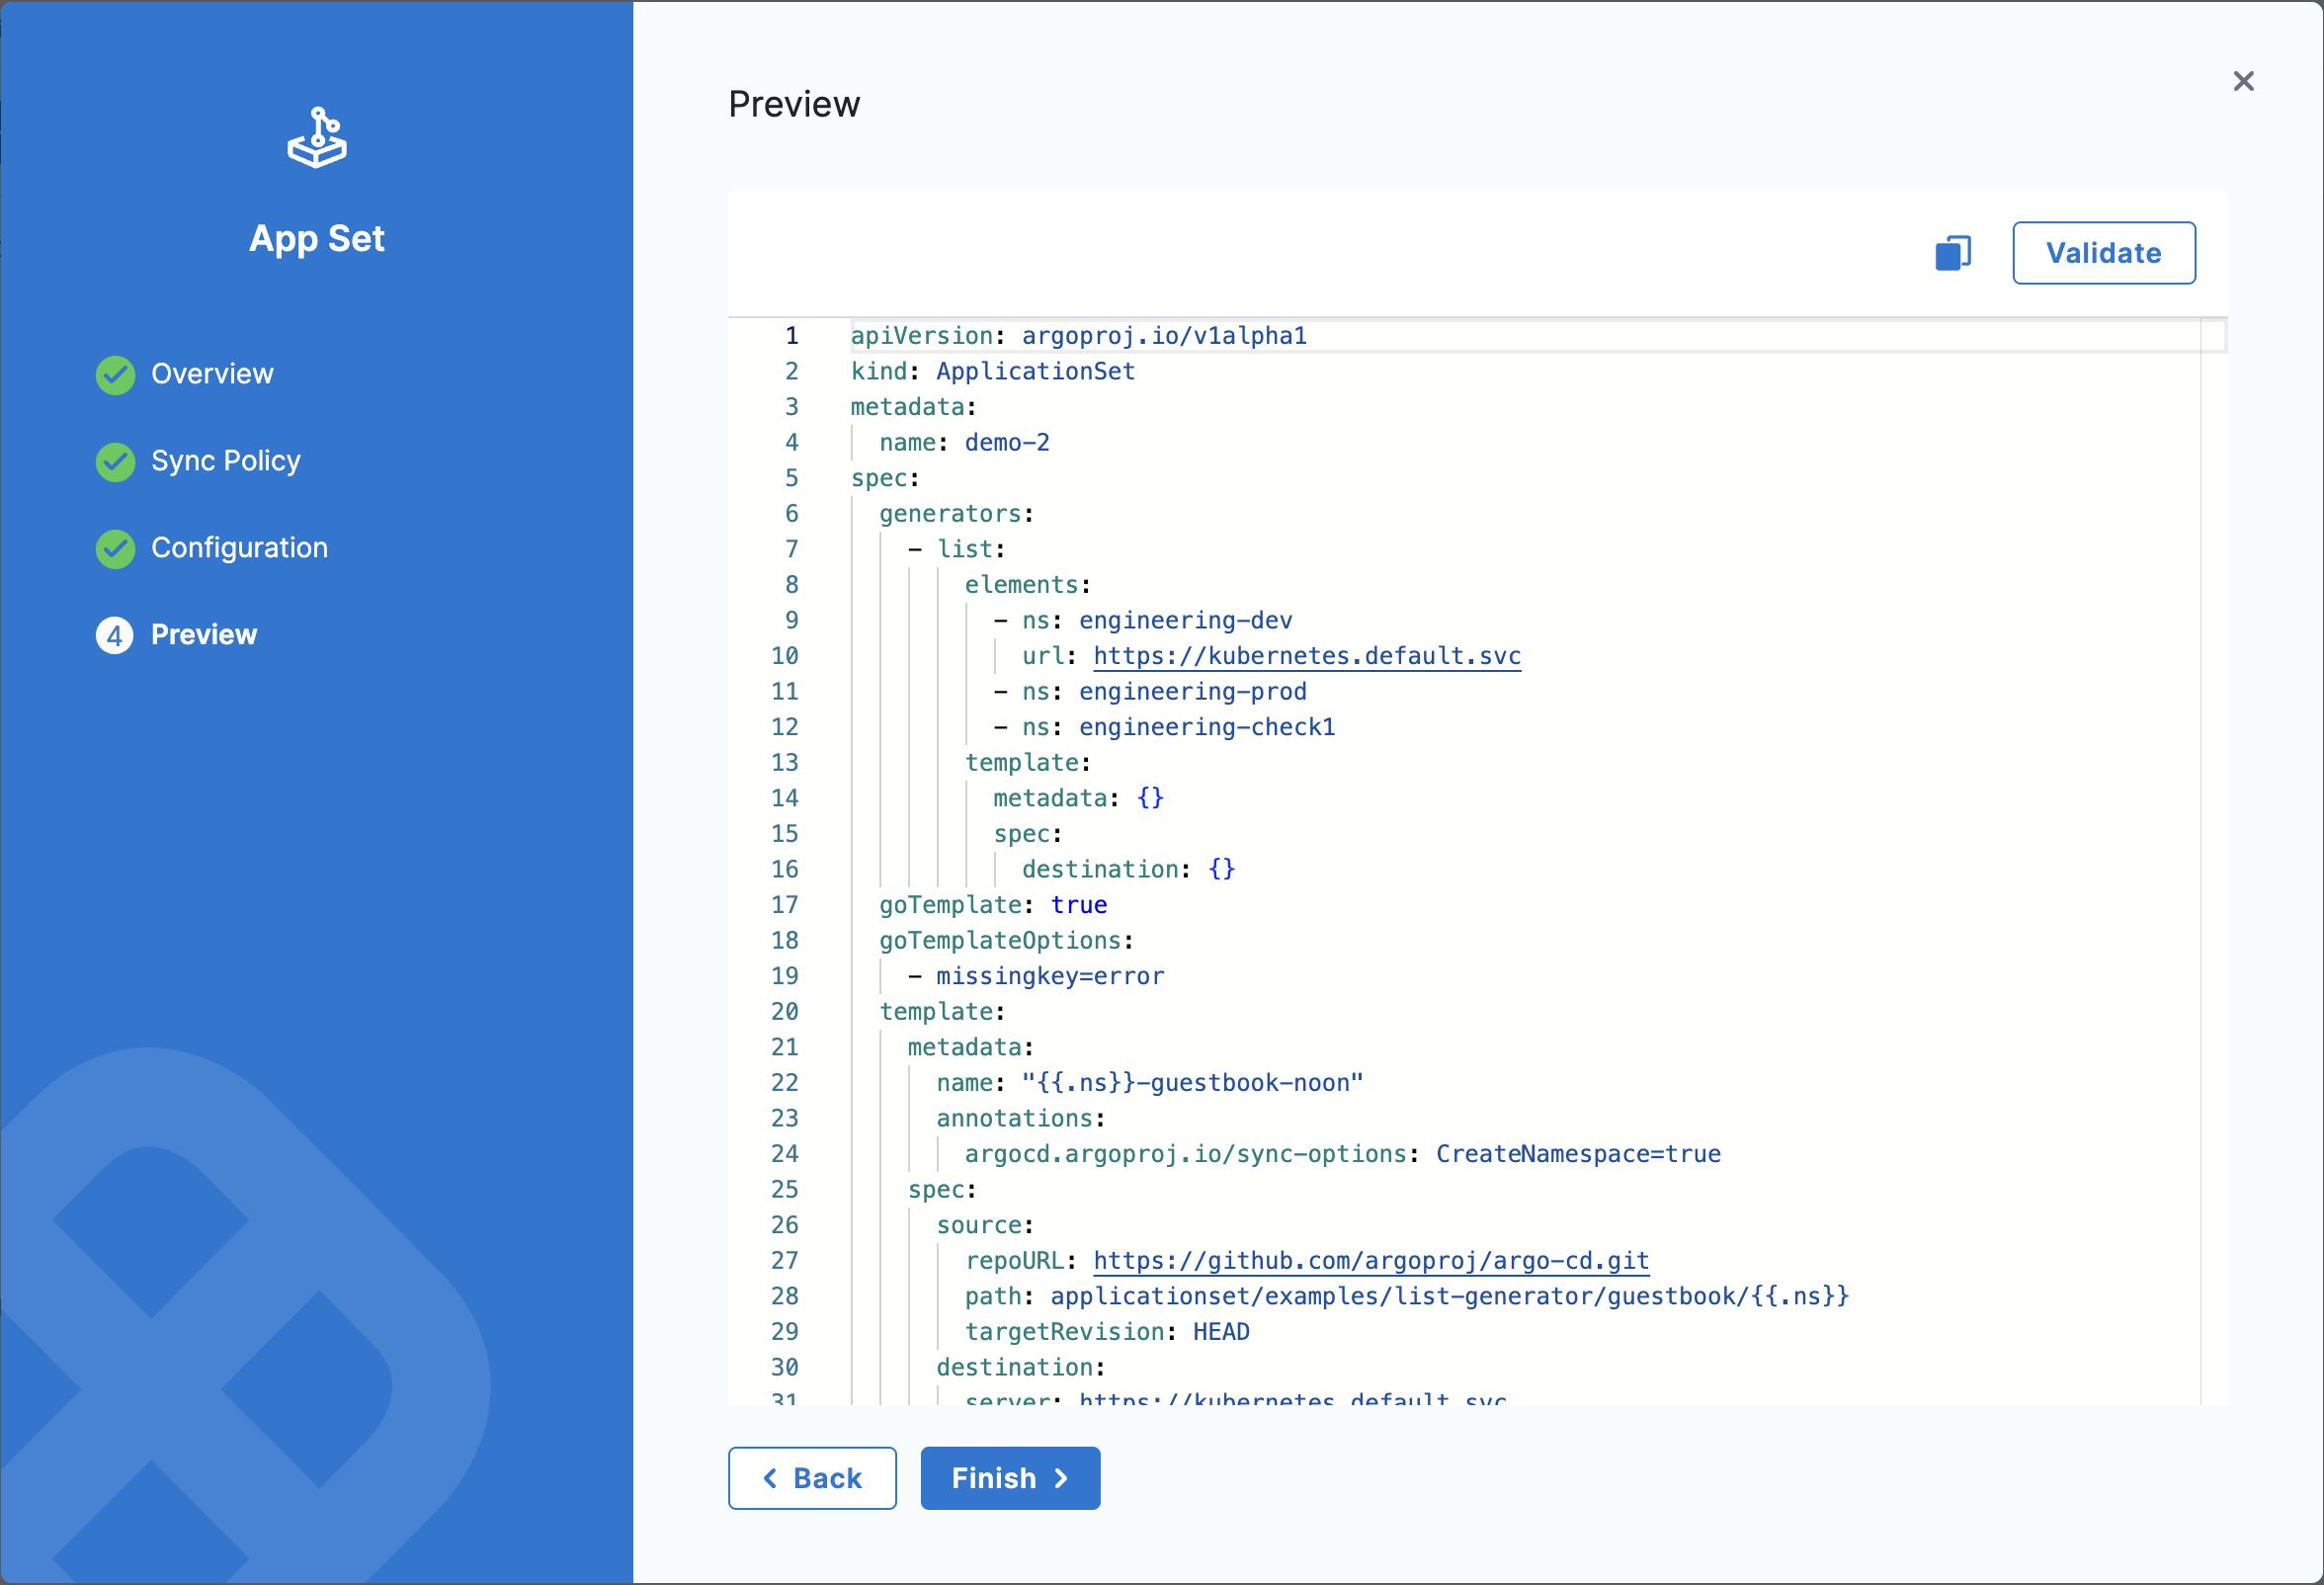
On the **Preview** tab, you can review the complete ApplicationSet manifest before creating it.
**Validate the Manifest**
1. Review the generated YAML manifest.
2. Click **Validate** to check the manifest for:
* Syntax errors
* Template variable substitution issues
* Service and Environment references
* Repository and cluster access permissions
3. If validation succeeds, you see a success message.
4. If validation fails, review the error messages and go back to fix the configuration.
**Create the ApplicationSet**
Once validation passes, select **Finish** to create the ApplicationSet.
### View ApplicationSet details
After creating the ApplicationSet, you can view its details and monitor the applications it generates.
### ApplicationSet dashboard
Perform the following steps to view ApplicationSet details and the applications it generates:
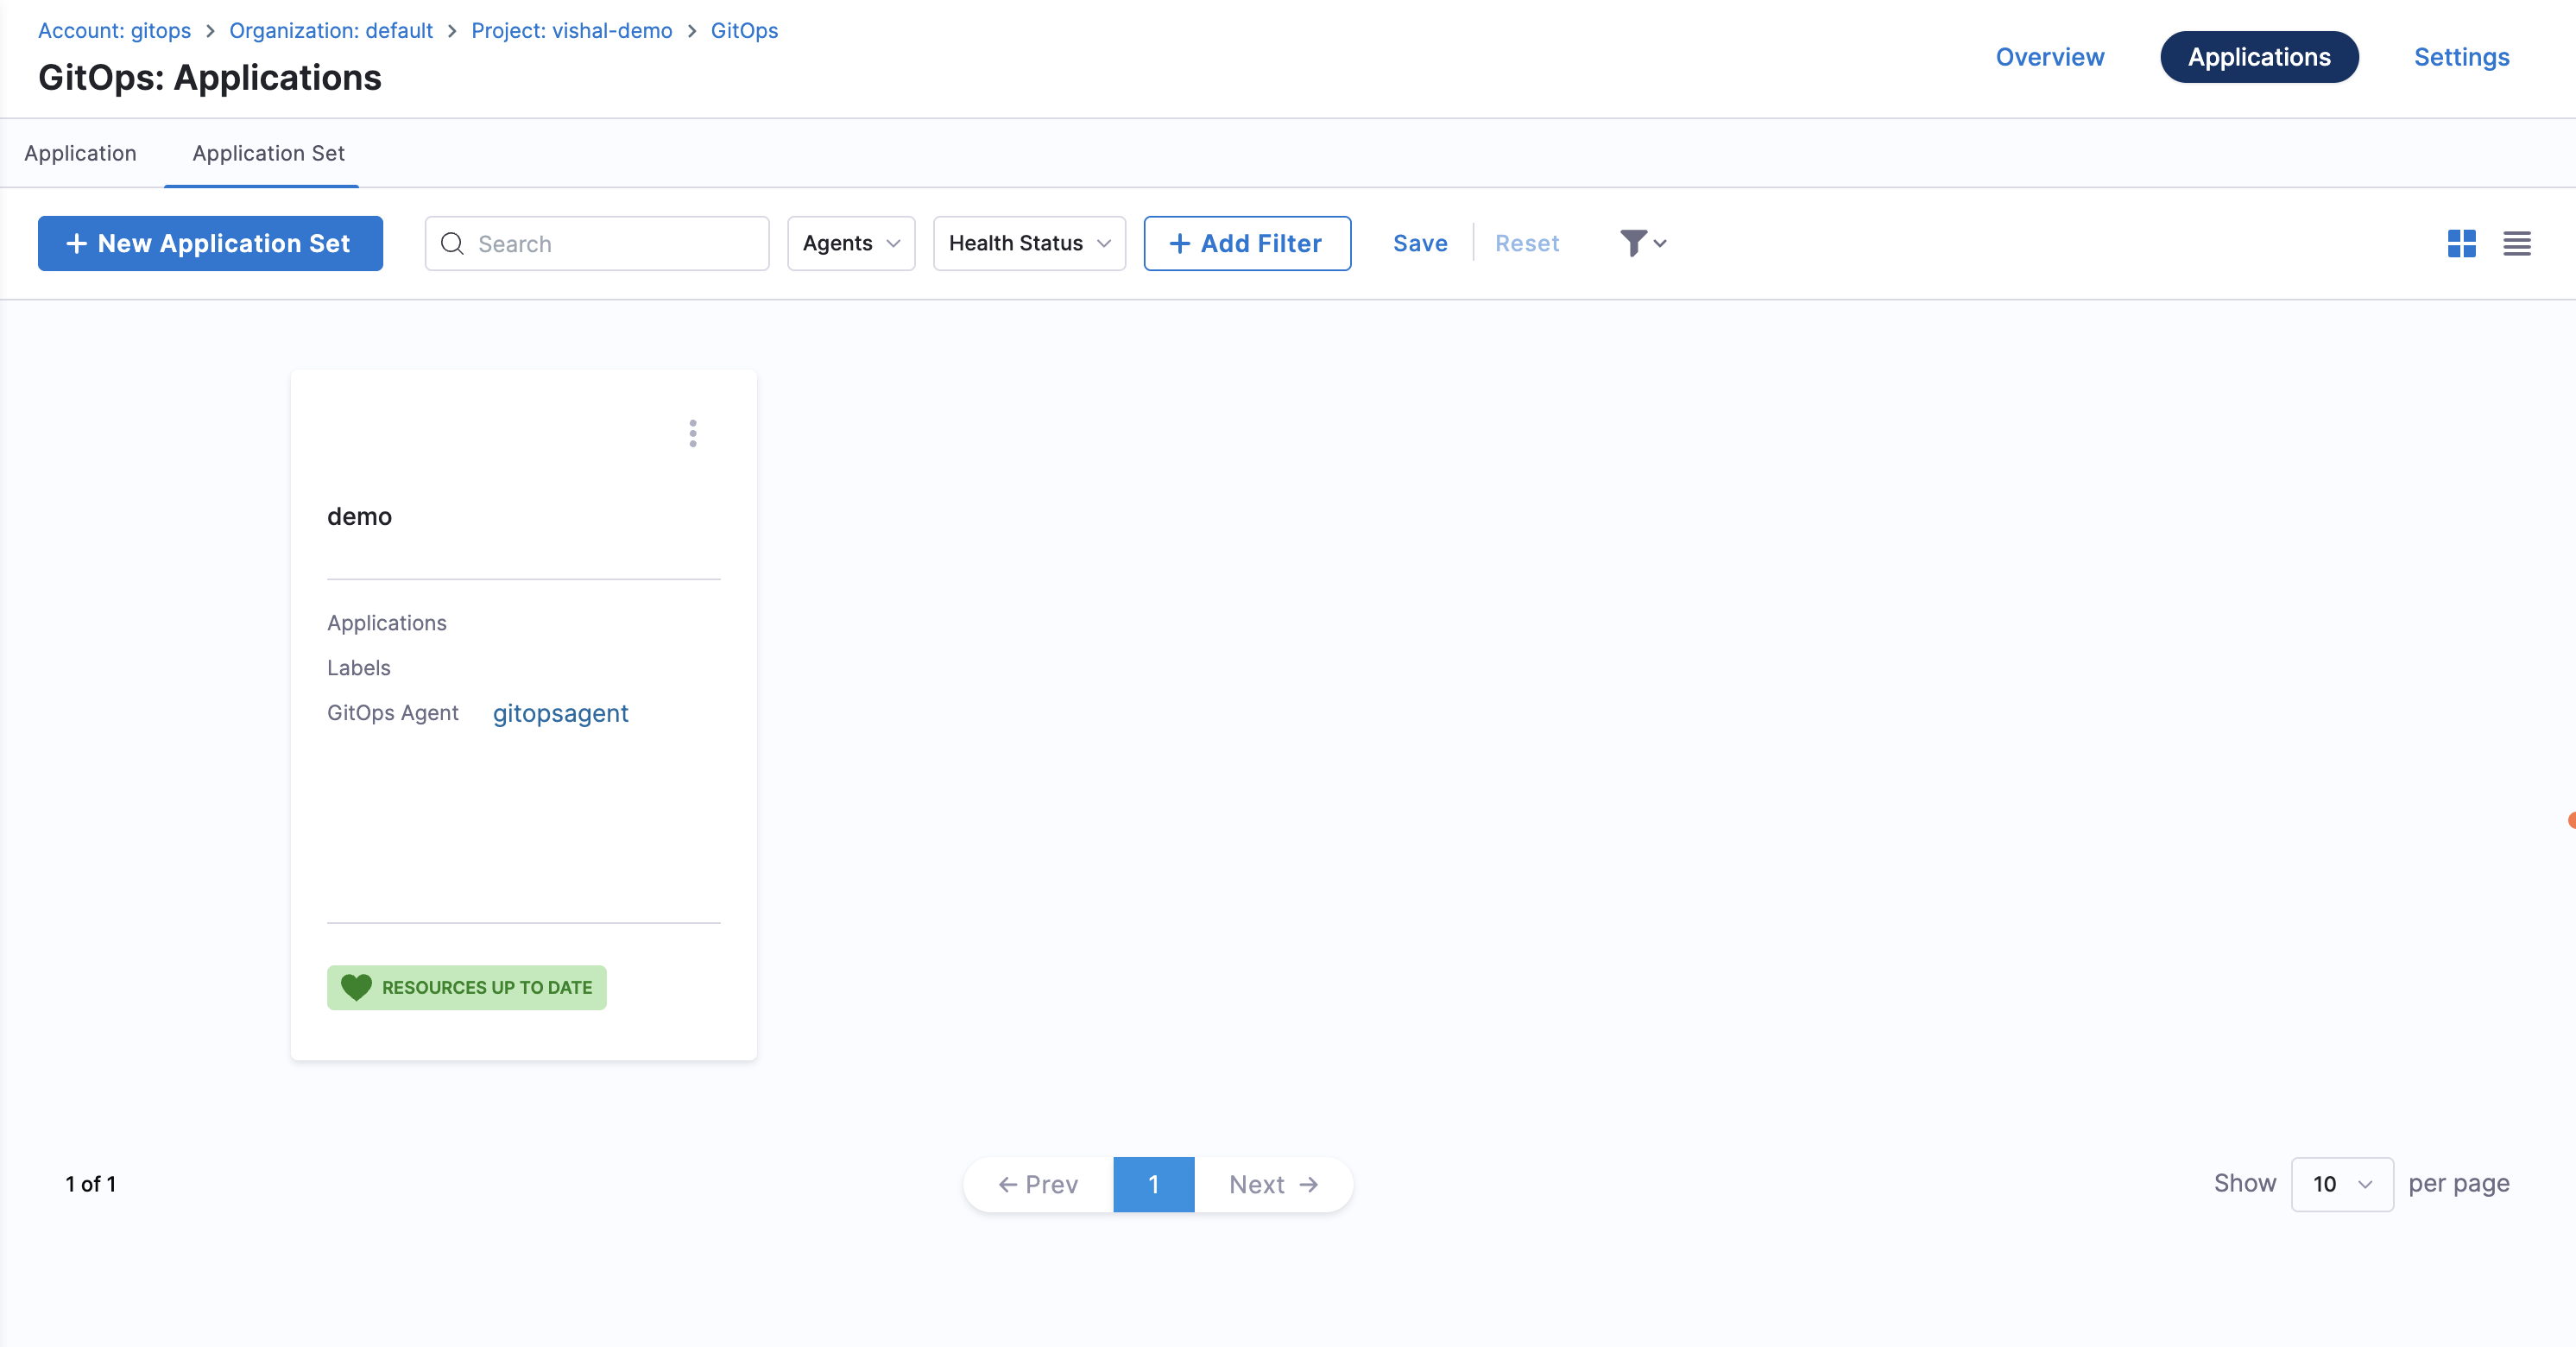
1. The ApplicationSet dashboard displays all ApplicationSets in the project, along with basic information such as:
* Applications within each ApplicationSet
* Labels
* The agent used to create the ApplicationSet
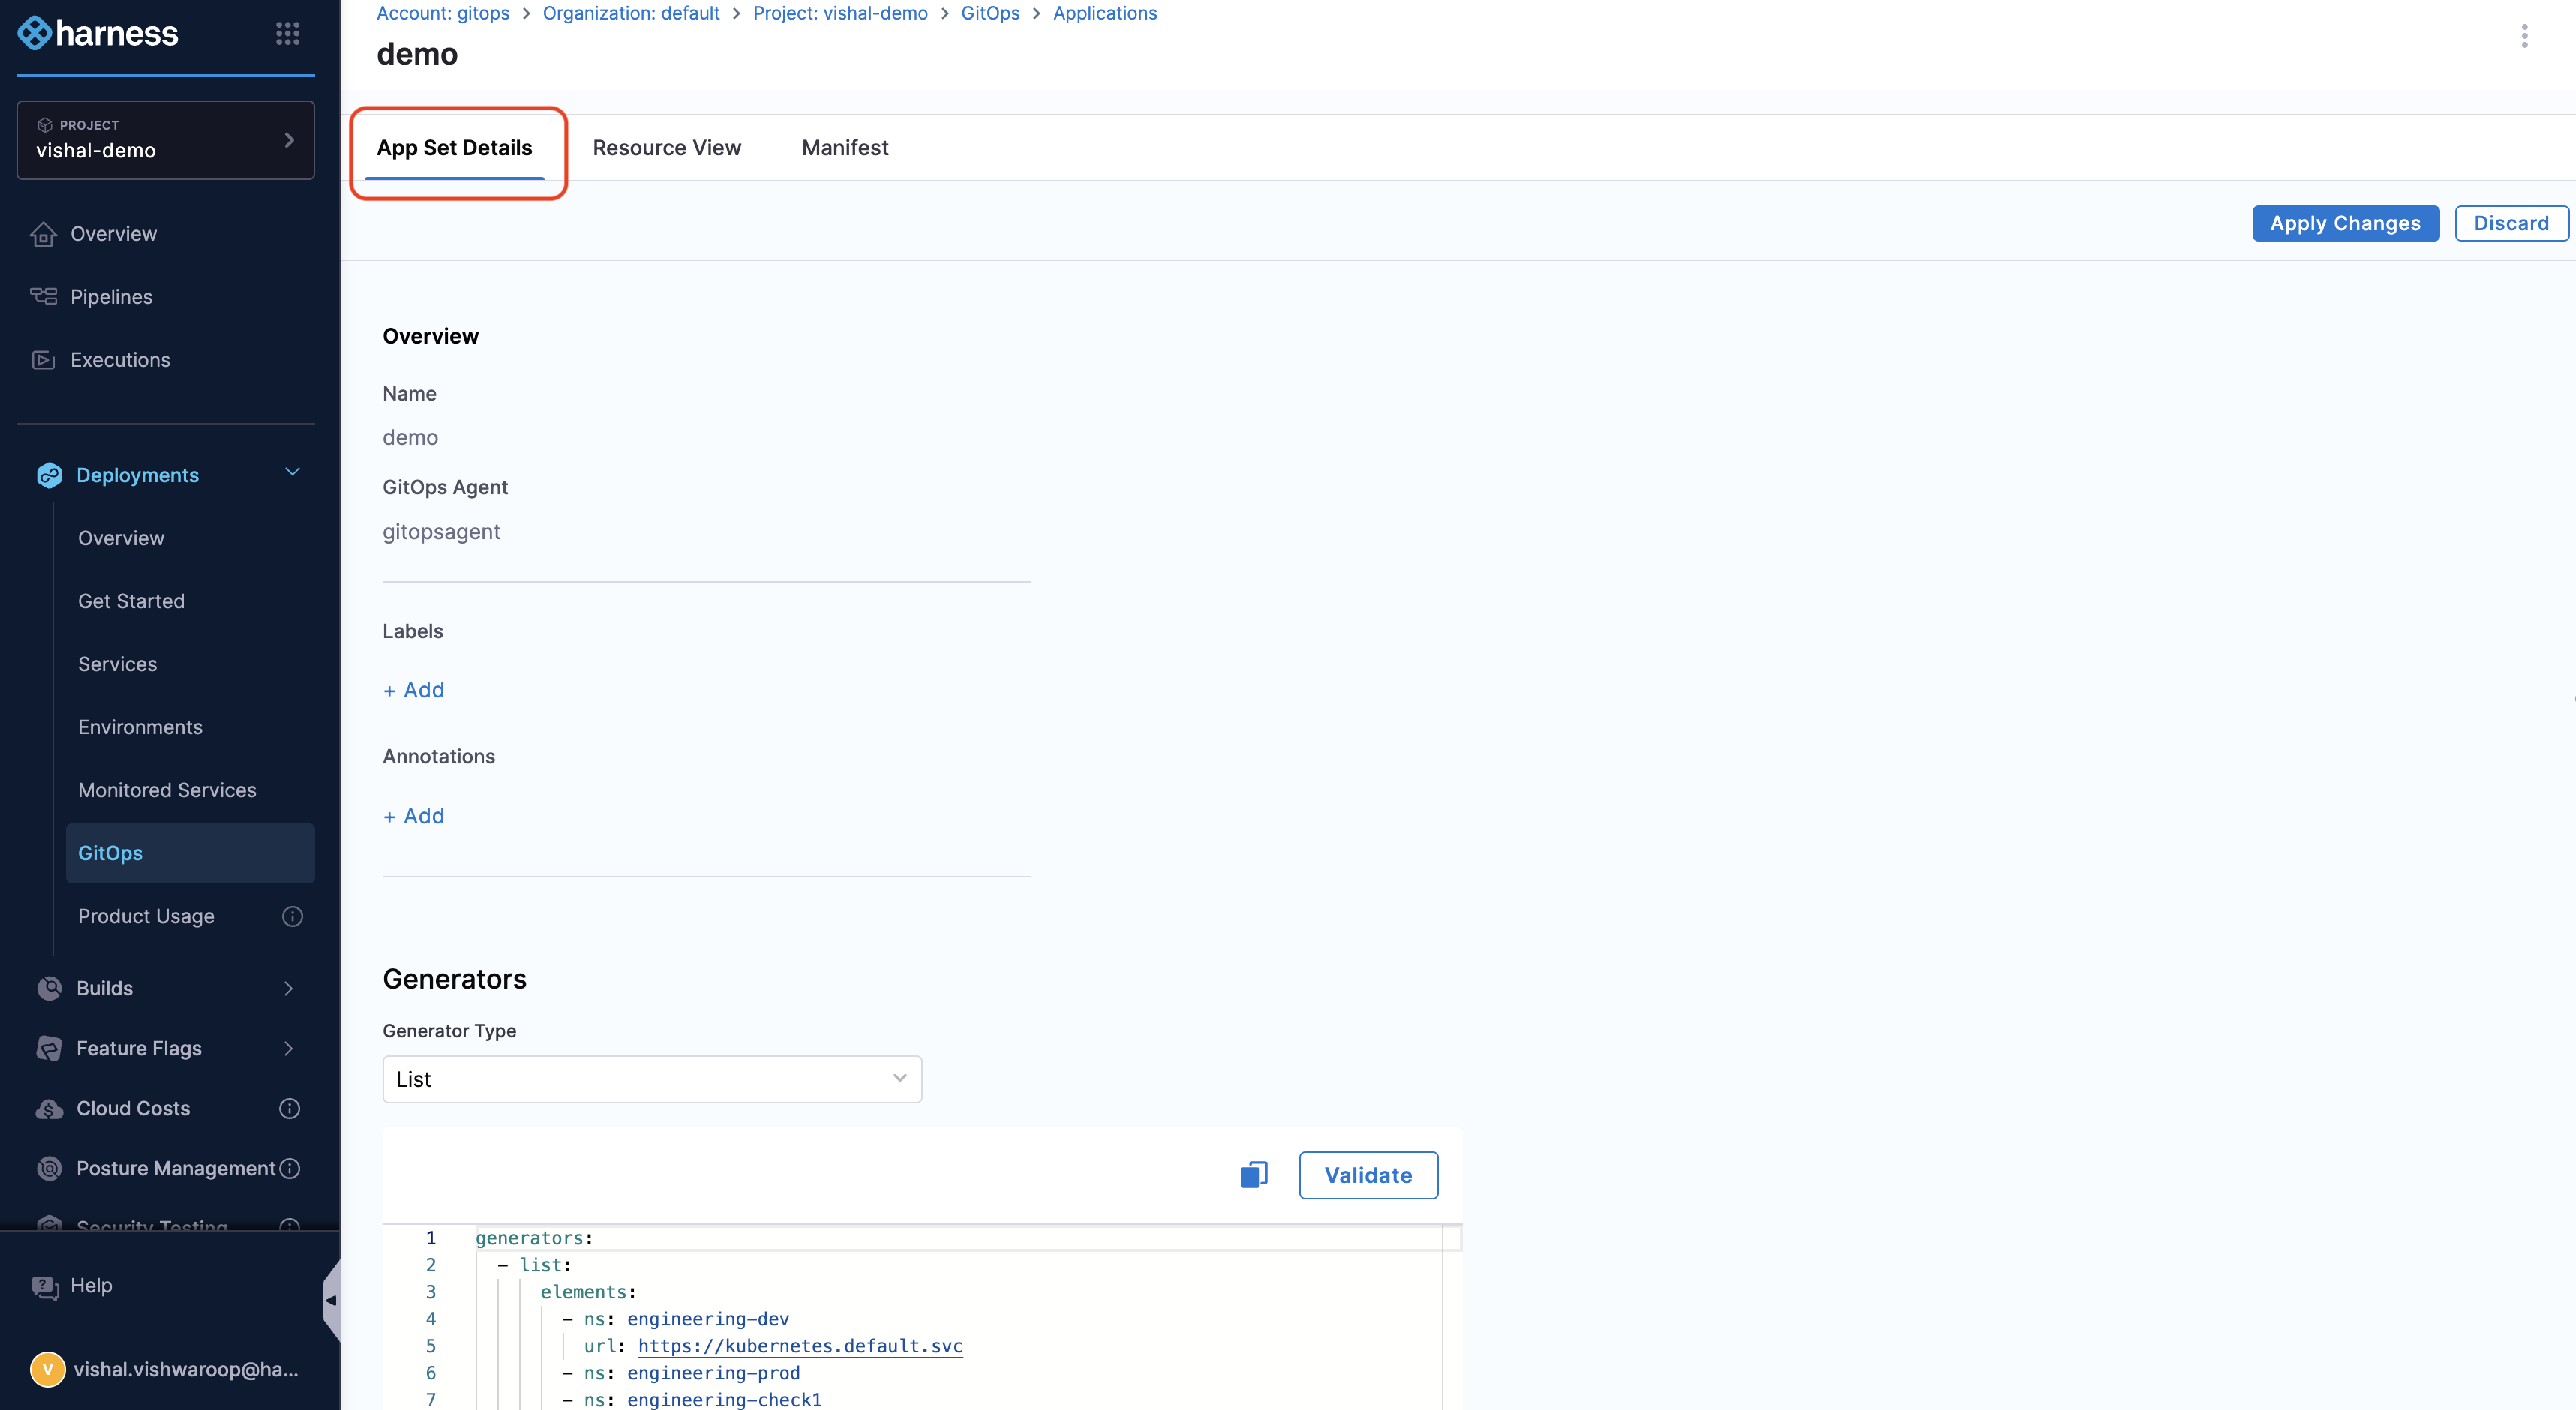
2. Click the ApplicationSet you created to view its details.
On the **App Set Details** page, you can see:
* ApplicationSet name
* GitOps agent used
* Labels and annotations
* Generator details
* Template generated based on the generator
* Sync options and policies
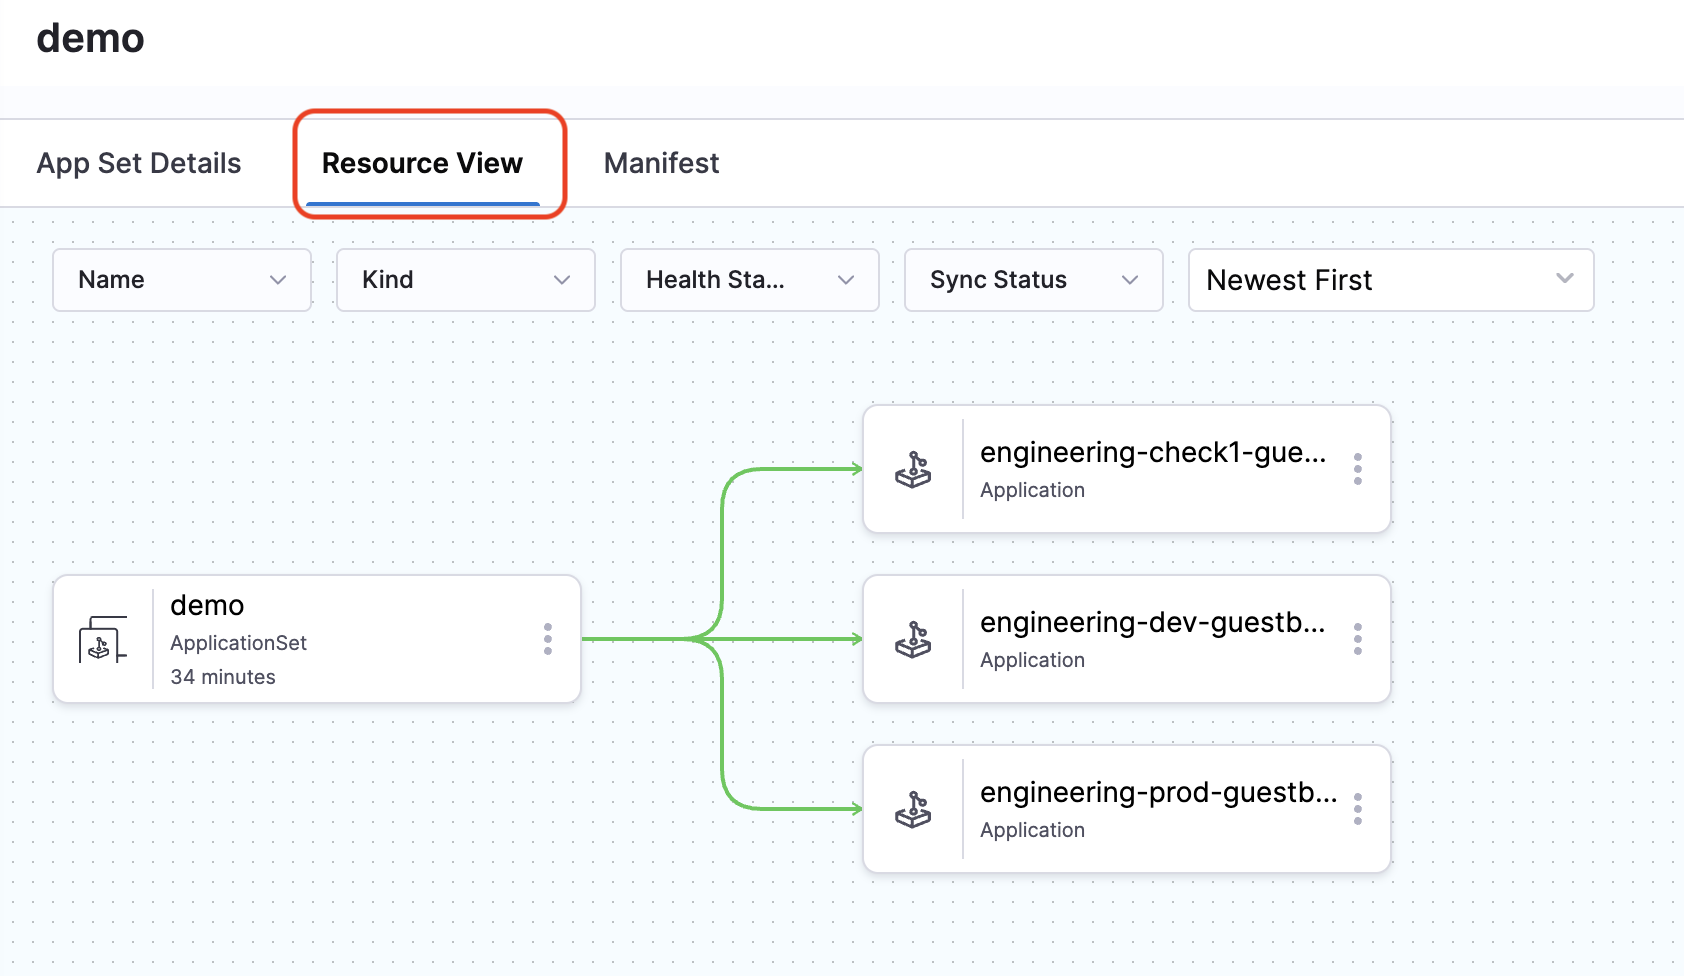
3. Select the **Resource View** tab to view the generated applications.
The **Resource View** shows:
* The ApplicationSet as the parent resource
* All applications generated by the ApplicationSet
* The sync status and health of each application
You can:
* Click any generated application to view its details
* Monitor the sync status and health of all applications
* Check which applications are healthy, progressing, or degraded
{% hint style="info" %}
**Resource tree refresh**
When viewing the ApplicationSet resource tree, child application objects may appear out of sync even if the individual application page shows a synced status. This is because the ApplicationSet resource tree refreshes every three minutes by default. For the most up-to-date status of a specific application, click the application to view its dedicated details page.
{% endhint %}
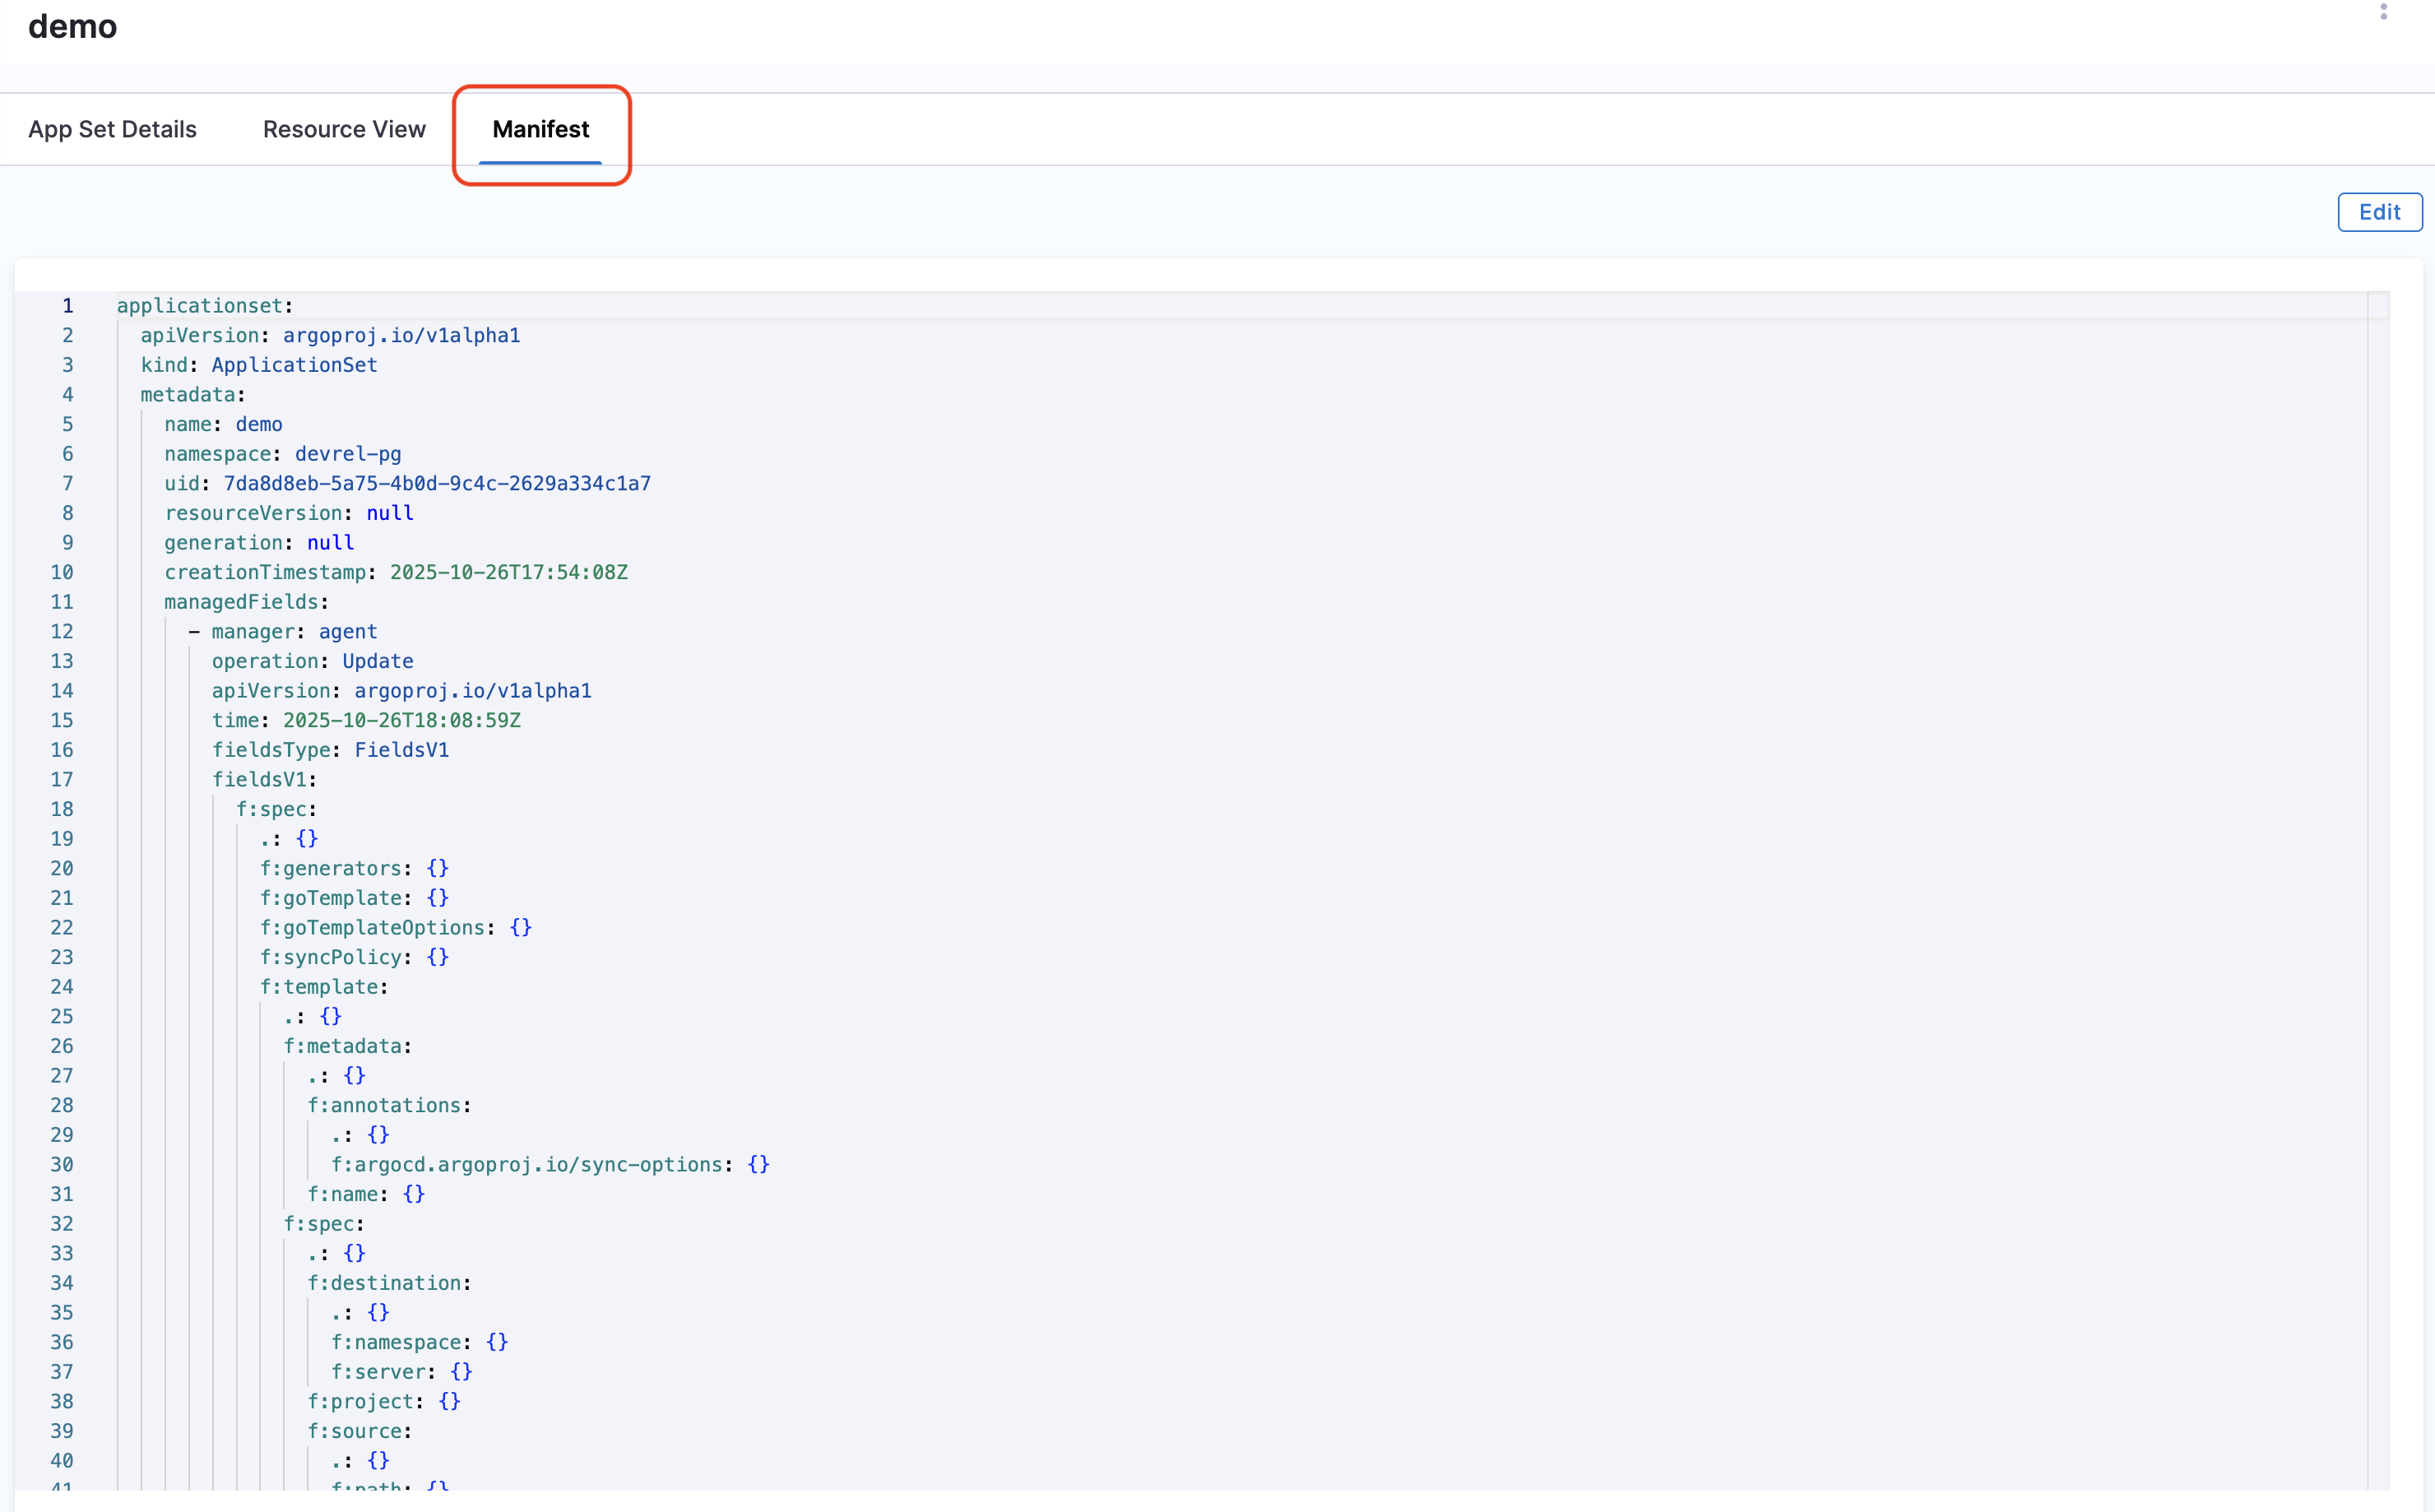
4. Select the **Manifest** tab to view the complete manifest generated for the ApplicationSet.
If you want more details about the applications created by the ApplicationSet, select **Applications** to view them. Filter by the agent and cluster to view the applications created by the ApplicationSet. Typically, all applications created by an ApplicationSet use the same agent and cluster.
## Auto-create services and environments
When importing Argo CD projects through a [Bring Your Own Argo CD (BYOA) setup](/continuous-delivery/use-gitops/connect-and-manage/multiple-argo-to-single-harness.md), Harness can automatically create services and environments in the target Harness project based on the `harness.io/serviceRef` and `harness.io/envRef` labels defined in your ApplicationSet template.
If a service or environment matching the label value already exists, the application is mapped to it. If it does not exist, Harness creates it automatically and maps it to the application.
{% hint style="warning" %}
**Identifier naming rules**
The `harness.io/serviceRef` and `harness.io/envRef` label values become Harness entity identifiers. They must follow these rules:
* Must start with a letter or underscore (not a number or `$`).
* Can only contain alphanumeric characters, underscores (`_`), and dollar signs (`$`).
* Maximum length: 128 characters.
* Cannot use reserved keywords: `or`, `and`, `eq`, `ne`, `lt`, `gt`, `le`, `ge`, `div`, `mod`, `not`, `null`, `true`, `false`, `new`, `var`, `return`, `step`, `parallel`, `stepGroup`, `org`, `account`, `class`, `shellScriptProvisioner`.
**Valid examples**: `my_service`, `MyService123`, `_internal_service`, `service_v2$backup`
**Invalid examples**: `123service` (starts with number), `$service` (starts with `$`), `my-service` (contains hyphen), `my.service` (contains dot), `org` (reserved keyword)
If a label value does not follow these rules, the auto-creation fails silently for that application.
{% endhint %}
To use this with ApplicationSets:
1. **Define labels in your ApplicationSet template**: Add `harness.io/serviceRef` and `harness.io/envRef` labels to the `template.metadata.labels` section. You can templatize these values so each generated application gets its own service and environment reference.
2. **Enable the toggle on the Map Projects screen**: When importing the Argo CD project during the BYOA agent setup, turn on the **Enables automatic creation of service environments** toggle.
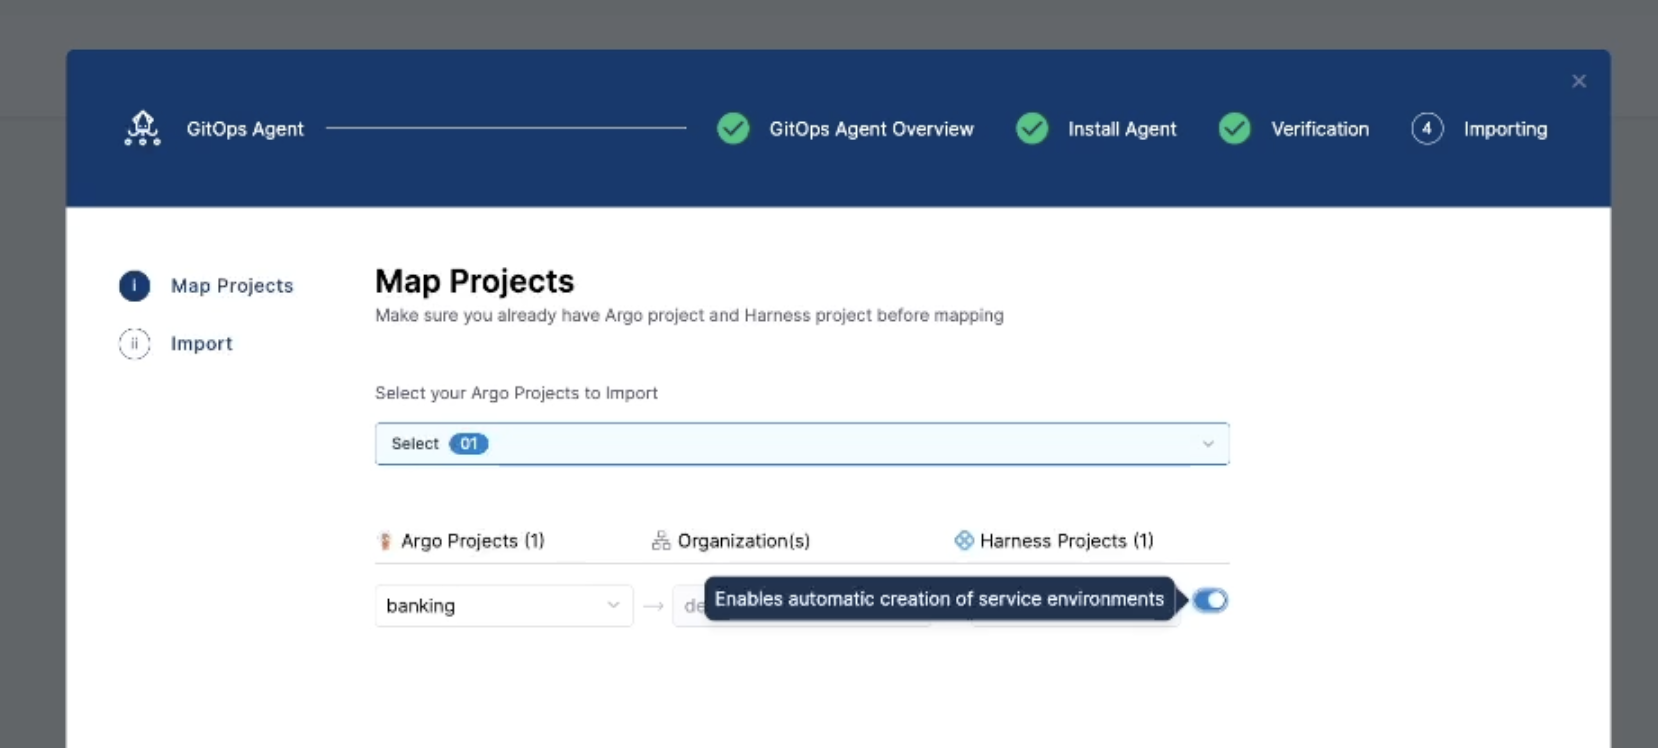
3. **Import the project**: Select **Import & Continue**. Harness processes all applications generated by the ApplicationSet. The import summary shows the number of services, environments, and cluster links that were created or mapped.
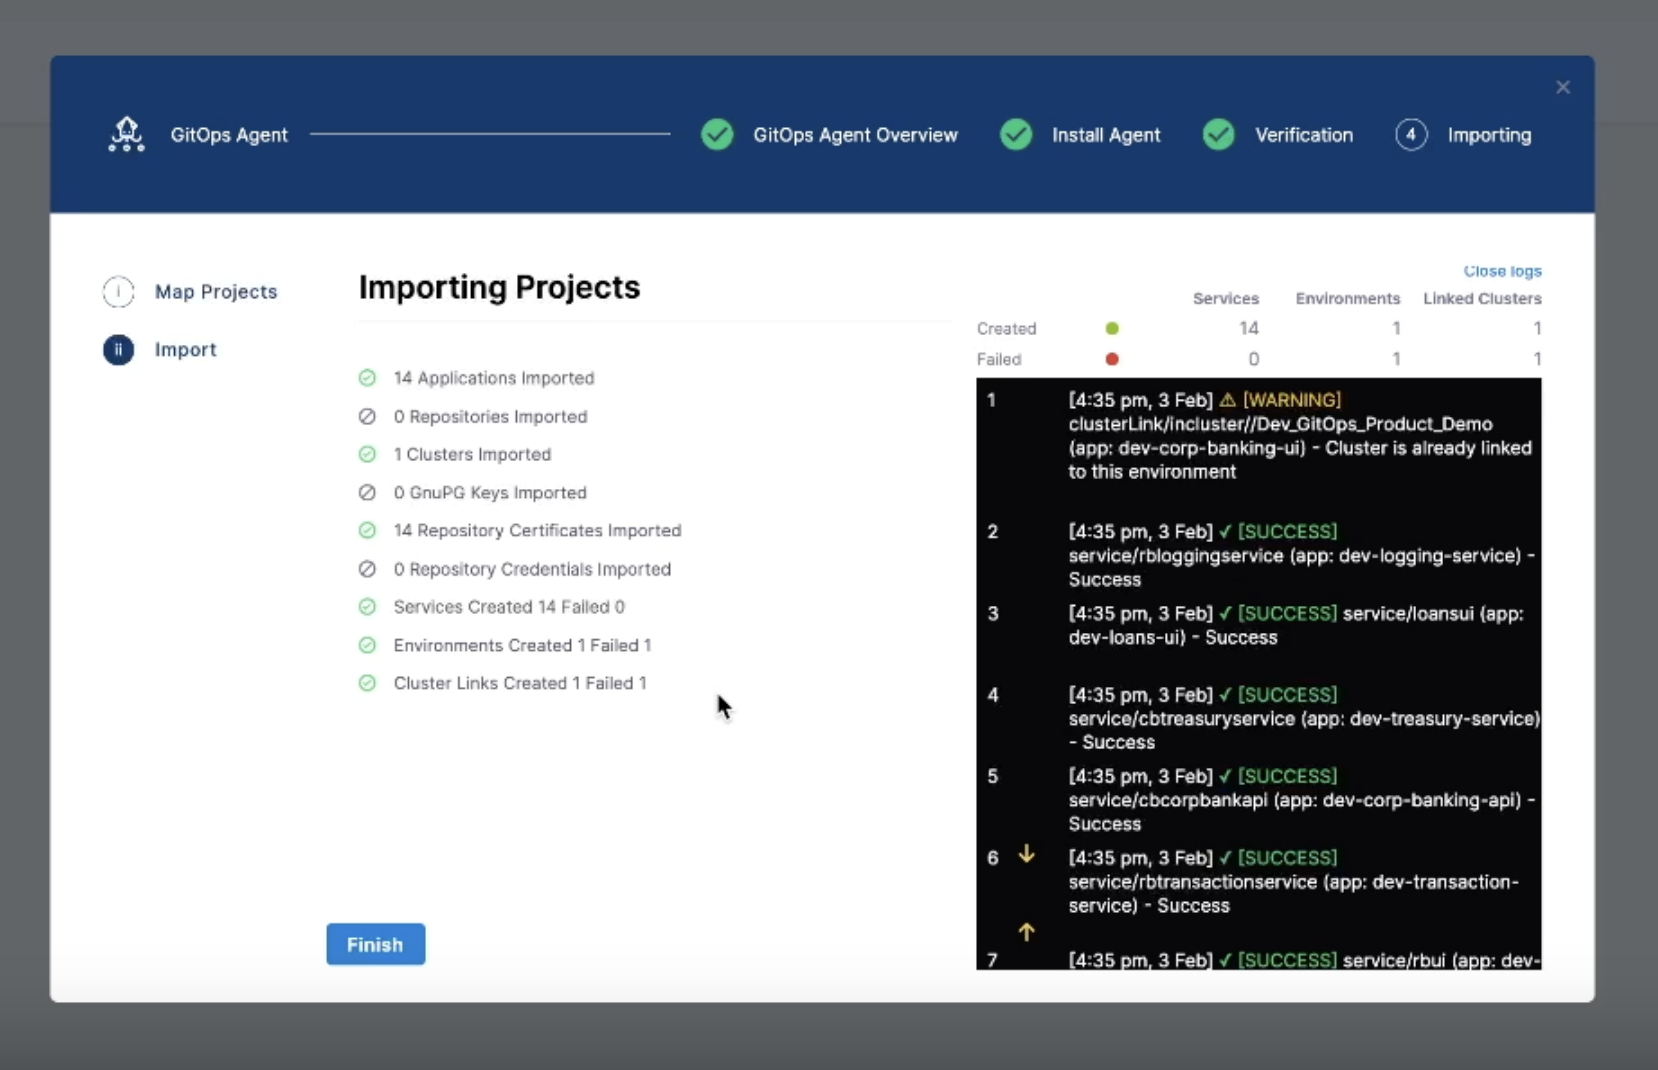
Example ApplicationSet YAML with serviceRef and envRef labels
```yaml
apiVersion: argoproj.io/v1alpha1
kind: ApplicationSet
metadata:
name: dev-microservices
namespace: argocd
spec:
goTemplate: true
goTemplateOptions:
- missingkey=error
generators:
- list:
elements:
- domain: corporate-banking
service: compliance-service
namespace: corporate-banking
serviceRef: cbcomplianceservice
envRef: Dev_GitOps_Product_Demo
- domain: corporate-banking
service: corp-banking-api
namespace: corporate-banking
serviceRef: cbcorpbankapi
envRef: Dev_GitOps_Product_Demo
- domain: corporate-banking
service: treasury-service
namespace: corporate-banking
serviceRef: cbtreasuryservice
envRef: Dev_GitOps_Product_Demo
- domain: retail-banking
service: account-service
namespace: retail-banking
serviceRef: rbaccountservice
envRef: Dev_GitOps_Product_Demo
- domain: retail-banking
service: transaction-service
namespace: retail-banking
serviceRef: rbtransactionservice
envRef: Dev_GitOps_Product_Demo
- domain: loans
service: loans-api
namespace: loans
serviceRef: loansapi
envRef: Dev_GitOps_Product_Demo
template:
metadata:
name: "dev-{{.service}}"
labels:
environment: "dev"
app: "{{.service}}"
harness.io/serviceRef: "{{.serviceRef}}"
harness.io/envRef: "{{.envRef}}"
spec:
project: banking
source:
repoURL: https://github.com/example-org/gitops-demo
targetRevision: main
path: "services/{{.domain}}/{{.service}}/overlays/dev"
destination:
server: "https://kubernetes.default.svc"
namespace: "{{.namespace}}"
syncPolicy:
automated:
prune: true
selfHeal: true
syncOptions:
- CreateNamespace=true
```
In this example, each element in the list generator defines a `serviceRef` and `envRef` that are substituted into the template labels. When the BYOA import runs with auto-creation enabled, Harness creates a service and environment for each unique `serviceRef`/`envRef` value and maps the generated applications accordingly.
## Filter ApplicationSets
You can filter ApplicationSets in the list view using the following controls:
* **Search**: Enter text to search by ApplicationSet name
* **Agent**: Filter by GitOps Agent
* **Sync Status**: Filter by sync status (Synced, OutOfSync, Unknown)
* **Health Status**: Filter by health status (Healthy, Progressing, Degraded, Suspended, Missing)
## Edit ApplicationSets
To edit an existing ApplicationSet:
1. Go to the **Application Set** tab.
2. Select your ApplicationSet.
3. Select the **Manifest** tab.
4. Select **Edit** to modify the manifest.
5. Make your changes and select **Save**.
{% hint style="warning" %}
**Edit impact**
Editing an ApplicationSet may cause applications to be created, updated, or deleted based on the changes you make to the generator or template.
{% endhint %}
## Delete ApplicationSets
To delete an ApplicationSet:
1. Go to the **Application Set** tab.
2. Find your ApplicationSet in the list.
3. Select the three vertical dots (⋮) next to the ApplicationSet.
4. Select **Delete**.
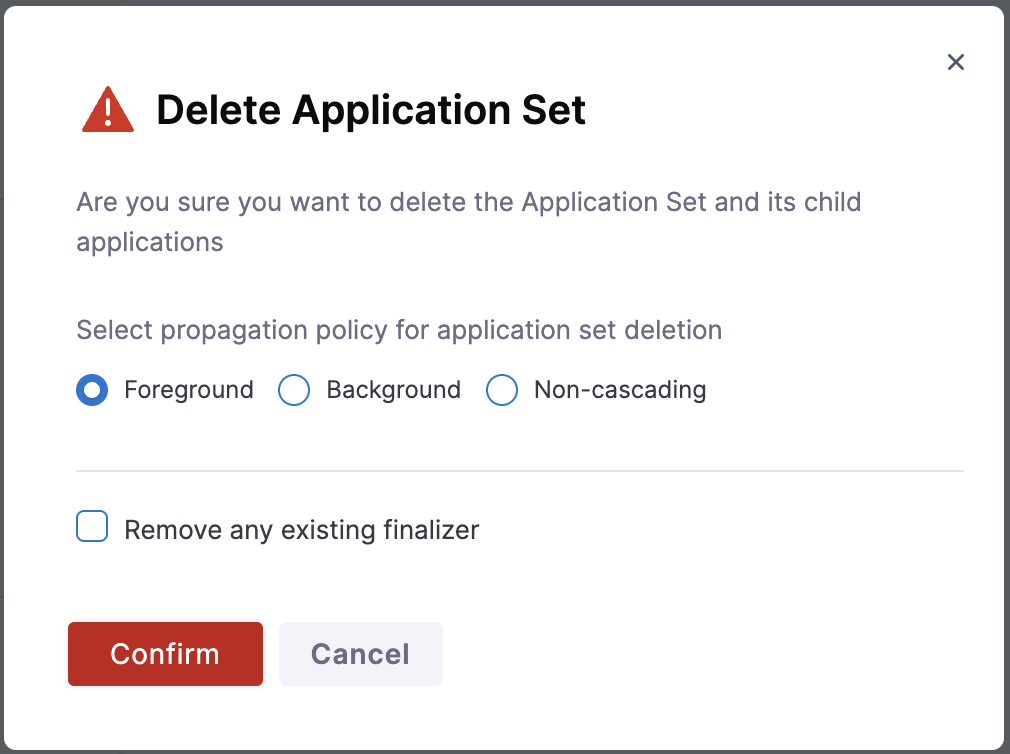
5. In the **Delete Application Set** dialog, configure the deletion options:
**Propagation Policy**: Select how the deletion should be handled:
* **Foreground** (recommended): Deletes the ApplicationSet first, then waits for all child applications and their resources to be deleted. This ensures a clean, ordered deletion process.
* **Background**: Deletes the ApplicationSet immediately and removes child applications asynchronously in the background. The ApplicationSet is removed from the UI before all resources are fully cleaned up.
* **Non-cascading**: Deletes only the ApplicationSet itself without deleting child applications. The applications become orphaned and continue running independently.
**Remove any existing finalizer**: Check this option to remove Kubernetes finalizers and force immediate deletion. Only use this if the ApplicationSet is stuck in a deleting state.
6. Click **Confirm** to proceed with the deletion.
{% hint style="danger" %}
**Deletion scope**
Deleting an ApplicationSet with **Foreground** or **Background** propagation also deletes all applications generated by it and their deployed resources, unless you have configured the sync policy to preserve resources or you select **Non-cascading**.
{% endhint %}
{% endtab %}
{% tab title="Standard Flow" %}
### Create ApplicationSet standard flow
Use this standard flow to manage ApplicationSet YAML in Git directly, without the wizard.
{% hint style="success" %}
**Prefer the wizard when possible**
The First-Class Support tab offers an enhanced UI wizard with Service and Environment integration. Go to the [First-Class Support](#applicationset-workflows) tab to use it.
{% endhint %}
### Update manifests in Git
The following example uses a [Git generator](https://argo-cd.readthedocs.io/en/stable/operator-manual/applicationset/Generators-Git/) from the [Argo Project's public repository](https://github.com/argoproj/applicationset/tree/master/examples/git-generator-files-discovery).
1. Clone the [ApplicationSet repository](https://github.com/argoproj/applicationset) and navigate to the example directory.
2. Update `git-generator-files.yaml` with the following YAML configuration:
```yaml
apiVersion: argoproj.io/v1alpha1
kind: ApplicationSet
metadata:
name: guestbook
spec:
generators:
- git:
repoURL: https://github.com//applicationset.git
revision: HEAD
files:
- path: "examples/git-generator-files-discovery/cluster-config/**/config.json"
template:
metadata:
name: '{{cluster.name}}-guestbook'
labels:
harness.io/envRef: '{{envTag}}'
harness.io/serviceRef: '{{serviceTag}}'
harness.io/buildRef: '{{releaseTag}}'
spec:
project:
source:
repoURL: https://github.com//applicationset.git
targetRevision: HEAD
path: "examples/git-generator-files-discovery/apps/guestbook"
destination:
server: '{{cluster.address}}'
namespace: default
syncPolicy:
automated: {}
```
3. To get the project ID:
* Go to **Deployments** -> **GitOps** -> **Settings** -> **GitOps Agents**
* Find the Argo Project ID you want to use to create the ApplicationSet
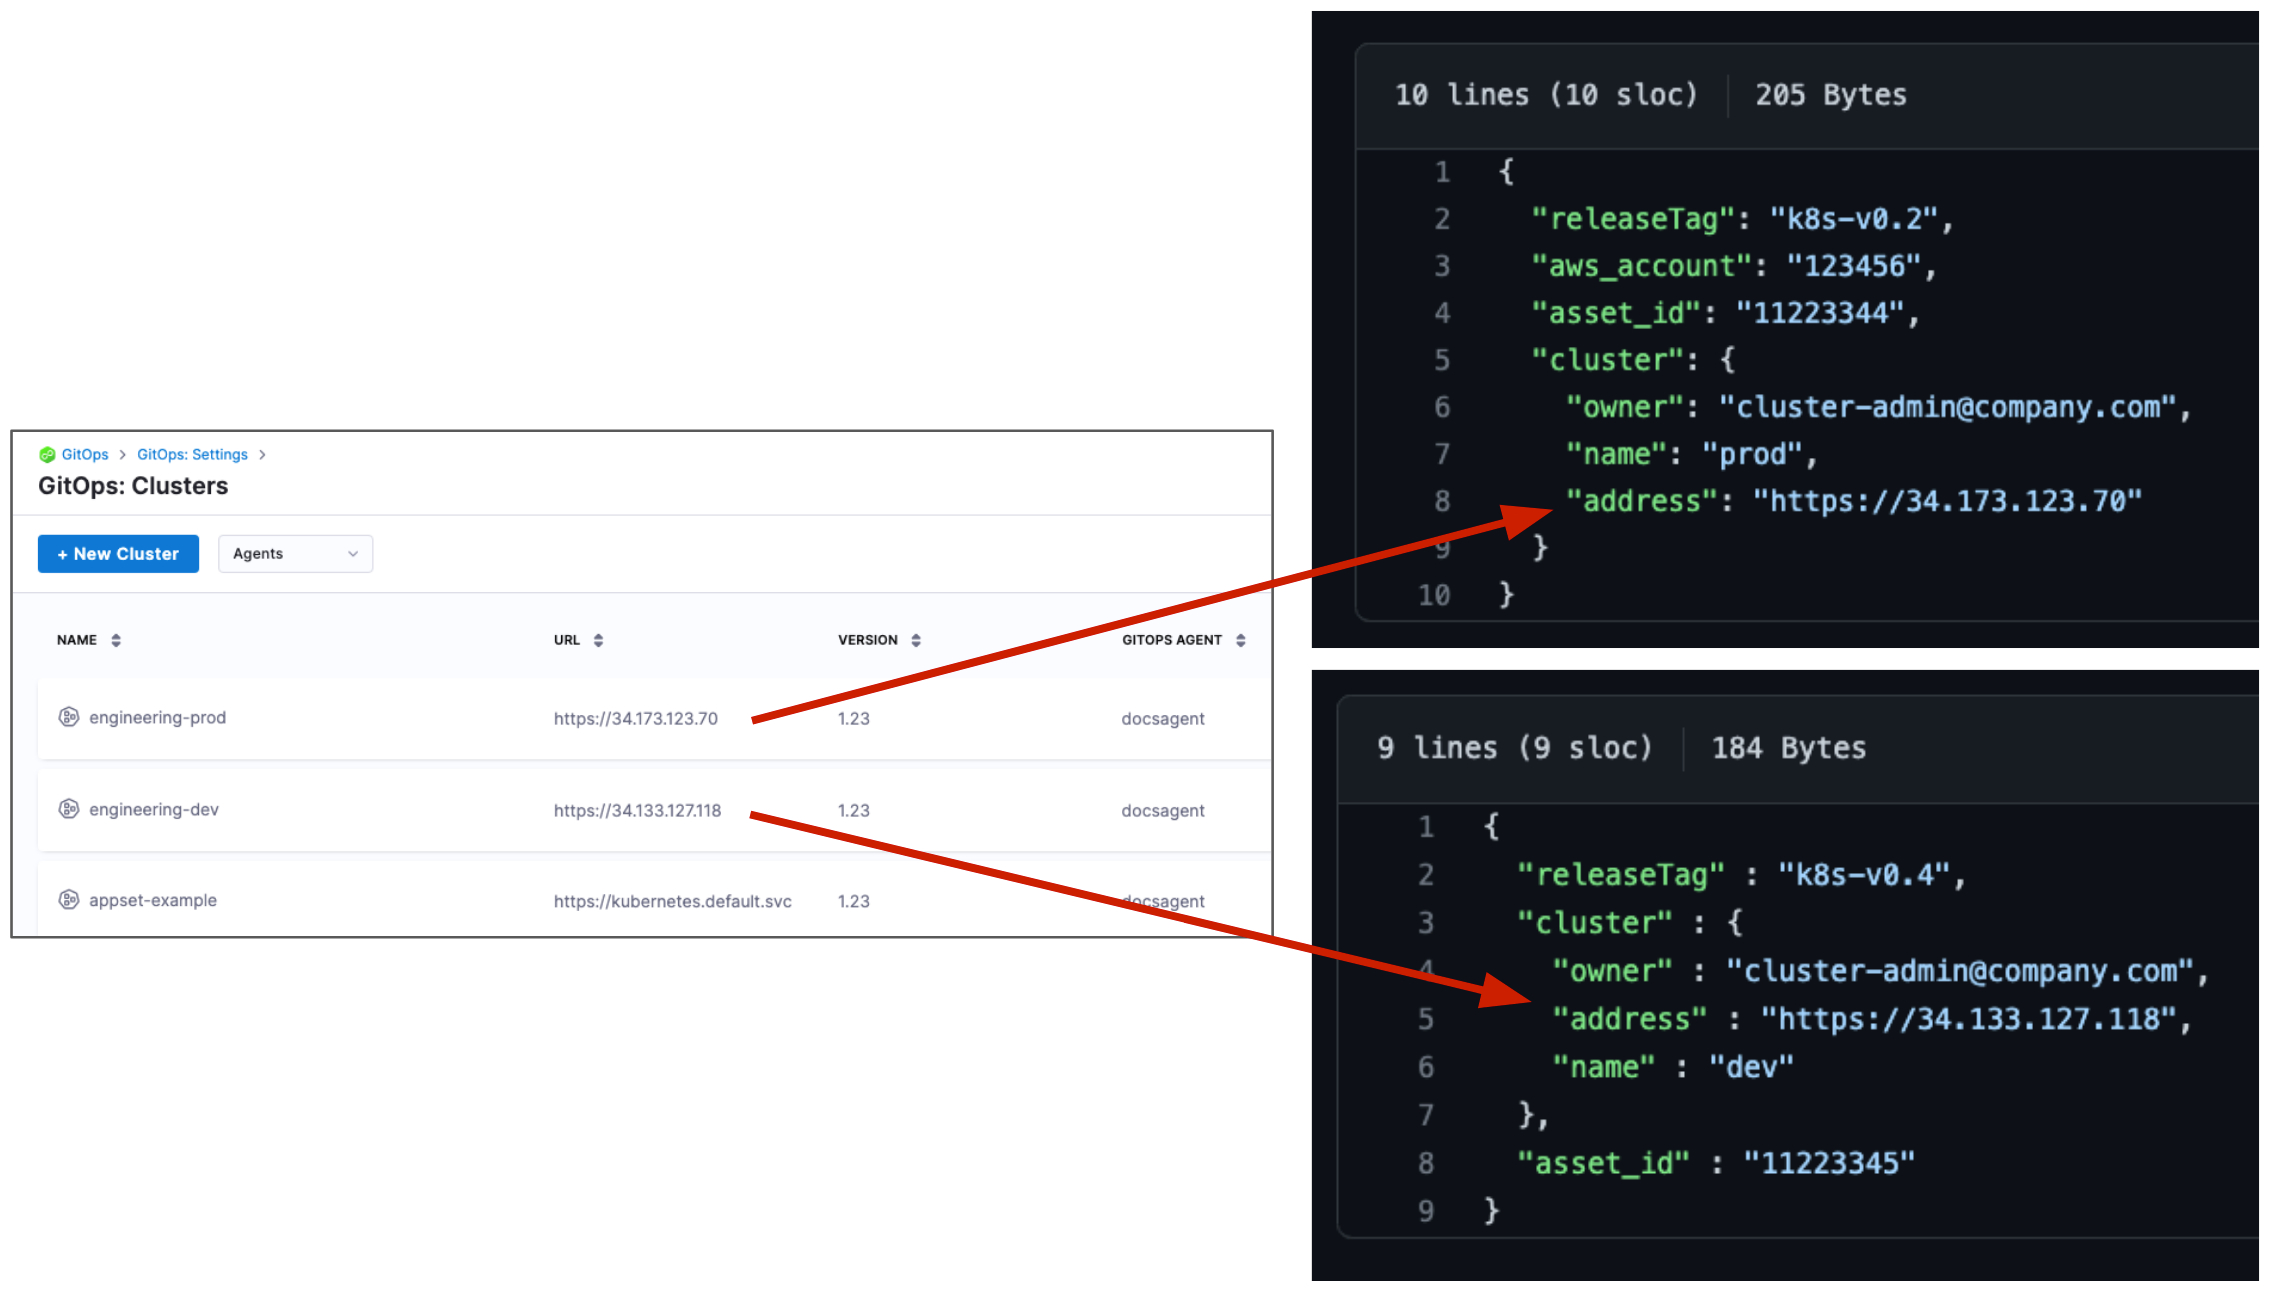
4. Navigate to `applicationset/examples/git-generator-files-discovery/cluster-config/engineering/dev/config.json`
5. Replace `"address": "https://1.2.3.4"` with the Endpoint IP address for your **dev** target cluster. Ensure you use the `https://` scheme.
{% hint style="info" %}
**Cluster prerequisite**
This cluster must be created in Harness beforehand.
{% endhint %}
6. Repeat for the **prod** target cluster by modifying `applicationset/examples/git-generator-files-discovery/cluster-config/engineering/prod/config.json`
The following is an example of the cluster configuration:
{% hint style="info" %}
**Supported formats**
Both JSON and YAML formats are supported for ApplicationSet configuration files.
{% endhint %}
### Create the ApplicationSet application
Perform the following steps to create the ApplicationSet application:
1. In your Harness project, go to **Deployments** -> **GitOps**.
2. Select **Applications** from the left navigation.
3. Click **New Application**.
4. Enter the following details:
* **Application Name**: Enter a name for your ApplicationSet
* **GitOps Agent**: Select the agent that manages this ApplicationSet
* **Sync Policy**: Leave the default settings or configure as needed
5. Click **Continue**.
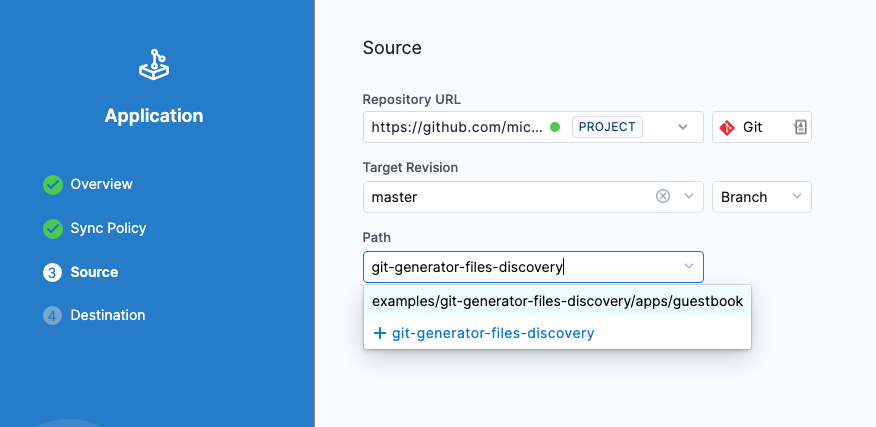
6. In the **Source** section, configure:
* **Repository URL**: Select the GitOps repository you added earlier
* **Target Revision**: Select **master** or your main branch
* **Path**: Enter `examples/git-generator-files-discovery`
7. Click **Continue**.
8. In the **Destination** section:
* **Cluster**: Select the cluster where your GitOps agent is installed
* **Namespace**: Select the namespace where your GitOps agent is installed
9. Click **Save** to create the ApplicationSet application.
### Sync the ApplicationSet application
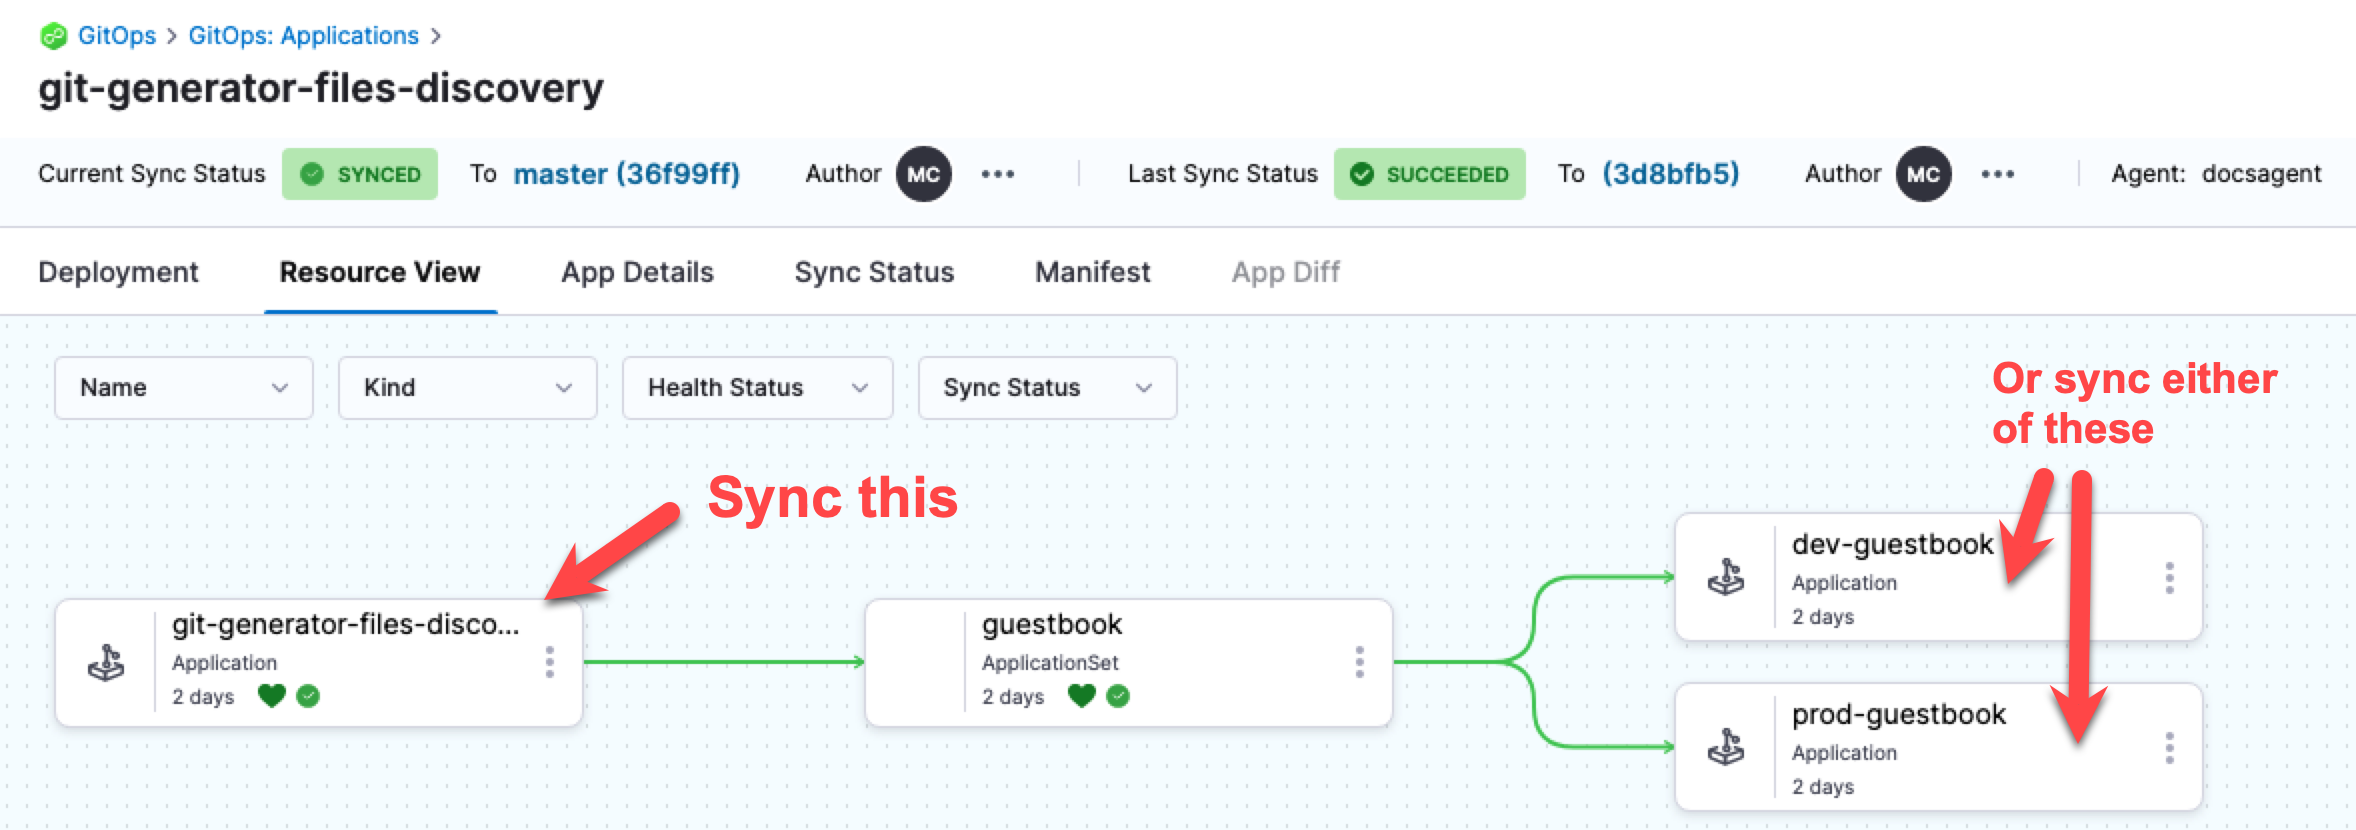
You can sync the ApplicationSet from two places: the **Applications** view or a PR pipeline.
**Sync from Applications View**
From the **Applications** view, you can sync the Harness ApplicationSet application or the individual child applications independently.
**Automatic Syncing**
If you configure automatic syncing in the ApplicationSet template, the applications sync automatically. The following example shows `syncPolicy.automated`:
```yaml
template:
metadata:
name: '{{cluster.name}}-guestbook'
spec:
project:
source:
repoURL: https://github.com//applicationset.git
targetRevision: HEAD
path: "examples/git-generator-files-discovery/apps/guestbook"
destination:
server: '{{cluster.address}}'
namespace: default
syncPolicy:
automated: {}
```
**Sync via PR Pipeline**
Go to [Sync GitOps applications](/continuous-delivery/use-gitops/application/sync-gitops-applications.md) to sync ApplicationSets through PR pipelines.
{% hint style="success" %}
**Prefer first-class support**
Use the First-Class Support tab for the ApplicationSet wizard with Service and Environment integration.
{% endhint %}
{% endtab %}
{% endtabs %}
***
## Next steps
* [ApplicationSet basics](/continuous-delivery/use-gitops/applicationsets/appset-basics.md): Review ApplicationSet concepts and generators.
* [PR Pipelines with ApplicationSets](/continuous-delivery/use-gitops/pr-pipelines/pr-pipelines-basics.md): Use ApplicationSets with PR pipelines.
* [GitOps Application management](/continuous-delivery/use-gitops/application/manage-gitops-applications.md): Manage individual GitOps applications.
{% @harness-feedback/feedback %}