> For the complete documentation index, see [llms.txt](https://developer.harness.io/llms.txt). Markdown versions of documentation pages are available by appending `.md` to page URLs; this page is available as [Markdown](https://developer.harness.io/continuous-delivery/use-gitops/applicationsets/harness-git-ops-application-set-tutorial.md).

# Create and manage ApplicationSets

Learn how to create and manage GitOps ApplicationSets in Harness.

Harness provides two ways to work with GitOps ApplicationSets:

1. **First-Class Support (Recommended)** - Enhanced UI wizard with Service/Environment integration, full CRUD operations, improved RBAC, and Terraform support
2. **Standard Flow** - Create ApplicationSets as GitOps Applications with manual YAML configuration

{% hint style="info" %}
**FIRST-CLASS APPLICATIONSET SUPPORT**

First-class ApplicationSet support is generally available. The former `GITOPS_APPLICATIONSET_FIRST_CLASS_SUPPORT` feature flag is no longer a runtime gate.

**Use the First-Class Support tab** in the [Create and Manage ApplicationSets](#create-and-manage-applicationsets) section below for the enhanced UI wizard.

**Use the Standard Flow tab** when you manage ApplicationSet YAML in Git without the wizard.
{% endhint %}

### What you'll learn <a href="#what-youll-learn" id="what-youll-learn"></a>

**With First-Class Support:**

* Create ApplicationSets using the Harness UI wizard
* Configure generators to dynamically create applications
* Define templates with Service and Environment labels
* Validate and preview ApplicationSet manifests
* Monitor ApplicationSet sync status and generated applications

**With Standard Flow:**

* Create ApplicationSets as GitOps Applications
* Configure ApplicationSet manifests in Git
* Sync ApplicationSets to generate child applications
* Monitor generated applications

### Prerequisites <a href="#prerequisites" id="prerequisites"></a>

Before you begin, ensure you have:

* A [Harness GitOps Agent](/continuous-delivery/use-gitops/gitops-entities/agents/install-a-harness-git-ops-agent.md) installed and running
* At least one [GitOps Cluster](/continuous-delivery/use-gitops/get-started/harness-cd-git-ops-quickstart.md#step-3-add-a-harness-gitops-cluster) configured
* A [GitOps Repository](/continuous-delivery/use-gitops/get-started/harness-cd-git-ops-quickstart.md#step-2-add-a-harness-gitops-repository) connected
* Appropriate RBAC permissions to create ApplicationSets

**Additional for First-Class Support:**

* [Harness Services](/continuous-delivery/use-gitops/gitops-entities/service/service.md) and [Environments](/continuous-delivery/use-gitops/gitops-entities/environment.md) created in your project

**Additional for Standard Flow:**

* At least two target clusters (e.g., dev and prod)
* GitHub account with access to clone and modify repositories

{% hint style="info" %}
ApplicationSets are project-scoped entities. All applications generated by an ApplicationSet belong to the same Harness project as the ApplicationSet itself.
{% endhint %}

### ApplicationSet overview <a href="#applicationset-overview" id="applicationset-overview"></a>

An ApplicationSet is a Kubernetes custom resource that enables you to automatically generate and manage multiple Argo CD applications from a single manifest. It consists of two main components:

* **Generator**: Defines the source of parameters used to create applications (e.g., Git repositories, clusters, lists)
* **Template**: Defines the application structure with parameterized fields that get substituted with values from the generator

For more information about ApplicationSet concepts, see [ApplicationSet basics](/continuous-delivery/use-gitops/applicationsets/appset-basics.md).

***

### Create and Manage ApplicationSets <a href="#create-and-manage-applicationsets" id="create-and-manage-applicationsets"></a>

{% hint style="info" %}
**SELECT YOUR FLOW**

Choose the appropriate tab below:

* **First-Class Support**: If you have access to the enhanced UI wizard (recommended)
* **Standard Flow**: If you're using the standard ApplicationSet creation method
  {% endhint %}

{% tabs %}
{% tab title="First-Class Support (Recommended)" %}
{% hint style="info" %}
Use this tab to create and manage ApplicationSets with the enhanced UI wizard. Use the [Standard Flow](#create-applicationset-standard-flow) tab if you manage ApplicationSet YAML in Git without the wizard.
{% endhint %}

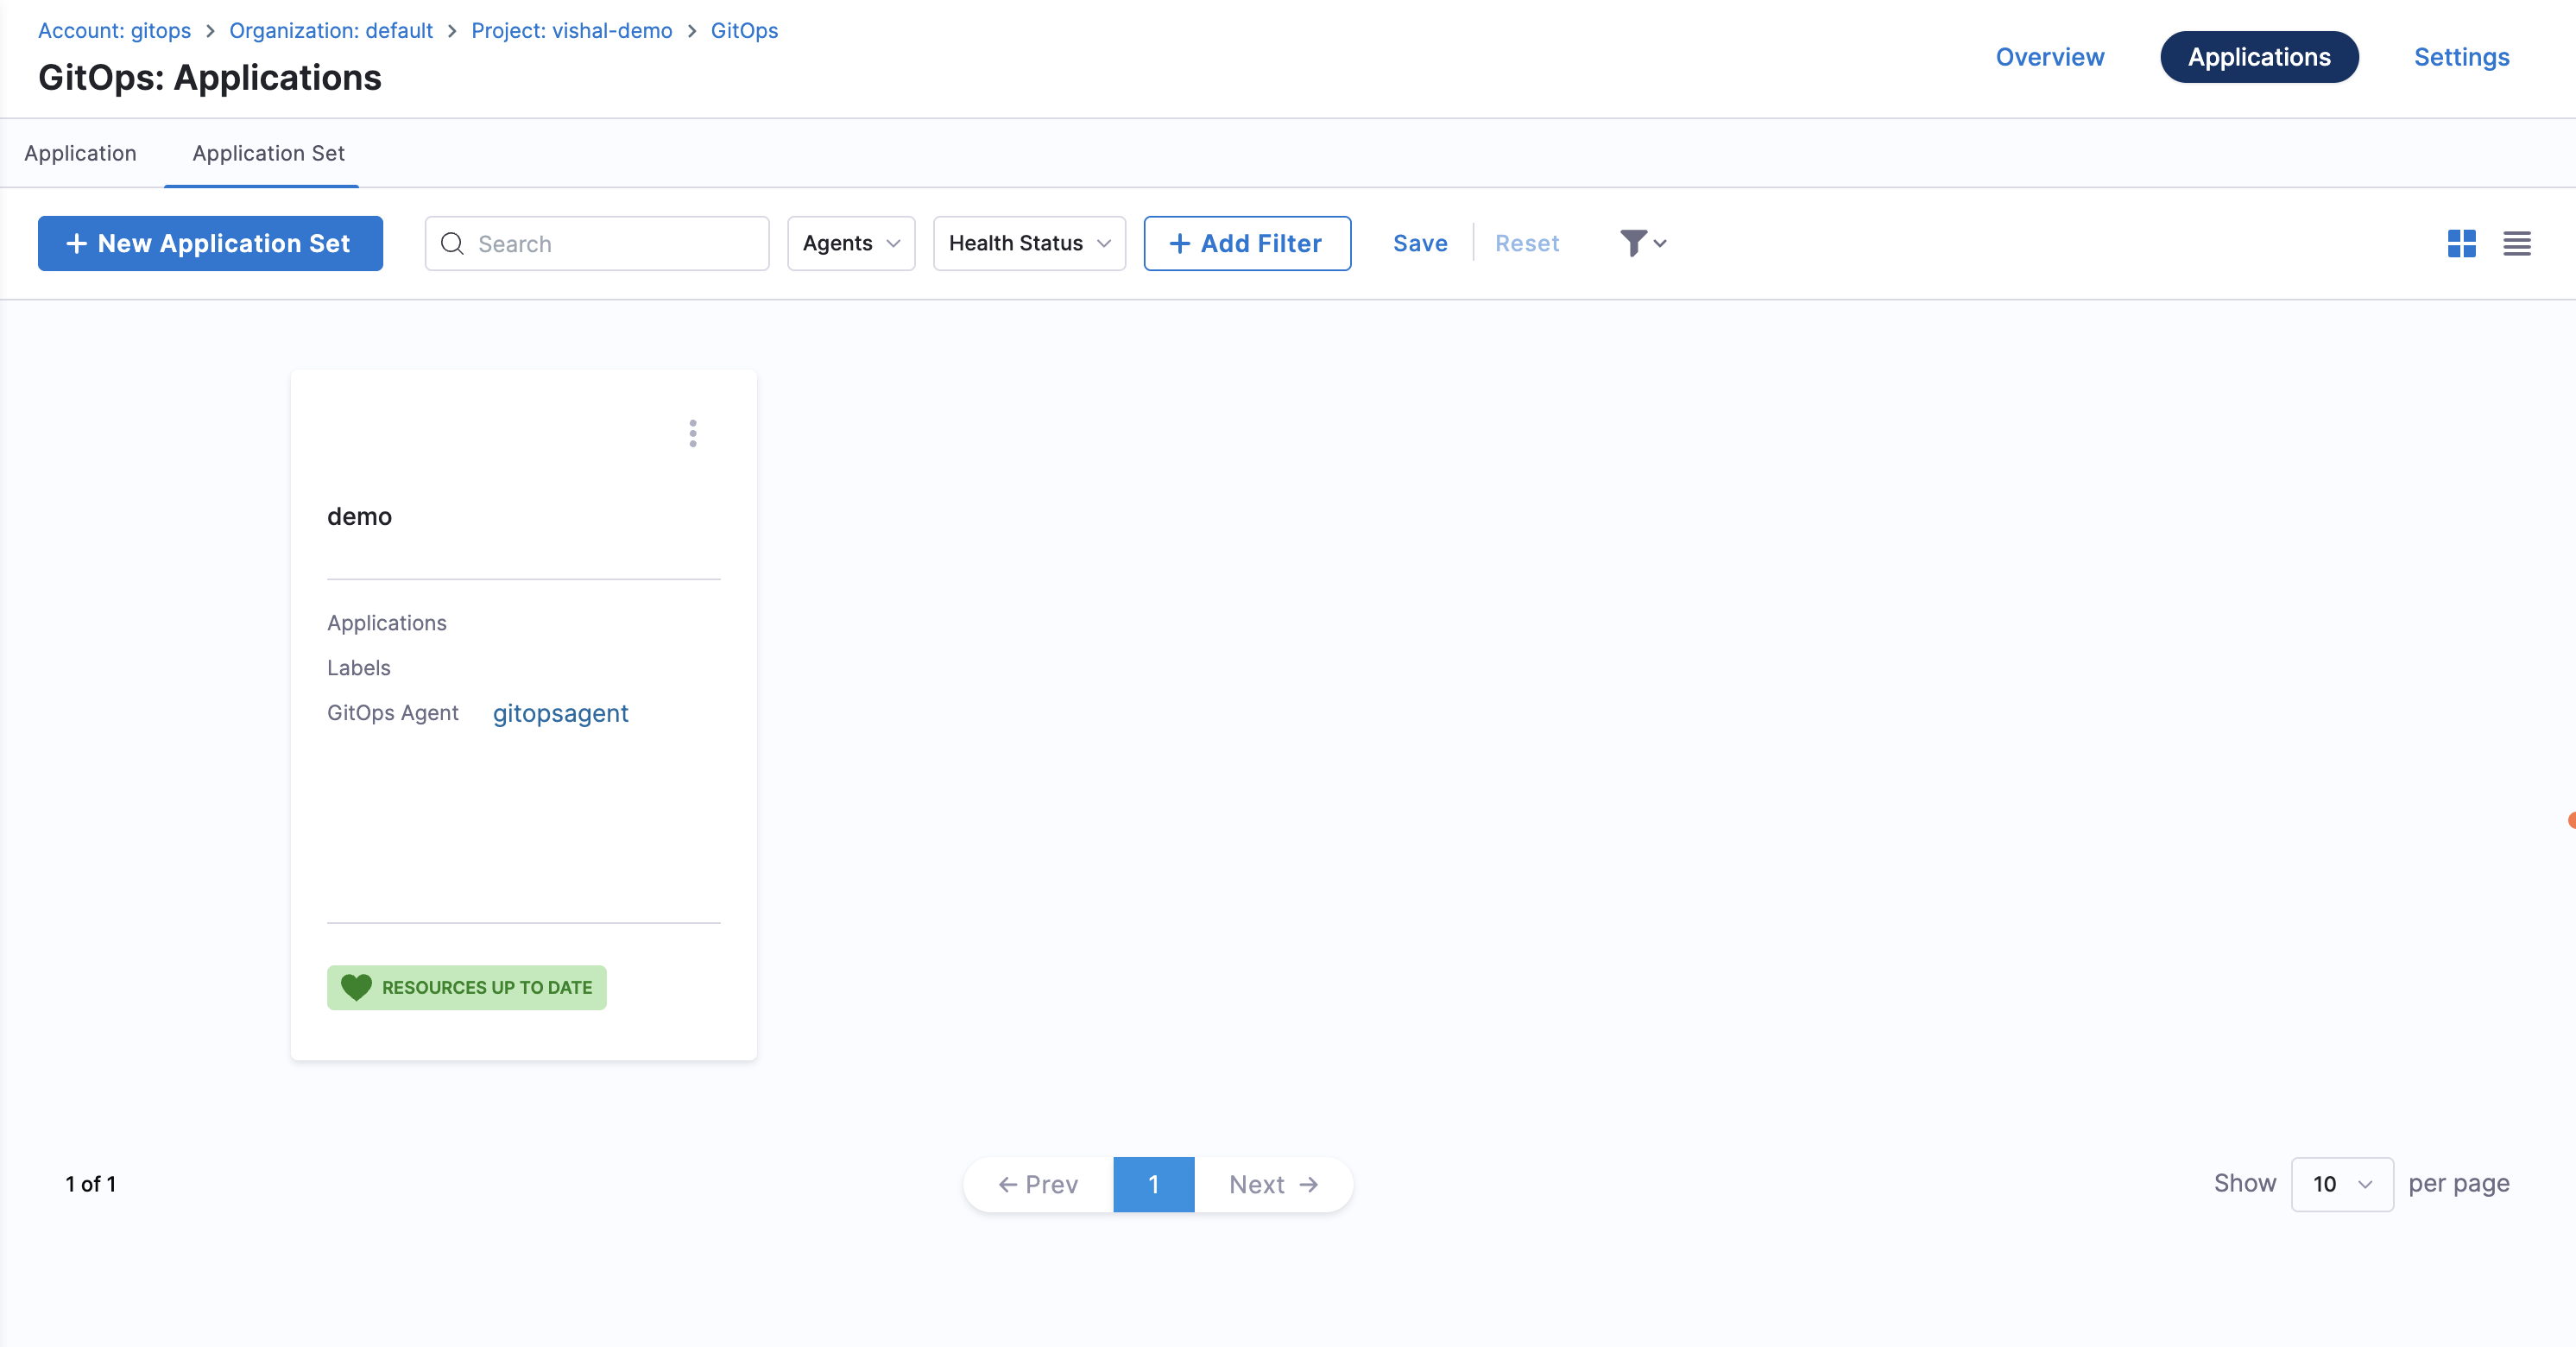
### Navigate to ApplicationSets <a href="#navigate-to-applicationsets" id="navigate-to-applicationsets"></a>

1. In your Harness project, go to **Deployments** > **GitOps**.
2. Select **Applications** from the left navigation.
3. Switch to the **Application Set** tab.

You'll see a list of all ApplicationSets in your project.

### Create an ApplicationSet <a href="#create-an-applicationset" id="create-an-applicationset"></a>

#### Step 1: Start the ApplicationSet wizard <a href="#step-1-start-the-applicationset-wizard" id="step-1-start-the-applicationset-wizard"></a>

1. On the **Application Set** tab, select **+ New Application Set**.
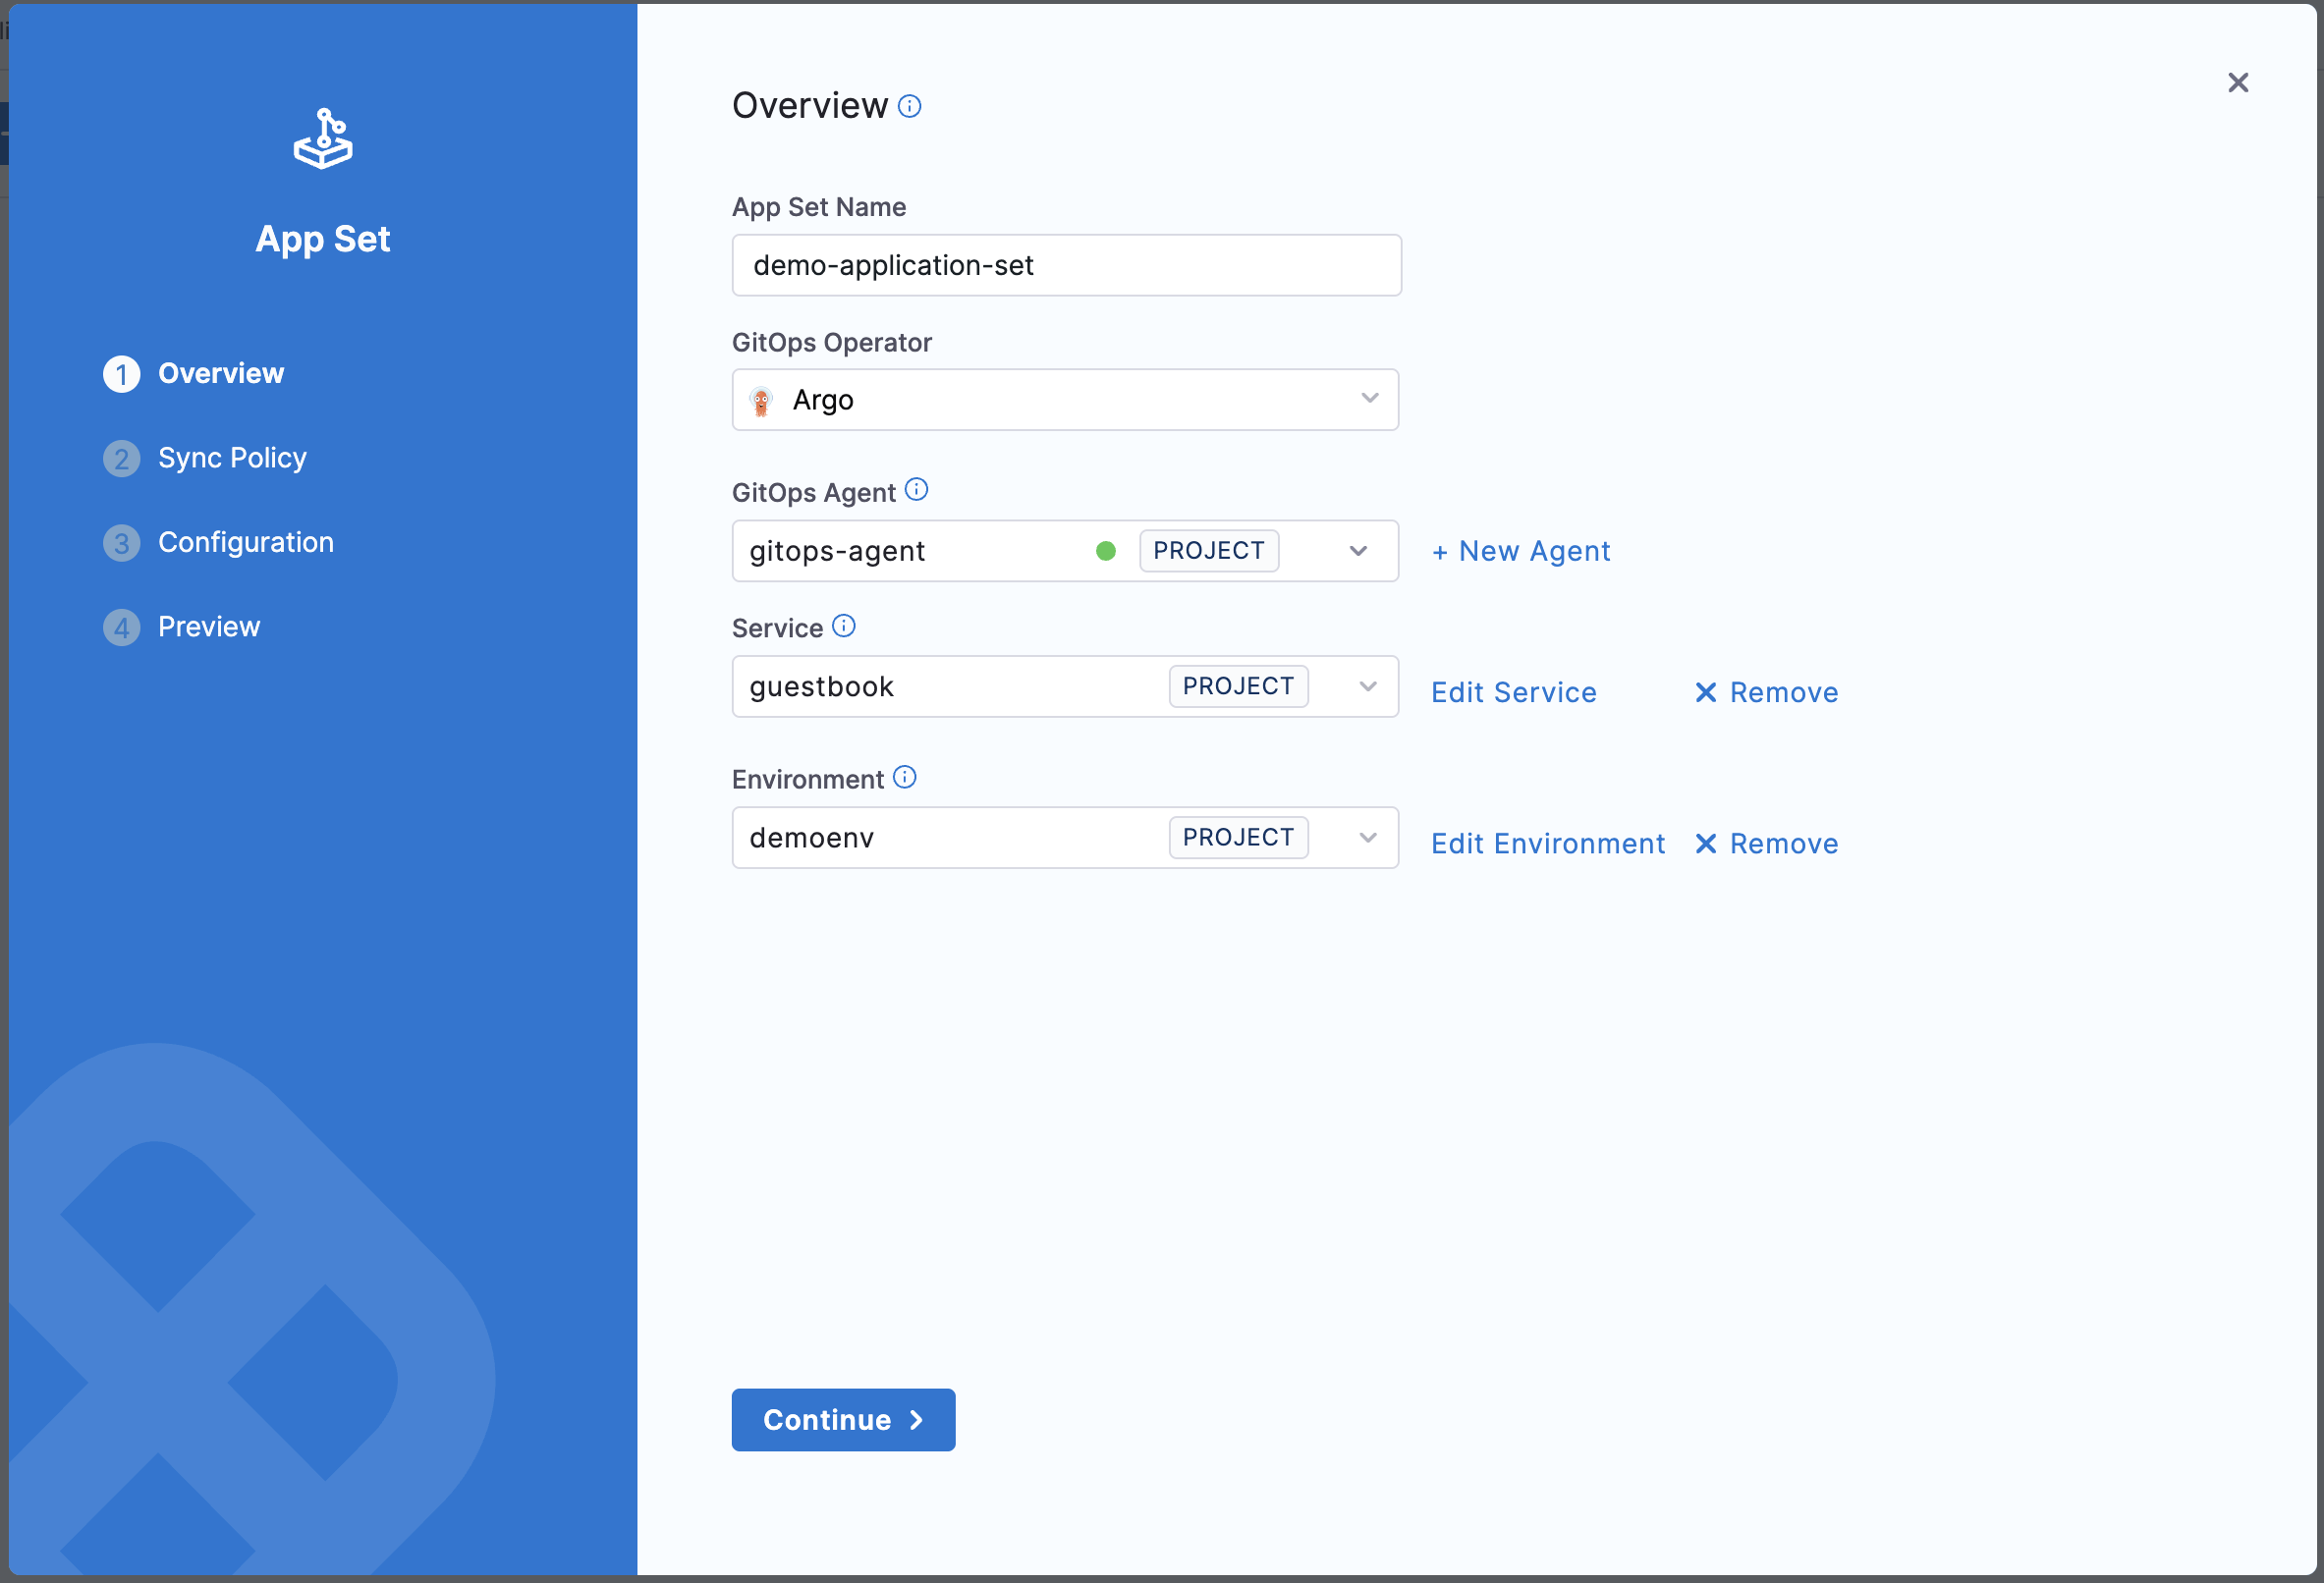
2. The ApplicationSet creation wizard opens with four tabs: **Overview**, **Sync Policy**, **Configuration**, and **Preview**.

<figure><img src="https://3694223630-files.gitbook.io/~/files/v0/b/gitbook-x-prod.appspot.com/o/spaces%2Fy1JhZ4oKIppwY7d5AhPj%2Fuploads%2Fgit-blob-75078ea2f22e8437cde2c34ddf3f7a2e5ee365dd%2Fappset-1.png?alt=media" alt=""><figcaption><p>Click to view full size image</p></figcaption></figure>

#### Step 2: Configure Overview settings <a href="#step-2-configure-overview-settings" id="step-2-configure-overview-settings"></a>

On the **Overview** tab, provide the following details:

* **App Set Name**: Enter a unique name for your ApplicationSet.
* **GitOps Operator**: Select **Argo**. Argo CD is the only supported GitOps reconciler. Flux is not supported.
* **GitOps Agent**: Select the GitOps Agent that will manage this ApplicationSet.
* **Service**: Select the Harness Service associated with this ApplicationSet. This enables PR pipeline integration, service dashboard visibility, and RBAC policies.
* **Environment**: Select the Harness Environment associated with this ApplicationSet. This enables environment-based filtering and PR pipeline configuration.

  <figure><img src="https://3694223630-files.gitbook.io/~/files/v0/b/gitbook-x-prod.appspot.com/o/spaces%2Fy1JhZ4oKIppwY7d5AhPj%2Fuploads%2Fgit-blob-832deff29d732f59175dfc6f8c1961c1f5fab6e6%2Fappset-2.png?alt=media" alt=""><figcaption><p>Click to view full size image</p></figcaption></figure>

{% hint style="info" %}
The Service and Environment selections automatically add `harness.io/serviceRef` and `harness.io/envRef` labels to the ApplicationSet template, enabling integration with Harness pipelines and RBAC policies.
{% endhint %}

Select **Continue** to proceed to the next step.

#### Step 3: Configure Sync Policy <a href="#step-3-configure-sync-policy" id="step-3-configure-sync-policy"></a>

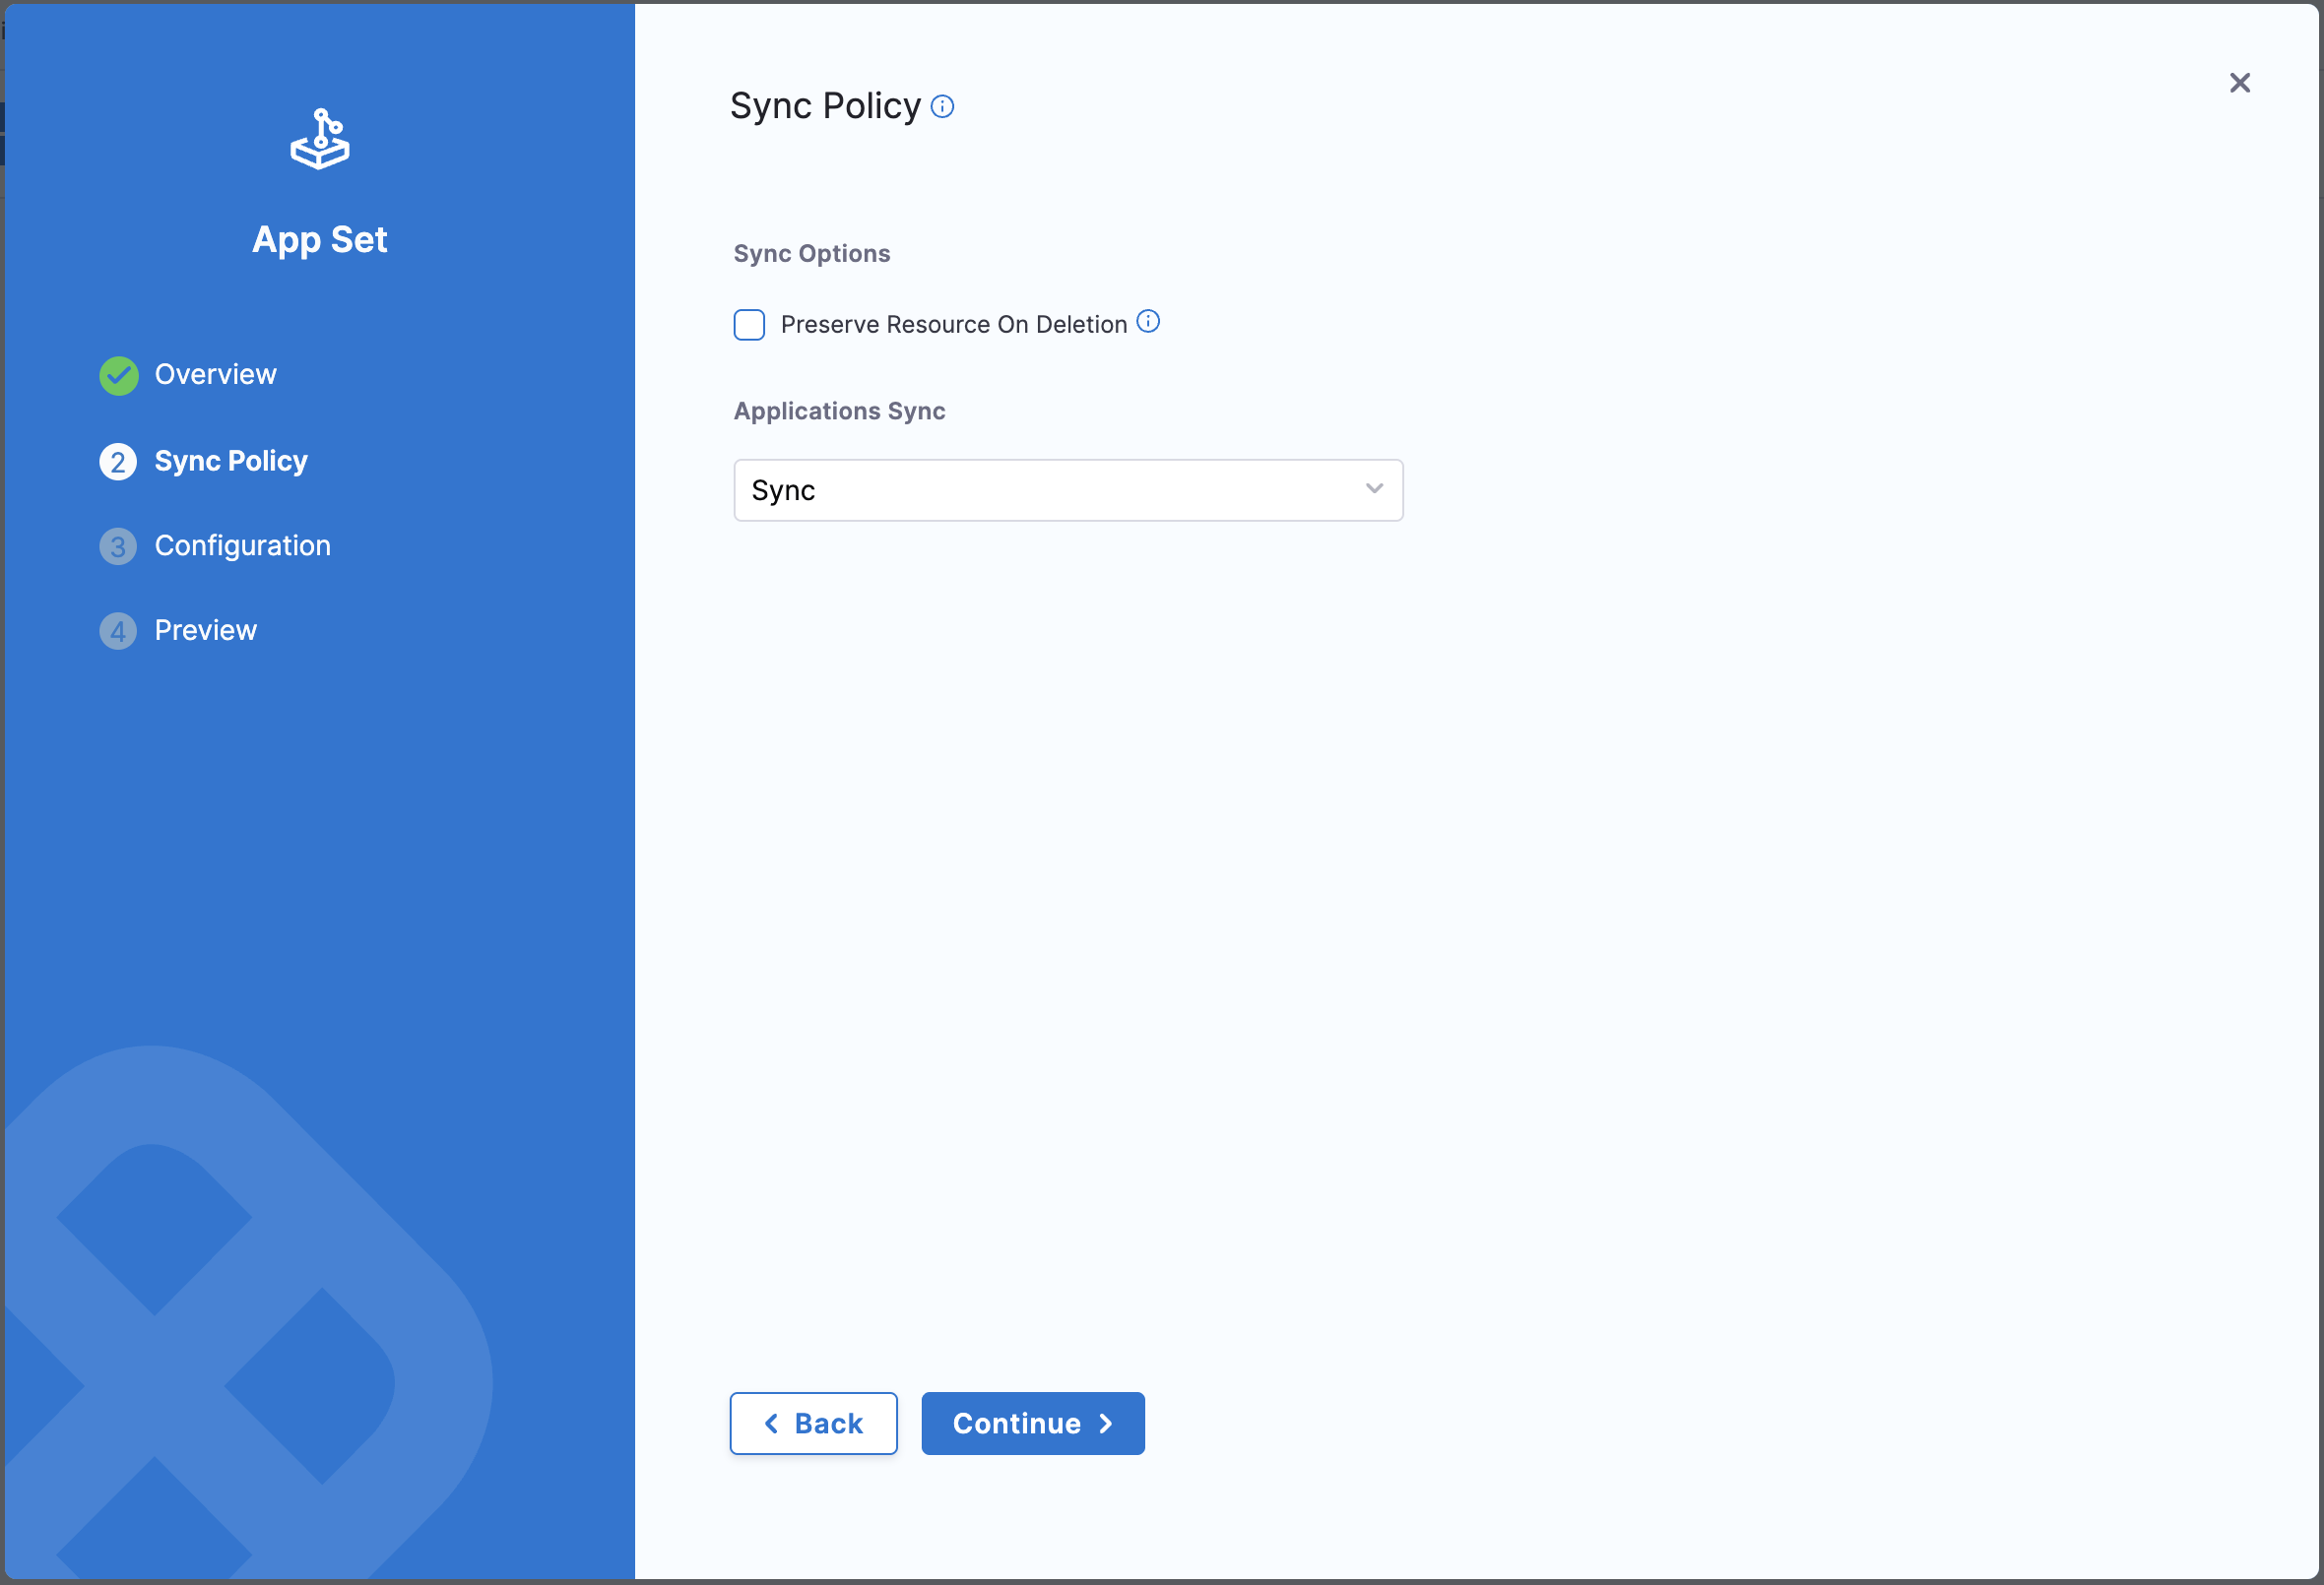
On the **Sync Policy** tab, define the sync policy that governs the relationship between the ApplicationSet and its child applications.

**Sync Options**

* **Preserve Resource On Deletion**: Check this option if you want to preserve Kubernetes resources when the application is deleted from Argo CD.

**Applications Sync**

Select the sync policy for applications created by this ApplicationSet.

**Application Sync Options**:

* **Create-Only**: Only create applications; don't update or delete them automatically.
* **Create-Update**: Create new applications and update existing ones.
* **Create-Delete**: Create new applications and delete removed ones.
* **Sync**: Fully automated sync with create, update, and delete operations.

  <figure><img src="https://3694223630-files.gitbook.io/~/files/v0/b/gitbook-x-prod.appspot.com/o/spaces%2Fy1JhZ4oKIppwY7d5AhPj%2Fuploads%2Fgit-blob-c34718f15cc5e41e0dc8531efd6b2ac6c7e7a43f%2Fappset-3.png?alt=media" alt=""><figcaption><p>Click to view full size image</p></figcaption></figure>

Select **Continue** to proceed to configuration.

#### Step 4: Configure Generator and Template <a href="#step-4-configure-generator-and-template" id="step-4-configure-generator-and-template"></a>

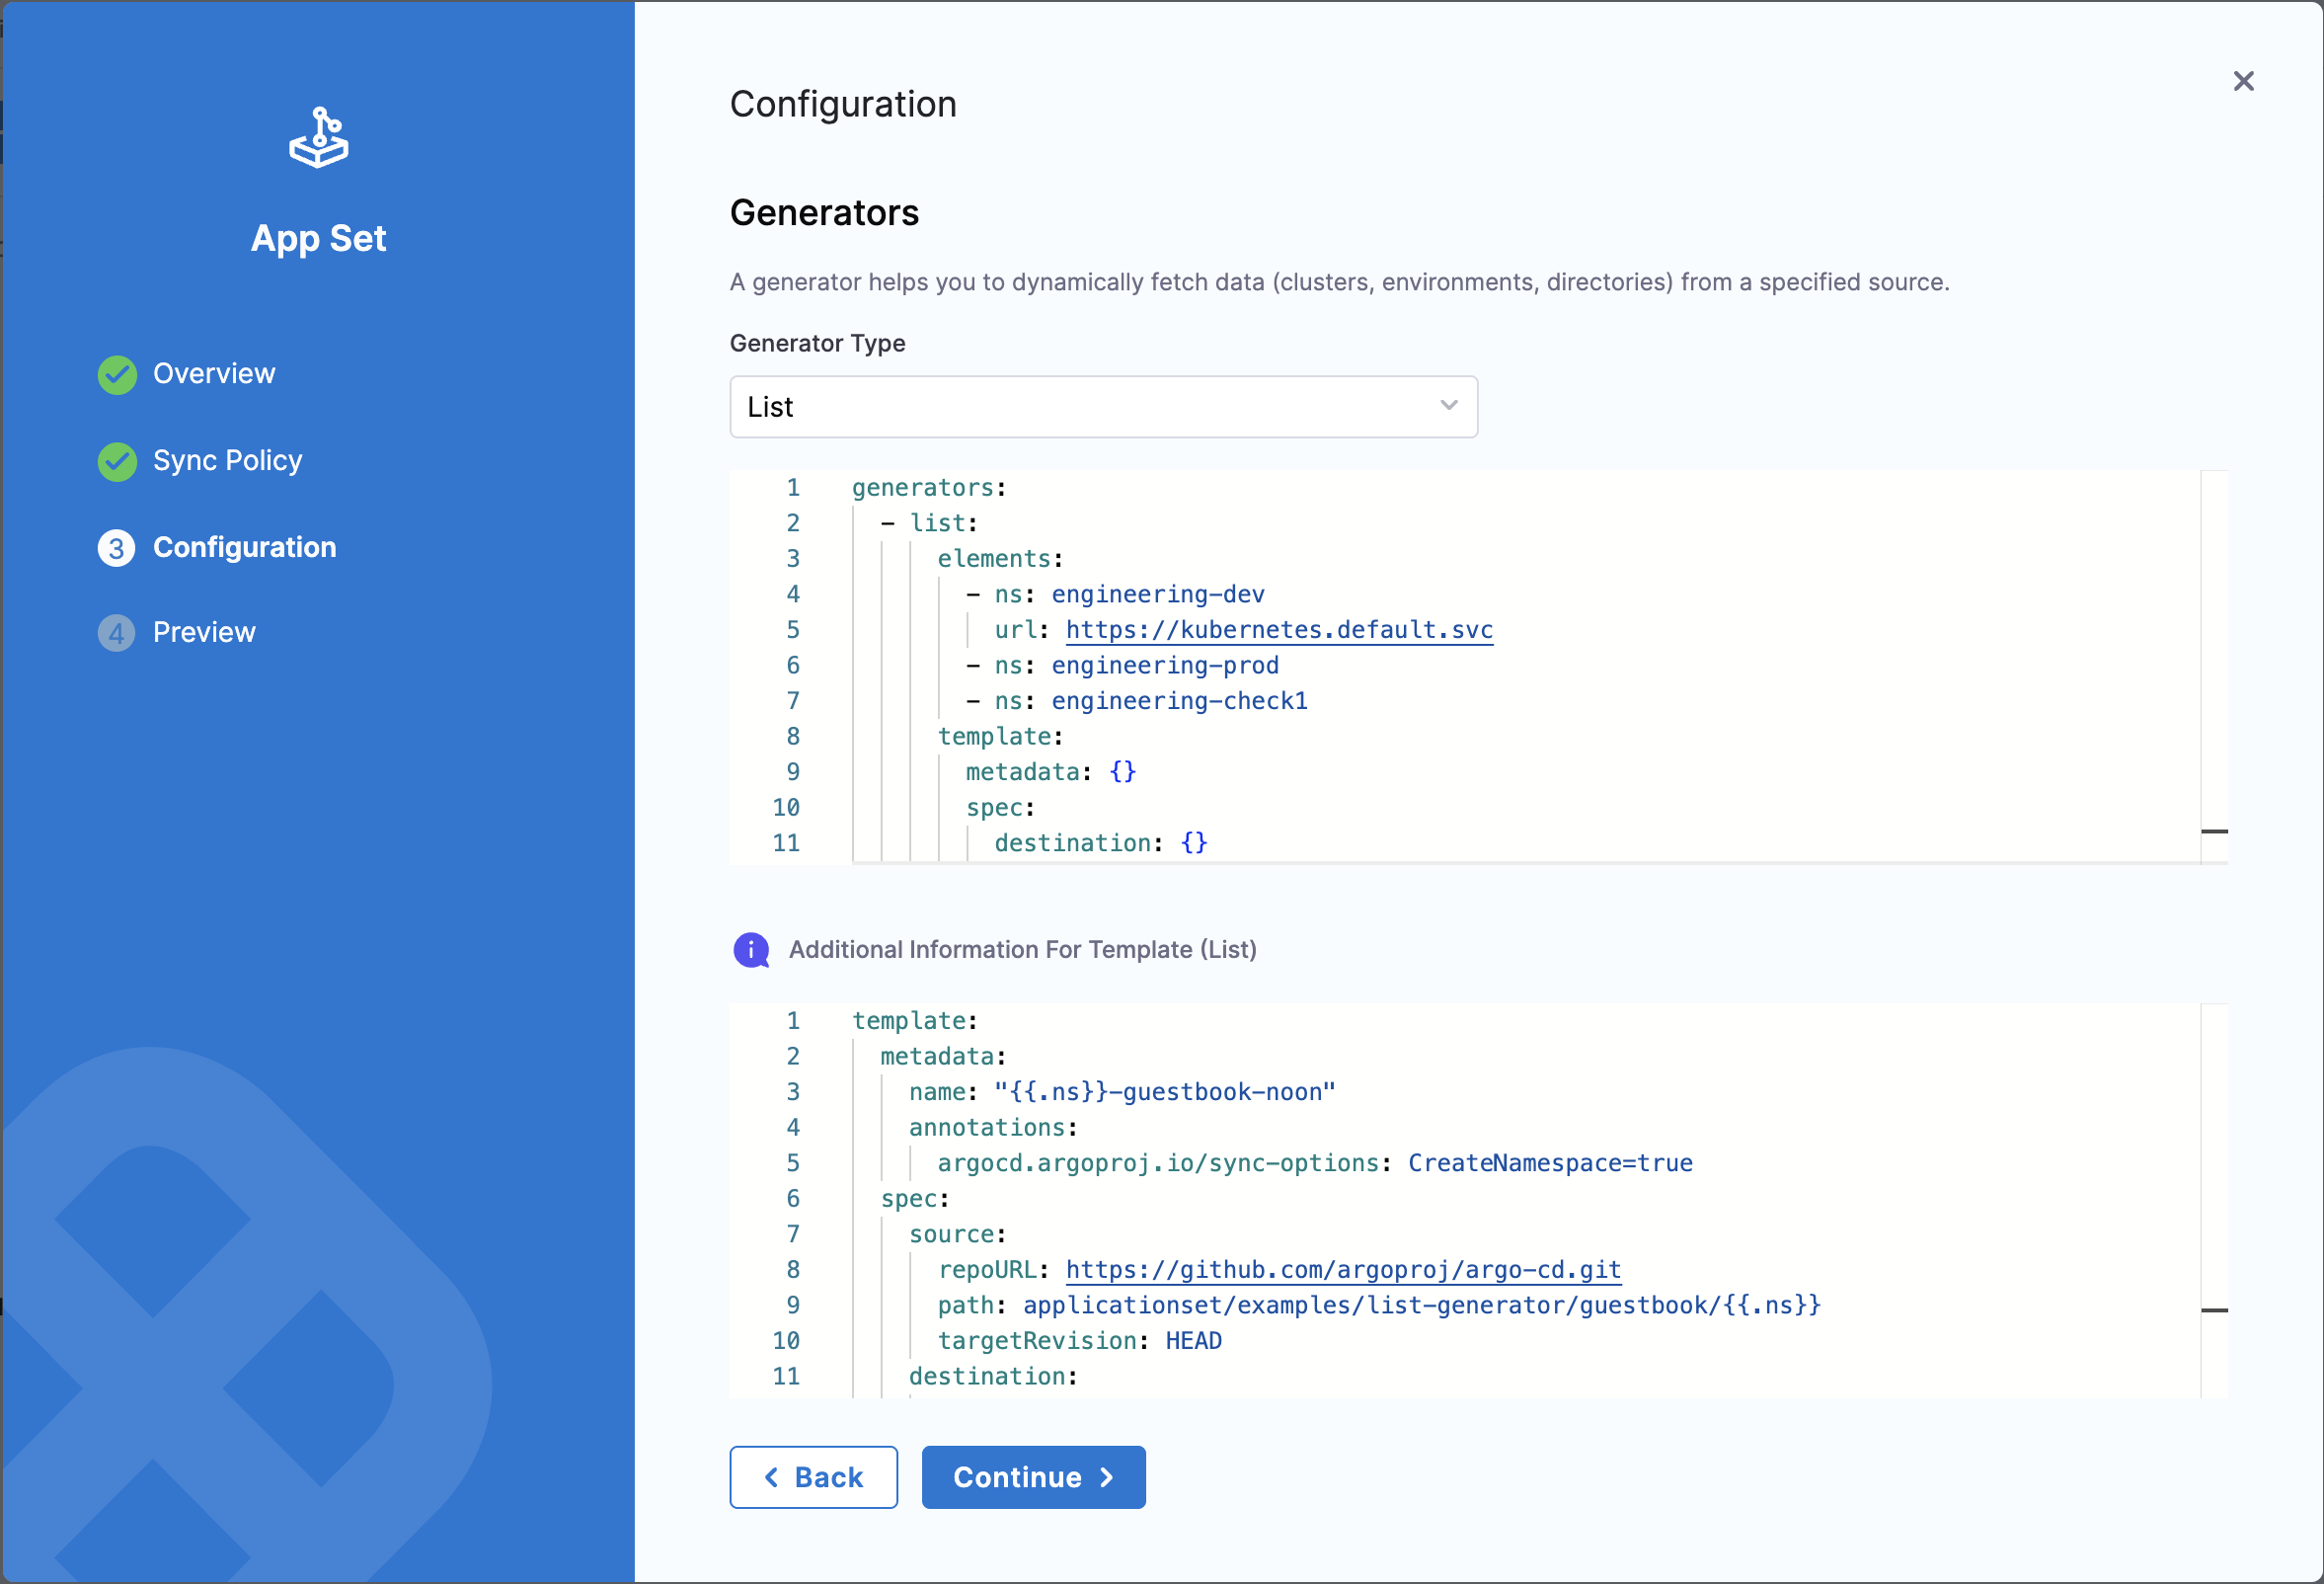
The **Configuration** tab is where you define the generator and template for your ApplicationSet.

**Select Generator Type**

Choose the generator type from the dropdown. Harness supports all Argo CD generator types:

* **Git**: Generate applications from files or directories in a Git repository
* **List**: Generate applications from a static list of parameters
* **Cluster**: Generate applications for each cluster registered in Argo CD
* **Matrix**: Combine multiple generators
* **Pull Request**: Generate applications from pull requests
* **SCM Provider**: Generate applications from repositories in an SCM provider
* **Cluster Decision Resource**: Generate applications based on custom Kubernetes resources
* **Plugin**: Use custom generator plugins

For more information on supported generator types, see [Argo CD Generator Types](https://argoproj.github.io/argo-cd/user-guide/applicationset/generators/).

When you select a generator type, Harness automatically generates a template skeleton for that generator.

<figure><img src="https://3694223630-files.gitbook.io/~/files/v0/b/gitbook-x-prod.appspot.com/o/spaces%2Fy1JhZ4oKIppwY7d5AhPj%2Fuploads%2Fgit-blob-a50c52643bb4c709b3ca61046b96a0e3dcf32e20%2Fappset-4.png?alt=media" alt=""><figcaption><p>Click to view full size image</p></figcaption></figure>

**Configure Generator**

The generator configuration appears in a YAML editor. Modify the template according to your needs.

**Example: List Generator**

```yaml
generators:
  - list:
      elements:
        - ns: engineering-dev
          url: https://kubernetes.default.svc
        - ns: engineering-prod
          url: https://kubernetes.default.svc
        - ns: engineering-check1
          url: https://kubernetes.default.svc
```

**Configure Template**

Below the generator configuration, you'll see the template section with automatically added labels for Harness integration:

```yaml
template:
  metadata:
    name: "{{.ns}}-guestbook"
    labels:
      harness.io/serviceRef: guestbook
      harness.io/envRef: dev
    annotations:
      argocd.argoproj.io/sync-options: CreateNamespace=true
  spec:
    project: default
    source:
      repoURL: https://github.com/argoproj/argo-cd.git
      path: applicationset/examples/list-generator/guestbook/{{.ns}}
      targetRevision: HEAD
    destination:
      server: https://kubernetes.default.svc
      namespace: "{{.ns}}"
    syncPolicy:
      automated:
        prune: true
        selfHeal: true
      syncOptions:
        - CreateNamespace=true
```

The template includes:

* **harness.io/serviceRef**: References the Service you selected in the Overview step. This label is added to the ApplicationSet template metadata and will be inherited by all child applications generated from this ApplicationSet.
* **harness.io/envRef**: References the Environment you selected in the Overview step. This label is added to the ApplicationSet template metadata and will be inherited by all child applications generated from this ApplicationSet.
* **project**: The Argo CD project where the ApplicationSet is created. This is usually auto-populated based on the project where the ApplicationSet is created. You can also get this value from the agent details under **Mapped Harness Project** → **Argo Projects**.

The sample generator and template refer to the sample Argo CD guestbook ApplicationSet provided in the [Argo CD GitHub repository](https://github.com/argoproj/argo-cd/tree/master/applicationset/examples/list-generator/guestbook).

**How these labels are used:**

The `harness.io/serviceRef` and `harness.io/envRef` labels are applied to all child applications generated by the ApplicationSet. These labels enable:

* **Service Dashboard Tracking**: Applications appear in the Harness Service dashboard for the referenced service
* **PR Pipeline Configuration**: The Fetch Linked Apps step in PR pipelines uses these labels to identify applications associated with a service
* **Environment-based Filtering**: Filter and organize applications by service and environment in the Harness UI

You can use variables in the format `{{.variableName}}` throughout the template. These variables will be substituted with values from the generator.

#### Step 5: Preview and Validate <a href="#step-5-preview-and-validate" id="step-5-preview-and-validate"></a>

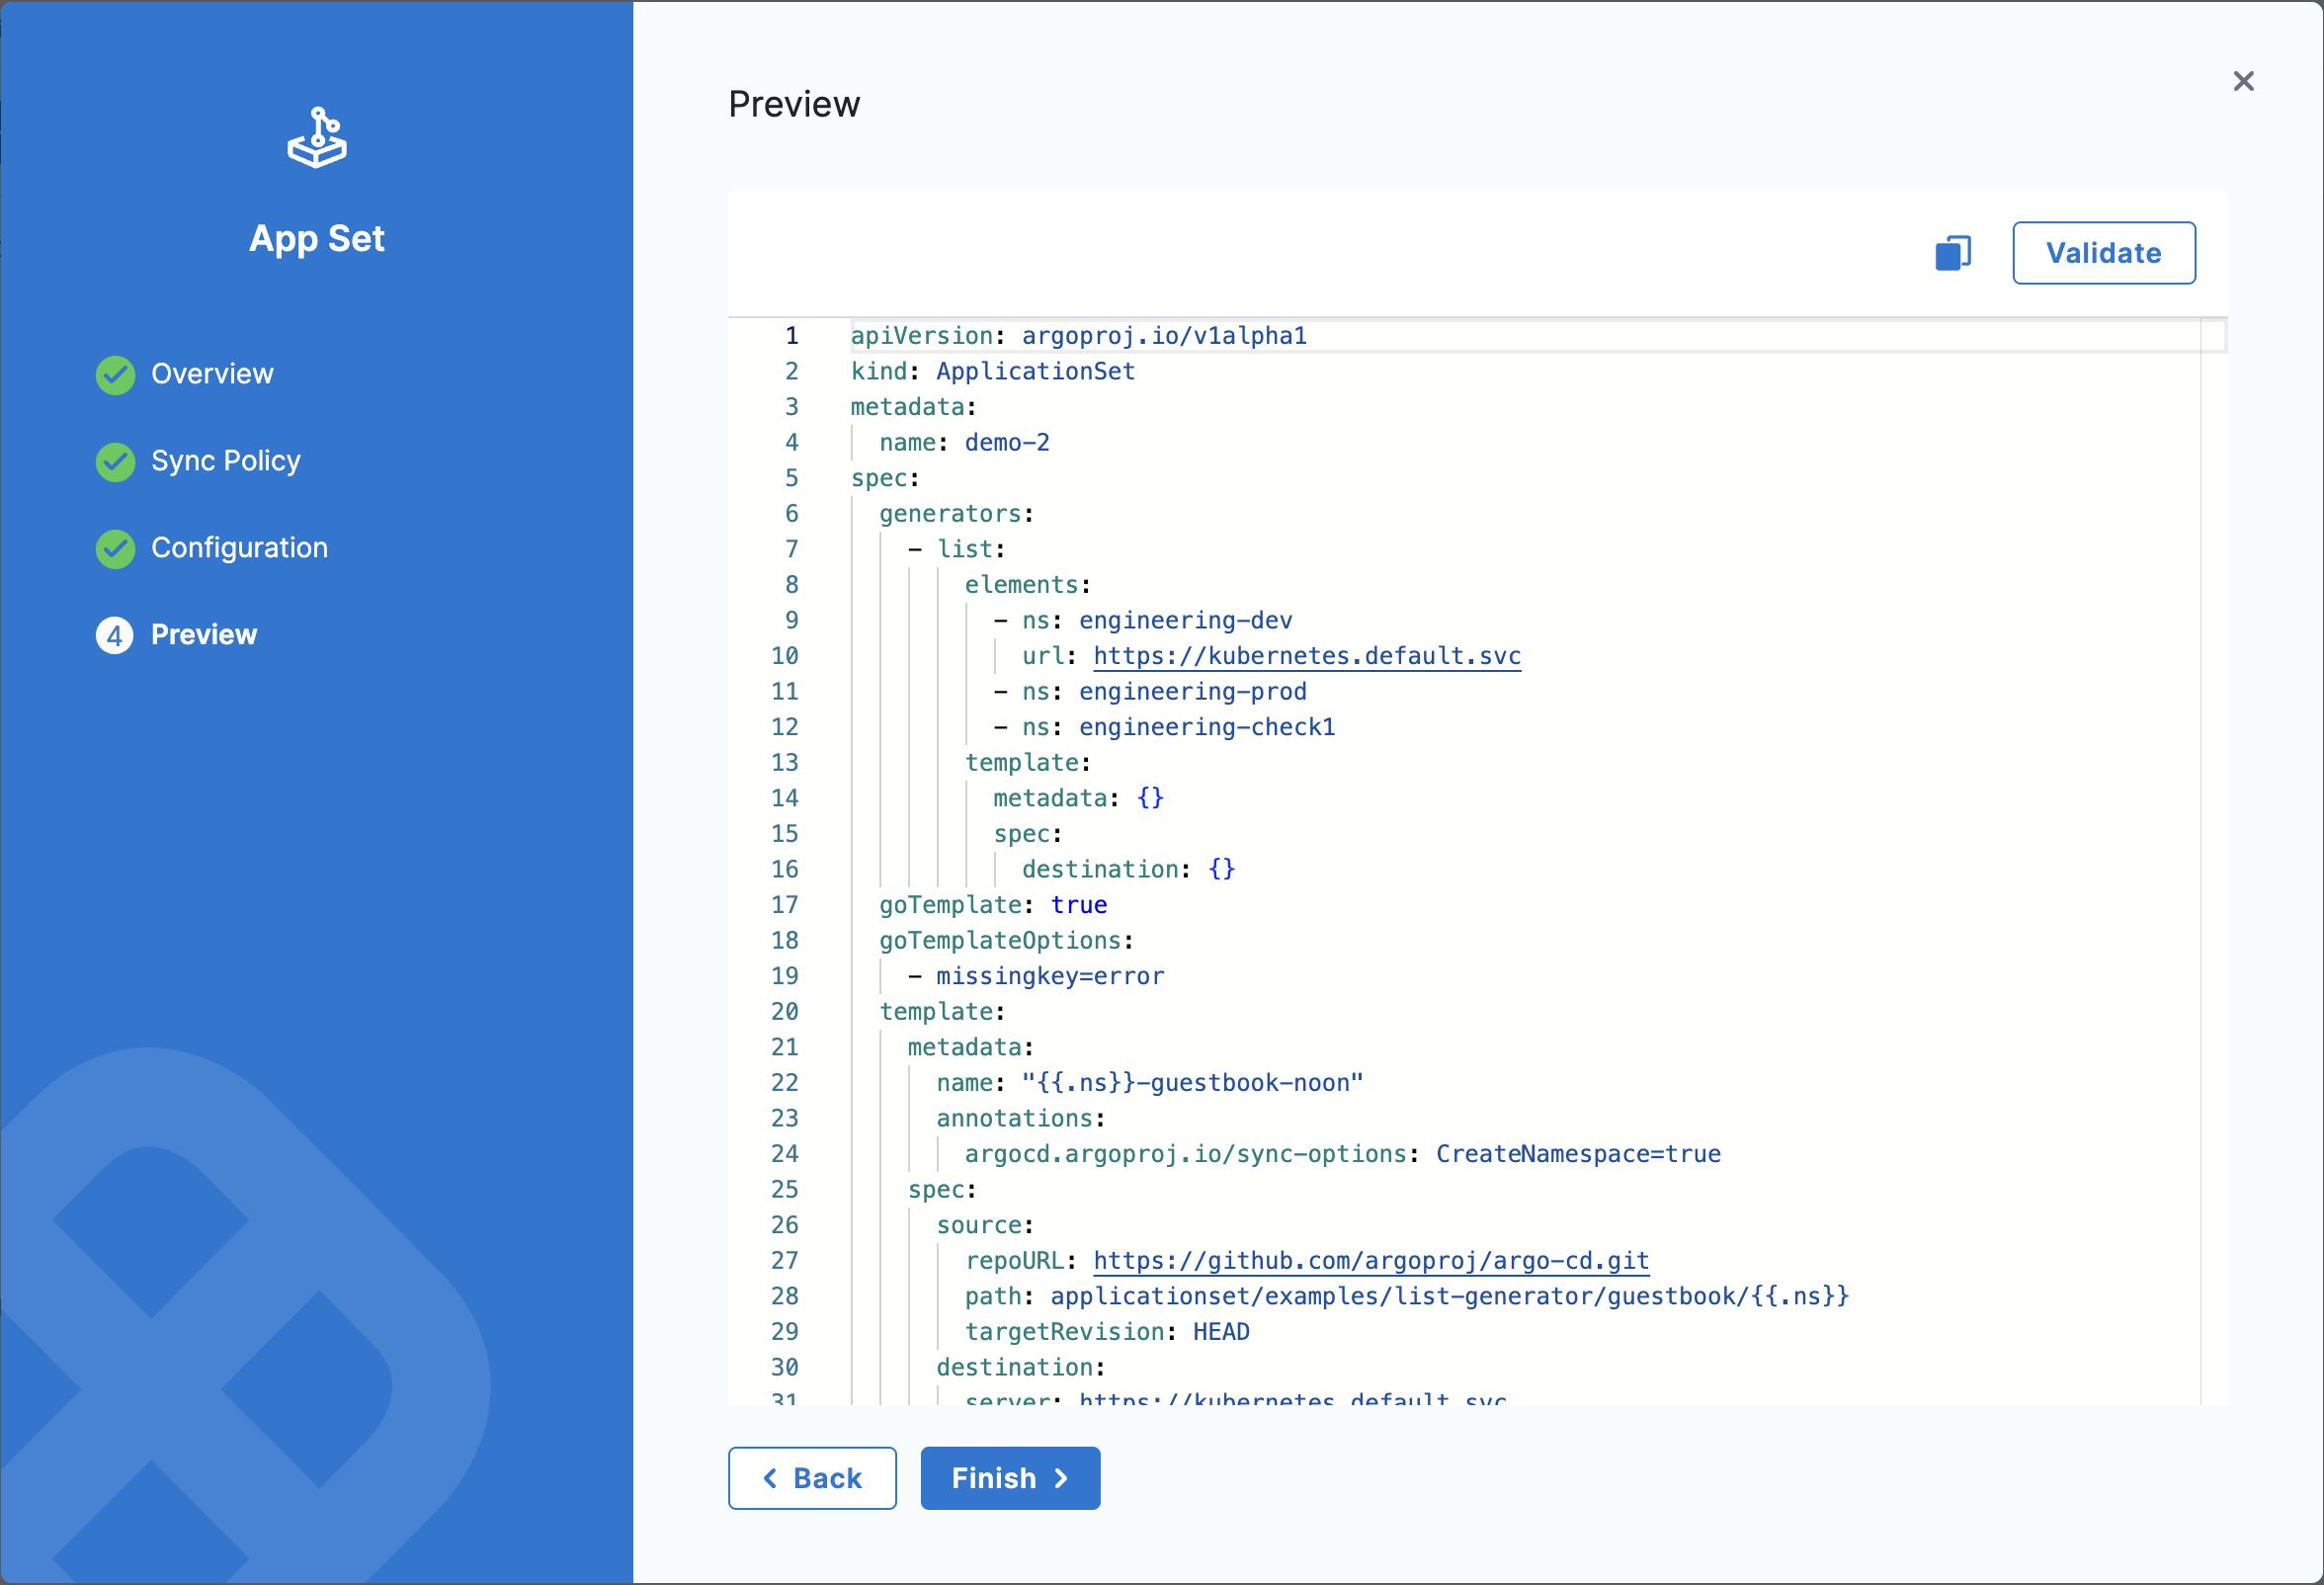
On the **Preview** tab, you can review the complete ApplicationSet manifest before creating it.

**Validate the Manifest**

1. Review the generated YAML manifest.
2. Click **Validate** to check the manifest for:
   * Syntax errors
   * Template variable substitution issues
   * Service and Environment references
   * Repository and cluster access permissions
3. If validation succeeds, you'll see a success message.
4. If validation fails, review the error messages and go back to fix the configuration.

<figure><img src="https://3694223630-files.gitbook.io/~/files/v0/b/gitbook-x-prod.appspot.com/o/spaces%2Fy1JhZ4oKIppwY7d5AhPj%2Fuploads%2Fgit-blob-ec5feac04d975f85738e13d1dd219fe48099fd40%2Fappset-5.png?alt=media" alt=""><figcaption><p>Click to view full size image</p></figcaption></figure>

**Create the ApplicationSet**

Once validation passes, select **Finish** to create the ApplicationSet.

### View ApplicationSet Details <a href="#view-applicationset-details" id="view-applicationset-details"></a>

After creating the ApplicationSet, you can view its details and monitor the applications it generates.

#### ApplicationSet Dashboard <a href="#applicationset-dashboard" id="applicationset-dashboard"></a>

1. The ApplicationSet dashboard displays all ApplicationSets in the project, along with basic information such as:
   * Applications within each ApplicationSet
   * Labels
   * The agent used to create the ApplicationSet

<figure><img src="https://3694223630-files.gitbook.io/~/files/v0/b/gitbook-x-prod.appspot.com/o/spaces%2Fy1JhZ4oKIppwY7d5AhPj%2Fuploads%2Fgit-blob-b912778c9c68d41c68576c1c7ee3ddfb4ead0893%2Fappset-6.png?alt=media" alt=""><figcaption><p>Click to view full size image</p></figcaption></figure>

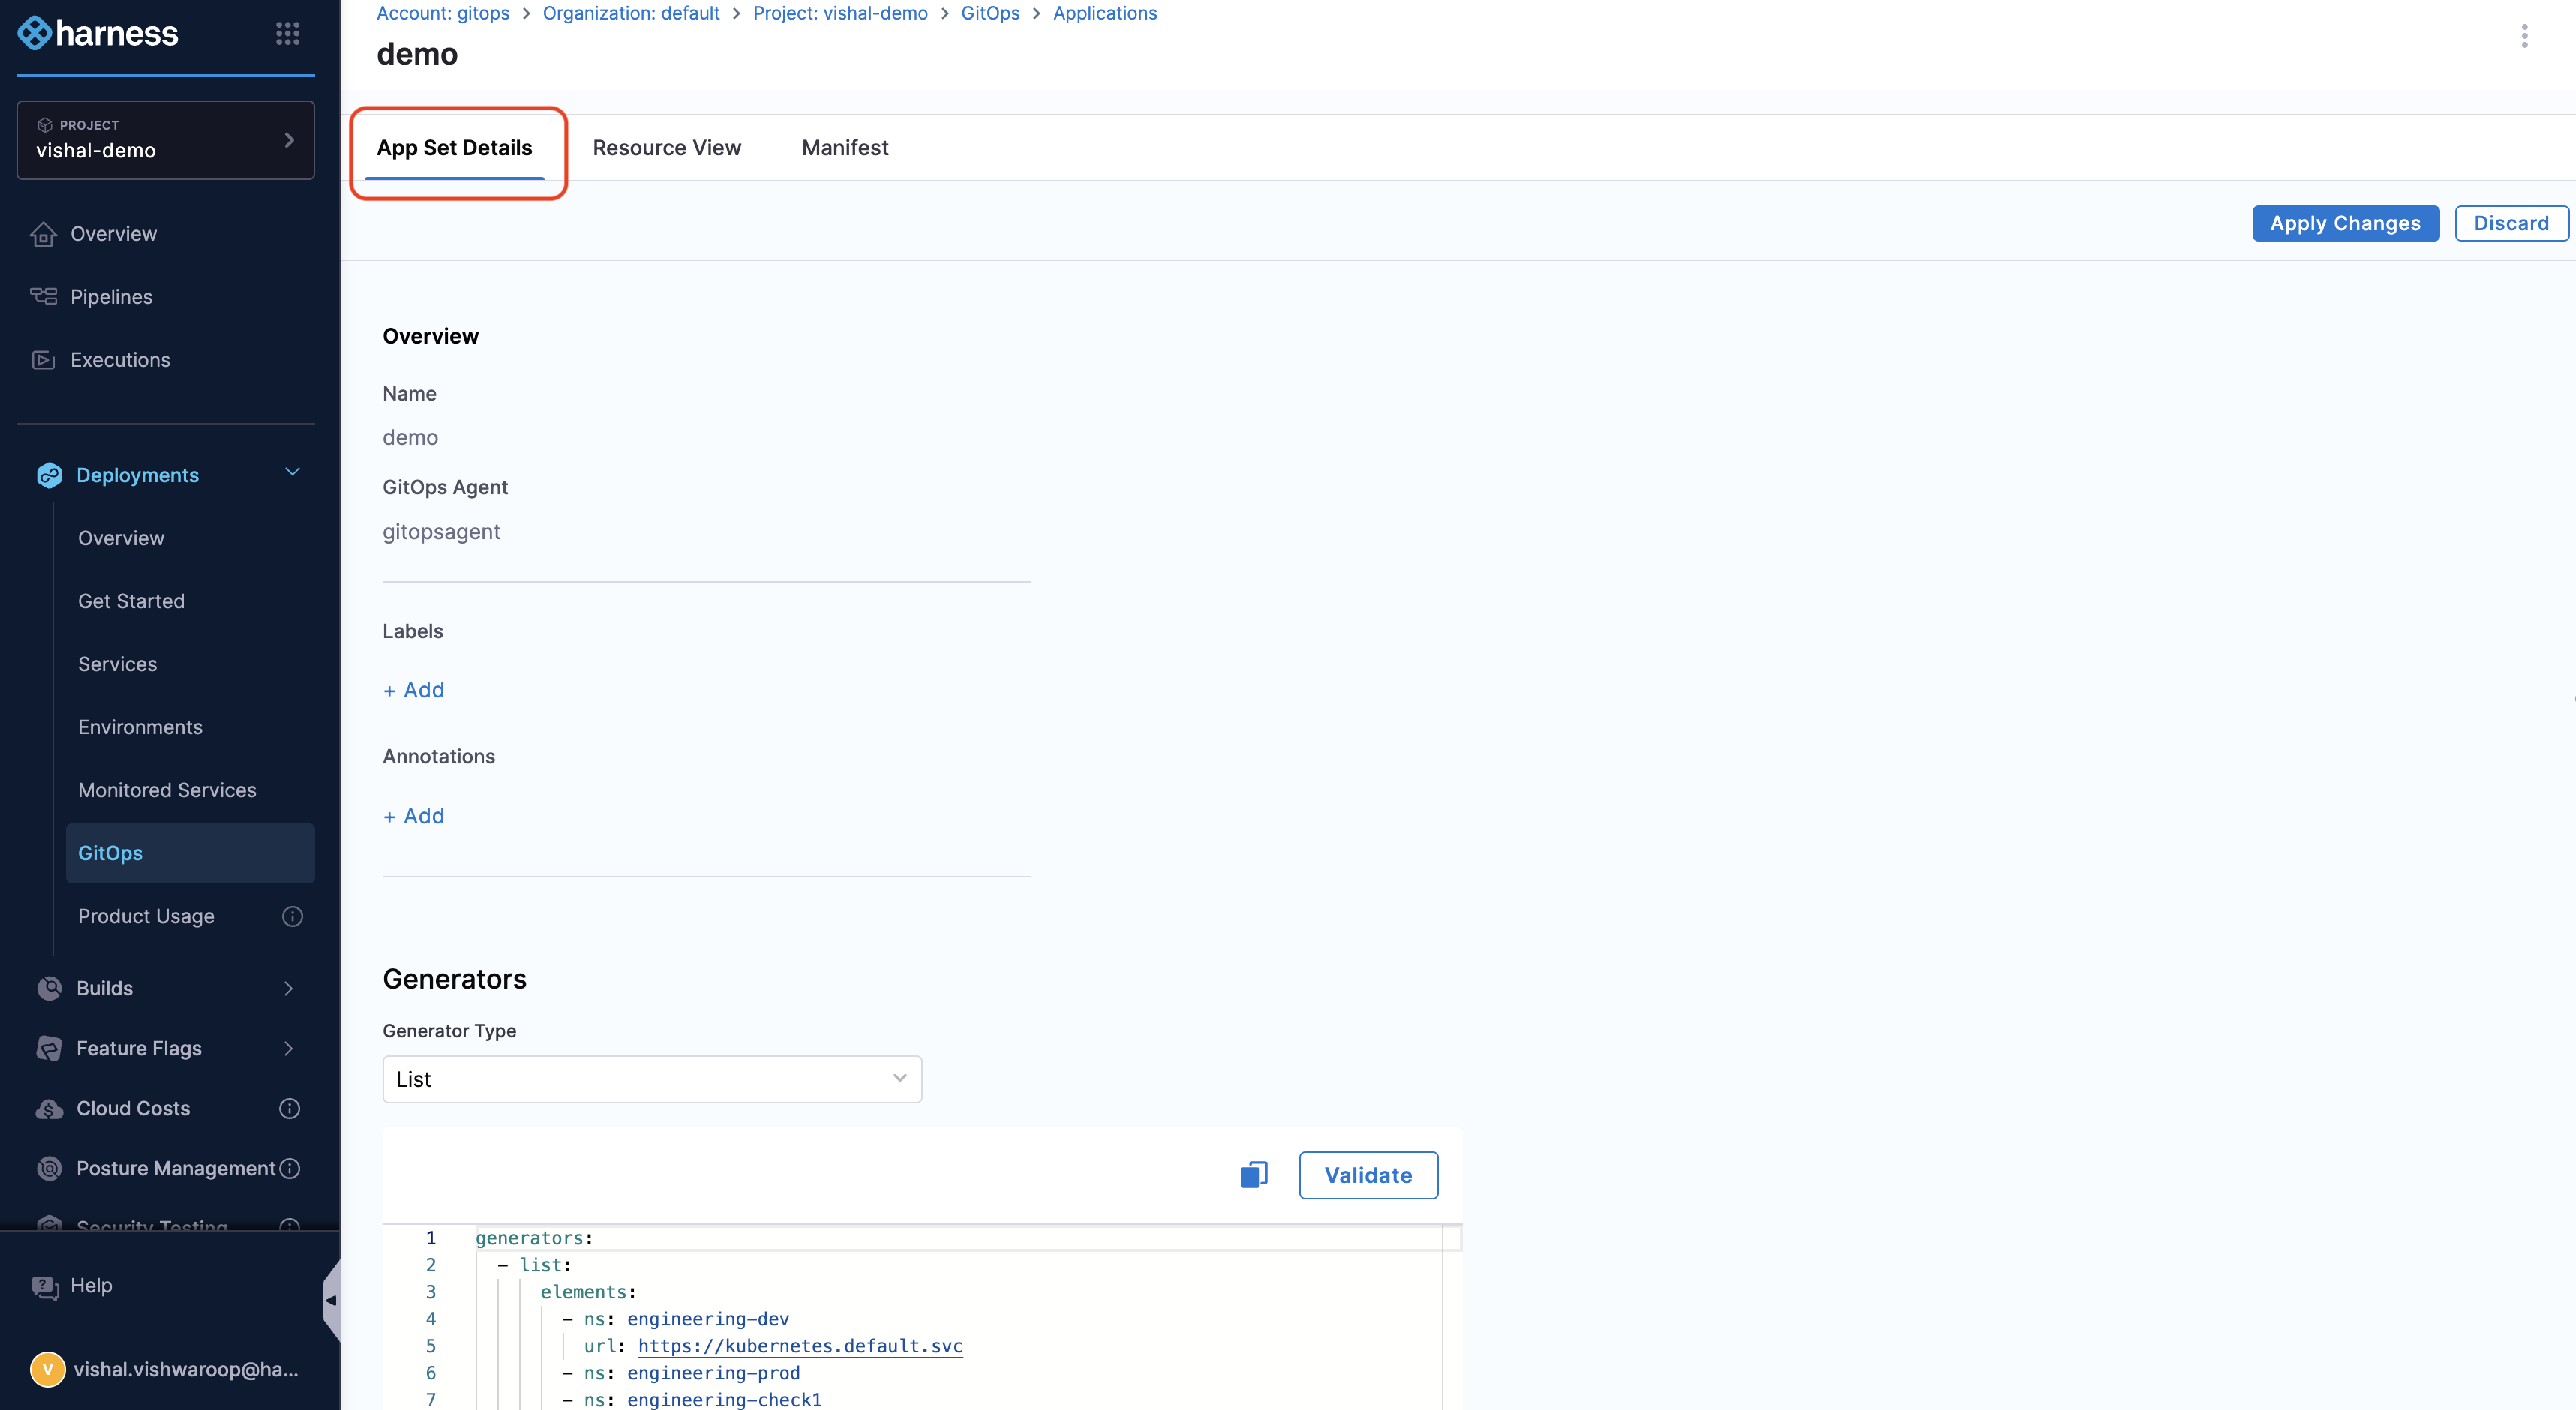
2. Click on the ApplicationSet you created to view its details.

On the **App Set Details** page, you can see:

* ApplicationSet name
* GitOps agent used
* Labels and annotations
* Generator details
* Template generated based on the generator
* Sync options and policies

  <figure><img src="https://3694223630-files.gitbook.io/~/files/v0/b/gitbook-x-prod.appspot.com/o/spaces%2Fy1JhZ4oKIppwY7d5AhPj%2Fuploads%2Fgit-blob-5c0cdde7d685b11beb6782b1b68ce7ab5138d576%2Fappset-7.png?alt=media" alt=""><figcaption><p>Click to view full size image</p></figcaption></figure>

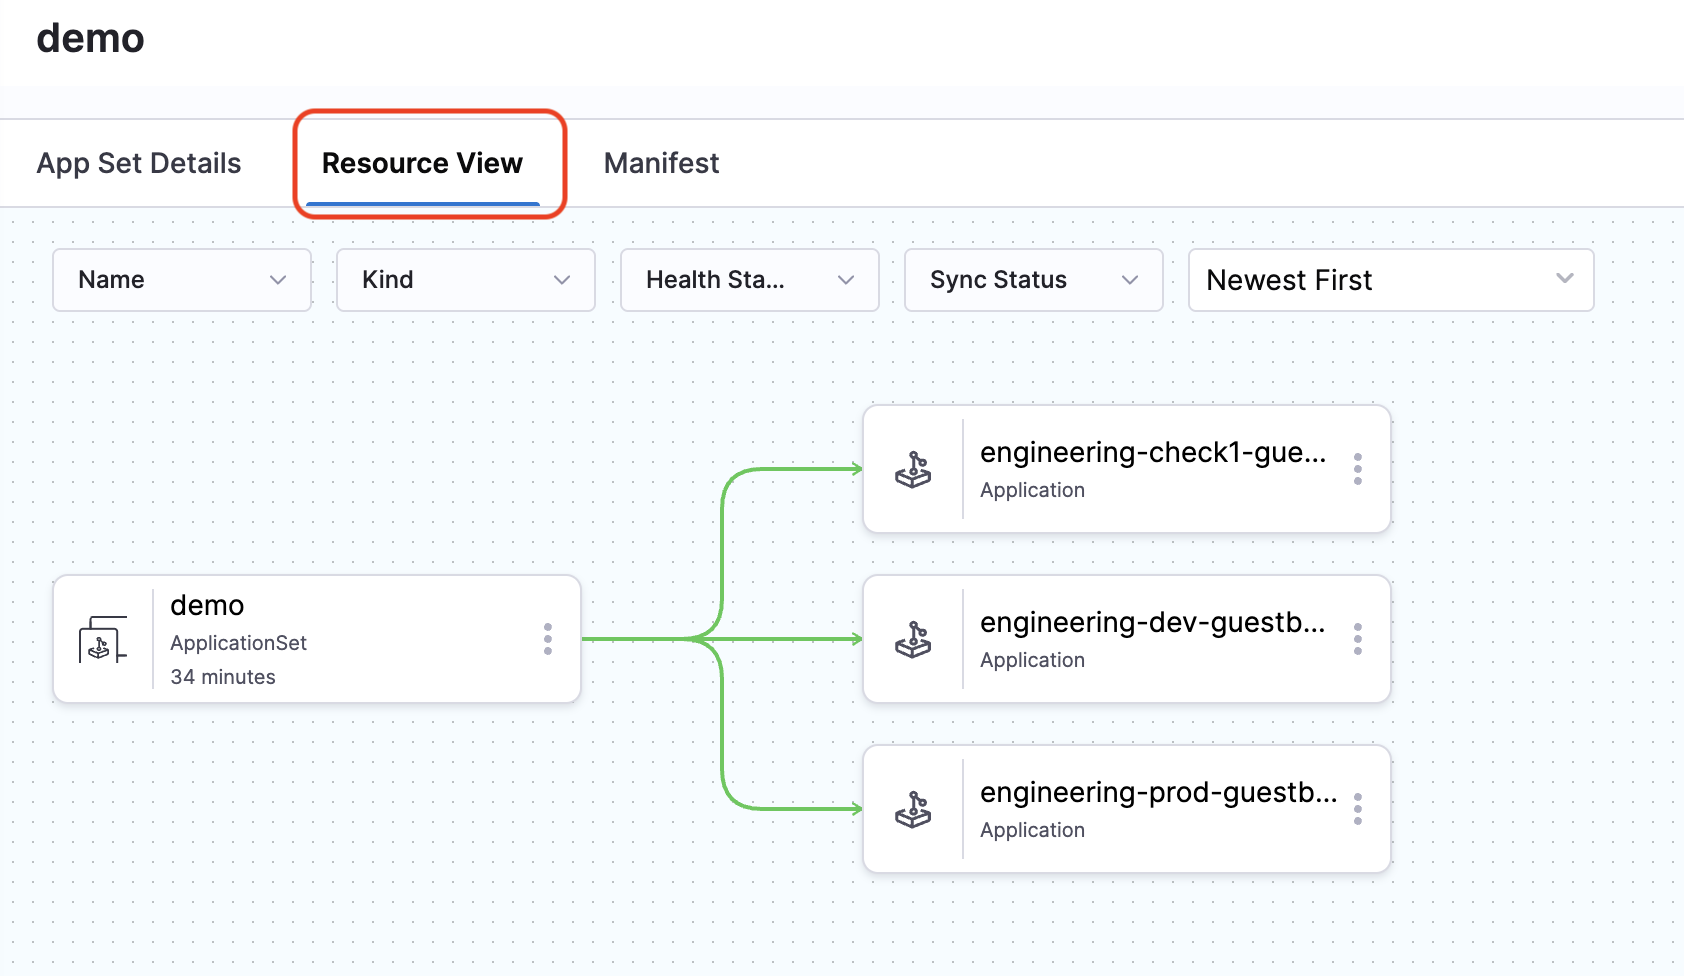
3. Click on the **Resource View** tab to view the generated applications.

The **Resource View** shows:

* The ApplicationSet as the parent resource
* All applications generated by the ApplicationSet
* The sync status and health of each application

You can:

* Click on any generated application to view its details
* Monitor the sync status and health of all applications
* See which applications are healthy, progressing, or degraded

{% hint style="info" %}
**RESOURCE TREE REFRESH**

When viewing the ApplicationSet resource tree, child application objects may appear out of sync even if the individual application page shows a synced status. This is because the ApplicationSet resource tree refreshes every 3 minutes by default. For the most up-to-date status of a specific application, click on the application to view its dedicated details page.
{% endhint %}

<figure><img src="https://3694223630-files.gitbook.io/~/files/v0/b/gitbook-x-prod.appspot.com/o/spaces%2Fy1JhZ4oKIppwY7d5AhPj%2Fuploads%2Fgit-blob-48fc304d76e578a9f723d2049b73722c09847dba%2Fappset-8.png?alt=media" alt=""><figcaption><p>Click to view full size image</p></figcaption></figure>

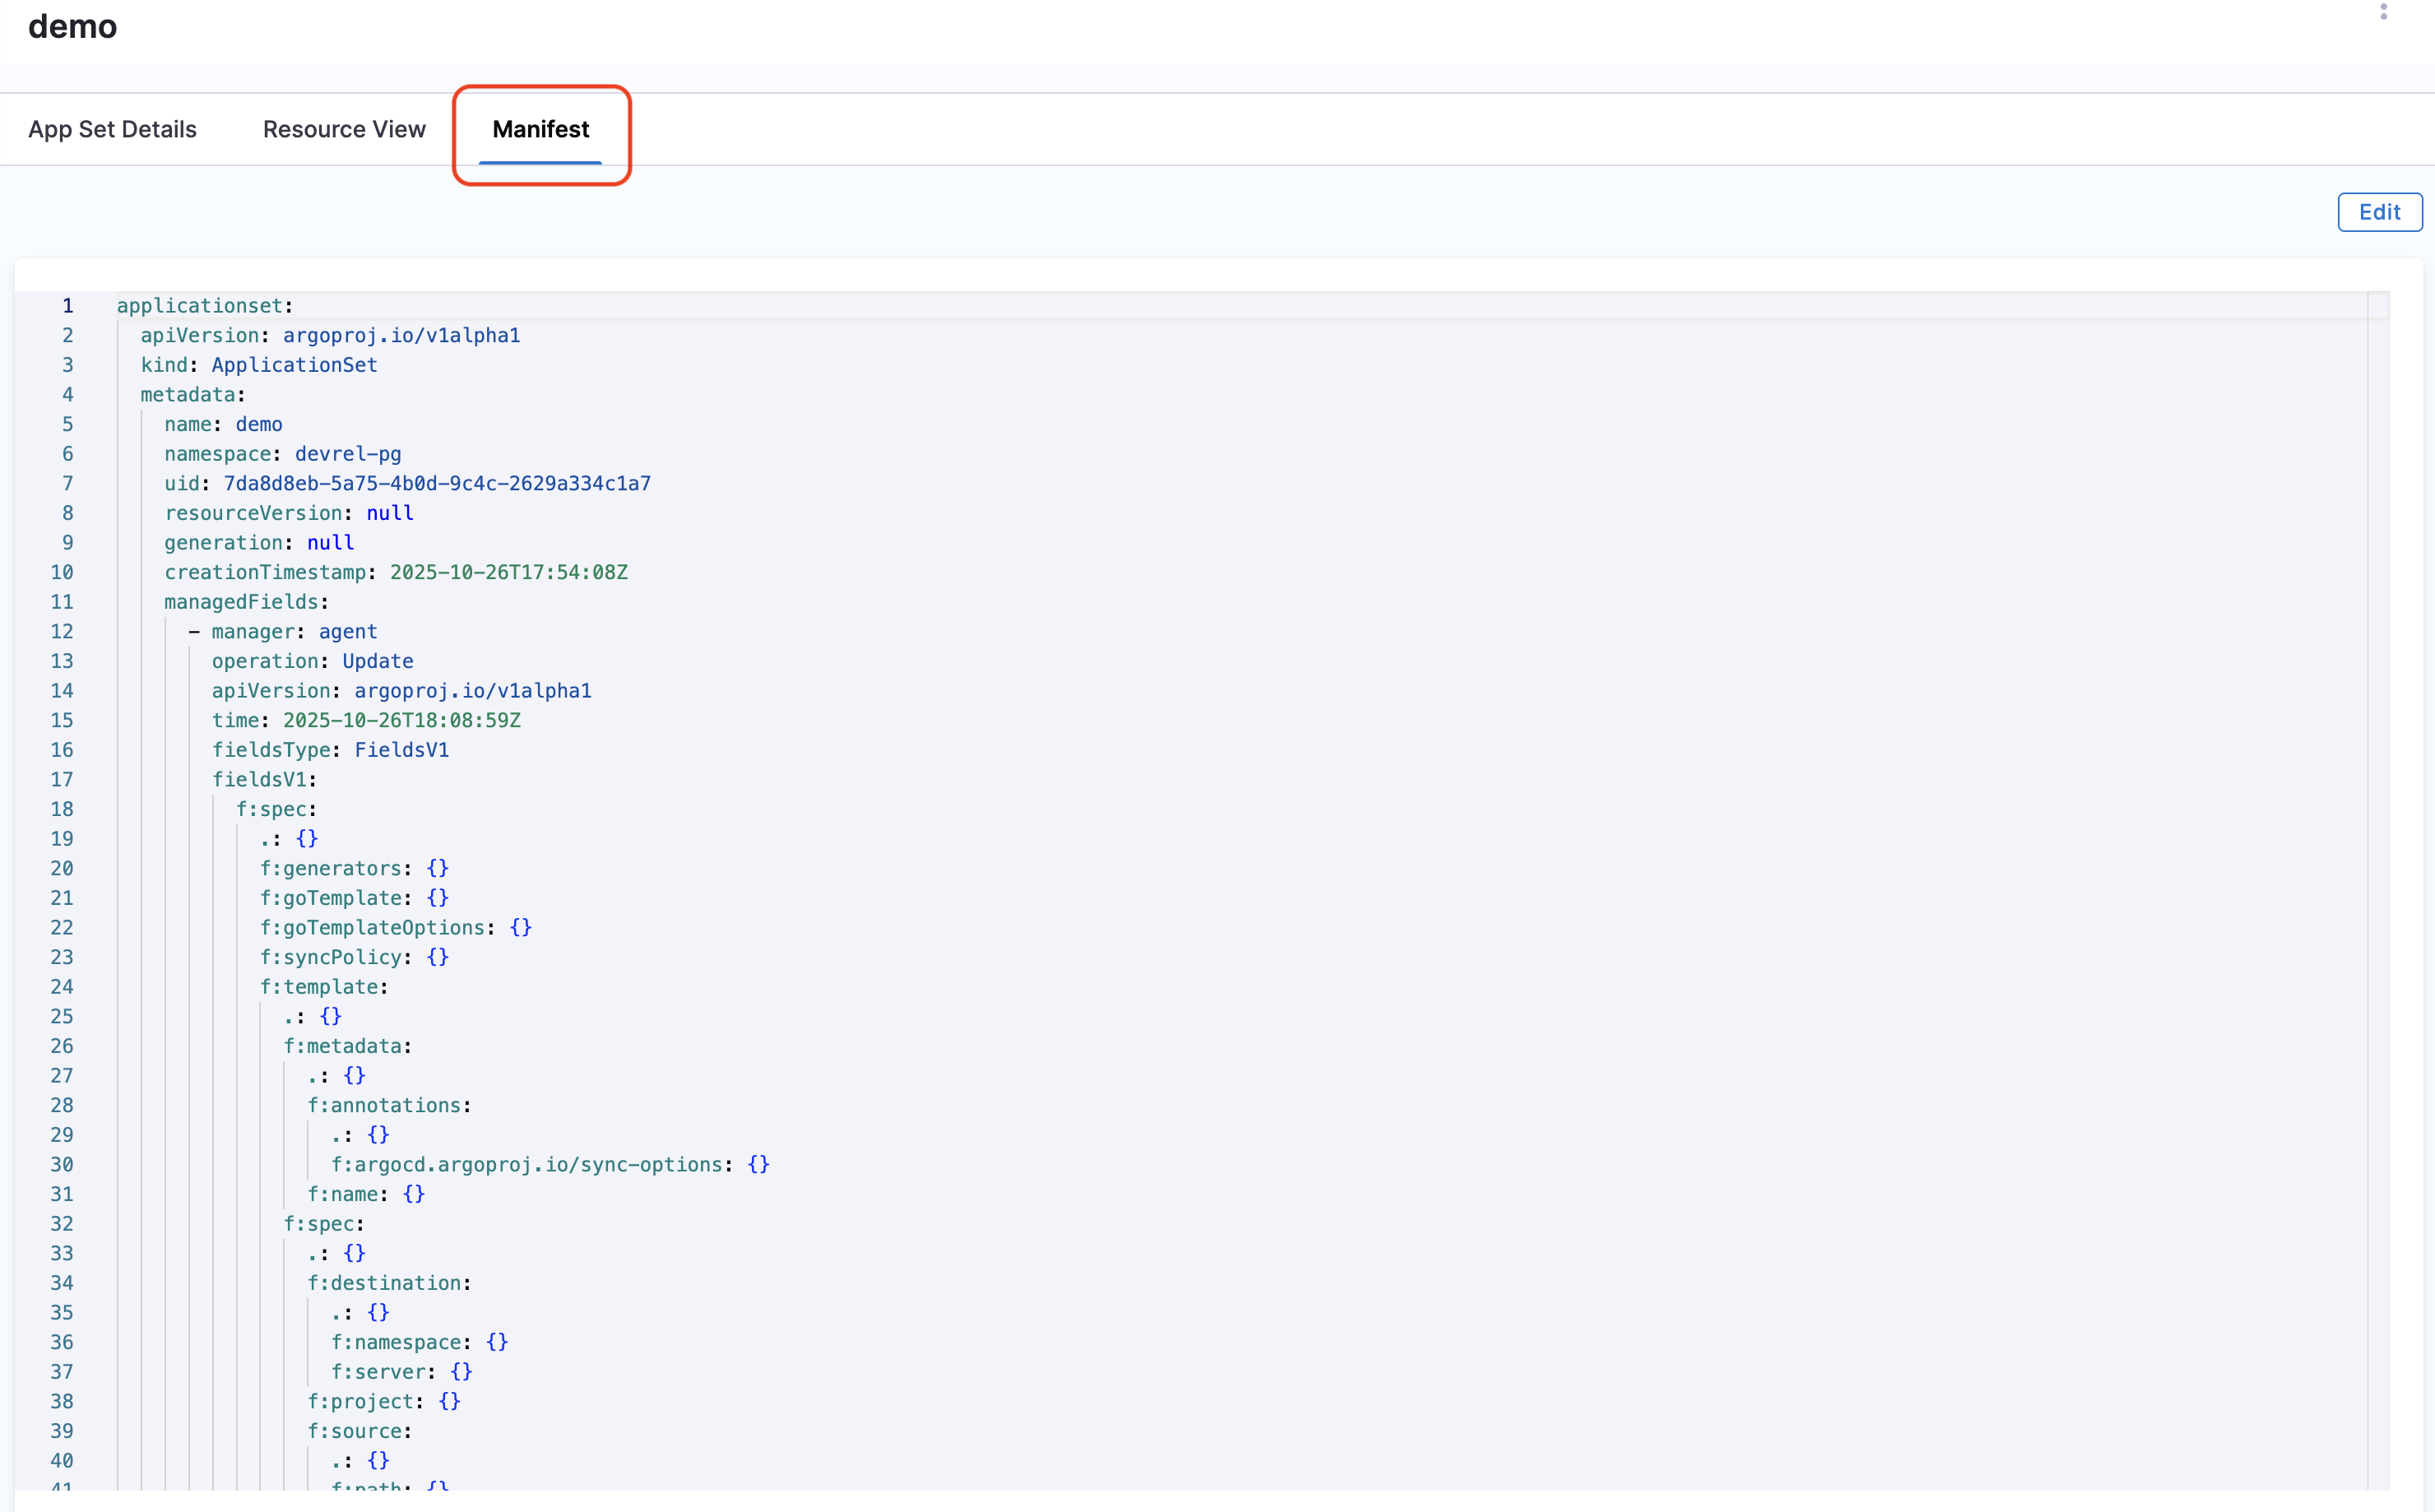
4. Click on the **Manifest** tab to see the complete manifest generated for the ApplicationSet.

<figure><img src="https://3694223630-files.gitbook.io/~/files/v0/b/gitbook-x-prod.appspot.com/o/spaces%2Fy1JhZ4oKIppwY7d5AhPj%2Fuploads%2Fgit-blob-297880d6e265ba05200ab612036e09e4954749e3%2Fappset-9.png?alt=media" alt=""><figcaption><p>Click to view full size image</p></figcaption></figure>

If you want more details about the applications created by the ApplicationSet, navigate to the **Applications** page. Filter by the agent and cluster to view the applications created by the ApplicationSet. Typically, all applications created by an ApplicationSet will use the same agent and cluster.

### Auto-create services and environments <a href="#auto-create-services-and-environments" id="auto-create-services-and-environments"></a>

When importing Argo CD projects through a [Bring Your Own Argo CD (BYOA) setup](/continuous-delivery/use-gitops/connect-and-manage/multiple-argo-to-single-harness.md), Harness can automatically create services and environments in the target Harness project based on the `harness.io/serviceRef` and `harness.io/envRef` labels defined in your ApplicationSet template.

If a service or environment matching the label value already exists, the application is mapped to it. If it does not exist, Harness creates it automatically and maps it to the application.

{% hint style="warning" %}
**IDENTIFIER NAMING RULES**

The `harness.io/serviceRef` and `harness.io/envRef` label values become Harness entity identifiers. They must follow these rules:

* Must start with a letter or underscore (not a number or `$`).
* Can only contain alphanumeric characters, underscores (`_`), and dollar signs (`$`).
* Maximum length: 128 characters.
* Cannot use reserved keywords: `or`, `and`, `eq`, `ne`, `lt`, `gt`, `le`, `ge`, `div`, `mod`, `not`, `null`, `true`, `false`, `new`, `var`, `return`, `step`, `parallel`, `stepGroup`, `org`, `account`, `class`, `shellScriptProvisioner`.

**Valid examples:** `my_service`, `MyService123`, `_internal_service`, `service_v2$backup`

**Invalid examples:** `123service` (starts with number), `$service` (starts with `$`), `my-service` (contains hyphen), `my.service` (contains dot), `org` (reserved keyword)

If a label value does not follow these rules, the auto-creation fails silently for that application.
{% endhint %}

To use this with ApplicationSets:

1. **Define labels in your ApplicationSet template:** Add `harness.io/serviceRef` and `harness.io/envRef` labels to the `template.metadata.labels` section. You can templatize these values so each generated application gets its own service and environment reference.
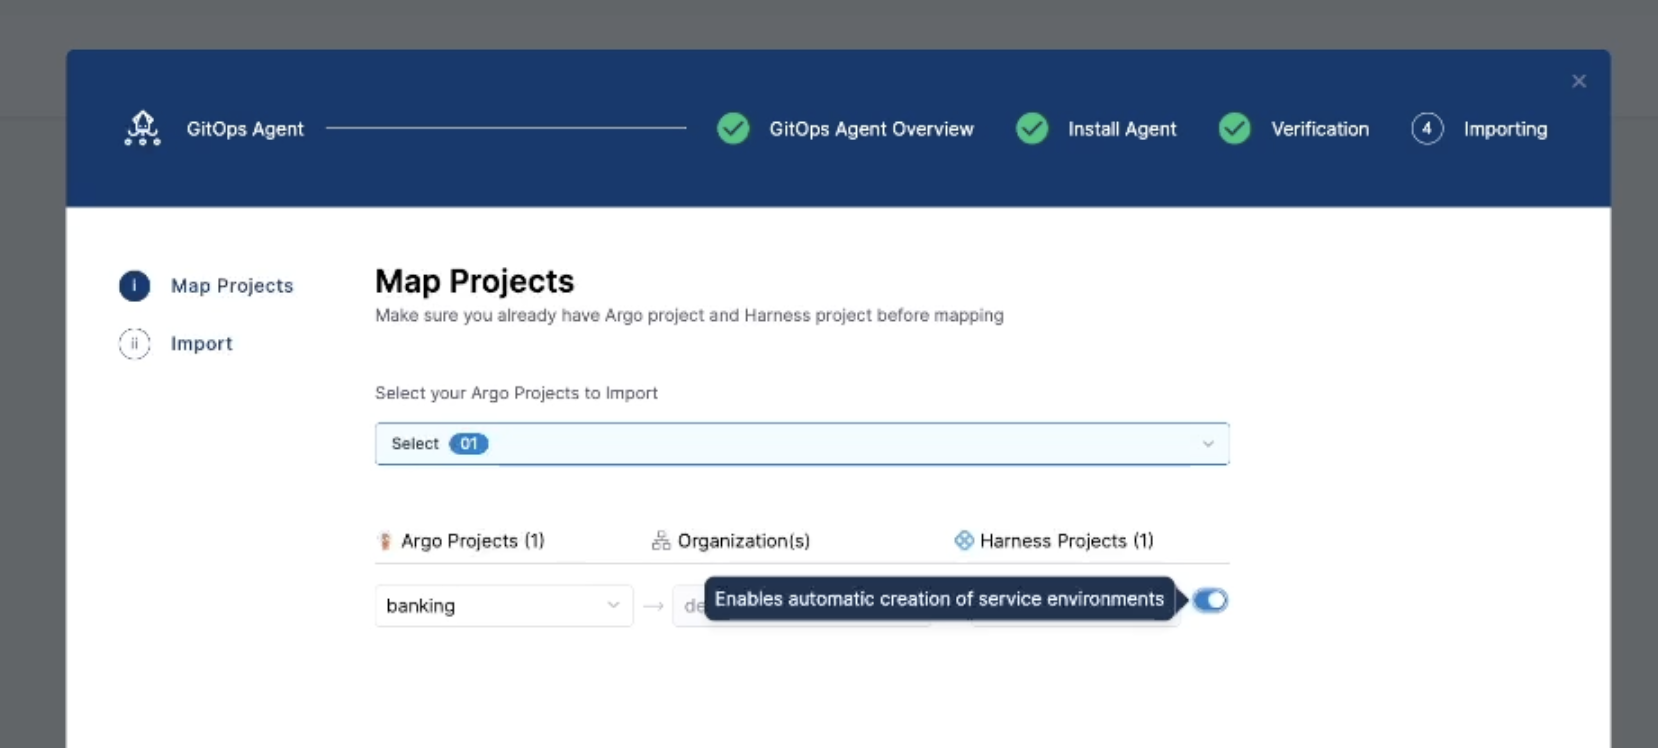
2. **Enable the toggle on the Map Projects screen:** When importing the Argo CD project during the BYOA agent setup, turn on the **Enables automatic creation of service environments** toggle.

<figure><img src="https://3694223630-files.gitbook.io/~/files/v0/b/gitbook-x-prod.appspot.com/o/spaces%2Fy1JhZ4oKIppwY7d5AhPj%2Fuploads%2Fgit-blob-cc0dba02b9cc171726e96022e39749aae76113b5%2Fmap-argo-project.png?alt=media" alt=""><figcaption><p>Click to view full size image</p></figcaption></figure>

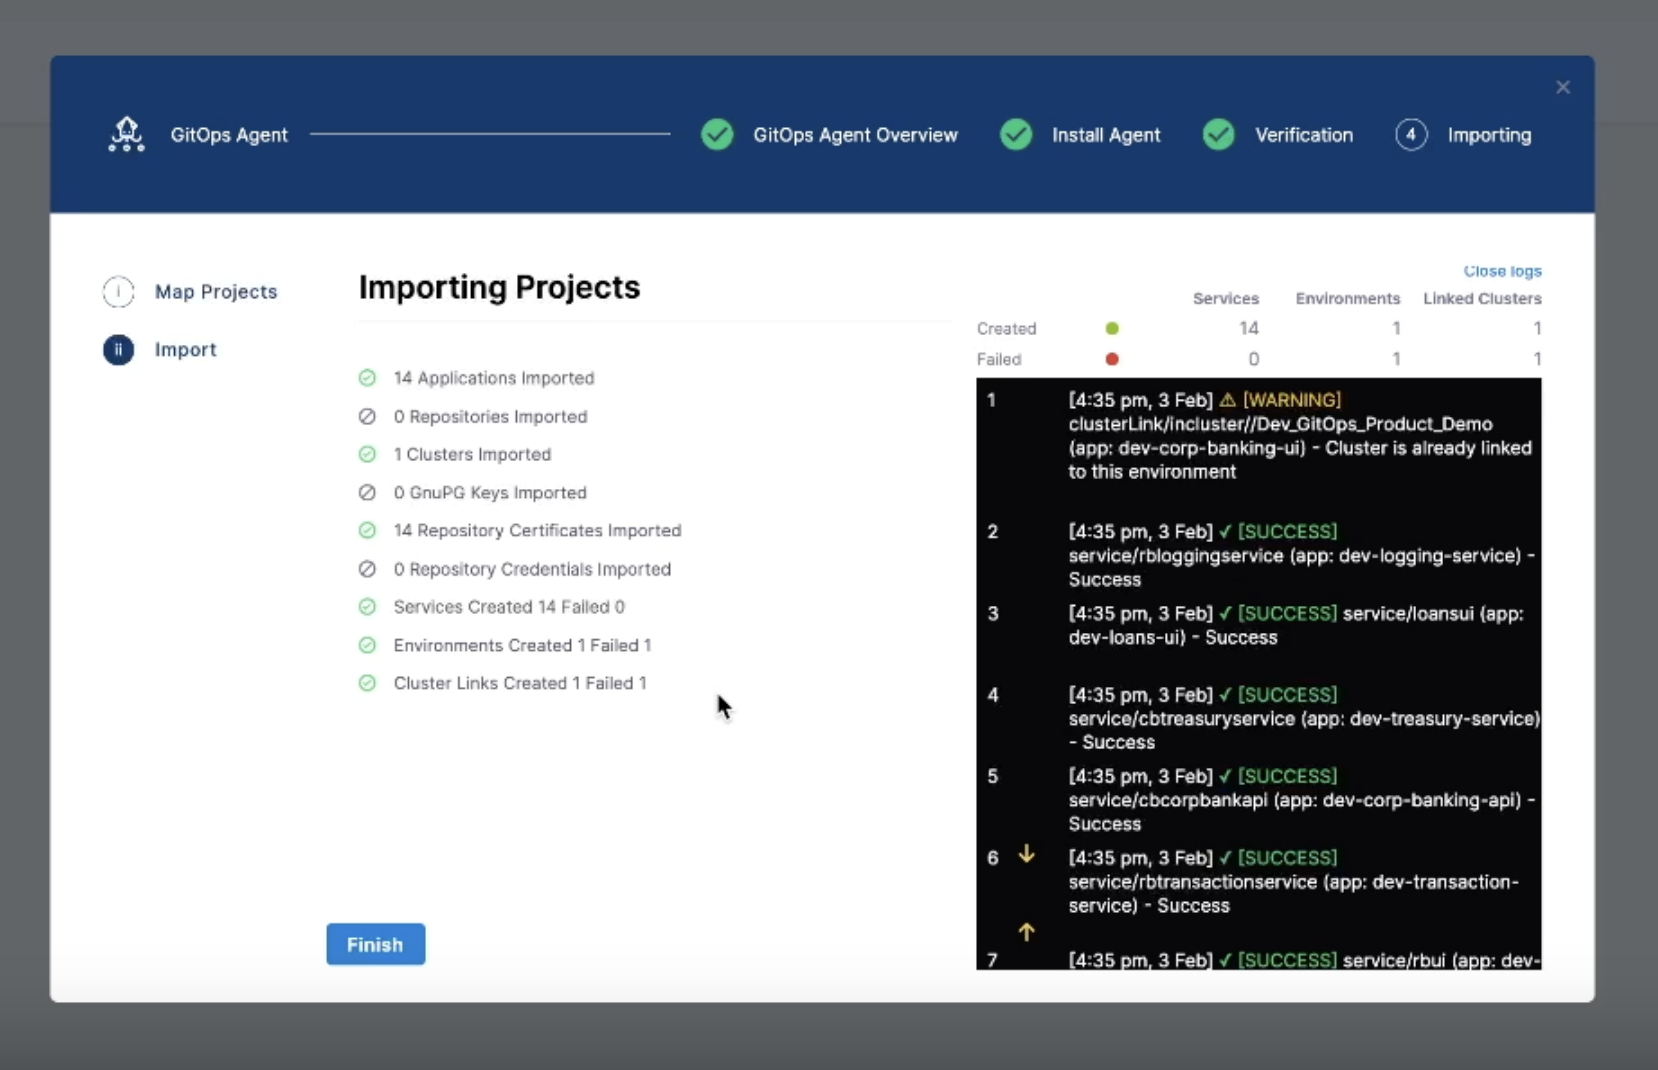
3. **Import the project:** Select **Import & Continue**. Harness processes all applications generated by the ApplicationSet. The import summary shows the number of services, environments, and cluster links that were created or mapped.

<figure><img src="https://3694223630-files.gitbook.io/~/files/v0/b/gitbook-x-prod.appspot.com/o/spaces%2Fy1JhZ4oKIppwY7d5AhPj%2Fuploads%2Fgit-blob-18dd8216096cd96634928fd381aa6788ee4dfac4%2Fimporting-projects.png?alt=media" alt=""><figcaption><p>Click to view full size image</p></figcaption></figure>

<details>

<summary>Example ApplicationSet YAML with serviceRef and envRef labels</summary>

```yaml
apiVersion: argoproj.io/v1alpha1
kind: ApplicationSet
metadata:
  name: dev-microservices
  namespace: argocd
spec:
  goTemplate: true
  goTemplateOptions:
    - missingkey=error

  generators:
  - list:
      elements:
        - domain: corporate-banking
          service: compliance-service
          namespace: corporate-banking
          serviceRef: cbcomplianceservice
          envRef: Dev_GitOps_Product_Demo
        - domain: corporate-banking
          service: corp-banking-api
          namespace: corporate-banking
          serviceRef: cbcorpbankapi
          envRef: Dev_GitOps_Product_Demo
        - domain: corporate-banking
          service: treasury-service
          namespace: corporate-banking
          serviceRef: cbtreasuryservice
          envRef: Dev_GitOps_Product_Demo
        - domain: retail-banking
          service: account-service
          namespace: retail-banking
          serviceRef: rbaccountservice
          envRef: Dev_GitOps_Product_Demo
        - domain: retail-banking
          service: transaction-service
          namespace: retail-banking
          serviceRef: rbtransactionservice
          envRef: Dev_GitOps_Product_Demo
        - domain: loans
          service: loans-api
          namespace: loans
          serviceRef: loansapi
          envRef: Dev_GitOps_Product_Demo

  template:
    metadata:
      name: "dev-{{.service}}"
      labels:
        environment: "dev"
        app: "{{.service}}"
        harness.io/serviceRef: "{{.serviceRef}}"
        harness.io/envRef: "{{.envRef}}"
    spec:
      project: banking

      source:
        repoURL: https://github.com/example-org/gitops-demo
        targetRevision: main
        path: "services/{{.domain}}/{{.service}}/overlays/dev"

      destination:
        server: "https://kubernetes.default.svc"
        namespace: "{{.namespace}}"

      syncPolicy:
        automated:
          prune: true
          selfHeal: true
        syncOptions:
          - CreateNamespace=true
```

</details>

In this example, each element in the list generator defines a `serviceRef` and `envRef` that are substituted into the template labels. When the BYOA import runs with auto-creation enabled, Harness creates a service and environment for each unique `serviceRef`/`envRef` value and maps the generated applications accordingly.

### Filter ApplicationSets <a href="#filter-applicationsets" id="filter-applicationsets"></a>

You can filter ApplicationSets in the list view using:

* **Search**: Enter text to search by ApplicationSet name
* **Agent**: Filter by GitOps Agent
* **Sync Status**: Filter by sync status (Synced, OutOfSync, Unknown)
* **Health Status**: Filter by health status (Healthy, Progressing, Degraded, Suspended, Missing)

### Edit ApplicationSets <a href="#edit-applicationsets" id="edit-applicationsets"></a>

To edit an existing ApplicationSet:

1. Go to the **Application Set** tab.
2. Select your ApplicationSet.
3. Select the **Manifest** tab.
4. Select **Edit** to modify the manifest.
5. Make your changes and select **Save**.

{% hint style="warning" %}
Editing an ApplicationSet may cause applications to be created, updated, or deleted based on the changes you make to the generator or template.
{% endhint %}

### Delete ApplicationSets <a href="#delete-applicationsets" id="delete-applicationsets"></a>

To delete an ApplicationSet:

1. Go to the **Application Set** tab.
2. Find your ApplicationSet in the list.
3. Select the three vertical dots (⋮) next to the ApplicationSet.
4. Select **Delete**.
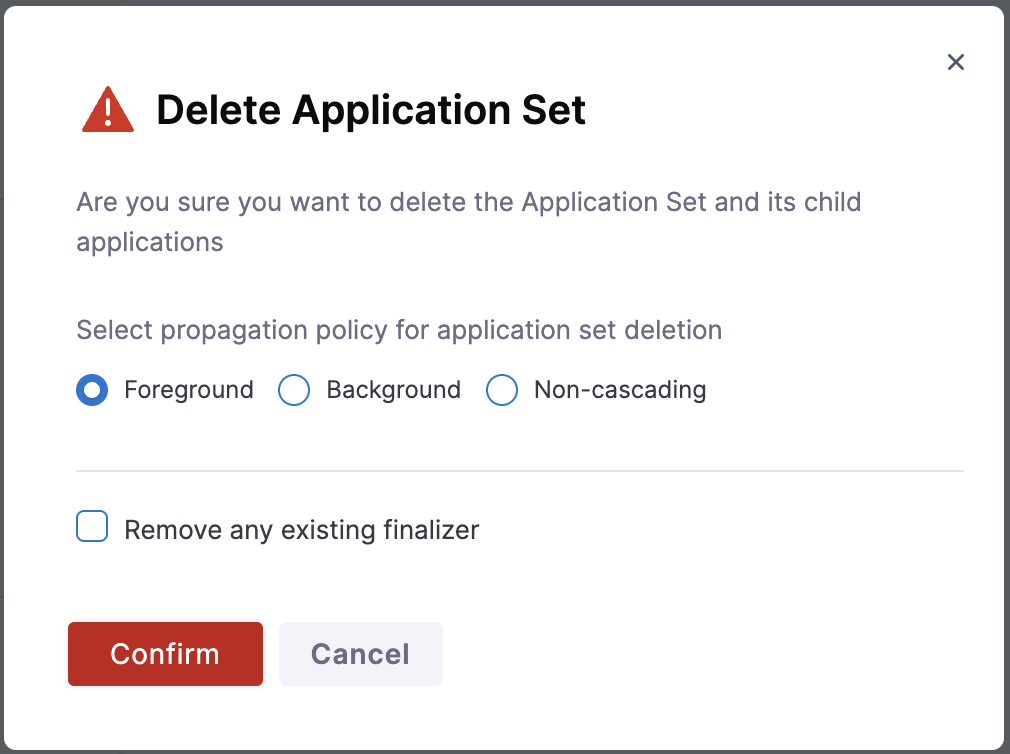
5. In the **Delete Application Set** dialog, configure the deletion options:

   **Propagation Policy**: Select how the deletion should be handled:

   * **Foreground** (recommended): Deletes the ApplicationSet first, then waits for all child applications and their resources to be deleted. This ensures a clean, ordered deletion process.
   * **Background**: Deletes the ApplicationSet immediately and removes child applications asynchronously in the background. The ApplicationSet is removed from the UI before all resources are fully cleaned up.
   * **Non-cascading**: Deletes only the ApplicationSet itself without deleting child applications. The applications become orphaned and continue running independently.

   **Remove any existing finalizer**: Check this option to remove Kubernetes finalizers and force immediate deletion. Only use this if the ApplicationSet is stuck in a deleting state.
6. Click **Confirm** to proceed with the deletion.

<figure><img src="https://3694223630-files.gitbook.io/~/files/v0/b/gitbook-x-prod.appspot.com/o/spaces%2Fy1JhZ4oKIppwY7d5AhPj%2Fuploads%2Fgit-blob-f455e99e1d01526f4eee511fc8cb3539015107ec%2Fappset-10.png?alt=media" alt=""><figcaption><p>Click to view full size image</p></figcaption></figure>

{% hint style="danger" %}
Deleting an ApplicationSet with **Foreground** or **Background** propagation will also delete all applications generated by it and their deployed resources, unless you've configured the sync policy to preserve resources or you select **Non-cascading**.
{% endhint %}
{% endtab %}

{% tab title="Standard Flow" %}

### Create ApplicationSet (Standard Flow) <a href="#create-applicationset-standard-flow" id="create-applicationset-standard-flow"></a>

Use this standard flow to manage ApplicationSet YAML in Git directly, without the wizard.

{% hint style="success" %}
**Prefer the wizard when possible**

The First-Class Support tab offers an enhanced UI wizard with Service/Environment integration and improved management capabilities. Go to the [First-Class Support](#create-and-manage-applicationsets) tab to use it.
{% endhint %}

#### Step 1: Update manifests in Git <a href="#step-1-update-manifests-in-git" id="step-1-update-manifests-in-git"></a>

The following example uses a [Git generator](https://argo-cd.readthedocs.io/en/stable/operator-manual/applicationset/Generators-Git/) from the [Argo Project's public repository](https://github.com/argoproj/applicationset/tree/master/examples/git-generator-files-discovery).

1. Clone the [ApplicationSet repository](https://github.com/argoproj/applicationset) and navigate to the example directory.
2. Update `git-generator-files.yaml` with the following YAML configuration:

   ```yaml
   apiVersion: argoproj.io/v1alpha1  
   kind: ApplicationSet  
   metadata:  
     name: guestbook  
   spec:  
     generators:  
       - git:  
           repoURL: https://github.com/<YOUR_ACCOUNT_NAME>/applicationset.git  
           revision: HEAD  
           files:  
           - path: "examples/git-generator-files-discovery/cluster-config/**/config.json"  
     template:  
       metadata:  
         name: '{{cluster.name}}-guestbook'
         labels: 
           harness.io/envRef: '{{envTag}}'
           harness.io/serviceRef: '{{serviceTag}}'
           harness.io/buildRef: '{{releaseTag}}'
       spec:  
         project: <PROJECT_ID_IN_AGENT_PAGE>  
         source:  
           repoURL: https://github.com/<YOUR_ACCOUNT_NAME>/applicationset.git  
           targetRevision: HEAD  
           path: "examples/git-generator-files-discovery/apps/guestbook"  
         destination:  
           server: '{{cluster.address}}'  
           namespace: default  
         syncPolicy:  
           automated: {}
   ```
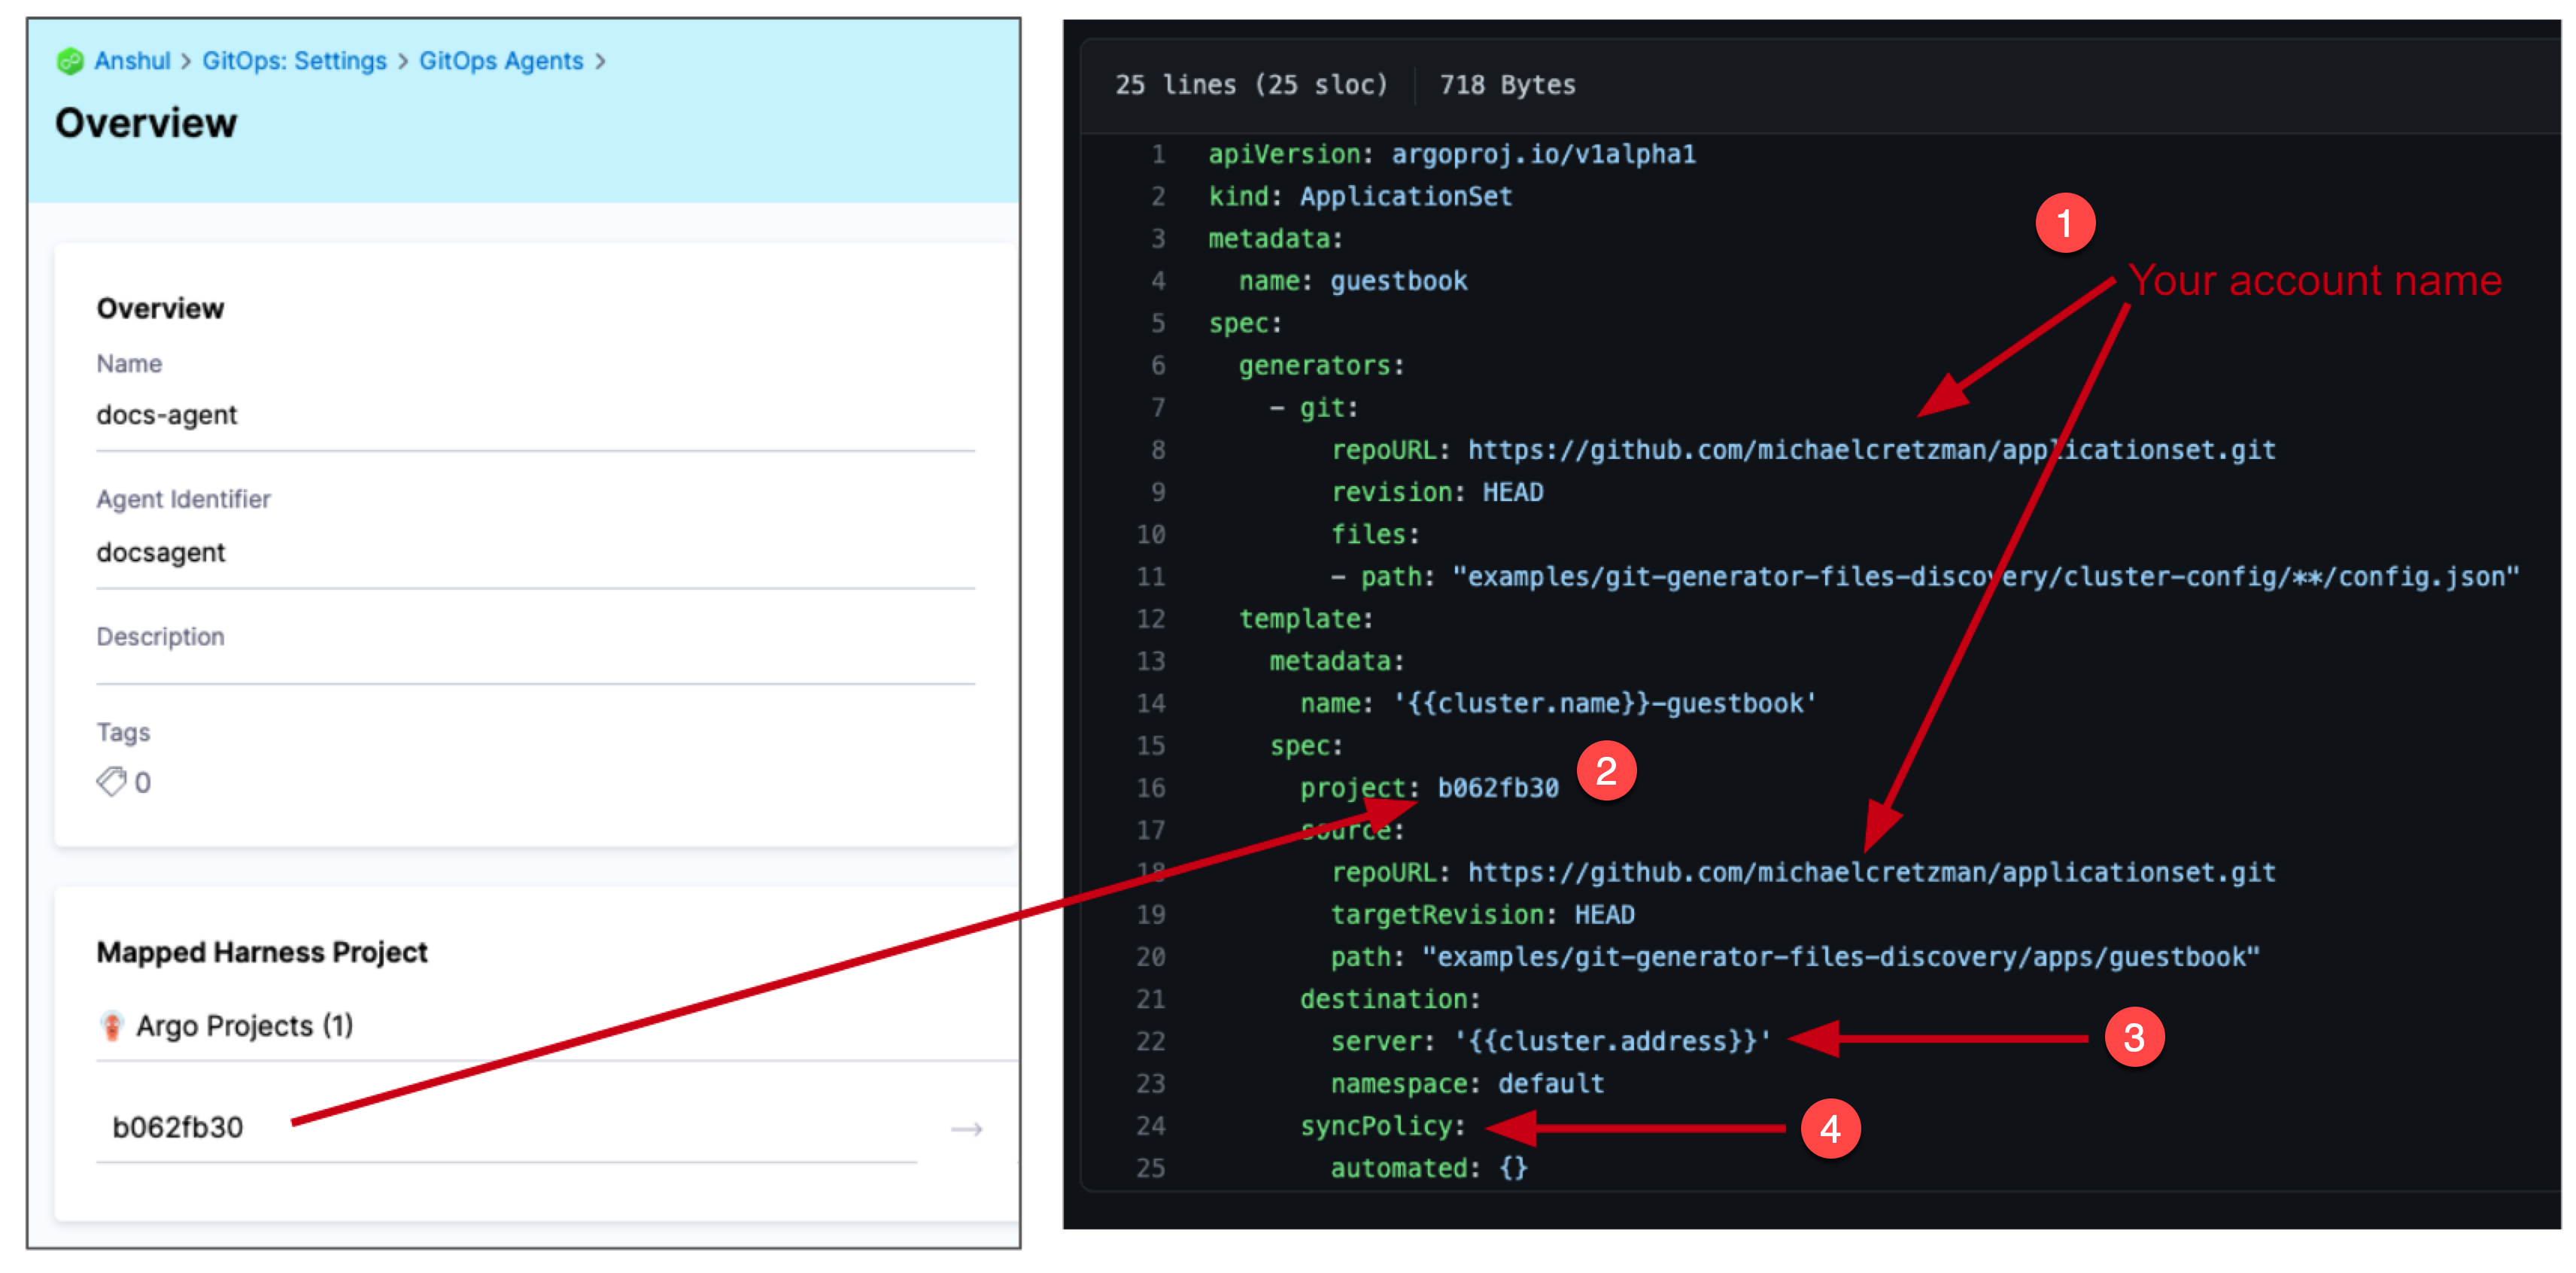
3. To get the project ID:
   * Go to **Deployments** > **GitOps** > **Settings** > **GitOps Agents**
   * Find the Argo Project ID you want to use to create the ApplicationSet

     <figure><img src="https://3694223630-files.gitbook.io/~/files/v0/b/gitbook-x-prod.appspot.com/o/spaces%2Fy1JhZ4oKIppwY7d5AhPj%2Fuploads%2Fgit-blob-1421435bd0846b836a73c99e26e30f01529dd481%2Fharness-git-ops-application-set-tutorial-33.png?alt=media" alt=""><figcaption><p>Click to view full size image</p></figcaption></figure>
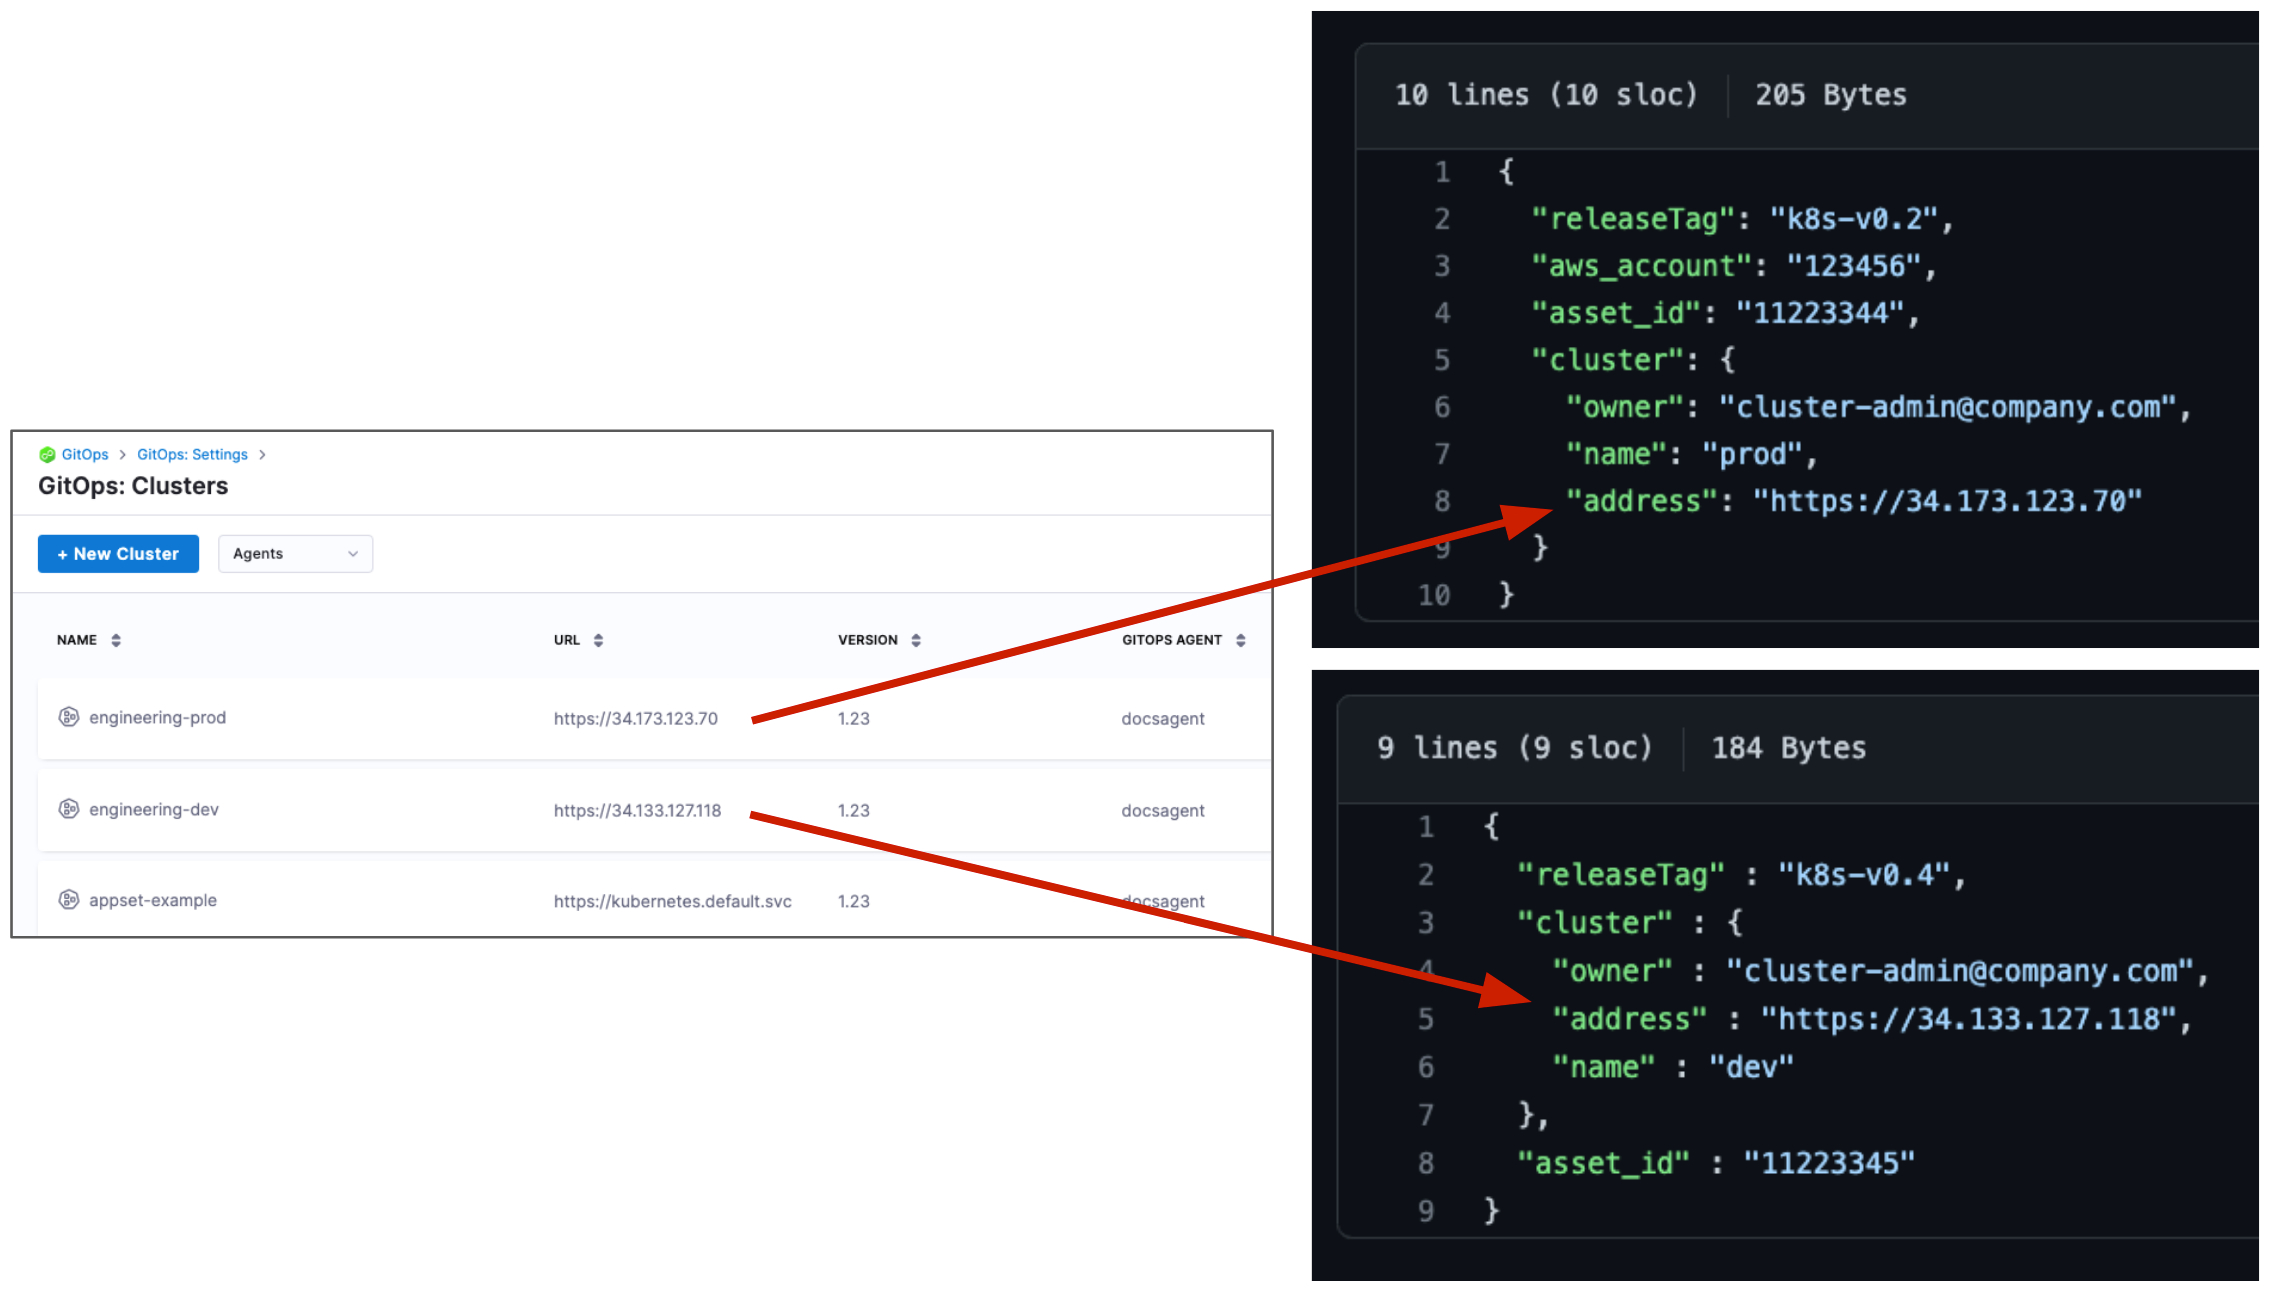
4. Navigate to `applicationset/examples/git-generator-files-discovery/cluster-config/engineering/dev/config.json`
5. Replace `"address": "https://1.2.3.4"` with the Endpoint IP address for your **dev** target cluster. Ensure you use the `https://` scheme.

   <div data-gb-custom-block data-tag="hint" data-style="info" class="hint hint-info"><p>This cluster must be created in Harness beforehand.</p></div>
6. Repeat for the **prod** target cluster by modifying `applicationset/examples/git-generator-files-discovery/cluster-config/engineering/prod/config.json`

Here's an example of the cluster configuration:

<figure><img src="https://3694223630-files.gitbook.io/~/files/v0/b/gitbook-x-prod.appspot.com/o/spaces%2Fy1JhZ4oKIppwY7d5AhPj%2Fuploads%2Fgit-blob-7c390f575a028c9eb685bd4ab3008f10dc8a4eb3%2Fharness-git-ops-application-set-tutorial-34.png?alt=media" alt=""><figcaption><p>Click to view full size image</p></figcaption></figure>

{% hint style="info" %}
Both JSON and YAML formats are supported for ApplicationSet configuration files.
{% endhint %}

#### Step 2: Create the ApplicationSet application <a href="#step-2-create-the-applicationset-application" id="step-2-create-the-applicationset-application"></a>

1. In your Harness project, go to **Deployments** > **GitOps**.
2. Select **Applications** from the left navigation.
3. Click **New Application**.
4. Enter the following details:
   * **Application Name**: Enter a name for your ApplicationSet
   * **GitOps Agent**: Select the agent that will manage this ApplicationSet
   * **Sync Policy**: Leave the default settings or configure as needed
5. Click **Continue**.
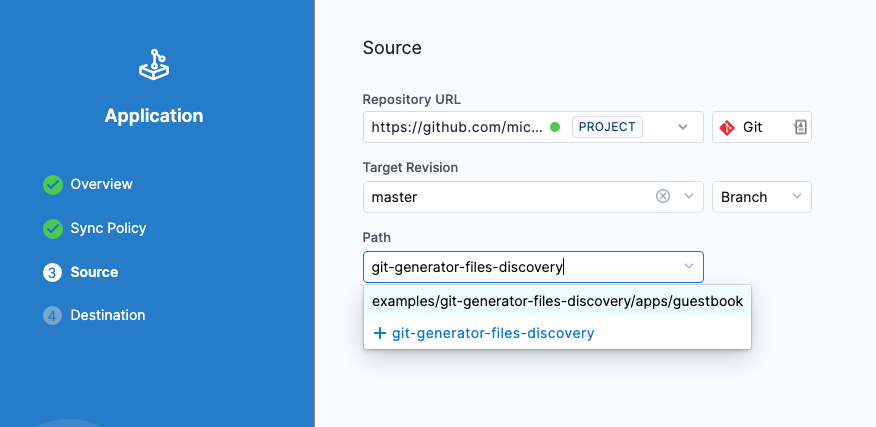
6. In the **Source** section, configure:
   * **Repository URL**: Select the GitOps repository you added earlier
   * **Target Revision**: Select **master** or your main branch
   * **Path**: Enter `examples/git-generator-files-discovery`

     <figure><img src="https://3694223630-files.gitbook.io/~/files/v0/b/gitbook-x-prod.appspot.com/o/spaces%2Fy1JhZ4oKIppwY7d5AhPj%2Fuploads%2Fgit-blob-c358bc37d5f9666a4398c7b9679da40707956f4b%2Fharness-git-ops-application-set-tutorial-39.png?alt=media" alt=""><figcaption><p>Click to view full size image</p></figcaption></figure>
7. Click **Continue**.
8. In the **Destination** section:
   * **Cluster**: Select the cluster where your GitOps agent is installed
   * **Namespace**: Select the namespace where your GitOps agent is installed
9. Click **Save** to create the ApplicationSet application.

#### Step 3: Sync the ApplicationSet application <a href="#step-3-sync-the-applicationset-application" id="step-3-sync-the-applicationset-application"></a>

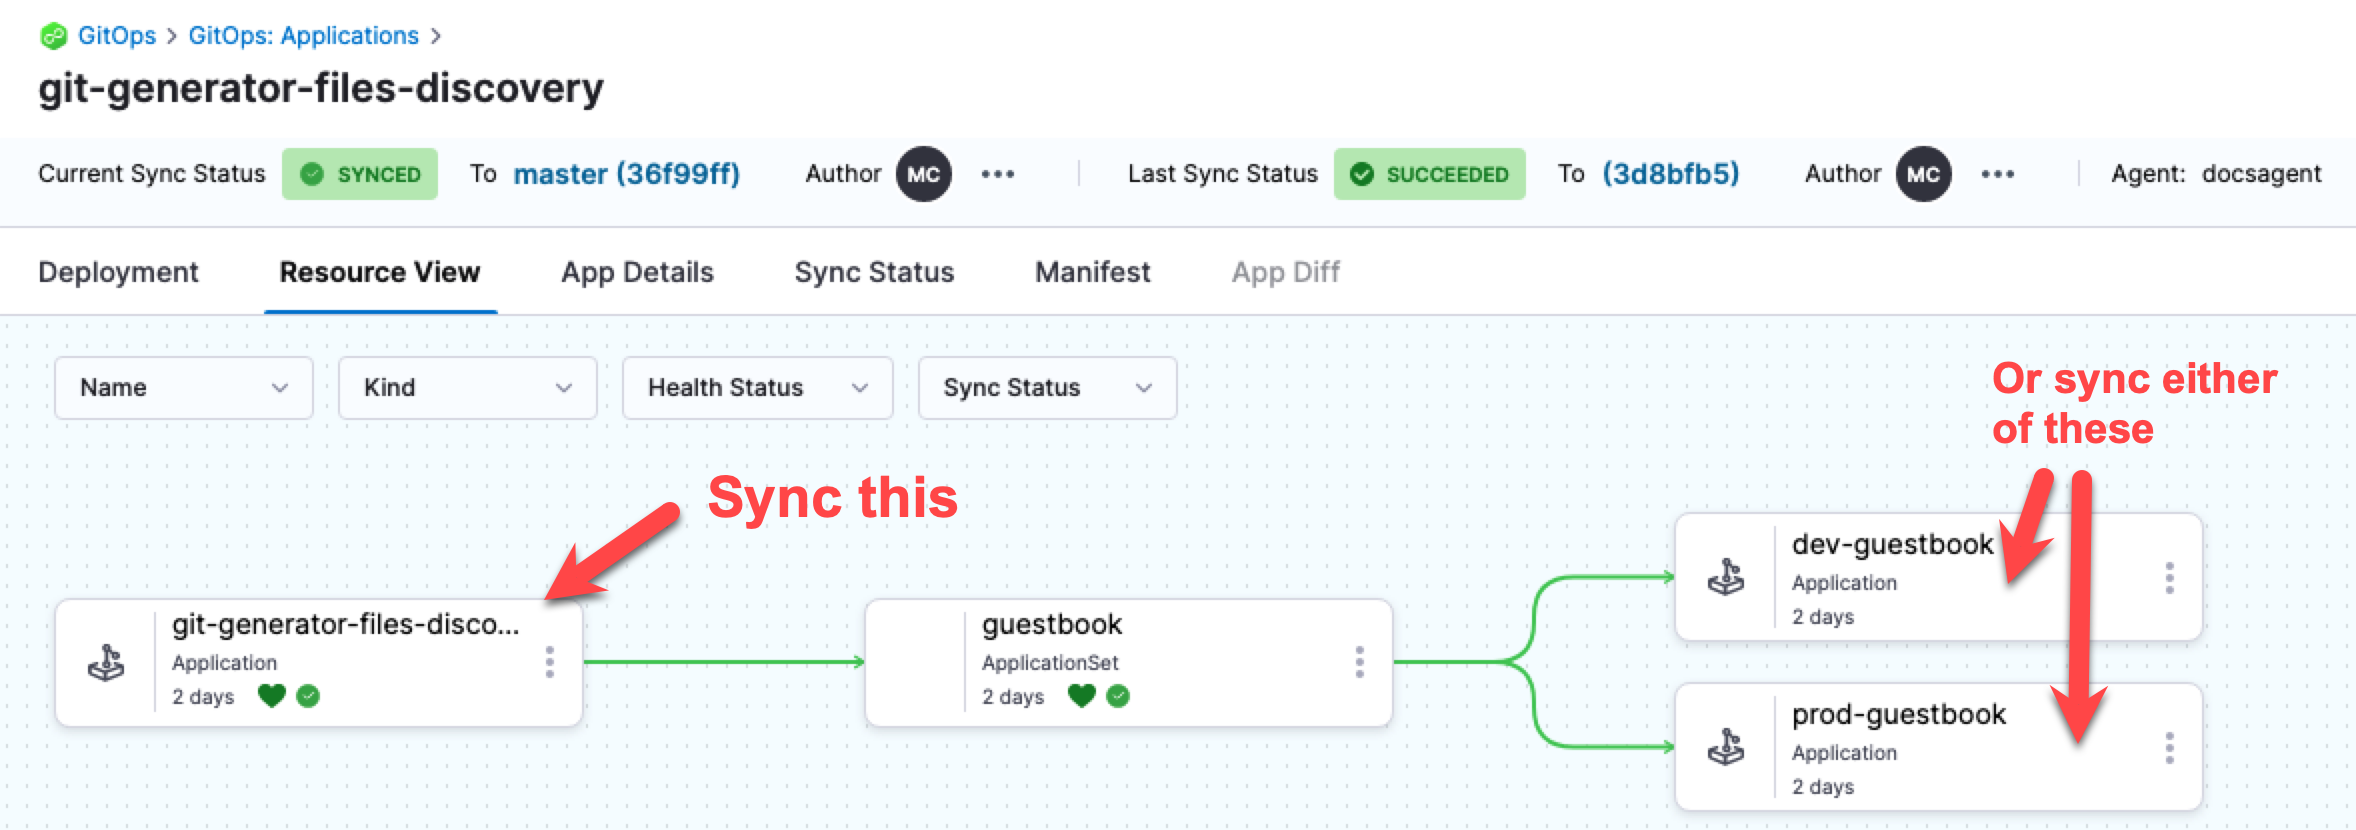
You can sync the ApplicationSet from two places: the **Applications** view or a PR pipeline.

**Sync from Applications View**

From the **Applications** view, you can sync the Harness ApplicationSet application or the individual child applications independently.

<figure><img src="https://3694223630-files.gitbook.io/~/files/v0/b/gitbook-x-prod.appspot.com/o/spaces%2Fy1JhZ4oKIppwY7d5AhPj%2Fuploads%2Fgit-blob-39f39b1fc265bb767635fb29e8158f0ed662c21d%2Fharness-git-ops-application-set-tutorial-63.png?alt=media" alt=""><figcaption><p>Click to view full size image</p></figcaption></figure>

**Automatic Syncing**

If you configure automatic syncing in the ApplicationSet template, the applications sync automatically. See `syncPolicy.automated` in the following example:

```yaml
template:  
  metadata:  
    name: '{{cluster.name}}-guestbook'  
  spec:  
    project: 191b68fc  
    source:  
      repoURL: https://github.com/johndoe/applicationset.git  
      targetRevision: HEAD  
      path: "examples/git-generator-files-discovery/apps/guestbook"  
    destination:  
      server: '{{cluster.address}}'  
      namespace: default  
    syncPolicy:  
      automated: {}
```

**Sync via PR Pipeline**

For syncing ApplicationSets through PR pipelines, refer to [Sync GitOps applications](/continuous-delivery/use-gitops/application/sync-gitops-applications.md).

{% hint style="success" %}
**Prefer first-class support**

Use the First-Class Support tab for the enhanced ApplicationSet experience with a dedicated UI wizard, Service/Environment integration, and better management capabilities.
{% endhint %}
{% endtab %}
{% endtabs %}

***

### Next Steps <a href="#next-steps" id="next-steps"></a>

* Learn about [ApplicationSet basics](/continuous-delivery/use-gitops/applicationsets/appset-basics.md)
* Explore [PR Pipelines with ApplicationSets](/continuous-delivery/use-gitops/pr-pipelines/pr-pipelines-basics.md)
* Understand [GitOps Application management](/continuous-delivery/use-gitops/application/manage-gitops-applications.md)

{% @harness-feedback/feedback %}