> For the complete documentation index, see [llms.txt](https://developer.harness.io/llms.txt). Markdown versions of documentation pages are available by appending `.md` to page URLs; this page is available as [Markdown](https://developer.harness.io/continuous-delivery/use-gitops/gitops-entities/agents/install-a-harness-git-ops-agent.md).
# Install a Harness GitOps Agent
Install a Harness GitOps Agent, a worker process that runs in your environment and performs GitOps tasks.
This topic describes how to install a Harness GitOps Agent, a worker process that runs in your environment and performs GitOps tasks.
You need to set up an Agent before you can set up a Cluster, Repository, or Application, as the Agent is selected in all three of these.
Typically, you install the Agent in the target cluster, but you can install it in any cluster, and it can connect to remote clusters using the credentials you provide.
## What you will learn from this topic
* How to meet the [requirements](#requirements) for installing the Harness GitOps Agent.
* How to use an [existing Argo CD project](#using-existing-argo-cd-projects) with the Agent.
* How to [configure custom Argo CD component names](#configure-custom-argo-cd-component-names-byoa) for a Bring Your Own Argo CD (BYOA) setup.
* How to [create](#create-a-gitops-agent) and [install](#install-the-agent) a GitOps Agent.
* How to [map Argo CD projects to Harness projects](#argo-cd-and-harness-project-mapping).
* How to configure [advanced options](#advanced-options), such as proxy support and Helm secrets path traversal.
* Understand how the [GitOps Auto Updater Job](#gitops-auto-updater-job) keeps the Agent up to date.
* How to set up a [High Availability GitOps Agent](#high-availability-gitops-agent).
## Before you begin
The Harness GitOps Agent has the following requirements:
* **vCPUs, memory, and disk size**: The Harness GitOps Agent only needs 1 vCPU, 2 GB memory, and 20 GB disk, but you will also be running Kubernetes and your deployed services. Consider the total CPU and memory needs for the Agent and the applications and services in your cluster.
* **Networking**: Outbound HTTPS for the Harness connection to **app.harness.io**, **github.com**, and **hub.docker.com**. Allow TCP port 22 for SSH.
* A **Kubernetes service account** with the permissions needed to create your desired state. The Harness GitOps Agent requires either `cluster-admin` or admin permissions in the target namespace:
* Create Deployment, Service, StatefulSet, Network Policy, Service Account, Role, ClusterRole, RoleBinding, ClusterRoleBinding, ConfigMap, Secret.
* Permission to apply CustomResourceDefinition. Go to [User-Facing Roles](https://kubernetes.io/docs/reference/access-authn-authz/rbac/#user-facing-roles) to review the Kubernetes RBAC reference.
* **Namespace**: The target namespace in the cluster must be created already. Harness will not create the namespace.
## Existing Argo CD projects
Typically, when you set up a Harness GitOps Agent you install a new Harness GitOps Agent in your target cluster along with other services (Repo server, Redis cache, Application controller, ApplicationSet controller).
In some cases, you might already have an Argo CD Project running in your target cluster. In this case, you can select this Project when you set up the Harness GitOps Agent.
You can use an existing Argo CD Project when you already have services deployed to different environments from that Argo CD instance.
If you do not use an existing Argo CD Project, you will create GitOps Applications, Repos, and Clusters in Harness. You may have to delete some of the already existing entities in the Argo CD cluster, for example, repositories or clusters you already have with the same URL.
In both cases, you will install the Harness GitOps Agent process.
If you use an existing Argo CD instance, then Harness will use the following existing processes in the cluster:
* Repo server
* Redis cache
* Application controller
* ApplicationSet controller
If you do not use an existing Argo CD instance, then Harness will install the following:
* GitOps agent
* Repo server
* Redis cache
* Application controller
* ApplicationSet controller
Go to [Harness GitOps Basics](/continuous-delivery/use-gitops/get-started/harness-git-ops-basics.md) to learn more about GitOps concepts.
### Configure custom Argo CD component names (BYOA)
When you install the Harness GitOps Agent as an overlay on an existing Argo CD instance (Bring Your Own Argo CD), the agent health check looks for Argo CD components using the default Helm chart names (for example, `argocd-redis`, `argocd-repo-server`). If your existing Argo CD uses different service names, which is common with HA Redis (Sentinel/HAProxy) setups or custom Helm release names, the health check cannot find the expected workloads and the agent shows a **DEGRADED** status even though it is functionally healthy.
To resolve this, pass the correct service names for your existing Argo CD components when you install the agent with Helm. The flags differ depending on whether your Argo CD is a standard or HA install.
**Non-HA setup**
For a standard (non-HA) Argo CD install, use `redisSvc` and `repoServerSvc`:
```bash
helm install argocd gitops-agent-byoa/gitops-helm-byoa --values override.yaml --namespace argocd \
--set harness.configMap.argocd.redisSvc= \
--set harness.configMap.argocd.repoServerSvc=
```
For example, with a Helm release named `argocd`:
```bash
helm install argocd gitops-agent-byoa/gitops-helm-byoa --values override.yaml --namespace argocd \
--set harness.configMap.argocd.redisSvc=argocd-redis \
--set harness.configMap.argocd.repoServerSvc=argocd-repo-server
```
**HA setup**
For an HA Argo CD install (Redis HA with HAProxy/Sentinel), use `redisHaProxySvc` instead of `redisSvc`:
```bash
helm install argocd gitops-agent-byoa/gitops-helm-byoa --values override.yaml --namespace argocd \
--set harness.configMap.argocd.redisHaProxySvc= \
--set harness.configMap.argocd.repoServerSvc=
```
For example, with a Helm release named `argocd`:
```bash
helm install argocd gitops-agent-byoa/gitops-helm-byoa --values override.yaml --namespace argocd \
--set harness.configMap.argocd.redisHaProxySvc=argocd-redis-ha-haproxy \
--set harness.configMap.argocd.repoServerSvc=argocd-repo-server
```
You can find the correct service names by listing services in your Argo CD namespace:
```bash
kubectl get svc -n | grep -E 'redis|repo-server'
```
{% hint style="warning" %}
**Agent shows degraded with HA Redis**
If you installed the agent without these flags and the overview page shows **DEGRADED** with a "Redis Cache Installed" warning, you can fix it by running `helm upgrade` with the same `--set` flags shown above. The agent remains functionally healthy during this time; only the status panel is affected.
{% endhint %}
## Create a GitOps Agent
Use the interactive guide or the step-by-step guide in the following tabs to create the Agent in Harness.
{% tabs %}
{% tab title="Interactive Guide" %}
{% embed url="" %}
Create a Harness GitOps Agent
{% endembed %}
{% endtab %}
{% tab title="Step-by-step Guide" %}
Ensure your Harness Project has the **Continuous Delivery** module enabled.

In your Harness Project, click **GitOps**.
The Harness GitOps **Overview**, **Applications**, and **Settings** appear. If this is the first time GitOps has been set up in the Project, the Applications will be empty.

All entities other than Applications are in **Settings**.
Select **Settings**. The Harness GitOps settings appear.

Select **GitOps Agents**.
Select **New GitOps Agent**. The Agent wizard appears.
{% hint style="info" %}
For the example in this topic, a regular Harness GitOps agent is created without an existing Argo CD instance (non-BYOA setup). Go to [Bring Your Own Argo CD into Harness GitOps](/continuous-delivery/use-gitops/connect-and-manage/multiple-argo-to-single-harness.md) to review how to create a BYOA setup with an existing Argo CD installation.
{% endhint %}
In **Agent Installations**, you can choose to install a Harness GitOps Agent with or without an existing Argo CD instance.
Select **No**, and then click **Start**.
In **Name**, enter the name for the new Agent.
In **GitOps Operator**, select **Argo**. Argo CD is the only supported GitOps reconciler. Flux is not supported.
In **Namespace**, enter the namespace where you want to install the Harness GitOps Agent.
If **Namespaced** is selected, the Harness GitOps agent is installed without cluster-scoped permissions, and it can access only those resources that are in its own namespace. You can select **Skip Crds** to not install Argo CD CRDs to avoid a collision if already installed.
If you remove CRDs from the cluster, you lose your instances of Argo CD objects such as applications, projects, and application sets.
Select **Next**. The **Helm Chart** and **YAML** deployment options appear.
The **Helm Chart** option lets you download a `override.yaml` file for the Harness GitOps Agent. Download this file and pass it as values to the Helm chart.

The **YAML** option lets you download the manifest YAML for the Harness GitOps Agent. You can download this YAML file and run it in your Harness GitOps Agent cluster.

{% endtab %}
{% endtabs %}
## Install the Agent
Select **Download Values Yaml** or **Download YAML**. You are prompted to save the YAML file.
Open a terminal and navigate to the folder where you downloaded manifest or override YAML file.
In the same terminal, log in to the Kubernetes cluster where you want to install the Agent.
For example, here is a typical GKE login:
```bash
gcloud container clusters get-credentials --zone us-central1-c --project
```
In case of **Helm Chart**, run the following command to install the `helm-chart` file you downloaded (in this example, the namespace entered in the **Namespace** setting is `argocd`):
```bash
helm repo add gitops-agent https://harness.github.io/gitops-helm/
helm repo update gitops-agent
helm install argocd gitops-agent/gitops-helm --values override.yaml --namespace argocd
```
You can use `--set argo-cd.crds.install=false` to skip CRDs installation to avoid collision if CRDs were already installed with previous installation of GitOps Agent or Argo CD.
In case of **YAML**, run the following command to apply the YAML file you downloaded (in this example, the namespace entered in the **Namespace** setting is `argocd`):
```bash
kubectl apply -f gitops-agent.yaml -n argocd
```
In the following output example you can see all of the Harness GitOps objects created in Kubernetes.
This example output is for installing a new Harness GitOps Agent without using an existing Argo CD instance using the YAML.
```bash
% kubectl apply -f gitops-agent.yaml -n argocd
networkpolicy.networking.k8s.io/argocd-application-controller created
networkpolicy.networking.k8s.io/argocd-applicationset-controller created
networkpolicy.networking.k8s.io/argocd-repo-server created
networkpolicy.networking.k8s.io/argocd-redis created
serviceaccount/argocd-application-controller created
serviceaccount/argocd-applicationset-controller created
serviceaccount/argocd-repo-server created
serviceaccount/argocd-redis created
serviceaccount/gitops-agent created
serviceaccount/gitops-agent-upgrader created
secret/argocd-secret created
secret/gitops-agent created
configmap/argocd-cm created
configmap/argocd-cmd-params-cm created
configmap/argocd-gpg-keys-cm created
configmap/argocd-rbac-cm created
configmap/argocd-ssh-known-hosts-cm created
configmap/argocd-tls-certs-cm created
configmap/gitops-agent created
configmap/gitops-agent-upgrader created
customresourcedefinition.apiextensions.k8s.io/applications.argoproj.io configured
customresourcedefinition.apiextensions.k8s.io/applicationsets.argoproj.io configured
customresourcedefinition.apiextensions.k8s.io/appprojects.argoproj.io configured
clusterrole.rbac.authorization.k8s.io/argocd-application-controller-default created
clusterrole.rbac.authorization.k8s.io/argocd-repo-server-default created
clusterrole.rbac.authorization.k8s.io/example-agent created
clusterrolebinding.rbac.authorization.k8s.io/argocd-application-controller-default created
clusterrolebinding.rbac.authorization.k8s.io/argocd-repo-server-default created
clusterrolebinding.rbac.authorization.k8s.io/example-agent created
role.rbac.authorization.k8s.io/argocd-application-controller created
role.rbac.authorization.k8s.io/argocd-applicationset-controller created
role.rbac.authorization.k8s.io/argocd-repo-server created
role.rbac.authorization.k8s.io/argocd-server created
role.rbac.authorization.k8s.io/gitops-agent created
role.rbac.authorization.k8s.io/gitops-agent-upgrader created
rolebinding.rbac.authorization.k8s.io/argocd-application-controller created
rolebinding.rbac.authorization.k8s.io/argocd-applicationset-controller created
rolebinding.rbac.authorization.k8s.io/argocd-repo-server created
rolebinding.rbac.authorization.k8s.io/argocd-server created
rolebinding.rbac.authorization.k8s.io/gitops-agent created
rolebinding.rbac.authorization.k8s.io/gitops-agent-upgrader created
service/argocd-applicationset-controller-metrics created
service/argocd-applicationset-controller created
service/argocd-repo-server-metrics created
service/argocd-repo-server created
service/argocd-server created
service/argocd-redis created
deployment.apps/argocd-applicationset-controller created
deployment.apps/argocd-repo-server created
deployment.apps/argocd-server created
deployment.apps/argocd-redis created
deployment.apps/gitops-agent created
statefulset.apps/argocd-application-controller created
cronjob.batch/gitops-agent-upgrader created
ingress.networking.k8s.io/argocd-applicationset-controller created
```
Back in Harness, select **Continue**.
Harness indicates that the Harness GitOps Agent is registered.

Select **Continue**.
When you are finished, the **Agents** list shows the new Agent as **Healthy** and **Connected**.

In your cloud platform Kubernetes cluster you can see the agent workload:

After the Harness GitOps Agent is installed, running, and registered, you can configure the remaining components.
## Argo CD and Harness project mapping
Once you have installed the Agent, when you create Application, Cluster, or Repository in Harness project, Harness will create its own Argo CD project in the cluster and name it with a random string.
Once you use this Agent to add another entity, such as a Cluster or Repository, Harness maps this new Argo CD project to a Harness Project identifier (Id). You will see this mapping in Harness:

If you used an existing Argo CD Project, you will see the existing Argo CD Project mapped to your Harness Project Id:

Go to [Entity Identifier Reference](https://developer.harness.io/harness-platform/use-harness-platform/references/entity-identifier-reference) to review entity identifier naming.
### Map existing Argo CD projects to Harness projects for BYOA
When you install a Harness GitOps Agent in an existing Argo CD namespace, Harness can import your existing Argo CD entities into Harness GitOps. This setup is called Bring Your Own Argo CD (BYOA).
In addition, when you install the Harness GitOps Agent in your existing Argo CD cluster, you can map Argo CD projects to Harness Projects. Harness will import all the Argo CD project entities (applications, clusters, and repositories) and create them in Harness automatically.
Also, whenever new entities are created in mapped Argo CD projects, they are added to Harness automatically.
Go to [Map existing Argo projects](/continuous-delivery/use-gitops/connect-and-manage/multiple-argo-to-single-harness.md#map-existing-argo-projects) to review the steps for setting up the mapping and import.
Go to [GitOps commands](https://developer.harness.io/harness-ai/use-harness-cli/harness-cli/harness-cli-commands/gitops-commands) in the Harness CLI reference to script this mapping and import instead of using the UI.
## Default in-cluster
When you create a GitOps agent, a default in-cluster is automatically created. This in-cluster is special kind of cluster which does not have project set so it is always created on scope same as GitOps agent.
* You can remove in-cluster from Harness but that does not actually delete in-cluster as it is a special cluster object. If deleted, it can be recreated.
* For a `Namespaced` agent, `in-cluster` is not being created as the cluster access is restricted to the agent's namespace only. If you still want to deploy to the same cluster where the agent is installed, you can add a cluster as usual using a publicly available endpoint for that cluster. Additionally, you can specify namespace/namespaces when creating that cluster to restrict access only to the specified namespaces.
## Advanced options
The Harness GitOps Agent can be configured with advanced options during creation. This section goes through those options.
### Proxy support
The Harness GitOps Agent can work on environments where traffic is routed through a proxy.
To do so, add your proxy settings to your GitOps agent when creating your agent.
1. Expand the **Advanced** dropdown menu in the **Overview** page.
2. Find the **Proxy Settings** as seen below and fill in the relevant fields for your proxy.

Manually configure proxy support (DEPRECATED)
To enable proxy support for the Harness GitOps Agent in environments where traffic is routed through a proxy, configuration is required for two key components: the agent itself and the argocd-repo-server. Follow these steps to set up proxy support for both components.
1. **Agent**: Add a property/config `HTTPS_PROXY`, and add proxy details, such as URL, port, and auth details as its value in the ConfigMap `gitops-agent`. For example, `HTTPS_PROXY: "http://squid.proxy-test:3128"`.
2. **Agent**: Add an environment variable `NO_PROXY` in the Harness GitOps Agent deployment with the following value.
```
localhost,argocd-repo-server,argocd-redis,127.0.0.1,$(KUBERNETES_SERVICE_HOST)
```
3. **Argo CD Repo Server**: Add the following environment variables and relevant proxy details, such as URL, port, and auth details in the `argocd-repo-server` deployment as well the second initcontainer under the `argocd-repo-server` deployment, namely the `sops-helm-secrets-tool` since it downloads resources from the internet using `wget`.
An example of how the repo-server yaml would look like:
```yaml
... rest of the agent YAML ...
apiVersion: apps/v1
kind: Deployment
metadata:
labels:
app.kubernetes.io/name: argocd-repo-server
app.kubernetes.io/instance: argocd
app.kubernetes.io/component: repo-server
app.kubernetes.io/managed-by: Helm
app.kubernetes.io/part-of: argocd
... other objects ...
spec:
... other fields ...
containers:
- command:
- sh
- -c
- entrypoint.sh argocd-repo-server --redis argocd-redis:6379
env:
... other variables ...
- name: HTTPS_PROXY
value: "http://squid.proxy-test:3128"
- name: HTTP_PROXY
value: "http://squid.proxy-test:3128"
- name: NO_PROXY
value: localhost,argocd-repo-server,argocd-redis,127.0.0.1,$(KUBERNETES_SERVICE_HOST),(\{agentname}-agent)
initContainers:
... other init containers spec ...
- name: sops-helm-secrets-tool
image: alpine:latest
imagePullPolicy: IfNotPresent
command: [ sh, -ec ]
env:
- name: HELM_SECRETS_VERSION
value: 4.4.2
- name: KUBECTL_VERSION
value: 1.26.7
- name: SOPS_VERSION
value: 3.7.3
- name: https_proxy
value: "http://squid.proxy-test:3128"
- name: http_proxy
value: "http://squid.proxy-test:3128"
.. rest of agent YAML ...
```
**Proxy setup for testing**
Use the following YAML example to install proxy in any other environment.
```yaml
---
apiVersion: v1
kind: ConfigMap
metadata:
name: script-cm
namespace: proxy-test
data:
entrypoint.sh: |-
#!/bin/bash
echo "Start"
apt-get -q update && apt-get -qy --no-install-recommends install python squid curl && apt-get clean;
sed -i "s/^#acl localnet/acl localnet/" /etc/squid/squid.conf;
sed -i "s/^#http_access allow localnet/http_access allow localnet/" /etc/squid/squid.conf;
mkdir -p /var/cache/squid;
cp /etc/squid/squid.conf /etc/squid/squid.conf.in;
squid
sleep 15
cd /var/log/squid
echo "==========================================ls"
ls
tail -f access.log
echo "==========================================End"
---
apiVersion: apps/v1
kind: Deployment
metadata:
name: squid
namespace: proxy-test
labels:
app.kubernetes.io/name: squid
spec:
replicas: 1
selector:
matchLabels:
app.kubernetes.io/name: squid
template:
metadata:
labels:
app.kubernetes.io/name: squid
spec:
containers:
- name: squid
image: debian:bullseye
imagePullPolicy: Always
command:
- /bin/entrypoint.sh
volumeMounts:
- name: configmap-volume
mountPath: /bin/entrypoint.sh
readOnly: true
subPath: entrypoint.sh
volumes:
- name: configmap-volume
configMap:
defaultMode: 0700
name: script-cm
---
apiVersion: v1
kind: Service
metadata:
labels:
app.kubernetes.io/name: squid
name: squid
namespace: proxy-test
spec:
ports:
- name: tcp-proxy
port: 3128
targetPort: 3128
selector:
app.kubernetes.io/name: squid
---
```
### Helm secrets path traversal
This feature allows Helm to traverse file paths containing dots (for example, `/../`). This is disabled by default due to security risks, so enable it with caution.
To do so, check the **Enable Helm Secrets Path Traversal** check box under the **Advanced** settings dropdown when creating your agent, as pictured below.

## GitOps auto updater job
The GitOps Auto Updater Job is designed to automate the process of keeping the GitOps agent up to date. This job checks the GitOps service at regular intervals (default is every four hours) to determine if a new version of the GitOps agent is available.
You can customize the schedule for these checks and updates, as well as specify a private or custom registry for pulling the updated agent images.
### Schedule the updater job
Locate the ConfigMap: The ConfigMap is typically named gitops-agent-upgrader and can be found in the namespace where your GitOps agent is deployed.
By default, the upgrader checks for updates every four hours. You can change this frequency by modifying the schedule field in the CronJob manifest of the GitOps agent YAML file:
```yaml
apiVersion: batch/v1
kind: CronJob
metadata:
name: gitops-agent-upgrader
namespace: "default"
labels: ...
spec:
schedule: "0 */4 * * *"
```
If you are using an overrides YAML file, add `cron: "0 */4 * * *"` in the Agent upgrader overrides section and run the Helm upgrade command again to apply the changes.
```yaml
# <---Agent upgrader overrides--->
upgrader:
enabled: true
cron : "0 */4 * * *"
image: harness/upgrader:latest
```
After making changes to the values.yaml file, run a Helm upgrade to apply the configuration:
```bash
helm upgrade -f values.yaml
```
### Disable auto upgrader
To disable the auto-upgrader, you can set `suspend: true` in the CronJob configuration under the `kind: CronJob` section:
```yaml
apiVersion: batch/v1
kind: CronJob
metadata:
name: gitops-agent-upgrader
namespace: "argocd"
labels:...
spec:
schedule: "0 */4 * * *"
concurrencyPolicy: Forbid
startingDeadlineSeconds: 20
jobTemplate:
spec:
suspend: true
```
Alternatively, you can run the following command to suspend the auto-upgrade on the installed image:
```bash
kubectl patch cronjobs -p '{"spec" : {"suspend" : true }}' -n
```
You can also remove the entire CronJob section if necessary.
If you are using an overrides YAML file, set `enabled: false` in the Agent upgrader overrides section and run the Helm upgrade command again to apply the changes.
```yaml
# <---Agent upgrader overrides--->
upgrader:
enabled: false
cron : "0 */4 * * *"
image: harness/upgrader:latest
```
### Configure GitOps auto upgrader for a private repository
Confirm your GitOps auto updater is configured to use your private registry. This involves updating the `gitops-agent-upgrader` ConfigMap.
Modify the ConfigMap: Add the `UPGRADER_REGISTRY_MIRROR` entry to specify your private repository. Here is an example of what the ConfigMap YAML would look like:
```yaml
# Source: gitops-helm-byoa/templates/upgrader/harness-upgrader-cm.yaml
apiVersion: v1
data:
UPGRADER_REGISTRY_MIRROR: myprivateartifactory.xyz
... other configs ...
kind: ConfigMap
metadata:
name: gitops-agent-upgrader
namespace: "default"
```
If you are using an overrides YAML file, you will need to update the values.yaml file to include the registry mirror for the upgrader:
```yaml
# <---Agent upgrader overrides--->
upgrader:
enabled: true
image: docker.io/harness/upgrader:latest
config:
registryMirror: myprivateartifactory.xyz
```
After making changes to the values.yaml file, run a Helm upgrade to apply the configuration:
```bash
helm upgrade -f values.yaml
```
Make sure that the agent image is hosted in your private repository with the appropriate format as mentioned in your config file, such as `privateregistryhost.xyz/harness/gitops-agent:tag`.
### STIG-compliant agent images (SaaS - on demand)
{% hint style="info" %}
Harness provides STIG-compliant (Security Technical Implementation Guide) hardened gitops agent images for SaaS customers with compliance requirements.
These images are stored in a private registry and are available on-demand for organizations in regulated environments such as government agencies, financial institutions, and enterprises with stringent security policies.
{% endhint %}
GitOps agent versions `v0.113.0` and later support STIG images. Perform the following steps to access and use them:
1. Log in to your Harness account, and submit a Zendesk support ticket requesting STIG-compliant gitops agent images.
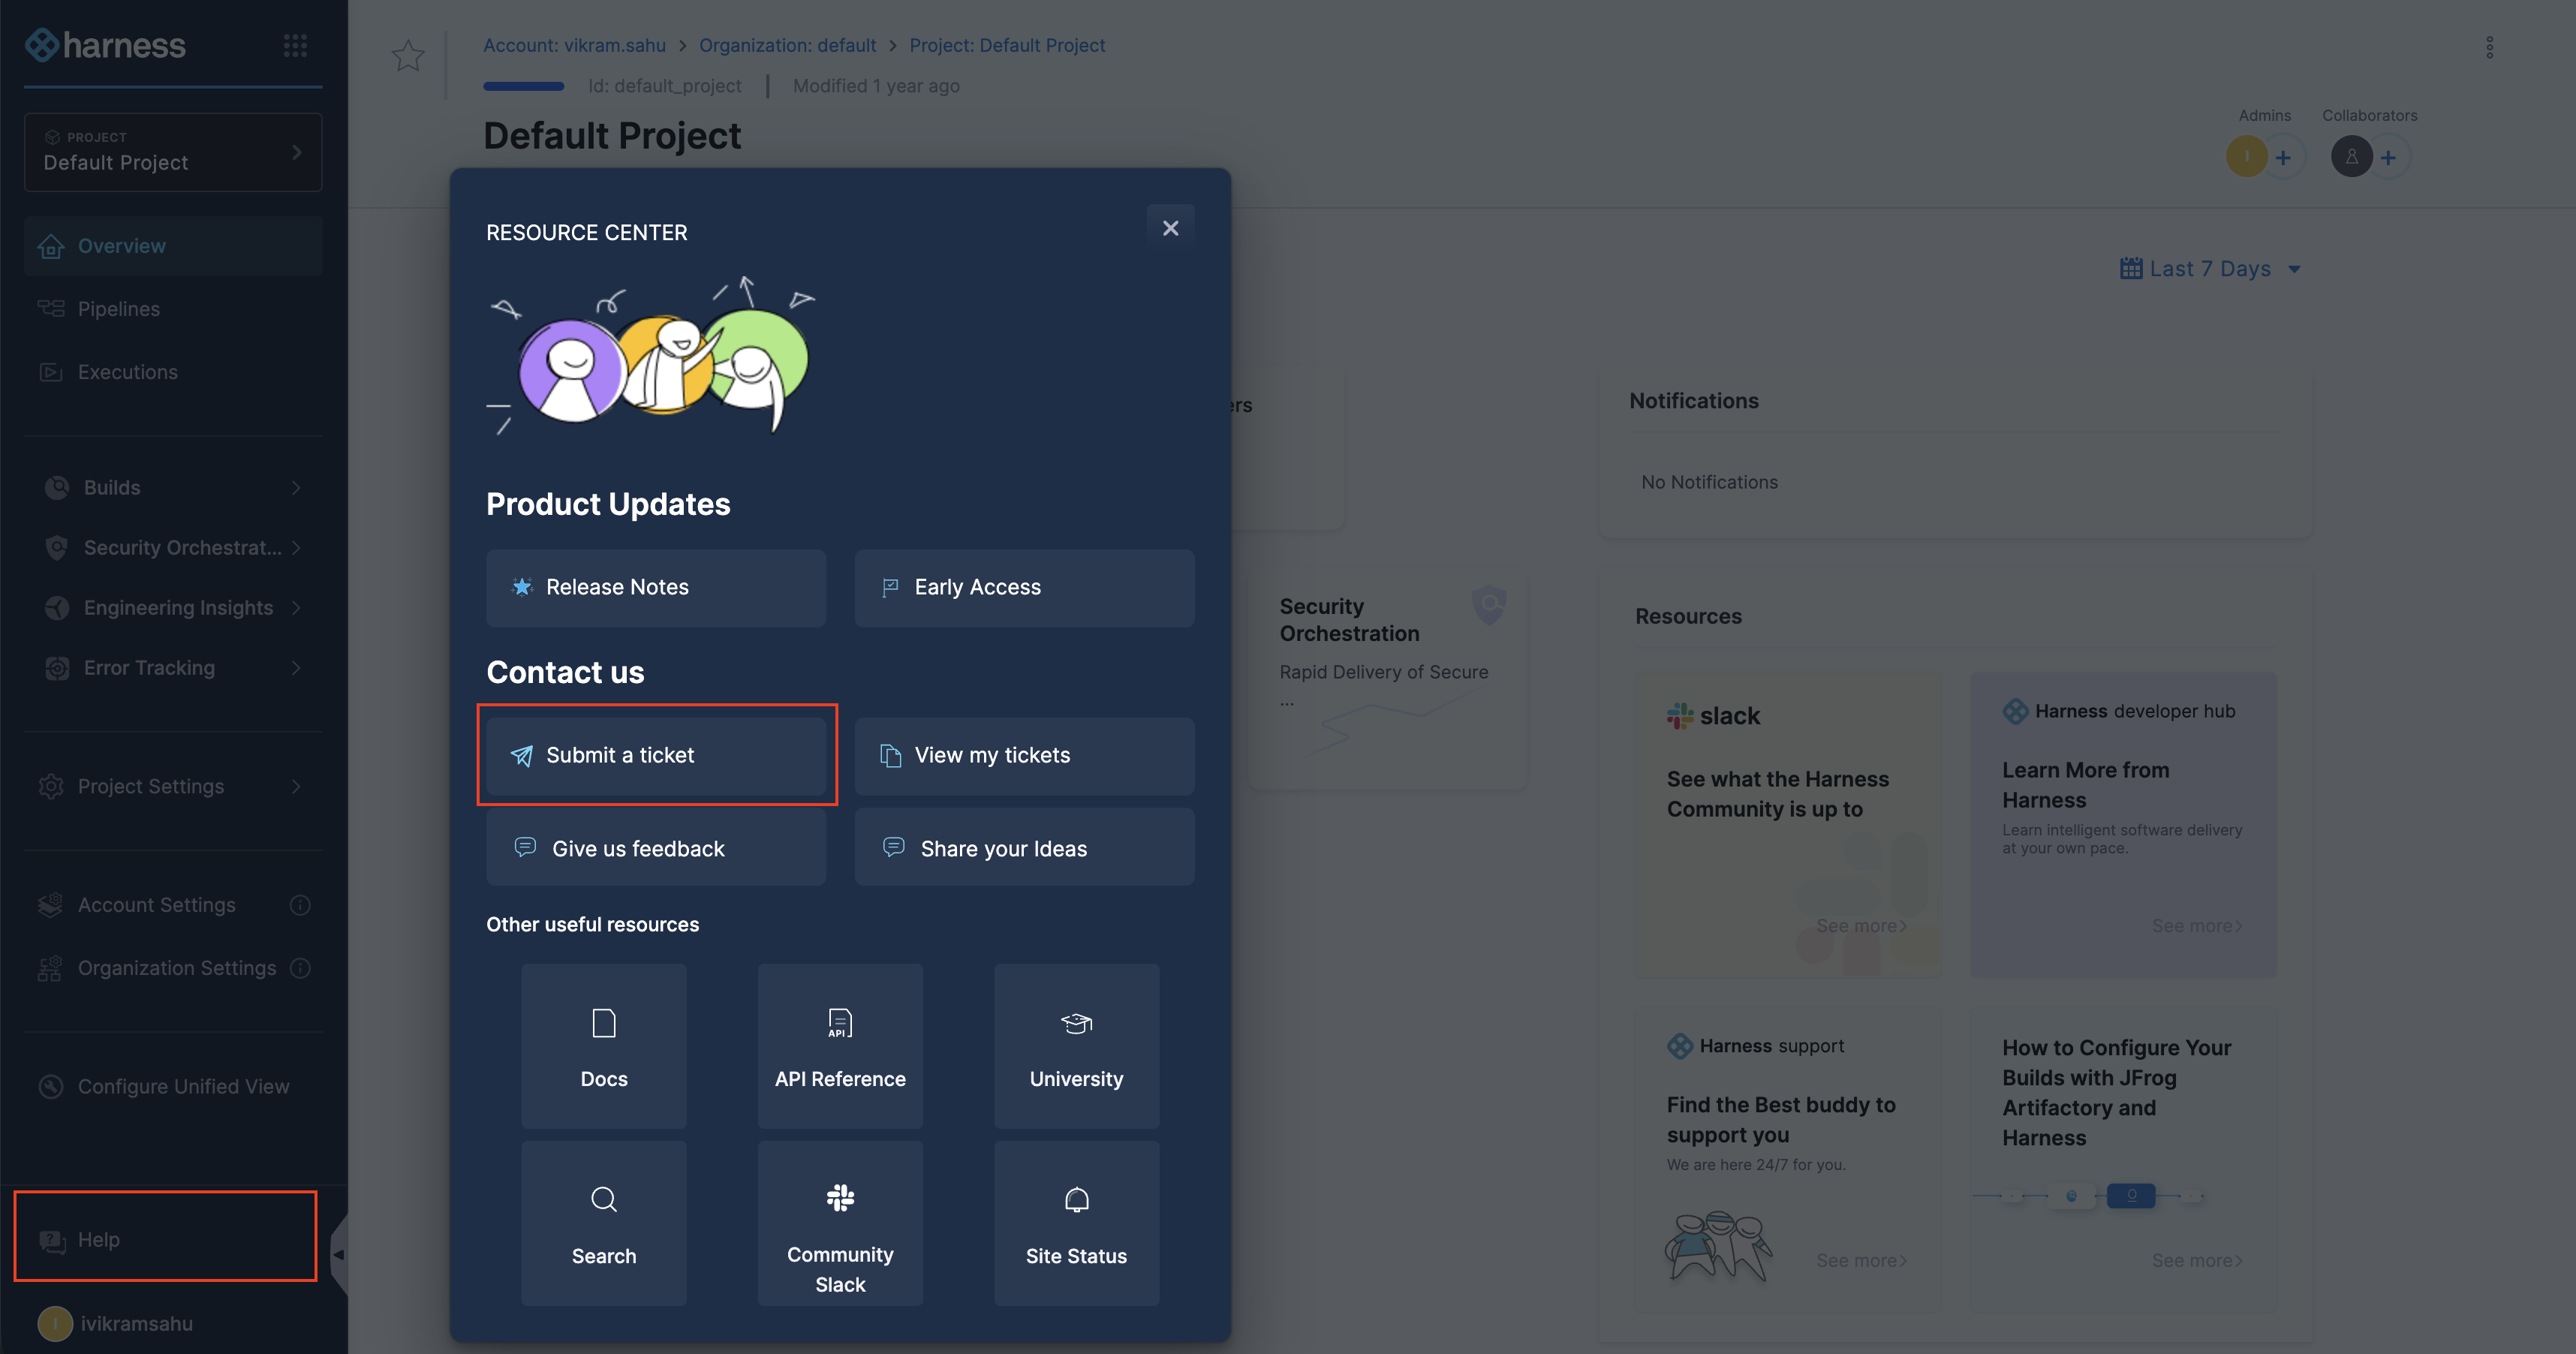
2. Go to [Harness Customer Success team](mailto:support@harness.io) to have your request reviewed and receive a Docker Hub token for the private registry.
3. Create a Kubernetes [imagePullSecret](https://kubernetes.io/docs/tasks/configure-pod-container/pull-image-private-registry/#create-a-secret-by-providing-credentials-on-the-command-line) with the provided credentials:
```bash
kubectl create secret docker-registry harness-stig-registry \
--docker-server= \
--docker-username= \
--docker-password= \
--namespace=
```
This generates a secret YAML file such as `harness-stig-registry-secret.yml`:
```yaml
apiVersion: v1
data:
.dockerconfigjson:
kind: Secret
metadata:
creationTimestamp: null
name: harness-stig-registry
namespace:
type: kubernetes.io/dockerconfigjson
```
4. Apply the secret manifest:
```bash
kubectl apply -f harness-stig-registry-secret.yml
```
5. Update your gitops agent manifest to reference the STIG image and pull secret:
```yaml
spec:
template:
spec:
imagePullSecrets:
- name: harness-stig-registry
containers:
image: docker.io/harnesssecure/gitops-agent:
```
The following table lists the other STIG images that are available:
| COMPONENT | IMAGE | VERSION |
| ---------- | ------------------------------------------------- | ----------------- |
| HAPROXY | docker.io/harnesssecure/haproxy:3.2.14-alpine3.23 | 3.2.14-alpine3.23 |
| ArgoCD | docker.io/harnesssecure/argocd:v3.3.0 | v3.3.0 |
| Redis | docker.io/harness/redis:7.4.8-jammy | 7.4.8-jammy |
| ShellCheck | docker.io/harnesssecure/shellcheck:v0.11.0 | v0.11.0 |
## GitOps agent FAQs
The following sections answer commonly asked GitOps Agent questions.
### Supported Repo server and Redis cache versions by GitOps Agent version
The following table lists the supported Repo server and Redis cache versions by GitOps Agent version.
| GitOps Agent version | Packaged Argo CD version | Supported Argo CD versions | Redis version | Haproxy version |
| -------------------- | ------------------------ | -------------------------------------------------------------------------------------------------------------------------- | ------------------- | ---------------- |
| 0.128.0 | v3.5.3 | 2.8.2, 2.10.14, 2.13.2, 2.13.5, 2.14.9, 2.14.13, 2.14.16, 2.14.21, 3.1.8, 3.2.5, 3.3.0, 3.3.9, 3.3.10, 3.4.2, 3.5.1, 3.5.3 | redis:7.4.8 | 3.4.1-alpine3.24 |
| 0.126.0 - 0.127.0 | v3.5.1 | 2.8.2, 2.10.14, 2.13.2, 2.13.5, 2.14.9, 2.14.13, 2.14.16, 2.14.21, 3.1.8, 3.2.5, 3.3.0, 3.3.9, 3.3.10, 3.4.2, 3.5.1 | redis:7.4.8 | 3.4.1-alpine3.24 |
| 0.122.0-0.125.0 | v3.4.2 | 2.8.2, 2.10.14, 2.13.2, 2.13.5, 2.14.9, 2.14.13, 2.14.16, 2.14.21, 3.1.8, 3.2.5, 3.3.0, 3.3.9, 3.3.10, 3.4.2 | redis:7.4.8 | 3.4.1-alpine3.24 |
| 0.120.0-0.121.0 | v3.3.10 | 2.8.2, 2.10.14, 2.13.2, 2.13.5, 2.14.9, 2.14.13, 2.14.16, 2.14.21, 3.1.8, 3.2.5, 3.3.0, 3.3.9, 3.3.10 | redis:7.4.8 | 2.9.4-alpine |
| 0.118.0-0.119.0 | v3.3.9 | 2.8.2, 2.10.14, 2.13.2, 2.13.5, 2.14.9, 2.14.13, 2.14.16, 2.14.21, 3.1.8, 3.2.5, 3.3.0, 3.3.9 | redis:7.4.8 | 2.9.4-alpine |
| 0.117.0 | v3.3.0 | 2.8.2, 2.10.14, 2.13.2, 2.13.5, 2.14.9, 2.14.13, 2.14.16, 2.14.21, 3.1.8, 3.2.5, 3.3.0 | redis:7.4.8 | 2.9.4-alpine |
| 0.110.0-0.116.0 | v3.3.0 | 2.8.2, 2.10.14, 2.13.2, 2.13.5, 2.14.9, 2.14.13, 2.14.16, 2.14.21, 3.1.8, 3.2.5, 3.3.0 | redis:7.4.1-alpine | 2.9.4-alpine |
| 0.108.0 | v3.2.5 | 2.8.2, 2.10.14, 2.13.2, 2.13.5, 2.14.9, 2.14.13, 2.14.16, 2.14.21, 3.1.8, 3.2.5 | redis:7.4.1-alpine | 2.9.4-alpine |
| 0.106.0 | v3.1.8 | 2.8.2, 2.10.14, 2.13.2, 2.13.5, 2.14.9, 2.14.13, 2.14.16, 2.14.21, 3.1.8 | redis:7.4.1-alpine | 2.9.4-alpine |
| 0.104.0 - 0.105.0 | v2.14.21 | 2.10.14, 2.13.2, 2.13.5, 2.14.9, 2.14.13, 2.14.16, 2.14.21 | redis:7.4.1-alpine | 2.9.4-alpine |
| 0.102.0 - 0.103.0 | v2.14.16 | 2.10.14, 2.13.2, 2.13.5, 2.14.9, 2.14.13, 2.14.16 | redis:7.4.1-alpine | 2.9.4-alpine |
| 0.97.0 - 0.101.0 | v2.14.13 | 2.10.14, 2.13.2, 2.13.5, 2.14.9, 2.14.13 | redis:7.4.1-alpine | 2.9.4-alpine |
| 0.94.0 - 0.96.0 | v2.14.9 | 2.10.10, 2.10.14, 2.13.2, 2.13.5, 2.14.9 | redis:7.4.1-alpine | 2.9.4-alpine |
| 0.86.2 - 0.93.0 | v2.13.5 | 2.9.4, 2.10.10, 2.10.14, 2.13.2, 2.13.5 | redis:7.4.1-alpine | 2.9.4-alpine |
| 0.84.2 - 0.85.0 | v2.13.2 | 2.9.0, 2.9.3, 2.9.4, 2.10.10, 2.10.14, 2.13.2 | redis:7.4.1-alpine | 2.9.4-alpine |
| 0.83.0 | v2.10.14 | v2.8.2, 2.9.0, 2.9.3, 2.9.4, 2.10.10, 2.10.14 | redis:7.2.4-alpine | 2.6.14-alpine |
| 0.82.0 | RELEASE BURNED | RELEASE BURNED | RELEASE BURNED | N/A |
| 0.78.0 - 0.81.0 | v2.10.14 | v2.8.2, 2.9.0, 2.9.3, 2.9.4, 2.10.10, 2.10.14 | redis:7.2.4-alpine | N/A |
| 0.77.0 | v2.10.10 | v2.8.2, 2.9.0, 2.9.3, 2.9.4, 2.10.10 | redis:7.2.4-alpine | N/A |
| 0.67.0 - 0.76.0 | v2.9.4 | v2.7.2, v.2.7.8, v2.8.2, 2.9.0, 2.9.3, 2.9.4 | redis:7.0.11-alpine | N/A |
| 0.66.0 | v2.9.3 | v2.7.2, v.2.7.8, v2.8.2, 2.9.0, 2.9.3 | redis:7.0.11-alpine | N/A |
| 0.64.0 - 0.65.0 | v2.9.0 | v2.7.2, v.2.7.8, v2.8.2, 2.9.0, | redis:7.0.11-alpine | N/A |
| 0.60.0 - 0.63.0 | v2.8.2 | v2.3.5, v2.7.2, v.2.7.8, v2.8.2 | redis:7.0.11-alpine | N/A |
The supported Argo CD versions listed above are what Harness has verified. However, any patch version should work for each minor version listed. For example, the GitOps agent version `0.78.0` should support the Argo CD version of `2.10.0`, but this is not verified by Harness.
{% hint style="warning" %}
The GitOps Agent version 0.82.0 was published to docker, but the release has been burned due to backward compatibility issues. Skip that release.
{% endhint %}
### GitOps Agent version support duration
Harness supports GitOps Agent versions that support Argo CD versions n to n-2 minor version (for example, 2.5.4, 2.4.4, 2.3.4).
### Update the GitOps Agent and related components
The GitOps Agent comes with an upgrader service that performs upgrades and automatically detects when an upgrade is needed.
If you disable automatic upgrades, update manually and often, since Harness actively rolls out bug fixes and feature enhancements.
The Argo CD components upgrade must be done manually.
### Uninstall a GitOps Agent
If you need to uninstall a GitOps Agent, you can use `kubectl delete` with the same manifest you used to install it. For example, `kubectl delete -f gitops-agent.yml -n argocd`.
### CRD removal when uninstalling a GitOps Agent
When you uninstall the GitOps Agent, deleting its CRDs will also delete all GitOps-managed apps in the cluster. To avoid accidental data loss, ensure CRDs are preserved:
```yaml
crds:
# -- Keep CRDs on chart uninstall
keep: true
```
This tells Helm not to delete CRDs when you run: `helm uninstall `
If you installed the agent with an older or custom chart that does not include `crds.keep: true`, Helm's default behavior will delete CRDs (and all dependent apps) on uninstall. Either override that setting at uninstall time or update your chart to include it.
## High availability GitOps agent
The Harness GitOps agent is a worker process based on Argo CD that is responsible for executing Harness GitOps tasks. It has the following components:
* `agent`
* `redis`
* `argocd-application-controller`
* `argocd-repo-server`
* `argocd-applicationset-controller`
It has two install types:
* Normal
* High Availability (HA)
### Normal agent
The Normal install type installs exactly one replica of all components.
### High availability (HA)
Both Argo CD and Harness have an HA install type. The Harness HA type installs different variations of the components with more than one replica.
* `agent` has two replicas. In HA mode, the agent uses a Horizontal Pod Autoscaler for CPU and memory, with a minimum of one replica and a maximum of five replicas.
* `redis` has three replicas/sentinels (`haproxy`).
* `argocd-application-controller` has one replica (Argo CD uses two).
* `argocd-repo-server` server has two replicas.
* `argocd-applicationset-controller` has one replica.
### Argo CD use case
**Handling UI load**
Since Argo CD has only one instance per UI, adding multiple replicas helps to manage load from the UI.
Adding multiple replicas helps scale the operations required by the UI, so more users can log in concurrently. Go to [argocd-server](https://github.com/argoproj/argo-cd/blob/master/server/server.go#L160) to review the UI-handling source code.
**Handling the application reconciliation and syncs**
Argo CD performs application reconciliation and syncs using the `argocd-application-controller` and `argocd-repo-server`.
The `argocd-application-controller` has two queues that are used for processing of application reconciliation and application syncs. By default, `argocd-application-controller` has 20 processors for the application reconciliation queue and 10 processors for the application syncs.
For reference, the Argo CD community recommends using 50 and 20 processors respectively for 1000 applications.
* Go to [Argo CD application controller command, line 191](https://github.com/argoproj/argo-cd/blob/master/cmd/argocd-application-controller/commands/argocd_application_controller.go#L191) to review the application reconciliation processor flag.
* Go to [Argo CD application controller command, line 192](https://github.com/argoproj/argo-cd/blob/master/cmd/argocd-application-controller/commands/argocd_application_controller.go#L192) to review the application sync processor flag.
* Go to [High Availability from Argo CD](https://argo-cd.readthedocs.io/en/latest/operator-manual/high_availability/#argocd-application-controller) to review the full scaling guidance.
The `argocd-application-controller` also watches (at a fixed frequency of 10 seconds, by default) the clusters using the Kubernetes client on the current state and maintains a cache for faster retrieval.
If the controller manages many clusters and is facing memory issues, the clusters are sharded (`ARGOCD_CONTROLLER_SHARDING_ALGORITHM`) across multiple replicas of `argocd-application-controller`.
Go to [High Availability from Argo CD](https://argo-cd.readthedocs.io/en/latest/operator-manual/high_availability/#argocd-application-controller) to review sharding guidance for large cluster counts.
**Handling monorepos**
The `argocd-repo-server` maintains one repository clone locally and uses it for application manifest generation. If the manifest generation must change a file in the local repository clone, then only one concurrent manifest generation per server instance is allowed. This limitation might significantly slow down Argo CD if you have a monorepo with multiple applications (50+).
Go to [High Availability from Argo CD](https://argo-cd.readthedocs.io/en/latest/operator-manual/high_availability/#argocd-application-controller) to review monorepo scaling guidance.
### Harness use cases
With Harness GitOps, multiple agents can run within a single Harness project. Harness is not limited to a single agent instance: you can deploy multiple agents across different scopes or clusters, enabling you to manage more applications and environments than a standard Argo CD setup.

**When to use the Harness GitOps HA Agent**:
* If you have high UI activity (50+ active sessions) for the applications on the agent.
* When you have a monorepo.
* If you want to add more than 100 applications per agent.
### Considerations
**Harness Agent reconciliation**
The GitOps agent has two types of reconciliation on top of the Argo CD's reconciliation. This ensures that the data the GitOps service has is in sync with what is present in the destination cluster.
1. On CRUD events, reconciliation runs every 10 seconds.
2. The bulk reconciliation (to check if anything was removed/added in the cluster directly) runs every 100 seconds.
**Known problem (fixed)**
{% hint style="info" %}
Go to [GitOps Agent 0.89 release notes](https://developer.harness.io/university/continuous-delivery#gitops-agent-version-0890) to review the fix. If you are encountering this issue, upgrade your GitOps Service to version 1.28 or higher, and the agent to 0.89 or higher.
{% endhint %}
In older agent versions, when agents run with multiple replicas, each replica is unaware of the others. As a result, reconciliation runs on all replicas independently.
Consequently, if there is a HA agent running five pods, all of the pods would send the reconcile call (five times in one cycle). This resulted in computing overhead.
### The `highAvailability` flag
The `highAvailability` flag controls how the agent performs health checks for Redis components:
* **`highAvailability: true`**: Checks for High Availability (HA) Redis with HAProxy (`redis-ha-haproxy`)
* **`highAvailability: false`**: Checks for standard Redis service (`argocd-redis`)
**When to use**:
The following table shows the `highAvailability` value for each scenario:
| Scenario | highAvailability flag |
| -------------------------------------- | --------------------- |
| External Redis | `false` |
| BYOA with standard Redis | `false` |
| BYOA with High Availability (HA) Redis | `true` |
{% hint style="info" %}
If set incorrectly, the agent shows **DEGRADED** status even though it functions normally. Go to [Troubleshooting](/continuous-delivery/use-gitops/resources/troubleshooting.md#agent-shows-degraded-with-redis-cache-installed-health-check-failure) to fix this issue.
{% endhint %}
***
## Next steps
* [Harness GitOps Basics](/continuous-delivery/use-gitops/get-started/harness-git-ops-basics.md): Review core GitOps concepts.
* [Harness CD GitOps Quickstart](/continuous-delivery/use-gitops/get-started/harness-cd-git-ops-quickstart.md): Walk through a complete GitOps setup from start to finish.
* [Troubleshooting](/continuous-delivery/use-gitops/resources/troubleshooting.md): Review common GitOps Agent and sync issues.
{% @harness-feedback/feedback %}