> For the complete documentation index, see [llms.txt](https://developer.harness.io/llms.txt). Markdown versions of documentation pages are available by appending `.md` to page URLs; this page is available as [Markdown](https://developer.harness.io/continuous-delivery/use-gitops/gitops-entities/projects/manage-projects.md).
# Manage ArgoCD Projects
Edit, configure, and govern ArgoCD Projects (AppProjects) directly from a Harness GitOps Agent.
Harness GitOps lets you manage ArgoCD Projects (AppProjects) from the Harness UI through the GitOps Agent that runs them. You can edit project metadata, control which repositories and clusters applications target, define roles, schedule sync windows, and inspect events without switching to the Argo CD CLI or editing AppProject manifests.
ArgoCD Projects group applications and define access boundaries for repositories, clusters, and namespaces. Each project controls which source repositories an application can pull from, which destination clusters and namespaces it can deploy to, and what sync behaviors are allowed.
***
### Before you begin
* **GitOps Agent:** A running Harness GitOps Agent (v0.117.0 or later) with at least one mapped Argo project. Go to [Install a Harness GitOps Agent](/continuous-delivery/use-gitops/gitops-entities/agents/install-a-harness-git-ops-agent.md) to set one up.
* **Mapped Argo project:** An Argo project mapped to a Harness project on the agent. Go to [Map existing Argo projects](/continuous-delivery/use-gitops/connect-and-manage/multiple-argo-to-single-harness.md#map-existing-argo-projects) to create the mapping.
* **RBAC permissions:** You need specific permissions to manage Argo Projects. The required permissions are:
* **View** (`gitops_argoproject_view`) — Read Argo Project configurations and view project details.
* **Edit** (`gitops_argoproject_edit`) — Modify Argo Project settings, roles, sync windows, and metadata.
* **Delete** (`gitops_argoproject_delete`) — Remove Argo Projects from the agent.
Go to [Permissions reference](/harness-ai/use-harness-platform/platform-access-control/permissions-reference.md#gitops) to see the full list of GitOps permissions, or go to [RBAC in Harness](/harness-ai/use-harness-platform/platform-access-control.md) to configure roles.
#### Minimum component versions
The ArgoCD Projects management UI depends on the following minimum component versions:
| Component | Minimum version |
| ---------------- | --------------- |
| platform-service | v1.114.0 |
| access-control | v1.252.0 |
***
### Open the Argo Project panel
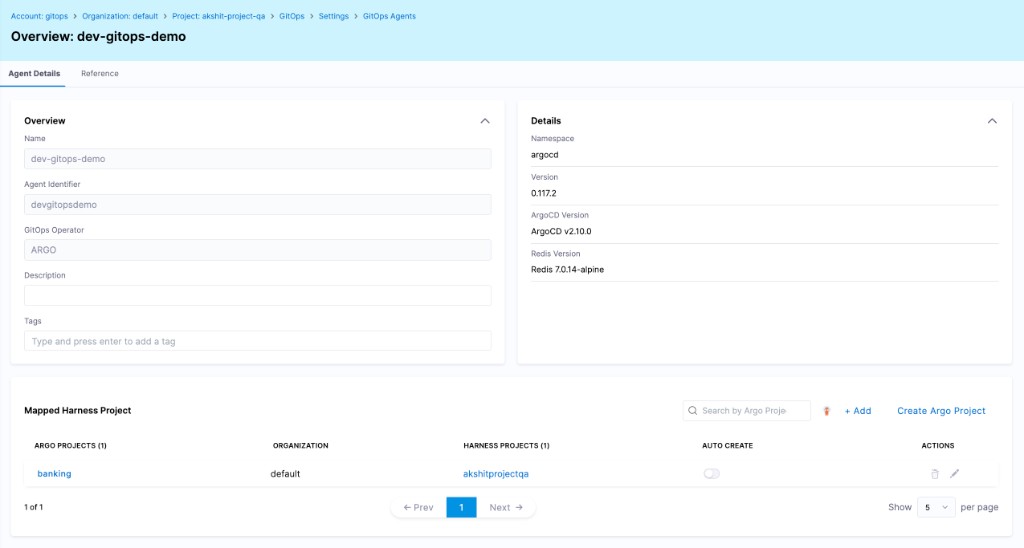
You manage ArgoCD Projects from the GitOps Agent overview page. The **Mapped Harness Project** section lists every Argo project the agent serves, along with the Harness projects each one is mapped to.
1. In your Harness project, go to **CD** > **GitOps** > **Settings**.
2. Select **GitOps Agents**.
3. Select the agent that serves the Argo project you want to manage. The agent overview opens.
4. Scroll to the **Mapped Harness Project** section.
5. In the **ARGO PROJECTS** column, select the project name.
Click to view full size
The **Argo Project** panel opens on the right with four tabs: **Summary**, **Roles**, **Sync Windows**, and **Events**.
After you make changes in any tab, select **Apply Changes** in the top-right of the panel to save them, or **Discard** to revert. Select **Delete** to remove the Argo project from the agent.
***
### Edit project settings on the Summary tab
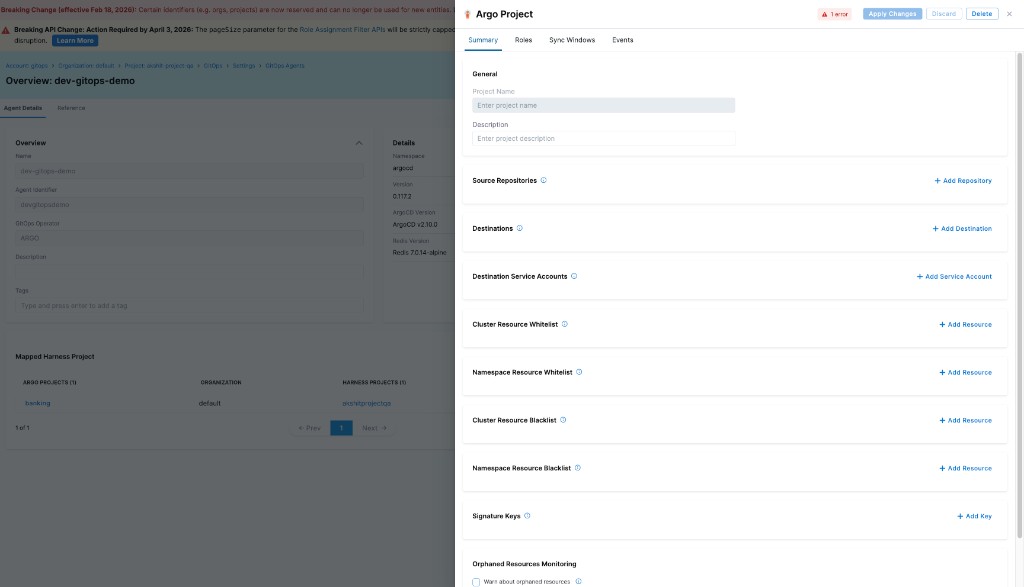
The **Summary** tab contains the AppProject spec: general metadata, source repository allow lists, destination cluster and namespace rules, cluster and namespace resource lists, signature keys, orphaned resource monitoring, and cluster restrictions.
Click to view full size
#### General
* **Project Name:** The Argo project identifier. The name is read-only after creation.
* **Description:** A short summary of the project purpose.
#### Source Repositories
Define which Git repositories applications in this project can pull manifests from. Select **+ Add Repository** to add an entry. Use `*` to allow all repositories.
Restricting source repositories ensures that applications in this project only deploy configurations from approved sources.
#### Destinations
Define which clusters and namespaces applications in this project can deploy to. Select **+ Add Destination** to add an entry. Each destination accepts a server URL (or `*` for all clusters) and a namespace (or `*` for all namespaces).
{% hint style="info" %}
**LEAST-PRIVILEGE ACCESS**
Restrict destinations to follow the principle of least privilege. Grant applications access only to the clusters and namespaces they need.
{% endhint %}
#### Destination Service Accounts
Map destinations to specific Kubernetes service accounts. Argo CD impersonates the service account when deploying to that destination. Select **+ Add Service Account** to add an entry.
#### Cluster Resource Whitelist
Specify cluster-scoped Kubernetes resources (for example, `ClusterRole` or `Namespace`) that applications in this project are allowed to manage. Select **+ Add Resource** to add a `group/kind` entry. If the list is empty, no cluster-scoped resources are allowed.
#### Namespace Resource Whitelist
Specify namespace-scoped Kubernetes resources that applications in this project are allowed to manage. Select **+ Add Resource** to add an entry. If the list is empty, all namespace-scoped resources are allowed.
#### Cluster Resource Blacklist
Specify cluster-scoped resources that applications in this project are explicitly denied, even if the whitelist would otherwise allow them. Select **+ Add Resource** to add an entry.
#### Namespace Resource Blacklist
Specify namespace-scoped resources that applications in this project are explicitly denied. Select **+ Add Resource** to add an entry.
#### Signature Keys
Require manifests to be signed by specific GPG keys. Select **+ Add Key** to add a key ID. Applications in this project sync only when manifests are signed by one of the listed keys.
#### Orphaned Resources Monitoring and Cluster Restrictions
The bottom of the Summary tab contains two governance toggles.
Click to view full size
* **Warn about orphaned resources:** When enabled, Harness flags Kubernetes resources that exist in a namespace managed by an application but are not tracked by that application.
* **Permit only project-scoped clusters:** When enabled, applications in this project can deploy only to clusters that are explicitly listed in **Destinations**. The Argo CD `in-cluster` destination and any cluster not listed are denied.
***
### Configure roles on the Roles tab
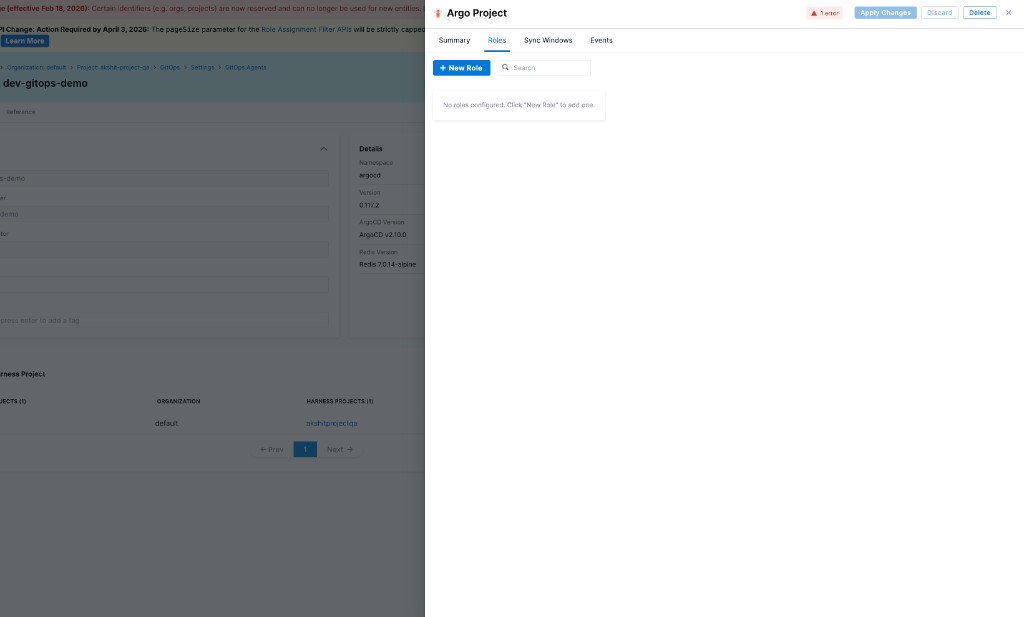
Use roles to delegate scoped access to the Argo project. Each role bundles a set of policies that grant specific actions on specific resources, and can optionally be bound to OIDC groups so that single sign-on users inherit the role automatically.
Click to view full size
#### Add a role
1. Open the **Roles** tab.
2. Select **+ New Role**. The **New Role** dialog opens.
Click to view full size
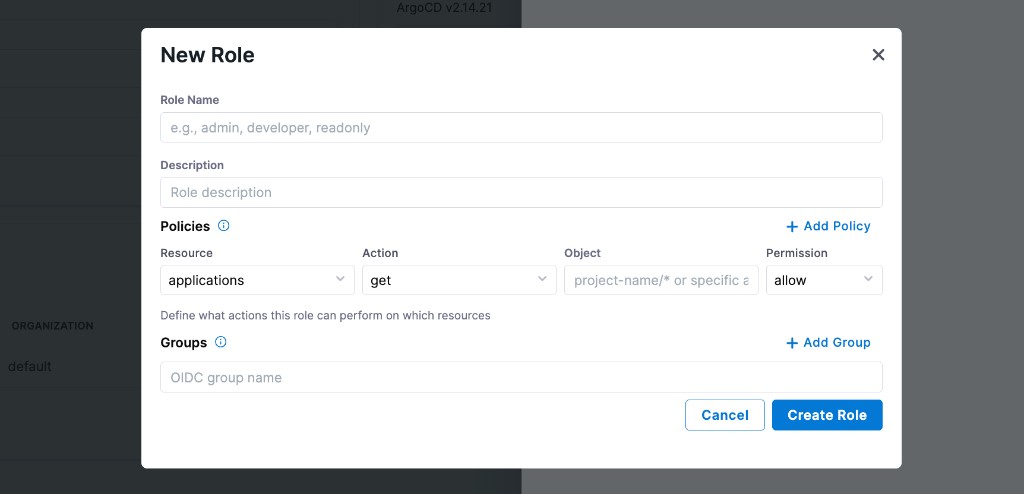
3. Configure the role:
* **Role Name:** A short identifier for the role, for example `admin`, `developer`, or `readonly`. The name must be unique within the project.
* **Description:** An optional summary of what the role grants.
4. Add one or more **Policies**. Each policy is a row that defines a single permission. Select **+ Add Policy** to add another row. For each policy, configure:
* **Resource:** The Argo CD resource the policy applies to. Choose from `applications`, `applicationsets`, `repositories`, `clusters`, `exec`, `logs`, or `projects`.
* **Action:** The action the role can perform on the resource. Common actions include `get`, `create`, `update`, `delete`, `sync`, and `override`. Use `*` to allow every action.
* **Object:** The specific object the action applies to, in the format `project-name/object-name`. Use `/*` to match every object in the project, or name a single application (for example, `banking/frontend-app`).
* **Permission:** Set to `allow` to grant the action, or `deny` to explicitly block it. Deny rules take precedence over allow rules.
5. Bind the role to one or more **Groups** (optional). Select **+ Add Group** and enter an OIDC group name. Any user that signs in through SSO and belongs to that group inherits the role's policies automatically.
6. Select **Create Role**.
7. Back in the **Argo Project** panel, select **Apply Changes** to persist the new role on the AppProject.
Roles are scoped to the Argo project and stack on top of the Harness project's RBAC.
#### Edit or delete a role
In the **Roles** tab, hover over an existing role to reveal the edit and delete icons. Editing reopens the same dialog. Deleting removes the role and all its policies; select **Apply Changes** afterwards to save.
***
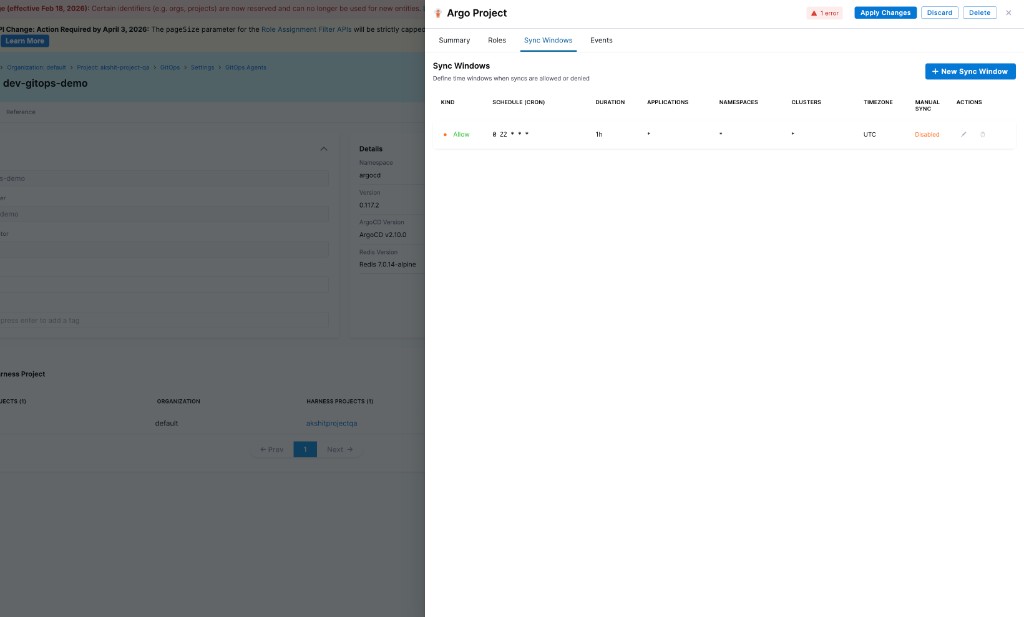
### Schedule sync windows on the Sync Windows tab
Sync windows control when applications in this project are allowed or denied automatic synchronization. Use sync windows to enforce change freezes, maintenance hours, or approved deployment windows.
Click to view full size
1. Open the **Sync Windows** tab.
2. Select **+ New Sync Window**.
3. Configure the window:
* **Kind:** Select **Allow** to permit syncs during the window, or **Deny** to block them.
* **Schedule (cron):** Enter a cron expression that defines when the window opens. For example, `0 22 * * *` opens the window at 10 PM daily.
* **Duration:** How long the window stays open. For example, `1h` for one hour.
* **Applications:** Which applications the window applies to. Use `*` for all.
* **Namespaces:** Which namespaces the window applies to. Use `*` for all.
* **Clusters:** Which clusters the window applies to. Use `*` for all.
* **Timezone:** The timezone the schedule is evaluated in. Defaults to **UTC**.
* **Manual Sync:** Set to **Enabled** to allow manual syncs from the UI even during a Deny window, or **Disabled** to block them.
4. Select **Apply Changes** to save.
You can configure multiple sync windows on a single project. When windows overlap, **Deny** wins over **Allow**.
***
### View project events on the Events tab
The **Events** tab displays Kubernetes events emitted for the underlying AppProject resource. Use it to confirm that recent edits were applied successfully or to investigate why a change was rejected by the Argo CD application controller.
***
### Delete an Argo project
To remove an Argo project from the agent:
1. Open the **Argo Project** panel for the project you want to delete.
2. Select **Delete** in the top-right of the panel.
3. Confirm the deletion.
You can also delete a mapping inline from the **Mapped Harness Project** table by selecting the trash icon in the **ACTIONS** column.
{% hint style="warning" %}
Deleting an Argo project does not delete the applications, repositories, or clusters associated with it. Applications that still reference the deleted project will fail to sync until they are reassigned to a valid project.
{% endhint %}
***
### Import existing ArgoCD Projects
If you have existing ArgoCD Projects in your Argo CD cluster, you can import them into Harness during the Bring Your Own Argo CD (BYOA) agent setup. Harness maps your Argo CD projects to Harness projects and imports all associated entities (applications, clusters, and repositories) automatically.
Go to [Bring Your Own Argo CD into Harness GitOps](/continuous-delivery/use-gitops/connect-and-manage/multiple-argo-to-single-harness.md) to configure BYOA and import your Argo CD projects.
For declarative management of ArgoCD Projects through Git, go to [Manage Argo CD configurations in Git](/continuous-delivery/use-gitops/connect-and-manage/manage-argo-configs.md) to set up AppProject manifests with the required Harness-specific fields.
***
### Next steps
Now that you can manage Argo projects from the agent, configure the entities your applications depend on:
* [Add a GitOps repository](/continuous-delivery/use-gitops/gitops-entities/repositories/add-a-harness-git-ops-repository.md): Connect source repositories for your application manifests.
* [Create a GitOps cluster](/continuous-delivery/use-gitops/get-started/harness-cd-git-ops-quickstart.md#step-3-add-a-harness-gitops-cluster): Add destination clusters for your deployments.
* [Manage GitOps applications](/continuous-delivery/use-gitops/application/manage-gitops-applications.md): Create and manage applications within your projects.
{% @harness-feedback/feedback %}