> For the complete documentation index, see [llms.txt](https://developer.harness.io/llms.txt). Markdown versions of documentation pages are available by appending `.md` to page URLs; this page is available as [Markdown](https://developer.harness.io/continuous-delivery/use-gitops/gitops-entities/service/service.md).
# GitOps services
Learn how to create and configure GitOps services for use in PR pipelines and GitOps sync workflows.
A GitOps service in Harness is **not** the same as a [traditional CD service](/continuous-delivery/use-continuous-delivery/cd-building-blocks/services/services-overview.md). In traditional CD, a service defines the artifact and manifests that Harness deploys directly to your cluster. In GitOps, an ArgoCD agent handles the actual deployment by syncing your cluster to the desired state in Git.
{% hint style="info" %}
**SERVICE UNIFICATION WITH FEATURE FLAG**
When the `CDS_GITOPS_MERGE_K8S_SERVICES` feature flag is enabled, the same service entity can be used across both CD and GitOps stages, eliminating the need for separate service definitions. For details on how this works, see the [Deployment Type section](#deployment-type) below. Contact [Harness Support](mailto:support@harness.io) to enable this feature.
{% endhint %}
A Harness GitOps service is a **tracking and templating entity**. It does three things:
* **Points to your Git config:** It stores references to the files in Git that PR pipelines need to read and update - typically Kubernetes manifests, Kustomize overlays, or Helm values files, depending on how your ArgoCD applications are configured.
* **Carries variables:** It defines variables (like `imageTag`) that get written into those Git config files when a PR pipeline runs.
* **Maps to your applications:** Together with an environment and cluster, it resolves which ArgoCD applications are affected by a pipeline run.
This topic walks you through creating and configuring a Harness GitOps service, section by section, so you understand every field you see in the UI and why it matters.
### How a GitOps service fits into the deployment flow
A GitOps service on its own does nothing. It comes to life when used in a [PR pipeline](/continuous-delivery/use-gitops/pr-pipelines/pr-pipelines-basics.md) or GitOps sync pipeline.
Your ArgoCD Application already has a **source** - a Git repo, branch, and path containing your Kubernetes manifests, Kustomize overlays, or Helm values. The Harness GitOps service points to that same source. When a PR pipeline runs, Harness uses the service's manifest reference and variables to update a file in that repo, creates a pull request, and merges it. ArgoCD then detects the change and syncs your cluster.
In short: the service tells Harness **what to change** in Git, and ArgoCD takes care of **applying that change** to the cluster.
For a detailed comparison, see [GitOps Services vs CD Services](/continuous-delivery/use-gitops/gitops-entities/service/gitops-vs-cd-service.md).
### Prerequisites
Before creating a GitOps service, make sure you have the following in place:
* **Harness GitOps Agent:** An agent installed and connected to your Kubernetes cluster. See [Install a Harness GitOps Agent](/continuous-delivery/use-gitops/gitops-entities/agents/install-a-harness-git-ops-agent.md).
* **Harness Git Connector (for PR pipelines):** A connector configured in Harness that points to the same Git repository your ArgoCD Application uses as its source. This is only needed if you plan to use the Update Release Repo step in a PR pipeline to modify files in Git.
How much you need to configure inside the service depends on your use case:
* **Syncing an independent application:** If you only need to sync an existing ArgoCD Application (using the GitOps Sync or Update GitOps App steps), the service itself doesn't need any manifests or Git details - just link the application to the service and use it in a pipeline.
* **Updating config via a PR pipeline:** If you want a PR pipeline to modify files in Git (using the Update Release Repo step), you need to configure a Release Repo Manifest in the service that points to the file to update.
* **Working with ApplicationSets:** If your applications are generated by an ApplicationSet, you also need to configure a Deployment Repo Manifest or App Set Reference so Harness can discover the linked applications.
### Create a GitOps Service
This section walks through every part of the service configuration screen.
#### Step 1: Create and name the service
1. Go to **Deployments** > **Services** in your Harness project.
2. Click **+ New Service**.
3. Fill in the **About the Service** fields:
* **Name:** A human-readable name for your service (for example, `icans-api`).
* **ID:** Auto-generated from the name. You can edit it before saving, but it cannot be changed later.
* **Description (optional):** A short description of what this service represents.
* **Tags (optional):** Key-value tags for filtering and organization.
4. Click **Save**.
#### Step 2: Choose service storage
After saving, you see two options for how the service configuration is stored:
* **Inline:** The service definition is stored in Harness. This is the default and simplest option.
* **Remote:** The service definition is stored in your Git repository. Use this if you want to version-control your service configuration alongside your application code.
#### Step 3: Configure the Service Definition
The Service Definition panel contains everything that makes this service work with GitOps. Each section is explained below.
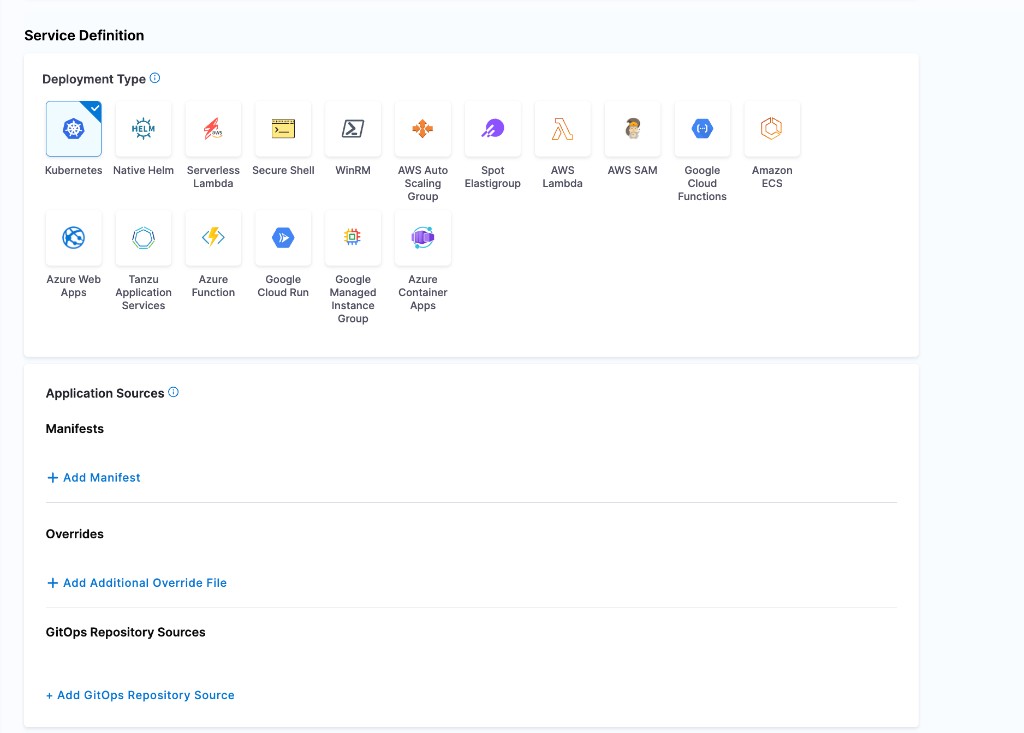
**Deployment Type**
Select **Kubernetes** as the deployment type.
{% hint style="info" %}
When the `CDS_GITOPS_MERGE_K8S_SERVICES` feature flag is enabled, this feature flag allows the same service to be used across both CD and GitOps stages. Configure the service definition with the fields required for your specific use case (for example, Release Repository for the Update Release Repo step or App Set Reference for Fetch Linked Apps). Contact [Harness Support](mailto:support@harness.io) to enable it.
{% endhint %}
Click to view full size image
The service definition includes a **GitOps Repository Sources** section where you add a Release Repository or a Deployment Repository. With the feature flag enabled, there is no separate GitOps checkbox. You populate the fields relevant to your pipeline steps.
**GitOps Repository Sources**
This is the most important section for GitOps workflows. The **GitOps Repository Sources** section sits at the bottom of the service definition and tells Harness where your configuration files live in Git. Populate the fields that correspond to the pipeline steps you plan to use.
Click **+ Add GitOps Repository Source** to add a repository. In the **Repo Store** dialog, select your Git provider (GitHub, Harness Code, Azure Repo, GitLab, or Bitbucket), choose a connector, and select a **Repository Type**:
| Repository Type | What it points to | What pipeline step uses it | Required? |
| ------------------------- | ---------------------------------------------------------------------------------------------------------------- | ------------------------------------------------------------------------------------------------------------------- | ----------------------------------------------------------------------------------------------------------------------------------- |
| **Release Repository** | The config file that the PR pipeline should update (Kubernetes manifest, `kustomization.yaml`, or `values.yaml`) | [Update Release Repo](/continuous-delivery/use-gitops/pr-pipelines/pr-pipelines-basics.md#update-release-repo) step | **Yes**, if you use the Update Release Repo step |
| **Deployment Repository** | ApplicationSet template YAML in Git | [Fetch Linked Apps](/continuous-delivery/use-gitops/pr-pipelines/pr-pipelines-basics.md#fetch-linked-apps) step | **No**, being deprecated. Prefer [App Set Reference](#app-set-reference-applicationset-workflows-only) for ApplicationSet workflows |
{% hint style="warning" %}
**Deployment Repository is being deprecated**
The Deployment Repository manifest on GitOps services is being deprecated and will stop working on **October 4, 2026**. If your GitOps service still uses a Deployment Repository, migrate it to Application Set references before then so that Fetch Linked Apps and PR pipelines keep working. Go to [Migrate Deployment Repo to Application Set references](/continuous-delivery/use-gitops/gitops-entities/service/migrate-deployment-repo-to-appset-references.md) to update your service.
{% endhint %}
For most GitOps workflows, you only need a **Release Repository**. This points to the per-environment config file that your PR pipeline updates. See [Release Repository](#release-repo-manifest) below for step-by-step instructions and examples.
{% hint style="info" %}
**GITOPS REPOSITORY SOURCES ARE OPTIONAL FOR INDEPENDENT APPLICATIONS**
If your ArgoCD applications are independent (not generated by an ApplicationSet) and you only need to sync or update them without modifying files in Git, the GitOps Repository Sources section is optional. You can link applications to the service using labels and use pipeline steps like [GitOps Sync or Update GitOps App](/continuous-delivery/use-gitops/pr-pipelines/pr-pipelines-basics.md#gitops-pipeline-steps) directly, without configuring any repository sources.
{% endhint %}
The Deployment Repository is only relevant if you use ApplicationSets to generate multiple ArgoCD applications from a single template. If your applications are independent, you do not need a Deployment Repository. Link your applications to services using labels instead (see [Linking Applications to a Service](#linking-applications-to-a-service)).
**Artifacts**
The Artifacts section lets you specify container images or other artifacts. In a GitOps service, artifacts are **optional**. The ArgoCD agent pulls images based on the manifests in your Git repository, not from Harness artifact configuration.
However, you can still configure an artifact source if you want to:
* Use the artifact tag as a service variable (for example, to write the image tag into your config file via a PR pipeline).
* Track which artifact version is associated with a deployment for auditing purposes.
If you don't need either of these, you can leave this section empty.
**Config Files**
Config Files let you attach plain-text or encrypted files to your service. In a GitOps context, this is **rarely used** because your configuration typically lives in your Git repository (as files referenced by the Release Repo Manifest).
Use Config Files only if you need to store additional configuration that isn't part of your Git-based workflow. See [Service Config Files](/continuous-delivery/use-continuous-delivery/cd-building-blocks/services/cd-services-config-files.md) for details.
**Service Hooks**
Service Hooks let you run scripts before or after specific service events. In a GitOps service, this section is typically left empty. If you need to run custom logic during your deployment, add it as a pipeline step in your PR pipeline instead.
**App Set Reference (ApplicationSet workflows only)**
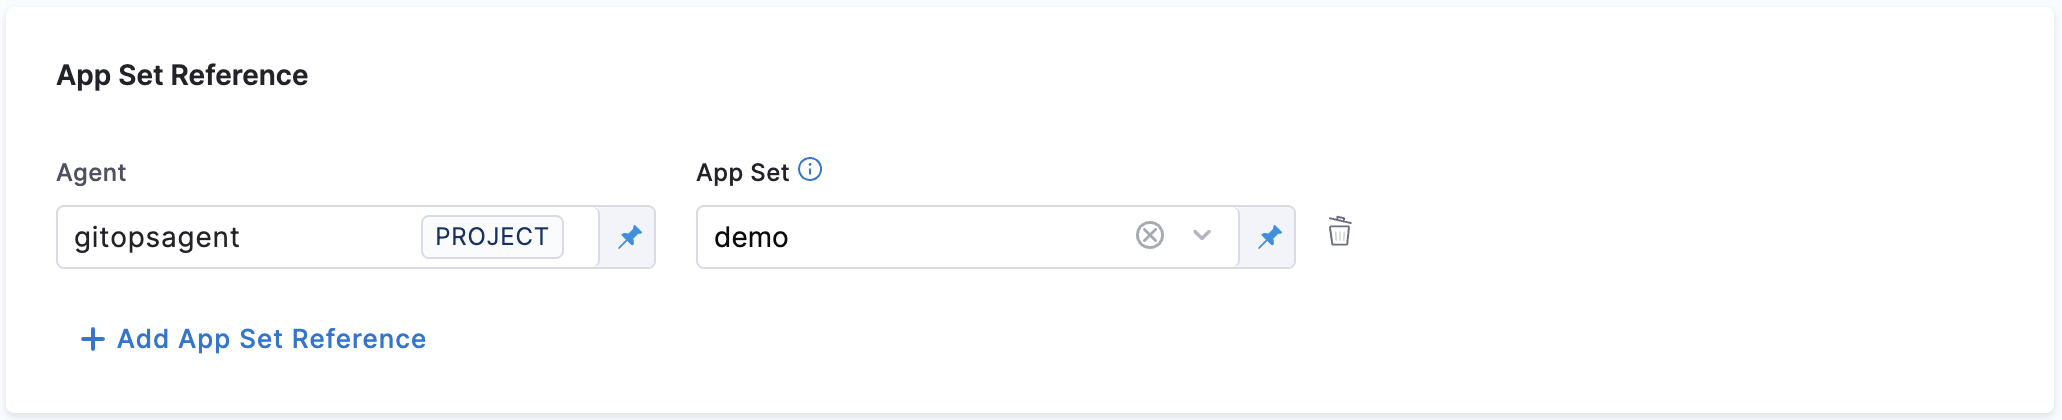
If you use ApplicationSets to generate multiple ArgoCD applications, App Set Reference lets you directly reference an existing ApplicationSet managed by a GitOps agent. This is an alternative to manually adding a manifest in the Deployment Repo Manifest field.
If you use standard ArgoCD Application YAML (not ApplicationSets), skip this section.
To configure:
1. Select the **Agent** that manages the ApplicationSet.
2. Select the **App Set** from the dropdown.
3. Click **+ Add App Set Reference** if you need to reference multiple ApplicationSets.
Click to view full size image
First-class ApplicationSet support is generally available. The former `GITOPS_APPLICATIONSET_FIRST_CLASS_SUPPORT` feature flag is no longer a runtime gate.
{% hint style="success" %}
**Preferred over Deployment Repository**
App Set Reference is the supported configuration going forward. Go to [Migrate Deployment Repo to Application Set references](/continuous-delivery/use-gitops/gitops-entities/service/migrate-deployment-repo-to-appset-references.md) to migrate existing Deployment Repo services.
{% endhint %}
**Variables (under Advanced)**
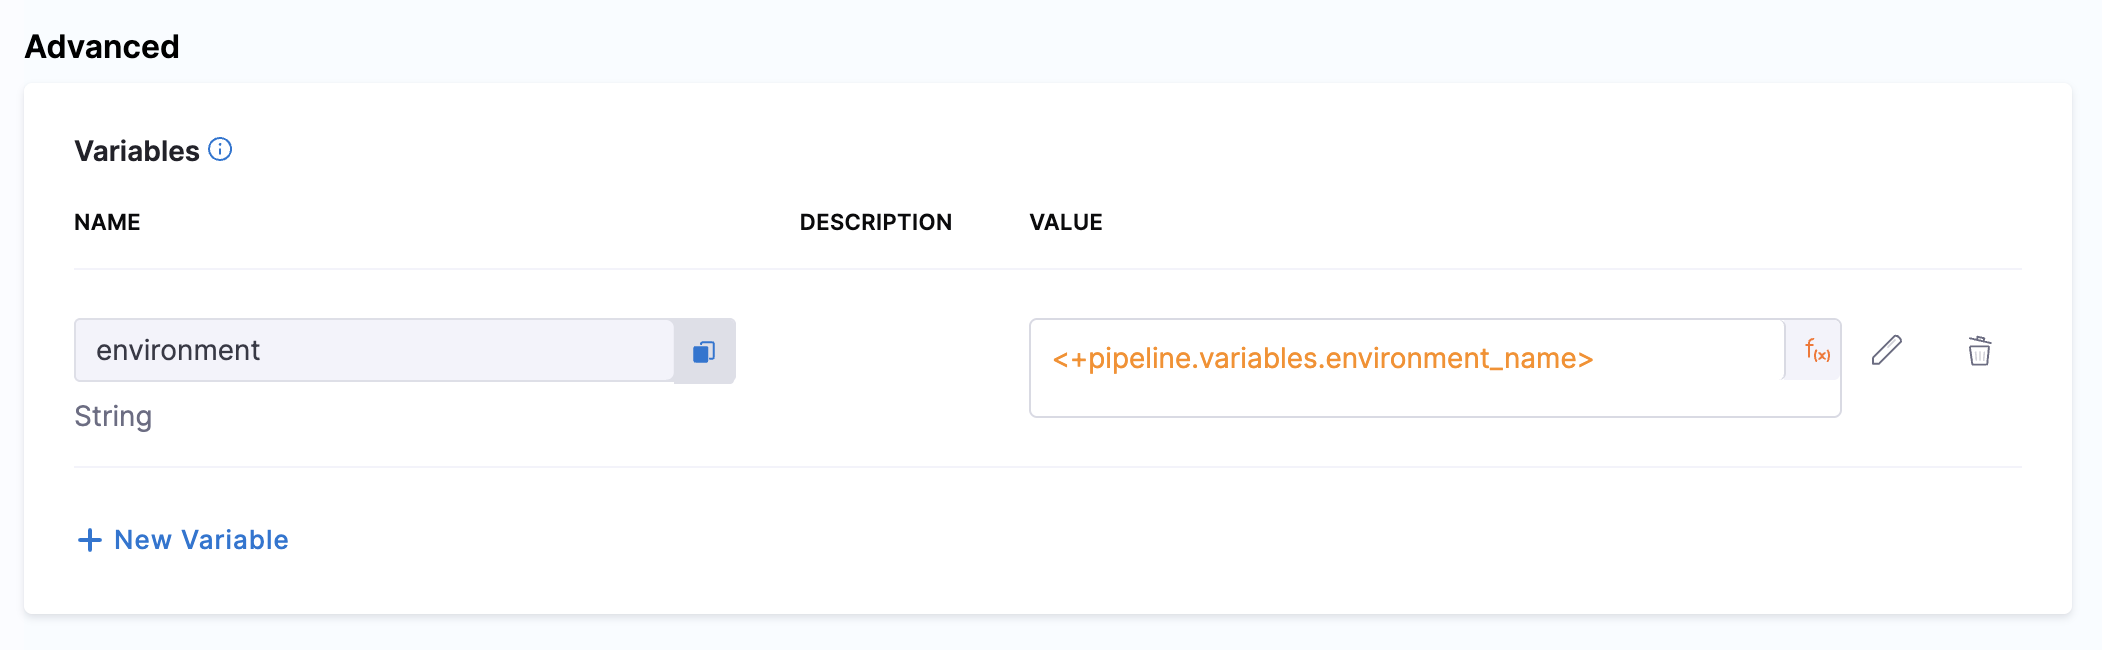
Scroll to the **Advanced** section to find **Variables**. These are key-value pairs that flow into your Git config files when a PR pipeline runs. See [Service Variables](#service-variables) for a full explanation and examples.
#### Step 4: Save
Click **Save** to complete the service configuration. Your service is now ready to be used in a PR pipeline.
### Repository Types in Detail
#### Release Repo Manifest
A Release Repository points to a file in your Git repository that the Update Release Repo step should modify during a PR pipeline run. The step reads the file, updates the specified key-value pairs, commits the change, and creates a pull request. After the PR is merged, ArgoCD detects the change and syncs your cluster.
The file you point to depends on how your ArgoCD Application's source is configured:
| ArgoCD Application source type | Release Repo points to | Example path |
| ------------------------------ | -------------------------------------- | --------------------------------- |
| **Kubernetes manifests** | The manifest YAML file per environment | `manifests/dev/deployment.yaml` |
| **Kustomize** | `kustomization.yaml` per environment | `overlays/dev/kustomization.yaml` |
| **Helm** | `values.yaml` per environment | `environments/dev/values.yaml` |
{% hint style="warning" %}
**THE RELEASE REPO MUST MATCH YOUR APPLICATION'S SOURCE**
The Git connector, repository, and branch you configure in the Release Repo Manifest should point to the **same repository** that your ArgoCD Application uses as its source. The file path should resolve to a file within that source path. This is how the PR pipeline knows which file to update so that ArgoCD picks up the change on its next sync.
{% endhint %}
**To add a Release Repository:**
1. In the **GitOps Repository Sources** section, click **+ Add GitOps Repository Source**.
2. In the **Repo Store** dialog, select your Git provider and connector, then set **Repository Type** to **Release Repository**.
3. Click **Continue** and configure the manifest details:
* **Manifest Name:** A name for this manifest (for example, `release-config`).
* **Git Fetch Type:** Select **Latest from Branch**.
* **Branch:** The same branch your ArgoCD Application tracks (for example, `main`).
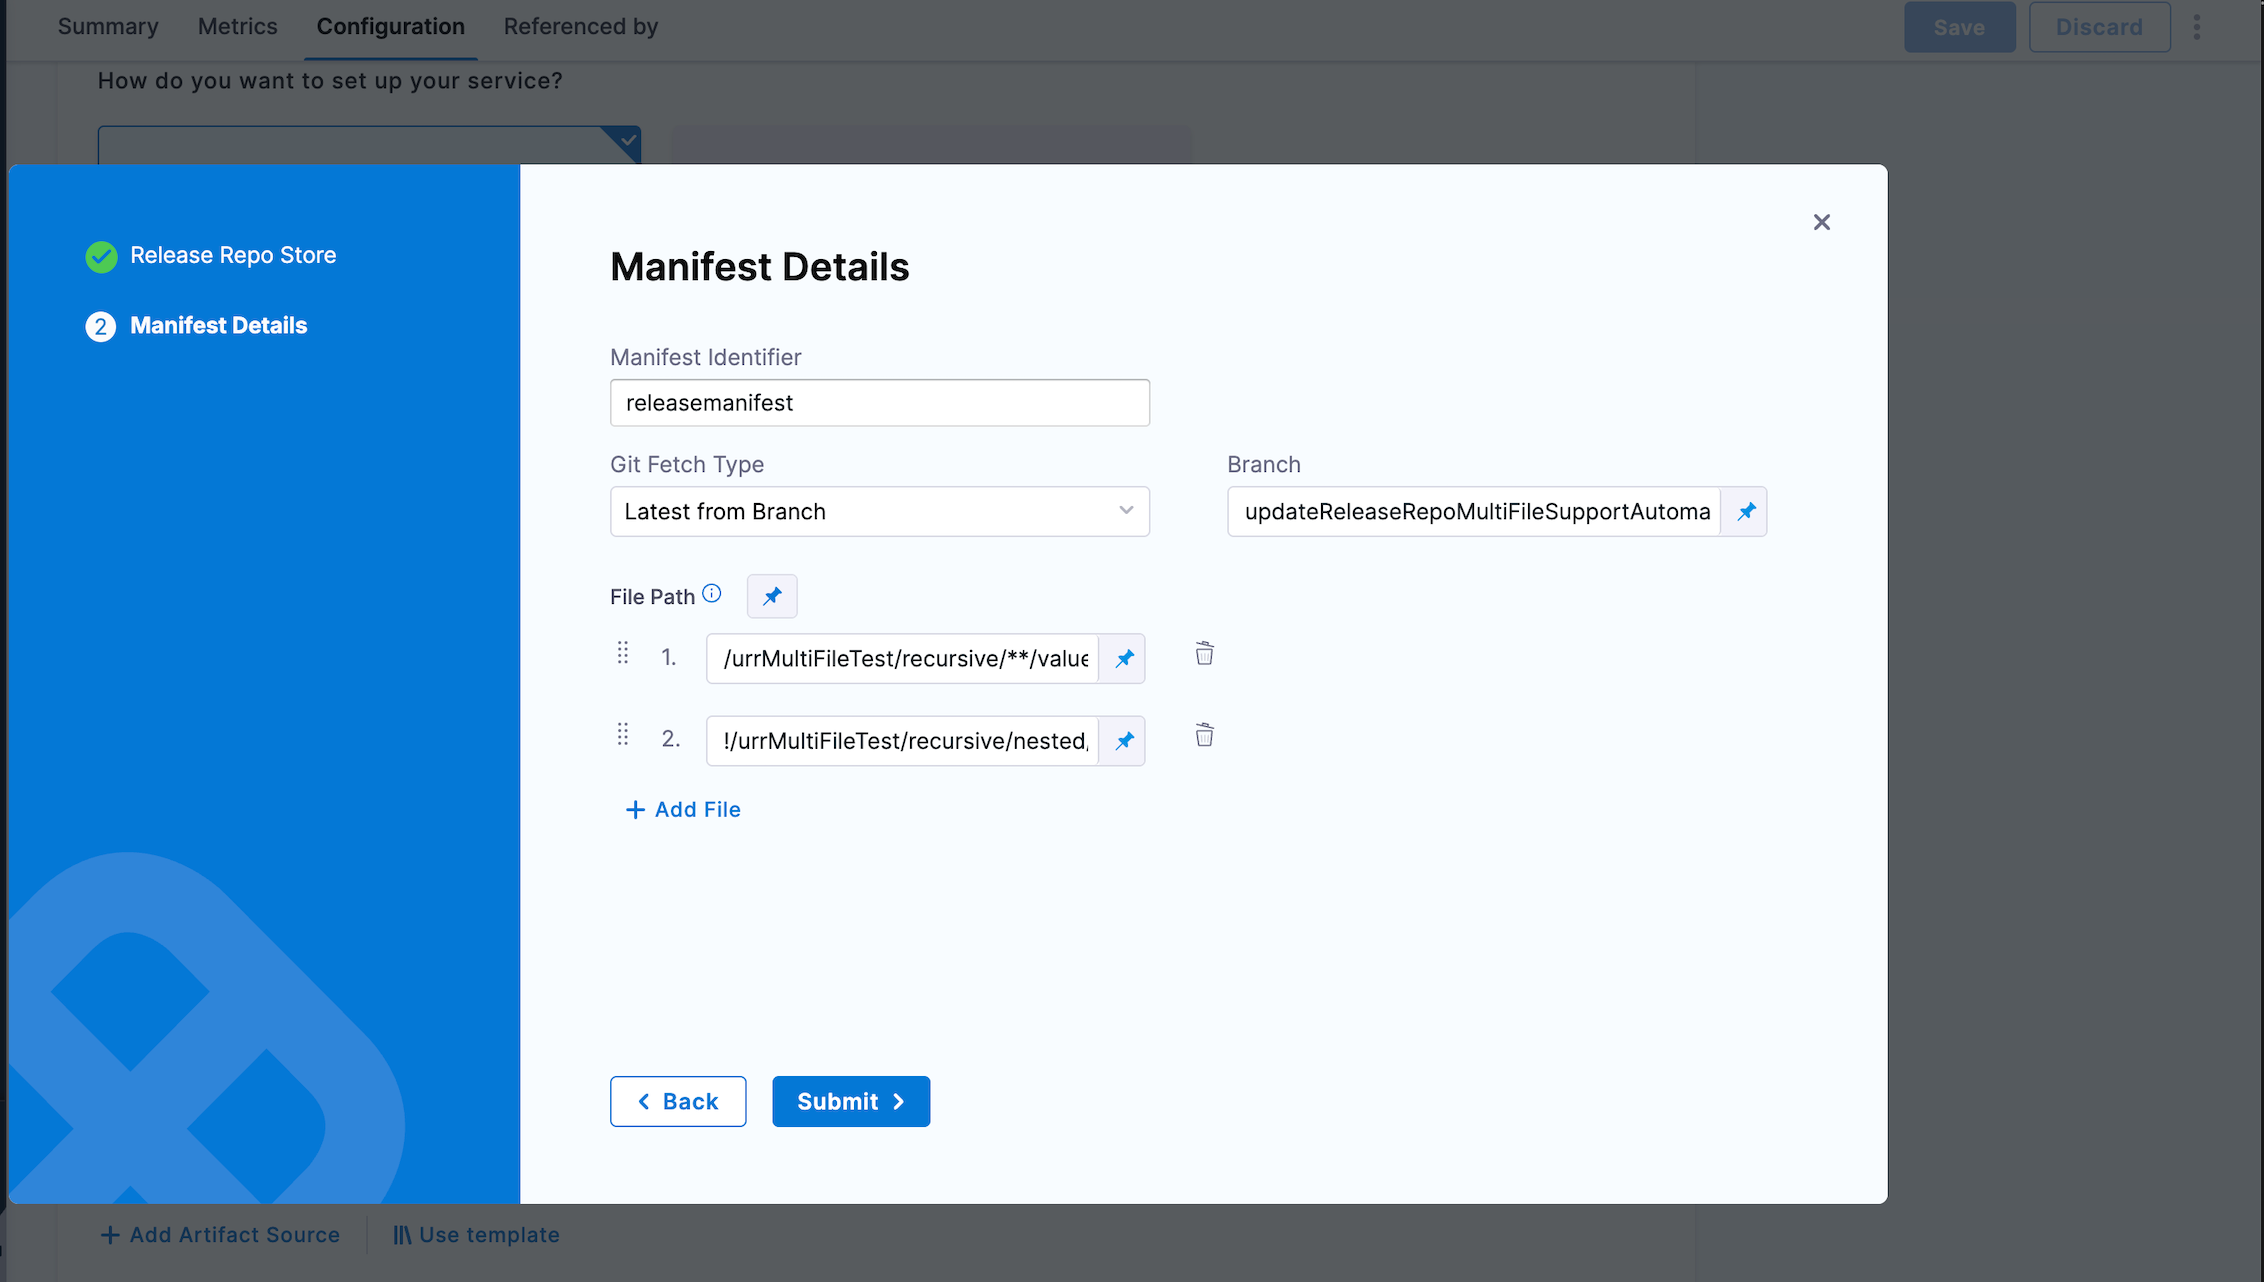
* **File Path:** The path to the file the pipeline should update. Use the `<+env.name>` expression to make the path resolve dynamically per environment. File Path is a list, and each entry can be a literal path or a pattern that matches multiple files. Go to [Match multiple files with a path pattern](#match-multiple-files-with-a-path-pattern) to update more than one file in a single PR.
For Kubernetes manifests:
```
manifests/<+env.name>/deployment.yaml
```
For Kustomize:
```
overlays/<+env.name>/kustomization.yaml
```
For Helm:
```
environments/<+env.name>/values.yaml
```
When you run the pipeline and select the `dev` environment, Harness resolves `<+env.name>` to `dev`.
Example: Kubernetes manifest
This pattern is used when your ArgoCD Application source points to a directory of plain Kubernetes YAML manifests. Each environment has its own directory.
**Directory structure:**
```
my-service/
└── manifests/
├── dev/
│ └── deployment.yaml
└── prod/
└── deployment.yaml
```
**Sample manifests/dev/deployment.yaml:**
```yaml
apiVersion: apps/v1
kind: Deployment
metadata:
name: my-service
spec:
replicas: 3
template:
spec:
containers:
- name: my-service
image: ghcr.io/your-org/my-service:v2.3.0
env:
- name: ENVIRONMENT
value: "dev"
```
When a PR pipeline runs with service variable `spec.template.spec.containers[0].image: ghcr.io/your-org/my-service:v2.4.1`, the Update Release Repo step updates the image value in this file. After the PR is merged, ArgoCD syncs the updated manifest to your cluster.
Example: kustomization.yaml (Kustomize overlay)
This pattern is used when your ArgoCD application sources are Kustomize overlays. Each environment has its own overlay directory with a `kustomization.yaml` that the PR pipeline updates.
**Directory structure:**
```
my-service/
├── base/
│ ├── deployment.yaml
│ ├── service.yaml
│ └── kustomization.yaml
└── overlays/
├── dev/
│ └── kustomization.yaml
└── prod/
└── kustomization.yaml
```
**Sample overlays/dev/kustomization.yaml:**
```yaml
apiVersion: kustomize.config.k8s.io/v1beta1
kind: Kustomization
namespace: my-service
bases:
- ../../base
replicas:
- name: my-service
count: 3
patches:
- target:
kind: Deployment
name: my-service
patch: |-
- op: add
path: /spec/template/spec/containers/0/env
value:
- name: ENVIRONMENT
value: "dev"
- target:
kind: ConfigMap
name: my-service-config
patch: |-
- op: add
path: /data/ENVIRONMENT
value: "dev"
```
When a PR pipeline runs, the Update Release Repo step can update values in this YAML file using dot-notation variables. For example, a variable `replicas[0].count: 5` updates the replica count, or `patches[0].patch` can update the environment value. After the PR is merged, ArgoCD applies the Kustomize overlay and syncs your cluster.
Example: values.yaml (Helm)
This pattern is used when your ArgoCD application source is a Helm chart with per-environment values files.
**Directory structure:**
```
my-service/
├── charts/
│ └── my-service/
│ ├── Chart.yaml
│ └── templates/
└── environments/
├── dev/
│ └── values.yaml
└── prod/
└── values.yaml
```
**Sample environments/dev/values.yaml:**
```yaml
image:
repository: ghcr.io/your-org/my-service
tag: v2.3.0
replicas: 3
environment: dev
```
When a PR pipeline runs with service variable `image.tag: v2.4.1`, the Update Release Repo step updates the nested `image.tag` value in the YAML file. After the PR is merged, ArgoCD re-renders the Helm chart with the new values and syncs your cluster.
{% hint style="info" %}
**CLUSTER-SPECIFIC PATHS**
You can scope config files per cluster as well as per environment by adding `<+cluster.name>` to the path:
```
overlays/<+env.name>/<+cluster.name>/kustomization.yaml
```
Your Git directories would look like:
```
overlays/dev/cluster1/kustomization.yaml
overlays/dev/cluster2/kustomization.yaml
```
This allows you to update only applications deployed in specific clusters.
{% endhint %}
#### Match multiple files with a path pattern
File Path also accepts a pattern that matches multiple files in your repository, so the Update Release Repo step can update all of them and raise a single pull request. This avoids creating a separate GitOps service, and a separate PR, for every file when your applications follow an app-of-apps pattern, for example one values file per service under a shared parent application. Matching many files through one service and one PR also reduces the number of commits the step makes against your Git provider on each run.
You can also match multiple files with stage expressions such as `<+cluster.name>`, `<+env.name>`, or `<+envgroup.name>` in File Path, without using a wildcard. When a stage runs against more than one cluster, environment, or environment group, Harness resolves the expression separately for each one. For example, `/app/<+cluster.name>/values.yaml` on a stage running against `cluster1` and `cluster2` resolves to both `/app/cluster1/values.yaml` and `/app/cluster2/values.yaml`, and the step updates both files in one PR. You can combine an expression with a path pattern in the same entry.
File Path is a numbered list. Click **+ Add File** to add another entry, and prefix an entry with `!` to exclude the files it matches from the entries above it.
Click to view full size image
Harness supports the following pattern syntax:
| Syntax | Matches |
| ----------------------------- | --------------------------------------------------------------------------------------------------------------------------------------------------------------------------------------------------------------------------------------------------------------------------------------------------------------------------------------------------- |
| `/` | Separates path segments. A pattern ending in `/` is equivalent to ending it with `**`. For example, `apps/` matches every file under `apps/`, the same as `apps/**`. |
| `*` | Any characters within a single path segment. For example, `values*.yaml` matches `values-dev.yaml` and `values-prod.yaml` in the same folder, and `apps/*/values.yaml` matches `values.yaml` under any single folder directly inside `apps/`, such as `apps/service-a/values.yaml`, but not a deeper path like `apps/service-a/nested/values.yaml`. |
| `**` | Any number of nested path segments. For example, `apps/**/values.yaml` matches `values.yaml` at any depth under `apps/`. |
| `!` (as a prefix on an entry) | Excludes files that match that entry from the files already matched by the other entries in File Path. |
This is a subset of standard glob syntax, similar to the patterns used in a [.gitignore file](https://git-scm.com/docs/gitignore#_examples). For background on glob patterns in general, go to [VS Code's glob pattern reference](https://code.visualstudio.com/docs/editor/glob-patterns), keeping in mind that Harness only supports `/`, `*`, `**`, and `!` from that syntax.
{% hint style="info" %}
**ONLY YAML AND JSON FILES ARE MATCHED**
File Path only matches files with a `.yaml`, `.yml`, or `.json` extension, even if a pattern would otherwise match more. The Update Release Repo step does not support updating other file types, such as binaries, text files, or symlinks, so your repository can contain those alongside the files a pattern matches without affecting the step.
{% endhint %}
{% hint style="warning" %}
**ONE INCLUDE PATTERN PER MANIFEST**
File Path currently supports one include entry together with any number of exclude entries, each prefixed with `!`. Adding a second, independent include entry is not supported yet.
{% endhint %}
Example 1: Match files in the same folder with `*`
This pattern matches every file in one folder whose name fits a prefix or suffix, without touching nested folders.
**Directory structure:**
```
test-values.yaml
```
**File Path entry:**
```yaml
paths:
- /test-values*.yaml
```
`test-values*.yaml` matches any file in the root folder whose name starts with `test-values`, such as `test-values.yaml` or `test-values-prod.yaml`. In this run, the folder contained only `test-values.yaml`, so the step matched one file.
Expand the **Fetch Files** log group in the step's execution console to see how the pattern resolved:
```
Fetch Files
Setting git configs
Resolved branch updateReleaseRepoMultiFileSupportAutomation HEAD to commit 83152308c77122af24fc200629b0e35d09f4132a. Discovery and file reads are pinned to this commit.
Path pattern mode. Include: [test-values*.yaml], exclusions: [], discovery prefix: []
Path pattern selected 1 files. Fetching content at commit 83152308c77122af24fc200629b0e35d09f4132a.
```
With a service variable `imageTag: v2.0`, the step updates the matched file and opens a PR with the change. Expand the **Create PR** log group to get the PR link:
```diff
apiVersion: 1.0
spec:
- imageTag: v1.0
+ imageTag: v2.0
```
Example 2: Match files recursively with `**`, and exclude a folder with `!`
This pattern matches files nested at varying depths under a parent folder, and removes one subfolder from that match with an exclude entry.
**Directory structure:**
```
apps/
└── recursive/
├── service-a/
│ └── values.yaml
├── service-b/
│ └── values.yaml
└── nested/
└── service-c/
└── values.yaml
```
**File Path entries:**
```yaml
paths:
- /apps/recursive/**/values.yaml
- "!/apps/recursive/nested/**"
```
The include entry matches `values.yaml` under every folder nested inside `recursive/`. The exclude entry removes everything under `recursive/nested/`, so the step updates `service-a/values.yaml` and `service-b/values.yaml` only, and skips `nested/service-c/values.yaml`.
Expand the **Fetch Files** log group in the step's execution console to see how the pattern resolves at runtime:
```
Fetch Files
Setting git configs
Resolved branch updateReleaseRepoMultiFileSupportAutomation HEAD to commit aee3df50b65d24024e88133bb849b1d1ce9d3160. Discovery and file reads are pinned to this commit.
Path pattern mode. Include: [apps/recursive/**/values.yaml], exclusions: [apps/recursive/nested/**], discovery prefix: [apps/recursive]
Exclusion [apps/recursive/nested/**] removed 1 previously matched files.
Path pattern selected 2 files. Fetching content at commit aee3df50b65d24024e88133bb849b1d1ce9d3160.
```
With a service variable `replicas: 2`, the step writes the change to both matched files and opens one pull request containing both updates. Expand the **Create PR** log group to get the PR link:
```yaml
# apps/recursive/service-a/values.yaml
service: service-a
replicas: 2
```
```yaml
# apps/recursive/service-b/values.yaml
service: service-b
replicas: 2
```
The step also produces a `changedFiles` output containing the list of files it changed. Use this output in a later step to verify that only the intended files were modified.
#### Deployment Repository (ApplicationSet workflows only)
{% hint style="warning" %}
**Deployment Repository is being deprecated**
The Deployment Repository manifest on GitOps services is being deprecated and will stop working on **October 4, 2026**. If your GitOps service still uses a Deployment Repository, migrate it to Application Set references before then so that Fetch Linked Apps and PR pipelines keep working. Go to [Migrate Deployment Repo to Application Set references](/continuous-delivery/use-gitops/gitops-entities/service/migrate-deployment-repo-to-appset-references.md) to update your service.
{% endhint %}
{% hint style="info" %}
**SKIP THIS IF YOU USE STANDARD APPLICATION YAML**
The Deployment Repository is only needed if you use the [ApplicationSet (App of Apps) pattern](/continuous-delivery/use-gitops/applicationsets/harness-git-ops-application-set-tutorial.md) to generate multiple ArgoCD applications from a single template. If you have standard ArgoCD Application YAML, you do not need this. Link your applications to services using labels instead.
{% endhint %}
A Deployment Repository points to your ApplicationSet template YAML in Git. The **Fetch Linked Apps** pipeline step reads this template to discover which ArgoCD applications are generated from it and linked to your service.
**To add a Deployment Repository:**
1. In the **GitOps Repository Sources** section, click **+ Add GitOps Repository Source**.
2. In the **Repo Store** dialog, select your Git provider and connector, then set **Repository Type** to **Deployment Repository**.
3. Click **Continue** and configure the manifest details:
* **Manifest Name:** A name for this manifest (for example, `appset-template`).
* **Git Fetch Type:** Select **Latest from Branch**.
* **Branch:** Your main branch name (for example, `main`).
* **File Path:** The path to your ApplicationSet YAML (for example, `applicationsets/my-service.yaml`).
For a full ApplicationSet example, see the [ApplicationSet tutorial](/continuous-delivery/use-gitops/applicationsets/harness-git-ops-application-set-tutorial.md).
{% hint style="info" %}
**NEXT STEP**
Once your manifests are configured, learn how they are used in a PR pipeline. See [GitOps PR Pipelines](/continuous-delivery/use-gitops/pr-pipelines/pr-pipelines-basics.md#gitops-pipeline-steps).
{% endhint %}
### Service Variables
Service variables are key-value pairs defined on your service that flow into your Git config files at pipeline runtime. You configure them under **Advanced** > **Variables** in the service configuration screen.
Click to view full size image
#### How variables flow from service to cluster
1. **You define a variable** on the service (for example, `image.tag: latest`).
2. **A PR pipeline runs.** By default, the Update Release Repo step reads service and environment variables and writes matching keys into your config file (for example, `values.yaml` or `kustomization.yaml`) in Git, then creates a pull request. To write only the variables defined in the step itself, enable **Don't Propagate Pipeline Variables** on the Update Release Repo step. Go to [Update Release Repo](/continuous-delivery/use-gitops/pr-pipelines/pr-pipelines-basics.md#update-release-repo) to configure this option.
3. **The Merge PR step runs.** It takes the PR generated by the Update Release Repo step and merges it. Once merged, the manifests in Git are updated to the new version.
4. **The cluster syncs.** You can trigger a sync using a subsequent Application Sync step in the same pipeline (recommended), or by configuring Auto Sync on the specific ArgoCD Applications.
#### Variable precedence
Variables can be overridden at multiple levels. The most specific override wins:
| Priority | Level | Where you set it |
| ----------- | -------------------------------------------- | --------------------------------------------------- |
| 1 (highest) | **Pipeline step variables** | In the Update Release Repo step configuration |
| 2 | **Infrastructure / cluster-level overrides** | In the environment's infrastructure definition |
| 3 | **Environment-level overrides** | In the environment configuration |
| 4 (lowest) | **Service-level variables** | In the service configuration (Advanced > Variables) |
#### Example: image.tag variable from service to cluster
**1. Define the variable on the service:**
| Variable | Value |
| ----------- | -------- |
| `image.tag` | `latest` |
**2. Override it at the environment level (for `prod`):**
| Variable | Value |
| ----------- | -------- |
| `image.tag` | `v2.4.1` |
**3. values.yaml in Git before the pipeline runs:**
```yaml
image:
repository: ghcr.io/your-org/my-service
tag: v2.3.0
replicas: 3
```
**4. values.yaml in Git after the Update Release Repo step:**
```yaml
image:
repository: ghcr.io/your-org/my-service
tag: v2.4.1
replicas: 3
```
The environment override (`v2.4.1`) takes precedence over the service default (`latest`). The Update Release Repo step writes it into the config file via a pull request. After the PR is merged, ArgoCD syncs the cluster to the new image tag.
#### Runtime inputs
You can set a variable value to `<+input>` to make it a runtime input. When someone runs the pipeline, they are prompted to enter the value. This is useful for values that change with every release, like a new image tag.
### Linking Applications to a Service
You can associate a Harness service with your GitOps applications at multiple points - when creating the application or after it already exists.
#### When creating an application
**Via the Harness UI (recommended):** When creating an application in **Deployments** > **GitOps** > **Applications**, select the service and environment in the application configuration form. The application is automatically linked to the service.
**Via Application labels:** Add the `harness.io/serviceRef` and `harness.io/envRef` labels to the Application resource metadata. When the agent syncs the application, Harness automatically maps it to the matching service and environment.
```yaml
metadata:
name: my-service-dev
labels:
harness.io/serviceRef: my-service
harness.io/envRef: dev
```
These labels can be set through the Harness UI, the ArgoCD UI, or `kubectl`. The label values must match the Harness service ID and environment ID.
**Via ApplicationSet YAML (App of Apps pattern only):** If you use ApplicationSets, add the `harness.io/*` labels in the template metadata so every generated application is automatically mapped. See the [ApplicationSet tutorial](/continuous-delivery/use-gitops/applicationsets/harness-git-ops-application-set-tutorial.md) for details.
#### After an application already exists
If an application was created without service labels (for example, imported from an existing Argo CD setup), you can link it to a service after the fact:
1. **Open the application:** Go to **Deployments** > **GitOps** > **Applications** and select the application.
2. **Map to a service:** In the **App Details** tab, choose to create a new service or map to an existing one.
3. **Apply:** Complete the mapping and click **Apply Changes**.
### GitOps Service Dashboard
The Service Dashboard gives you two levels of visibility: a **services list** showing all services in your project, and an **individual service detail** page showing deployment history and application status for a single service.
{% hint style="info" %}
* When the `CDS_GITOPS_SERVICE_BASED_LICENSING` feature flag is enabled, service instances are tracked based on ArgoCD Application syncs in addition to pipeline executions. This means that GitOps services can display instances even if they are synced independently (outside of a Harness pipeline), and the service dashboard reflects App Sync activity. Contact [Harness Support](mailto:support@harness.io) to enable this feature flag.
* Service instances appear on the dashboard after a PR pipeline has been executed with that specific service and environment, or after an ArgoCD Application linked to the service has been synced. A newly created service with no pipeline runs and no application syncs shows zero instances.
{% endhint %}
#### Services list
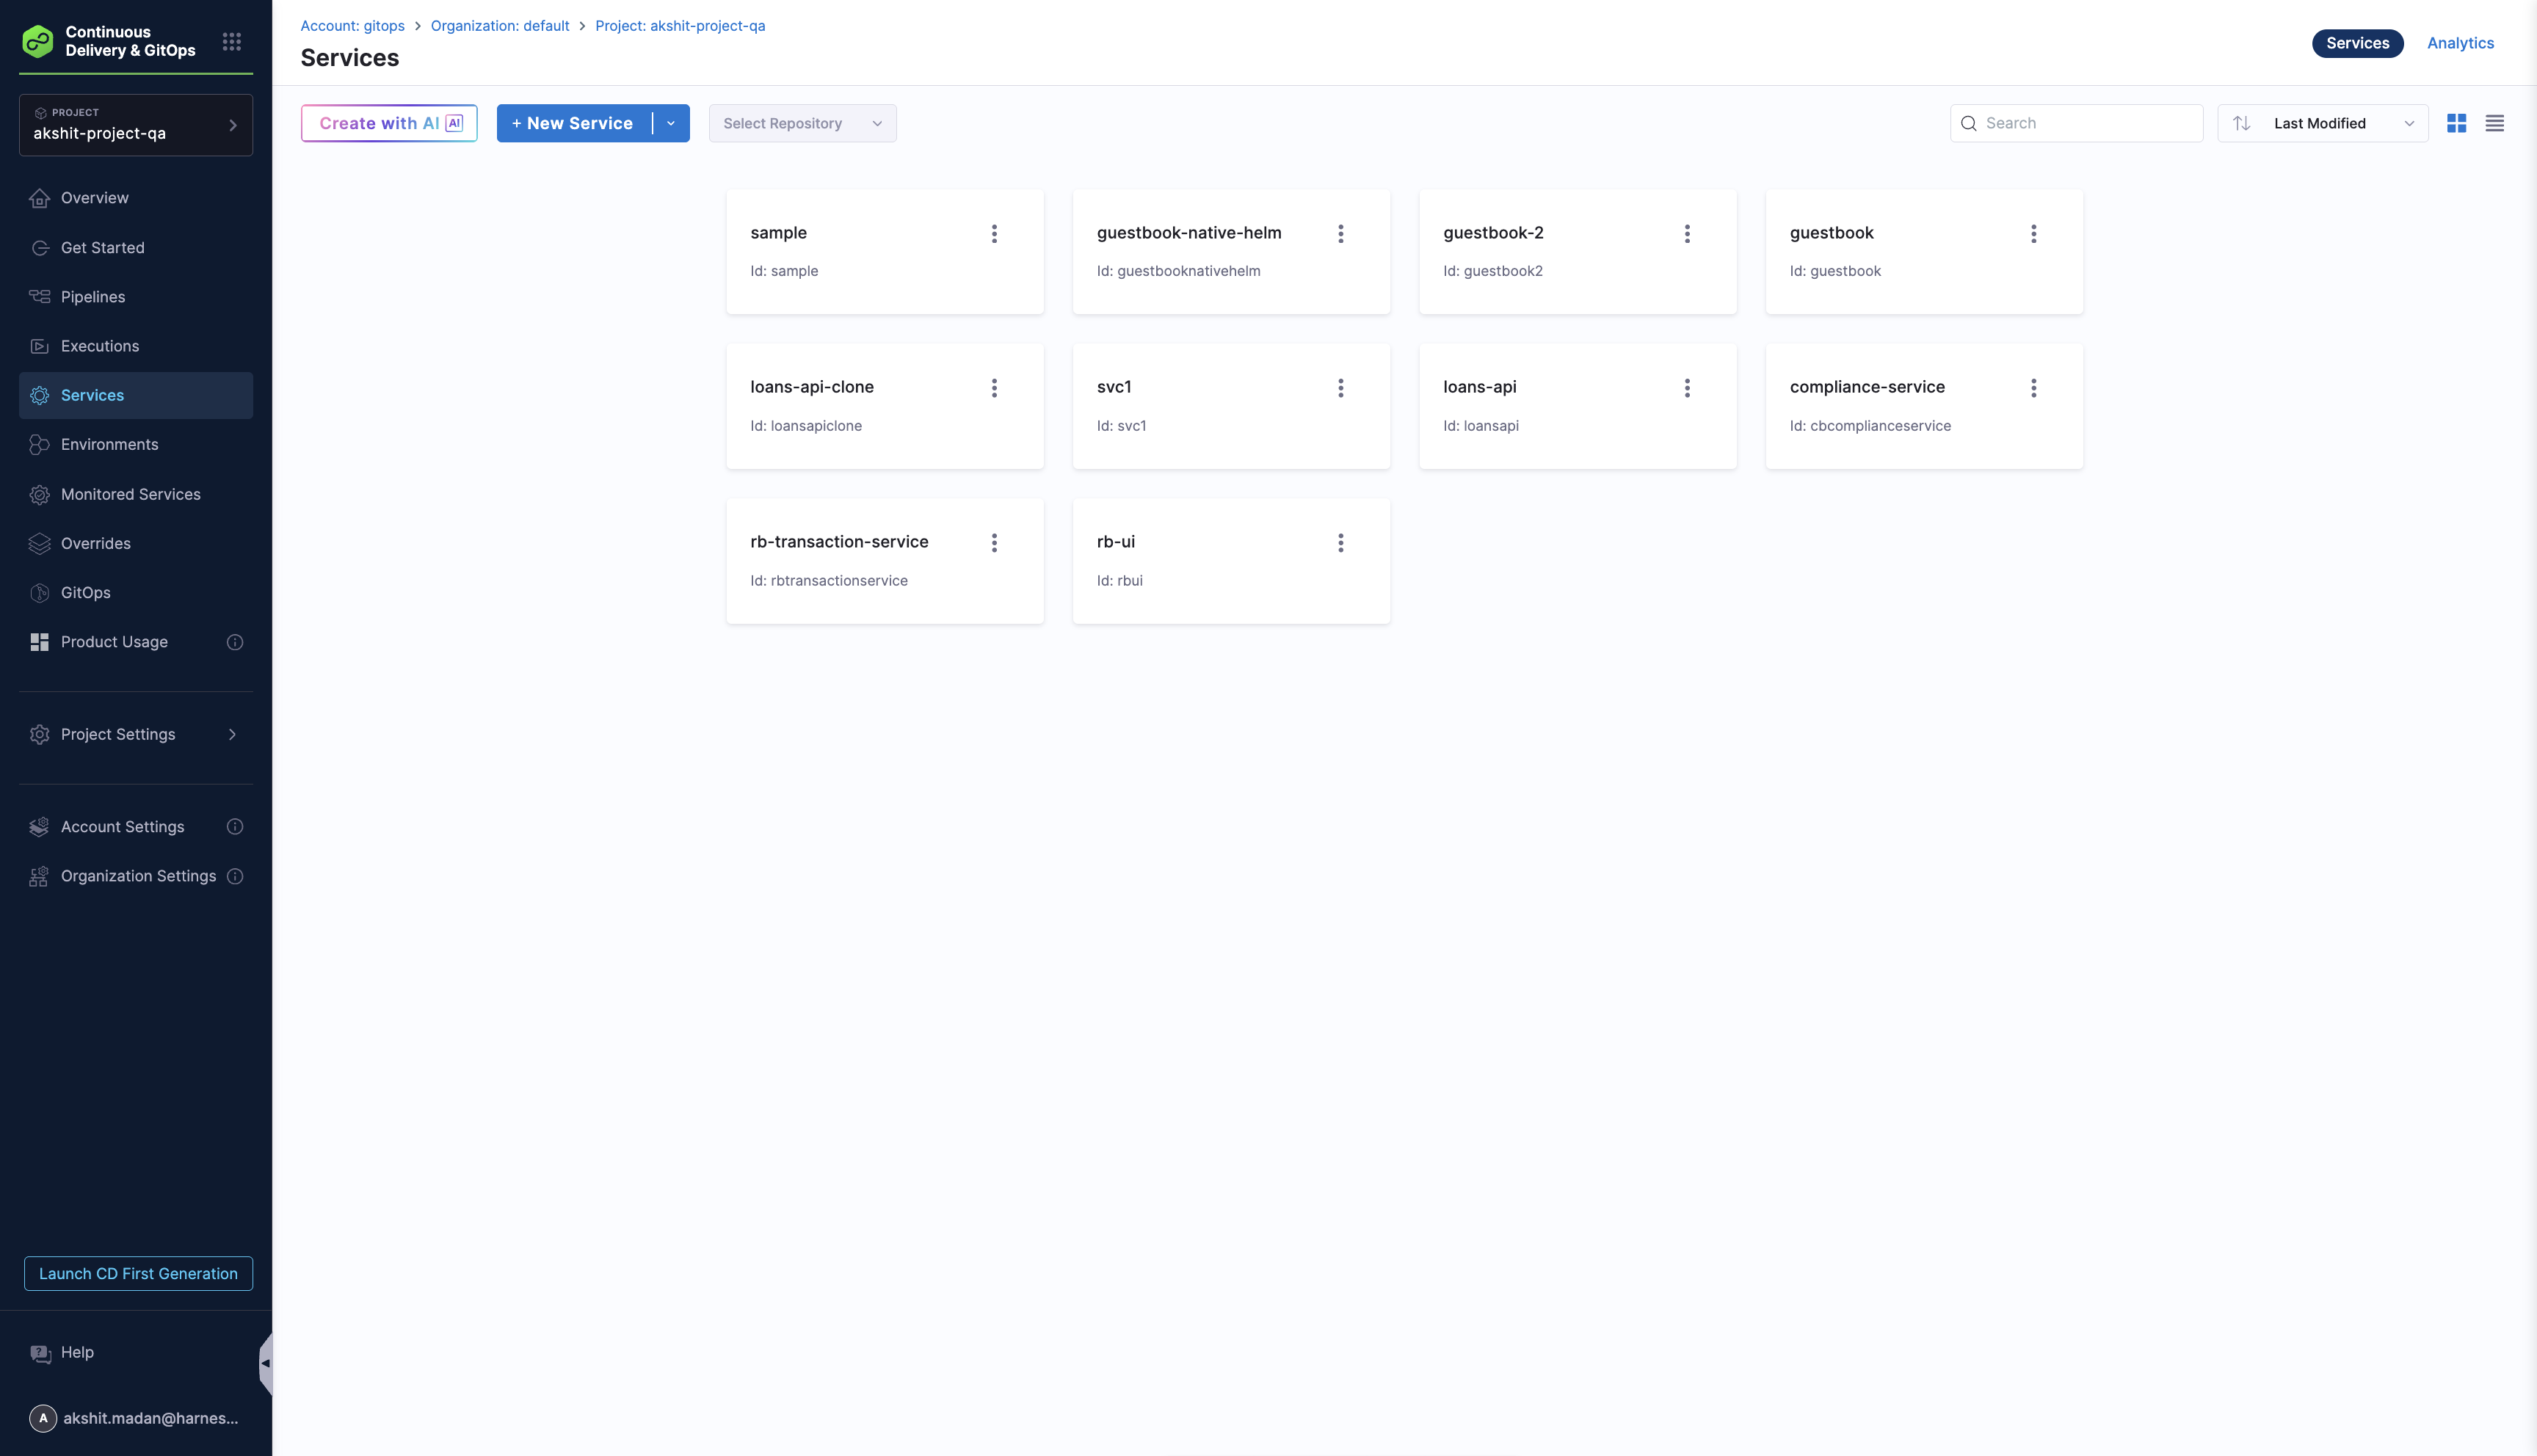
Navigate to **Deployments** > **Services** to see all services in your project. The list includes both traditional CD and GitOps services.
Click to view full size image
**Summary metrics** at the top of the page:
| Metric | Description |
| --------------------- | ------------------------------------------------------ |
| **Total Services** | Total number of services in your project |
| **Service Instances** | Number of active service instances across all services |
| **Deployments** | Total deployments in the selected time period |
| **Failure Rate** | Percentage of failed deployments |
| **Frequency** | Average number of deployments per day |
You can filter by time range (last 7 days, 30 days, or custom).
Click a service name to open its detail page.
#### Individual service detail
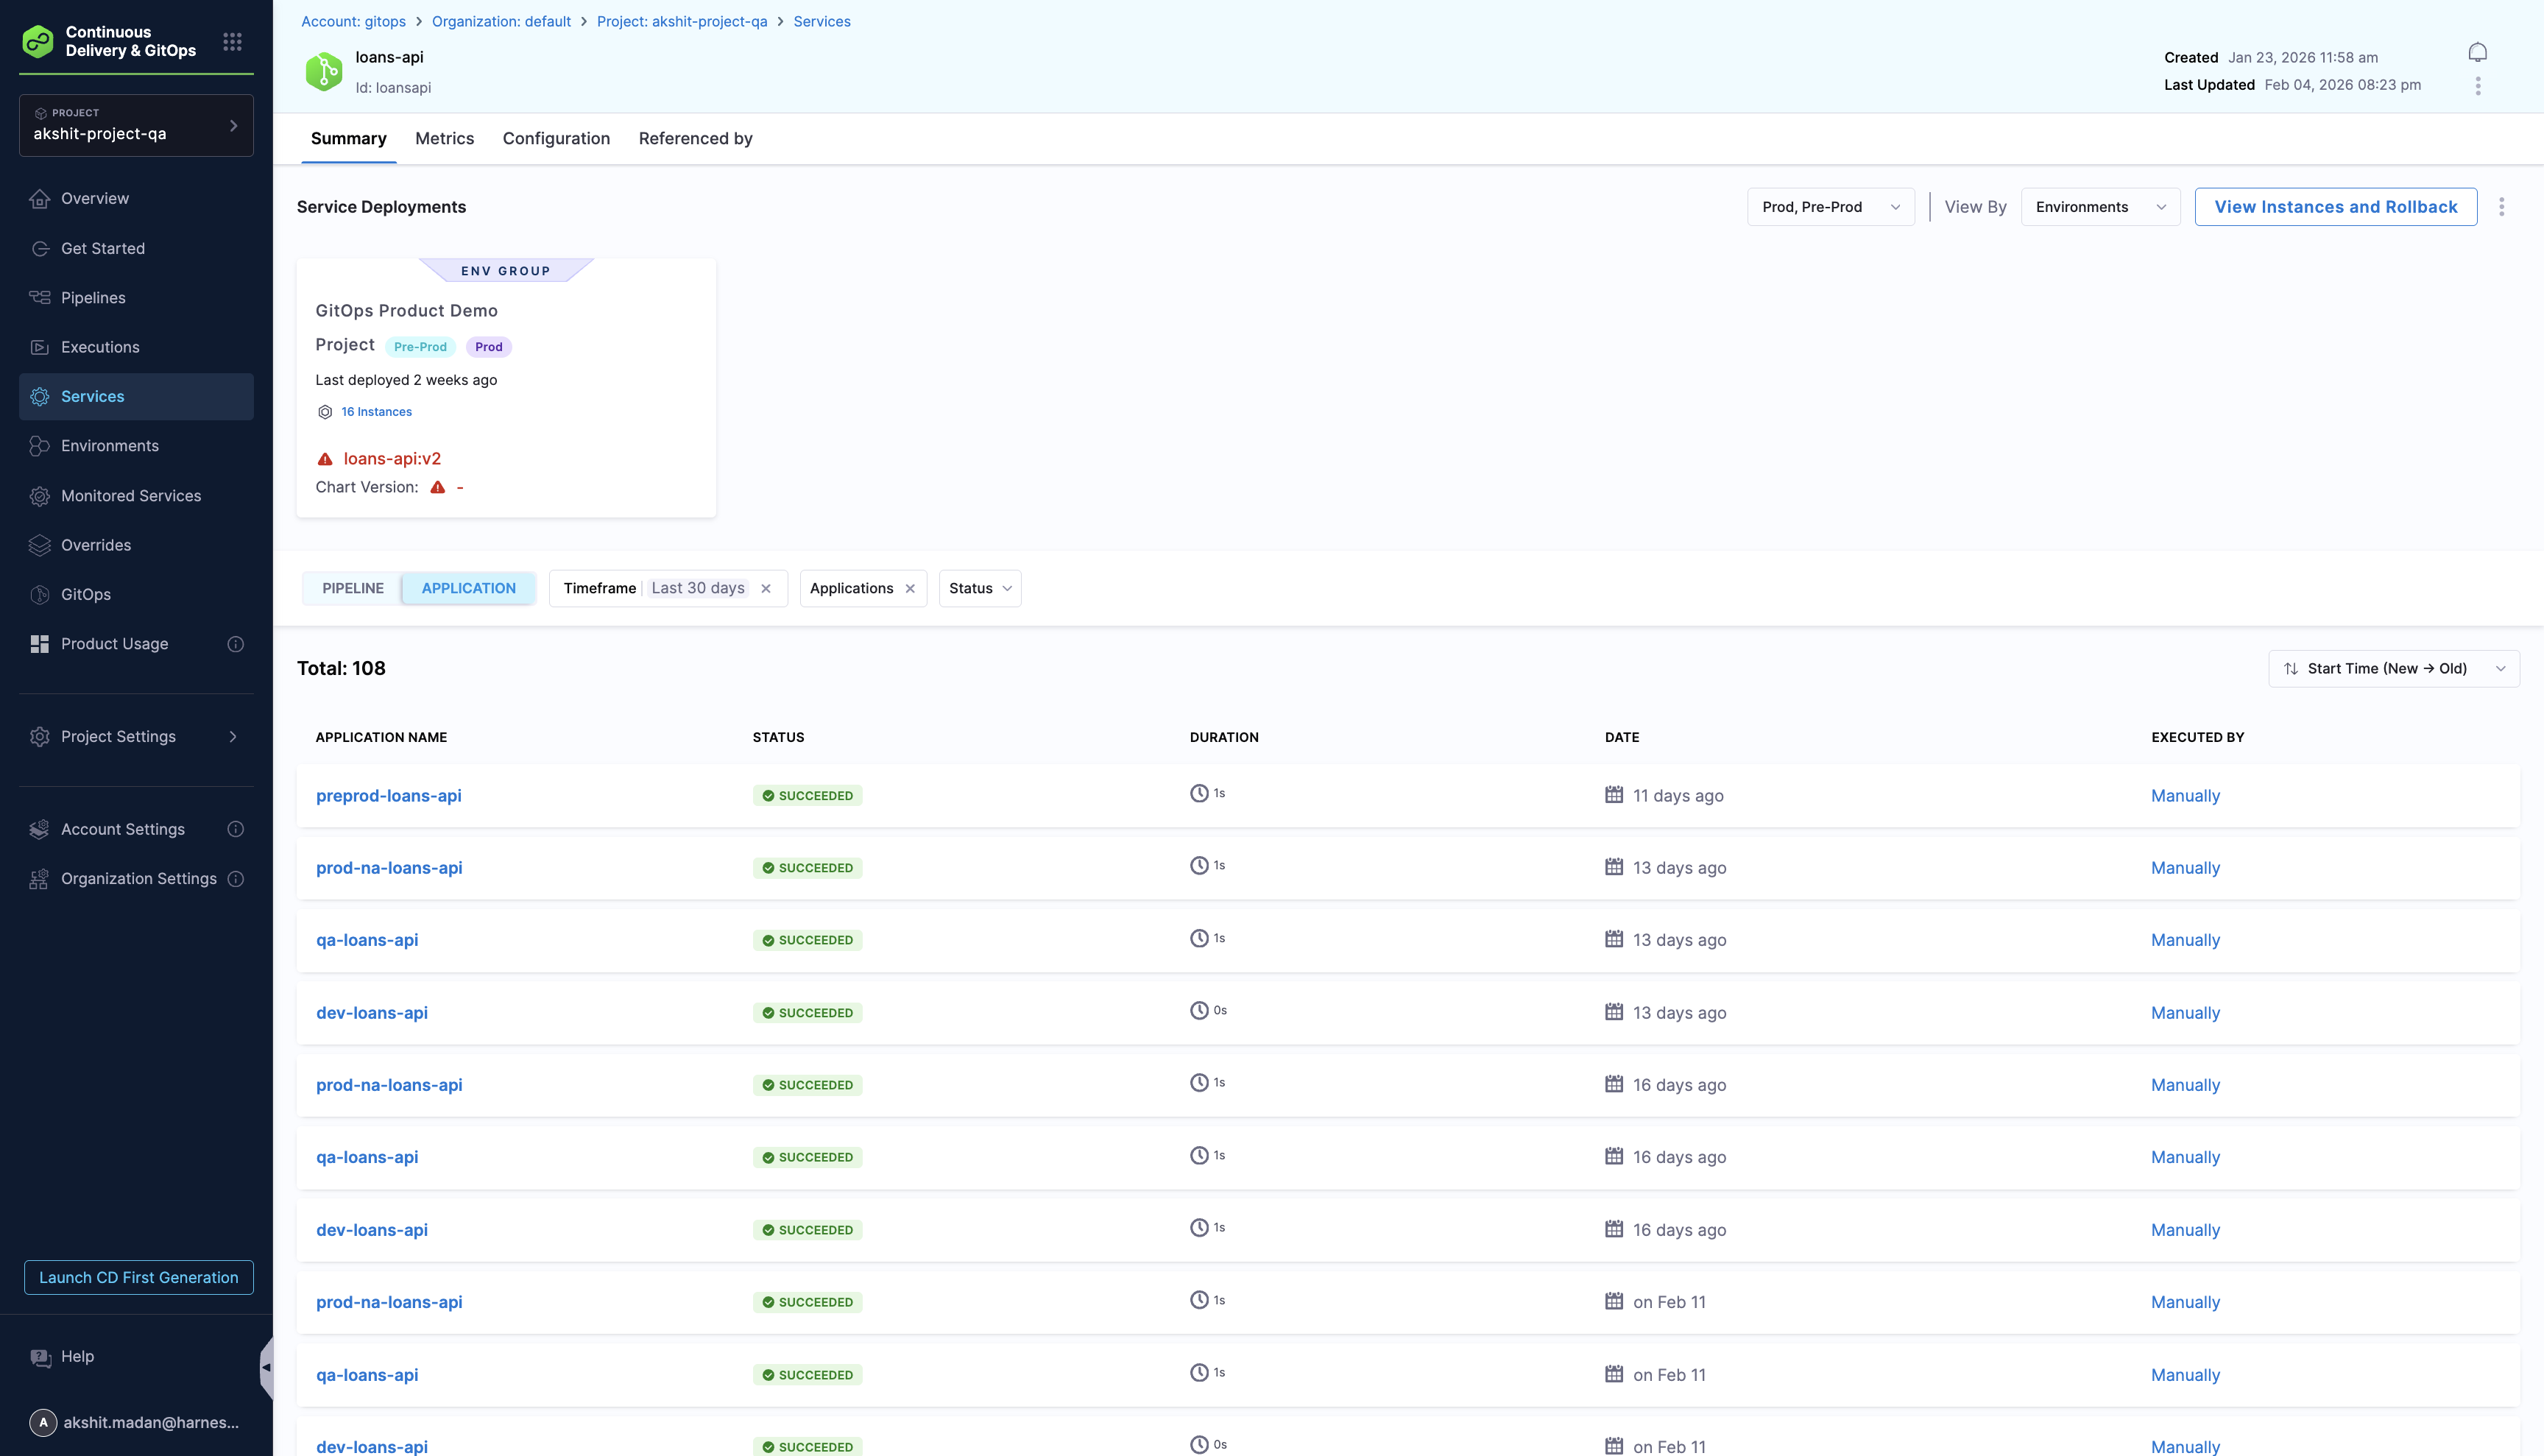
When you click into a service, you land on the **Summary** tab. This page shows the full deployment history and application status for that service.
Click to view full size image
The service detail page has four tabs:
| Tab | What it shows |
| ----------------- | ----------------------------------------------------------------------------------- |
| **Summary** | Deployment history, environment groups, linked applications, and instance counts |
| **Metrics** | Deployment frequency, success rate, and trends over time |
| **Configuration** | The service definition you configured (deployment type, manifests, variables, etc.) |
| **Referenced by** | Pipelines and other entities that reference this service |
**Summary tab**
The Summary tab is divided into two parts:
**Environment and instance overview (top):**
* **Environment groups and environments** where this service is deployed, shown as cards.
* Each card displays the environment name, environment type badges (**Prod** / **Pre-Prod**), last deployment time, instance count, and the current artifact version (for example, `loans-api:v2`).
* **View Instances and Rollback** button opens a detailed view of all active instances with the option to trigger a rollback.
* Use the **View By** dropdown to group by **Environments** or other dimensions, and filter by **Prod, Pre-Prod**, or both.
**Deployment history (bottom):**
* Toggle between **Pipeline** and **Application** views:
* **Pipeline view:** Shows PR pipeline executions that targeted this service.
* **Application view:** Shows individual ArgoCD application syncs associated with this service.
* Filter by **Timeframe**, **Applications**, and **Status**.
Click any row to view the full execution or sync details.
{% hint style="info" %}
**APP SYNC-BASED INSTANCE TRACKING**
When the `CDS_GITOPS_SERVICE_BASED_LICENSING` feature flag is enabled and a deployment happens through an ArgoCD Application sync:
* The dashboard displays the **Application name** instead of the pipeline name, even if the sync was triggered inside a pipeline.
* The **Deployed time** field is updated to reflect the sync time whenever the application syncs.
* Service instances are created and updated based on Application sync events, not just pipeline executions.
* The **Application view** in deployment history provides full visibility into all sync events for linked applications.
{% endhint %}
### Using GitOps Services with PR Pipelines
GitOps services are the foundation for [PR pipelines](/continuous-delivery/use-gitops/pr-pipelines/pr-pipelines-basics.md). A PR pipeline reads the manifest references and variables from your service, uses them to update configuration files in Git via pull requests, and then syncs the changes to your clusters through ArgoCD.
To learn how each pipeline step uses your service configuration, see [GitOps PR Pipelines](/continuous-delivery/use-gitops/pr-pipelines/pr-pipelines-basics.md#gitops-pipeline-steps).
### Next Steps
* [GitOps PR Pipelines](/continuous-delivery/use-gitops/pr-pipelines/pr-pipelines-basics.md)
* [Manage GitOps Applications](/continuous-delivery/use-gitops/application/manage-gitops-applications.md)
* [GitOps Services vs CD Services](/continuous-delivery/use-gitops/gitops-entities/service/gitops-vs-cd-service.md)
{% @harness-feedback/feedback %}