> For the complete documentation index, see [llms.txt](https://developer.harness.io/llms.txt). Markdown versions of documentation pages are available by appending `.md` to page URLs; this page is available as [Markdown](https://developer.harness.io/continuous-error-tracking/get-started/agent-onboarding-wizard.md).
# Agent Onboarding Wizard
Install and configure an Error Tracking Agent with the onboarding wizard.
{% hint style="info" %}
**NOTE**
This feature is behind the feature flag `CET_AGENT_WIZARD`. Contact [Harness Support](mailto:support@harness.io) to enable the feature.
{% endhint %}
The CET Agent Onboarding Wizard helps you quickly install and configure the CET Agent in your environment. The wizard:
* Provides instructions for downloading the necessary Agent installation files.
* Dynamically generates variable settings based on your environment details, which you can copy and apply during the Agent installation process.
This topic provides instructions on how to use the CET Agent Onboarding Wizard.
### Generate Agent configuration
To generate Agent configuration settings, do the following:
1. In your Harness project, navigate to the **Continuous Error Tracking** module, and then select **Monitored Services**.
The Monitored Services page appears, displaying a list of all the monitored services in your project. It also displays whether Agent and notifications are configured for each monitored service.
2. Select **Configure Error Tracking Agent** to start creating a configuration. You can also select a monitored service, go to the **Agent Configurations** tab, and then select **New error tracking agent configuration** to launch the agent wizard.
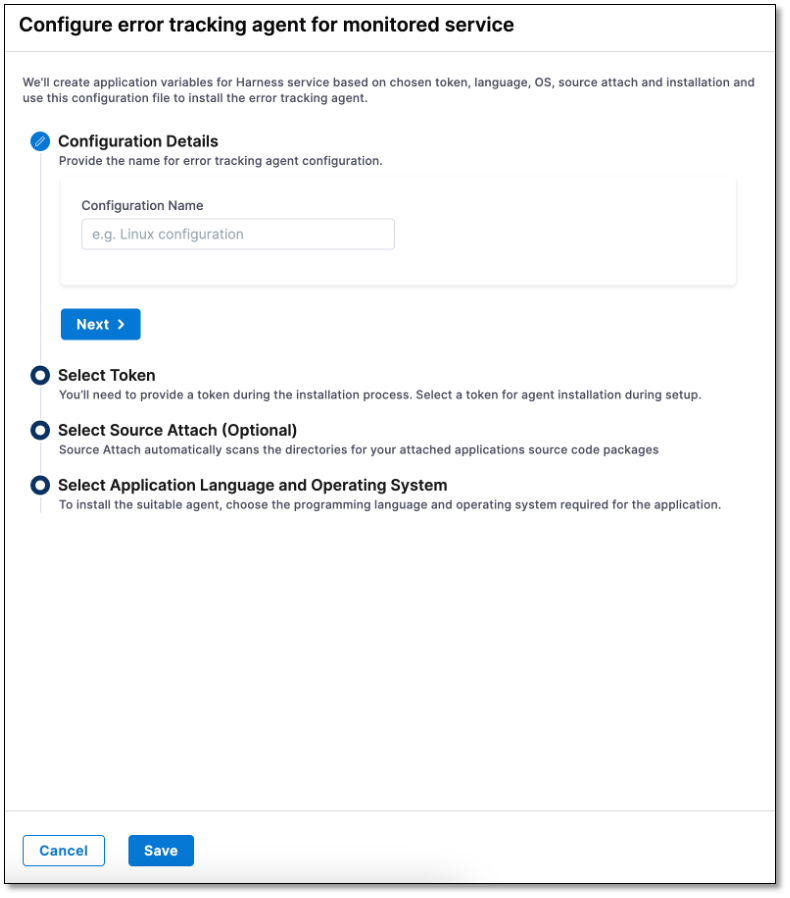
The Configure error tracking agent for monitored service wizard appears.
3. Enter a name for the configuration and select **Next**.
4. Select a token from the dropdown and select **Next**.
5. Optionally, provide source repository details if you want to access a code repository, branch, and commits related to errors from the ARC screen.
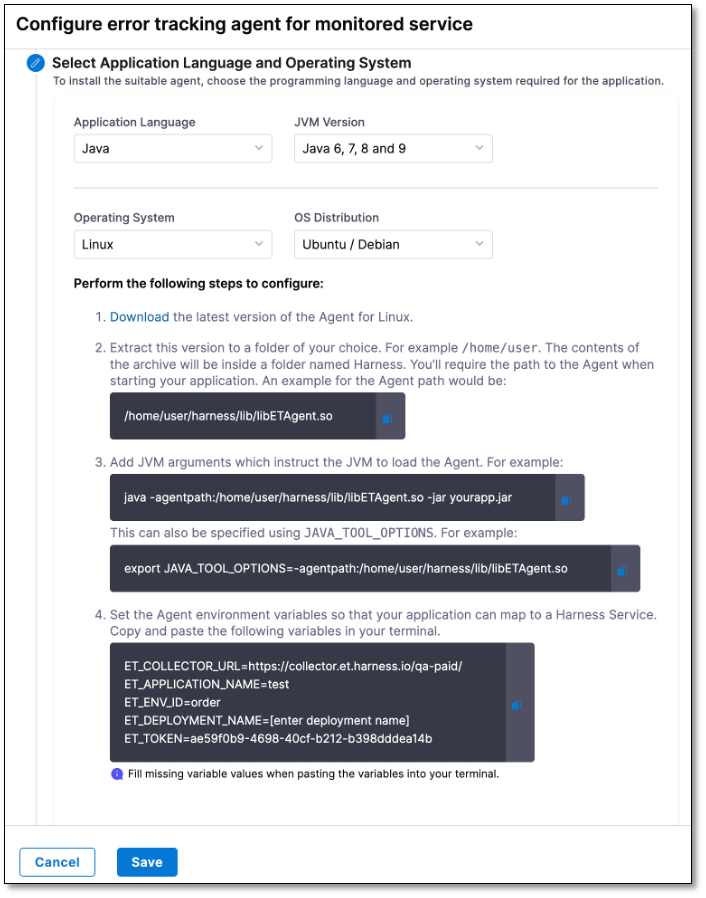
6. Select your application programming language, version, and OS. Based on the OS that you select, you might need to enter OS distribution details.
Once you have entered your programming language and OS information, CET displays the Agent configuration information and usage instructions.
7. Select **Save**.
The saved configuration is listed in the **Agent Configurations** tab.
### Use an Agent configuration
To view and use a configuration, do the following:
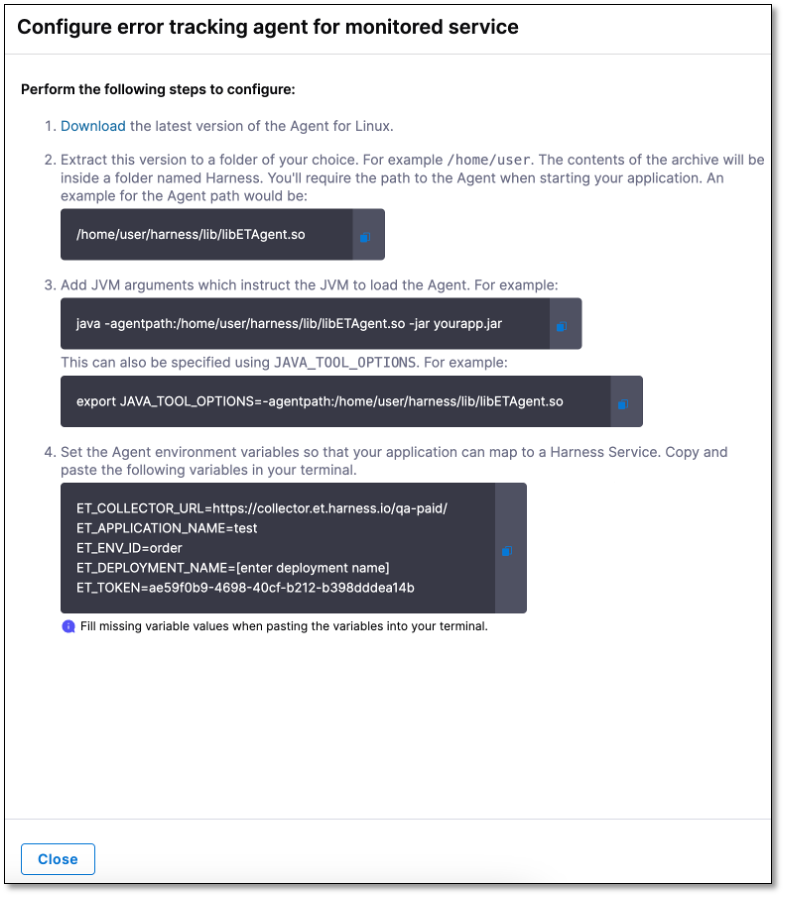
* In the **Agent Configurations** tab, locate the configuration that you want to use and select the **Code** (:solid:) button.
Use the instructions on the **Configure error tracking agent for monitored service** page to download the Agent, add JVM arguments, and set environment variables.
### Clone an Agent configuration
The **Clone** option allows you to create a new Agent configuration quickly based on an existing one.
To clone an Agent configuration, follow these steps:
1. In the **Agent Configurations** tab, locate the configuration you wish to clone and select the **Copy** (:regular:) button.
The Configure error tracking agent for monitored service page is displayed.
2. Make the necessary changes to the configuration settings, and then select Save.
The newly saved configuration appears in the Agent configuration tab.
### Edit an Agent configuration
The **Edit** option allows you to change the settings of an existing Agent configuration.
To edit an Agent configuration, follow these steps:
1. In the **Agent Configurations** tab, locate the configuration you wish to edit, and then select **More options** (:solid:) > **Edit**.
The Configure error tracking agent for monitored service page is displayed.
2. Make the necessary changes to the configuration settings, and then select **Save**.
The changes will be applied to the Agent configuration.
### Delete an Agent configuration
The **Delete** option allows you to delete an existing Agent configuration.
To delete an Agent configuration, follow these steps:
1. In the **Agent Configurations** tab, locate the configuration you wish to edit, and then select **More options** (:solid:) > **Delete**.
2. In the confirmation message that appears, select **Confirm**.
The Agent configuration will be deleted.
{% @harness-feedback/feedback %}