Set up CCM for Azure
Harness Cloud Cost Management (CCM) monitors the cloud costs of your Azure services. Connect your Azure account and set up Billing Export to get insights into your cloud infrastructure and Azure services such as Storage accounts, Virtual machines, Containers, and so on. CCM also allows you to optimize your instances and AKS clusters using intelligent cloud AutoStopping rules.
After enabling CCM, it takes about 24 hours for the data to be available for viewing and analysis.
Prerequisites
- Make sure that you have the Application Administrator role assigned to your Azure AD. Users in this role can create and manage all aspects of enterprise applications, application registrations, and application proxy settings. See Application Administrator.
- Many Azure CLI commands act within a subscription. Make sure that you have selected the right subscription before executing the commands.
If you need to switch subscription, run:
az account set -s <'*'subs id/name'*'>For more information, see Manage Subscriptions.
Azure Connector requirements
- The same connector cannot be used in NextGen and FirstGen. For information on creating an Azure connector in the FirstGen see Set Up Cost Visibility for Azure.
- For CCM, Azure connectors are available only at the Account level in Harness.
- You can create multiple Azure connectors for each Harness Account.
- You can create multiple Azure connectors per Azure Tenant with unique subscription IDs.
- If you have separate billing exports for each of your subscriptions in your Azure account, set up separate connectors in Harness to view the cloud cost of all the subscriptions in CCM.
Connect CCM to your Azure Account
To enable CCM for your Azure services (such as storage accounts, virtual machines, containers, and so on), you need to connect Harness to your Azure account.
Perform the following steps to connect to your Azure account:
- Create a new Kubernetes connector using one of the two options below:
- From Account Settings
- From Cloud Costs
- Go to Account Resources > Connectors.
- Select + New Connector.
- Under Cloud Costs, select Azure.
- Go to Setup > Cloud Integration.
- Select on New Cluster/Cloud account.
- Select Azure.
- Perform the following tasks in the Azure Connector wizard.
Overview
- In the Azure Connector wizard, in the Overview section, enter the following details:
-
Connector name: Enter a name for the connector.
-
Azure Tenant ID: Enter the Tenant ID of your Azure AD account. A tenant represents an organization. It's a dedicated instance of Azure AD that an organization or app developer receives at the beginning of a relationship with Microsoft. Each Azure AD tenant is distinct and separate from other Azure AD tenants. To find your tenant ID, do the following:
- Launch Microsoft Entra ID (formerly Active Directory).
- Copy the tenant ID from the Tenant information.
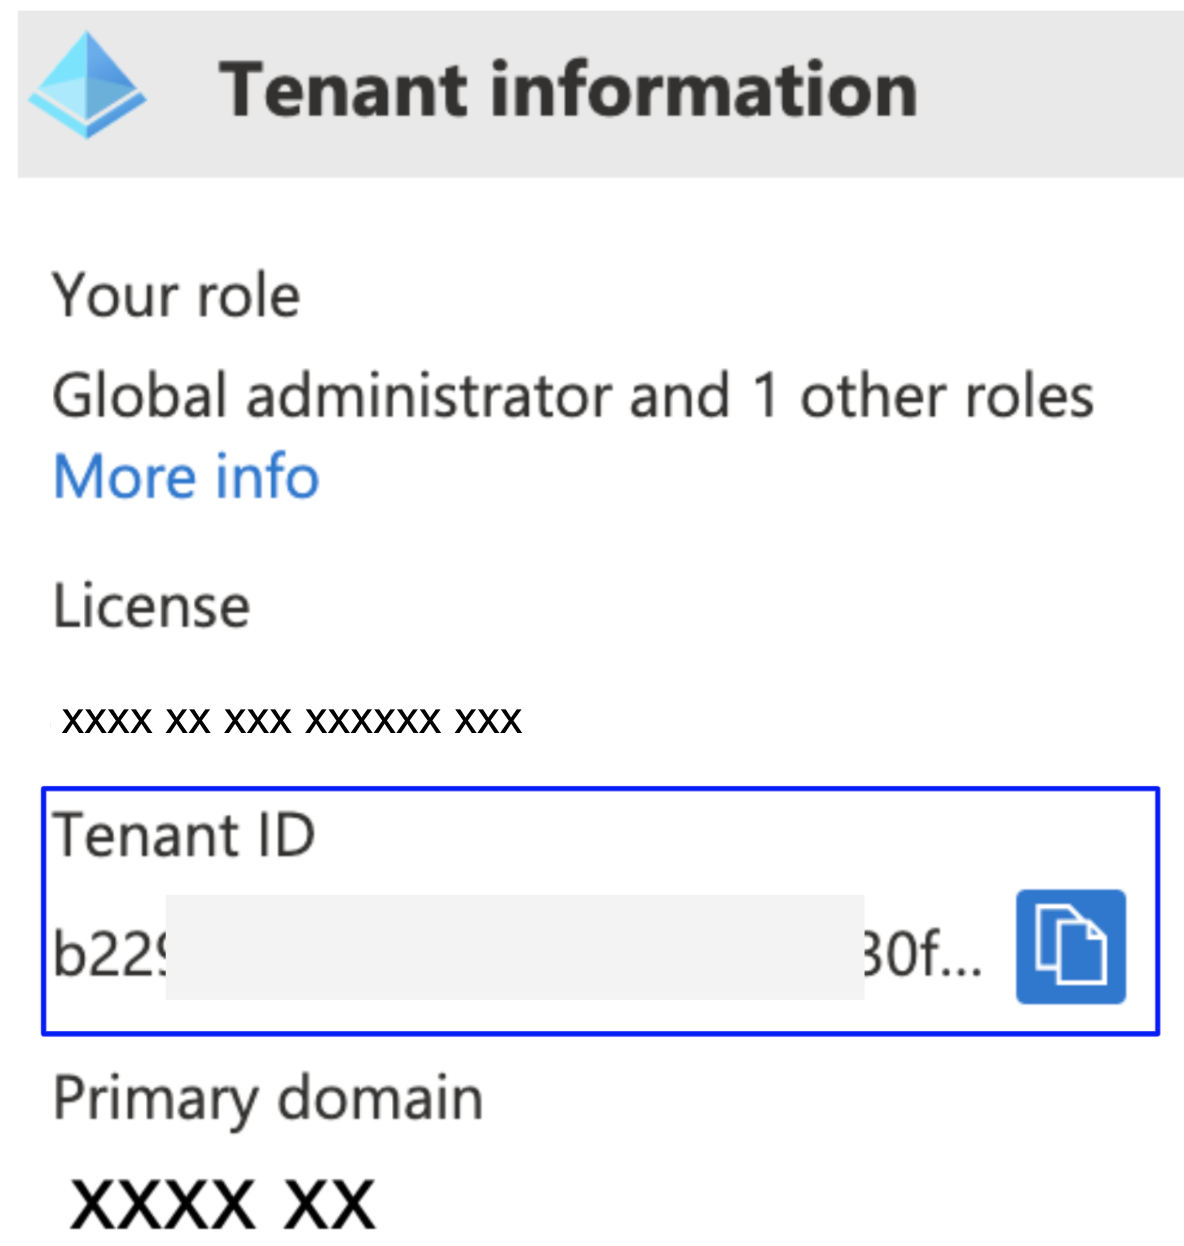
If you don't find the tenant ID in the Azure console, run the
az account showcommand using the Azure CLI. -
Azure Subscription ID: Enter the Azure subscription ID. To find your Subscription ID, do the following:
- Launch Azure Cost Management page.
- Under Product + services, select Azure subscriptions.
- Copy the Subscription ID for your subscription.
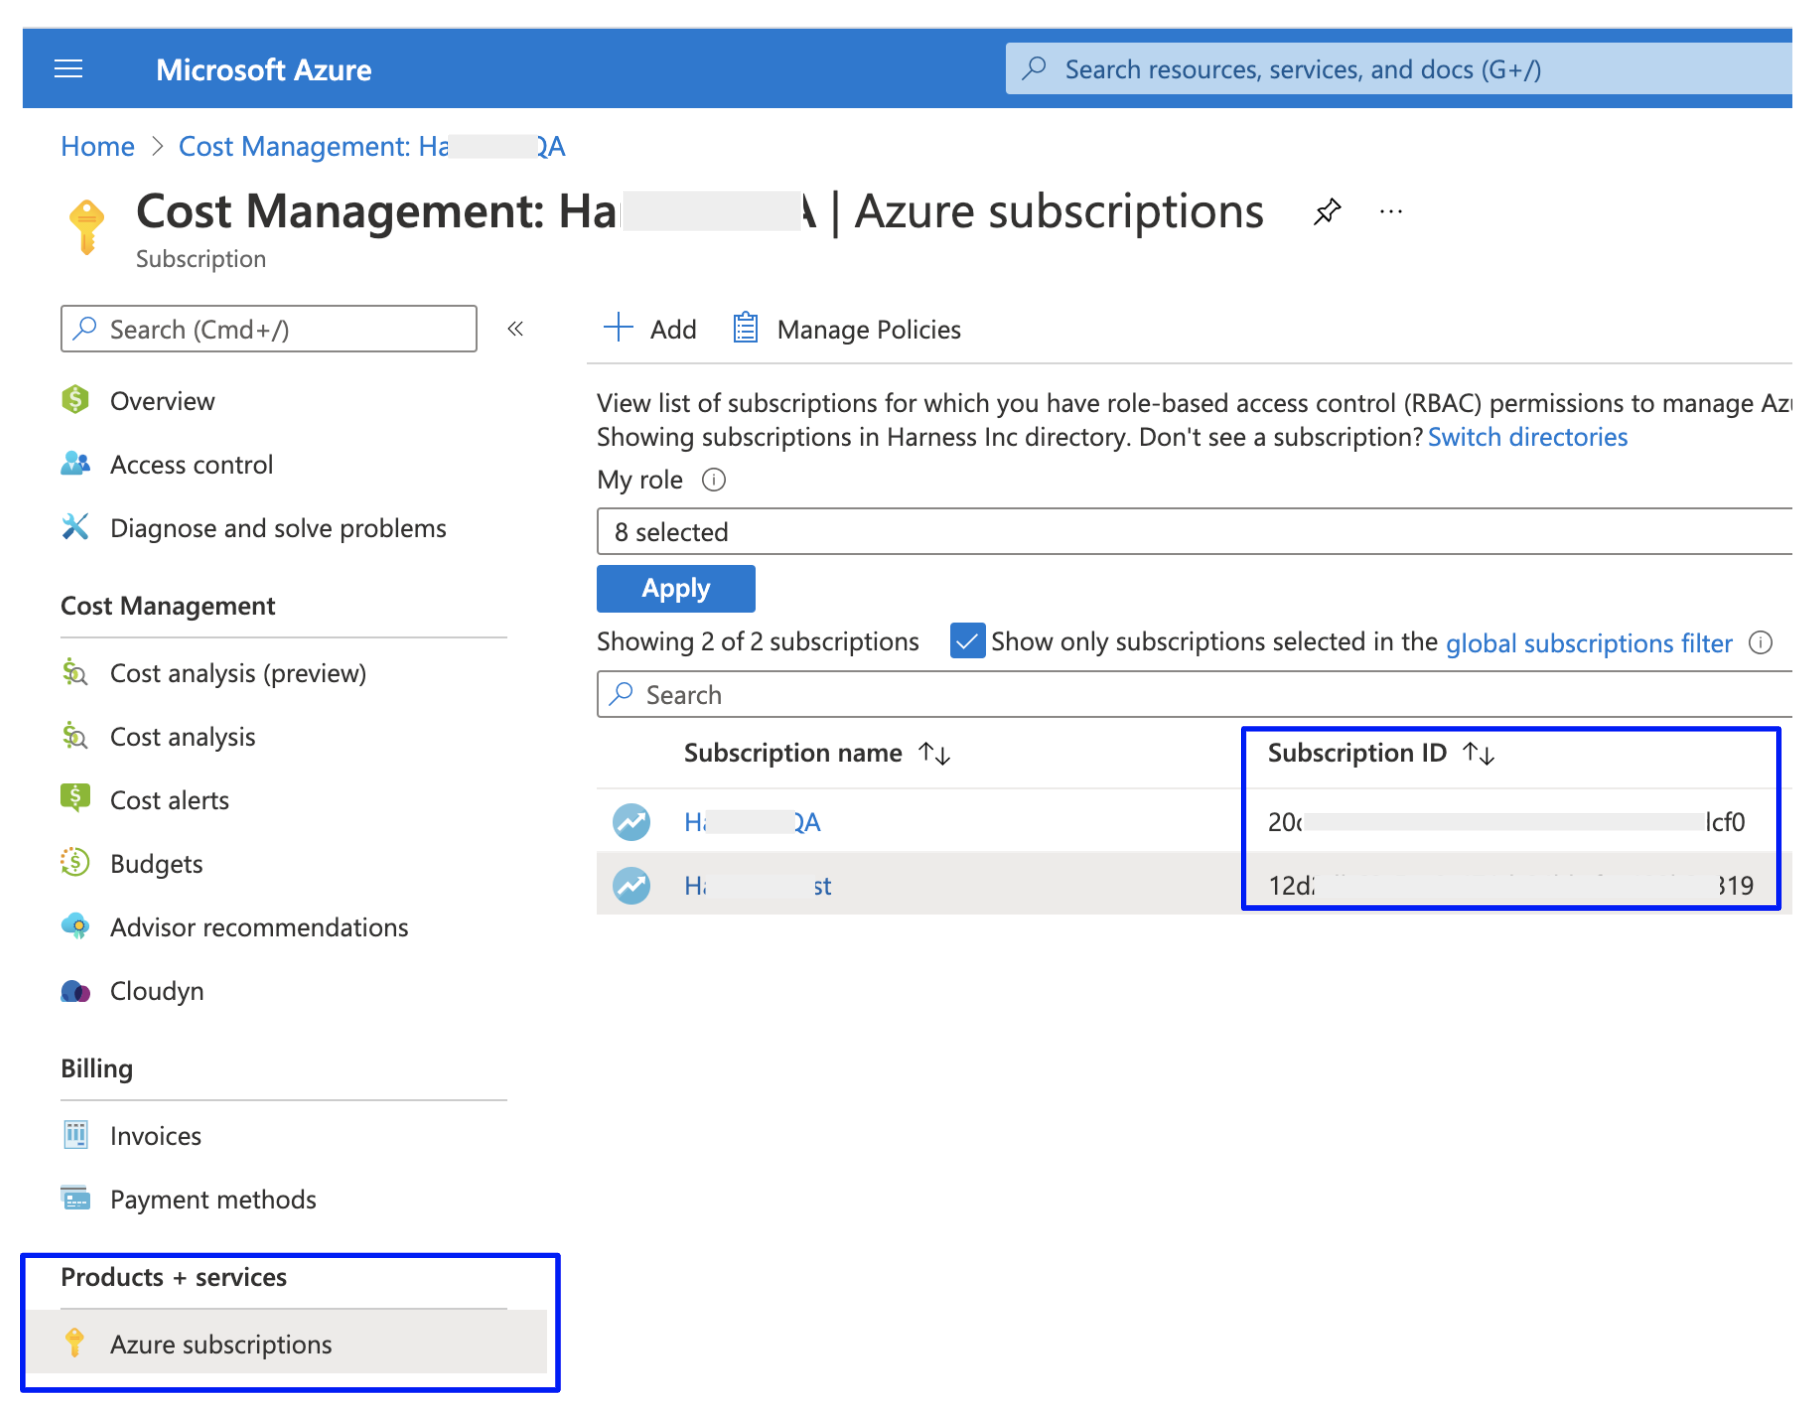
If you don't find the Subscription ID in the Azure console, you can use Azure CLI. See List your Azure subscriptions with CLI.
-
Description (optional): Enter a brief description that conveys the purpose of this connector.
-
Tag (optional): Enter text to create a tag for this connector.
-
- Select Continue.
Azure Billing Exports
Billing export is used to get insights into your cloud infrastructure and Azure services such as Storage accounts, Virtual machines, Containers, etc.
-
In Azure Billing Exports, select Launch Azure Billing Exports.

-
In the Azure Cost Management portal, under Settings, in Exports, select Add to create a new export.
-
In Export details, provide the following details:
- Enter a name for your export.
- In Metrics, select one of the following cost type:
- Actual cost (Usage and Purchases) - Select to export standard usage and purchases.
- Amortized cost (Usage and Purchases) - Select to export amortized costs for purchases like Azure reservations and Azure savings plan for compute.
- In Export type, select Daily export of month-to-date costs.
- In the Start date, leave the date as the current date. For example, if you are creating a new export on March 1, 2021, select the date as Mon Mar 01 2021.
-
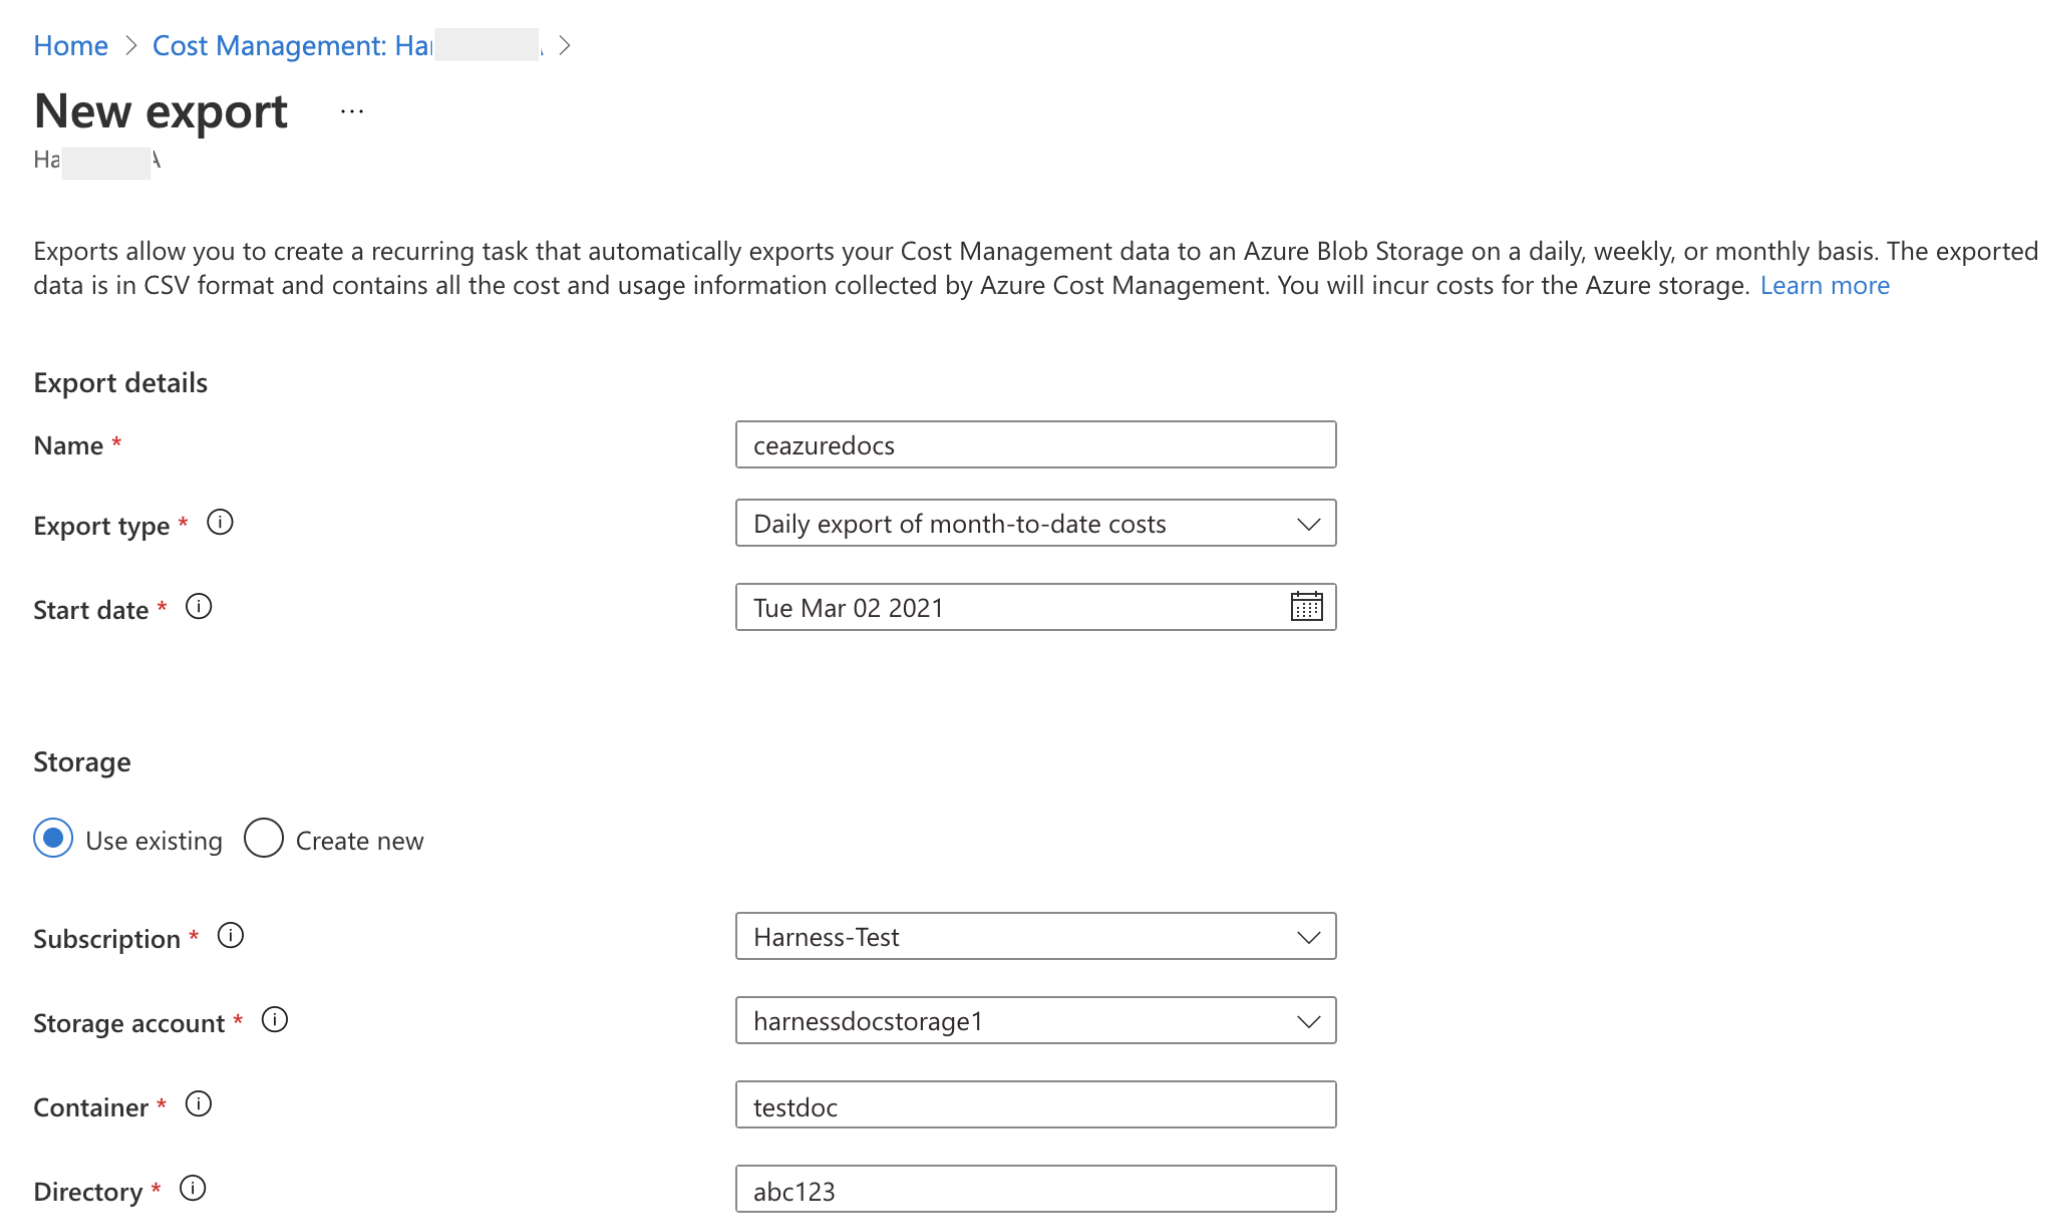
In Storage, you can select Use existing or Create new.
- If you select Use existing, enter the following details:
- In Subscription, select the Subscription of your storage account.
- In the Storage account, select the storage account where the data needs to be exported.
- In Container, enter the container name where the report is to be stored.
- In Directory, enter the directory path where the export is to be stored.
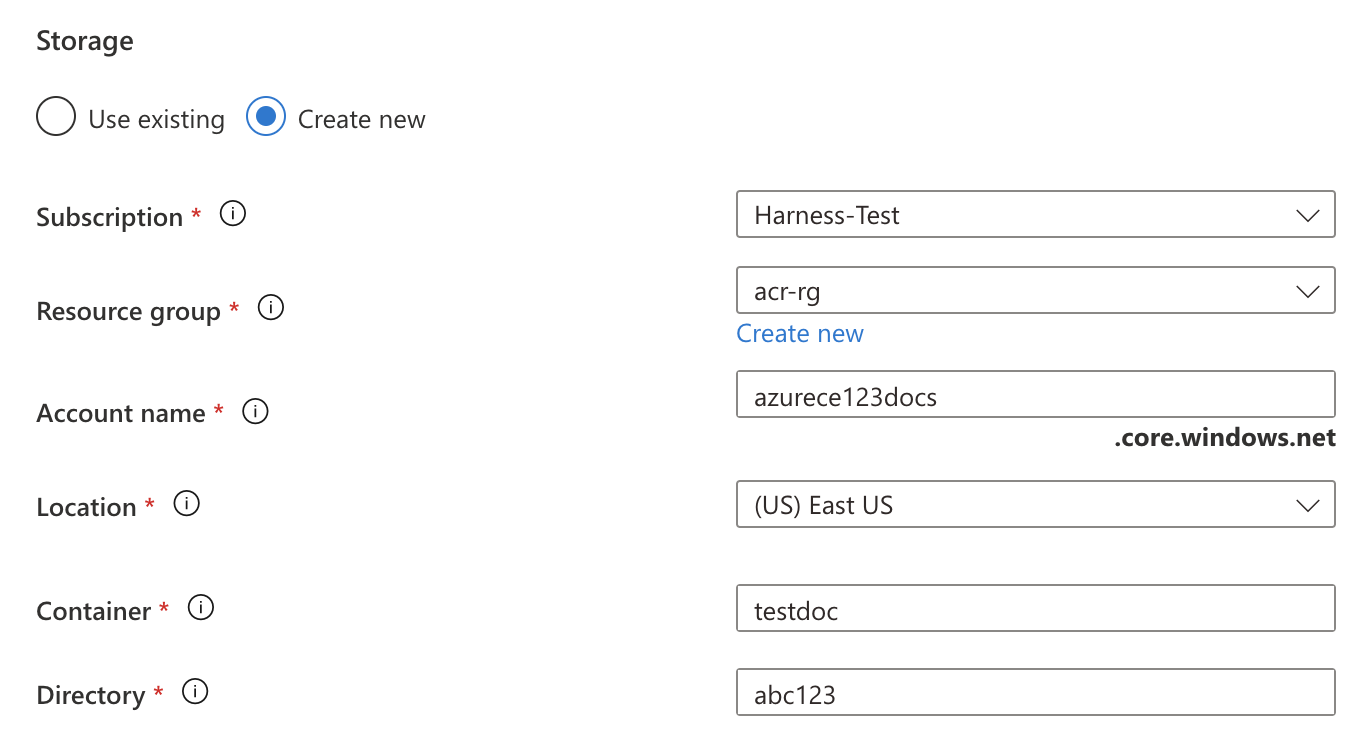
- If you select Create new, enter the following details:
- In Subscription, select the Subscription of your storage account.
- In the Resource group, select the group to place the storage account. You can also create a new resource group. A resource group is a container that holds related resources for an Azure solution.
- In Account name, enter the name for your storage account.
- In Location, select the region for your storage account.
- In Container, enter the container name where the report is to be stored.
- In Directory, enter the directory path where the export is to be stored.
- Make a note of the Storage account name. You need it while assigning permissions to the storage account.
- Select Create. Your export report is listed in the Exports list.
- If you select Use existing, enter the following details:
-
Select the export that you created in the previous step and select Run now.

-
In the Azure Cost Management portal, select the billing export that you created in the enable export billing step.
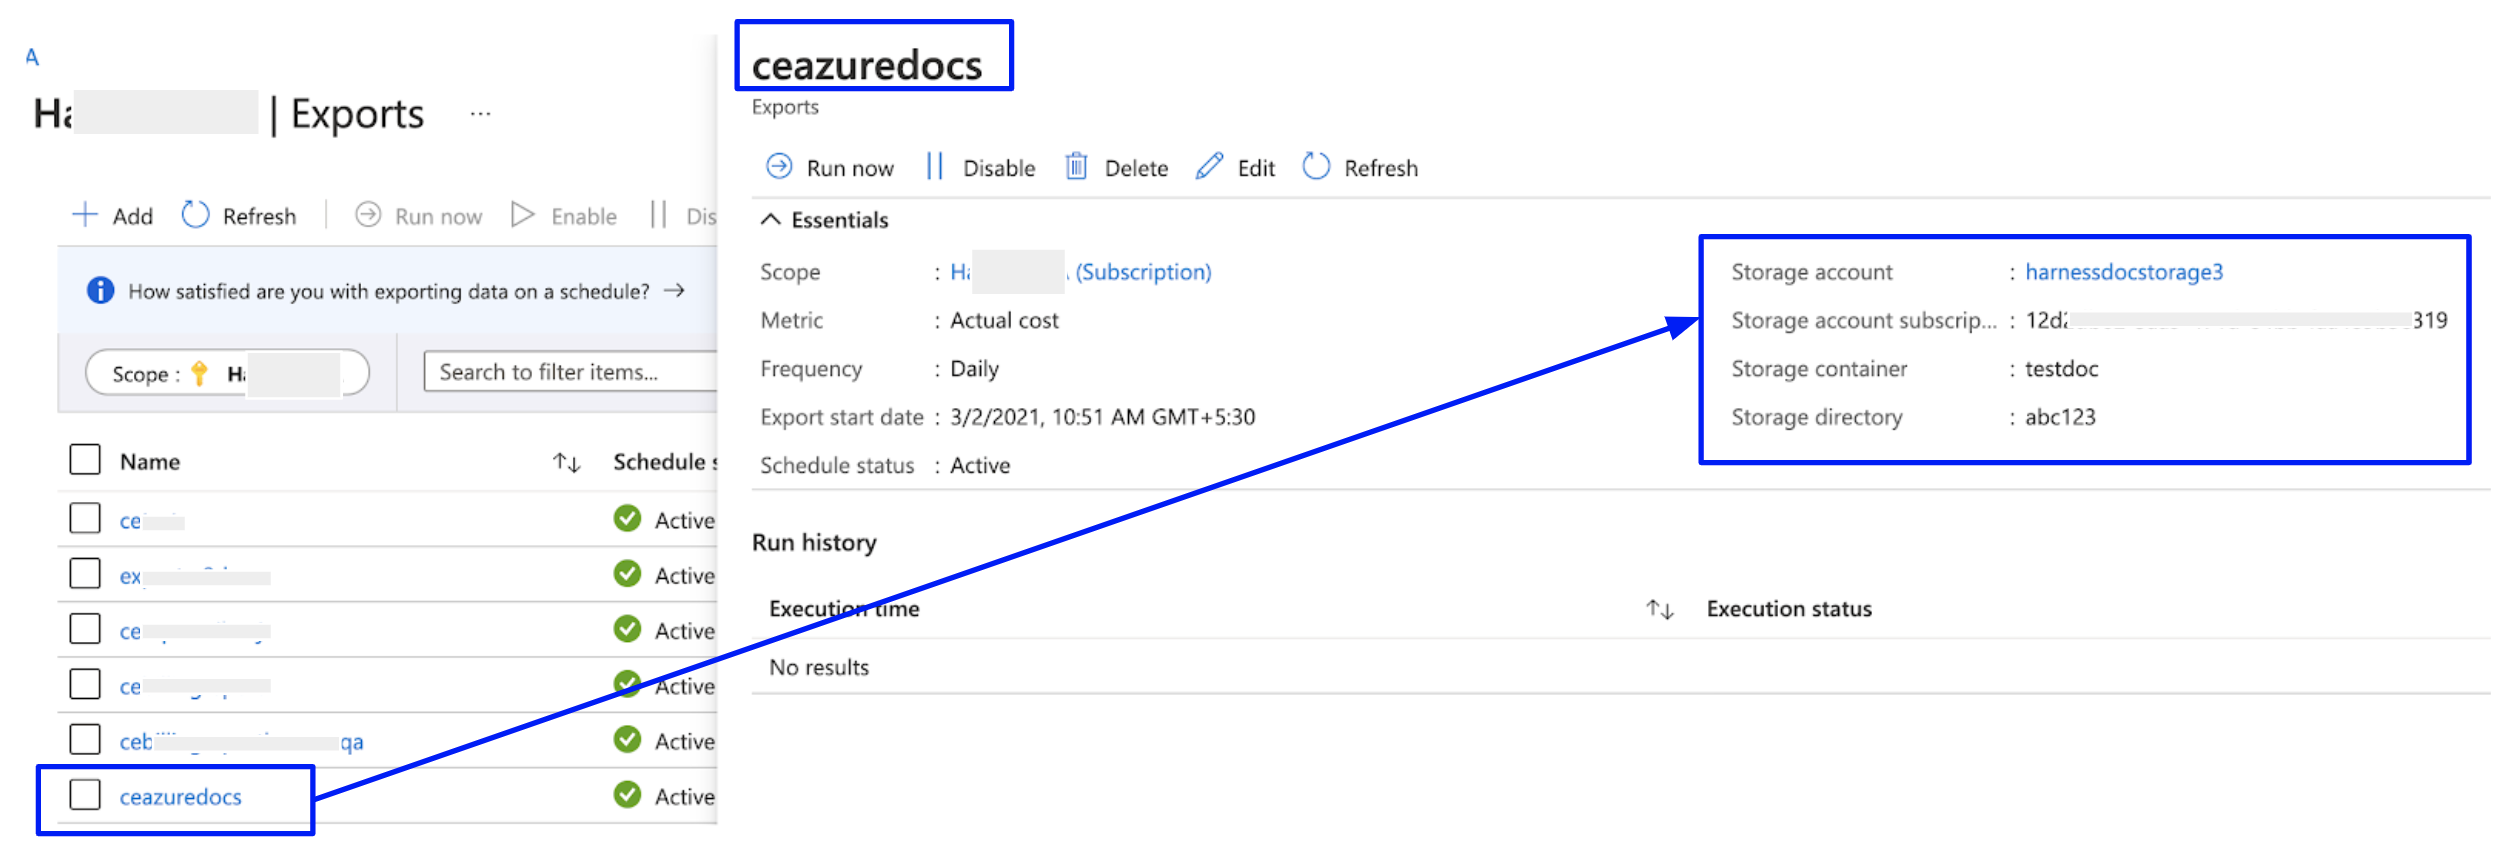
-
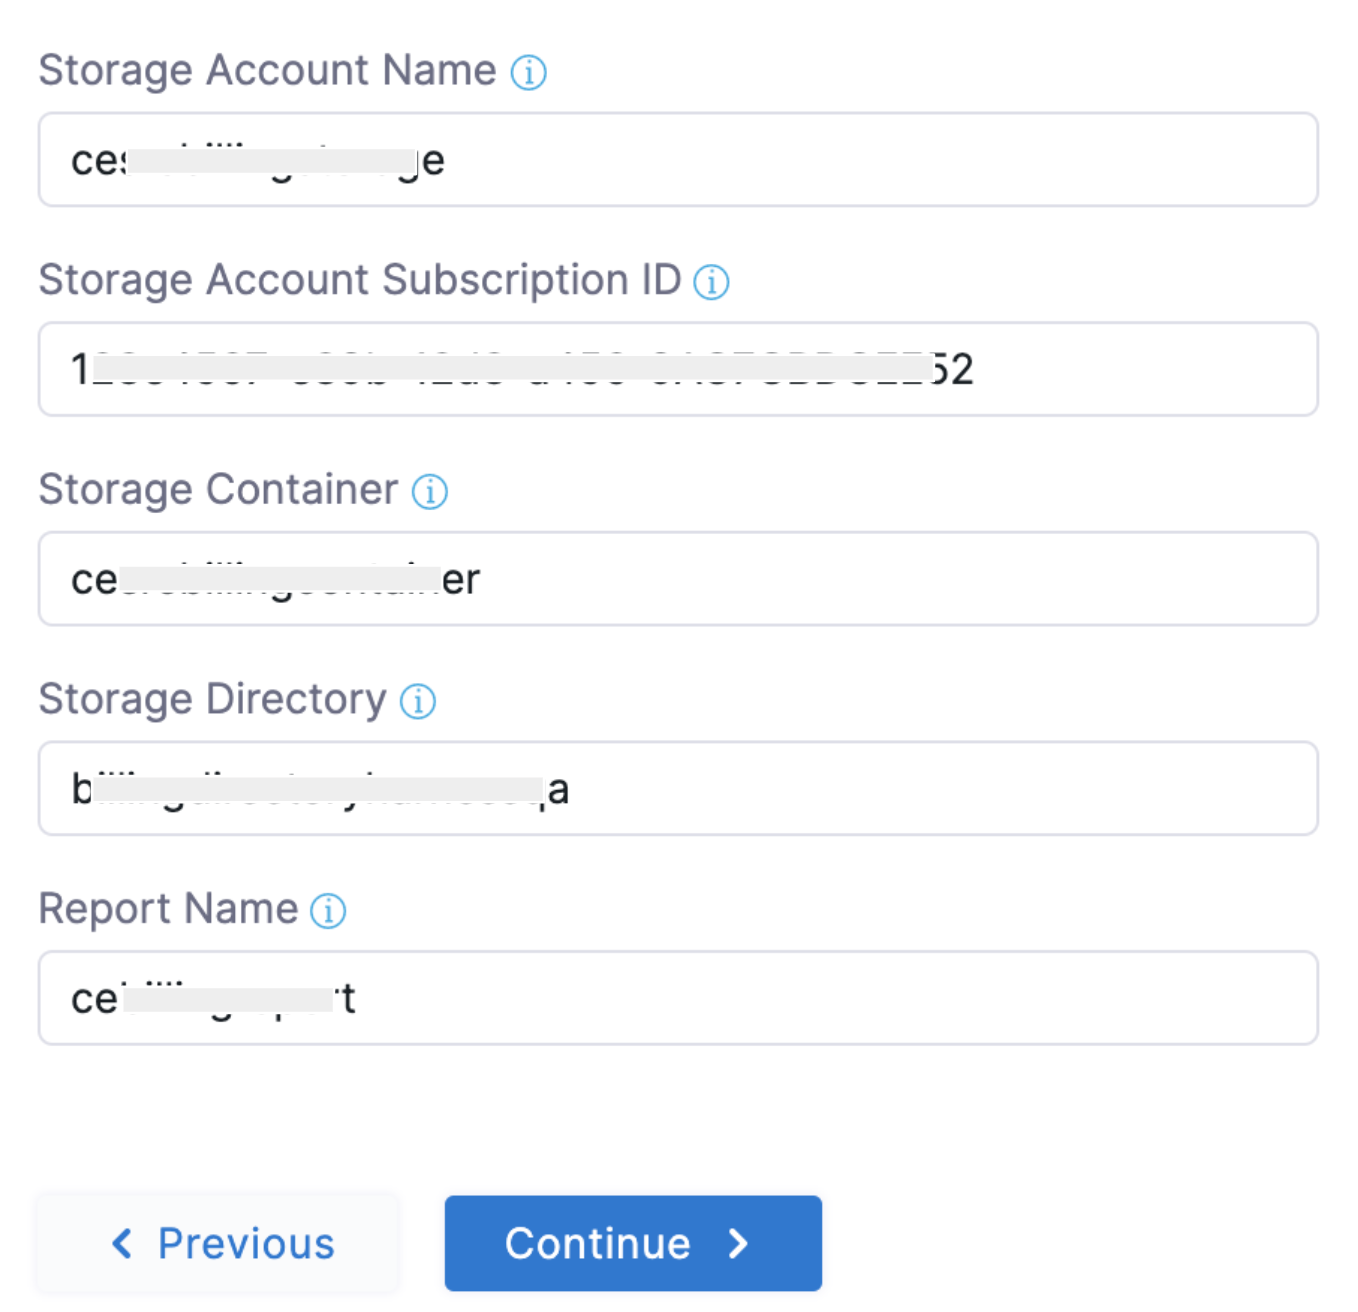
Enter the following details in Harness:
- In the Storage account name, enter the account name.
- In Storage Container, enter the container name.
- In Storage Directory, enter the directory name.
- In Report Name, enter the export name.
-
Select Continue.
Choose Requirements
- Select Cost Visibility and Azure resource optimization using AutoStopping rules in Create Cross Account Role. Make sure to add the required permissions to the service principal.
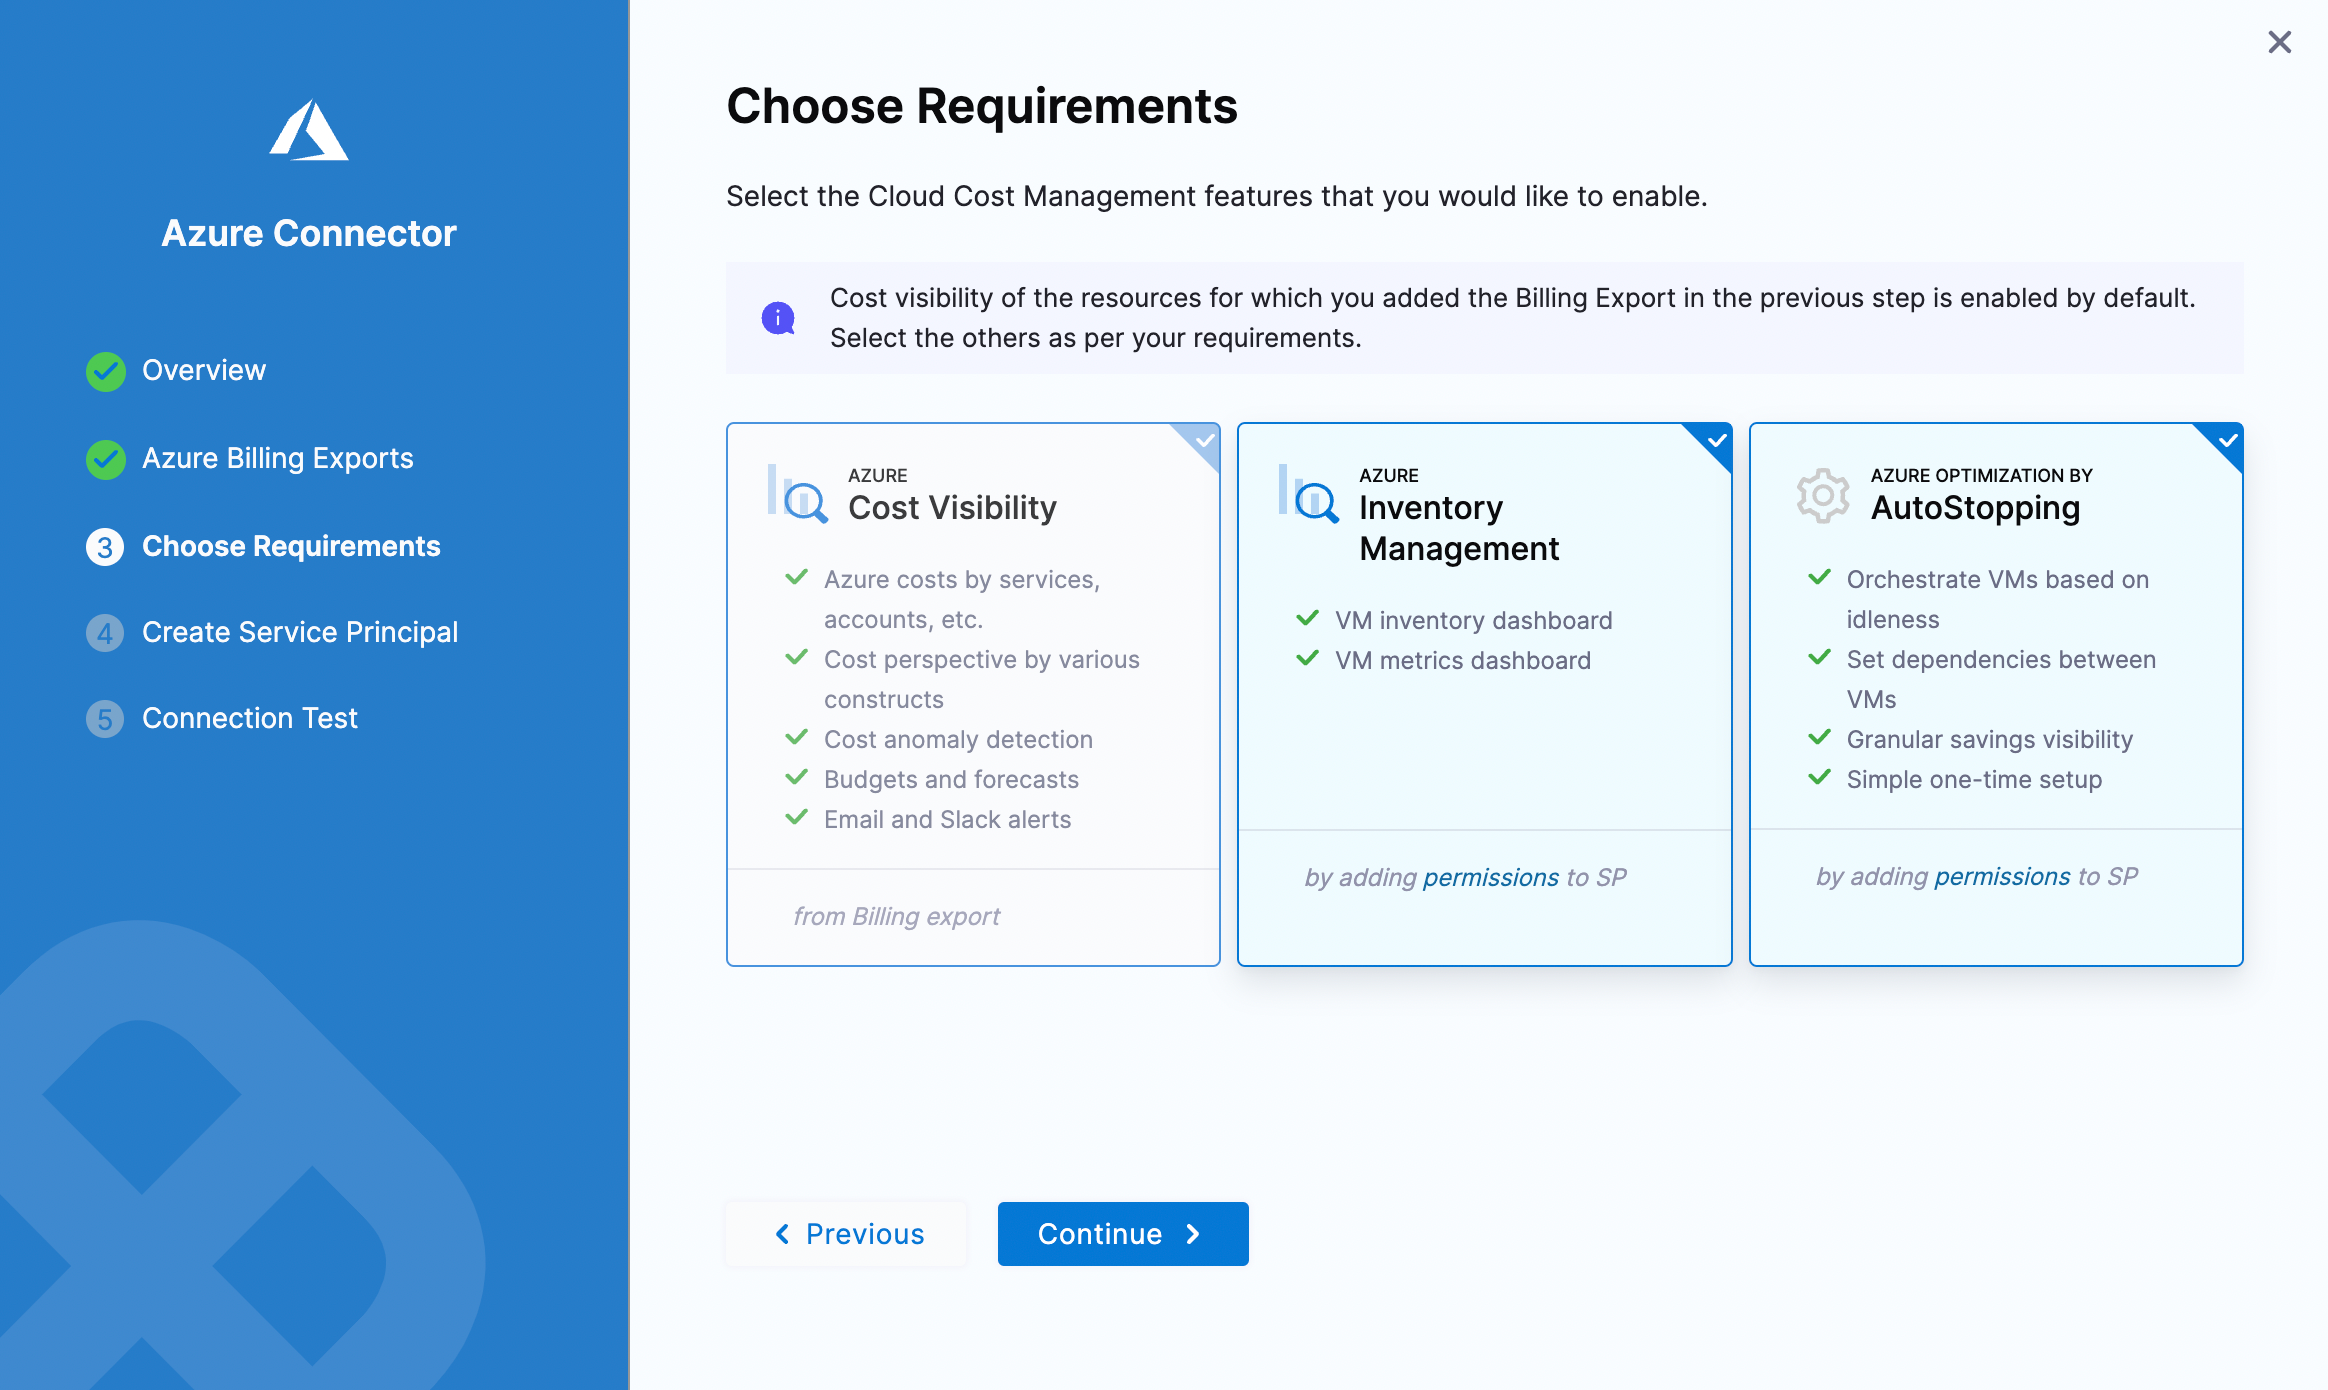
CCM offers the following features:
| Features | Capabilities |
|---|---|
| Cost Visibility (Required) | This feature is available by default and requires access to the billing export. Provides the following functionalities:
|
| Azure Inventory Management (Optional) | This feature provides visibility into your Azure VM inventory dashboard and metrics dashboard. The insights provided by inventory management can be used by finance teams to understand resource utilization across the board. |
| Azure optimization using AutoStopping rules (Required for AutoStopping Rules) | This feature allows you to enable Intelligent Cloud AutoStopping for your Azure instances with a simple one-time setup. For more information, go to Create AutoStopping Rules for Azure.
|
| Cloud Governance (Optional) | This feature allows you to optimize your cloud spend and avoid unnecessary costs by rightsizing resources and decommissioning unused instances. For more information, see Asset governance.
|
- Make your selection and select Continue.
Create Service Principal and Assign Permissions
Harness uses a multi-tenant app to sync billing export data from the source storage account to Harness and to perform cost optimization functions. This involves the following steps:
- Register the Harness CCM application into your Azure account.
- Grant read permissions to the storage account in which the billing data export is available and/or assign
contributorrole to the subscription if the AutoStopping feature is being utilized.
Create a service principal and assign permissions by running the following commands in the bash terminal or in the Azure cloud shell.
Register the Harness Application
Run the following Bash commands using your terminal or Azure cloud shell:
az ad sp create --id 0211763d-24fb-4d63-865d-92f86f77e908
See Azure client application ID in Harness Platform > Connectors > Add a Microsoft Azure Cloud Connector for more information.
If you encounter the following error message, proceed to assigning permissions to the storage accounts:
Another object with the same value for property servicePrincipalNames already exists.
The error means that your Harness CCM application is already registered into your Azure account.
Assign Permissions to the Storage Accounts
Run the following Bash commands using your terminal or Azure cloud shell.
-
Run the following command that provides scope for your storage account. Each role assignment in Azure needs a scope on which the permissions or role is applied. The
--nameparameter is required.SCOPE='az storage account show --name <storage account name> --query "id" | xargs'The output of this command is used in the next step. Here's an example output:
$ SCOPE=`az storage account show --name test --query "id" | xargs`

$ echo $SCOPE
/subscriptions/XXXXXXX-XXXX-XXXX-XXXX-XXXXXXXXXXXX/resourceGroups/<resourcegroupname>/providers/Microsoft.Storage/storageAccounts/<storage account name> -
Run the following command that provides Storage Blob Data Reader permission to the Harness application on the scope fetched in the previous step. It contains the ID of the Harness CCM client application:
0211763d-24fb-4d63-865d-92f86f77e908.az role assignment create --assignee 0211763d-24fb-4d63-865d-92f86f77e908 --role 'Storage Blob Data Reader' --scope $SCOPE -
(Optional) Run this command if you have opted for Azure Inventory Management in the Choosing Requirements step:
az role assignment create --assignee 0211763d-24fb-4d63-865d-92f86f77e908 --role 'Reader' --scope /subscriptions/<Subscription ID> -
(Optional) Run this command if you selected Azure Optimization by AutoStopping in the Choosing Requirements step:
az role assignment create --assignee 0211763d-24fb-4d63-865d-92f86f77e908 --role 'Contributor' --scope /subscriptions/<Subscription ID> -
Select Continue in Harness.
Test Connection
The connection is validated and verified in this step. After successful validation, and verification, select Finish.
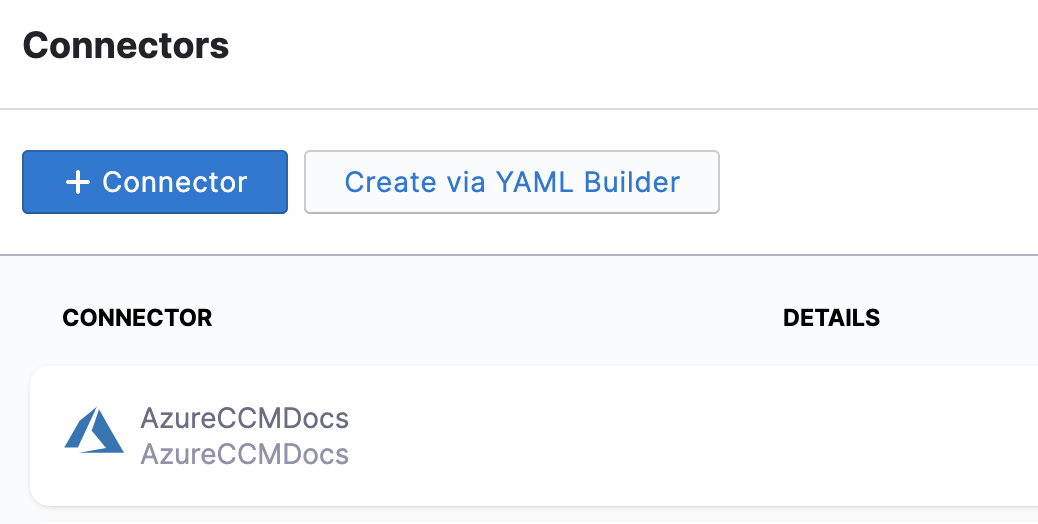
Your connector is listed in the Connectors.
Troubleshooting
If you get this error: When using this permission, the backing application of the service principal being created must in the local tenant. Then check if you have the Application Administrator role assigned for your Azure AD. Users in this role can create and manage all aspects of enterprise applications, application registrations, and application proxy settings. For more information, see Application Administrator.
Enable Azure recommendations
Configure the following settings in Azure to enable recommendations:
- Sign in to the Azure portal, and then open Advisor.
- Select Configuration.
All resources are selected by default. However, you can deselect to exclude resources for which you do not wish to receive recommendations.
- Select the VM/VMSS right sizing tab.
- Select the subscriptions. This is required to receive VM rightsizing recommendations. The default CPU utilization is 100% and the default Look back period is 7 days.
After configuring the Advisor, go to Azure recommendations to view and apply recommendations.