Set up CCM for AWS
Harness Cloud Cost Management (CCM) offers comprehensive solutions to manage and optimize the cloud costs of your Amazon Web Services (AWS) infrastructure. CCM provides visibility, governance, and optimization of AWS services such as EC2, S3, RDS, Lambda, and others. CCM provides recommendations to effectively right-size your cloud resources to match the workload demands and optimizes the auto-scaling groups (ASGs), and EKS clusters using intelligent cloud AutoStopping rules.
☆ NOTE — After enabling CCM, it takes about 24 hours for the data to be available for viewing and analysis.
AWS Connector requirements
- The same connector cannot be used in NextGen and FirstGen.
- For CCM, AWS connectors are available only at the Account level in Harness.
- If you have multiple AWS accounts, you may need to create multiple AWS connectors depending on desired functionality:
- Cost Visibility: You may need to create one or multiple AWS connectors depending on the availability of consolidated billing. Go to Cost and Usage Reports (CUR) for more information.
- Resource Inventory Management: You need to create an AWS connector for each account.
- Optimization by AutoStopping: You need to create an AWS connector for each account.
Cost and Usage Reports (CUR)
- Multiple Accounts with Consolidated Billing
- Multiple Accounts
- Single Account
-
If you have consolidated billing process enabled, then you need to create only a single CUR for the management account. This provides cost data for all member accounts in the organization.
-
For the Cost Visibility feature alone, you will only need a single AWS connector configured with the management account CUR.
-
In order to take advantage of other features such as Inventory Management and AutoStopping, you need to create a connector for each member account:
- If you are using the UI to create the additional connectors, configure all connectors with the same management account CUR.
- If you are using the API to create the additional connectors, you can omit billing information altogether.
-
If you do not have consolidated billing process enabled, then you need to create a CUR for each linked account.
-
Create an AWS connector for each AWS account, configured with the CUR for that account.
-
Create a single CUR for your AWS account.
-
Create a single AWS connector configured with the CUR for your account.
Connect CCM to your AWS account
To enable CCM for your AWS services (such as EC2, S3, RDS, Lambda, and so on), you simply need to connect Harness to your AWS accounts.
Perform the following steps to connect CCM to the AWS account.
- Create a new AWS connector using one of the two options below:
- From Account Settings
- From Cloud Costs
- Go to Account Resources > Connectors.
- Select + New Connector.
- Under Cloud Costs, select AWS.
- Go to Setup > Cloud Integration.
- Select New Cluster/Cloud account.
- Select AWS.
- Perform the following tasks in the AWS Connector wizard.
Overview
- Enter the following details and select Continue.
| Field | Description |
|---|---|
| Connector Name | Enter any name for the connector. This name will appear throughout the product to identify this AWS account. |
| Specify the AWS account ID | The Account ID of the AWS account to connect to. To find your AWS account ID, see Finding your AWS account ID. |
| Is this an AWS GovCloud account? | Select Yes if connecting to a GovCloud account. |
Cost and Usage Report
Launch the AWS console and perform the following steps:
- Log into your AWS account if not already logged in.
- Select Create Report.
- In the Specify report details step, enter the following values, and then select Next.
| Field | Description |
|---|---|
| Report Name | Enter a name for the report. Make sure to copy this name, as you will need it to continue configuring the Harness connector in the steps below. |
| Include resource IDs | Make sure this option is selected. |
| Split cost allocation data | Make sure this option is unchecked. |
| Refresh automatically | Make sure this option is selected. |
- In the Set delivery options step, enter the following values, and then select Next.
| Field | Description |
|---|---|
| Configure S3 Bucket | Select an existing bucket or create a new one. Make sure to copy this name, as you will need it to continue configuring the Harness connector in the steps below. |
| S3 path prefix - required | Enter any path prefix. Harness will automatically scan and find this prefix. |
| Report data time granularity | Select Hourly. |
| Report versioning | Select Overwrite existing report. |
| Amazon Athena | Make sure this option is unchecked. |
| Amazon Redshift | Make sure this option is unchecked. |
| Amazon QuickSight | Make sure this option is unchecked. |
| Compression type | Select GZIP. |
-
In the Review and create step, select Create Report.
-
In the Harness connector dialog, enter the following values, and then select Continue.
| Field | Description |
|---|---|
| Cost and Usage Report Name | Enter the report name you copied earlier. |
| Cost and Usage S3 Bucket Name | Enter the bucket name you specified earlier. |
Choose Requirements
Select your desired features, and then select Continue.
Details about the features are listed below. Note that the permissions required as part of the AWS cross-account role will be based on your selections. Those permissions are listed out in the Reference - AWS Access Permission section below.
| Features | Capabilities |
|---|---|
| Cost Visibility (Required) | This feature is available by default and requires access to the CUR report. Provides the following capabilities:
|
| Resource Inventory Management (Optional) | This feature provides visibility into your EC2, EBS volumes, and ECS costs. The insights provided by inventory management can be consumed by Finance teams to understand resource utilization across the board.
|
| Optimization by AutoStopping (Optional) | This feature allows you to enable Intelligent Cloud AutoStopping for your AWS instances and auto-scaling groups. For more information, see Create AutoStopping Rules for AWS.
|
| Cloud Governance (Optional) | This feature allows you to optimize your cloud spend and avoid unnecessary costs by rightsizing resources and decommissioning unused instances. For more information, see Asset governance.
|
Create Cross Account Role
Harness uses the secure cross-account role to access your AWS account. The role includes a restricted policy based on the features selected above.
- In Create Cross Account Role, select Launch Template on AWS console.
Perform the following steps in the AWS Console.
-
In Quick create stack, in Capabilities, select the acknowledgment, and then select Create stack.
☆ NOTE - The values on this page are based on your previous selections. Do not modify any values before creating the stack.
-
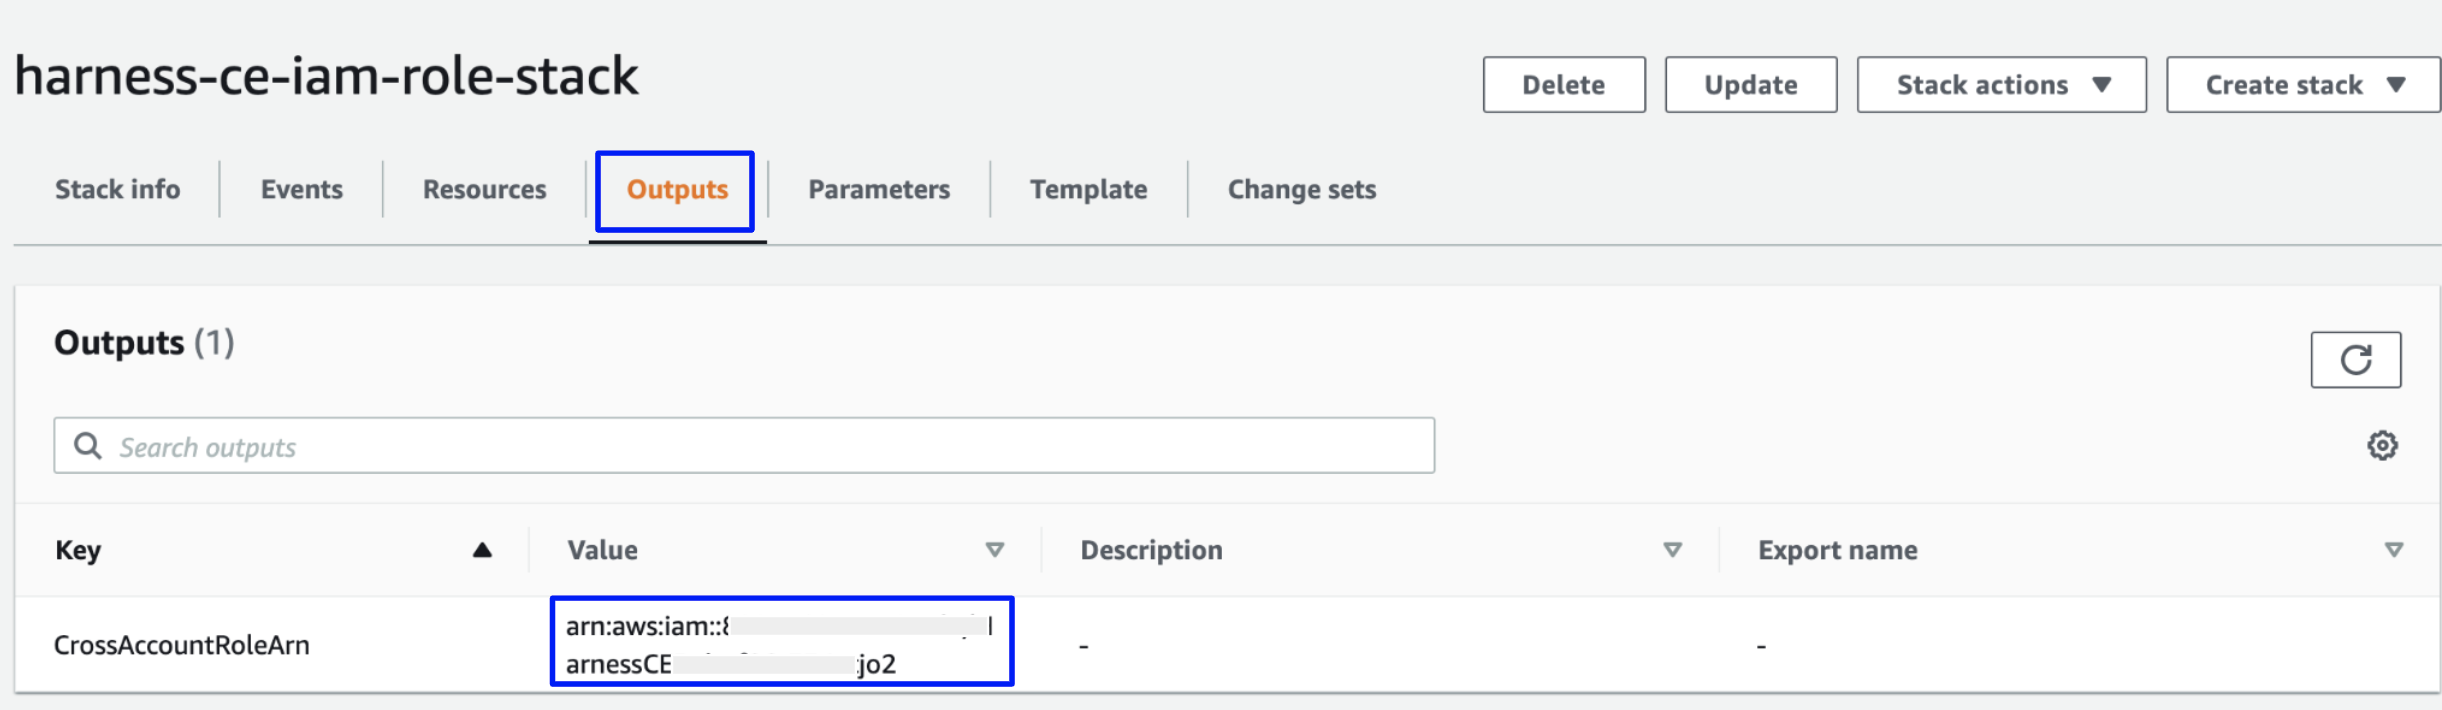
In the stack's page, go to the Outputs tab and copy the Value of CrossAccountRoleArn Key.
-
In the Harness connector dialog, enter the following values, and then select Save and Continue.
| Field | Description |
|---|---|
| Cross Account Role ARN | Enter the value that you copied in step 3. |
| External ID | Do not modify. If you intend to create multiple AWS connectors via API, be sure to copy this value as you will need to reference it later. |
Connection Test
The connection is validated, and verified in this step. After successful validation, select Finish.
Creating a new CUR (Cost and Usage Report) in AWS typically takes 6-8 hours. During this period, you might encounter an error message stating that Harness CCM is unable to find a CUR file.
Create Connectors for multiple AWS accounts
Harness CCM also provides the ability to create connectors via API using a StackSet configured at the management account. It involves the following steps:
- Create a Service Account and API Key in Harness
- Create a StackSet in AWS
- Create an AWS Connector via API (performed once for each AWS account)
☆ NOTE — You should manually create a connector via the UI for the management account before using the API method described here to create connectors for the member accounts.
Create a Service Account and API key in Harness
- At the Account level, create a service account with the Admin role for All Account Level Resources or All Resources Including Child Scopes.
- Create a service account token. Save the API Key, which will be used when creating AWS connectors via the API below.
Create a StackSet in AWS
Perform the following steps to create a StackSet in AWS:
- Select the following link to start creating the StackSet:
https://console.aws.amazon.com/cloudformation/home?region=us-east-1#/stacksets/create - In the Choose a template step, enter the following values, and then select Next.
| Field | Description |
|---|---|
| Permissions | Optional, configure if necessary based on your AWS policies. |
| Prerequisite - Prepare template | Select Template is ready. |
| Specify template | Select Amazon S3 URL. |
| Amazon S3 URL | Enter https://continuous-efficiency-prod.s3.us-east-2.amazonaws.com/setup/ngv1/HarnessAWSTemplate.yaml |
- In the Specify StackSet details step, enter the following values, and then select Next.
| Field | Description |
|---|---|
| StackSet name | Enter any name. For example, harness-ce-iam-stackset . |
| BillingEnabled | Select false. |
| BucketName | Leave empty. |
| EventsEnabled | Select true. |
| ExternalId | The External ID value copied in step 4 of Create Cross Account Role. |
| GovernanceEnabled | Select true to enable Governance. Otherwise, select false. |
| LambdaExecutionRoleName | Leave as is unless your AWS policies required a different naming convention. |
| OptimizationEnabled | Select true to enable AutoStopping. Otherwise, select false. |
| PrincipalBilling | Do not modify. |
| RoleName | Leave as is unless your AWS policies required a different naming convention. |
- In the Configure StackSet options step, enter the following values and select Next
| Field | Description |
|---|---|
| Managed execution | Select Active. |
- In the Set deployment options step, enter the following values, and then select Next.
| Field | Description |
|---|---|
| Add stacks to StackSet | Select Deploy new stacks. |
| Deployment locations | Configure the accounts or organization units that you want to deploy to. |
| Specify regions | Configure the regions that you want to deploy to. |
| Region Concurrency | Select Sequential. |
- In the Review step, select the acknowledgment, and then select Submit.
Create an AWS Connector via API
Use the Harness API's Create a Connector endpoint to create an AWS connector for each member account. Below is a sample cURL command to create an AWS connector. Replace the following placeholders with your values:
| Placeholder | Description |
|---|---|
| API TOKEN | The API Key created in the Create a Service Account and API Key in Harness section. |
| CONNECTOR NAME | Enter any name. This will be visible in the UI, perspectives, dashboards, etc. |
| CONNECTOR ID | Enter a unique ID for the connector. The ID must meet the Entity Identifier Reference specification. |
| CROSS ACCOUNT ROLE ARN | The ARN value copied in step 3 of Create Cross Account Role. |
| EXTERNAL ID | The External ID value copied in step 4 of Create Cross Account Role. |
| AWS ACCOUNT ID | The ID of the AWS member account. |
| FEATURES | A comma separated list of features to enable. Enter "VISIBILITY", "OPTIMIZATION", "GOVERNANCE" removing any features that you do not want to enable. |
curl -i -X POST 'https://app.harness.io/gateway/ng/api/connectors' \
  -H 'Content-Type: application/json' \
  -H 'x-api-key: <API TOKEN>' \
  -d '{
  "connector":{
    "name":"<CONNECTOR NAME>",
    "identifier":"<CONNECTOR ID>",
    "type":"CEAws",
    "spec":{
      "crossAccountAccess":{
        "crossAccountRoleArn":"<CROSS ACCOUNT ROLE ARN>",
        "externalId":"<EXTERNAL ID>"
      },
      "awsAccountId":"<AWS ACCOUNT ID>",
      "curAttributes":{
        "reportName":"",
        "s3BucketName":""
      },
      "featuresEnabled":[
        <FEATURES>
      ]
    }
  }
}'
Enable EC2 recommendations
If you are an existing customer, you need to:
- Edit the IAM role used by the Harness AWS Connector corresponding to the AWS account.
- In the IAM role, add the
ce:GetRightsizingRecommendationpermission to the HarnessEventsMonitoringPolicy.
Once you have the ce:GetRightsizingRecommendation permission added to the HarnessEventsMonitoringPolicy in the IAM role, perform the following tasks on your AWS console to enable recommendations.
- On your AWS console, go to the Cost Explorer service.

- Click Preferences on the left pane.
- Enable the following recommendations:
- Receive Amazon EC2 resource recommendations
- Recommendations for linked accounts

- Verify that you have enabled these recommendations correctly.
Open AWS CloudShell and run the following command:
aws ce get-rightsizing-recommendation --service AmazonEC2
If the recommendations are not enabled, the following error message is displayed:
"An error occurred (AccessDeniedException) when calling the GetRightsizingRecommendation operation: Rightsizing EC2 recommendation is an opt-in only feature. You can enable this feature from the PAYER account’s Cost Explorer Preferences page. Normally it may take up to 24 hours in order to generate your rightsizing recommendations."
- You must install the Amazon CloudWatch agent on your EC2 instance to enable memory metrics.
Reference - AWS access permissions
CCM requires the following permissions which are automatically created via a StackSet based on the features you select during configuration.
☆ NOTE — If you don't have access to create a cost and usage report or run a CloudFormation template, contact your IT or security teams to provide the required permissions.
Cost visibility
The cost visibility policy grants the following permissions:
- List CUR reports and visibility into the organization's Structure
- Get objects from the S3 bucket configured in the CUR
- Put objects into the Harness S3 bucket
  HarnessBillingMonitoringPolicy:
    "Type": "AWS::IAM::ManagedPolicy"
    "Condition": "CreatingHarnessBillingMonitoringPolicy"
    "Properties":
      "Description": "Policy granting Harness Access to Collect Billing Data"
      "PolicyDocument":
        "Version": "2012-10-17"
        "Statement":
          - "Effect": "Allow"
            "Action":
              - "s3:GetBucketLocation"
              - "s3:ListBucket"
              - "s3:GetObject"
            Resource:
              - !Join
                - ''
                - - 'arn:aws:s3:::'
                  - !Ref BucketName
              - !Join
                - /
                - - !Join
                    - ''
                    - - "arn:aws:s3:::"
                      - !Ref BucketName
                  - '*'
          - "Effect": "Allow"
            "Action":
              - "s3:ListBucket"
              - "s3:PutObject"
              - "s3:PutObjectAcl"
            "Resource":
              - "arn:aws:s3:::ce-customer-billing-data-prod*"
              - "arn:aws:s3:::ce-customer-billing-data-prod*/*"
          - "Effect": "Allow"
            "Action":
              - "cur:DescribeReportDefinitions"
              - "organizations:Describe*"
              - "organizations:List*"
            "Resource": "*"
      "Roles":
        - "!Ref HarnessCloudFormationRole"
If the cur:DescribeReportDefinitions, organizations:Describe, and organizations:List* permissions are too wide, you can modify these to the following:
{
    "Version": "2012-10-17",
    "Statement": [
        {
            "Sid": "VisualEditor0",
            "Effect": "Allow",
            "Action": [
                "organizations:ListAccounts",
                "organizations:ListTagsForResource"
            ],
            "Resource": "*"
        }
    ]
}
organizations:ListAccounts: fetches a list of all the accounts present in the organization, and also fetches the accountID to Account Name mapping.organizations:ListTagsForResource: fetches the AWS Account level tags. Harness supports account tags within CCM that can be used for reporting and analysis.
Resource inventory management
The inventory management policy performs the following actions:
- ECS Visibility - For Granular Cluster Cost Breakdown
- EC2, EBS, RDS Visibility - Inventory Management
HarnessEventsMonitoringPolicy:
  "Type": "AWS::IAM::ManagedPolicy"
  "Condition": "CreateHarnessEventsMonitoringPolicy"
  "Properties":
    "Description": "Policy granting Harness Access to Enable Event Collection"
    "PolicyDocument":
      "Version": "2012-10-17"
      "Statement":
        - "Effect": "Allow"
          "Action":
              - "ecs:ListClusters*"
              - "ecs:DescribeClusters"
              - "ecs:ListServices"
              - "ecs:DescribeServices"
              - "ecs:DescribeContainerInstances"
              - "ecs:ListTasks"
              - "ecs:ListContainerInstances"
              - "ecs:DescribeTasks"
              - "ec2:DescribeInstances*"
              - "ec2:DescribeRegions"
              - "cloudwatch:GetMetricData"
              - "ec2:DescribeVolumes"
              - "ec2:DescribeSnapshots"
              - "rds:DescribeDBSnapshots"
              - "rds:DescribeDBInstances"
              - "rds:DescribeDBClusters"
              - "rds:DescribeDBSnapshotAttributes"
          "Resource": "*"
    "Roles":
      - "!Ref HarnessCloudFormationRole"
Insight into RDS instances
This feature provides visibility into your EC2, EBS volumes, and ECS costs. The insights provided by inventory management can be consumed by finance teams to understand resource utilization across the board.
- Breakdown by ECS cluster cost, Service, Task, and Launch Type (EC2, Fargate).
- Insight into EC2 instances and their utilization.
- Access to AWS EC2 Inventory Cost and EBS Volumes and Snapshots inventory dashboards. For more information, see View AWS EC2 Inventory Cost Dashboard, Orphaned EBS Volumes and Snapshots Dashboard, and View AWS EC2 Instance Metrics Dashboard.
AutoStopping rules
The AutoStopping policy performs the following actions:
- Create an IAM role for optimization
- Permissions for creating AutoStopping Rules
The following template illustrates the relevant permissions needed for AutoStopping to work seamlessly.
 HarnessOptimizationLambdaExecutionRole:
    Type: "AWS::IAM::Role"
    Condition: CreateHarnessOptimisationPolicy
    Properties:
      RoleName: !Ref LambdaExecutionRoleName
      AssumeRolePolicyDocument:
        Version: 2012-10-17
        Statement:
          - Effect: Allow
            Principal:
              Service: "lambda.amazonaws.com"
            Action: 'sts:AssumeRole'
      Path: /ce-optimization-service-role/
HarnessOptimsationLambdaPolicy:
    Type: 'AWS::IAM::ManagedPolicy'
    Condition: CreateHarnessOptimisationPolicy
    Properties:
      Description: Policy granting Harness Access to Enable Cost Optimisation
      PolicyDocument:
        Version: 2012-10-17
        Statement:
          - Effect: Allow
            Action:
              - 'ec2:CreateNetworkInterface'
              - 'ec2:CreateNetworkInsightsPath'
              - 'ec2:CreateNetworkInterfacePermission'
              - 'ec2:CreateNetworkAcl'
              - 'ec2:*'
              - 'ec2:CreateNetworkAclEntry'
              - 'logs:CreateLogGroup'
              - 'logs:CreateLogStream'
              - 'logs:PutLogEvents'
            Resource: "*"
      Roles:
        - !Ref HarnessOptimizationLambdaExecutionRole
  HarnessOptimisationPolicy:
    Type: 'AWS::IAM::ManagedPolicy'
    Condition: CreateHarnessOptimisationPolicy
    Properties:
      Description: Policy granting Harness Access to Enable Cost Optimisation
      PolicyDocument:
        Version: 2012-10-17
        Statement:
              - Effect: Allow
                Action:
                  - elasticloadbalancing:*
                  - ec2:StopInstances
                  - autoscaling:*
                  - ec2:Describe*
                  - iam:CreateServiceLinkedRole
                  - iam:ListInstanceProfiles
                  - iam:ListInstanceProfilesForRole
                  - iam:AddRoleToInstanceProfile
                  - iam:PassRole
                  - ec2:StartInstances
                  - ec2:*
                  - iam:GetUser
                  - ec2:ModifyInstanceAttribute
                  - iam:ListRoles
                  - acm:ListCertificates
                  - lambda:*
                  - cloudwatch:ListMetrics
                  - cloudwatch:GetMetricData
                  - route53:GetHostedZone
                  - route53:ListHostedZones
                  - route53:ListHostedZonesByName
                  - route53:ChangeResourceRecordSets
                  - route53:ListResourceRecordSets
                  - route53:GetHealthCheck
                  - route53:GetHealthCheckStatus
                  - cloudwatch:GetMetricStatistics
                  - ecs:ListClusters
                  - ecs:ListContainerInstances
                  - ecs:ListServices
                  - ecs:ListTaskDefinitions
                  - ecs:ListTasks
                  - ecs:DescribeCapacityProviders
                  - ecs:DescribeClusters
                  - ecs:DescribeContainerInstances
                  - ecs:DescribeServices
                  - ecs:DescribeTaskDefinition
                  - ecs:DescribeTasks
                  - ecs:DescribeTaskSets
                  - ecs:RunTask
                  - ecs:StopTask
                  - ecs:StartTask
                  - ecs:UpdateService
                  - rds:DescribeDBClusters
                  - rds:DescribeDBInstances
                  - rds:ListTagsForResource
                  - rds:AddTagsToResource
                  - rds:RemoveTagsFromResource
                  - rds:ModifyDBInstance
                  - rds:StartDBCluster
                  - rds:StartDBInstance
                  - rds:StopDBCluster
                  - rds:StopDBInstance
                  - s3:ListBucket
                  - s3:GetObject
                  - s3:ListAllMyBuckets
                  - s3:GetBucketLocation
                  - secretsmanager:GetSecretValue
                Resource: "*"
      Roles:
        - !Ref HarnessCloudFormationRole
Cloud asset governance rules
Enable the following permissions in AWS to execute cloud governance rules:
{
    "Version": "2012-10-17",
    "Statement": [
        {
            "Action": [
                "ec2:Describe*",
                "ec2:DeleteSnapshot",
                "ec2:DeleteVolume",
                "ec2:Get*",
                "ec2:ListImagesInRecycleBin",
                "ec2:ListSnapshotsInRecycleBin",
                "elasticbeanstalk:Check*",
                "elasticbeanstalk:Describe*",
                "elasticbeanstalk:List*",
                "elasticbeanstalk:Request*",
                "elasticbeanstalk:Retrieve*",
                "elasticbeanstalk:Validate*",
                "elasticloadbalancing:Describe*",
                "rds:Describe*",
                "rds:List*",
                "autoscaling-plans:Describe*",
                "autoscaling-plans:GetScalingPlanResourceForecastData",
                "autoscaling:Describe*",
                "autoscaling:GetPredictiveScalingForecast",
                "s3:DescribeJob",
                "s3:Get*",
                "s3:List*"
            ],
            "Resource": "*",
            "Effect": "Allow"
        }
    ]
}
- This is not an exhaustive list; you may require additional permissions to support custom rules.
- A yellow underline in a custom policy indicates that you need permission to support the underlined filters and/or actions.
Add permissions
If you come across an error message indicating missing permissions, as displayed in the following screenshot, you need to add the missing permission here.

- Copy the role specified in the error message that requires permission to execute the rule.
- Enter the role in IAM > Roles search box to filter the roles. The policies are displayed.

-
In the list of policies, select the policy to edit.

-
In the Permissions tab, select Edit policy, and then go to the JSON tab.

-
Add the missing permissions. You can use a wildcard (asterisk) to grant multiple permissions. For example,
s3:Get*permission would allow multiple S3 actions that start with "Get". -
Save changes.
For more information, go to Editing IAM policies.