Cost Categories
Cost Categories transform raw cloud spending data into meaningful business contexts by aggregating costs across multiple sources (AWS, GCP, Kubernetes clusters, etc.) and organizing them into customizable business dimensions such as departments, teams, projects, or environments.
With Cost Categories, you can:
- Map cloud costs to business units - Create categories like "Teams" or "Departments" to track spending across organizational structures
- Drill down into detailed cost analysis - Examine specific cost buckets (e.g., the "Operations" team within a "Teams" category) to identify spending patterns
- Apply consistent cost attribution - Use the same business contexts across different cloud providers and resource types
- Filter and group in CCM Perspectives - Leverage your categories in reports and dashboards for comprehensive cost analysis
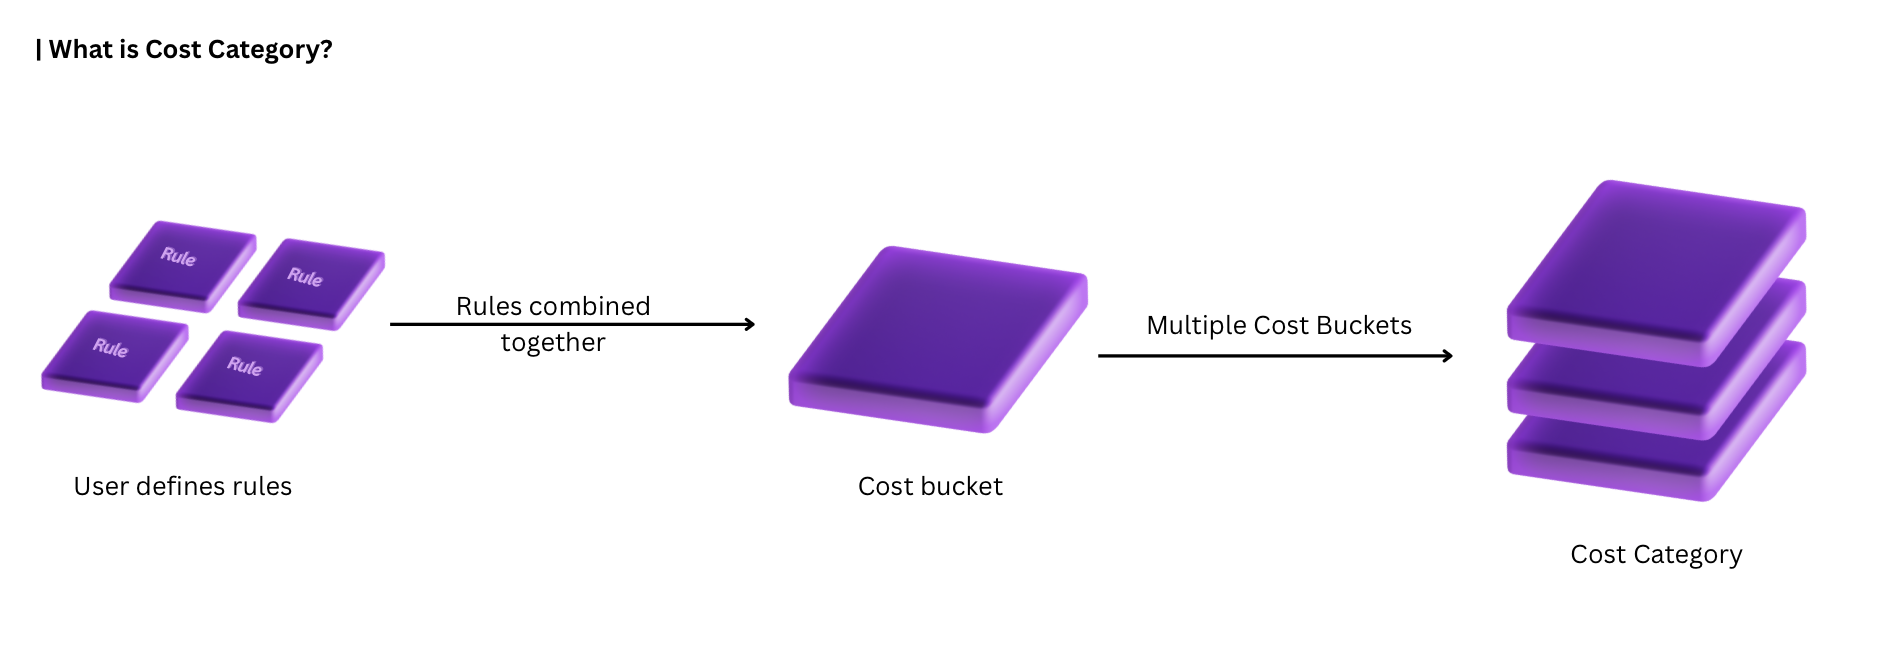
The logic behind cost categories is simple: Create Rules that bring in cost data -> Rules combine to form Cost Bucket -> Cost Buckets combine to form Cost Category
For example: Imagine your company has multiple departments. You want better visibility into marketing spend across various campaigns and cloud platforms. Currently, marketing costs are scattered across parts of AWS resources (for digital marketing), GCP resources (for YouTube marketing), and some kubernetes Clusters (for social media marketing tools):
- Create a Cost Category called "Marketing"
- Add Cost Buckets to this category:
- "Digital Marketing" - with rules for AWS resources
- "YouTube Marketing" - with rules for GCP resources
- "Social Media Marketing" - with rules for Kubernetes clusters
- Result: A comprehensive view of all Marketing costs across multiple cloud platforms
What is the difference between Cost Categories and Perspectives?
Cost Categories label and organize your cloud spend into custom buckets, while Perspectives let you view and analyze that categorized data using Cost Categories as filters or group-by dimensions.
| Aspect | Cost Categories | Perspectives |
|---|---|---|
| What it is | A classification system that assigns costs into custom buckets based on rules you define. | A saved view of cost data with predefined filters, groupings, and time ranges. |
| Purpose | To label and organize costs into meaningful business groupings (e.g., Environment, Department, Project). | To analyze and visualize costs through a consistent lens, making it easy to track trends or budgets over time. |
| Scope | Changes how cost line items are categorized across all reporting and dashboards. | Controls how the categorized cost data is displayed and compared in reports. |
How They Work Together
- Cost Categories define the labels for your costs.
- Perspectives decide how to look at those costs.
You can:
- Use a Cost Category as a filter in a Perspective → see only costs for a specific category value.
- Use it as a group-by dimension → break down total cost into category buckets.
Example: Using Cost Categories with Perspectives
Let's say your organization runs workloads in multiple AWS accounts. Some accounts are for Production, some for Development, and others for Staging.
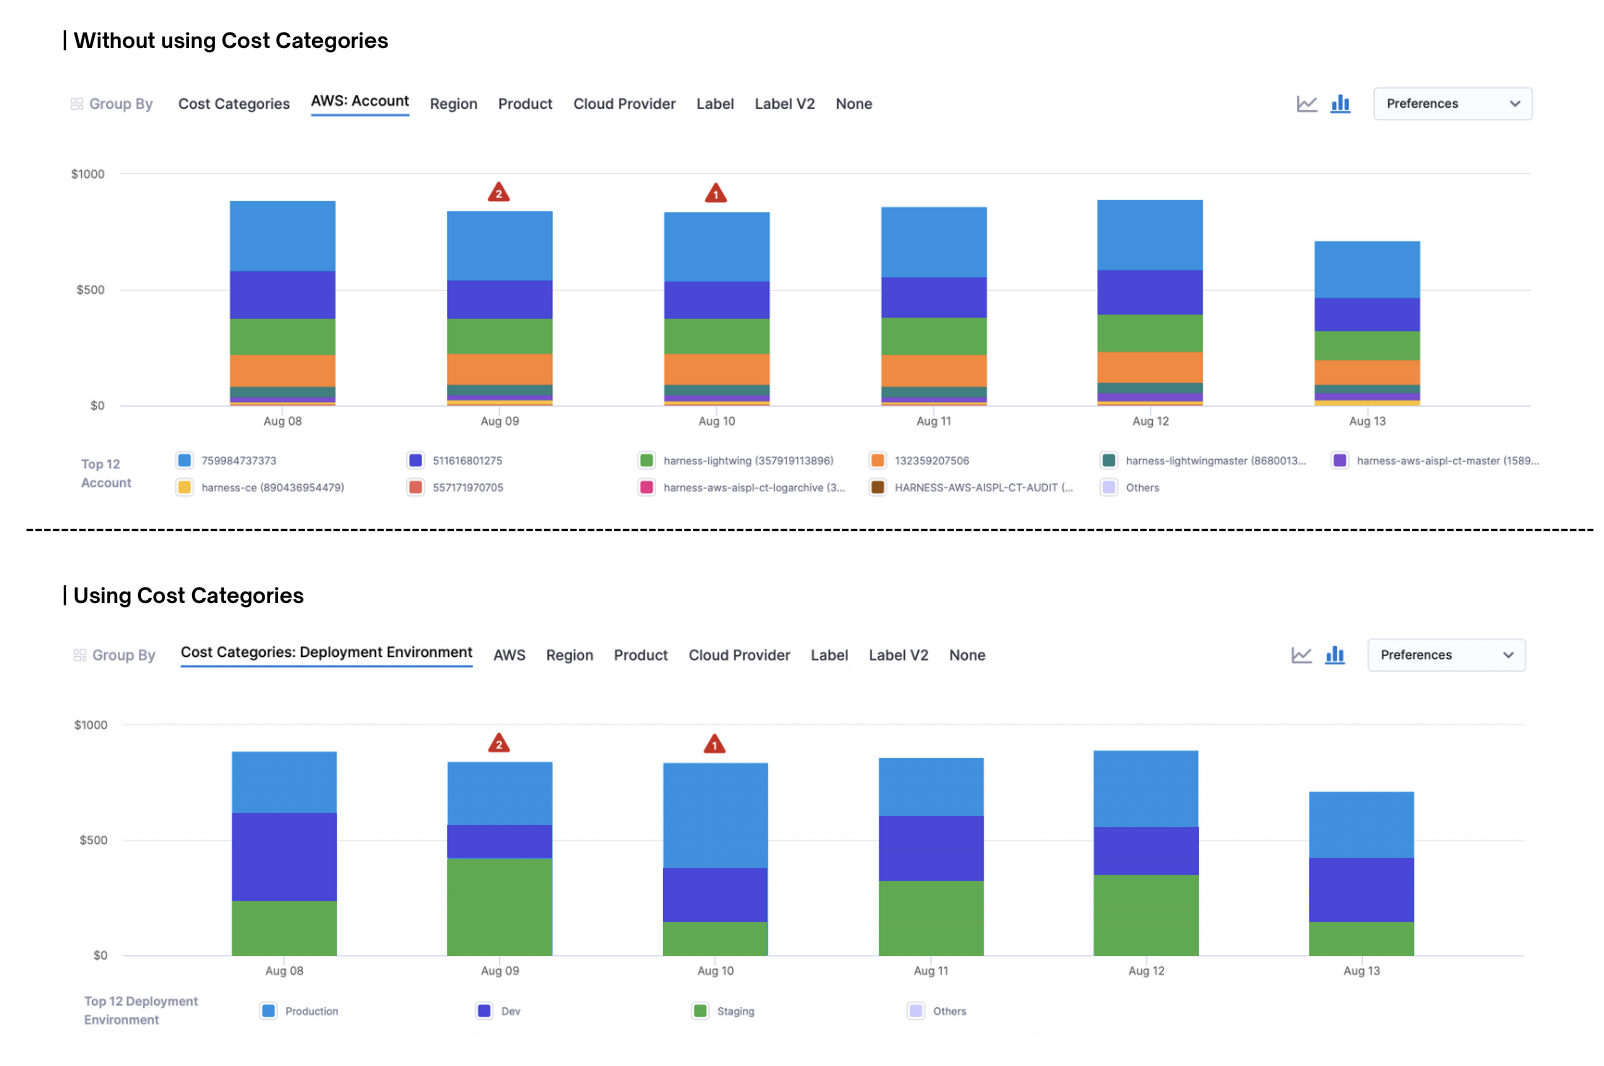
Without Cost Categories: Creating a Perspective to analyze costs by environment requires creating perspectives with multiple rules and any new account or tag variation means updating the Perspective again.
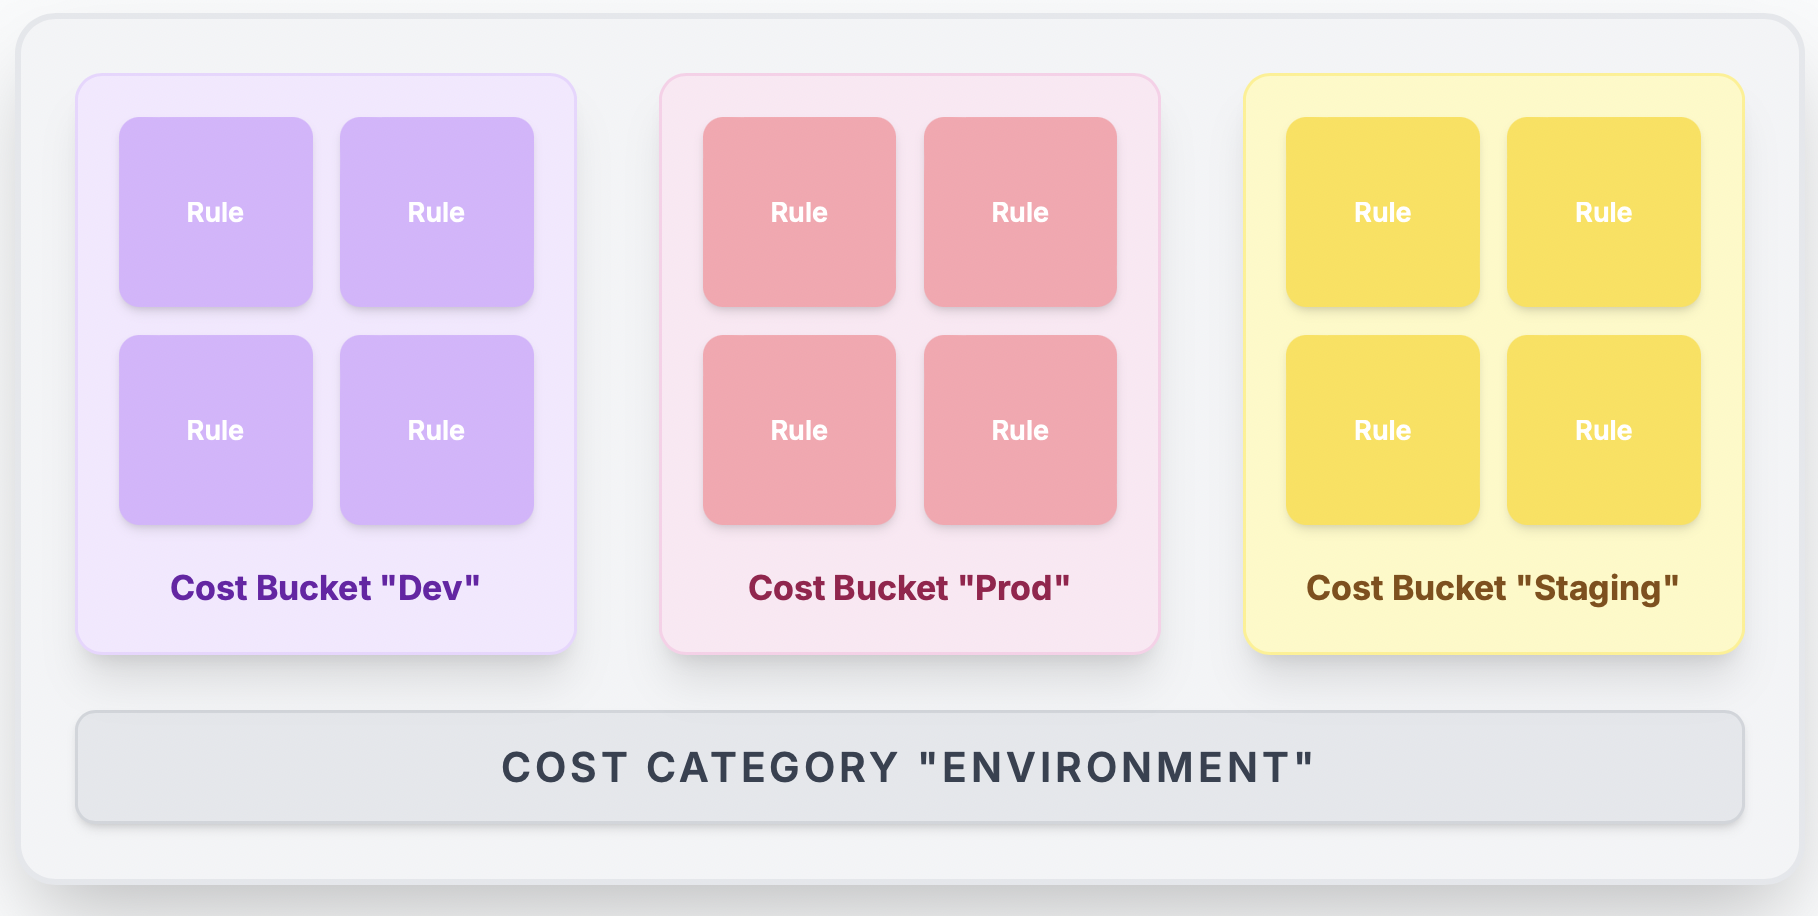
With Cost Categories: You can define an Environment cost category that standardizes this classification by using three cost buckets (Production, Development, and Staging).
| Rule | Cost Bucket |
|---|---|
| Operand: AWS, Operator: Account, Value: {all the accounts related to production} | Production |
| Operand: AWS, Operator: Usage Type, Value: {all the usage types related to development} OR Operand: AWS, Operator: Service, Value: {all the services related to development} | Development |
| Operand: AWS, Operator: Service, Value: {all the services related to staging} | Staging |
Once this Cost Category is in place, you can use it in Perspectives to:
- Filter: Filter by any cost bucket.
- Group By: Break down total spend by your cost buckets.
Before You Begin
To create and manage Cost Categories in Harness CCM, you need:
Active CCM Connectors: You must have at least one active cloud connector set up for the cloud providers you want to categorize costs for: Set Up CCM Connectors.
Required Permissions: Your Harness user account must belong to a user group with the following role permissions:
- Cloud Cost Management: Cost Categories: Create/Edit
- Cloud Cost Management: Cost Categories: View
For more details on CCM permissions, see CCM Roles and Permissions.
Creating Cost Categories
- Step-by-Step
- Interactive Guide
- In your Harness application, go to Cloud Cost Management > Cost Categories > New Cost Category.
- Define Cost Bucket(s)
- Attribute Shared Costs
- Manage Unallocated Costs
Define your Cost Bucket(s)
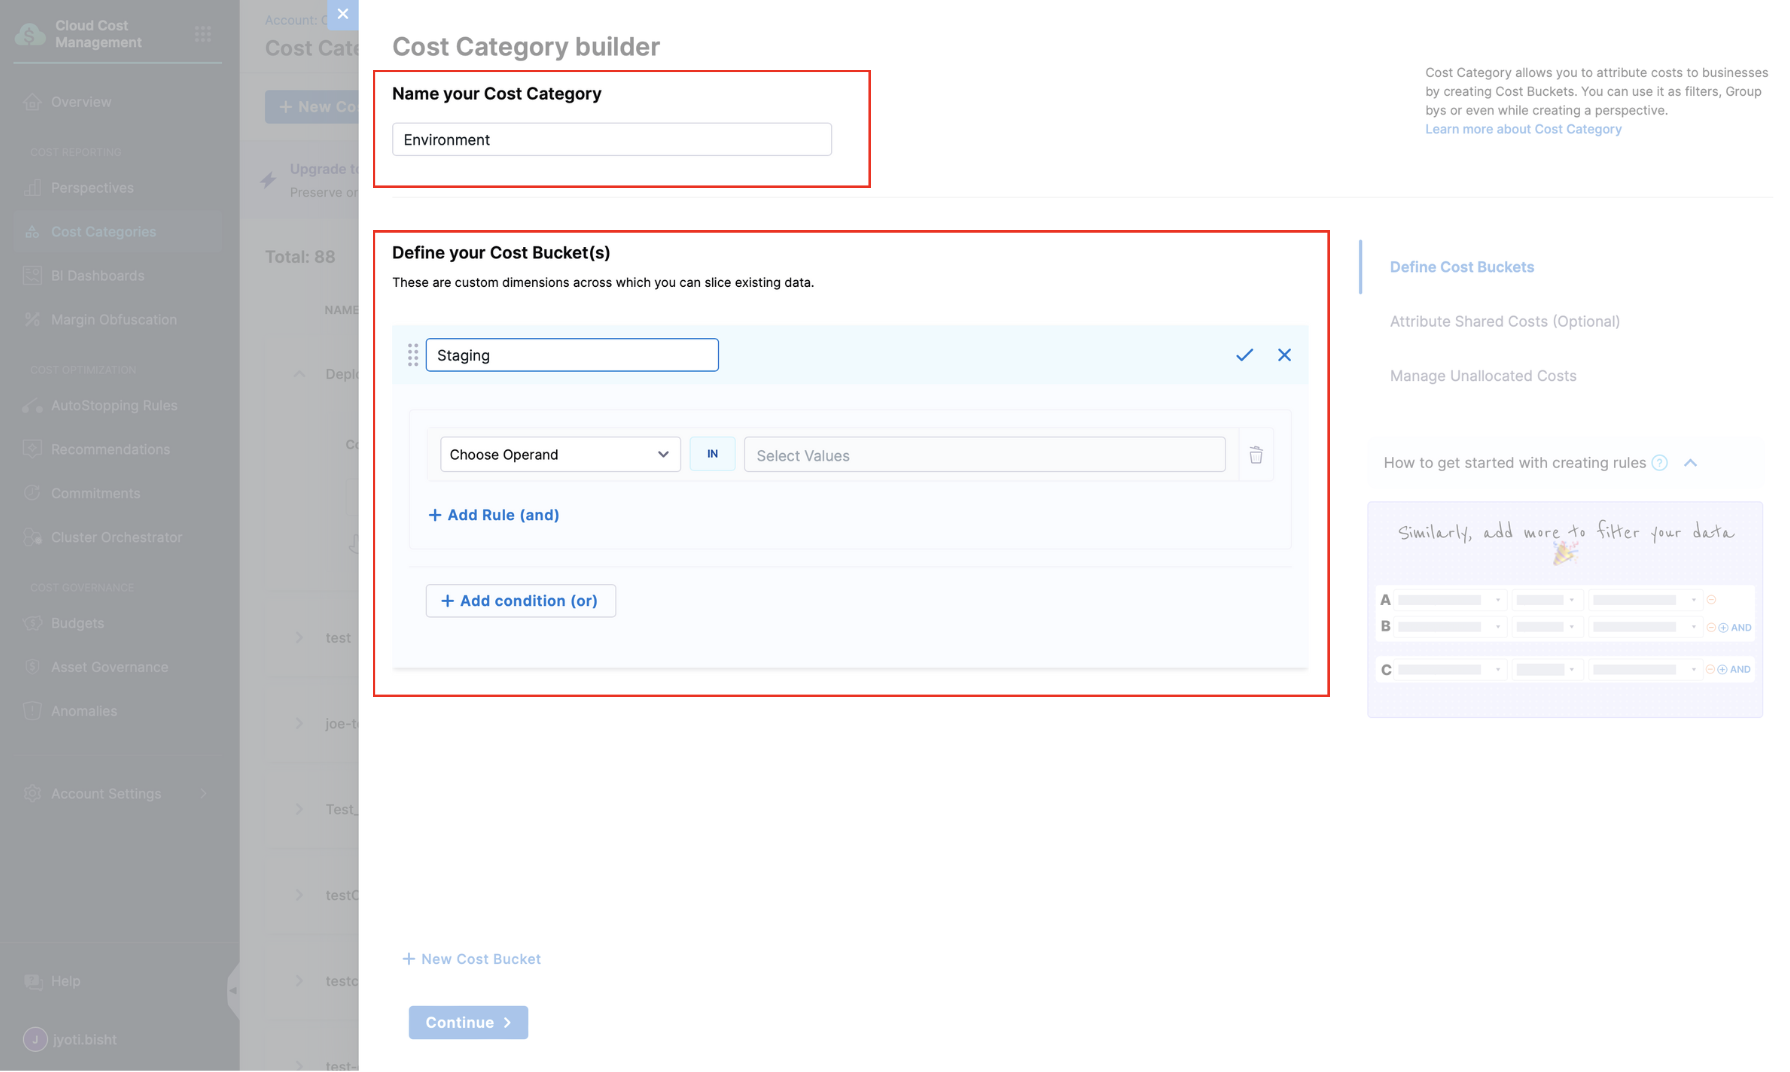
A cost category is composed of one or more buckets. Each bucket contains filters that collect data from specific sources.
- Enter a descriptive name for the cost bucket (e.g., "Marketing Department")
- Each bucket collects costs from data sources that belong to that department
- Define Rules: Add multiple conditions to a rule using the AND operator (Use to filter data sources that include both criteria)/ OR operator (Use to filter data sources that include one of the criteria)
What are Rules?
- Common
- Cost Categories
- Cluster
- AWS
- GCP
- Azure
- External Data
- IN: Include only resources that exactly match the specified value
- NOT IN: Include all resources except those that match the specified value
- NULL: Include only resources where this field has no value (excludes resources with this field)
- NOT NULL: Include only resources where this field has a value
- LIKE: Include resources where the field partially matches a pattern (uses regular expressions)
- For exact pattern matching, use
^pattern$syntax
- For exact pattern matching, use
After configuring all your cost buckets, click on "Continue"
Important Limitations When Using Cost Categories:
- If a cost category has a shared bucket, you cannot nest it inside another cost category
- A cost category cannot reference itself in its own rules
- You cannot create loops between categories
- Example: If Category A includes Category B, then Category B cannot include Category A
- You can nest categories up to 5 levels deep
[Optional] Attribute Shared Costs
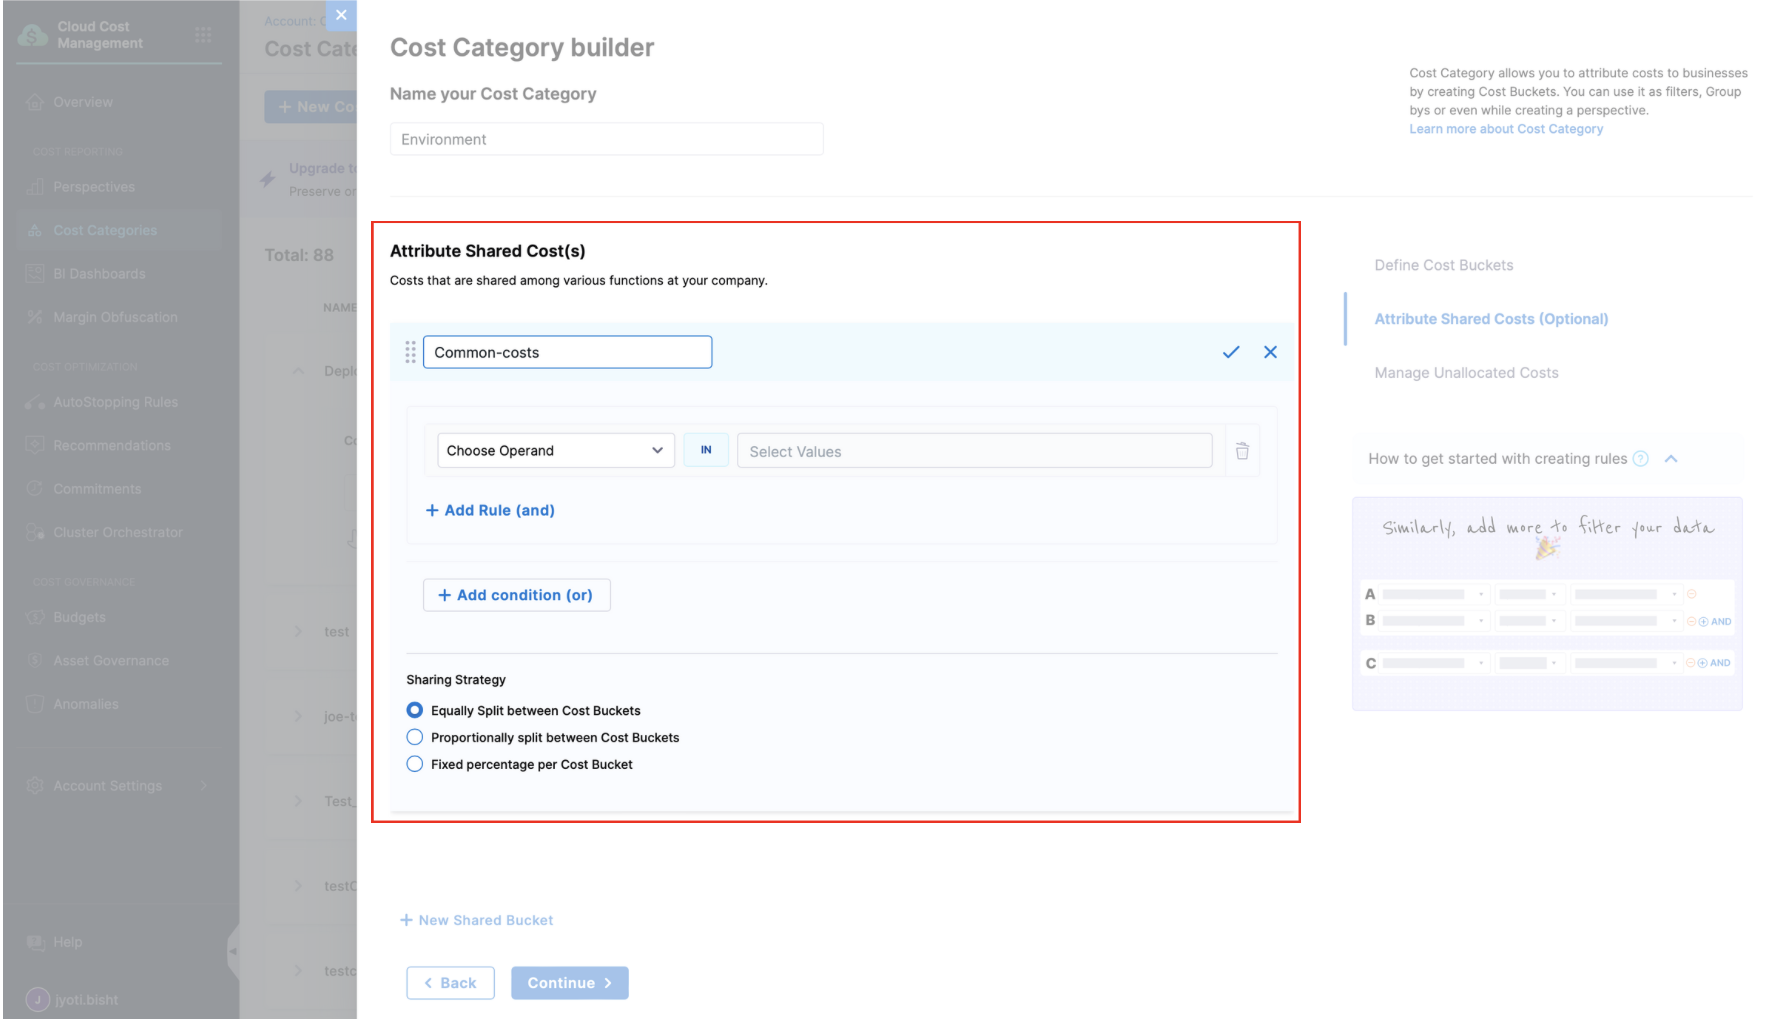
Shared buckets allow you to distribute common costs across multiple cost buckets in a category. For example, database maintenance costs that benefit multiple departments can be shared among them using a shared bucket.
-
Name your shared bucket (e.g., "Database Costs", "IT Infrastructure")
-
Define filtering rules for the shared bucket (similar to regular cost buckets)
-
Select a sharing strategy:
Strategy Description Example Equal Split Divides costs equally among all buckets $100 shared across 4 buckets = $25 each Proportional Split Allocates based on each bucket's existing costs If Bucket A has 70% of direct costs and Bucket B has 30%: - For $100 shared cost
- Bucket A receives $70
- Bucket B receives $30
Fixed Percentage Distributes according to manually defined percentages Manually assign 60% to Bucket A, 25% to Bucket B, 15% to Bucket C -
Click on "Continue".
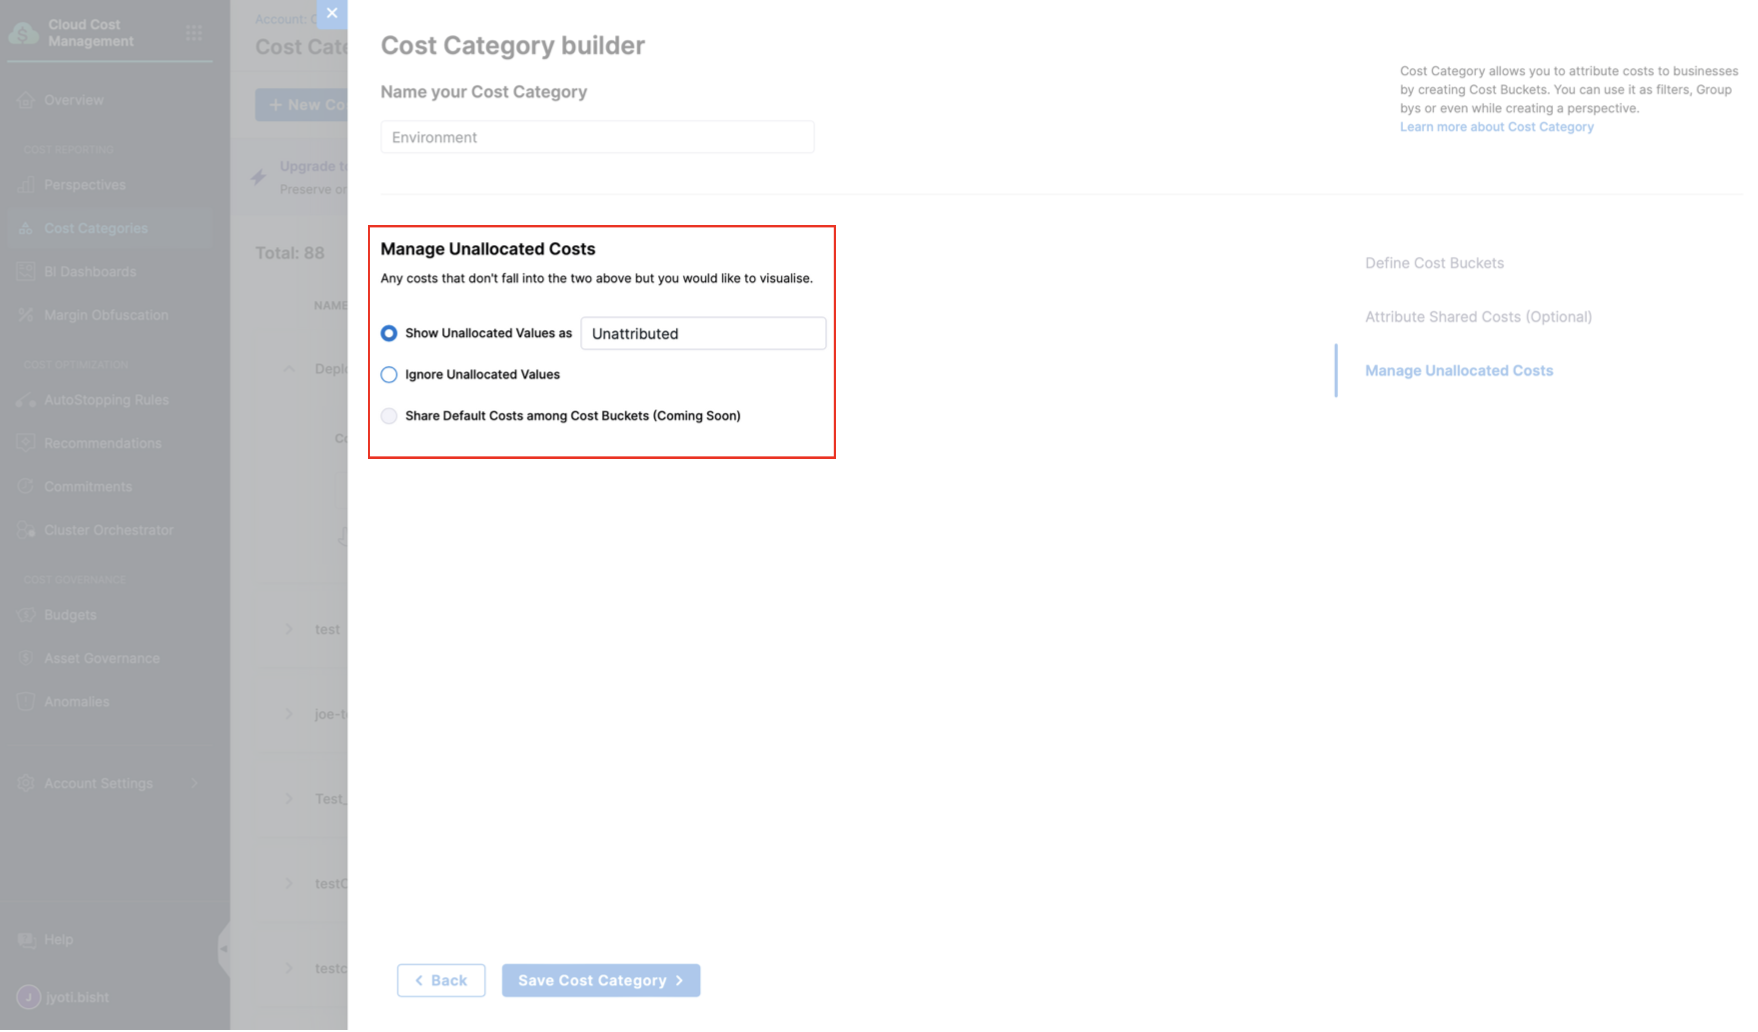
Manage Unallocated Costs
When you use Cost Categories in a Perspective (as a filter or Group By dimension), some costs may not match any of your defined cost buckets. These are called Unallocated Costs.
In Manage Unallocated Costs, you can choose to show or ignore unallocated costs, and choose a name for how those costs are displayed.
- Show Unallocated Values as (enter a name)
- Ignore Unallocated Values
- Share Default Costs among Cost Buckets (Coming Soon)
Overview Page
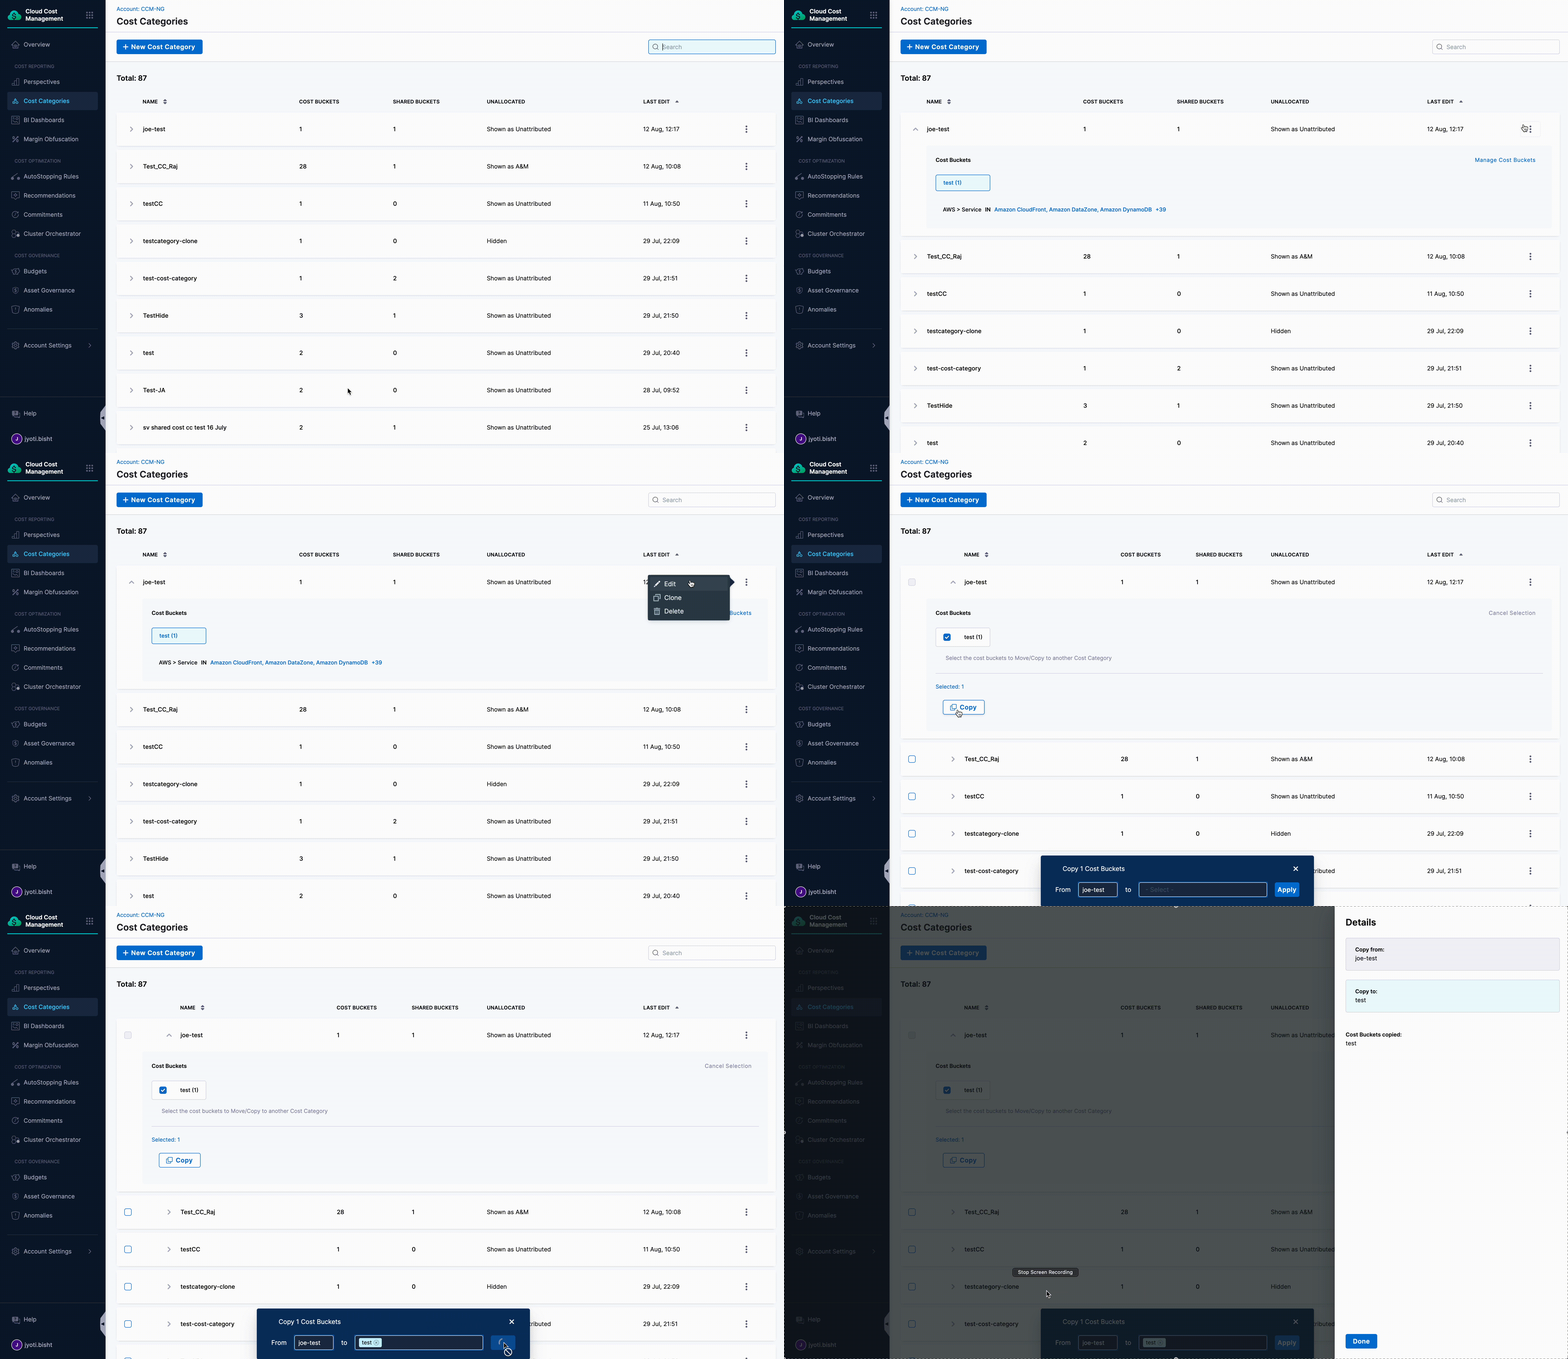
The Cost Categories overview page provides a centralized view of all your defined categories. From this dashboard, you can:
- View category details - Click any category to examine its cost buckets, rules, and configurations
- Manage categories - Edit existing categories, clone them to create similar ones, or delete categories you no longer need
- Copy cost buckets - Transfer bucket definitions between categories to maintain consistency across your cost organization structure:
- Expand the source cost category
- Select Manage Cost Buckets
- Select buckets to copy
- Click Copy and choose target categories
- Verify with View Details
Use Cost Categories
Cost Categories can be used across multiple Harness CCM features. The table below shows how each feature supports different Cost Category capabilities:
| Feature | Perspectives | Dashboards | Recommendations |
|---|---|---|---|
| Usage Methods | • Rules for filtering • Group By dimension • Filter panel selection | • Dimension for analysis • Filter for data selection | • Filter for recommendations • Important: Governance Recommendations do not support labels. Therefore, cost categories that use labels will not work with this feature. |
| Shared Cost Buckets | ✅ Supported Costs allocated per sharing strategy | ❌ Not Supported | ❌ Not Supported |
| Nested Categories | ✅ Supported | ✅ Supported | ✅ Supported |
| Cluster Data | ✅ Supported Can create categories with cluster rules | ✅ Supported | ✅ Supported |
| If Changes in Cost Category | Updates apply to historical data | Monthly tracking of changes | Updates apply to future recommendations |
Note: When using Cost Categories across multiple features, be aware of the different support levels and behaviors to ensure consistent analysis.
In Perspectives
- GroupBy
- Filter
- Perspective rule
When you group by a cost category:
- Each cost bucket appears as a separate line item
- Costs are distributed to their respective buckets based on the rules defined in the cost category
- Shared costs are allocated proportionally to each cost bucket according to your sharing strategy
- Resources that don't match any bucket rules appear under "Unattributed"
Cross-Category Interactions
When using one cost category in a rule and grouping by another cost category:
- Only costs that match your rule's cost category will be included
- These costs are then grouped according to the buckets in your group-by cost category
- Resources that match your rule but don't belong to any bucket in your group-by category appear under "No [Category Name]"
- Shared costs from both categories are allocated according to their respective sharing strategies
Important: When using multiple cost categories with overlapping resources, be careful with shared buckets. If both categories have shared buckets with overlapping rules, costs might be counted differently than expected.
Filter
You can use Group By and filters together. For example, your filter could select Manufacturing from the Department Cost Category, and then you can select GCP: SKUs in Group By.
When including multiple cost categories in your filter, it is important to check for any shared cost buckets between them. If you have shared cost buckets with overlapping rules in both cost categories, the cost of these buckets is counted twice, resulting in duplication of costs. Therefore, it is recommended not to have multiple cost category filter in a Perspective. However, if you must add a multiple cost category filter, avoid overlapping shared cost buckets between cost categories to prevent any potential errors.
When creating a Perspective, you can define a rule using cost categories. The benefit of using a cost category as a rule in a Perspective is that the cost category definition is separated from all the Perspectives that use it.
If you modify the definition of a cost category, any Perspective that uses the cost category automatically displays the changes.
For example, if a new product is added to the Manufacturing department, you can simply update the Manufacturing bucket in the Departments Cost Category, and that change is automatically reflected in all the Perspectives that use that Cost Category.
If cost categories with overlapping cost buckets are used in your Perspective rule, the total cost of the cost buckets in both categories is counted only once. However, the cost of the shared buckets between the two categories is duplicated because of overlapping rules. Therefore, it is recommended to avoid using multiple cost categories with overlapping shared cost buckets in your perspective rule to prevent any potential errors.
When you add a cost category to your Perspective rule:
- The Perspective will only show costs that match the selected cost buckets within that category
- Shared cost buckets associated with the selected cost buckets will be included and allocated according to your sharing strategy
- Costs outside your selected buckets will not appear unless you include "Unattributed" in your selection
In Dashboards
You can visualize cost categories in your custom dashboard. Cost Categories is available in AWS, GCP, Azure, Unified and External Data Explores
-
Update Delay: Changes to cost categories may take up to 24 hours to appear in dashboard data.
-
Historical Data Behavior: Cost category changes apply to data from the current month forward via CUR and Billing Exports. Historical data remains unchanged.
-
Deletion Behavior: When you delete a cost category, it remains visible in dashboards until the end of the current month. Example: If deleted on January 24th, it will still appear until January 31st.
-
Shared Buckets: Important: Shared cost buckets are not included when using cost categories in dashboards.
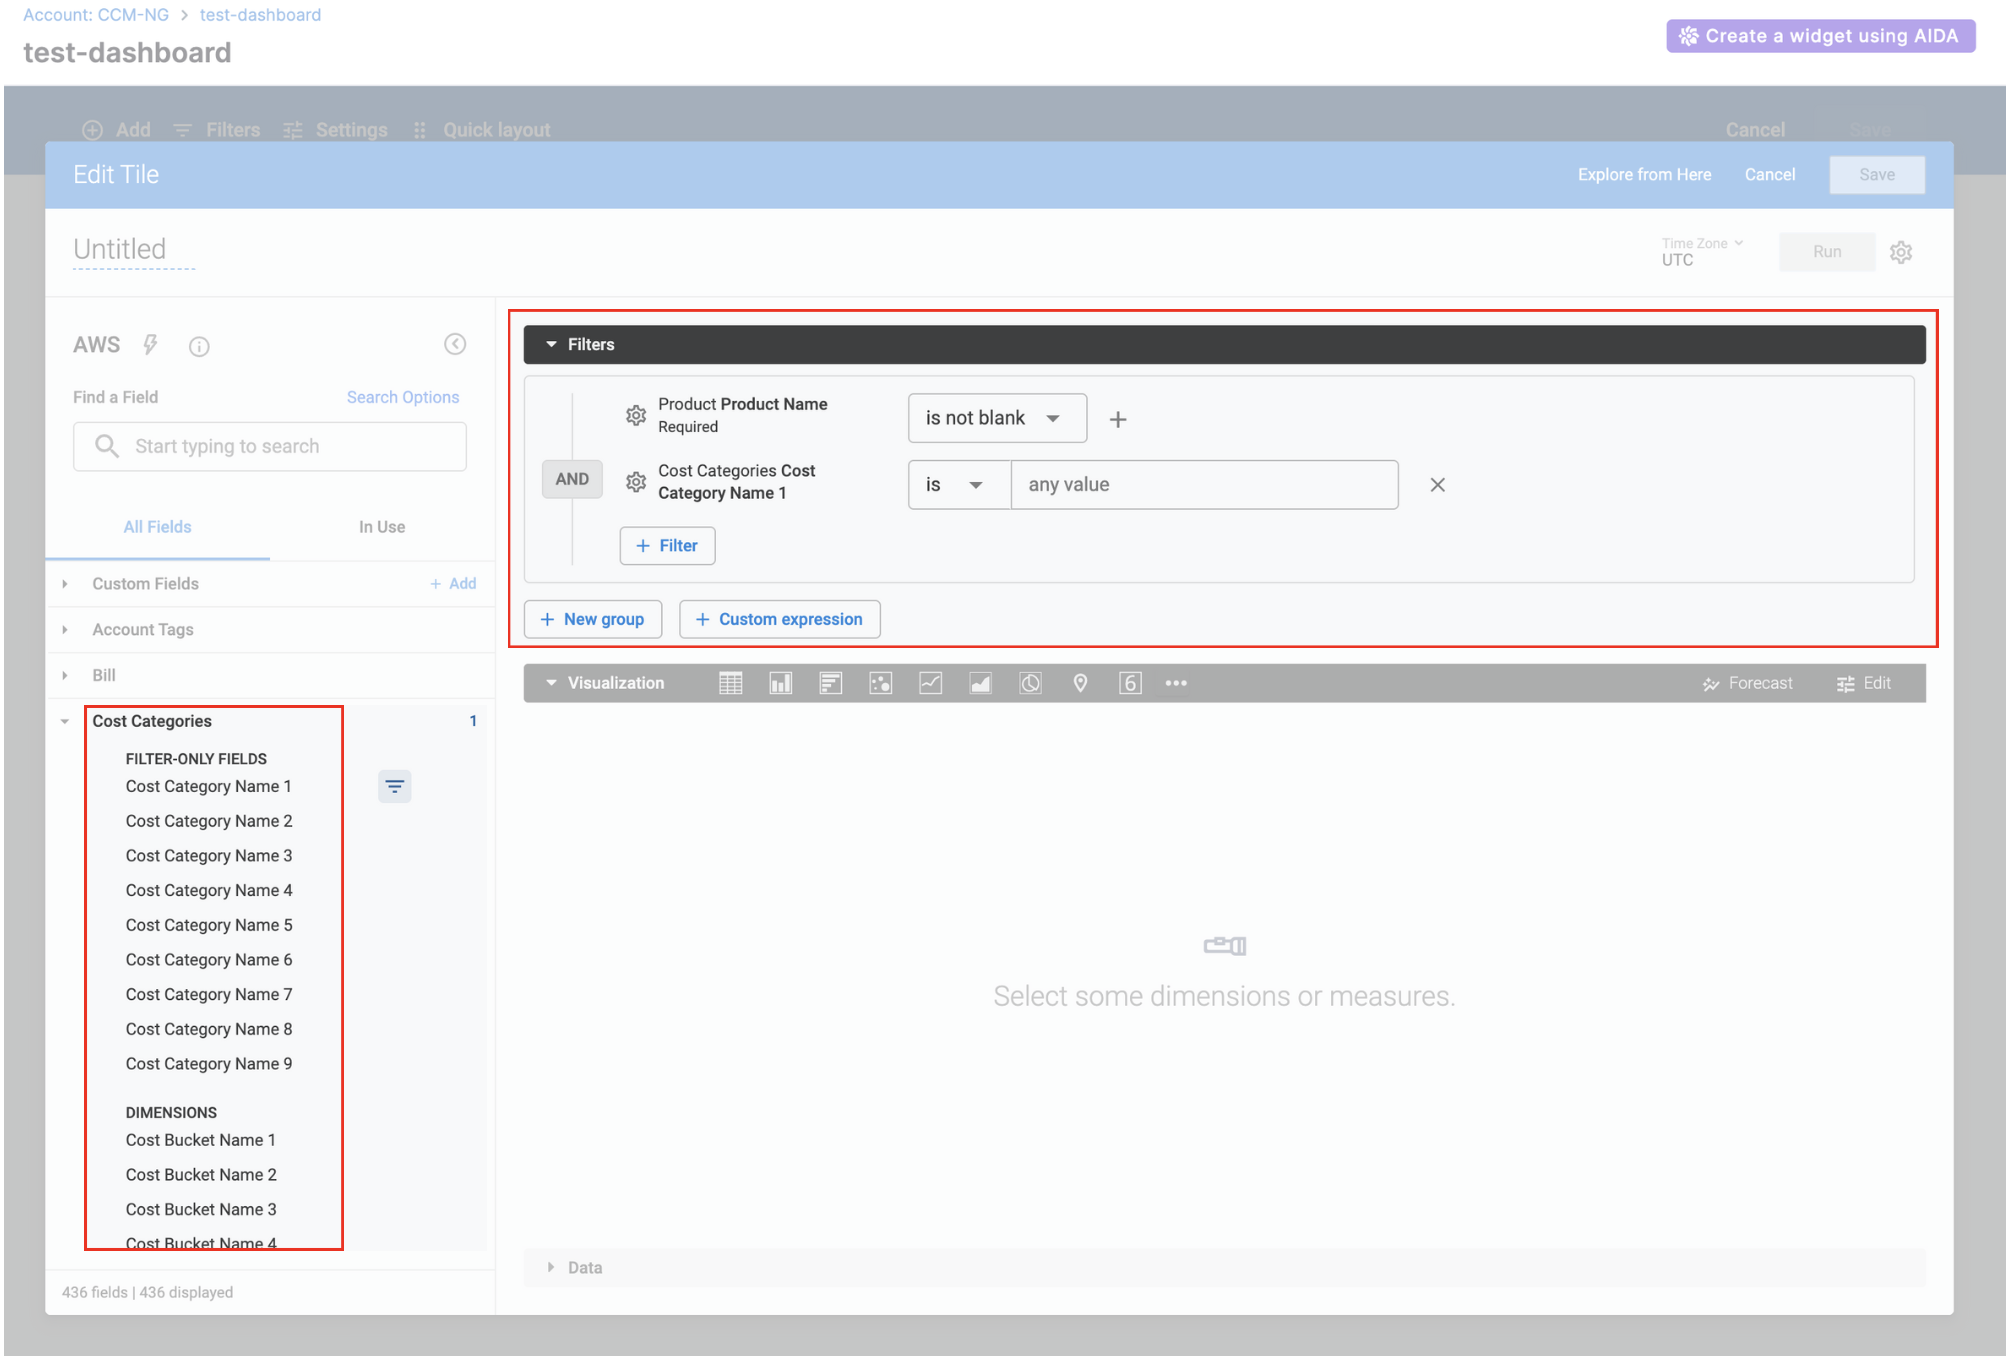
In AWS, you cannot use cost categories as a dimension in custom dashboards if you have selected any of the following fields in the explore:
- Resource ID
- Line Item Type
- Market Type
- Amortised Cost
- Net Amortised Cost
In Recommendations
Using Cost Categories with Recommendations
You can filter CCM Recommendations using Cost Categories to focus on specific business areas:
| Feature | Support Status |
|---|---|
| Regular Cost Buckets | Fully supported |
| Nested Cost Categories | Fully supported |
| Shared Cost Buckets | Not supported |
-
Since recommendations operate at the resource level, all resources included in your selected cost buckets will appear in the filtered recommendations view.
-
Important: Governance Recommendations do not support labels. Therefore, cost categories that use labels will not work with this feature.
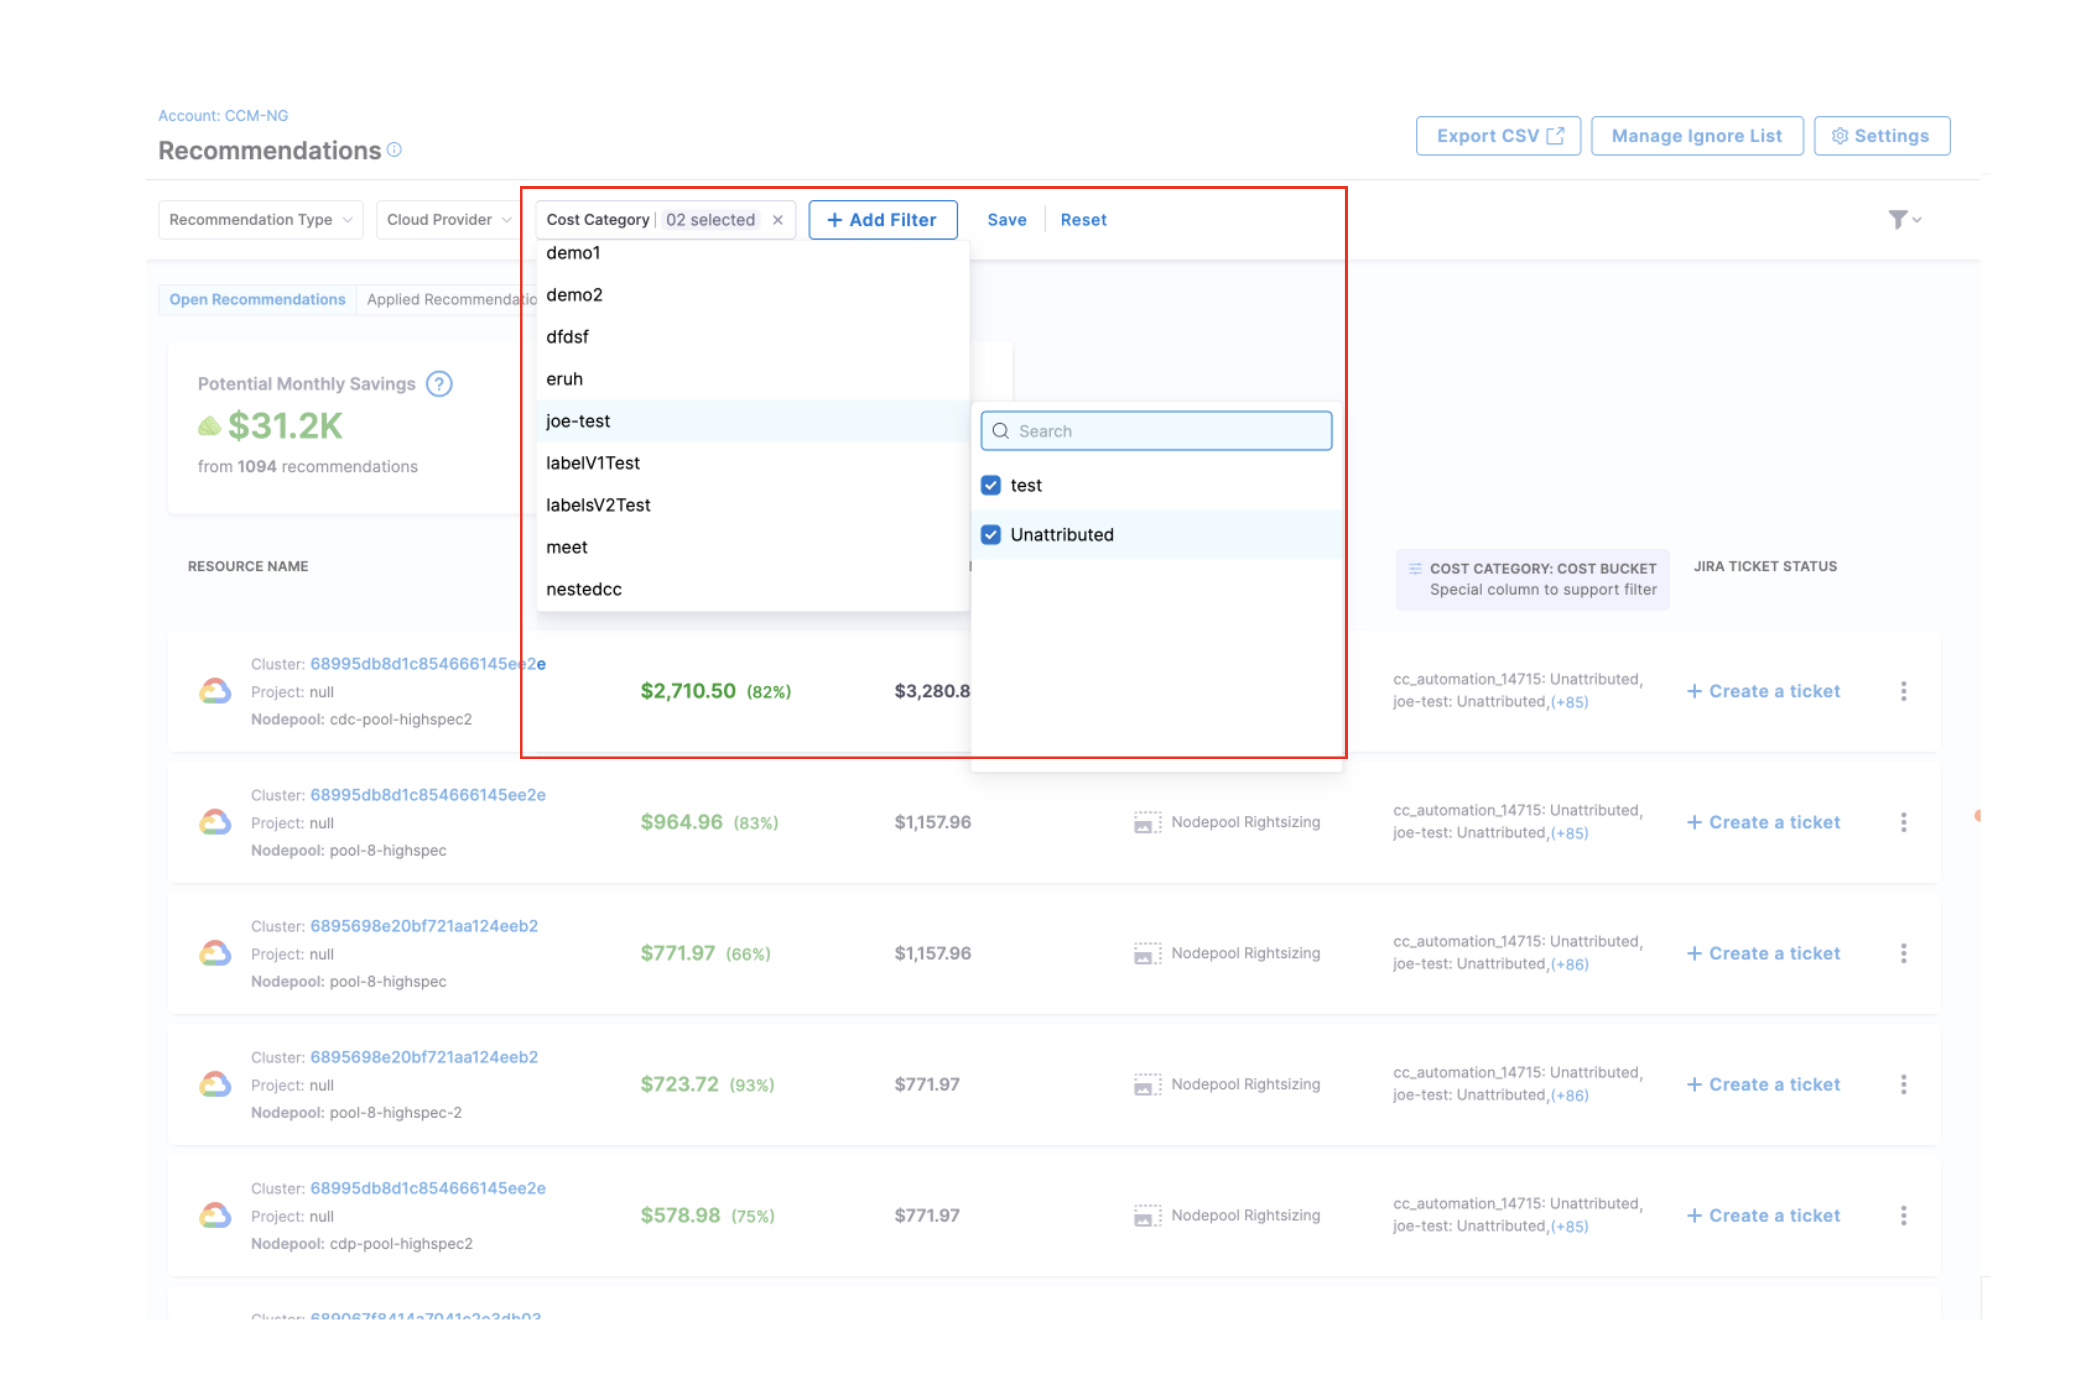
To filter recommendations using cost categories:
- Go to Cloud Cost Management > Recommendations
- Select your cost category in the Filter panel
- Select the cost buckets you want to include
- All the resources included in your selected cost buckets will appear in the filtered recommendations view.
Examples
Example 1: Department Cost Category
Let's say you've created a "Department" Cost Category with these buckets:
| Department Bucket | What's Included |
|---|---|
| Engineering | • All EC2 instances with tag "team=dev" • All S3 buckets with tag "team=dev" |
| Marketing | • All EC2 instances with tag "team=marketing" • All RDS instances with tag "dept=marketing" |
| Shared Services | • All network costs • All support costs |
When used as a Perspective rule:
- You'll see costs broken down by Engineering, Marketing, and Shared Services
- Shared costs are properly allocated based on your sharing strategy
When used with Group By:
- You can group by Department to see costs for each department
- You can combine with other dimensions (e.g., Group by Department → AWS Service)
Example 2: Multiple Cost Categories
Imagine you have two Cost Categories:
- Department Category (Engineering, Marketing, Finance)
- Environment Category (Production, Development, Testing)
When you:
- Use Department Category in your Perspective rule
- Group By Environment Category
You'll see:
| Environment | Cost | What This Shows |
|---|---|---|
| Production | $5,000 | Production costs across selected departments |
| Development | $2,000 | Development costs across selected departments |
| Testing | $1,000 | Testing costs across selected departments |
| No Environment | $500 | Costs that belong to selected departments but don't have environment tags |
Note: When using multiple Cost Categories together, be careful with shared buckets. If both categories have shared buckets with overlapping rules, costs might be counted twice.
FAQs
What's the difference between "No [Category Name]" and "Unattributed" costs?
Unattributed Costs:
- Appear when you're using a single cost category
- Represent costs that don't match any bucket rules within that category
- Example: If your "Department" category has buckets for Engineering, Marketing, and Finance, costs that don't match any department rules will appear as "Unattributed"
- These costs are completely outside your defined buckets
No [Category Name] Costs:
- Appear when you're using multiple cost categories together (one in rules, another in Group By)
- Represent costs that match your rule category but don't match any bucket in your group-by category
- Example: If you filter by "Department = Engineering" and group by "Environment", costs from Engineering that don't have an environment tag will appear as "No Environment"
- These costs are within your primary category but not classified in your secondary category
Can I use cost categories with multiple cloud providers?
Yes, cost categories work across all supported cloud providers (AWS, Azure, GCP) and Kubernetes clusters. You can create rules that span multiple providers and organize costs consistently across your entire cloud estate.
How do shared buckets affect my cost reporting?
Shared buckets distribute common costs (like infrastructure or support) across multiple cost buckets according to your chosen allocation strategy. In Perspectives, these shared costs are included when you select the associated cost buckets. However, be aware that:
- Shared buckets are not supported in Dashboards or Recommendations
- Using multiple cost categories with overlapping shared buckets can potentially count costs twice
- Shared buckets cannot be nested inside other cost categories