Add a custom remote script and manifests
This topic describes how to use Custom Remote Manifests to run a script at deployment runtime and pull in your manifests.
Harness provides first-class support for all the major devops platforms manifests and specifications, but there are situations when you want to use a custom script to pull your manifests.
Harness provides Custom Remote Manifests to let you run your script at deployment runtime and pull in your manifests.
In some cases, your manifests are in a packaged archive and you simply wish to extract and use them at runtime. In these cases, you can use a packaged archive with Custom Remote Manifests.
You can simply use Custom Remote Manifests to add a script that pulls the package and extracts its contents. Next, you supply the path to the manifest or template for Harness to use.
Custom Remote Manifests are supported for:
- Kubernetes
- Helm chart
- OpenShift
Looking for other methods? See Add Kubernetes Manifests.
Before you begin
Supported platforms and technologies
See Supported Platforms and Technologies.
Limitations
- Custom Remote Manifests scripts use Bash only.
- The Delegate that runs the script must have all the software needed for the scripts to execute.If you select a Delegate in the Kubernetes Cluster Connector used by the stage Infrastructure Definition, then the script is run on that Delegate.
Add secrets for a script
Typically, your script to pull the remote package will use a user account. For example:
curl -sSf -u "johndoe:mypwd" -O 'https://mycompany.jfrog.io/module/example/manifest.zip'
You can use Harness secrets for the username and password in your script. For example:
curl -sSf -u "<+secrets.getValue("username")>:<+secrets.getValue("password")>" -O 'https://mycompany.jfrog.io/module/example/manifest.zip'
For more information, see Add and Reference Text Secrets.
Start a pipeline
This topic assumes you have a Harness Project set up. If not, see Create Organizations and Projects.
You can create a Pipeline from any module in your Project, or in the Project Overview, and then add stages for any module.
Enter a name for the Pipeline and click Start. Now you're ready to add a stage.
Add a Deploy stage
For steps on adding a stage, see Add a Stage.
- Name the stage, and select what you'd like to deploy. For example, select Service.
- Click Set Up Stage. The new stage's settings appear.
- Click Next or Service.
Create a Harness Kubernetes Service
In Service, you can define/select the Service and Service Definition.
Select or create the Service.
To add your manifests, go to Manifests in the Service Definition.
Add the remote script and Kubernetes manifests
You can use your Git repo for the remote script and manifests in Manifests and Harness will use them at runtime.
If you are adding the image location to Harness as an Artifact in the Service Definition, see Add Container Images as Artifacts for Kubernetes Deployments.
-
In your Harness Kubernetes Service, in Manifests, click Add Manifest.
-
In Specify Manifest Type, select K8s Manifest, and then click Next.
-
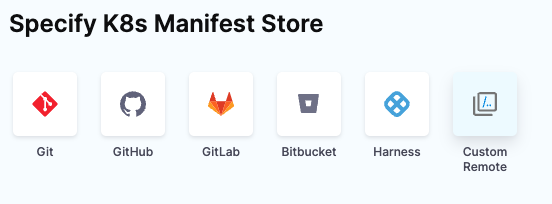
In Specify K8s Manifest Store, click Custom Remote.
-
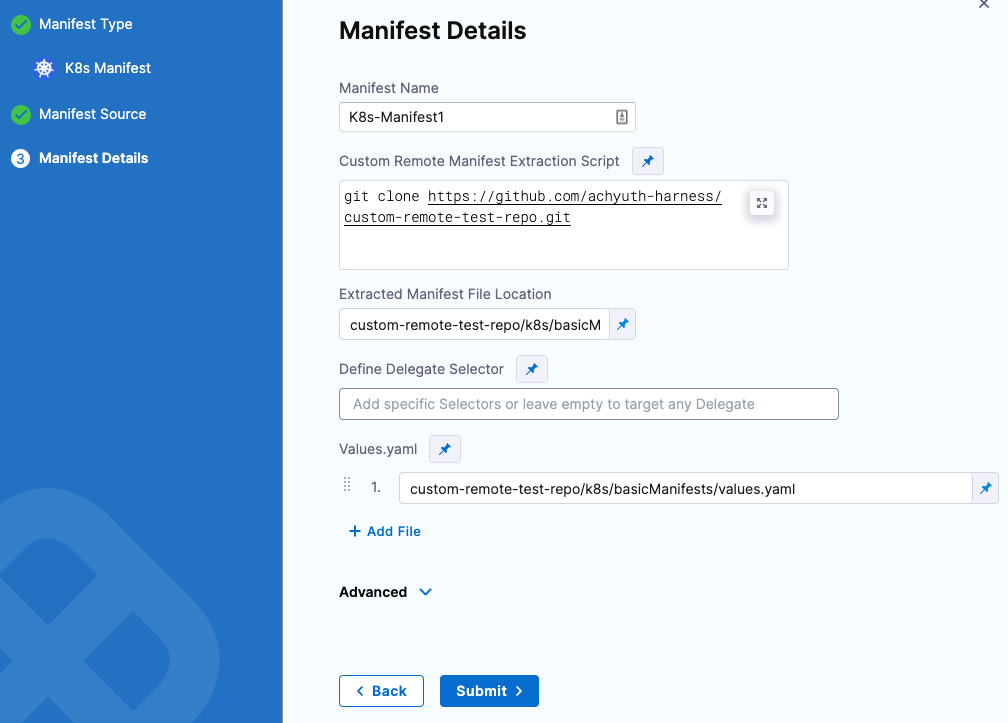
Click Continue. The Manifest Details appear. Now you can add your script to pull the package containing your manifests and specify the folder path for the manifests.
-
Enter the name in Manifest Name.
-
In Custom Remote Manifest Extraction Script, enter the path to the Git repo where your remote manifest script is available. This script runs on the Harness Delegate selected for the deployment.
-
In Extracted Manifest File Location, enter the folder path for the manifests.
-
In Define Delegate Selector, Harness selects the best delegate. Select a specific delegate from the list of tags available for delegates or leave this blank and allow Harness to select a delegate. Go to Use delegate selectors for more information.
noteDelegate selectors do not override service infrastructure connectors. Delegate selectors only determine the delegate that executes the operations of your pipeline.
-
In Values.yaml, the field is populated with the folder path for the values.yaml.
-
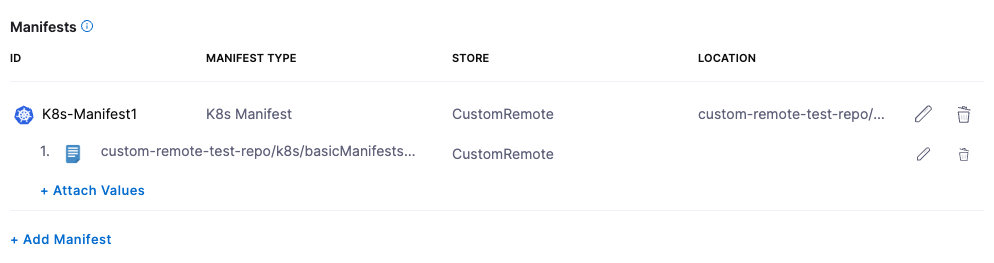
Click Submit. The new manifest is created and added to Manifests in Harness.
View the Harness Delegate selected for the deployment
The custom script runs on the Harness Delegate selected for deployment. If you selected a Delegate in the Kubernetes Cluster Cloud Provider used by the Workflow's Infrastructure Definition, then the script is run on that Delegate.
Harness creates a temporary working directory on the Delegate host for the downloaded package. You can reference the working directory in your script with WORKING_DIRECTORY=$(pwd) or cd $(pwd)/some/other/directory.
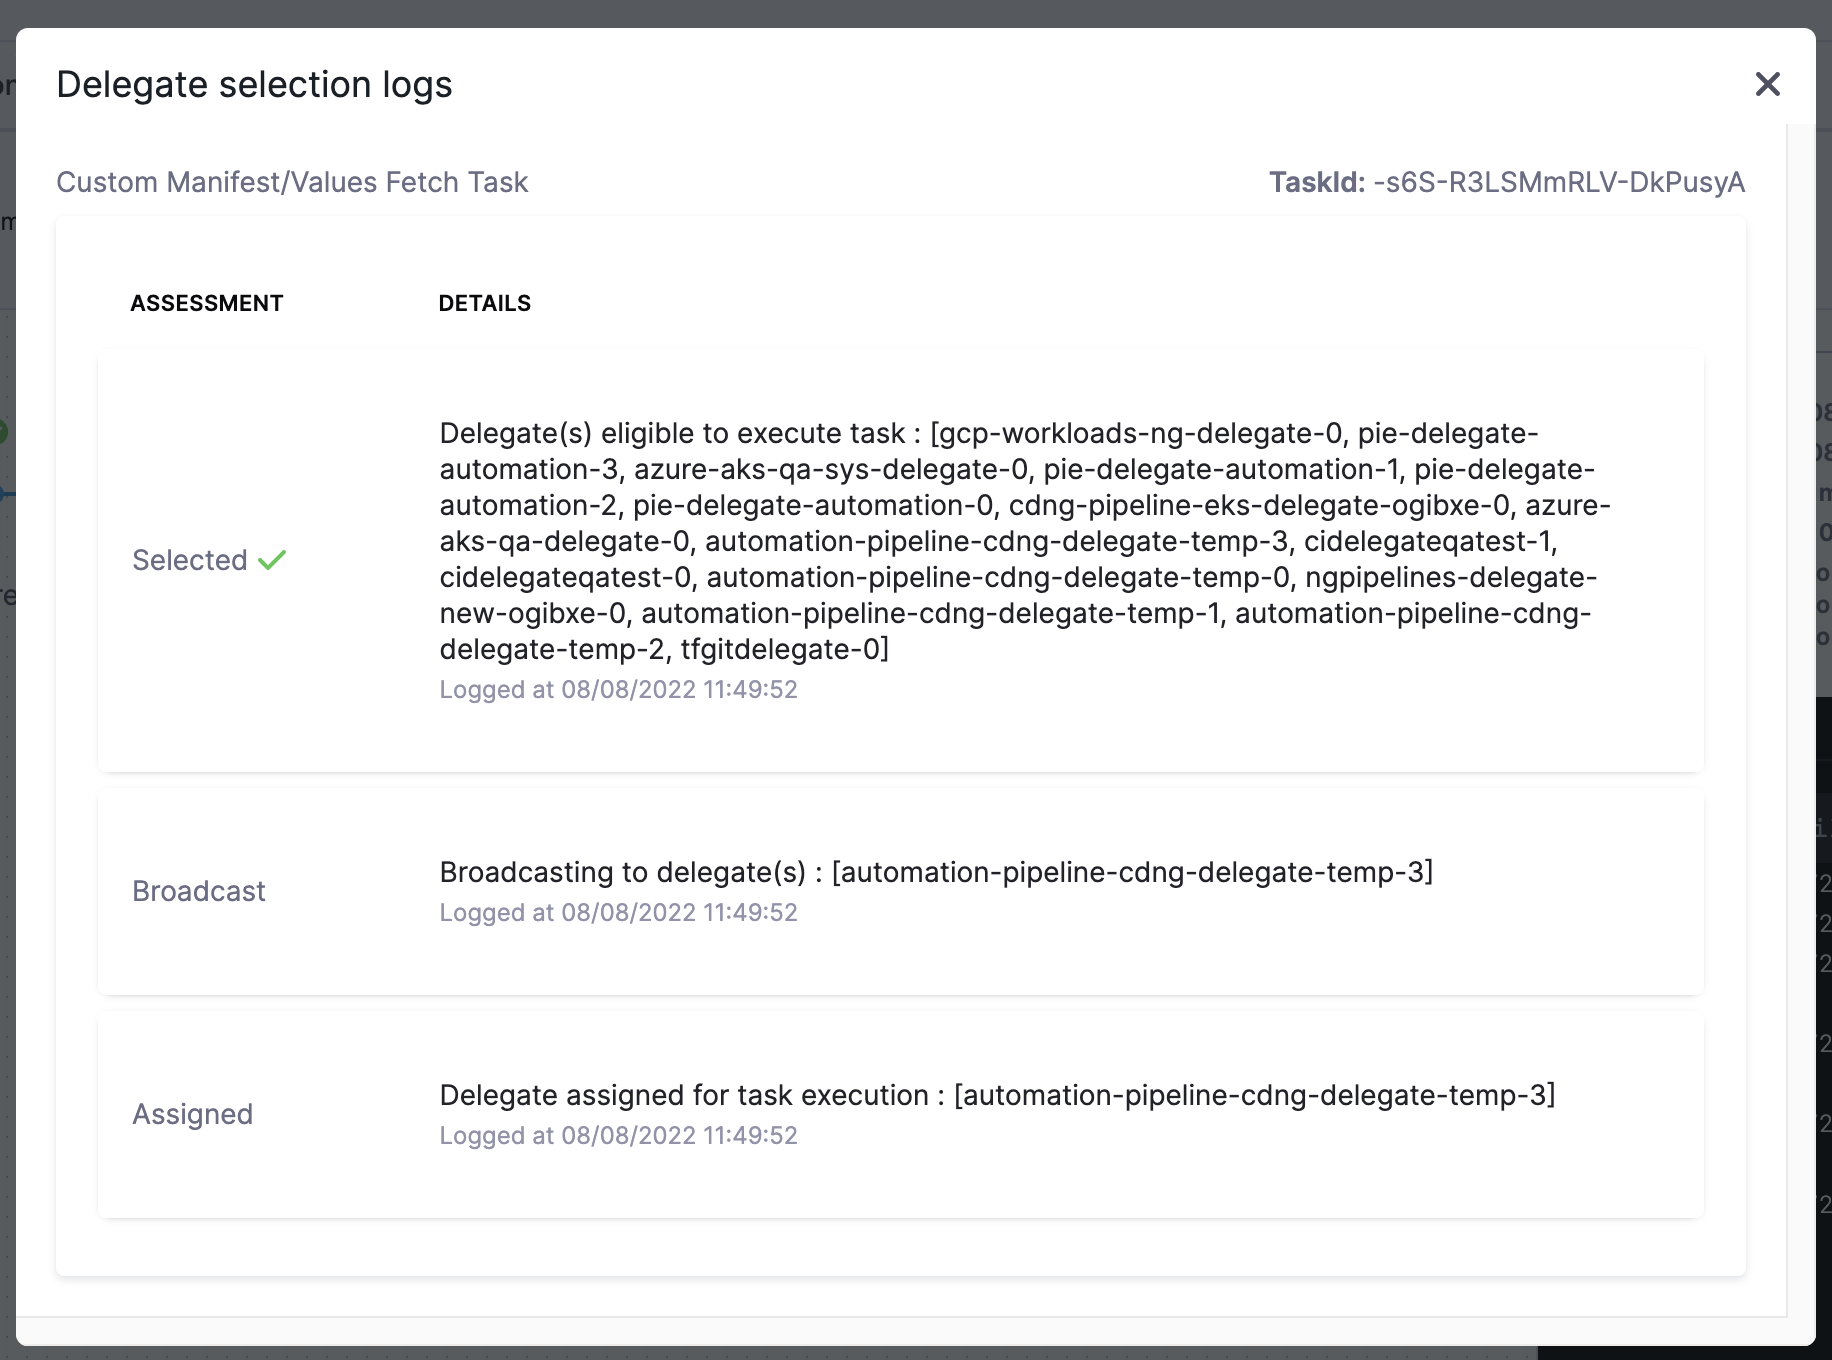
After deploying your Workflow, you can view the Delegate that was selected for the deployment.
Click on Execution Summary, and then click on Custom Manifest Values Fetch Task in the console to view the selected Delegate.
If you use separate connectors for downloading manifests and deploying the manifests to your environment, how Harness uses the selectors specified in the connectors varies between custom remote manifests and manifests downloaded from other store types, such as HTTP Helm.
For other store types, the delegate used for deployment must have all the selectors used with both connectors. For example, if a GitHub connector has selectors A and B, and the Kubernetes connector is configured with selectors C and D, the delegate used for deployment must have all of these selectors, that is, A, B, C, and D.
With custom remote manifests, Harness does not merge the delegate selectors used in the connectors when carrying out the deployment task. This is because the manifests have already been downloaded to Harness and are made available for deployment. Therefore, the delegate that’s deploying a customer remote manifest needs to have only selectors C and D.
Kubernetes YAML
You can enter the path to a manifests folder.
For example, if your expanded package has this folder structure:
manifest:
 - values.yaml
 - templates
     - deployment.yaml
     - service.yaml
In this example, you can enter manifest and Harness automatically detects the values.yaml and the other file (for example, deployment.yaml and service.yaml). If no values.yaml file is present, Harness will simply use the other files.
That's all the setup required. You can now deploy the Service and the script is executed at runtime.
OpenShift manifest
Provide the path to the OpenShift template, Kubernetes manifest, or Helm file. For example, manifest/template.yaml.
Do not enter a folder. Harness requires a direct path to the file.
That's all the setup required. You can now deploy the Service and the script is executed at runtime.
Helm chart manifests
When configuring a Helm chart with Custom Remote manifests, in the Manifest Details > Advanced section, you can select a Helm Version, and then add the command flags that you wish to pass based on the version.
For more information on Helm command flags, go to Add Helm chart.
Task Breakdown of custom remote manifest with Kubernetes deployment
Harness performs deployment with two Harness Delegate tasks. These are jobs that are assigned to the delegate by the Harness Manager.
- Fetch Files: This task goes to the source repository or manifest source to fetch the manifests and download them onto the delegate running in your environment.
- Kubernetes Rolling Deploy: This task takes the manifests collected from the Fetch Files task and deploys them into the target Kubernetes cluster.
Scenario 1: Fetching on-premise manifest source with cloud target cluster
In this scenario, Harness fetches an on-premise manifest source and the deployment cluster is in the cloud. You have 2 delegates: 1 on-premise and 1 in the cloud.
- The Harness Manager will use the delegate installed in your environment to collect the manifest from the on-premise source and then store it with the deploy task.
- The Harness Manager will assign the task with the archived manifests to the cloud delegate associated with the cloud Kubernetes cluster for deployment.
Scenario 2: Fetching on-premise manifest source with on-premise target cluster
In this scenario, Harness fetches a manifest source that is on-premise, and the deployment cluster is also on-premise. You have 2 delegates: 1 for on-premise tasks and 1 for the on-premise Kubernetes cluster.
One delegate with access to on-premise remote manifest source and on-premise target cluster
- The Harness Manager will assign the Fetch Files task to the delegate with access to the custom remote manifest source.
- If that same delegate has access to the on-premise Kubernetes cluster, it will perform a second fetch for any values.yaml files needed for deployment and then perform the deployment.
One delegate with access to on-premise remote manifest source and one delegate with access to on-premise target cluster
- The Harness Manager will assign the Fetch Files task to the delegate with access to the custom remote manifest source.
- The manifests collected are archived for the Deploy task that is done by the delegate with access to the on-premise Kubernetes cluster.
Notes
You can use Go templating in your Kubernetes resource files, just as you would for files stored in Git or inline. See Example Kubernetes Manifests Using Go Templating. For OpenShift, you must use OpenShift templating.
If the artifact you are deploying with your manifest is public (DockerHub) and does not require credentials, you can use the standard public image reference, such as image: harness/todolist-sample:11.