Bring Your Own Argo CD into Harness GitOps
This topic describes how to import your existing Argo CD configuration into Harness GitOps as a Bring Your Own Argo CD (BYOA) setup.
In addition, when you install the Harness GitOps Agent in your existing Argo CD cluster as part of BYOA, you can map Argo CD projects to Harness projects. Harness imports all the Argo CD project entities (applications, clusters, repos, etc.) and creates them in Harness automatically.
Also, whenever new entities are created in the mapped Argo CD projects, they are added to Harness automatically.
With a standard Harness GitOps Agent installation (non-BYOA), Harness can install and manage Argo CD for you. This scenario is different from a BYOA where you are importing an existing Argo CD configuration into Harness GitOps.
For more information, go to Install a Harness GitOps Agent.
Mapping existing Argo CD projects across different Harness scopes
To map Argo CD projects to Harness projects, you need to install the Harness GitOps Agent from the Harness account or organization level. Then you can map the Argo CD projects to any of the Harness projects in the account or organizations.
If you install the GitOps Agent at the Harness project level, you can only map to the current project.
The following example installs the GitOps Agent at the Harness account level.
Installing a GitOps Agent in an existing Argo CD setup (BYOA)
The following steps show you how to install a GitOps Agent into an existing Argo CD namespace and then map your existing projects to your Harness project.
-
In your Harness account, select Account Settings.
-
Select GitOps, and then select Agents.
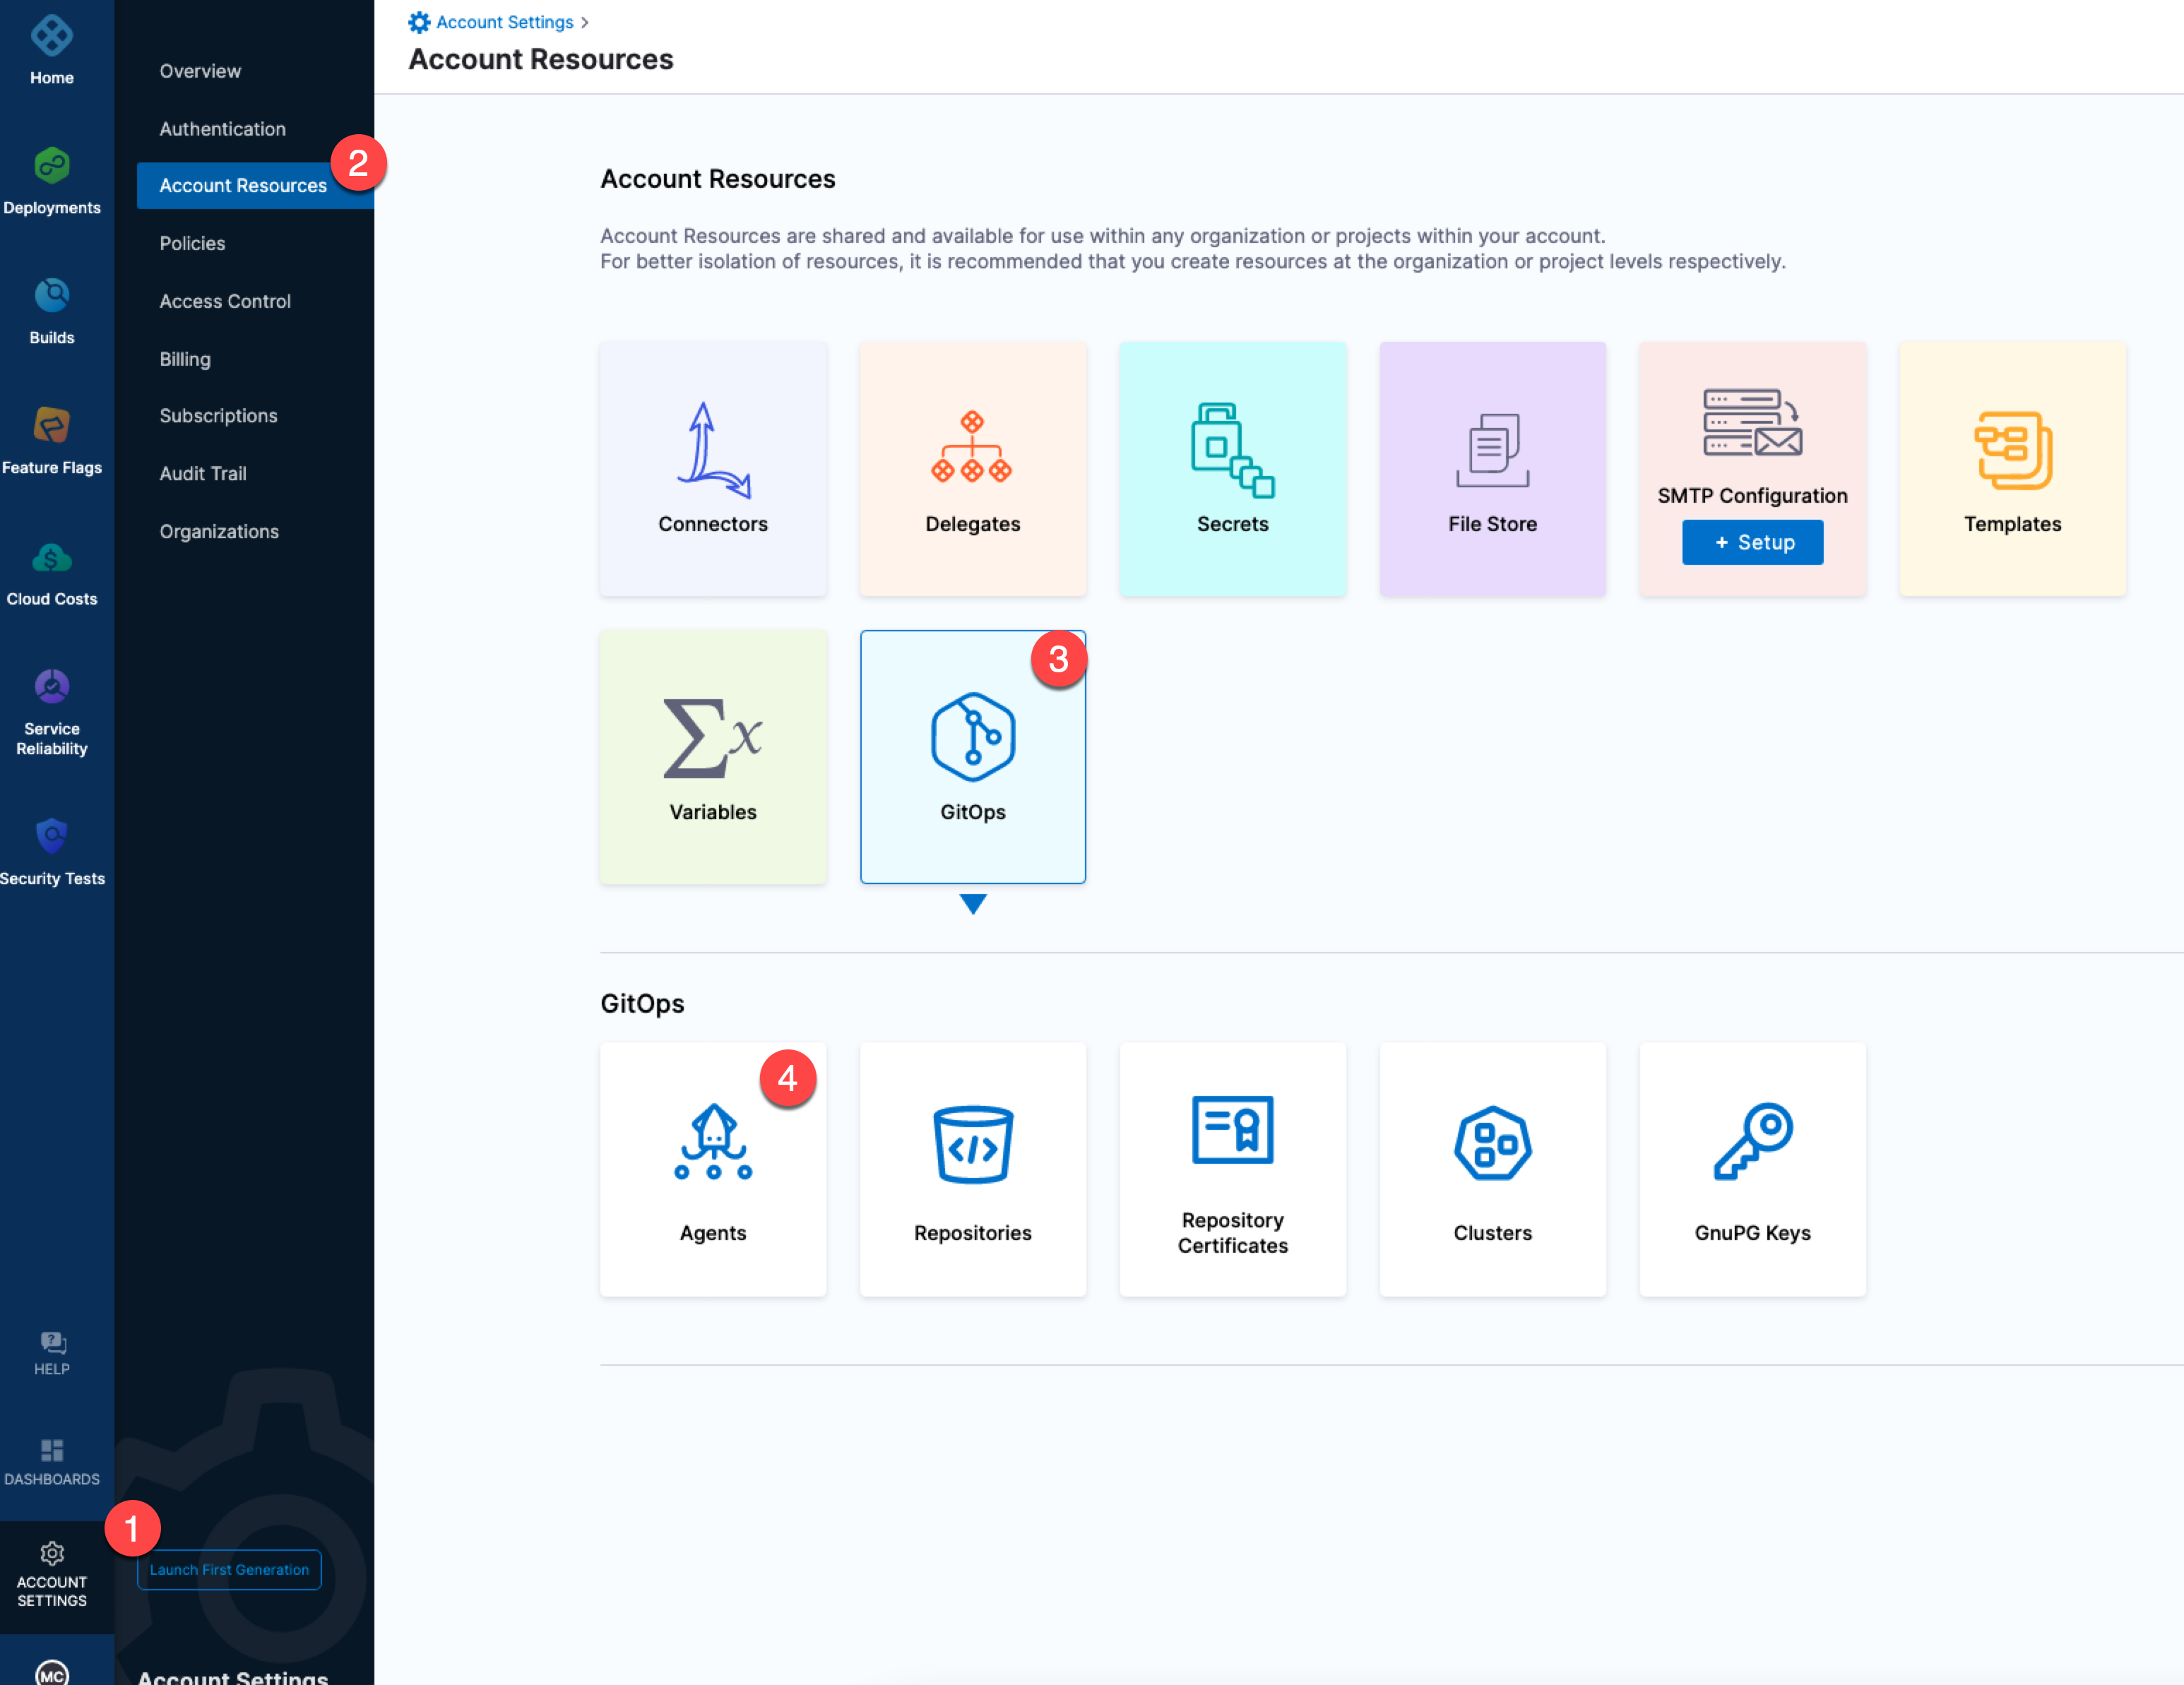
-
Select New GitOps Agent.
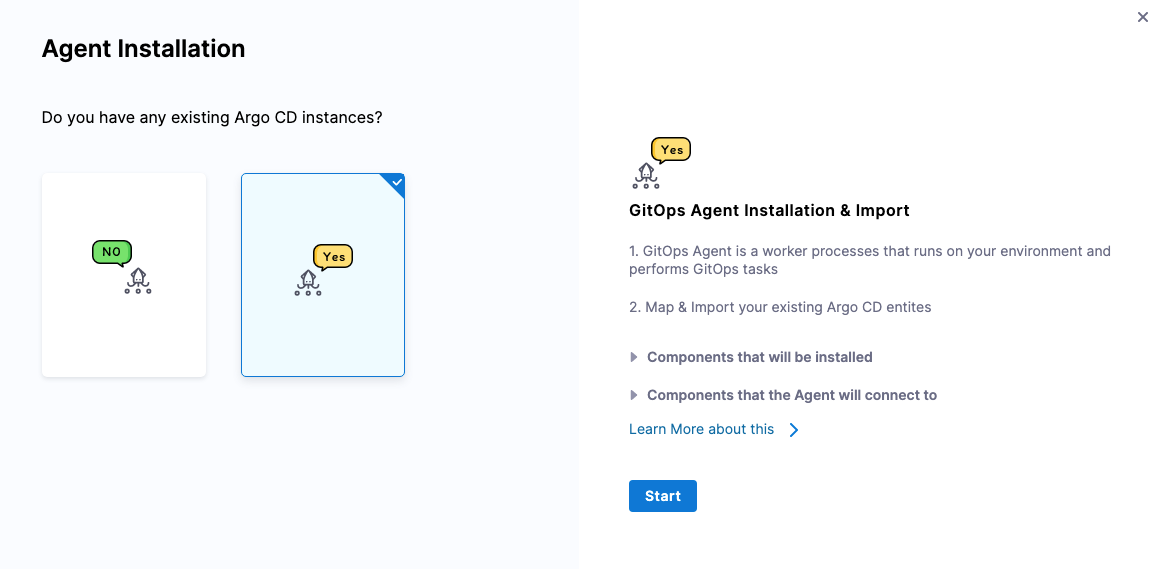
-
In Agent Installation, in Do you have any existing Argo CD instances, select Yes, and then select Start.
-
In Name, enter a name for your agent, such as
byoa-agent. -
In GitOps Operator, select Argo.
-
In Namespace, enter the namespace where Argo CD is hosted. The default is
argocd.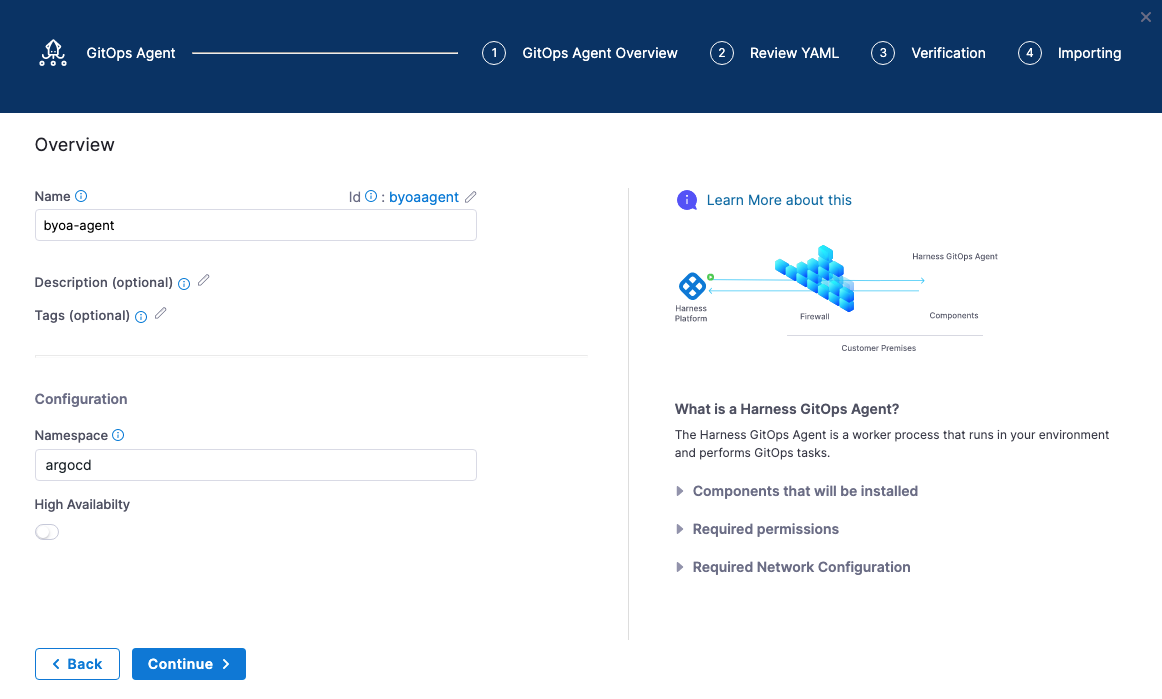
-
Select Continue.
-
In Review YAML, select Download & Continue.
noteAlternatively, the Helm Chart option lets you download a
helm-chartfile for the Harness GitOps Agent. You can download this file and install it in your Harness GitOps Agent cluster if you prefer using Helm.You can download an
override.yamlfile which will contain the Helm Value overrides to apply, and you can use the commands mentioned to install the agent using the public Helm Repository for the GitOps Agent. -
Log in to the cluster hosting Argo CD.
-
Run the install command provided in the Agent installer, such as
kubectl apply -f gitops-agent.yml -n argocd. You'll see output similar to this:serviceaccount/gitops-agent created
serviceaccount/gitops-agent-upgrader created
secret/gitops-agent created
configmap/gitops-agent created
configmap/gitops-agent-upgrader created
clusterrole.rbac.authorization.k8s.io/byoa-agent-agent created
clusterrolebinding.rbac.authorization.k8s.io/byoa-agent-agent created
role.rbac.authorization.k8s.io/gitops-agent created
role.rbac.authorization.k8s.io/gitops-agent-upgrader created
rolebinding.rbac.authorization.k8s.io/gitops-agent created
rolebinding.rbac.authorization.k8s.io/gitops-agent-upgrader created
deployment.apps/gitops-agent created
cronjob.batch/gitops-agent-upgrader created -
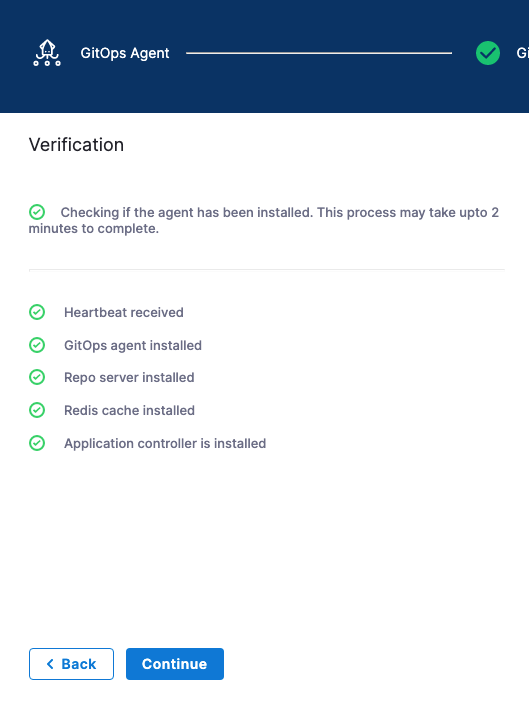
In the Harness GitOps Agent installer, select Continue.
The Agent has registered with Harness.
- Select Continue. The Map Projects settings appear.
Ensure that you deploy only one Harness GitOps Agent per Argo CD namespace. Deploying multiple Agents created in different projects or accounts can lead to unpredictable behavior.
Harness supports mapping Argo CD projects into Harness projects through the Agent that controls the Argo CD deployment. When importing Argo CD projects, Harness maps Argo CD projects into Harness projects that belong to one account.
Enabling multiple Agents in one Argo CD namespace implies cross-account resource sharing which Harness does not support.
Map existing Argo projects
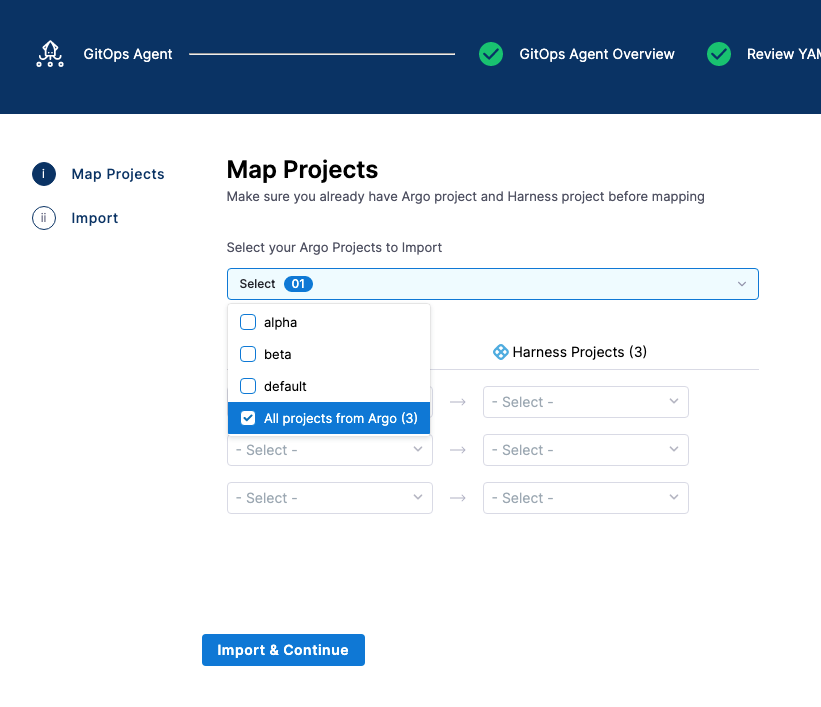
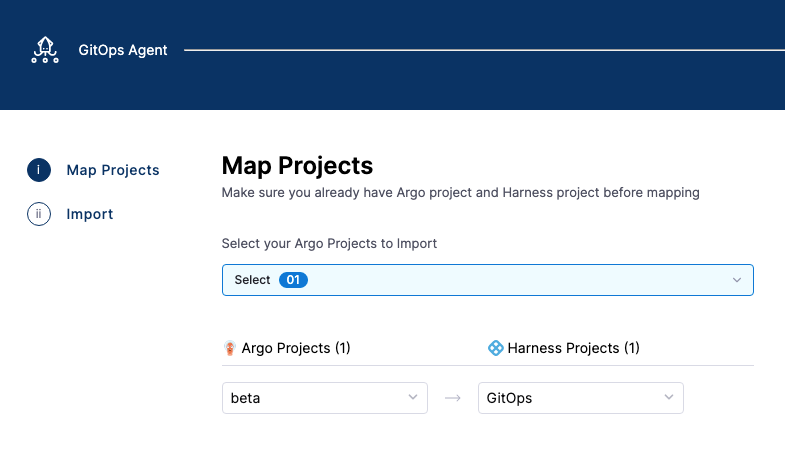
To map your existing Argo CD projects to Harness projects, select the Argo CD projects you want to use, and then select the Harness project where you want to map the Argo CD project.
-
In Map Projects, in Select your Argo Projects to Import, select the Argo CD projects you want to map.
-
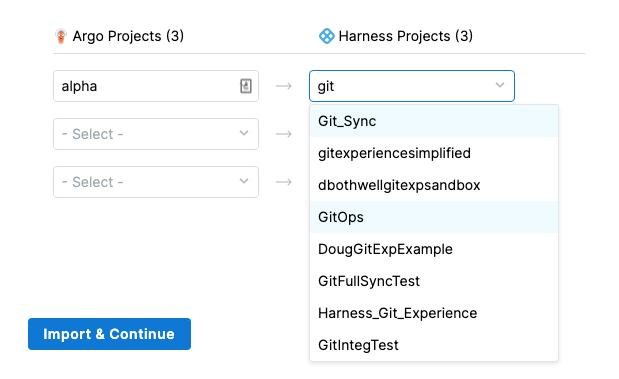
In each row, select the Argo project and the Harness project.
 note
noteDo not map the same Argo CD project to multiple Harness projects.
-
Select Import & Continue.
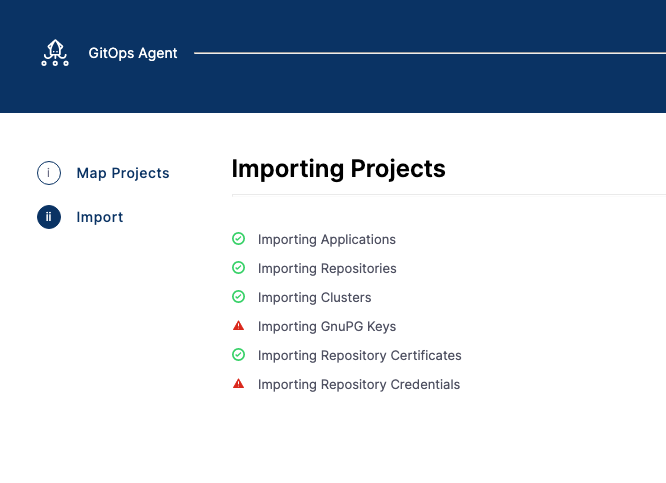
The Argo CD projects are imported.
Here's an example where the Argo CD applications, repositories, repository certs, and clusters are imported.
-
Select Finish. The mapping is displayed in the Agent details.
-
Select Save.
Verify mapping
To see the imported Argo CD entities from the mapping, look in the mapped Harness project.
-
In your Harness project, Select GitOps, and then select Applications. You can see the imported application.

-
Select Settings, and then select Repositories. You can see the imported repositories.
-
Select Settings, and then select Clusters. You can see the imported clusters.
Do the same for any other mapped project entities.
Adding new mappings to existing Agent
You can add new mappings to an existing Agent in the Agent's Mapped Harness Project settings.
-
In Harness, open an existing Agent.
-
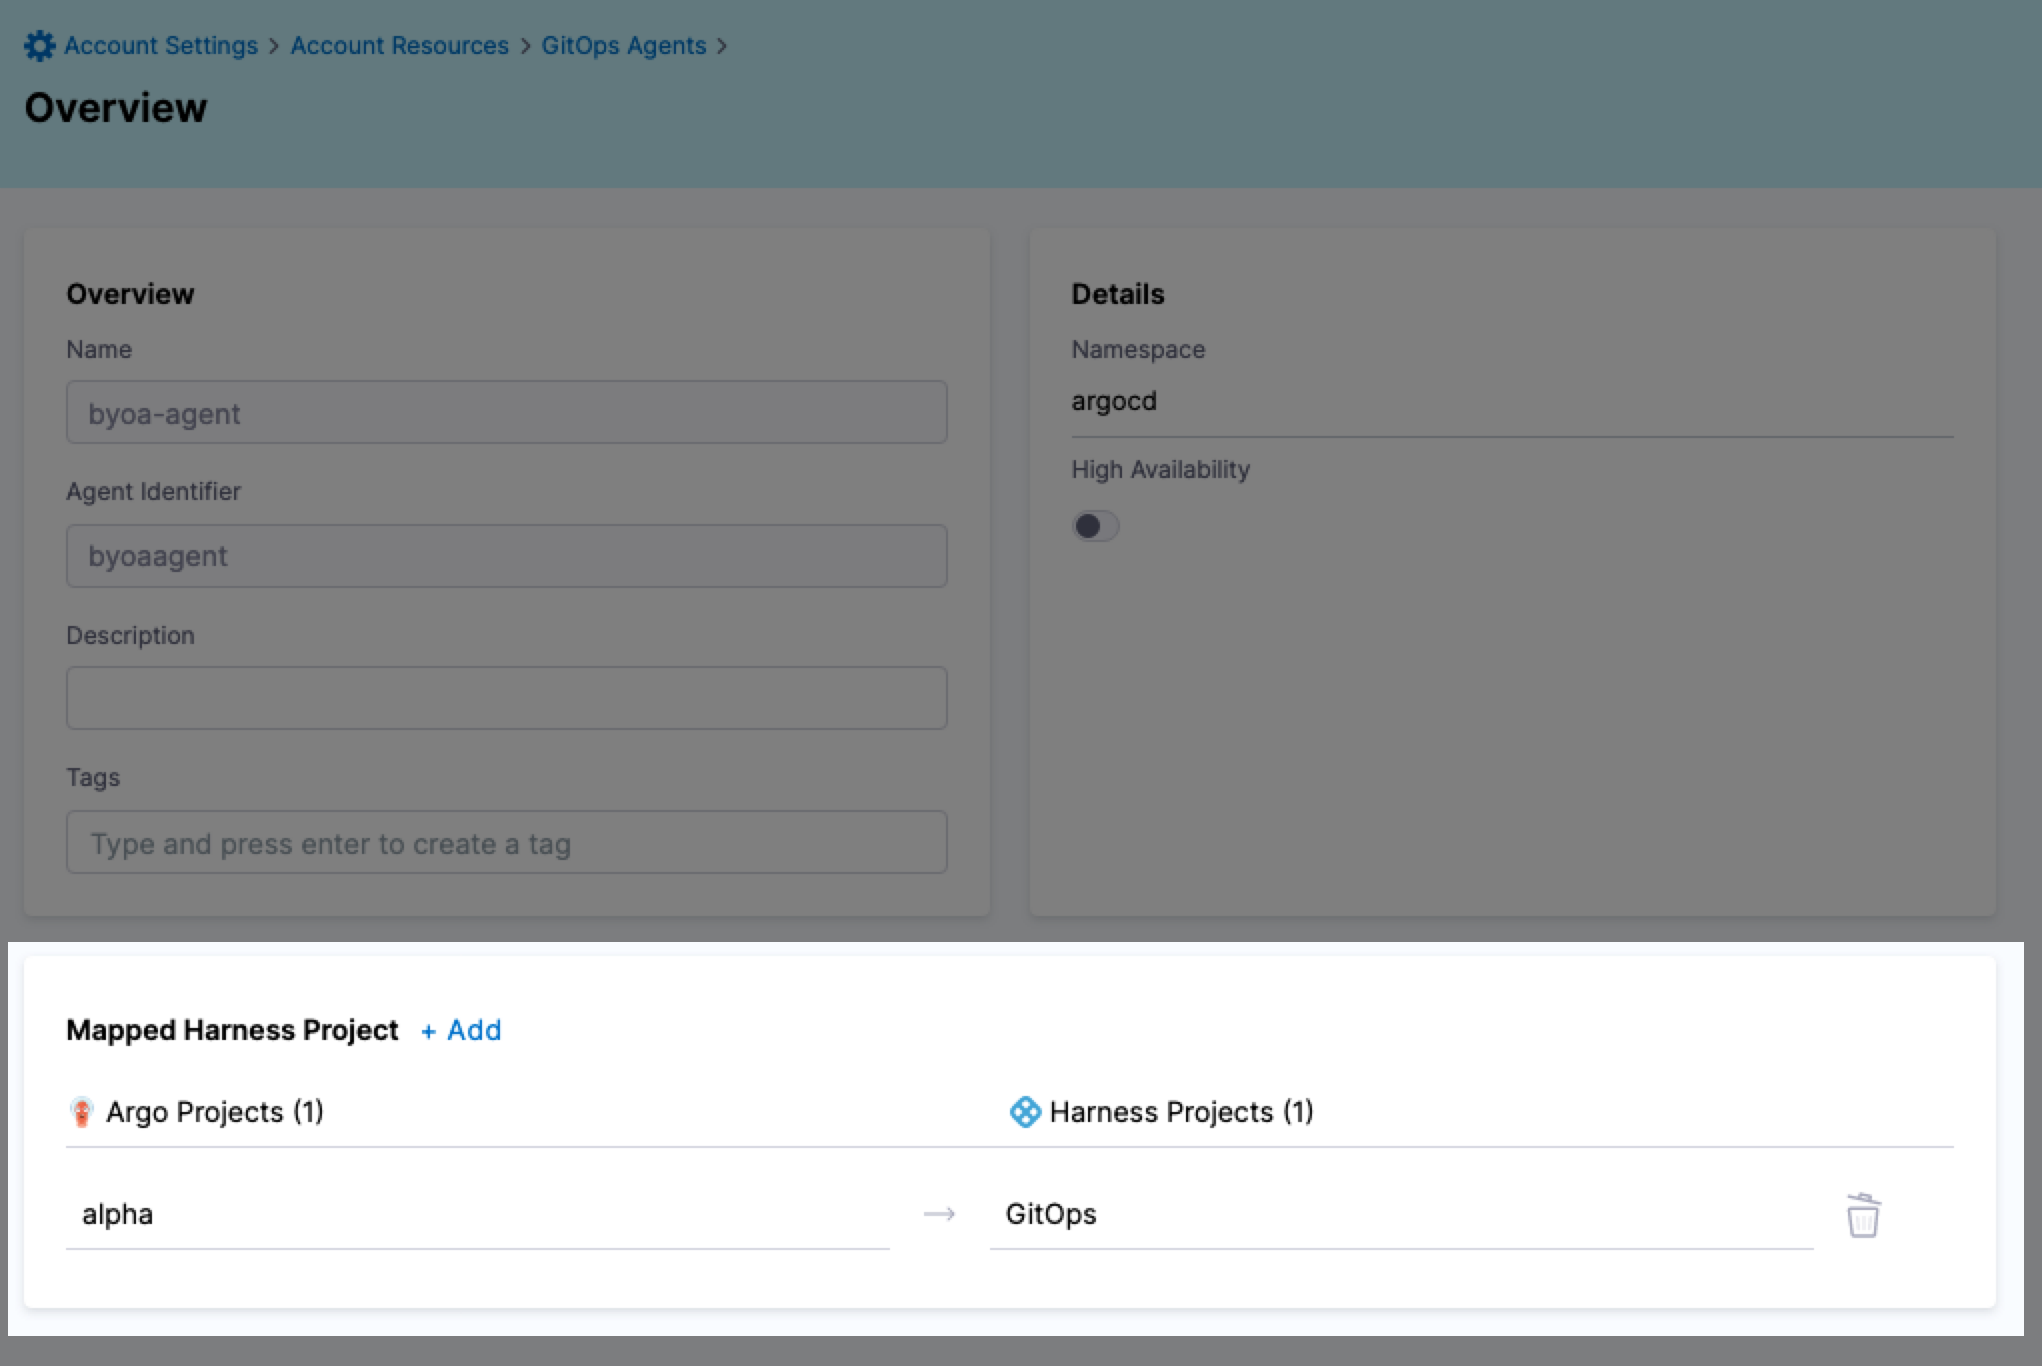
Select Edit. In this example, the Argo CD project alpha is mapped to the Harness project GitOps.

Let's add a new mapping.
-
In Mapped Harness Project, select Add.
-
In Map Projects, in Select your Argo Projects to Import, select an Argo CD project. Do not select a project you have already mapped.
-
Map the Argo CD project to a Harness project and select Import & Continue. Do not re-map an existing mapping. Harness will throw an error.
-
When the import is complete, select Finish.
Both projects are now mapped.

Adding Argo CD entities to Harness automatically
When an Agent contains Argo CD project mappings to a Harness project, any new entities added to the Argo CD project are added to the mapped Harness project automatically.
Try adding a new Argo CD repository to the mapped Argo CD project.
Once it is saved in Argo CD, go to Harness and look at the GitOps repositories in the mapped Harness project. A new repository is added.
Automatically added Argo CD repositories
When Argo CD repositories are added to Harness, Harness automatically generates a name for each repository. Name generation is necessary because Argo CD has no name setting for its repositories. When generating a name for a repository, Harness removes any dashes from the name of the repository, and then appends an underscore followed by a unique suffix.
For example, the Argo CD repository https://github.com/argoproj/gitops-engine.git is named gitopsengine_kmjzyrbs in Harness.

Ensure your Argo CD entities are visible in Harness
In some Argo CD versions, you are not required to specify a project for your entities. However, for the entities to be visible in Harness, you must associate the entities with a project.
If you are unable to edit an entity from the Argo CD UI, you can edit that entity in the cluster so that they have a project and other required values. The entities are stored in different formats in the cluster. For example, clusters, repositories, and repository credential templates are stored in Secret, and GnuPG keys and repository certificates are stored in ConfigMap in the namespace where Argo CD is installed.
Edit the respective secret of the entity and add the fields project and name in the data or stringData block. For examples, go to Manage an Argo CD configuration in Git with Harness GitOps.
Creating GitOps entities with multiple projects
When you have multiple Argo CD projects mapped to your Harness project, you can choose which Argo CD project to use when you create a new GitOps entity (cluster, repository, or application) in your Harness project.
By default, in the Argo CD console, when you create a cluster, it is not associated with an Argo CD project. You can add the cluster by using the argocd cluster add CLI and its --project option.
The following steps are common to all three entities (clusters, repositories, and applications) when you create them in Harness. We will demonstrate this with GitOps clusters:
-
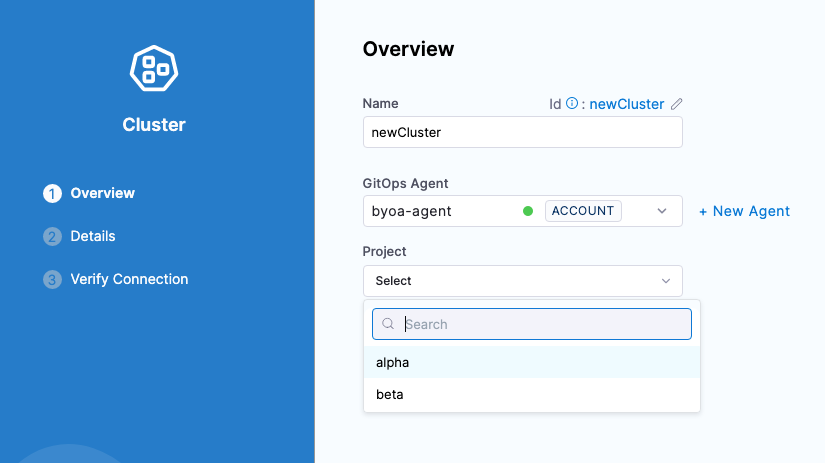
While creating a GitOps cluster in the Harness project that is mapped to multiple Argo CD projects, under GitOps Agent, select the Agent where you set up the mappings. The Project setting appears.
If the Agent has only one Argo CD project mapped, the Project setting is not shown.
-
In Project, select the Argo CD project with the cluster you want to import.
When you have completed setting up the cluster, the cluster appears in the GitOps Cluster list.
Enable Harness Expression Resolution for Existing Installations
With a BYOA setup, you can enable the Harness ArgoCD plugin to use Harness secret expressions directly in your application manifests. This feature allows you to reference secrets stored in Harness (such as database passwords, API keys, etc.) within your Kubernetes manifests, and the expressions are resolved and decrypted during manifest rendering.
For feature requirements, supported secret managers, and usage examples, go to Harness Secret Expressions in Application Manifests.
For existing Agent installations (BYOA or Harness-installed Argo), the Enable ArgoCD Harness Plugin checkbox cannot be changed after the initial installation. You must configure the Harness ArgoCD plugin by running a patch script on your existing Argo CD installation using the instructions below.
For Helm Chart installations
If your GitOps agent was installed using the Harness-provided Helm chart, follow these steps:
-
Upgrade to the latest chart and make the following changes to your
values.yamlfile. -
Enable the Harness ArgoCD plugin by adding the following flag:
values.yaml: Enable plugin
harness:
  argocdHarnessPlugin:
enabled: true -
Add the agent service configuration under the
agentsection:values.yaml: Agent service configuration
agent:
  service:
    enabled: true
    type: ClusterIP
    port: 7910
    targetPort: 7910
    labels: {}
annotations: {} -
Add the plugin container to the Argo CD repo server by adding the following under
argo-cd.repoServer.extraContainers:values.yaml: Plugin sidecar container
argo-cd:
  repoServer:
    extraContainers:
    - command: [ /var/run/argocd/argocd-cmp-server ]
      image: harness/gitops-agent-installer-helper:v0.0.3
      imagePullPolicy: IfNotPresent
      name: argocd-harness-plugin
      resources:
        limits:
          cpu: "0.5"
          memory: 512Mi
        requests:
          cpu: "0.5"
          memory: 512Mi
      securityContext:
        capabilities:
          drop:
          - NET_RAW
        runAsGroup: 999
        runAsUser: 999
      terminationMessagePath: /dev/termination-log
      terminationMessagePolicy: File
      volumeMounts:
      - mountPath: /var/run/argocd
        name: var-files
      - mountPath: /home/argocd/cmp-server/plugins
        name: plugins
      - mountPath: /tmp
        name: tmp
      - mountPath: /home/argocd/cmp-server/config/plugin.yaml
        name: argocd-harness-plugin
subPath: harness.yaml -
Add the ConfigMap volume to the repo server by adding the following under
argo-cd.repoServer.volumes:values.yaml: ConfigMap volume
argo-cd:
  repoServer:
    volumes:
    - name: argocd-harness-plugin
      configMap:
name: argocd-harness-plugin -
Apply the changes by running the Helm upgrade command:
helm upgrade <release-name> gitops-agent/gitops-helm --values values.yaml --namespace <agent-namespace>
For plain Kubernetes manifest installations
If your GitOps agent was installed using plain Kubernetes manifests, follow these steps:
-
Create the agent service (if it doesn't already exist):
Service manifest
apiVersion: v1
kind: Service
metadata:
  name: gitops-agent
  namespace: <agent-namespace>
spec:
  type: ClusterIP
  ports:
    - name: http
      protocol: TCP
      port: 7910
      targetPort: 7910
  selector:
    app.kubernetes.io/name: harness-gitops-agent
    app.kubernetes.io/instance: <release-name>
Apply this manifest:
kubectl apply -f gitops-agent-service.yaml -n <agent-namespace> -
Create the plugin ConfigMap in the same namespace as your GitOps agent/Argo CD:
Plugin ConfigMap
apiVersion: v1
kind: ConfigMap
metadata:
  name: argocd-harness-plugin
  namespace: <agent-namespace>
data:
  harness.yaml: |
    ---
    apiVersion: argoproj.io/v1alpha1
    kind: ConfigManagementPlugin
    metadata:
      name: argocd-harness-plugin
    spec:
      version: v1.0
      allowConcurrency: true
      discover:
        find:
          command:
            - /bin/sh
            - -c
            - |
              if [ -f "Chart.yaml" ] || [ -f "values.yaml" ]; then
                echo "Harness Plugin discovered Helm Chart. Proceeding to generate manifests."
              elif find . -name '*.yaml' -o -name '*.yml' | grep -q .; then
                echo "Harness Plugin discovered Native Kubernetes Manifests. Proceeding to generate manifests."
              else
                exit 1
              fi
      generate:
        command:
          - /bin/sh
          - -c
          - |
            set -o pipefail
            if [ -f "Chart.yaml" ] || [ -f "values.yaml" ]; then
              helm template $ARGOCD_APP_NAME -n $ARGOCD_APP_NAMESPACE ${ARGOCD_ENV_HELM_ARGS} --include-crds . \
                | argocd-harness-plugin generate -
            else
              argocd-harness-plugin generate .
            fi
      lockRepo: false
Apply this ConfigMap:
kubectl apply -f argocd-harness-plugin-configmap.yaml -n <agent-namespace> -
Add the plugin sidecar container to the
argocd-repo-serverdeployment:Edit the
argocd-repo-serverdeployment and add the following container underspec.template.spec.containers:Deployment patch for argocd-repo-server
apiVersion: apps/v1
kind: Deployment
metadata:
  name: argocd-repo-server
  namespace: <agent-namespace>
spec:
  template:
    spec:
      containers:
      # ... existing containers ...
      - command: [ /var/run/argocd/argocd-cmp-server ]
        image: harness/gitops-agent-installer-helper:v0.0.3
        imagePullPolicy: IfNotPresent
        name: argocd-harness-plugin
        resources:
          limits:
            cpu: "0.5"
            memory: 512Mi
          requests:
            cpu: "0.5"
            memory: 512Mi
        securityContext:
          capabilities:
            drop:
            - NET_RAW
          runAsGroup: 999
          runAsUser: 999
        terminationMessagePath: /dev/termination-log
        terminationMessagePolicy: File
        volumeMounts:
        - mountPath: /var/run/argocd
          name: var-files
        - mountPath: /home/argocd/cmp-server/plugins
          name: plugins
        - mountPath: /tmp
          name: tmp
        - mountPath: /home/argocd/cmp-server/config/plugin.yaml
          name: argocd-harness-plugin
          subPath: harness.yaml
      volumes:
      # ... existing volumes ...
      - configMap:
          defaultMode: 420
          name: argocd-harness-plugin
        name: argocd-harness-plugin
Apply the updated deployment:
kubectl apply -f argocd-repo-server-deployment.yaml -n <agent-namespace> -
Verify the installation by checking that the plugin container is running:
kubectl get pods -n <agent-namespace> -l app.kubernetes.io/name=argocd-repo-server
kubectl logs -n <agent-namespace> <argocd-repo-server-pod> -c argocd-harness-plugin
Verification
After completing the installation, verify that the Harness plugin is working correctly:
- Check that the
argocd-repo-serverpods are running with the new sidecar container - Verify that the plugin ConfigMap exists in the namespace
- Test expression resolution by deploying an application with Harness secret expressions
For usage examples and expression syntax, refer to Harness Secret Expressions in Application Manifests.
Notes
- Harness honors Argo CD project permissions. If the project selected for the Harness application does not have permissions for the repository or cluster, then Harness returns a permissions-related error. You must go to Argo CD and adjust the project's scoped repositories and destinations.
- A non-BYOA setup does not support mapping multiple Argo CD projects to a single Harness project.
- Upgrading your Argo CD Version: If you upgrade your Argo CD version to any version that is >= v2.8.0 with a BYO Argo GitOps agent installed, you will have to restart the agent pods in order for the agent to pickup the required configuration change. You canrestart the deployment or the pods individually.