Deploy AWS Auto Scaling Groups
This guide shows you how to deploy Amazon EC2 workloads by orchestrating Auto Scaling Group (ASG) deployments using Harness CD. You will create a Harness service with ASG configuration files, define a target AWS region, and execute a rolling deployment that creates a new ASG based on your Amazon Machine Image (AMI).
What will you learn?
- ASG service configuration: How to define launch templates, ASG configuration files, and AMI artifacts in Harness
- Infrastructure targeting: How to connect Harness to your AWS account and specify the target region for ASG deployments
- Deployment strategies: When to use rolling, canary, or blue-green deployment patterns for ASGs
- Rollback behavior: How Harness stores ASG configurations and performs automatic rollback on failure
Before you begin
- Harness account with CD module enabled: You need access to Harness Continuous Delivery. Go to Getting started with Harness Platform to create or access a Harness account.
- Permissions to create services, environments, and pipelines: You need View, Create/Edit permissions for Services, Environments, and Pipelines, and Execute permission for Pipelines. An administrator must assign a role that includes these permissions. Go to RBAC in Harness to configure roles and Permissions reference to review required permissions.
- AWS IAM role with ASG permissions: The AWS IAM role associated with your Harness AWS connector must have permissions to create and manage Auto Scaling Groups. Go to Review AWS policy requirements below to review required IAM policies.
- Private AMI in target AWS region: ASG deployments require a private Amazon Machine Image (AMI). Public AMIs from the AMI Catalog are not supported. Go to Creating an AMI from AWS to create a private AMI.
- Basic understanding of AWS Auto Scaling Groups: Familiarity with ASG concepts (launch templates, desired capacity, scaling policies). Go to What is Amazon EC2 Auto Scaling? from AWS to learn ASG fundamentals.
Understand ASG deployment flow
Before creating your first ASG deployment, review how Harness orchestrates ASG creation and updates.
Deployment summary
Here's a high-level summary of the setup steps and how Harness deploys ASGs.
Harness setup summary
Here's a summary of how you set up ASG deployments in Harness:
- Create the Harness ASG service.
- Add the launch template manifest file.
- Add the ASG configuration manifest file.
- Add scaling policies (optional).
- Add scheduled update group actions (optional).
- Add the user data script file (optional).
- Add the AMI image to use for the ASG as an artifact.
- Create the Harness ASG environment.
- Connect Harness to the AWS region where you want to deploy.
- Define the Harness ASG pipeline execution.
- Select a deployment strategy (rolling, canary, blue-green) and Harness automatically creates the steps to deploy the new ASG.
- Deploy the Harness pipeline.
Deployment summary
Here's a summary of how Harness deploys new ASG versions:
- First deployment:
- Harness takes the launch template and ASG configuration files you provide and creates a new ASG and its instances in your AWS account and region. Harness creates a new launch template with name same as the ASG name and that launch template is applied to the new ASG.
- Subsequent deployments:
- Harness creates a new version of the launch template.
- Harness uses the new version of the launch template and other configurations to update the ASG. For example, if you also increased the desired capacity (
desiredCapacity) for the ASG in your ASG configuration file, Harness will create a new version of the ASG with the new desired capacity and new launch template version. - Instance refresh is triggered (a rolling replacement of all or some instances in the ASG).
Notes:
- ASG creation differs for rolling and blue green deployments:
- For rolling, Harness updates the existing ASG with the new configuration.
- For blue green, Harness creates a new ASG with a new revision suffix, like
asg-demo__2. Once there are two ASGs (asg-demo__1andasg-demo__2) Harness alternately updates these existing ASGs with the new configuration on each successive deployment.
- AWS OIDC connectors are supported for ASG deployments starting with delegate version
84900or later.
Review AWS policy requirements
Your AWS IAM role associated with your Harness AWS connector must have the following required policies:
Required Policies
Policy JSON:
{
    "Version": "2012-10-17",
    "Statement": [
        {
            "Effect": "Allow",
            "Action": [
                "autoscaling:AttachLoadBalancers",
                "autoscaling:AttachLoadBalancerTargetGroups",
                "autoscaling:CreateAutoScalingGroup",
                "autoscaling:CreateOrUpdateTags",
                "autoscaling:DeleteAutoScalingGroup",
                "autoscaling:DeleteLifecycleHook",
                "autoscaling:DeletePolicy",
                "autoscaling:DeleteScheduledAction",
                "autoscaling:DeleteTags",
                "autoscaling:DescribeAutoScalingGroups",
                "autoscaling:DescribeInstanceRefreshes",
                "autoscaling:DescribeInstanceRefreshes",
                "autoscaling:DescribeLifecycleHooks",
                "autoscaling:DescribeLoadBalancers",
                "autoscaling:DescribeLoadBalancerTargetGroups",
                "autoscaling:DescribePolicies",
                "autoscaling:DescribeScheduledActions",
                "autoscaling:DescribeTags",
                "autoscaling:DetachLoadBalancers",
                "autoscaling:DetachLoadBalancerTargetGroups",
                "autoscaling:PutLifecycleHook",
                "autoscaling:PutScalingPolicy",
                "autoscaling:PutScheduledUpdateGroupAction",
                "autoscaling:SetDesiredCapacity",
                "autoscaling:StartInstanceRefresh",
                "autoscaling:UpdateAutoScalingGroup",
                "ec2:CreateLaunchTemplate",
                "ec2:CreateLaunchTemplateVersion",
                "ec2:DescribeLaunchTemplates",
                "ec2:DescribeLaunchTemplateVersions",
                "ec2:DescribeRegions",
                "ec2:DescribeImages",
                "ec2:RunInstances",
                "elasticloadbalancing:DescribeListeners",
                "elasticloadbalancing:DescribeLoadBalancers",
                "elasticloadbalancing:DescribeRules",
                "elasticloadbalancing:DescribeTargetHealth",
                "elasticloadbalancing:DescribeTargetHealth",
                "elasticloadbalancing:ModifyListener",
                "elasticloadbalancing:ModifyRule"
            ],
            "Resource": "*"
        }
    ]
}
Optionally, you can also give full access with just two policies:
AmazonEC2FullAccess and DescribeRegions
- Policy Name: AmazonEC2FullAccess.
- Policy ARN: arn:aws:iam::aws:policy/AmazonEC2FullAccess.
- Description: Provides full access to Amazon EC2 via the AWS Management Console.
Policy JSON:
{
  "Version": "2012-10-17",
  "Statement": [
    {
      "Action": "ec2:*",
      "Effect": "Allow",
      "Resource": "*"
    },
    {
      "Effect": "Allow",
      "Action": "elasticloadbalancing:*",
      "Resource": "*"
    },
    {
      "Effect": "Allow",
      "Action": "cloudwatch:*",
      "Resource": "*"
    },
    {
      "Effect": "Allow",
      "Action": "autoscaling:*",
      "Resource": "*"
    }
  ]
}
Harness needs a policy with the DescribeRegions action so that it can list the available regions for you when you define your target architecture.
The DescribeRegions action is required by default for all AWS IAM roles used in Harness AWS connectors, regardless of what AWS service you are using. This requirement can be removed with the feature flag CDS_AWS_DESCRIBE_REGIONS_OPTIONAL. For details, go to DescribeRegions - Optional.
Create a Customer Managed Policy, add the DescribeRegions action to list those regions, and add that to any role used by the Cloud Provider.
{
    "Version": "2012-10-17",
    "Statement": [
        {
            "Sid": "VisualEditor0",
            "Effect": "Allow",
            "Action": "ec2:DescribeRegions",
            "Resource": "*"
        }
    ]
}
Create a Harness ASG service
The Harness ASG service contains the following:
- Launch template.
- ASG configuration file.
- ASG Additional Configuration
- Scaling policies (optional).
- Scheduled update group action (optional).
- User Data script file.
- The AMI image to use for the ASG.
Harness supports standard ASG JSON formatted files. For more information, go to Get started with Amazon EC2 Auto Scaling from AWS.
You can use remote files stored in a Git repo or the Harness File Store.
You can create a service when you are building the pipeline or separately in Services. In this topic, we walk through building the service separately. For more information, go to CD pipeline modeling overview.
- YAML
- API
- Terraform Provider
- Harness Manager
Here's an example where the configuration files are stored in the Harness File Store.
service:
  name: svc-asg
  identifier: svcasg
  serviceDefinition:
    type: Asg
    spec:
      manifests:
        - manifest:
            identifier: launchTemplate
            type: AsgLaunchTemplate
            spec:
              store:
                type: Harness
                spec:
                  files:
                    - /asg/launchtemplate
        - manifest:
            identifier: launchConfig
            type: AsgConfiguration
            spec:
              store:
                type: Harness
                spec:
                  files:
                    - /asg/launchconfig
        - manifest:
            identifier: scalePolicy
            type: AsgScalingPolicy
            spec:
              store:
                type: Harness
                spec:
                  files:
                    - /asg/scalingPolicy.json
        - manifest:
            identifier: scheduledUpdateGroupAction
            type: AsgScheduledUpdateGroupAction
            spec:
              store:
                type: Harness
                spec:
                  files:
                    - /asg/scheduledUpdateGroupAction.json
      artifacts:
        primary:
          primaryArtifactRef: <+input>
          sources:
            - identifier: AMI-ARTIFACT
              spec:
                connectorRef: AWS_ASG_CONNECTOR
                region: us-east-1
                filters:
                  - name: ami-name
                    value: Returns local IP address at port 80
                version: Returns local IP address at port 80
              type: AmazonMachineImage
  gitOpsEnabled: false
Create a service using the Create Services API.
curl -i -X POST \
  'https://app.harness.io/gateway/ng/api/servicesV2/batch?accountIdentifier=<Harness account Id>' \
  -H 'Content-Type: application/json' \
  -H 'x-api-key: <Harness API key>' \
  -d '[{
    "identifier": "svcasg",
    "orgIdentifier": "default",
    "projectIdentifier": "CD_Docs",
    "name": "svc-asg",
    "description": "string",
    "tags": {
      "property1": "string",
      "property2": "string"
    },
    "yaml": "service:\n  name: svc-asg\n  identifier: svcasg\n  serviceDefinition:\n    type: Asg\n    spec:\n      manifests:\n        - manifest:\n            identifier: launchTemplate\n            type: AsgLaunchTemplate\n            spec:\n              store:\n                type: Harness\n                spec:\n                  files:\n                    - /asg/launchtemplate\n        - manifest:\n            identifier: launchConfig\n            type: AsgConfiguration\n            spec:\n              store:\n                type: Harness\n                spec:\n                  files:\n                    - /asg/launchconfig\n        - manifest:\n            identifier: scalePolicy\n            type: AsgScalingPolicy\n            spec:\n              store:\n                type: Harness\n                spec:\n                  files:\n                    - /asg/scalingPolicy.json\n        - manifest:\n            identifier: scheduledUpdateGroupAction\n            type: AsgScheduledUpdateGroupAction\n            spec:\n              store:\n                type: Harness\n                spec:\n                  files:\n                    - /asg/scheduledUpdateGroupAction.json\n      artifacts:\n        primary:\n          primaryArtifactRef: <+input>\n          sources:\n            - identifier: AMI-ARTIFACT\n              spec:\n                connectorRef: AWS_ASG_CONNECTOR\n                region: us-east-1\n                filters:\n                  - name: ami-name\n                    value: Returns local IP address at port 80\n                version: Returns local IP address at port 80\n              type: AmazonMachineImage\n  gitOpsEnabled: false"
  }]'
For the Terraform Provider resource, go to harness_platform_service.
resource "harness_platform_service" "example" {
  identifier  = "identifier"
  name        = "name"
  description = "test"
  org_id      = "org_id"
  project_id  = "project_id"

  ## SERVICE V2 UPDATE
  ## We now take in a YAML that can define the service definition for a given Service
  ## It isn't mandatory for Service creation
  ## It is mandatory for Service use in a pipeline

  yaml = <<-EOT
                service:
                  name: svc-asg
                  identifier: svcasg
                  serviceDefinition:
                    type: Asg
                    spec:
                      manifests:
                        - manifest:
                            identifier: launchTemplate
                            type: AsgLaunchTemplate
                            spec:
                              store:
                                type: Harness
                                spec:
                                  files:
                                    - /asg/launchtemplate
                        - manifest:
                            identifier: launchConfig
                            type: AsgConfiguration
                            spec:
                              store:
                                type: Harness
                                spec:
                                  files:
                                    - /asg/launchconfig
                        - manifest:
                            identifier: scalePolicy
                            type: AsgScalingPolicy
                            spec:
                              store:
                                type: Harness
                                spec:
                                  files:
                                    - /asg/scalingPolicy.json
                        - manifest:
                            identifier: scheduledUpdateGroupAction
                            type: AsgScheduledUpdateGroupAction
                            spec:
                              store:
                                type: Harness
                                spec:
                                  files:
                                    - /asg/scheduledUpdateGroupAction.json
                      artifacts:
                        primary:
                          primaryArtifactRef: <+input>
                          sources:
                            - identifier: AMI-ARTIFACT
                              spec:
                                connectorRef: AWS_ASG_CONNECTOR
                                region: us-east-1
                                filters:
                                  - name: ami-name
                                    value: Returns local IP address at port 80
                                version: Returns local IP address at port 80
                              type: AmazonMachineImage
                  gitOpsEnabled: false
              EOT
}
To configure a Harness ASG service in the Harness Manager, do the following:
-
In your project, in CD (Deployments), select Services.
-
Select Manage Services, and then select New Service.
-
Enter a name for the service and select Save.
-
Select Configuration.
-
In Service Definition, select AWS Auto Scaling Group.
-
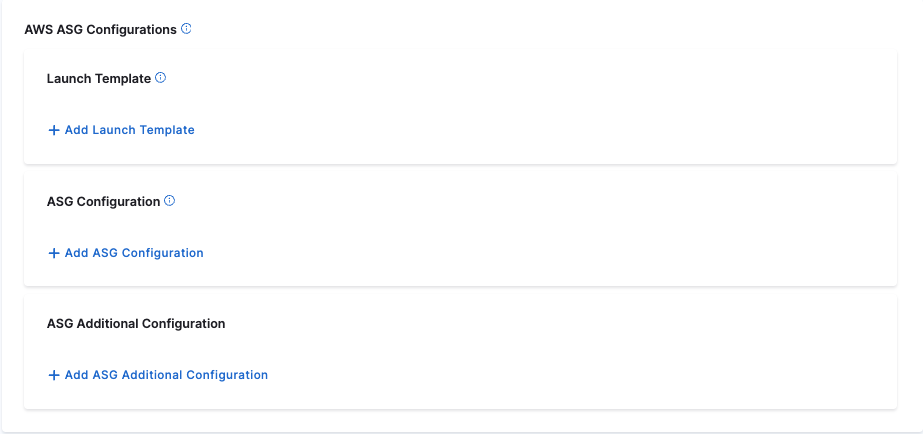
In AWS ASG Configurations, enter the following configuration files. Only Launch Template and ASG Configuration are required.
- Launch template. Enter a standard AWS JSON or YAML formatted launch template.
- In ASG Configuration, add a ASG configuration file.
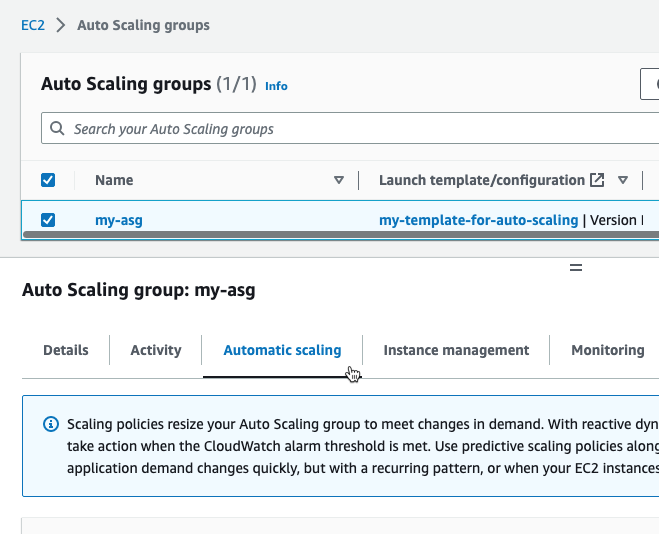
- Scaling policy. This is optional.
This is the same as the Automatic scaling option in the ASG console setup:
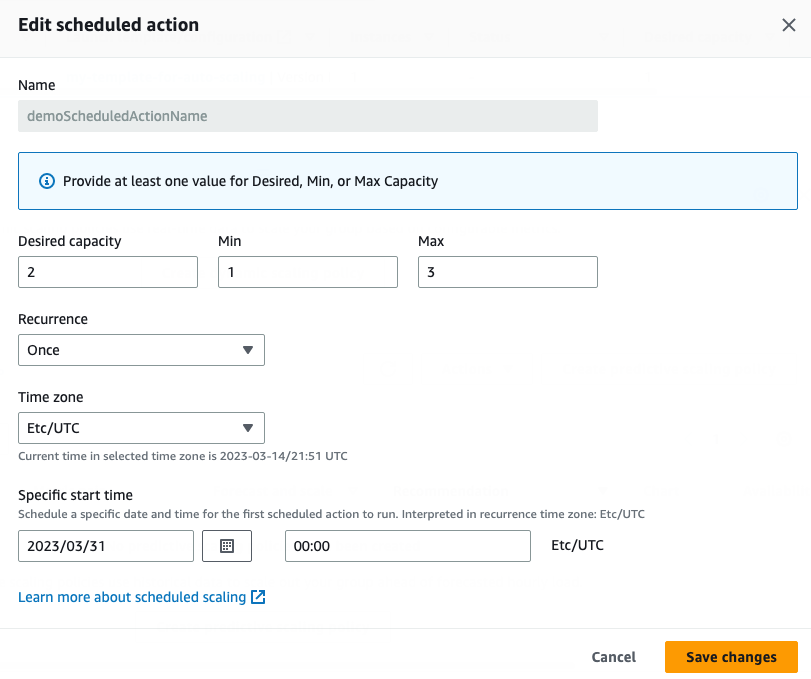
- Scheduled update group action. This is optional.
This is the same as the scheduled action in the ASG console setup:
Next, in Artifacts, you add the private AMI image to use for the ASG instances.
-
In Artifacts, select Add Artifact Source.
-
In Specify Artifact Repository Type, select Amazon Machine Image, and select Continue.
-
In Amazon Machine Image Repository, in AWS Connector, select or create a Harness AWS connector, and then select Continue. Review AWS policy requirements to ensure that the AWS credentials you provide are adequate.
-
In Artifact Details, enter a name to identify this AMI artifact in Harness.
-
In Region, select the region where the ASG is located.
-
In AMI Tags, add any AWS Tags that you are using to identify your AMI. For details on these key/value pairs, go to Tagging Your Amazon EC2 Resources from AWS.
-
In AMI Filters, add AMI filters to locate the AMI resource. These are key/value pairs that identify the AMI Id. This must be a private AMI.
-
In Version Details and Version, specify the AMI version to use.
-
Select Submit.
-
Select Save to save the service.
The Harness ASG service is complete. You can now use it in your Harness ASG pipelines.
ASG Launch Template files
AWS does not have a dedicated public resource for Launch Template file formatting because Launch template creation is typically done using the AWS CLI, SDKs, or Management Console, which have their own syntax and methods for specifying the parameters. However, the AWS CLI create-launch-template command reference documentation provides a detailed description of the parameters that can be used when creating a launch template.
ASG Launch Template file example
{
  "LaunchTemplateData": {
    "InstanceType": "t2.micro",
    "KeyName": "vit-cd-play"
  }
}
ASG configuration files
AWS does not have a dedicated public resource for ASG configuration file formatting because ASG creation is typically done using the AWS CLI, SDKs, or Management Console, which have their own syntax and methods for specifying the parameters.
However, the AWS CLI create-auto-scaling-group command reference documentation provides a detailed description of the parameters that can be used when creating an ASG.
ASG configuration file example
{
  "AutoScalingGroupName": "my-asg",
  "MinSize": 1,
  "MaxSize": 3,
  "DesiredCapacity": 2,
  "AvailabilityZones": ["us-west-2a", "us-west-2b"],
  "LaunchTemplate": {
    "LaunchTemplateId": "lt-0123456789abcdef0",
    "Version": "1"
  },
  "VPCZoneIdentifier": "subnet-0123456789abcdef0,subnet-0123456789abcdef1",
  "HealthCheckType": "EC2",
  "HealthCheckGracePeriod": 300,
  "Tags": [
    {
      "Key": "Environment",
      "Value": "Development",
      "PropagateAtLaunch": true
    }
  ]
}
Use MixedInstancesPolicy for cost optimization and resilience
This feature is behind the feature flag CDS_ASG_MIXED_INSTANCES_POLICY. Contact Harness Support to enable the feature.
AWS MixedInstancesPolicy allows your Auto Scaling Group to use multiple instance types and purchase options (On-Demand and Spot instances), enabling capacity resilience against stock-outs and cost optimization by letting AWS select from the cheapest available instance types at any moment.
When you enable MixedInstancesPolicy for your ASG, Harness automatically detects the configuration and manages the launch template appropriately. Supported operations include create, update, health check, instance refresh, and rollback across all deployment strategies (rolling, blue-green, canary, setup).
Configure MixedInstancesPolicy in your ASG configuration file
Add a mixedInstancesPolicy section to your ASG configuration JSON file. Do not include a launchTemplateSpecification field inside mixedInstancesPolicy.launchTemplate; Harness manages the launch template reference and injects it automatically. You configure all other MixedInstancesPolicy settings, including instance type overrides and purchase options.
ASG configuration with MixedInstancesPolicy example
{
  "autoScalingGroupName": "my-asg",
  "minSize": 1,
  "maxSize": 10,
  "desiredCapacity": 2,
  "mixedInstancesPolicy": {
    "launchTemplate": {
      "overrides": [
        { "instanceType": "t3.medium" },
        { "instanceType": "t3.large" },
        { "instanceType": "m5.large" }
      ]
    },
    "instancesDistribution": {
      "onDemandBaseCapacity": 1,
      "onDemandPercentageAboveBaseCapacity": 0,
      "spotAllocationStrategy": "price-capacity-optimized"
    }
  }
}
The example above configures an ASG with three instance type options. AWS will start with one On-Demand instance (onDemandBaseCapacity: 1) and use Spot instances for all capacity above that base (onDemandPercentageAboveBaseCapacity: 0), selecting from the cheapest available instance type among the three overrides at any moment.
Manage launch templates with MixedInstancesPolicy
When MixedInstancesPolicy is present in your configuration, the launch template reference in AWS moves from the top-level LaunchTemplate field to MixedInstancesPolicy.LaunchTemplate.LaunchTemplateSpecification. Harness detects this automatically and routes all launch template operations (create, update, version tracking) to the correct location.
During ASG creation or updates, Harness will inject the launch template specification into the nested MixedInstancesPolicy.LaunchTemplate.LaunchTemplateSpecification path instead of the top-level field. All existing deployment strategies continue to work without changes.
Switch between regular and MixedInstancesPolicy configurations
You can convert an existing ASG between regular and MixedInstancesPolicy configurations by updating your ASG configuration JSON file and running a deployment:
- Regular to MixedInstancesPolicy: Add the
mixedInstancesPolicysection to your configuration JSON. On the next deployment, Harness will create or update the ASG with MixedInstancesPolicy enabled. - MixedInstancesPolicy to Regular: Remove the
mixedInstancesPolicysection from your configuration JSON. On the next deployment, Harness will convert the ASG back to a regular configuration with a top-level launch template reference.
The conversion is automatic. AWS allows only one mode at a time (either top-level LaunchTemplate or MixedInstancesPolicy), and Harness handles the transition based on what is present in your configuration file.
Configure MixedInstancesPolicy options
You can configure the following MixedInstancesPolicy settings in your ASG configuration JSON. All AWS-supported options are available except launchTemplateSpecification (which Harness manages).
Instance type overrides
Define multiple instance types from which AWS can choose. AWS will select based on availability and cost optimization according to your spotAllocationStrategy. You can specify up to 40 instance types in overrides.
You can optionally specify weightedCapacity on each override to define how much capacity each instance type contributes toward the ASG's desired capacity. When weighted capacity is configured, Harness evaluates steady state based on total capacity targets rather than raw instance count. For example, if desiredCapacity is 4 and an instance type has weightedCapacity: "2", two such instances satisfy the target.
Instance type overrides example
"launchTemplate": {
  "overrides": [
    { "instanceType": "t3.medium" },
    { "instanceType": "t3.large" },
    { "instanceType": "m5.large", "weightedCapacity": "2" }
  ]
}
Instances distribution settings
Control the balance between On-Demand and Spot instances, and how AWS selects instance types.
Instance distribution configuration example
"instancesDistribution": {
  "onDemandAllocationStrategy": "prioritized",
  "onDemandBaseCapacity": 2,
  "onDemandPercentageAboveBaseCapacity": 20,
  "spotAllocationStrategy": "price-capacity-optimized",
  "spotMaxPrice": "0.05"
}
onDemandBaseCapacity: The minimum number of On-Demand instances. AWS launches this many On-Demand instances before considering Spot instances.onDemandPercentageAboveBaseCapacity: Percentage of capacity above the base that should be On-Demand instances (0-100). For example, if you set this to 20 and have 10 instances above the base, 2 will be On-Demand and 8 will be Spot.onDemandAllocationStrategy: How AWS selects On-Demand instance types from your overrides. Useprioritizedto prefer instance types in the order you list them.spotAllocationStrategy: How AWS selects Spot instance types. Useprice-capacity-optimized(recommended) to balance cost and capacity availability, orlowest-priceto minimize cost.spotInstancePools: Number of Spot instance pools to use whenspotAllocationStrategyislowest-price. AWS divides Spot capacity across this many pools to reduce interruption risk. This setting is ignored whenspotAllocationStrategyisprice-capacity-optimized.spotMaxPrice: Maximum price per hour you are willing to pay for a Spot instance. If not specified, defaults to the On-Demand price.
Go to AWS MixedInstancesPolicy documentation to review all configuration options and best practices.
ASG Additional Configuration
Enabling Metrics in ASG
You can use the ASG Additional Configuration to configure your ASG Metrics. Store the metrics JSON file in any filestore of your choice and reference the file in the configuration.
Steps to Configure ASG Metrics:
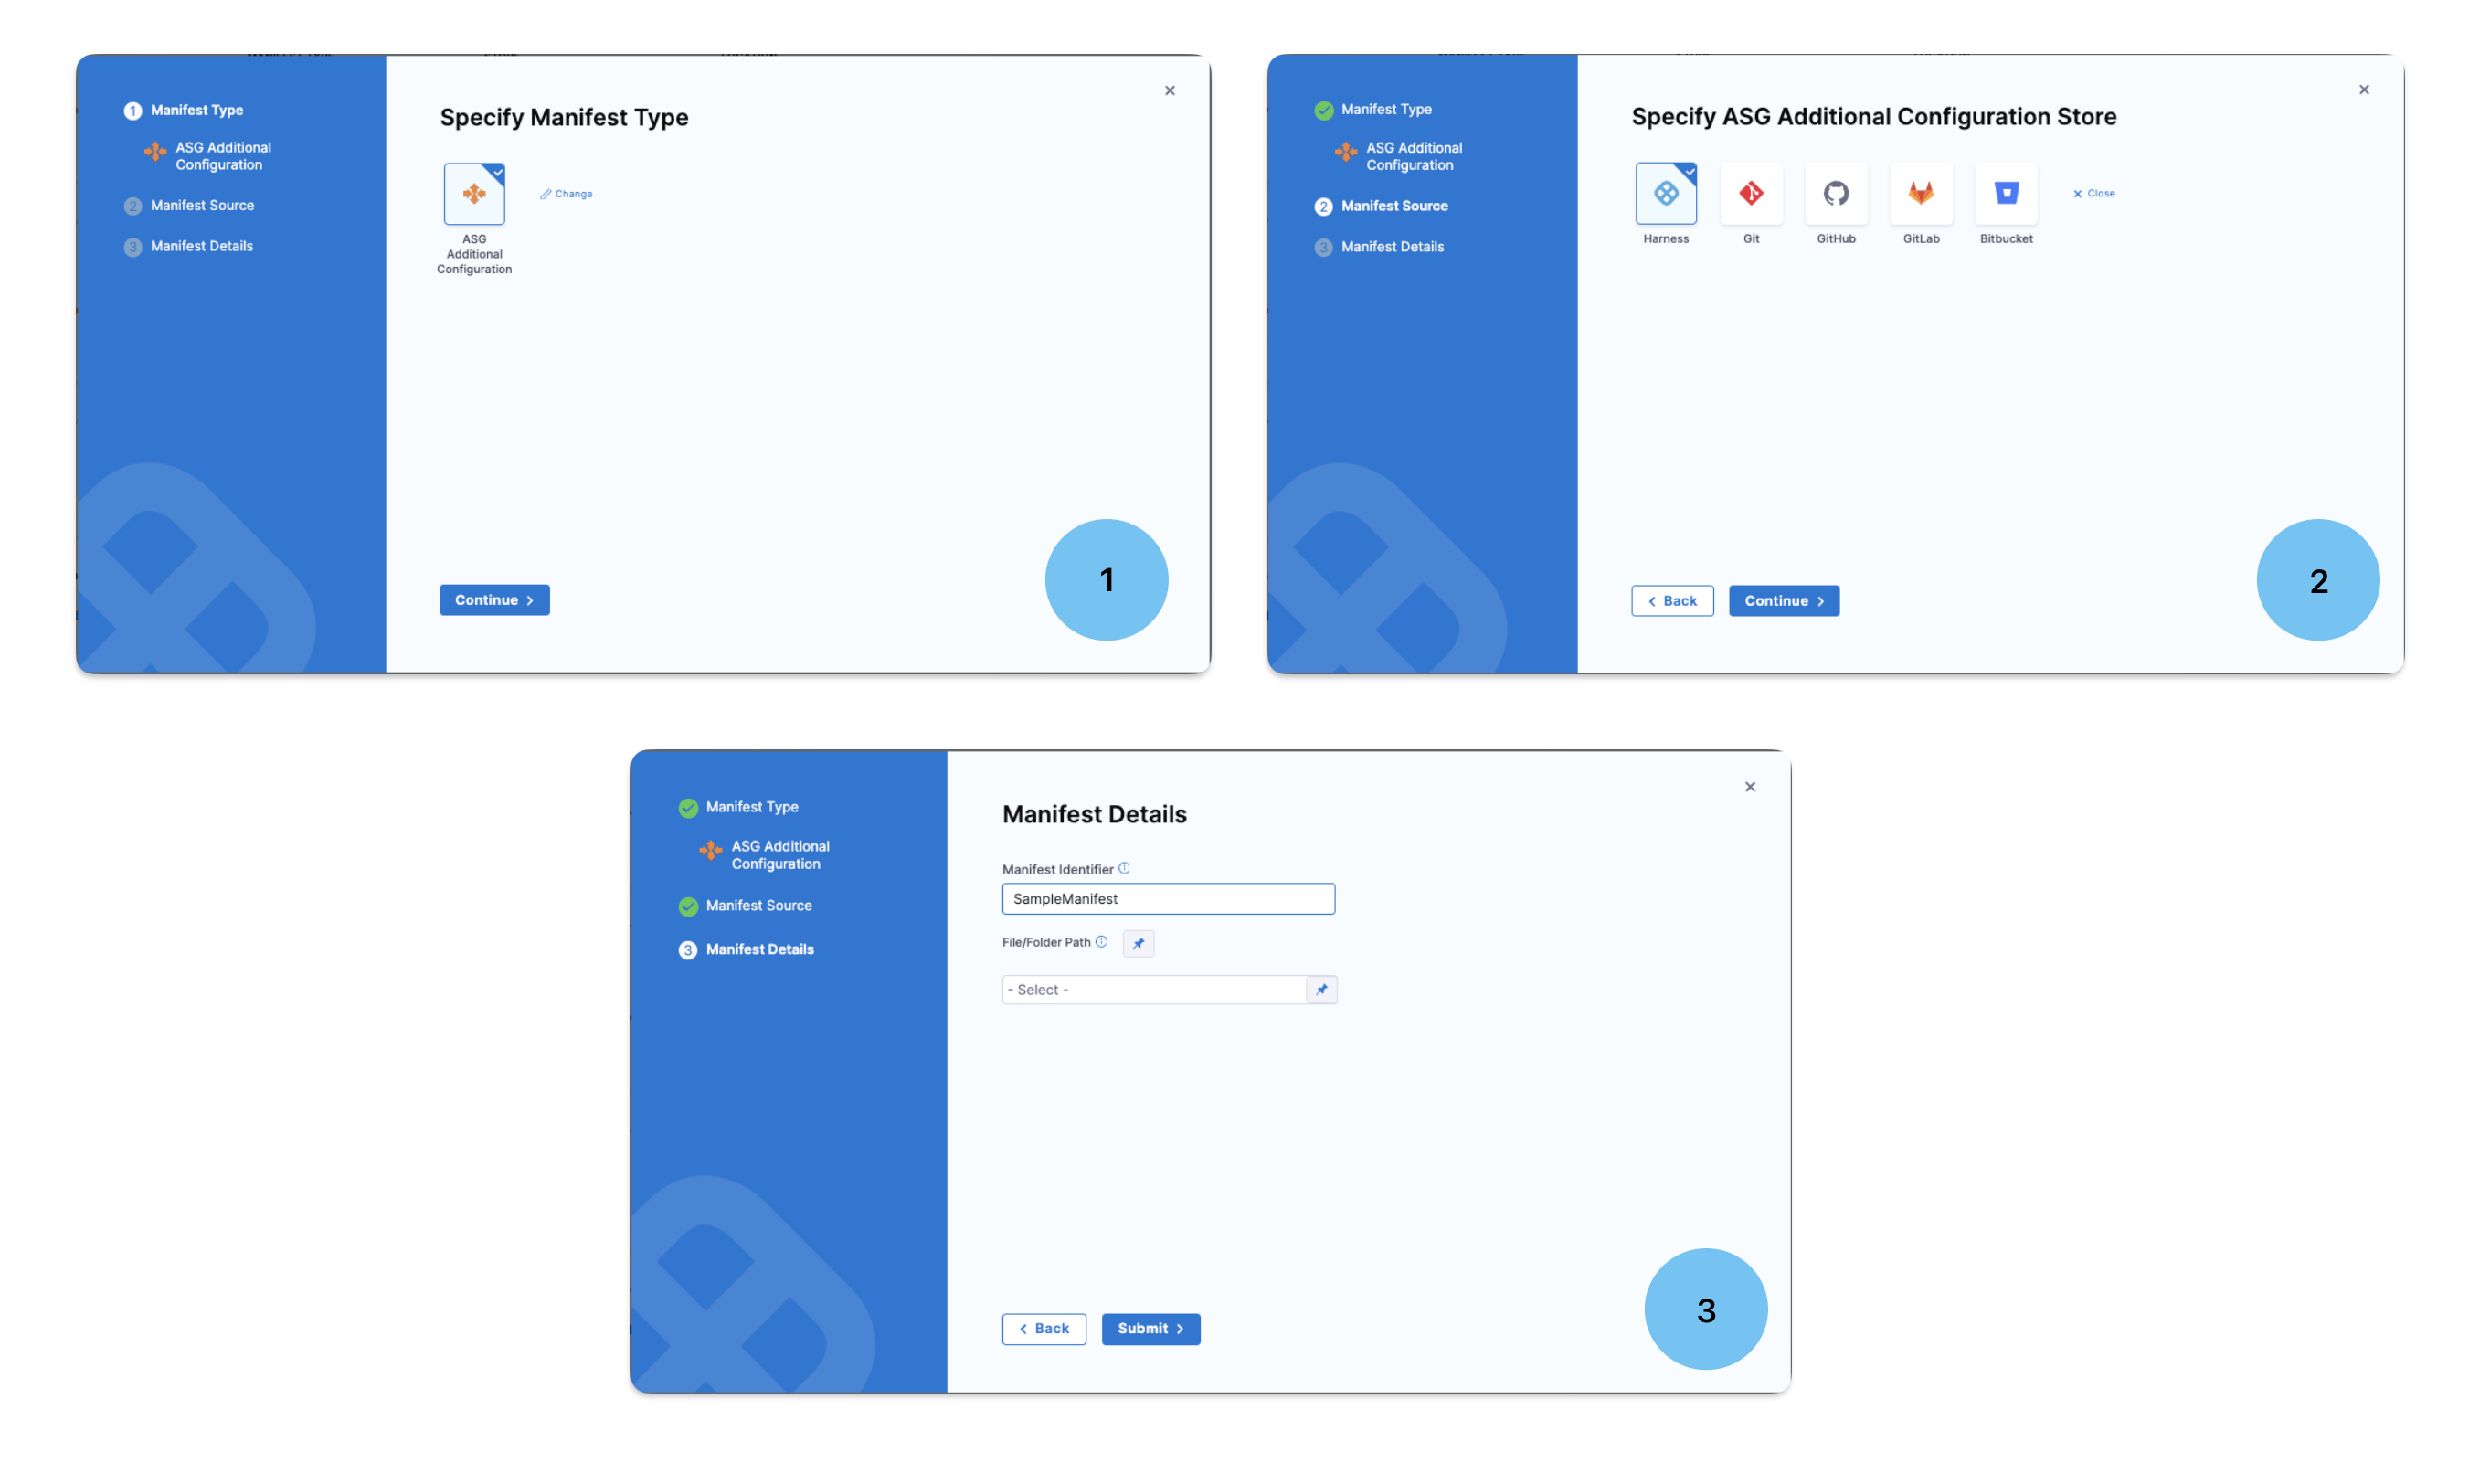
- Click on Add ASG Additional Configuration.
- Specify the ASG Additional Configuration Store. You can store your configuration file in the following repositories:
- Git
- GitHub
- GitLab
- Bitbucket
- Harness Code Repository
- In Manifest Details tab, provide the name of the manifest in Manifest Identifier and the File/Folder Path of the manifest. Click Submit to save the configuration.
In the Metrics Configuration, there is a boolean variable enableMetrics:
enableMetrics:
- Set
enableMetricsto true to enable all the metrics defined in the metricsCollection. - Set
enableMetricsto false to disable the metrics defined in the metricsCollection.
metricsCollection The metricsCollection is a collection that specifies the metrics to be included in the manifest.
ASG metrics configuration file example
Here is a sample JSON to show the metrics configuration
{
  "metrics": {
    "enableMetrices": true,
    "metricsCollection": [
      {
        "metric": "GroupDesiredCapacity",
        "granularity": "1Minute"
      },
      .
      .
      .
    ]
  }
}
Upon successful pipeline execution, the metrics will be retrieved from the specified file. Once the fetch is complete, the metrics will be enabled in your AWS account, along with all configurations defined in the metricsCollection.
Additionally, you can configure Metrics in the Overrides to modify the manifest. To override the manifest, navigate to Overrides, select Manifest from the dropdown, and choose ASG Additional Configuration. This allows you to override the manifest specified in the service.
User Data
You can add standard AWS AMI user data to enter configuration scripts and directives that your AWS instance will run upon launch.
The resulting User Data container corresponds to the AWS Launch Instance wizard's Advanced Details > User data container.
The user data can be added using the Harness File Store or any Git provider.
- What can I add in user data? You can enter the same shell scripts and cloud-init directives that AWS will accept through its own UI. For details about scripting requirements, formatting, and options, see Amazon's EC2 User Data and Shell Scripts documentation. When Harness creates a new instance, it will apply your defined user data.
- Permissions for your user data: If your user data is going to perform actions that require permissions, ensure that the IAM role assigned to the Harness Delegate(s) has the required roles and policies.
Scaling Policy
Add a scaling policy to apply to the ASG that Harness will create during deployment.
You can use standard AWS scaling policies formatted in JSON. For example:
{
  "policyName": "demoPolicy",
  "adjustmentType":"PercentChangeInCapacity",
  "scalingAdjustment":30
}
The scaling policy can be added using the Harness File Store or any Git provider.
Scheduled Update Group Action
You can schedule scaling using a standard AWS scheduled action formatted in JSON. For example:
{
  "scheduledActionName": "scheduledActionName1",
  "startTime": "2030-03-31T08:00:00Z",
  "desiredCapacity": 2
}
The scaling policy can be added using the Harness File Store or any Git provider.
AMI artifacts
Review the following information about the AMI artifacts you select in your ASG service.
Only private AMIs are supported
When you add an AMI artifact you must use a private AMI. Public AMIs from the AMI Catalog are not supported at this time.
In the AWS console, in EC2, private AMIs are listed in Images > AMIs.
Artifact AMI overrides config files AMIs
You can specify an AMI in the launch template used in the Harness service, but it will be overridden by the AMI specified in the Harness service Artifacts section.
The AMI specified in the Harness service Artifacts section is the same as selecting an AMI in the Create launch template wizard in the AWS console or ImageId in in the create-launch-template CLI command.
Using service variables in config file
Service variables are a powerful way to template your services or make them more dynamic.
In the Variables section of the service, you can add service variables and then reference them in any of the ASG configuration files you added to the service.
For example, you could create a variable named desiredCapacity and set its value as a fixed value, runtime input, or expression.
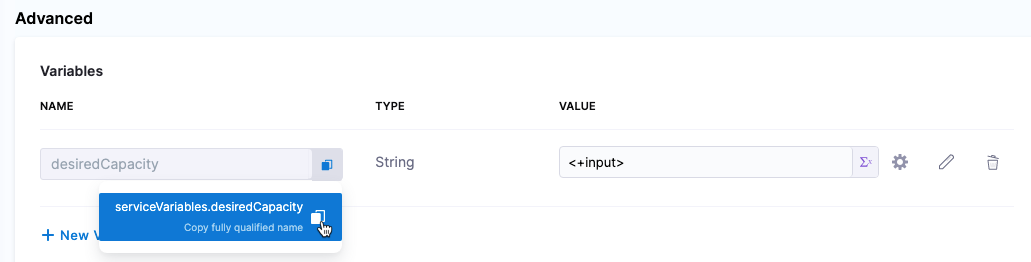
Next, in your ASG configuration file, you could reference the variable like this (see <+serviceVariables.desiredCapacity>):
{
  "autoScalingGroupName": "test2-asg",
  "minSize": 1,
  "maxSize": 3,
  "desiredCapacity": <+serviceVariables.desiredCapacity>,
  "tags": [{"key": "key7", "value":  "value7"}, {"key": "key2", "value":  "value2"}],
  "availabilityZones": ["us-east-1a", "us-east-1b"]
}
Now, when you add that service to a pipeline, you will be prompted to enter a value for this variable in the pipeline Services tab. The value you provide is then used as the desiredCapacity in your ASG configuration.
Create a Harness ASG environment
The Harness ASG environment is where you specify production and non-production environment settings.
You also add a infrastructure definition to define the region where you want to deploy the ASG.
You can create an environment when you are building the pipeline or separately in Environments. In this topic, we walk through building the environment separately. For more information, go to CD pipeline modeling overview.
- YAML
- API
- Terraform Provider
- Harness Manager
Here's a YAML example of an ASG environment.
environment:
  name: ASG
  identifier: ASG
  description: ""
  tags: {}
  type: Production
  orgIdentifier: default
  projectIdentifier: myProject
  variables: []
Create an environment using the Create Environments API.
curl -i -X POST \
  'https://app.harness.io/gateway/ng/api/environmentsV2?accountIdentifier=<account_id>' \
  -H 'Content-Type: application/json' \
  -H 'x-api-key: <token>' \
  -d '{
    "orgIdentifier": "default",
    "projectIdentifier": "CD_Docs",
    "identifier": "ASG",
    "tags": {
      "property1": "",
      "property2": ""
    },
    "name": "ASG",
    "description": "",
    "color": "",
    "type": "PreProduction",
    "yaml": "environment:\n  name: ASG\n  identifier: ASG\n  tags: {}\n  type: PreProduction\n  orgIdentifier: default\n  projectIdentifier: CD_Docs\n  variables: []"
  }'
For the Terraform Provider resource, go to harness_platform_environment and harness_platform_environment_service_overrides.
Here's an example of harness_platform_environment:
resource "harness_platform_environment" "example" {
  identifier = "ASG"
  name       = "ASG"
  org_id     = "default"
  project_id = "myproject"
  tags       = ["foo:bar", "baz"]
  type       = "PreProduction"

  ## ENVIRONMENT V2 Update
  ## The YAML is needed if you want to define the Environment Variables and Overrides for the environment
  ## Not Mandatory for Environment Creation nor Pipeline Usage

  yaml = <<-EOT
               environment:
                  name: ASG
                  identifier: ASG
                  description: ""
                  tags: {}
                  type: Production
                  orgIdentifier: default
                  projectIdentifier: myproject
                  variables: []
      EOT
}
To create an environment, do the following:
- In your project, in CD (Deployments), select Environments.
- Select New Environment.
- Enter a name for the new environment.
- In Environment Type, select Production or Pre-Production. The Production or Pre-Production settings can be used in Harness RBAC to restrict who can deploy to these environments.
- Select Save. The new environment is created.
Pipelines require that an environment have an infrastructure definition. We'll cover that next.
Define the infrastructure
You define the target infrastructure for your deployment in the Environment settings of the pipeline stage. You can define an environment separately and select it in the stage, or create the environment within the stage Environment tab.
There are two methods of specifying the deployment target infrastructure:
- Pre-existing: the target infrastructure already exists and you simply need to provide the required settings.
- Dynamically provisioned: the target infrastructure will be dynamically provisioned on-the-fly as part of the deployment process.
For details on Harness provisioning, go to Provisioning overview.
Pre-existing ASG infrastructure
To define the target ASG region, you add an infrastructure definition to a Harness environment. The infrastructure definition uses a Harness AWS connector and a region setting to define the deployment target.
You can use the same AWS connector you used when adding the AMI artifact in the Harness service. Ensure the AWS IAM user in the AWS connector credentials meets the AWS policy requirements.
- YAML
- API
- Terraform Provider
- Harness Manager
Here's a YAML example of an ASG infrastructure definition.
infrastructureDefinition:
  name: asg-infra
  identifier: asginfra
  description: ""
  tags: {}
  orgIdentifier: default
  projectIdentifier: DoNotDelete_IvanBalan
  environmentRef: ASG
  deploymentType: Asg
  type: Asg
  spec:
    connectorRef: AWS_ASG_CONNECTOR
    region: us-east-1
  allowSimultaneousDeployments: false
Create an infrastructure definition using the Create Infrastructure API.
curl -i -X POST \
  'https://app.harness.io/gateway/ng/api/infrastructures?accountIdentifier=<account_Id>' \
  -H 'Content-Type: application/json' \
  -H 'x-api-key: <token>' \
  -d '{
    "identifier": "asginfra",
    "orgIdentifier": "default",
    "projectIdentifier": "CD_Docs",
    "environmentRef": "ASG",
    "name": "asginfra",
    "description": "",
    "tags": {
      "property1": "1",
      "property2": "2"
    },
    "type": "Asg",
    "yaml": "infrastructureDefinition:\n  name: asginfra\n  identifier: asginfra\n  description: \"\"\n  tags: {}\n  orgIdentifier: default\n  projectIdentifier: CD_Docs\n  environmentRef: ASG\n  deploymentType: Asg\n  type: Asg\n  spec:\n    connectorRef: AWS_ASG\n    region: us-east-2\n  allowSimultaneousDeployments: false"
  }'
For the Terraform Provider resource, go to harness_platform_infrastructure.
Here's an example of harness_platform_infrastructure:
resource "harness_platform_infrastructure" "example" {
  identifier      = "asginfra"
  name            = "asginfra"
  org_id          = "default"
  project_id      = "CD_Docs"
  env_id          = "ASG"
  type            = "Asg"
  deployment_type = "Asg"
  yaml            = <<-EOT
        infrastructureDefinition:
          name: asginfra
          identifier: asginfra
          description: ""
          tags: {}
          orgIdentifier: default
          projectIdentifier: CD_Docs
          environmentRef: ASG
          deploymentType: Asg
          type: Asg
          spec:
            connectorRef: AWS_ASG
            region: us-east-2
          allowSimultaneousDeployments: false
      EOT
}
To create the ASG infrastructure definition in an environment, do the following:
-
In your project, in CD (Deployments), select Environments.
-
Select the environment where you want to add the infrastructure definition.
-
In the environment, select Infrastructure Definitions.
-
Select Infrastructure Definition.
-
In Create New Infrastructure, in Name, enter a name for the new infrastructure definition.
-
In Deployment Type, select AWS Auto Scaling Group.
-
In AWS Details, in Connector, select or create a Harness AWS connector that connects Harness with the account where you want the ASG deployed.
You can use the same AWS connector you used when adding the AMI artifact in the Harness service. Ensure the AWS IAM user in the AWS connector credentials meets the AWS policy requirements.
-
In Region, select the AWS region where you want the ASG deployed.
-
Optionally, in Base ASG, select an existing ASG as the base for new ASG deployments. Harness then clones the base ASG as a template to create a new ASG for the deployment.
-
Select Save.
The infrastructure definition is added.
Dynamically provisioned ASG infrastructure
Here's a summary of the steps to dynamically provision the target infrastructure for a deployment:
- Add dynamic provisioning to the CD stage:
-
In a Harness Deploy stage, in Environment, enable the option Provision your target infrastructure dynamically during the execution of your Pipeline.
-
Select the type of provisioner that you want to use.
Harness automatically adds the provisioner steps for the provisioner type you selected.
-
Configure the provisioner steps to run your provisioning scripts.
-
Select or create a Harness infrastructure in Environment.
-
- Map the provisioner outputs to the Infrastructure Definition:
- In the Harness infrastructure, enable the option Map Dynamically Provisioned Infrastructure.
- Map the provisioning script/template outputs to the required infrastructure settings.
Supported provisioners
The following provisioners are supported for Lambda deployments:
- Terraform
- Terragrunt
- Terraform Cloud
- CloudFormation
- Shell Script
Adding dynamic provisioning to the stage
To add dynamic provisioning to a Harness pipeline Deploy stage, do the following:
-
In a Harness Deploy stage, in Environment, enable the option Provision your target infrastructure dynamically during the execution of your Pipeline.
-
Select the type of provisioner that you want to use.
Harness automatically adds the necessary provisioner steps.
-
Set up the provisioner steps to run your provisioning scripts.
For documentation on each of the required steps for the provisioner you selected, go to the following topics:
- Terraform:
- Terraform Plan
- Terraform Apply
- Terraform Rollback. To see the Terraform Rollback step, toggle the Rollback setting.
- Terragrunt
- Terraform Cloud
- CloudFormation:
- Create Stack
- Delete Stack
- Rollback Stack. To see the Rollback Stack step, toggle the Rollback setting.
- Shell Script
Mapping provisioner output
Once you set up dynamic provisioning in the stage, you must map outputs from your provisioning script/template to specific settings in the Harness Infrastructure Definition used in the stage.
-
In the same CD Deploy stage where you enabled dynamic provisioning, select or create (New Infrastructure) a Harness infrastructure.
-
In the Harness infrastructure, in Select Infrastructure Type, select AWS if it is not already selected.
-
Enable the option Map Dynamically Provisioned Infrastructure.
A Provisioner setting is added and configured as a runtime input.
-
Map the provisioning script/template outputs to the required infrastructure settings.
To provision the target deployment infrastructure, Harness needs specific infrastructure information from your provisioning script. You provide this information by mapping specific Infrastructure Definition settings in Harness to outputs from your template/script.
For ASG, Harness needs the following settings mapped to outputs:
- Base ASG: The base ASG is not used in the deployment. It is simply cloned in order for Harness to create a new ASG. Harness will use this existing ASG as a template, but it will not resize it all. The newly created ASG will have unique name, Min and Max instances, and Desired Capacity.
In the Harness Infrastructure Definition, in Base ASG, select the ASG to use as the base ASG.

Create a Harness ASG pipeline
Once you have the service and environment created, you can create the pipeline.
You can create a service and environment when you are building the pipeline or separately in Services and Environments. In this topic, we walk through building these separately. For more information, go to CD pipeline modeling overview.
The pipeline models the release process using execution steps, triggers, and other settings. For more information, go to CD pipeline modeling overview.
- YAML
- API
- Terraform Provider
- Harness Manager
Here's a pipeline with a service, environment, and ASG Rolling Deploy and ASG Rolling Rollback steps:
pipeline:
  projectIdentifier: CD_Docs
  orgIdentifier: default
  tags: {}
  stages:
    - stage:
        name: DeployRolling
        identifier: Deploy
        description: ""
        type: Deployment
        spec:
          deploymentType: Asg
          service:
            serviceRef: svcasg
            serviceInputs:
              serviceDefinition:
                type: Asg
                spec:
                  artifacts:
                    primary:
                      primaryArtifactRef: <+input>
                      sources: <+input>
                  variables:
                    - name: desiredCapacity
                      type: String
                      value: <+input>
          environment:
            environmentRef: ASG
            deployToAll: false
            infrastructureDefinitions:
              - identifier: asginfra
          execution:
            steps:
              - step:
                  name: ASG Rolling Deploy
                  identifier: AsgRollingDeploy
                  type: AsgRollingDeploy
                  timeout: 10m
                  spec:
                    useAlreadyRunningInstances: false
                    skipMatching: true
            rollbackSteps:
              - step:
                  type: AsgRollingRollback
                  name: ASG Rolling Rollback
                  identifier: ASG_Rolling_Rollback
                  spec: {}
                  timeout: 10m
        tags: {}
        failureStrategies:
          - onFailure:
              errors:
                - AllErrors
              action:
                type: StageRollback
  identifier: ASGROLLING
  name: ASG-ROLLING
Create a pipeline using the Create Pipeline API.
curl -i -X POST \
  'https://app.harness.io/gateway/pipeline/api/pipelines/v2?accountIdentifier=<account_Id>&orgIdentifier=<org_Id>&projectIdentifier=<project_Id>' \
  -H 'Content-Type: application/yaml' \
  -H 'x-api-key: <token>' \
  -d 'pipeline:
    name: ASG Rolling
    identifier: ASG_Rolling
    projectIdentifier: CD_Docs
    orgIdentifier: default
    tags: {}
    stages:
      - stage:
          name: ASG Rolling
          identifier: ASG_Rolling
          description: ""
          type: Deployment
          spec:
            deploymentType: Asg
            service:
              serviceRef: AMI_Example
            environment:
              environmentRef: ASG
              deployToAll: false
              infrastructureDefinitions:
                - identifier: ASG_Infra
            execution:
              steps:
                - step:
                    name: Asg Rolling Deploy
                    identifier: AsgRollingDeploy
                    type: AsgRollingDeploy
                    timeout: 10m
                    spec:
                      useAlreadyRunningInstances: false
              rollbackSteps:
                - step:
                    name: Asg Rolling Rollback
                    identifier: AsgRollingRollback
                    type: AsgRollingRollback
                    timeout: 10m
                    spec: {}
          tags: {}
          failureStrategies:
            - onFailure:
                errors:
                  - AllErrors
                action:
                  type: StageRollback'
For the Terraform Provider resource, go to harness_platform_pipeline.
resource "harness_platform_pipeline" "example" {
  identifier = "ASG_Rolling"
  org_id     = "default"
  project_id = "CD_Docs"
  name       = "ASG Rolling"
  yaml = <<-EOT
      pipeline:
        name: ASG Rolling
        identifier: ASG_Rolling
        projectIdentifier: CD_Docs
        orgIdentifier: default
        tags: {}
        stages:
          - stage:
              name: ASG Rolling
              identifier: ASG_Rolling
              description: ""
              type: Deployment
              spec:
                deploymentType: Asg
                service:
                  serviceRef: AMI_Example
                environment:
                  environmentRef: ASG
                  deployToAll: false
                  infrastructureDefinitions:
                    - identifier: ASG_Infra
                execution:
                  steps:
                    - step:
                        name: Asg Rolling Deploy
                        identifier: AsgRollingDeploy
                        type: AsgRollingDeploy
                        timeout: 10m
                        spec:
                          useAlreadyRunningInstances: false
                  rollbackSteps:
                    - step:
                        name: Asg Rolling Rollback
                        identifier: AsgRollingRollback
                        type: AsgRollingRollback
                        timeout: 10m
                        spec: {}
              tags: {}
              failureStrategies:
                - onFailure:
                    errors:
                      - AllErrors
                    action:
                      type: StageRollback
  EOT
}
To create an ASG pipeline, do the following:
-
In your project, in CD (Deployments), click Pipelines.
-
Select Create a Pipeline.
-
Enter a name for the pipeline and select Start.
-
Select Add Stage, and then select Deploy.
-
Enter a name for the stage.
-
In Deployment Type, select AWS Auto Scaling Group, and then select Set Up Stage.
-
In Service, select the service you created earlier, and then select Continue.
-
In Environment, select the environment you created earlier.
-
In Specify Infrastructure, select the infrastructure definition you created earlier, and then select Continue.
-
In Execution Strategies, select the execution strategy for your deployment, and then select Use Strategy.
The steps for the deployment are generated automatically by Harness. You can add any additional steps you want by selecting Add Step.
In Rollback, you can see the rollback steps.
-
Select Save. The pipeline is saved.
Choose an execution strategy
Harness ASG deployments support the following deployment strategies:
Choose based on your risk tolerance and rollback requirements:
-
Rolling: Incremental instance replacement within a single ASG (lowest downtime, gradual rollout)
-
Canary: Deploy to a temporary canary ASG, validate, then deploy to production ASG (safe testing before full rollout)
-
Blue Green: Deploy to a new ASG, swap load balancer traffic, keep old ASG for instant rollback (zero downtime, instant rollback)
-
Rolling
-
Canary
-
Blue Green
Rolling
The first ASG rolling deployment will deploy a new ASG with the number of desired instances you have defined in your ASG configuration file in the Harness service used in the pipeline. Any other configuration files in the service are also applied.
Subsequent deployments will deploy a new version of the same ASG with any changes you have made in the Harness service configuration files (launch template, ASG configuration, etc.). This is the same as using the Edit buttons in the AWS console and creating a new version of the ASG.
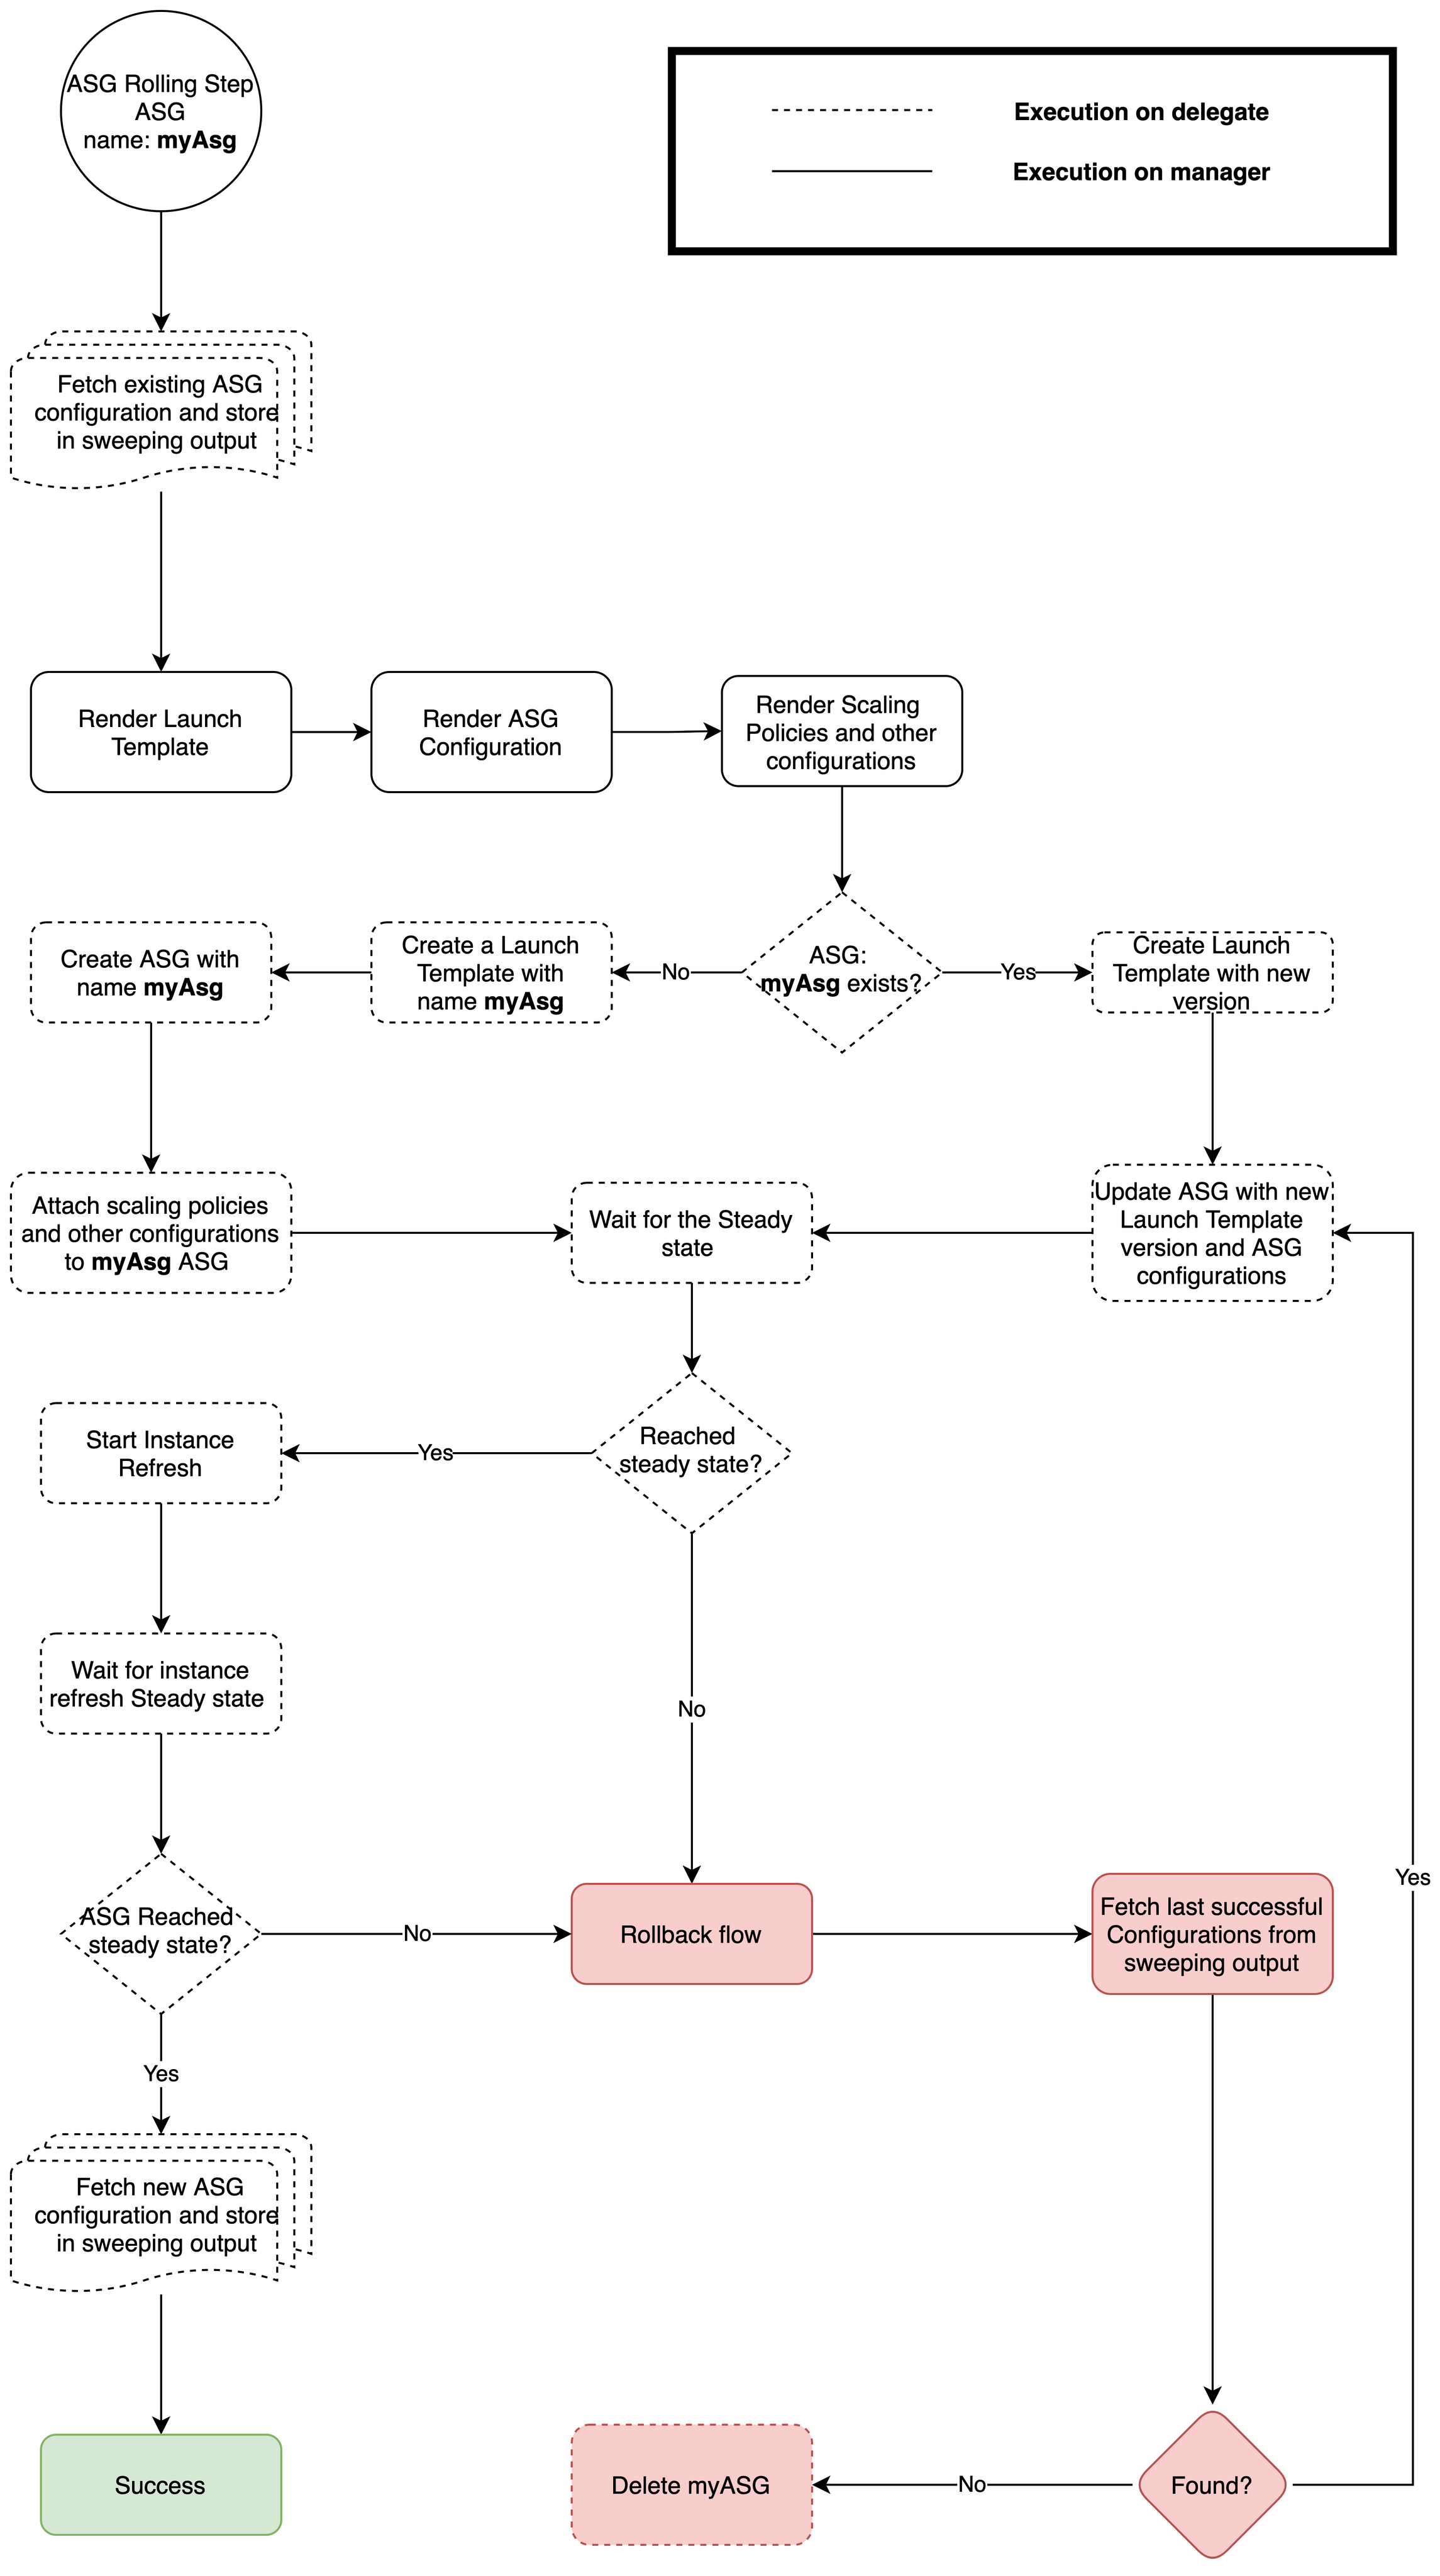
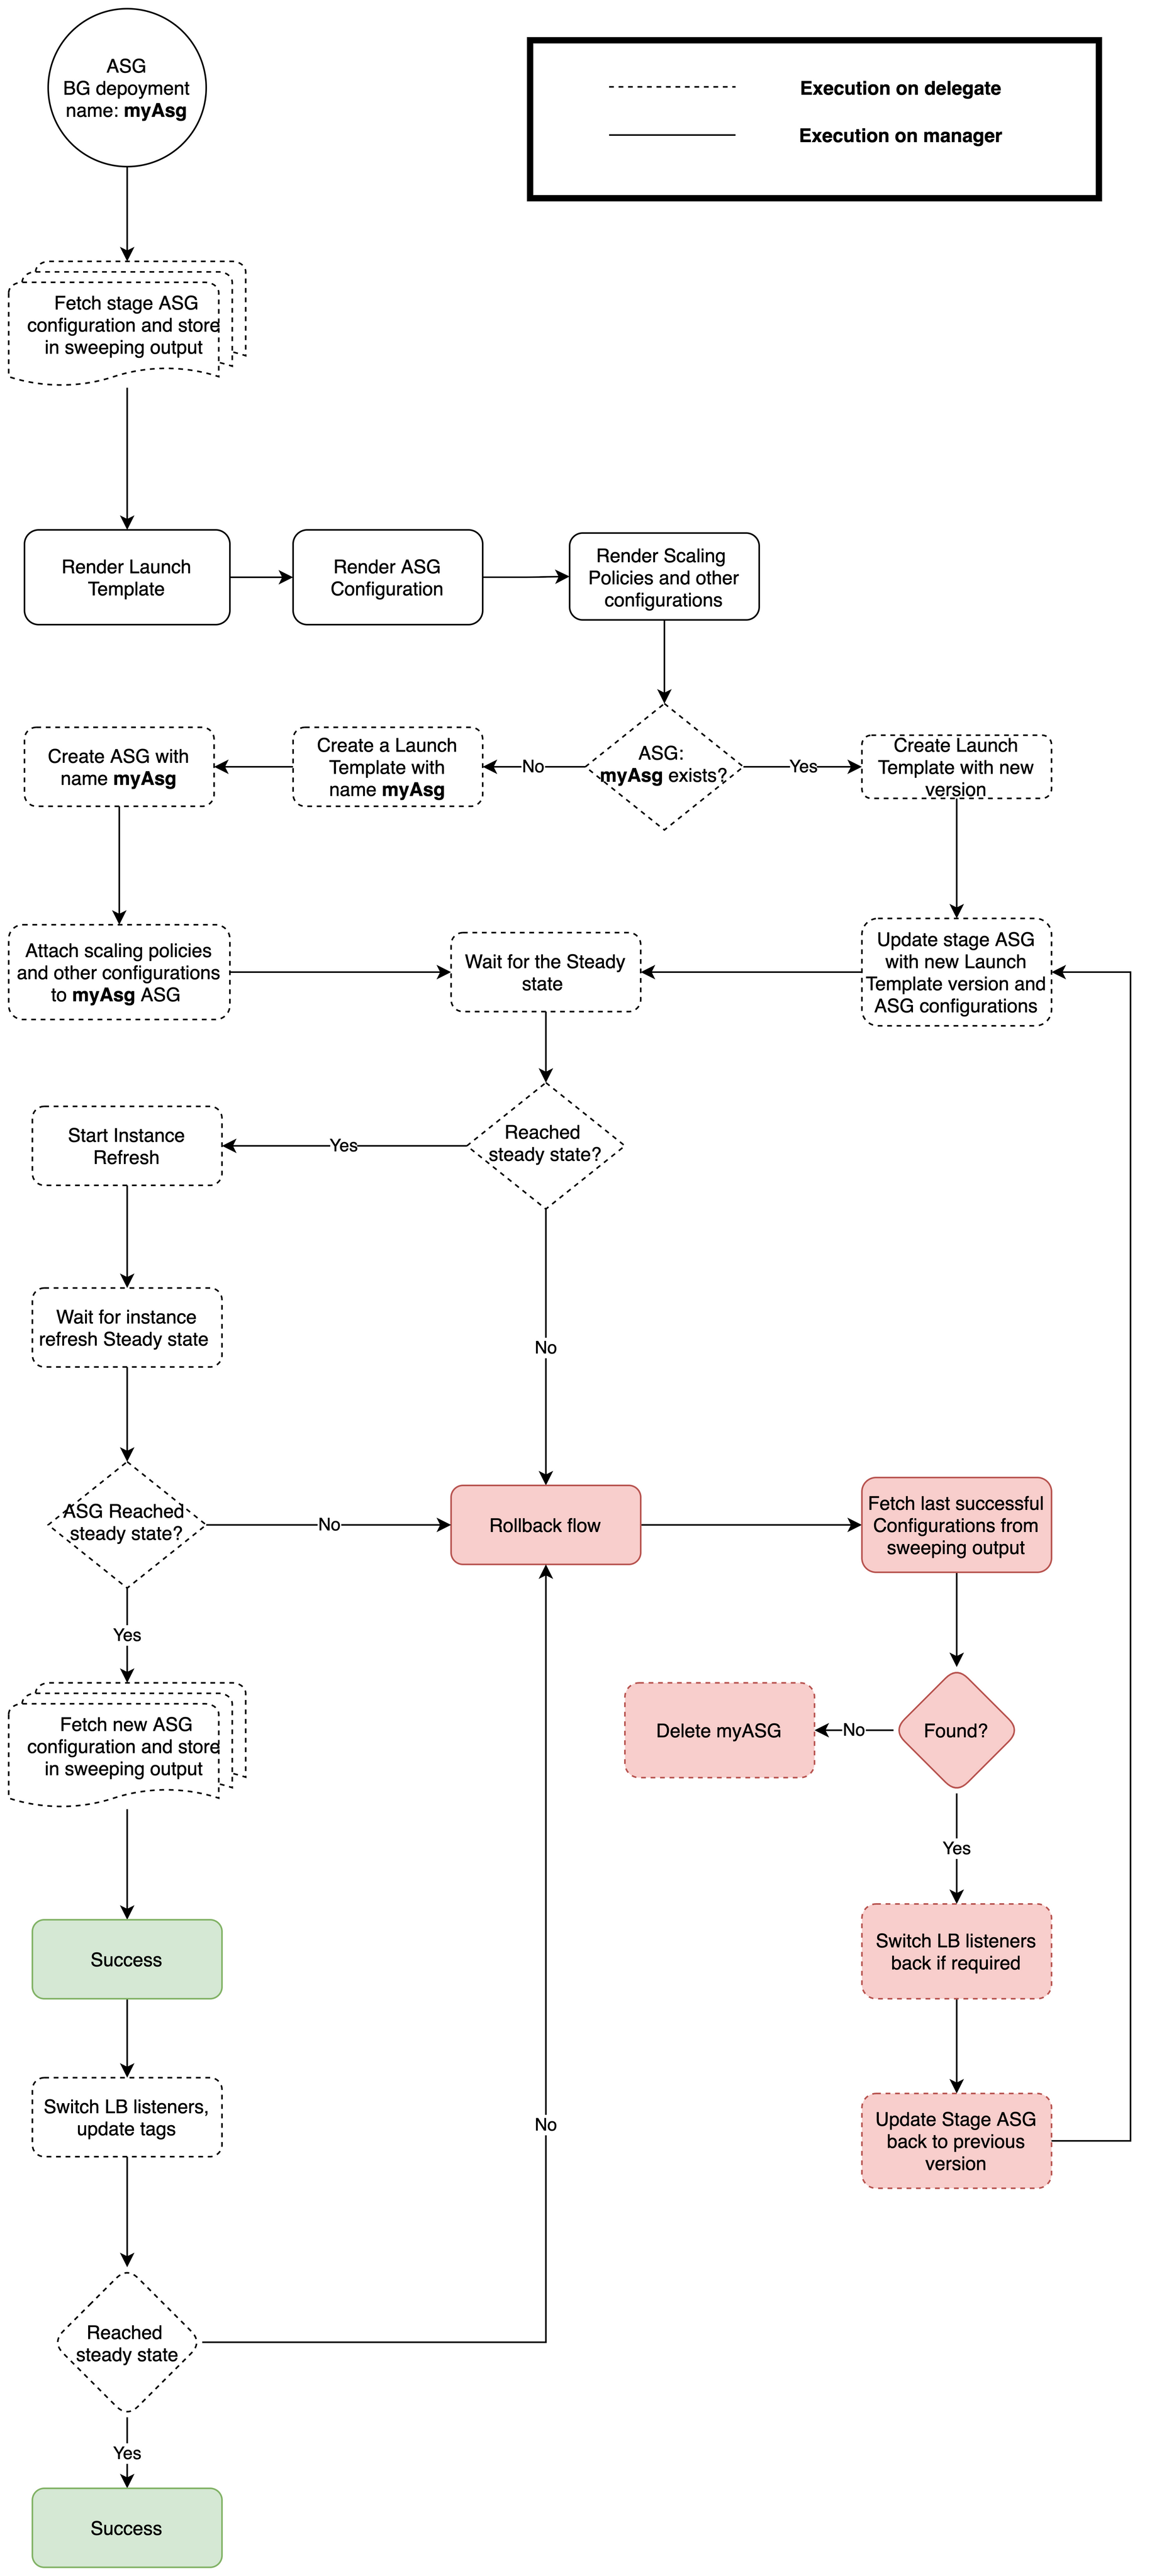
Here's a flowchart that explains how Harness performs rolling deployments:
Rolling deployments flowchart
- Rolling Deploy step
- Rolling Rollback step
The Rolling Deploy step has the following options:
- ASG Name: Enter a name for the ASG that Harness will create.
- Same as already running Instances or Fixed:
- Select Fixed to enforce a Max, Min, and Desired number of instances.Select Same as already running Instances to use scaling settings on the last ASG deployed by this Harness pipeline. If this is the first deployment and you select Same as already running Instances, Harness uses a default of Min 0, Desired 6, and Max 10. Harness does not use the Min, Max, and Desired settings of the base ASG.
- Minimum Healthy Percentage (optional)
- The percentage of the desired capacity of the ASG that must pass the group's health checks before the refresh can continue. For more information, go to Health checks for Auto Scaling instances from AWS. If not specified, harness sets the default value for this field as 90% during rolling deployment and 100% during rollback.
- Maximum Healthy Percentage (optional)
- The percentage of the desired capacity of the ASG that your ASG can increase to when replacing instances. For more information, go to Instance refresh core concepts from AWS. If not specified, harness sets the default value for this field as 110% during rolling deployment and 200% during rollback.
- Instance Warmup (optional)
- Go to Set the default instance warmup for an Auto Scaling group from AWS.
- Skip Matching
- Choose whether AWS Auto Scaling skips replacing instances that match the desired configuration. If no desired configuration is specified, then it skips replacing instances that have the same launch template and instance types that the ASG was using before the instance refresh started. For more information, go to Use an instance refresh with skip matching from AWS.
YAML example
          execution:
            steps:
              - step:
                  name: ASG Rolling Deploy
                  identifier: AsgRollingDeploy
                  type: AsgRollingDeploy
                  timeout: 10m
                  spec:
                    useAlreadyRunningInstances: false
                    skipMatching: true
Deployment logs
Here's an example of the log from a successful deployment.ASG Rolling Deploy log example
If deployment failure occurs, the stage or step failure strategy is initiated. Typically, this runs the Rolling Rollback step in the Rollback section of Execution.
During rollback of the first deployment, Harness deletes the ASG.
During rollback of subsequent deployments, Harness reverts the ASG to the previous state of ASG before deployment.
During the rollback of the first deployment, Harness restores the ASG template version to the state of the last successful run without deleting it. This enhancement eliminates the downtime caused by the instance refresh during rollbacks, ensuring continuous service availability.
The minimum required delegate version to use this feature is 83900.
Currently, this feature is behind the feature flag CDS_ASG_ROLLOUT_ROLLBACK_INSTANCE_REFRESH. Please contact Harness support to enable this feature.
Harness stores configurations of the ASG you are deploying twice:
- First storage: Harness stores the ASG configuration at the start of deployment for rollback during deployment.
- Second storage: Harness stores the ASG configuration at the end of deployment for rollbacks post deployment.
Steady State Step
:::

The ASG Steady State Step is an additional pipeline step designed to monitor the progress and completion of the Instance Refresh process in AWS Auto Scaling Groups (ASGs). It is introduced to ensure that, during an ASG rolling deployment, the deployment workflow proceeds as soon as the new instances are launched and have reached a healthy state.
To use this step, select the Skip Instance Termination checkbox in the Instance Refresh Configuration of the ASG Rolling Deploy step. This ensures that only new instance launches are tracked, without waiting for the termination of old instances. The ASG Steady State Step will monitor the instance termination state separately.
This step is not supported for Canary and Blue-Green deployment strategies, as the Instance Refresh ID is not available for these strategies. As a result, the step will fail if used in these scenarios.
Key Features
-
Polls Instance Refresh Status: Uses the DescribeInstanceRefreshes API to monitor the PercentageComplete and Status of the instance refresh.
-
Ensures Healthy Instances: Marks the step successful only when the new instances reach a healthy state and the refresh process is 100% complete.
-
Customizable Polling Interval: Configurable polling interval to check the refresh status at regular intervals (default: 30 seconds).
-
Supports Multi-Service Deployments: Can be used in both single-service and multi-service deployments, as well as in custom deployments.
Configuration Parameters
- ASG Name: The ASG name is automatically picked up from the Service. In the case of a custom stage, provide the ASG name manually or use an expression to resolve it.
- Polling Interval: Defines how often the DescribeInstanceRefreshes API is invoked to check the instance refresh status; The default value is 60 seconds.
ASG Steady State Step and Rollback Support
The ASG Steady State Step does not support rollback on its own. If a rollback step is added to a stage that contains only the Steady State Step, the rollback step will fail.
Rollback is only supported when the stage includes a Rolling Deployment step along with the Steady State Step.
Below are sample YAML configurations illustrating both use cases.
Sample Asg Steady State Step YAML
    - stage:
        name: Steady Stage
        identifier: Steady_Stage
        description: ""
        type: Deployment
        spec:
          deploymentType: Asg
          service:
            serviceRef: ASG_SERVICE
            serviceInputs:
              serviceDefinition:
                type: Asg
                spec:
                  artifacts:
                    primary:
                      primaryArtifactRef: <+input>
                      sources: <+input>
          environment:
            environmentRef: ASG_ENV
            deployToAll: false
            infrastructureDefinitions:
              - identifier: ASG_INFRA
          execution:
            steps:
              - step:
                  type: AsgSteadyState
                  name: AsgSteadyState_1
                  identifier: AsgSteadyState_1
                  spec:
                    pollingInterval: 30s
                    asgName: asg-test
                  timeout: 10m
            rollbackSteps: []
The YAML defines an ASG Steady State Step in a stage that:
- Monitors an ASG by polling every 30 seconds.
- Uses the specified ASG name
asg-test - Completes within a 10-minute timeout period.
- Since this stage only monitors instance health, it does not require a rollback step.
Sample Asg Steady State Step YAML along with Rolling deploy Step
    - stage:
        name: Deploy Stage
        identifier: deploy-stage
        description: ""
        type: Deployment
        spec:
          deploymentType: Asg
          service:
            serviceRef: ASG_SERVICE
            serviceInputs:
              serviceDefinition:
                type: Asg
                spec:
                  artifacts:
                    primary:
                      primaryArtifactRef: <+input>
                      sources: <+input>
          environment:
            environmentRef: ASG_ENV
            deployToAll: false
            infrastructureDefinitions:
              - identifier: ASG_ENV
          execution:
            steps:
              - step:
                  type: AsgRollingDeploy
                  name: AsgRollingDeploy_1
                  identifier: AsgRollingDeploy_1
                  spec:
                    useAlreadyRunningInstances: false
                    skipMatching: true
                    asgName: asg-test
                    instances:
                      type: Fixed
                      spec:
                        desired: 2
                        max: 3
                        min: 1
                    skipInstanceTermination: true
                  timeout: 10m
              - step:
                  type: AsgSteadyState
                  name: AsgSteadyState_1
                  identifier: AsgSteadyState_1
                  spec:
                    pollingInterval: ""
                    asgName: asg-test
                  timeout: 10m
            rollbackSteps:
              - step:
                  name: Asg Rolling Rollback
                  identifier: AsgRollingRollback
                  type: AsgRollingRollback
                  timeout: 10m
                  spec: {}
        tags: {}
        failureStrategies:
          - onFailure:
              errors:
                - AllErrors
              action:
                type: StageRollback
The YAML defines an ASG Steady State Step in a stage that:
- Monitors an ASG by polling every 30 seconds.
- Uses the specified ASG name
asg-test - Completes within a 10-minute timeout period.
- Includes a rollback step that reverts to the previous version of the ASG Rolling Deployment step.
Canary
The ASG canary deployment uses two step groups:
- Canary Deployment:
- ASG Canary Deploy step: deploys a new ASG version with the name of your ASG and the extension
__Canary. The canary ASG version can use thedesiredCapacityin your ASG configuration file or you can set it in the Instances setting in the ASG Canary Deploy step. - ASG Canary Delete step: deletes the canary ASG.
- ASG Canary Deploy step: deploys a new ASG version with the name of your ASG and the extension
- Primary Deployment:
- ASG Rolling Deploy step:
- The first deployment will deploy a new ASG with the number of desired instances you have defined in your ASG configuration file in the Harness service used in the pipeline. Any other configuration files in the service are also applied.
- Subsequent deployments will deploy a new version of the same ASG with any changes you have made in the Harness service configuration files (launch template, ASG configuration, etc.). This is the same as using the Edit buttons in the AWS console and creating a new version of the ASG.
- ASG Rolling Deploy step:
Here's what the two step groups look like:
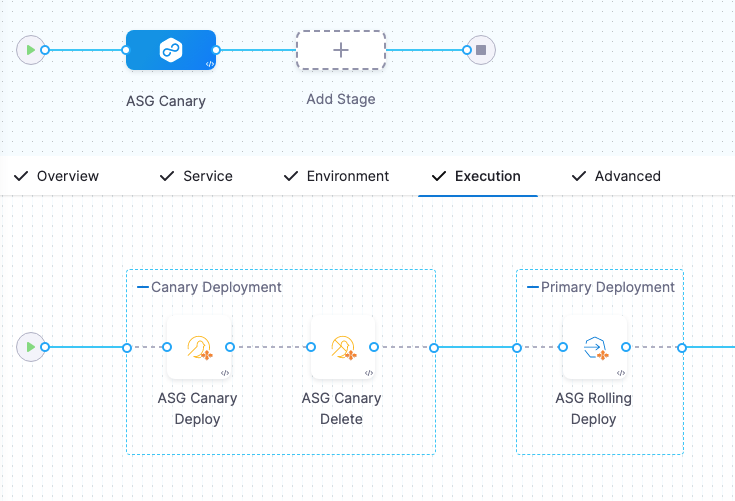
- ASG Canary Deploy step
- ASG Canary Delete step
- ASG Rolling Deploy step
- Rollback steps
The ASG Canary Deploy step deploys a new ASG with the name of your ASG and the extension __Canary.
In the ASG Canary Deploy step, in Instances, you can specify how many instances to use in this temporary ASG.
The Instances replaces the desiredCapacity in your ASG configuration file.ASG Canary Deploy step log example
The ASG Canary Delete step deletes the temporary ASG created by the ASG Canary Deploy step.ASG Canary Delete step log example
This is the standard Harness ASG Rolling Deploy step. For details, go to Rolling.
If deployment failure occurs, the stage or step failure strategy is initiated. Typically, this runs the rollback steps in the Rollback section of Execution.
For ASG canary deployments there are two rollback steps:
- ASG Canary Delete: deletes the canary ASG (
[app_name]__canary). - ASG Rolling Rollback: deletes the new state and returns state to the previous ASG version.
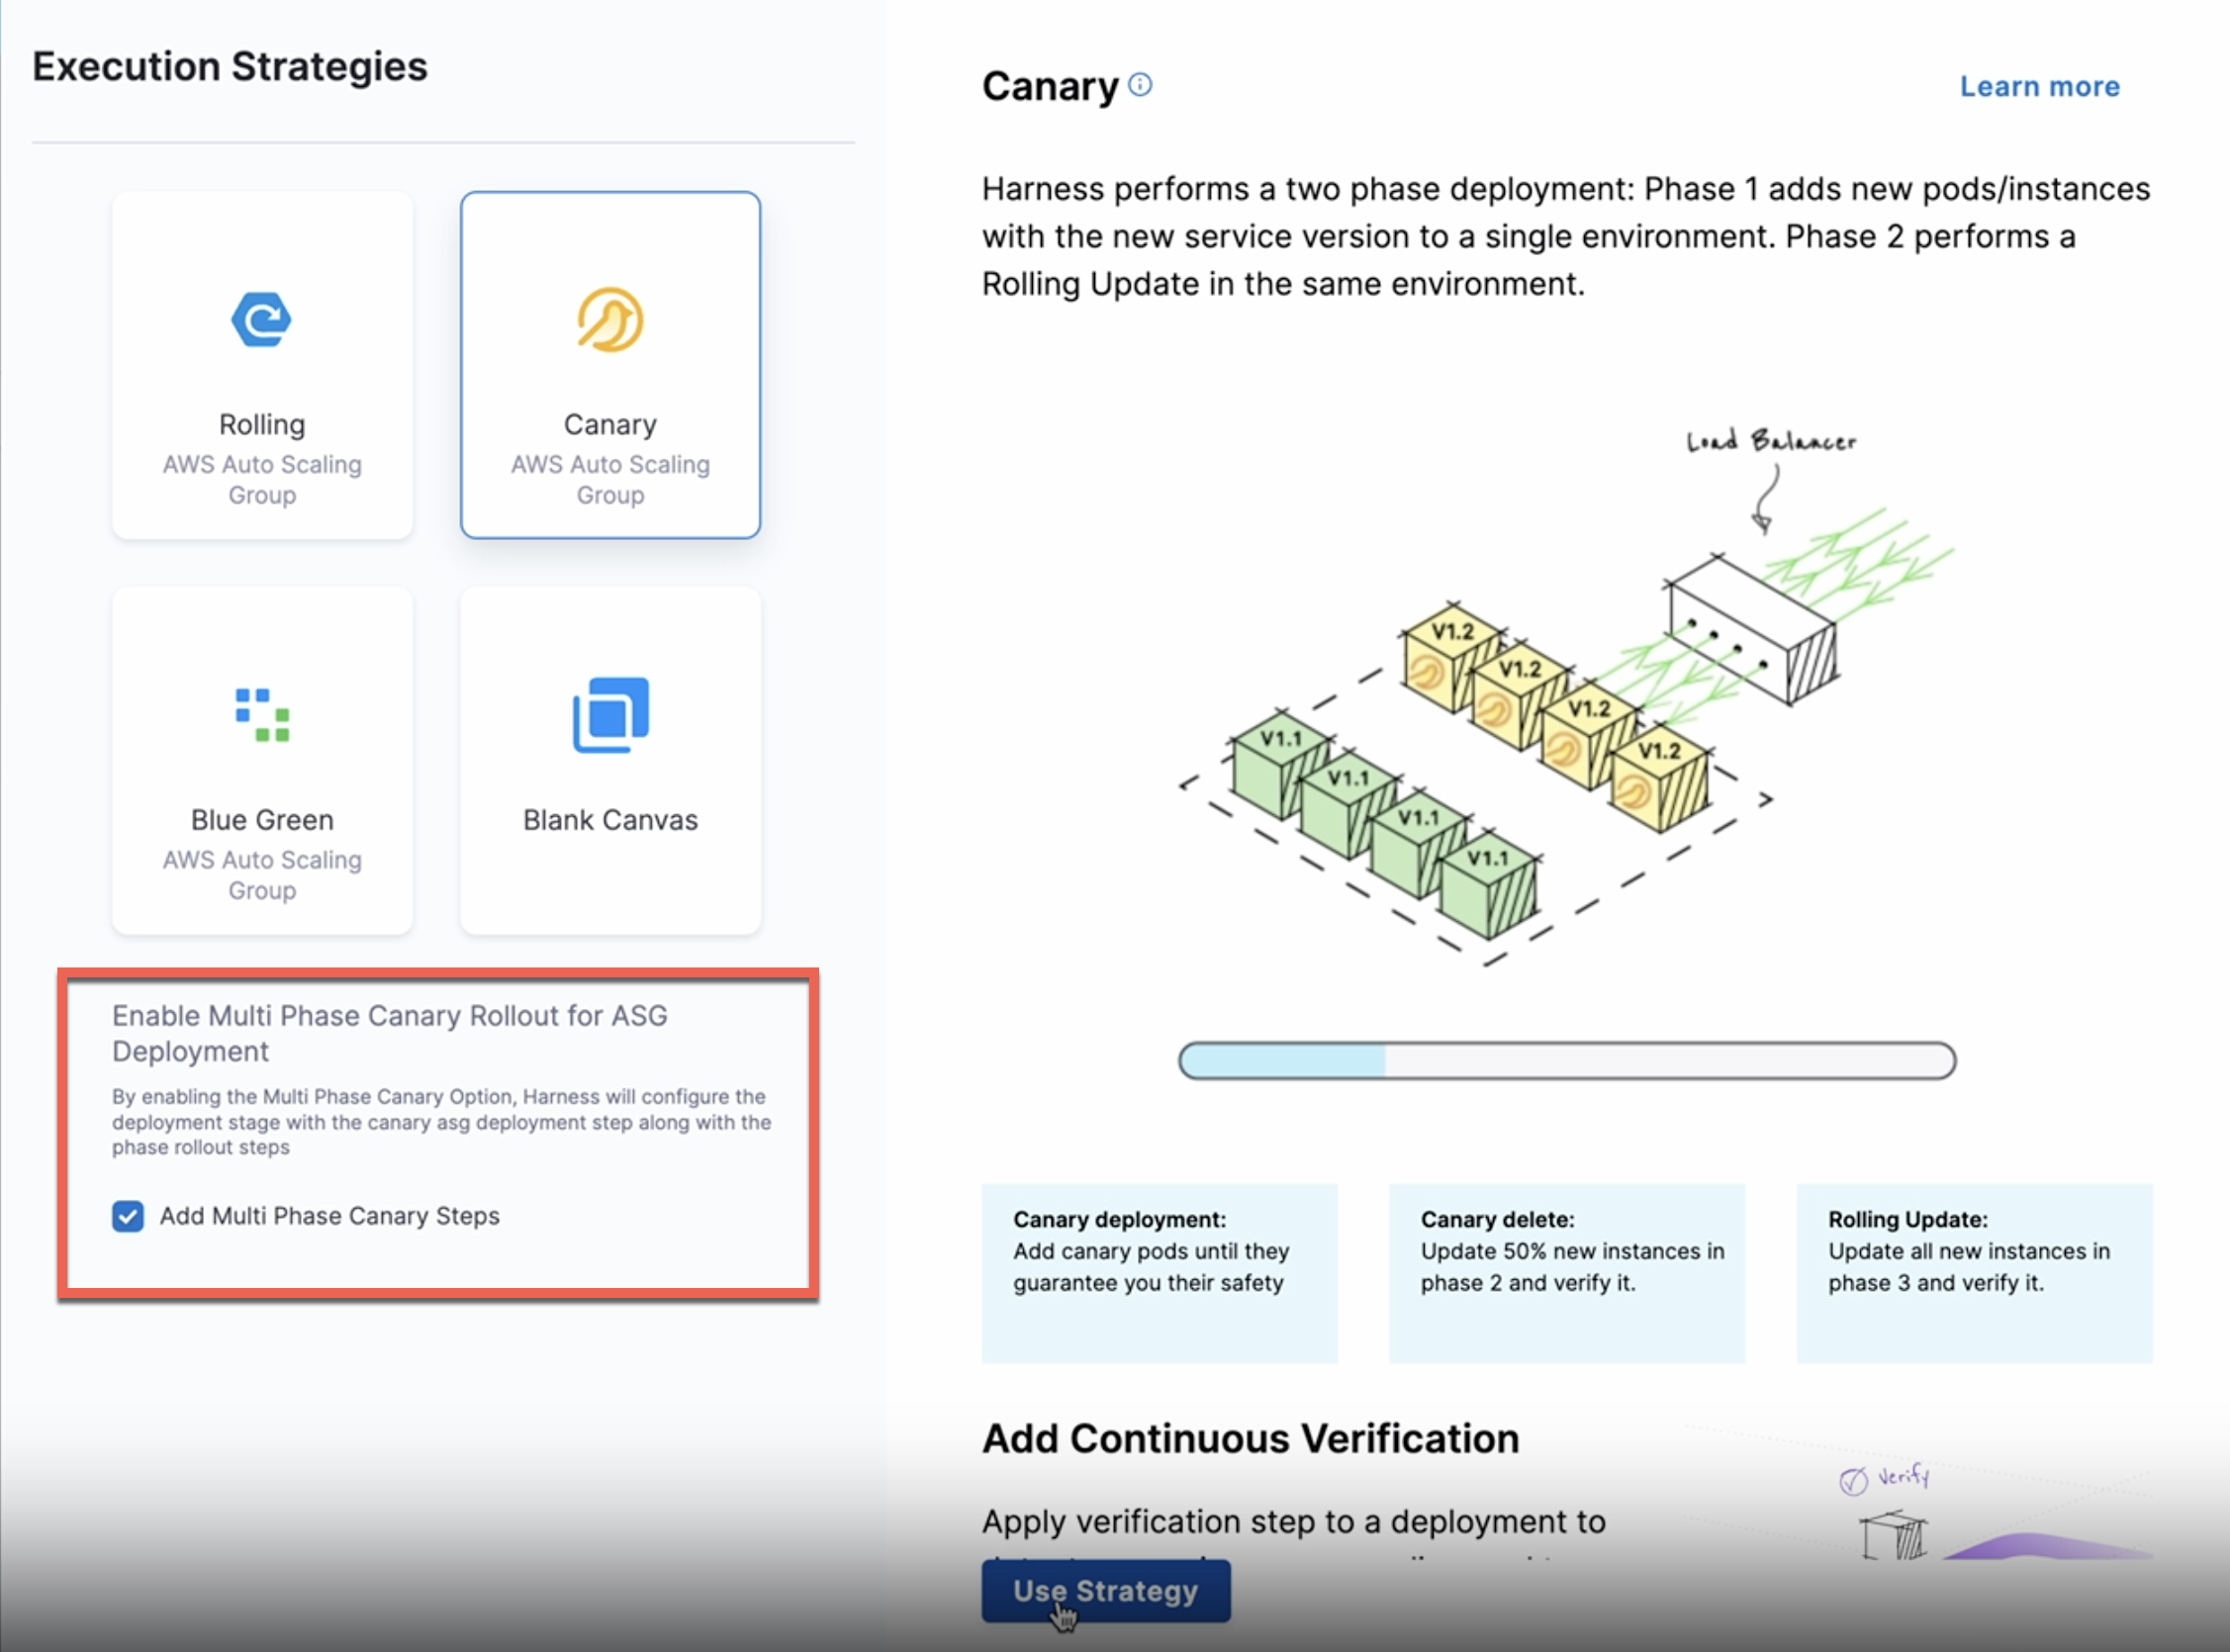
Canary phased deployment
You can create a multi-phase workflow that progressively deploy your new instances to a new ASG incrementally using the ASG Phased Deploy step when creating a Canary deployment.
When you select the Canary execution strategy for your pipeline, make sure to select the Add Multi Phase Canary Steps to enable phased deployment.
A phased deployment uses two step groups:
- A Canary phase containing steps that define your ASG, deploy a percentage or partial count of the ASG's instances, and verify this partial deployment. You can add more Canary phases that expand the partial deployment.
- A Primary phase that deploys your image to the full count of instances defined in your ASG.
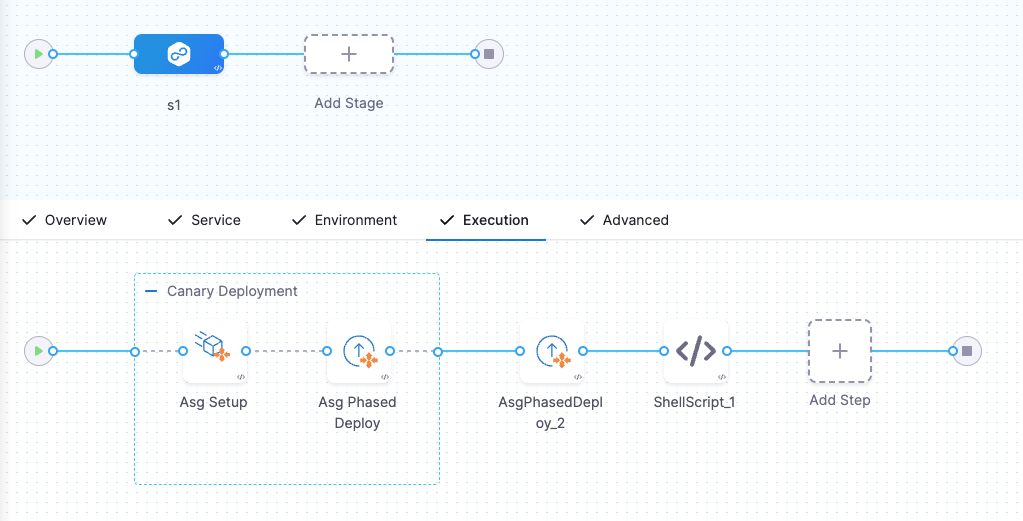
Here're the steps we build:
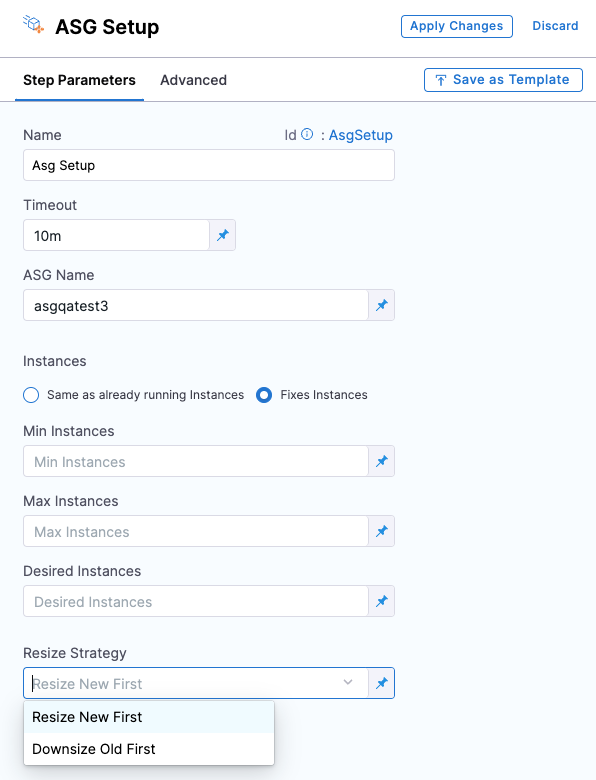
ASG Setup:
This step will remove older non-used ASGs, and create new a new ASG with zero instances and desired launch template configuration. In this step, you can specify how many EC2 instances to launch in the ASG that Harness deploys at the end of the workflow. You can also specify the resizing order and steady state timeout of the instances.
The instance can be Fixed Instances and Same as already running instances. If you select same as already running instances, then Harness fetches the minimum, maximum, and desired capacity of current live ASG and use that for configuring this step.
There are two resize options:
- Resize New First: Select to resize new ASG first and then downsize older ASG.
- Downsize Old First: Select to downsize older ASG first and then resize new ASG.
Here's a sample ASG Setup step YAML for the Fixed Instances option:
              - step:
                  type: AsgSetup
                  name: AsgSetup_1
                  identifier: AsgSetup_1
                  spec:
                    asgName: abcd
                    instances:
                      type: CurrentRunning
                    resizeStrategy: "resize_new_first"
                  timeout: 10m
Here's a sample ASG Setup step YAML for the Same as already running instances option:
          - step:
              type: AsgSetup
              name: AsgSetup_1
              identifier: AsgSetup_1
              spec:
                asgName: abcd
                instances:
                  type: Fixed
                  spec:
                    desired: 2
                    max: 3
                    min: 1
                resizeStrategy: "downsize_old_first"
              timeout: 10m
ASG Phased Deploy:
In this step, you can specify the percentage or count of instances to deploy in this phase. When you add additional Canary phases, each phase automatically includes an ASG Phase Deploy, which you must configure with the count or percentage of instances you want deployed in that phase.
This step will resize the new ASG to desired instance, and then downsize the older ASG to desired instance. For example, increase the instance count of new ASG by 1, then decrease the instance count of older ASG by 1.
Here's a sample ASG Phased Deploy step YAML:
              - step:
                  type: AsgPhasedDeploy
                  name: AsgPhasedDeployStep_1
                  identifier: AsgPhasedDeployStep_1
                  spec:
                    instanceSelection:
                      type: Count
                      spec:
                        count: 1
                  timeout: 10m
ASG Rollback:
This step will rollback to the initial setup (setup before ASG setup was created). Here, the new ASG is deleted and the old ASG is up-sized to its pre-deployment instance count.
Here's a sample ASG Rollback step YAML:
          - step:
              name: Asg Rollback
              identifier: AsgRollback
              type: AsgRollback
              timeout: 10m
              spec: {}
Blue Green
An ASG Blue Green deployment uses two steps:
For a detailed comparison of ASG Blue-Green deployments with other platforms, see Blue-Green Deployment Across Platforms.
- ASG Blue Green Deploy step:
- You specify the production and stage listener ports and rules to use.
- The new ASG is deployed to the stage target group.
- ASG Blue Green Swap Services step:
- Harness modifies the ELB prod listener to forward requests to target groups associated with each new ASG version.
- Harness swaps all traffic from stage to production listeners and ports.
- Harness modifies the ELB stage listener to forward requests to target groups associated with old ASG version.
The first ASG deployed is given a suffix using the format [app_name]__1, like asgdemo__1. The second ASG deployed is given the suffix [app_name]__2.
Every subsequent deployment will simply create new versions of these ASGs instead of creating new ASGs. So the third deployment will create a new version of ASG [app_name]__1, route prod traffic to it, and route stage traffic to ASG [app_name]__2.
Here's a flowchart that explains how Harness performs Blue Green deployments:
Blue Green deployments flowchart
AWS Requirements
In addition to the requirements of the Harness ASG service and environment, an ASG Blue Green deployment requires you to set up the following resources up within AWS:
- A security group that allows inbound access to your Application Load Balancer's listener ports.
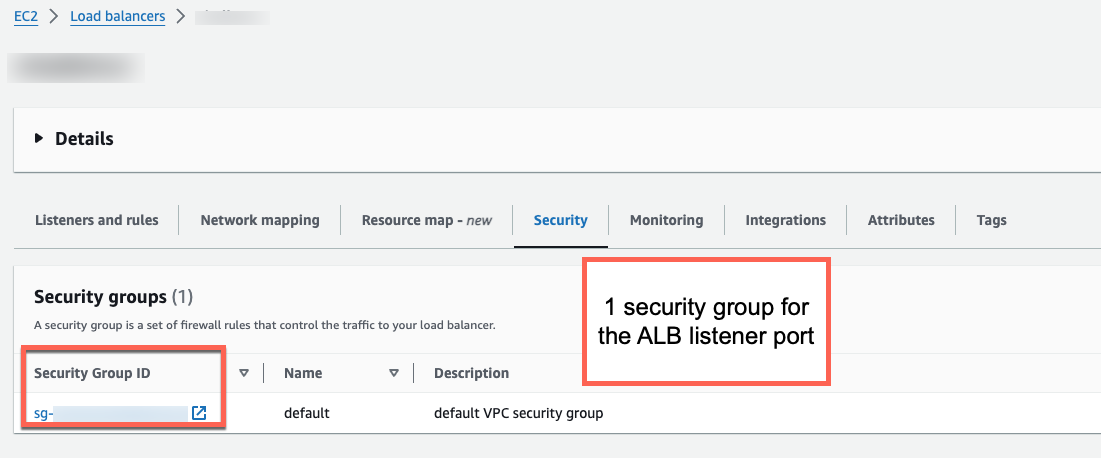
- A pair of target groups, typically staging (Stage) and production (Prod) both with the instance target type.
- An Application Load Balancer (ALB) with one listener rule for both your target groups.
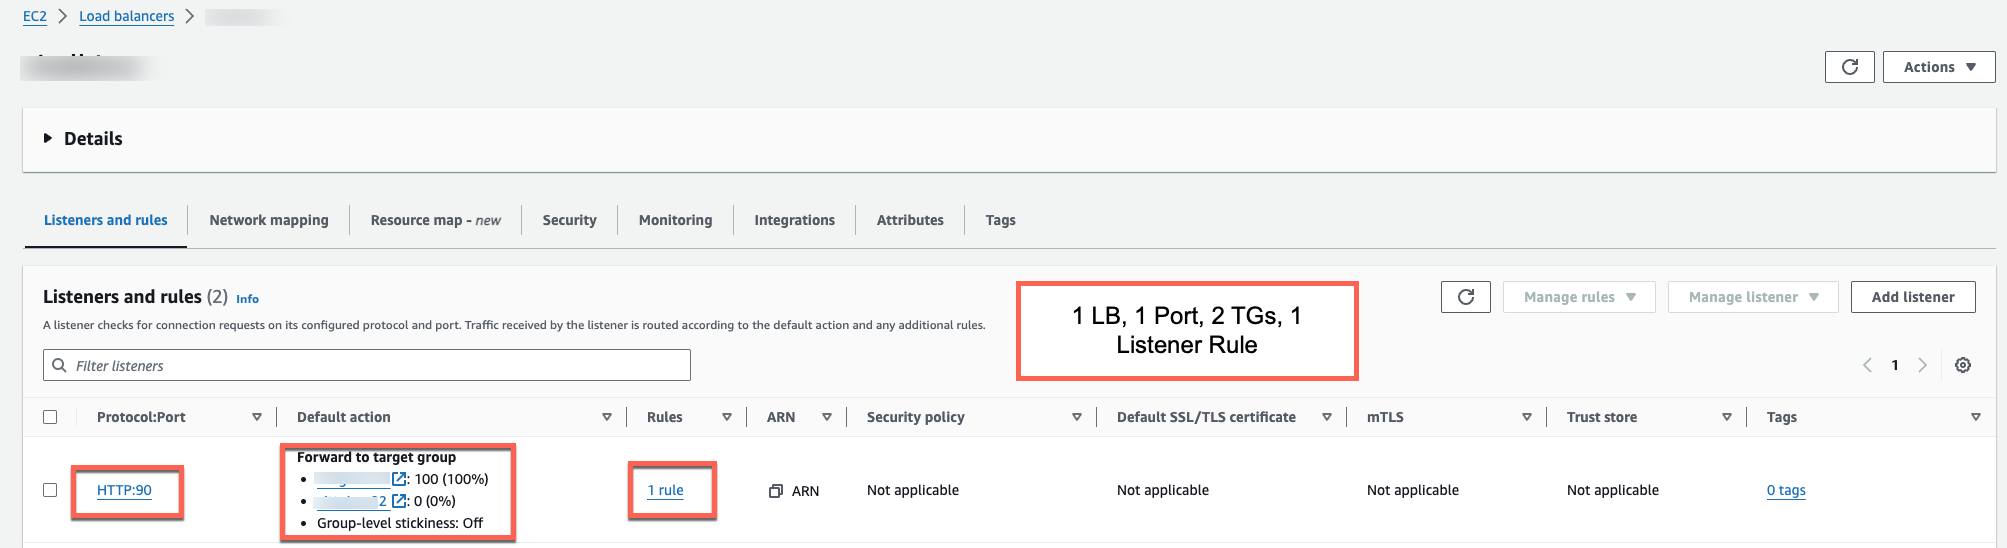
Let's take a look at the first two deployments.
First Blue Green deployment
The first Blue Green deployment follows these steps:
- ASG Blue Green Deploy step:
- Checks that listener ARN and listener rule ARN are valid.
- Fetches target groups' ARN.
- Creates launch template and ASG using the format
[app_name]__1, likeasgdemo__1. - Sets the tag
BG_VERSION=BLUEon new ASG.
- ASG Blue Green Swap step:
- Not used as there is only one ASG at this point.
Second Blue Green deployment
At the start, the second Blue Green deployment will only have one prod ASG (the one deployed in the first Blue Green deployment).
Harness will create a new ASG with the suffix __2 and swap prod traffic to it.
The second Blue Green deployment follows these steps:
- ASG Blue Green Deploy step:
- Checks that listener ARN and listener rule ARN are valid.
- Fetches target groups' ARN.
- Creates launch template and new ASG using the format
[app_name]__2, likeasgdemo__2. - Sets the tag
BG_VERSION=GREENon new ASG, for example,asgdemo__2.
- ASG Blue Green Swap step swaps target groups and updates tags:
- Modifies the ELB prod listener to forward requests to target groups associated with new autoscaling group.
- Modifies the ELB stage listener to forward requests to target groups associated with the old autoscaling group.
- Updates tags of the autoscaling groups.
Now there are two ASGs being used: a prod and a stage ASG. Subsequent deployments will create a new versions of these ASGs and swap prod traffic to the new ASG version from the previous ASG.
Blue Green deployment steps:
- ASG Blue Green Deploy step
- ASG Blue Green Swap Services step
- ASG Blue Green Rollback step
The ASG Blue Green Deploy step has the following settings:
-
ASG Name: Enter a name for the ASG that Harness will create.
-
Same as already running Instances or Fixed:
- Select Fixed to enforce a Max, Min, and Desired number of instances.Select Same as already running Instances to use scaling settings on the last ASG deployed by this Harness pipeline. If this is the first deployment and you select Same as already running Instances, Harness uses a default of Min 0, Desired 6, and Max 10. Harness does not use the Min, Max, and Desired settings of the base ASG.
-
Load Balancer: Provide the load balancer(s) to use.
-
Prod Listener: Provide the listener on your load balancer that handles live production traffic. This field specifies the production listener on your load balancer. A listener is responsible for receiving incoming connections on a specified protocol and port. The production listener is the one that handles live traffic for your currently active deployment.
Example Prod Listener value:
arn:aws:elasticloadbalancing:us-east-2:999999999999:listener/app/[lbname]]/[lbref]/[listenerref]] -
Prod Listener Rule ARN: Provide the ARN of the listener rule associated with the production listener. This field holds the Amazon Resource Name (ARN) of the listener rule associated with the production listener. Listener rules define how incoming requests are evaluated (using conditions like URL path, host header, etc.) and routed to the appropriate target group. The rule ensures that traffic is correctly directed to the target group for your production environment.
Example Listener Rule ARN value:
arn:aws:elasticloadbalancing:us-east-2:999999999999:listener/app/[lbname]]/[lbref]/[listenerref]/[ruleref]] -
Stage Listener: Provide the listener on your load balancer that routes traffic to your staging environment. This field defines the staging listener on the load balancer. The staging listener is used to route traffic to the new environment where you can perform tests and validations before making it live.
Example Stage Listener value:
arn:aws:elasticloadbalancing:us-east-2:999999999999:listener/app/[lbname]]/[lbref]/[listenerref]] -
Stage Listener Rule ARN: Provide the ARN of the listener rule associated with the staging listener. Similar to the production listener rule, this field contains the ARN for the rule associated with the staging listener. It determines how traffic is routed to the staging target group based on the defined conditions.
Example Stage Listener Rule ARN value:
arn:aws:elasticloadbalancing:us-east-2:999999999999:listener/app/[lbname]]/[lbref]/[listenerref]/[ruleref]]importantThere is only one listener rule for both target groups (stage and prod), and one listener ARN for a listener rule. Go to AWS requirements for more information.
Harness fetches these AWS settings using the Harness AWS connector you have set up in the Infrastructure Definition in the Environment section of the stage.
The ASG Blue Green Swap Services step has the following settings:
-
Downsize old ASG: select this option to downsize the ASG that Harness swapped the traffic from.
For example, if there was an existing ASG named
asgdemo__1and you deployed a new version of the ASG namedasgdemo__2and swapped traffic to it, selecting Downsize old ASG will downsizeasgdemo__1.
The ASG Blue Green Rollback rolls back the routes and ASG created/updated in the Blue Green deployment.
Harness stores configurations of the ASG you are deploying twice:
- First storage: Harness stores the ASG configuration at the start of deployment for rollback during deployment.
- Second storage: Harness stores the ASG configuration at the end of deployment for rollbacks post deployment.
Blue Green traffic shift options
There are two options for traffic-shifting with blue green deployments: instant and incremental.
Blue/Green with Instant Traffic Shift Summary
In this strategy, you specify production and stage listener ports and rules to use in the ASG Blue Green Deploy step. Next, the ASG Swap Services step swaps all traffic from stage to production.
A Blue/Green deployment reliably deploys your ASGs by maintaining new and old versions of ASGs. The ASGs run behind an Application Load Balancer (ALB) using two listeners, stage and prod. These listeners forward respectively to two target groups, stage and prod, where the new and old ASGs are run.
In the first stage of deployment, the new ASG is attached to the stage target group:
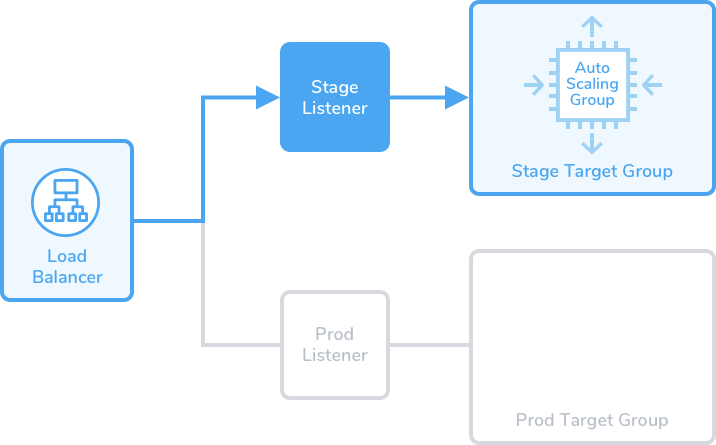
Blue/Green deployments are achieved by swapping routes between the target groups—always attaching the new ASG first to the stage target group, and then to the prod target group:
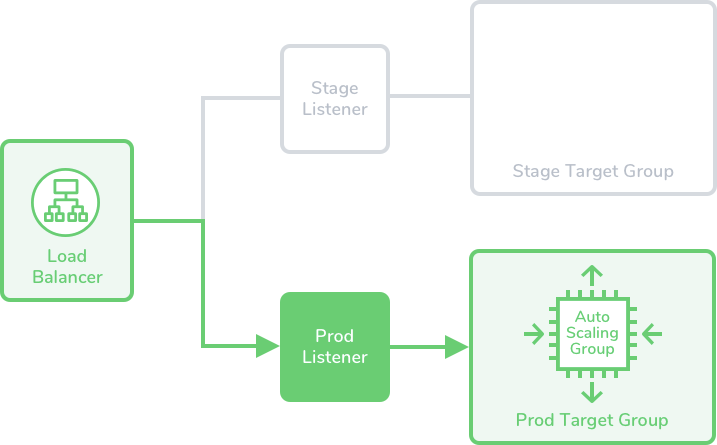
For more information on how to configure blue-green traffic shifting, refer to ASG Blue-Green Traffic Shifting Step
Multi-ASG Deployments and Parallel Rollback (Single Service/Environment/Infrastructure)
Currently, this feature is behind the feature flag: CDS_ASG_MULTI_DEPLOY_ROLLBACK_SUPPORT. Please contact Harness Support to enable this feature.
In an ASG stage, users can add multiple Deploy steps to deploy multiple Auto Scaling Groups (ASGs) for the same service, environment, and infrastructure combination. These steps can be executed in parallel or in sequence.
Rollback is also triggered automatically on failure. A single Rollback step will initiate rollback for all successfully deployed ASGs in parallel within that stage.
You can also configure a fail fast strategy so that the pipeline immediately fails and skips remaining steps when any Deploy step fails.
Example
Suppose a stage contains four parallel Deploy steps, each deploying a different ASG. If one of the Deploy steps fails:
- The failed ASG and all successfully deployed ASGs will be rolled back in parallel.
- Any Deploy steps that had not yet executed will be skipped.
Limitations
Looping strategies are not supported for multi-deploy rollback.
If a single ASG Rolling Deploy step is looped multiple times in a stage, rollback will not be triggered for any of the ASGs.
Rollback Behavior with ASG Multi-Service Deployment
Harness supports rollback for ASG multi-service deployments using a single rollback step. This means that even if you configure different delegate selectors for different deployment steps, only one delegate will be used for the rollback.
Delegate Selection Order
In scenarios with multiple delegate selectors, the delegate for the rollback step is chosen based on the following priority:
- Step-level selector
- Stage-level selector
- Pipeline-level selector
- Connector-level selector
Ensure that the appropriate delegate selectors are configured at the relevant level to avoid unexpected delegate selection during rollback.
Troubleshooting
Pipeline fails with 'Unable to fetch AMI' error during ASG Rolling Deploy step
Verify the AMI ID exists in the target AWS region. Private AMIs are region-specific — if you created the AMI in us-east-1, you cannot deploy to us-west-2 without copying the AMI. Go to Copy an AMI from AWS to copy AMIs across regions.
Instance refresh stuck at 0% complete for more than 5 minutes
Check the ASG health check configuration in your ASG configuration file. If health check grace period is too short, new instances may fail health checks before fully initializing. Increase healthCheckGracePeriod to 300 seconds or more.
Blue Green deployment fails with 'Listener rule not found' error
Verify the listener rule Amazon Resource Name (ARN) is correct and the listener rule exists in your AWS Application Load Balancer. Listener rules must be created in AWS before running the pipeline. Go to AWS requirements above to review blue-green prerequisites.
Rollback step fails with 'Previous ASG configuration not found'
Harness stores ASG configurations at the start of each deployment for rollback. If this is the first deployment and it fails before completing the ASG creation, there is no previous state to rollback to. Harness will delete the failed ASG instead.
Next steps
Now that you have deployed your first ASG, explore advanced deployment patterns and monitoring capabilities:
- ASG Blue-Green Traffic Shifting: Configure incremental traffic shifting for gradual blue-green deployments
- AWS deployment FAQs: Troubleshoot common AWS deployment issues
- Continuous Verification: Monitor ASG health metrics and automatically rollback on anomalies
- Deployment freeze: Prevent deployments during maintenance windows
Advanced settings
In the Advanced settings of all step, you can use the following options:
Notes
AWS has the following limitations to keep in mind:
- You are limited to creating 5000 launch templates per region and 10000 versions per launch template. For more information, go to Launch an instance from a launch template from AWS.
- ASGs per region: 500.
- Launch configurations per region: 200.
FAQs
For frequently asked questions about AWS deployments in Harness, go to AWS deployment FAQs.