Harness Community Edition deployments
As of Dec 2023, the Harness CD Community Edition (CE) is retired in favor of Harness Open Source.
Use the instructions on this page only if you are still using the Harness CD CE.
This quickstart shows you how to set up Harness CD Community Edition locally and create a CD pipeline that deploys a public NGINX image to a local cluster.
Harness CD Community Edition is a lightweight version of Harness that you can download and run on your laptop or any VM with 3GB RAM and 2 CPUs. Harness CD Community Edition is intended to get devs started with Harness quickly without having to sign up for a Harness SaaS account.
For an overview, see Harness CD Community Edition overview.
Objectives
You'll learn how to:
- Install and run Harness CD Community Edition locally.
- Create and deploy a CD pipeline in Harness CD Community Edition using a public Docker image and a local Kubernetes cluster.
Requirements
- Harness CD Community Edition:
- Docker Desktop minimum version 4.3.1 (72247)
- 3GB RAM and 2 CPUs is the minimum.
- Docker Compose (included in Docker Desktop).
- 20GB of free disk space.
- Docker Desktop minimum version 4.3.1 (72247)
- Tutorial:
- GitHub account.
- You will use your GitHub account to pull a publicly available manifest (
https://github.com/kubernetes/website/blob/main/content/en/examples/application/nginx-app.yaml). - Docker Compose Kubernetes is installed and running in Docker Desktop (a new installation of Docker Desktop might need to have Kubernetes enabled in its Settings).
- Docker Compose Kubernetes should have at least 2GB memory and 1 CPU. That will bring the total Docker Desktop resources up to a minimum of 5GB and 3 CPUs.
- If you want to use Minikube instead of Docker Desktop Kubernetes, use Minikube minimum version v1.22.0 or later installed locally.
- Minikube needs 4GB and 4 CPUs:
minikube start --memory 4g --cpus 4.
- Kubernetes cluster.
- This is the target cluster for the deployment you will set up in this quickstart. When Docker Compose Kubernetes is installed it comes with a cluster and the default namespace. You don't need to make any changes to Docker Compose Kubernetes. Don't have a cluster? Go to Notes below.
- Review Harness CD Community Edition overview and Harness key concepts to establish a general understanding of Harness.
The Docker Compose installer is described below, but Harness also supports a Helm installer.
Completely new to Continuous Delivery (CD)?
Simply put, CD is the automation of a software release process. In Harness, you model this process as a pipeline.
What do I need for a CD pipeline?
- An artifact to deploy: an artifact is the application or microservice you are deploying. It can be a Docker image, a zip file, etc.
- A deployment method: this is whatever specification or manifest is needed by the deployment platform you are using, such as a Kubernetes manifest.
- A place to deploy it: this is your target environment, such as a Kubernetes cluster.
Harness takes care of the rest.
Architecture summary
Harness CD Community Edition has two main components:
- Harness Manager: the Harness Manager is where your CD configurations are stored and your pipelines are managed.
- After you install Harness, you sign up in the Manager at
http://localhost/#/signup. - Pipelines are triggered manually in the Harness Manager or automatically in response to Git events, schedules, new artifacts, and so on.
- After you install Harness, you sign up in the Manager at
- Harness Delegate: the Harness Delegate is a software service you install in your environment that connects to the Harness Manager and performs tasks using your container orchestration platforms, artifact repositories, etc.
- You can install a Delegate inline when setting up connections to your resources or separately as needed. This guide will walk you through setting up a Harness Delegate inline.
Installation
Installation and deployment should take about 10 minutes.
The Docker Compose installer is described below, but Harness also supports a Helm installer.
Make sure your system meets the requirements above.
Ensure Docker Desktop is running and Docker Desktop Kubernetes is running with it.
-
Clone the Harness Git repo into your local directory:
git clone https://github.com/harness/harness-cd-community
The output will look something like this:
Cloning into 'harness-cd-community'...
remote: Enumerating objects: 793, done.
remote: Counting objects: 100% (793/793), done.
remote: Compressing objects: 100% (371/371), done.
remote: Total 793 (delta 497), reused 592 (delta 339), pack-reused 0
Receiving objects: 100% (793/793), 116.39 KiB | 2.42 MiB/s, done.
Resolving deltas: 100% (497/497), done.
-
Change directory to the harness folder:
cd harness-cd-community/docker-compose/harness -
Build and run Harness using Docker Compose:
docker-compose up -dDo not try to bring up containers one by one. Harness CD Community Edition is a distributed system with dependencies. The only way to bring it up is using
docker-compose up -d.The first download can take 3–12 mins (downloading images and starting all containers) depending on the speed of your Internet connection. You won't be able to sign up until all the required containers are up and running.The output will look something like this:
[+] Running 13/13⠿ Network harness_harness-network Created 0.1s⠿ Container harness_log-service_1 Started 2.9s
⠿ Container harness_redis_1 Started 2.7s
...
4. Run the following command to ensure all services are running:
docker-compose ps
All services should show `running (healthy)`. If any show `running (starting)`, wait a minute, and run `docker-compose ps` again until they are all `running (healthy)`.

5. Run the following command to start the Harness Manager (it will wait until all services are healthy):
docker-compose run --rm proxy wait-for-it.sh ng-manager:7090 -t 180
The output will look like this:
[+] Running 6/0
⠿ Container harness_platform-service_1 Running 0.0s
⠿ Container harness_pipeline-service_1 Running 0.0s
⠿ Container harness_manager_1 Running 0.0s
⠿ Container harness_delegate-proxy_1 Running 0.0s
⠿ Container harness_ng-manager_1 Running 0.0s
⠿ Container harness_ng-ui_1 Running 0.0s
wait-for-it.sh: waiting 180 seconds for ng-manager:7090
wait-for-it.sh: ng-manager:7090 is available after 0 seconds
Wait until you see that `ng-manager` is available:
wait-for-it.sh: ng-manager:7090 is available after 0 seconds
6. In your browser, go to the URL `http://localhost/#/signup`.
If you see a 403 error, that just means the Harness Manager service isn't up and running yet. Make sure you ran the wait-for-it.sh script earlier and wait a few minutes: `docker-compose run --rm proxy wait-for-it.sh ng-manager:7090 -t 180`.
7. Enter an email address and password and select **Sign up**.
You'll see the CD page:

You're now using Harness!
The next section walks you through setting up and running a simple CD Pipeline using a public manifest and Docker image.
## Create pipeline
We'll create a quick CD pipeline that deploys a public manifest and image to a local Kubernetes cluster. The following steps are similar to the [Kubernetes CD quickstart](/docs/continuous-delivery/deploy-srv-diff-platforms/kubernetes/kubernetes-cd-quickstart).
1. In Harness, select **Create Project**.
2. In **About the Project**, in **Name**, enter **Quickstart**, and then select **Save and Continue**.
3. In **Invite Collaborators**, select **Save and Continue**. Your new project appears. Let's add a CD pipeline.
4. In **Setup Pipeline**, enter the name **quickstart**, and then select **Start**. Your new pipeline is started.
Now let's jumpstart your pipeline setup by pasting in the YAML for a pipeline. Once it's pasted in, we'll update a few placeholders and then deploy.
Copy the following YAML:
```yaml
pipeline:
name: quickstart
identifier: quickstart
projectIdentifier: Quickstart
orgIdentifier: default
tags: {}
stages:
- stage:
name: demo
identifier: demo
description: ""
type: Deployment
spec:
serviceConfig:
serviceRef: <+input>
serviceDefinition:
type: Kubernetes
spec:
variables: []
manifests:
- manifest:
identifier: nginx
type: K8sManifest
spec:
store:
type: Github
spec:
connectorRef: <+input>
gitFetchType: Branch
paths:
- content/en/examples/application/nginx-app.yaml
repoName: <+input>
branch: main
skipResourceVersioning: false
infrastructure:
environmentRef: <+input>
infrastructureDefinition:
type: KubernetesDirect
spec:
connectorRef: <+input>
namespace: <+input>
releaseName: release-<+INFRA_KEY>
allowSimultaneousDeployments: false
execution:
steps:
- step:
type: K8sRollingDeploy
name: Rollout Deployment
identifier: Rollout_Deployment
spec:
skipDryRun: false
timeout: 10m
rollbackSteps: []
tags: {}
failureStrategies:
- onFailure:
errors:
- AllErrors
action:
type: StageRollback
- In Pipeline Studio, select YAML.

- Select Edit YAML.
- Replace the YAML contents with the YAML you copied above.
- Select Save.
- Select Visual. The new pipeline is created.
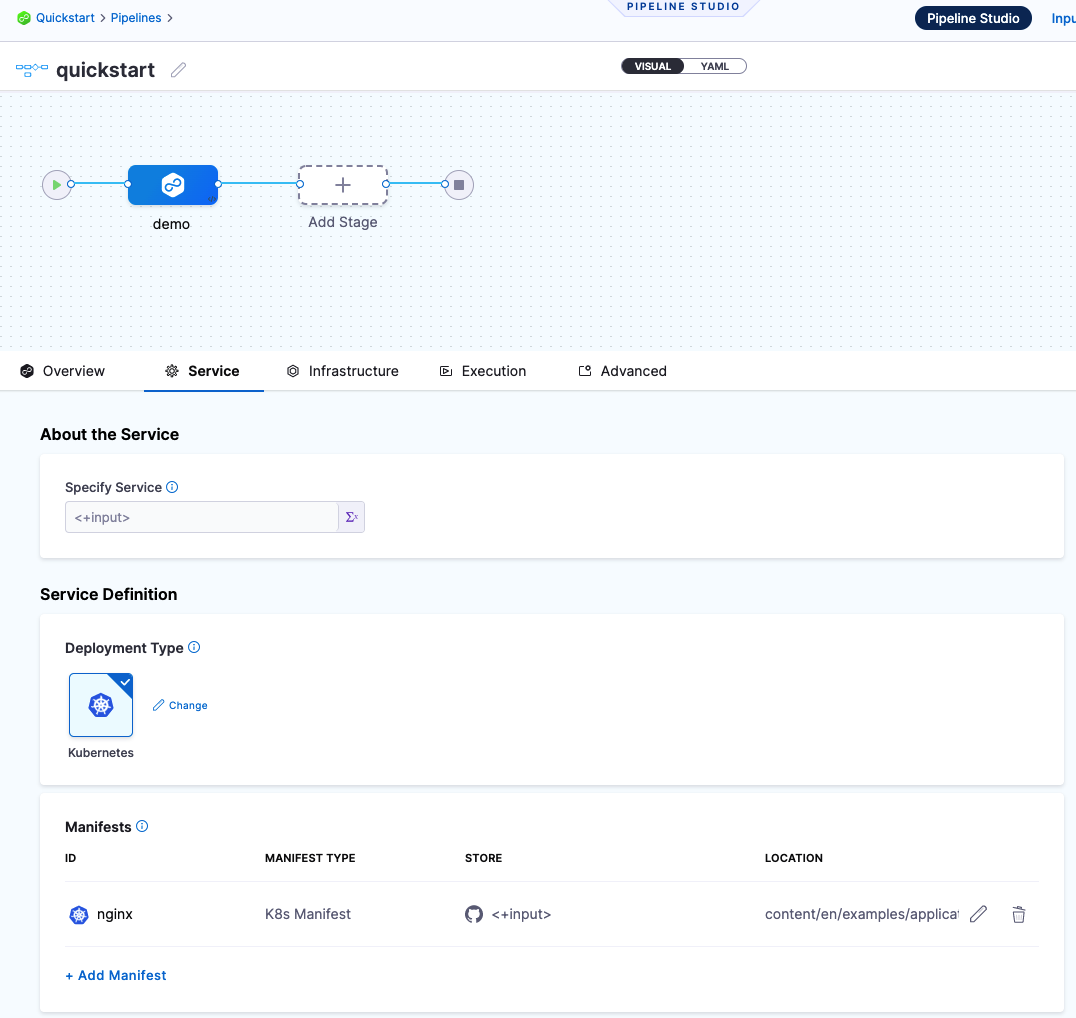
Let's quickly review some key pipeline concepts:
- Harness Delegate: the Harness Delegate is a software service you install in your environment that connects to the Harness Manager and performs tasks using your container orchestration platforms, artifact repositories, monitoring systems, etc.
- Pipelines: A CD pipeline is a series of stages where each stage deploys a service to an environment.
- Stages: A CD stage is a subset of a pipeline that contains the logic to perform one major segment of the deployment process.
- Services: A service represents your microservices and other workloads logically. A service is a logical entity to be deployed, monitored, or changed independently.
- Service Definition: Service definitions represent the real artifacts, manifests, and variables of a service. They are the actual files and variable values.
- Environments: Environments represent your deployment targets logically (QA, Prod, etc).
- Infrastructure Definition: Infrastructure definitions represent an environment's infrastructure physically. They are the actual target clusters, hosts, etc.
- Execution Steps: Execution steps perform the CD operations like applying a manifest, asking for approval, rollback, and so on. Harness automatically adds the steps you need for the deployment strategy you select. You can then add additional steps to perform many other operations.
- Connectors: Connectors contain the information necessary to integrate and work with 3rd party tools such as Git providers and artifact repos. Harness uses connectors at pipeline runtime to authenticate and perform operations with a 3rd party tool.
You'll notice a runtime input expression <+input> for most of the settings. These are placeholders we'll replace when we run the pipeline.
6. Select Run. The Run Pipeline settings appear.
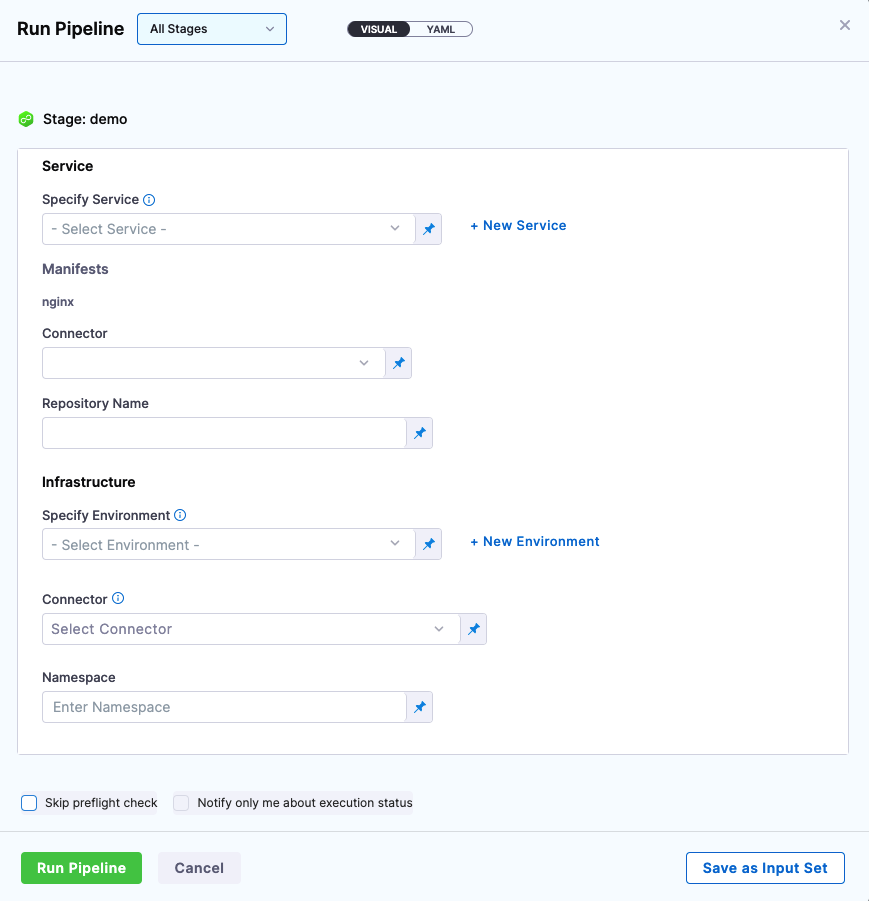
Now let's update the placeholders.
Specify Service
- Select New Service.
- In Name, enter nginx.
- Select Save.
Manifests
Here you'll add a connector to Github using your personal GitHub credentials.
Credentials are encrypted and stored locally in the MongoDB service installed as part of Harness CE
You'll also install a Harness Kubernetes Delegate in your local Kubernetes cluster.
This Delegate will perform all operations at runtime.
Connector
- Select the Connector dropdown menu.
- Select New Connector.
- In Name, enter GitHub, and then select Continue.
- In URL Type, select Repository.
- In Connection Type, select HTTP.
- In GitHub Repository URL, enter
https://github.com/kubernetes/website. - Select Continue.
- In Username, enter your GitHub account username.
- In Personal Access Token, select Create or Select a Secret.
- Select New Secret Text.
- In Secret Name, enter the name github-pat.
- In Secret Value, paste in a GitHub Personal Access Token (PAT). When you're logged into GitHub, these are typically listed at https://github.com/settings/tokens. For steps on setting up a GitHub PAT, see Creating a personal access token from GitHub. Ensure you PAT has the repo scope selected:
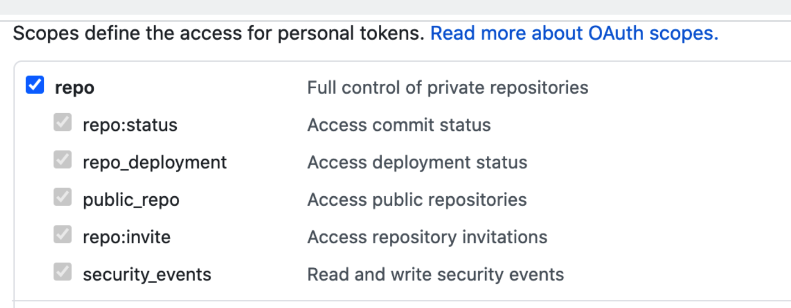
-
Select Save, and then select Continue.
-
In Connect to the provider, select Connect through a Harness Delegate, and then Continue.
-
In Delegates Setup, select Install a New Delegate.
-
Select Kubernetes, and then select Continue.
-
Enter a name quickstart for the Delegate, select the Laptop size, and then select Continue.
-
Select Download YAML file. The YAML file for the Kubernetes Delegate will download to your computer.
-
Open a terminal and navigate to where the Delegate file is located.If you're using a remote Kubernetes cluster, go to notes below.
On a terminal, run this command:
kubectl apply -f harness-delegate.yamlThis installs the Delegate into the default cluster that comes with Docker Desktop Kubernetes. It can take a few minutes for the Delegate pod to run.
-
Run
kubectl get pods -n harness-delegate-ngto verify that it is Ready: 1/1 and Status: Running. -
Back in Harness, select Continue.
-
Once the Delegate registers, select Done.
-
In Delegates Setup, select Connect only via Delegates which has all of the following tags, and then select the tag for your new Delegate (quickstart).
-
Select Save and Continue.
-
The Connection Test should prove successful. If not, review your credentials.
-
Select Finish.
Repository name
- Enter
https://github.com/kubernetes/website.
Infrastructure
Here you'll create a connection to the target cluster for this CD stage.
- Select New Environment.
- In Name, enter quickstart, select Non-Production, and select Save.
Connector
- Select the Connector dropdown menu, and then select New Connector.
- In Name, enter localK8s, and then select Continue.
- In Details, select Use the credentials of a specific Harness Delegate, and then select Continue.
- If you are running a local Delegate but using a target cluster that does not have a Delegate installed in it, select Specify master URL and credentials, and then go to Notes below.
- In Delegates Setup, select Connect only via Delegates which has all of the following tags, and then enter and select quickstart. The Delegate you added earlier is selected.
- Select Save and Continue.
- In Connection Test, select Finish.
Namespace
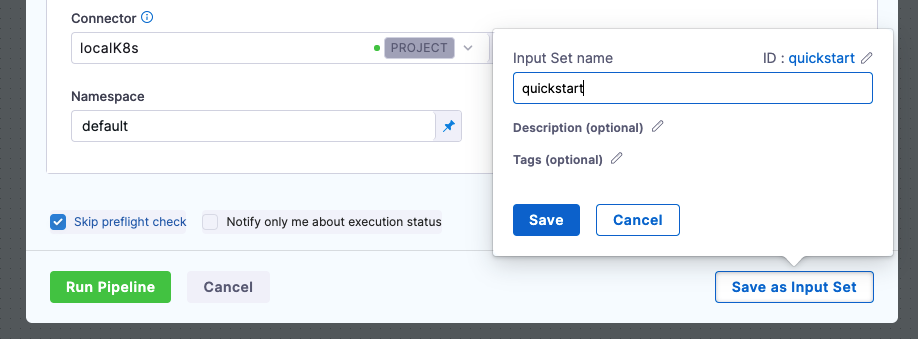
- Enter default. If you are using a different namespace, such as a namespace given to you by someone in your company, enter that namespace instead.
Now that the placeholders are configured, you can deploy the pipeline.
If you want to save these settings, you can select Save as Input Set. Then you can use them whenever you run this pipeline.
Deploy
-
In Run Pipeline, select Run Pipeline.
You can see the pipeline fetch the manifest and deploy the NGINX artifact to your local cluster.
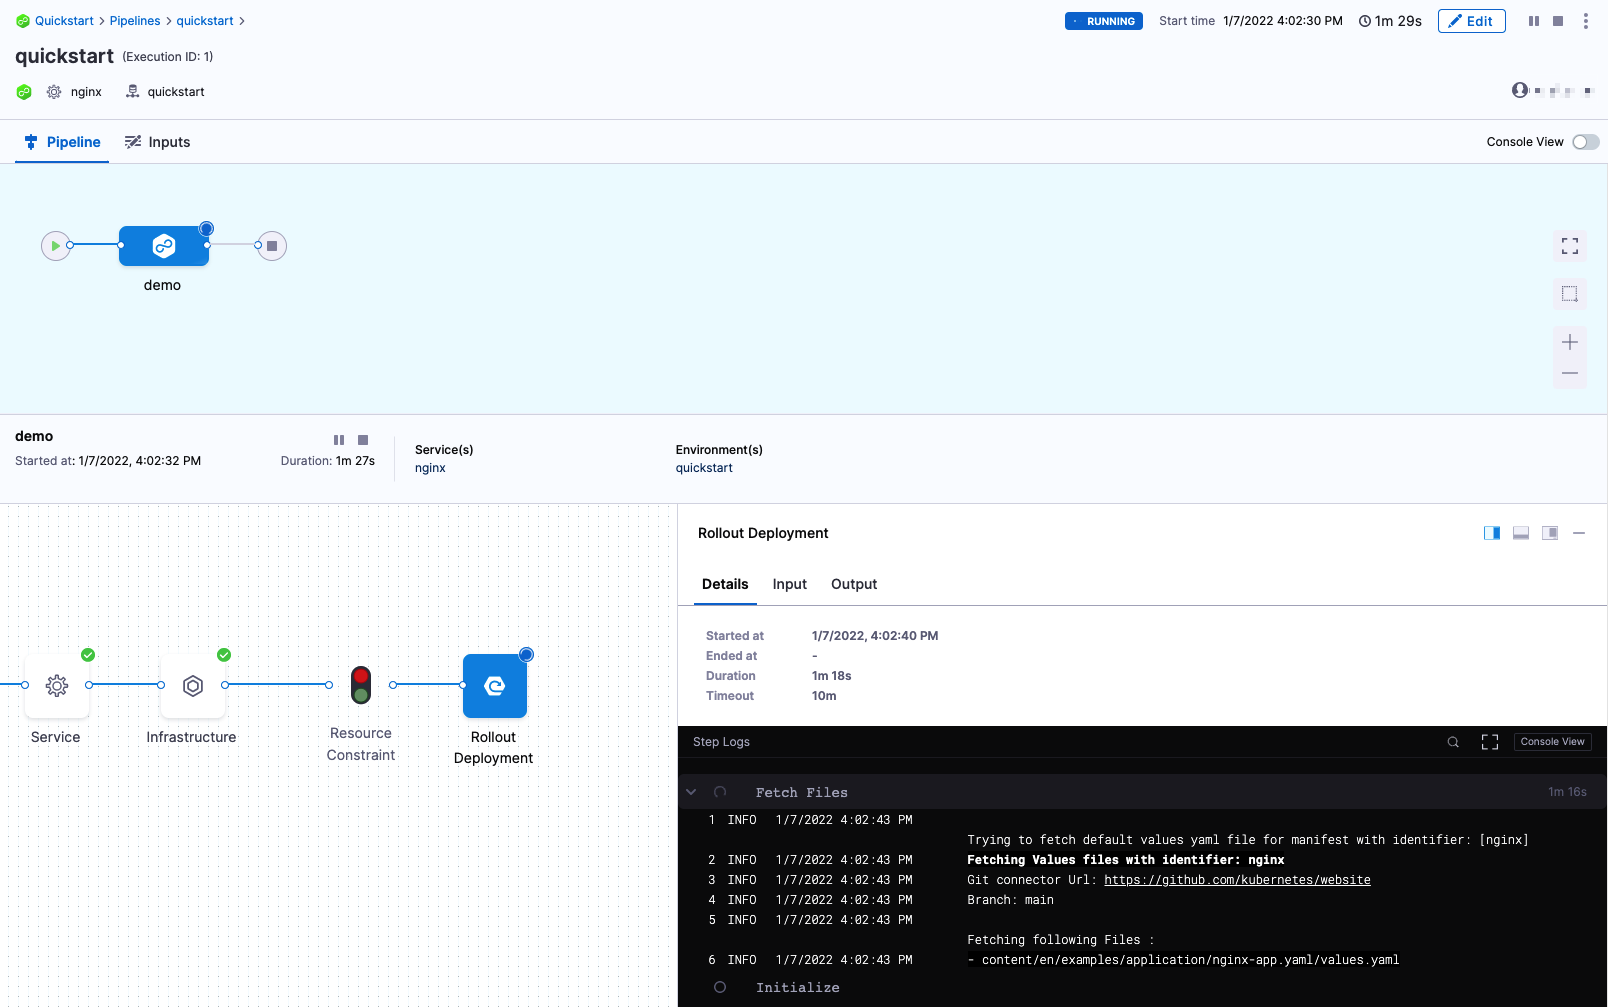
-
Select Console View to see more of the logs and watch the deployment in realtime.
-
In the Rollout Deployment step, in Wait for Steady State, you'll see that NGINX was deployed successfully:
Status : my-nginx deployment "my-nginx" successfully rolled out
Congratulations! You have a successful local deployment using Harness CD Community Edition!
Now you can use Harness to deploy remotely. Simply follow the same steps but use a remote target cluster.
Clean Up
To clean up your environment, do the following.
-
To delete the Delegate, run the following:
kubectl delete statefulset -n harness-delegate-ng quickstart -
To remove Harness CD Community Edition, run the following:
docker-compose down -v -
To remove the Harness images, use
docker rmito removes images by their ID.To remove the image, you first need to list all the images to get the Image IDs, Image name and other details. Run
docker images -aordocker images.Note the images you want to remove, and then run:
docker rmi <image-id> <image-id> ... -
To remove all images at once, run:
docker rmi $(docker images -q)
Community and Support
Use the Harness Community to ask questions, find answers, and give feedback.
Upgrade
We are updating builds on a daily basis to fix issues and add features. To upgrade your setup, do the following:
- Navigate to the harness-cd-community folder in your terminal.
- Run
git pullin a terminal in the harness-cd-community folder. - Run
docker-compose downin the harness-cd-community/docker-compose/harness folder. - Run
docker-compose up -din the harness-cd-community/docker-compose/harness folder.
You must manually pull the delegate image after the delegate is disconnected. This updates the version and allows you to restart.
Next Steps
In this tutorial, you learned how to:
- Install and run Harness CD Community Edition locally.
- Create and deploy CD pipeline in Harness CD Community Edition using a public Docker image and a local Kubernetes cluster.
Try some other tutorials to learn more about Harness CD:
- Kubernetes deployment tutorial
- Helm Chart deployment tutorial
- Kustomize deployment tutorial
- Write pipelines in YAML
Notes
The following notes will help you if your set up is different from the general steps in this quickstart.
Harness Docker Delegate and the M1 processor
This quickstart uses the Harness Kubernetes Delegate. If you decide to use the Harness Docker Delegate and your laptop uses an M1 processor, edit the Docker Delegate YAML cpus to use 1 before installation:
version: "3.7"
services:
  harness-ng-delegate:
    restart: unless-stopped
    deploy:
      resources:
        limits:
          cpus: "1"
          memory: 2048M
...
This is a temporary change. In the next release of Harness CD Community Edition, the Docker Delegate YAML will use cpus: "1" by default.
What if I don't have my own Kubernetes cluster?
You have a few Kubernetes cluster options.
Docker Compose Kubernetes
When Docker Compose Kubernetes is installed it comes with a cluster and the default namespace. You don't need to make any changes to Docker Compose Kubernetes. This is recommended.
Free-tier account Kubernetes cluster on AWS, GCP, Azure
The popular cloud providers offer free-tier accounts that include their Kubernetes services. You can create a cluster in these accounts.
Use one of your company's Kubernetes clusters
If your company uses Kubernetes, they likely have dev or QA accounts on a cloud platform. If you have access to those environments, you can add a cluster there.
If you don't have access, you can request access to a namespace in an existing cluster. Just ask for access to a namespace and a service account with permission to create entities in the target namespace.
The YAML provided for the Harness Delegate defaults to the cluster-admin role because that ensures anything could be applied. If you can't use cluster-admin because you are using a cluster in your company, you'll need to edit the Delegate YAML.
The set of permissions should include list, get, create, watch (to fetch the pod events), and delete permissions for each of the entity types Harness uses.
If you don’t want to use resources: [“*”] for the Role, you can list out the resources you want to grant. Harness needs configMap, secret, event, deployment, and pod at a minimum for deployments, as stated above.
What if I have a local cluster for the Delegate but want to deploy to a remote cluster?
If you can't use a local or remote cluster for both the Harness Delegate and the deployment, you'll be fine.
Install the Delegate locally and then when you set up the Harness Kubernetes Cluster Connector, select Specify master URL and credentials and use the target cluster master URL and a Kubernetes service account token from the target cluster to connect.
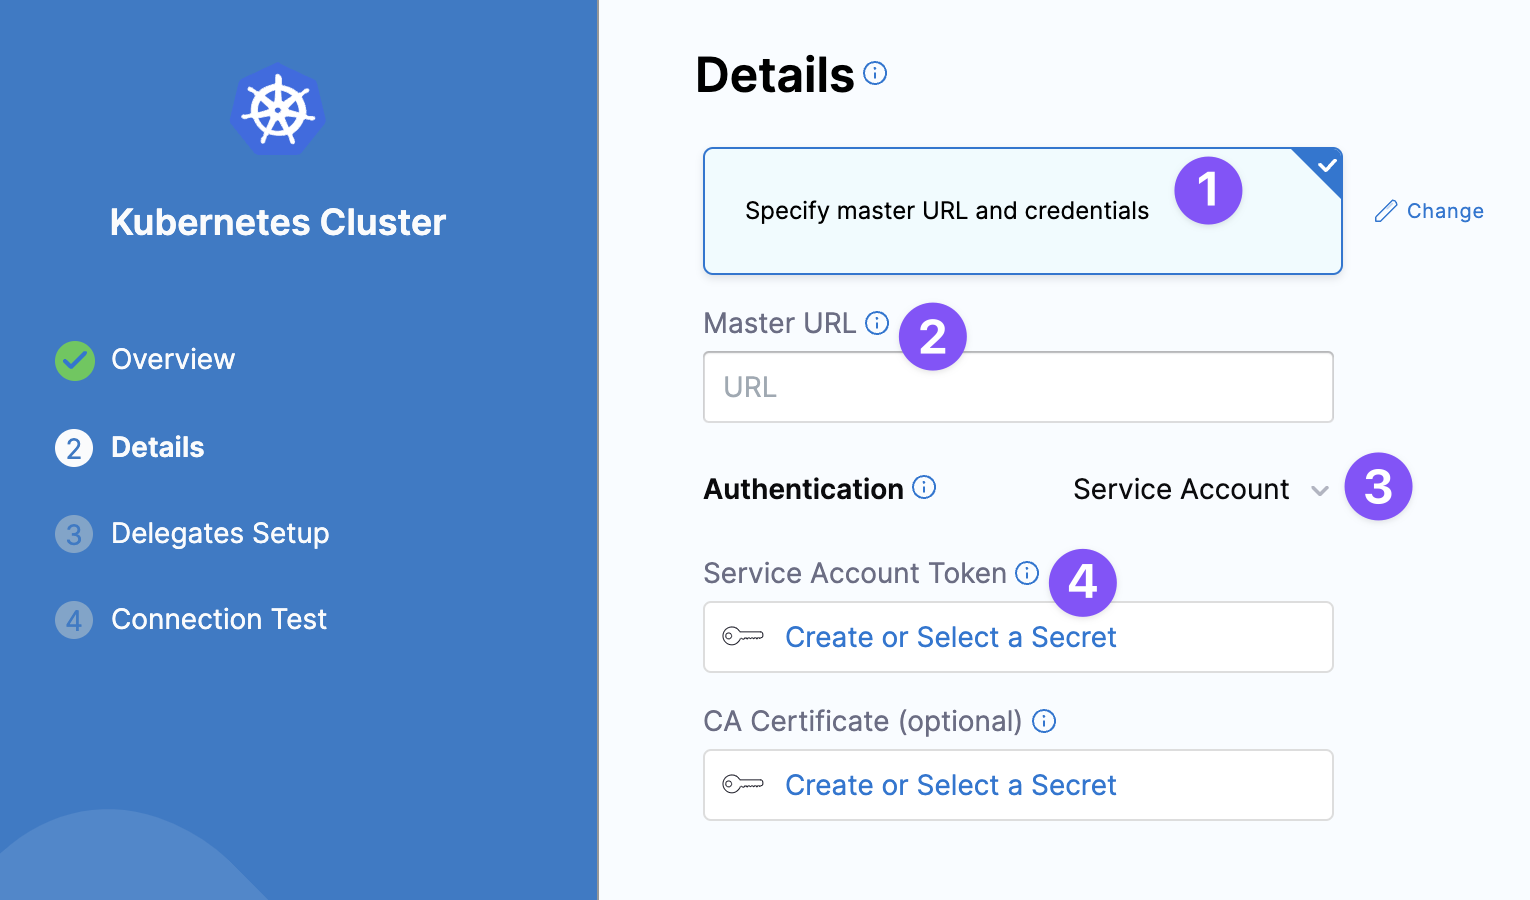
You can get the master URL by connecting to the cluster and running kubectl cluster-info.
To use a Kubernetes Service Account (SA) and token, you will need to either use an existing SA that has the cluster-admin permission (or namespace-level admin permissions) or create a new SA and grant it the cluster-admin permission (or namespace-level admin permissions).
For example, here's a manifest that creates a new SA named harness-service-account in the harness namespace.
# harness-service-account.yml
apiVersion: v1
kind: ServiceAccount
metadata:
  name: harness-service-account
  namespace: harness
Next, you apply the SA.
kubectl apply -f harness-service-account.yml
Next, grant the SA the cluster-admin permission.
# harness-clusterrolebinding.yml
apiVersion: rbac.authorization.k8s.io/v1beta1
kind: ClusterRoleBinding
metadata:
  name: harness-admin
roleRef:
  apiGroup: rbac.authorization.k8s.io
  kind: ClusterRole
  name: cluster-admin
subjects:
- kind: ServiceAccount
  name: harness-service-account
  namespace: harness
Next, apply the ClusterRoleBinding.
kubectl apply -f harness-clusterrolebinding.yml
Once you have the SA added, you can gets its token using the following commands.
SERVICE_ACCOUNT_NAME={SA name}

NAMESPACE={target namespace}

SECRET_NAME=$(kubectl get sa "${SERVICE_ACCOUNT_NAME}" --namespace "${NAMESPACE}" -o=jsonpath='{.secrets[].name}')

TOKEN=$(kubectl get secret "${SECRET_NAME}" --namespace "${NAMESPACE}" -o=jsonpath='{.data.token}' | base64 -d)

echo $TOKEN
The | base64 -d piping decodes the token. You can now enter it into the Harness Kubernetes Cluster Connector Service Account Token using a Harness secret.
How do I connect to a remote Kubernetes cluster?
If you are using a remote Kubernetes cluster, you must log into it before you can install the Harness Kubernetes Delegate and deploy to that cluster.
How you connect to the remote cluster depends on the provider. Typically, you will need to install the provider's CLI locally and then use the CLI to connect to the cluster and run the kubectl command to install the Harness Delegate. See the following:
Azure AKS
See the Azure doc Quickstart: Deploy an Azure Kubernetes Service cluster using the Azure CLI for a good overview.
The commands will look something like this.
Install the Azure CLI:
az aks install-cli
Set the Azure subscription to use:
az account set --subscription [subscription-id]
Connect to the cluster:
az aks get-credentials --resource-group [resource-group-name] --name [cluster-name]
Test the connection:
kubectl get nodes
Next, you simply run the command to install the Delegate:
kubectl apply -f harness-delegate.yaml
AWS EKS
See the AWS doc Connecting a cluster for a good overview.
Once you're connected, you simply run the command to install the Delegate:
kubectl apply -f harness-delegate.yaml
GCP GKE
See the GCP doc Install kubectl and configure cluster access for a good overview.
Basically, you just need to install the gcloud CLI as described in Installing the gcloud CLI from GCP.
Once gcloud is installed you can connect to the remote cluster.
The command will look something like this.
gcloud container clusters get-credentials [cluster-name] --zone [zone-name] --project [project-name]
Once you're connected, you simply run the command to install the Delegate:
kubectl apply -f harness-delegate.yaml