Deploy Helm charts
This topic describes how to deploy Helm charts in standard Helm syntax in YAML from a remote Git repo, HTTP Helm Repository, or cloud storage service (Google Cloud Storage, AWS S3).
This process is also covered in the Helm Chart deployment tutorial.
Before you begin
- Helm CD Quickstart
- The Chart Template Developer's Guide from Helm.
- The Helm charts repo on GitHub has many useful examples.
Important notes
-
Harness supports AWS cross-account access for S3-based Helm chart stores when the AWS connector is configured with IRSA and cross-account access (STS Role). The delegate obtains temporary credentials via IRSA, then assumes the cross-account role via STS. These credentials are passed through to ChartMuseum when fetching Helm charts from S3. Ensure the cross-account IAM role has the necessary S3 permissions (
s3:GetObject,s3:ListBucket) for the Helm chart bucket. -
Helm 2 was deprecated by the Helm community in November 2020 and is no longer supported by Helm. If you continue to maintain the Helm 2 binary on your delegate, it might introduce high and critical vulnerabilities and put your infrastructure at risk.
To safeguard your operations and protect against potential security vulnerabilities, Harness will launch an update to deprecate the Helm 2 binary from delegates with an immutable image type (image tag
yy.mm.xxxxx) on July 30, 2023. For information on delegate types, go to Delegate image types.If your delegate is set to auto-upgrade, Harness will automatically remove the binary from your delegate. This will result in pipeline and workflow failures for services deployed via Helm 2.
noteIf your development team still uses Helm 2, you can reintroduce the binary on the delegate. Harness is not responsible for any vulnerabilities or risks that might result from reintroducing the Helm 2 binary.
For more information about updating your delegates to reintroduce Helm 2, go to:
Contact Harness Support if you have any questions.
-
The release name for the Helm deployment shouldn't exceed length 53. For more information, go to Helm documentation.
Supported platforms and technologies
See Supported Platforms and Technologies.
Commands used by Harness to perform a Helm Chart Deployment managed by Harness
When using the Harness-managed Helm Chart Deployment approach, Harness uses a mix of helm and kubectl commands to perform the deployment.
- The command we run to perform Fetch Files, depends on the store type Git or Helm Repo.
For Git:
git clone {{YOUR GIT REPO}}
For Helm Repo:
helm pull {{YOUR HELM REPO}}
- Based on your values.yaml and Harness configured variables, Harness will then render those values via
helm template. We will consolidate all the rendered manifest into amanifest.yaml.
helm template release-75d461a29efd32e5d22b01dc0f93aa5275e2f003 /opt/harness-delegate/repository/helm/source/c1475174-18d6-38e6-8c67-1000f3b71297/helm-test-chart --namespace default -f ./repository/helm/overrides/6a7628964506885eb37908b81914a04c.yaml
- Harness will perform a dry run by default to show what is about to be applied
kubectl --kubeconfig=config apply --filename=manifests-dry-run.yaml --dry-run=client
- Harness will then run the
kubectl applycommand to apply the manifest files to the Kubernetes clusters.
kubectl --kubeconfig=config apply --filename=manifests.yaml
- Harness will then query the deployed resources to show a summary of what was deployed.
kubectl --kubeconfig=config describe --filename=manifests.yaml
- In the event of failure Harness will rollback, we perform a
kubectl rollout undo.
kubectl --kubeconfig=config rollout undo Deployment/test-deploy --namespace=default --to-revision=1
ChartMuseum binaries
Many Helm chart users use ChartMuseum as their Helm chart repository server.
- ChartMuseum binary v0.8.2: the default ChartMuseum binary used by Harness is v0.8.2.
- ChartMuseum binary v0.12.0: to use ChartMuseum binary v0.12.0 you must enable the feature flag
USE_LATEST_CHARTMUSEUM_VERSION. Contact Harness Support to enable the feature.
Helm OCI Chart Registry Support
To use a Helm OCI chart registry, do the following.
- In Specify Helm Chart Store, select OCI Helm.
- In Select Connection Type, select Direct Connection or Cloud Provider.
- Provide the connection information for the connectio type, described below.
Direct Connection
The Direct Connection option uses the Harness OCI Helm Registry connector which requires following authentication settings:
- OCI URL
- Username (For Auth with Creds)
- Password (For Auth with Creds)
Harness supports the following Helm OCI chart registries in Direct Connection:
- Amazon ECR
- Azure Container Registry
- DockerHub
- JFrog Artifactory
- Google Artifact Registry
Cloud Provider
Harness supports ECR only via the Cloud Provider option.
Cloud Provider is specifically designed for AWS ECR to help you overcome the limitation of having to regenerate the ECR registry authentication token every 12 hours. This option uses an AWS connector. The credentials for this connector generate the authentication token used to access the ECR registry.
The Cloud Provider option does not depend on OCI, but uses the official ECR APIs to fetch the chart and chart version. The OCI URL is not required.
Harness supports all the AWS authentication types to fetch the Helm chart from ECR.
For steps on configuring the AWS connector, go to Add an AWS connector. For the required AWS policies, go to AWS connector settings reference.
Manifest details for ECR
After you select the Cloud Provider option, you can configure the manifest details for fetching the chart from ECR:
- In Manifest Identifier, enter a unique identify for the manifest.
- In Base Path, enter the path to the chart folder. The default is
/. - In Chart Name, enter the ECR repository name.
- In Region, enter the AWS region of the ECR repository.
- In Registry Id, enter the AWS account Id.
- In Chart Version, enter the version number. This option only works when Chart Name and Region are configured.
Important notes
- Helm OCI chart support includes the following deployment types:
- Native Helm
- Helm charts with Kubernetes deployments.
- Harness OCI chart registry support details:
- You can use the Harness Helm OCI connector to authenticate Harness with any OCI compliant repository.
- Harness can fetch the list of chart versions for a respective Helm chart. These versions can be passed at runtime as a parameter into the service.
- You can define expressions for the Chart Name and Base Path settings, and, at runtime, Harness will resolve those expressions and let you pick a version.
- You cannot trigger pipelines using the On New Manifest trigger if your service uses the OCI Helm connector.
Visual summary
Here's a quick video showing you how to add different types of manifests. It also describes how to add Helm charts and multiple values YAML files in the same repo as the chart, or in separate repos.
Artifacts and Helm charts
Harness supports image artifacts with Helm charts in the following ways.
Helm chart with hardcoded artifact
The image artifact is identified in the Helm chart values.yaml file. For example:
---
containers:
  - name: nginx
    image: docker.io/bitnami/nginx:1.21.1-debian-10-r0
If the image is hardcoded then you do not use the Artifacts section of the service. Any artifacts added here are ignored.
Helm chart using artifact added to the stage
You add an image artifact to the Artifacts section of the service and then reference it in the Helm chart values.yaml file.
Artifacts in the Artifacts section are referenced using the <+artifact.image> expression. For example:
---
image: <+artifact.image>
pullPolicy: IfNotPresent
dockercfg: <+artifact.imagePullSecret>
This is the same method when using artifacts with standard Kubernetes deployments. See Add Container Images as Artifacts for Kubernetes Deployments.
Add the Helm chart
Adding a Helm chart is a simple process of connecting Harness to the Git or HTTP Helm repo where your chart is located.
-
In your CD stage, click Service.
-
In Service Definition, select Kubernetes.
-
In Manifests, click Add Manifest.
-
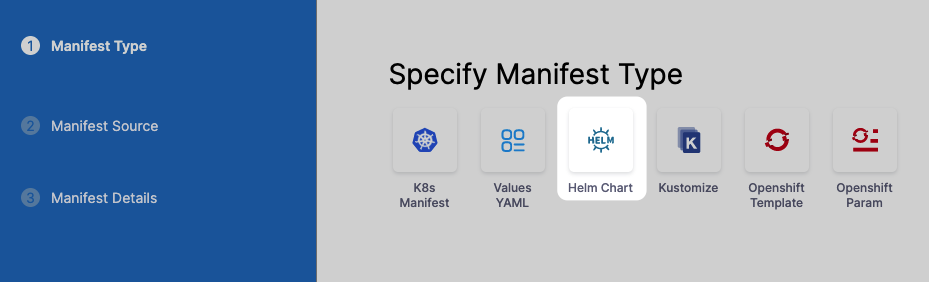
In Specify Manifest Type, select Helm Chart, and click Continue.
-
In Specify Helm Chart Store, select the type of repo or or cloud storage service (Google Cloud Storage, AWS S3) you're using.
For the steps and settings of each option, see the Connect to an Artifact Repo How-tos.
If you are using Google Cloud Storage or Amazon S3, see Cloud Platform Connectors.
You can also use a local Helm chart if you are deploying the same Helm chart and version to many clusters/namespaces in parallel. For information, see Use a local Helm Chart. For all of the Helm Chart Store types (Git, GitHub, HTTP Helm, OCI, etc), you will need to provide the following Helm info:
-
Manifest Identifier: Enter a name that identifies this Helm chart. It doesn't have to be the chart name. It can be the name of the service you are deploying or another name. Ex:
helm_chart. -
Chart name: Enter the name of the Helm chart for Harness to pull. Don't include the chart version. You will add that in the Chart Version setting. Ex:
todolist. -
Chart Version: Enter the version of the chart you want to deploy. This is found in the Chart.yaml
versionlabel in your chart. You can list all available versions of a chart using thesearch repocommand with the--versionsoption. See helm search repo from Helm.- If you leave Chart Version empty Harness gets the latest chart.
- If you are going to use a Harness trigger to run this pipeline when a new version is added to your chart repo, select the Runtime Input option. When you set up the trigger, you will select this chart and Harness will listen on the repo for new versions. See Trigger Pipelines on New Helm Chart. For example,
1.4.1.
-
Helm Version: Select the version of Helm used in your chart. See Helm Version Support Policy from Helm. For example,
Version 2. -
Values YAML: Your chart will have a default values.yaml file in its root folder.
-
If you do not enter a values.yaml in Values YAML, Harness uses the default values.yaml file in the root of the chart.
-
If you want to use a different values.yaml file, enter the path to that file.
-
For example, let's imagine a Helm Chart with the following Values YAML files:
- dev-values.yaml
- qa-values.yaml
- prod-values.yaml
- sample-chart/test-values.yaml
You can specify the values YAML file based using a path to the file within the retrieved Helm chart.
If you have additional values YAML files in the chart, and you want to use those to override some settings of the default values.yaml file for this deployment, you can enter the addition values YAML file(s) in Values YAML.
For each additional values YAML file, specify its location within this chart. Enter the location from the root of the chart to the values.yaml file.
If a values YAML file is located in a folder, enter the path from the root of the chart to the folder and values.yaml.
The values YAML file(s) must be in this chart. You cannot enter a location to a values YAML file in a chart located somewhere else.If you use multiple files in Values YAML, priority is given from the last file to the first file.
For example, let's say you have 3 files: the default values.yaml, values2.yaml added next, and values3.yaml added last.
![]./static/deploy-helm-charts-05.png)
All files contain the same key:value pair.
The values3.yaml key:value pair overrides the key:value pair of values2.yaml and values.yaml files.
You can also select Expression and use Harness expressions in this setting. The resolved expression must be the name of a Values YAML file in the chart. For example, you could create a stage variable for values4.yaml named qa and then reference it in Values YAML like this:
<+stage.variables.qa>. -
Manifest Optional Values
You can now proceed with your Helm chart deployment without configuring a values.yaml file in the manifest configuration of a Helm service.
To enable this option, go to the Service Configuration. Under the Manifests section, click Add Manifest or edit the existing Helm chart.
Enable the Optional checkbox in the Manifest Details tab, below to the Values.yaml field.
When this option is enabled, the Values YAML is no longer required. If the file is missing from the specified path, the deployment will still proceed without it.

Sample YAML
Here is a sample of how the manifest would look when this checkbox is enabled. The optionalValuesYaml will be set to true.
      manifests:
        - manifest:
            identifier: test
            type: K8sManifest
            spec:
              store:
                type: Github
                spec:
                  connectorRef: account.gitconnector
                  gitFetchType: Branch
                  paths:
                    - path_to_manifest
                  repoName: test
                  branch: test
              skipResourceVersioning: false
              enableDeclarativeRollback: false
              optionalValuesYaml: true
- Skip Resource Versioning: By default, Harness versions ConfigMaps and secrets deployed into Kubernetes clusters. In some cases, such as when using public manifests or Helm charts, you cannot add the annotation. When you enable Skip Resource Versioning, Harness will not perform versioning of ConfigMaps and secrets for the resource. If you have enabled Skip Resource Versioning for a few deployments and then disable it, Harness will start versioning ConfigMaps and secrets.
- Helm Command Flags: You can use Helm command flags to extend the Helm commands that Harness runs when deploying your Helm chart. Harness will run Helm-specific Helm commands and their flags as part of preprocessing. All the commands you select are run before
helm install/upgrade. - Command Type: Select the Helm command type you want to use. For example:
- Flag: Add any options for the command. Ex:
--verify.
Here's an example:

If you haven't set up a Harness Delegate, you can add one as part of the connector setup. This process is described in Helm CD Quickstart and Install a Kubernetes Delegate.
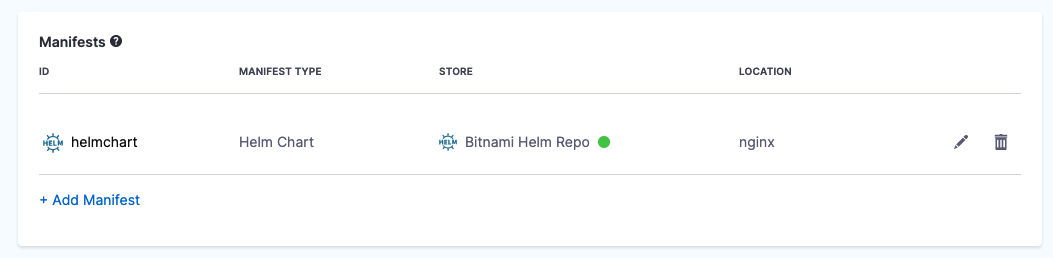
Once your Helm chart is added, it appears in the Manifests section. For example:
Using subcharts
Helm charts can have dependencies called subcharts. You can define subcharts in your service YAML. Helm downloads these dependencies from exisiting or seperate repositories. Harness fetches the defined subcharts during pipeline execution.
Important notes
- Helm subcharts are supported for the following deployment types only.
- Kubernetes deployments using canary, blue/green, and rolling deployment strategies
- Native Helm deployments using basic strategy
- Harness Continuous Delivery (CD) captures the parent chart as the deployed instance. Harness Continuous Verification (CV) detects and verifies the parent chart as the deployed instance. CV cannot simultaneously verify all subcharts as deployed instances.
Service configuration
To configure Helm subcharts, you must define the subchart name and path in your service YAML.
To resolve dependencies, you must configure the Helm command Template with the flag, --dependency-update. This allows Harness to fetch your dependencies defined in Chart.yaml.
Helm charts store their dependencies in the charts/ folder. Make sure that all subcharts are located within the charts/ folder inside your parent chart. Look at the sample Harness respository for structural guidance.
Here is a sample directory:
charts/
	- subchart1/
		 - templates/
			 - app.yaml
		 - Chart.yaml
		 - values.yaml
Here is a sample service YAML where a subchart is defined.
service:
  name: K8sHelmSubChart
  identifier: K8sHelmSubChart
  serviceDefinition:
    type: Kubernetes
    spec:
      manifests:
        - manifest:
            identifier: m1
            type: HelmChart
            spec:
              store:
                type: Github
                spec:
                  connectorRef: gitHubAchyuth
                  gitFetchType: Branch
                  folderPath: parent-chart
                  branch: main
              subChartPath: first-child
              skipResourceVersioning: false
              enableDeclarativeRollback: false
              helmVersion: V3
              commandFlags:
                - commandType: Template
                  flag: "--dependency-update"
  gitOpsEnabled: false
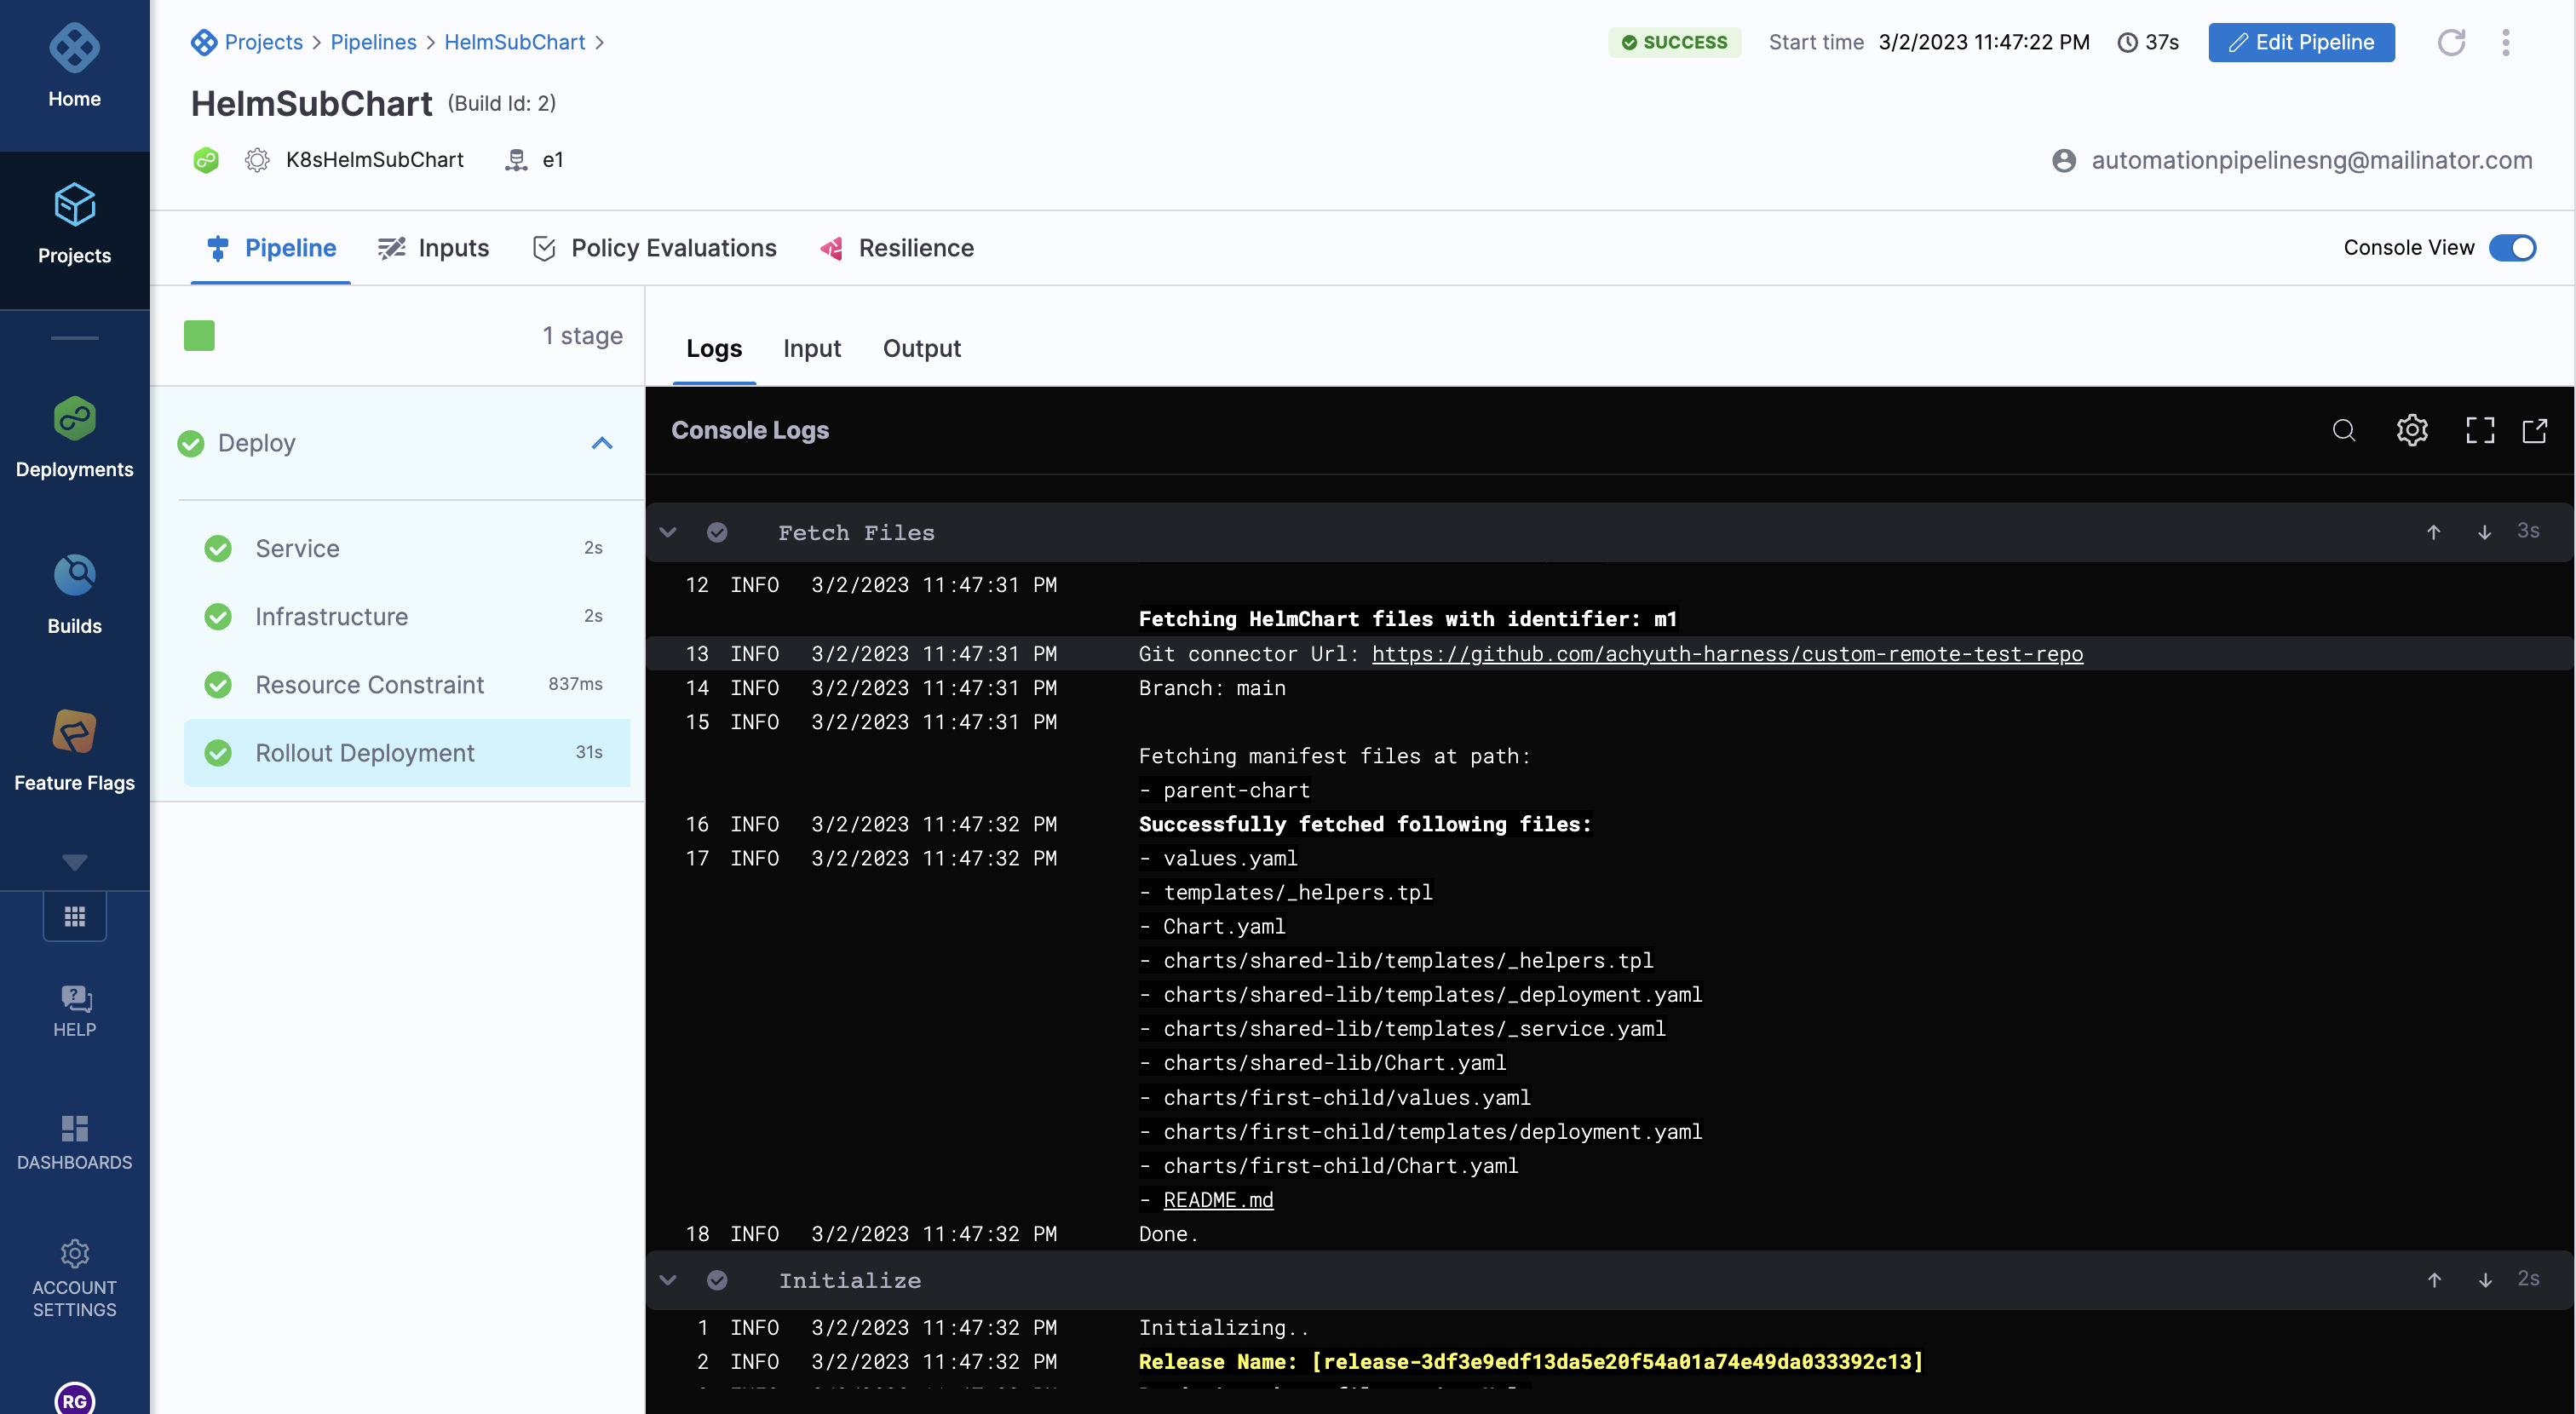
Pipeline execution of a Helm chart with subcharts
During pipeline execution, Harness fetches the subcharts and dependencies for the deployment based on the values in the service YAML.
You can see the subchart and the list of files fetched in the fetch section of the pipeline execution log.
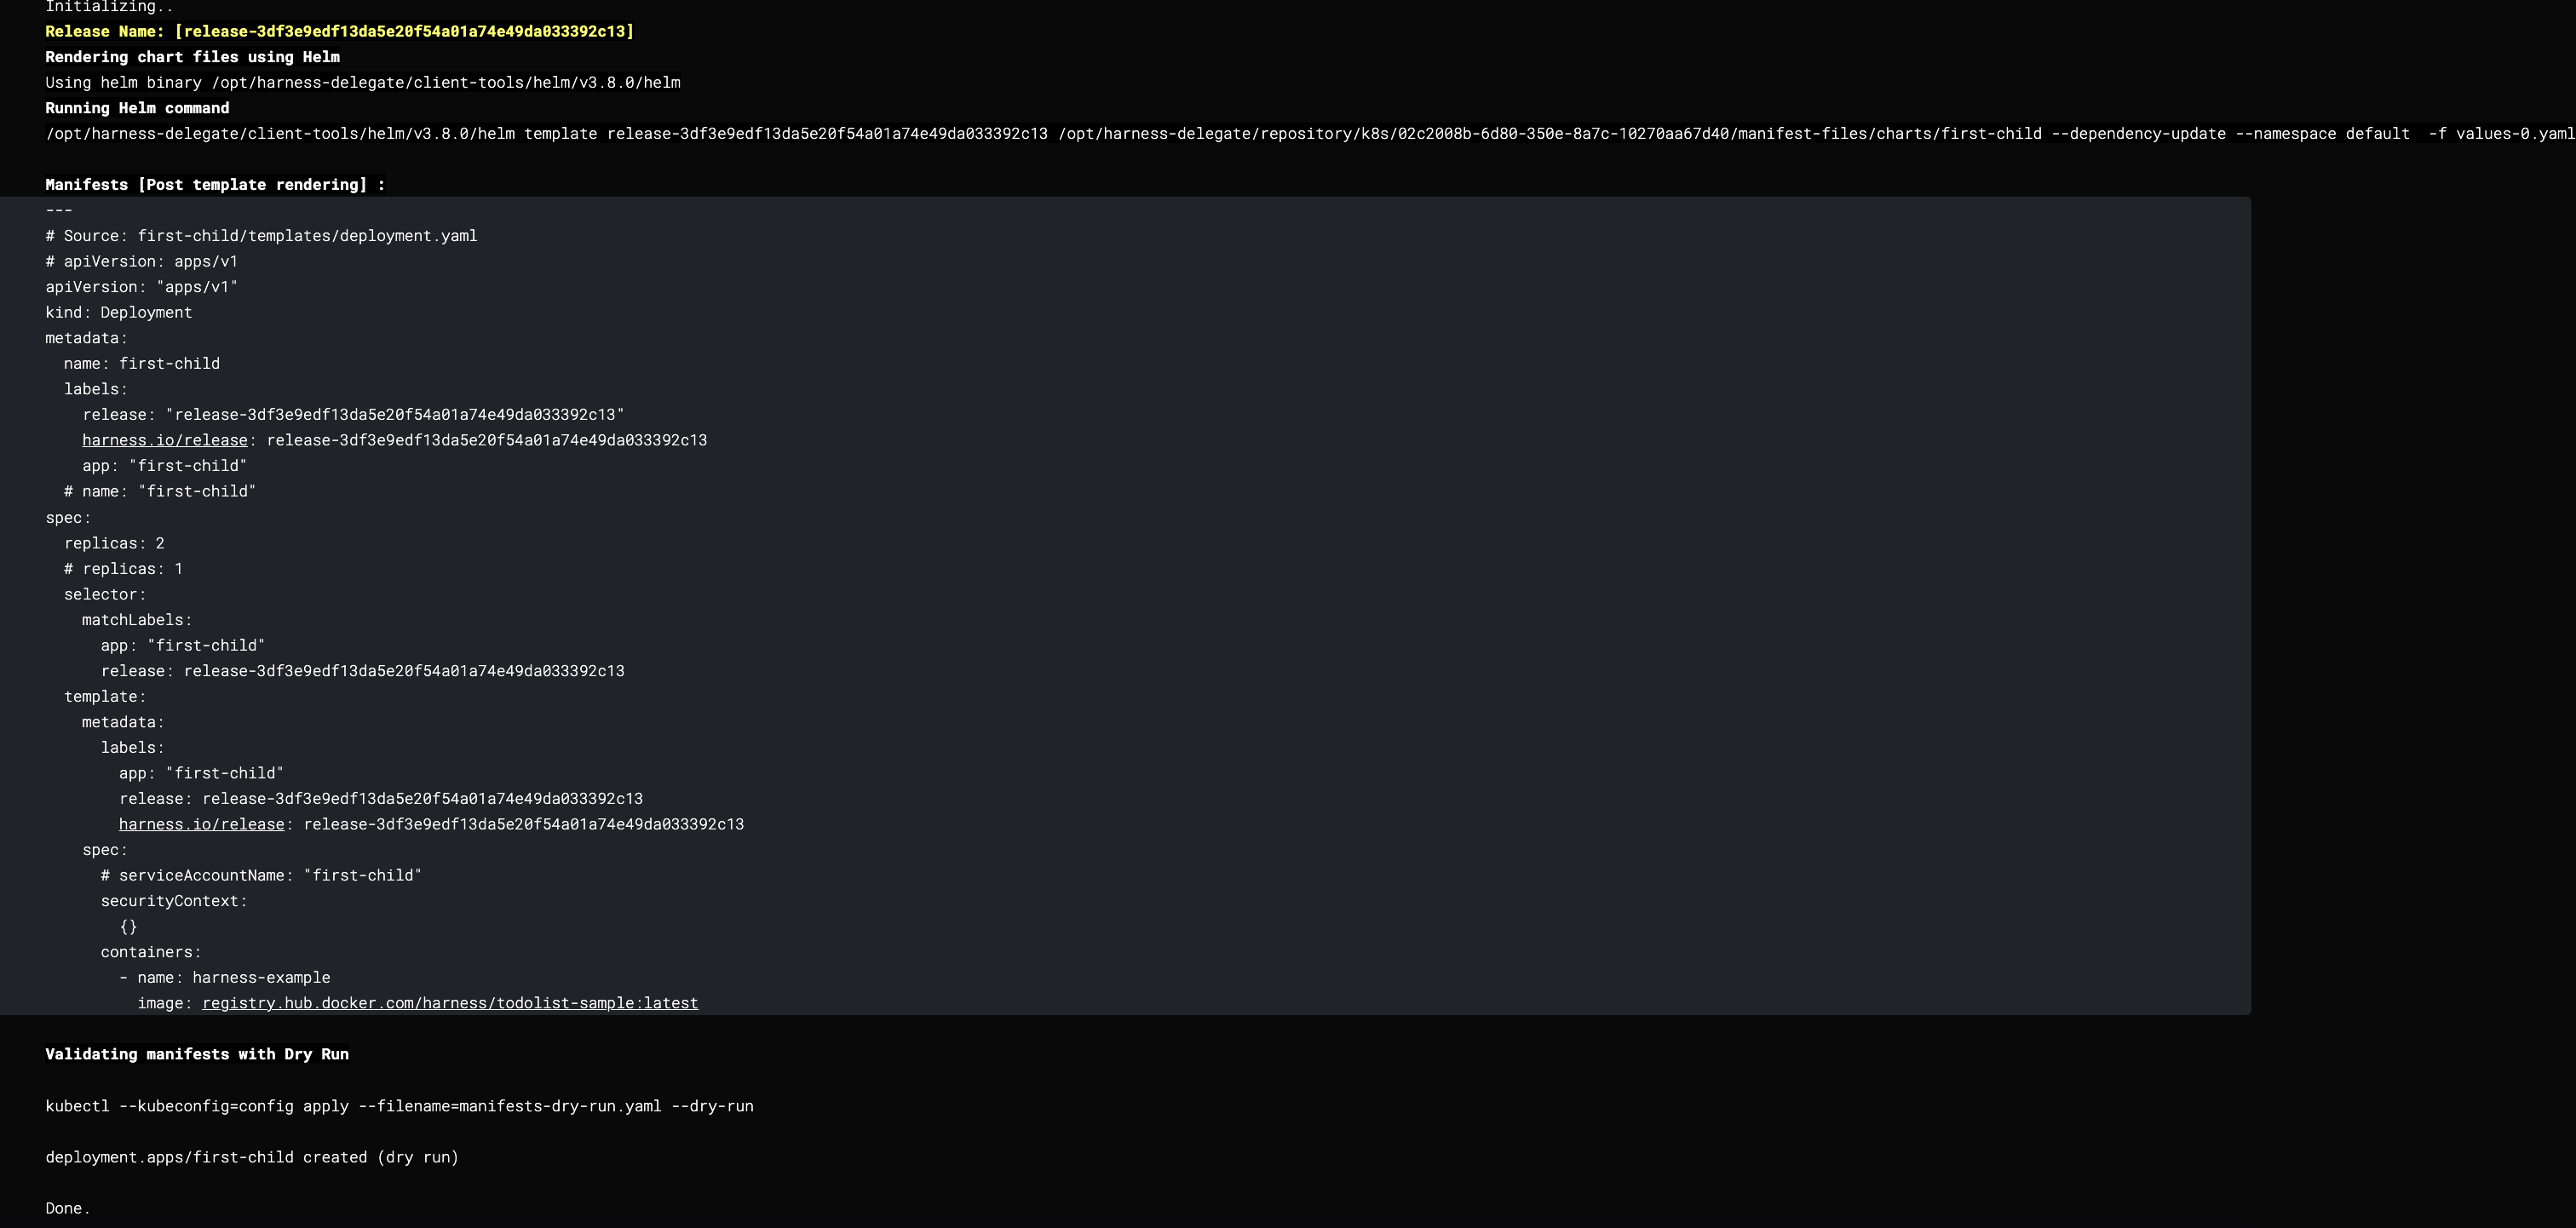
You can see the template command with the --dependency-update flag running in the prepare section of the pipeline execution.
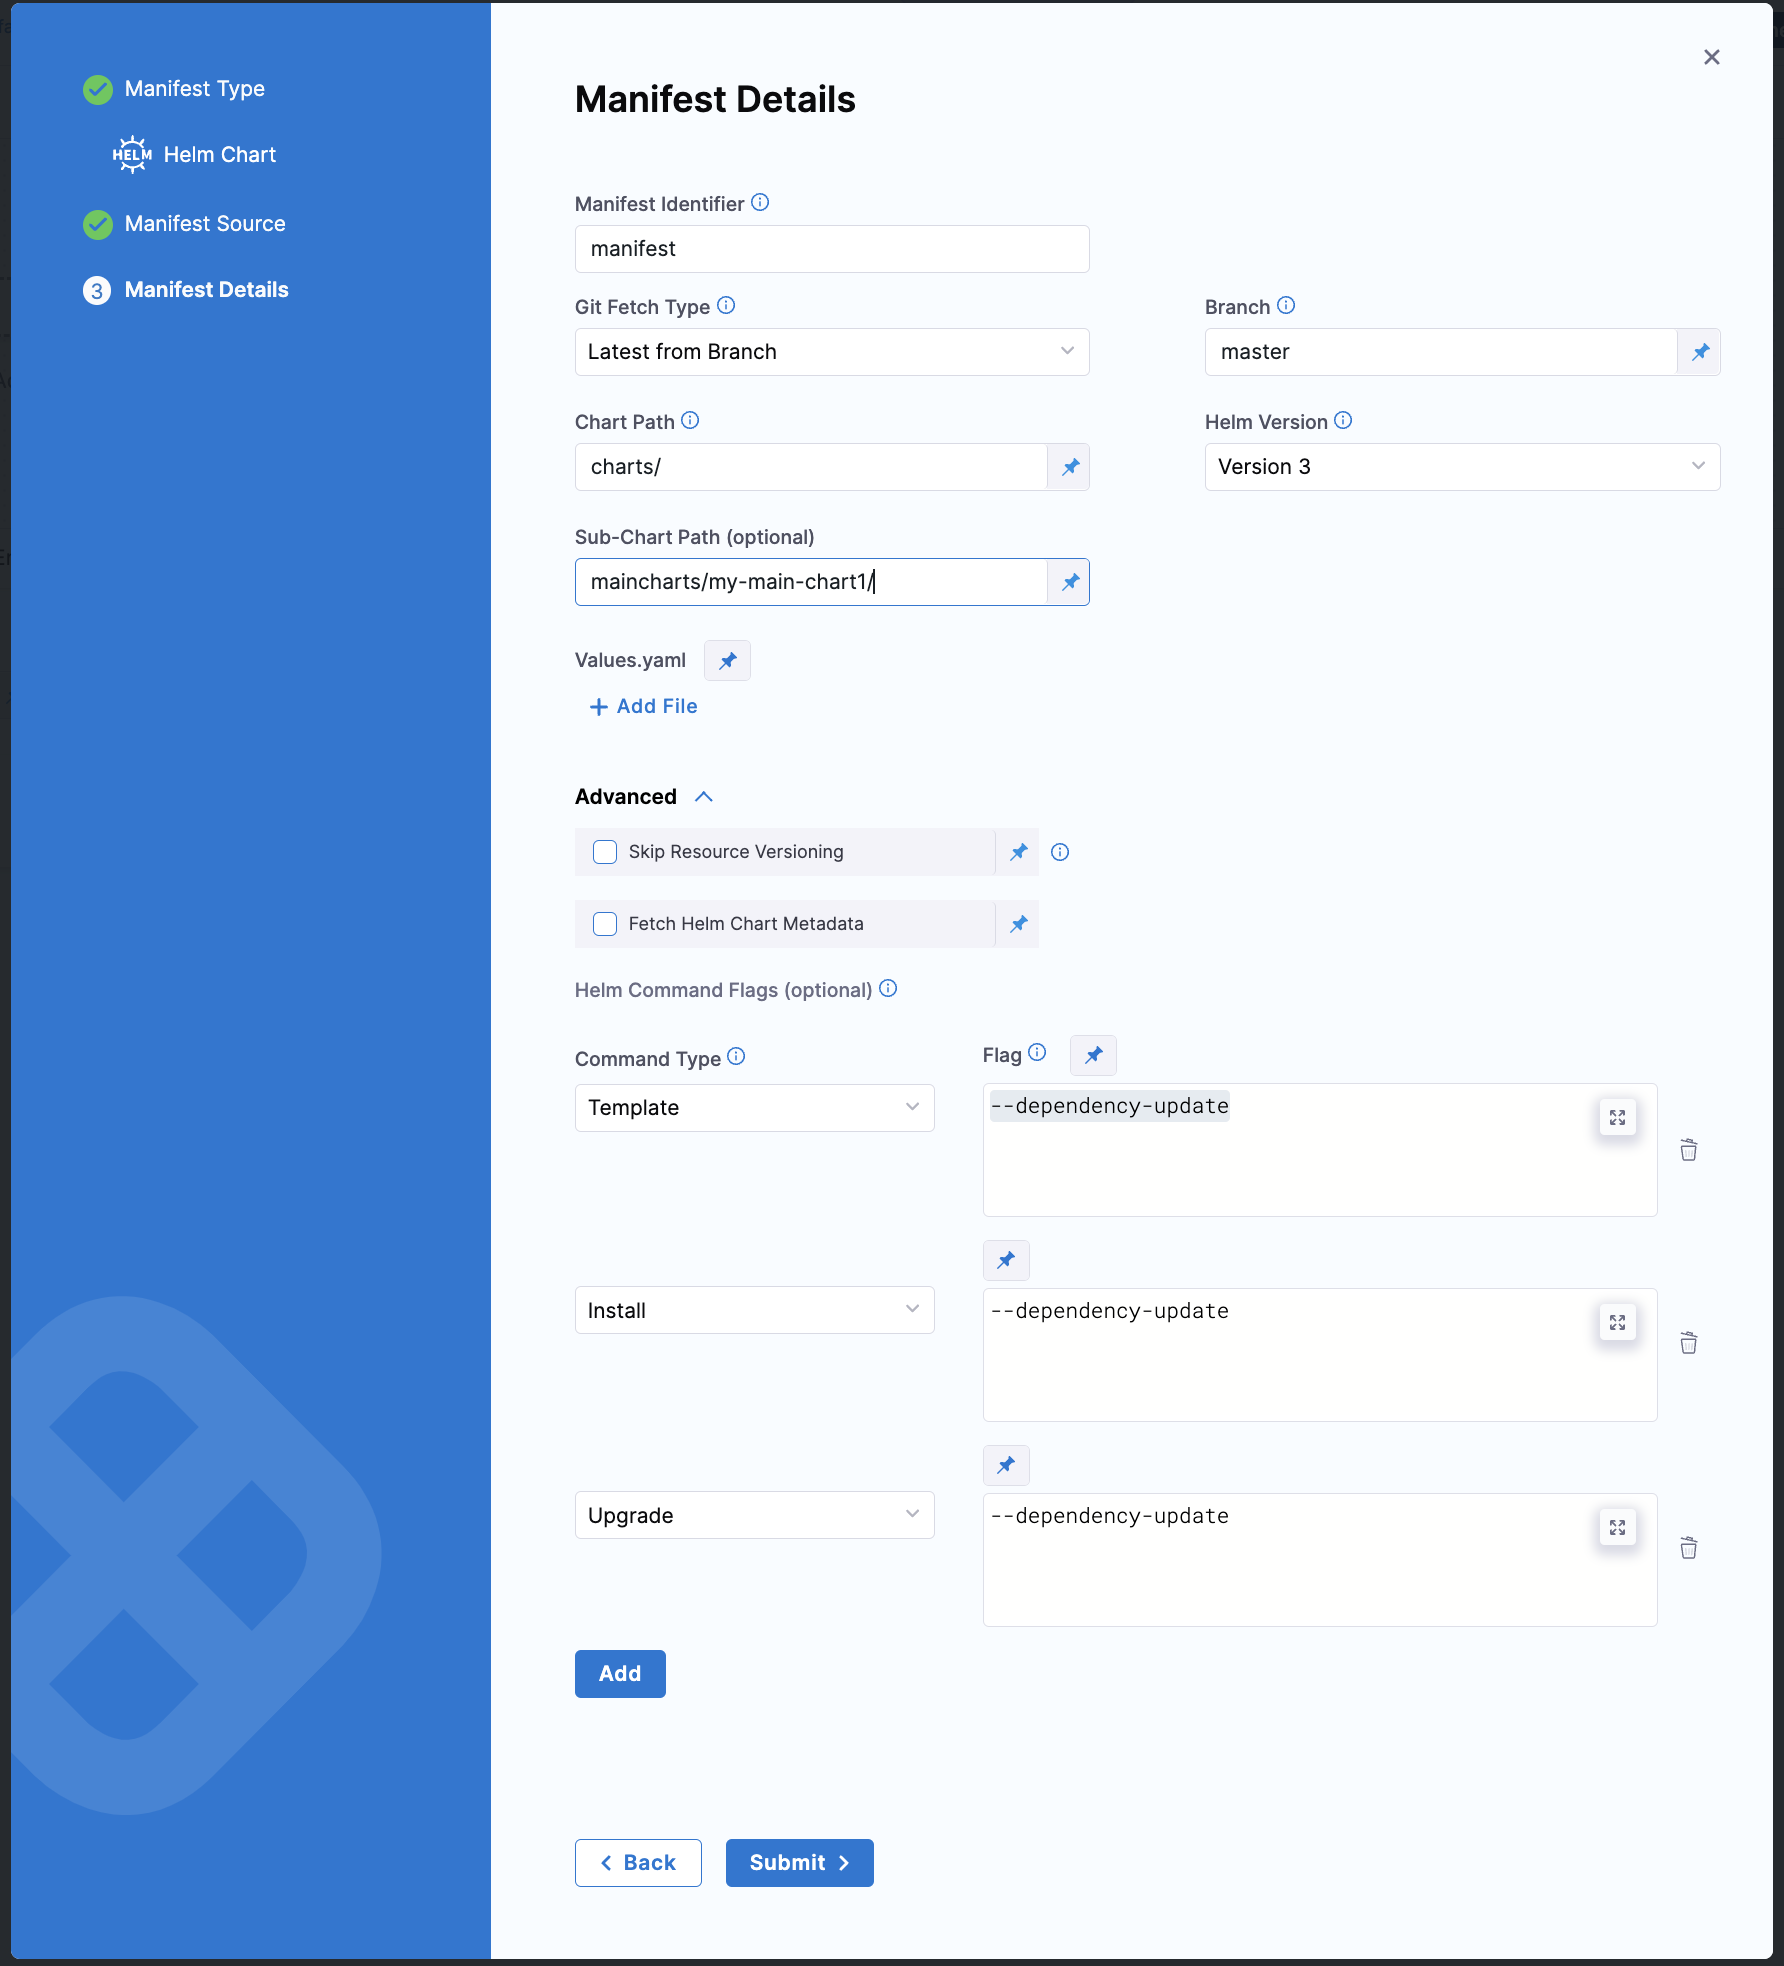
Configuring Helm Sub-Charts with Git Repositories
We can set up Helm Sub-chart scenarios with Git repositories as well. Suppose you have your project directory structured as follows:
charts/
  ├── subcharts/
  │   ├── my-sub-chart1/
  │   └── my-sub-chart2/
  └── maincharts/
      ├── my-main-chart1/
      └── my-main-chart2/
Chart Path: This should be the path where all charts are present, in this case, charts/.
Sub-Chart Path: This will be the relative path of the chart you want to deploy. For example, if you want to deploy my-main-chart1, the Sub-Chart Path would be maincharts/my-main-chart1/.
All dependency files can be fetched from the charts/ folder, allowing you to include any sub-chart as a dependency.
It is also recommended to add the following Helm Command Flags in the Advanced section:
- Command Type Template, Flag
--dependency-update - Command Type Install, Flag
--dependency-update - Command Type Upgrade, Flag
--dependency-update
With these commands, Helm will update the chart dependencies defined in your Chart.yaml
Reference the artifact
If the image artifact is not hardcoded in the Helm chart, add the artifact in Artifacts and use the expression <+artifact.image> in your values.yaml. For example:
---
image: <+artifact.image>
pullPolicy: IfNotPresent
dockercfg: <+artifact.imagePullSecret>
This is the same method when using artifacts with standard Kubernetes deployments. For more information, go to Add Container Images as Artifacts for Kubernetes Deployments.
Override chart values YAML in service
You can override the values YAML in the Helm chart by adding multiple values YAML files when you add the chart.
If you use multiple files, priority is given from the last file to the first file.
For example, let's say you have 3 files: the default values.yaml, values2.yaml added next, and values3.yaml added last.
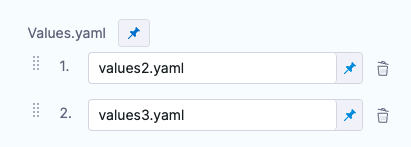
All files contain the same key:value pair. The values3.yaml key:value pair overrides the key:value pair of values2.yaml and values.yaml files.
Your values.yaml file can use Go templating and Harness built-in variable expressions.
See Example Kubernetes Manifests using Go Templating.
Optional Override File
You can also proceed with your Helm deployment without configuring an override file in the manifest configuration.
To enable this, click Add Additional Override File or edit an existing override file in the Manifest section of the Helm service.
Enable the Optional checkbox in the Manifest Details tab, below to the File Path field.
When this option is enabled, the override file is no longer required. If the file is missing from the specified path, the deployment will still proceed without it.

Sample YAML
Here is a sample of how the Values config would look when this checkbox is enabled. The optionalValuesYaml will be set to true.
- manifest:
            identifier: values_test
            type: Values
            spec:
              store:
                type: Github
                spec:
                  connectorRef: account.github_connector
                  gitFetchType: Branch
                  paths:
                    - path_to_file
                  branch: main
              optionalValuesYaml: true
Override chart values YAML in environment
You can override the values YAML file for a stage's environment by mapping the environment name to the values file or folder. Next, you use the <+env.name> Harness expression in the values YAML path.
Let's look at an example.
Let's say there is a repo with three values YAML files, dev.yaml, qa.yaml. prod.yaml. In the Values YAML setting for the values file, you use the <+env.name> expression.
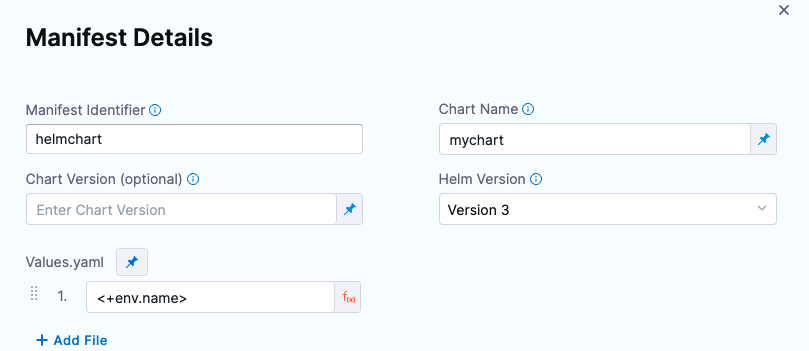
Next, in the environment setting, you add three environments, one for each YAML file name.
When you select an environment, such as qa, the name of the environment is used in File Path and resolves to qa.yaml. At runtime, the qa.yaml values file is used, and it overrides the values.yaml file in the chart.
Instead of selecting the environment in the Infrastructure each time, you can set the environment as a Runtime Input and then enter dev, qa, or prod at runtime.
Using multiple Helm charts in one Harness service
For Kubernetes Helm and Native Helm deployment types, you can add multiple Helm charts to a Harness service.
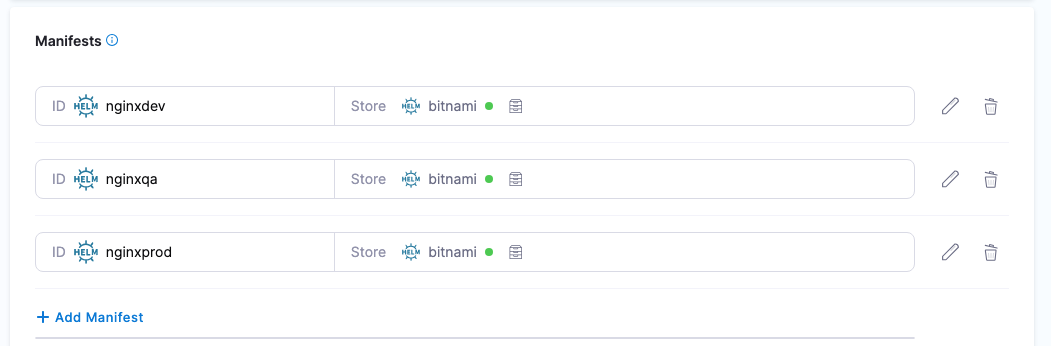
When you run a Harness pipeline that deploys the service, you can select one of the Helm charts to deploy.
By using multiple Helm charts, you can deploy the same artifact with different manifests at pipeline runtime.
Video summary of using multiple manifests
Helm chart expressions
For Kubernetes Helm and Native Helm deployments, you can use the following built-in expressions in your pipeline stage steps to reference chart details.
| Expression | Description |
|---|---|
<+manifests.MANIFEST_ID.helm.name> | Helm chart name. |
<+manifests.MANIFEST_ID.helm.description> | Helm chart description. |
<+manifests.MANIFEST_ID.helm.version> | Helm Chart version. |
<+manifests.MANIFEST_ID.helm.apiVersion> | Chart.yaml API version. |
<+manifests.MANIFEST_ID.helm.appVersion> | The app version. |
<+manifests.MANIFEST_ID.helm.kubeVersion> | Kubernetes version constraint. |
<+manifests.MANIFEST_ID.helm.metadata.url> | Helm Chart repository URL. |
<+manifests.MANIFEST_ID.helm.metadata.basePath> | Helm Chart base path, available only for OCI, GCS, and S3. |
<+manifests.MANIFEST_ID.helm.metadata.bucketName> | Helm Chart bucket name, available only for GCS and S3. |
<+manifests.MANIFEST_ID.helm.metadata.commitId> | Store commit Id, available only when manifest is stored in a Git repo and Harness is configured to use latest commit. |
<+manifests.MANIFEST_ID.helm.metadata.branch> | Store branch name, available only when manifest is stored in a Git repo and Harness is configured to use a branch. |
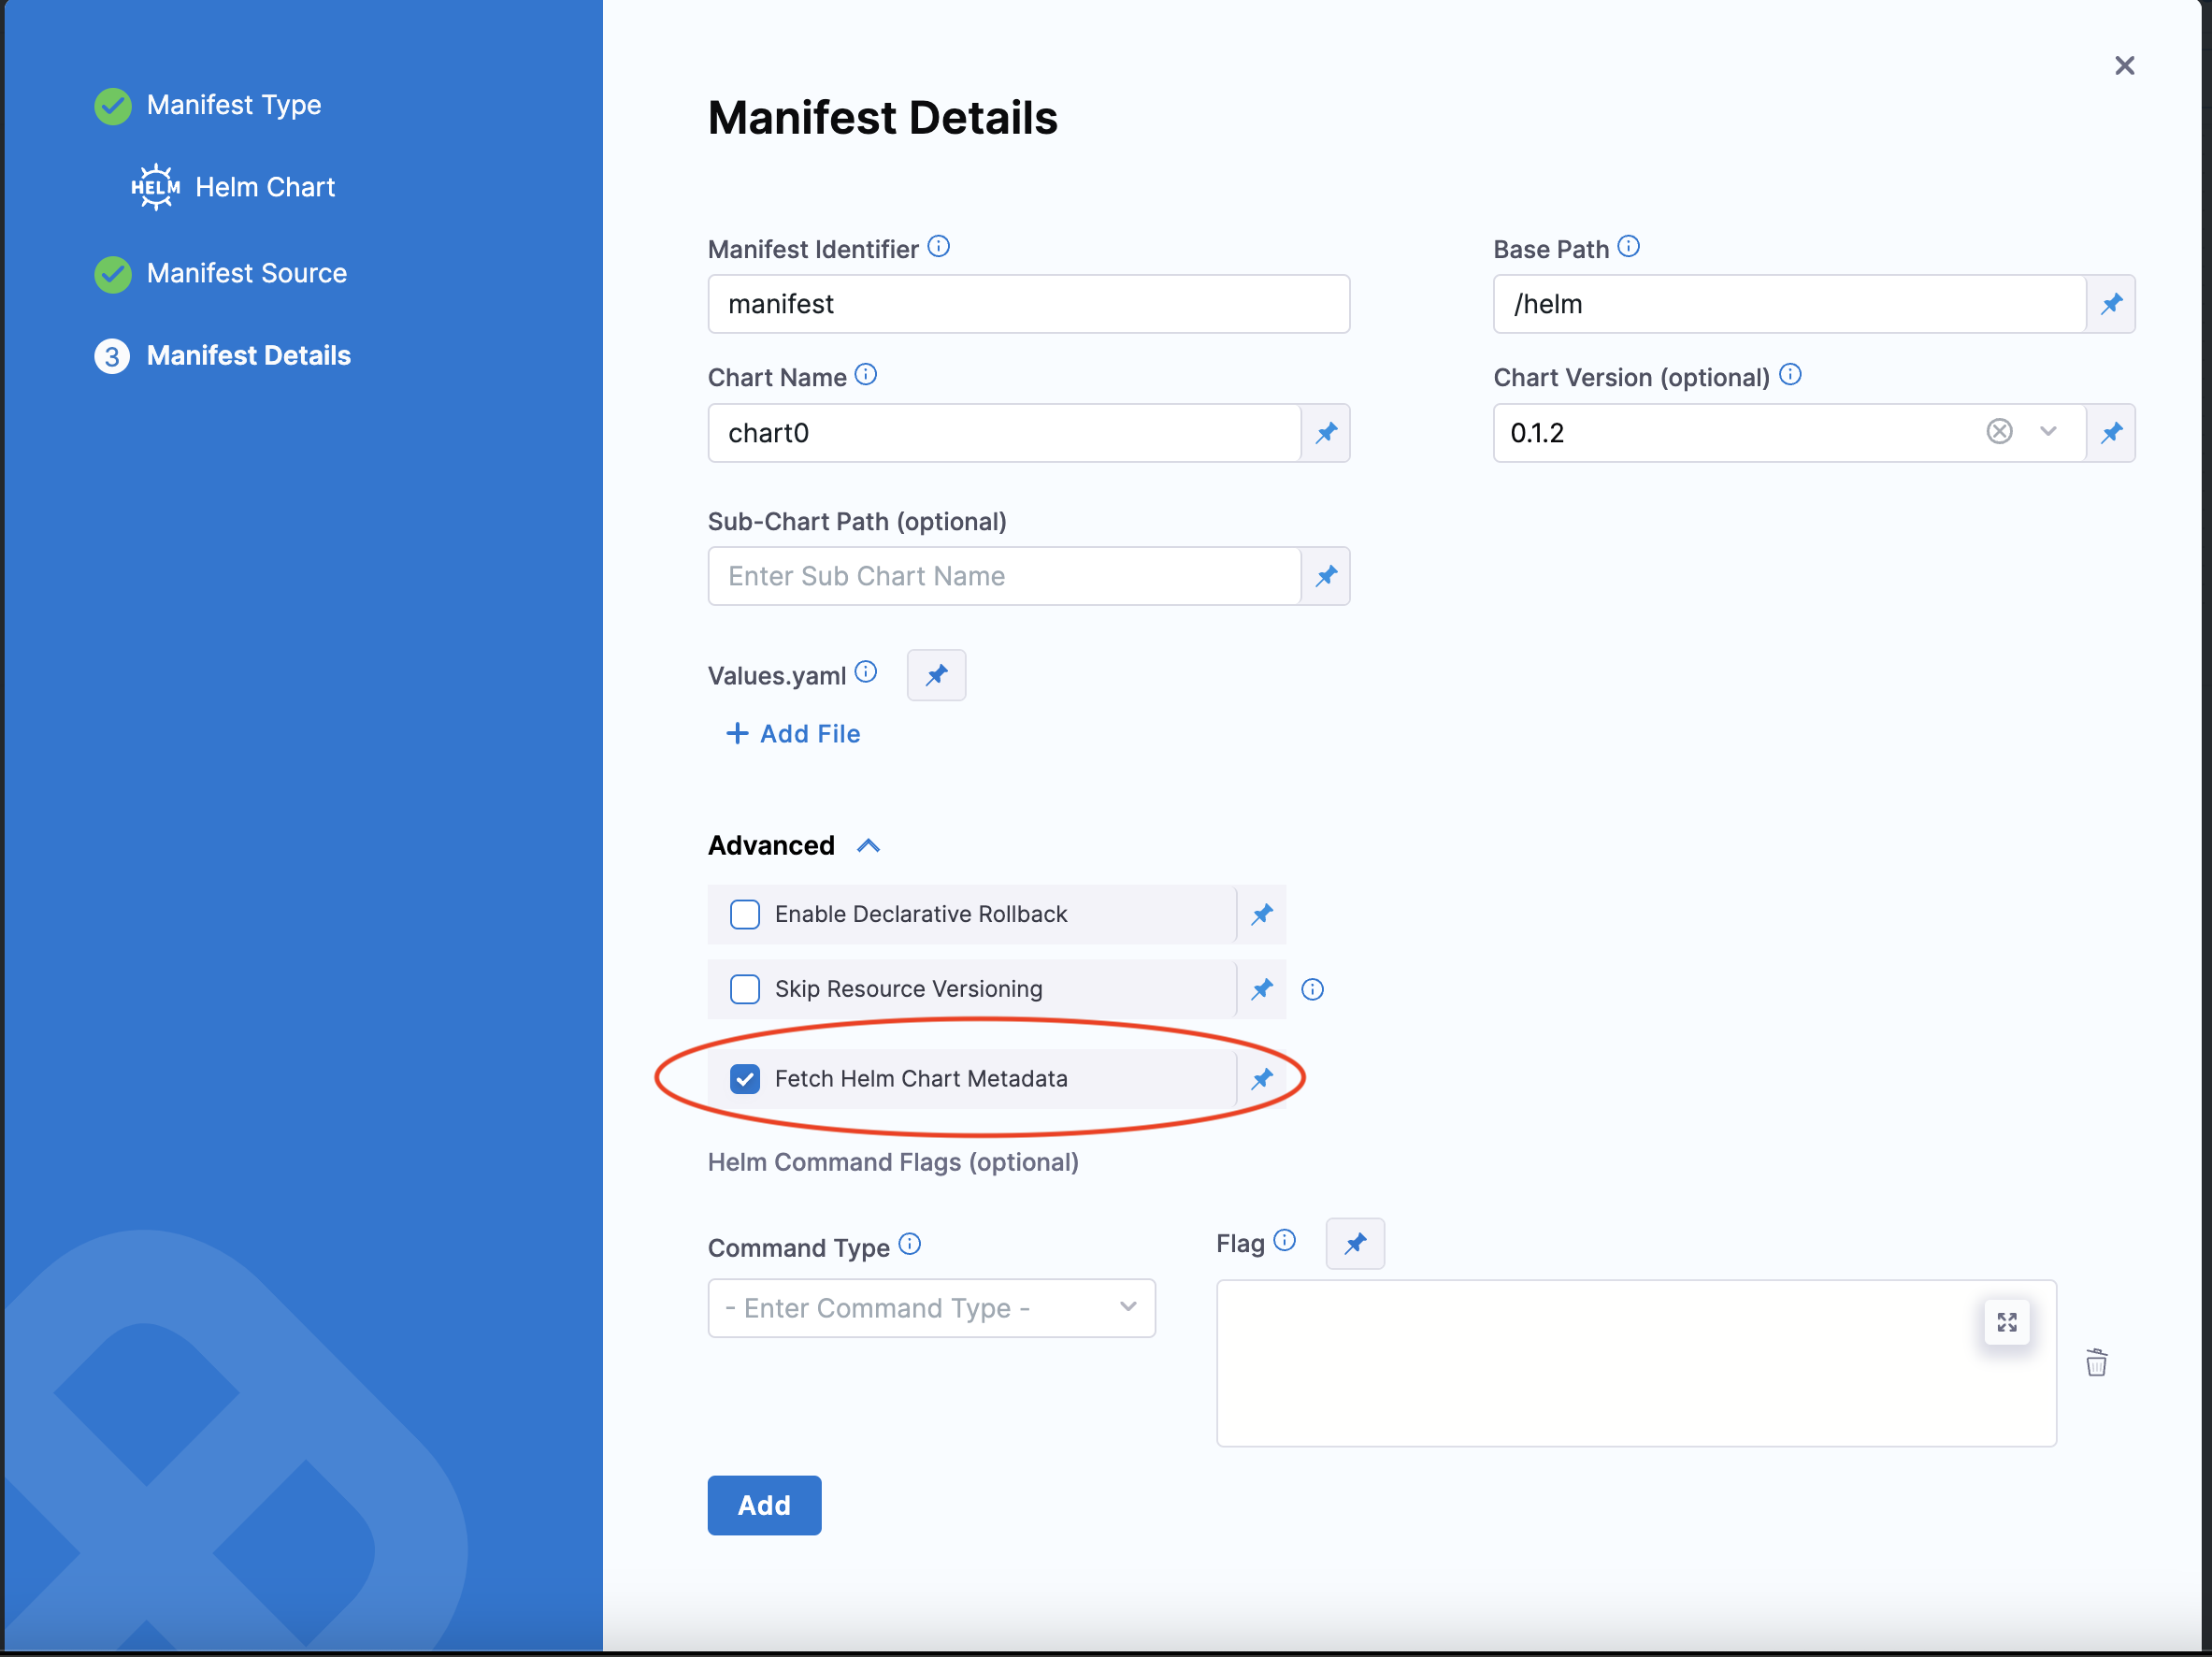
Select Fetch Helm Chart Metadata in the Manifest Details page's Advanced section to enable this functionality.
The MANIFEST_ID is located in service.serviceDefinition.spec.manifests.manifest.identifier in the Harness service YAML. In the following example, it is nginx:
service:
  name: Helm Chart
  identifier: Helm_Chart
  tags: {}
  serviceDefinition:
    spec:
      manifests:
        - manifest:
            identifier: nginx
            type: HelmChart
            spec:
              store:
                type: Http
                spec:
                  connectorRef: Bitnami
              chartName: nginx
              helmVersion: V3
              skipResourceVersioning: false
              fetchHelmChartMetadata: true
              commandFlags:
                - commandType: Template
                  flag: mychart -x templates/deployment.yaml
    type: Kubernetes
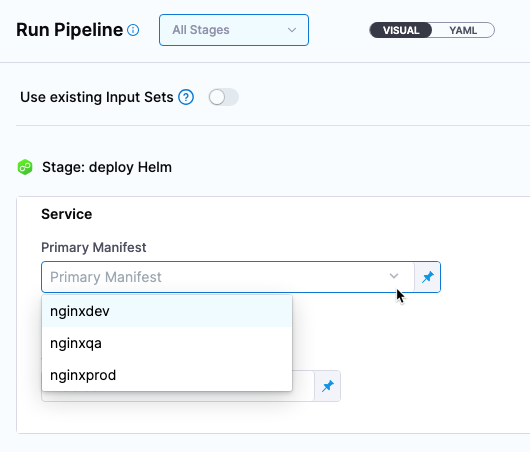
It can be also be fetched using the expression <+manifestConfig.primaryManifestId>. This expression is supported in multiple Helm chart manifest configuration.
Define the infrastructure
There is nothing unique about defining the target cluster infrastructure definition for a Helm chart deployment. It is the same process as a typical Harness Kubernetes deployment.
For more information, go to Define Your Kubernetes Target Infrastructure.
Pre-existing and dynamically provisioned infrastructure
There are two methods of specifying the deployment target infrastructure:
- Pre-existing: the target infrastructure already exists and you simply need to provide the required settings.
- Dynamically provisioned: the target infrastructure will be dynamically provisioned on-the-fly as part of the deployment process.
For details on Harness provisioning, go to Provisioning overview.
Execution steps
Helm charts can be deployed using any of the execution steps and deployment strategies used in other Kubernetes deployments. For more information, go to Kubernetes How-tos.
Deploy
Each Helm chart deployment is treated as a release. During deployment, when Harness detects that there is a previous release for the chart, it upgrades the chart to the new release.
During deployment, Harness downloads your Helm chart manifests and override files (values and secrets) to the delegate. Override files are stored persistently in /repository/helm/overrides/ and are not automatically deleted after deployment. For details about file storage, cleanup options, and security considerations, go to Helm Deployment FAQs.
In your pipeline, click Run.
The Helm chart deployment runs.
You will see Harness fetch the Helm chart. Here is an example:
Helm repository: Bitnami Helm Repo

Chart name: nginx

Chart version: 9.4.1

Helm version: V3

Repo url: https://charts.bitnami.com/bitnami

Successfully fetched values.yaml

Fetching files from helm chart repo

Helm repository: Bitnami Helm Repo

Chart name: nginx

Helm version: V3

Repo url: https://charts.bitnami.com/bitnami

Successfully fetched following files:

- nginx/.helmignore
- nginx/charts/common/.helmignore
- nginx/charts/common/templates/validations/_postgresql.tpl
- nginx/charts/common/templates/validations/_cassandra.tpl
- nginx/charts/common/templates/validations/_mongodb.tpl
- nginx/charts/common/templates/validations/_mariadb.tpl
- nginx/charts/common/templates/validations/_validations.tpl
- nginx/charts/common/templates/validations/_redis.tpl
- nginx/charts/common/templates/_ingress.tpl
- nginx/charts/common/templates/_names.tpl
- nginx/charts/common/templates/_affinities.tpl
- nginx/charts/common/templates/_storage.tpl
- nginx/charts/common/templates/_utils.tpl
- nginx/charts/common/templates/_errors.tpl
- nginx/charts/common/templates/_capabilities.tpl
- nginx/charts/common/templates/_secrets.tpl
- nginx/charts/common/templates/_warnings.tpl
- nginx/charts/common/templates/_tplvalues.tpl
- nginx/charts/common/templates/_images.tpl
- nginx/charts/common/templates/_labels.tpl
- nginx/charts/common/Chart.yaml
- nginx/charts/common/values.yaml
- nginx/charts/common/README.md
- nginx/Chart.lock
- nginx/templates/svc.yaml
- nginx/templates/health-ingress.yaml
- nginx/templates/ldap-daemon-secrets.yaml
- nginx/templates/tls-secrets.yaml
- nginx/templates/NOTES.txt
- nginx/templates/pdb.yaml
- nginx/templates/ingress.yaml
- nginx/templates/server-block-configmap.yaml
- nginx/templates/serviceaccount.yaml
- nginx/templates/hpa.yaml
- nginx/templates/servicemonitor.yaml

Done.
Next, Harness will initialize and prepare the workloads, apply the Kubernetes manifests, and wait for steady state.
In Wait for Steady State you will see the workloads deployed and the pods scaled up and running (the release name has been shortened for readability):
kubectl --kubeconfig=config get events --namespace=default --output=custom-columns=KIND:involvedObject.kind,NAME:.involvedObject.name,NAMESPACE:.involvedObject.namespace,MESSAGE:.message,REASON:.reason --watch-only

kubectl --kubeconfig=config rollout status Deployment/release-e008...ee-nginx --namespace=default --watch=true

Status : release-e008...ee-nginx   Waiting for deployment spec update to be observed...

Event  : release-e008...ee-nginx   Deployment   release-e008...ee-nginx   default     Scaled up replica set release-e008...ee-nginx-779cd786f6 to 1   ScalingReplicaSet

Status : release-e008...ee-nginx   Waiting for deployment spec update to be observed...

Status : release-e008...ee-nginx   Waiting for deployment "release-e008...ee-nginx" rollout to finish: 0 out of

Event  : release-e008...ee-nginx   ReplicaSet   release-e008...ee-nginx-779cd786f6   default   Created pod: release-e008...ee-nginx-779n765l   SuccessfulCreate

Status : release-e008...ee-nginx   Waiting for deployment "release-e008...ee-nginx" rollout to finish: 0 of 1 updated replicas are available...

Event  : release-e008...ee-nginx   Pod   release-e008...ee-nginx-779n765l   default   Successfully assigned default/release-e008...ee-nginx-779n765l to gke-doc-account-default-pool-d910b20f-argz   Scheduled

Event  : release-e008...ee-nginx   Pod   release-e008...ee-nginx-779n765l   default   Pulling image "docker.io/bitnami/nginx:1.21.1-debian-10-r0"   Pulling

Event  : release-e008...ee-nginx   Pod   release-e008...ee-nginx-779n765l   default   Successfully pulled image "docker.io/bitnami/nginx:1.21.1-debian-10-r0" in 3.495150157s   Pulled

Event  : release-e008...ee-nginx   Pod   release-e008...ee-nginx-779n765l   default   Created container nginx   Created

Event  : release-e008...ee-nginx   Pod   release-e008...ee-nginx-779n765l   default   Started container nginx   Started

Status : release-e008...ee-nginx   deployment "release-e008...ee-nginx" successfully rolled out

Done.
You deployment is successful.
Helm Steady State Check
Harness has two ways of performing Helm Steady State Checks for Native Helm Deployment types (Helm Deployments managed by Helm). Depending on your use case and needs you can opt into either option via the setting. By default, Harness will perform a Helm Steady State Check on the deployed resources however, the mechanism of how Harness' does it differs based on the setting.
Helm Test Support
Harness now lets you run your chart’s built-in tests immediately after deployment. Charts that include helm.sh/hook: test jobs under templates can be validated with a single checkbox.
- Where to find it: In any Native Helm Deploy step, enable Run Chart Tests.
- What it does: After
helm upgrade --install ..., Harness will invokehelm test <release-name>. - Pass/fail: Your test containers must exit 0 for success. Failures will mark the step (and stage) as failed.
- Skip logging: If you leave the box unchecked, Harness logs Helm test skipped and proceeds.
For more information on Helm Chart Tests, go to the Helm documentation
Disabled Setting - Native Helm steady state for jobs - Default Mode
Harness will check for the steady state of the deployed resources via the ConfigMap Harness generates to manage and track the deployment. The limitation of this method, is we do not track Kubernetes Jobs objects that are being created as part of the deployment and wait for them to reach a steady state.
Helm Steady State with Setting Disabled
kubectl --kubeconfig=config get events --namespace=default --output=custom-columns=KIND:involvedObject.kind,NAME:.involvedObject.name,NAMESPACE:.involvedObject.namespace,MESSAGE:.message,REASON:.reason --watch-only

kubectl --kubeconfig=config rollout status Deployment/release-e008...ee-nginx --namespace=default --watch=true
Enable Setting - Native Helm steady state for jobs
By Default, Harness will check for the steady state of deployed Helm resources. If you want to check the steady state for Kubernetes jobs for Native Helm Deployments, we now have a setting that will enable that. Please navigate to Account Settings > Account Resources > Default Settings and navigate to the Continuous Deployment Section. This setting can be configured at the project, organization, and account level. You will see the option Enable Native Helm steady state for jobs this will check the steady state of the jobs deployed with the Helm Chart. With the checkbox configuration enabled, during a Native Helm Deployment, you will see Harness use the helm get manifest <+release.name> command to get the details to check the steady state. With the setting enabled, we are no longer using the ConfigMap to check for status.
Helm Steady State with Setting Enabled
Retrieve helm manifest from release [release-75d461a29efd32e5d22b01dc0f93aa5275e2f003] and namespace [default]
Executing command - KUBECONFIG=/opt/harness-delegate/./repository/helm/.kube/1f8e53c52248bbf69fe59fdbe5c0b3b5 helm get manifest release-75d461a29efd32e5d22b01dc0f93aa5275e2f003 --namespace=default
Currently running Containers: [0]

Done
Versioning and rollback
Helm chart deployments support versioning and rollback in the same way as standard Kubernetes deployments.
For more information, go to Kubernetes Rollback.
Deployment sequence: Harness first runs a canary release, then a full release. Helm bumps the revision by 1 on each step, so together they advance it by 2 (e.g. v1 → v2 [canary] then v2 → v3 [full]).
Rollback: To revert, Harness subtracts 2 from the current revision (e.g. v3 – 2 = v1), skipping the now-deleted canary revision (v2).
Trigger the pipeline on a new chart version
You can set up a Harness trigger to listen on the chart repo and execute the pipeline when a new chart version appears. For more information, go to Trigger Pipelines on New Helm Chart.
Fetch Helm chart dependencies
Harness can fetch Helm chart dependencies within GitHub using the --dependency-update command flag.
Harness fetches dependent Helm charts along with the main Helm chart used for the deployment. Dependencies are resolved before Harness performs the deployment of the main Helm chart.
For more information, go to Helm Docs.
To update Helm chart dependencies:
-
For Kubernetes with Helm deployments (as described in this topic), configure Helm Command Flags with the Template command type and
--dependency-updateflag. -
For Native Kubernetes deployments, add the command flag
--depdency-updateto the Install and Upgrade command types.
All dependency repositories must be available and accessible from the Harness Delegate(s) used by the deployment.
Service hooks
Kubernetes and Helm deployments use service hooks to fetch Helm Chart dependencies that refer to Git and other repositories, and install them with the main Helm Chart.
Harness supports two types of service hooks: preHook and postHook. These are the service hook actions supported by Harness:
- Fetch files: Service hooks can be triggered before or after the manifest files are fetched.
- Manifest templates: Service hooks can be triggered before or after the manifest has been rendered.
- Steady state check: Service hooks can be triggered before or after the steady state check.
Each service hook has its own context variable:
| Action | Context Variable and Description |
|---|---|
| Fetch files | $MANIFEST_FILES_DIRECTORY: The path to the directory from where the manifest files can be downloaded. |
| Manifest template | $MANIFEST_FILES_DIRECTORY: The path to the directory where the original Kubernetes template is located. |
| Steady state check | $WORKLOADS_LIST: The comma separated list of all workloads. $MANAGED_WORKLOADS: The comma separated list of workloads managed by Harness. $CUSTOM_WORKLOADS: The comma separated list of custom workloads. |
Native Helm: values overrides and SOPS
For Native Helm services, when the feature flag CDS_HELM_IMPROVED_SOPS_SUPPORT_FOR_SERVICE_HOOKS is enabled, Harness exposes additional context for decrypting or generating Helm values overrides in Fetch files post-hooks:
VALUES_OVERRIDE_DIRECTORY: Directory where Harness writes Harness-defined override YAML files (override-0.yaml,override-1.yaml, …) before your post-hook runs.OVERRIDE_FILES: Export this environment variable from your hook with a comma-separated list of extra override file paths for Helm to use after the hook completes.
You can still use $MANIFEST_FILES_DIRECTORY for chart files; Harness-defined overrides are also available under $MANIFEST_FILES_DIRECTORY/values-overrides when that path applies to your deployment.
For prerequisites, delegate version, and examples, go to SOPS and values overrides in Native Helm service hooks.
You can use service hooks to run additional configurations when carrying out the actions above. For example, when you run a deployment, you must fetch files first. After fetching the files, you can resolve the secrets of those encrypted files using Helm secrets, SOPS, AGE keys, and so on. You can use the context variables above during deployment. For more details, go to Using shell scripts in CD stages.
Here are some sample service hook YAMLs:
hooks:
  - preHook:
      identifier: sample
      storeType: Inline
      actions:
        - FetchFiles
        - TemplateManifest
        - SteadyStateCheck
      store:
        content: echo "sample Hook for all action"
hooks:
  - postHook:
      identifier: dependency
      storeType: Inline
      actions:
        - FetchFiles
      store:
        content: |
          cd $MANIFEST_FILES_DIRECTORY
          helm repo add test-art-remote https://sample.jfrog.io/artifactory/sample-charts/ --username automationuser --password <+secrets.getValue("reposecret")>
          helm dependency build
          cd charts
hooks:
  - postHook:
      identifier: cdasd
      storeType: Inline
      actions:
        - FetchFiles
      store:
        content: |-
          source $HOME/.profile
          cd $MANIFEST_FILES_DIRECTORY
          echo $MANIFEST_FILES_DIRECTORY
          export SOPS_AGE_KEY=<+secrets.getValue("agesecret")>
          helm secrets decrypt secrets.enc.yaml
          helm secrets decrypt secrets.enc.yaml > secrets.yaml
For more information about Helm dependencies, go to Helm dependency and Helm dependency update.
Harness does not support Helm hooks for Helm Blue-Green and Canary deployments.
Video summary
Use case: Add private repositories as a Helm Chart dependency
-
Add a repository in Helm using the following script:
helm repo add test-remote-name
https://url.to.chart.example.artifactory/artifactory/harness-helm-charts/ --username
<+secrets.getValue("username")> --password <+secrets.getValue("password")> -
Add the required name and version of the dependency in the
Chart.yamlto reference these dependencies.The repository name starts with
@followed by the name you used for the repository in your script.apiVersion: v1
appVersion: "1.0"
description: A Helm chart for Kubernetes
name: todolist
version: 0.2.0
dependencies:
- name: trivy-operator
version: "0.1.9"
repository: "https://aquasecurity.github.io/helm-charts/"
- name: kube-prometheus-stack
version: "16.13.0"
repository: "@test-art-remote" -
Run the
--dependency-updatecommand flag in the manifest configuration to update dependencies as shown in the image below: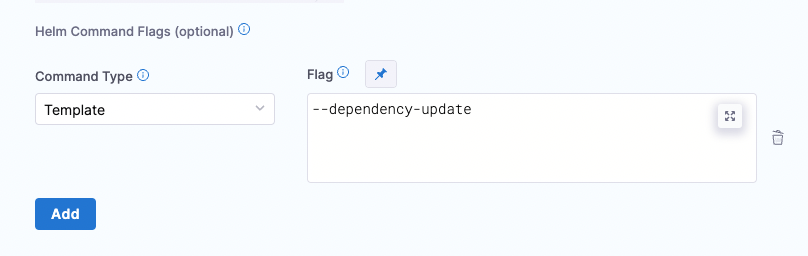
Use case: Use secrets to encrypt and decrypt files
-
Install SOPS or AGE keys to generate a public key to encrypt files.
-
Enter the following commands to encrypt and save your files in your Git repository:
export SOPS_AGE_KEY=<"ENTER_YOUR_SOPS_AGE_KEY">
sops --encrypt --age $SOPS_AGE_KEY secrets.yaml > secrets.enc.yaml
This command creates a
secrets.yamlfile. -
Enter the following commands to decrypt the
secrets.yamlfile and use it to resolve the values in your Chart. This file will be used to override values wherever required:cd $MANIFEST_FILES_DIRECTORY //go to the directory containing manifest-files
export SOPS_AGE_KEY=<+secrets.getValue("agesecret")> // export the PRIVATE Key to be used to decrypt
sops --decrypt secrets.enc.yaml // you can decrypt using sops
helm secrets decrypt secrets.enc.yaml // or by using helm secrets
helm secrets decrypt secrets.enc.yaml > secrets.yaml // store the decrypted file in a temporary folder -
Add the
--dependency-update -f secrets.yamlcommand flag in the manifest configuration to resolve the values. Please remember that files submitted through this method take precedence, followed by the override files set in the Harness service. Avoid using encrypted files as overrides as they will replace decrypted values with encrypted ones. An example on how to configure this is shown in the image below:
Uninstall command flag
If you want to use the uninstall command in the Manifest Details, be aware of the following:
- When the deployment is successful, Harness won't execute this command.
- If the deployment fails on the very first execution, then Harness will apply the
--uninstallflag itself. You can see this in the logs underWait For Steady State. - If you want to pass in some command flags when Harness performs the
--uninstall, enter uninstall in Manifest Details and enter in the relevant command flags.
Authentication for Google Cloud with Helm OCI connector
To configure authentication for GCP with a Helm OCI connector, you must provide the username and password to your Google service account.
Username: A _json_key or _json_key_base64. We recommend that you use the json_key_base64 to encode your Google service account file to base64.
Password: Your Google service account file content.
Active Feature Flags
To enable a feature flag in your Harness account, contact Harness Support.
| Flag | Description |
| CDS_HELM_STEADY_STATE_CHECK_1_16 | Enables steady state check for Helm deployments on Kubernetes clusters using 1.16 or higher. |
| CDS_HELM_VERSION_3_8_0 | Sets the default version of Helm to 3.8 when using the Harness Helm delegate. |
| CDS_DISABLE_HELM_REPO_YAML_CACHE | Disables Helm repository caching on the Harness Delegate. Please use the flag if you encounter the context deadling exceeded error during parallel Helm deployments. Note that this is a result of known Helm concurrency issue. By turning on the flag, there might be slight performance degradation in case of very large Helm repositories. |
| CDS_K8S_SOCKET_CAPABILITY_CHECK_NG | Replaces the HTTP capability check for the Harness Kubernetes connector with socket capability. |
| CDS_HELM_STEADY_STATE_CHECK_1_16_V2_NG | There is a behavior change in how Harness tracks managed workloads for rollback. We are not using ConfigMap anymore to match the deployed resources' release name to track managed workloads for rollback. We use helm get manifest to retrieve the workloads from a Helm release. For steady-state checks of the kubernetes jobs, we’re planning to provide an option in account/org/project settings. This is not enabled by default. For customer's who didn't have this feature flag enabled before, they may start seeing that the Wait for steady state check is not skipped and won't need to configure it. |
| CDS_HELM_IMPROVED_SOPS_SUPPORT_FOR_SERVICE_HOOKS | For Native Helm, writes values overrides to a per-task directory before Fetch files post-hooks run, and exposes VALUES_OVERRIDE_DIRECTORY and optional OVERRIDE_FILES so service hooks can decrypt (for example SOPS) or add overrides. Requires delegate 26.03.88700 or later. For more information, go to SOPS and values overrides in Native Helm service hooks. |