Azure Web Apps deployments
Harness can deploy a Docker image or non-containerized artifact for your Azure Web App. You can deploy to slots, perform traffic shifting, and swap slots. Harness supports common deployment strategies (basic, canary, and blue green).
This topic walks you through setting up and run an Azure Web App deployment in Harness.
The basic steps are:
- Specify the Web App startup command, configuration, and artifact you want to deploy as a Harness Service.
- Connect Harness with your Azure subscription.
- Define the target Web App in Harness and install a Harness Delegate to perform the deployment.
- Define the steps for the different deployment strategies:
- Basic: Slot Deployment step. No traffic shifting takes place.
- Canary: Slot Deployment, Traffic Shift, and Swap Slot steps. Traffic is shifted from the source slot to the target slot incrementally.
- Blue Green: Slot Deployment and Swap Slot steps. All traffic is shifted from the source slot to the target slot at once.
Azure Web Apps deployments requirements
Harness will deploy a new artifact version to your existing Azure Web App. You will need the following:
- An existing Azure Web App using a Docker image or non-containerized artifact: you can create one in minutes in Azure.
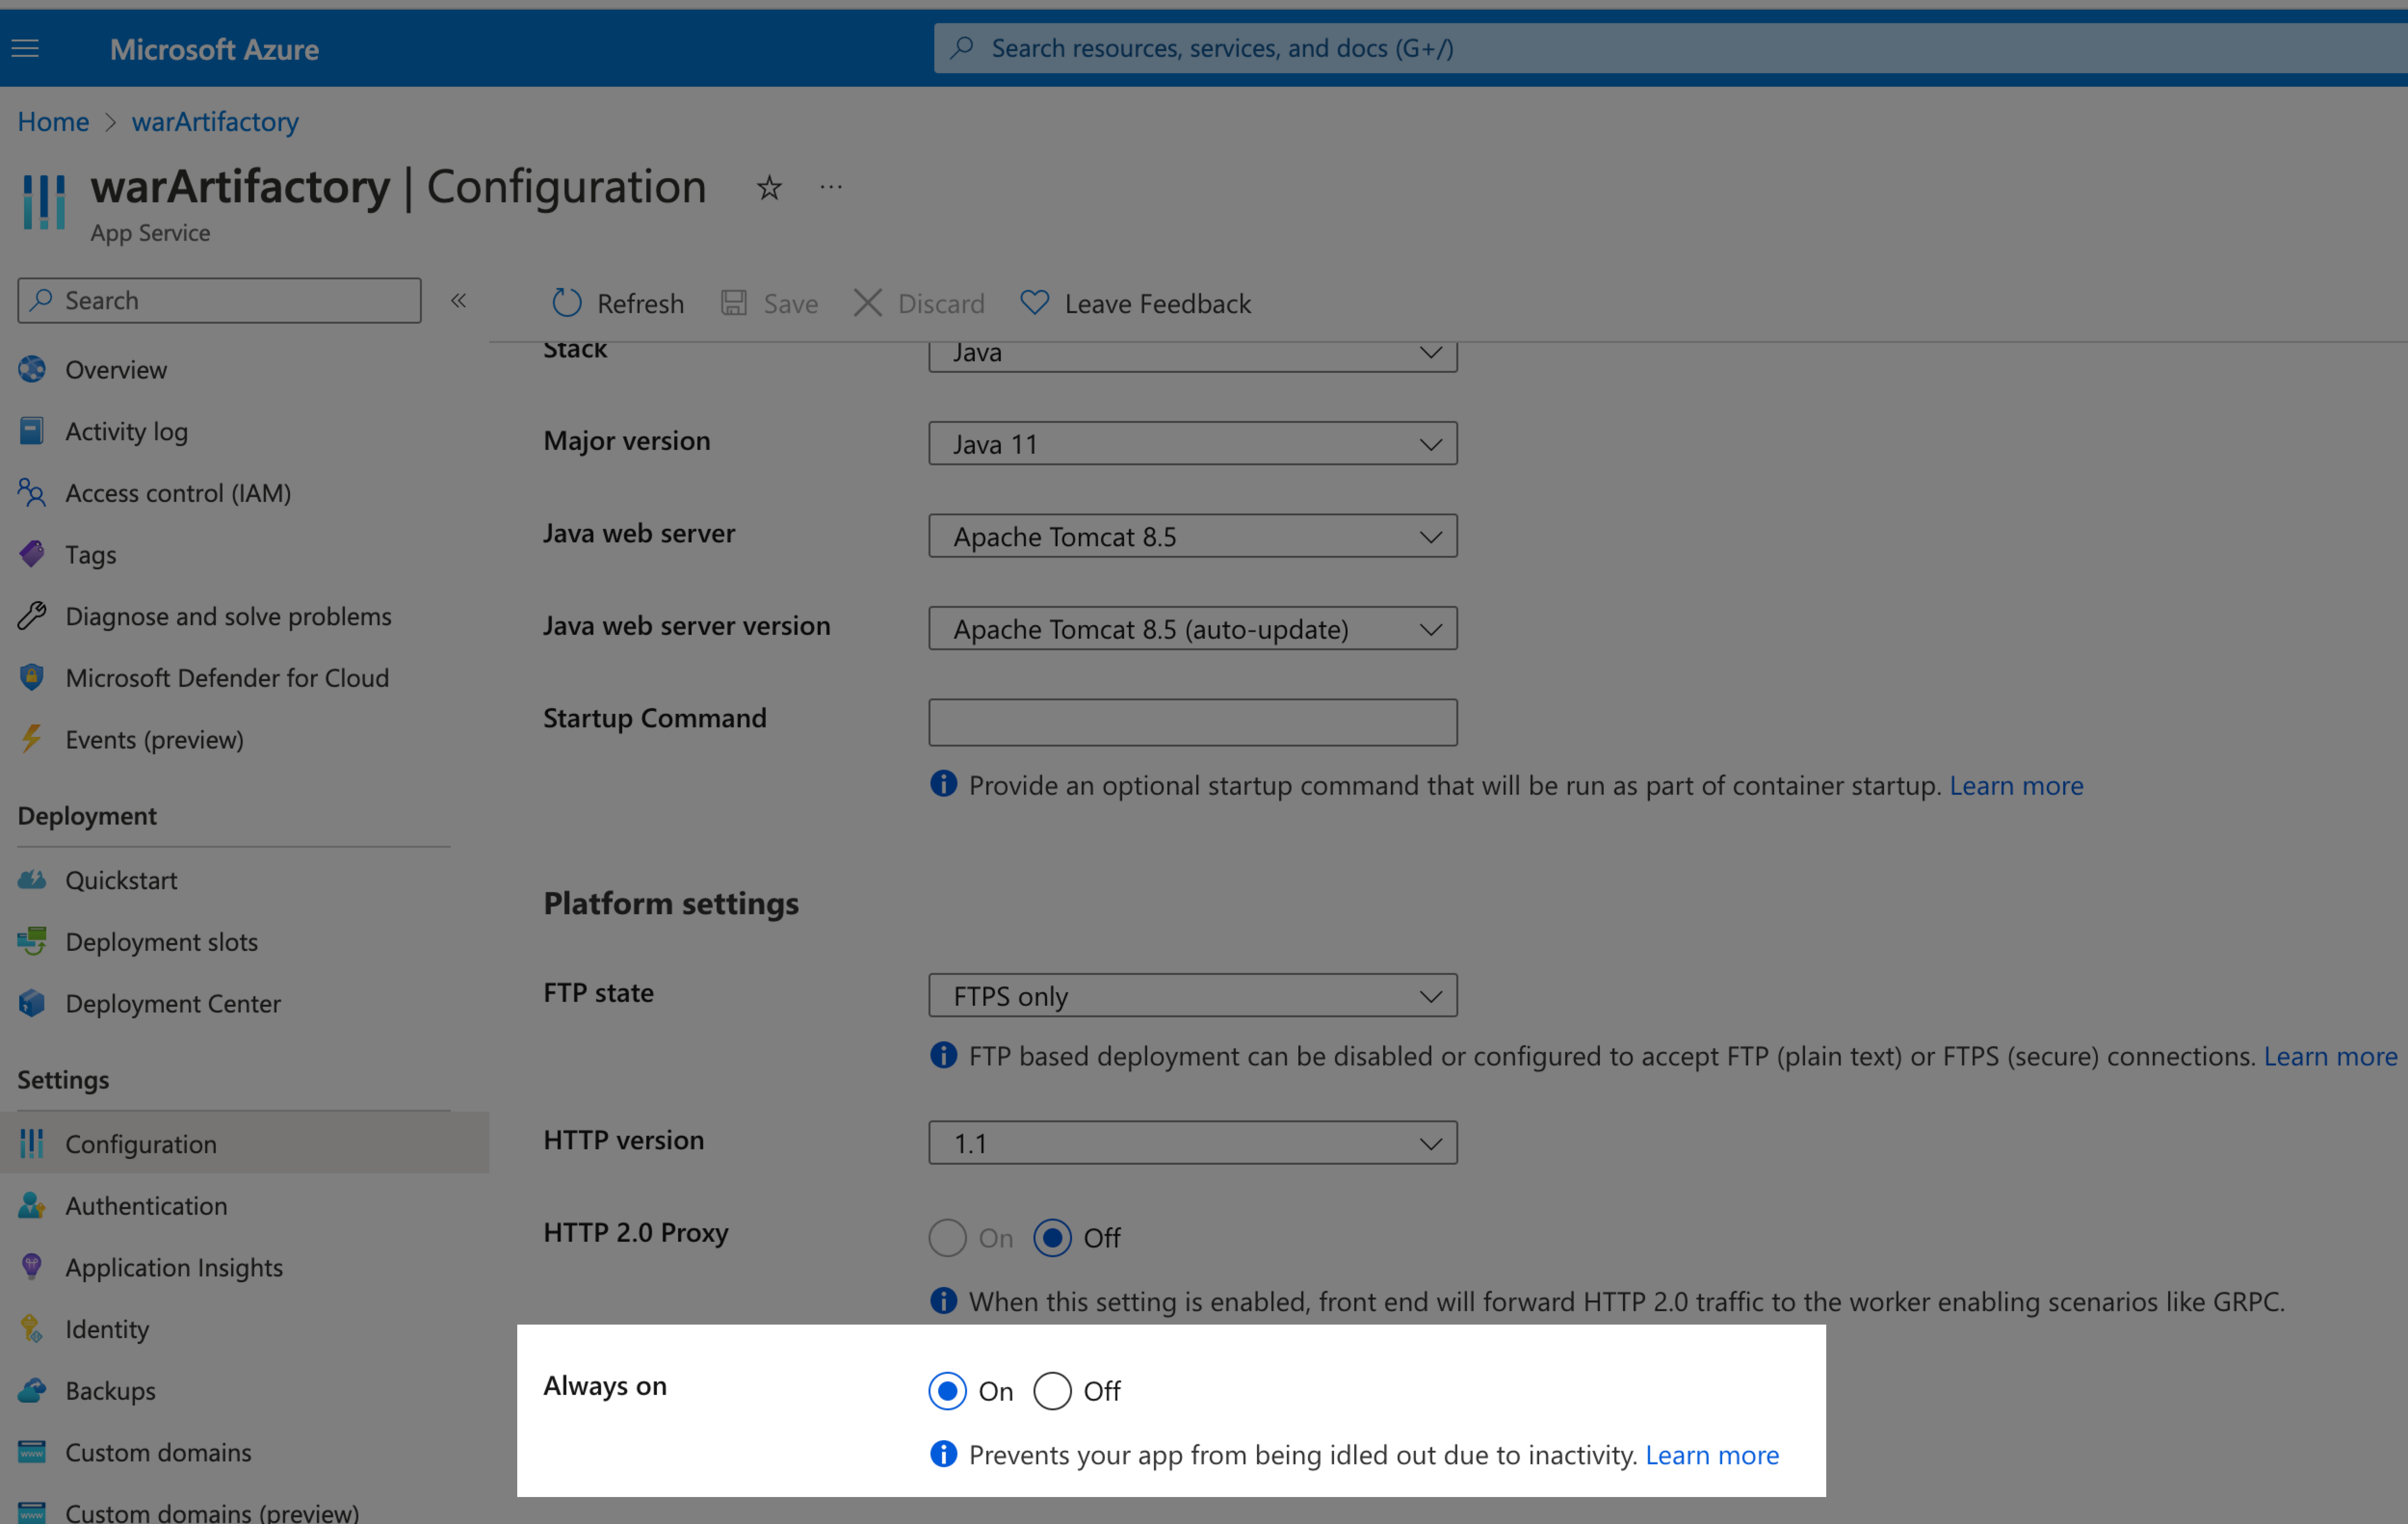
- Web App must have Always on setting set to On.
- One or more running slots: the slots created for your existing Azure Web App. If you are doing a Blue Green deployment, you will need two slots.
- A Docker image or non-containerized artifact: this is the same image or artifact you used when you created the Azure Web App.
- Azure account connection information: The required permissions are described below.
- App Service Plan: the name of the Azure App Service configured for your existing Web App.
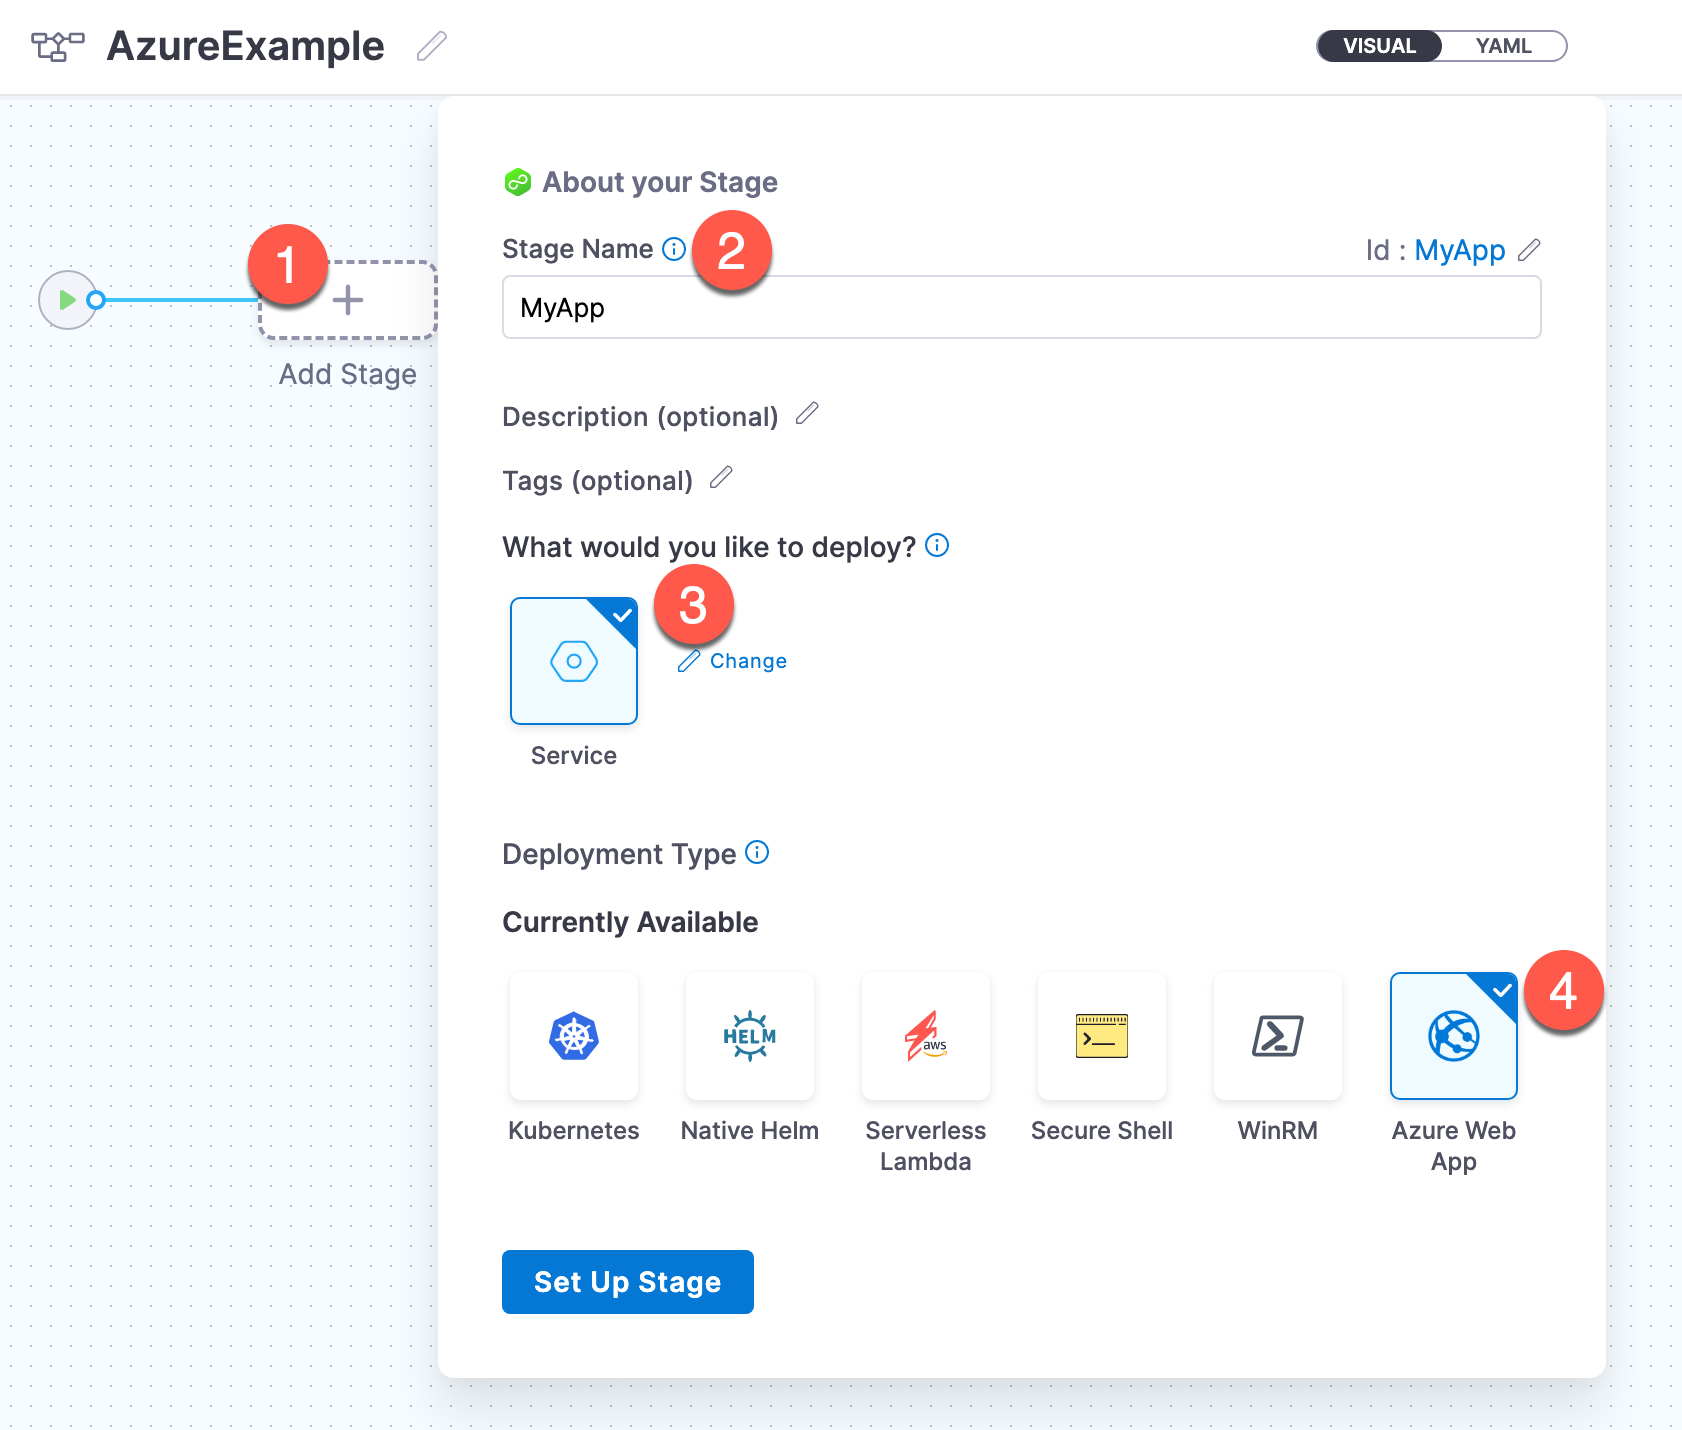
Azure Web Apps pipeline stages
Azure deployments are done using an CD stage with the deployment type Azure Web App.
For more info on stages, got to Add a Stage and CD Pipeline modeling overview.
Azure Web Apps services
The Harness service represents your Azure Web App.
You identify the artifact for the app, configuration settings, and any secrets and configuration variables.
The Artifact is required but the rest of the settings are optional, and will depend on your Web App.
Azure Web Apps service startup command
You can use service Startup Command to add a startup script for your app.
For details on Web App startup commands, go to What are the expected values for the Startup File section when I configure the runtime stack? and Azure App Service on Linux FAQ from Azure.
You can use remote Git repos that contain your start command file, or you can select Harness to use the Harness File Store to add them to your Harness Project.
Here's an example of the startup command to start your JAR app for a Java SE stack:
java -jar /home/site/wwwroot/app.jar --server.port=80
Azure Web Apps app services configuration
In the Harness Azure App service, app settings are variables passed as environment variables to the application code.
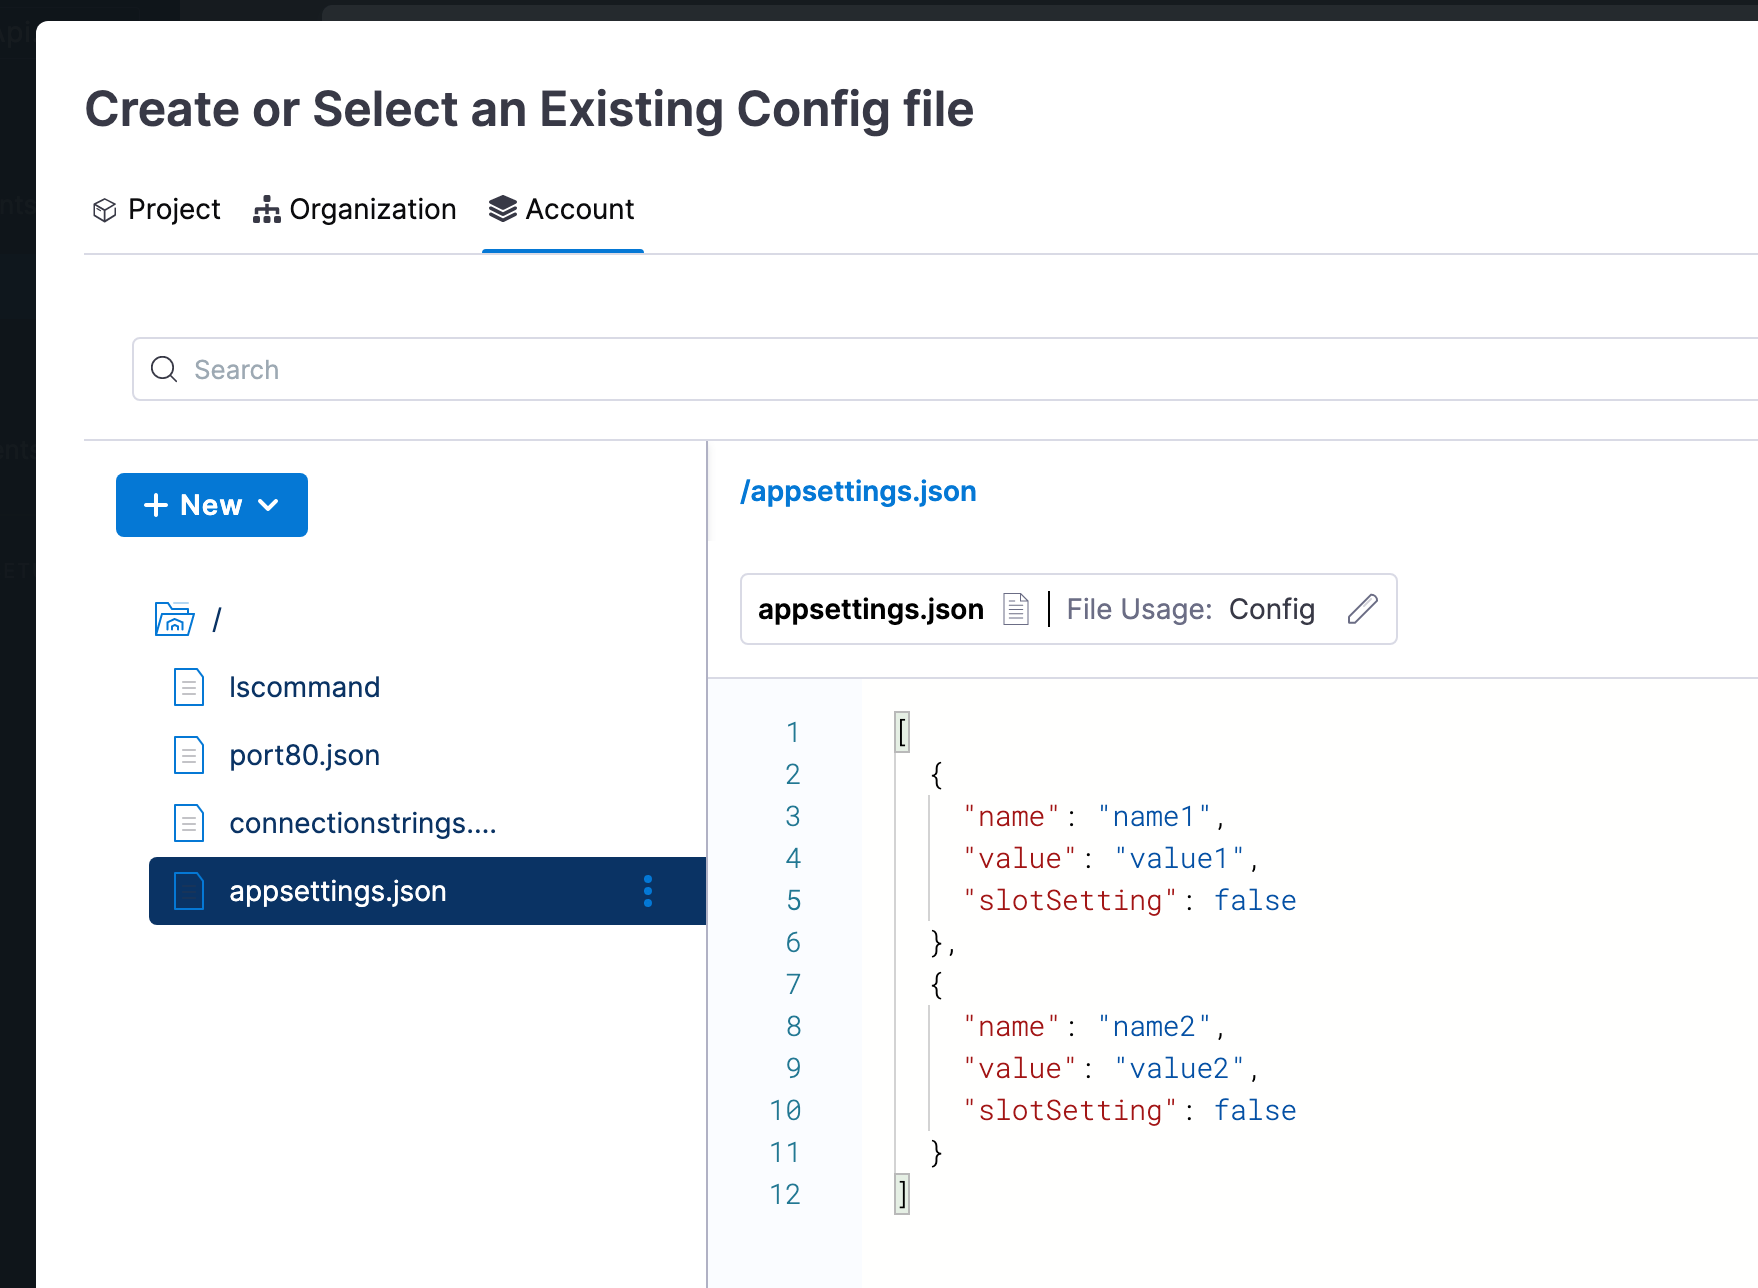
In Harness, you have the option of setting Application settings and Connection strings in the Harness Service under App Services Configuration.
You can use remote Git repos that contain your settings files, or you can select Harness to use the Harness File Store to add them to your Harness Project. For example:
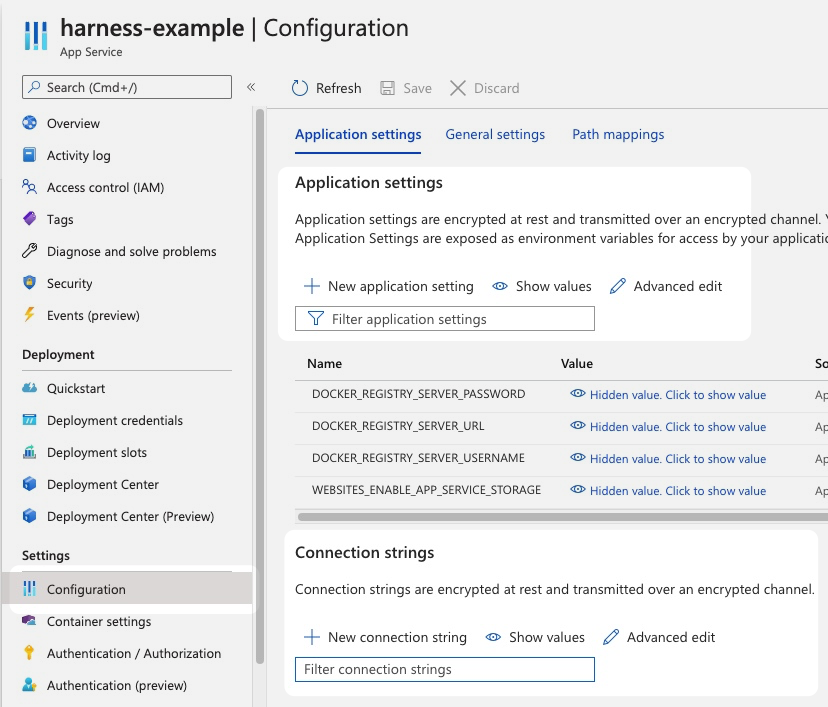
See Configure an App Service app in the Azure portal from Azure.These are the same setting you would normally set for your App using the Azure CLI:
az webapp config appsettings set --resource-group <group-name> --name <app-name> --settings DB_HOST="myownserver.mysql.database.azure.com"
Or via the portal:
Azure Web Apps artifacts
For Azure Web Apps artifacts, you will add the same Docker image or non-containerized artifact you use in your Azure Web App.
In the Harness service Artifacts, you select or create a Harness connector to the artifact registry.
For details on setting up each registry, go to Connect to an Artifact Repo.
Once you have an artifact connector set up and selected, you can fill out the Artifact Details settings.
Here are some common examples.
| ACR | Artifactory | Docker Registry |
|---|---|---|
 |  |  |
The settings for the Harness connector and artifact details are a combination of the container settings in your Azure Web App.
For example, here are the Docker Hub settings in Harness and an Azure Web App:

The above example uses a publicly available Docker image from Harness.
You might want to use that the first time you set up an Azure Web App deployment.
Harness Delegate requirement
A Harness Delegate must be installed in your infrastructure for Harness to perform tasks.
You can install a Harness Delegate in your infrastructure as part of adding the connector for the App Services Configuration or Artifacts.
There are several types of delegates you can use for an Azure App Service deployment, such as Kubernetes and Docker Delegates, as listed in the Delegates category.
For Azure Web App deployments, users typically install a Kubernetes delegate in AKS or a Docker Delegate on a VMSS.
Azure Web Apps target infrastructure
You define the target infrastructure for your deployment in the Environment settings of the pipeline stage. You can define an environment separately in your project's Environments section and select it in the stage, or create the environment within the stage Environment tab.
There are two methods of specifying the deployment target infrastructure:
- Pre-existing: the target infrastructure already exists and you simply need to provide the required settings.
- Dynamically provisioned: the target infrastructure will be dynamically provisioned on-the-fly as part of the deployment process.
For details on Harness provisioning, go to Provisioning overview.
Pre-existing Web App infrastructure
The target Azure environment for your Harness Web App deployment is defined in a Harness Environment's Infrastructure. You will provide the Web App name later in your stage's Execution.
You simply provide select or create an Azure Cloud Provider connector and then select the Web App's Subscription Id and Resource Group.
In your stage Environment, in Specify Infrastructure, you select an infrastructure or select New Infrastructure and define the infrastructure settings:
-
Connector: Select or create an Azure Cloud Provider connector that connects to your Azure application and tenant Ids.
For steps on setting up a new Azure Cloud Provider connector, go to Add a Microsoft Azure Cloud Connector.
-
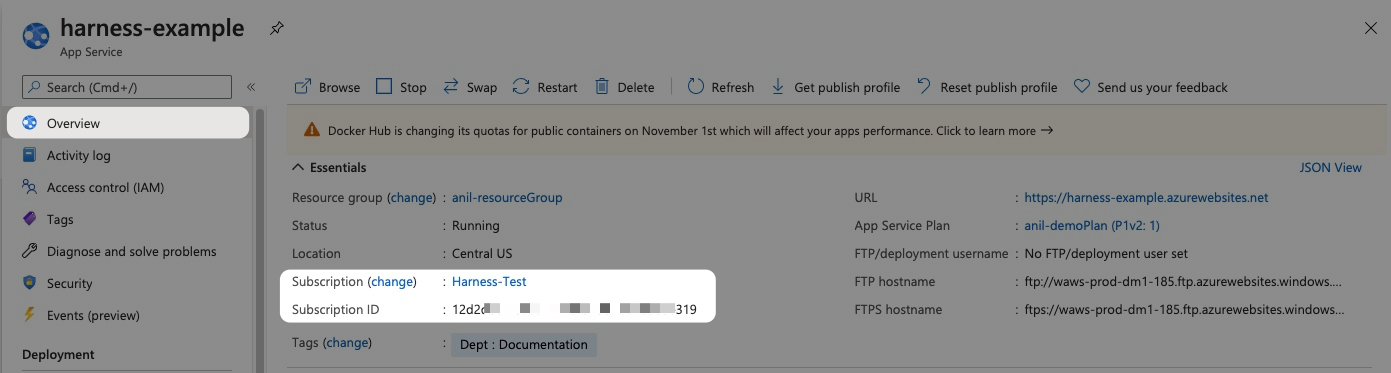
Subscription Id: Select the Azure subscription used by your Web App.
The subscription is located in the Web App Overview section of the Azure portal.
-
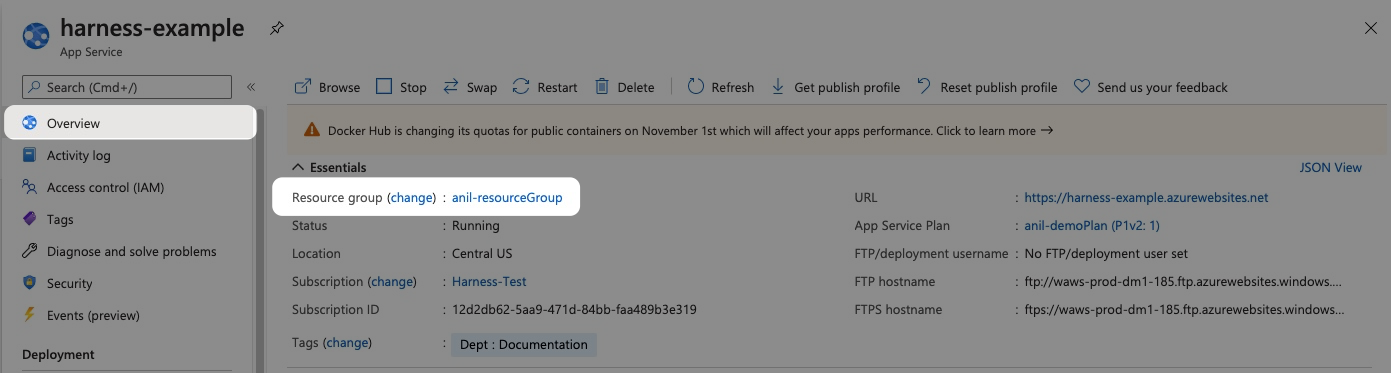
Resource Group: Select the resource group used by your Web App.
The resource group is located in the Web App Overview section of the Azure portal.
Within the same resource group, you can't mix Windows and Linux apps in the same region. See Limitations from Azure.
When you're done, infrastructure will look something like this:

Dynamically provisioned Web App infrastructure
Here is a summary of the process to dynamically provision the target infrastructure for a deployment:
- Add dynamic provisioning to the CD stage:
- In a Harness Deploy stage, in Environment, enable the option Provision your target infrastructure dynamically during the execution of your Pipeline.
- Select the type of provisioner that you want to use.
- Map the provisioner outputs to the Infrastructure Definition:
- In the Harness infrastructure, enable the option Map Dynamically Provisioned Infrastructure.
- Map the provisioning script/template outputs to the required infrastructure settings.
This process is explained in detail below.
Supported provisioners
The following provisioners are supported for Web App deployments:
Adding dynamic provisioning to the stage
To add dynamic provisioning to a Harness pipeline Deploy stage, in Environment, you enable the option Provision your target infrastructure dynamically during the execution of your Pipeline.
Next, you select the type of provisioner that you want to use. Harness automatically adds the necessary provisioner steps.
Finally, you set up the provisioner steps to run your provisioning scripts.
For documentation on each of the required steps for the provisioner you selected, go to the following topics:
- Terraform:
- Terraform Plan
- Terraform Apply
- Terraform Rollback. To see the Terraform Rollback step, toggle the Rollback setting.
- Terragrunt
- Terraform Cloud
- Azure Resource Management (ARM)
- Azure Blueprint
- Shell Script
Mapping provisioner output
Once you set up dynamic provisioning in the stage, you must map outputs from your provisioning script/template to specific settings in the Harness Infrastructure Definition used in the stage.
-
In the same CD Deploy stage where you enabled dynamic provisioning, select or create (New Infrastructure) a Harness infrastructure.
-
In the Harness infrastructure, in Azure Infrastructure details, enable the option Map Dynamically Provisioned Infrastructure.
The Azure Infrastructure details section adds a Provisioner setting and configures it as a runtime input.
-
Map the provisioning script/template outputs to the required infrastructure settings.
To provision the target deployment infrastructure, Harness needs specific infrastructure information from your provisioning script. You provide this information by mapping specific Infrastructure Definition settings in Harness to outputs from your template/script.
For Azure Web Apps, Harness needs the following settings mapped to outputs:
- Subscription Id
- Resource Group
- Tags (optional)
For example, here's a snippet of an ARM template that provisions the infrastructure for an Azure Web App and includes the required outputs:
{
  "$schema": "https://schema.management.azure.com/schemas/2019-04-01/deploymentTemplate.json#",
  "contentVersion": "1.0.0.0",
  "parameters": {
    "webAppName": {
      "type": "string",
      "metadata": {
        "description": "Name of the Azure Web App."
      }
...
  "outputs": {
    "subscription_id": {
      "type": "string",
      "value": "[subscription().subscriptionId]"
    },
    "resource_group_name": {
      "type": "string",
      "value": "[resourceGroup().name]"
    },
    "tags": {
      "type": "object",
      "value": "[parameters('tags')]"
    }
  }
}
In the Harness infrastructure definition, you map outputs to their corresponding settings using expressions in the format <+provisioner.OUTPUT_NAME>, such as <+provisioner.subscription_id>.

Roles and permissions for the connector
If you use Microsoft Azure Cloud connector and Service Principal or Managed Identity credentials, you can use a custom role or the Contributor role. The Contributor role is the minimum requirement.
Below are the Azure RBAC permissions used for System Assigned Managed Identity permissions to perform Azure Web App deployments for container and non-container artifacts.
[
                   "microsoft.web/sites/slots/deployments/read",
                   "Microsoft.Web/sites/Read",
                   "Microsoft.Web/sites/config/Read",
                   "Microsoft.Web/sites/slots/config/Read",
                   "microsoft.web/sites/slots/config/appsettings/read",
                   "Microsoft.Web/sites/slots/*/Read",
                   "Microsoft.Web/sites/slots/config/list/Action",
                   "Microsoft.Web/sites/slots/stop/Action",
                   "Microsoft.Web/sites/slots/start/Action",
                   "Microsoft.Web/sites/slots/config/Write",
                   "Microsoft.Web/sites/slots/Write",
                   "microsoft.web/sites/slots/containerlogs/action",
                   "Microsoft.Web/sites/config/Write",
                   "Microsoft.Web/sites/slots/slotsswap/Action",
                   "Microsoft.Web/sites/config/list/Action",
                   "Microsoft.Web/sites/start/Action",
                   "Microsoft.Web/sites/stop/Action",
                   "Microsoft.Web/sites/Write",
                   "microsoft.web/sites/containerlogs/action",
                   "Microsoft.Web/sites/publish/Action",
                   "Microsoft.Web/sites/slots/publish/Action"
]
Web App basic strategy deployments
In a basic deployment, a new service/artifact version is deployed to the deployment slot. Basic deployments are useful for learning Harness and any non-mission critical workflows.
The basic strategy adds the Slot Deployment step automatically, but it does not add other steps like Traffic Shift or Swap Slot.
While Traffic Shift and Swap Slot can be added, it's better to select the canary or blue green strategies for these steps.
Slot Deployment step in basic strategies
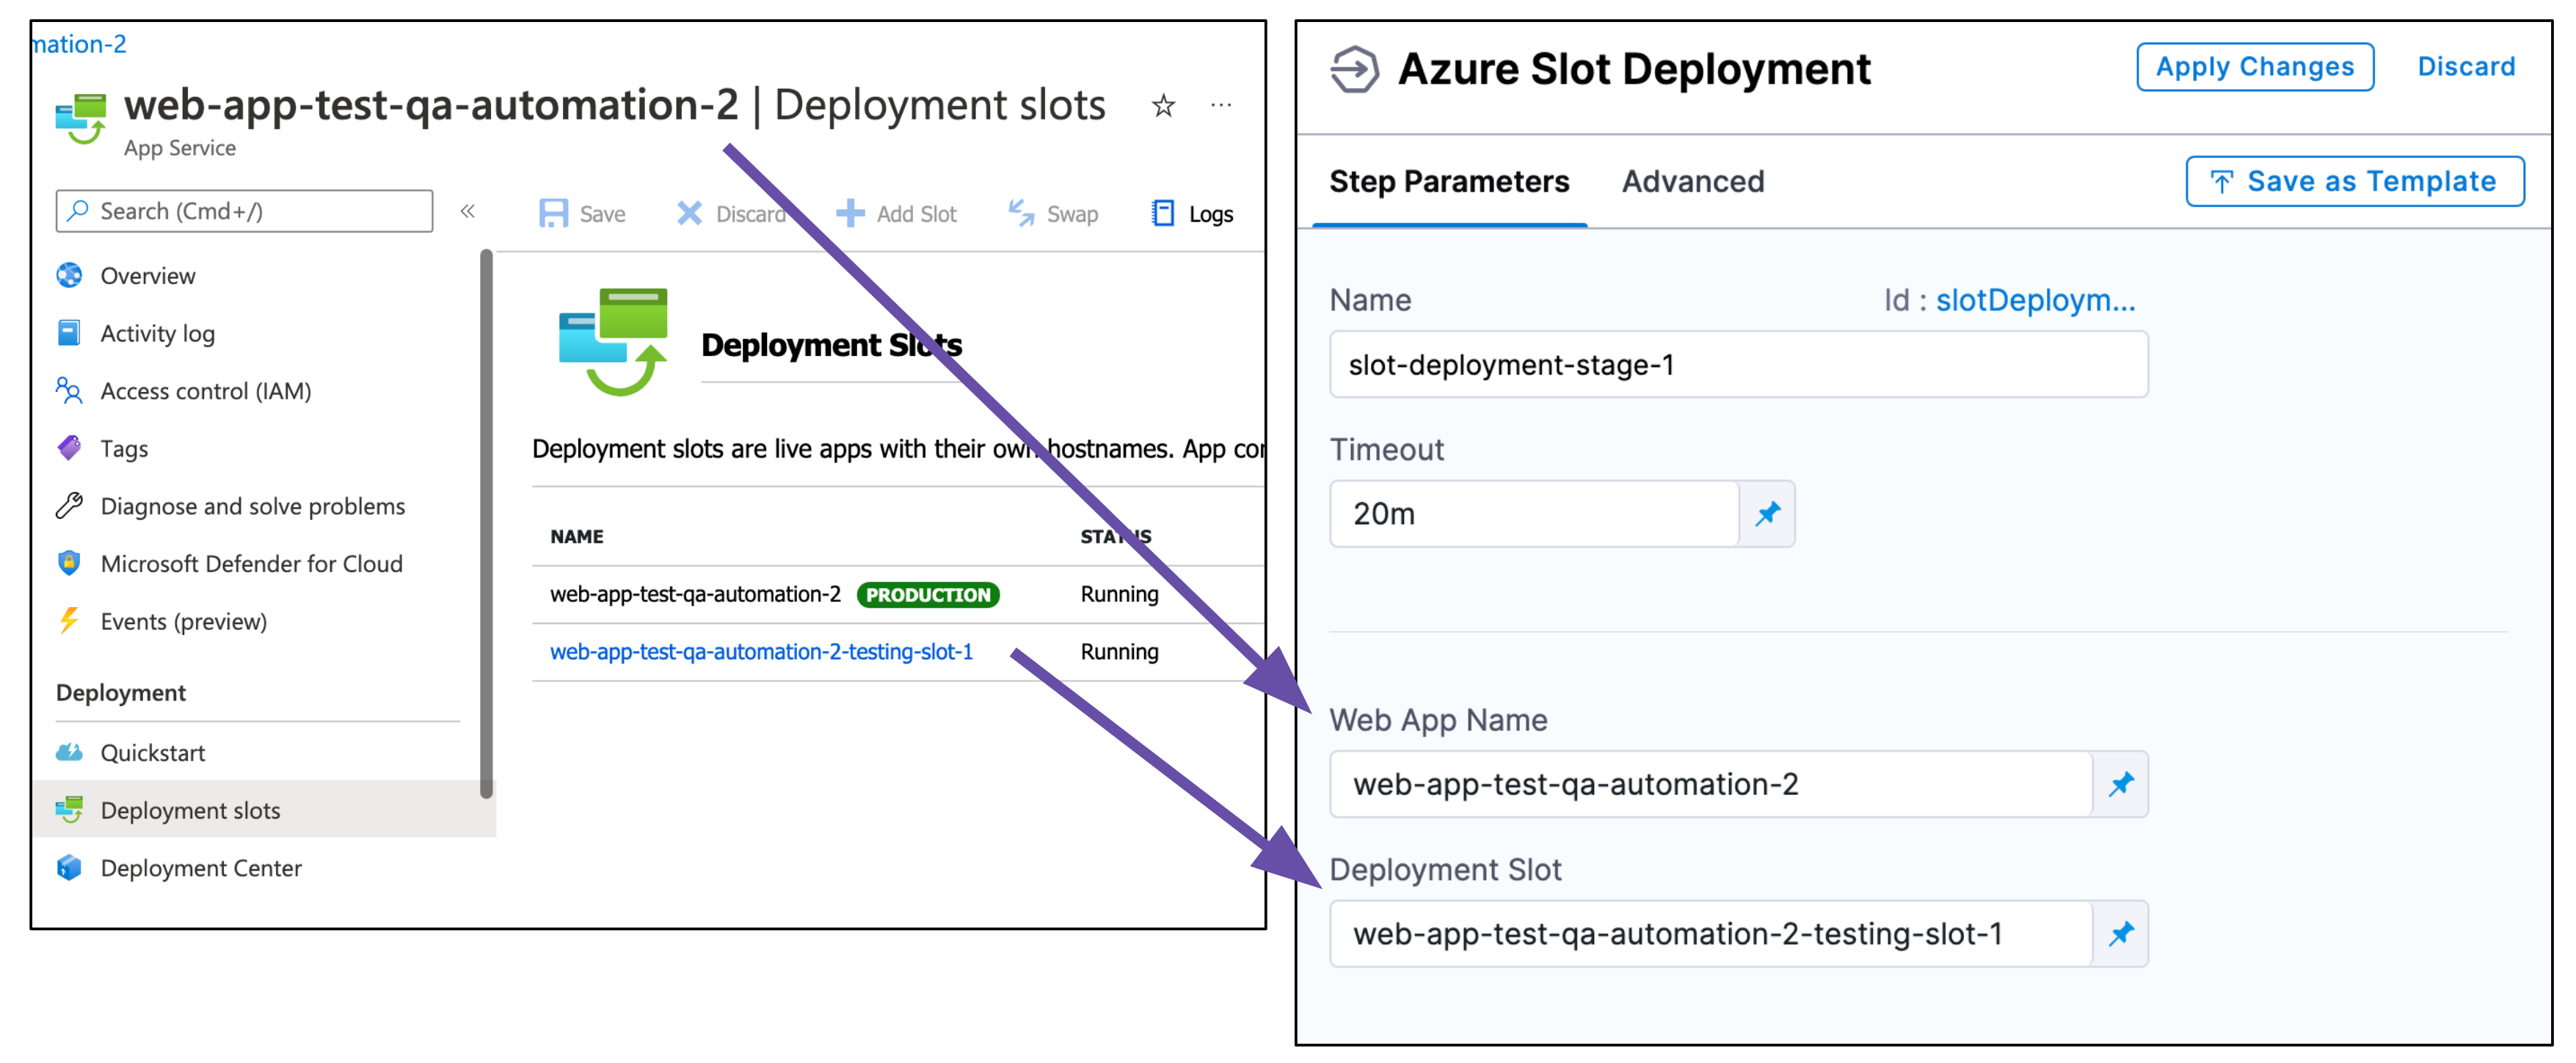
The Slot Deployment step is where you select the Web App and source deployment slot for the deployment.
The Slot Deployment step has the following settings:
-
Name: Enter a name for the step.
-
Timeout: Enter a minimum of 10m. The slot deployment relies on Azure and can take time.
- Clean: Select if you want to clean the target directory prior to deployment. For more information, go to the documentation for the
az webapp deploycommand and see the description of the--cleanoption.
- Clean: Select if you want to clean the target directory prior to deployment. For more information, go to the documentation for the
-
Web App Name: Enter the name of the Azure Web App for deployment.
When you select a Web App in Web App Name, Harness will automatically update the Deployment Slot setting with the slots for that Web App.
- Deployment Slot: enter the name of the Source slot for the deployment. This slot is where Harness deploys the new Web App version.Make sure the slot you enter is running.
Here's an example.
Web App Rollback step in basic strategies
In the Execution Rollback section you will see the Web App Rollback step.
For details on rollbacks, see Notes below.
Web App canary strategy deployments
A Harness Azure Web App canary deployment shifts traffic from one deployment slot to another incrementally.
First, you select the deployment slot where the deployment will be done. Next, you add Traffic Shift steps to incrementally shift traffic from the production slot to the deployment slot.
Finally, you swap the deployment slot with the target slot. Azure swaps the Virtual IP addresses and URLs of the deployment and target slots.
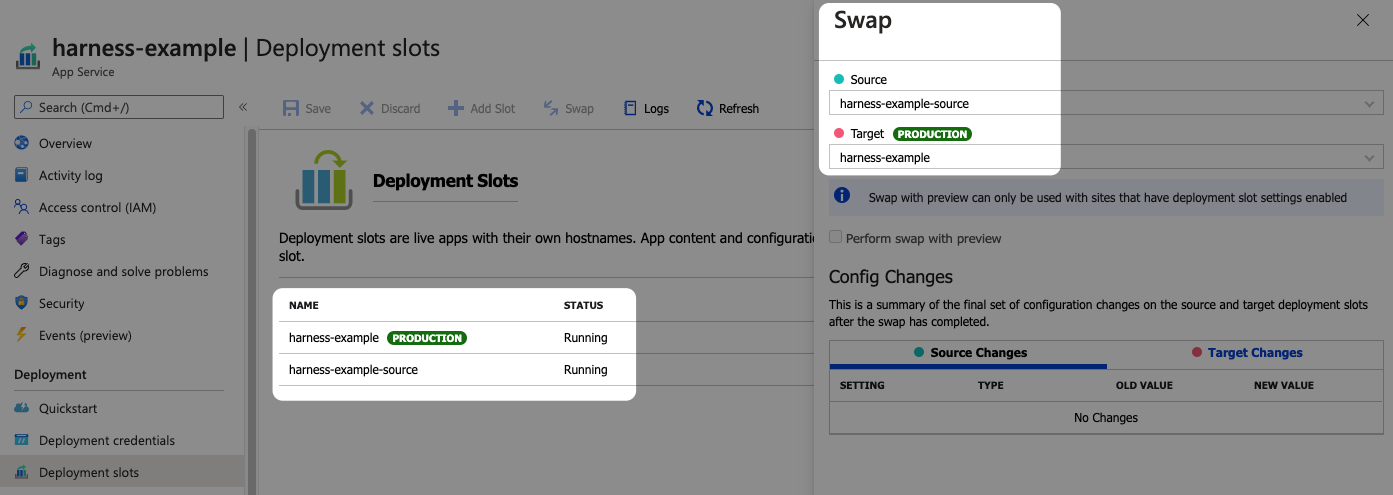
To set up the canary deployment, you need to collect the existing Deployment slots from your Azure Web App.
- In the Azure portal, select your Web App, and then select Deployment slots. You can see the Deployment slots for your Web App.
- Select Swap. You can see the Source and Target slots.

You'll use these slot names in your Harness steps.
For a canary deployment, Harness adds the following steps.
Slot Deployment step in canary strategies
The Slot Deployment step is where you select the Web App and source deployment slot for the deployment.
The Slot Deployment step has the following settings:
-
Name: Enter a name for the step.
-
Timeout: Enter a minimum of 10m. The slot deployment relies on Azure and can take time.
- Clean: Select if you want to clean the target directory prior to deployment. For more information, go to the documentation for the
az webapp deploycommand and see the description of the--cleanoption.
- Clean: Select if you want to clean the target directory prior to deployment. For more information, go to the documentation for the
-
Web App Name: Enter the name of the Azure Web App for deployment.
-
Deployment Slot: Enter the name of the Source slot for the deployment. This slot is where Harness deploys the new Web App version.Make sure the slot you enter is running.
Here's an example.

Add a health check after slot deployment
Typically, it's a good practice to add a health check to ensure that the Docker container or non-containerized app is running correctly.
The Slot Deployment step is considered successful once the slot is in a running state. A running state does not ensure that your new app is accessible. It can take some time for new content to become available on Azure. Also, the slot deployment might succeed but the Docker container or non-containerized artifact could be corrupted.
A health check after Slot Deployment can ensure a successful deployment.
A health check can be performed using a Shell Script step. You can also use Harness Approval steps to ensure the app is running before proceeding to the Traffic Shift step.
Traffic Shift steps in canary strategies
The Traffic Shift step shifts network traffic from the production slot to the deployment slot specified in the Slot Deployment step.
Traffic Shift steps are not cumulative. If you set 25% in one and 25% in the next one, only 25% of traffic is routed.
In the Traffic Shift step, in Traffic %, enter a number (without the % character).
You can use multiple Traffic Shift steps to incrementally increase traffic. In-between each Traffic Shift step, you can add a health check and/or Approval step.
Swap Slot step in canary strategies
The final step in the phase is Swap Slot. This step swaps the deployment slot you entered in the Slot Deployment step with the Target Slot mentioned in the Swap Slots step. It is similar to doing a swap in the Azure portal or via the Azure CLI:
az webapp deployment slot swap -n "web app name" -g "resource group name" -s "source slot name" --target-slot "target slot"
If you are new to Azure Web App deployment slot swapping, see What happens during a swap from Azure.
In the Swap Slot step, in Target Slot, enter the name of the target (production) slot.
Once you run the pipeline you will see the swap in the Swap Slot step logs:
Sending request for swapping source slot: [stage] with target slot: [production]
Operation - [Swap Slots] was success
Swapping request returned successfully
Swapping slots done successfully
Web App Rollback in canary strategies
In the Execution Rollback section you will see the Web App Rollback step.
For details on rollbacks, see Notes below.
Web App blue green strategy deployments
A Harness Azure Web App blue green deployment swaps traffic from one deployment slot to another.
If you are new to Azure Web App deployment slot swapping, see What happens during a swap from Azure.
First, you need to collect the existing Deployment slots from your Azure Web App.
- In the Azure portal, select your Web App, and then select Deployment slots. You can see the Deployment slots for your Web App.
- Select Swap. You can see the Source and Target slots.
You'll use these slot names in your Harness steps.
For a blue green deployment, Harness adds the following steps.
Slot Deployment step in blue green strategies
The Slot Deployment step is where you select the Web App and source deployment slot for the deployment.
The Slot Deployment step has the following settings:
-
Name: Enter a name for the step.
-
Timeout: Enter a minimum of 10m. The slot deployment relies on Azure and can take time.
- Clean: Select if you want to clean the target directory prior to deployment. For more information, go to the documentation for the
az webapp deploycommand and see the description of the--cleanoption.
- Clean: Select if you want to clean the target directory prior to deployment. For more information, go to the documentation for the
-
Web App Name: Enter the Azure Web App for deployment.
-
Deployment Slot: Enter the Source slot for the deployment. This slot is where Harness deploys the new Web App version.Make sure the slot you select is running. Harness shows all slots regardless of their status.
Add a health check after Slot Deployment
Typically, it's a good practice to add a health check to ensure that the Docker container or non-containerized app is running correctly.
The Slot Deployment step is considered successful once the slot is in a running state. A running state does not ensure that your new app is accessible. It can take some time for new content to become available on Azure. Also, the slot deployment might succeed but the Docker container or non-containerized artifact could be corrupted.
A health check after Slot Deployment can ensure a successful deployment.
A health check can be performed using a Shell Script step. You can also use Harness Approval steps to ensure the app is running before proceeding to the Traffic Shift step.
Swap Slot step in blue green strategies
This step performs the Web App deployment slot swap. It's like doing a swap in the Azure portal or via the Azure CLI:
az webapp deployment slot swap -n "web app name" -g "resource group name" -s "source slot name" --target-slot "target slot"
The Swap Slot step has the following settings:
- Target Slot: enter the Target slot (production) for the deployment. This slot is where Harness will swap the App content and configurations elements during the Swap Slot step.
Web App Rollback
In the Execution Rollback section you will see the Web App Rollback step.
For details on rollbacks, see Notes below.
Notes
Important notes
- App Service on Linux isn't supported on Shared pricing tier.
- You can't mix Windows and Linux apps in the same App Service plan.
- Within the same resource group, you can't mix Windows and Linux apps in the same region.
- Harness uses the Azure SDK among other methods and Authenticated proxy is not supported for Azure SDK. Consequently, you cannot use Azure connections for artifacts, machine images, etc, that require proxy authentication. This is an Azure limitation, not a Harness limitation. This is a known Azure limitation with Java environment properties and their SDK.
Rollback summary
For Azure Web App deployments, Harness saves the previous Docker or non-containerized app details that were running on the slot.
In case of an Azure Web App deployment failure, Harness rollback redeploys the previous instance.
Web app rollback
Harness will try to recover the state before deployment.
For a Docker image deployment rollback, Harness will fetch the Web App details (artifact, app settings, connection strings, startup script) of the existing slot and use this data to bring the slot to its previous state.
For non-containerized artifact rollback, Harness will rollback to the last successful deployment done with Harness. Harness saves deployment details after a successful deployment and uses this data for rollback in the next deployment.
Traffic rollback
Harness returns all traffic to the previous, pre-deployment percentages.
If the pre-deployment traffic was arranged with the source slot at 20% and the target slot at 80%, rollback will return network traffic to these percentages.
Rollback example for non-containerized rollbacks
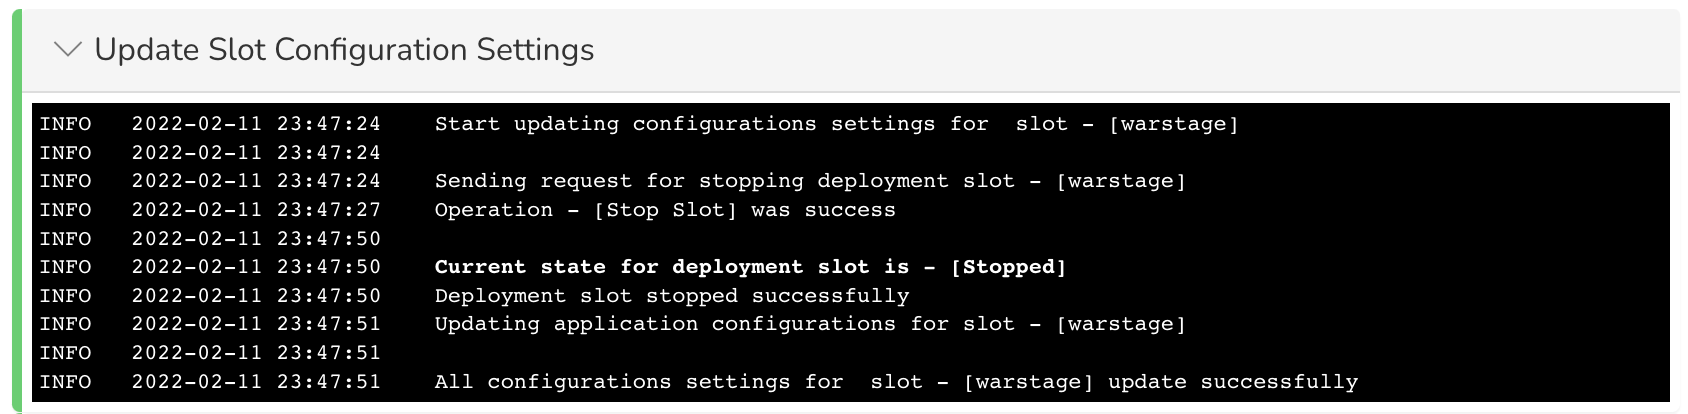
Here's an example of a rollback.
Update Slot Configuration Settings:
Deploy to Slot:
Rollback logs
Here's the log activity from a rollback with the timestamps removed:
Sending request for stopping deployment slot - [stage]
Operation - [Stop Slot] was success
Request sent successfully

Start updating Container settings for slot - [stage]
Start cleaning existing container settings

Current state for deployment slot is - [Stopped]
Deployment slot stopped successfully

Start updating application configurations for slot - [stage]
Deployment slot configuration updated successfully

Existing container settings deleted successfully
Start cleaning existing image settings

Existing image settings deleted successfully
Start updating Container settings:
[[DOCKER_REGISTRY_SERVER_URL]]

Container settings updated successfully
Start updating container image and tag:
[library/nginx:1.19-alpine-perl], web app hosting OS [LINUX]

Image and tag updated successfully for slot [stage]
Deployment slot container settings updated successfully

Sending request for starting deployment slot - [stage]
Operation - [Start Slot] was success
Request sent successfully

Sending request to shift [0.00] traffic to deployment slot: [stage]

Current state for deployment slot is - [Running]
Deployment slot started successfully

Traffic percentage updated successfully

The following task - [SLOT_ROLLBACK] completed successfully
Rollback limitations
Rollback limitations for non-containerized rollbacks
Rollback for Non-Containerized artifact deployments is not supported for the first two deployments because the necessary artifact details are not available to perform a rollback.
Streaming logs limitations for both Azure container and non-containerized deployments
You might face timeout issues as a result of limitations with streaming Web App slot deployment logs. For example, you might see java.net.SocketTimeoutException: timeout or some other socket errors as a result of the Azure SDK client.
Harness is working with the Azure team for a resolution (see issue 27221). At this time, you can use a Harness HTTP step to verify that the slot is up and ready.
Application settings and connection strings
- If you add App Service Configuration settings in the Harness Service, you must include a name (
"name":), and the name must be unique. This is the same requirement in Azure App Services. - Do not set Docker settings in the Harness Service Application Settings and Connection Strings. Harness will override these using the Docker settings in the artifact you add to the Harness Service in Artifact.
Using secrets and variables settings
You can use Harness secrets and Service or Workflow variables in the Application settings and Connection strings in the Harness Service.
These settings use JSON, so ensure that you use quotes around the variable or secret reference:
  {
    "name": "PASSWORD",
    "value": "<+secrets.getValue('doc-secret')>",
    "slotSetting": false
  },
What about the Rolling strategy?
The Rolling strategy doesn't suit Azure Web App deployments as they are use slots for staging and production environments. The Rolling strategy uses a single environment and roll out a new app version incrementally.