> For the complete documentation index, see [llms.txt](https://developer.harness.io/llms.txt). Markdown versions of documentation pages are available by appending `.md` to page URLs; this page is available as [Markdown](https://developer.harness.io/continuous-integration/use-harness-ci/use-harness-ci/build-and-upload-artifacts/artifacts-tab.md).

# Publish anything to the Artifacts tab

You can publish any URL to the Artifacts tab.

You can use the [Artifact Metadata Publisher plugin](https://github.com/drone-plugins/artifact-metadata-publisher) to publish any URL on the **Artifacts** tab of the [Build details page](/continuous-integration/use-harness-ci/use-harness-ci/viewing-builds.md).

{% hint style="info" %}
If you use AWS S3, you can use either the Artifact Metadata Publisher plugin or the [S3 Upload and Publish plugin](/continuous-integration/use-harness-ci/use-harness-ci/build-and-upload-artifacts/upload-artifacts/upload-artifacts-to-s3.md#use-the-s3-upload-and-publish-plugin), which combines the upload artifact and publish URL steps in one plugin.
{% endhint %}

### Configure the Artifact Metadata Publisher plugin <a href="#configure-the-artifact-metadata-publisher-plugin" id="configure-the-artifact-metadata-publisher-plugin"></a>

To use the Artifact Metadata Publisher plugin, add a [Plugin step](/continuous-integration/use-harness-ci/use-harness-ci/use-drone-plugins/plugin-step-settings-reference.md) to your [CI pipeline](/continuous-integration/use-harness-ci/use-harness-ci/prep-ci-pipeline-components.md).

For artifacts generated in the same pipeline, the Plugin step is usually placed after the step that [uploads the artifact](/continuous-integration/use-harness-ci/use-harness-ci/build-and-upload-artifacts/build-and-upload-an-artifact.md#upload-artifacts) to cloud storage.

```yaml
- step:
    type: Plugin
    name: publish artifact metadata
    identifier: publish_artifact_metadata
    spec:
      connectorRef: YOUR_IMAGE_REGISTRY_CONNECTOR
      image: plugins/artifact-metadata-publisher
      settings:
        file_urls: https://domain.com/path/to/artifact
```

#### Plugin step specifications <a href="#plugin-step-specifications" id="plugin-step-specifications"></a>

Use these specifications to configure the Plugin step to use the Artifact Metadata Publisher plugin.

**connectorRef**

Use the built-in Docker connector (`account.harness.Image`) or specify your own Docker connector. Harness uses this to pull the plugin Docker image.

This setting is labeled **Container Registry** in the Visual editor.

**image**

Set to `plugins/artifact-metadata-publisher`.

**file\_urls**

Provide the URL for the artifact you want to link on the **Artifacts** tab. In the Visual editor, set this as a key-value pair under **Settings**.

For artifacts in cloud storage, use the appropriate URL format for your cloud storage provider, for example:

* GCS: `https://storage.googleapis.com/GCS_BUCKET_NAME/TARGET_PATH/ARTIFACT_NAME_WITH_EXTENSION`
* S3: `https://BUCKET.s3.REGION.amazonaws.com/TARGET/ARTIFACT_NAME_WITH_EXTENSION`

For artifacts uploaded through [Upload Artifacts steps](/continuous-integration/use-harness-ci/use-harness-ci/build-and-upload-artifacts/build-and-upload-an-artifact.md#upload-artifacts), use the **Bucket**, **Target**, and artifact name specified in the **Upload Artifacts** step.

For private S3 buckets, use the console view URL, such as `https://s3.console.aws.amazon.com/s3/object/BUCKET?region=REGION&prefix=TARGET/ARTIFACT_NAME_WITH_EXTENSION`.

If you uploaded multiple artifacts, you can provide a list of URLs, such as:

```yaml
file_urls:
  - https://BUCKET.s3.REGION.amazonaws.com/TARGET/artifact1.html
  - https://BUCKET.s3.REGION.amazonaws.com/TARGET/artifact2.pdf
```

You can also set **display name** for each of the URLs set in the plugin, by using the format `name:::file_url`, where `:::` is the delimiter that separates the name and url. For example:

```yaml
file_urls:
  - artifact1:::https://BUCKET.s3.REGION.amazonaws.com/TARGET/artifact1.html
  - artifact2:::https://BUCKET.s3.REGION.amazonaws.com/TARGET/artifact2.pdf
```

For information about using Harness CI to upload artifacts, go to [Build and push artifacts and images](/continuous-integration/use-harness-ci/use-harness-ci/build-and-upload-artifacts/build-and-upload-an-artifact.md).

### Artifact metadata publisher environment variables <a href="#artifact-metadata-publisher-environment-variables" id="artifact-metadata-publisher-environment-variables"></a>

The artifact-metadata-publisher plugin looks for two environment variables:

* `PLUGIN_ARTIFACT_FILE`: The file path where the plugin stores artifact metadata
* `PLUGIN_FILE_URLS`: The URLs to be published to the Artifacts tab

The URLs passed via `PLUGIN_FILE_URLS` are stored in `PLUGIN_ARTIFACT_FILE` in the following JSON format, which the CI manager expects to publish under the Artifacts tab:

```json
{
  "kind": "fileUpload/v1",
  "data": {
    "fileArtifacts": [
      {
        "name": "file-0",
        "url": "https://example.com/artifact"
      }
    ]
  }
}
```

#### Kubernetes flow differences <a href="#kubernetes-flow-differences" id="kubernetes-flow-differences"></a>

In Kubernetes flow, the CI manager doesn't automatically create the temporary file and pass it via `PLUGIN_ARTIFACT_FILE` (unlike cloud flow). You need to pass `artifact_file: somefile.txt` explicitly as input. The plugin then creates this file (`somefile.txt`) in the JSON format above, containing the URLs passed via `PLUGIN_FILE_URLS` input, which is then processed and displayed under the Artifacts tab in the pipeline.

```yaml
- step:
    type: Plugin
    name: publish artifact metadata
    identifier: publish_artifact_metadata
    spec:
      connectorRef: YOUR_IMAGE_REGISTRY_CONNECTOR
      image: plugins/artifact-metadata-publisher
      settings:
        file_urls: https://domain.com/path/to/artifact
        artifact_file: temp.txt
```

### Using the plugin binary on hosted macOS runners <a href="#using-the-plugin-binary-on-hosted-macos-runners" id="using-the-plugin-binary-on-hosted-macos-runners"></a>

Hosted macOS runners cannot run Docker containers, which means you cannot use a containerized Plugin step. Download and run the plugin binary directly in a Run step instead.

The following example downloads the macOS ARM64 binary and publishes a URL. It passes through `PLUGIN_ARTIFACT_FILE`, which Harness injects on the runner.

#### Download and use the plugin binary <a href="#download-and-use-the-plugin-binary" id="download-and-use-the-plugin-binary"></a>

Use the following commands in a Run step to download the appropriate binary for macOS and publish artifacts:

```yaml
- step:
    type: Run
    name: Publish Artifact Metadata
    identifier: publish_artifact_metadata
    spec:
      shell: Sh
      command: |-
        echo "$PLUGIN_ARTIFACT_FILE"
        # Download the artifact-metadata-publisher binary for macOS ARM64
        curl -L https://github.com/drone-plugins/artifact-metadata-publisher/releases/download/v2.2.0/artifact-metadata-publisher-darwin-arm64.zst -o artifact-metadata-publisher-darwin-arm64.zst
        # Decompress the binary and make it executable
        zstd -d artifact-metadata-publisher-darwin-arm64.zst -o ./artifact-metadata-publisher
        chmod 700 ./artifact-metadata-publisher
        # Run the plugin with the injected artifact file and your artifact URL
        PLUGIN_ARTIFACT_FILE="$PLUGIN_ARTIFACT_FILE" PLUGIN_FILE_URLS="https://domain.com/path/to/artifact" ./artifact-metadata-publisher
```

**Note**

* Replace `v2.2.0` with the latest version from the [artifact-metadata-publisher releases](https://github.com/drone-plugins/artifact-metadata-publisher/releases).
* For macOS Intel (x86\_64), use `artifact-metadata-publisher-darwin-amd64.zst` instead.
* The CI manager automatically creates a temporary file and injects it via the `PLUGIN_ARTIFACT_FILE` environment variable, so you don't need to create or manage this file manually.

#### Publish multiple artifacts with custom names <a href="#publish-multiple-artifacts-with-custom-names" id="publish-multiple-artifacts-with-custom-names"></a>

You can publish multiple artifacts and set custom display names using the format `name:::url`, where `:::` is the delimiter between the name and URL:

```yaml
- step:
    type: Run
    name: Publish Multiple Artifacts
    identifier: publish_multiple_artifacts
    spec:
      shell: Sh
      command: |-
        curl -L https://github.com/drone-plugins/artifact-metadata-publisher/releases/download/v2.2.0/artifact-metadata-publisher-darwin-arm64.zst -o artifact-metadata-publisher-darwin-arm64.zst
        zstd -d artifact-metadata-publisher-darwin-arm64.zst -o ./artifact-metadata-publisher
        chmod 700 ./artifact-metadata-publisher
        
        # Publish multiple artifacts with custom names
        PLUGIN_FILE_URLS="Config File:::https://s3.amazonaws.com/bucket/config.json,Build Report:::https://s3.amazonaws.com/bucket/report.html" ./artifact-metadata-publisher
```

#### Example: Publishing S3 presigned URLs <a href="#example-publishing-s3-presigned-urls" id="example-publishing-s3-presigned-urls"></a>

Here's a complete example that generates a presigned URL for an S3 artifact and publishes it to the Artifacts tab:

```yaml
- step:
    type: Run
    name: Generate Presigned URL
    identifier: generate_presigned_url
    spec:
      shell: Sh
      command: |-
        FILE_NAME="my-artifact.zip"
        
        # Generate presigned URL (assumes AWS credentials are configured)
        PRESIGNED_URL=$(aws s3 presign s3://my-bucket/$FILE_NAME --expires-in 3600)
        
        echo "Generated presigned URL: $PRESIGNED_URL"
      envVariables:
        AWS_ACCESS_KEY_ID: <+secrets.getValue("aws_access_key")>
        AWS_SECRET_ACCESS_KEY: <+secrets.getValue("aws_secret_key")>
      outputVariables:
        - name: PRESIGNED_URL

- step:
    type: Run
    name: Publish Artifact Metadata
    identifier: publish_artifact_metadata
    spec:
      shell: Sh
      command: |-
        curl -L https://github.com/drone-plugins/artifact-metadata-publisher/releases/download/v2.2.0/artifact-metadata-publisher-darwin-arm64.zst -o artifact-metadata-publisher-darwin-arm64.zst
        zstd -d artifact-metadata-publisher-darwin-arm64.zst -o ./artifact-metadata-publisher
        chmod 700 ./artifact-metadata-publisher
        
        # Use the presigned URL from the previous step
        PLUGIN_FILE_URLS="my-artifact.zip:::<+execution.steps.generate_presigned_url.output.outputVariables.PRESIGNED_URL>" ./artifact-metadata-publisher
```

### Build logs and artifact files <a href="#build-logs-and-artifact-files" id="build-logs-and-artifact-files"></a>

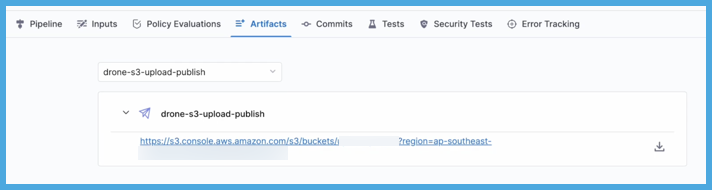
When you run the pipeline, you can observe the step logs on the [Build details page](/continuous-integration/use-harness-ci/use-harness-ci/viewing-builds.md), and you can find the artifact URL on the [Artifacts tab](/continuous-integration/use-harness-ci/use-harness-ci/viewing-builds.md).

On the **Artifacts** tab, select the step name to expand the list of artifact links associated with that step.

If your pipeline has multiple steps that upload artifacts, use the dropdown menu on the **Artifacts** tab to switch between lists of artifacts uploaded by different steps.

<figure><img src="https://4226796345-files.gitbook.io/~/files/v0/b/gitbook-x-prod.appspot.com/o/spaces%2FqKtVmwAGTfGQS1MVC97G%2Fuploads%2Fgit-blob-ca8e292a49ebca5845619e811da42881bb5314c8%2Fartifacts-tab-with-link.png?alt=media" alt=""><figcaption></figcaption></figure>

### Tutorial: Upload an Allure report to the Artifacts tab <a href="#tutorial-upload-an-allure-report-to-the-artifacts-tab" id="tutorial-upload-an-allure-report-to-the-artifacts-tab"></a>

This tutorial demonstrates how to use the Artifacts Metadata Publisher plugin by generating and uploading an [Allure report](https://qameta.io/allure-report/).

<details>

<summary>Part 1: Prepare cloud storage</summary>

1. You need access to a cloud storage provider. This tutorial uses GCS. If you use another option, you'll need to modify some of the steps according to your chosen cloud storage provider.
2. If you use S3, GCS, or JFrog, you need a Harness connector to use with the **Upload Artifact** step:

   * S3: [AWS connector](/harness-ai/use-harness-platform/connectors/cloud-providers/add-aws-connector.md)
   * GCS: [GCP connector](/harness-ai/use-harness-platform/connectors/cloud-providers/connect-to-google-cloud-platform-gcp.md)
   * JFrog: [Artifactory connector](/harness-ai/use-harness-platform/connectors/artifact-repositories/add-an-artifactory-connector/artifactory-connector-settings-reference.md)

   <div data-gb-custom-block data-tag="hint" data-style="info" class="hint hint-info"><p>Store authentication and access keys for connectors as <a href="/harness-ai/use-harness-platform/secrets/add-file-secrets.md">Harness secrets</a>.</p></div>
3. In your cloud storage, create a bucket or repo where you can upload your artifact.

   To access the artifact directly from the **Artifacts** tab, the upload location must be publicly available. If the location is not publicly available, you might need to log in to view the artifact or use a different artifact URL (such as a console view URL). This tutorial uses a publicly available GCS bucket to store the report.
</details>

<details>

<summary>Part 2: Prepare artifacts to upload</summary>

Add steps to your pipeline that generate and prepare artifacts to upload, such as [Run steps](/continuous-integration/use-harness-ci/use-harness-ci/run-step-settings.md). The steps you use depend on what artifacts you ultimately want to upload.

For example, this tutorial uses three **Run** steps to generate and prepare an artifact:

* The first step runs tests with Maven.
* The second step generates an Allure report. To ensure the build environment has the Allure tool, the step uses a Docker image that has this tool: `solutis/allure:2.9.0`.
* The third step combines the Allure report into a single HTML file.
  * To view an Allure report in a browser, you must run a web server with the `allure open` command; however, this command won't persist after the CI pipeline ends. Instead, use the [allure-combine](https://pypi.org/project/allure-combine/) tool to convert the Allure report into a single HTML file.
  * Running the `allure-combine .` command inside `allure-report` generates the `complete.html` file.
  * To ensure the build environment as access to the allure-combine tool, you can include steps to install it or use a Docker image that has the tool, such as `shubham149/allure-combine:latest`.

```yaml
- step:
    type: Run
    name: run maven tests
    identifier: run_maven_tests
    spec:
      connectorRef: YOUR_IMAGE_REGISTRY_CONNECTOR
      image: openjdk:11
      shell: Sh
      command: ./mvnw clean test site
- step:
    type: Run
    name: generate allure report
    identifier: generate_allure_report
    spec:
      connectorRef: YOUR_IMAGE_REGISTRY_CONNECTOR
      image: solutis/allure:2.9.0
      command: |
        cd target
        allure generate allure-results --clean -o allure-report
- step:
    type: Run
    name: combine report
    identifier: combine_report
    spec:
      connectorRef: YOUR_IMAGE_REGISTRY_CONNECTOR
      image: shubham149/allure-combine:latest
      command: |
        cd target/allure-report
        allure-combine .
        cd ../..
        cp target/allure-report/complete.html .
```

</details>

<details>

<summary>Part 3: Upload to cloud storage</summary>

Add a step to upload your artifact to cloud storage:

* [Upload Artifacts to JFrog](/continuous-integration/use-harness-ci/use-harness-ci/build-and-upload-artifacts/upload-artifacts/upload-artifacts-to-jfrog.md)
* [Upload Artifacts to GCS](/continuous-integration/use-harness-ci/use-harness-ci/build-and-upload-artifacts/upload-artifacts/upload-artifacts-to-gcs-step-settings.md)
* [Upload Artifacts to S3](/continuous-integration/use-harness-ci/use-harness-ci/build-and-upload-artifacts/upload-artifacts/upload-artifacts-to-s3.md)
* [Upload Artifacts to Sonatype Nexus](/continuous-integration/use-harness-ci/use-harness-ci/build-and-upload-artifacts/upload-artifacts/upload-artifacts-to-sonatype-nexus.md)

For example, this tutorial uploads the combined Allure report to GCS:

```yaml
- step:
    type: GCSUpload
    name: upload report
    identifier: upload_report
    spec:
      connectorRef: YOUR_GCP_CONNECTOR_ID
      bucket: YOUR_GCS_BUCKET
      sourcePath: target/allure-report/complete.html
      target: <+pipeline.sequenceId>
```

{% hint style="info" %}
The `target` value uses a [Harness expression](/harness-ai/use-harness-platform/variables-and-expressions/runtime-inputs.md#expressions), `<+pipeline.sequenceId>`, to ensure that artifacts uploaded by this pipeline are stored in unique directories and don't overwrite one another.
{% endhint %}

</details>

<details>

<summary>Part 4: Add URLs to the Artifacts tab</summary>

At this point, you can run the pipeline and then manually find the uploaded artifact in your cloud storage bucket or repo. Alternately, you can [use the Artifact Metadata Publisher plugin](#configure-the-artifact-metadata-publisher-plugin), which makes it easier to find the artifact directly associated with a particular build.

For example, this step publishes the URL for the combined Allure report on the Artifacts tab:

```yaml
- step:
    type: Plugin
    name: publish artifact metadata
    identifier: publish_artifact_metadata
    spec:
      connectorRef: YOUR_IMAGE_REGISTRY_CONNECTOR
      image: plugins/artifact-metadata-publisher
      settings:
        file_urls: https://storage.googleapis.com/YOUR_GCS_BUCKET/<+pipeline.sequenceId>/complete.html
```

For details about these settings, go to [Configure the Artifact Metadata Publisher plugin](#configure-the-artifact-metadata-publisher-plugin).

</details>

<details>

<summary>Tutorial YAML examples</summary>

These YAML examples demonstrate the pipeline created in the preceding tutorial. This pipeline:

1. Builds a Java Maven application.
2. Generates and compiles an Allure report.
3. Uploads the report to cloud storage.
4. Provides a URL to access the report from the **Artifacts** tab in Harness.

This example uses Harness Cloud build infrastructure and uploads the Allure report artifact to GCS.pipeline: name: allure-report-upload identifier: allurereportupload projectIdentifier: YOUR\_HARNESS\_PROJECT\_ID orgIdentifier: default tags: {} properties: ci: codebase: connectorRef: YOUR\_CODEBASE\_CONNECTOR\_ID repoName: YOUR\_CODE\_REPO\_NAME build: <+input> stages: - stage: name: test and upload artifact identifier: test\_and\_upload\_artifact description: "" type: CI spec: cloneCodebase: true platform: os: Linux arch: Amd64 runtime: type: Cloud spec: {} execution: steps: - step: type: Run name: run maven tests identifier: run\_maven\_tests spec: connectorRef: YOUR\_IMAGE\_REGISTRY\_CONNECTOR image: openjdk:11 shell: Sh command: ./mvnw clean test site - step: type: Run name: generate allure report identifier: generate\_allure\_report spec: connectorRef: YOUR\_IMAGE\_REGISTRY\_CONNECTOR image: solutis/allure:2.9.0 command: | cd target allure generate allure-results --clean -o allure-report - step: type: Run name: combine report identifier: combine\_report spec: connectorRef: YOUR\_IMAGE\_REGISTRY\_CONNECTOR image: shubham149/allure-combine:latest command: | cd target/allure-report allure-combine . cd ../.. cp target/allure-report/complete.html . - step: type: GCSUpload name: upload report identifier: upload\_report spec: connectorRef: YOUR\_GCP\_CONNECTOR\_ID bucket: YOUR\_GCS\_BUCKET sourcePath: target/allure-report/complete.html target: <+pipeline.sequenceId> - step: type: Plugin name: publish artifact metadata identifier: publish\_artifact\_metadata spec: connectorRef: YOUR\_IMAGE\_REGISTRY\_CONNECTOR image: plugins/artifact-metadata-publisher settings: file\_urls: <https://storage.googleapis.com/YOUR\\_GCS\\_BUCKET/><+pipeline.sequenceId>/complete.htmlThis example uses a Kubernetes cluster build infrastructure and uploads the Allure report artifact to GCS.pipeline: name: allure-report-upload identifier: allurereportupload projectIdentifier: YOUR\_HARNESS\_PROJECT\_ID orgIdentifier: default tags: {} properties: ci: codebase: connectorRef: YOUR\_CODEBASE\_CONNECTOR\_ID repoName: YOUR\_CODE\_REPO\_NAME build: <+input> stages: - stage: name: build identifier: build description: "" type: CI spec: cloneCodebase: true infrastructure: type: KubernetesDirect spec: connectorRef: YOUR\_KUBERNETES\_CLUSTER\_CONNECTOR\_ID namespace: YOUR\_KUBERNETES\_NAMESPACE automountServiceAccountToken: true nodeSelector: {} os: Linux execution: steps: - step: type: Run name: run maven tests identifier: run\_maven\_tests spec: connectorRef: YOUR\_IMAGE\_REGISTRY\_CONNECTOR image: openjdk:11 shell: Sh command: ./mvnw clean test site - step: type: Run name: generate allure report identifier: generate\_allure\_report spec: connectorRef: YOUR\_IMAGE\_REGISTRY\_CONNECTOR image: solutis/allure:2.9.0 command: | cd target allure generate allure-results --clean -o allure-report - step: type: Run name: combine report identifier: combine\_report spec: connectorRef: YOUR\_IMAGE\_REGISTRY\_CONNECTOR image: shubham149/allure-combine:latest command: | cd target/allure-report allure-combine . cd ../.. cp target/allure-report/complete.html . - step: type: GCSUpload name: upload report identifier: upload\_report spec: connectorRef: YOUR\_GCP\_CONNECTOR\_ID bucket: YOUR\_GCS\_BUCKET sourcePath: target/allure-report/complete.html target: <+pipeline.sequenceId> - step: type: Plugin name: publish artifact metadata identifier: publish\_artifact\_metadata spec: connectorRef: YOUR\_IMAGE\_REGISTRY\_CONNECTOR image: plugins/artifact-metadata-publisher settings: file\_urls: <https://storage.googleapis.com/YOUR\\_GCS\\_BUCKET/><+pipeline.sequenceId>/complete.html

This example uses Harness Cloud build infrastructure and uploads the Allure report artifact to GCS.pipeline: name: allure-report-upload identifier: allurereportupload projectIdentifier: YOUR\_HARNESS\_PROJECT\_ID orgIdentifier: default tags: {} properties: ci: codebase: connectorRef: YOUR\_CODEBASE\_CONNECTOR\_ID repoName: YOUR\_CODE\_REPO\_NAME build: <+input> stages: - stage: name: test and upload artifact identifier: test\_and\_upload\_artifact description: "" type: CI spec: cloneCodebase: true platform: os: Linux arch: Amd64 runtime: type: Cloud spec: {} execution: steps: - step: type: Run name: run maven tests identifier: run\_maven\_tests spec: connectorRef: YOUR\_IMAGE\_REGISTRY\_CONNECTOR image: openjdk:11 shell: Sh command: ./mvnw clean test site - step: type: Run name: generate allure report identifier: generate\_allure\_report spec: connectorRef: YOUR\_IMAGE\_REGISTRY\_CONNECTOR image: solutis/allure:2.9.0 command: | cd target allure generate allure-results --clean -o allure-report - step: type: Run name: combine report identifier: combine\_report spec: connectorRef: YOUR\_IMAGE\_REGISTRY\_CONNECTOR image: shubham149/allure-combine:latest command: | cd target/allure-report allure-combine . cd ../.. cp target/allure-report/complete.html . - step: type: GCSUpload name: upload report identifier: upload\_report spec: connectorRef: YOUR\_GCP\_CONNECTOR\_ID bucket: YOUR\_GCS\_BUCKET sourcePath: target/allure-report/complete.html target: <+pipeline.sequenceId> - step: type: Plugin name: publish artifact metadata identifier: publish\_artifact\_metadata spec: connectorRef: YOUR\_IMAGE\_REGISTRY\_CONNECTOR image: plugins/artifact-metadata-publisher settings: file\_urls: <https://storage.googleapis.com/YOUR\\_GCS\\_BUCKET/><+pipeline.sequenceId>/complete.htmlThis example uses a Kubernetes cluster build infrastructure and uploads the Allure report artifact to GCS.pipeline: name: allure-report-upload identifier: allurereportupload projectIdentifier: YOUR\_HARNESS\_PROJECT\_ID orgIdentifier: default tags: {} properties: ci: codebase: connectorRef: YOUR\_CODEBASE\_CONNECTOR\_ID repoName: YOUR\_CODE\_REPO\_NAME build: <+input> stages: - stage: name: build identifier: build description: "" type: CI spec: cloneCodebase: true infrastructure: type: KubernetesDirect spec: connectorRef: YOUR\_KUBERNETES\_CLUSTER\_CONNECTOR\_ID namespace: YOUR\_KUBERNETES\_NAMESPACE automountServiceAccountToken: true nodeSelector: {} os: Linux execution: steps: - step: type: Run name: run maven tests identifier: run\_maven\_tests spec: connectorRef: YOUR\_IMAGE\_REGISTRY\_CONNECTOR image: openjdk:11 shell: Sh command: ./mvnw clean test site - step: type: Run name: generate allure report identifier: generate\_allure\_report spec: connectorRef: YOUR\_IMAGE\_REGISTRY\_CONNECTOR image: solutis/allure:2.9.0 command: | cd target allure generate allure-results --clean -o allure-report - step: type: Run name: combine report identifier: combine\_report spec: connectorRef: YOUR\_IMAGE\_REGISTRY\_CONNECTOR image: shubham149/allure-combine:latest command: | cd target/allure-report allure-combine . cd ../.. cp target/allure-report/complete.html . - step: type: GCSUpload name: upload report identifier: upload\_report spec: connectorRef: YOUR\_GCP\_CONNECTOR\_ID bucket: YOUR\_GCS\_BUCKET sourcePath: target/allure-report/complete.html target: <+pipeline.sequenceId> - step: type: Plugin name: publish artifact metadata identifier: publish\_artifact\_metadata spec: connectorRef: YOUR\_IMAGE\_REGISTRY\_CONNECTOR image: plugins/artifact-metadata-publisher settings: file\_urls: <https://storage.googleapis.com/YOUR\\_GCS\\_BUCKET/><+pipeline.sequenceId>/complete.html

</details>

### See also <a href="#see-also" id="see-also"></a>

* [View test reports on the Artifacts tab](/continuous-integration/use-harness-ci/use-harness-ci/run-tests/viewing-tests.md#view-reports-on-the-artifacts-tab)
* [View code coverage reports on the Artifacts tab](broken://pages/Betsy2HRrmXeJm1QsuAo#view-code-coverage-reports-on-the-artifacts-tab)
* [View GCS artifacts on the Artifacts tab](/continuous-integration/use-harness-ci/use-harness-ci/build-and-upload-artifacts/upload-artifacts/upload-artifacts-to-gcs-step-settings.md#view-artifacts-on-the-artifacts-tab)
* [View JFrog artifacts on the Artifacts tab](/continuous-integration/use-harness-ci/use-harness-ci/build-and-upload-artifacts/upload-artifacts/upload-artifacts-to-jfrog.md#view-artifacts-on-the-artifacts-tab)
* [View Sonatype Nexus artifacts on the Artifacts tab](/continuous-integration/use-harness-ci/use-harness-ci/build-and-upload-artifacts/upload-artifacts/upload-artifacts-to-sonatype-nexus.md#view-artifacts-on-the-artifacts-tab)
* [View S3 artifacts on the Artifacts tab](/continuous-integration/use-harness-ci/use-harness-ci/build-and-upload-artifacts/upload-artifacts/upload-artifacts-to-s3.md#view-artifacts-on-the-artifacts-tab)

### Troubleshoot the Artifacts tab <a href="#troubleshoot-the-artifacts-tab" id="troubleshoot-the-artifacts-tab"></a>

Go to the [CI Knowledge Base](/continuous-integration/troubleshooting-and-resources/ci-articles-and-faqs/continuous-integration-faqs.md) for questions and issues related to the Artifacts tab, such as:

* [Is it possible to publish custom data, such as outputs from variables or custom messages, to the Artifacts tab?](/continuous-integration/troubleshooting-and-resources/ci-articles-and-faqs/continuous-integration-faqs.md#is-it-possible-to-publish-custom-data-such-as-outputs-from-variables-or-custom-messages-to-the-artifacts-tab)
* [Do Upload Artifacts steps compress files before uploading them?](/continuous-integration/troubleshooting-and-resources/ci-articles-and-faqs/continuous-integration-faqs.md#does-the-upload-artifacts-to-s3-step-compress-files-before-uploading-them)

{% @harness-feedback/feedback %}
