> For the complete documentation index, see [llms.txt](https://developer.harness.io/llms.txt). Markdown versions of documentation pages are available by appending `.md` to page URLs; this page is available as [Markdown](https://developer.harness.io/continuous-integration/use-harness-ci/use-harness-ci/build-and-upload-artifacts/build-and-push/build-and-push-to-docker-jfrog.md).
# Build and Push to JFrog Docker registries
Use a CI pipeline to build and push an image to a JFrog Docker registry.
This topic explains how to use the [Build and Push an image to Docker Registry step](/continuous-integration/use-harness-ci/use-harness-ci/build-and-upload-artifacts/build-and-push/build-and-push-to-docker-registry.md) to build and push an image to [JFrog Artifactory](https://www.jfrog.com/confluence/display/JFROG/JFrog+Artifactory) Docker registries.
For JFrog non-Docker registries, you can use a script in a [Run step](/continuous-integration/use-harness-ci/use-harness-ci/run-step-settings.md) to build the artifact, and then use the [Upload Artifacts to JFrog step](/continuous-integration/use-harness-ci/use-harness-ci/build-and-upload-artifacts/upload-artifacts/upload-artifacts-to-jfrog.md) to upload the artifact.
You need:
* Access to a JFrog Artifactory instance with a Docker registry.
* A [CI pipeline](/continuous-integration/use-harness-ci/use-harness-ci/prep-ci-pipeline-components.md) with a [Build stage](/continuous-integration/use-harness-ci/use-harness-ci/set-up-build-infrastructure/ci-stage-settings.md).
* A Harness [Docker connector](#docker-connector) configured to your JFrog instance.
{% hint style="info" %}
With Kubernetes cluster build infrastructures, **Build and Push** steps use [Chainguard's maintained Kaniko fork](https://github.com/chainguard-forks/kaniko/blob/main/README.md) by default. Kaniko can run as non-root in many cases. Root access is only required when your Dockerfile performs privileged operations (e.g., installing system packages, modifying root-owned directories).
If your build runs as non-root (`runAsNonRoot: true`), and you want to run the **Build and Push** step as root, you can set **Run as User** to `0` on the **Build and Push** step to use the root user for that individual step only.
If your security policy doesn't allow running as root, go to [Build and push with non-root users](/continuous-integration/use-harness-ci/use-harness-ci/build-and-upload-artifacts/build-and-push-nonroot.md).
{% endhint %}
### Build and push to JFrog Docker registries
In your pipeline's **Build** stage, add a **Build and Push an image to Docker Registry** step and configure the [settings](#build-and-push-to-docker-step-settings-for-jfrog-docker-registries) for JFrog.
Here is a YAML example of a **Build and Push an image to Docker Registry** step configured for JFrog:
```yaml
- step:
type: BuildAndPushDockerRegistry
name: Build and push to JFrog Docker
identifier: Build_and_push_to_JFrog_Docker
spec:
connectorRef: YOUR_DOCKER_CONNECTOR_ID
repo: domain.jfrog.io/REPO/IMAGE
tags:
- <+pipeline.sequenceId>
```
When you run a pipeline, you can observe the step logs on the [build details page](/continuous-integration/use-harness-ci/use-harness-ci/viewing-builds.md). If the **Build and Push** step succeeds, you can find the uploaded image in JFrog.
{% hint style="info" %}
You can also:
* [Build images without pushing](/continuous-integration/use-harness-ci/use-harness-ci/build-and-upload-artifacts/build-without-push.md)
* [Build multi-architecture images](/continuous-integration/use-harness-ci/use-harness-ci/build-and-upload-artifacts/build-multi-arch.md)
{% endhint %}
#### Using Local Tar Output
In scenarios where pushing a Docker image to a registry is not feasible, you can generate a local tarball of the built image instead. This approach is particularly useful for situations like local testing or when registry access is unavailable during the build process.
Once the tarball is generated, you can use a Security Testing Orchestration (STO) step, such as Aqua Trivy, to scan the image for vulnerabilities. This workflow ensures that images are built and scanned effectively, even without access to a remote registry.
Here’s a sample partial pipeline that demonstrates how build the image, generate the tarball, and push it to the registry:
```yaml
- step:
type: BuildAndPushDockerRegistry
name: BuildAndPushDockerRegistry_1
identifier: BuildAndPushDockerRegistry_1
spec:
connectorRef: docker_connector
repo: dockerhub/image_name
tags:
- linux-amd64
caching: false
dockerfile: ./docker/Dockerfile
envVariables:
PLUGIN_TAR_PATH: /harness/image_name.tar
- step:
type: Run
name: Run_2
identifier: Run_2
spec:
shell: Sh
command: ls /harness
```
The `PLUGIN_NO_PUSH: "true"` environment variable prevents the image from being pushed to the registry.Here’s a sample partial pipeline that demonstrates how build the image, generate the tarball, but skip pushing it to the registry:
```yaml
- step:
type: BuildAndPushDockerRegistry
name: BuildAndPushDockerRegistry_1
identifier: BuildAndPushDockerRegistry_1
spec:
connectorRef: docker_connector
repo: dockerhub/image_name
tags:
- linux-amd64
caching: false
dockerfile: ./docker/Dockerfile
envVariables:
PLUGIN_TAR_PATH: /harness/image_name.tar
PLUGIN_NO_PUSH: "true"
- step:
type: Run
name: Run_2
identifier: Run_2
spec:
shell: Sh
command: ls /harness
```
{% hint style="info" %}
* The local tar output feature is available only when using Kaniko as the build tool, which is commonly used in Kubernetes environments.
* While the above examples show a push to a Docker registry, you can easily repurpose it for other registries by updating the step type, connector, and other relevant fields.
{% endhint %}
#### Step settings
These sections explain how to configure the **Build and Push an image to Docker Registry** step settings for JFrog. Depending on the build infrastructure, some settings might be unavailable or optional. Settings specific to containers, such as **Set Container Resources**, are not applicable when using a VM or Harness Cloud build infrastructure.
**Name**
Enter a name summarizing the step's purpose. Harness automatically assigns an **Id** ([Entity Identifier](/harness-ai/use-harness-platform/references/entity-identifier-reference.md)) based on the **Name**. You can change the **Id** until the step is saved. Once save, the **Id** can't be changed.
**Docker Connector**
Specify a [Harness Docker Registry connector](broken://spaces/3F2TpHXhur2QtQnORSM9/pages/LZPXMHJjbQyZXdwC5Omo) configured for JFrog.
To create this connector:
1. Go to **Connectors** in your Harness project, organization, or account resources, and select **New Connector**.
2. Select **Docker Registry** under **Artifact Repositories**.
3. Enter a **Name** for the connector. The **Description** and **Tags** are optional.
4. For **Provider Type**, Select **Other**.
5. In **Docker Registry URL**, enter your JFrog URL, such as `https://mycompany.jfrog.io`.
6. In the **Authentication** settings, you must use **Username and Password** authentication.
* **Username:** Enter your JFrog username.
* **Password:** Select or create a [Harness text secret](/harness-ai/use-harness-platform/secrets/add-use-text-secrets.md) containing the password corresponding with the **Username**.
7. Complete any other settings and save the connector. For information all Docker Registry connector settings, go to the [Docker connector settings reference](broken://spaces/3F2TpHXhur2QtQnORSM9/pages/LZPXMHJjbQyZXdwC5Omo).
{% hint style="info" %}
**JFROG URLS**
The JFrog URL format depends on your Artifactory configuration, and whether your Artifactory instance is local, virtual, remote, or behind a proxy. To get your JFrog URL, you can select your repo in your JFrog instance, select **Set Me Up**, and get the repository URL from the server name in the `docker-login` command.
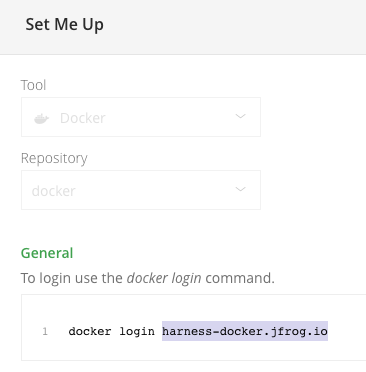 For more information, go to the JFrog documentation on [Repository Management](https://www.jfrog.com/confluence/display/JFROG/Repository+Management) and [Configuring Docker Repositories](https://www.jfrog.com/confluence/display/RTF/Docker+Registry#DockerRegistry-ConfiguringDockerRepositories).
{% endhint %}
**Docker Repository**
The repo where you want to store the image and the image name, for example, `mycompany.jfrog.io/REPO_NAME/IMAGE_NAME`.
**Tags**
Add [Docker build tags](https://docs.docker.com/engine/reference/commandline/build/#tag). This is equivalent to the `-t` flag.
Add each tag separately.

{% hint style="info" %}
When you push an image to a repo, you tag the image so you can identify it later. For example, in one pipeline stage, you push the image, and, in a later stage, you use the image name and tag to pull it and run integration tests on it.
Harness expressions are a useful way to define tags. For example, you can use the expression `<+pipeline.sequenceId>` as a tag. This expression represents the incremental build identifier, such as `9`. By using a variable expression, rather than a fixed value, you don't have to use the same image name every time.
For example, if you use `<+pipeline.sequenceId>` as a tag, after the pipeline runs, you can see the `Build Id` in the output.
For more information, go to the JFrog documentation on [Repository Management](https://www.jfrog.com/confluence/display/JFROG/Repository+Management) and [Configuring Docker Repositories](https://www.jfrog.com/confluence/display/RTF/Docker+Registry#DockerRegistry-ConfiguringDockerRepositories).
{% endhint %}
**Docker Repository**
The repo where you want to store the image and the image name, for example, `mycompany.jfrog.io/REPO_NAME/IMAGE_NAME`.
**Tags**
Add [Docker build tags](https://docs.docker.com/engine/reference/commandline/build/#tag). This is equivalent to the `-t` flag.
Add each tag separately.

{% hint style="info" %}
When you push an image to a repo, you tag the image so you can identify it later. For example, in one pipeline stage, you push the image, and, in a later stage, you use the image name and tag to pull it and run integration tests on it.
Harness expressions are a useful way to define tags. For example, you can use the expression `<+pipeline.sequenceId>` as a tag. This expression represents the incremental build identifier, such as `9`. By using a variable expression, rather than a fixed value, you don't have to use the same image name every time.
For example, if you use `<+pipeline.sequenceId>` as a tag, after the pipeline runs, you can see the `Build Id` in the output.
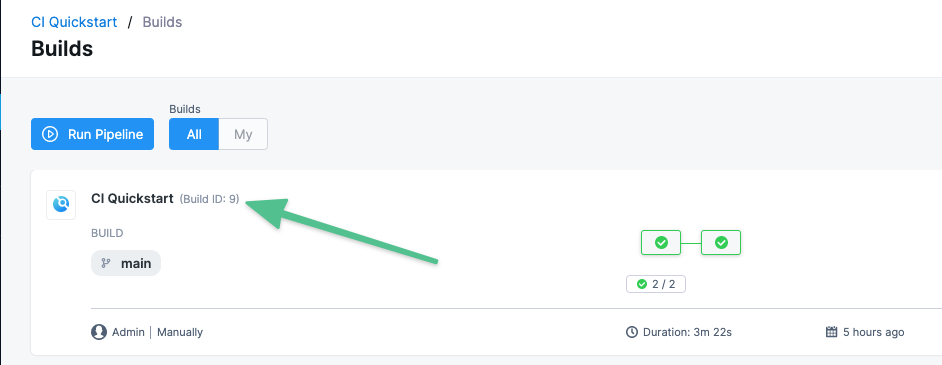 And you can see where the `Build Id` is used to tag your image in the container registry:
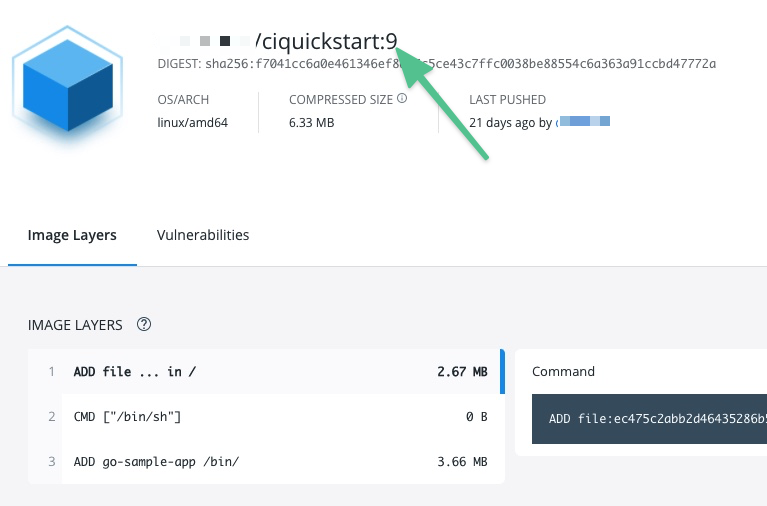 You can use the same expression to pull the tagged image, such as `namespace/myimage:<+pipeline.sequenceId>`.
{% endhint %}
**Optimize**
With Kubernetes cluster build infrastructures, select this option to enable `--snapshotMode=redo`. This setting causes file metadata to be considered when creating snapshots, and it can reduce the time it takes to create snapshots. For more information, go to the Kaniko documentation for the [snapshotMode flag](https://github.com/chainguard-forks/kaniko?tab=readme-ov-file#flag---snapshot-mode).
For information about setting other kaniko runtime flags, go to [Environment variables](#environment-variables-plugin-runtime-flags).
**Dockerfile**
The name of the Dockerfile. If you don't provide a name, Harness assumes that the Dockerfile is in the root folder of the codebase.
**Context**
Enter a path to a directory containing files that make up the [build's context](https://docs.docker.com/engine/reference/commandline/build/#description). When the pipeline runs, the build process can refer to any files found in the context. For example, a Dockerfile can use a `COPY` instruction to reference a file in the context.
{% hint style="info" %}
**KUBERNETES CLUSTER BUILD INFRASTRUCTURES**
Kaniko, which is used by the **Build and Push** step with Kubernetes cluster build infrastructures, requires root access to build the Docker image. If you have not already enabled root access, you will receive the following error:
`failed to create docker config file: open/kaniko/ .docker/config.json: permission denied`
If your security policy doesn't allow running as root, go to [Build and push with non-root users](/continuous-integration/use-harness-ci/use-harness-ci/build-and-upload-artifacts/build-and-push-nonroot.md).
{% endhint %}
**Labels**
Specify [Docker object labels](https://docs.docker.com/config/labels-custom-metadata/) to add metadata to the Docker image.
**Build Arguments**
The [Docker build-time variables](https://docs.docker.com/engine/reference/commandline/build/#build-arg). This is equivalent to the `--build-arg` flag.

**Target**
The [Docker target build stage](https://docs.docker.com/engine/reference/commandline/build/#target), equivalent to the `--target` flag, such as `build-env`.
#### Docker layer caching and Remote cache image
There are two ways in which you can leverage Docker Layer Caching: **Enable Docker layer caching** (*'caching'* property) or **Remote cache image** (*'remoteCacheRepo'* property). Refer to [Enable Docker layer caching for your build](/continuous-integration/use-harness-ci/use-harness-ci/caching-ci-data/docker-layer-caching.md) to learn more.
**Environment Variables (plugin runtime flags)**
**Build and Push** steps use plugins to complete build and push operations. With Kubernetes cluster build infrastructures, these steps use [Chainguard's maintained Kaniko fork](https://github.com/chainguard-forks/kaniko/blob/main/README.md). With other build infrastructures, these steps use [drone-docker](https://github.com/drone-plugins/drone-docker/blob/master/README.md).
These plugins have a number of additional runtime flags that you might need for certain use cases. For information about the flags, go to the [Kaniko plugin documentation](https://github.com/chainguard-forks/kaniko/blob/main/README.md) and the [drone-docker plugin documentation](https://plugins.drone.io/plugins/docker).
In **Environment Variables** for your step, add the environment variable `PLUGIN_BUILDX_OPTIONS` to pass any [supported options](https://docs.docker.com/reference/cli/docker/buildx/build/#options) to the buildx command used by the build and push steps.
How you configure plugin runtime flags depends on your build infrastructure.
You can use the same expression to pull the tagged image, such as `namespace/myimage:<+pipeline.sequenceId>`.
{% endhint %}
**Optimize**
With Kubernetes cluster build infrastructures, select this option to enable `--snapshotMode=redo`. This setting causes file metadata to be considered when creating snapshots, and it can reduce the time it takes to create snapshots. For more information, go to the Kaniko documentation for the [snapshotMode flag](https://github.com/chainguard-forks/kaniko?tab=readme-ov-file#flag---snapshot-mode).
For information about setting other kaniko runtime flags, go to [Environment variables](#environment-variables-plugin-runtime-flags).
**Dockerfile**
The name of the Dockerfile. If you don't provide a name, Harness assumes that the Dockerfile is in the root folder of the codebase.
**Context**
Enter a path to a directory containing files that make up the [build's context](https://docs.docker.com/engine/reference/commandline/build/#description). When the pipeline runs, the build process can refer to any files found in the context. For example, a Dockerfile can use a `COPY` instruction to reference a file in the context.
{% hint style="info" %}
**KUBERNETES CLUSTER BUILD INFRASTRUCTURES**
Kaniko, which is used by the **Build and Push** step with Kubernetes cluster build infrastructures, requires root access to build the Docker image. If you have not already enabled root access, you will receive the following error:
`failed to create docker config file: open/kaniko/ .docker/config.json: permission denied`
If your security policy doesn't allow running as root, go to [Build and push with non-root users](/continuous-integration/use-harness-ci/use-harness-ci/build-and-upload-artifacts/build-and-push-nonroot.md).
{% endhint %}
**Labels**
Specify [Docker object labels](https://docs.docker.com/config/labels-custom-metadata/) to add metadata to the Docker image.
**Build Arguments**
The [Docker build-time variables](https://docs.docker.com/engine/reference/commandline/build/#build-arg). This is equivalent to the `--build-arg` flag.

**Target**
The [Docker target build stage](https://docs.docker.com/engine/reference/commandline/build/#target), equivalent to the `--target` flag, such as `build-env`.
#### Docker layer caching and Remote cache image
There are two ways in which you can leverage Docker Layer Caching: **Enable Docker layer caching** (*'caching'* property) or **Remote cache image** (*'remoteCacheRepo'* property). Refer to [Enable Docker layer caching for your build](/continuous-integration/use-harness-ci/use-harness-ci/caching-ci-data/docker-layer-caching.md) to learn more.
**Environment Variables (plugin runtime flags)**
**Build and Push** steps use plugins to complete build and push operations. With Kubernetes cluster build infrastructures, these steps use [Chainguard's maintained Kaniko fork](https://github.com/chainguard-forks/kaniko/blob/main/README.md). With other build infrastructures, these steps use [drone-docker](https://github.com/drone-plugins/drone-docker/blob/master/README.md).
These plugins have a number of additional runtime flags that you might need for certain use cases. For information about the flags, go to the [Kaniko plugin documentation](https://github.com/chainguard-forks/kaniko/blob/main/README.md) and the [drone-docker plugin documentation](https://plugins.drone.io/plugins/docker).
In **Environment Variables** for your step, add the environment variable `PLUGIN_BUILDX_OPTIONS` to pass any [supported options](https://docs.docker.com/reference/cli/docker/buildx/build/#options) to the buildx command used by the build and push steps.
How you configure plugin runtime flags depends on your build infrastructure.
Set plugin runtime flags with Kubernetes cluster build infrastructure
When using the built-in **Build and Push** steps with a Kubernetes cluster build infrastructure, you can use the **Environment Variables** setting to set kaniko plugin runtime flags.
{% hint style="warning" %}
Unlike in other Harness CI steps, the **Environment Variables** setting in **Build and Push** steps *only* accepts the known kaniko plugin runtime flags. You must set other types of environment variables in your Dockerfile, build arguments, or as stage variables, depending on their usage and purpose in your build.
{% endhint %}
In **Environment Variables**, you must input a **Name** and **Value** for each variable. Format the name as `PLUGIN_FLAG_NAME`.
For example, to set `--skip-tls-verify`, add an environment variable named `PLUGIN_SKIP_TLS_VERIFY` and set the variable value to `true`.
```yaml
- step:
identifier: buildandpush
name: buildandpush
type: BuildAndPush---
spec:
...
envVariables:
PLUGIN_SKIP_TLS_VERIFY: true
```
To [build without pushing](/continuous-integration/use-harness-ci/use-harness-ci/build-and-upload-artifacts/build-without-push.md), use the `no-push` kaniko flag.
{% hint style="info" %}
**STAGE VARIABLES**
Previously, you could set some kaniko runtime flags as [stage variables](/harness-ai/use-harness-platform/pipelines/add-a-stage.md#stage-variables). If you had done this *and you are using Kubernetes cluster build infrastructure*, then Harness recommends moving these kaniko plugin stage variables to the **Environment Variables** in your **Build and Push** step. Don't change non-kaniko plugin variables, such as `PLUGIN_USER_ROLE_ARN`.
For other types of environment variables (that aren't Build and Push plugin runtime flags), stage variables are still inherently available to steps as environment variables. However, where you declare environment variables depends on their usage and purpose in your build. You might need to set them in your Dockerfile, build args, or otherwise.
However some flags still require using a stage variable:
* `ignore-path`: Set this flag to ignore a comma separated list of file paths when taking an image snapshot. Required when ignoring multiple paths.
Format these stage variables as `PLUGIN_FLAG_NAME`.
{% endhint %}
Set plugin runtime flags with other build infrastructures
With Harness Cloud, self-managed VM, or local runner build infrastructures, you can set *some* drone-docker plugin runtime flags as stage variable.
Currently, Harness supports the following drone-docker flags:
* `auto_tag`: Enable auto-generated build tags.
* `auto_tag_suffix`: Auto-generated build tag suffix.
* `custom_labels`: Additional arbitrary key-value labels.
* `artifact_file`: Harness uses this to show links to uploaded artifacts on the [Artifacts tab](/continuous-integration/use-harness-ci/use-harness-ci/viewing-builds.md).
* `dry_run`: Disables pushing to the registry. Used to [build without pushing](/continuous-integration/use-harness-ci/use-harness-ci/build-and-upload-artifacts/build-without-push.md).
* `custom_dns`: Provide your custom CNS address.
To set these flags in your Build and Push steps, add [stage variables](/harness-ai/use-harness-platform/pipelines/add-a-stage.md#stage-variables) formatted as `PLUGIN_FLAG_NAME`.
For example, to set `custom_dns`, add a stage variable named `PLUGIN_CUSTOM_DNS` and set the variable value to your custom DNS address.
```yaml
variables:
- name: PLUGIN_CUSTOM_DNS
type: String
description: ""
required: false
value: "vvv.xxx.yyy.zzz"
```
Mounting Docker Secrets
Harness now allows mounting Docker build secrets securely in 'Build and Push' steps. This feature enables you to pass sensitive data such as credentials or configuration files during Docker builds, either as environment variables or file-based secrets. It ensures secure handling of secrets, reducing the risk of exposing sensitive information.
{% hint style="info" %}
**USE CACHING AND KUBERNETES REQUIREMENTS**
* This feature is currently configurable only through YAML.
* On non-Kubernetes build infrastructures (Harness Cloud, self-managed VM, local runner), you must set `caching: true` on the step. With `caching: false` (the default), the step uses the plain docker plugin, which silently drops `envDockerSecrets` and `fileDockerSecrets` without emitting any `--secret` flag. Setting `caching: true` activates the buildx plugin, which supports secret mounts.
* In Kubernetes, unlike other build infrastructures (e.g., Harness Cloud), "Build and Push" steps default to Kaniko rather than Buildx. To enable this feature in Kubernetes, you must enable the feature flag `CI_USE_BUILDX_ON_K8`. Additionally, note that Kubernetes build infrastructure using Buildx requires privileged access.
{% endhint %}
Using Local Tar Output
In scenarios where pushing a Docker image to a registry is not feasible, you can generate a local tarball of the built image instead. This approach is particularly useful for situations like local testing or when registry access is unavailable during the build process.
Once the tarball is generated, you can use a Security Testing Orchestration (STO) step, such as Aqua Trivy, to scan the image for vulnerabilities. This workflow ensures that images are built and scanned effectively, even without access to a remote registry.
Here’s a sample partial pipeline that demonstrates how build the image, generate the tarball, and push it to the registry:
```yaml
- step:
type: BuildAndPushDockerRegistry
name: BuildAndPushDockerRegistry_1
identifier: BuildAndPushDockerRegistry_1
spec:
connectorRef: docker_connector
repo: dockerhub/image_name
tags:
- linux-amd64
caching: false
dockerfile: ./docker/Dockerfile
envVariables:
PLUGIN_TAR_PATH: /harness/image_name.tar
- step:
type: Run
name: Run_2
identifier: Run_2
spec:
shell: Sh
command: ls /harness
```
The `PLUGIN_NO_PUSH: "true"` environment variable prevents the image from being pushed to the registry.Here’s a sample partial pipeline that demonstrates how build the image, generate the tarball, but skip pushing it to the registry:
```yaml
- step:
type: BuildAndPushDockerRegistry
name: BuildAndPushDockerRegistry_1
identifier: BuildAndPushDockerRegistry_1
spec:
connectorRef: docker_connector
repo: dockerhub/image_name
tags:
- linux-amd64
caching: false
dockerfile: ./docker/Dockerfile
envVariables:
PLUGIN_TAR_PATH: /harness/image_name.tar
PLUGIN_NO_PUSH: "true"
- step:
type: Run
name: Run_2
identifier: Run_2
spec:
shell: Sh
command: ls /harness
```
{% hint style="info" %}
* The local tar output feature is available only when using Kaniko as the build tool, which is commonly used in Kubernetes environments.
* While the above examples show a push to a Docker registry, you can easily repurpose it for other registries by updating the step type, connector, and other relevant fields.
{% endhint %}
**Run as User**
With Kubernetes cluster build infrastructures, you can specify the user ID to use to run all processes in the pod if running in containers. For more information, go to [Set the security context for a pod](https://kubernetes.io/docs/tasks/configure-pod-container/security-context/#set-the-security-context-for-a-pod).
This step requires root access. You can use the **Run as User** setting if your build runs as non-root (`runAsNonRoot: true`), and you can run the **Build and Push** step as root. To do this, set **Run as User** to `0` to use the root user for this individual step only.
If your security policy doesn't allow running as root, go to [Build and push with non-root users](/continuous-integration/use-harness-ci/use-harness-ci/build-and-upload-artifacts/build-and-push-nonroot.md).
**Set Container Resources**
Set maximum resource limits for the resources used by the container at runtime:
* **Limit Memory:** The maximum memory that the container can use. You can express memory as a plain integer or as a fixed-point number using the suffixes `G` or `M`. You can also use the power-of-two equivalents `Gi` and `Mi`. The default is `500Mi`.
* **Limit CPU:** The maximum number of cores that the container can use. CPU limits are measured in CPU units. Fractional requests are allowed; for example, you can specify one hundred millicpu as `0.1` or `100m`. The default is `400m`. For more information, go to [Resource units in Kubernetes](https://kubernetes.io/docs/concepts/configuration/manage-resources-containers/#resource-units-in-kubernetes).
**Timeout**
Set the timeout limit for the step. Once the timeout limit is reached, the step fails and pipeline execution continues. To set skip conditions or failure handling for steps, go to:
* [Step Skip Condition settings](/harness-ai/use-harness-platform/pipelines/step-skip-condition-settings.md)
* [Step Failure Strategy settings](/harness-ai/use-harness-platform/pipelines/failure-handling/define-a-failure-strategy-on-stages-and-steps.md)
#### Conditions, looping, and failure strategies
You can find the following settings on the **Advanced** tab in the step settings pane:
* [Conditional Execution](/harness-ai/use-harness-platform/pipelines/step-skip-condition-settings.md): Set conditions to determine when/if the step should run.
* [Failure Strategy](/harness-ai/use-harness-platform/pipelines/failure-handling/define-a-failure-strategy-on-stages-and-steps.md): Control what happens to your pipeline when a step fails.
* [Use looping strategies](/harness-ai/use-harness-platform/pipelines/looping-strategies/looping-strategies-matrix-repeat-and-parallelism.md): Define a matrix, repeat, or parallelism strategy for an individual step.
### Publish Build metadata to a Docker image in JFrog Docker Registry
Use the Harness plugin to publish build metadata to a Docker image in the JFrog Docker Registry. It's useful for tracking and managing Docker builds in Artifactory, ensuring that all relevant build information is stored alongside your images.
For example:
```yaml
- step:
identifier: metadata
name: Artifactory - Publish build info to JFrog Docker Registry
type: Plugin
spec:
connectorRef: account.ArtifactoryDocker
image: plugins/artifactory-publish-docker-buildinfo
settings:
access_token: <+secrets.getValue("org.artifactory_token")>
url: https://artifactory.customer.com/artifactory/
build_name: <+pipeline.name>
build_number: <+pipeline.executionId>
build_url: <+pipeline.executionUrl>
docker_image: artifactory.customer.com/DOCKER_REPO/IMAGE_NAME:TAG_NAME
```
#### Plugin specification
* **connectorRef**: Harness Connector for the container registry where the plugin image is located.
* **image:** The Docker image containing the plugin to publish build info. For this example, it's `plugins/artifactory-publish-docker-buildinfo`.
Settings:
* **access\_token**: The access token for authenticating with Artifactory. In the example above it's retrieved from Harness secrets manager.
* **url**: The URL of the Artifactory instance where the build info will be published.
* **build\_name**: The name of the build, typically set to the pipeline name.
* **build\_number**: The build number, typically set to the pipeline execution ID.
* **build\_url**: The URL to the pipeline execution in Harness, allowing quick access to the build details.
* **docker\_image**: The Docker image for which to attach the build metadata, including its tag.
[Plugin on Dockerhub](https://hub.docker.com/r/plugins/artifactory-publish-docker-buildinfo/tags)
You can securely perform SSH-based operations in your Docker builds — such as cloning private Git repositories — by mounting an SSH key into the build using Docker BuildKit’s `--ssh` feature. The SSH key is mounted only during the build process and is never baked into the final image.
Below is a full working Harness CI pipeline example:
```yaml
pipeline:
projectIdentifier: YOUR_PROJECT_ID
orgIdentifier: YOUR_ORG_ID
tags: {}
stages:
- stage:
name: Build
identifier: Build
type: CI
spec:
cloneCodebase: false
execution:
steps:
- step:
type: Run
name: Create Dockerfile
identifier: Run
spec:
connectorRef: account.harnessImage
image: alpine
shell: Sh
command: |-
mkdir docker
cat > Dockerfile <<- "EOF"
FROM node:20-slim AS base
RUN apt-get update && apt-get install git -y
RUN mkdir -p ~/.ssh && ssh-keyscan github.com >> ~/.ssh/known_hosts
RUN --mount=type=ssh,id=sshkey git clone git@github.com:GITHUB_ORG/PRIVATE_REPO.git
RUN ls -lR PRIVATE_REPO
EOF
cat Dockerfile
mv Dockerfile docker/
ls -al /harness
# docker pull harness/buildkit:1.0.1
- step:
type: Run
name: SSH Key Prep
identifier: SSH_Key_Prep
spec:
shell: Sh
command: |-
cat << EOF > /harness/id_ed25519
<+secrets.getValue("SSH_KEY")> # SSH_KEY is a file secret containing the private SSH key
EOF
chmod 400 /harness/id_ed25519
- step:
type: BuildAndPushDockerRegistry
name: Build and Push Image
identifier: Build_and_Push_Image
spec:
connectorRef: DOCKER_CONNECTOR
repo: DOCKER_ORG/DOCKER_REPO
tags:
- multiarch
caching: true # Required to enable BuildKit/buildx; without this, buildx will not be used
dockerfile: docker/Dockerfile
resources:
limits:
memory: 1Gi
cpu: 750m
envVariables:
PLUGIN_BUILDX_OPTIONS: "--ssh=sshkey=/harness/id_ed25519"
when:
stageStatus: Success
platform:
os: Linux
arch: Amd64
runtime:
type: Cloud
spec: {}
when:
pipelineStatus: Success
description: ""
identifier: SSH_Dockerfile_Example
name: SSH Dockerfile Example
```
## Key points:
* `--mount=type=ssh,id=sshkey` in the Dockerfile matches `--ssh=sshkey=/harness/id_ed25519` in `PLUGIN_BUILDX_OPTIONS`.
* The SSH key comes from the Harness Secrets Manager, as shown in the **SSH Key Prep** step above where a file secret is used to create `/harness/id_ed25519`. It is mounted only during the build.
* In this example, **cloneCodebase** is set to `false` because the Dockerfile is created in the pipeline itself. In your own pipelines, set this to `true` if your Dockerfile (or other build context files) is stored in a repository that Harness needs to clone before the build.
### Troubleshoot Build and Push steps
Go to the [CI Knowledge Base](/continuous-integration/troubleshooting-and-resources/ci-articles-and-faqs/continuous-integration-faqs.md) for questions and issues related to building and pushing images, such as:
* [What drives the Build and Push steps? What is kaniko?](/continuous-integration/troubleshooting-and-resources/ci-articles-and-faqs/continuous-integration-faqs.md#what-drives-the-build-and-push-steps-what-is-kaniko)
* [Does a kaniko build use images cached locally on the node? Can I enable caching for kaniko?](/continuous-integration/troubleshooting-and-resources/ci-articles-and-faqs/continuous-integration-faqs.md#does-a-kaniko-build-use-images-cached-locally-on-the-node-can-i-enable-caching-for-kaniko)
* [Can I run Build and Push steps as root if my build infrastructure runs as non-root? What if my security policy doesn't allow running as root?](/continuous-integration/troubleshooting-and-resources/ci-articles-and-faqs/continuous-integration-faqs.md#can-i-run-build-and-push-steps-as-root-if-my-build-infrastructure-runs-as-non-root)
* [Can I set kaniko and drone-docker runtime flags, such as skip-tls-verify or custom-dns?](/continuous-integration/troubleshooting-and-resources/ci-articles-and-faqs/continuous-integration-faqs.md#can-i-set-kaniko-and-drone-docker-runtime-flags-such-as-skip-tls-verify-or-custom-dns)
* [Can I push without building?](/continuous-integration/troubleshooting-and-resources/ci-articles-and-faqs/continuous-integration-faqs.md#can-i-push-without-building)
* [Can I build without pushing?](/continuous-integration/troubleshooting-and-resources/ci-articles-and-faqs/continuous-integration-faqs.md#can-i-build-without-pushing)
* [Is remote caching supported in Build and Push steps?](/continuous-integration/troubleshooting-and-resources/ci-articles-and-faqs/continuous-integration-faqs.md#is-remote-caching-supported-in-build-and-push-steps)
* [Why doesn't the Build and Push step include the content of VOLUMES from my Dockerfile in the final image?](/continuous-integration/troubleshooting-and-resources/ci-articles-and-faqs/continuous-integration-faqs.md#why-doesnt-the-build-and-push-step-include-the-content-of-volumes-from-my-dockerfile-in-the-final-image)
* [Can I use a specific version of kaniko or drone-docker?](/continuous-integration/troubleshooting-and-resources/ci-articles-and-faqs/continuous-integration-faqs.md#is-there-a-way-to-use-a-newer-or-older-version-of-kaniko)
* [How do I fix this kaniko container runtime error: kaniko should only be run inside of a container?](/continuous-integration/troubleshooting-and-resources/ci-articles-and-faqs/articles/kaniko-container-runtime-error.md)
* [Can I push and pull from two different docker registries that have same prefix for registry URL ?](/continuous-integration/troubleshooting-and-resources/ci-articles-and-faqs/continuous-integration-faqs.md#can-i-push-and-pull-from-two-different-docker-registries-that-have-same-prefix-for-registry-url-)
* [Why does the parallel execution of build and push steps fail when using Buildx on Kubernetes?](/continuous-integration/troubleshooting-and-resources/ci-articles-and-faqs/continuous-integration-faqs.md#why-does-the-parallel-execution-of-build-and-push-steps-fail-when-using-buildx-on-kubernetes)
* [Why do Build and Push steps fail with "Error while loading buildkit image: exit status 1" when /var/lib/docker is included in shared paths during DIND execution?](/continuous-integration/troubleshooting-and-resources/ci-articles-and-faqs/continuous-integration-faqs.md#why-do-build-and-push-steps-fail-with-error-while-loading-buildkit-image-exit-status-1-when-varlibdocker-is-included-in-shared-paths-during-dind-execution)
{% @harness-feedback/feedback %}