Git Clone step in CI
This topic describes how to use the Git Clone step included in Harness Continuous Integration (CI) pipelines. The Git Clone step clones a repository into the CI stage's workspace. In addition to the pipeline's default clone codebase, you can use Git Clone, Run, and Plugin steps to clone additional code repos into the pipeline's workspace.
For example, assume the default codebase is a repo that contains app code files, and the Dockerfile necessary to build the app image is in a different repo. You can use a Git Clone or Run step to clone the second repo into the workspace. Then, you can use a Build and Push step to build and push an image using files from both repos.
In VM runners and cloud infrastructure, the step to clone your codebase runs in a container by default. Enable the CI_GIT_CLONE_CONTAINERLESS feature flag to run it on the host, which is recommended for faster cloning on Windows by eliminating image download time. Read more.
Add a Git Clone step to clone a second repo into the pipeline's workspace.
              - step:
                  type: GitClone
                  name: clone second repo
                  identifier: clone_second_repo
                  spec:
                    connectorRef: account.git2
                    build:
                      type: branch
                      spec:
                        branch: main
Step Settings
The Git Clone step has the following settings. Depending on the stage's build infrastructure, some settings might be unavailable.
Name, Id, and Description
Enter a Name summarizing the step's purpose. Harness automatically assigns an Id (Entity Identifier Reference) based on the Name. You can change the Id.
The Description is an optional text string.
Connector
If you're using Harness Code Repository (Code), you do not need to configure a connector.
For third-party Git provider, select a connector for the source control provider hosting the code repo that you want the step to clone.
The following topics provide more information about creating code repo connectors:
- Azure Repos: Connect to Azure Repos
- Bitbucket: Bitbucket connector settings reference
- GitHub: GitHub connector settings reference
- GitLab: GitLab Connector Settings Reference
- Other Git providers:
You must have delegate version 25.02.85201 and onwards in order to use a connector with an SSH credential that uses a passphrase with Kubernetes build infrastructure. For any earlier delegate version, this will not work.
Repository Name
If the connector's URL Type is Repository, then Repository Name is automatically populated based on the repository defined in the connector's configuration.
If the connector's URL Type is Account, then you must specify the name of the code repo that you want to clone into the pipeline workspace.
Build Type, Branch Name, and Tag Name
For Build Type, select Git Branch if you want the step to clone code from a specific branch within the repo, or select Git Tag if you want the step to clone code from a specific commit tag. Based on your selection, specify a Branch Name or Tag Name.
You can use fixed values, runtime input, or variable expressions for the branch and tag names. For example, you can enter <+input> for the branch or tag name to supply a branch or tag name at runtime. You could also use expressions to match the pipeline's codebase branch or tag so that, for example, the pipeline and the Git Clone step both pull code from the same environment, such as production when a production build runs or development when a development build runs.
This setting applies only to the repo specified in this Git Clone step. It is separate from the codebase object for the pipeline's Build stage. If you want this Git Clone step's repo to use the same branch or commit as the primary codebase, specify either <+codebase.branch> or <+codebase.tag> for Branch Name or Tag Name. These expressions pull runtime input from the pipeline; for example, if the pipeline's primary codebase uses the development branch, then the Git Clone step clones the development branch from its repo. For more information, go to the CI codebase variables reference.
Clone Directory
An optional target path in the pipeline workspace where you want to clone the repo.
You can't specify /harness/ as a target directory for a Git Clone step because this folder is reserved for the Build stage's codebase. You can specify Shared Paths in your CI Build stage settings to share data across steps in your Build stage.
On Harness macOS build infrastructure, /harness is a protected system directory. The workspace is /tmp/harness instead (/tmp/harness is a symlink to /private/tmp/harness; both paths work). If you use macOS infrastructure, specify clone directory paths using either the full macOS workspace path (for example, /tmp/harness/my-repo) or a relative path (for example, ./my-repo). For more information, go to How can I share cache between different OS types?.
Additional Configuration
The following settings are available when you click Additional Configuration.
Privileged
When this setting is enabled, Harness will run all containers with the Docker --privileged flag enabled. This option is disabled by default.
This option grants the container elevated privileges within the underlying host environment. This means that the container has access to all Linux kernel capabilities and devices, similar to running processes outside the container. It effectively removes the isolation provided by the container runtime and can potentially pose security risks if not used carefully.
Depth
The number of commits to fetch when the step clones the repo.
The default depth varies by build and trigger type:
- For manually-triggered branch and tag builds, the default depth is
50. This means eachgit cloneoperation fetches the 50 most recent commits. - For manually-triggered PR builds and all auto-triggered builds (such as webhook triggers), the default depth is
0. This means eachgit cloneoperation fetches all commits from the relevant branch.
For more information, go to the git clone documentation.
Fetch Tags
Determines whether to fetch all tags when performing a shallow clone (depth > 0). Setting this to true is equivalent to adding the --tags flag.
Pull Request Clone Strategy
When a build is triggered by a pull request, this setting determines the branch to use for the artifact after the repo is cloned.
If this is set to Merge Commit (which is the default setting), the pipeline tries to merge the pull request branch with the target branch before building the artifact. This guarantees that the artifact includes all commits in both the pull request and the target branch. The disadvantage is that this can take more time and result in build failures: If the merge fails, then the build fails.

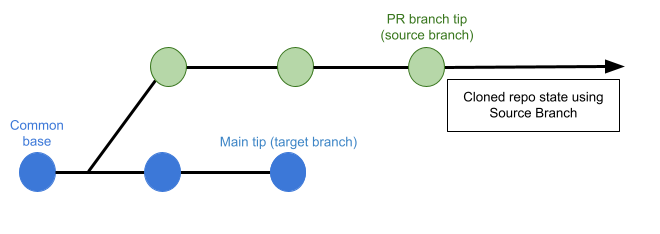
If this is set to Source Branch, the pipeline builds the artifact from the latest commit in the pull request branch. This can be faster and less likely to result in build failures; however, it might not include some commits in the target branch.
Download LFS Files
The Git Large File Storage (LFS) client is an extension for versioning large files, such as audio, video, datasets, and graphics.
Set Download LFS Files to true to download Git-LFS files. Default is false.
Sparse Checkout
Do a sparse checkout on given patterns. The subset of files is chosen by providing a list of directories in cone mode. Refer to git documentation for more details.
Include Submodules
Determines whether to include submodules in the clone. Default is false. Set to true to include submodules or recursive to clone submodules recursively.
Pre Fetch Command
Specify any additional Git commands to run before fetching the code. This field is for Git commands only; separate each command with a new line.
This could be used, for example, to set additional LFS configurations or clone specific submodules. For example,
git config lfs.fetchexclude ".jpg"
Example: Partial clone
Git partial clone downloads commit and tree objects upfront but defers blob (file content) downloads until those files are accessed. The full commit history is available for git log with no extra network calls. Operations that read file content, such as git blame, git show, and the checkout step performed by git bisect, trigger on-demand blob downloads as the files they touch are accessed. The initial fetch size for large repositories is reduced.
Partial clone works with the Harness Code Repository module and any third-party Git provider that supports the partial clone protocol (GitHub, GitLab, Bitbucket, and others).
To enable partial clone, set depth: 0 so the clone is not shallow, then add a preFetchCommand that runs git fetch with a --filter flag:
- step:
    type: GitClone
    name: clone repo
    identifier: clone_repo
    spec:
      connectorRef: YOUR_CONNECTOR_ID
      build:
        type: branch
        spec:
          branch: <+codebase.branch>
      depth: 0
      preFetchCommand: git fetch --filter=blob:none origin <+codebase.branch>
depth: 0 is required. If depth is greater than 0, the clone is shallow, and combining a shallow clone with a partial-clone filter is not supported and may produce unexpected results.
The expression <+codebase.branch> resolves to the pipeline codebase branch at runtime. You can also use a literal branch name such as main or master. For pull request triggers, <+codebase.branch> resolves to the source branch of the PR. If you need to fetch from the target branch instead, use <+codebase.targetBranch>.
You can substitute any --filter value that Git supports. For example:
- Defer all blobs:
git fetch --filter=blob:none origin <+codebase.branch>downloads no blobs upfront and fetches each one on first access. - Defer large blobs only:
git fetch --filter=blob:limit=100k origin <+codebase.branch>downloads blobs smaller than 100 KB upfront and defers the rest.
Go to the git rev-list --filter reference to review all supported filter values.
To verify that partial clone is active after the Git Clone step, add a Run step that prints the following Git configuration values from inside the cloned directory:
git config --get remote.origin.promisor              # expected: true
git config --get remote.origin.partialclonefilter    # expected: your filter value, for example blob:none
git rev-parse --is-shallow-repository                # expected: false
Combine partial clone with sparse checkout to limit which directories are materialized in the working tree. This further reduces disk usage when only a subset of the repository is needed for the build.
Blobs that were not fetched upfront are downloaded on demand the first time they are accessed, for example by git checkout, git show, or git blame.
Partial clone filter is ignored or produces errors when depth is greater than 0
Set depth to 0. Shallow clones (depth > 0) are incompatible with partial clone filters. Remove the depth setting or set it explicitly to 0, then re-run the pipeline.
Example: Conditional Git clean and reset
When you run builds on persistent workspaces, for example a shared path on a self-managed build infrastructure that retains the cloned repository across executions, you may want to control whether each run discards untracked files or resets the working tree back to the remote branch. You can drive this behavior from preFetchCommand using pipeline variables and conditional expressions, so a single pipeline supports both warm and clean runs without editing the pipeline structure.
Declare two string pipeline variables and reference them in preFetchCommand with the ternary operator. If the variable resolves to the literal string "TRUE", the prefetch phase runs the corresponding Git command. Otherwise, it runs git --version as a no-op so the expression remains valid.
- step:
    type: GitClone
    name: clone repo
    identifier: clone_repo
    spec:
      connectorRef: YOUR_CONNECTOR_ID
      build:
        type: branch
        spec:
          branch: <+codebase.branch>
      preFetchCommand: |-
        <+<+pipeline.variables.cleanVar>=="TRUE"?"git clean -fdx":"git --version">
        <+<+pipeline.variables.resetVar>=="TRUE"?"git fetch origin <+pipeline.variables.branch> && git reset --hard origin/<+pipeline.variables.branch>":"git --version">
Declare the supporting pipeline variables alongside your other pipeline-level variables:
variables:
  - name: cleanVar
    type: String
    value: <+input>.default(TRUE)
  - name: resetVar
    type: String
    value: <+input>.default(TRUE)
  - name: branch
    type: String
    value: <+input>.default(<+codebase.branch>)
Behavior:
cleanVar == "TRUE": Runsgit clean -fdx, which removes all untracked files and directories, including ignored files. Use this to remove build artifacts and restore a clean working tree.resetVar == "TRUE": Runsgit fetch origin <branch>followed bygit reset --hard origin/<branch>, which moves the local branch pointer to the remote tip and discards any local commits or uncommitted changes.- Neither variable set to
"TRUE": Both expressions resolve togit --version, which leaves the existing workspace untouched.
Important callouts:
- Case-sensitive matching: The comparison is strict string matching. Only the literal value
TRUEtriggers the command. Values such astrue,True, or1are treated as false. - Independent toggles:
cleanVarandresetVarare evaluated separately. You can enable one, both, or neither per execution. - Runtime overrides: Because the variables use
<+input>.default(...), you can overridecleanVar,resetVar, orbranchat runtime from the Run Pipeline form or from a trigger, or pin them through an input set. - No-op fallback: The
git --versionplaceholder is required so the ternary expression always produces a valid command line when the condition is false.
SSL Verify
If True, which is the default value, the pipeline verifies your Git SSL certificates. The build fails if the certificate check fails. Set this to False only if you have a known issue with the certificate and you are willing to run your builds anyway.
If you want to use self-signed certificates in a Kubernetes Cluster build infrastructure, go to Configure a Kubernetes Build Farm to use Self-Signed Certificates
Run as User
This setting is available for Kubernetes cluster build infrastructures only.
All Git clone steps, including the default clone codebase step and any additional Git Clone steps, use user 1000 by default for Kubernetes.
If necessary, you can specify, in Run as User, a user ID to use to run all processes in the pod if running in containers. For more information, go to Set the security context for a pod.
Specifying Run as User at the step level overrides Run as User in the build infrastructure settings, if you had also specified it there.
Set Container Resources
Set maximum resource limits for the resources used by the container at runtime:
- Limit Memory: The maximum memory that the container can use. You can express memory as a plain integer or as a fixed-point number using the suffixes
GorM. You can also use the power-of-two equivalentsGiandMi. The default is500Mi. - Limit CPU: The maximum number of cores that the container can use. CPU limits are measured in CPU units. Fractional requests are allowed; for example, you can specify one hundred millicpu as
0.1or100m. The default is400m. For more information, go to Resource units in Kubernetes.
Timeout
Set the timeout limit for the step. Once the timeout limit is reached, the step fails and pipeline execution continues. To set skip conditions or failure handling for steps, go to:
Troubleshooting
SSH-keyscan timeout
- If your connector uses SSH authentication, you can add a
PLUGIN_SSH_KEYSCAN_TIMEOUTstage variable to override thessh-keyscancommand's timeout limit (the default is5s). Stage variables are configured in stage settings, not step settings.
Parallel container-less Git Clone steps are not supported
Harness CI does not support container-less git steps in parallel. This could cause intermittent build failures. Please ensure your git clone steps are in sequence if using container-less build infrastructure.