Configure Author DB Change
This guide explains how to enable an LLM-driven change authoring workflow in Harness Database DevOps that generates migration artifacts (e.g., Liquibase changesets or SQL migration scripts), commits them to a temporary branch, and opens a Pull Request (PR) against a target Git branch for review and CI validation. The workflow preserves GitOps principles (auditability, review gates, CI checks) while accelerating authoring through LLM assistance.
Prerequisites
Before configuring LLM change authoring, ensure you have the following prerequisites in place:
- An active Harness account with Database DevOps enabled.
- Access to a Git repository where database migration artifacts will be stored.
- Interactive Guide
- Step-by-Step Guide
Step 1: Enable Harness AI in Harness
- Log in to your Harness account.
- Navigate to Account Settings > Default Settings > Harness AI.
- Toggle the Harness AI switch to enable it for your account.
- Then click on Database DevOps and in LLM Authoring Test and Commit Pipeline field point to the LLM pipeline identifier, e.g.,
dbops_llm_test_previewwhich we will create in the next step.
Step 2: Create a Pipeline with LLM Change Authoring
- Go to the Pipelines section in Harness.
- Click on Create Pipeline, and click on Add Stage and select the Custom Stage
- Provide the desired name for your pipeline, and click on Add. (Make sure that the pipeline identifier is same as mentioned in LLM pipeline identifier in step 1)
- Create a New Step Group.
- Click on Add Step and select the DB Test and Preview step from the list of available steps.
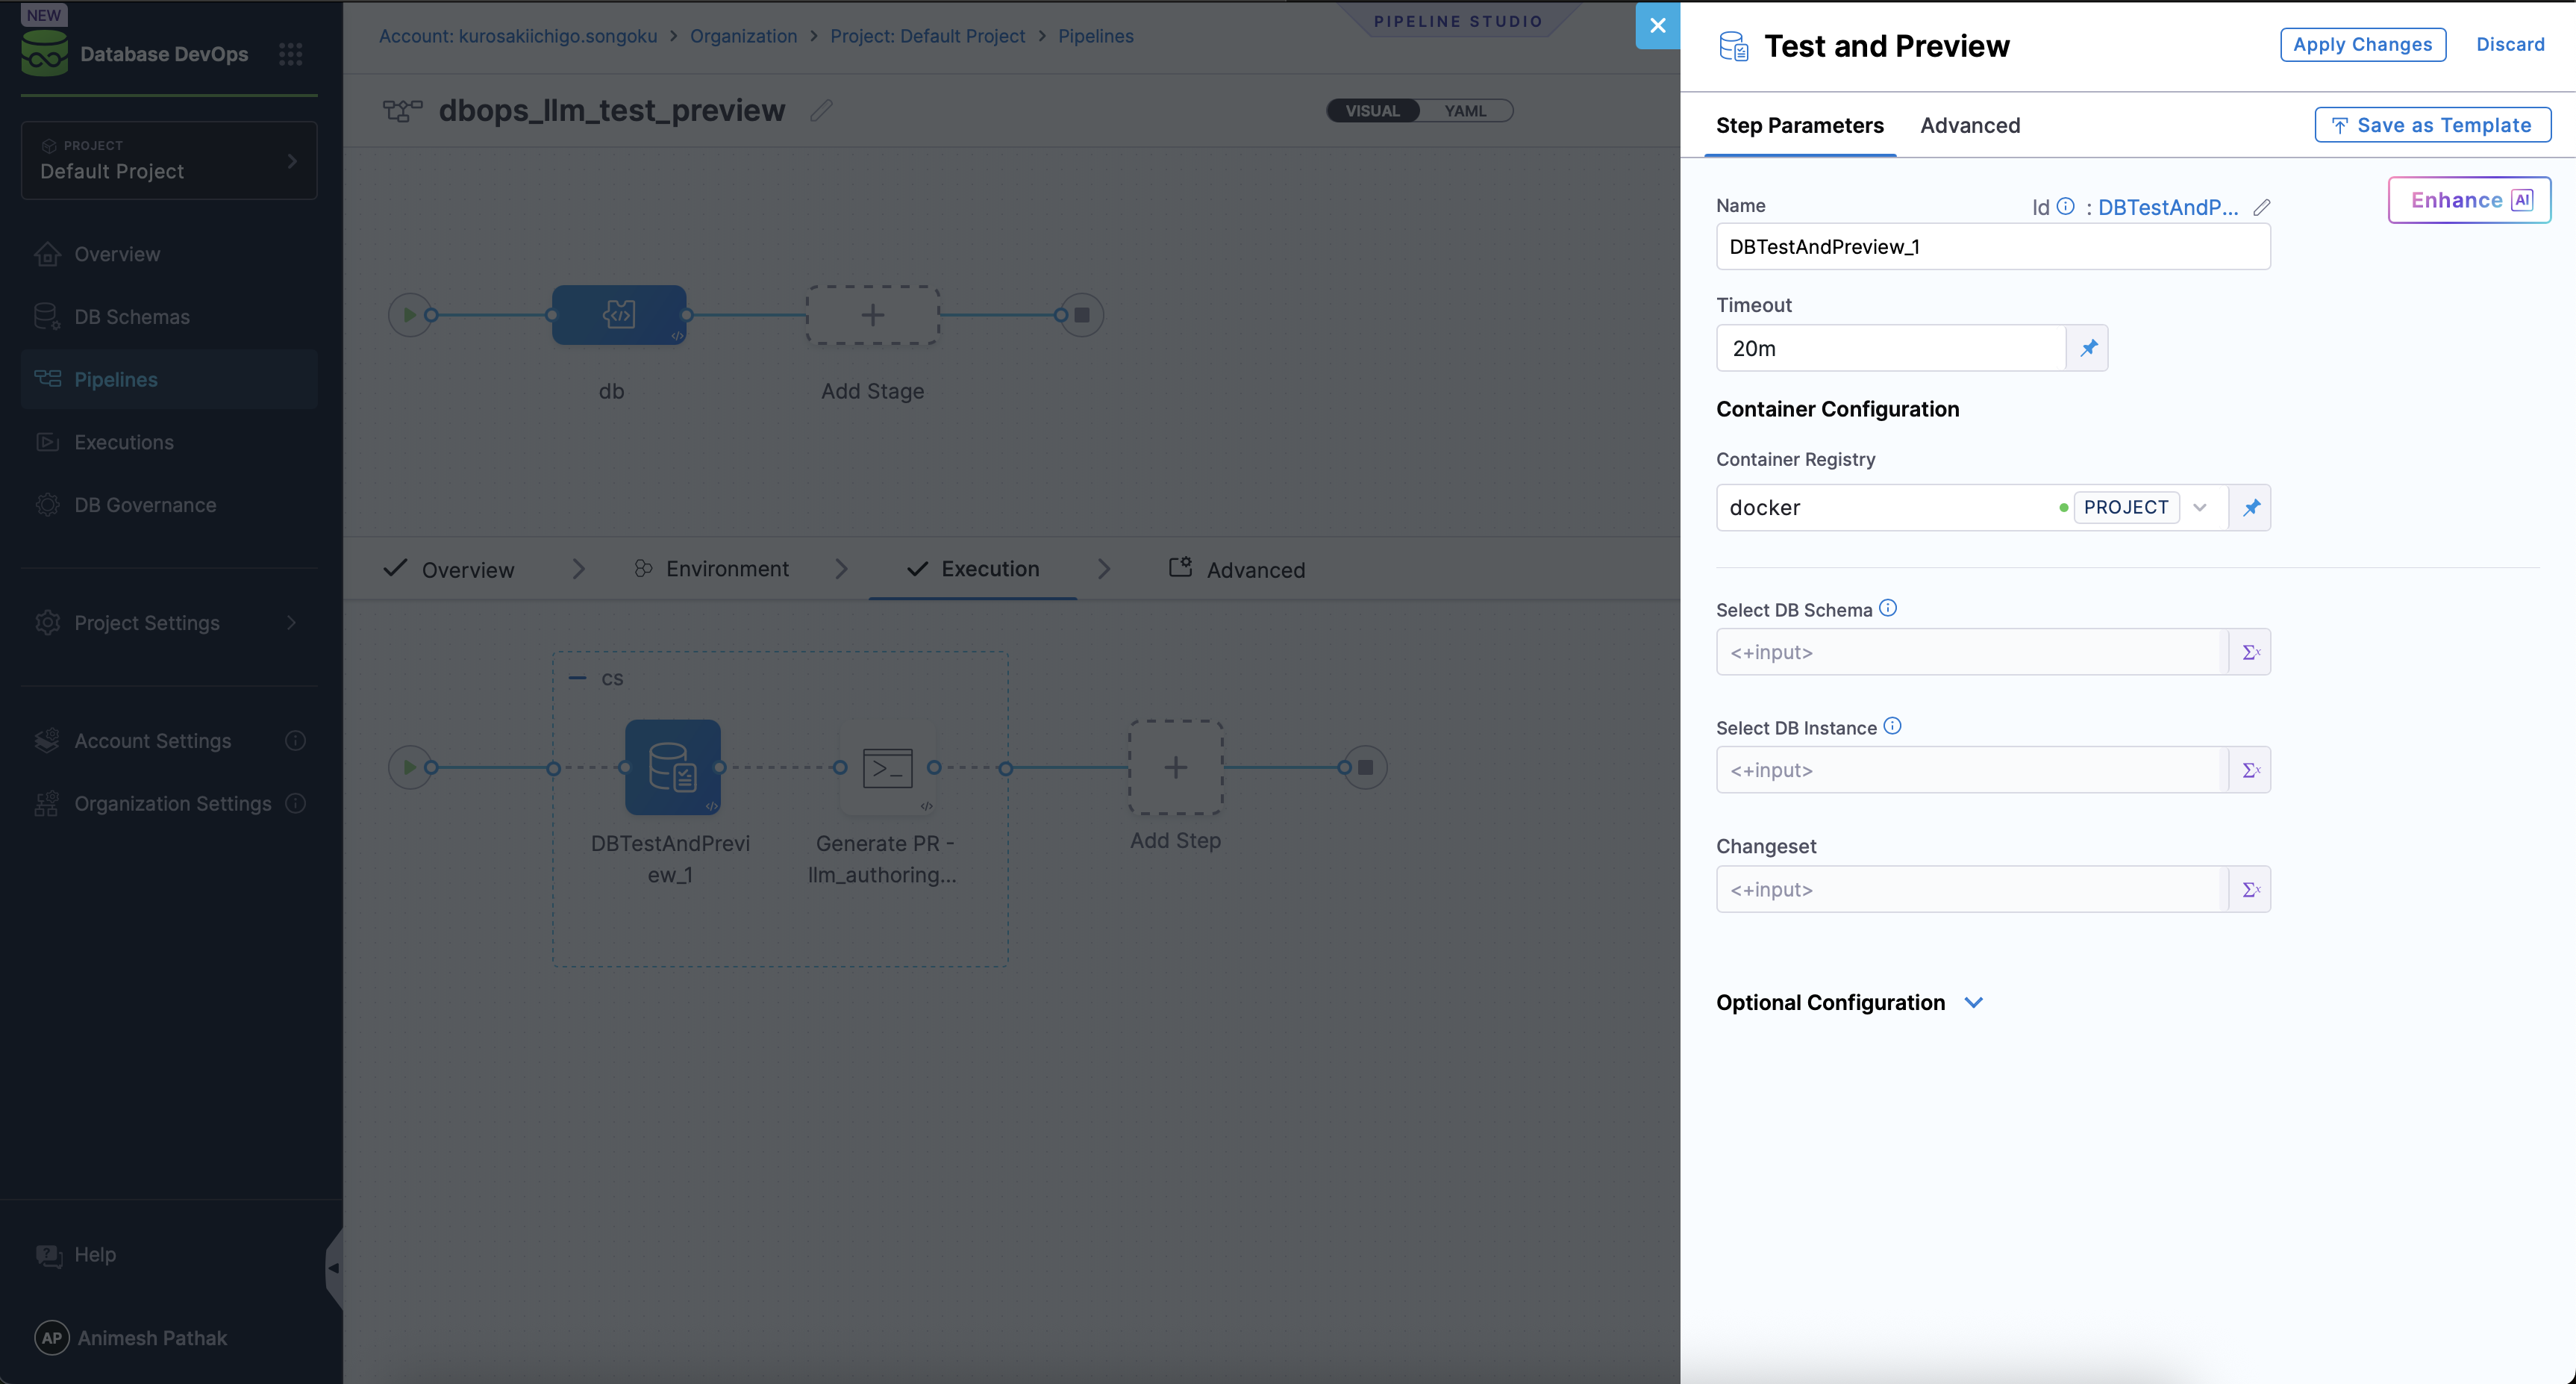
Leave schema and instance set as runtime input, i.e., <+input>, as these will be provided by the LLM change authoring.
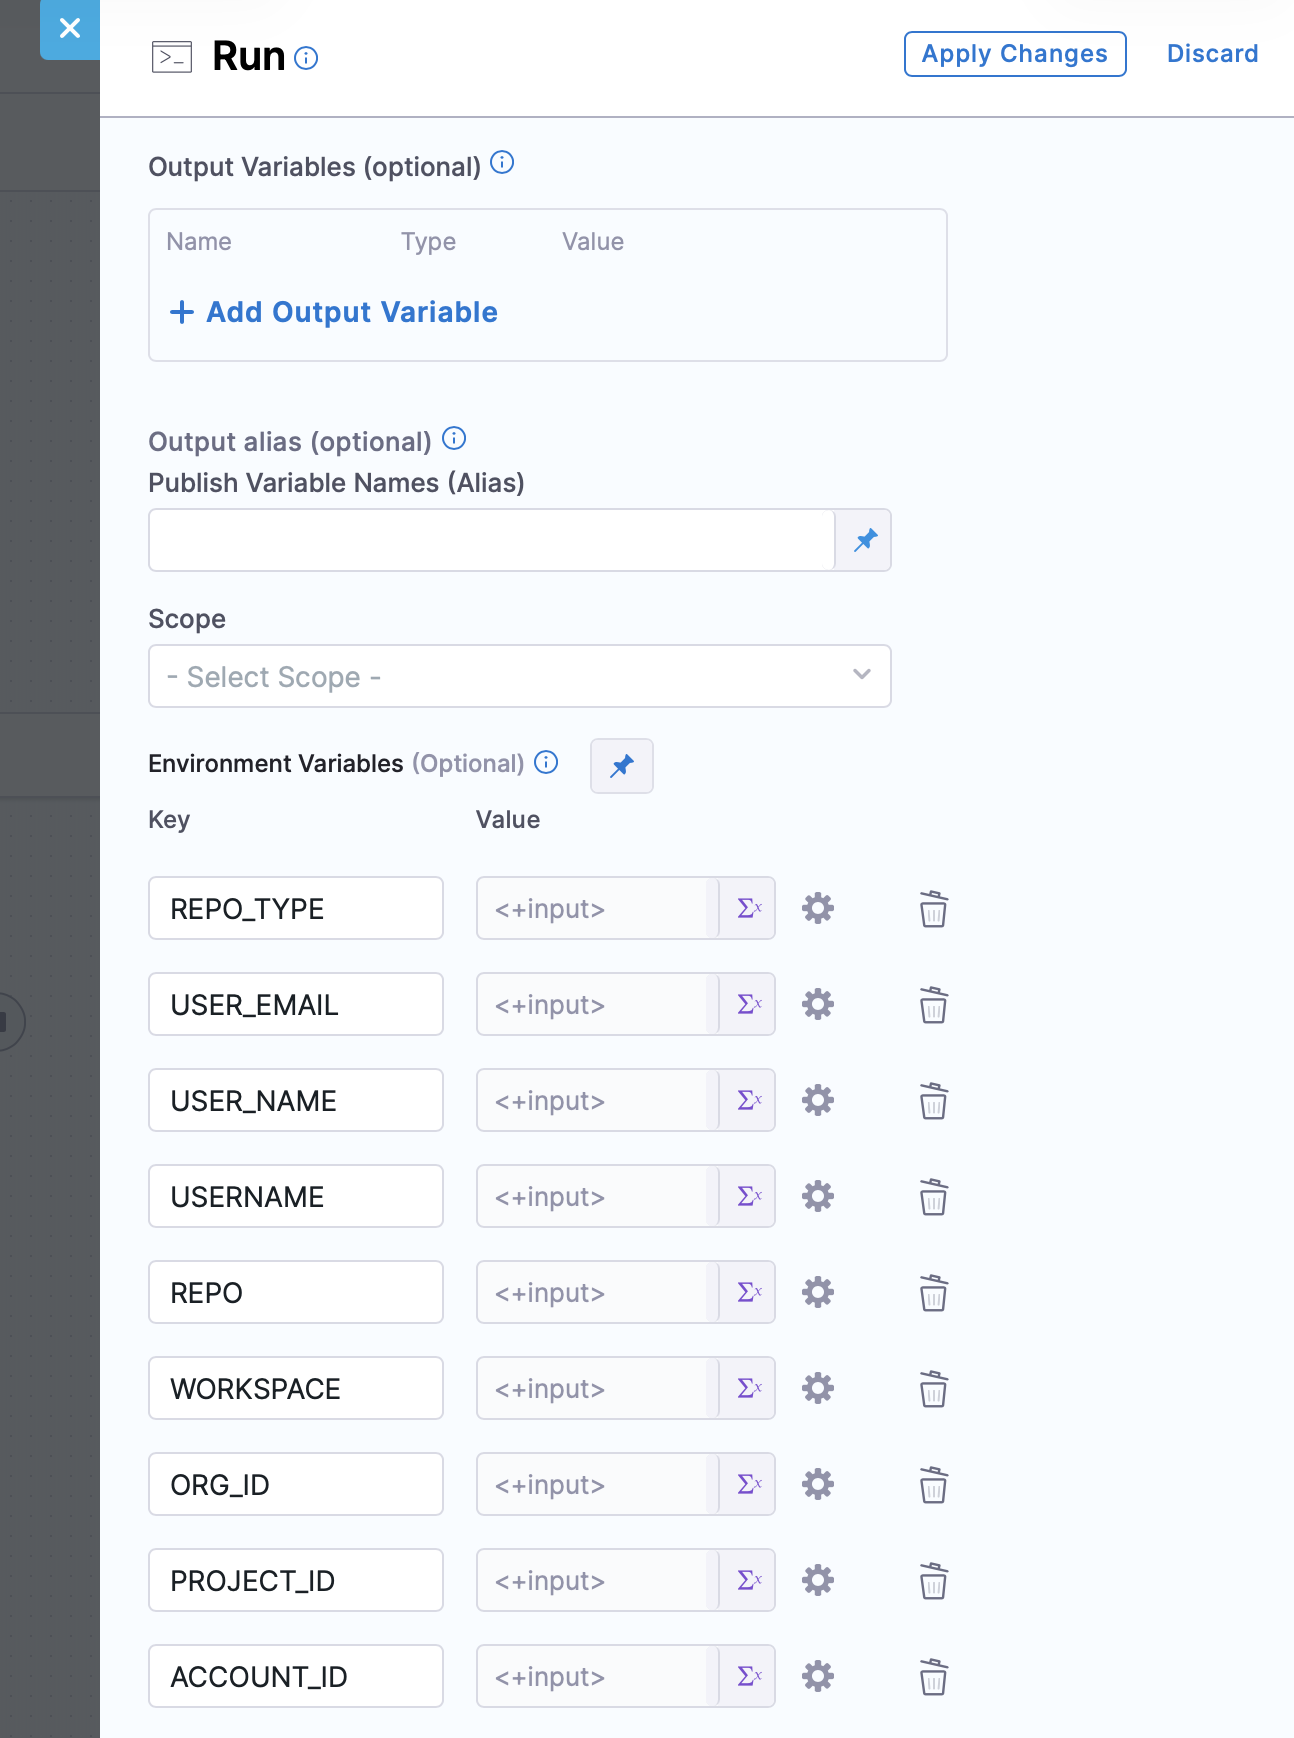
- Click on Add Step again and select the Run Step from the list of available steps.
- Configure the Run step to run the following script to create a Pull Request in your Git repository with the generated migration artifacts.
- First, add a pipeline variable (or step input) named $REPO_TYPE with allowed values: "github", "bitbucket", "harness". (This variable will determine the Git provider and API used for creating the Pull Request).
- In the Run step configuration, set the image to
prontotools/alpine-git-curl:latestwhich has git and curl installed, and set the shell toSh. - Then use the following unified script, replacing the common placeholders with your actual values:
#!/bin/bash
set -e

# All configuration is read from step environment variables — no edits needed below.

cd dbops/DBTestAndPreview_1
git config --global user.email "$USER_EMAIL"
git config --global user.name  "$USER_NAME"

# ── Set remote URL ────────────────────────────────────────────────────────────
case "$REPO_TYPE" in
  github)
    ENCODED_EMAIL="${USER_EMAIL//@/%40}"
    REMOTE_URL="https://${ENCODED_EMAIL}:<+secrets.getValue("github")>@github.com/${USERNAME}/${REPO}.git"
    ;;
  bitbucket)
    REMOTE_URL="https://${USERNAME}:<+secrets.getValue("bitbucket")>@bitbucket.org/${WORKSPACE}/${REPO}.git"
    ;;
  harness)
    REMOTE_URL="https://${HARNESS_CODE_NAME}:<+secrets.getValue("harness_api_token")>@git.harness.io/${ACCOUNT_ID}/${ORG_ID}/${PROJECT_ID}/${REPO}.git"
    ;;
  *)
    echo "ERROR: Unsupported REPO_TYPE '${REPO_TYPE}'. Must be github, bitbucket, or harness."
    exit 1
    ;;
esac

# ── Push to a new branch ──────────────────────────────────────────────────────
git remote remove origin 2>/dev/null || true
git remote add origin "$REMOTE_URL"
git fetch origin
DEFAULT_BRANCH=$(git remote show origin | grep 'HEAD branch' | awk '{print $NF}')
DEFAULT_BRANCH="${DEFAULT_BRANCH:-main}"
echo "Default branch: $DEFAULT_BRANCH"

git add .
git commit -m "Updating changeset in changelog file"
NEW_BRANCH="changelog-update-$(date +%Y%m%d%H%M%S)"
git checkout -b "$NEW_BRANCH"
git push -u origin "$NEW_BRANCH"

# ── Open a Pull Request ───────────────────────────────────────────────────────
case "$REPO_TYPE" in
  github)
    PR_RESPONSE=$(curl -s -X POST \
      -H "Authorization: token '<+secrets.getValue("github")>'" \
      -H "Accept: application/vnd.github+json" \
      "https://api.github.com/repos/${USERNAME}/${REPO}/pulls" \
      -d "{\"title\":\"Automated changelog update\",\"head\":\"${NEW_BRANCH}\",\"base\":\"${DEFAULT_BRANCH}\"}")
    PR_URL=$(echo "$PR_RESPONSE" | grep '"html_url"' | head -1 | sed -E 's/.*"html_url": *"([^"]+)".*/\1/')
    ;;
  bitbucket)
    PR_RESPONSE=$(curl -s -X POST \
      -u "${USERNAME}:<+secrets.getValue("bitbucket")>" \
      -H "Content-Type: application/json" \
      "https://api.bitbucket.org/2.0/repositories/${WORKSPACE}/${REPO}/pullrequests" \
      -d "{\"title\":\"Automated changelog update\",\"source\":{\"branch\":{\"name\":\"${NEW_BRANCH}\"}},\"destination\":{\"branch\":{\"name\":\"${DEFAULT_BRANCH}\"}},\"close_source_branch\":true}")
    PR_URL=$(echo "$PR_RESPONSE" | grep -o '"html":{"href":"[^"]*"' | sed 's/"html":{"href":"//;s/"$//')
    ;;
  harness)
    PR_RESPONSE=$(curl -s -w "\n__HTTP_STATUS__%{http_code}" -X POST \
      "https://app.harness.io/code/api/v1/repos/${REPO}/pullreq?accountIdentifier=${ACCOUNT_ID}&orgIdentifier=${ORG_ID}&projectIdentifier=${PROJECT_ID}" \
      -H "Content-Type: application/json" \
      -H "x-api-key: <+secrets.getValue("harness_api_token")>" \
      -d "{\"title\":\"Automated changelog update\",\"source_branch\":\"${NEW_BRANCH}\",\"target_branch\":\"${DEFAULT_BRANCH}\",\"is_draft\":false}")
    HTTP_STATUS=$(echo "$PR_RESPONSE" | grep "__HTTP_STATUS__" | sed 's/__HTTP_STATUS__//')
    BODY=$(echo "$PR_RESPONSE" | grep -v "__HTTP_STATUS__")
    if [ "$HTTP_STATUS" -lt 200 ] || [ "$HTTP_STATUS" -ge 300 ]; then
      echo "❌ Failed to create PR (HTTP $HTTP_STATUS)"
      echo "$BODY"
      exit 1
    fi
    PR_NUMBER=$(echo "$BODY" | grep -o '"number":[0-9]*' | head -1 | sed 's/"number"://')
    PR_URL="https://app.harness.io/ng/account/${ACCOUNT_ID}/module/code/orgs/${ORG_ID}/projects/${PROJECT_ID}/repos/${REPO}/pull-requests/${PR_NUMBER}"
    ;;
esac

echo "Pull request created: $PR_URL"
export CHANGESET_PR_LINK="$PR_URL"
Setup the following environment variables in the Run step configuration, ensuring that sensitive values like github, bitbucket, and harness_api_token are stored securely in Harness secrets and referenced appropriately:
| Variable Name | Type | Description | Example |
|---|---|---|---|
| REPO_TYPE | String | Target Git provider | github, bitbucket, harness |
| USER_EMAIL | String | Git commit author email | jane.doe@example.com |
| USER_NAME | String | Git commit author name | Jane Doe |
| USERNAME | String | Git provider username (GitHub/Bitbucket only) | janedoe |
| REPO | String | Repository name | my-database-repo |
| WORKSPACE | String | Workspace slug (Bitbucket only) | mycompany |
| ORG_ID | String | Organization identifier (Harness Code only) | default |
| PROJECT_ID | String | Project identifier (Harness Code only) | my_project |
| ACCOUNT_ID | String | Account identifier (Harness Code only) | abc123 |
| HARNESS_CODE_NAME | String | Harness Code username (Harness Code only) | code_token_toewv |
If the target Git provider is Harness Code, ensure that the REPO_TYPE is set to harness.
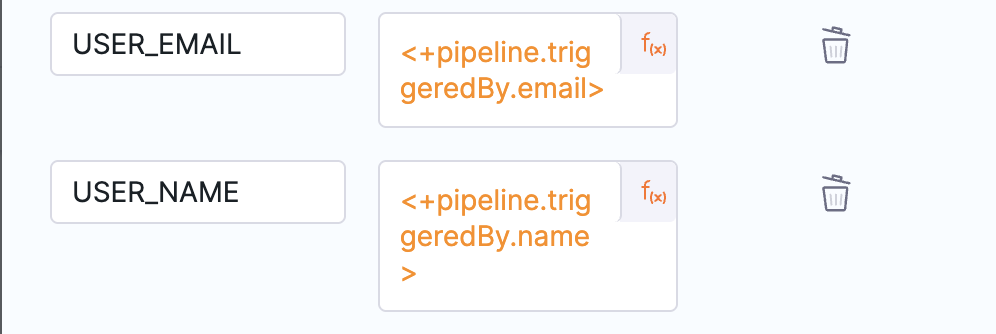
You can also set USER_NAME and USER_EMAIL to the user who started the pipeline via expression: <+pipeline.startingUser.email> and <+pipeline.startingUser.name> to automatically attribute the commit and PR to the user who initiated the change authoring process.
Step 3: Author your first DB Change
-
Select your Database DevOps project from the Harness dashboard.
-
Navigate to your desired Database Schema.
-
Click on Edit Schema to open the schema details page and select the Primary DB Instance (Optional) from the dropdown.
-
Click on the Author DB Change tab.
-
In the Author DB Change chat window, mention the changes you want to make to the database schema. For example, you can type:
Add a new column named Quantity under the tableName Items which is a non-null, with integer datatype.
-
Once satisfied with the changes, Click on the Test and Preview button. The LLM will process your request and generate the appropriate migration artifacts (e.g., changesets or SQL scripts).
-
You can monitor the pipeline execution status via the Chat Window. Once the pipeline completes successfully, a Pull Request will be created in your Git repository with the generated migration artifacts since the pipeline is configured to create a Pull Request.
- Visual Pipeline Example
- Pipeline YAML Example

pipeline:
  name: LLM Authoring
  identifier: LLM_Authoring
  projectIdentifier: DBMarlin
  orgIdentifier: default
  tags: {}
  stages:
    - stage:
        name: LLm Authoring
        identifier: LLm_Authoring
        description: "This stage is used for testing the LLM generated changeset and creating a PR with the changeset file in the git repository."
        type: Custom
        spec:
          execution:
            steps:
              - stepGroup:
                  name: LLM
                  identifier: LLM
                  steps:
                    - step:
                        type: DBTestAndPreview
                        name: DBTestAndPreview_1
                        identifier: DBTestAndPreview_1
                        spec:
                          connectorRef: docker
                          dbSchema: <+input>
                          dbInstance: <+input>
                          changeset: <+input>
                        timeout: 10m
                    - step:
                        type: Run
                        name: Git Merge
                        identifier: Git_Merge
                        spec:
                          connectorRef: docker
                          image: prontotools/alpine-git-curl
                          shell: Sh
                          command: |-
                            #!/bin/bash
                            set -e

                            cd dbops/DBTestAndPreview_1
                            git config --global user.email "$USER_EMAIL"
                            git config --global user.name  "$USER_NAME"

                            # ── Set remote URL ────────────────────────────────────────────────────────────
                            case "$REPO_TYPE" in
                              github)
                                ENCODED_EMAIL="${USER_EMAIL//@/%40}"
                                REMOTE_URL="https://${ENCODED_EMAIL}:<+secrets.getValue("github")>@github.com/${USERNAME}/${REPO}.git"
                                ;;
                              bitbucket)
                                REMOTE_URL="https://${USERNAME}:<+secrets.getValue("account.bitbucket")>@bitbucket.org/${WORKSPACE}/${REPO}.git"
                                ;;
                              harness)
                                # Fix 1: hardcoded username, Fix 2: correct host and path format
                                REMOTE_URL="https://${HARNESS_CODE_NAME}:<+secrets.getValue("harness_api_token")>@git.harness.io/${ACCOUNT_ID}/${ORG_ID}/${PROJECT_ID}/${REPO}.git"
                                ;;
                              *)
                                echo "ERROR: Unsupported REPO_TYPE '${REPO_TYPE}'. Must be github, bitbucket, or harness."
                                exit 1
                                ;;
                            esac

                            # ── Push to a new branch ──────────────────────────────────────────────────────
                            git remote remove origin 2>/dev/null || true
                            git remote add origin "$REMOTE_URL"
                            git fetch origin
                            DEFAULT_BRANCH=$(git remote show origin | grep 'HEAD branch' | awk '{print $NF}')
                            DEFAULT_BRANCH="${DEFAULT_BRANCH:-main}"
                            echo "Default branch: $DEFAULT_BRANCH"
                            echo "── Current directory ──"
                            pwd
                            echo "── Git status ──"
                            git status
                            echo "── All files ──"
                            find . -type f | grep -v ".git" | sort

                            git add .
                            git commit -m "Updating changeset in changelog file"
                            NEW_BRANCH="changelog-update-$(date +%Y%m%d%H%M%S)"
                            git checkout -b "$NEW_BRANCH"
                            git push -u origin "$NEW_BRANCH"

                            # ── Open a Pull Request ───────────────────────────────────────────────────────
                            case "$REPO_TYPE" in
                              github)
                                PR_RESPONSE=$(curl -s -X POST \
                                  -H "Authorization: token '<+secrets.getValue("github")>'" \
                                  -H "Accept: application/vnd.github+json" \
                                  "https://api.github.com/repos/${USERNAME}/${REPO}/pulls" \
                                  -d "{\"title\":\"Automated changelog update\",\"head\":\"${NEW_BRANCH}\",\"base\":\"${DEFAULT_BRANCH}\"}")
                                PR_URL=$(echo "$PR_RESPONSE" | grep '"html_url"' | head -1 | sed -E 's/.*"html_url": *"([^"]+)".*/\1/')
                                ;;
                              bitbucket)
                                PR_RESPONSE=$(curl -s -X POST \
                                  -u "${USERNAME}:<+secrets.getValue("account.bitbucket")>" \
                                  -H "Content-Type: application/json" \
                                  "https://api.bitbucket.org/2.0/repositories/${WORKSPACE}/${REPO}/pullrequests" \
                                  -d "{\"title\":\"Automated changelog update\",\"source\":{\"branch\":{\"name\":\"${NEW_BRANCH}\"}},\"destination\":{\"branch\":{\"name\":\"${DEFAULT_BRANCH}\"}},\"close_source_branch\":true}")
                                PR_URL=$(echo "$PR_RESPONSE" | grep -o '"html":{"href":"[^"]*"' | sed 's/"html":{"href":"//;s/"$//')
                                ;;
                              harness)
                                PR_RESPONSE=$(curl -s -w "\n__HTTP_STATUS__%{http_code}" -X POST \
                                  "https://app.harness.io/code/api/v1/repos/${REPO}/pullreq?accountIdentifier=${ACCOUNT_ID}&orgIdentifier=${ORG_ID}&projectIdentifier=${PROJECT_ID}" \
                                  -H "Content-Type: application/json" \
                                  -H "x-api-key: <+secrets.getValue("harness_api_token")>" \
                                  -d "{\"title\":\"Automated changelog update\",\"source_branch\":\"${NEW_BRANCH}\",\"target_branch\":\"${DEFAULT_BRANCH}\",\"is_draft\":false}")
                                HTTP_STATUS=$(echo "$PR_RESPONSE" | grep "__HTTP_STATUS__" | sed 's/__HTTP_STATUS__//')
                                BODY=$(echo "$PR_RESPONSE" | grep -v "__HTTP_STATUS__")
                                if [ "$HTTP_STATUS" -lt 200 ] || [ "$HTTP_STATUS" -ge 300 ]; then
                                  echo "❌ Failed to create PR (HTTP $HTTP_STATUS)"
                                  echo "$BODY"
                                  exit 1
                                fi
                                PR_NUMBER=$(echo "$BODY" | grep -o '"number":[0-9]*' | head -1 | sed 's/"number"://')
                                PR_URL="https://app.harness.io/ng/account/${ACCOUNT_ID}/module/code/orgs/${ORG_ID}/projects/${PROJECT_ID}/repos/${REPO}/pull-requests/${PR_NUMBER}"
                                ;;
                            esac

                            echo "Pull request created: $PR_URL"
                            export CHANGESET_PR_LINK="$PR_URL"
                          envVariables:
                            REPO_TYPE: harness
                            USER_EMAIL: <+pipeline.triggeredBy.email>
                            USER_NAME: <+pipeline.triggeredBy.name>
                            REPO_TYPE: <+input>
                            USER_EMAIL: <+pipeline.triggeredBy.email>
                            USER_NAME: <+pipeline.triggeredBy.name>
                            ACCOUNT_ID: <+input>
                            ORG_ID: <+input>
                            PROJECT_ID: <+input>
                            HARNESS_CODE_NAME: <+input>
                            REPO: <+input>
                  stepGroupInfra:
                    type: KubernetesDirect
                    spec:
                      connectorRef: gke
        tags: {}