API Keys
The Harness platform supports multiple types of API keys and tokens, including personal access tokens (PATs), service account API keys, and SDK API keys. The following section focuses on creating and using SDK API keys.
You typically create one client-side and one server-side SDK API key per environment in Harness FME. While multiple keys of the same type are supported, Harness FME SDKs must use the matching key type; client-side for frontend and mobile SDKs, and server-side for backend SDKs.
To create an SDK API key in Harness FME:
-
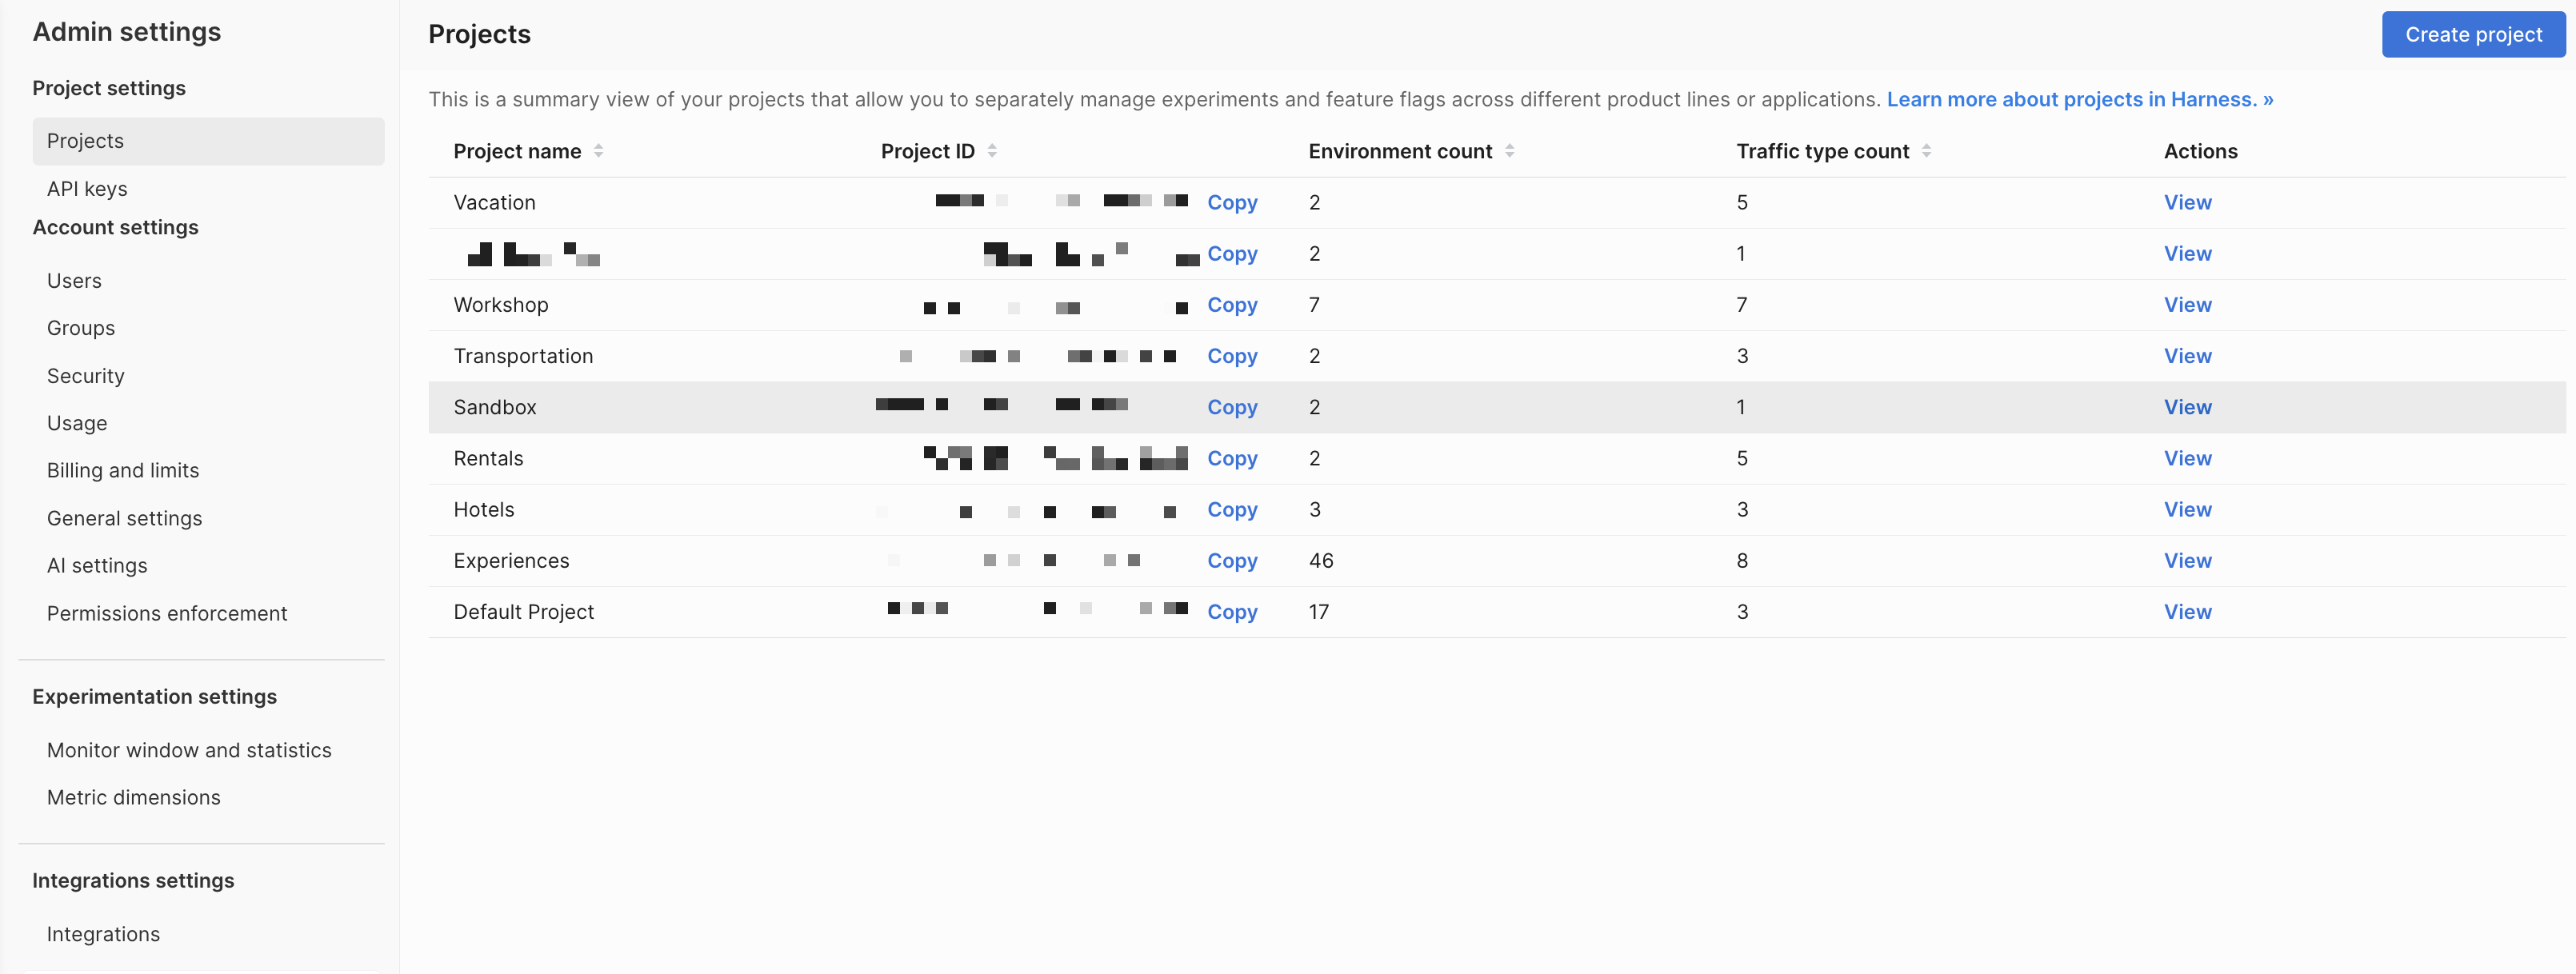
From the FME navigation menu, click FME Settings and select Projects.
-
Click View under the Actions column for the project you want to create an SDK API key in.
-
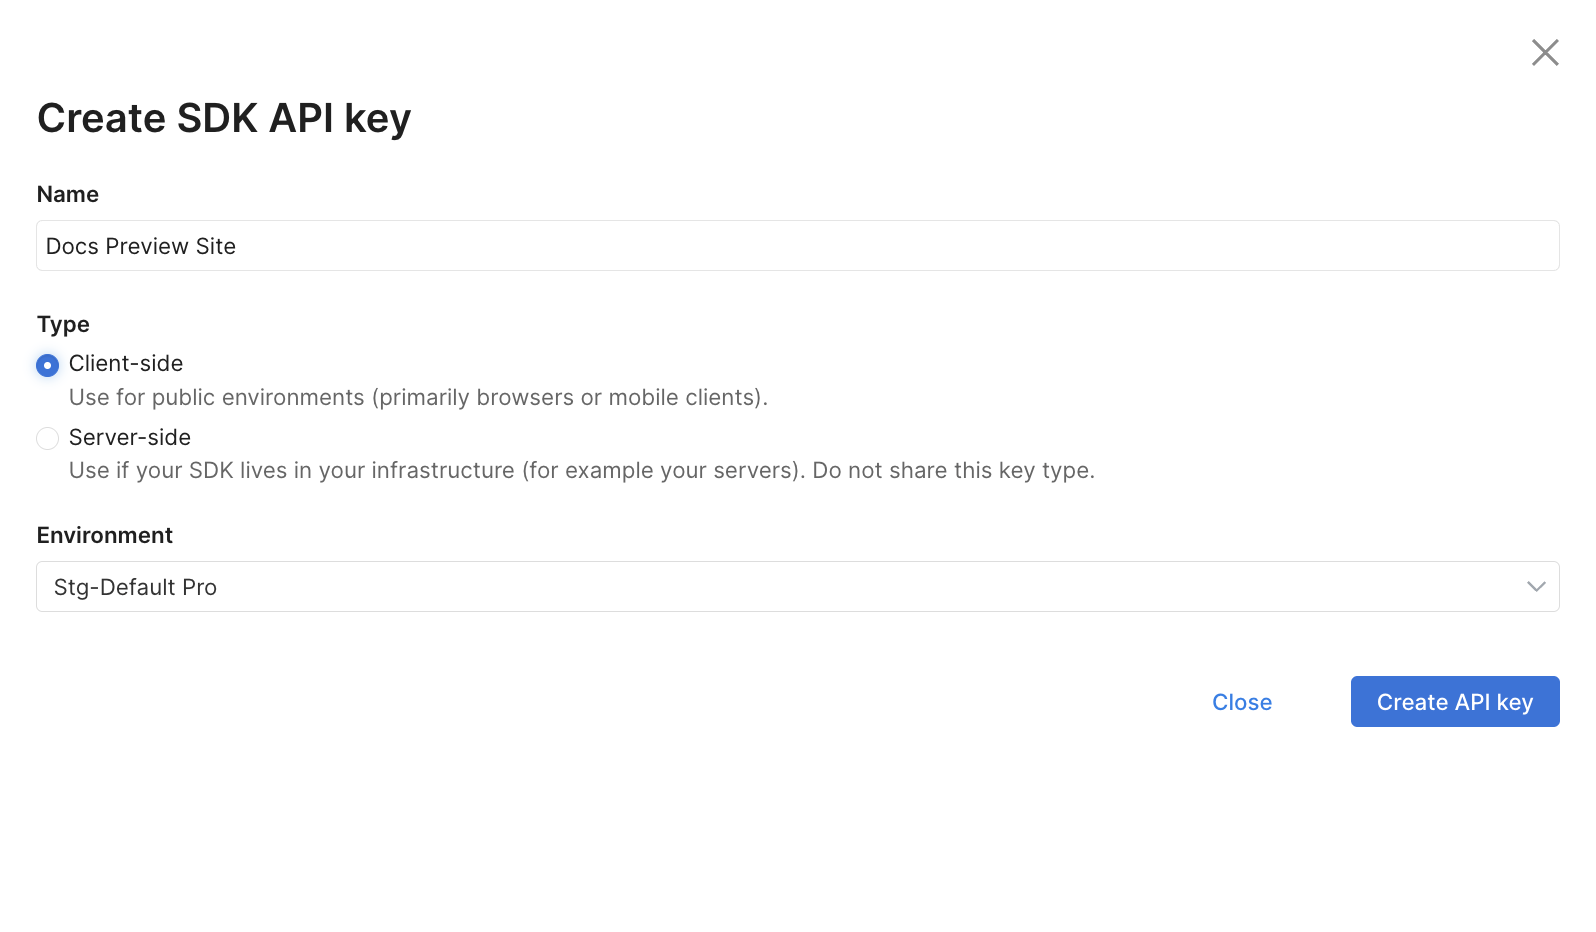
Click Create SDK API Key on the SDK API Keys tab.
-
Enter a name for the SDK API key.
-
Select the type of SDK API key: Client-side or Server-side.
-
Select an environment from the dropdown menu in the
Environmentssection. -
Click Create API key.
The following sections provides general information about Harness API keys, personal access tokens (PATs), and service accounts. This content applies across the Harness platform and is included here for reference.
Harness APIs use API keys to authenticate requests. You can create API keys for either your personal account or a service account. API keys for personal accounts can be created only at the account level, whereas service account API keys can be created at any scope.
After creating an API key, you must add one or more tokens to it. These tokens are then used in your API requests or anywhere else an API key is required for authentication. Each API key can have multiple tokens.
API keys and their tokens inherit the permissions of the account under which they are created. If the API key is created under your personal account, it will have the same permissions as your account. If it is created under a service account, it will inherit the permissions of that service account.
To create service accounts and their API keys, you must have Account Admin privileges (or an equivalent role).
Create personal API keys and tokens
Use these steps to create an API key and personal access token (PAT) for your personal Harness account.
-
Go to your user profile in Harness.
-
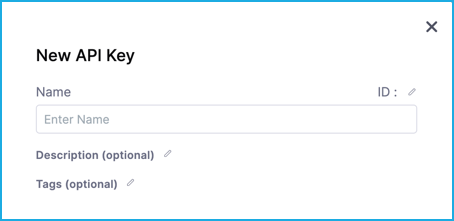
Under My API Keys, select API Key.
-
Enter a Name for the API key. Description and Tags are optional.
-
Select Save to create your API key.
-
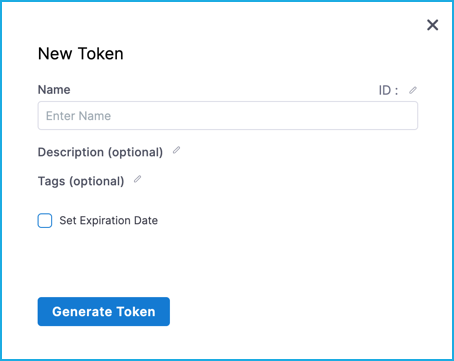
Select Token under your new API key.
-
Enter a Name for the token. Description and Tags are optional.
-
To set an expiration date for the token, select Set Expiration Date and enter the date in mm/dd/yyyy format. For more information about token expiration, see the section below.
-
Select Generate Token and copy the token.
warningThe token is only displayed once. Store the token somewhere secure that you can access when you make API requests.
Your API keys carry many privileges. Don't store them in publicly-accessible areas.
After rotating tokens make sure you always use the new token.

Create service account API keys and tokens
Use these steps to create an API key and service account token (SAT) for a service account. To do this, you must have the Account Admin role or another role that provides permissions to View, Create/Edit, Manage, and Delete service accounts.
- If you haven't done so already, create a Service Account. The API key and token inherit the permissions of the service account they are associated with; therefore, make sure the service account has the necessary permissions.
- In Harness, select Account Settings, and then select Access Control.
- Select Service Accounts in the header, and then select the service account for which you want to create an API key.
- Under API Keys, select API Key.
- Enter a Name for the API key. Description and Tags are optional.
- Select Save to create the API key.
- Select Token under the new API key.
- Enter a Name for the token. Description and Tags are optional.
- If you want to set an expiration date for the token, select Set Expiration Date and enter an expiration date in
mm/dd/yyyyformat. - Select Generate Token and copy the token.
The token is only displayed once. Store the token somewhere secure that you can access when you make API requests.
API keys carry many privileges. Don't store them in publicly-accessible areas.
After rotating tokens make sure you always use the new token.
Edit API keys
Use these steps to edit the name, description, or tags for an API key. To edit tokens under API keys, go to edit tokens and rotate tokens.
- Edit personal API keys
- Edit service account API keys
- Go to your user profile in Harness.
- Under My API Keys, select More Options (⋮) next to the key you want to edit, and then select Edit.
- You can edit the name, description, and tags. You can't edit the Id.
- Select Save.
- In Harness, select Account Settings, and then select Access Control.
- Select Service Accounts in the header, and then select the service account for which you want to edit an API key.
- Select More Options (⋮) next to the key you want to edit, and then select Edit.
- You can edit the name, description, and tags. You can't edit the ID.
- Select Save.
Edit tokens
Use these steps to edit the name, description, tags, and expiration dates of tokens under API keys. You can also rotate tokens.
- Edit personal access tokens
- Edit service account tokens
- Go to your user profile in Harness.
- Under My API Keys, expand the token that you want to edit, select More Options (⋮), and then select Edit.
- You can edit the name, description, tags, and expiration date. You can't edit the Id or the token's value.
- Select Save.
- In Harness, select Account Settings, and then select Access Control.
- Select Service Accounts in the header, and then select the service account for which you want to edit a token.
- Select the API key that has the token you want to edit.
- Select More Options (⋮) next to the token you want to edit, and then select Edit.
- You can edit the name, description, tags, and expiration date. You can't edit the ID or the token's value.
- Select Save.
Rotate tokens
As a security best practice, rotate tokens periodically. You can rotate tokens in Harness for symmetric encryption.
- Rotate personal access tokens
- Rotate service account tokens
- Go to your user profile in Harness.
- Under My API Keys, expand the token that you want to rotate, select More Options (⋮), and then select Rotate Token.
- If you want to set an expiration date for the token, select Set Expiration Date and enter an expiration date in
mm/dd/yyyyformat. - Select Rotate Token and copy the token.
- In Harness, select Account Settings, and then select Access Control.
- Select Service Accounts in the header, and then select the service account for which you want to rotate a token.
- Select the API key that has the token you want to rotate.
- Select More Options (⋮) next to the token you want to rotate, and then select Rotate Token.
- If you want to set an expiration date for the token, select Set Expiration Date and enter an expiration date in
mm/dd/yyyyformat. - Select Rotate Token and copy the token.
The token is only displayed once. Store the token somewhere secure that you can access when you make API requests.
API keys carry many privileges. Don't store them in publicly-accessible areas.
After rotating tokens make sure you always use the new token.
Delete API keys
Use these steps to delete an API key and all of its tokens. To delete individual tokens under API keys, go to delete tokens.
- Edit personal API keys
- Edit service account API keys
- Go to your user profile in Harness.
- Under My API Keys, select More Options (⋮) next to the key you want to delete, and then select Delete.
- In Harness, select Account Settings, and then select Access Control.
- Select Service Accounts in the header, and then select the service account for which you want to delete an API key.
- Select More Options (⋮) next to the key you want to delete, and then select Delete.
Delete tokens
- Delete personal access tokens
- Delete service account tokens
- Go to your user profile in Harness.
- Under My API Keys, expand the token that you want to delete, select More Options (⋮), and then select Delete.
- In Harness, select Account Settings, and then select Access Control.
- Select Service Accounts in the header, and then select the service account for which you want to delete a token.
- Select the API key that has the token you want to delete.
- Select More Options (⋮) next to the token you want to delete, and then select Delete.
Token Expiry
When creating a token, you can choose how long it stays active. You can set it to expire in 30, 90, or 180 days — or pick a custom date. If you don't want it to expire, select No expiration.
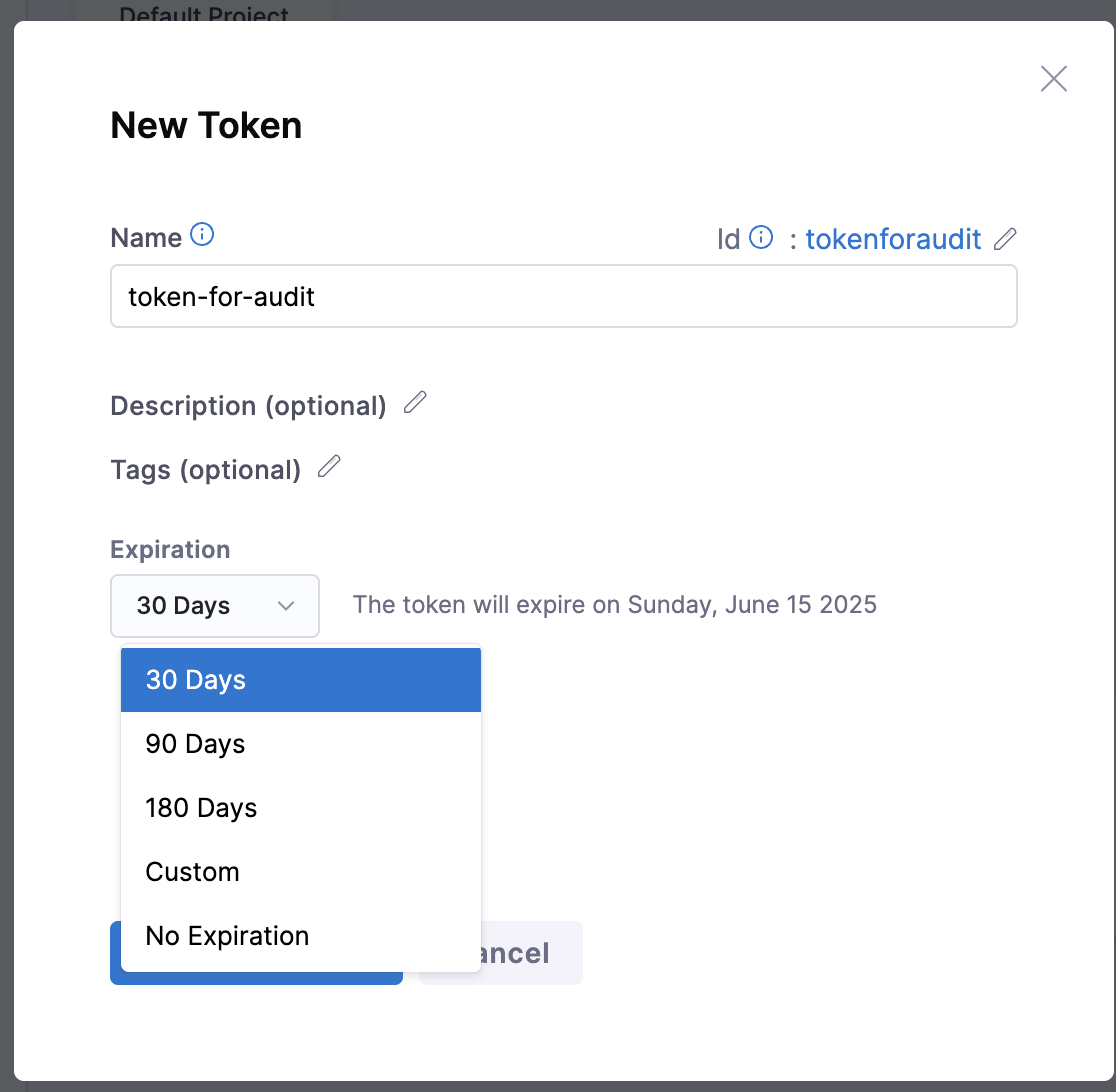
To set the expiration, Go to Profile Overview → My API Keys → Token.
You can set expiration for both User tokens and Service Account tokens.
Token expiration events are recorded in the audit logs. Expiration is checked every 5 minutes, so there may be a delay of up to 5 minutes between when a token expires and when the event is logged.
Legacy Split (reference only)
View Legacy Split guidance
This documentation describes the Split legacy Admin API keys experience.
If your organization is using Harness FME, API key behavior and the UI may differ. For more information, see RBAC for Split Admins.
FME SDKs and Admin API both require API keys for authentication.
In Harness FME, there are three types of keys:
-
Server-side type API keys are recommended to use with SDKs that live in your infrastructure (for example, your servers)
-
Client-side type API keys are for SDKs living in public environments (for example, browsers or mobile clients)
-
Admin type API Keys are used for access to Harness FME's Admin API endpoints.
Never expose Admin and server-side keys in untrusted contexts. Do not put your server-side or Admin API keys in client-side JavaScript or mobile SDKs. FME has special browser keys that you can use in client-side JavaScript, Android, and iOS. If you accidentally expose your API key, revoke it in the APIs tab in Account settings.
Be sure to copy your API Key once it's generated. For security purposes, you won’t see the key again.
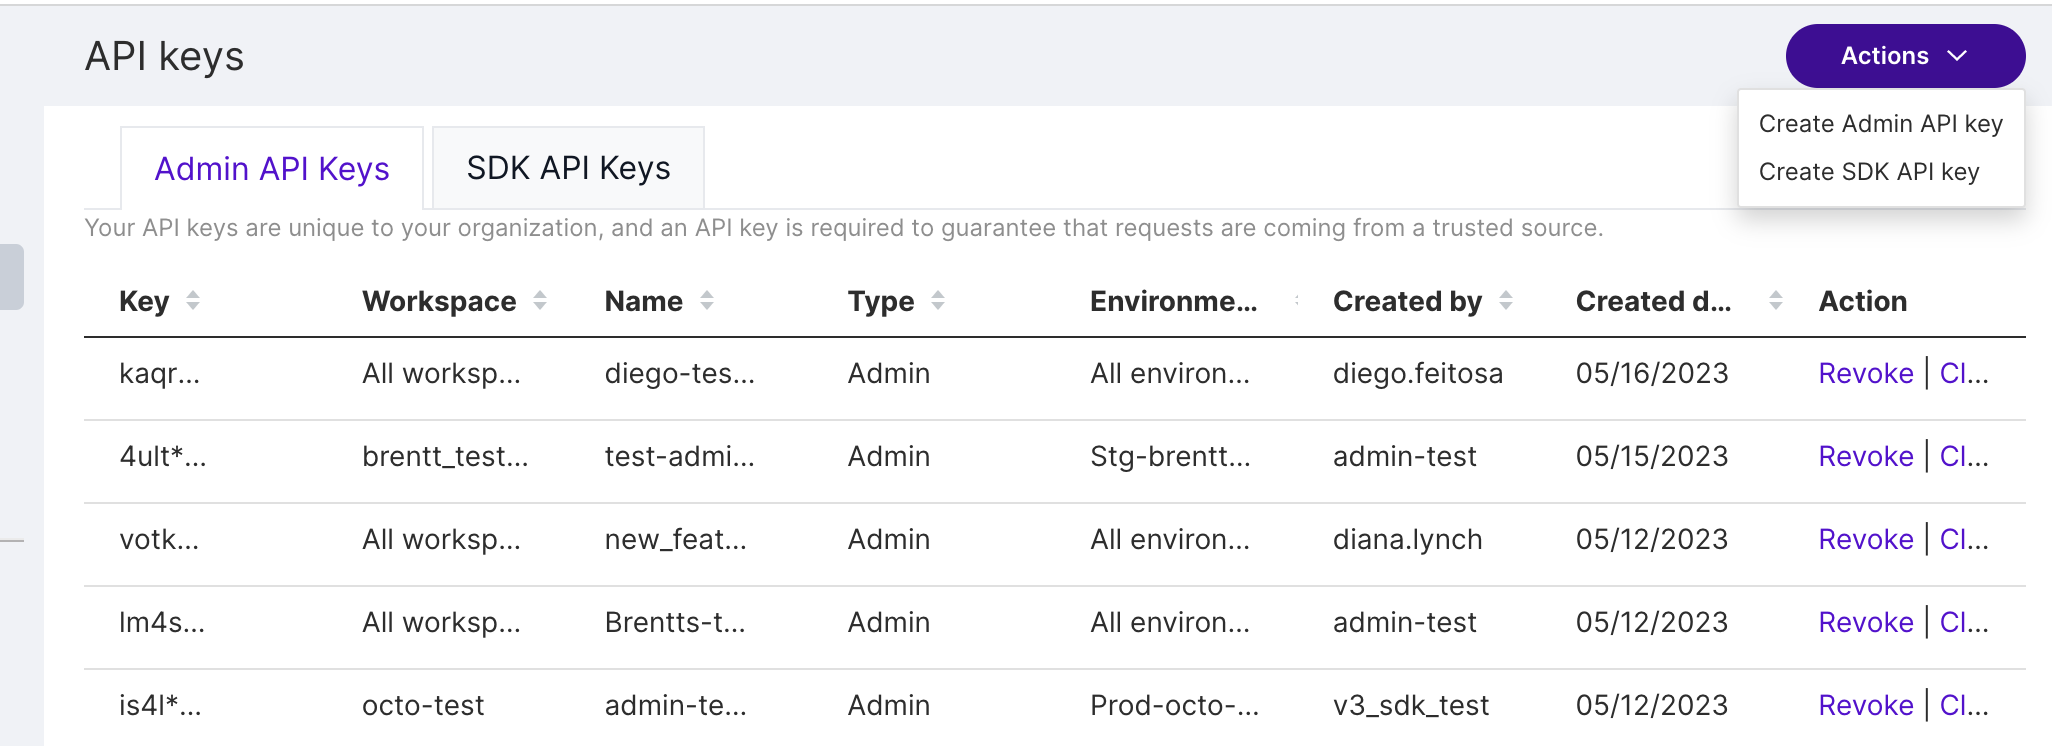
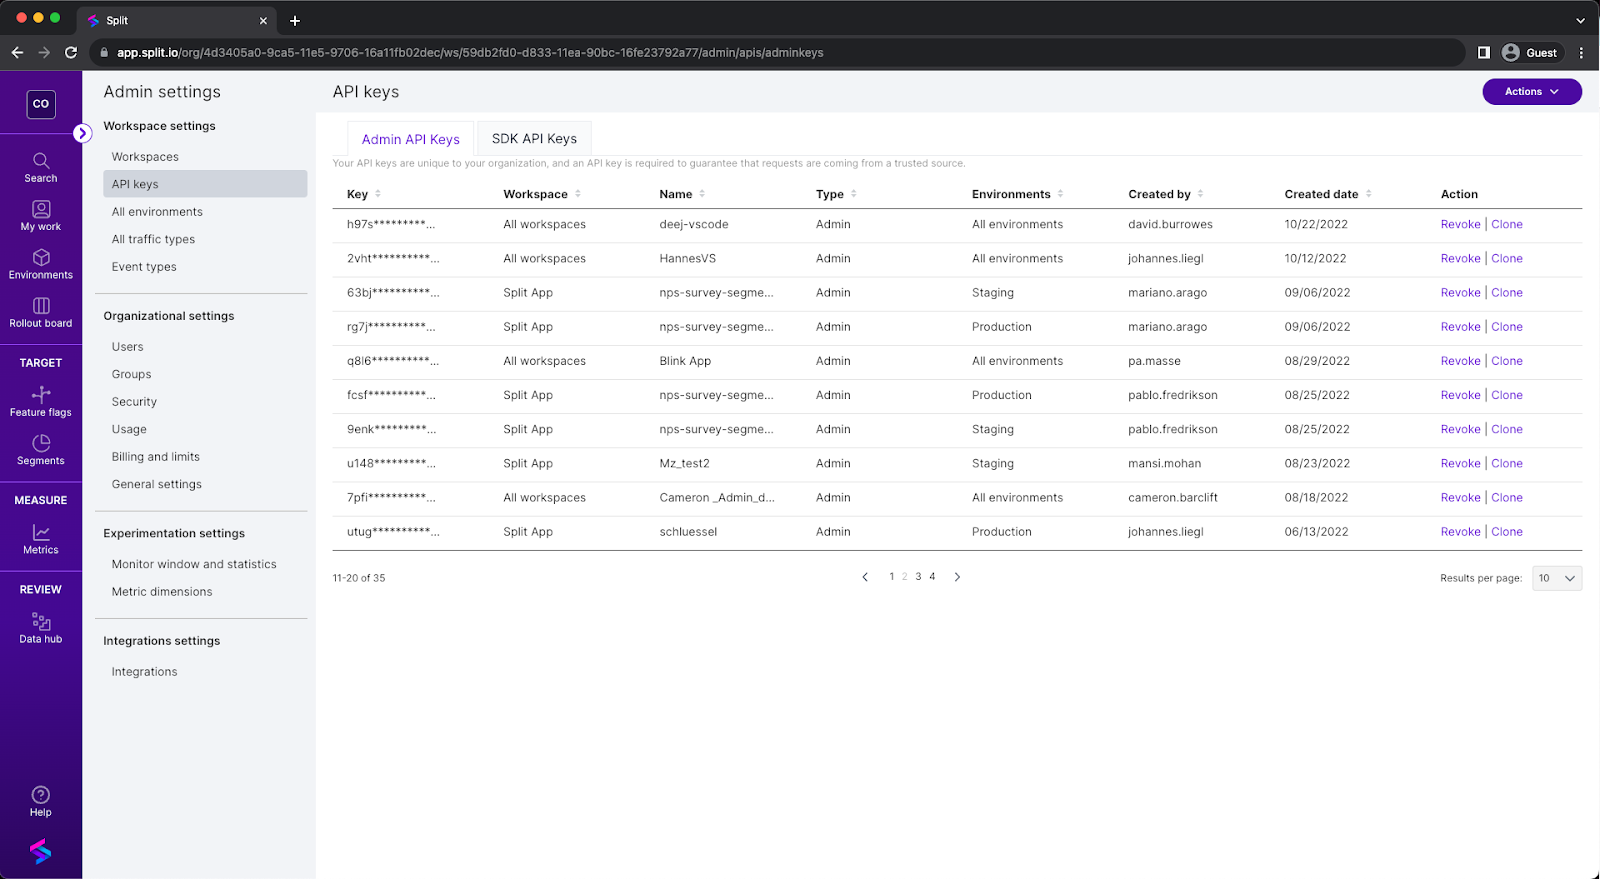
Managing your API keys
To manage your API keys, go to the API keys tab in your Admin Settings page. On this page you can:
- See a list of all your existing API keys.
- Add additional API keys by clicking Add API key in the top right.
- Revoke existing API keys
- Clone existing API keys
Adding server-side and client-side API keys
To add one of these API keys, do the following:
-
From the left navigation, click the profile button at the bottom, and then select Admin settings.
-
Click API keys. The API key page appears.
-
From the Admin API keys tab, click Actions and then Create SDK API key . The Create SDK API key view appears.
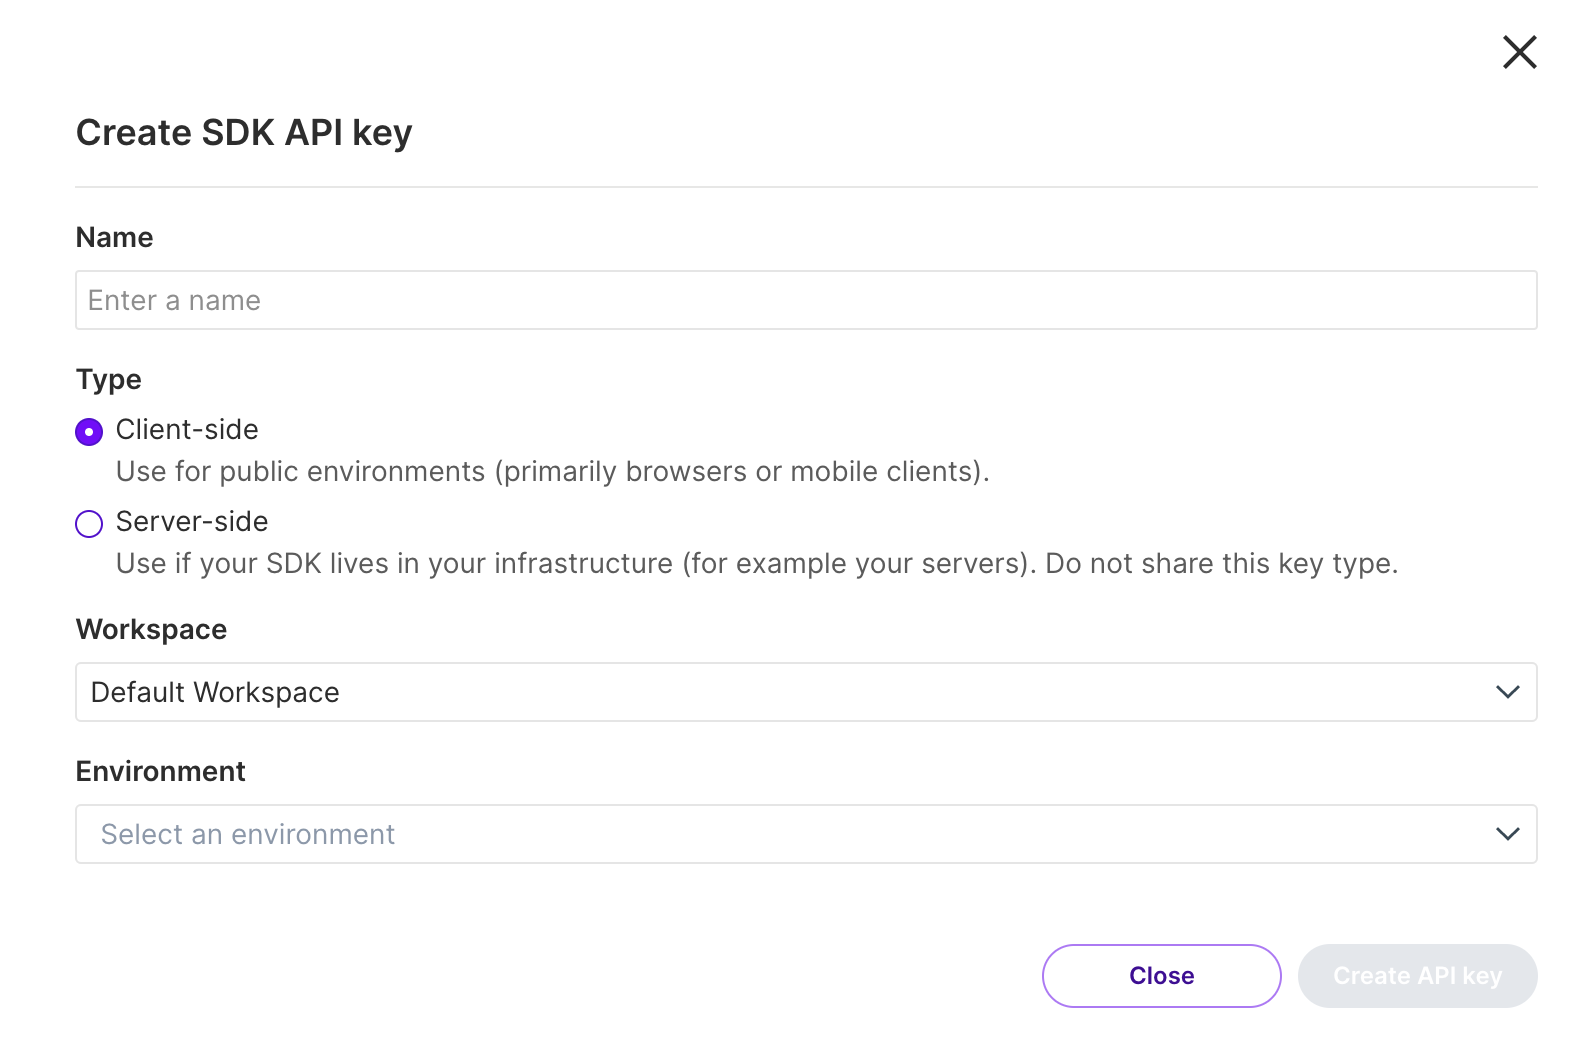
-
Enter a name for this API Key to let other users know what it’s used for.
-
Select Server-side or Client-side as the type depending if you use this key to get treatments for a back end service or your user interface.
-
Select one environment that the key has access to fetch a feature flag and segment information from.
-
Click the Create API key button to create the key.
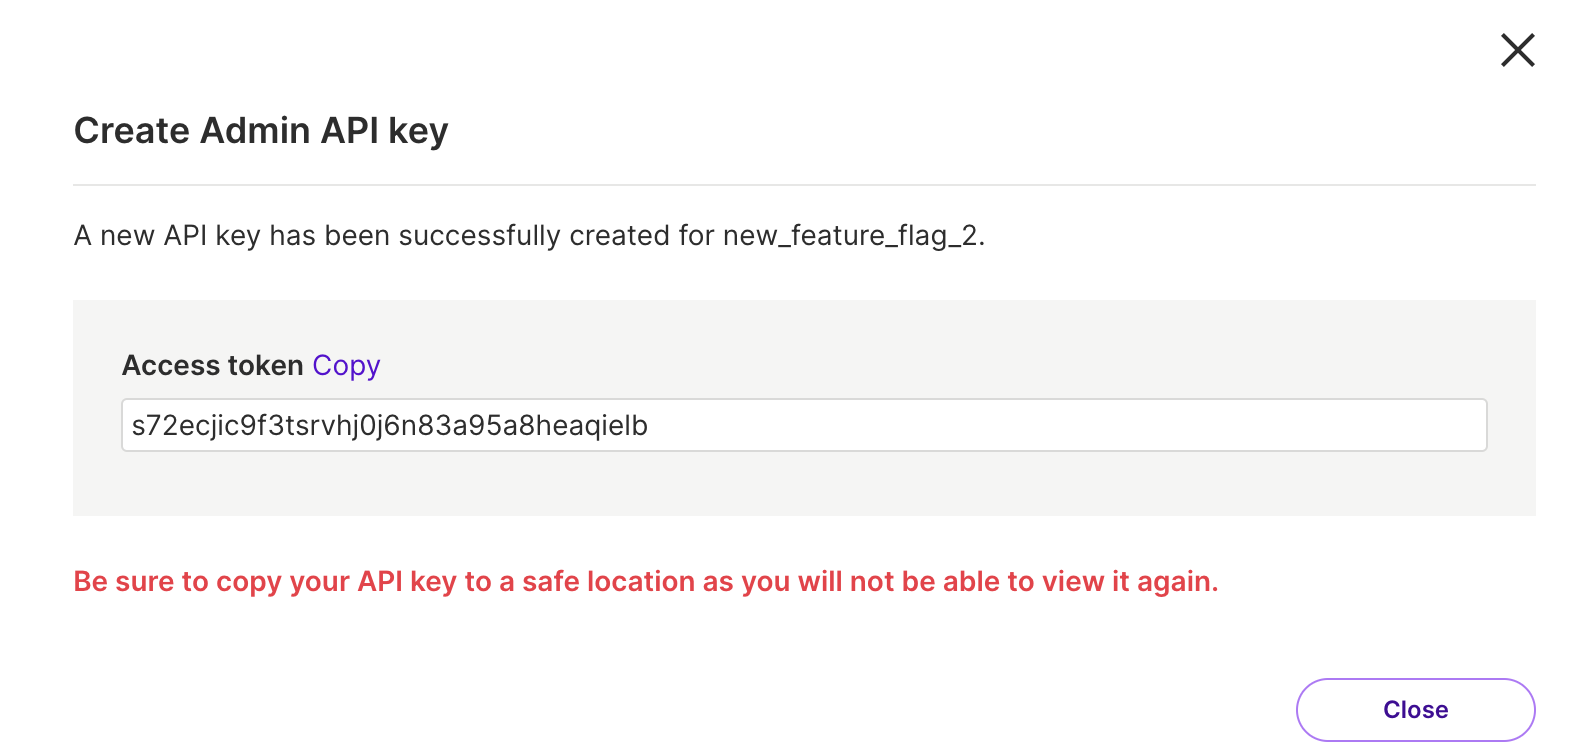
Adding Admin API keys
-
From the left navigation, click the profile button at the bottom and then select Admin settings.
-
Click API keys. The API key page appears.
-
From the Admin API keys tab, click Actions and then Create Admin API. The Create Admin API key view appears.
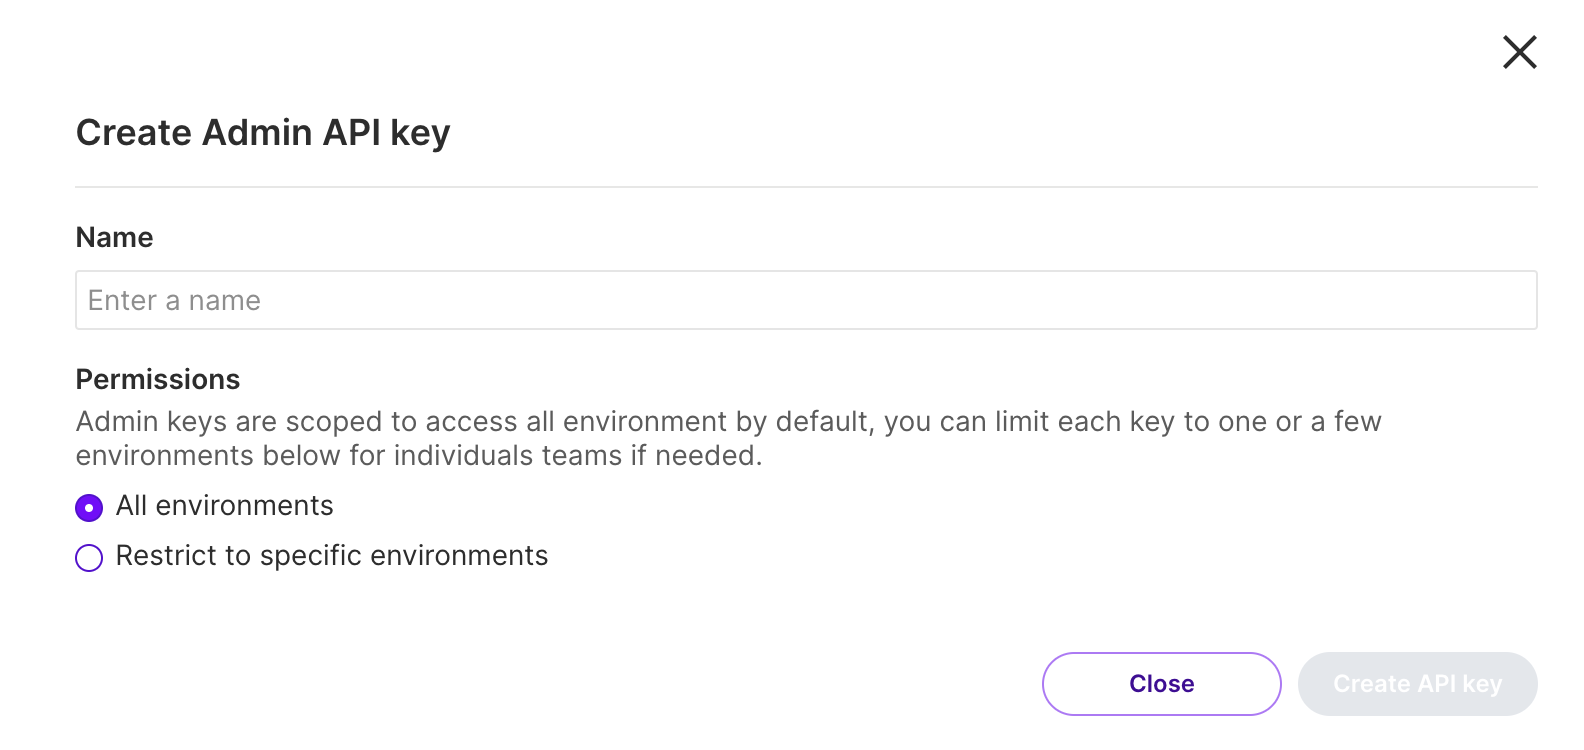
-
Enter a name for this API key to let other users what it's used for.
-
Select All environments or Restrict to specific environments to control the restrictions that this API Key has access to. If you select Restrict to specific environments, select one or more environments that the key has access to in one project.
-
Click the Create API key button. A new API key and access token are now created.
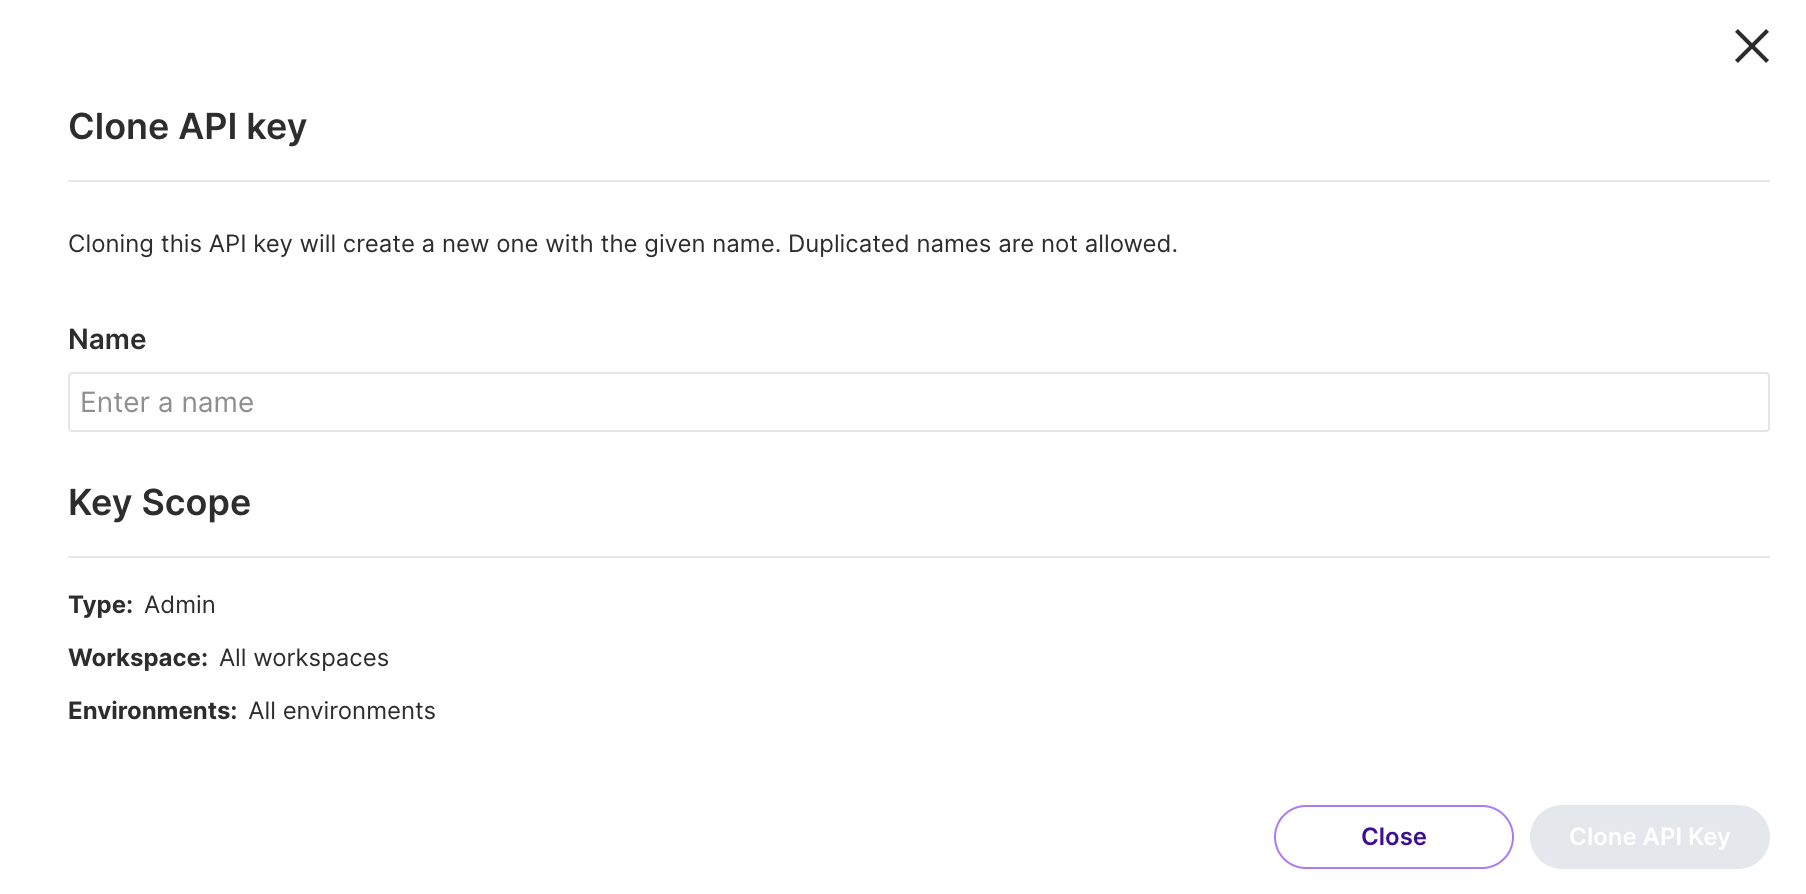
Cloning API keys
The Clone API keys action creates a new API key with access levels the same as the key being cloned. To clone an API key, do the following:
-
From the left navigation, click the profile button at the bottom and then select Admin settings.
-
Click API keys. The API key page appears.
-
From the Admin API keys tab, click Clone on the desired key. The Clone API key view appears.
-
Enter a new name for the cloned key.
-
The Key scope section shows the original key’s scope that is applied to this new key.
-
Click the Clone API key button to create the cloned key.
Endpoint restrictions for Admin API keys
If you restrict an API Key to one or more environments, the following are the Admin API endpoints that are restricted:
- Projects (formerly called Workspaces). All calls return a 401
- Environments. All calls return a 401
- Traffic Types. All calls return a 401
- Attributes. All calls return a 401
- Identities. All calls using an environment the key is not restricted for return a 401
- Segments. All calls using an environment the key is not restricted for return a 401
- Feature flags. All calls using an environment the key is not restricted for return a 401
- Change Requests. All calls return a 401
- Tags. All calls return a 401
Managing Admin API key roles and scopes
Harness FME enables you to restrict the access level of API keys in two ways:
- Specifying roles for the API key: This limits what resource types an API key can access
- Specifying a scope for the API key: This limits the reach of the API key across environments, a project, or the whole account.
While FME client-side and server-side SDK API keys are always scoped to a specific environment, Admin API keys can be tuned to granular access levels by creating them with a role and scope using the Harness FME API. This page describes the roles and scopes that can be applied when creating Admin API keys.
Choose the right role
The role given to an Admin API key aims to limit the access and operations a key can perform within FME within two functional areas: Administrative Permissions and Resource (Feature Flag & Segment) Permissions.
| Role | String Identifier | Permission Granted | |
|---|---|---|---|
| Administrative Permissions | Full Permissions Role | API_ALL_GRANTED | A key with this role grants access to all of your Account’s settings and resources via FME API. |
| Api Key Role | API_APIKEY | A key with this role allows the creation and deletion of other API Keys. | |
| Account Administrator Role | API_ADMIN | Reduced Admin capabilities. This role enables administration of the account from the API. However, this role excludes permission to manage API keys and the following resources: feature flags segments, change requests, tags, and rollout statuses. | |
| Project Administrator Role | API_WORKSPACE_ADMIN | Admin capabilities within a project (formerly called a workspace), similar to API_ADMIN, but excluding permission to manage users and groups. | |
| Resource Permissions: Feature Flags | Feature Flag Viewer Role | API_FEATURE_FLAG_VIEWER | View-only access to feature flags, including permission to view associated change requests and rollout-board information. |
| Feature Flag Owner Role | API_FEATURE_FLAG_EDITOR | Grants access to all feature flag operations including operations related to associated tags, change requests and rollout-board information. | |
| Resource Permissions: Segments | Segment Viewer Role | API_SEGMENT_VIEWER | View-only access to segments including associated tags and change requests. |
| Segment Owner Role | API_SEGMENT_EDITOR | Grants access to all segment operations including operations related to associated tags and change requests. |
Note that roles can be combined together at the time an API key is created to provide the appropriate set of permissions needed to accomplish specific tasks.
Choose the right scope
An API key can be scoped to limit its reach to:
- Specific environment(s): The API key will grant access to manage the resources (flags, segments, etc.) only within the specific set of environments that are enumerated at the time the API key is created.
- A specific project: The API key will grant access to manage the resources (flags, segments, traffic types, etc.) within only a single project. Access is also granted to manage future environments created within that project.
- The whole account: The API key will grant access to reach resources across the whole FME account. Granted access is effectively unscoped.
Create a restricted API key
You can use the FME API to create an Admin API key that has a restricted role or that leverages project and environment scopes. You can also restrict scope of an Admin API key to specific environments in the FME UI. Both approaches are described below.
Using the FME API to manage roles and scopes
Roles and scopes are assigned to an Admin API key ("apiKeyType": "admin") at the moment of its creation via the FME API. Go to Create an API key to learn more.
Some important considerations:
- Roles and scopes are not editable. A role or scope cannot be changed for an API key after it is created.
- An Admin API Key cannot be used to create another with a broader scope than its own. When creating a new API key, the API key used to authenticate the request must have an equal or greater scope than the scope of the new API key.
- In order to create a new API key, the API key used to authenticate the request must have either the API_ALL_GRANTED and/or the API_APIKEY role assigned.
- If no value is specified, by default the API_ALL_GRANTED role is assigned.
- If no scope is specified, by default the account-wide scope is assigned.
The POST API Key endpoint takes a JSON attribute, used to pass in the desired role. For an Admin key with full permissions, here’s a sample payload you can send to create the role and its expected response.
POST: /internal/api/v2/apiKeys
{
  "name": "my_first_restricted_apikey",
  "apiKeyType": "admin",
  "workspace": null,
  "environments": [],
  "roles": ["API_ALL_GRANTED"]
}
Response:
{
  "organization": {
    "type": "Organization",
    "id": "your-account-id"
  },
  "environments": [
    {
      "type": "Environment",
      "id": "<<GLOBAL>>"
    }
  ],
  "name": "my_first_restricted_apikey",
  "createdBy": {
    "type": "api_key",
    "id": "641mm**********************"
  },
  "createdAt": 1682722168424,
  "apiKeyType": "admin",
  "roles": [
    "API_ALL_GRANTED"
  ],
  "type": "api_key",
  "key": "b9lnhf***************************"
}
Be sure to copy your Admin API key (Line 34 in above example) once it's generated. For security purposes, you won't see the key again.
This is another example of a request to create an Admin API key that is scoped to a project.
POST: /internal/api/v2/apiKeys`
{
  "name": "my_project_admin_api_key",
  "apiKeyType": "admin",
  "workspace": {
     "type": "workspace",
     "id": "your-project-id"
  },
  "environments": [],
  "roles": ["API_WORKSPACE_ADMIN"]
}
Response:
{
  "organization": {
    "type": "Organization",
    "id": "your-account-id",
  },
  "environments": [
     {
       "type": "environment",
       "id": "<<GLOBAL>>"
     }
  ],
  "name": "my_project_admin_api_key",
  "createdBy": {
    "type": "api_key",
    "id": "641mm**********************"
  },
  "createdAt": 1691762215442,
  "apiKeyType": "admin",
  "workspace": {
    "type": "workspace",
    "id": "Your-Project-id"
  },
  "roles": [
    "API_WORKSPACE_ADMIN"
  ],
  "type": "api_key",
  "key": "b9lnhf***************************"
}
Using the FME UI to manage scopes
You can also use the Admin settings section in the Harness FME to create an Admin API key that is scoped to specific environment(s). At this time, you cannot use this UI to specify a specific role or project scope. Note that all SDK API keys are inherently scoped to a single environment.
Manage a restricted API key
You can revoke and clone restricted Admin API keys using the FME UI as you would an unrestricted key.
Ensure your key has the appropriate role to use the API endpoints
Each FME API endpoint has a list of accepted roles that the endpoint will look for on the bearer key that you used to authorize your API request. You can see the list of accepted roles by navigating to a specific resource in our API documentation.
Additionally, error codes have been created for cases where requests do not have the appropriate role in the bearer token that was used.