Environments
Depending on your use case, environments are surfaced in two places in Harness FME.
- Environments Page
- Projects Page
The Environments page in the FME navigation menu helps you view and analyze feature flags by environment. You can use the Environments dropdown menu to switch between environments.
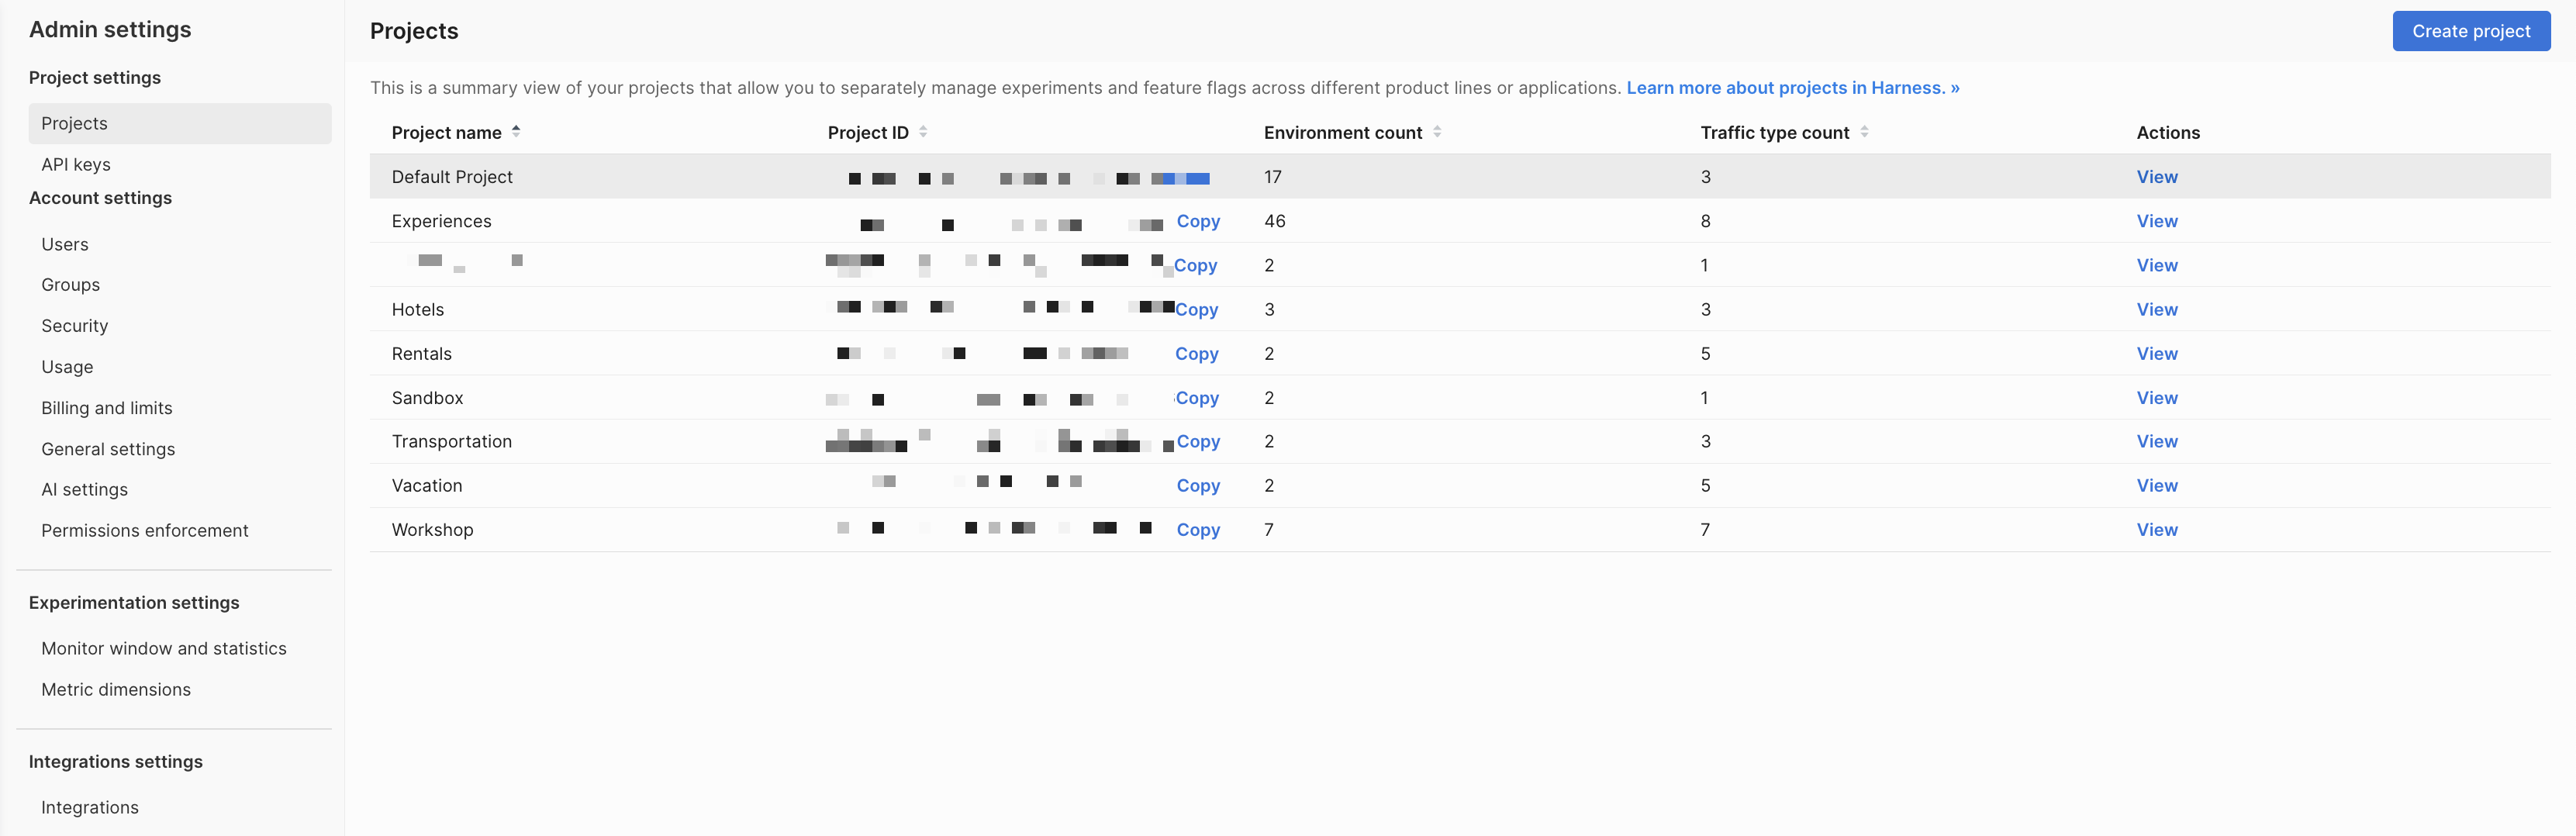
The Projects page in FME Settings allows you to create and edit environments. Click View on the project you want to create an environment in, then click Create environment.

When you create an account in Harness FME, your default project provides you with two environments: Stg-<PROJECT_NAME> for pre-production and Prod-<PROJECT_NAME> for production.

Each environment is set up with its own API keys that are used to connect the FME SDK to a specific environment. Environments allow you to manage your feature flags throughout your development lifecycle, from local development to staging and production.
Each feature flag that you create has its own set of targeting rules in each environment, allowing you to define different targeting rules in your staging and production environments. For example, you can change the targeting rules for a specific feature flag for quality testing on your staging environment with confidence that the feature flag is not enabled for users on your production environment.
Localhost environment
A developer can set up a feature flag on their development machine without the SDK requiring network connectivity. This is called the localhost environment. This environment does not show up in the user interface because, by definition, that requires network connectivity.
To configure your SDK for this mode, see the Localhost mode section in the Harness FME SDK documentation.
Manage environments
To manage your environments in Harness FME:
-
Navigate to the Projects page in FME Settings and select View for a specific project.
-
Click Create environment to add environments or click Edit on an environment to edit an existing one.
Environments typically represent the software delivery lifecycle: Dev, Test, Staging, and Production. There's usually no reason to have more than one Harness FME environment per software delivery lifecycle environment unless multiple projects use the same environments. However, there are cases where you might have multiple staging, dev, or even production environments in Harness FME.
Harness recommends following these best practices:
- Every feature flag should go through all your team's environments (dev, test, staging, and production). Skipping directly to production can lead to bugs showing up directly in production that you might otherwise uncover earlier.
- It's common, and often critical, to have environment-level permission controls enabled for production environment(s). New, inexperienced teammates may accidentally edit a feature flag or make a rollout change they did not have the authority to make. For any pre-production environments, permission controls are not as important given the lack of customer impact and the robust auditing capability.
- For any pre-production environments, our guidance is to keep it simple; focus on simple on/off instead of creating complex targeting plans. For most organizations, pre-production environments often have dummy data and just a few hundred customers, and is most often used for testing.
- You don't necessarily need to see metrics in pre-production environments unless, say for example, you're conducting a performance test.
Create environments
- Harness FME
- Legacy Split
To create an environment in Harness FME:
-
From the FME navigation menu, click FME Settings and select Projects.
-
Click View under the Actions column for the project you want to create an environment in.
-
Click Create environment on the Environments tab.
-
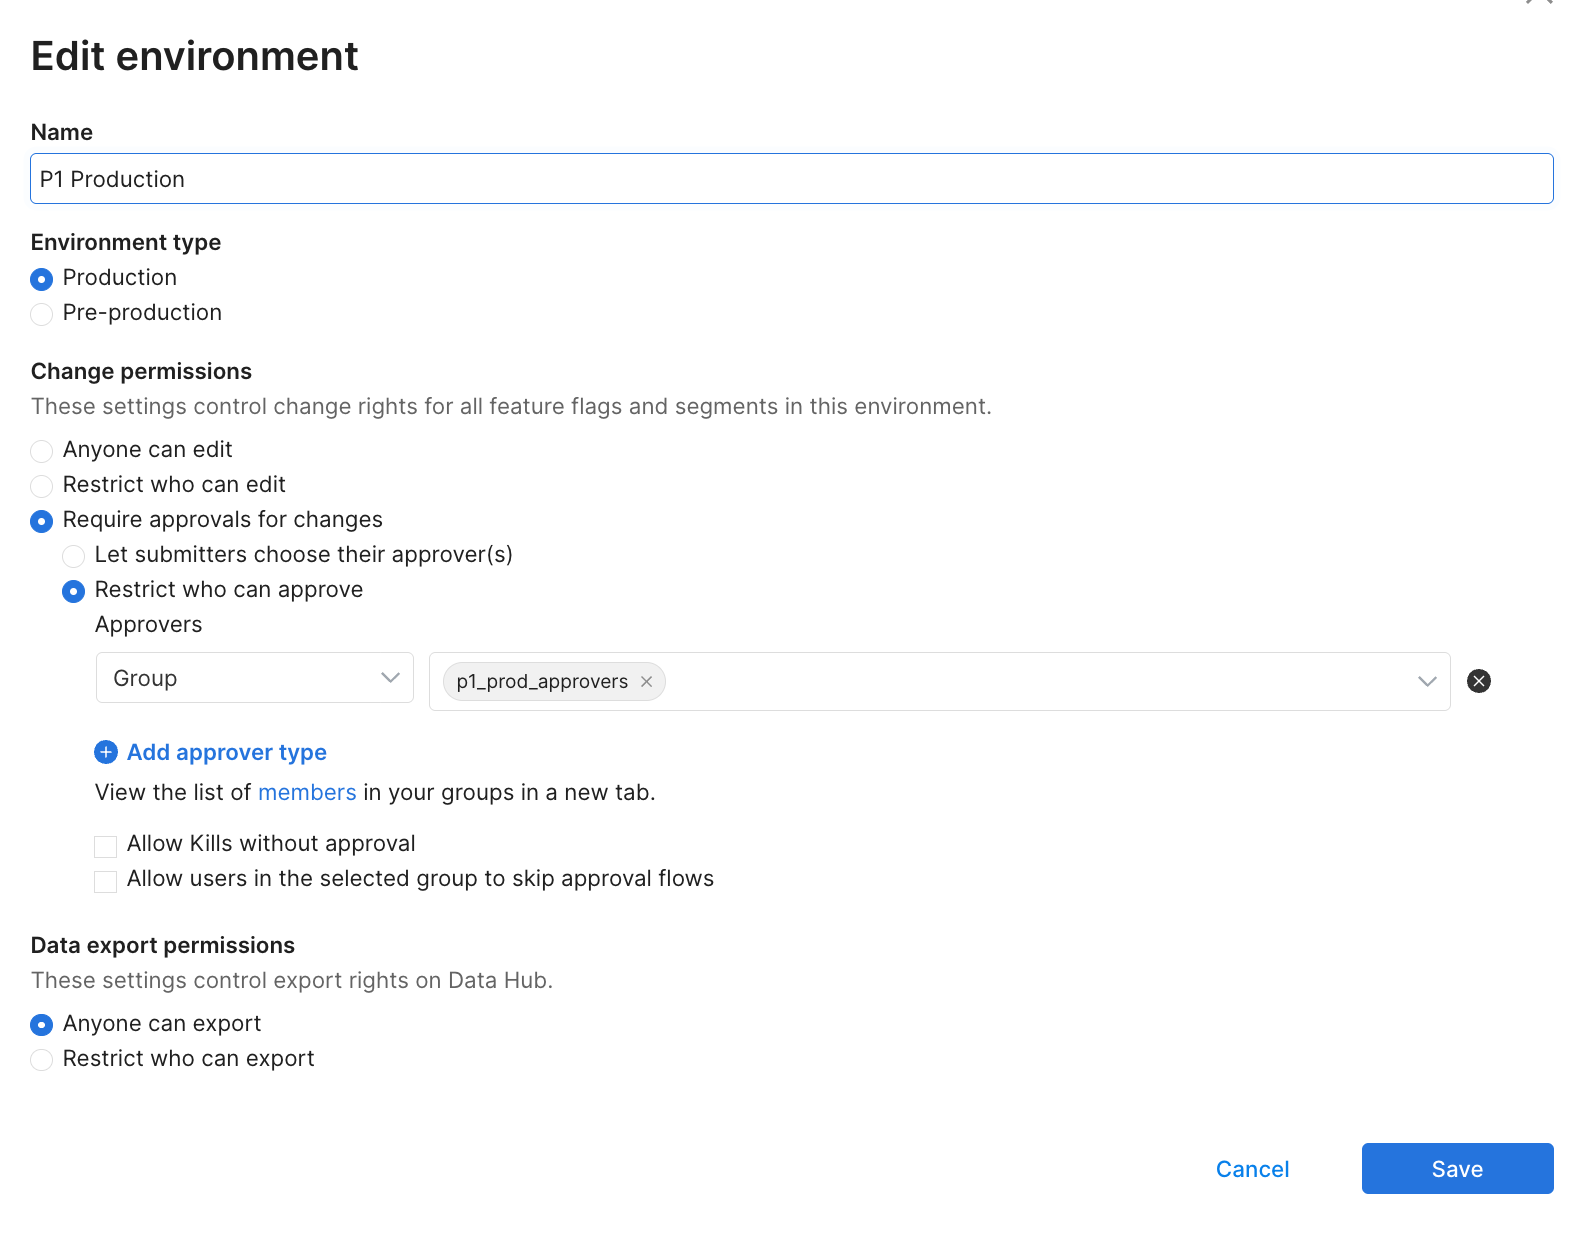
Configure the following settings:
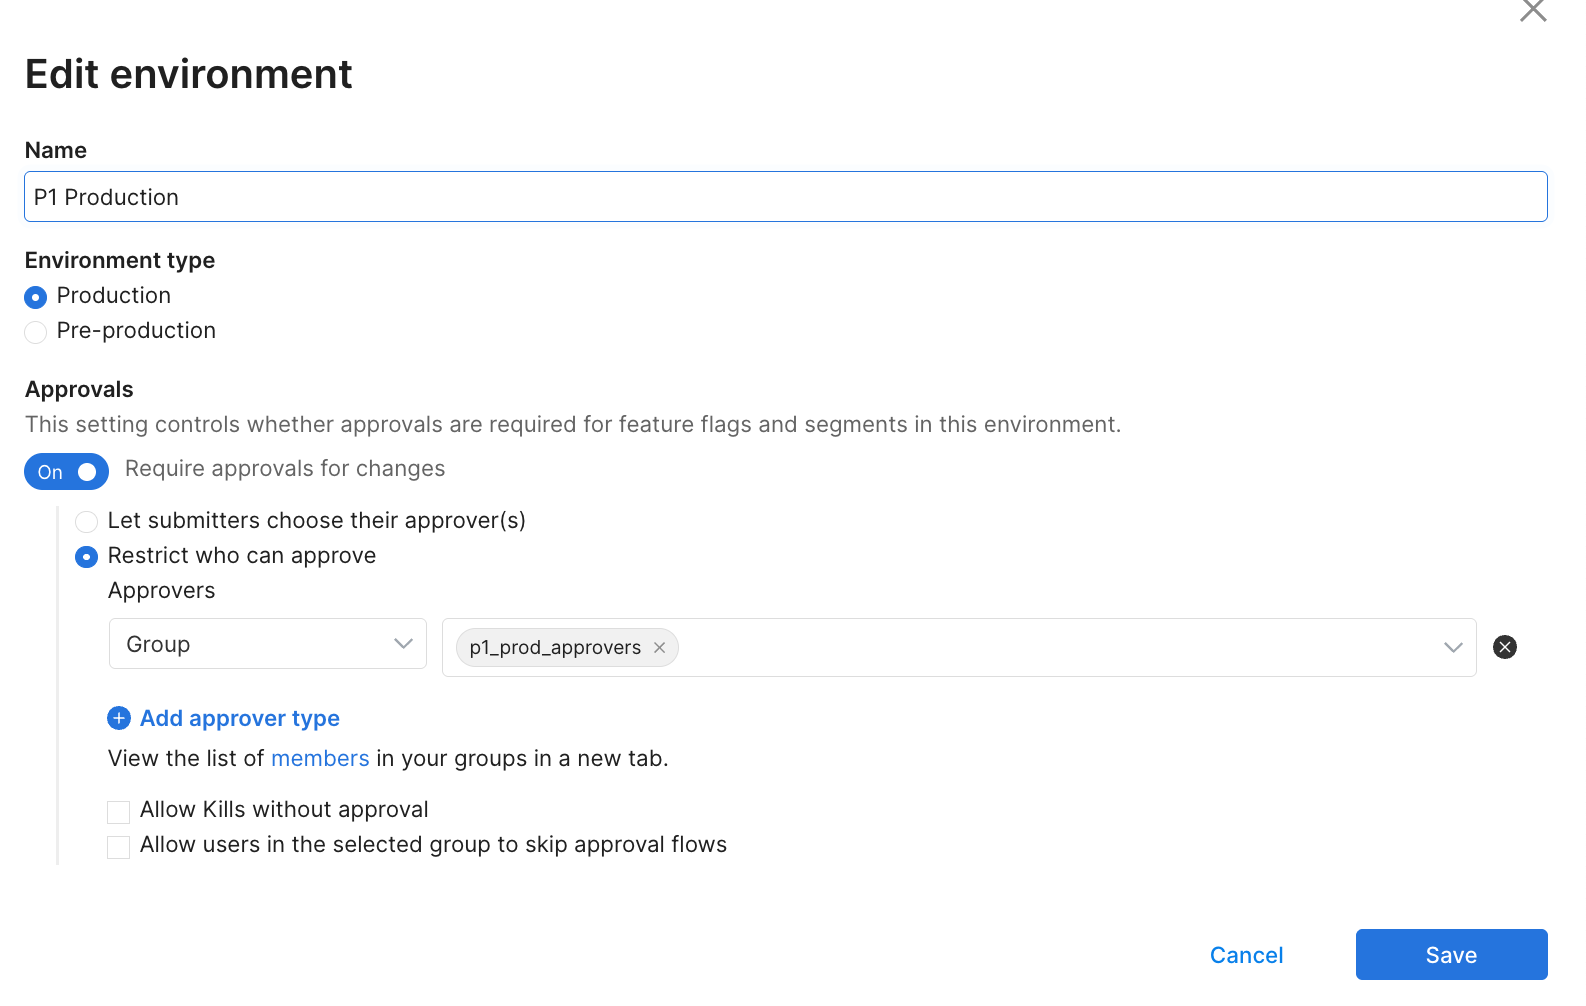
Field Description Options / Notes Name Enter a descriptive name for the environment. For example: Docs-StagingEnvironment type Define how this environment is classified for feature delivery and governance. - Production
- Pre-productionApprovals Configure whether approval is required before feature flag or segment changes are applied in this environment. Toggle Require approvals for changes on or off. -
Click Create to apply the changes.
Configure approvals
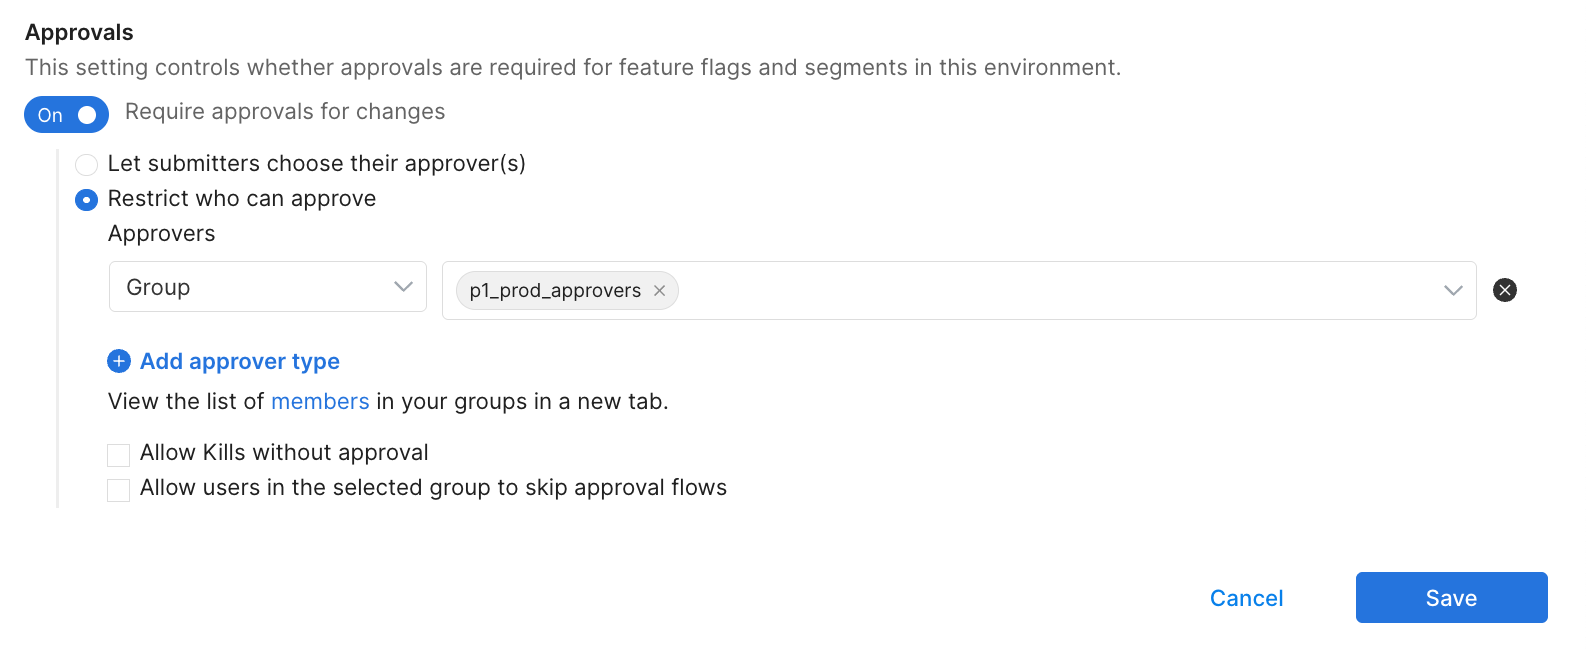
If Require approvals for changes is enabled, configure how approvals are handled:
-
Choose one of the following approval modes:
- Let submitters choose their approver(s): Submitters select approvers when making a change.
- Restrict who can approve: Define a fixed set of approvers for this environment.
-
If you select Restrict who can approve, configure the following:
- Approvers: Select one or more user groups (for example,
prod_approvers). To add additional approver groups, click + Add approver type. - Allow kills without approval: Allows emergency flag kills to bypass approval.
- Allow users in the selected group to skip approval flows: Allows approvers to make changes without approval.
Additional Permissions Options
Some organizations may see additional edit or export permission options (such as Anyone can edit or Restrict who can export) during environment creation.
These options appear only when legacy permissions are enabled in Harness FME through Permissions Enforcement.
- Approvers: Select one or more user groups (for example,
-
Click Save.
To edit an environment in Harness FME:
- Click Edit under the Actions column for a specific environment on the Environments tab.
- Update the environment configuration.
- Click Save.
Edit and export permissions are enforced through RBAC Resource Groups and Roles. Approval requirements are configured at the environment level.
When you first create your account, you are provided with two environments. To manage your environments, go to the Projects tab in your Admin settings page. Select the project that you want to edit environments for. You can:
- Rename environments to match your deployment process as well update their permissions by clicking Edit.
- Add additional environments by clicking Create environment.

Navigate environments
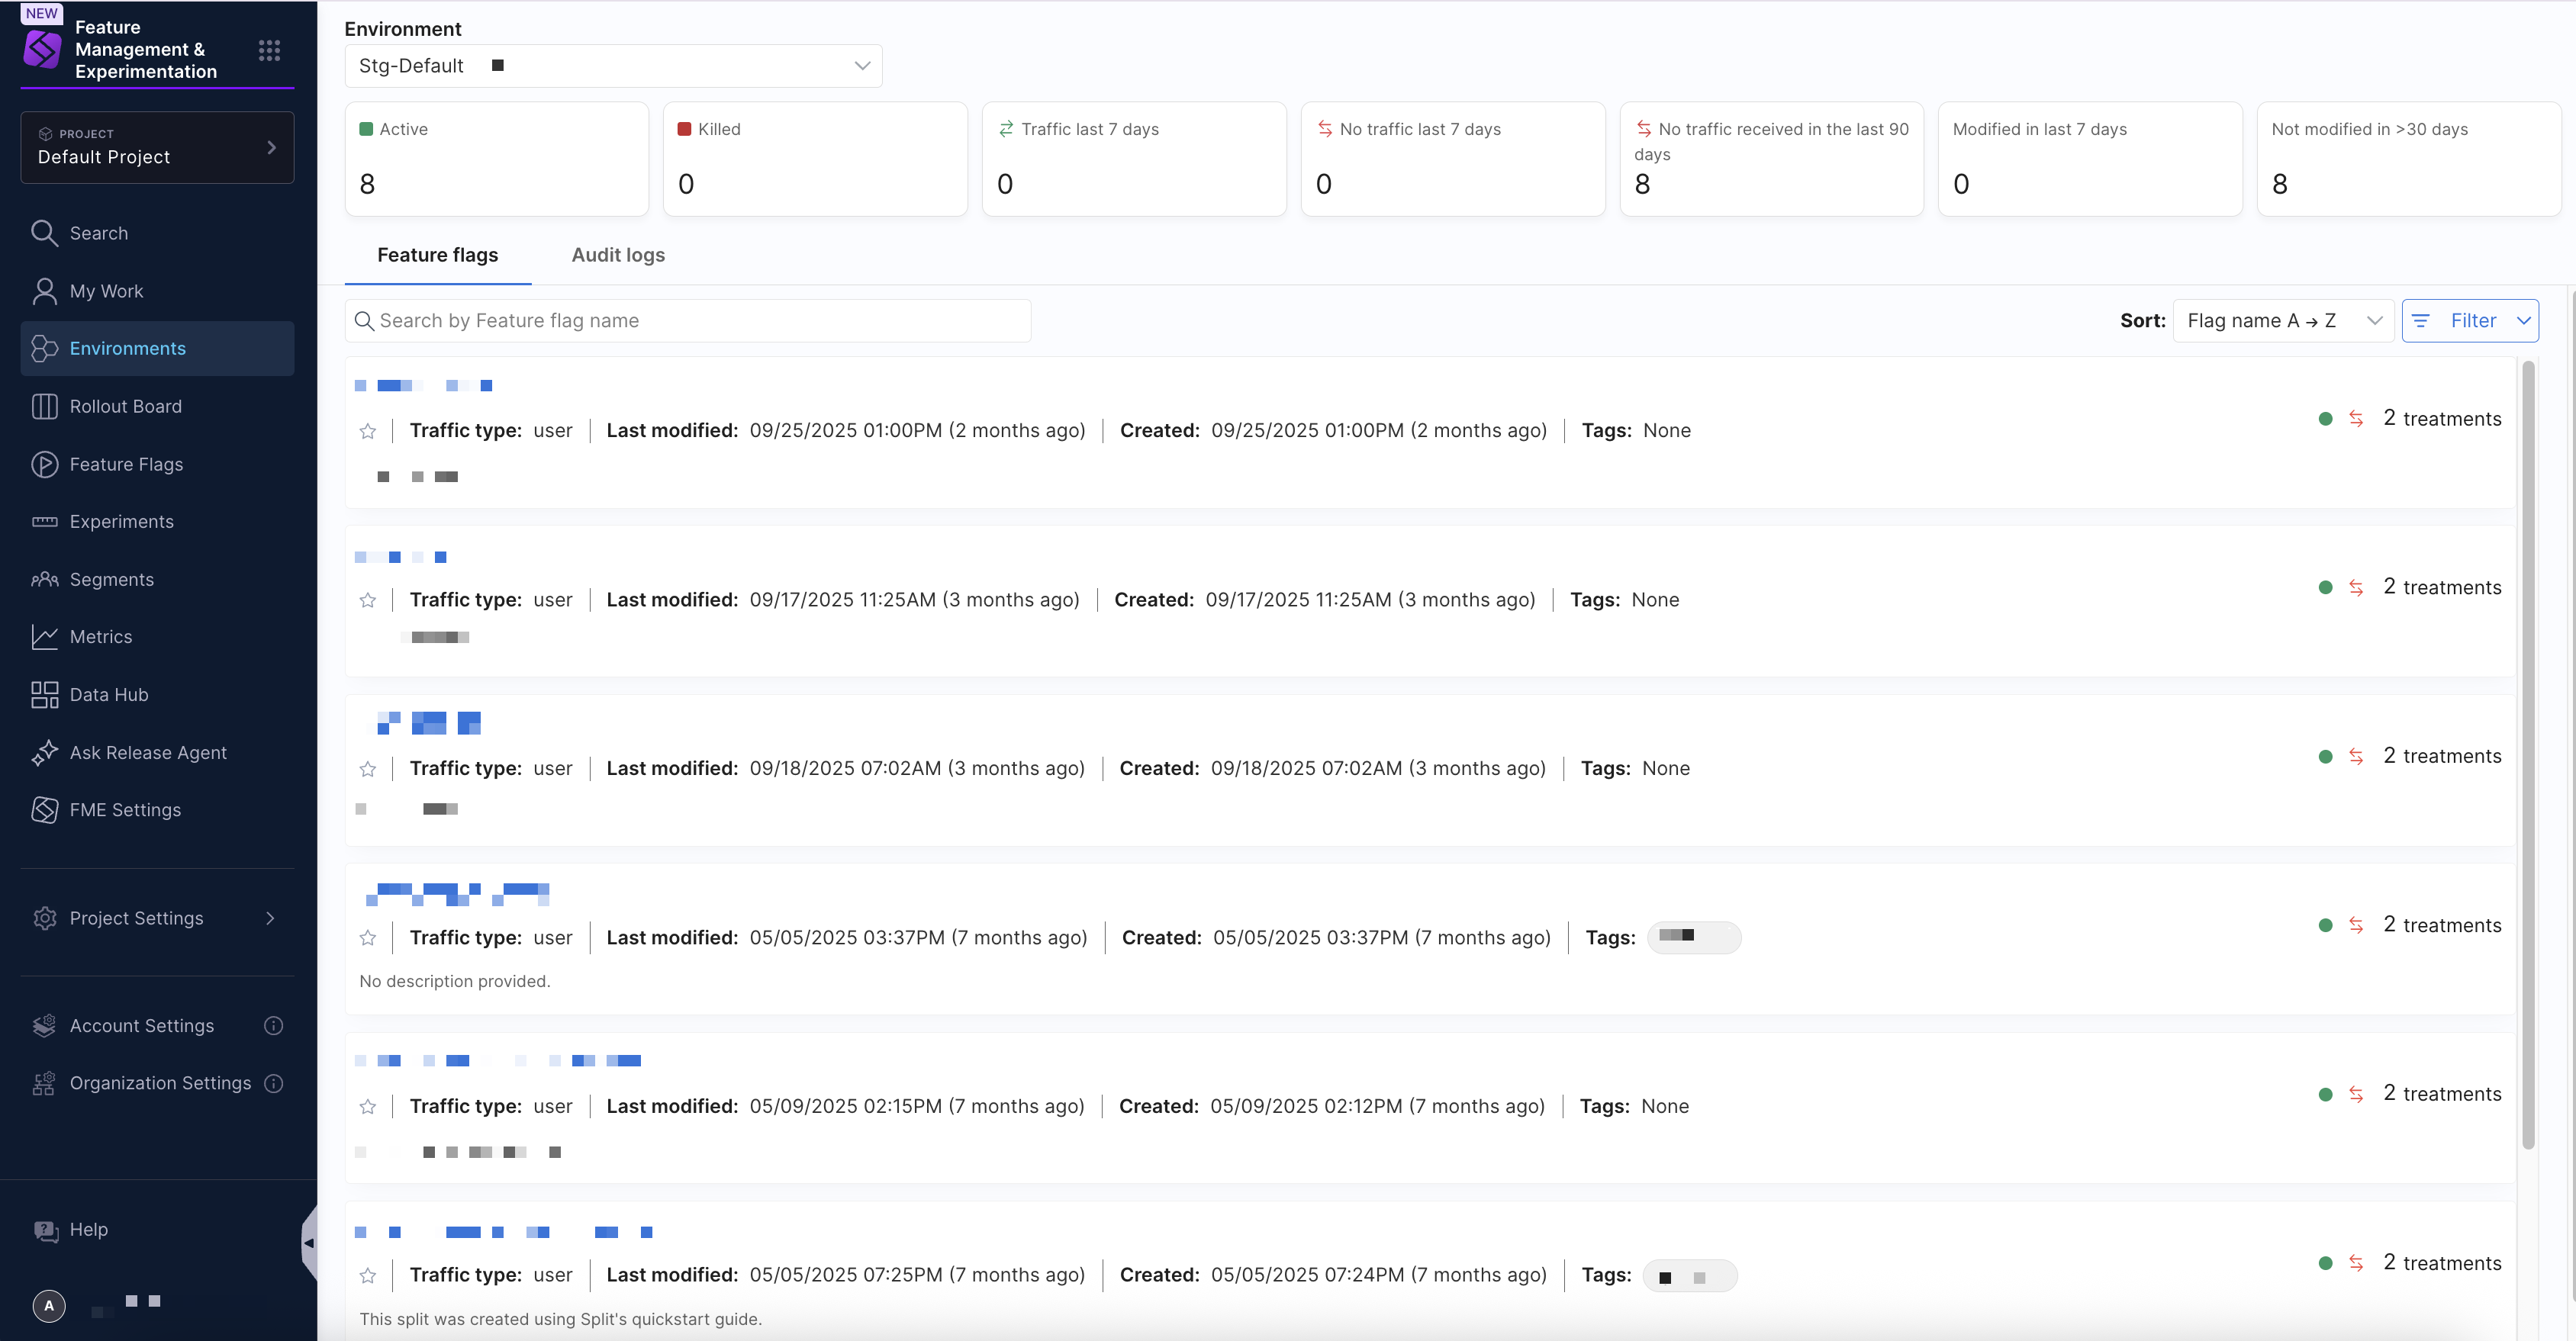
The Environments page on the FME navigation menu provides insights into the feature flags configured in each environment on the Feature flags tab and displays audit logs for feature flag changes on the Audit logs tab.
Using the Environment dropdown menu, you can select an environment to display all configured feature flags along with their current status (Active or Killed) and recent traffic activity. You can filter feature flags by name in the search bar, use the Sort dropdown menu to order flags by name, last modified date, or creation date, in addition to a Filter dropdown menu to narrow results by traffic type, tag, status, or traffic activity.
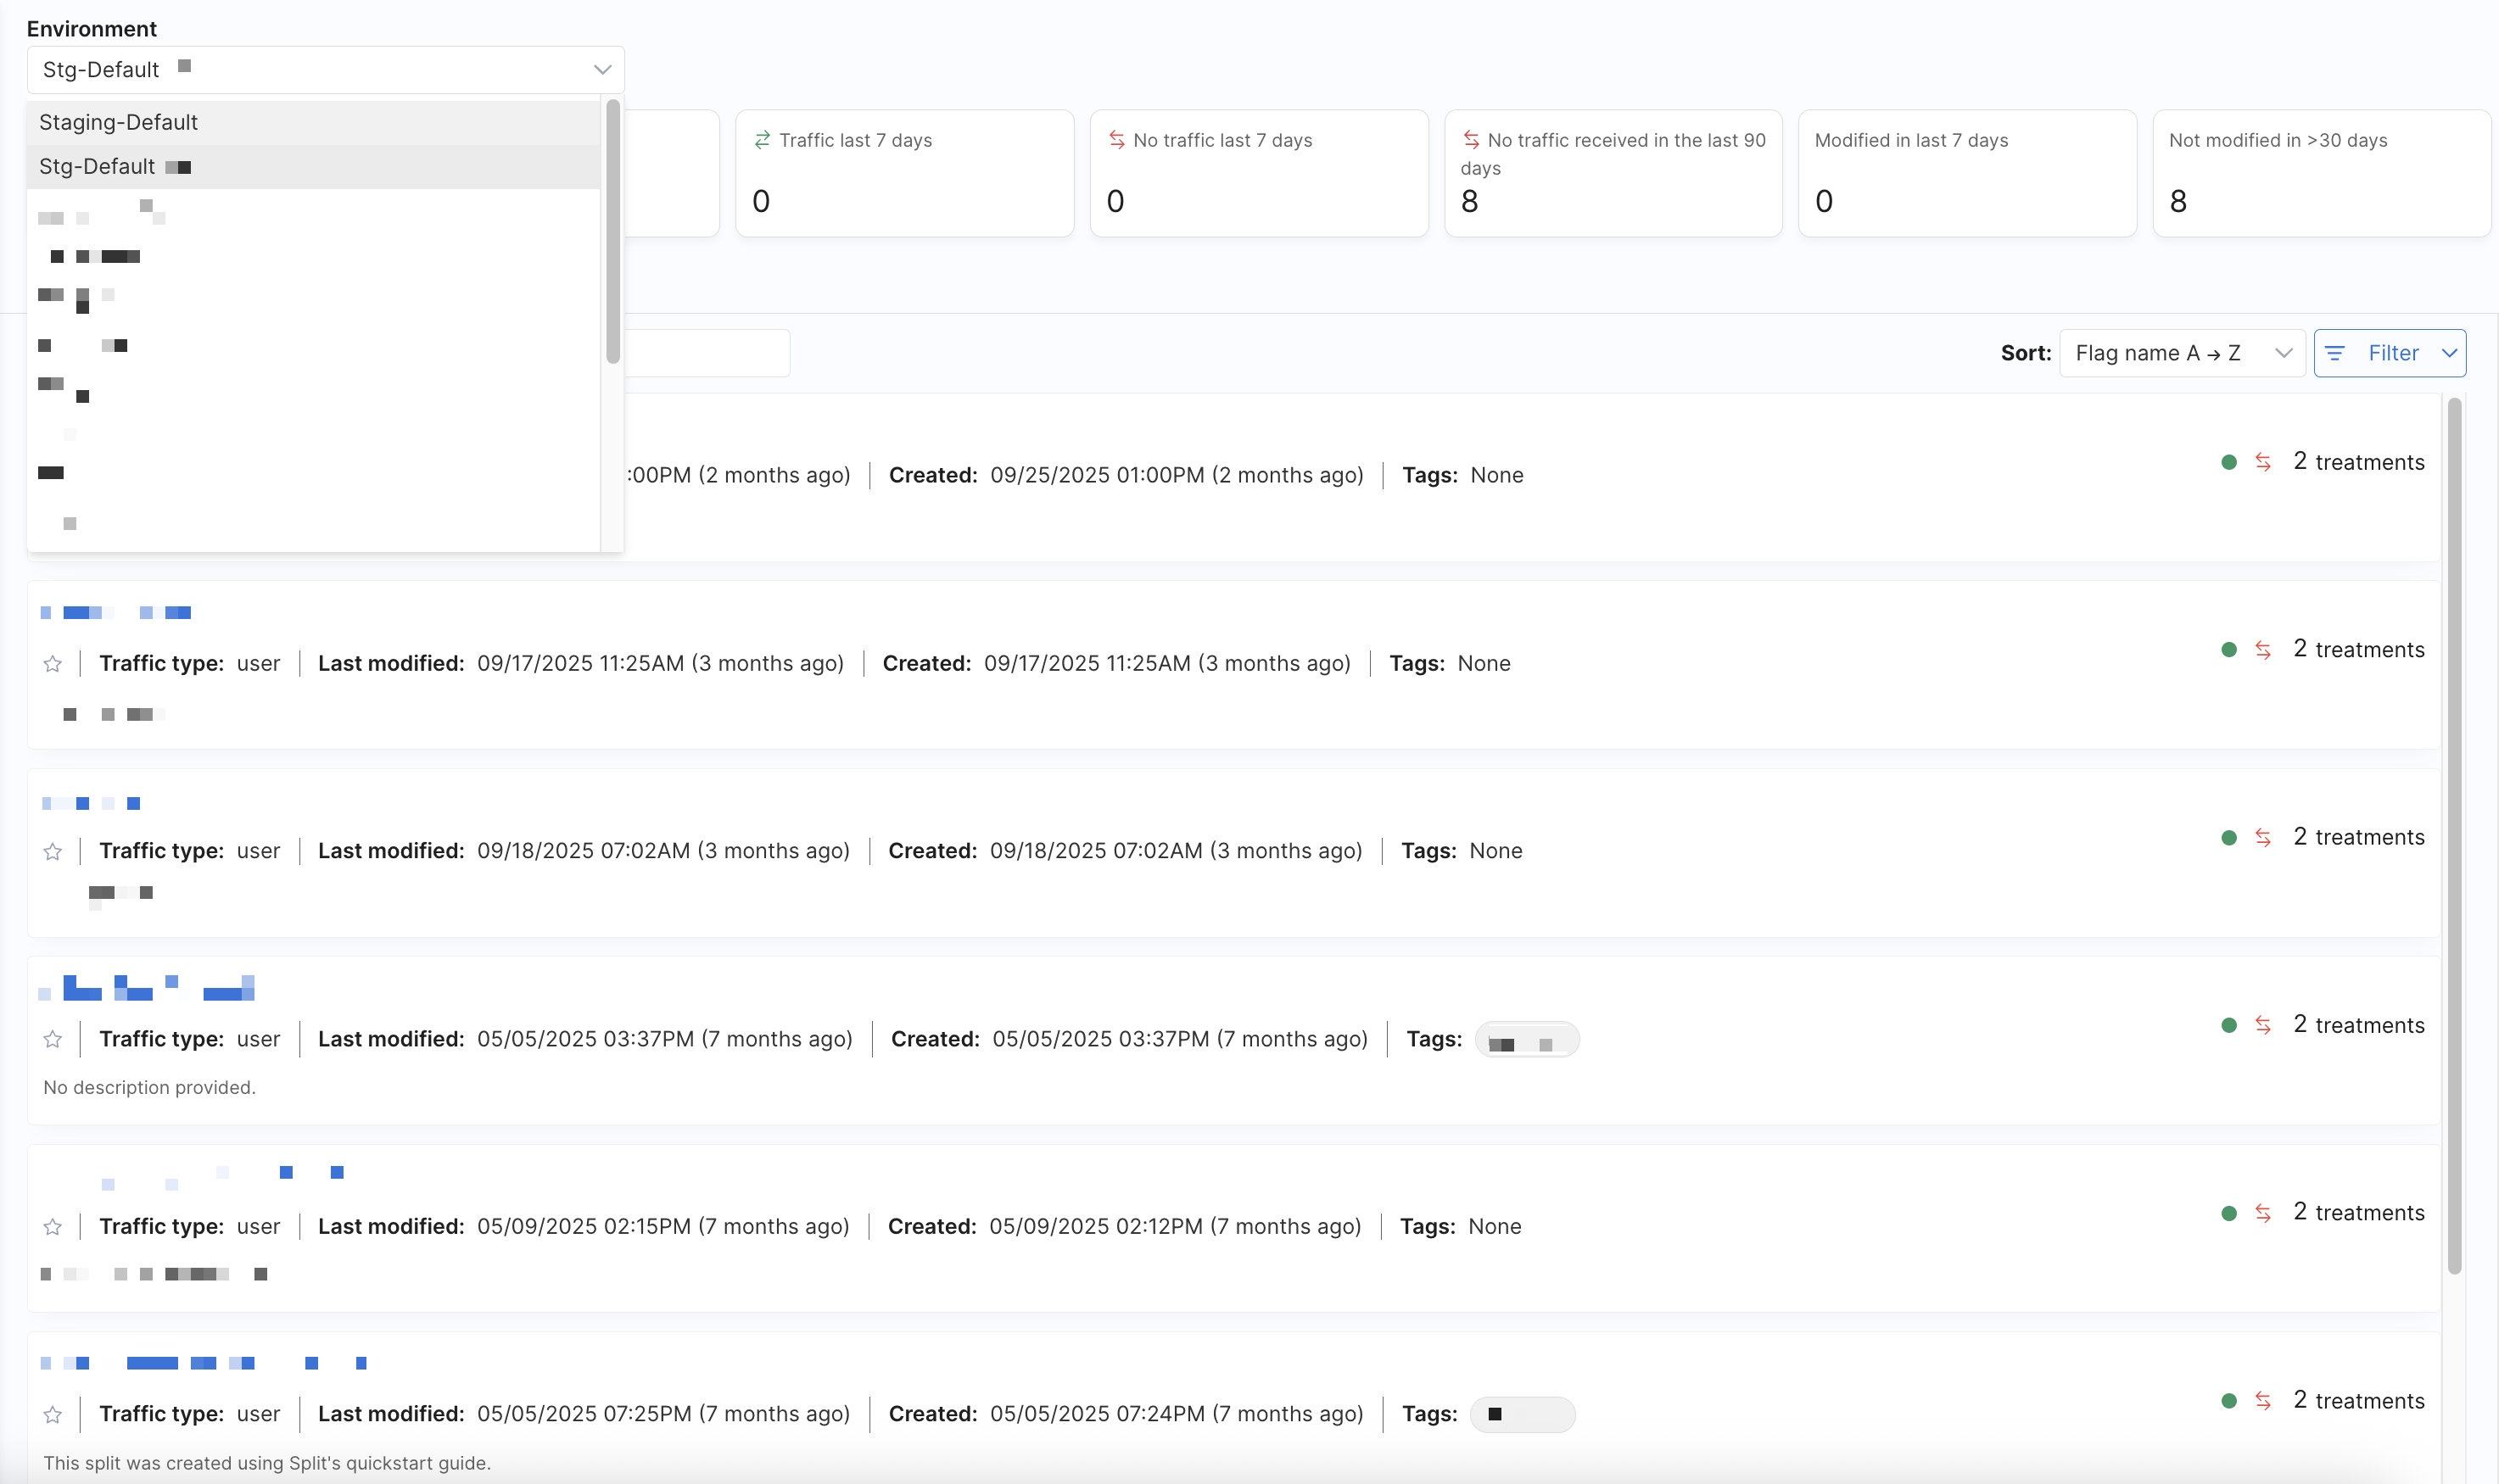
Summary statistics and these sorting and filtering options make it easy to find and manage the feature flags your team is working with.
Manage audit logs
The Audit logs tab on the Environments page provides a history of changes made to feature flags in the selected environment. Each entry in the audit log list includes details such as the title, feature flag, change type, approvers, editor, version, change status, and timestamp.
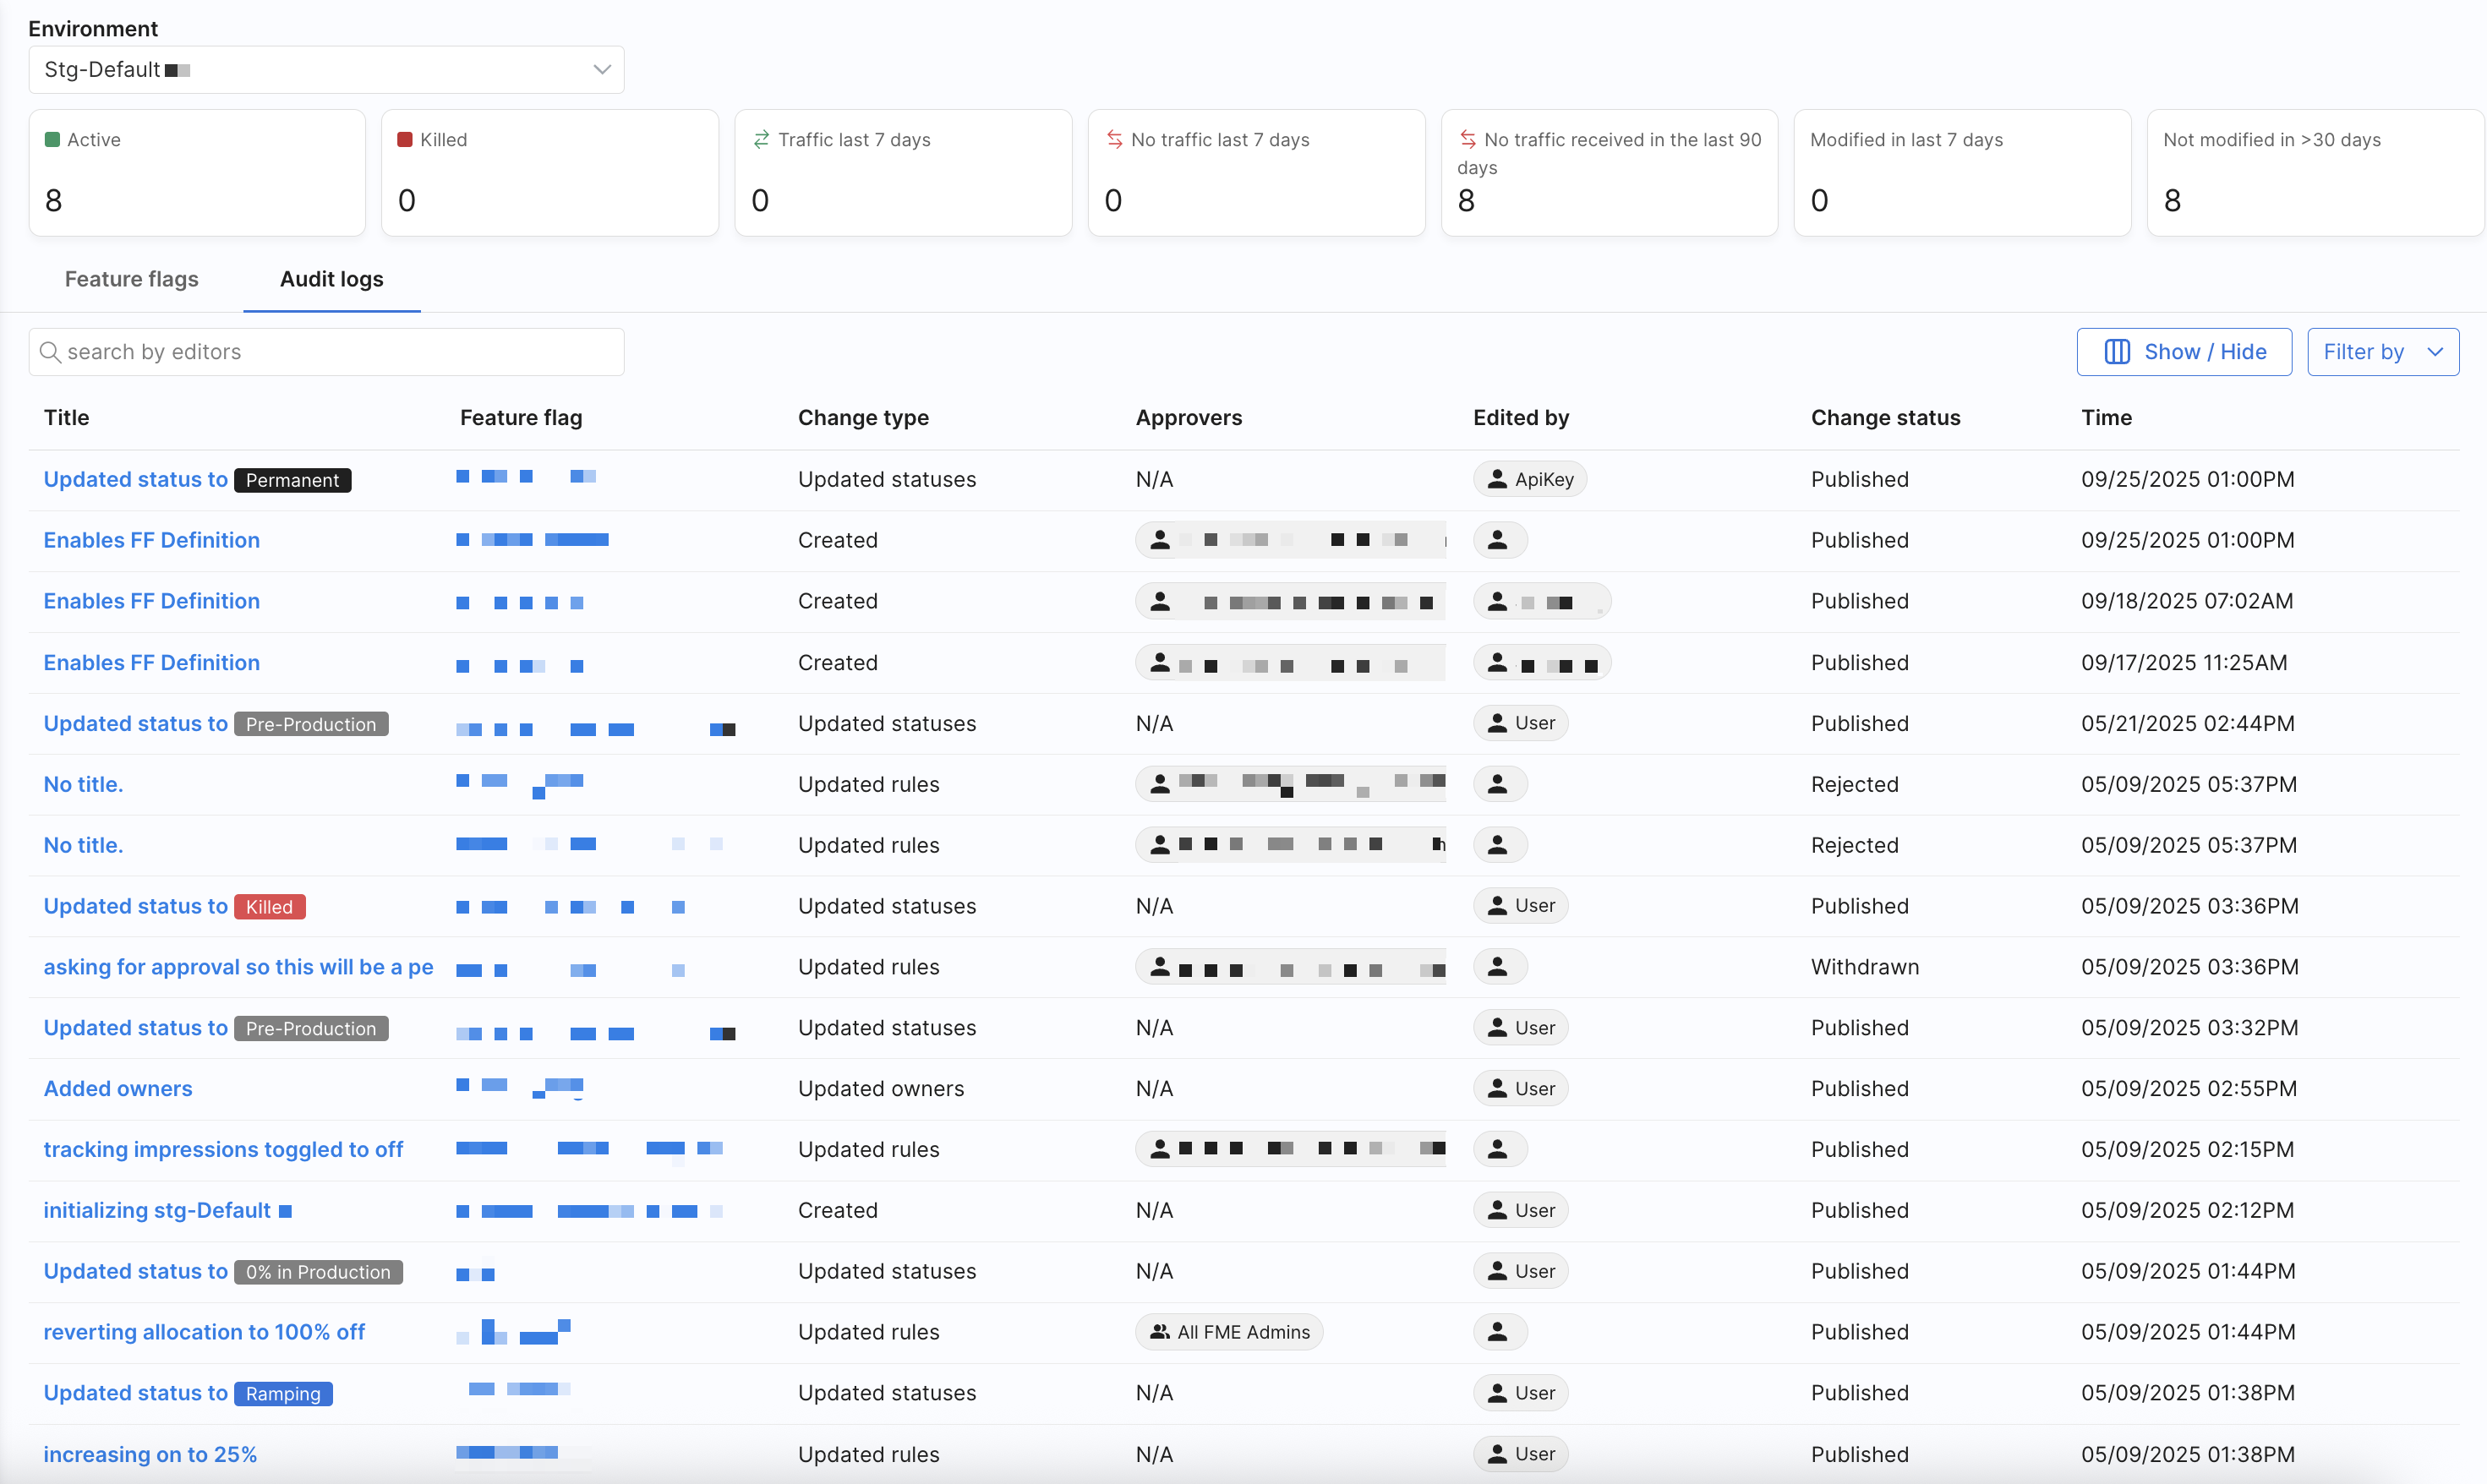
Use the search bar to find changes made by specific editors. You can further refine and customize the audit log list using the following options:
- Show/Hide columns: Select which columns to display in the list (including
Title,Feature flag,Change type,Approvers,Edited by,Version,Change status, andTime). - Filter by dropdown menu: Display only specific types of changes (such as
Created,Updated rules,Killed,Reallocated,Customized experiment settings,Updated tags,Updated owners,Updated statuses, andArchived).
Click on an individual audit log entry to open a change summary, which provides additional details about the modification, including:
- Status: The current state of the feature flag and the effective time (e.g.,
Published, with a timestamp). - Change: A summary of what changed (or “No changes to display” if there were none).
- Title: The title associated with the change, if available.
- Comments: Any comments added by the submitter.
- Approvers: Selected approvers for the change, if any.
- Effective time: Indicates when the change will take effect (immediately or at a scheduled time).
Feature flag audit logs make it easy to track modifications, audit team activity, and review the history of feature flag changes.