Using Harness Policy As Code with Feature Management & Experimentation
Harness Policy As Code lets FME administrators define governance rules that are automatically evaluated whenever feature flags or feature flag definitions are created, updated, deleted, or archived. Policies are authored in Rego and evaluated using Open Policy Agent (OPA).
Harness provides out-of-the-box policies for Feature Management & Experimentation (FME). These policies cover common governance requirements across feature flags, environments, and segments.
| FME Entity | Out-of-the-box Policies |
|---|---|
| Feature Flags | Naming Convention, Required Tags, Team Ownership Required |
| Feature Flag Definitions | Validation Rules |
| Environments | Naming Convention, Production Requires Approvals |
| Segments | Naming Convention |
| Segment Definitions | Validation Rules, Exclude High Priority Users |
All policies are evaluated on On Save events across these entities. Policies apply across feature flag lifecycle, rollout configuration, targeting logic, and environment governance controls.
Prerequisites
- Familiarity with Harness Policy As Code concepts such as policies, policy sets, and enforcement.
- You need the Governance Policies and Governance Policy Sets permissions to create and enforce policies. The built-in FME Administrator role includes these permissions, or you can assign them through a custom role.
- Policies are written in Rego. If you're new to Rego, see the Open Policy Agent documentation.
Input payload reference
When a policy is evaluated, Harness sends an input payload to OPA containing the entity data and metadata. The payload structure depends on the entity type.
Feature Flag
{
  "featureFlag": {
    "name": "ff_enable_dark_mode",
    "status": "active",
    "description": "Enable dark mode for end users",
    "tags": ["ui", "frontend"],
    "trafficType": {
      "id": "c8bcb9e0-dc3e-11f0-9821-627b61d9f8bc",
      "name": "user"
    },
    "pendingChangeRequests": 0,
    "hasPendingStatusChange": false
  },
  "entityMetadata": {
    "actor": {
      "id": "user_789",
      "type": "user"
    },
    "changeTrigger": "update",
    "owners": [
      {
        "id": "team_frontend",
        "type": "team"
      }
    ],
    "project": {
      "id": "mobile_shopping_app"
    },
  }
}
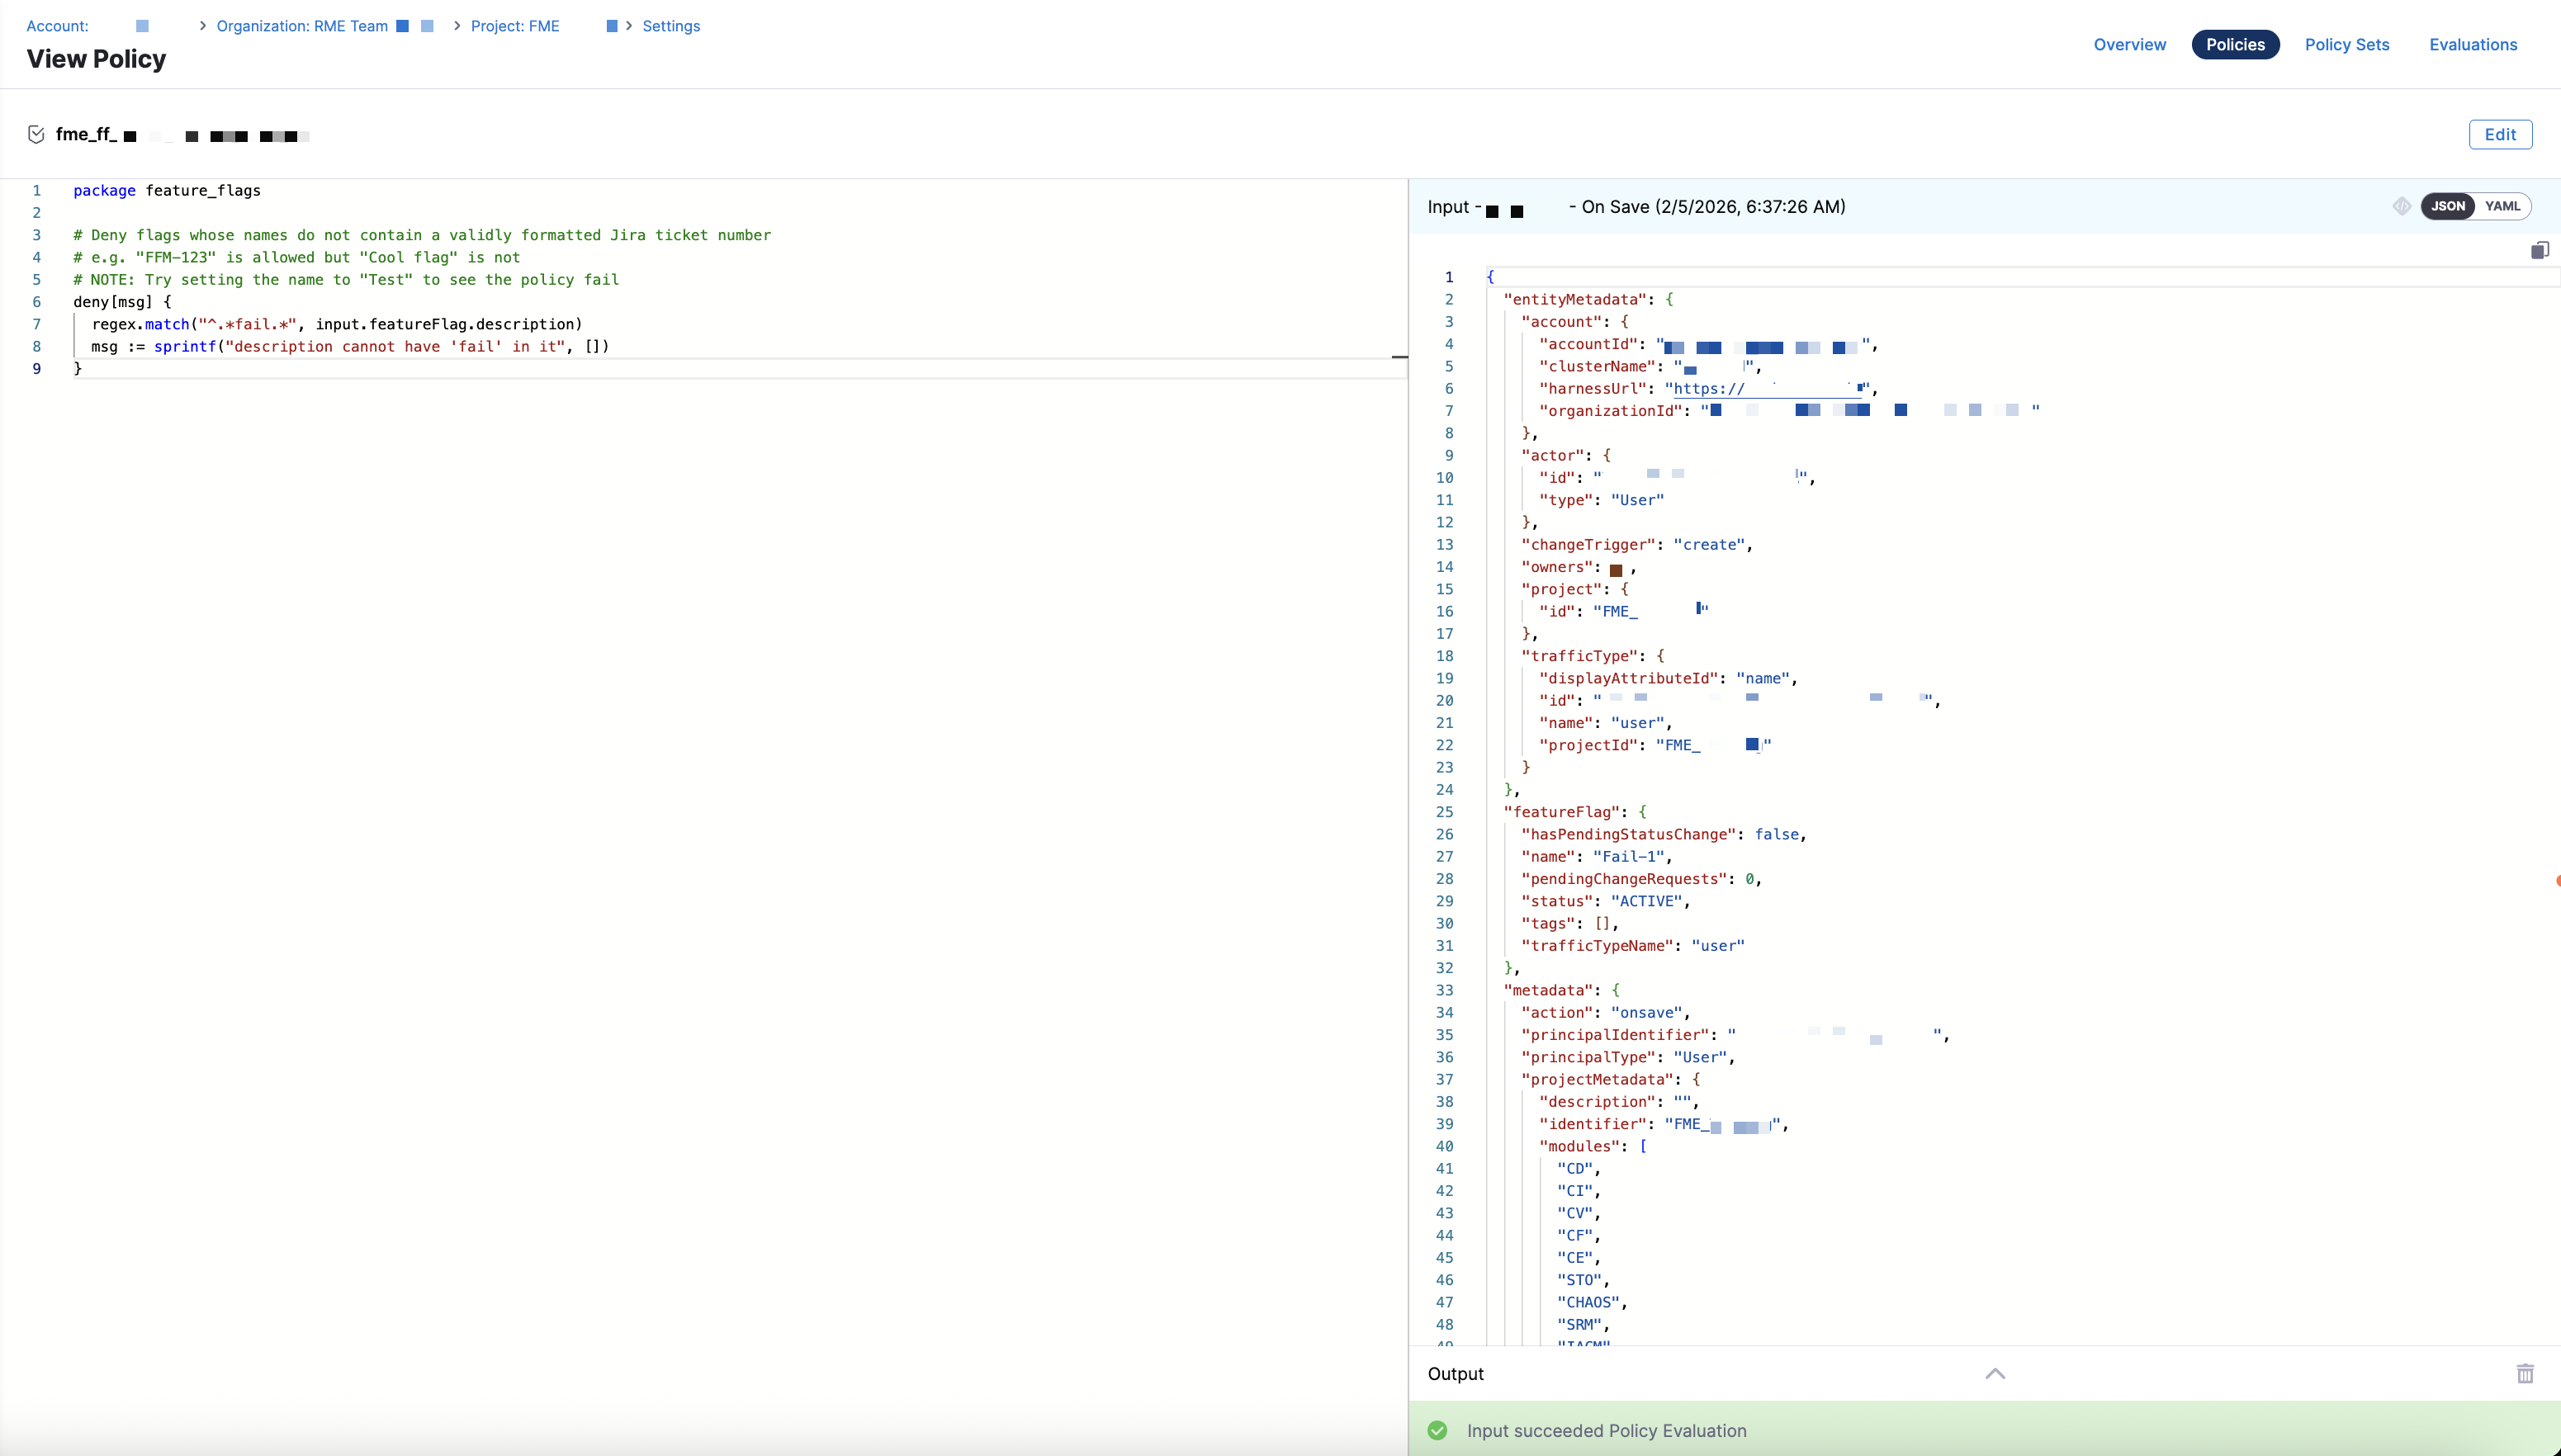
The following policy denies creating or updating a feature flag if the description is missing or empty. It uses changeTrigger to skip validation on delete, so that flags with missing descriptions can still be cleaned up. For more examples, see FME policy samples.
package fme_feature_flags

deny[msg] {
  input.entityMetadata.changeTrigger != "delete"
  not input.featureFlag.description
  msg := sprintf(
    "Feature flag '%s' must include a description before it can be saved",
    [input.featureFlag.name]
  )
}

deny[msg] {
  input.entityMetadata.changeTrigger != "delete"
  input.featureFlag.description == ""
  msg := sprintf(
    "Feature flag '%s' must include a non-empty description",
    [input.featureFlag.name]
  )
}
Feature Flag Definition
{
  "featureFlagDefinition": {
    "name": "ff_enable_dark_mode",
    "environmentName": "Production",
    "status": "active",
    "killed": false,
    "trafficTypeName": "user",
    "description": "Enable dark mode for end users",
    "definition": [
      {
        "conditionType": "ROLLOUT",
        "matcherGroup": {
          "combiner": "AND",
          "matchers": [
            {
              "matcherType": "ALL_KEYS",
              "negate": false
            }
          ]
        },
        "partitions": [
          {
            "treatment": "off",
            "size": 100
          }
        ],
        "label": "Default treatment"
      }
    ],
    "treatments": [
      {
        "name": "on",
        "description": "Enable dark mode",
        "baseline": false,
        "defaultTreatment": false
      },
      {
        "name": "off",
        "description": "Keep dark mode disabled",
        "baseline": true,
        "defaultTreatment": true
      }
    ],
    "trafficAllocation": 100,
    "flagSets": []
  },
  "entityMetadata": {
    "actor": {
      "id": "user_789",
      "type": "user"
    },
    "changeTrigger": "update",
    "owners": [
      {
        "id": "team_frontend",
        "type": "team"
      }
    ],
    "project": {
      "id": "mobile_shopping_app"
    }
  }
}
The following policy ensures that every feature flag definition saved in a production environment belongs to at least one flag set. For additional examples, see FME Feature Flag Definition policy samples.
package fme_feature_flag_definitions

deny[msg] {
  lower(input.featureFlagDefinition.environmentName) == "production"
  count(input.featureFlagDefinition.flagSets) == 0
  msg := sprintf(
    "Feature flag '%s' in Production must belong to at least one flag set",
    [input.featureFlagDefinition.name]
  )
}
Environment
{
  "entityMetadata": {
    "actor": {
      "id": "user_789",
      "type": "user"
    },
    "changeTrigger": "update",
    "owners": [],
    "project": {
      "id": "ws_prod_001"
    }
  },
  "fmeEnvironment": {
    "changeSettings": {
      "approvalsSkippableBy": [],
      "approvers": [
        {
          "id": "_project_all_users",
          "type": "team"
        }
      ],
      "areApprovalsRequired": true,
      "areApproversRestricted": true,
      "areKillsAllowedWithoutApproval": false
    },
    "environmentType": "production",
    "id": "env_prod_001",
    "name": "production"
  }
}
The following policy enforces naming conventions for FME environments.
package fme_environments

deny[msg] {
  not regex.match("^[a-z][a-z0-9_]*$", input.fmeEnvironment.name)
  msg := sprintf(
    "FME Environment name '%s' must start with a lowercase letter and contain only lowercase letters, numbers, and underscores",
    [input.fmeEnvironment.name]
  )
}
The following policy ensures that production environments require approvals and have at least one approver configured.
package fme_environments

deny[msg] {
  input.fmeEnvironment.environmentType == "production"
  not input.fmeEnvironment.changeSettings.areApprovalsRequired
  msg := sprintf(
    "FME production environment '%s' must have approvals required",
    [input.fmeEnvironment.name]
  )
}

deny[msg] {
  input.fmeEnvironment.environmentType == "production"
  count(object.get(input.fmeEnvironment.changeSettings, "approvers", [])) == 0
  msg := sprintf(
    "FME production environment '%s' must have at least one approver configured",
    [input.fmeEnvironment.name]
  )
}
Segment
{
  "fmeSegment": {
    "name": "beta_users"
  },
  "entityMetadata": {
    "actor": {
      "id": "user_789",
      "type": "user"
    },
    "changeTrigger": "update",
    "owners": [],
    "project": {
      "id": "mobile_shopping_app"
    }
  }
}
The following policy enforces naming conventions for FME segments.
package fme_segments

deny[msg] {
  not regex.match("^[a-z][a-z0-9_]*$", input.fmeSegment.name)
  msg := sprintf(
    "FME Segment name '%s' must follow naming conventions",
    [input.fmeSegment.name]
  )
}
Segment Definition
{
  "fmeSegmentDefinition": {
    "name": "beta_users",
    "type": "rule_based",
    "rules": [
      {
        "attribute": "country",
        "operator": "equals",
        "values": ["US"]
      }
    ],
    "excludedSegments": ["high_priority_users"]
  },
  "entityMetadata": {
    "actor": {
      "id": "user_789",
      "type": "user"
    },
    "changeTrigger": "update",
    "owners": [],
    "project": {
      "id": "mobile_shopping_app"
    }
  }
}
The following policy ensures that rule-based segment definitions exclude the high priority users segment.
package fme_segment_definitions

deny[msg] {
  input.fmeSegmentDefinition.type == "rule_based"
  not "high_priority_users" in input.fmeSegmentDefinition.excludedSegments
  msg := sprintf(
    "Segment '%s' must exclude the high priority users segment",
    [input.fmeSegmentDefinition.name]
  )
}
Access Harness policies
When you navigate to the Policies page from Project, Account, or Organization Settings, you can manage policies, policy sets, and evaluations across the following tabs.
- Overview
- Policies
- Policy Sets
- Evaluations
The Overview tab displays a high-level view of policy health across your project, account, or organization. This includes charts for policy evaluations, summary counts for policy sets and total evaluations, and the total number of policies.
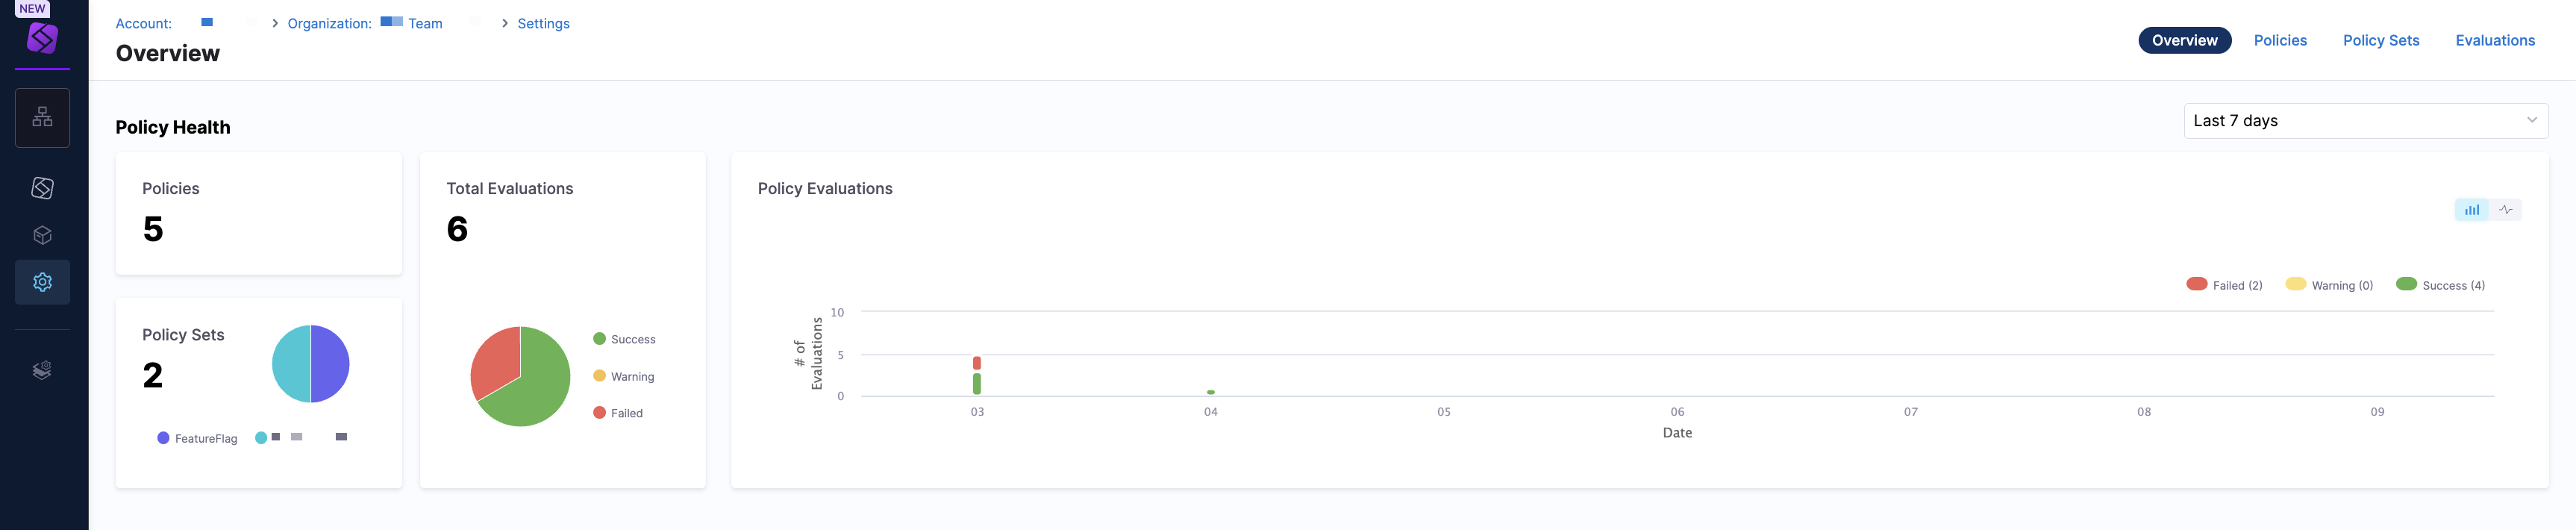
Click the dropdown menu to view the policy health in the Last 24 hours, Last 7 days, and Last 30 days. Use this view to understand how policies are performing and whether violations are increasing or decreasing.
The Policies tab displays a list view of individual policies. To create a policy, click + New Policy.
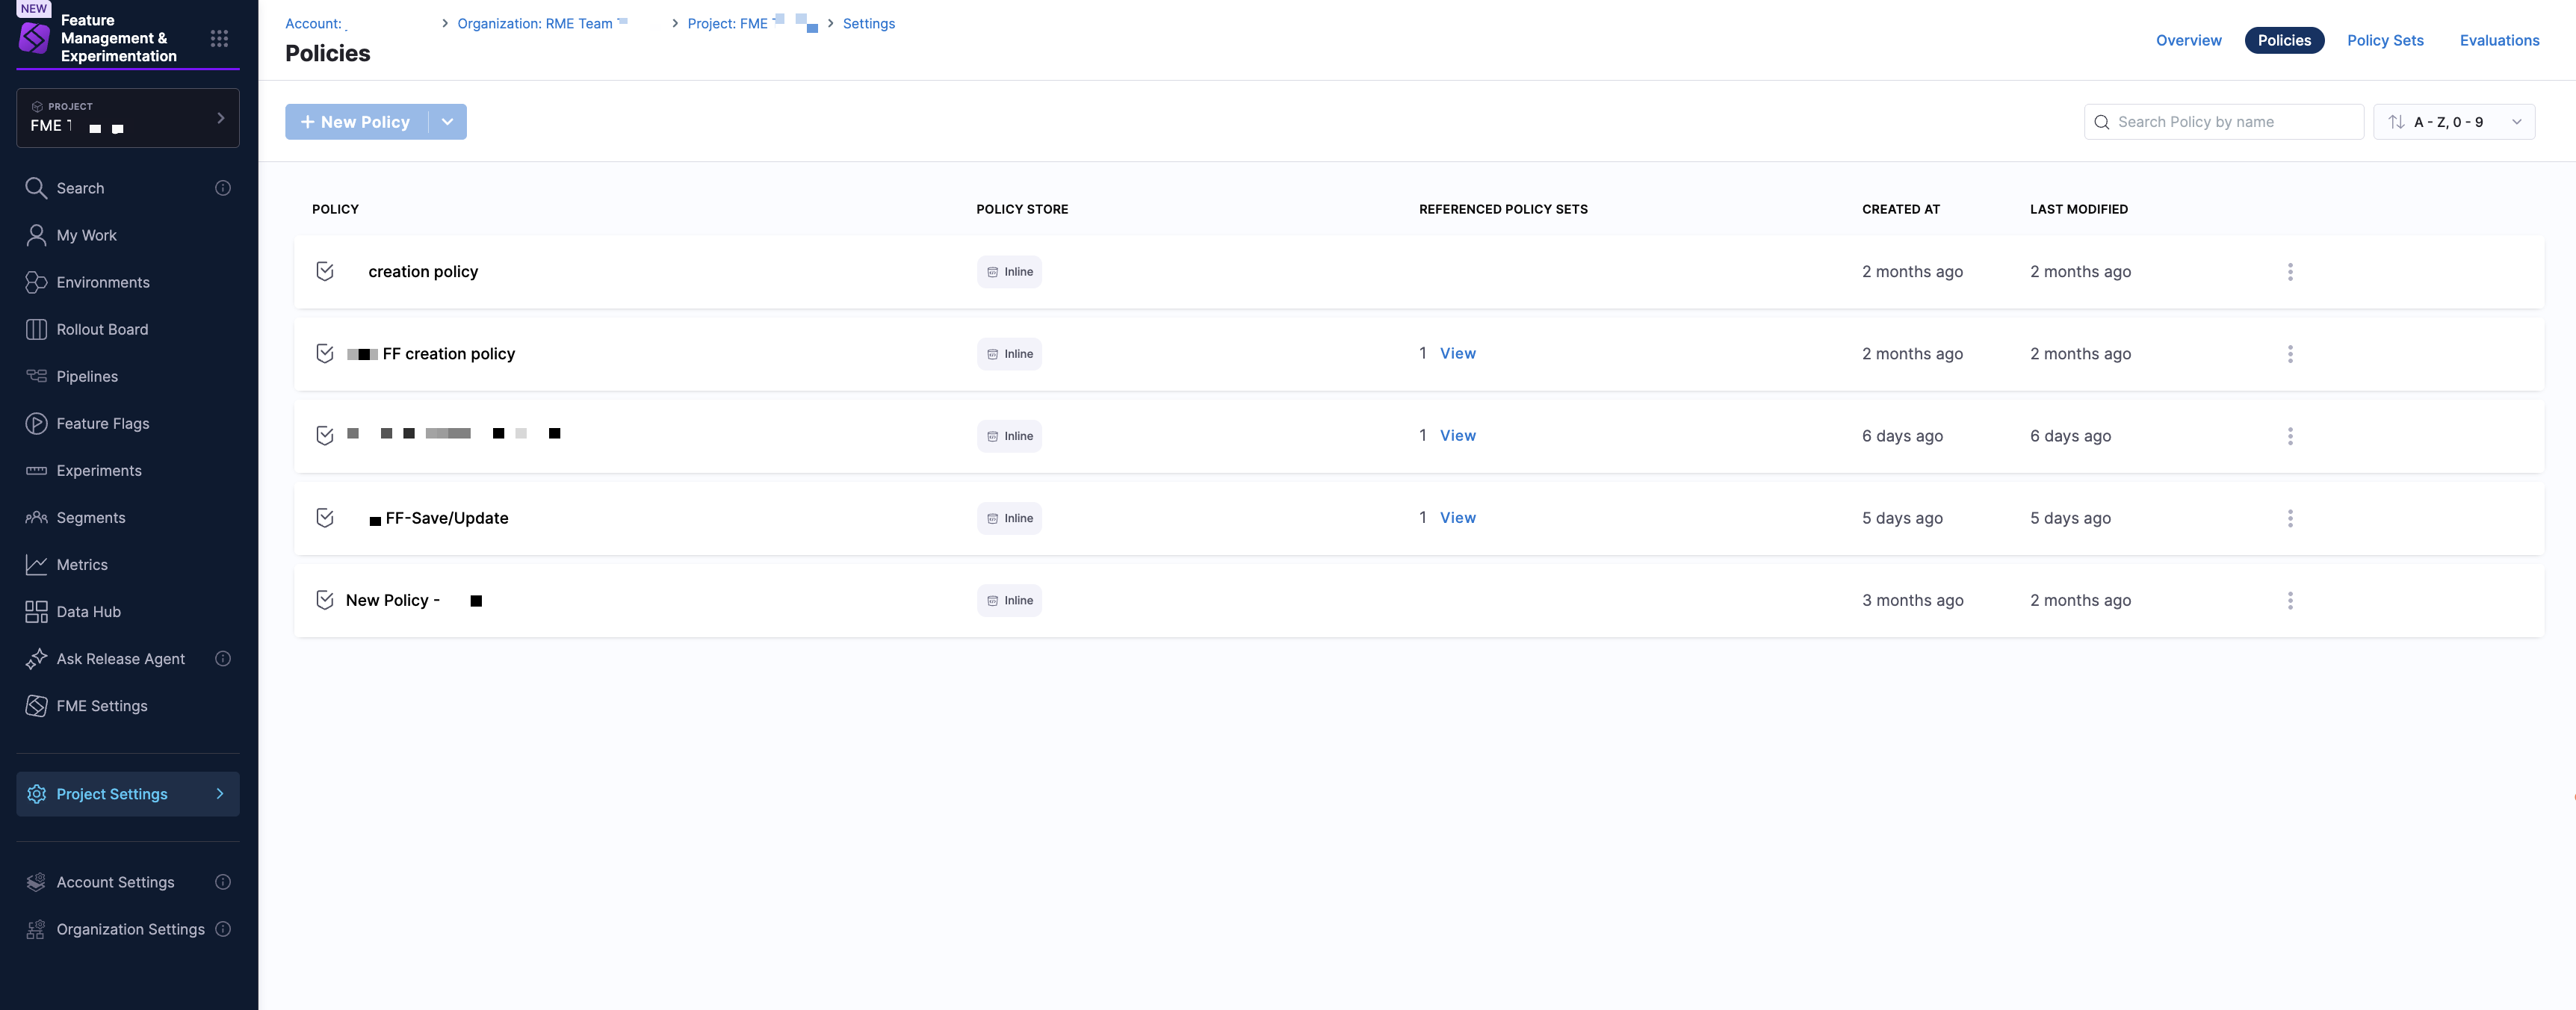
Each row represents a single policy and includes the following information:
| Column | Description |
|---|---|
| Policy | Name of the policy |
| Policy Store | Inline or Remote (Git-backed) |
| Referenced Policy Sets | Number of policy sets using the policy |
| Created At | Policy creation timestamp |
| Last Modified | Most recent update |
Use the search bar to search for policies by name, and the dropdown menu to sort policies using filters such as Last Updated, A-Z, 0-9, or Z-A, 9-0. To manage your policies, click on the kebab menu (⋮) in a policy and select Edit or Delete.
The Policy Sets tab shows a list view of policy sets, which group one or more policies and define enforcement behavior. To create a policy set, click + New Policy Set.
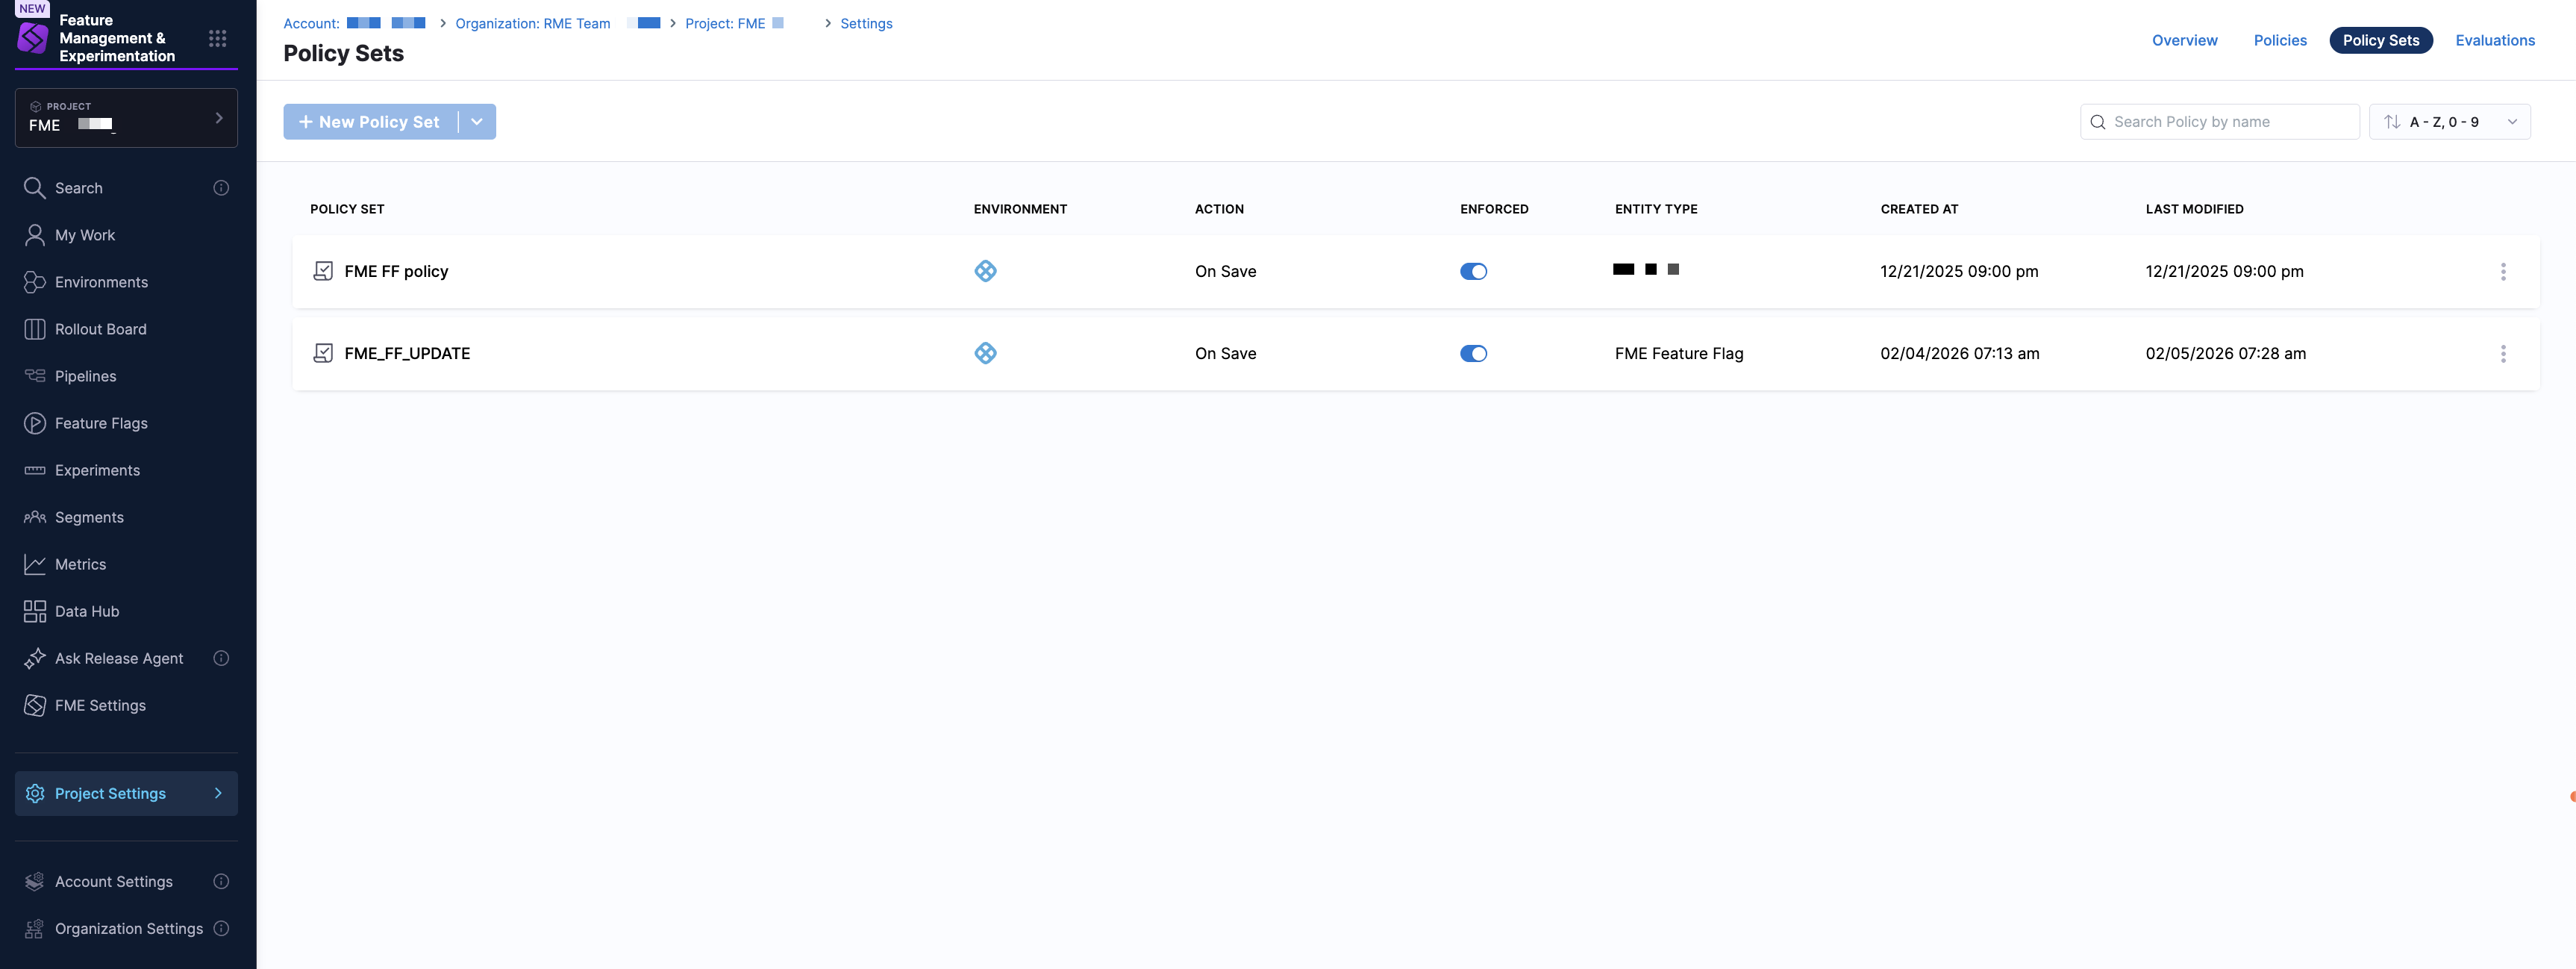
Each row represents a single policy set and includes the following information:
| Column | Description |
|---|---|
| Policy Set | Name of the policy set |
| Environment | Environment where the policy set applies (for FME, this is Harness) |
| Action | Trigger event (for FME, this is On Save) |
| Enforced | Whether enforcement is enabled |
| Entity Type | Type of entity (Feature Flag, Feature Flag Definition, Environment, Segment, Segment Definition ) |
| Created At | Creation timestamp |
| Last Modified | Most recent update |
Use the search bar to search for policy sets by name, and the dropdown menu to sort policy sets using filters such as Last Updated, A-Z, 0-9, or Z-A, 9-0. To manage your policy sets, click on the kebab menu (⋮) in a policy set and select Edit or Delete.
The Evaluations tab provides a list view of individual policy evaluations, allowing you to audit policy enforcement results.
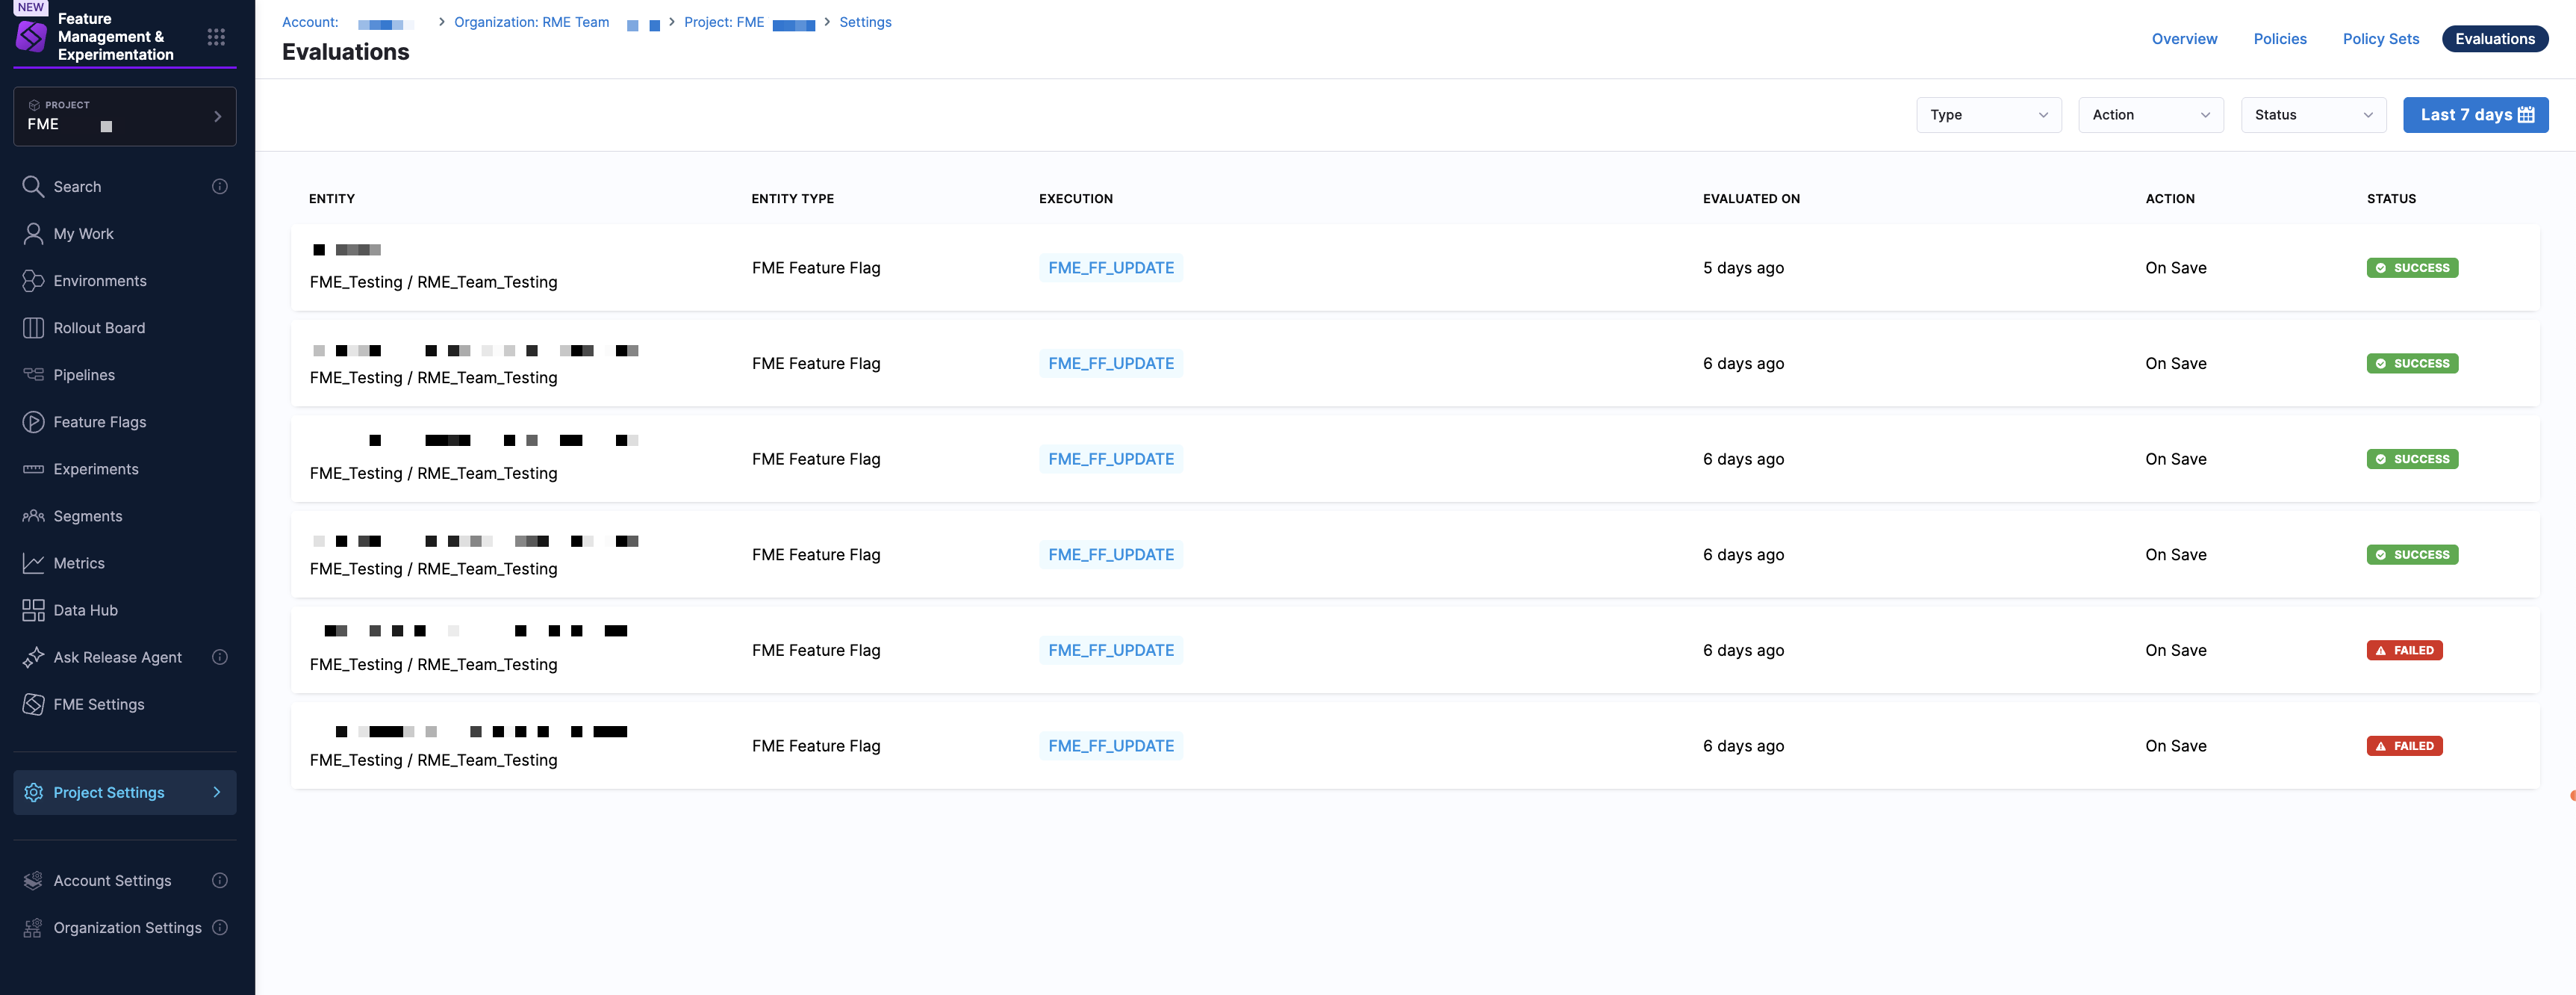
You can filter evaluations using the time range dropdown menu (for example, Last 7 days). Each evaluation includes the following information:
| Column | Description |
|---|---|
| Entity | Name of the evaluated entity |
| Entity Type | Type of entity (Feature Flag, Feature Flag Definition, Environment, Segment, Segment Definition ) |
| Execution | Internal execution identifier |
| Evaluated On | When the evaluation occurred |
| Action | Trigger event (for FME, this is On Save) |
| Status | Evaluation result: Success, Failed, or Warning |
This view is useful for troubleshooting failed saves and validating that policies are being enforced as expected.
Create and enforce a policy
To create a policy:
-
From the Harness FME navigation menu, click on Project, Account, or Organization Settings.
-
Under Security and Governance, select Policies. This directs you to the Overview tab which displays overall policy health over a selected time range.
-
Navigate to the Policies tab and click + New Policy. Optionally, you can import a policy from Git by clicking the dropdown menu and selecting Import from Git.
-
Enter a name for the policy and select the setup option:
- Inline to author the policy in the Harness editor.
- Remote to reference a Rego policy stored in a Git repository. Select a connector, repository, branch, and Rego path, then click Apply.
-
This opens the Policy Editor view, where you can author your own policy or use an out-of-the-box sample.
The editor includes a code editor for writing or modifying Rego, a Testing Terminal tab to validate policy behavior, and a Library tab containing sample policies.
- Write Your Rego Policy
- Use the Harness Policy Library
- In the policy editor, write or paste your Rego logic.
- Use the Testing Terminal to test the policy against sample inputs.
- Click Save.
-
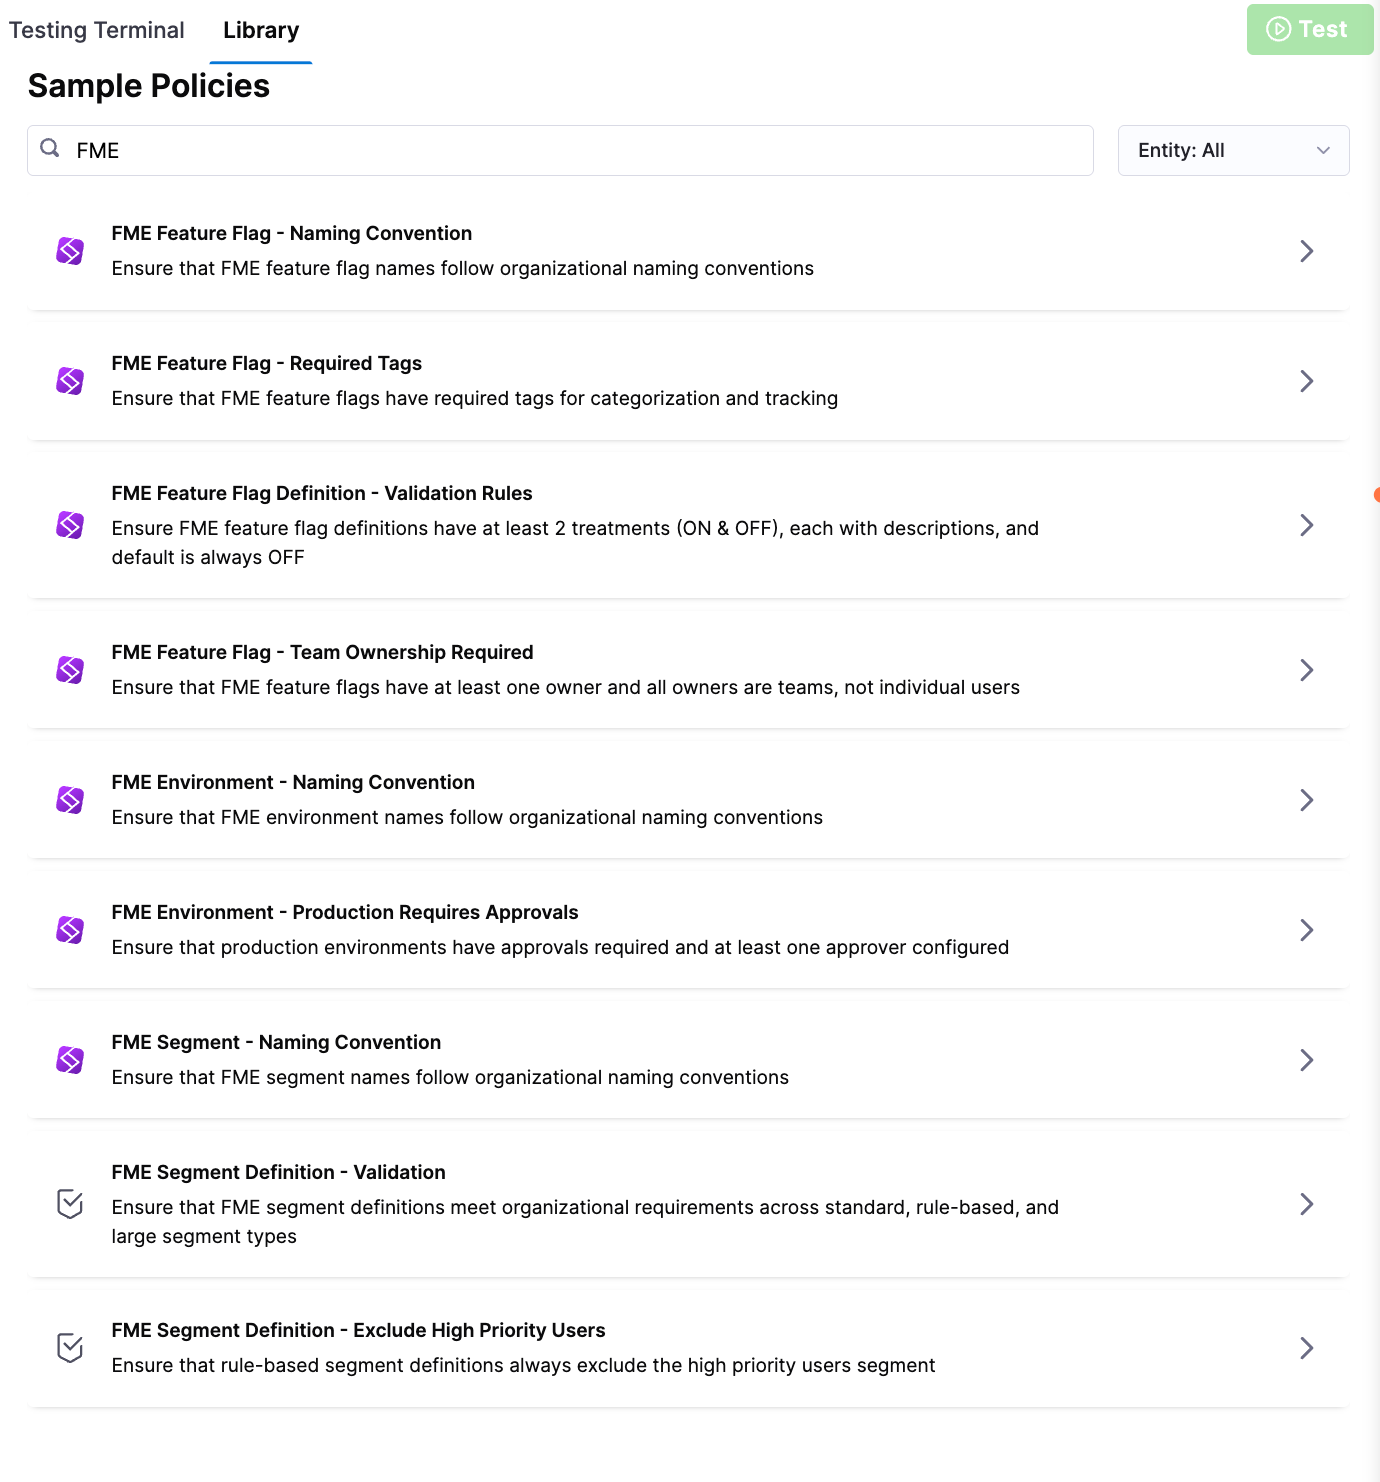
Open the Library tab.
-
Type in
FME. -
Select a policy to populate the library editor:
FME Entity Policy Description Feature Flag Naming Convention Ensures feature flag names follow organizational naming standards. Feature Flag Required Tags Ensures feature flags include required tags for proper categorization and tracking. Feature Flag Team Ownership Required Ensures feature flags have at least one owner and that all owners are teams, not individual users. Feature Flag Definition Validation Rules Ensures feature flag definitions include at least two treatments ( ONandOFF), each with descriptions, and that the default treatment isOFF.Environment Naming Convention Ensures environment names follow organizational naming standards. Environment Production Requires Approvals Ensures production environments require approvals and have at least one approver configured. Segment Naming Convention Ensures segment names follow organizational naming standards. Segment Definition Validation Ensures segment definitions meet required structure and validation rules across standard, rule-based, and large segments. Segment Definition Exclude High Priority Users Ensures rule-based segment definitions exclude the high priority users segment. -
Click Test to validate the policy logic.
-
Click Use This Sample to copy the policy into your policy editor.
-
Click Save.
-
Test the policy by opening the Testing Terminal tab.
-
Click Select Input.
-
Choose the appropriate inputs, including the entity type, organization, project, and action (On Save). Then, select an entity from the list of results.
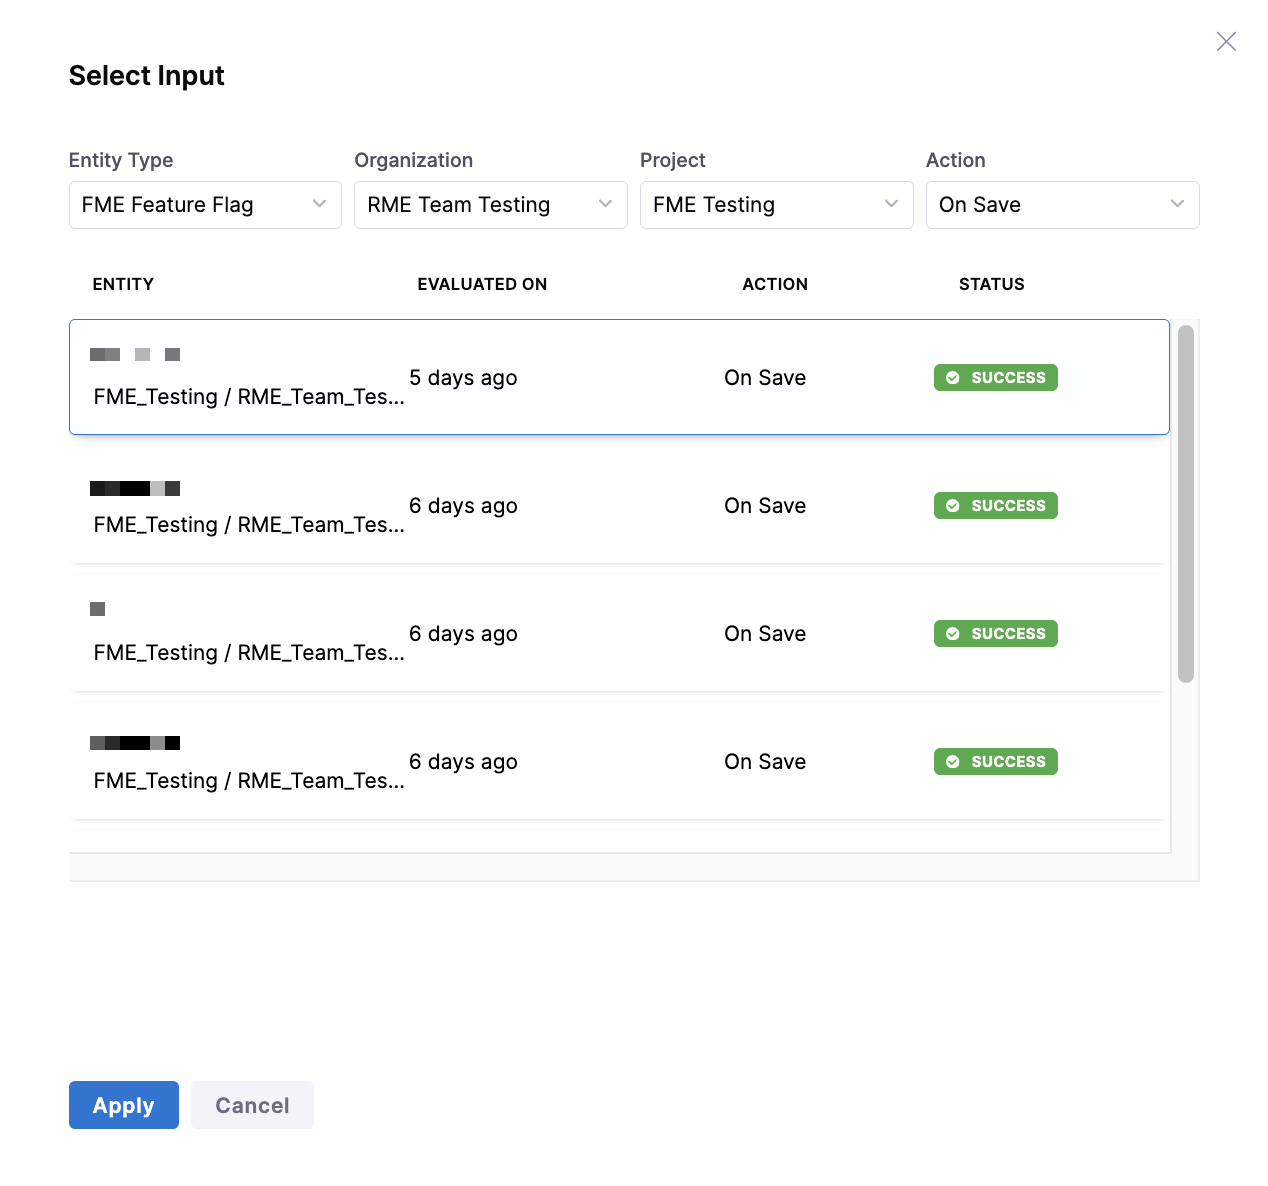
-
Click Apply, then click Test. Review the output to confirm the policy behaves as expected.
-
Click Next: Enforce Policy.
-
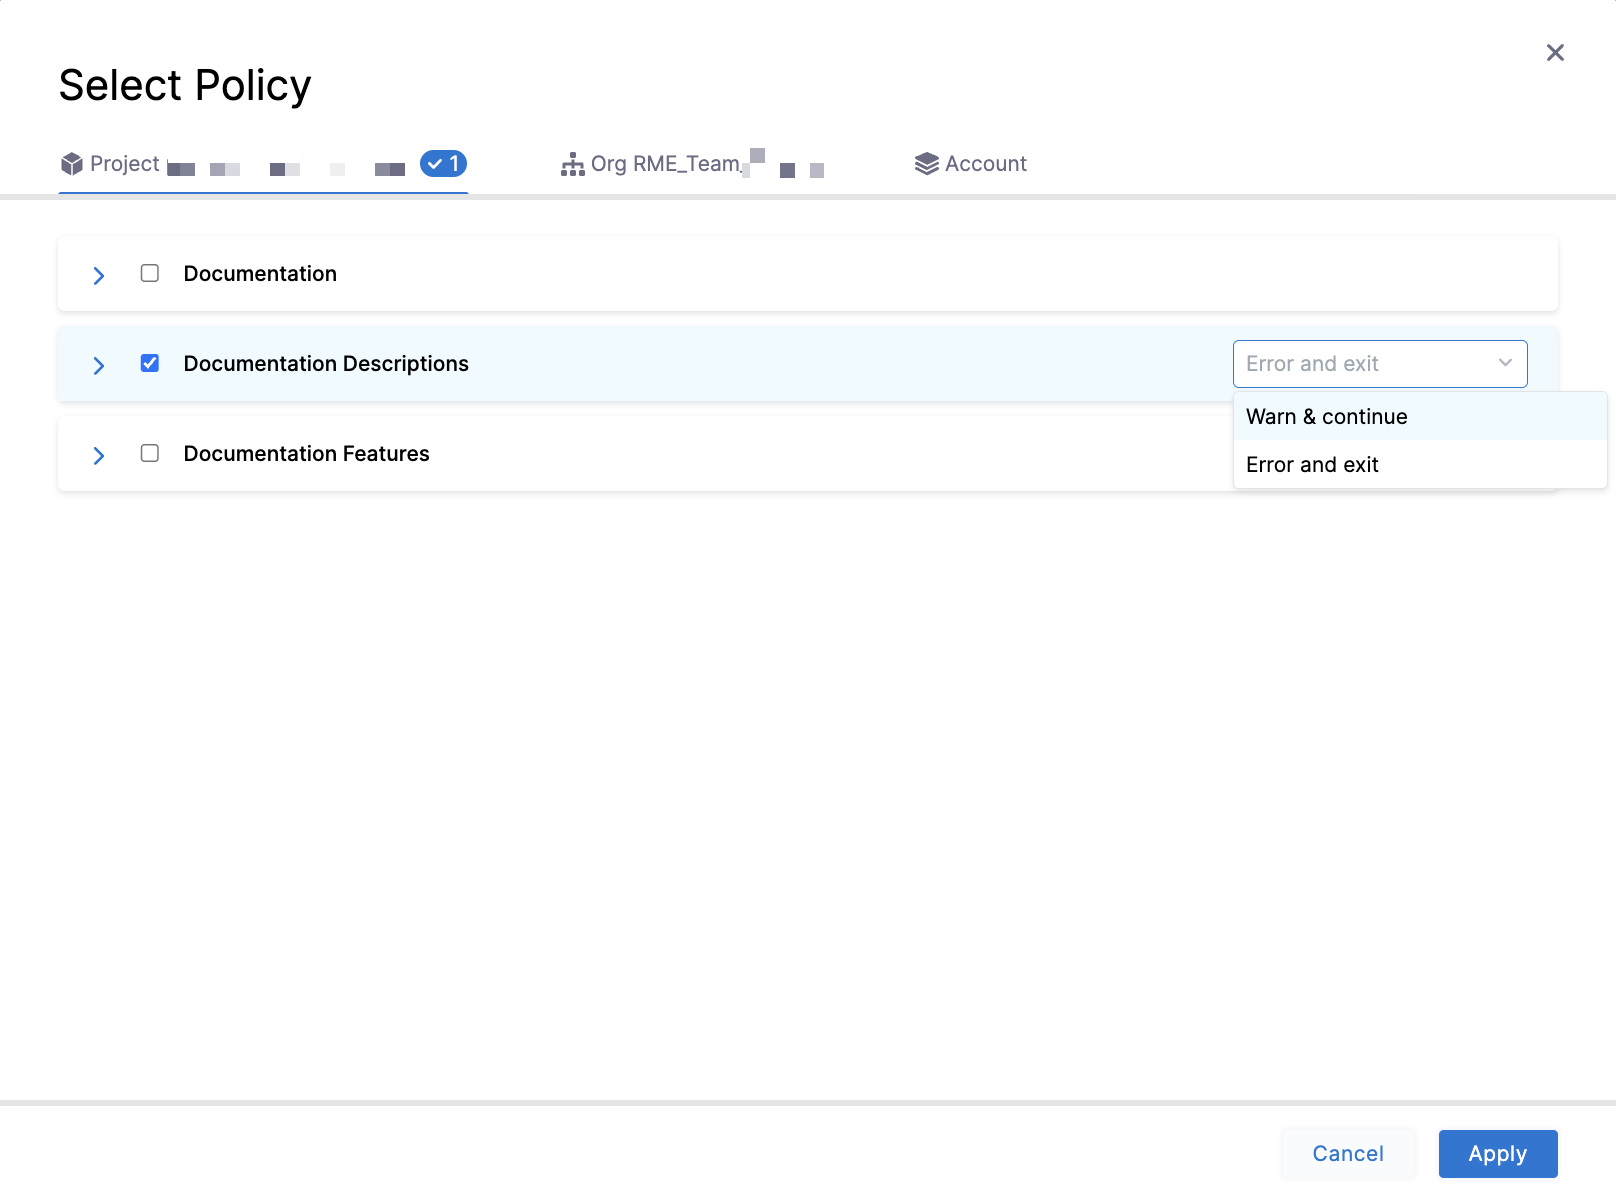
Configure the following enforcement settings:
-
Scope: Select the appropriate scope, for example:
Account. -
Trigger event: Select On Save.
-
Severity:
- Warn and Continue: Violations generate a warning, but the entity is saved.
- Error and Exit: Violations block the save operation.
-
-
Click You're all set! to save and enforce the policy.
Existing FME entities are not automatically evaluated against new policies. A policy runs only when a feature flag or feature flag definition is created, updated, deleted, or archived. To evaluate an existing entity, save it again.
Add the policy to a policy set
Once you've created an individual policy, you must add it to a policy set before you can apply it to your feature flags. Policy sets allow you to group policies and configure where they will be enforced.
To add a policy set:
-
Navigate to the Policy Sets tab.
-
Click + New Policy Set.
-
In the Overview section, enter a name and optionally, include a description.
-
Select the entity type that this policy set applies to: Feature Flag, Feature Flag Definition, FME Environment, FME Segment, or FME Segment Definition.
-
Select On Save as the trigger event.
-
Click Continue.

-
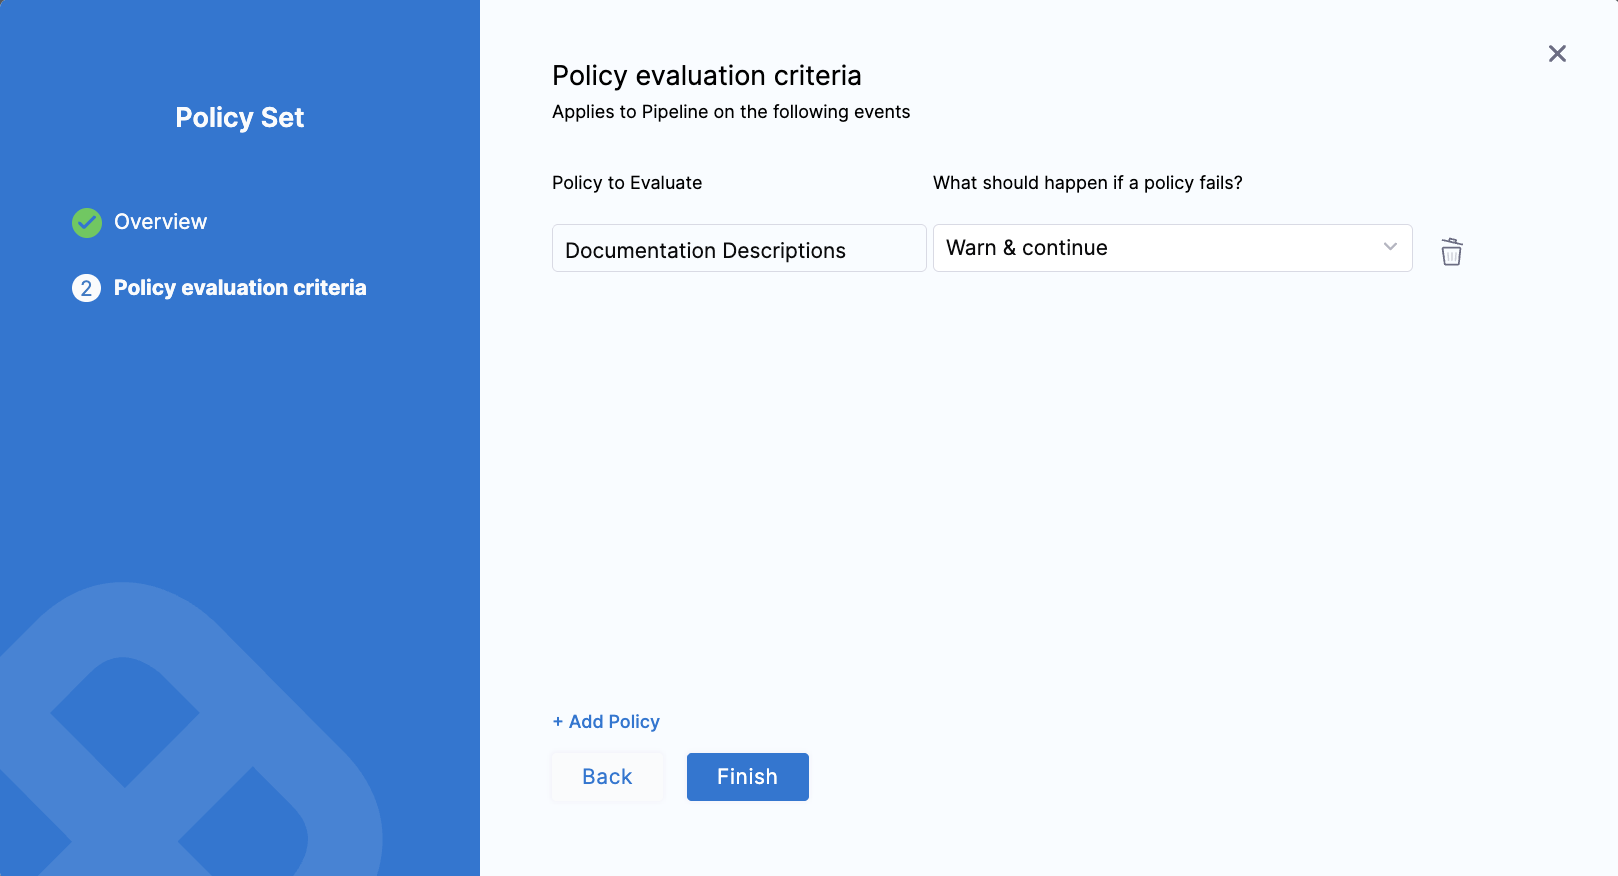
In the Policy evaluation criteria section, click + Add Policy.
-
Select a policy applicable to the chosen entity type (feature flag, environment, or segment).
-
To the right of the policy, select Warn and Continue or Error and Exit.
- Warn and Continue: If a policy isn't met when an entity is evaluated, you receive a warning but the entity is saved.
- Error and Exit: If a policy isn't met when an entity is evaluated, you receive an error and the entity is not saved.
-
Click Apply.
-
To add an additional policy, click + Add Policy. When you're done adding policies to a policy set, click Finish.
-
In the Policy Sets list, click the Enforced checkbox for the policy set you created.

How policies are evaluated
Policies are evaluated whenever a Feature Flag, Feature Flag Definition, FME Environment, FME Segment, or FME Segment Definition entity is created, updated, deleted, or archived. The input payload sent to OPA includes an entityMetadata.changeTrigger field (create, update, delete, or archive) so you can write policies that apply to specific change types.
- Feature Flag
- Feature Flag Definition
- Environment
- Segment
- Segment Definition
An FME Feature Flag policy is evaluated when you change a feature flag's metadata. Examples of changes that trigger evaluation:
- Creating a new feature flag
- Updating a flag's name, description, tags, or metrics
- Archiving or deleting a feature flag
An FME Feature Flag Definition policy is evaluated when you change a feature flag's targeting configuration in a specific environment. Examples of changes that trigger evaluation:
- Adding or modifying targeting rules
- Changing rollout percentages or traffic allocation
- Updating the default treatment
- Killing or restoring a flag in an environment
An FME Environment policy is evaluated when you create or modify environments in FME Settings. Examples of changes that trigger evaluation:
- Creating a new environment
- Updating the environment type
- Modifying approval requirements or approvers
- Updating data export permission settings
A Segment policy is evaluated when you create or update a segment. Examples of changes that trigger evaluation:
- Creating a new segment
- Updating the segment name
- Modifying segment descriptions, tags, or owners
A Segment Definition policy is evaluated when you change a segment's definition or targeting logic. Examples of changes that trigger evaluation:
- Adding or removing users in a segment
- Defining or modifying rule-based conditions
On success, the change is applied. On failure, the result depends on the severity you configured:
- Warn and Continue: The change is applied, but you receive a warning message.
- Error and Exit: The change is blocked, and you receive an error message.
The entityMetadata.changeTrigger field in the input payload lets you target specific operations. For example, you might skip name convention checks on delete to avoid blocking cleanup of legacy flags. See the example policy for a pattern that excludes delete operations.
Manage policy evaluations
Navigate to the Evaluations tab to view all successful, warning, and failed policy set evaluations. Use the Type dropdown menu to filter by entities, and the Action dropdown menu to filter by On Save events.
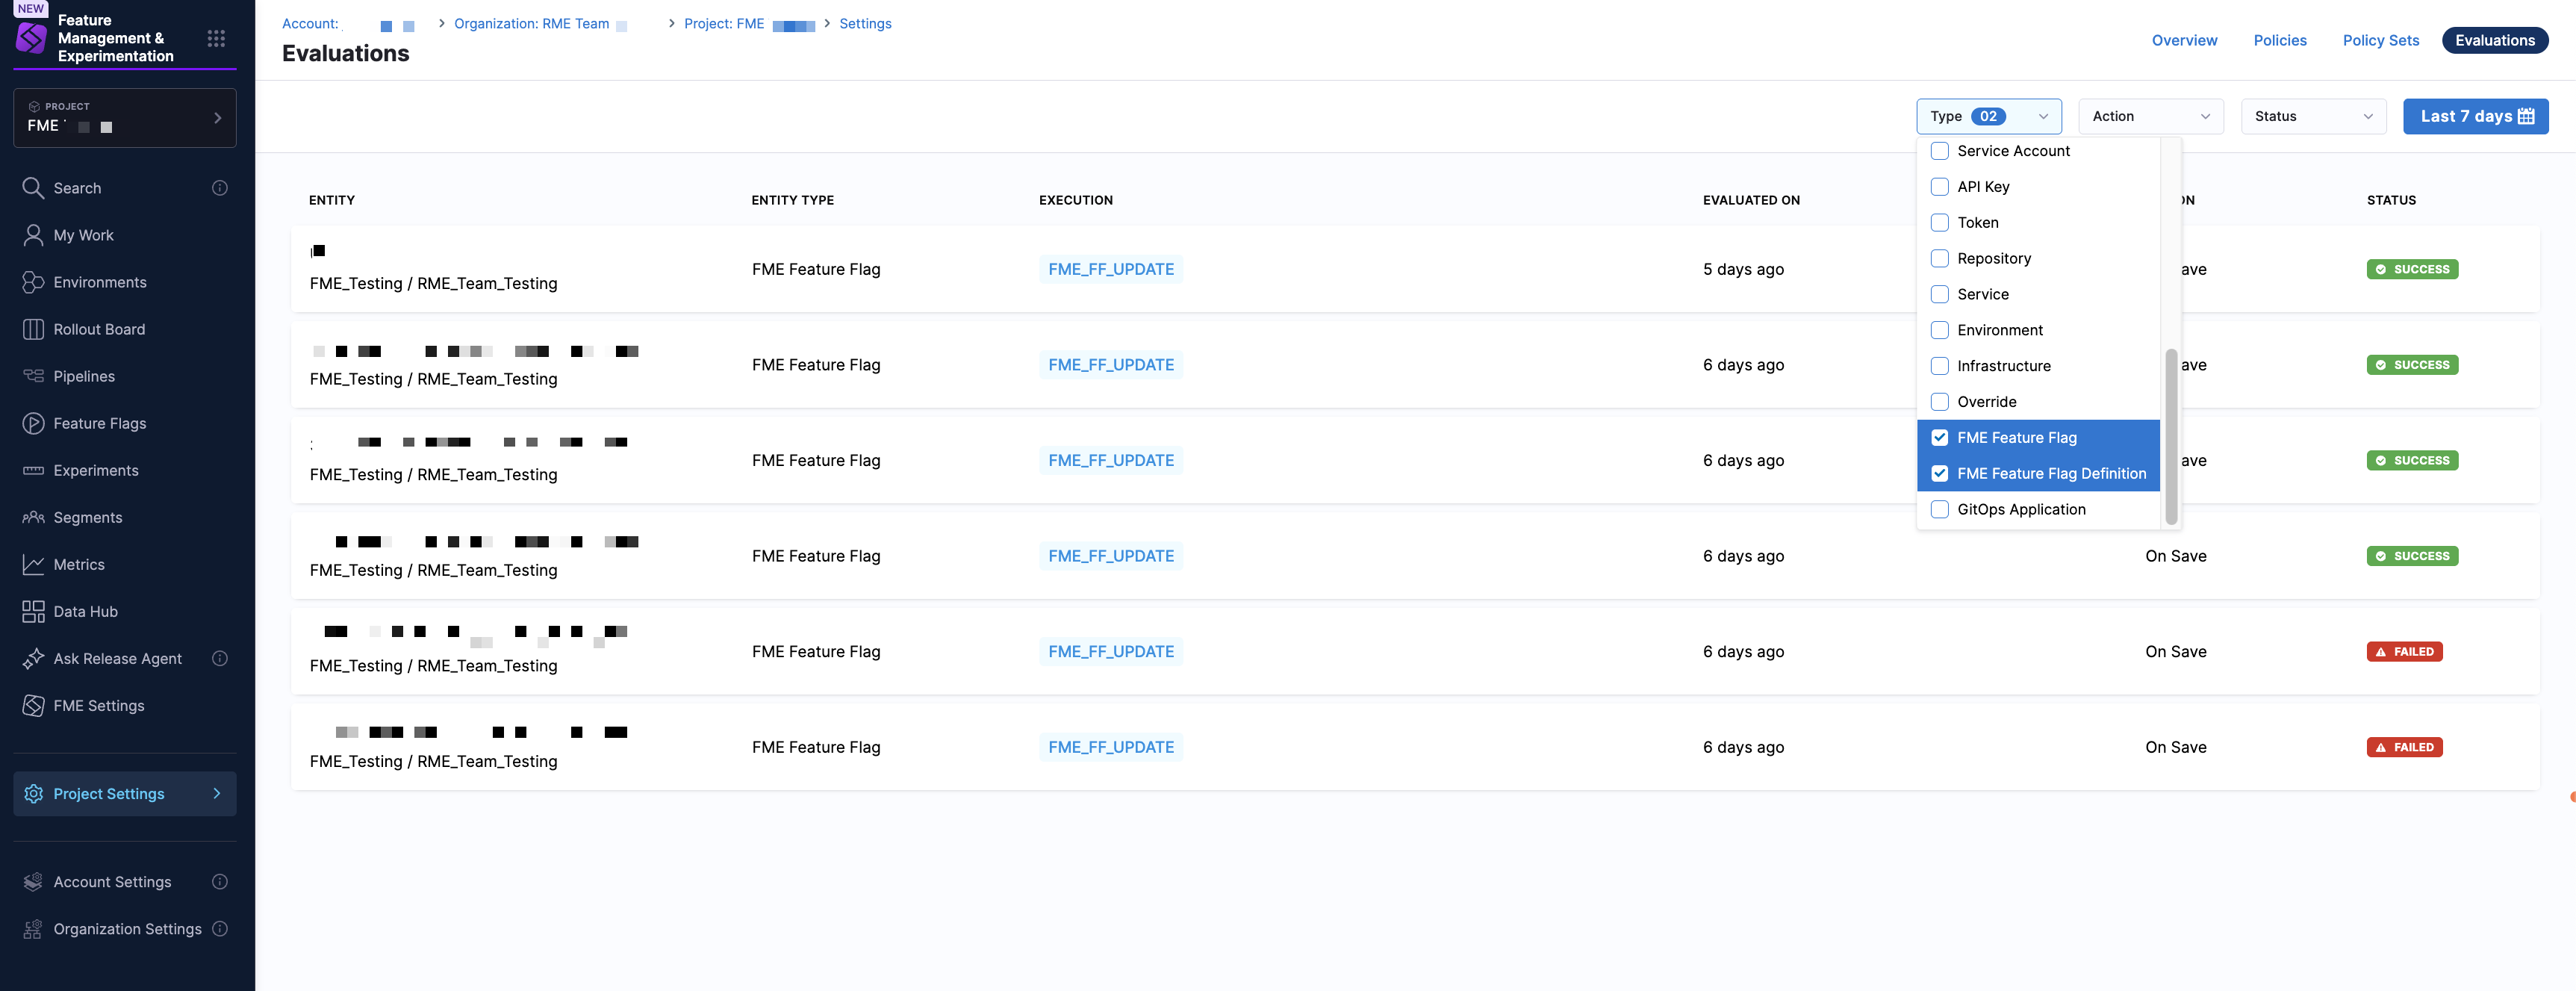
Use the Status dropdown menu to filter evaluations by Success, Failed, or Warning. You can also use the time range selector to switch to a custom time range or a preset such as the past week, past month, or past three months.

Click on an evaluation in the list to access the policy set that was evaluated. You can then click into the policy set details and see associated policies, or click into the policy definition itself.
- Policy Set
- Policy

From here, you can review which policies were applied and their evaluation results.

From here, you can review the Rego logic that was evaluated and update it if needed.