Split Synchronizer
Split Synchronizer coordinates feature flag and segment data between Harness Feature Management Experimentation (FME) servers and SDKs that do not have native shared caching. It uses Redis as a shared datastore, allowing multiple SDK instances to stay synchronized without each fetching data independently.
Use Split Synchronizer with PHP, Python, .NET, Node.js, Ruby, Go, or Java SDKs in environments where multiple application processes run concurrently and need consistent feature flag evaluations. The Synchronizer also posts impression data (records of flag evaluations) and event data (custom tracking from SDK .track calls) back to Harness servers for analytics and experimentation reporting.
As of version 5.0, Split Synchronizer introduced significant improvements to impression and event handling, including a new approach to eviction that replaces periodic fetching and posting with dedicated threads for better throughput. What was once proxy mode is now a separate tool called Split Proxy. Go to Split Proxy to learn about proxy mode configuration.
Currently supported SDK versions with Synchronizer 5.0:
- Ruby 6.0.0+
- PHP 6.0.0+
- Node.js 10.6.0+
- Go 3.0.0+
- Python 7.0.0+
- .NET 4.0.0+
- Java 4.4.0+
If you are upgrading from Split Synchronizer version 4.x or earlier, note that configuration parameter names and values changed in version 5.0. For example, impressionsMaxSize became impressions-fetch-size, and boolean options now use true/false instead of on/off. The configuration reference section uses version 5.0 parameter names.
What you will learn from this topic
- What Split Synchronizer is and when to use it: Understand how Split Synchronizer coordinates data across SDK instances and which SDK languages require it for shared caching.
- How to install Split Synchronizer: Learn installation methods including Docker, command-line (Linux/Mac/Windows), and cloud platforms like Heroku and AWS ECS.
- How to configure for different Redis topologies: Configure Split Synchronizer for standard Redis (single instance), Redis Sentinel (high availability with automatic failover), or Redis Cluster (horizontal scaling).
- How to monitor and troubleshoot: Use the admin dashboard, health check endpoints, and troubleshooting guidance to ensure Synchronizer runs reliably in production.
Before you begin
Before installing Split Synchronizer, ensure you have the following prerequisites:
-
Harness FME account: You need access to Harness Feature Management Experimentation. If FME does not appear in your Harness account, contact your account administrator or Harness Support.
-
Redis instance: Split Synchronizer requires a Redis instance running and accessible. Supported topologies include standard Redis (single instance), Redis Sentinel (high availability with automatic failover), and Redis Cluster (horizontal scaling). Go to Redis installation documentation to install Redis if you do not have it already. For production deployments, Redis 5.0 or later is recommended.
-
SDK API key: You need an SDK-type API key to authenticate Split Synchronizer with Harness FME servers. To find your SDK API key:
- In Harness, go to Project Settings > Feature Flags > Environments
- Select your environment
- Copy the SDK Key (also called Server SDK Key or API Key)
Note: Use an SDK-type key, not an Admin or Client key. SDK keys allow Synchronizer to fetch feature flag definitions and post impressions (flag evaluation records) and events (custom tracking data from SDK
.trackcalls) back to Harness for analytics. -
Permissions: If your Harness account uses role-based access control (RBAC), ensure you have permissions to view environment settings and SDK keys. Typically, you need View permissions on Feature Flags. Go to RBAC in Harness to understand permissions and Manage roles to configure role assignments.
Supported SDKs
Split Synchronizer works with the following Harness FME server-side SDKs:
Synchronizer compatibility matrix
| Language | Supported Synchronizer Versions | Supported SDK Versions |
|---|---|---|
| Java | Not implemented | — |
| JavaScript | 1.x, 2.x | JavaScript SDK 9.x, 10.x |
| Ruby | 1.6, 1.7, 1.8, 2.x | Ruby SDK 4.x, 5.x, 6.x (required for 2.x features) |
| PHP | 1.6, 1.7, 1.8, 2.x | PHP SDK 5.x |
| Python | 1.6, 1.7, 1.8, 2.x | Python SDK 5.x |
| .NET/.NET Core | 1.6, 1.7, 1.8, 2.x | .NET/Core 2.1+, 3.x |
| Go Lang | 1.x, 2.x | GoLang SDK 1.x |
| iOS | N/A | — |
| Android | N/A | — |
Notes:
- “Not implemented” means no Synchronizer support for that language.
- “N/A” means not applicable. The Synchronizer is not used for those platforms.
- SDK versions noted are minimum or recommended versions tested with each Synchronizer version.
If you need Split Synchronizer support for a language not listed here, contact Harness Support to discuss your options.
Architecture
Split Synchronizer performs five primary actions:
- Fetch feature flags: Retrieve feature flag definitions from Harness FME servers.
- Fetch segments: Retrieve segment lists and membership data.
- Post impressions: Send impression data (records of flag evaluations) generated by SDKs to Harness servers for analytics.
- Post telemetry: Send SDK performance metrics such as latencies and operational data.
- Post events: Send custom event data generated by SDK
.trackmethod calls to Harness servers.
Starting with version 5.0, Split Synchronizer uses a new approach to impressions and events eviction that replaces periodic fetching and posting. The new pipeline has three stages: a thread dedicated to fetching data from Redis and placing it in a buffer, N threads (where N is derived from available CPU cores) dedicated to parsing and formatting the data into a second buffer, and N configurable threads that pick formatted data and post it to Harness servers. This results in significantly increased throughput for high-volume deployments.
Synchronizer architecture diagram
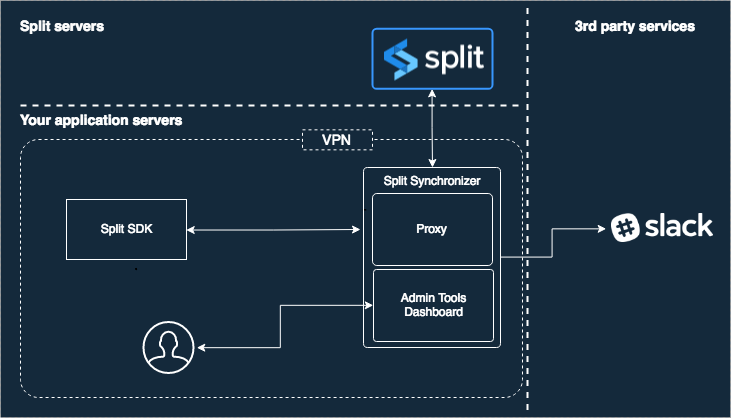
Split Synchronizer coordinates data between Redis (shared by SDKs) and Harness FME servers
Setup
Split Synchronizer can be installed using Docker (recommended), command-line binary, or deployed to cloud platforms like Heroku or AWS ECS.
Docker installation (recommended)
Docker is the recommended installation method for most deployments. The Split Synchronizer Docker image is available on Docker Hub.
To install using Docker:
- Pull the image:
docker pull splitsoftware/split-synchronizer - Run the container with your configuration:
- Running as Synchronizer
- Running as Synchronizer with Sentinel
- Running as Synchronizer with Cluster
- Running as Synchronizer with AWS Redis Cluster
docker run --rm --name split-synchronizer \
 -p 3010:3010 \
 -e SPLIT_SYNC_APIKEY="your-sdk-key" \
 -e SPLIT_SYNC_REDIS_HOST=<your-redis-host> \
 -e SPLIT_SYNC_REDIS_PORT=<your_redis_port> \
 splitsoftware/split-synchronizer
docker run --rm --name split-synchronizer \
 -p 3010:3010 \
 -e SPLIT_SYNC_APIKEY="your-sdk-key" \
 -e SPLIT_SYNC_REDIS_SENTINEL_REPLICATION="true" \
 -e SPLIT_SYNC_REDIS_SENTINEL_MASTER="MASTER_SERVICE_NAME" \
 -e SPLIT_SYNC_REDIS_SENTINEL_ADDRESSES="SENTINEL_HOST_1:SENTINEL_PORT_1,SENTINEL_HOST_2:SENTINEL_PORT_2" \
 splitsoftware/split-synchronizer
docker run --rm --name split-synchronizer \
 -p 3010:3010 \
 -e SPLIT_SYNC_APIKEY="your-sdk-key" \
 -e SPLIT_SYNC_REDIS_CLUSTER_MODE="true" \
 -e SPLIT_SYNC_REDIS_CLUSTER_NODES="CLUSTER_NODE_1:CLUSTER_PORT_1,CLUSTER_NODE_2:CLUSTER_PORT_2,CLUSTER_NODE_3:CLUSTER_PORT_3" \
 splitsoftware/split-synchronizer
docker run --rm --name split-synchronizer \
 -p 3010:3010 \
 -e SPLIT_SYNC_APIKEY="your-sdk-key" \
 -e SPLIT_SYNC_REDIS_CLUSTER_MODE="true" \
 -e SPLIT_SYNC_REDIS_CLUSTER_NODES="Cluster Entry Host" \
 splitsoftware/split-synchronizer
Sometimes, when building POCs or testing the synchronizer locally, you might want to launch our docker container image, pointing to a local redis server (or another container with redis, whose port has been mapped to a local one). In such case, you should consider adding the option --network="host" (appending it to the command shown above) when launching the synchronizer. This will allow you to use -e SPLIT_SYNC_REDIS_HOST="localhost", with the split-synchronizer container properly reaching your local redis server.
The Advanced configuration section includes additional Docker information in the column Docker environment variable.
See Deploy Synchronizer Docker Container in AWS ECS for a full step-by-step AWS deployment guide.
Command line
To install and run the service from command line, follow the steps below depending of your platform.
Linux
On Linux systems, the Synchronizer service install script is invoked with this.
curl -L -o install_linux.bin 'https://downloads.split.io/synchronizer/install_split_sync_linux.bin' && chmod 755 install_linux.bin && ./install_linux.bin
OSX
On OSX systems, the Synchronizer service install script is invoked with this.
curl -L -o install_osx.bin 'https://downloads.split.io/synchronizer/install_split_sync_osx.bin' && chmod 755 install_osx.bin && ./install_osx.bin
Windows
On Microsoft Windows systems, follow these steps:
-
Download the app from https://downloads.split.io/synchronizer/split_sync_windows.zip.
-
Unzip the downloaded file.
-
Run it!
The links above point to the latest version. To download a previous version of split-sync, go to https://downloads.split.io/synchronizer/downloads.sync.html.
Run the service
To run the service, paste the snippet below into your command line terminal and add in your SDK-Key.
Linux/Mac
split-sync -apikey "your_sdk_key"
Windows
Open the cmd terminal or the PowerShell terminal, go to (cd) unzipped Split Synchronizer folder, and type:
split-sync.exe -apikey "your_sdk_key"
On the samples above, Redis is running as a local service with default host: localhost and default port: 6379. For further information, see Advanced configuration.
To maximize performance and isolation, we recommend connecting to a Redis database dedicated to the Split Synchronizer. For further information, see Advanced configuration.
Split Synchronizer also supports Redis Sentinel (v2) replication for high availability with automatic failover. Go to Redis Sentinel documentation to learn how to set up replication.
Split Synchronizer supports Redis Cluster (Redis 3.0.0 and later) for horizontal scaling across multiple Redis nodes. Go to Redis Cluster documentation to learn how to configure clustering.
Recommended configuration for production
You can run the service with the simple steps above, but the system is more stable in your production environment when you run the job with a scheduling system. We recommend starting the synchronizer via supervisord, a daemon that launches other processes and ensures they stay running.
To use supervisord, make sure that it is installed on your machine. You can get help on the installation at the official Supervisord documentation.
When supervisord is installed into your project, copy and paste the program below anywhere into the supervisord.conf file that should now be in your project.
[program:splitio_sync]
command=/usr/local/bin/split-sync -config /path/to/your/config.file.json
process_name = SplitIO
numprocs = 1
autostart=true
autorestart=true
user = your_user
stderr_logfile=/var/log/splitio.err.log
stderr_logfile_maxbytes = 1MB
stdout_logfile=/var/log/splitio.out.log
stdout_logfile_maxbytes = 1MB
Advanced configuration
The Synchronizer service has a number of knobs for configuring performance. Each knob is tuned to a reasonable default, however, you can override the default values by changing a splitio.config.json file or by setting your customer values as parameters of -config in the command line option. In this section, we lay out all the different knobs you can configure for performance, Redis, and logging.
The splitio.config.json file provided via the -config option lets you control how often the synchronizer fetches data from Harness servers. You can create a sample JSON file automatically with default values by running this command.
./split-sync -write-default-config "/home/someuser/splitio.config.json"
Save the JSON config file on your server in your desired folder. For instance, on Linux systems, it could be saved in the etc folder.
Remember to set the right path as the -config parameter.
- splitio.config.json
- splitio.sentinel.config.json
- splitio.cluster.config.json
{
  "apikey": "YOUR_SDK_KEY",
  "ipAddressEnabled": true,
  "initialization": {
    "timeoutMS": 10000,
    "forceFreshStartup": false
  },
  "storage": {
    "type": "redis",
    "redis": {
      "host": "localhost",
      "port": 6379,
      "db": 0,
      "username": "",
      "password": "",
      "prefix": "",
      "network": "tcp",
      "maxRetries": 0,
      "dialTimeout": 5,
      "readTimeout": 10,
      "writeTimeout": 5,
      "poolSize": 10,
      "sentinelReplication": false,
      "sentinelAddresses": "",
      "sentinelMaster": "",
      "clusterMode": false,
      "clusterNodes": "",
      "keyHashTag": "",
      "enableTLS": false,
      "tlsServerName": "",
      "caCertificates": null,
      "tlsSkipNameValidation": false,
      "tlsClientCertificate": "",
      "tlsClientKey": ""
    }
  },
  "sync": {
    "splitRefreshRateMs": 60000,
    "segmentRefreshRateMs": 60000,
    "impressionsMode": "optimized",
    "advanced": {
      "streamingEnabled": true,
      "httpTimeoutMs": 30000,
      "internalTelemetryRateMs": 3600000,
      "telemetryPushRateMs": 60000,
      "impressionsFetchSize": 0,
      "impressionsProcessConcurrency": 0,
      "impressionsProcessBatchSize": 0,
      "impressionsPostConcurrency": 0,
      "impressionsPostSize": 0,
      "impressionsAccumWaitMs": 0,
      "eventsFetchSize": 0,
      "eventsProcessConcurrency": 0,
      "eventsProcessBatchSize": 0,
      "eventsPostConcurrency": 0,
      "eventsPostSize": 0,
      "eventsAccumWaitMs": 0
    }
  },
  "admin": {
    "host": "0.0.0.0",
    "port": 3010,
    "username": "",
    "password": "",
    "secureChecks": false
  },
  "integrations": {
    "impressionListener": {
      "endpoint": "",
      "queueSize": 100
    },
    "slack": {
      "webhook": "",
      "channel": ""
    }
  },
  "logging": {
    "level": "info",
    "output": "stdout",
    "rotationMaxFiles": 10,
    "rotationMaxSizeKb": 0
  },
  "healthcheck": {
    "app": {
      "storageCheckRateMs": 3600000
    }
  }
}
{
  "apikey": "YOUR_SDK_KEY",
  "ipAddressEnabled": true,
  "initialization": {
    "timeoutMS": 10000,
    "forceFreshStartup": false
  },
  "storage": {
    "type": "redis",
    "redis": {
      "host": "localhost",
      "port": 6379,
      "db": 0,
      "username": "",
      "password": "",
      "prefix": "",
      "network": "tcp",
      "maxRetries": 0,
      "dialTimeout": 5,
      "readTimeout": 10,
      "writeTimeout": 5,
      "poolSize": 10,
      "sentinelReplication": true,
      "sentinelAddresses": "SENTINEL_HOST_1:SENTINEL_PORT_1, SENTINEL_HOST_2:SENTINEL_PORT_2,SENTINEL_HOST_3:SENTINEL_PORT_3",
      "sentinelMaster": "MASTER_SERVICE_NAME",
      "clusterMode": false,
      "clusterNodes": "",
      "keyHashTag": "",
      "enableTLS": false,
      "tlsServerName": "",
      "caCertificates": null,
      "tlsSkipNameValidation": false,
      "tlsClientCertificate": "",
      "tlsClientKey": ""
    }
  },
  "sync": {
    "splitRefreshRateMs": 60000,
    "segmentRefreshRateMs": 60000,
    "impressionsMode": "optimized",
    "advanced": {
      "streamingEnabled": true,
      "httpTimeoutMs": 30000,
      "internalTelemetryRateMs": 3600000,
      "telemetryPushRateMs": 60000,
      "impressionsFetchSize": 0,
      "impressionsProcessConcurrency": 0,
      "impressionsProcessBatchSize": 0,
      "impressionsPostConcurrency": 0,
      "impressionsPostSize": 0,
      "impressionsAccumWaitMs": 0,
      "eventsFetchSize": 0,
      "eventsProcessConcurrency": 0,
      "eventsProcessBatchSize": 0,
      "eventsPostConcurrency": 0,
      "eventsPostSize": 0,
      "eventsAccumWaitMs": 0
    }
  },
  "admin": {
    "host": "0.0.0.0",
    "port": 3010,
    "username": "",
    "password": "",
    "secureChecks": false
  },
  "integrations": {
    "impressionListener": {
      "endpoint": "",
      "queueSize": 100
    },
    "slack": {
      "webhook": "",
      "channel": ""
    }
  },
  "logging": {
    "level": "info",
    "output": "stdout",
    "rotationMaxFiles": 10,
    "rotationMaxSizeKb": 0
  },
  "healthcheck": {
    "app": {
      "storageCheckRateMs": 3600000
    }
  }
}
{
  "apikey": "",
  "ipAddressEnabled": true,
  "initialization": {
    "timeoutMS": 10000,
    "forceFreshStartup": false
  },
  "storage": {
    "type": "redis",
    "redis": {
      "host": "localhost",
      "port": 6379,
      "db": 0,
      "username": "",
      "password": "",
      "prefix": "",
      "network": "tcp",
      "maxRetries": 0,
      "dialTimeout": 5,
      "readTimeout": 10,
      "writeTimeout": 5,
      "poolSize": 10,
      "sentinelReplication": false,
      "sentinelAddresses": "",
      "sentinelMaster": "",
      "clusterMode": true,
      "clusterNodes": "CLUSTER_NODE_1:CLUSTER_PORT_1, CLUSTER_NODE_2:CLUSTER_PORT_2,CLUSTER_NODE_3:CLUSTER_PORT_3",
      "keyHashTag": "",
      "enableTLS": false,
      "tlsServerName": "",
      "caCertificates": null,
      "tlsSkipNameValidation": false,
      "tlsClientCertificate": "",
      "tlsClientKey": ""
    }
  },
  "sync": {
    "splitRefreshRateMs": 60000,
    "segmentRefreshRateMs": 60000,
    "impressionsMode": "optimized",
    "advanced": {
      "streamingEnabled": true,
      "httpTimeoutMs": 30000,
      "internalTelemetryRateMs": 3600000,
      "telemetryPushRateMs": 60000,
      "impressionsFetchSize": 0,
      "impressionsProcessConcurrency": 0,
      "impressionsProcessBatchSize": 0,
      "impressionsPostConcurrency": 0,
      "impressionsPostSize": 0,
      "impressionsAccumWaitMs": 0,
      "eventsFetchSize": 0,
      "eventsProcessConcurrency": 0,
      "eventsProcessBatchSize": 0,
      "eventsPostConcurrency": 0,
      "eventsPostSize": 0,
      "eventsAccumWaitMs": 0
    }
  },
  "admin": {
    "host": "0.0.0.0",
    "port": 3010,
    "username": "",
    "password": "",
    "secureChecks": false
  },
  "integrations": {
    "impressionListener": {
      "endpoint": "",
      "queueSize": 100
    },
    "slack": {
      "webhook": "",
      "channel": ""
    }
  },
  "logging": {
    "level": "info",
    "output": "stdout",
    "rotationMaxFiles": 10,
    "rotationMaxSizeKb": 0
  },
  "healthcheck": {
    "app": {
      "storageCheckRateMs": 3600000
    }
  }
}
All the options available in the JSON file are also included as command line options. Run the command followed by the -help option to see more details, or just keep reading this documentation page.
Methods to configure the Split Synchronizer
You can configure the Split Synchronizer service using the command line or by directly editing the above mentioned JSON configuration file.
All config values are set with a default value that you can see in the example JSON file above. You can overwrite the default value from the JSON config file, and you can overwrite the JSON config file from the command line. See a sample below for how to do that via command line.
split-sync -config "/etc/splitio.config.json" -log-level "debug" -redis-pass "somePass"
Handling High Impression Rates with Synchronizer
When using a server-side SDK with the Split Synchronizer and Redis, it is important to properly configure the Synchronizer to handle a high load of incoming impressions efficiently.
Key Configuration Parameters
The Split Synchronizer (version 1.6.0 and above) exposes several parameters that control impression processing performance:
impressionsMaxSize: Maximum size for the impressions queue.impressionsRefreshRate: How often impressions are processed and sent (in seconds).impressionsThreads: Number of threads handling impressions processing.impressionsPerPost: Number of impressions sent per post request.
Adjust these parameters according to your expected impression volume. Because the Synchronizer uses multithreading, increasing impressionsThreads can reduce latency in posting impressions.
Below is an example JSON configuration designed to handle approximately 100,000 impressions per minute. Update the API Key, Redis host, port, and database number to match your environment before applying.
{
  "apiKey": "YOUR_API_KEY",
  "proxy": {
    "port": 3000,
    "adminPort": 3010,
    "adminUsername": "",
    "adminPassword": "",
    "dashboardTitle": "",
    "persistInFilePath": "",
    "impressionsMaxSize": 10485760,
    "eventsMaxSize": 10485760,
    "auth": {
      "sdkAPIKeys": [
        "SDK_API_KEY"
      ]
    }
  },
  "redis": {
    "host": "localhost",
    "port": 6379,
    "db": 0,
    "password": "",
    "prefix": "",
    "network": "tcp",
    "maxRetries": 0,
    "dialTimeout": 5,
    "readTimeout": 10,
    "writeTimeout": 5,
    "poolSize": 10,
    "sentinelReplication": false,
    "sentinelAddresses": "",
    "sentinelMaster": ""
  },
  "sync": {
    "admin": {
      "adminPort": 3010,
      "adminUsername": "",
      "adminPassword": "",
      "dashboardTitle": ""
    }
  },
  "log": {
    "verbose": false,
    "debug": false,
    "stdout": false,
    "file": "/tmp/split-agent.log",
    "fileMaxSizeBytes": 2000000,
    "fileBackupCount": 3,
    "slackChannel": "",
    "slackWebhookURL": ""
  },
  "impressionListener": {
    "endpoint": ""
  },
  "splitsRefreshRate": 60,
  "segmentsRefreshRate": 60,
  "impressionsRefreshRate": 20,
  "impressionsPerPost": 10000,
  "impressionsThreads": 5,
  "eventsPushRate": 60,
  "eventsConsumerReadSize": 10000,
  "eventsConsumerThreads": 1,
  "metricsRefreshRate": 60,
  "httpTimeout": 60
}
Configuration reference
Split Synchronizer configuration can be specified using command-line flags, JSON configuration file, or environment variables. The following reference lists all available configuration options.
CLI configuration options and equivalents in JSON and environment variables
Since version 5.0, Split Synchronizer only accepts true and false (lowercase) for boolean flags. Values like enabled, on, yes, or tRue will cause startup errors. This applies to JSON configuration, CLI arguments, and environment variables.
| Command line option | JSON option | Environment variable (container-only) | Description |
|---|---|---|---|
| log-level | level | SPLIT_SYNC_LOG_LEVEL | Log level (error|warning|info|debug|verbose) |
| log-output | output | SPLIT_SYNC_LOG_OUTPUT | Where to output logs (defaults to stdout) |
| log-rotation-max-files | rotationMaxFiles | SPLIT_SYNC_LOG_ROTATION_MAX_FILES | Max number of files to keep when rotating logs |
| log-rotation-max-size-kb | rotationMaxSizeKb | SPLIT_SYNC_LOG_ROTATION_MAX_SIZE_KB | Max file size before rotating log files. |
| admin-host | host | SPLIT_SYNC_ADMIN_HOST | Host where the admin server will listen |
| admin-port | port | SPLIT_SYNC_ADMIN_PORT | Admin port where incoming connections will be accepted |
| admin-username | username | SPLIT_SYNC_ADMIN_USERNAME | HTTP basic auth username for admin endpoints |
| admin-password | password | SPLIT_SYNC_ADMIN_PASSWORD | HTTP basic auth password for admin endpoints |
| admin-secure-hc | secureChecks | SPLIT_SYNC_ADMIN_SECURE_HC | Secure Healthcheck endpoints as well. |
| admin-tls-enabled | enabled | SPLIT_SYNC_ADMIN_TLS_ENABLED | Enable HTTPS on proxy endpoints. |
| admin-tls-client-validation | clientValidation | SPLIT_SYNC_ADMIN_TLS_CLIENT_VALIDATION | Enable client cert validation. |
| admin-tls-server-name | serverName | SPLIT_SYNC_ADMIN_TLS_SERVER_NAME | Server name as it appears in provided server-cert. |
| admin-tls-cert-chain-fn | certChainFn | SPLIT_SYNC_ADMIN_TLS_CERT_CHAIN_FN | X509 Server certificate chain. |
| admin-tls-private-key-fn | privateKeyFn | SPLIT_SYNC_ADMIN_TLS_PRIVATE_KEY_FN | PEM Private key file name. |
| admin-tls-client-validation-root-cert | clientValidationRootCertFn | SPLIT_SYNC_ADMIN_TLS_CLIENT_VALIDATION_ROOT_CERT | X509 root cert for client validation. |
| admin-tls-min-tls-version | minTlsVersion | SPLIT_SYNC_ADMIN_TLS_MIN_TLS_VERSION | Minimum TLS version to allow X.Y. |
| admin-tls-allowed-cipher-suites | allowedCipherSuites | SPLIT_SYNC_ADMIN_TLS_ALLOWED_CIPHER_SUITES | Comma-separated list of cipher suites to allow. |
| impression-listener-endpoint | endpoint | SPLIT_SYNC_IMPRESSION_LISTENER_ENDPOINT | HTTP endpoint to forward impressions to |
| impression-listener-queue-size | queueSize | SPLIT_SYNC_IMPRESSION_LISTENER_QUEUE_SIZE | max number of impressions bulks to queue |
| slack-webhook | webhook | SPLIT_SYNC_SLACK_WEBHOOK | slack webhook to post log messages |
| slack-channel | channel | SPLIT_SYNC_SLACK_CHANNEL | slack channel to post log messages |
| apikey | apikey | SPLIT_SYNC_APIKEY | Split Server-side SDK api-key |
| ip-address-enabled | ipAddressEnabled | SPLIT_SYNC_IP_ADDRESS_ENABLED | Bundle host's ip address when sending data to Harness FME |
| timeout-ms | timeoutMS | SPLIT_SYNC_TIMEOUT_MS | How long to wait until the synchronizer is ready |
| snapshot | snapshot | SPLIT_SYNC_SNAPSHOT | Snapshot file to use as a starting point |
| force-fresh-startup | forceFreshStartup | SPLIT_SYNC_FORCE_FRESH_STARTUP | Wipe storage before starting the synchronizer |
| storage-type | type | SPLIT_SYNC_STORAGE_TYPE | Storage driver to use for caching feature flags and segments and user-generated data |
| split-refresh-rate-ms | splitRefreshRateMs | SPLIT_SYNC_SPLIT_REFRESH_RATE_MS | How often to refresh feature flags |
| segment-refresh-rate-ms | segmentRefreshRateMs | SPLIT_SYNC_SEGMENT_REFRESH_RATE_MS | How often to refresh segments |
| impressions-mode | impressionsMode | SPLIT_SYNC_IMPRESSIONS_MODE | whether to send all impressions for debugging |
| streaming-enabled | streamingEnabled | SPLIT_SYNC_STREAMING_ENABLED | Enable/disable streaming functionality |
| http-timeout-ms | httpTimeoutMs | SPLIT_SYNC_HTTP_TIMEOUT_MS | Total http request timeout |
| internal-metrics-rate-ms | internalTelemetryRateMs | SPLIT_SYNC_INTERNAL_METRICS_RATE_MS | How often to send internal metrics |
| telemetry-push-rate-ms | telemetryPushRateMs | SPLIT_SYNC_TELEMETRY_PUSH_RATE_MS | how often to flush sdk telemetry |
| impressions-fetch-size | impressionsFetchSize | SPLIT_SYNC_IMPRESSIONS_FETCH_SIZE | Impression fetch bulk size |
| impressions-process-concurrency | impressionsProcessConcurrency | SPLIT_SYNC_IMPRESSIONS_PROCESS_CONCURRENCY | #Threads for processing imps |
| impressions-process-batch-size | impressionsProcessBatchSize | SPLIT_SYNC_IMPRESSIONS_PROCESS_BATCH_SIZE | Size of imp processing batchs |
| impressions-post-concurrency | impressionsPostConcurrency | SPLIT_SYNC_IMPRESSIONS_POST_CONCURRENCY | #concurrent imp post threads |
| impressions-post-size | impressionsPostSize | SPLIT_SYNC_IMPRESSIONS_POST_SIZE | Max #impressions to send per POST |
| impressions-accum-wait-ms | impressionsAccumWaitMs | SPLIT_SYNC_IMPRESSIONS_ACCUM_WAIT_MS | Max ms to wait to close an impressions bulk |
| events-fetch-size | eventsFetchSize | SPLIT_SYNC_EVENTS_FETCH_SIZE | How many impressions to pop from storage at once |
| events-process-concurrency | eventsProcessConcurrency | SPLIT_SYNC_EVENTS_PROCESS_CONCURRENCY | #Threads for processing imps |
| events-process-batch-size | eventsProcessBatchSize | SPLIT_SYNC_EVENTS_PROCESS_BATCH_SIZE | Size of imp processing batchs |
| events-post-concurrency | eventsPostConcurrency | SPLIT_SYNC_EVENTS_POST_CONCURRENCY | #concurrent imp post threads |
| events-post-size | eventsPostSize | SPLIT_SYNC_EVENTS_POST_SIZE | Max #impressions to send per POST |
| events-accum-wait-ms | eventsAccumWaitMs | SPLIT_SYNC_EVENTS_ACCUM_WAIT_MS | Max ms to wait to close an events bulk |
| redis-host | host | SPLIT_SYNC_REDIS_HOST | Redis server hostname |
| redis-port | port | SPLIT_SYNC_REDIS_PORT | Redis Server port |
| redis-db | db | SPLIT_SYNC_REDIS_DB | Redis DB |
| redis-pass | password | SPLIT_SYNC_REDIS_PASS | Redis password |
| redis-user | username | SPLIT_SYNC_REDIS_USER | Redis username |
| redis-prefix | prefix | SPLIT_SYNC_REDIS_PREFIX | Redis key prefix |
| redis-network | network | SPLIT_SYNC_REDIS_NETWORK | Redis network protocol |
| redis-max-retries | maxRetries | SPLIT_SYNC_REDIS_MAX_RETRIES | Redis connection max retries |
| redis-dial-timeout | dialTimeout | SPLIT_SYNC_REDIS_DIAL_TIMEOUT | Redis connection dial timeout |
| redis-read-timeout | readTimeout | SPLIT_SYNC_REDIS_READ_TIMEOUT | Redis connection read timeout |
| redis-write-timeout | writeTimeout | SPLIT_SYNC_REDIS_WRITE_TIMEOUT | Redis connection write timeout |
| redis-pool | poolSize | SPLIT_SYNC_REDIS_POOL | Redis connection pool size |
| redis-sentinel-replication | sentinelReplication | SPLIT_SYNC_REDIS_SENTINEL_REPLICATION | Redis sentinel replication enabled. |
| redis-sentinel-addresses | sentinelAddresses | SPLIT_SYNC_REDIS_SENTINEL_ADDRESSES | List of redis sentinels |
| redis-sentinel-master | sentinelMaster | SPLIT_SYNC_REDIS_SENTINEL_MASTER | Name of master |
| redis-cluster-mode | clusterMode | SPLIT_SYNC_REDIS_CLUSTER_MODE | Redis cluster enabled. |
| redis-cluster-nodes | clusterNodes | SPLIT_SYNC_REDIS_CLUSTER_NODES | List of redis cluster nodes. |
| redis-cluster-key-hashtag | keyHashTag | SPLIT_SYNC_REDIS_CLUSTER_KEY_HASHTAG | keyHashTag for redis cluster. |
| redis-tls | enableTLS | SPLIT_SYNC_REDIS_TLS | Use SSL/TLS for connecting to redis |
| redis-tls-server-name | tlsServerName | SPLIT_SYNC_REDIS_TLS_SERVER_NAME | Server name to use when validating a server public key |
| redis-tls-ca-certs | caCertificates | SPLIT_SYNC_REDIS_TLS_CA_CERTS | Root CA certificates to connect to a redis server via SSL/TLS |
| redis-tls-skip-name-validation | tlsSkipNameValidation | SPLIT_SYNC_REDIS_TLS_SKIP_NAME_VALIDATION | Blindly accept server's public key. |
| redis-tls-client-certificate | tlsClientCertificate | SPLIT_SYNC_REDIS_TLS_CLIENT_CERTIFICATE | Client certificate signed by a known CA |
| redis-tls-client-key | tlsClientKey | SPLIT_SYNC_REDIS_TLS_CLIENT_KEY | Client private key matching the certificate. |
| storage-check-rate-ms | storageCheckRateMs | SPLIT_SYNC_STORAGE_CHECK_RATE_MS | How often to check storage health |
| flag-sets-filter | flagSetsFilter | SPLIT_SYNC_FLAG_SETS_FILTER | This setting allows the Split Synchronizer to only synchronize the feature flags in the specified flag sets, avoiding unused or unwanted flags from being synced on the Split Synchronizer instance, bringing all the benefits from a reduced payload. |
Deploying Synchronizer on Heroku
Follow these steps to deploy the Synchronizer container on Heroku:
-
Clone the GitHub repository or download the source code and unzip it to a new folder (e.g.,
mysync). -
Open a terminal and
cdto that folder. -
Run this command to create a Heroku app:
heroku create -
You should see a response like:
Creating app... done, ⬢ secret-anchorage-16496https://secret-anchorage-16496.herokuapp.com/ | https://git.heroku.com/secret-anchorage-16496.git -
Set the stack to container and add the Go language buildpack:
heroku stack:set containerheroku buildpacks:set heroku/go -
Open the existing
Dockerfileand replace the last line:ENTRYPOINT ["sh", "./entrypoint.sh"]with:
CMD ["sh", "./entrypoint.sh"]Heroku only supports CMD for containers.
-
Add the following content to a
heroku.ymlfile:build:docker:web: Dockerfileworker:dockerfile: Dockerfile -
Add a
Procfilewith the content:worker: sh entrypoint.sh -
On the Heroku dashboard, open your app, go to the Settings tab, and add the following environment variables:
SPLIT_SYNC_API_KEYSPLIT_SYNC_REDIS_HOSTSPLIT_SYNC_REDIS_PORTSPLIT_SYNC_REDIS_DBSPLIT_SYNC_REDIS_PASS
-
Modify
entrypoint.shto map the admin dashboard to Heroku's$PORTenvironment variable.Replace the last line:
exec split-sync ${PARAMETERS}with:
exec split-sync ${PARAMETERS} -sync-admin-port $PORT -
Run these git commands to deploy to Heroku:
git initgit add .git commit -m "Deploy Synchronizer to Heroku"git push heroku master -
Check logs using
heroku logs. -
You should see output similar to:
2019-09-11T19:53:06.954882+00:00 app[worker.1]: __ ____ _ _ _2019-09-11T19:53:06.954887+00:00 app[worker.1]: / /__ / ___| _ __ | (_) |_2019-09-11T19:53:06.954890+00:00 app[worker.1]: / / \ \ \___ \| '_ \| | | __|2019-09-11T19:53:06.954891+00:00 app[worker.1]: \ \ \ \ ___) | |_) | | | |_2019-09-11T19:53:06.954893+00:00 app[worker.1]: \_\ / / |____/| .__/|_|_|\__|2019-09-11T19:53:06.954895+00:00 app[worker.1]: /_/ |_|2019-09-11T19:53:06.954897+00:00 app[worker.1]:2019-09-11T19:53:06.954899+00:00 app[worker.1]:2019-09-11T19:53:06.954922+00:00 app[worker.1]:2019-09-11T19:53:06.954924+00:00 app[worker.1]: Split Synchronizer - Version: 2.5.1 (2178c61)2019-09-11T19:53:06.955154+00:00 app[worker.1]: Log file: /tmp/split-agent.log -
Access the Admin Dashboard by visiting
https://[heroku-app-name].herokuapp.com/admin/dashboard.
Using the Synchronizer as a proxy service on Heroku
Since Heroku maps only one port, you need to assign the proxy listener port to the $PORT environment variable.
-
Update
entrypoint.shby replacingexec split-sync ${PARAMETERS}withexec split-sync ${PARAMETERS} -proxy-port $PORT. -
Modify
Procfileby changing its content toweb: sh entrypoint.sh. -
Add the following environment variables in the Heroku UI:
SPLIT_SYNC_PROXY(value:on)SPLIT_SYNC_PROXY_SDK_APIKEYS(value: your customer API key)
-
Deploy changes:
git add .git commit -m "Enable proxy mode on Heroku"git push heroku master -
Configure SDKs. An example Java SDK configuration:
SplitClientConfig config = SplitClientConfig.builder().setBlockUntilReadyTimeout(5000).endpoint("http://[heroku-app-name].herokuapp.com", "http://[heroku-app-name].herokuapp.com").build();try {splitFactory = SplitFactoryBuilder.build("custom api key", config);client = splitFactory.client();client.blockUntilReady();} catch (Exception e) {System.out.print("Exception: " + e.getMessage());}
Since Heroku maps only a single port, the Admin Dashboard will not be accessible when running in proxy mode.
Listener
The Split Synchronizer provides an impression listener that bulks post impressions to a user-defined HTTP endpoint.
The endpoint should expect a POST request, containing a JSON body with the following format.
{
 "impressions": [
  {
   "testName": "feature1",
   "keyImpressions": [
    {
     "keyName": "user1",
     "treatment": "on",
     "time": 1502754901182,
     "changeNumber": -1,
     "label": ""
    },
    {
     "keyName": "user2",
     "treatment": "off",
     "time": 1502754876144,
     "changeNumber": -1,
     "label": ""
    }
   ]
  }
 ],
 "sdkVersion": "php-5.2.2",
 "machineIP": "208.63.222.7",
 "MachineName": ""
}
Currently, the configuration options are available in the integrations.impressionListener section of the JSON configuration file detailed in Advanced configuration.
Using a network proxy
If you need to use a network proxy, configure proxies by setting the environment variables HTTP_PROXY and HTTPS_PROXY. The internal HTTP client reads those variables and uses them to perform the server request.
$ export HTTP_PROXY="http://10.10.1.10:3128"
$ export HTTPS_PROXY="http://10.10.1.10:1080"
Inject a certificate into a Synchronizer Docker image
If the Synchronizer Docker container is running in a network that uses an SSL proxy, the Synchronizer may fail to authenticate the root certificate. This causes errors like the following when trying to connect to Harness FME servers to fetch feature flag definitions:
SPLITIO-AGENT | ERROR: 2020/08/19 14:42:51 fetchdataforproxy.go:209: Error fetching split changes
Get https://sdk.split.io/api/splitChanges?since=-1: x509: certificate signed by unknown authority
To resolve this, you need to inject the root certificate into the Synchronizer Docker image by rebuilding it with the proxy certificates included.
-
Clone the Synchronizer public repository:
git clone https://github.com/splitio/split-synchronizer -
Change to the cloned directory:
cd split-synchronizer -
Copy your proxy certificates (root, intermediate, and proxy certs) into this folder. For example:
cp /path/to/certs/root.crt .cp /path/to/certs/intermediate.crt .cp /path/to/certs/proxy.pem . -
Open the
Dockerfilein thesplit-synchronizerfolder with a text editor, and just before the line containingEXPOSE 3000 3010, add:COPY root.crt /etc/ssl/certs/root.crtCOPY intermediate.crt /etc/ssl/certs/intermediate.crtCOPY proxy.pem /etc/ssl/certs/proxy.pemRUN cat /etc/ssl/certs/root.crt >> /etc/ssl/certs/ca-certificates.crt -
Save and close the Dockerfile.
-
Build the new Docker image:
docker build --tag split-sync:latest . -
Run the new image to verify it works (replace environment variables as needed). The
http_proxyandhttps_proxyvariables are optional based on your setup:docker run --rm --name split-sync -p 3010:3010 --net="host" \-e SPLIT_SYNC_API_KEY="SDK API KEY" \-e SPLIT_SYNC_LOG_STDOUT="on" \-e SPLIT_SYNC_LOG_DEBUG="true" \-e SPLIT_SYNC_LOG_VERBOSE="true" \-e SPLIT_SYNC_REDIS_HOST="Redis Host" \-e SPLIT_SYNC_REDIS_PORT=6379 \-e http_proxy="https://[internal proxy host]" \-e https_proxy="https://[internal proxy host]" \split-sync
Admin dashboard and monitoring
Split Synchronizer provides admin endpoints and a dashboard for monitoring synchronization status, cached data, and performance metrics in real-time.
Admin endpoints
The Split Synchronizer service exposes admin endpoints on port 3010 by default. For security, endpoints support HTTP Basic Authentication configured through admin-username and admin-password settings.
/info/ping
A ping endpoint to monitor the service status. If the service is running, it sends the text response pong and the HTTP status code 200.
/info/version
Returns the split-sync version in JSON format.
{
  "version" : "1.1.0"
}
/info/uptime
Returns the uptime string representation in JSON format.
{
  "uptime" : "5d 3h 36m 39s"
}
/info/config Returns a JSON object describing the current configuration of the Synchronizer.
{
  "config": {
    "apikey": "*",
    "ipAddressEnabled": true,
    "initialization": {
      "timeoutMS": 10000,
      "forceFreshStartup": false
    },
    "storage": {
      "type": "redis",
      "redis": {
        "host": "localhost",
        "port": 6379,
        "db": 0,
        "username": "",
        "password": "",
        "prefix": "",
        "network": "tcp",
        "maxRetries": 0,
        "dialTimeout": 5,
        "readTimeout": 10,
        "writeTimeout": 5,
        "poolSize": 10,
        "sentinelReplication": false,
        "sentinelAddresses": "",
        "sentinelMaster": "",
        "clusterMode": false,
        "clusterNodes": "",
        "keyHashTag": "",
        "enableTLS": false,
        "tlsServerName": "",
        "caCertificates": null,
        "tlsSkipNameValidation": false,
        "tlsClientCertificate": "",
        "tlsClientKey": ""
      }
    },
    "sync": {
      "splitRefreshRateMs": 60000,
      "segmentRefreshRateMs": 60000,
      "impressionsMode": "optimized",
      "advanced": {
        "streamingEnabled": true,
        "httpTimeoutMs": 30000,
        "internalTelemetryRateMs": 3600000,
        "telemetryPushRateMs": 60000,
        "impressionsFetchSize": 0,
        "impressionsProcessConcurrency": 0,
        "impressionsProcessBatchSize": 0,
        "impressionsPostConcurrency": 0,
        "impressionsPostSize": 0,
        "impressionsAccumWaitMs": 0,
        "eventsFetchSize": 0,
        "eventsProcessConcurrency": 0,
        "eventsProcessBatchSize": 0,
        "eventsPostConcurrency": 0,
        "eventsPostSize": 0,
        "eventsAccumWaitMs": 0
      }
    },
    "admin": {
      "host": "0.0.0.0",
      "port": 3010,
      "username": "",
      "password": "",
      "secureChecks": false
    },
    "integrations": {
      "impressionListener": {
        "endpoint": "",
        "queueSize": 100
      },
      "slack": {
        "webhook": "",
        "channel": ""
      }
    },
    "logging": {
      "level": "info",
      "output": "stdout",
      "rotationMaxFiles": 10,
      "rotationMaxSizeKb": 0
    },
    "healthcheck": {
      "app": {
        "storageCheckRateMs": 3600000
      }
    }
  }
}
/health/application Returns a JSON object describing whether the synchronizer is healthy or not.
{
  "healthy": true,
  "healthySince": "2021-11-20T19:04:46.528242-03:00",
  "items": [
    {
      "name": "Splits",
      "healthy": true,
      "lastHit": "2021-11-20T19:04:49.079956-03:00"
    },
    {
      "name": "Segments",
      "healthy": true,
      "lastHit": "2021-11-20T19:04:49.268349-03:00"
    },
    {
      "name": "Storage",
      "healthy": true
    }
  ]
}
/health/dependencies Returns a JSON object describing whether the servers the synchronizer depends on are healthy or not.
{
  "serviceStatus": "healthy",
  "dependencies": [
    {
      "service": "https://telemetry.split.io/health",
      "healthy": true,
      "healthySince": "2021-11-20T19:04:46.528262-03:00"
    },
    {
      "service": "https://auth.split.io/health",
      "healthy": true,
      "healthySince": "2021-11-20T19:04:46.528264-03:00"
    },
    {
      "service": "https://sdk.split.io/api/version",
      "healthy": true,
      "healthySince": "2021-11-20T19:04:46.528265-03:00"
    },
    {
      "service": "https://events.split.io/api/version",
      "healthy": true,
      "healthySince": "2021-11-20T19:04:46.528266-03:00"
    },
    {
      "service": "https://streaming.split.io/health",
      "healthy": true,
      "healthySince": "2021-11-20T19:04:46.528266-03:00"
    }
  ]
}
Observability
The Split Synchronizer exposes an observability endpoint that provides visibility into cached data.
You can use this endpoint in versions 5.0.3 or later.
GET http://<SERVER_HOST>:<SERVER_PORT>/admin/observability
The following metrics are available:
| Metric | Category | Description |
|---|---|---|
| Active segments | Cache state | Map of segment names to key counts. |
| Active splits | Cache state | List of feature flags currently loaded. |
Example response
{
  "activeSegments": {
    "employees": 9984,
    "starred_customers": 10122
  },
  "activeSplits": [
    "admin_panel",
    "main_campaign",
    "ab_test"
  ]
}
Use this endpoint to verify that feature flags and segments are synchronized and stored correctly.
Admin Dashboard
Split-sync has a web admin UI out of the box that exposes all available endpoints. Browse to /admin/dashboard to see it.
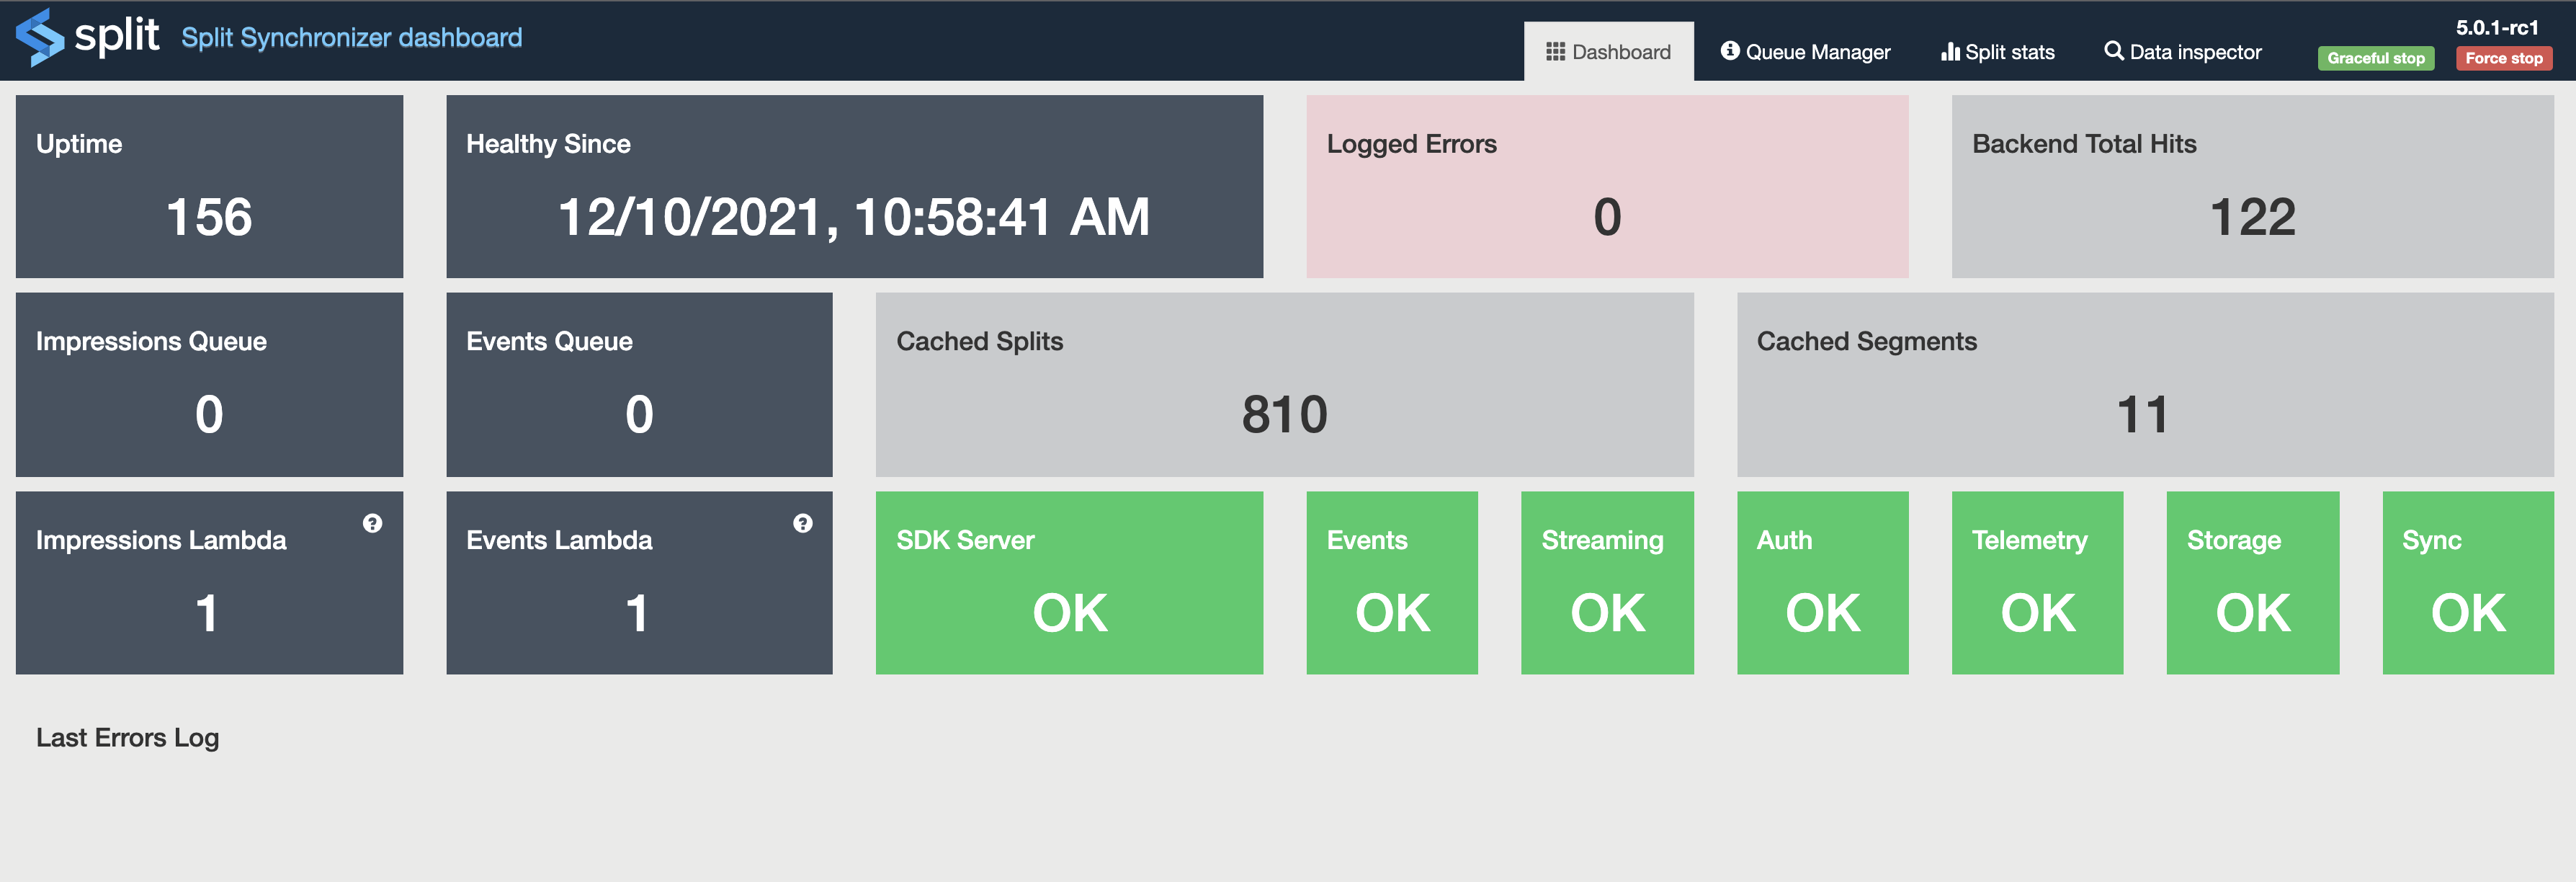
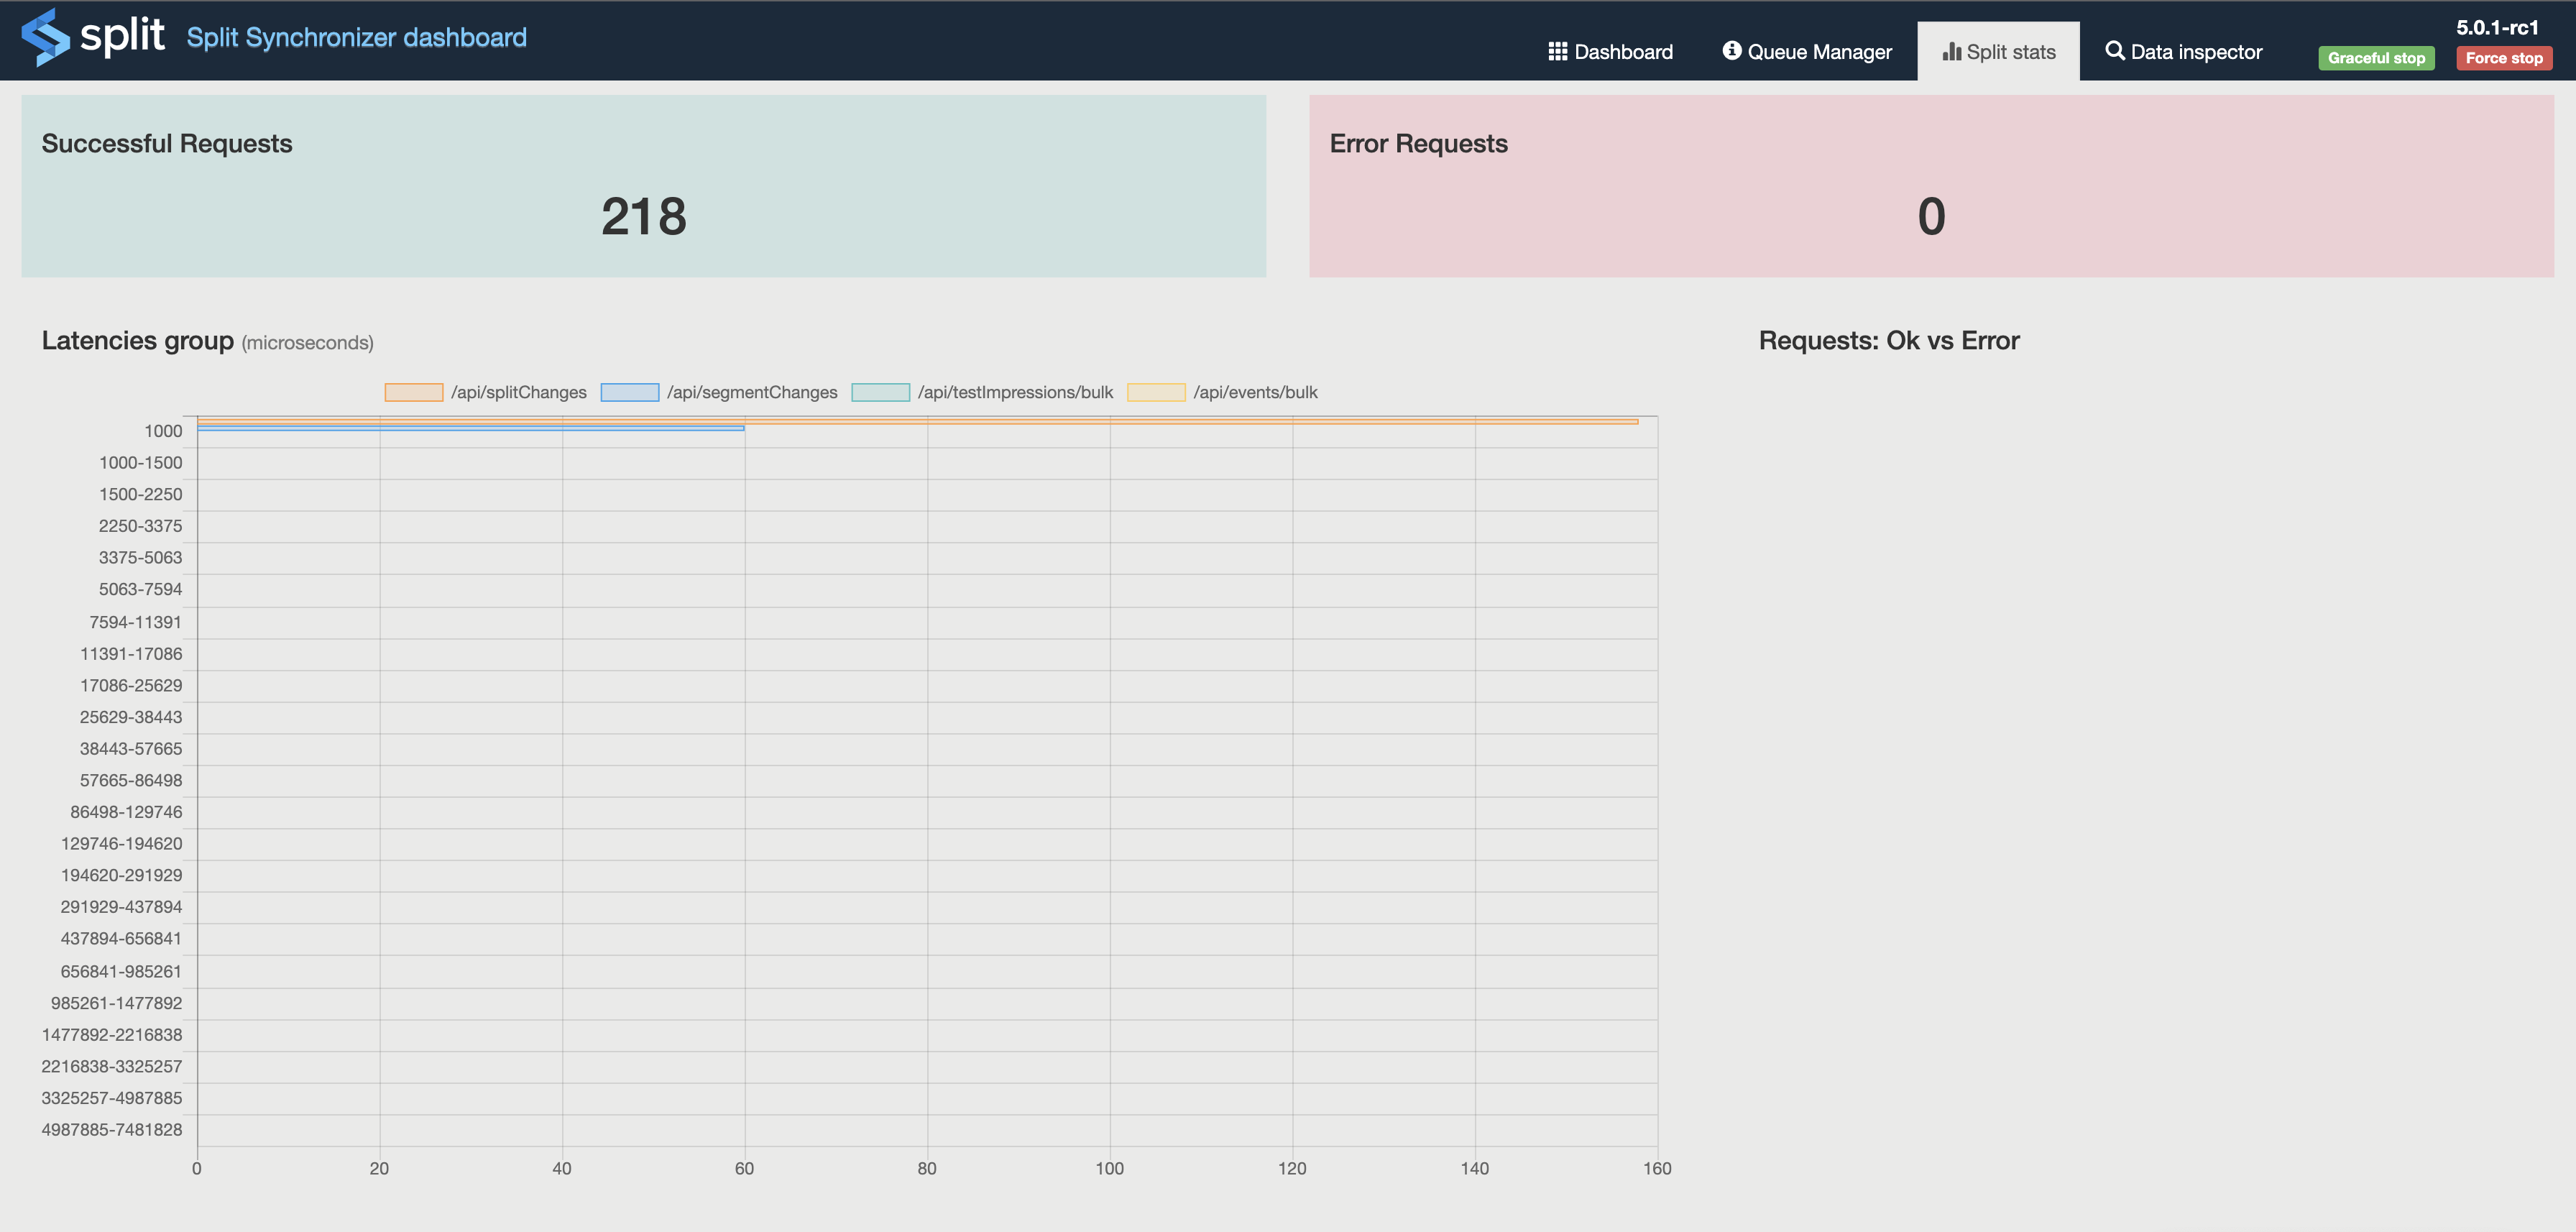
The dashboard is organized in four sections for ease of visualization:
- Dashboard: Tile-sorted summary information, including these metrics:
- Uptime: Uptime metric
- Healthy Since: Time passed without errors
- Logged Errors: Total count of error messages
- SDKs Total Hits: Total SDKs requests
- Backend Total Hits: Total backend requests between split-sync and Harness servers
- Cached Feature flags: Number of feature flags cached in memory
- Cached Segments: Number of segments cached in memory
- Impressions Queue Size: shows the total amount of Impressions stored in Redis (only Producer Mode).
- Impressions Lambda: shows the eviction rate for Impressions (only Producer Mode).
- Events Queue Size: shows the total amount of Events stored in Redis (only Producer Mode).
- Events Lambda: shows the eviction rate for Events (only Producer Mode).
- SDK Server: displays the status of Split server for SDK.
- Events Server: displays the status of Split server for Events.
- Streaming Server*: displays the status of Split streaming service
- Auth Server*: displays the status of Split server for initial streaming authentication
- Telemetry Server*: displays the status of Split server for telemetry capturing.
- Storage: (only Sync mode) displays the status of the storage.
- Sync: displays the status of the Synchronizer.
- Last Errors Log: List of the last 10 error messages
- SDK stats: Metrics numbers and a latency graph, measured between SDKs requests integration and proxy.
- Data inspector: Cached data showing feature flags and segments; filters to find keys and feature flag definitions.
- Queue Manager: expose sizes of Impressions and Events queues.
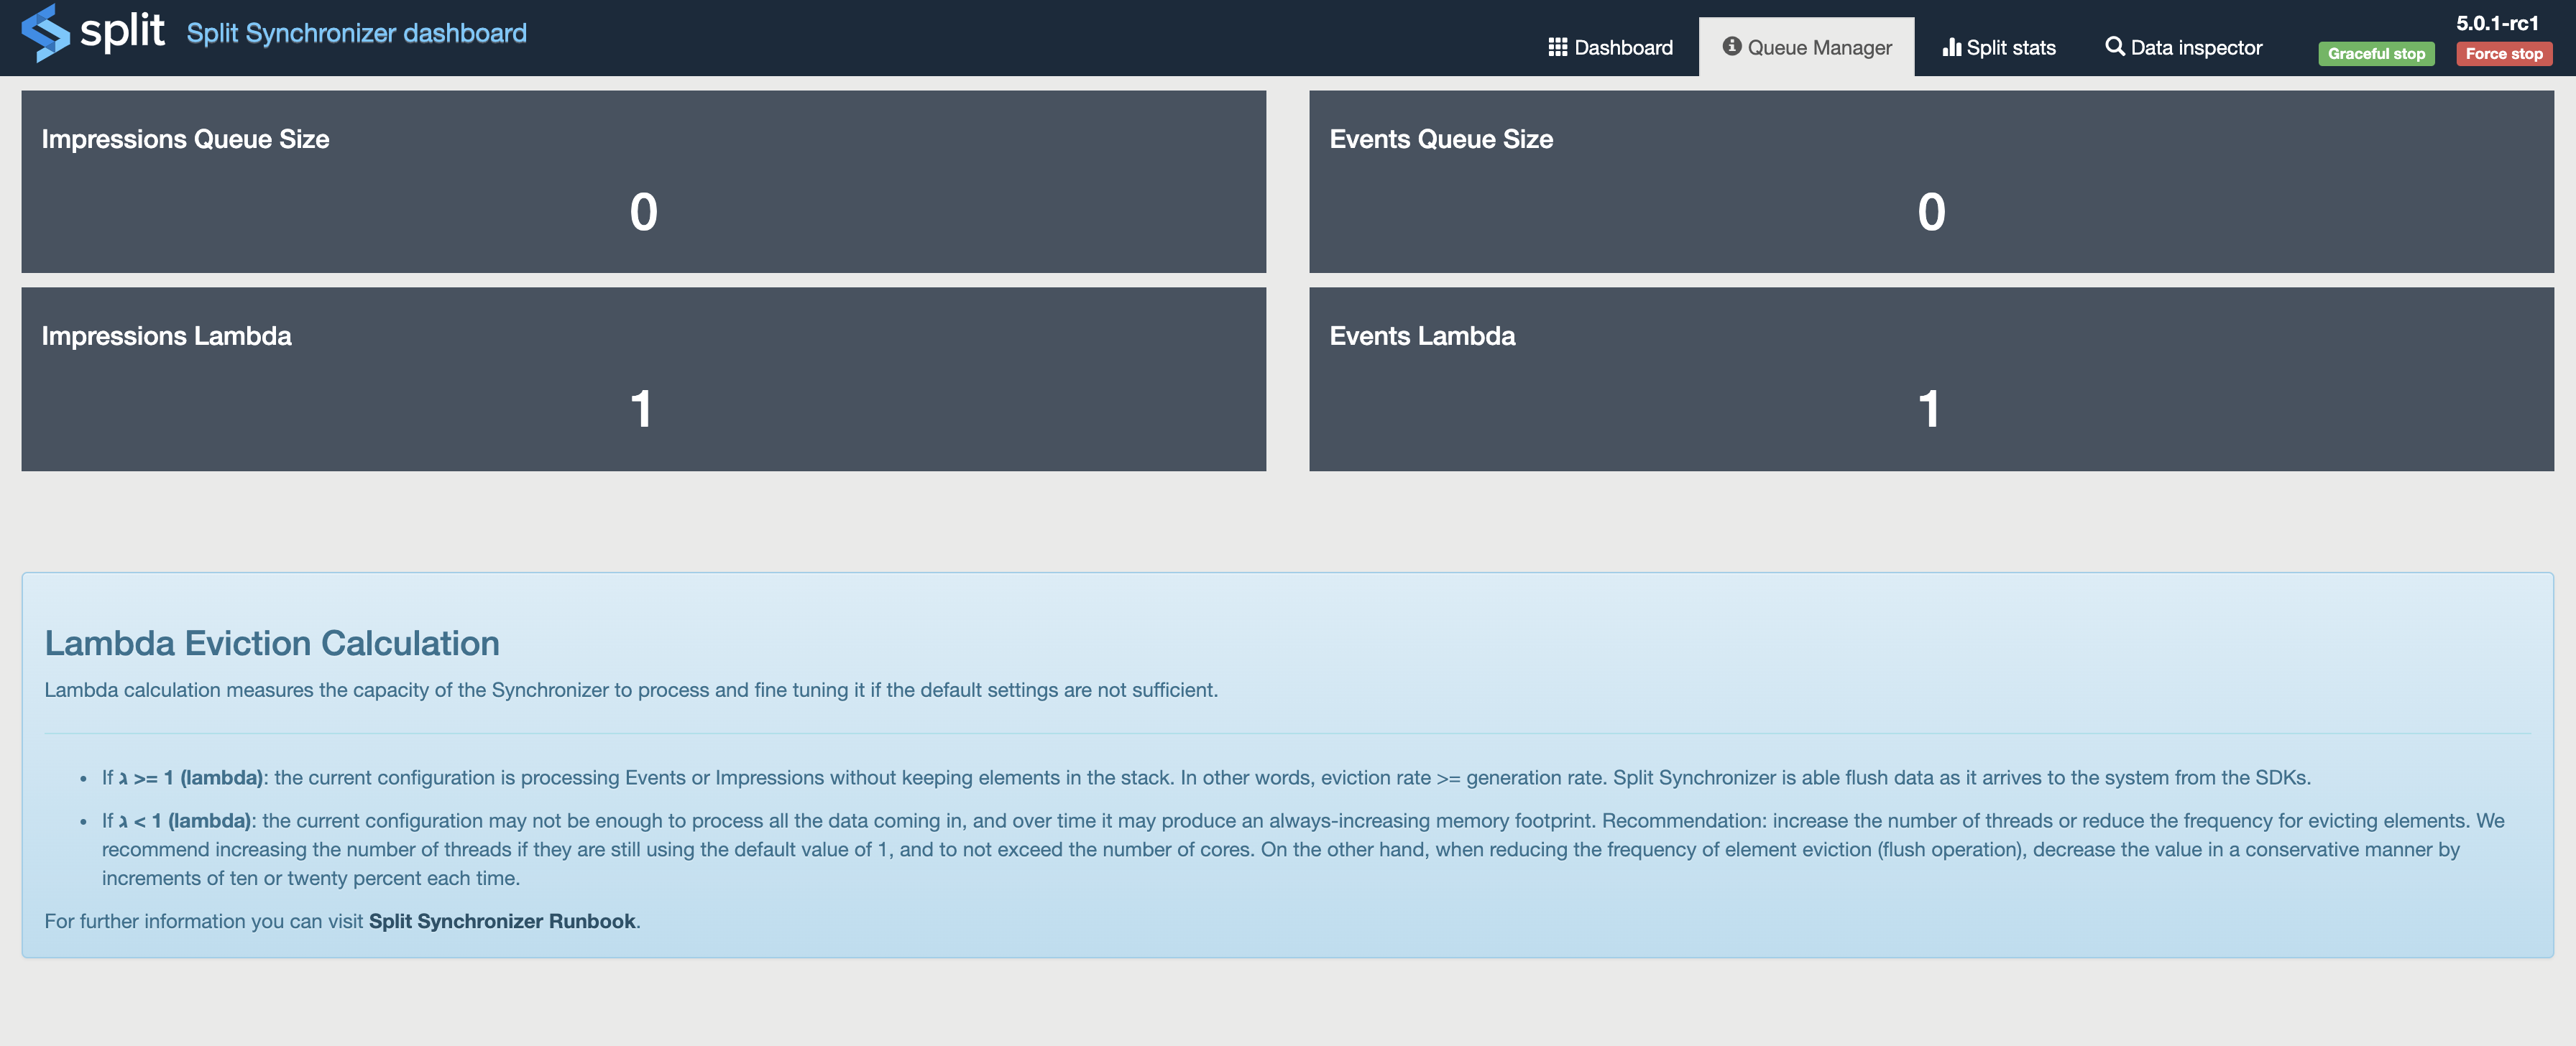
The dashboard numbers are committed every 60 seconds. The Logged Errors, Last Errors Log tiles, and the Data inspector section are populated each time the dashboard is refreshed.
For Impressions and Events Queue size the numbers are refreshed every 10 seconds.
Service shutdown
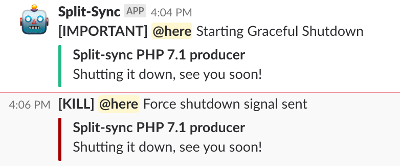
The split-sync service can catch a kill sig command and start a graceful shutdown, flushing all cached data progressively. Additionally, you can perform graceful stop and force stop (kill -9) with one click from the admin dashboard.

If you have configured a Slack channel and the Slack Webhook URL, an alert is sent to the channel when and initialization or shutdown is performed.
Troubleshooting
Use the following troubleshooting guidance to resolve common Split Synchronizer issues.
Synchronizer returns 500 HTTP error when SDK connects in proxy mode
Verify the SDK API key used by Synchronizer matches an environment that has active feature flags configured. Check Synchronizer debug logs for empty feature flag responses from Harness FME servers.
Details: When using Synchronizer in proxy mode, the SDK may never become ready and receive a 500 HTTP error. Synchronizer’s debug logs show successful calls to Harness FME servers, but the JSON response contains an empty list of feature flags:
SPLITIO-AGENT  - DEBUG - 2020/10/12 21:41:51 logger.go:35: GET |500| 285.71µs | 10.10.6.249 | /api/splitChanges
SPLITIO-AGENT  - DEBUG - 2020/10/12 21:41:52 client.go:60: Authorization [ApiKey]:  1c9s...e19o
SPLITIO-AGENT  - DEBUG - 2020/10/12 21:41:52 client.go:56: [GET]  https://sdk.split.io/api/splitChanges?since=-1
SPLITIO-AGENT  - DEBUG - 2020/10/12 21:41:52 client.go:64: Headers: map[Accept-Encoding:[gzip] Content-Type:[application/json]]
SPLITIO-AGENT  - VERBOSE - 2020/10/12 21:41:52 client.go:95: [RESPONSE_BODY] {"splits":[],"since":-1,"till":-1} [END_RESPONSE_BODY]
This indicates that no feature flags are present in the environment associated with the SDK API key used by the Synchronizer. Although the upstream HTTP call succeeds, Synchronizer returns a 500 error to the SDK because it cannot compute any treatments without any feature flags
- Ensure that the environment linked to the SDK API key used by Synchronizer has active feature flags configured.
- Alternatively, verify that you are using the correct SDK API key for the intended environment with feature flags.
SDK getTreatment Always Returning 'control' When Using Synchronizer Docker
After installing and running the Split Synchronizer Docker instance with a Redis instance, and configuring an SDK to use Redis, the getTreatment call always returns 'control'.
By default, the Synchronizer Docker instance uses a prefix for Redis keys. If the SDK does not specify the same prefix in its Redis configuration, it cannot read the data stored by Synchronizer.
-
Check if the Synchronizer is using a prefix by running:
redis-clikeys *Look for text before
"SPLITIO"in the keys.Example output showing the prefix
myprefix:127.0.0.1:6379> keys *1) "myprefix.SPLITIO.split.Split1"2) "myprefix.SPLITIO.splits.till"3) "myprefix.SPLITIO.split.Split2"4) "myprefix.SPLITIO.split.nico_test"5) "myprefix.SPLITIO.split.coach_matching_v1"6) "myprefix.SPLITIO.split.clients_on"7) "myprefix.SPLITIO.split.Split3"8) "myprefix.SPLITIO.split.sample_feature"9) "myprefix.SPLITIO.segments.registered"10) "myprefix.SPLITIO.split.Demo_split"11) "myprefix.SPLITIO.split.clients" -
Update your SDK configuration. Specify the
redisPrefixparameter in your SDK configuration so it matches the Synchronizer prefix.For example, in the Python SDK:
from splitio import get_factoryconfig = {'redisHost': 'localhost','redisPort': 6379,'redisDb': 0,'redisPassword': 'somePassword','redisPrefix': 'myprefix'}
No Impressions Sent from Python SDK 7.x and Synchronizer 1.x
When using Synchronizer 1.x with Python SDK 7.x, the Python SDK processes treatments correctly and Synchronizer does not report any errors. However, no impressions are sent to the Harness FME servers.
Starting in Python SDK 7.0.0, design changes were made to align with the enhancements introduced in Synchronizer 2.0. Therefore, when using Python SDK 7.x, you must upgrade to Synchronizer 2.x.
POST method returns 404 Not Found error in Split Synchronizer logs and admin dashboard
Verify the API key is SDK type (not Admin or Client type). Check Harness FME Admin settings API keys page to confirm key type. SDK keys are required for Synchronizer to post impressions and events.
Details: After starting Split Synchronizer (version 1.6.0 and above), the debug log and admin dashboard show the error POST method: Status Code: 404 - 404 Not Found on all network POST calls.
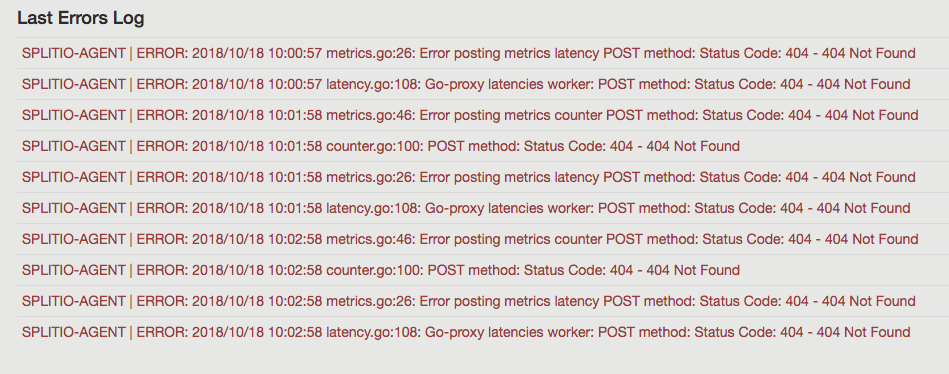
This error occurs because an incorrect API key is passed to the Synchronizer, causing the Synchronizer to be unable to find the Account in the Harness FME servers.
-
Verify the API key used by Synchronizer is correct. Synchronizer API key must be of SDK type. API keys can be viewed from Admin settings on the API keys page:
https://app.split.io/org/[Your Account ID]/admin/apis.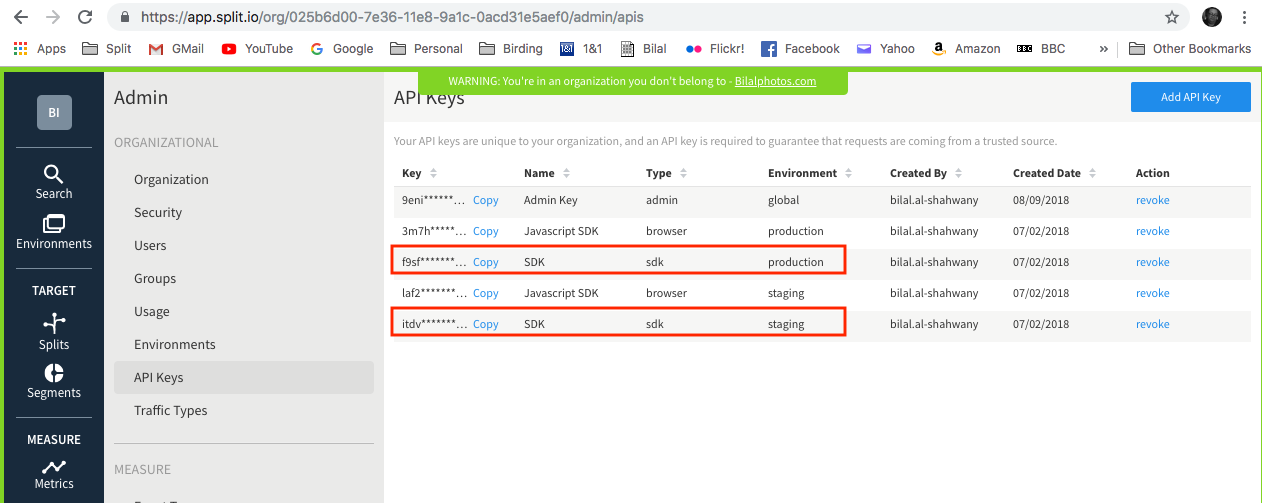
-
Ensure the API key is properly passed to Synchronizer.
Common ways include:
-
Command line argument:
-api-key <APIKEY> -
JSON configuration file: The
apiKeyproperty is used to issue requests against Harness FME servers.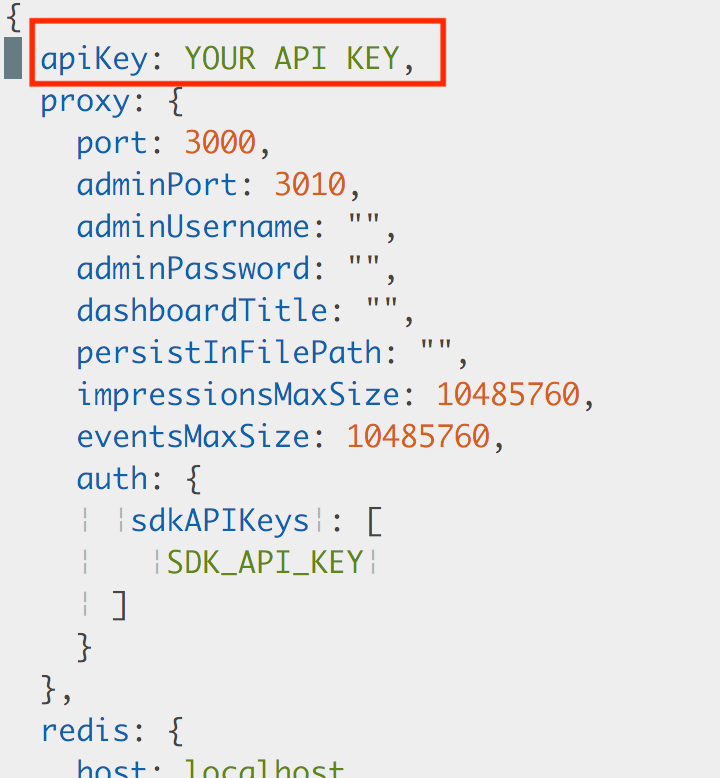
-
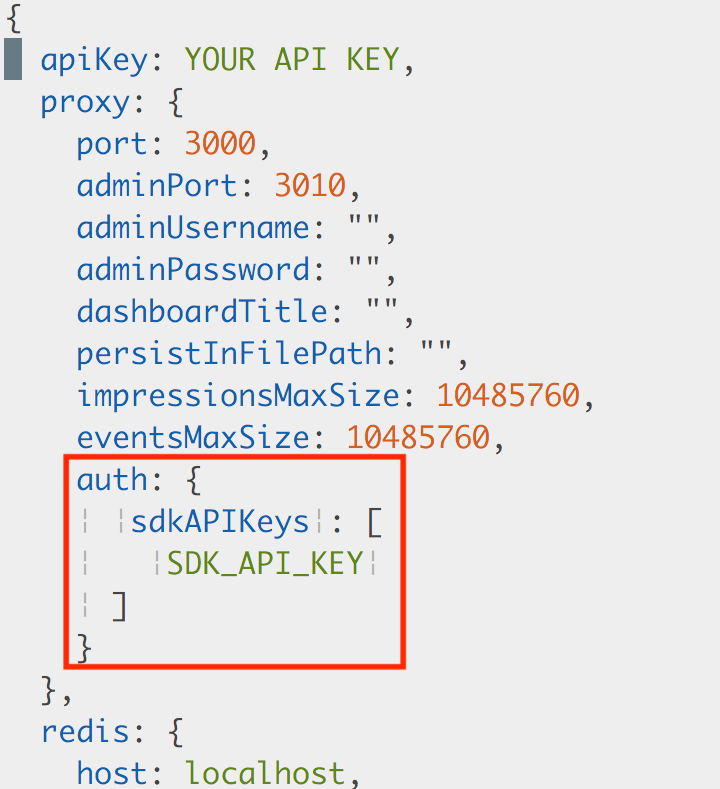
Proxy mode usage: When Synchronizer is used in proxy mode (not Redis), the "auth" section and "sdkAPIKeys" allow setting custom API keys for internal use, enabling SDKs to use the internal custom API key.
-
Docker environment variable: If running Synchronizer within the packaged Docker image, use:
-e SPLIT_SYNC_API_KEY=<APIKEY>
-
Redis connection refused when starting Split Synchronizer
Verify Redis is running and accessible at the configured host and port. Check firewall rules allow connections to Redis port (default 6379). Test connectivity with redis-cli -h <host> -p <port> ping.
Split Synchronizer fails to connect to Harness FME servers with TLS or certificate errors
Verify TLS configuration in Synchronizer settings. If using custom certificates, ensure cert paths are correct and readable. For Docker deployments, mount certificate files into the container and reference mounted paths in configuration.
High memory usage or performance degradation in Split Synchronizer under heavy impression load
Tune impression processing parameters: increase impressions-process-concurrency to match CPU cores, adjust impressions-fetch-size and impressions-post-size based on volume. Monitor admin dashboard queue sizes and latency metrics to identify bottlenecks.
Next steps
You have successfully installed and configured Split Synchronizer. Your SDKs can now share feature flag data through Redis while Synchronizer coordinates updates with Harness FME servers.
- Configure FME SDKs: Update SDK configuration to connect to your Redis instance and use Split Synchronizer.
- Monitor Split Synchronizer health: Use the admin dashboard at
http://<host>:3010/admin/dashboardto monitor synchronization status, queue sizes, and performance metrics.